Embed Size (px)
Citation preview

Finance Training Version 5.1 15-Nov-17 Page 1
Adjustments & Set Up in Accounts Receivable

AR2: Adjustments & Set Ups in AR
Finance Training Version: 5.1 15-Nov-17 Page 2
Table of Contents
1. Setting up Salespersons ................................................................................................ 3
2. Creating standard memo lines ...................................................................................... 7
3. Defining Receivables Activities ..................................................................................... 8
4. Correcting errors on invoices ........................................................................................ 9
5. Amending invoice distributions ................................................................................... 11
6. Voiding transactions ..................................................................................................... 13
7. Credit memo .................................................................................................................. 17
8. VAT only credit memo .................................................................................................. 21
9. Applying a credit memo to an invoice ........................................................................ 25
10. Reversing a “Remitted” and “Cleared” receipt ......................................................... 27
11. Using the Receipt Summary ....................................................................................... 30
12. Entering foreign currency invoices ........................................................................... 32
13 Entering foreign currency receipts ............................................................................ 33
14. Other types of receipts ............................................................................................... 37
15. Month-end guidance ................................................................................................... 39
16. Incomplete Invoices report ......................................................................................... 40
17. Unapplied Receipt Register report ............................................................................. 44
Appendix A: Account codes used in AR ......................................................................... 47
Appendix B: VAT and AR ................................................................................................. 53
Appendix C: How to deal with foreign currency cheques .............................................. 58

AR2: Adjustments & Set Ups in AR
Finance Training Version 5.1 15-Nov-17 Page 3
1. Setting up Salespersons
The ‘Salesperson’ is usually the person who raises the invoice or credit note. Contact details of the sales person will print out on the top of each invoice/credit note, providing details to the customer should they need to contact in case of a query.
The accounts team within each department is set up as the default but you can add individual details too.
Step 1: Identifying the Salesperson number
Each department is set up with a range of ten numbers, which must be manually entered in order for you to set up departmental Salespersons.
Click in to the List of Values in the Name field.
This will now open up the Salespersons box to enter your search criteria. Enter your two letter department code followed by the wildcard (%) and click Find.
Responsibility: CAPSA AR Supervisor / U.F.S AR Manager
Navigate to: Set Up → Salesperson

AR2: Adjustments & Set Ups in AR
Finance Training Version 5.1 15-Nov-17 Page 4
In this example we can see that the range of numbers here are 860 – 869. The next available number to use would be 863.
Remember that it is possible for other users not to follow this procedure and use your departmental numbers. The system will notify you if the salesperson number is already in use, therefore you will have to select a different number.
Click on Cancel to go back to the Find Resources screen.
Step 2: Creating the Salesperson
Click on New in the Find Resources screen.
AR2: Adjustments & Set Ups in AR
Finance Training Version 5.1 15-Nov-17 Page 5
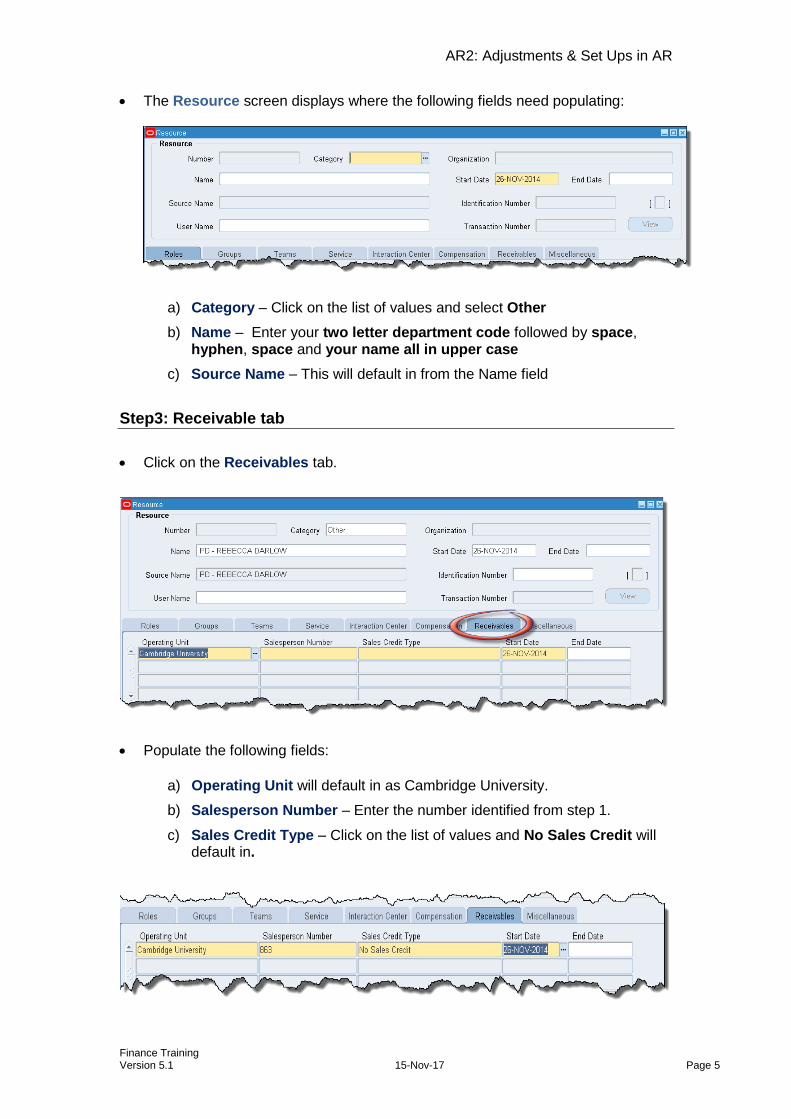
The Resource screen displays where the following fields need populating:
a) Category – Click on the list of values and select Other
b) Name – Enter your two letter department code followed by space, hyphen, space and your name all in upper case
c) Source Name – This will default in from the Name field
Step3: Receivable tab
Click on the Receivables tab.
Populate the following fields:
a) Operating Unit will default in as Cambridge University.
b) Salesperson Number – Enter the number identified from step 1.
c) Sales Credit Type – Click on the list of values and No Sales Credit will default in.

AR2: Adjustments & Set Ups in AR
Finance Training Version 5.1 15-Nov-17 Page 6
Step 4: Additional Information
Using the scroll bar, scroll to the end and click in the flex field which will display the Sales Rep Additional Information box.
Populate the following fields:
a) Telephone Number – Enter your direct dial number or departmental phone number.
b) Email Address – Enter your email address or a departmental address.
c) Fax Number – Your departmental fax number
Click OK. The system will automatically click into the next available line, ensure
that you click back into the line created.
Click on Save icon at the top of the screen. The Salesperson is now complete and ready to use when raising invoices/credit memo’s.

AR2: Adjustments & Set Ups in AR
Finance Training Version 5.1 15-Nov-17 Page 7
2. Creating standard memo lines
Memo lines are predefined lines that can be used on invoices and credit/debit memos. When raising an invoice, they can be selected from the list of values. If required this information can be amended or added to at this stage. All memo lines are maintained locally and can only be accessed by the individual department.
Entering standard memo line information
The following fields are mandatory and need populating:
Name Prefix with your department code, space, followed by hyphen, space and then name of memo line.
Description Details of the line. This is what is searched for when selecting memo lines on the sales invoice.
Type Always user Line (default setting).
The remaining fields are optional, but it will be beneficial if they are populated when using the memo lines.
Tax classification Select appropriate option from list of values.
Unit List Price Cost of goods or service.
Unit of Measure Select appropriate option from list of value
Revenue Account Enter the distribution code you wish the income to be posted to.
Active dates Will default in the date of creation and you can opt to enter a deactivate date.
Responsibility: CAPSA AR Supervisor / U.F.S AR Manager Navigate to: Set Up → Memo Lines

AR2: Adjustments & Set Ups in AR
Finance Training Version 5.1 15-Nov-17 Page 8
3. Defining Receivables Activities
Receivable Activities are used when inputting miscellaneous receipts. They provide accounting information for monies received that don’t relate to invoices or to account customers.
Populate the following fields:
Operating Unit Cambridge University (defaults in). Name Prefix with your two letter department code followed by
hyphen and name of the activity you are creating. Description Free text field, enter details of the activity you are
creating. Type Click on the arrow and select Miscellaneous Cash. GL Account Source
Activity GL Account defaults in. However if you require the income to be split to more than one distribution code refer to guidance on Distribution set.
Tax Rate Code Source
Select Activity from drop down list
Activity GL Account
Enter the GL code as to where the income for the activity will be coded too.
Asset Tax Rate Code
Select the appropriate tax code for the activity from the list of values.
Liability Tax Rate Code
Select the same code as the asset tax rate but will appear as a credit.
Once all the details have been populated Save your work. The activity is ready to be used for your miscellaneous receipts relating to that description.
Responsibility: CAPSA AR Supervisor / U.F.S AR Manager Navigate to: Set Up → Receivable Activities

AR2: Adjustments & Set Ups in AR
Finance Training Version 5.1 15-Nov-17 Page 9
4. Correcting errors on invoices
If a sales invoice/credit memo has not been printed AND was created the same day, you can preview the invoice raised and completed to ensure that it is correct before you send to print.
Once you have the relevant invoice displayed and clicked Complete, an icon looking like a pair of glasses appears next to the invoice number at the top left of the screen.
Click on the icon to review the transaction created.
AR2: Adjustments & Set Ups in AR
Finance Training Version 5.1 15-Nov-17 Page 10
You are unable to make any changes in this review screen. It is purely there to review the narrative and ensure it is correct. You can not view the distribution code in this screen, all checks for distribution codes must be done in the CUFS screen.
After reviewing the invoice you can either go back to the invoice in CUFS to make changes or alternatively leave it how it is and follow instructions on how to print.
To amend the original invoice:
1. Close the print preview screen and minimise the Oracle application screen.
2. Clicking on the Incomplete button will allow you to go back in to the
transaction and make the changes.
3. Make the relevant amendments accordingly.
4. Click on the Complete button to resubmit for approval.
5. You can access the Print Preview function again to ensure all changes made
are correct and the transaction appears as you require it.
If a sales invoice has been printed OR the invoice was raised on a previous day, you
must raise a Credit Memo to correct the error.

AR2: Adjustments & Set Ups in AR
Finance Training Version 5.1 15-Nov-17 Page 11
5. Amending invoice distributions
Once you have completed and printed your sales invoice, there is very little that can be amended. One aspect that can be changed at any time on the invoice is the revenue account code. For example, you may have entered the incorrect cost centre or source of funds code when the invoice was originally raised and now need to correct it.
Follow the steps outlined below to amend a revenue line on a sales invoice.
a) Navigate to Transactions > Transactions Summary.
b) Press F11 on your keyboard (unless you are a MAC user in which case navigate to View, Query by Example, Enter). The first line on the form should turn blue.
c) Enter the invoice number in the Number field.
d) Press Ctrl+F11 to find the invoice (unless you are a MAC user in which case navigate to View, Query by Example, Run). The invoice details should appear.
e) Navigate to the Tools menu and select Distributions:
f) Ensure you click into the Revenue line/s and amend to the correct code either by clicking on the list of values or simply overtyping the account code.
g) Save the amendment by clicking on the disk icon .

AR2: Adjustments & Set Ups in AR
Finance Training Version 5.1 15-Nov-17 Page 12
h) Once the correction has been made and saved, a negative line is generated to the original code and a new positive line is created for the correct account.
Note: A negative line will only display if the sales transactions has been accounted for in CUFS. Therefore if you are making a change to the account code on the day the invoice was raised it may not generate a negative line and simply remain as an overtyped line.
i) The amendment is complete and the distribution screen can be closed.
Amendments to revenue lines will be posted into the general ledger overnight; therefore you will be able to view the corresponding accounting entries the following day.

Finance Training Version 5.1 15-Nov-17 Page 13
6. Voiding transactions
If a transaction has been created in error, it cannot be deleted from the system as it corrupts the audit trail. In this scenario the transaction type must be amended to ‘Void’.
Void transactions are maintained on the database and have no impact on the departments Accounts Receivable or General Ledger records. It is therefore purely a housekeeping tool.
Step 1: Search the transaction
Search for the transaction to void by using the torch icon on the tool bar and entering the transaction number or any other criteria listed below and click ‘Find’.
Navigate: Transactions → Transactions
If the transaction has been completed and printed it cannot be voided. In this situation please refer to the guidance on raising credit notes.

AR2: Adjustments & Set Ups in AR
Finance Training Version 5.1 15-Nov-17 Page 14
Step 2: Changing the header details
Now you have located the transaction, you will need to make the following changes:
Type Change the type to XX Void (XX being your dept code).
As soon as this has been changed a message will popup stating ‘Rerun Auto Accounting’. You must click ‘Yes’.
Step 3: Main tab
The only field that will need to be changed on the main tab is Payment Term to Immediate.

AR2: Adjustments & Set Ups in AR
Finance Training Version 5.1 15-Nov-17 Page 15
Step 4: Line Items
This is where the details of the products or services you were providing were entered if you got that far in the process before you realised the transaction was raised in error! Otherwise it may be blank.
The following fields are to be populated:
Description As this transaction will have no bearing on your accounts, you are advised to detail the reason for voiding.
Unit Of Measure (UOM)
Optional field.
Quantity This will already be populated based upon the information entered when the invoice was raised. If the information wasn’t entered then enter a quantity of 1.
Unit Price This will already be populated based upon the information entered when the invoice was raised. If the information wasn’t entered then enter a unit price of 1.
Amount This will already be populated based upon the information entered when the invoice was raised or based upon the quantity and Unit Price field that has just been completed.
Tax classification This will already be populated
Once the lines are complete, update the accounting information by clicking on the Distributions button.
Step 5: Entering distribution codes
Once you have clicked on distributions, the following screen displays. This is usually where you enter the codes as to where the income is to go to. Even though this transaction is being voided, you must only change the revenue line. To view all lines as seen below, click on the drop down arrow and select Account for all lines.

AR2: Adjustments & Set Ups in AR
Finance Training Version 5.1 15-Nov-17 Page 16
As the transaction will have no bearing on the departmental accounts, central finance advise to use the following codes for all revenue lines:
U.XX.XXBA.GAAA/B.LKAA.0000 (XX being replaced with your department code)
The cost centre code specified is a generic one that all departments have. The Source of Funds will depend on the original transaction created (GAAA for external trading and GAAB for internal trading).
Repeat steps for each Revenue line and Save. The next step is for the void transaction to be checked and completed. Refer to guidance on Completing a Transaction on this process.
If you have raised a credit memo in error, it is not possible to void this. You will need to raise a debit memo in order to cancel it out.
Please contact the AR helpdesk for assistance: [email protected] or 01223 3()32215

AR2: Adjustments & Set Ups in AR
Finance Training Version 5.1 15-Nov-17 Page 17
7. Credit memo
A credit memo is another type of transaction which can be raised against a customer’s overall account. The credit will be linked to a specific sales invoice and will appear on the customer’s statement. Credit memos can be used for VAT only, external trading and internal trading.
Step 1: Creating the transaction header
a) Once you have navigated to the transaction screen, complete the fields listed below:
Class – Select Credit Memo.
Type – XX Credit memo for external or XX Int Trade CM for internal credit memo.
b) Review the following fields and update if required:
Reference This is an optional field and free text. Enter information that you feel may be helpful to you/department.
GL Date The date the transaction will reflect in your departmental accounts.
Currency Use GBP, you can use Euro and USD. All losses on exchange rates are the responsibility of the department.
Navigate: Transaction → Transactions
CARE: When you are crediting back a line from an invoice or an entire invoice it is important to ensure that the credit is coded back to the same account code that was entered on the original invoice.
Search for the original invoice and make note of the revenue account code that was created in Distributions.

AR2: Adjustments & Set Ups in AR
Finance Training Version 5.1 15-Nov-17 Page 18
Step 2: Enter customer details
a) On the main tab complete the following:
Bill To: Enter the customer details by placing the cursor into the first line of the bill to section. Click on the list of values, enter the customer name and click find. This will display the results that match your search criteria. Select the correct customer you wish to use. Alternatively if you know the customer number, enter it in the second line of the bill to section and tab.
b) Payment terms field will remain blank as no payment is due.
Step 3: More tab
The More tab has additional fields that must be populated
Salesperson Using the list of values, search and enter the salesperson details (pre requisite ‘Setting up a Salesperson’).
Purchase order number
Enter it in this free text field if applicable.

AR2: Adjustments & Set Ups in AR
Finance Training Version 5.1 15-Nov-17 Page 19
Step 4: Reference information
Use this tab to enter the reason for the credit note and any other information such as original invoice number.
Reason Select from the List of Values an appropriate option
Customer Reference Free text field (usually enter the invoice number being credited).
Step 5: Line Items
This is where you enter the details of the products or services you are credIting. The following fields are to be populated:
Description This is a free text field where you enter the details of the product or service or any other reference you chose to enter.
Unit Of Measure (UOM)
Optional field and chose appropriately
Quantity Either this field or the Unit Price field must be a negative figure.
Unit Price Value of product or service you are providing but as a negative figure.
Tax classification Defaults in based on customer set up. To change the tax classification, click on list of values and select appropriate option
Once your lines are complete, you must update the accounting information by clicking on the Distributions button. (Remember codes must be the same as the original invoice).

AR2: Adjustments & Set Ups in AR
Finance Training Version 5.1 15-Nov-17 Page 20
Step 6: Entering distribution codes
Once you have clicked on distributions, the following screen displays. This is where you enter the codes as to where the credit memo is to go to:
The codes must be the same as per the original invoice.
You must only change the revenue line.
To view all lines as seen below, click on the drop down arrow and select Account for all lines.
The revenue GL account will automatically populate, however, the code must be changed using the list of values to what was on the original invoice.
Repeat steps for each revenue line of the invoice and Save. A transaction number is generated, which you should make a note of.
The next step is for the credit memo to be checked and completed before printing (refer to guidance Completing a Transaction on this process).
Once the Credit memo has been completed, you will need to apply the credit memo to the original invoice and send a copy of the credit memo to the customer. To apply the transactions together refer to Matching Credit to Invoice process.

AR2: Adjustments & Set Ups in AR
Finance Training Version 5.1 15-Nov-17 Page 21
8. VAT only credit memo
A Credit Memo is a tool that can be used to make VAT adjustments where there have been billing errors raised against your customer’s overall account. The Credit will be linked to a specific sales invoice and will appear on the customer’s statement.
Step 1: Completing header details
On the transaction screen, complete the fields listed below:
Class Type of transaction you are creating - select from the list of values eg. Credit Memo.
Type XX Credit Memo will be the option here as this is for VAT.
Review the following fields and update if required:
GL Date The date the transaction will reflect in your departmental accounts.
Currency Use GBP, you can use Euro and USD. All losses on exchange rates are the responsibility of the department and ensure you use the currency as the original invoice.
Step 2: Enter customer details
a) The information you need to complete here is the following.
Navigate: Transactions → Transactions
When you are crediting back a line from an invoice or an entire invoice it is important to ensure that the credit is coded back to the same account code that was used on the original invoice.

AR2: Adjustments & Set Ups in AR
Finance Training Version 5.1 15-Nov-17 Page 22
Bill To: Enter the customer details by placing the cursor into the first line of the bill to section. Click on the list of values, enter the customer name and click find. This will display the results that match your search criteria. Select the correct customer you wish to use and ensure it matches the original invoice
Alternatively if you know the customer number, enter it in the second line of the bill to section and tab.
b) Review the following:
Payment terms will default in as Immediate.
Due date is irrelevant as we are not due a payment.
Sold To fields will automatically populate based on customer selected.
Paying customer fields automatically populate based on customer selected.
Step 3: More tab
This tab has additional fields you must populate.
Salesperson Using the list of values search for and enter the salesperson details (pre-requisite Setting up a salesperson).
Purchase order number
Enter it in this free text field.

AR2: Adjustments & Set Ups in AR
Finance Training Version 5.1 15-Nov-17 Page 23
Step 4: The reference information tab
Reference Information – Enter a valid reason for the credit from list of values.
Customer Reference – Enter the invoice number the credit relates to.
Step 5: Line Items
VAT only credit notes must be entered onto the system exactly as shown; otherwise the VAT may not credit back directly to the VAT account.
Line 1 (details as per the original transaction)
a) Description – This is a free text field where you enter the details of the original invoice line you are crediting.
b) Unit Of Measure (UOM) – Optional field and chose appropriately.
c) Quantity – You must enter a negative value here.
d) Unit Price – Value of as per the original invoice line..
e) Amount – Automatically populates after quantity and unit price have been entered.
1. Credit the entire original invoice line in full using the original tax code
2. Re-bill the customer for the entire invoice line using the correct tax code

AR2: Adjustments & Set Ups in AR
Finance Training Version 5.1 15-Nov-17 Page 24
f) Tax classification – ensure it is the same tax code as per the original line that is being credited back.
Line 2 (details of the correct information)
a) Description – This is a free text field where you enter the details of the invoice line you are re-billing.
b) Unit Of Measure (UOM) – Optional field and chose appropriately.
c) Quantity – You must enter a positive value here.
d) Unit Price – Value of product or service you are providing.
e) Amount – Automatically populates after quantity and unit price have been entered.
f) Tax classification – defaults in based on customer set up, ensure it is relevant to the product/service being sold. Amend using the list of values if required.
Once your lines are complete, you must update the accounting information by clicking on the Distributions button.
Step 6: Entering distribution codes
Once you have clicked on distributions, the following screen displays. You must only change the revenue line. To view all lines as seen below, click on the drop down arrow and select Account for all lines. Ensure you use the same Distribution Codes as the original Invoice for the negative Revenue Lines and enter the correct coding information for the positive revenue lines.
The next step is for the credit memo to be checked and completed before printing (refer to guidance Completing a Transaction on this process).
Once the Credit memo has been completed, you will need to apply the credit memo to the original invoice and send a copy of the credit memo to the customer. To apply the transactions together refer to Matching Credit to Invoice process

AR2: Adjustments & Set Ups in AR
Finance Training Version 5.1 15-Nov-17 Page 25
9. Applying a credit memo to an invoice
After a credit memo has been completed, you may wish to apply the credit memo to the original invoice. By linking the two transactions together it will either reduce the balance on the invoice or cancel the invoice.
Step 1: Recall the completed credit memo
Navigate to the Tool Bar and click on the Torch icon to display the screen below. Enter the credit memo number in the Transaction Numbers field or enter
information in one or more of the other fields. Click Find.
The details of the credit memo will now appear in the Transactions Summary screen. By clicking on the Open button, details can be checked relating to the original credit memo.
Navigate: Transactions → Transaction Summary

AR2: Adjustments & Set Ups in AR
Finance Training Version 5.1 15-Nov-17 Page 26
Step 2: Applying the rredit memo to the invoice
The next process is to link the transactions together.
Click on the Applications button.
This will display the Applications screen where the Invoice details are entered.
Either manually enter the invoice number or use the list of values and search for the invoice in the Apply To field.
Press the Tab key to pull through the invoice details.
Click the Save icon and a tick will populate in the Apply box.

AR2: Adjustments & Set Ups in AR
Finance Training Version 5.1 15-Nov-17 Page 27
10. Reversing a “Remitted” and “Cleared” receipt
If you have applied a receipt to an incorrect customer or entered the wrong amount you will need to reverse it and then re-enter it. It is only possible to reverse receipts with a status field of ‘Remitted’.
Step 1: Recall the remitted receipt
Retrieve the receipt to be ‘Reversed’ from the Batches Summary window and click on the torch icon. In the find batches screen (see below) enter your batch number in both fields. Alternatively you can search using any of the other criteria. Click Find after details entered.
Once the Receipt Batches Summary screen displays, ensure the cursor is in the correct line and click on Receipts. This will display the Receipts Summary screen which lists the individual receipts within that batch.
Place the cursor in the receipt line you wish to reverse.
Navigate: Receipts → Batches Summary

AR2: Adjustments & Set Ups in AR
Finance Training Version 5.1 15-Nov-17 Page 28
Step 2: Reversing the receipt
Click on the Reverse …1 button.
In the reverse dialogue box enter the following information.
Category Reverse Payment (defaults in). Reason ALWAYS select Payment Reversal from the list of values. Comment This is a free text field to outline any specific reasons for the reversal.
Click on the Reverse button and close out of the Receipts Summary screen.
Receipt Batches Summary screen will display. Scroll along the line for the reversed receipt and the status will be Out of Balance.
Click on Open to display the Receipt Batches screen. The Control Count and Control Amount will need to be adjusted accordingly to balance and the status is Closed.

AR2: Adjustments & Set Ups in AR
Finance Training Version 5.1 15-Nov-17 Page 29
Reversing a cleared receipt
If the receipt is marked cleared it must not be reversed without prior action from Cash Management. This is because the receipt has already been reconciled to an entry on the bank statement.
Cash Management will un-match the receipt from the bank statement and the receipt status will return to Remitted.
Once this has been done the receipt can be reversed using the steps outlined above.

AR2: Adjustments & Set Ups in AR
Finance Training Version 5.1 15-Nov-17 Page 30
11. Using the Receipt Summary
The Receipts Summary window provides basic information about receipts. From this window you can select and review several receipts.
1. Click on the torch icon on the toolbar to open the Find Receipts window.
2. Enter your search criteria using one or more of the available fields. To make the search run as quickly as possible use as many of the fields as possible to narrow down the search time.
3. Click on the Find button to begin the search. A list of receipts matching the criteria will be displayed in the Receipts Summary window.
4. Click on the Open button to view the details of each receipt.
Navigate: Receipts → Receipts Summary Inquiry

AR2: Adjustments & Set Ups in AR
Finance Training Version 5.1 15-Nov-17 Page 31
Note: The Receipts Summary Inquiry menu provides a read-only view of your departmental receipts.
If you wish to make changes to receipts, you will need to close the window and navigate back to the original receipt batch using either:
Navigate: Receipts → Receipt Batches Or
Receipts → Batches Summary
AR2: Adjustments & Set Ups in AR
Finance Training Version 5.1 15-Nov-17 Page 32
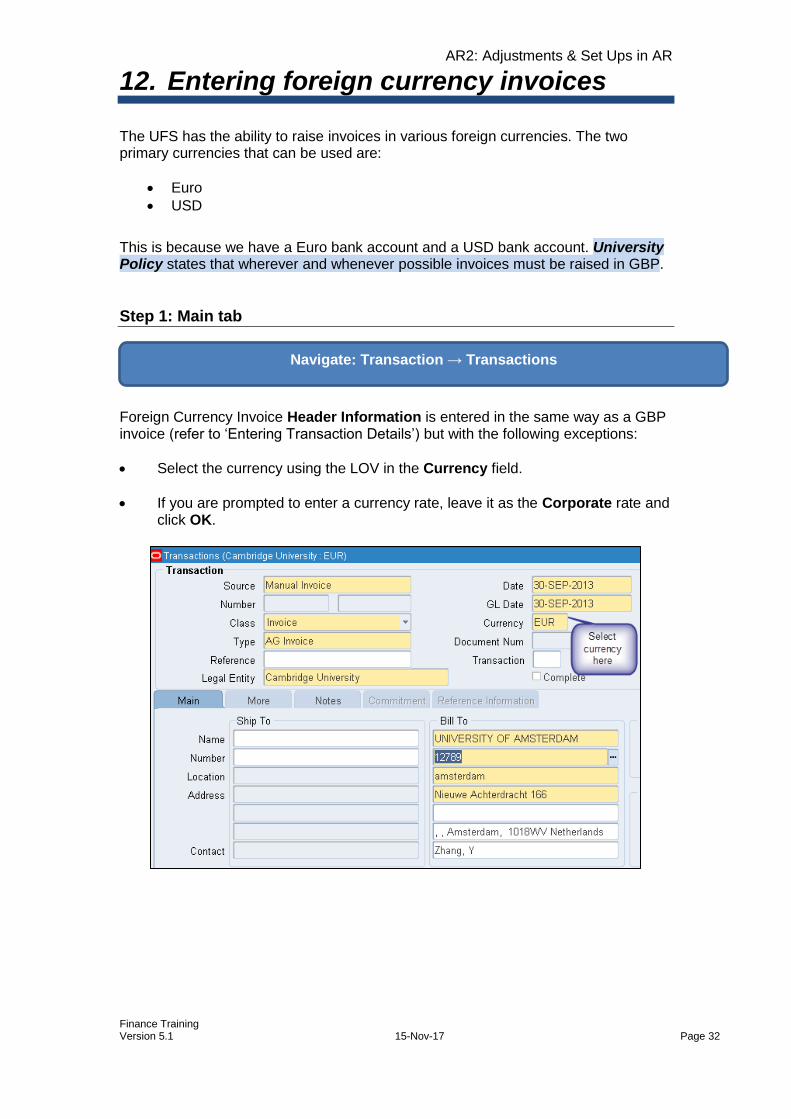
12. Entering foreign currency invoices
The UFS has the ability to raise invoices in various foreign currencies. The two primary currencies that can be used are:
Euro
USD
This is because we have a Euro bank account and a USD bank account. University Policy states that wherever and whenever possible invoices must be raised in GBP.
Step 1: Main tab
Foreign Currency Invoice Header Information is entered in the same way as a GBP invoice (refer to ‘Entering Transaction Details’) but with the following exceptions:
Select the currency using the LOV in the Currency field.
If you are prompted to enter a currency rate, leave it as the Corporate rate and click OK.
Navigate: Transaction → Transactions

AR2: Adjustments & Set Ups in AR
Finance Training Version 5.1 15-Nov-17 Page 33
13. Entering foreign currency receipts
Step 1: Start a foreign currency batch
Receipts with the same currency rate type and rates should be grouped together and batched separately.
When creating a foreign currency receipt batch, it is vital to select the correct Batch Source to ensure that the receipts will be applied to the correct bank account. This allows the Cash Management section of the Finance Division to match your receipts to the income in the bank account.
Batch Number: Use the same naming convention as you would do with a sterling
receipt batch (refer to entering a receipt batch) but add the currency type after the date eg. AG/05/01/10/USD/01.
Batch Source Select the appropriate batch source for your currency from the list of values. The system will then automatically default in the correct bank details for this transaction. For Euros select Euro Manual Receipts
and for USD select USD Manual Receipts. Currency This will automatically populate once the correct batch source has
been selected.
Control Count Enter the number of receipts (remember they must be of the same currency).
Navigate: Receipts → Receipt Batches

AR2: Adjustments & Set Ups in AR
Finance Training Version 5.1 15-Nov-17 Page 34
Control Amount Enter the accumulated total of the receipt values.
When changing the batch source, you may be prompted to select an exchange rate. Select Corporate Rate type from the pop-up menu. If you require a different rate then please contact the AR Helpdesk on:
[email protected] or telephone (3)32215.
Step 2: Receipts summary
Here we enter the details of each individual receipt that is going in to the batch. Each receipt will have its own receipt name. There is a naming convention for each receipt within the batch which is similar to the batch name.
a) Complete the fields below, as per the image above.
Receipt Number The naming convention is as follows. DD/Initials/DD/MM/YY/Currency/Unique number (same as batch unique number)/Unique number (2) eg. AG/AK/13/01/14/USD/02/01.
Type There are two types available and the option to use is standard.
This is the type that links to receipts to invoices.
Receipt Date This will default in based on the batch date you selected in the
batch header.
Currency This will default in based on the currency selected in the batch
header.
Receipt Amount Enter the value of the receipt you are entering.
b) Click on Open.

AR2: Adjustments & Set Ups in AR
Finance Training Version 5.1 15-Nov-17 Page 35
Step 3: Linking the receipt to the invoice
Now the batch and receipt have been created, the receipt now needs to be linked to the invoice. The majority of details will default in from the information entered in the batch header and receipts summary screen.
To match the receipt to the invoice, see the steps below.
a) Enter either the invoice number in the trans number or the customer details in the customer name or number field.
b) Comments – This is a free text field. If you receive a cheque payment you must enter the cheque number and payee name and if it is a BACS payment then you must enter the line number, date and value of payment receipting.
c) Click on Apply.
You will now be in the Applications screen where it will populate details of the transaction you are applying the receipt to.

AR2: Adjustments & Set Ups in AR
Finance Training Version 5.1 15-Nov-17 Page 36
The following fields will be displayed:
Apply to Defaults in with the transaction number you have entered in the receipts screen. However if you only entered the customer details in the receipts screen click on the list of values and select the correct transaction you wish to match to the invoice.
Instalment Defaults in.
Apply Date The date the defaults in.
Amount Applied The value of the payment you are applying against the invoice. This can be changed if full payment has not been received therefore a balance will remain outstanding.
Discount Value of 0.00 will default in.
Balance Due The amount outstanding if there is a difference between invoice and receipt.
d) Click on the Save icon
Should the receipt cover more than one invoice, complete the steps above and then click in to the line below or press arrow down key and repeat steps.
When a sales invoice is raised in a foreign currency and the receipt is in the foreign currency, the UFS will calculate any exchange rate gain/loss by looking at the sterling equivalent of the original sales invoice and comparing it to the sterling equivalent of the receipt being entered. Any gain/loss will be highlighted in the Exchange Gain/Loss field. If you raised the sales invoice in sterling and you have been paid in a foreign currency or vice versa, then please refer to Cross Currency Receipting detailed procedure that is available from the Guidance web page:
http://ufs.admin.cam.ac.uk/r12reference/ar/ar_fcurtosinv.pdf

AR2: Adjustments & Set Ups in AR
Finance Training Version 5.1 15-Nov-17 Page 37
14. Other types of receipts
BACS receipts
Twice a week (Monday and Wednesday) Central Finance send two spreadsheets, via e-mail, to all Key Contacts. The spreadsheets are listings of all the BACS receipts received into the Sterling Bank Account, USD Bank Account and the Euro Bank Account, that have not been reconciled (matched) to a receipt in UFS. The information listed includes:
The Date the monies were received onto the bank statement.
The Amount of the receipt.
Any other information provided by the customer when paying via BACS. If you find any receipts on the spreadsheet that relate to your department, then please enter a Receipt onto the system. NB: It is the responsibility of the DEPARTMENT, to enter BACS receipts in the UFS. a) Enter a Receipt Batch in the normal way, using the same naming conventions
outlined in the previous section.
b) However change the Batch Source to “BACS/ Standing Orders”.
Change Batch Source

AR2: Adjustments & Set Ups in AR
Finance Training Version 5.1 15-Nov-17 Page 38
c) When you have entered your BACS receipt(s) onto the system, please send an
e-mail to [email protected] , indicating the following details:
Bank Statement Date (As per the spreadsheet).
Amount (As per the spreadsheet).
Your Batch Number and Receipt Number.
The line number from the spreadsheet. This information then allows the Cash Management Team to reconcile your receipt with the payment on the bank statement. If you have any queries or problems then please e-mail the above address.
Multiple departments receipts
All receipts (invoice and non-invoice related) that are relevant to more than one department should be entered as normal onto the system, however;
Only claim the proportion of the payment that is proper to your own department (as per the remittance advice with the cheque); and
Then forward the remittance advice and cheque onto the Cash Management Team via the UMS, who will then arrange for the remainder to be claimed.
Unidentified receipts
Unidentified receipts are when money is put into a receipt batch without attaching it to either a customer or a General Ledger code. By running the Aging 7 Buckets report, you will be able to identify such receipts, which will require investigation and ‘allocated’ accordingly. For further assistance in relation to this please contact [email protected].

AR2: Adjustments & Set Ups in AR
Finance Training Version 5.1 15-Nov-17 Page 39
15. Month-end guidance
UAccounts Receivable (AR) Complete AR invoices, credit notes and batch receipts for the month (this is
ongoing).
Print and send AR invoices and customer statements.
Print and send dunning letters as part of credit control.
Run Incomplete Invoices report to identify any incomplete sales transactions and complete/cancel transactions as necessary.
Run Unapplied Receipts Register to identify any receipts unapplied to specific invoices and apply these receipts to the appropriate invoices.
Run Aging 7 Buckets by Accounts report to show invoices with no remittance, and review – use for credit control.
Review and write-off bad debts (with necessary approval).
Internal Trading Raise Internal Trading AR invoices promptly to departments in accordance with
agreed terms.
Review and agree Internal Trading invoices in dispute and refer to arbitration as necessary.
Banking Complete all receipt batches for cash and cheques received on or before the last
day of the month.
Run the Receipt Register Report for cash receipt batches.
Arrange for banking of all monies received up to the last day of the month (including vending machines, photocopier sales, pay phones, key deposits).
Claim BACS receipts/bank transfers from the weekly Finance Division spreadsheet.
Process monthly petty cash journal for balancing your petty cash float.

AR2: Adjustments & Set Ups in AR
Finance Training Version 5.1 15-Nov-17 Page 40
16. Incomplete Invoices Report
This report highlights all sales transactions that are currently incomplete on the system. They will all require some further action by the department. There are various reasons as to why they remain incomplete:
Raised in error
Awaiting approval and completion
Copy transactions
Duplicate transaction
How to run this report
To run this report.
a) Ensure Single Request is selected and click ‘OK’.
b) Click on the ‘List of Values’ in the Name field and type in ‘Incomplete’ and this will take you to the parameters screen.
c) Order By – Invoice.
d) Click OK.
Should you wish to print the report,
o Click on Options and select the correct printer you wish to print to and enter the number of copies you require.
o Click OK.
Navigate: Requests → Run

AR2: Adjustments & Set Ups in AR
Finance Training Version 5.1 15-Nov-17 Page 41
Click Submit. This will take you to the Requests screen. Occasionally click refresh until process has been completed.
You will now either have a printed copy at your printer or click on View Output to view on screen.
If you are in a central department, this report will show all Incomplete Invoices across the entire University.

AR2: Adjustments & Set Ups in AR
Finance Training Version 5.1 15-Nov-17 Page 42
Action points from this report
Each Invoice on this report will have to be reviewed and one of the actions detailed on the next page carried out.
Type
Question Instructions/Comments
Void
Is the invoice no longer required?
No. Void and complete the invoice (refer to voiding transactions guidance)
Does the void transaction need completing?
Yes. Complete in normal way or refer to someone who can complete it or contact AR helpdesk
Credit Memo
Was the credit memo not completed as it was raised in error or it had an error?
Yes was raised in error – If the credit memo was raised in error, complete the transaction with a zero value and match to a debit memo or an invoice
Is the credit memo still required?
Yes it is required – Complete the remaining details on the credit memo and complete or send for completion
Invoice
Was the invoice raised in error?
Yes. Void the transaction (refer to voiding a transaction guidance).
Are you awaiting for someone to complete the transaction?
Yes. Request a colleague who has the correct responsibility to complete the transaction.

AR2: Adjustments & Set Ups in AR
Finance Training Version 5.1 15-Nov-17 Page 43
Incomplete Invoices report
Transaction number
Transaction Type
Customer name and number

AR2: Adjustments & Set Ups in AR
Finance Training Version 5.1 15-Nov-17 Page 44
17. Unapplied Receipt Register report
This report highlights receipts that are showing against a customer’s account, but have not been applied to a specific transaction. The receipt batch status will be OPEN when investigated but should be CLOSED wherever possible. The batch will close once all of the receipts have been applied within the batch. a) Ensure Single Request is selected and click OK.
b) Click on the ‘List of Values’ in the Name field and type in ‘Unapplied’ and this will take you to the parameters screen.:
Ledger Currency Defaults in with GBP, can change to other currencies if required.
Format Select Detailed.
c) Click OK.
d) Should you wish to print this report adjust your printer options and print copies.
e) Alternatively click on view output after the request has completed.
Navigate: Request → Run
If you are in a Central Department, the report will list every unapplied receipt across the entire University.

AR2: Adjustments & Set Ups in AR
Finance Training Version 5.1 15-Nov-17 Page 45
Receipt batch source
Receipt batch name
Individual Receipt Number
Unapplied receipt amount

AR2: Adjustments & Set Ups in AR
Finance Training Version 5.1 15-Nov-17 Page 46
Action points from this report
Start Here
Query back the Receipt Batch and locate the unapplied receipt.
Can the money/funds be applied?
YES
Drill down to the receipt and apply the funds to a transaction (eg. sales invoice).
NB it may be necessary to create a Debit Note in order to have somewhere for the funds to be applied against.
Was it an overpayment?
YES
NO
Make arrangements in the AP module to refund your customer.
Guidance on this is available from the AR Helpdesk.
Verify that the amount should be carried forward for future allocation
NO

AR2: Adjustments & Set Ups in AR
Finance Training Version 5.1 15-Nov-17 Page 47
Appendix A: Account codes used in AR
All invoices to research sponsors are raised on the department’s behalf by the Research Office. Therefore departments can only record transactions against General Ledger codes.
General Ledger account codes are made up of six segments:
Organisation (1 character)
Department (2 characters)
Cost Centre (4 characters)
Source of Funds (4 characters)
Transaction (4 characters)
Spare (4 zeros)
They are normally written in a string format e.g. U.AG.AGAA.AAAA.LAAA.0000
Organisation Segment
This is used to split transactions by legal entity.
This will be U if you are a department of the University of Cambridge.
Department Segment
This is used to define the Department for whom the transaction relates, eg. AG for the Finance Division.
Cost Centre Codes
These provide departments with the means to analyse the transactions in a more detailed manner and against which budgets can be set. Each department has automatically been set up with a standard set of cost centres, covering activities such as administration, workshop, library, catering and Research Grants. Other costs centres specific to the Department have been added to these. The Cost Centre code comprises of four characters: the first two are normally the Department’s two-letter code and the next two identify the particular activity. An example of some of the Finance Division’s codes is given overleaf.

AR2: Adjustments & Set Ups in AR
Finance Training Version 5.1 15-Nov-17 Page 48
Source of Funds Funding for the University’s activities comes from many different Funds sources. The University has a responsibility to its sponsors, donors, and government funders to separate, manage and report (in most cases) on the activities based upon the source of funds.
The Source of Funds code is represented by four characters, which are the same across all departments. Although the list of them is very long there is some logical structure behind it. The main ones that are used in the Accounts Receivable module are:
G Self Supporting Activities
GAAA External Trading
GAAB Internal trading
GB** Research Training Support Grants.
GC** Donations from University Companies
GD** College Support Grants
H & E Special Accounts
These will be the two main Sources of Funds that you will use
The standard set that all departments get
DO NOT USE!
The system uses this when it transfers in data from the Research
Grants Module

AR2: Adjustments & Set Ups in AR
Finance Training Version 5.1 15-Nov-17 Page 49
When raising a Sales Invoice or receiving money from another source you must detail on the system how you have obtained that income.
Example Source of Funds Code
You sell some goods/provide services to an external customer
External trading GAAA
You sell goods/provide services to another department
Internal trading GAAB
Reimbursements/sales to Students and staff
External trading GAAA
Security Deposits received
Balance sheet item a ‘creditor’ (we will have to return the deposit to the customer upon safe return of the item)
0000
Deposit payment from a customer to reserve goods or services
External trading GAAA
Donations The University receives donations from a variety of sponsors. The accounting treatment of these funds relies on the conditions attached to the money and if/how it is invested. Cash donations are classified as follows.
General Donations This is where no specific conditions on the use of the money has been stipulated by the donor e.g. a contribution to a general appeal
EF**
Specific Donations Where the donor specifies how the whole of the amount donated should be spent (excluding donations for Building projects)
H***
Refer to the flowchart on page 52 for further guidance on ascertaining the type of donation and the relevant source of funds.

AR2: Adjustments & Set Ups in AR
Finance Training Version 5.1 15-Nov-17 Page 50
Decisions Source of
funds begins Classification
Include unspent balance in
Is this a research activity grant? Yes Advise ROO
No Does this income establish a
contractual relationship? Yes
No
Is this a donation? No Account for according to
nature of income Yes
Has the donor placed restrictions on the spending of this donation?
No Assume no restrictions in
the absence of evidence Yes
Are there restrictions? No Yes
Can we meet the conditions with expenditure already committed or
planned as part of department's existing operations?
Yes E General donation Reserves
No
Has the donor specified the gift is to be invested for longer term?
No
Yes ENDOWMENTS
Is a Trust Fund being / has been established?
Yes K Trust fund Specific endowments
No Are there conditions placed on spending of the investment income
arising? No R General endowments General endowments
Yes I Special funds Specific endowments
SPECIFIC DONATIONS - income matches expenditure Is the gift to be spent on a building project? Yes P Donations for buildings Creditors
No H Donation accounts Creditors

Finance Training Version 5.1 15-Nov-17 Page 51
Transaction Codes Transaction codes are used to describe further the actual item/service codes for both income and expenditure. This is required for reporting and control purposes. The code is made up of four characters. See below:
1st Character
Identifies what sort of account the transactions should be attributed to
There are many types of transaction codes (the first character) but the ones you will most commonly use in AR are: L Other Operating Income
or possibly
K Academic Fees & Support Grants
2nd – 4th Characters
Describe exactly what the transaction was.
The majority of the time you will be selecting a description code that will relate to operating income. There is a long list for this, but as with sources of funds there is a logical sequence behind them and you may find the following helpful. All L codes follow roughly this logic:
LA.. Other Services Rendered*
LB.. Catering*
LC.. Health & Hospital Authorities*
LD.. Released from Deferred Capital Grants
LE.. Transfer from Local Examinations Syndicate
LF.. General Donations*
LG.. University Companies
LH.. VAT Rebate
LJ.. Room Hire*
LK.. Other*
LL.. Discount Taken
LM.. Property Income
LN.. Press & Publications Income*
LP.. Pensions Income
LR.. Computer Related Sales*
LZA. Overhead Recovery*
LZB. Labour Recovery*
LZD. Trust Fund Recovery
LZE. Research Grant Revenue

AR2: Adjustments & Set Ups in AR
Finance Training Version 5.1 15-Nov-17 Page 52
Other Operating Income codes starting L… * These are the most likely ones to be used. Occasionally you may use V*** transaction codes
to indicate a receipt of a security deposit , e.g. Key deposits is VPPA
to code VAT on miscellaneous receipts straight to the VAT account , e.g. Output Tax is VCCA
Spare Code This is simply a spare field if the University decides to expand the accounting code structure at some point in the future. At present this is always going to be 0000 (four zeros).
AR2: Adjustments & Set Ups in AR
Finance Training Version 5.1 15-Nov-17 Page 53
Standard Rated -
VAT charged at 20%
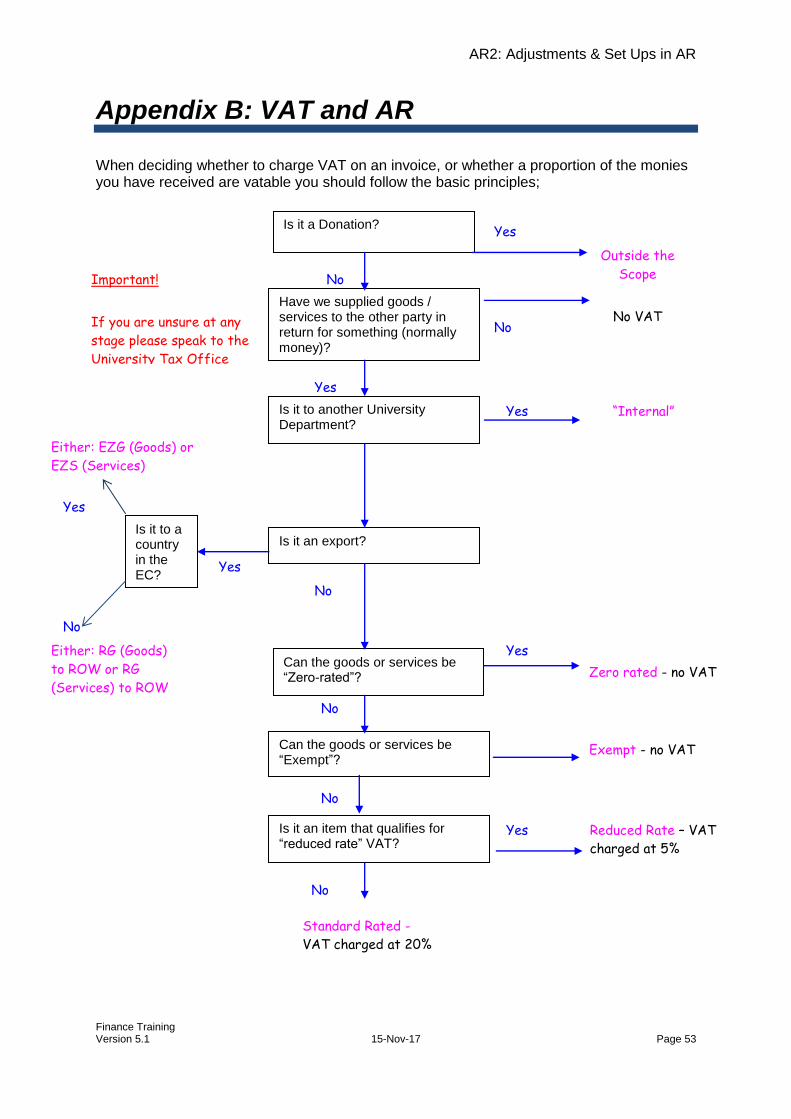
Appendix B: VAT and AR
When deciding whether to charge VAT on an invoice, or whether a proportion of the monies you have received are vatable you should follow the basic principles;
No
Have we supplied goods / services to the other party in return for something (normally money)?
Is it to another University Department?
Can the goods or services be “Zero-rated”?
Can the goods or services be “Exempt”?
Is it an item that qualifies for “reduced rate” VAT?
Is it a Donation?
(see the Donation flow chart)
Important!
If you are unsure at any
stage please speak to the
University Tax Office
“Internal”
No VAT
Zero rated - no VAT
Exempt - no VAT
Reduced Rate – VAT
charged at 5%
Yes
Yes
Yes
Yes
No
Yes
Outside the
Scope
No VAT
Is it an export?
Either: RG (Goods)
to ROW or RG
(Services) to ROW
– No VAT
Either: EZG (Goods) or
EZS (Services)
– No VAT
No
No
No
Yes
Is it to a country in the EC?
No
No
Yes

AR2: Adjustments & Set Ups in AR
Finance Training Version 5.1 15-Nov-17 Page 54
Below are some common examples of items in the University and their VAT rates, further details and explanations are given in the VAT guidance published on the Finance Division web page at: http://www.finance.admin.cam.ac.uk/policy-and-procedures/financial-procedures/chapter-9-vat-and-other-taxes Alternatively please call the University VAT Office for further clarification VAT Queries (3)32230
Common outside the scope items
True donations
VAT is not chargeable on pure donations of cash, i.e. where no strings are attached to the donation. However, if a 'donation' of cash is made on condition that the recipient provides something in return, then the recipient is making a taxable supply of services to the donor which will be liable to VAT under the normal rules.
True donations are 'outside the scope' of VAT.
Exports
EC goods and services
In the case of a supply of services to a member of the EC (other than the UK) the VAT Code 'EZS' should be selected as the tax rate. In the case of goods supplied to the EC 'EZG' should be used.
The supplies are then zero-rated.
However, in order to zero-rate the supply, the customer's VAT number is required and should be entered on the invoice. Where EC goods are supplied copy invoices should be passed to the Tax section. If the customer does not provide his VAT registration number, tax should be charged at the 'standard rate'.
AR2: Adjustments & Set Ups in AR
Finance Training Version 5.1 15-Nov-17 Page 55
Supplies of goods and services to the rest of the world.
For the purposes of the accounting system services to the rest of the world should be classed as 'RS', whilst goods to the rest of the world are 'RG'.
Documentary evidence of export should be kept.
Common Zero-rated Items
Sales of books
Library fines
Common Exempt items
Fees for education and vocational training
Goods/services closely related to the supply of education, vocational training or research (when supplied to another eligible body for use directly by their students)
In the majority of cases rent and room hire
Catering for students
Photocopying for students
Sale of stamps
Bench fees for students
Common Standard Rated Items
Sales to staff and visitors
Sales of second hand equipment (unless can be zero-rated in its own right e.g. books)
Catering for staff and visitors
Sale of postcards
Admission cards for libraries
Sponsorship
Advertising
Bench fees for academics
Gift Items eg. souvenir mugs
Consultancy Fees
Education
Supplies of education are 'exempt'. This includes not only supplies of education to full time students, but to all supplies of education. Education includes educational seminars, conferences, and lectures, together with sporting and recreational courses.

AR2: Adjustments & Set Ups in AR
Finance Training Version 5.1 15-Nov-17 Page 56
Closely related supplies
Supplies of goods and services which are closely related to a supply of education, vocational training or research (where the research is supplied to another eligible body) are 'exempt'. For example, supplies of accommodation, catering and other facilities to those attending a conference are 'exempt' under the proviso that they are a closely related supply to the supply of the education. Other examples of 'closely related supplies' are transport, photocopying, and supplies from vending machines. However, alcohol is not included in this concession!
The decision as to whether a supply is closely related to the provision of education can be subject to interpretation and in cases of doubt you should take advice from the Tax Section.
Room hire
The supply of room hire is 'exempt', unless the University has 'opted to tax' the building, in which case VAT should be added at the 'standard rate'. The majority of buildings have not been subject to an 'option to tax'.
Room hire for the purpose of catering is 'standard rated', as is the supply of room hire in conjunction with the supply of bedded accommodation.
Catering
Supplies to students are 'exempt'. Supplies to staff and visitors are standard rated. Where there is a mixed supply, the different types of supply should be identified. If it is difficult to identify different categories of customer at the point of sale, please speak to the Tax Section who may be able to agree a different method of calculating the VAT due.
Museum and other shops
The supply of books is 'zero-rated'. This includes children's picture books and painting books.
The sale of postcards is 'standard rated'.
The supply of stamps is 'exempt'.
Libraries
Library fines are 'zero-rated'.
Admission cards are 'standard rated' where a charge is made.
Photocopying services
Photocopying charged to another department is an internal sale and 'INT' should be selected as the tax rate. The supply of photocopying services to a student is regarded as a 'closely related supply' and is 'exempt'. Other supplies of photocopying are 'standard rated'.
Supplies of second-hand goods to staff
The supply of second-hand goods to staff are 'standard rated' unless the item being sold is 'zero-rated' in its own right e.g. books.

AR2: Adjustments & Set Ups in AR
Finance Training Version 5.1 15-Nov-17 Page 57
How do I account for VAT on cash sales?
Non invoice related receipts of cash should be entered under 'receipts' within the Accounts Receivable responsibility. The receipt type should be set at 'Misc'. Before receipts of cash are entered each activity will need to be set up as a 'Receivable Activity'.
For example, you might need activities for exempt and VATable catering coming from the same canteen.
You must not raise invoices off the system and apply the receipt of cash to a receivable activity as this can lead to an error in the paying VAT to HM Revenue and Customs at the correct time which is driven by the invoice date, not the date of receiving payment.

AR2: Adjustments & Set Ups in AR
Finance Training Version 5.1 15-Nov-17 Page 58
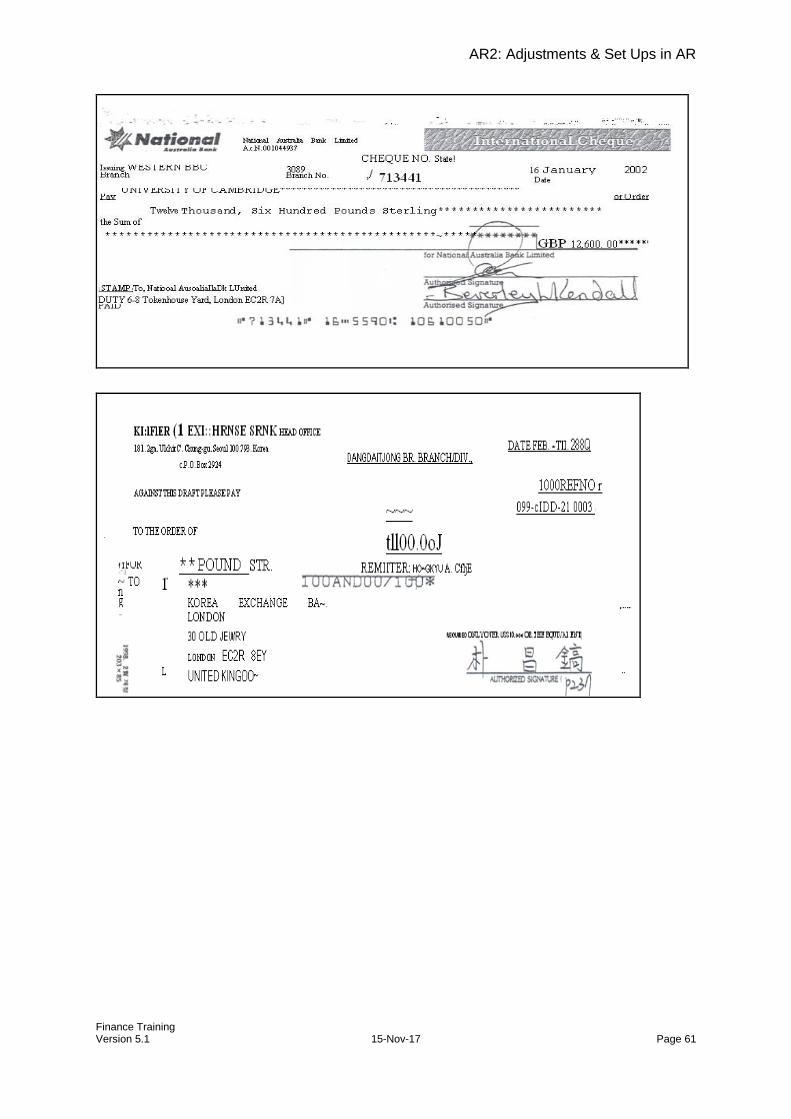
Appendix C: How to deal with foreign currency cheques
Cheques which have been drawn abroad but are payable in the UK and cheques that are payable abroad (in either Sterling or another currency).
Please see the attached examples numbered as follows.
Examples 1 – 4
TYPE: Cheques in Sterling, drawn abroad by overseas banks but payable in the UK at a British bank named on the cheque (1 & 2 also have an UK bank sort code printed on them.)
SOLUTION: These cheques should be banked as a normal Sterling receipt
along with any other UK cheques. Examples 5 – 6
TYPE: Cheques drawn in Sterling, drawn abroad by an overseas bank but
payable at the drawee bank’s UK office.
SOLUTION: Treat as example 1-4. Examples 7 – 8
TYPE: Cheques in Sterling, drawn abroad AND payable abroad. There is no
UK bank detailed on the cheque therefore payable where the cheque was drawn.
SOLUTION: Enter in a separate Sterling receipts batch and forward to the cashier
at the Old Schools. Bank commission will be payable, the receipt will be adjusted centrally after the proceeds have been received.
Examples 9 – 10
TYPE: Cheques drawn in Euros, drawn abroad and payable abroad.
SOLUTION: Enter on a separate receipts batch as a EURO receipt to credit
the EURO bank account. Forward to the Cashier as above (commission will be payable). NB Euro cheques payable in the UK should be treated the same.

AR2: Adjustments & Set Ups in AR
Finance Training Version 5.1 15-Nov-17 Page 59
Examples 11 – 12
TYPE: US $ (Dollars) cheques payable in the USA. (Note US Cheques
seldom state US dollars or the name of the country. It is assumed that everybody has a detailed knowledge of the geography of the USA!)
SOLUTION: Enter on a separate receipts batch as a credit to the dollar account.
Send to Cash Management or the Cashier at the Old Schools. Example 13
TYPE: A Canadian $ (Dollar) cheque. Again the type of dollar and country are
not stated (geography knowledge again is assumed).
SOLUTION: - Enter on a separate receipts batch as a Canadian Dollar receipt but to the Sterling bank account. Send to the cashier, commission will be payable. NB Cheques in any other currency should be treated as Example 13. A separate receipts batch needed for each.
Example 14
TYPE: The Complicated One! Drawn in Canada but in US $ Dollars.
Payable in Canada but also payable in the USA.
SOLUTION: Treat as 11 – 12.

AR2: Adjustments & Set Ups in AR
Finance Training Version 5.1 15-Nov-17 Page 60
Example Cheques 1-3
Example Cheques 4-6
AR2: Adjustments & Set Ups in AR
Finance Training Version 5.1 15-Nov-17 Page 61

AR2: Adjustments & Set Ups in AR
Finance Training Version 5.1 15-Nov-17 Page 62
Example cheques 7-9

AR2: Adjustments & Set Ups in AR
Finance Training Version 5.1 15-Nov-17 Page 63
Example Cheques 10-12

AR2: Adjustments & Set Ups in AR
Finance Training Version 5.1 15-Nov-17 Page 64
Example Cheques 13-14

AR2: Adjustments & Set Ups in AR
Finance Training Version 5.1 15-Nov-17 Page 65