Embed Size (px)
Citation preview
1© 2012 Jones & Bartlett Learning, LLC (www.jblearning.com)
Knowledge Objectives1. Discuss the indications, contraindications, technique, and
complications of performing intraosseous (IO) infusion in an adult. (p 2)
2. List devices used to perform IO insertion in an adult. (p 2)
3. Explain how to perform IO insertion, including how to find the visual landmarks. (p 2)
4. Describe how to administer medication via an IO line in an adult. (p 4)
Skills Objectives1. Demonstrate IO insertion in an adult. (pp 2–3, Skill Drill 1)
2. Demonstrate how to administer medication via an IO line in an adult. (pp 4–5, Skill Drill 2)
Contents
■ Obtaining Intraosseous Access in an Adult Skill Drill 1
■ Administering Medication Via the Intraosseous Route Skill Drill 2
ADDITIONAL SKILLS
Intraosseous Access and Infusion
2 Intraosseous Access and Infusion
© 2012 Jones & Bartlett Learning, LLC (www.jblearning.com)
specialized training and thorough familiarity with the features of each device, its functionality, and clinical application. If your EMS system uses any of these devices, follow local pro-tocols regarding their application.
IO lines require full and careful immobilization because they rest at a 90º angle to the bone and are easily dislodged. It is critical for you to stabilize these lines to maintain adequate flow.
6Obtaining Intraosseous Access
6in an Adult
The technique for performing IO infusion requires proper anatomic landmark identification. The flat bone of the proxi-mal tibia—the most commonly used site—is located medial to the tibial tuberosity, the bony protuberance just below the knee.
Follow these steps to perform IO infusion using a manu-ally inserted IO needle Skill Drill 1 .
1. Check the selected IV fluid for proper fluid, clarity, and expiration date. Look for discoloration and for particles floating in the fluid. If found, discard the bag and choose another bag of fluid.
2. Select the appropriate equipment, including an IO needle, syringe, saline, and extension set Step 1 . A three-way stopcock may also be used to facilitate easier fluid administration.
3. Select the proper administration set. Connect the administration set to the bag. Prepare the adminis-tration set. Fill the drip chamber and flush the tub-ing. Make sure all air bubbles are removed from the tubing.
4. Prepare the syringe and extension tubing.
5. Cut or tear the tape. This can be done at any time before IO puncture.
6. Take standard precautions Step 2 . This must be done before IO puncture.
7. Identify the proper anatomic site for IO puncture Step 3 . When using the BIG device in an adult,
measure 2 cm from the tibial tuberosity toward the inner leg, and then measure 1 cm up toward the knee. When using the EZ-IO, measure 2 cm from the patella to the tibial tuberosity, then 1 cm toward the inner leg.
8. Cleanse the site appropriately. Follow aseptic tech-nique by cleansing in a circular manner from the inside out.
9. Perform the IO puncture by first stabilizing the tibia, then placing a folded towel under the knee, and finally holding the leg in a manner to keep your fingers away from the site of puncture.
10. Insert the needle at a 90° angle to the leg. Advance the needle with a twisting motion until a “pop” is felt
Step 4 . Unscrew the cap, and remove the stylet from the needle Step 5 .
6Introduction
Chapter 8, Vascular Access and Medication Administration, introduced the topic of intraosseous (IO) access and infu-sion. Chapter 33, Pediatric Emergencies, discussed obtaining IO access in a pediatric patient. The following discussion is about IO access and infusion in adults.
Cannulation of a peripheral extremity vein is the pre-ferred initial means of establishing vascular access. IO routes are used for critically ill patients when IV access cannot be established within three attempts or 90 seconds. They also may be used in adults in specific circumstances guided by local protocols.
Any fluid or medication that may be given through an IV line can also be given by the IO route. Shock and status epi-lepticus are only two of the reasons for establishing IO access. The IO space, which acts like a sponge, quickly absorbs fluids and medications and rapidly transports them to the central circulation. Unlike an IV line, fluid does not flow well into the bone because of resistance; therefore, it is necessary to use a large syringe to infuse the fluid.
Although peripheral veins often collapse when a patient is in shock or cardiac arrest, the IO space tends to remain patent. Thus, the use of IO cannulation and infusion may be considered a lifesaving measure if peripheral venous access is not possible.
Contraindications to IO insertion in adults include frac-ture of the bone intended for IO cannulation, osteoporosis, osteogenesis imperfecta (a congenital disease resulting in fragile bones), and bilateral knee replacements.
Complications of using the IO route are similar to those of the IV route. There is also the potential for compartment syn-drome if fluid leaks outside of the bone and into the osteofascial compartment, fracture of the tibia from improper technique, and pulmonary embolism due to the bone and fat particles.
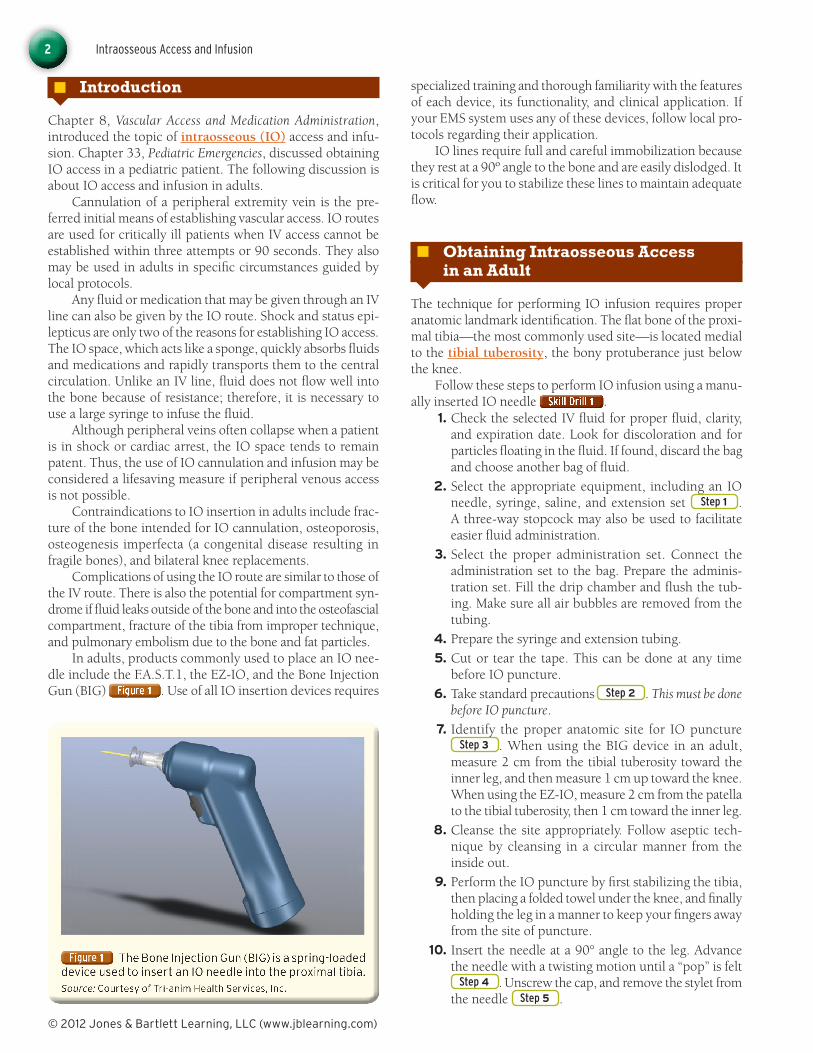
In adults, products commonly used to place an IO nee-dle include the F.A.S.T.1, the EZ-IO, and the Bone Injection Gun (BIG) Figure 1 . Use of all IO insertion devices requires
The Bone Injection Gun (BIG) is a spring-loaded device used to insert an IO needle into the proximal tibia.Source: Courtesy of Tri-anim Health Services, Inc.
Intraosseous Access and Infusion 3
© 2012 Jones & Bartlett Learning, LLC (www.jblearning.com)
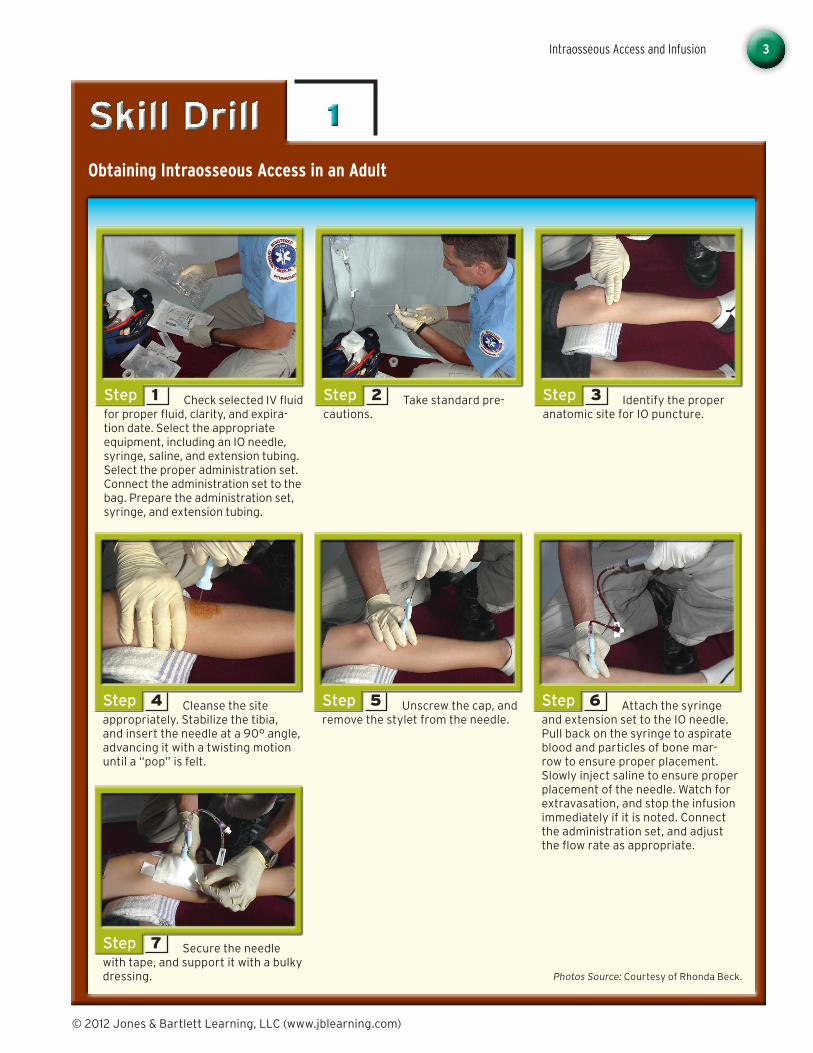
Skill Drill 1
Obtaining Intraosseous Access in an Adult
Step 1 Check selected IV fluid for proper fluid, clarity, and expira-tion date. Select the appropriate equipment, including an IO needle, syringe, saline, and extension tubing. Select the proper administration set. Connect the administration set to the bag. Prepare the administration set, syringe, and extension tubing.
Step 2 Take standard pre-cautions.
Step 3 Identify the proper anatomic site for IO puncture.
Step 4 Cleanse the site appropriately. Stabilize the tibia, and insert the needle at a 90° angle, advancing it with a twisting motion until a “pop” is felt.
Step 5 Unscrew the cap, and remove the stylet from the needle.
Step 6 Attach the syringe and extension set to the IO needle. Pull back on the syringe to aspirate blood and particles of bone mar-row to ensure proper placement. Slowly inject saline to ensure proper placement of the needle. Watch for extravasation, and stop the infusion immediately if it is noted. Connect the administration set, and adjust the flow rate as appropriate.
Step 7 Secure the needle with tape, and support it with a bulky dressing. Photos Source: Courtesy of Rhonda Beck.

4 Intraosseous Access and Infusion
© 2012 Jones & Bartlett Learning, LLC (www.jblearning.com)
4. Follow standing orders, or contact medical control for permission.
5. Check the medication to be certain that it is the cor-rect one, that it is not cloudy or discolored, and that the expiration date has not passed, and determine the appropriate dose.
6. Explain the procedure to the patient and the need for the medication.
7. Assemble needed equipment, and draw up the medi-cation. Also draw enough fluid from the IV line for a flush.
8. Cleanse the injection port of the extension tubing with alcohol, or remove the protective cap if using the needleless system Step 1 .
9. Insert the needle into the port, and clamp off the IV tubing proximal to the administration port. This is usually managed with a three-way stopcock. Failure to shut off the line will result in the medication taking the pathway of least resistance and flowing into the bag instead of into the patient.
10. Administer the correct dose of the medication at the proper push rate. Some medications must be admin-istered very quickly, while others must be pushed slowly to prevent adverse effects Step 2 .
11. Place the needle and syringe into the sharps container.
12. Unclamp the IV line to flush the medication into the vein. Flush with at least a 20-mL bolus of normal saline (or the fluid being administered).
13. Readjust the IV flow rate to the original setting.
14. Store any unused medication properly.
15. Monitor the patient’s condition, and document the medication given, route, time of administration, and response of the patient Step 3 .
11. Attach the syringe and extension set to the IO needle. Pull back on the syringe to aspirate blood and par-ticles of bone marrow to ensure proper placement.
12. Slowly inject saline to ensure proper placement of the needle. Watch for extravasation, and stop the infusion immediately if it is noted. It is possible to fracture the bone during insertion of the IO. If this happens, you should remove the IO and switch to the other leg.
13. Connect the administration set and adjust the flow rate as appropriate Step 6 . Fluid does not flow as rapidly through an IO catheter as through an IV line; therefore, adult patients should be given crystalloid boluses with a pressure infuser device.
14. Secure the needle with tape, and support it with a bulky dressing. Stabilize in place in the same manner that an impaled object is stabilized. Use bulky dress-ings around the catheter, and tape securely in place. Be careful not to tape around the entire circumference of the leg because this could impair circulation and potentially result in compartment syndrome Step 7 .
15. Dispose of the needle in the proper container.
6Administration of Medication
6Via the Intraosseous Route
Once an IO line is established, follow the steps in Skill Drill 2 to administer a medication via the IO route:
1. Take standard precautions.
2. Determine the need for the medication based on patient presentation.
3. Obtain the patient’s history and perform a physical examination, including any drug allergies and vital signs.
Intraosseous Access and Infusion 5
© 2012 Jones & Bartlett Learning, LLC (www.jblearning.com)
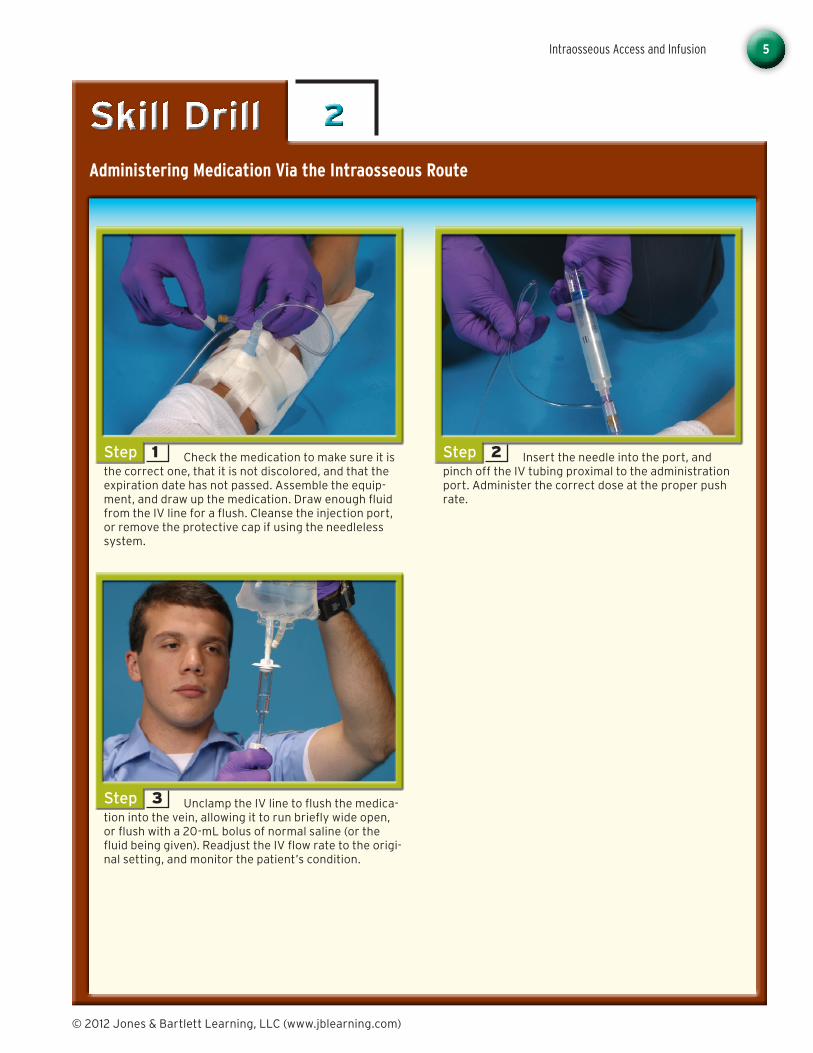
Skill Drill 2
Administering Medication Via the Intraosseous Route
Step 1 Check the medication to make sure it is the correct one, that it is not discolored, and that the expiration date has not passed. Assemble the equip-ment, and draw up the medication. Draw enough fluid from the IV line for a flush. Cleanse the injection port, or remove the protective cap if using the needleless system.
Step 2 Insert the needle into the port, and pinch off the IV tubing proximal to the administration port. Administer the correct dose at the proper push rate.
Step 3 Unclamp the IV line to flush the medica-tion into the vein, allowing it to run briefly wide open, or flush with a 20-mL bolus of normal saline (or the fluid being given). Readjust the IV flow rate to the origi-nal setting, and monitor the patient’s condition.

Prep Kit
© 2012 Jones & Bartlett Learning, LLC (www.jblearning.com)
6Ready for Review
■ The intraosseous (IO) route is used when the AEMT is unable to obtain IV access in a critically ill patient.
■ The IO space, which acts like a sponge, quickly absorbs fluids and medications and rapidly transports them to the central circulation.
■ Any medication or fluid that can be administered via the IV route can be given by the IO route.
■ Devices commonly used to place an IO needle in an adult include the F.A.S.T.1, the EZ-IO, and the Bone Injection Gun (BIG). Use of all IO insertion devices requires specialized training and thorough familiarity with the device.
■ The flat bone of the proximal tibia is the most com-monly used site for IO puncture. It is located medial to the tibial tuberosity, the bony protuberance just below the knee.
■ It is imperative to practice IO skills, as well as the other routes of medication administration, on a regular basis.
6Vital Vocabulary
intraosseous (IO) Into the bone; a medication delivery route.
tibial tuberosity The bony protuberance just below the knee.
CreditsUnless otherwise indicated, all photographs and illustrations are under copyright of Jones & Bartlett Learning, LLC, courtesy of Mary-land Institute for Emergency Medical Services Systems, or have been provided by the American Academy of Orthopaedic Surgeons.