Embed Size (px)
Citation preview

Add-in Express™ for Microsoft® Office and Delphi VCL

2 Add-in Express™
www.add-in-express.com
Add-in Express for Office and VCL Add-in Express™ for Microsoft® Office and Delphi VCL
Add-in Express™ for Microsoft® Office and Delphi VCL
Developer's Guide
Revised on 16-May-16
Copyright © Add-in Express Ltd. All rights reserved.
Add-in Express, ADX Extensions, ADX Toolbar Controls, Afalina, AfalinaSoft and Afalina Software are trademarks or registered trademarks of Add-in Express
Ltd. in the United States and/or other countries. Microsoft, Outlook, and the Office logo are trademarks or registered trademarks of Microsoft Corporation in the
United States and/or other countries. Borland and the Delphi logo are trademarks or registered trademarks of Borland Corporation in the United States and/or
other countries.
THIS SOFTWARE IS PROVIDED "AS IS" AND ADD-IN EXPRESS LTD. MAKES NO REPRESENTATIONS OR WARRANTIES, EXPRESS OR IMPLIED. BY
WAY OF EXAMPLE, BUT NOT LIMITATION, ADD-IN EXPRESS LTD. MAKES NO REPRESENTATIONS OR WARRANTIES OF MERCHANTABILITY OR
FITNESS FOR ANY PARTICULAR PURPOSE OR THAT THE USE OF THE LICENSED SOFTWARE, DATABASE OR DOCUMENTATION WILL NOT
INFRINGE ANY THIRD PARTY PATENTS, COPYRIGHTS, TRADEMARKS OR OTHER RIGHTS.

3 Add-in Express™
www.add-in-express.com
Add-in Express for Office and Delphi VCL Table of Contents
Table of Contents
Add-in Express™ for Microsoft® Office and Delphi VCL .................... 2
Introduction ......................................................................................... 6
Why Add-in Express? ..................................................................................................................................... 7 Add-in Express Products ............................................................................................................................................. 7
System Requirements .................................................................................................................................... 8 Supported Delphi Versions .......................................................................................................................................... 8 Host Applications ........................................................................................................................................................ 8
Technical Support ......................................................................................................................................... 10
Installing and Activating............................................................................................................................... 11 Activation Basics ....................................................................................................................................................... 11 Setup Package Contents........................................................................................................................................... 11 Solving Installation Problems .................................................................................................................................... 12
Getting Started .................................................................................. 13
Your First Microsoft Office COM Add-in ..................................................................................................... 14 A Bit of Theory .......................................................................................................................................................... 14 Step #1 – Creating a COM Add-in Project ................................................................................................................. 15 Step #2 – COM Add-in Module ................................................................................................................................. 16 Step #3 – COM Add-in Designer ............................................................................................................................... 18 Step #4 – Adding a New Command Bar.................................................................................................................... 18 Step #5 – Adding a New Command Bar Button ........................................................................................................ 19 Step #6 – Accessing Host Application Objects .......................................................................................................... 20 Step #7 - Customizing Main Menus .......................................................................................................................... 21 Step #8 – Customizing Context Menus ..................................................................................................................... 22 Step #9 – Handling Host Application Events ............................................................................................................. 23 Step #10 – Customizing the Office Ribbon User Interface ........................................................................................ 24 Step #11 – Adding Custom Task Panes in Excel 2000-2016 .................................................................................... 25 Step #12 – Adding Custom Task Panes for PowerPoint 2000-2016 ......................................................................... 26 Step #13 – Adding Custom Task Panes for Word 2000-2016 ................................................................................... 26 Step #14 – Running the COM Add-in ........................................................................................................................ 27 Step #15 – Debugging the COM Add-in .................................................................................................................... 30 Step #16 – Deploying the COM Add-in ..................................................................................................................... 30
Your First Microsoft Outlook COM Add-in ................................................................................................. 31 A Bit of Theory .......................................................................................................................................................... 31 Step #1 – Creating an Outlook COM Add-in Project ................................................................................................. 32 Step #2 – COM Add-in Module ................................................................................................................................. 34 Step #3 – COM Add-in Designer ............................................................................................................................... 36 Step #4 – Adding a New Explorer Command Bar ..................................................................................................... 37 Step #5 – Adding a New Command Bar Button ........................................................................................................ 38 Step #6 – Accessing Outlook Objects ....................................................................................................................... 38 Step #7 – Handling Outlook Events .......................................................................................................................... 39 Step #8 – Adding a New Inspector Command Bar .................................................................................................... 40 Step #9 – Customizing Main Menus in Outlook ......................................................................................................... 41 Step #10 – Customizing Context Menus in Outlook .................................................................................................. 42 Step #11 – Handling Events of Outlook Items Object ............................................................................................... 43

4 Add-in Express™
www.add-in-express.com
Add-in Express for Office and Delphi VCL Table of Contents
Step #12 – Adding Property Pages to the Folder Properties Dialogs ........................................................................ 45 Step #13 – Intercepting Keyboard Shortcuts ............................................................................................................. 46 Step #14 – Customizing the Outlook Ribbon User Interface ..................................................................................... 47 Step #15 – Adding Custom Task Panes in Outlook 2000-2016 ................................................................................ 48 Step #16 – Running the COM Add-in ........................................................................................................................ 50 Step #17 – Debugging the COM Add-in .................................................................................................................... 52 Step #18 – Deploying the COM Add-in ..................................................................................................................... 52
Your First Excel RTD Server ........................................................................................................................ 53 A Bit of Theory .......................................................................................................................................................... 53 Step #1 – Creating a New RTD Server Project ......................................................................................................... 54 Step #2 – RTD Server Module .................................................................................................................................. 55 Step #3 – RTD Server Designer ................................................................................................................................ 56 Step #4 – Adding and Handling a New Topic ............................................................................................................ 56 Step #5 – Running the RTD Server ........................................................................................................................... 58 Step #6 – Debugging the RTD Server ....................................................................................................................... 59 Step #7 – Deploying the RTD Server ........................................................................................................................ 59
Your First Smart Tag ..................................................................................................................................... 60 A Bit of Theory .......................................................................................................................................................... 60 Step #1 – Creating a New Smart Tag Library Project ............................................................................................... 60 Step #2 – Smart Tag Module .................................................................................................................................... 61 Step #3 – Smart Tag Designer .................................................................................................................................. 63 Step #4 – Adding a New Smart Tag .......................................................................................................................... 63 Step #6 - Running Your Smart Tag ........................................................................................................................... 65 Step #7 – Debugging the Smart Tag ......................................................................................................................... 66 Step #8 – Deploying the Smart Tag .......................................................................................................................... 66
Your First Excel Automation Add-in ........................................................................................................... 67 A Bit of Theory .......................................................................................................................................................... 67 Step #1 – Creating a New COM Add-in Project ........................................................................................................ 68 Step #2 – Creating an Excel Automation Add-in ....................................................................................................... 70 Step #3– Creating User-Defined Functions ............................................................................................................... 70 Step #4 – Running the Excel Automation Add-in ...................................................................................................... 72 Step #5 – Debugging the Excel Automation Add-in .................................................................................................. 73 Step #6 – Deploying the Excel Automation Add-in .................................................................................................... 73
Add-in Express Components ............................................................ 74
Office Ribbon Components ......................................................................................................................... 75 How Ribbon Controls Are Created ............................................................................................................................ 76 Referring to Built-in Ribbon Controls ......................................................................................................................... 77 Intercepting Built-in Ribbon Controls ......................................................................................................................... 78 Positioning Ribbon Controls ...................................................................................................................................... 78 Creating Ribbon Controls at Run-time ...................................................................................................................... 78 Updating Ribbon Controls at Run-Time..................................................................................................................... 79 Determining a Ribbon Control's Context ................................................................................................................... 79 Sharing Ribbon Controls across Multiple Add-ins ..................................................................................................... 79
Custom Task Panes in Office 2007-2016 .................................................................................................... 81
Command Bars: Toolbars, Menus, and Context Menus ........................................................................... 81 Toolbar ...................................................................................................................................................................... 81 Main Menu ................................................................................................................................................................ 82 Context Menu ............................................................................................................................................................ 82 Outlook Toolbars and Main Menus ........................................................................................................................... 83

5 Add-in Express™
www.add-in-express.com
Add-in Express for Office and Delphi VCL Table of Contents
Connecting to Existing Command Bars ..................................................................................................................... 83
Command Bar Controls ................................................................................................................................ 84 Command Bar Control Properties and Events .......................................................................................................... 85 Command Bar Control Types .................................................................................................................................... 85 Using Built-in Command Bar Controls ....................................................................................................................... 85
Built-in Control Connector ........................................................................................................................... 86
Keyboard Shortcut ........................................................................................................................................ 86
Outlook Bar Shortcut Manager .................................................................................................................... 86
Outlook Property Page ................................................................................................................................. 87
Advanced Outlook Regions and Advanced Office Task Panes ............................................................... 87 Introducing Advanced Task Panes in Word, Excel and PowerPoint ......................................................................... 87 Introducing Advanced Outlook Form and View Regions ........................................................................................... 89 Hello, World! .............................................................................................................................................................. 94 The UI Mechanics ..................................................................................................................................................... 95 Excel Task Panes ................................................................................................................................................... 102 Advanced Outlook Regions ..................................................................................................................................... 103
Smart Tag ..................................................................................................................................................... 107
RTD Topic .................................................................................................................................................... 107
Host Application Events ............................................................................................................................. 107
MSForms Controls ...................................................................................................................................... 108
Tips and Notes ................................................................................ 109
Terminology ............................................................................................................................................................ 109 Getting Help on COM Objects, Properties and Methods ......................................................................................... 109 COM Add-ins Dialog ............................................................................................................................................... 109 How to Get Access to the Add-in Host Applications ................................................................................................ 110 Registry Entries ....................................................................................................................................................... 110 ControlTag vs. Tag Property ................................................................................................................................... 110 Pop-ups ................................................................................................................................................................... 110 Edits and Combo Boxes and the Change Event ..................................................................................................... 110 Built-in Controls and Command Bars ...................................................................................................................... 111 CommandBar.SupportedApps ................................................................................................................................ 111 Outlook Command Bar Visibility Rules .................................................................................................................... 111 Removing Custom Command Bars and Controls .................................................................................................... 111 My Add-in Is Always Disconnected ......................................................................................................................... 111 Update Speed for an RTD Server ........................................................................................................................... 111 Sequence of Events When an Office 2007-2016 Custom Task Pane Shows up .................................................... 112 Adding an Office 2007-2016 Custom Task Pane to an Existing Add-in Express Project ........................................ 112 Temporary or Not? .................................................................................................................................................. 113 Registering with User Privileges .............................................................................................................................. 114 Additional Files ........................................................................................................................................................ 116 How to find if Office 64-bit is installed on the target machine .................................................................................. 117 Excel Workbooks .................................................................................................................................................... 117 Word Documents .................................................................................................................................................... 117 Don't use any Office object models in the OnCreate and OnDestroy events .......................................................... 118
Final Note ....................................................................................... 119

6 Add-in Express™
www.add-in-express.com
Add-in Express for Office and Delphi VCL Introduction
Add-in Express for Office and Delphi VCL Introduction
Introduction
Add-in Express is a development tool designed to simplify and speed up the
development of Office COM Add-ins, Run-Time Data servers (RTD servers), Smart
Tags, and Excel Automation Add-ins in Delphi through the consistent use of the RAD
paradigm. It provides a number of specialized components that allow the developer to
walk through the interface-programming phase to the functional programming phase
with a minimal loss of time.
.

7 Add-in Express™
www.add-in-express.com
Add-in Express for Office and Delphi VCL Why Add-in Express?
Why Add-in Express?
Microsoft supplied us with another term – Office Extensions. This term covers all the customization
technologies provided for Office applications. The technologies are:
COM Add-ins
Smart Tags
Excel RTD Servers
Excel Automation Add-ins
Add-in Express allows you to overcome the basic problem when customizing Office applications – building your
solutions into the Office application. Based on the True RAD paradigm, Add-in Express saves the time that you
would have to spend on research, prototyping, and debugging numerous issues of any of the above-mentioned
technologies in all versions and updates of all Office applications. The issues include safe loading / unloading,
host application startup / shutdown, as well as user-interaction-related and deployment-related issues.
Add-in Express Products
Add-in Express offers a number of products for developers on its web site.
Add-in Express for Microsoft Office and .NET
It allows creating version-neutral managed COM add-ins, smart tags, Excel Automation add-ins, XLL add-ins
and RTD servers in Visual Studio. See http://www.add-in-express.com/add-in-net/ .
Add-in Express for Internet Explorer and .NET
It allows developing add-ons for IE in Visual Studio. Custom toolbars, sidebars and BHOs are on board. See
http://www.add-in-express.com/programming-internet-explorer/ .
Security Manager for Microsoft Outlook
This is a product designed for Outlook solution developers. It allows controlling the Outlook e-mail security
guard by turning it off and on in order to suppress unwanted Outlook security warnings. See http://www.add-in-
express.com/outlook-security/ .

8 Add-in Express™
www.add-in-express.com
Add-in Express for Office and Delphi VCL System Requirements
System Requirements
You must have Microsoft Office 2000 Sample Automation Server Wrapper Components installed.
Supported Delphi Versions
Delphi XE2 Architect, Ultimate, Enterprise and Professional with Update Pack 4 Hotfix 1
Delphi XE3 Architect, Ultimate, Enterprise and Professional with Update Pack 1
Delphi XE4 Architect, Ultimate, Enterprise and Professional with Update Pack 1
Delphi XE5 Architect, Ultimate, Enterprise and Professional
Delphi XE6 Architect, Ultimate, Enterprise and Professional
Delphi XE7 Architect, Ultimate, Enterprise and Professional
Delphi XE8 Architect, Ultimate, Enterprise and Professional
Delphi 10 Seattle Architect, Ultimate, Enterprise, Professional
Delphi 10.1 Berlin Architect, Ultimate, Enterprise, Professional
Host Applications
COM Add-ins
Microsoft Excel 2000 and higher
Microsoft Outlook 2000 and higher
Microsoft Word 2000 and higher
Microsoft FrontPage 2000 and higher
Microsoft PowerPoint 2000 and higher
Microsoft Access 2000 and higher
Microsoft Project 2000 and higher
Microsoft MapPoint 2002 and higher
Microsoft Visio 2002 and higher
Microsoft Publisher 2003 and higher
Microsoft InfoPath 2007 and higher
Real-Time Data Servers
Microsoft Excel 2002 and higher

9 Add-in Express™
www.add-in-express.com
Add-in Express for Office and Delphi VCL System Requirements
Smart Tags
Microsoft Excel 2002 and higher
Microsoft Word 2002 and higher
Microsoft PowerPoint 2003 and higher
Smart tags are declared deprecated since Office 2010. However, you can still use the related APIs
in projects for Excel 2010-2016 and Word 2010-2016; see Changes in Word 2010 and Changes in
Excel 2010 .
Excel Automation Add-ins
Microsoft Excel 2002 and higher

10 Add-in Express™
www.add-in-express.com
Add-in Express for Office and Delphi VCL Technical Support
Technical Support
Add-in Express is developed and supported by the Add-in Express Team, a branch of Add-in Express Ltd. You
can get technical support using any of the following methods.
The Add-in Express web site at www.add-in-express.com provides a mine of information and software
downloads for Add-in Express developers, including:
The HOWTOs section that contains sample projects answering most common "how to" questions.
Add-in Express technical blog contains most recent information as well as Video HOWTOs.
Add-in Express Toys contains "open sourced" add-ins for popular Office applications.
Built-in Controls Scanner utility, which is free.
For technical support through the Internet, e-mail us at [email protected] or use our forums .
If you are a subscriber of our Premium Support Service and need help immediately, you can request technical
support via an instant messenger, e.g. Windows/MSN Messenger or Skype.

11 Add-in Express™
www.add-in-express.com
Add-in Express for Office and Delphi VCL Installing and Activating
Installing and Activating
What follows below is a brief guide on installing and activating your copy of Add-in Express.
Activation Basics
During the registration process, the registration wizard prompts you to enter your license key. The key is a 30
character alphanumeric code shown in six groups of five characters each (for example, AXN4M-GBFTK-
3UN78-MKF8G-T8GTY-NQS8R). Keep the license key in a safe location and do not share it with others. This
product key forms the basis for your ability to use the software.
For the purposes of product activation only, a non-unique hardware identifier is created from general
information that is included in the system components. Product activation is anonymous. At no time, files on the
hard drive are scanned, or any personally identifiable information is used to create the hardware identifier. To
ensure your privacy, the hardware identifier is created by what is known as a "one-way hash". To produce a
one-way hash, information is processed through an algorithm to create a new alphanumeric string. It is
impossible to get the original information from the resulting string.
Your product key and a hardware identifier are the only pieces of information required to activate the
product. No other information is collected from your PC or sent to the activation server.
If you choose the Automatic Activation Process option of the activation wizard, the wizard attempts to establish
an online connection to the activation server, www.activatenow.com . If the connection is established, the
wizard sends both the license key and the hardware identifier over the Internet. The activation service
generates an activation key using this information and sends it back to the activation wizard. The wizard saves
the activation key to the registry.
If an online connection cannot be established (or you choose the Manual Activation Process option), you can
activate the software using your web-browser. In this case, you will be prompted to enter the product key and a
hardware identifier on a web page, and will get an activation key in return. This process ends with saving the
activation key to the registry.
Activation is completely anonymous; no personally identifiable information is required. The activation key can
be used to activate the product on the same computer an unlimited number of times. However, if you need to
install the product on several computers, you will need to perform the activation process again on every PC.
Please refer to your end-user license agreement for information about the number of computers you can install
the software on.
Setup Package Contents
The Add-in Express setup program installs the following folders on your PC:
Packages – design-time packages for supported Delphi versions
Docs – Add-in Express documentation
Redistributables – Add-in Express redistributable files

12 Add-in Express™
www.add-in-express.com
Add-in Express for Office and Delphi VCL Installing and Activating
Sources – Add-in Express source code
Sources \ DesignTime – design-time source code.
Please note that the source code of Add-in Express is delivered or not depending on the product
package you purchased. See Feature Matrix & Pricing for details.
Add-in Express setup program installs the following text files on your PC:
licence.txt – the EULA
readme.txt – short description of the product, support addresses and such
whatsnew.txt – this file describes the latest information on the product features added and bugs fixed.
Solving Installation Problems
Make sure you are an administrator on the PC.
On Vista, Windows 7 and Windows 2008 Server, set UAC to its default level.
In Control Panel | System | Advanced | Performance | Settings | Data Execution Prevention, set the "... for
essential Windows programs and services only" flag.
Remove the following registry key, if it exists:
HKEY_CURRENT_USER\Software\Add-in Express\{product identifier} {version}
{package}
Finally, use the Automatic activation option in the installer windows.
13 Add-in Express™
www.add-in-express.com
Add-in Express for Office and Delphi VCL Installing and Activating
Getting Started
In this chapter, we guide you through the following steps of developing Add-in Express projects:
Create an Add-in Express project
Add components to the Add-in Express designer
Add some business logics
Build, register, and debug the project
Deploy your project to a target PC
14 Add-in Express™
www.add-in-express.com
Add-in Express for Office and Delphi VCL
Your First Microsoft Office COM Add-in
Your First Microsoft Office COM Add-in
This chapter highlights creating COM Add-ins for Microsoft Office applications. The sample project described
below implements a COM add-in for Excel, Word and PowerPoint. It is included in Add-in Express for Office
and VCL sample projects available on the Downloads page.
Add-in Express provides a number of components targeting Outlook. See Your First Microsoft Outlook
COM Add-in.
A Bit of Theory
COM add-ins have been around since Office 2000 when Microsoft allowed Office applications to extend their
features with COM DLLs supporting the IDTExtensibility2 interface (it is a COM interface, of course).
COM add-ins is the only way to add new or re-use built-in UI elements such as command bar controls and
Ribbon controls. Say, a COM add-in can show a command bar or Ribbon button to process selected Outlook e-
mails, Excel cells, or paragraphs in a Word document and perform some actions on the selected objects. A
COM add-in supporting Outlook, Excel, Word or PowerPoint can show advanced task panes in Office 2000-
2016. In a COM add-in targeting Outlook, you can add custom option pages to the Tools | Options and Folder
Properties dialogs. A COM add-in also handles events and calls properties and methods provided by the object
model of the host application. For instance, a COM add-in can modify an e-mail when it is being sent; it can
cancel saving an Excel workbook or it can check if a Word document meets some conditions.
Per-user and per-machine COM add-ins
A COM add-in can be registered either for the current user (the user running the installer) or for all users on the
machine. Add-in Express generates a per-user add-in project; your add-in is per-machine if the add-in module
has ADXAddinModule.RegisterForAllUsers = True. Registering for all users means writing to HKLM
and that means the user registering a per-machine add-in must have administrative permissions. Accordingly,
RegisterForAllUsers = Flase means writing to HKCU (=for the current user). See Registry Entries.
A standard user may turn a per-user add-in off and on in the COM Add-ins Dialog. You use that dialog to check
if your add-in is active.

15 Add-in Express™
www.add-in-express.com
Add-in Express for Office and Delphi VCL
Your First Microsoft Office COM Add-in
Step #1 – Creating a COM Add-in Project
Run Delphi via the Run as Administrator command.
Add-in Express adds the COM Add-in project template to the New Items dialog.
When you select the template and click OK, the COM Add-in Wizard starts. In the wizard windows, you choose
the project options.

16 Add-in Express™
www.add-in-express.com
Add-in Express for Office and Delphi VCL
Your First Microsoft Office COM Add-in
The project wizard creates and opens the COM Add-in project in the IDE.
The add-in project includes the following items:
The project source files (MyAddin1.*);
The type library files (MyAddin1_TLB.pas, MyAddin1.ridl);
The add-in module (MyAddin1_IMPL.pas and MyAddin1_IMPL.dfm)
discussed below.
Step #2 – COM Add-in Module
The add-in module (MyAddin1_IMPL.pas and MyAddin1_IMPL.dfm) is the core component of the COM add-in
project. It is a container for Add-in Express components. You specify the add-in properties in the module's
properties, add the required components to the module's designer, and write the functional code of your add-in
in this module.
The code for MyAddin1_IMPL.pas is as follows:
unit MyAddin1_IMPL;
interface
uses

17 Add-in Express™
www.add-in-express.com
Add-in Express for Office and Delphi VCL
Your First Microsoft Office COM Add-in
SysUtils, ComObj, ComServ, ActiveX, Variants, Office2000, adxAddIn,
MyAddin1_TLB;
type
TcoMyAddin1 = class(TadxAddin, IcoMyAddin1)
end;
TAddInModule = class(TadxCOMAddInModule)
procedure adxCOMAddInModuleAddInInitialize(Sender: TObject);
procedure adxCOMAddInModuleAddInFinalize(Sender: TObject);
private
protected
public
end;
var
adxcoMyAddin1: TAddInModule;
implementation
{$R *.dfm}
procedure TAddInModule.adxCOMAddInModuleAddInInitialize(Sender: TObject);
begin
adxcoMyAddin1 := Self;
end;
procedure TAddInModule.adxCOMAddInModuleAddInFinalize(Sender: TObject);
begin
adxcoMyAddin1 := nil;
end;
initialization
TadxFactory.Create(ComServer, TcoMyAddin1, CLASS_coMyAddin1,
TAddInModule);
end.
The add-in module contains two classes: the “interfaced” class (TcoMyAddin1 in this case) and the add-in
module class (TAddInModule). The “interfaced” class is a descendant of the TadxAddIn class that
implements the IDTExtensibility2 interface required by the COM Add-in architecture. Usually you do not
need to change anything in the TadxAddIn class.
The add-in module class implements the add-in functionality. It is an analogue of the Data Module, but unlike
the Data Module, the add-in module allows you to set all properties of your add-in, handle its events, and create
toolbars and controls.

18 Add-in Express™
www.add-in-express.com
Add-in Express for Office and Delphi VCL
Your First Microsoft Office COM Add-in
Step #3 – COM Add-in Designer
The designer of the add-in module allows setting add-in properties and adding components to the module.
Click the module's designer surface, activate Object Inspector, choose the SupportedApps property and
select Excel, Word, and PowerPoint.
You find Add-in Express components in the Tool Palette. See also Add-in Express Components.
Step #4 – Adding a New Command Bar
To add a command bar to your add-in, find the TadxCommandBar component in the Tool Palette and drag-n-
drop it onto the TadxCOMAddinModule designer (see also Command Bars: Toolbars, Menus, and Context
Menus).

19 Add-in Express™
www.add-in-express.com
Add-in Express for Office and Delphi VCL
Your First Microsoft Office COM Add-in
Select the command bar component, and, in the Object Inspector, specify the command bar name using the
CommandBarName property. In addition, you select its position in the Position property.
To display a command bar in the Office Ribbon you must explicitly set the UseForRibbon property
of the command bar component to True. The controls added to such a command bar will be shown
on the built-in Ribbon tab called Add-ins.
Step #5 – Adding a New Command Bar Button
To add a new button to the command bar, in the Object Inspector you run the property editor of the Controls
property for the appropriate command bar component. The property editor is a simple and easy designer of
command bars and their controls.
Specify the button's Caption property and set the Style property to adxMsoButtonIconAndCaption
(default value = adxMsoButtonAutomatic). In the Object Inspector, you switch to the Events tab to add the
OnClick event handler for the command bar button component.

20 Add-in Express™
www.add-in-express.com
Add-in Express for Office and Delphi VCL
Your First Microsoft Office COM Add-in
Step #6 – Accessing Host Application Objects
The add-in module provides the HostApplication property that returns the Application object (of the
OleVariant type) of the host application in which the add-in is running now. For your convenience Add-in
Express provides the <HostName>App properties, say ExcelApp of the TExcelApplication type and
WordApp of the TWordApplication type. Together with the HostType property, it allows writing the following
code to the OnClick event of the newly added button.
procedure TAddInModule.DefaultAction(Sender: TObject);
begin
ShowMessage(GetInfoString());
end;
function TAddInModule.GetInfoString(): string;
var
er: ExcelRange;
IWindow: IDispatch;
begin
Result := 'No document window found!';
try
// Word raises an exception if there's no document open
IWindow := HostApp.ActiveWindow;
except
end;
try
if IWindow <> nil then
case HostType of
ohaExcel:
try
er := (IWindow as Excel2000.Window).ActiveCell;
//relative address
Result := 'The current cell is: '
+ er.AddressLocal[False, False, xlA1, EmptyParam, EmptyParam];
finally
er := nil;
end;
ohaWord:
Result := 'The current selection contains '
+ IntToStr(
(IWindow as Word2000.Window).Selection.Range.Words.Count)
+ ' words';
ohaPowerPoint:
Result := 'The current selection contains '
+ IntToStr(
(IWindow as MSPpt2000.DocumentWindow).Selection.SlideRange.Count)
+ ' slides';

21 Add-in Express™
www.add-in-express.com
Add-in Express for Office and Delphi VCL
Your First Microsoft Office COM Add-in
else
Result := 'The ' + AddinName
+ ' COM Add-in doesn''t support the current host application!' ;
end;
except
end;
IWindow := nil;
end;
Step #7 - Customizing Main Menus
Add-in Express provides a component to customize main menus in Office applications (see Your First Microsoft
Outlook COM Add-in for customizing Outlook main menus). Some applications from Office 2000-2003 have
several main menus. Say, in these Excel versions, you find Worksheet Menu Bar and Chart Menu Bar.
Naturally, in Excel 2007 - 2016, these menus are replaced with the Ribbon UI. Nevertheless, the main menus
are still accessible programmatically and you may want to use this fact in your code.
In this sample, we are going to customize the File menu in Excel and Word version 2000-2003. You start with
adding two main menu components (TadxMainMenu) and
specifying correct host applications in their SupportedApp
properties. Then, in the CommandBarName property, you specify
the main menu.
The screenshot shows how you set up the main menu component
in order to customize the Worksheet Menu Bar main menu in
Excel 2000-2003.
The TadxMainMenu.Controls property provides a designer
that allows adding custom controls to a set of predefined popup
controls that corresponds to built-in main menu items such as File, Edit, etc. Those popups demonstrate the
main principle of referencing built-in command bar controls: if the OfficeID property of a CommandBar control
component is other than 1, you are referencing the
corresponding built-in control. You can find the IDs of built-in
command bar controls using the free Built-in Controls Scanner
utility. Download it at http://www.add-in-
express.com/downloads/controls-scanner.php .
In the source code of the sample add-in described here, you
can find how you can customize the Office Button menu in
Office 2007 (see the component named
adxRibbonOfficeMenu1). As to the Backstage View, also
known as a File tab in Office 2010-2016, the sample projects
provide the adxBackstageView1 component that implements
the customization shown in Figure 3 at Introduction to the Office 2010 Backstage View for Developers . Note
22 Add-in Express™
www.add-in-express.com
Add-in Express for Office and Delphi VCL
Your First Microsoft Office COM Add-in
that if you customize the Office Button menu only, Add-in Express maps your controls to the Backstage View. If,
however, both Office Button menu and File tab are customized at the same time, Add-in Express ignores
custom controls you add to the Office Button menu.
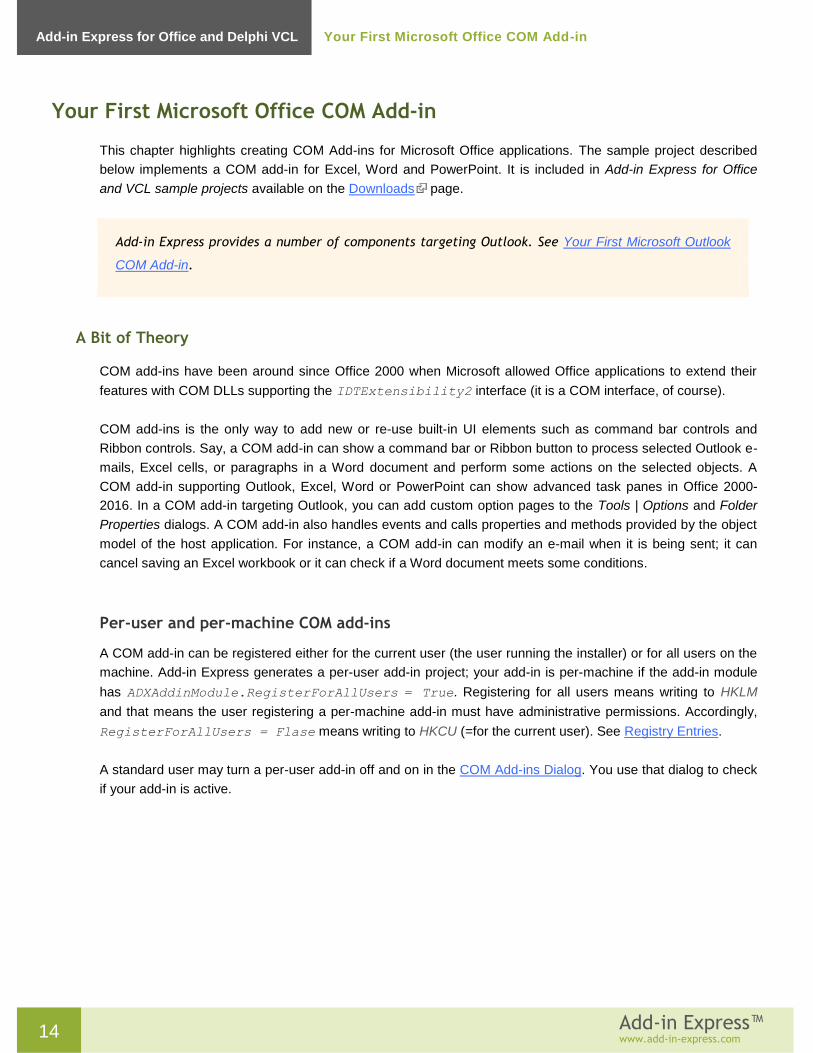
Step #8 – Customizing Context Menus
Add-in Express allows customizing CommandBar-based context menus in Office 2000-2016 with the
TadxContextMenu component. Its use is similar to that of the TadxMainMenu component. To set up a
TadxContextMenu to add a custom button to a context menu, you do the following:
Add a context menu component to the add-in module
In the component's properties choose the host application and the context menu to be customized,
Use the editor of the Controls collection to populate the context menu with custom controls
The screenshot below demonstrates adding a custom item to the context menu Cells in Excel.
You may want to use the OnBeforeAddControls event provided by the component to modify the context
menu depending on the current context. Say, custom controls in the context menu may reflect the content of an
Excel cell, the current chapter of the Word document, etc.
There are several issues related to using command bar based context menus:
Excel contains two different context menus named Cell. This fact breaks down the command bar
development model because the only way to recognize two command bars is to compare their names. This

23 Add-in Express™
www.add-in-express.com
Add-in Express for Office and Delphi VCL
Your First Microsoft Office COM Add-in
isn't the only exception: see the Built-in Control Scanner to find a number of examples. In this case, the
context menu component cannot distinguish context menus. Accordingly, it connects to the first context
menu with the specified name.
Command bar based context menu items cannot be positioned in the Ribbon-based context menus: a
custom context menu item created with the ADXContextMenu component will always be shown below the
built-in and custom context menu items in a Ribbon-based context menu of Office 2010-2016.
To add a custom item to a context menu in Office 2010-2016, you use the TadxRibbonContextMenu
component. Unlike its commandbar-based counterpart (TadxContextMenu), this component allows adding the
same custom controls to several context menus in the specified Ribbon. Say, the screenshots below
demonstrate component settings required for adding a control to the ExcelWorkbook Ribbon. To specify the
context menus to which the control will be added, you use the editor of the ContexMenuNames property of the
component.
See also Context Menu.
Step #9 – Handling Host Application Events
Add-in Express supplies several components that provide application-level events for the add-in module (see
Host Application Events). To handle Excel events to the add-in, drop a TadxExcelAppEvents onto the
module. Naturally, handling Word events requires using a TadxWordAppEvents while
TadxPowerPointAppEvents provides PowerPoint application-level events.
With the above components, you can handle any application-level events of the host application. Say, you may
want to disable a button when a window deactivates and enable it when a window activates. The code
processing the PowerPoint version of the WindowActivate and WindowDeactivate events is as follows:
procedure TAddInModule.adxPowerPointAppEvents1WindowActivate(
ASender: TObject; const Pres: _Presentation; const Wn: DocumentWindow);

24 Add-in Express™
www.add-in-express.com
Add-in Express for Office and Delphi VCL
Your First Microsoft Office COM Add-in
begin
adxCommandBar1.Controls[0].Enabled := true;
end;
procedure TAddInModule.adxPowerPointAppEvents1WindowDeactivate(
ASender: TObject; const Pres: _Presentation; const Wn: DocumentWindow);
begin
adxCommandBar1.Controls[0].Enabled := false;
end;
It is possible to create a set of event handlers and connect it to any given Excel worksheet. You can
do this by adding a TExcelWorksheet (Tool Palette, the Servers tab) onto the add-in module.
Step #10 – Customizing the Office Ribbon User Interface
To add a new tab to the Ribbon UI of the host application(s) of your add-in, you add the TadxRibbonTab
component to the module.
In the Object Inspector, run the editor for the Controls collection of the Ribbon tab component. In the editor,
use the toolbar buttons or context menu to add or delete Add-in Express components that form the Ribbon
interface of your add-in. First, you add a Ribbon tab and change its caption to My Ribbon Tab. Then, you select
the tab component, add a Ribbon group, and change its caption to My Ribbon Group. Next, you select the
group, and add a button. Set the button caption to My Ribbon Button. Use the Glyph property to set the icon for
the button.
Now write the following code in the OnClick event handler of the newly added Ribbon button (the code below
refers to the code added in Step #6 – Accessing Host Application Objects):

25 Add-in Express™
www.add-in-express.com
Add-in Express for Office and Delphi VCL
Your First Microsoft Office COM Add-in
procedure TAddInModule.adxRibbonTab1Controls0Controls0Controls0Click(
Sender: TObject; const RibbonControl: IRibbonControl);
begin
DefaultAction(nil);
end;
Remember, the TadxRibbonTab.Controls editor performs the XML-schema validation automatically, so
from time to time you will run into the situation when you cannot add a control to some Ribbon level. It is a
restriction of the Ribbon XML-schema. See also Office Ribbon Components.
Step #11 – Adding Custom Task Panes in Excel 2000-2016
Creating a new Excel task pane includes the following steps:
add an Excel Task Panes Manager (TadxExcelTaskPanesManager) to your add-in module
add an Add-in Express Excel Task Pane (TadxExcelTaskPane) to your project using the New Items
dialog
in the visual designer available for the Controls collection of the manager, add an item to the collection,
bind the pane to the item and specify its properties as shown on the screenshot.
Below is the description of the settings:
AlwaysShowHeader - specifies that the pane header will be
shown even if the pane is the only one in the current region.
CloseButton - specifies if the Close button is shown in the
pane header. Obviously, there isn’t much sense in setting
this property to true when the header is not shown.
Position - specifies the region in which an instance of the
pane will be shown. Excel panes are allowed in four regions
docked to the four sides of the main Excel window: pRight,
pBottom, pLeft, and pTop. The fifth region is pUnknown.
TaskPaneClassName - specifies the class name of the
Excel task pane.
Now you add a label onto the pane and add an event handler for the OnADXBeforeTaskPaneShow event:
procedure TadxExcelTaskPane1.adxExcelTaskPaneADXBeforeTaskPaneShow(
ASender: TObject; Args: TadxBeforeTaskPaneShowEventArgs);
begin
Label1.Caption := (AddinModule as TAddInModule).GetInfoString();

26 Add-in Express™
www.add-in-express.com
Add-in Express for Office and Delphi VCL
Your First Microsoft Office COM Add-in
end;
See also Advanced Outlook Regions and Advanced Office Task Panes and Excel Task Panes.
Step #12 – Adding Custom Task Panes for PowerPoint 2000-2016
add a PowerPoint Task Panes Manager (TadxPowerPointTaskPanesManager) to your add-in module
add an Add-in Express PowerPoint Task Pane (TadxPowerPointTaskPane) to your project using the
New Items dialog
in the visual designer available for the Controls collection of the manager, add an item to the collection,
bind the pane to the item and specify the appropriate value in the Position.
Now add a label onto the form, and update the label in the OnADXBeforeTaskPaneShow event handler of the
form:
procedure TadxPowerPointTaskPane1.adxPowerPointTaskPaneADXBeforeTaskPaneShow(
ASender: TObject; Args: TadxBeforeTaskPaneShowEventArgs);
begin
Label1.Caption := (AddinModule as TAddInModule).GetInfoString();
end;
See also Advanced Outlook Regions and Advanced Office Task Panes.
Step #13 – Adding Custom Task Panes for Word 2000-2016
add a Word Task Panes Manager (TadxWordTaskPanesManager) to your add-in module
add an Add-in Express Word Task Pane (TadxWordTaskPane) to your project using the New Items dialog
in the visual designer available for the Controls collection of the manager, add an item to the collection,
bind the pane to the item and specify an appropriate value in the Position.
When the item's properties are set, you add a label onto the form, and write the code that updates it in the
OnADXBeforeTaskPaneShow event handler of your form:
procedure TadxWordTaskPane1.adxWordTaskPaneADXBeforeTaskPaneShow(
ASender: TObject; Args: TadxBeforeTaskPaneShowEventArgs);
begin
Label1.Caption := (AddinModule as TAddInModule).GetInfoString();
end;
See also Advanced Outlook Regions and Advanced Office Task Panes.

27 Add-in Express™
www.add-in-express.com
Add-in Express for Office and Delphi VCL
Your First Microsoft Office COM Add-in
Step #14 – Running the COM Add-in
Choose Register ActiveX Server in menu Run, restart the host application(s) you selected, find your toolbar and
click the button. You can also find your add-in in the COM Add-ins Dialog.

28 Add-in Express™
www.add-in-express.com
Add-in Express for Office and Delphi VCL
Your First Microsoft Office COM Add-in

29 Add-in Express™
www.add-in-express.com
Add-in Express for Office and Delphi VCL
Your First Microsoft Office COM Add-in

30 Add-in Express™
www.add-in-express.com
Add-in Express for Office and Delphi VCL
Your First Microsoft Office COM Add-in
Step #15 – Debugging the COM Add-in
To debug your add-in, just indicate the add-in host application in the Host Application field in the Project
Options window.
To debug your add-in in an Office 2010-2016 64-bit application, you have to register the add-in DLL
using regsvr32; run it from an elevated 64-bit Command Prompt. In addition, you must explicitly
specify to run the 64-bit application in the dialog window shown above.
Step #16 – Deploying the COM Add-in
Make sure your setup project registers the add-in DLL. Say, in Inno Setup projects you use the regserver
command. See also:
Registering with User Privileges
Additional Files

31 Add-in Express™
www.add-in-express.com
Add-in Express for Office and Delphi VCL
Your First Microsoft Outlook COM Add-in
Your First Microsoft Outlook COM Add-in
Add-in Express provides the Outlook-specific add-in module and two Outlook-specific command bar
components: TadxOlExplorerCommandBar and TadxOlInspectorCommandBar. The former adds a
command bar to the Outlook Explorer window and solves many problems with custom Outlook command bars.
The latter adds a command bar to the Outlook Inspector window. Both command bar components have the
FolderName, FolderNames and ItemTypes properties that add context-sensitivity to Outlook command
bars. The olExplorerItemTypes, olInspectorItemTypes, and olItemTypeAction properties add
context-sensitivity to Outlook command bar controls.
Additionally, the Add-in Express Outlook Add-in wizard allows creating property pages which will be shown in
the Options (see menu Tools | Options) and folder Properties dialogs.
The sample project described below implements a COM add-in for Outlook. It is included in Add-in Express for
Office and VCL sample projects available on the Downloads page.
A Bit of Theory
COM add-ins have been around since Office 2000 when Microsoft allowed Office applications to extend their
features with COM DLLs supporting the IDTExtensibility2 interface (it is a COM interface, of course).
COM add-ins is the only way to add new or re-use built-in UI elements such as command bar controls and
Ribbon controls. Say, a COM add-in can show a command bar or Ribbon button to process selected Outlook e-
mails, Excel cells, or paragraphs in a Word document and perform some actions on the selected objects. A
COM add-in supporting Outlook, Excel, Word or PowerPoint can show advanced task panes in Office 2000-
2016. In a COM add-in targeting Outlook, you can add custom option pages to the Tools | Options and Folder
Properties dialogs. A COM add-in also handles events and calls properties and methods provided by the object
model of the host application. For instance, a COM add-in can modify an e-mail when it is being sent; it can
cancel saving an Excel workbook or it can check if a Word document meets some conditions.
Per-user and per-machine COM add-ins
A COM add-in can be registered either for the current user (the user running the installer) or for all users on the
machine. Add-in Express generates a per-user add-in project; your add-in is per-machine if the add-in module
has ADXAddinModule.RegisterForAllUsers = True. Registering for all users means writing to HKLM
and that means the user registering a per-machine add-in must have administrative permissions. Accordingly,
RegisterForAllUsers = Flase means writing to HKCU (=for the current user). See Registry Entries.
A standard user may turn a per-user add-in off and on in the COM Add-ins Dialog. You use that dialog to check
if your add-in is active.

32 Add-in Express™
www.add-in-express.com
Add-in Express for Office and Delphi VCL
Your First Microsoft Outlook COM Add-in
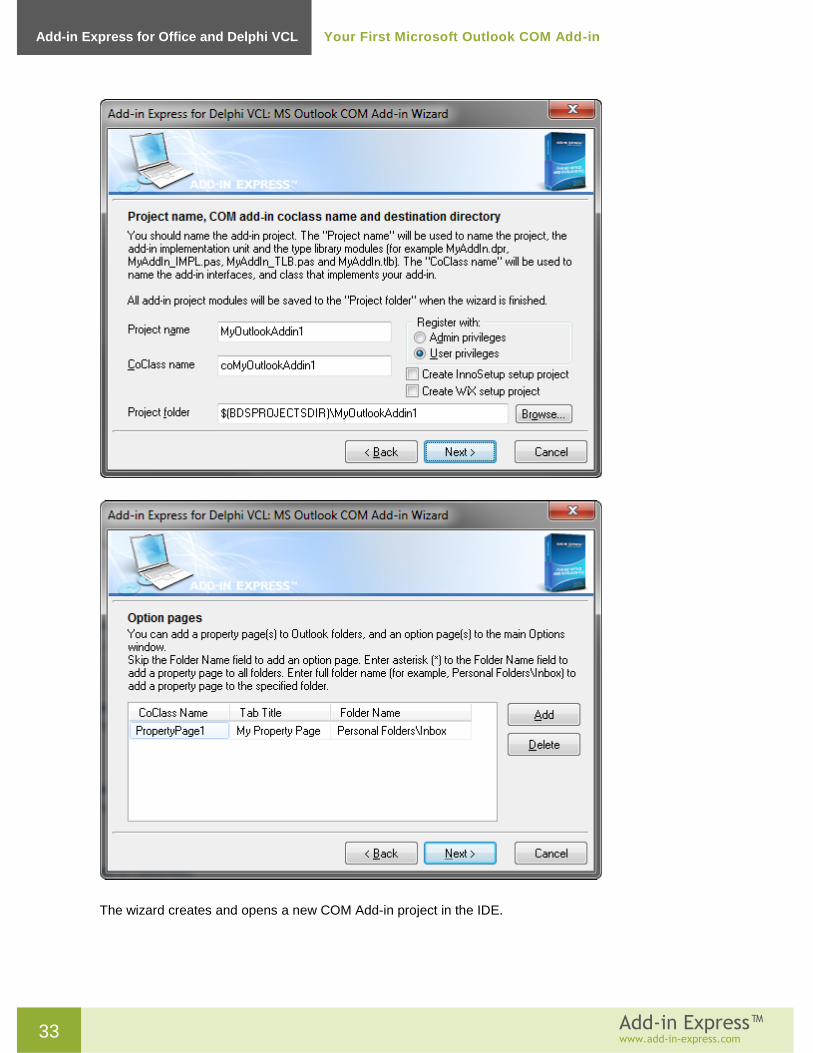
Step #1 – Creating an Outlook COM Add-in Project
Run Delphi via the Run as Administrator command.
You use the Outlook Add-in project template available in the New Items dialog:
When you select the template and click OK, the project wizard starts.
In the wizard windows, you choose the project options, define task panes and option pages for your add-in.
33 Add-in Express™
www.add-in-express.com
Add-in Express for Office and Delphi VCL
Your First Microsoft Outlook COM Add-in
The wizard creates and opens a new COM Add-in project in the IDE.

34 Add-in Express™
www.add-in-express.com
Add-in Express for Office and Delphi VCL
Your First Microsoft Outlook COM Add-in
The add-in project includes the following items:
The project source files (MyOutlookAddin1.*);
The type library files (MyOutlookAddin1_TLB.pas,
MyOutlookAddin1.ridl);
The Outlook add-in module (MyOutlookAddin1_IMPL.pas and
MyOutlookAddin1_IMPL.dfm) discussed in the following step;
The Outlook Property Page (PropertPage1.pas and
PropertPage1.dfm) discussed in Step #12 – Adding Property
Pages to the Folder Properties Dialogs;
Step #2 – COM Add-in Module
The add-in module (MyOutlookAddin1_IMPL.pas and MyOutlookAddin1_IMPL.dfm) is the core part of the COM
add-in project (see COM Add-ins Dialog). It is a container for Add-in Express components. You specify the add-
in properties in the module's properties, add the required components to the module's designer, and write the
functional code of your add-in in this module.
The code for MyAddin1_IMPL.pas is as follows:
unit MyOutlookAddin1_IMPL;
interface
uses
SysUtils, ComObj, ComServ, ActiveX, Variants, Office2000, adxAddIn,
MyOutlookAddin1_TLB, Outlook2000;
type
TcoMyOutlookAddin1 = class(TadxAddin, IcoMyOutlookAddin1)
end;
TAddInModule = class(TadxCOMAddInModule)
procedure adxCOMAddInModuleAddInInitialize(Sender: TObject);
procedure adxCOMAddInModuleAddInFinalize(Sender: TObject);
private
protected
procedure NameSpaceOptionsPagesAdd(ASender: TObject;
const Pages: PropertyPages; const Folder: MAPIFolder); override;
public
end;
var

35 Add-in Express™
www.add-in-express.com
Add-in Express for Office and Delphi VCL
Your First Microsoft Outlook COM Add-in
adxcoMyOutlookAddin1: TAddInModule;
implementation
{$R *.dfm}
procedure TAddInModule.adxCOMAddInModuleAddInInitialize(Sender: TObject);
begin
adxcoMyOutlookAddin1 := Self;
end;
procedure TAddInModule.adxCOMAddInModuleAddInFinalize(Sender: TObject);
begin
adxcoMyOutlookAddin1 := nil;
end;
procedure TAddInModule.NameSpaceOptionsPagesAdd(ASender: TObject;
const Pages: PropertyPages; const Folder: MAPIFolder);
function GetFullFolderName(const AFolder: MAPIFolder): string;
var
IDisp: IDispatch;
Folder: MAPIFolder;
begin
Result := '';
Folder := AFolder;
while Assigned(Folder) do begin
Result := '\' + Folder.Name + Result;
try
IDisp := Folder.Parent;
if Assigned(IDisp) then
IDisp.QueryInterface(IID_MAPIFolder, Folder);
except
Break;
end;
end;
IDisp := nil;
Folder := nil;
if Result <> '' then Delete(Result, 1, 1);
end;
begin
if GetFullFolderName(Folder) = 'Personal Folders\Inbox' then
Pages.Add('MyOutlookAddin1.PropertyPage1', 'My Property Page');
end;
initialization

36 Add-in Express™
www.add-in-express.com
Add-in Express for Office and Delphi VCL
Your First Microsoft Outlook COM Add-in
TadxFactory.Create(ComServer, TcoMyOutlookAddin1, CLASS_coMyOutlookAddin1,
TAddInModule);
end.
The add-in module contains two classes: the “interfaced” class (TcoMyOutlookAddin1 in this case) and the
add-in module class (TAddInModule). The “interfaced” class is a descendant of the TadxAddIn class that
implements the IDTExtensibility2 interface required by the COM Add-in architecture. Usually you don't
need to change anything in the TadxAddIn class.
The add-in module class implements the add-in functionality. It is an analogue of the Data Module, but unlike
the Data Module, the add-in module allows you to set all
properties of your add-in, handle its events, and create toolbars
and controls.
Step #3 – COM Add-in Designer
First off, you can drop a component from the Tool Palette onto the
designer of the Outlook add-in module.
Also, the module designer allows setting add-in properties. The
most important are the name of your add-in (AddInName) and
how it loads into the host application (LoadBehavior). The
typical value of the LoadBehavior property is 3, which means
Loaded & Connected.

37 Add-in Express™
www.add-in-express.com
Add-in Express for Office and Delphi VCL
Your First Microsoft Outlook COM Add-in
Step #4 – Adding a New Explorer Command Bar
To add a command bar to the Outlook Explorer window, use the TadxOlExplorerCommandBar component
from the Add-in Express group in the Tool Palette.
Select the Outlook Explorer Command Bar component, and in
the Object Inspector window, specify the command bar name
using the CommandBarName property and choose its position
(see the Position property). Outlook-specific versions of the
CommandBar component provide context-sensitive properties,
such as FolderName, FolderNames, and ItemTypes (see
Outlook Command Bar Visibility Rules).
In the screenshot, you see the properties of the Outlook
Explorer command bar component that will create the command
bar named AdxOlExplorerCommandBar1. The command bar
will be shown for every Outlook folder (FolderName = ''),
the default item types of which are Mail or Task. See also
Command Bars: Toolbars, Menus, and Context Menus.

38 Add-in Express™
www.add-in-express.com
Add-in Express for Office and Delphi VCL
Your First Microsoft Outlook COM Add-in
Step #5 – Adding a New Command Bar Button
You run the property editor for the Controls property in the Object Inspector. The editor allows adding
command bar controls in an intuitive way.
Add a button to the toolbar, specify the Caption and set Style to adxMsoButtonIconAndCaption. To
handle the Click event, in the Object Inspector window, switch to Events and add a Click event handler.
Step #6 – Accessing Outlook Objects
Add-in Express provides the OutlookApp property of the TOutlookApplication type for Outlook add-ins.
This allows you to write the following code to the Click event of the newly added button.
procedure TAddInModule.DefaultActionInExplorer(
Sender: TObject);
var
IExplorer: _Explorer;
begin
IExplorer := OutlookApp.ActiveExplorer;
if Assigned(IExplorer) then
begin
ShowMessage('The subject is:' + CRLF + GetSubject(IExplorer));
IExplorer := nil;
end;
end;
function TAddInModule.GetSubject(
const ExplorerOrInspector: IDispatch): string;
var
IExplorer: _Explorer;
ISelection: Selection;
IInspector: _Inspector;
begin
Result := '';

39 Add-in Express™
www.add-in-express.com
Add-in Express for Office and Delphi VCL
Your First Microsoft Outlook COM Add-in
if (ExplorerOrInspector <> nil) then
begin
ExplorerOrInspector.QueryInterface(IID__Explorer, IExplorer);
if Assigned(IExplorer) then
try
try
ISelection := IExplorer.Selection;
except
ISelection := nil;
//skip an exception generated by Outlook when some folders are selected
end;
if Assigned(ISelection) then
try
if ISelection.Count > 0 then
Result := OleVariant(ISelection.Item(1)).Subject;
finally
ISelection := nil;
end;
finally
IExplorer := nil;
end
else
begin
ExplorerOrInspector.QueryInterface(IID__Inspector, IInspector);
if Assigned(IInspector) then
try
Result := OleVariant(IInspector.CurrentItem).Subject;
finally
IInspector := nil;
end;
end;
end;
end;
The code of the GetSubject method emphasizes the following:
Outlook fires an exception when you try to obtain the Selection object in some situations.
There may be no items in the Selection object.
Step #7 – Handling Outlook Events
Add-in Express provides several components that make host's events available for the add-in module (see Host
Application Events). To add Outlook events to the add-in, find the TadxOutlookAppEvents component in the
Tool Palette and drag-n-drop it onto the module. You can use the component to get access to the events of all
Outlook versions. If both TAddInModule and TadxOutlookAppEvents provide the same event, you should
40 Add-in Express™
www.add-in-express.com
Add-in Express for Office and Delphi VCL
Your First Microsoft Outlook COM Add-in
use the event provided by TAddInModule. For instance, both TAddInModule and TadxOutlookAppEvents
provide the BeforeFolderSwitch event. According to the rule, we choose the event provided by the add-in
module and write the following code:
procedure TAddInModule.adxCOMAddInModuleOLExplorerBeforeFolderSwitch (
ASender: TObject; const NewFolder: IDispatch; var Cancel: WordBool);
begin
if (NewFolder <> nil) then
ShowMessage('You are switching to the '
+ (NewFolder as MAPIFolder).Name + ' folder');
end;
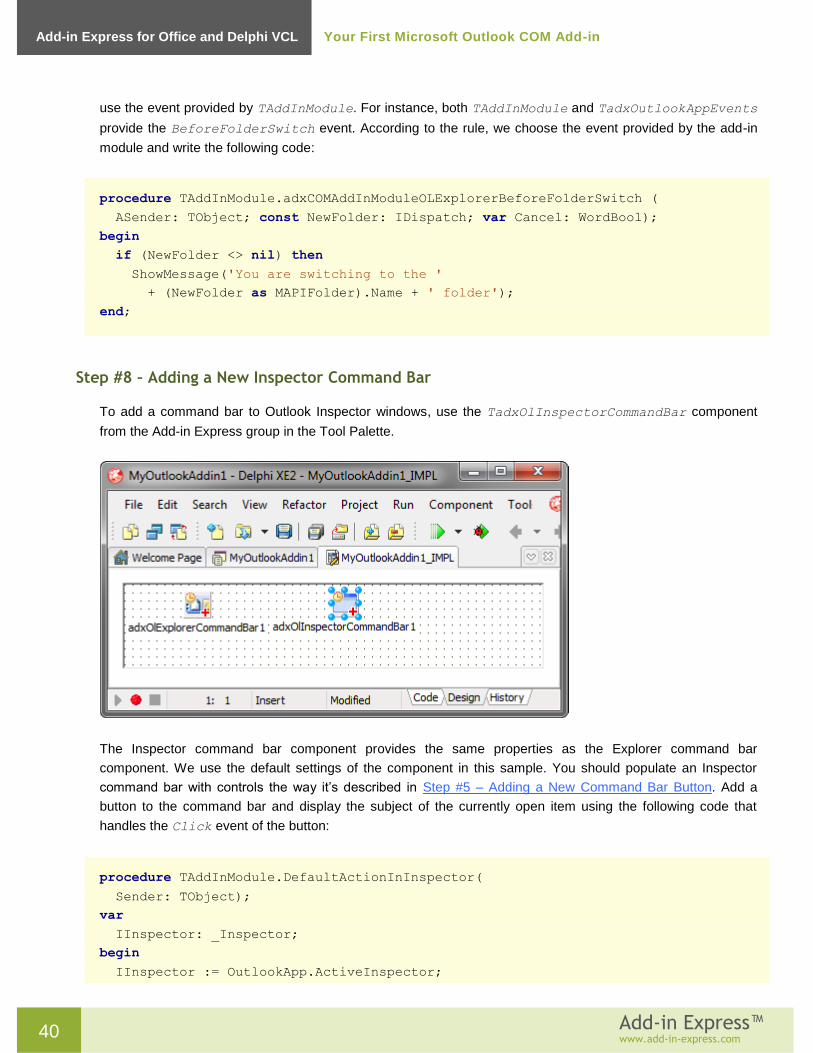
Step #8 – Adding a New Inspector Command Bar
To add a command bar to Outlook Inspector windows, use the TadxOlInspectorCommandBar component
from the Add-in Express group in the Tool Palette.
The Inspector command bar component provides the same properties as the Explorer command bar
component. We use the default settings of the component in this sample. You should populate an Inspector
command bar with controls the way it’s described in Step #5 – Adding a New Command Bar Button. Add a
button to the command bar and display the subject of the currently open item using the following code that
handles the Click event of the button:
procedure TAddInModule.DefaultActionInInspector(
Sender: TObject);
var
IInspector: _Inspector;
begin
IInspector := OutlookApp.ActiveInspector;

41 Add-in Express™
www.add-in-express.com
Add-in Express for Office and Delphi VCL
Your First Microsoft Outlook COM Add-in
if Assigned(IInspector) then
begin
ShowMessage('The subject is:' + CRLF + GetSubject(IInspector));
IInspector := nil;
end;
end;
To display an Inspector command bar in the Ribbon UI you must explicitly set the UseForRibbon
property of the command bar component to True.
See also Command Bars: Toolbars, Menus, and Context Menus and Outlook Command Bar Visibility Rules.
Step #9 – Customizing Main Menus in Outlook
Outlook 2000-2003 provides two main menu types. They are available for two main types of Outlook windows:
Explorer and Inspector. Accordingly, Add-in Express provides two main menu components: Explorer Main
Menu component and Inspector Main Menu component (note the Ribbon UI replaces the main menu of
Inspector windows in Outlook 2007 and all main menus in
Outlook 2010-2016). You add either of them using the context
menu of the add-in module. Then you use the visual designer
provided for the Controls property of the component. For
instance, to add a custom control to the popup shown by the
File | New item in all Outlook Explorer windows, you do the
following:
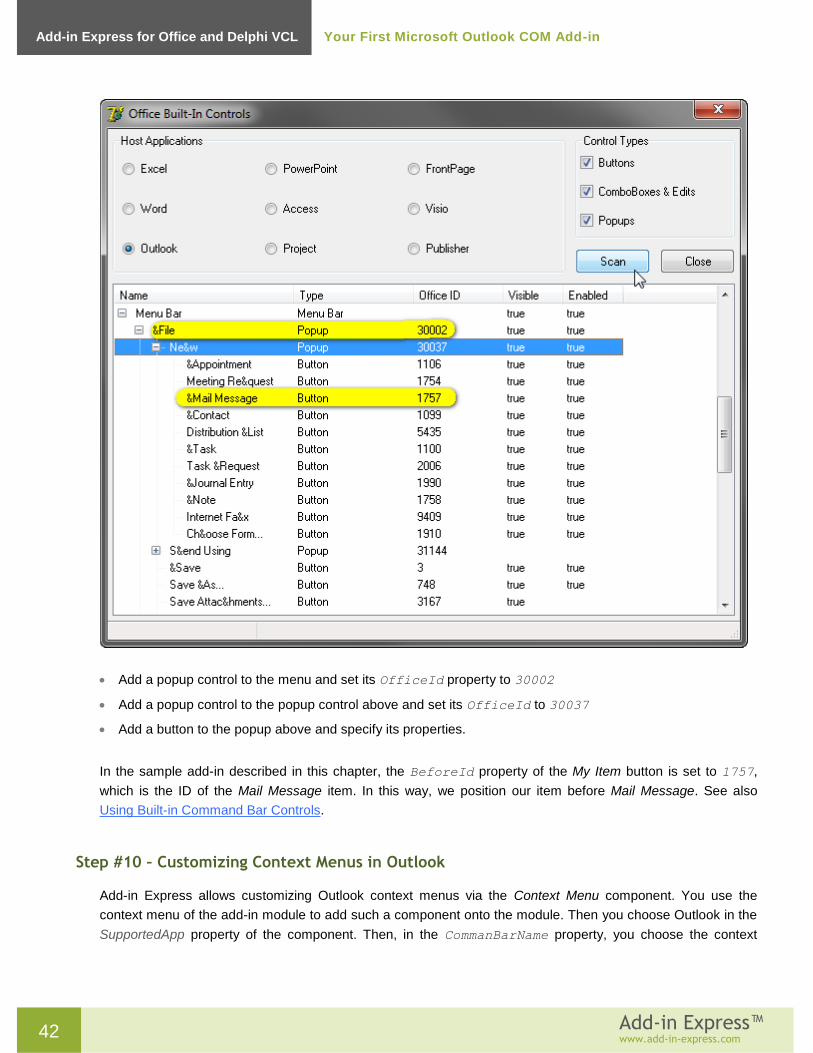
Use our free Built-in Control Scanner to get the IDs and
names of built-in command bars and controls in Outlook
The screenshot below shows the result of scanning. You
will need the Office IDs from the screenshot below to bind
Add-in Express controls to them:
42 Add-in Express™
www.add-in-express.com
Add-in Express for Office and Delphi VCL
Your First Microsoft Outlook COM Add-in
Add a popup control to the menu and set its OfficeId property to 30002
Add a popup control to the popup control above and set its OfficeId to 30037
Add a button to the popup above and specify its properties.
In the sample add-in described in this chapter, the BeforeId property of the My Item button is set to 1757,
which is the ID of the Mail Message item. In this way, we position our item before Mail Message. See also
Using Built-in Command Bar Controls.
Step #10 – Customizing Context Menus in Outlook
Add-in Express allows customizing Outlook context menus via the Context Menu component. You use the
context menu of the add-in module to add such a component onto the module. Then you choose Outlook in the
SupportedApp property of the component. Then, in the CommanBarName property, you choose the context

43 Add-in Express™
www.add-in-express.com
Add-in Express for Office and Delphi VCL
Your First Microsoft Outlook COM Add-in
menu you want to customize. Finally, you add custom controls in the visual designer supplied for the Controls
property.
The sample add-in described in this chapter adds a custom item to the Folder Context Menu command bar that
represents the context menu shown when you right-click a folder in the folder tree.
Outlook 2000 context menus are not customizable.
Outlook 2002-2007 context menus can be customized only using TadxContextMenu.
Outlook 2010 context menus are customizable using TadxContextMenu (with some limitations) and
TadxRibbonContextMenu.
Outlook 2016 context menus are customizable only using TadxRibbonContextMenu (see below).
Also, you can customize many Ribbon-based context menus in Outlook 2010-2016. Find the
TadxRibbonContextMenu component on the Tool Palette and drop it on the add-in module. The component
allows specifying Ribbons that supply context menu names for the ContextMenuNames property. You use the
ContextMenuNames property editor to choose the context menu(s) that will display your custom controls
specified in the Controls property.
Step #11 – Handling Events of Outlook Items Object
The Outlook2000 unit contains the TItems component (of the TOleServer type). This component provides
the following events: OnItemAdd, OnItemChange, and OnItemRemove. To process these events, you add the
following to the add-in module:
TAddInModule = class(TadxCOMAddInModule)

44 Add-in Express™
www.add-in-express.com
Add-in Express for Office and Delphi VCL
Your First Microsoft Outlook COM Add-in
private
...
procedure ItemsAdd(ASender: TObject; const Item: IDispatch);
function GetIsFolderTracked: boolean;
procedure SetIsFolderTracked(const Value: boolean);
...
public
...
Items: TItems;
property IsFolderTracked: boolean read GetIsFolderTracked write
SetIsFolderTracked;
...
end;
...
procedure TAddInModule.adxCOMAddInModuleAddInStartupComplete(Sender: TObject);
begin
IsFolderTracked := true;
end;
procedure TAddInModule.adxCOMAddInModuleAddInBeginShutdown(Sender: TObject);
begin
IsFolderTracked := false;
end;
procedure TAddInModule.SetIsFolderTracked(const Value: boolean);
begin
if Assigned(ItemsEvents) then begin
if not Value then begin
ItemsEvents.Disconnect;
ItemsEvents.Free;
ItemsEvents := nil;
end;
end
else if Value then begin
ItemsEvents := TItems.Create(Self);
ItemsEvents.OnItemAdd := ItemsAdd;
ItemsEvents.ConnectTo(
Self.OutlookApp.GetNamespace('MAPI').
GetDefaultFolder(olFolderInbox).Items);
end;
end;
function TAddInModule.GetIsFolderTracked: boolean;
begin
if Assigned(ItemsEvents) then
Result := Assigned(ItemsEvents.DefaultInterface)
else

45 Add-in Express™
www.add-in-express.com
Add-in Express for Office and Delphi VCL
Your First Microsoft Outlook COM Add-in
Result := false;
end;
procedure TAddInModule.ItemsAdd(ASender: TObject; const Item: IDispatch);
var
S: WideString;
begin
S := '';
try
S := OleVariant(Item).Subject;
except
end;
if (S <> '') then
ShowMessage('The item with subject "' + S
+ '" has been added to the Inbox folder');
end;
Step #12 – Adding Property Pages to the Folder Properties Dialogs
Outlook allows you to add custom option pages to the Options dialog box (the Tools | Options menu) and / or to
the Properties dialog box of any folder. To automate this task, the Add-in Express wizard provides you with the
Option Pages window (see Step #1 – Creating an Outlook COM Add-in Project).
By default, a property page contains two controls only: a label and an edit box. The edit box gives you an
example of how to handle events of the controls on the property page.
procedure TPropertyPage1.Edit1Change(Sender: TObject);
begin
GetPropertyPageSite;
// TODO - put your code here
UpdatePropertyPageSite;
end;
You add the TCheckBox component to the Property page, handle its OnClick event following the code
template above, and connect or disconnect the TItems component in the Apply method. You initialize the
check box in the Initialize method of the property page:
function TcoPropertyPage1.Apply: HResult;
begin
adxcoMyOutlookAddin1.IsFolderTracked := CheckBox1.State = cbChecked;
FDirty := False;
Result := S_OK;
end;

46 Add-in Express™
www.add-in-express.com
Add-in Express for Office and Delphi VCL
Your First Microsoft Outlook COM Add-in
procedure TPropertyPage1.Initialize;
begin
...
if (adxcoMyOutlookAddin1.IsFolderTracked) then
begin
if (CheckBox1.State <> cbChecked) then
CheckBox1.State := cbChecked;
end
else
if (CheckBox1.State <> cbUnchecked) then
CheckBox1.State := cbUnchecked;
end;
See also Outlook Property Page.
Step #13 – Intercepting Keyboard Shortcuts
To intercept a keyboard shortcut, you add a TadxKeyboardShortcut component to the add-in module. In the
Object Inspector window you select (or enter) the desired shortcut in the ShortcutText property. We chose
the shortcut for the Send button in the Standard command bar of the mail Inspector. It is Ctrl+Enter.
To use keyboard shortcuts, set the HandleShortcuts property of the add-in module to true.
procedure TAddInModule.adxKeyboardShortcut1Action(Sender: TObject);
begin
ShowMessage('You`ve pressed ' +
TadxKeyboardShortcut(Sender).ShortcutText);

47 Add-in Express™
www.add-in-express.com
Add-in Express for Office and Delphi VCL
Your First Microsoft Outlook COM Add-in
end;
Step #14 – Customizing the Outlook Ribbon User Interface
To add a new tab to the Ribbon, you add the TadxRibbonTab component to the module. Then, in the Object
Inspector window, run the editor for the Controls collection of the Ribbon tab component. In the editor, use
the toolbar buttons or context menu to add or delete Add-in Express components that form the Ribbon interface
of your add-in. First, you add a Ribbon tab and change its caption to My Ribbon Tab. Then, you select the tab
component, add a Ribbon group, and change its caption to My Ribbon Group. Next, you select the group, and
add a button. Set the button caption to My Ribbon Button. Use the Glyph property to set the icon for the button.
Now add the event handler to the Click event of the button and write the following code:
procedure TAddInModule.adxRibbonTab1Controls0Controls0Controls0Click(Sender:
TObject; const RibbonControl: IRibbonControl);
var
IExplorer: _Explorer;
Window: IDispatch;
begin
Window := OutlookApp.ActiveWindow;
if Window <> nil then begin
Window.QueryInterface(IID__Explorer, IExplorer);
if Assigned(IExplorer) then
DefaultActionInExplorer(nil)
else
DefaultActionInInspector(nil);
end;
end;

48 Add-in Express™
www.add-in-express.com
Add-in Express for Office and Delphi VCL
Your First Microsoft Outlook COM Add-in
Remember, the TadxRibbonTab.Controls editor performs the XML-schema validation automatically, so
from time to time you will run into the situation when you cannot add a control to some Ribbon level. It is a
restriction of the Ribbon XML-schema.
Unlike other Ribbon-based applications, Outlook has numerous ribbons. Use the Ribbons property of your
TadxRibbonTab components to specify the ribbons you customize with your tabs. See also Office Ribbon
Components.
Step #15 – Adding Custom Task Panes in Outlook 2000-2016
As described in Advanced Outlook Regions and Advanced Office Task Panes, you add an Outlook Forms
Manager component (TadxOlFormsManager) to your add-in module and an Add-in Express Outlook Form to
your project using the New Items dialog. Then you add an item to the Items collection of the manager and
specify the following properties:
ExplorerItemTypes = expMailItem – your form will be shown for all mail folders;
ExplorerLayout = elBottomSubpane – an instance
of the form will be shown below the list of mails in Outlook
Explorer windows;
InspectorItemTypes = insMail – your task pane will
be shown whenever you open an e-mail;
InspectorLayout = ilBottomSubpane – an instance
of the form will be shown to the right of the message
body;
AlwaysShowHeader = True – the header containing
the icon (a 16x16 .ico) and the caption of your form (see
the Icon and Caption properties of your form) will be
shown for your form even if it is a single form in the given
region;
CloseButton = True – the header will contain the
Close button; a click on it generates the
OnADXBeforeCloseButtonClick event of the form
FormClassName =TadxOlForm1 – the class name of
the form whose instances will be shown in the regions
specified by the ExplorerLayout and/or
InspectorLayout properties.
On the form, you add a label and handle, say, the OnADXSelectionChange event of the form:

49 Add-in Express™
www.add-in-express.com
Add-in Express for Office and Delphi VCL
Your First Microsoft Outlook COM Add-in
procedure TadxOlForm1.adxOlFormADXSelectionChange(Sender: TObject);
begin
RefreshMe();
end;
procedure TadxOlForm1.RefreshMe;
var
module: TAddinModule;
begin
module := (self.AddinModule as TAddinModule);
if (self.InspectorObj <> nil) then
Label1.Caption := module.GetSubject(self.InspectorObj)
else if (self.ExplorerObj <> nil) then
Label1.Caption := module.GetSubject(self.ExplorerObj);
end;
The GetSubject method above retrieves the subject of the e-mail currently open in the Outlook Inspector
window or the one selected in the current Explorer window.

50 Add-in Express™
www.add-in-express.com
Add-in Express for Office and Delphi VCL
Your First Microsoft Outlook COM Add-in
Step #16 – Running the COM Add-in
Choose Register ActiveX Server in menu Run, then restart Outlook and find your option page(s), command
bars, and controls. Note that your add-in is also listed in the COM Add-ins Dialog.

51 Add-in Express™
www.add-in-express.com
Add-in Express for Office and Delphi VCL
Your First Microsoft Outlook COM Add-in

52 Add-in Express™
www.add-in-express.com
Add-in Express for Office and Delphi VCL
Your First Microsoft Outlook COM Add-in
Step #17 – Debugging the COM Add-in
To debug your add-in, indicate the add-in's host application in the Host Application field in the Project Options
window.
To debug your add-in in Outlook 2010-2016 64-bit, you have to register the add-in DLL using regsvr32;
run it from an elevated 64-bit Command Prompt. In addition, you must explicitly specify to run
Outlook 2010-2016 64-bit in the dialog window shown above.
Step #18 – Deploying the COM Add-in
Make sure your setup project registers the add-in DLL. For example, in Inno Setup projects you use the
regserver command. See also:
Registering with User Privileges
Additional Files

53 Add-in Express™
www.add-in-express.com
Add-in Express for Office and Delphi VCL
Your First Excel RTD Server
Your First Excel RTD Server
The sample project described below implements an RTD server. It is included in Add-in Express for Office and
VCL sample projects available on the Downloads page.
A Bit of Theory
The RTD Server technology (introduced in Excel 2002) is used to provide the end user with a flow of changing
data such as stock quotes, currency exchange rates etc. If an RTD server is mentioned in a formula (placed on
an Excel worksheet), Excel loads the RTD server and waits for new data from it. When data arrive, Excel seeks
for a proper moment and updates the formula with new data.
RTD Server terminology:
An RTD server is a Component Object Model (COM) Automation server that implements the IRtdServer
COM interface. Excel uses the RTD server to communicate with a real-time data source on one or more
topics.
A real-time data source is any source of data that you can access programmatically.
A topic is a string (or a set of strings) that uniquely identifies a data source or a piece of data that resides in
a real-time data source. The RTD server passes the topic to the real-time data source and receives the
value of the topic from the real-time data source; the RTD server then passes the value of the topic to
Excel for displaying. For example, the RTD server passes the topic "New Topic" to the real-time data
source, and the RTD server receives the topic's value of "72.12" from the real-time data source. The RTD
server then passes the topic's value to Excel for display.
Per-user and Per-machine RTD Servers
An RTD Server can be registered either for the current user (the user running the installer) or for all users on
the machine. That's why the corresponding module type, ADXRTDServerModule, provides the
RegisterForAllUsers property. Registering for all users means writing to HKLM and that means the user
registering a per-machine RTD server must have administrative permissions. Accordingly,
RegisterForAllUsers = Flase means writing to HKCU (=for the current user).

54 Add-in Express™
www.add-in-express.com
Add-in Express for Office and Delphi VCL
Your First Excel RTD Server
Step #1 – Creating a New RTD Server Project
Run Delphi via the Run as Administrator command.
Add-in Express adds the RTD Server project template to the New Items dialog.
When you select the template and click OK, the RTD Server project wizard starts. You choose the project
options in the wizard windows.

55 Add-in Express™
www.add-in-express.com
Add-in Express for Office and Delphi VCL
Your First Excel RTD Server
The project wizard creates and opens the RTD server project in the IDE.
The RTD server project includes the following items:
The project source files (MyRtdServer1.*);
The type library files (MyRtdServer1_TLB.pas, MyRtdServer1.ridl);
The RTD server module (MyRtdServer1_IMPL.pas and
MyRtdServer1_IMPL.dfm) discussed below.
Step #2 – RTD Server Module
The RTD server module (MyRtdServer1_IMPL.pas and MyRtdServer1_IMPL.dfm) is the core part of the RTD
server project. The module is the container for TadxRTDTopic components.
The code of MyRtdServer1_IMPL.pas is as follows:
unit MyRtdServer1_IMPL;
interface
uses
SysUtils, Classes, ComServ, MyRtdServer1_TLB, adxRTDServ;
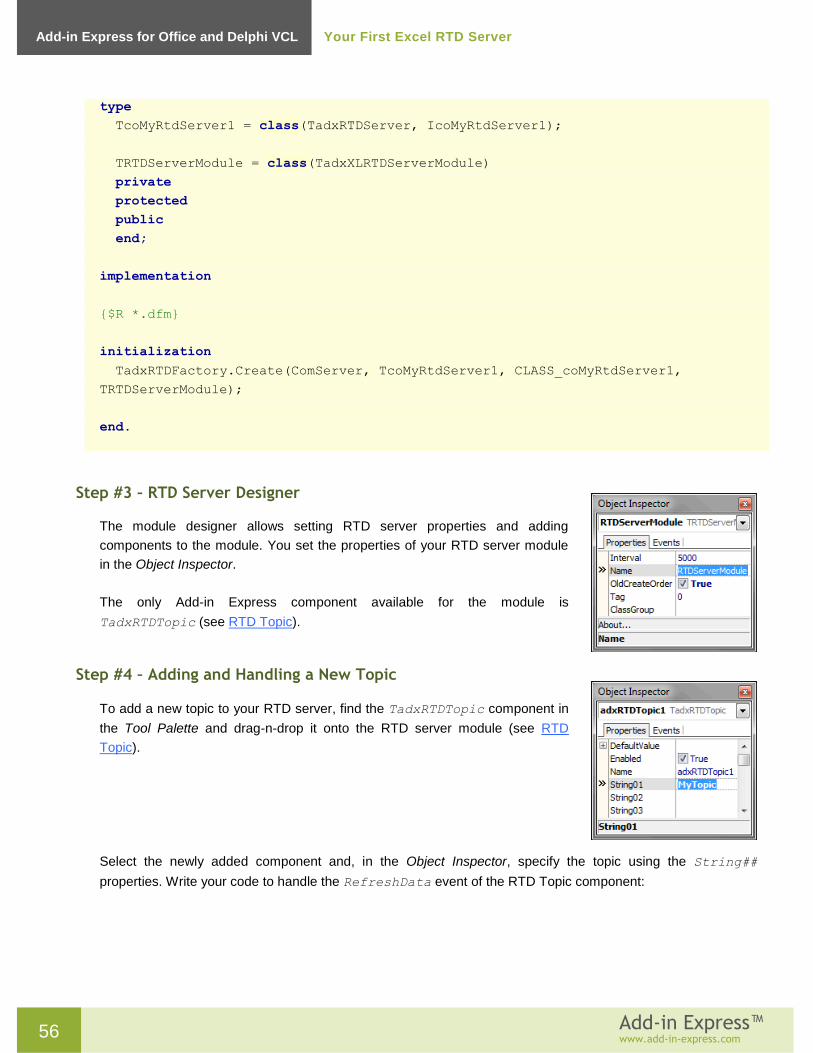
56 Add-in Express™
www.add-in-express.com
Add-in Express for Office and Delphi VCL
Your First Excel RTD Server
type
TcoMyRtdServer1 = class(TadxRTDServer, IcoMyRtdServer1);
TRTDServerModule = class(TadxXLRTDServerModule)
private
protected
public
end;
implementation
{$R *.dfm}
initialization
TadxRTDFactory.Create(ComServer, TcoMyRtdServer1, CLASS_coMyRtdServer1,
TRTDServerModule);
end.
Step #3 – RTD Server Designer
The module designer allows setting RTD server properties and adding
components to the module. You set the properties of your RTD server module
in the Object Inspector.
The only Add-in Express component available for the module is
TadxRTDTopic (see RTD Topic).
Step #4 – Adding and Handling a New Topic
To add a new topic to your RTD server, find the TadxRTDTopic component in
the Tool Palette and drag-n-drop it onto the RTD server module (see RTD
Topic).
Select the newly added component and, in the Object Inspector, specify the topic using the String##
properties. Write your code to handle the RefreshData event of the RTD Topic component:

57 Add-in Express™
www.add-in-express.com
Add-in Express for Office and Delphi VCL
Your First Excel RTD Server
function TRTDServerModule.adxRTDTopic1RefreshData(Sender: TObject): OleVariant;
begin
Result := RandomRange(-100, 100);
end;

58 Add-in Express™
www.add-in-express.com
Add-in Express for Office and Delphi VCL
Your First Excel RTD Server
Step #5 – Running the RTD Server
Choose the Register ActiveX Server item in the Run menu, restart Excel, and enter the RTD function to a cell.

59 Add-in Express™
www.add-in-express.com
Add-in Express for Office and Delphi VCL
Your First Excel RTD Server
Step #6 – Debugging the RTD Server
To debug your RTD server, just indicate Excel as the Host Application in the Project Options window.
To debug your add-in in Excel 2010-2016 64-bit, you have to register the add-in DLL using regsvr32;
run it from an elevated 64-bit Command Prompt. In addition, you must explicitly specify to run Excel
2010-2016 64-bit in the dialog window shown above.
Step #7 – Deploying the RTD Server
Make sure your setup project registers the RTD server DLL (or EXE). Say, in Inno Setup projects you use the
regserver command. If you use the Register with User Privileges option, please read the following:
Registering with User Privileges

60 Add-in Express™
www.add-in-express.com
Add-in Express for Office and Delphi VCL
Your First Smart Tag
Your First Smart Tag
The sample project described below implements a smart tag. It is included in Add-in Express for Office and VCL
sample projects available on the Downloads page.
A Bit of Theory
Smart Tags were introduced in Word 2002 and Excel 2002. Then they added PowerPoint 2003 to the list of
smart tag host applications.
Since Office 2010 Microsoft declared smart tags deprecated. Although you can still use the related APIs in
projects for Excel 2010-2016, Word 2010-2016, and PowerPoint 2010-2016, these applications do not
automatically recognize terms, and recognized terms are no longer underlined. Users must trigger recognition
and view custom actions associated with text by right-clicking the text and clicking the Additional Actions on the
context menu. Please see Changes in Word 2010 and Changes in Excel 2010 .
Below is what was said about the Smart Tag technology in earlier days:
This technology provides Office users with more interactivity for the content of their Office documents. A smart
tag is an element of text in an Office document having custom actions associated with it. Smart tags allow
recognizing such text using either a dictionary-based or a custom-processing approach. An example of such
text might be an e-mail address you type into a Word document or an Excel workbook. When smart tag
recognizes the e-mail address, it allows the user to choose one of the actions associated with the text. For e-
mail addresses, possible actions are to look up additional contact information or send a new e-mail message to
that contact.
Per-user Smart Tags
A smart tag is a per-user thing that requires registering in HKCU. In other words, a smart tag cannot be
registered for all users on the machine. Instead, it must be registered for every user separately.
Step #1 – Creating a New Smart Tag Library Project
Start Delphi via the Run as Administrator command.
Add-in Express adds the Smart Tag project template to the New Items dialog:
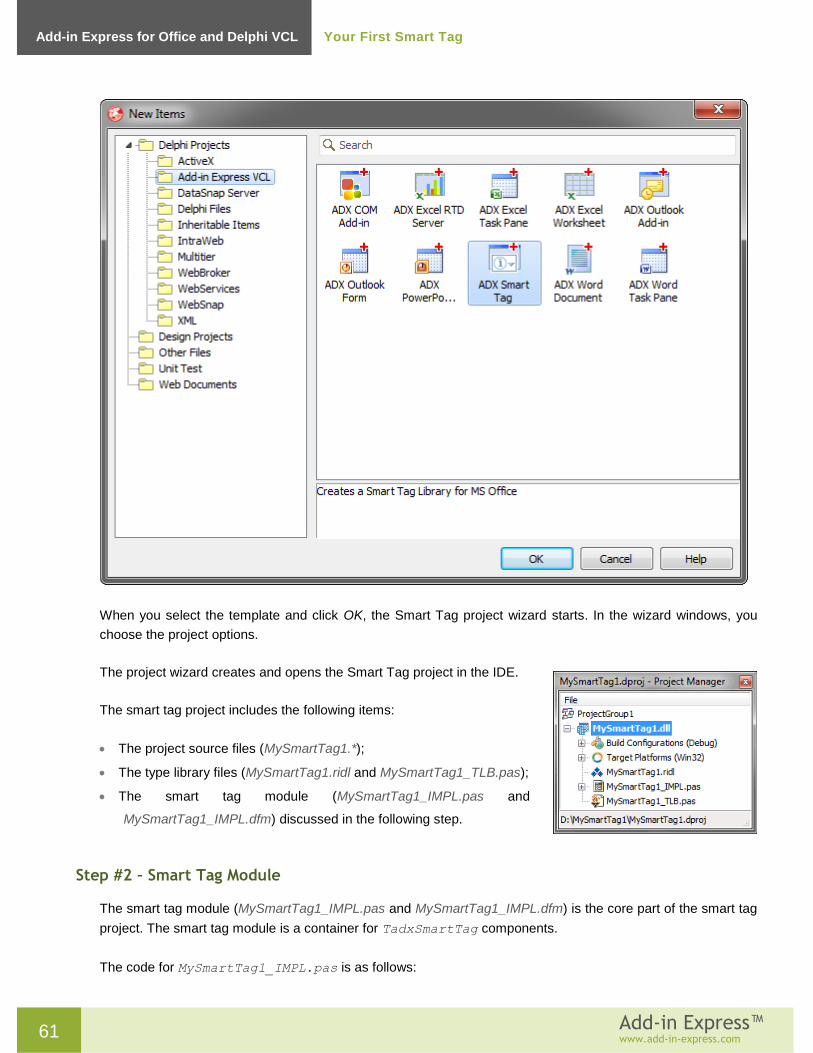
61 Add-in Express™
www.add-in-express.com
Add-in Express for Office and Delphi VCL
Your First Smart Tag
When you select the template and click OK, the Smart Tag project wizard starts. In the wizard windows, you
choose the project options.
The project wizard creates and opens the Smart Tag project in the IDE.
The smart tag project includes the following items:
The project source files (MySmartTag1.*);
The type library files (MySmartTag1.ridl and MySmartTag1_TLB.pas);
The smart tag module (MySmartTag1_IMPL.pas and
MySmartTag1_IMPL.dfm) discussed in the following step.
Step #2 – Smart Tag Module
The smart tag module (MySmartTag1_IMPL.pas and MySmartTag1_IMPL.dfm) is the core part of the smart tag
project. The smart tag module is a container for TadxSmartTag components.
The code for MySmartTag1_IMPL.pas is as follows:

62 Add-in Express™
www.add-in-express.com
Add-in Express for Office and Delphi VCL
Your First Smart Tag
unit MySmartTag1_IMPL;
interface
uses
SysUtils, ComObj, ComServ, ActiveX, Variants, adxSmartTag, adxSmartTagTLB,
MySmartTag1_TLB;
type
TcoMySmartTag1Recognizer = class(TadxRecognizerObject,
IcoMySmartTag1Recognizer)
protected
end;
TcoMySmartTag1Action = class(TadxActionObject, IcoMySmartTag1Action)
protected
end;
TSmartTagModule = class(TadxSmartTagModule)
private
protected
public
end;
implementation
{$R *.dfm}
initialization
TadxRecognizerFactory.Create(ComServer, TcoMySmartTag1Recognizer,
CLASS_coMySmartTag1Recognizer, TSmartTagModule);
TadxActionFactory.Create(ComServer, TcoMySmartTag1Action,
CLASS_coMySmartTag1Action, TSmartTagModule);
end.
The smart tag module contains three classes:
The “interfaced” classes (TcoMySmartTag1Recognizer and TMySmartTag1Action);
The smart tag module class (TSmartTagModule).
The “interfaced” classes are descendants of the TadxRecognizerObject class and the TadxActionObject
class that implement the smart tag specific interfaces required by the smart tag architecture:

63 Add-in Express™
www.add-in-express.com
Add-in Express for Office and Delphi VCL
Your First Smart Tag
ISmartTagRecognizer, ISmartTagRecognizer2, ISmartTagAction and ISmartTagAction2. Usually
you don't need to change anything in these classes.
In the smart tag module class, we write the functionality to be implemented by the smart tag. The smart tag
module is an analogue of the Data Module, but unlike the Data Module, the smart tag module allows you to set
all properties of your smart tags.
Step #3 – Smart Tag Designer
In the Project Manager, select the smart tag module, activate the Object Inspector, specify your smart tag name
in the SmartTagName property (this name appears in the Smart
Tags tab on the host application AutoCorrect Options dialog box),
and enter the description of the smart tag through the
SmartTagDesc property. These properties depend on Office
localization.
The designer of the Smart Tag module allows setting smart tag
library properties and adding TadxSmartTag components to the
module.
Step #4 – Adding a New Smart Tag
To add a new Smart Tag to your library, find the TadxSmartTag component in the Tool Palette and drag-n-
drop it onto the Smart Tag Module.

64 Add-in Express™
www.add-in-express.com
Add-in Express for Office and Delphi VCL
Your First Smart Tag
In the Object Inspector window, specify the caption for the added smart
tag. The value of the Caption property will become a caption of the
smart tag context menu. Also, specify the phrase(s) recognizable by
the smart tag in the RecognizedWords string collection.
Say, in this sample, the words are the following:
Step #5 – Adding and Handling Smart Tag Actions
To add a new smart tag action, right-click the smart tag component, select Smart Tag Actions on the pop-up
menu, and, in the Editing window, click the Add New button. Select the action in
the Editing window and fill in the Caption property the Object Inspector. The
value of the Caption property will be shown on an item of the smart tag context
menu (pop-up).
To handle clicking on this menu item, select the Events tab of the Object
Inspector, double click the OnClick event, and enter code:

65 Add-in Express™
www.add-in-express.com
Add-in Express for Office and Delphi VCL
Your First Smart Tag
procedure TSmartTagModule.adxSmartTag1Actions0Click(Sender: TObject;
const AppName: WideString; const Target: IDispatch; const Text,
Xml: WideString; LocaleID: Integer);
begin
ShowMessage('Recognized text is ' + Text);
end;
Step #6 - Running Your Smart Tag
Choose Register ActiveX Server in menu Run, restart Word or Excel, enter the words recognizable by your
smart tag into a document, and see if the smart tag works.
In Office 2003-2003, choose the Tools | AutoCorrect menu item and find your smart tag on the Smart Tags
tab.
In Office 2007, the path to this dialog is as follows: Office button | Word Options | Add-ins | "Manage" Smart
Tags | Go.
In Office 2010-2016, see File tab | Options | Add-ins | "Manage" Actions | Go.

66 Add-in Express™
www.add-in-express.com
Add-in Express for Office and Delphi VCL
Your First Smart Tag
Step #7 – Debugging the Smart Tag
To debug your Smart Tag, just indicate a required application as the Host Application in the Project Options.
Step #8 – Deploying the Smart Tag
Make sure your setup project registers the smart tag DLL. Say, in Inno Setup projects you use the regserver
command. If you use the Register with User Privileges option, please read the following:
Registering with User Privileges

67 Add-in Express™
www.add-in-express.com
Add-in Express for Office and Delphi VCL
Your First Excel Automation Add-in
Your First Excel Automation Add-in
The sample project described below implements an Excel Automation add-in smart tag. It is included in Add-in
Express for Office and VCL sample projects available on the Downloads page.
The fact is that Excel Automation Add-ins do not differ from COM Add-ins except for the registry entries. That's
why Add-in Express bases Excel Automation Add-in projects on COM Add-in projects.
A Bit of Theory
Excel 2002 brought in Automation Add-ins – a technology that allows writing user-defined functions for use in
Excel formulas. Add-in Express provides you with a specialized module, COM Excel Add-in Module, that cuts
down this task to just writing one or more user-defined functions. A typical function accepts one or more Excel
ranges and/or other parameters. Excel shows the resulting value of the function in the cell where the user calls
it.
Add-in Express allows developing Excel Automation add-ins using the add-in module that has the
XLAutomationAddin Boolean property. Set the property to true, add a method to the add-in module's type
library, and write the method’s code.
Excel user-defined functions (UDFs) are used to build custom functions in Excel for the end user to use them in
formulas. This definition underlines the main restriction of an UDF: it should return a result that can be used in a
formula – not an object of any given type but a number, a string, or an error value (Booleans and dates are
essentially numbers). When used in an array formula, the UDF should return a properly dimensioned array of
values of the types above. Excel shows the value returned by the function in the cell where the user calls the
function.
There are two Excel UDF types: Excel Automation add-in and Excel XLL add-in. Add-in Express allows creating
only an Excel Automation add-in.
Per-user Excel UDFs
An Excel UDF is a per-user thing that requires registering in HKCU. In other words, a UDF cannot be registered
for all users on the machine. Instead, it must be registered for every user separately. See also Registry Entries.
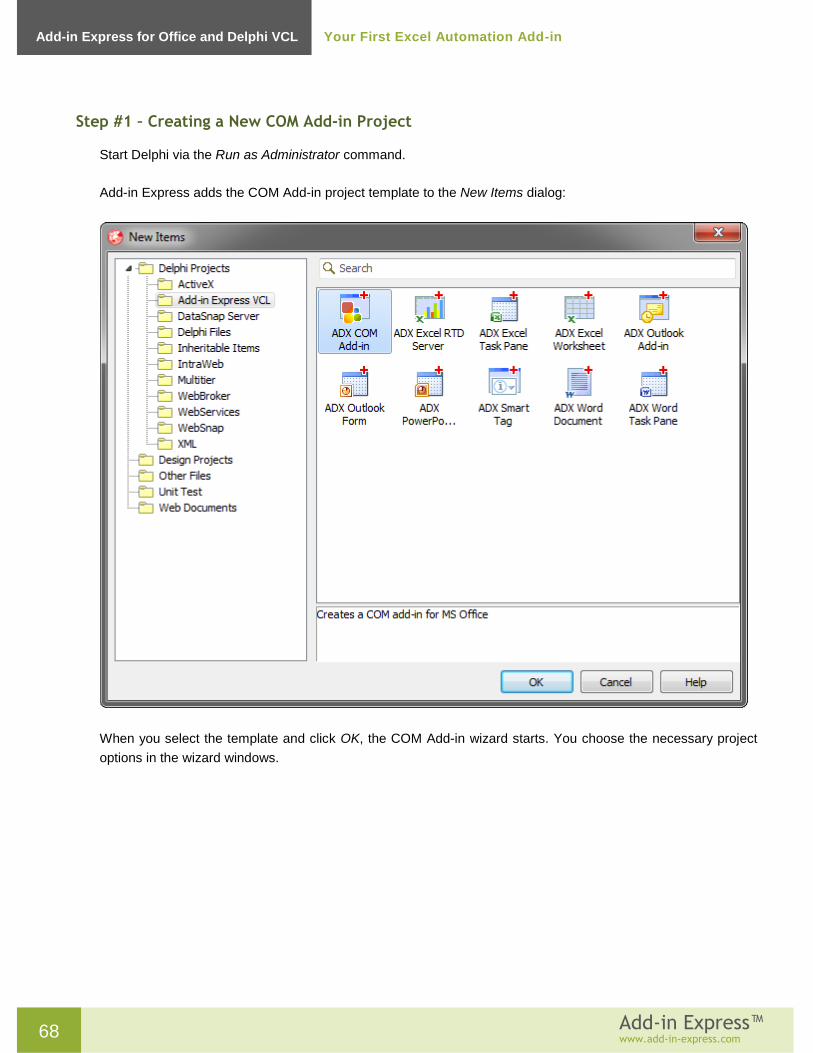
68 Add-in Express™
www.add-in-express.com
Add-in Express for Office and Delphi VCL
Your First Excel Automation Add-in
Step #1 – Creating a New COM Add-in Project
Start Delphi via the Run as Administrator command.
Add-in Express adds the COM Add-in project template to the New Items dialog:
When you select the template and click OK, the COM Add-in wizard starts. You choose the necessary project
options in the wizard windows.
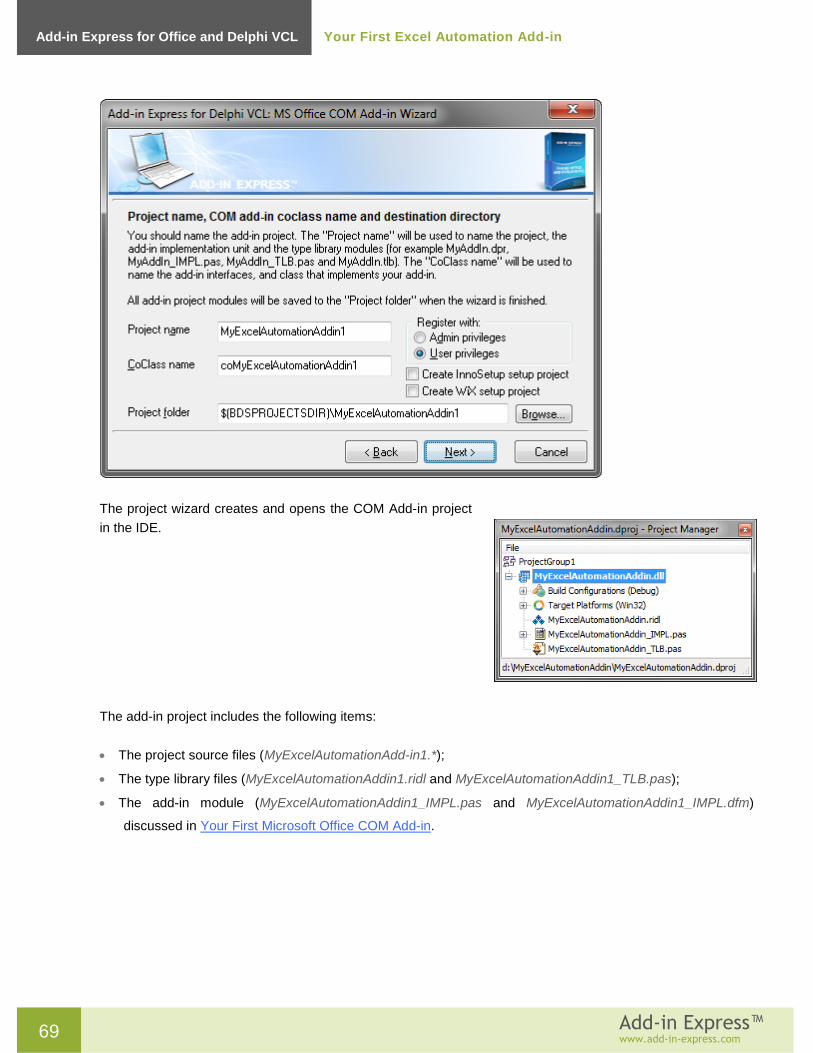
69 Add-in Express™
www.add-in-express.com
Add-in Express for Office and Delphi VCL
Your First Excel Automation Add-in
The project wizard creates and opens the COM Add-in project
in the IDE.
The add-in project includes the following items:
The project source files (MyExcelAutomationAdd-in1.*);
The type library files (MyExcelAutomationAddin1.ridl and MyExcelAutomationAddin1_TLB.pas);
The add-in module (MyExcelAutomationAddin1_IMPL.pas and MyExcelAutomationAddin1_IMPL.dfm)
discussed in Your First Microsoft Office COM Add-in.

70 Add-in Express™
www.add-in-express.com
Add-in Express for Office and Delphi VCL
Your First Excel Automation Add-in
Step #2 – Creating an Excel Automation Add-in
Before you start adding Excel user-defined functions to the COM
Add-in, you set the XLAutomationAddin property of the add-in
module to true.
Step #3– Creating User-Defined Functions
Open the project type library (menu View | Type Library). Add a new method to the type library and define its
parameters.

71 Add-in Express™
www.add-in-express.com
Add-in Express for Office and Delphi VCL
Your First Excel Automation Add-in
Click the Refresh button and write your code to the TcoMyExcelAutomationAddin1.MyFunc function:
function TcoMyExcelAutomationAddin1.MyFunc(var Range: OleVariant): OleVariant;
begin
Result := 0;
case VarType(Range) of
varSmallint, varInteger, varSingle,
varDouble, varCurrency, varShortInt, varByte,
varWord, varLongWord, varInt64: Result := Range * 1000;
else
try
Result := Range.Cells[1, 1].Value * 1000;
except
Result := CVErr(xlErrValue);
end;
end;
end;
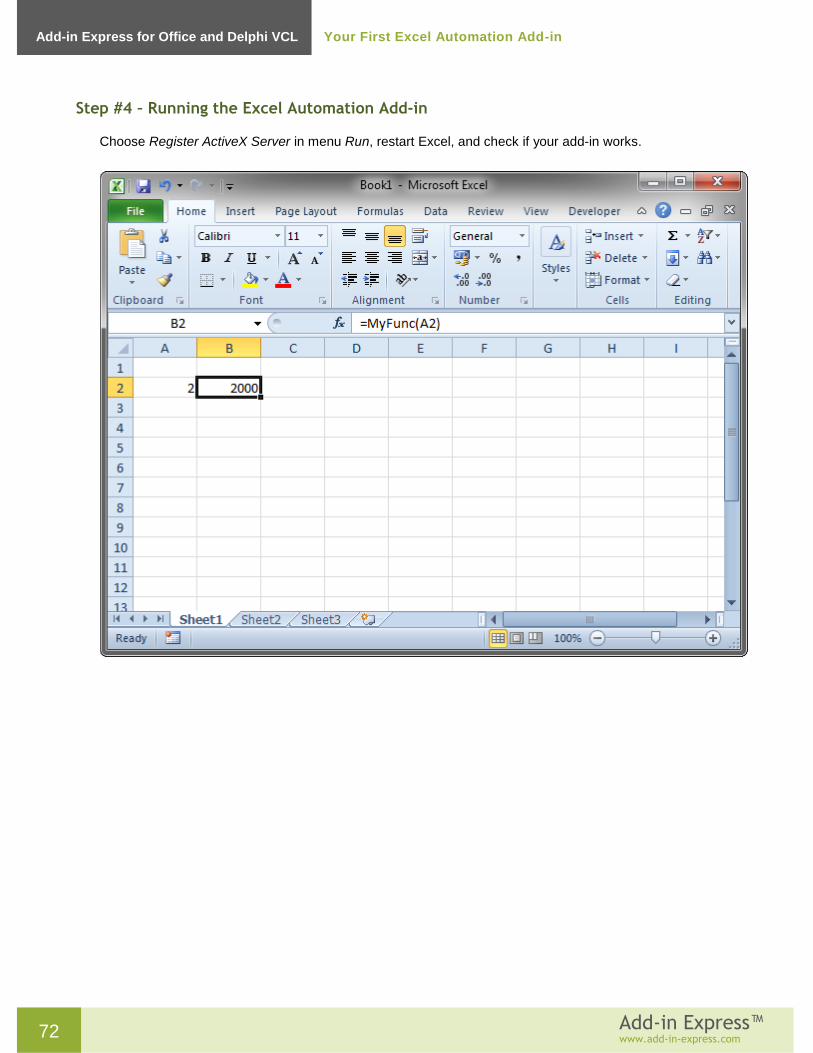
72 Add-in Express™
www.add-in-express.com
Add-in Express for Office and Delphi VCL
Your First Excel Automation Add-in
Step #4 – Running the Excel Automation Add-in
Choose Register ActiveX Server in menu Run, restart Excel, and check if your add-in works.

73 Add-in Express™
www.add-in-express.com
Add-in Express for Office and Delphi VCL
Your First Excel Automation Add-in
Step #5 – Debugging the Excel Automation Add-in
To debug your add-in, just indicate the add-in host application as the Host Application in Project Options.
To debug your add-in in Excel 2010-2016 64-bit, you have to register the add-in DLL using regsvr32;
run it from an elevated 64-bit Command Prompt. In addition, you must explicitly specify to run Excel
2010-2016 64-bit in the dialog window shown above.
Step #6 – Deploying the Excel Automation Add-in
Make sure your setup project registers the add-in DLL. Say, in Inno Setup projects you use the regserver
command. See also:
Registering with User Privileges
Additional Files

74 Add-in Express™
www.add-in-express.com
Add-in Express for Office and Delphi VCL Add-in Express Components
Add-in Express Components
You can find all the Add-in Express components below in the Add-in Express category on the Tool Palette:
TadxCommandBar – a command bar (see Command Bars: Toolbars, Menus, and Context Menus)
TadxOlExplorerCommandBar – an Outlook Explorer command bar (see Command Bars: Toolbars,
Menus, and Context Menus)
TadxOlInspectorCommandBar – an Outlook Inspector command bar (see Command Bars: Toolbars,
Menus, and Context Menus)
TadxMainMenu – a main menu in any Office application (see Command Bars: Toolbars, Menus, and
Context Menus)
TadxOlExplorerMainMenu – a main menu in Outlook Explorer (see Command Bars: Toolbars, Menus,
and Context Menus)
TadxOlInspectorMainMenu – a main menu in Outlook Inspector (see Command Bars: Toolbars,
Menus, and Context Menus)
TadxContextMenu – a context menu in any Office application (see Command Bars: Toolbars, Menus,
and Context Menus)
TadxBuiltInControl – allows intercepting the action of a built-in control of the host application(s) (see
Built-in Control Connector)
TadxOlBarShortcutManager – allows adding Outlook Bar shortcuts and shortcut groups (see Outlook
Bar Shortcut Manager)
TadxKeyboardShortcut – allows intercepting application-level keyboard shortcuts (see Keyboard
Shortcut)
TadxRTDTopic – represents a topic supported by your RTD server (see RTD Topic)
TadxSmartTag – represents a Smart Tag
Tadx<application name>AppEvents – allows connecting to application-level events in the
corresponding Office applications (see Host Application Events)
TadxRibbonTab – a Ribbon tab (see Office Ribbon Components)
TadxRibbonQAT – the Ribbon Quick Access Toolbar (see Office Ribbon Components)
TadxRibbonOfficeMenu – the Ribbon Office Menu (see Office Ribbon Components)
TadxRibbonCommand – allows intercepting built-in Ribbon commands (see Office Ribbon Components)

75 Add-in Express™
www.add-in-express.com
Add-in Express for Office and Delphi VCL Add-in Express Components
TadxOLSolutionModule – allows adding a solution module to the Outlook 2010-2016 UI (see
Programming the Outlook 2010 Solutions Module)
TadxRibbonContextMenu – allows customizing context menus available in the Office 2010-2016 Ribbon
UI (see Context Menu)
TadxBackstageView – allows customizing the File Tab in the Office 2010-2016 Ribbon UI.
TadxOlFormsManager – allows embedding custom VCL forms into Outlook windows (see Advanced
Outlook Regions and Advanced Office Task Panes)
TadxExcelTaskPanesManager – allows embedding custom VCL forms into the main Excel window (see
Advanced Outlook Regions and Advanced Office Task Panes)
TadxWordTaskPanesManager – allows embedding custom VCL forms into the Word windows (see
Advanced Outlook Regions and Advanced Office Task Panes)
TadxPowerPointTaskPanesManager – allows embedding custom VCL forms into the main PowerPoint
window (see Advanced Outlook Regions and Advanced Office Task Panes)
Office Ribbon Components
Starting from version 2007 Office provides the Ribbon user interface. Microsoft states that the interface makes it
easier and quicker for users to achieve the desired results. The developers extend this interface by using the
XML markup that the COM add-in should return to the host through the appropriate interface.

76 Add-in Express™
www.add-in-express.com
Add-in Express for Office and Delphi VCL Add-in Express Components
Add-in Express provides some 50 Ribbon-related components to give you the full power of the Ribbon UI
customization features. You start with TadxRibbonTab, TadxBackstageView in Office 2010-2016 or
TadxRibbonOfficeMenu in Office 2007 and TadxRibbonQAT (Quick Access Toolbar) that undertake the
task of creating the markup. You add controls to a tab or menu using a convenient tree-view-like editor that
allows you to see all the items of a tab or menu at a glance. To access the controls in your code you use the
FindRibbonControl function of the add-in module. Please note, Microsoft requires developers to use the
StartFromScratch parameter (see the StartFromScratch property of the add-in module) when
customizing the Quick Access Toolbar.
In Office 2010-2016, Microsoft abandoned the Office Button (introduced in Office 2007) in favor of the File Tab
(also known as Backstage View). When the add-in is being loaded in Office 2010-2016,
TadxRibbonOfficeMenu maps your controls to the File tab unless you have a TadxBackStageView
component in your add-in; in this case, all controls you add to TadxRibbonOfficeMenu are ignored.
To use command bars in add-ins targeting Ribbon-enabled Office versions, you must explicitly set the
UseForRibbon property of the appropriate command bar components to True. In this case, your toolbars are
added to the built-in ribbon tab called Add-ins.
You use the Ribbon Command (TadxRibbonCommand) component to override the default action of a built-in
Ribbon control. Note that Microsoft allows intercepting only buttons, toggle buttons and check boxes; see the
ActionTarget property of the component. You specify the built-in Ribbon control to be intercepted in the
IdMso property of the component. In fact, you are expected to specify the ID of the control to be intercepted. All
such IDs are available for download at the Microsoft web site, for Office 2007, see here ; for Office 2010-2016,
see this page. The download installs Excel files; the Control Name column of each contains the IDs of almost
all built-in Ribbon controls for the corresponding Ribbon.
New features of the Ribbon UI introduced in Office 2010 are covered by the TadxBackStageView and
TadxRibbonContextMenu components discussed in Main Menu and Context Menu.
How Ribbon Controls Are Created
When your add-in is being loaded by the host application supporting the Ribbon UI, the very first event received
by the add-in is the OnRibbonBeforeCreate event of the add-in module (in a pre-Ribbon Office application,
the very first event is OnAddinInitialize). This is the only event in which you can add/remove/modify the
Ribbon components onto/from/on the add-in module.
Then Add-in Express generates the XML markup reflecting the settings of the Ribbon components and raises
the OnRibbonBeforeLoad event. In that event, you can modify the generated markup, say, by adding XML
tags generating extra Ribbon controls.
Finally, the markup is passed to Office and the add-in module fires the OnRibbonLoaded event. In the event
parameters, you get an object of the IRibbonUI type that allows invalidating a Ribbon control; you call the
corresponding methods when you need the Ribbon to re-draw the control. Also, in Office 2010-2016,
IRibbonUI allows activating a Ribbon tab.
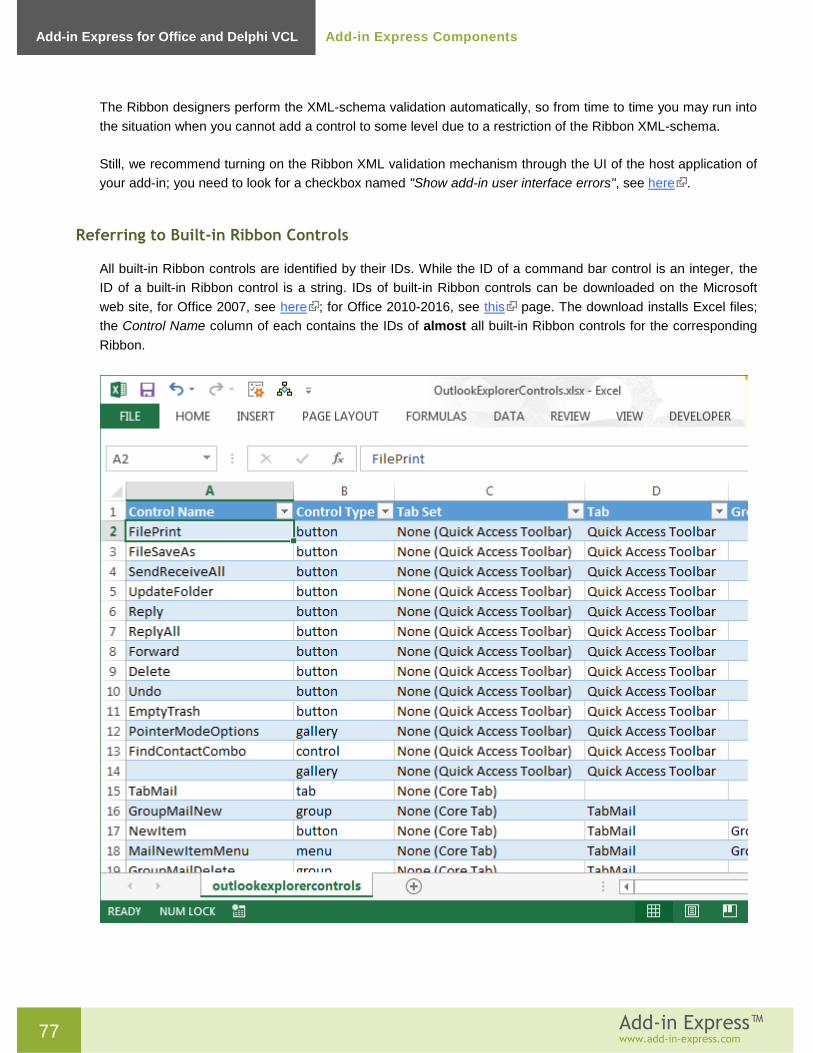
77 Add-in Express™
www.add-in-express.com
Add-in Express for Office and Delphi VCL Add-in Express Components
The Ribbon designers perform the XML-schema validation automatically, so from time to time you may run into
the situation when you cannot add a control to some level due to a restriction of the Ribbon XML-schema.
Still, we recommend turning on the Ribbon XML validation mechanism through the UI of the host application of
your add-in; you need to look for a checkbox named "Show add-in user interface errors", see here .
Referring to Built-in Ribbon Controls
All built-in Ribbon controls are identified by their IDs. While the ID of a command bar control is an integer, the
ID of a built-in Ribbon control is a string. IDs of built-in Ribbon controls can be downloaded on the Microsoft
web site, for Office 2007, see here ; for Office 2010-2016, see this page. The download installs Excel files;
the Control Name column of each contains the IDs of almost all built-in Ribbon controls for the corresponding
Ribbon.
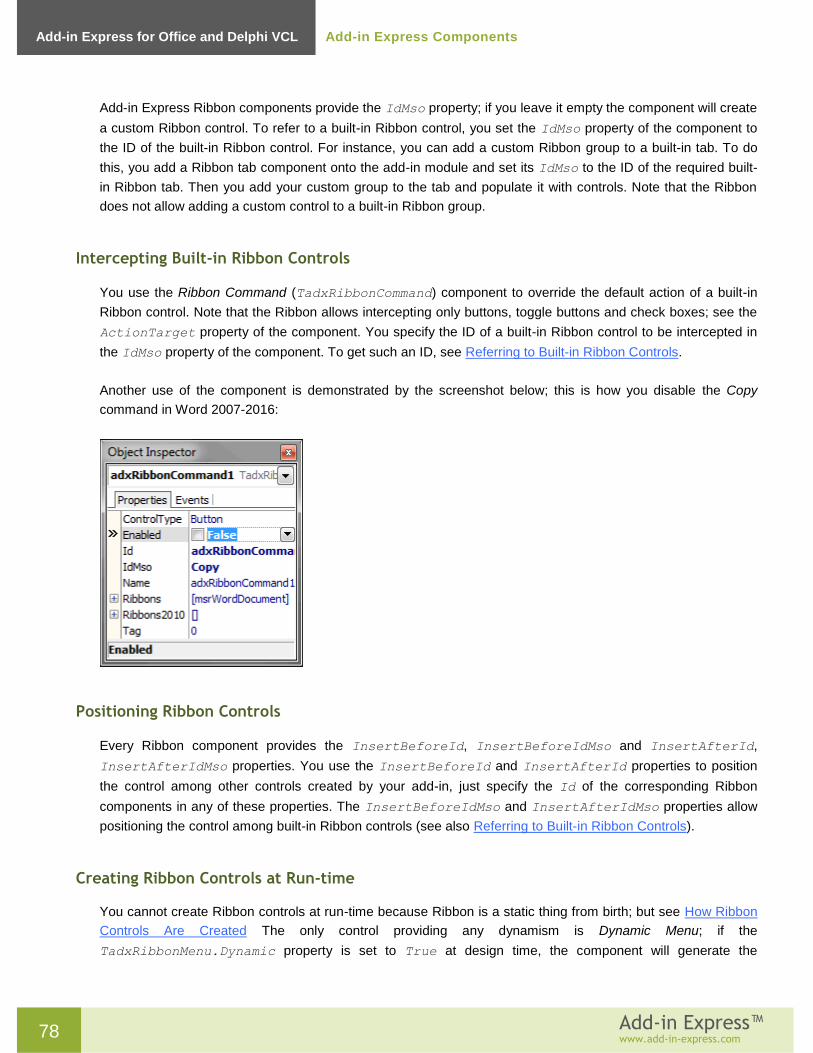
78 Add-in Express™
www.add-in-express.com
Add-in Express for Office and Delphi VCL Add-in Express Components
Add-in Express Ribbon components provide the IdMso property; if you leave it empty the component will create
a custom Ribbon control. To refer to a built-in Ribbon control, you set the IdMso property of the component to
the ID of the built-in Ribbon control. For instance, you can add a custom Ribbon group to a built-in tab. To do
this, you add a Ribbon tab component onto the add-in module and set its IdMso to the ID of the required built-
in Ribbon tab. Then you add your custom group to the tab and populate it with controls. Note that the Ribbon
does not allow adding a custom control to a built-in Ribbon group.
Intercepting Built-in Ribbon Controls
You use the Ribbon Command (TadxRibbonCommand) component to override the default action of a built-in
Ribbon control. Note that the Ribbon allows intercepting only buttons, toggle buttons and check boxes; see the
ActionTarget property of the component. You specify the ID of a built-in Ribbon control to be intercepted in
the IdMso property of the component. To get such an ID, see Referring to Built-in Ribbon Controls.
Another use of the component is demonstrated by the screenshot below; this is how you disable the Copy
command in Word 2007-2016:
Positioning Ribbon Controls
Every Ribbon component provides the InsertBeforeId, InsertBeforeIdMso and InsertAfterId,
InsertAfterIdMso properties. You use the InsertBeforeId and InsertAfterId properties to position
the control among other controls created by your add-in, just specify the Id of the corresponding Ribbon
components in any of these properties. The InsertBeforeIdMso and InsertAfterIdMso properties allow
positioning the control among built-in Ribbon controls (see also Referring to Built-in Ribbon Controls).
Creating Ribbon Controls at Run-time
You cannot create Ribbon controls at run-time because Ribbon is a static thing from birth; but see How Ribbon
Controls Are Created The only control providing any dynamism is Dynamic Menu; if the
TadxRibbonMenu.Dynamic property is set to True at design time, the component will generate the

79 Add-in Express™
www.add-in-express.com
Add-in Express for Office and Delphi VCL Add-in Express Components
OnCreate event allowing creating menu items at run-time. For other control types, you can only imitate that
dynamism by setting the Visible property of a Ribbon control.
Updating Ribbon Controls at Run-Time
Add-in Express Ribbon components implement two schemas of refreshing Ribbon controls.
The simple schema allows you to change a property of the Ribbon component and the component will supply it
to the Ribbon whenever hat property is requested. This mechanism is an ideal when you need to display static
or almost static things such as a button caption that doesn't change or changes across all windows showing the
button, say in Outlook inspectors or Word documents. This works because Add-in Express supplies the same
property value whenever the Ribbon invokes a corresponding callback function.
You use the advanced schema when you need to show different captions of a Ribbon button in different
Inspector windows or Word document. To achieve this, you need to intercept the PropertyChanging event,
which all Ribbon components provide. That event occurs when the Ribbon expects that you can supply a new
value for a property of the Ribbon control. The event allows you to learn the current context, see Determining a
Ribbon Control's Context. It also allows you to get the property being changed and its current value. Finally, you
can change that value as required.
Determining a Ribbon Control's Context
The developer retrieves an IDispatch that represents the context is in these ways:
in action events such as Click and Change, you use the IRibbonControl parameter to retrieve
IRibbonControl.Context
in the PropertyChanging event (see Updating Ribbon Controls at Run-Time), the context is supplied in
the Context parameter
For a Ribbon control shown on a Ribbon tab, the context represents the window in which the Ribbon control is
shown: Excel.Window, Word.Window, PowerPoint.DocumentWindow, Outlook.Inspector,
Outlook.Explorer, etc. For a Ribbon control shown in a Ribbon context menu the context object may not be
a window e.g. Outlook.Selection, Outlook.AttachmentSelection, etc. When debugging the add-in
we recommend that you find the actual type name behind the context object by using
IDispatch.GetTypeInfo() and then ITypeInfo.GetDocumentation().
Sharing Ribbon Controls across Multiple Add-ins
First off, you assign the same string value to the TAddinModule.Namespace property of every add-in that will
share your Ribbon controls. Add-in Express reacts to this by adding two xmlns attributes to the customUI tag
in the resulting xml markup:
xmlns:default="%ProgId, say TAddinModule.COMAddInClassFactory.ProgID%",

80 Add-in Express™
www.add-in-express.com
Add-in Express for Office and Delphi VCL Add-in Express Components
xmlns:shared="%the value of the TAddinModule.Namespace property%".
Originally, all Ribbon controls are located in the default namespace (id="%Ribbon control's id%" or
idQ="default:%Ribbon control's id%") and you have a full control over them via the callbacks
provided by Add-in Express. When you specify the Namespace property, Add-in Express changes the markup
to use idQ's instead of id's.
Then, in all add-ins that should share a Ribbon control, you set the Shared property to True for the control
with the same Id (you can change the Id's to match), For the Ribbon control whose Shared property is True,
Add-in Express changes its idQ to use the shared namespace (idQ="shared:%Ribbon control's id%")
instead of the default one. Also, for such Ribbon controls, Add-in Express cuts out all callbacks and replaces
them with "static" versions of the attributes. Say, getVisible="GetVisible_CallBack" will be replaced
with visible="%value%".
The shareable Ribbon controls are the following Ribbon container controls:
Ribbon Tab - TadxRibbonTab
Ribbon Box - TadxRibbonBox
Ribbon Group - TadxRibbonGroup
Ribbon Button Group - TadxRibbonButtonGroup
When referring to a shared Ribbon control in the BeforeId and AfterId properties of another Ribbon control,
you use the shared controls' idQ: %namespace abbreviation% + ':' + %control id%. The
abbreviations of these namespaces are available in the adxDefaultNS and adxSharedNS constants
('default' and 'shared' string values). The resulting XML markup may look like this:
<customUI xmlns="http://schemas.microsoft.com/office/2006/01/customui"
xmlns:default="MyOutlookAddin1.coMyOutlookAddin1"
xmlns:shared="MyNameSpace" [callbacks omitted]>
<ribbon>
<tabs>
<tab idQ=" shared:adxRibbonTab1" visible="true" label="My Tab">
<group idQ="default:adxRibbonGroup1" [callbacks omitted]>
<button idQ="default:adxRibbonButton1" [callbacks omitted]/>
</group>
</tab>
</tabs>
</ribbon>
</customUI>
In the XML-code above, the add-in creates a shared tab with a private group containing a button.

81 Add-in Express™
www.add-in-express.com
Add-in Express for Office and Delphi VCL Add-in Express Components
Custom Task Panes in Office 2007-2016
To allow further customization of its applications, Office 2007 provides custom task panes. Add-in Express
supports Office 2007 custom task panes by providing the appropriate window in the project wizard and
equipping the add-in module with the TaskPanes property. Use the Add-in Express COM Add-in project wizard
to add a task pane(s) to your project. Add your reaction to the OnTaskPaneXXX event series of the add-in
module and the OnDockPositionStateChange and OnVisibleStateChange events of the task pane. See
also Adding an Office 2007-2016 Custom Task Pane to an Existing Add-in Express Project.
Add-in Express provides a technology to show custom task panes in Outlook, Excel, Word and PowerPoint,
versions 2000-2016. See Advanced Outlook Regions and Advanced Office Task Panes for details.
Command Bars: Toolbars, Menus, and Context Menus
Microsoft Office 2000-2003 supplied us with a common term for Office toolbars, menus, and context menus.
This term is "command bar". Add-in Express provides toolbar, menu, and context menu components that allow
tuning up targeted command bars at design time. Every such component provides a visual designer available in
the Controls property of the component.
For instance, the screenshot above shows a visual designer for the toolbar component that creates a custom
toolbar with a button. Note that this screenshot was taken when creating a sample project described in Your
First Microsoft Office COM Add-in.
To create toolbars, menus, and context menus in Outlook, you need to use Outlook-specific versions
of command bar components.
Toolbar
To add a toolbar to your add-in, find TadxCommandBar (TadxOlExplorerCommandBar,
TadxOlInspectorCommandBar) in the Tool Palette and drop it onto the add-in module. Its most important
property is CommandBarName. If its value is not equal to the name of any built-in command bar of the host
application, then you are creating a new command bar. If its value is equal to any built-in command bar of the

82 Add-in Express™
www.add-in-express.com
Add-in Express for Office and Delphi VCL Add-in Express Components
host application, then you are connecting to a built-in
command bar. To find out the built-in command bar names,
use our free Built-in Controls Scanner utility.
To position your toolbar, use the Position property that
allows docking your toolbar to the top, right, bottom, or left
edges of the host application window. You can also leave your
toolbar floating. For a fine positioning you can use the
CommandBarLeft, CommandBarTop, and RowIndex
properties. To show a toolbar in the Ribbon UI, set the
UseForRibbon property of the corresponding command bar
component to true.
To speed up add-in loading when connecting to an existing command bar, set the Temporary property to
False. To make the host application remove the command bar when the host application quits, set the
Temporary property to true. See also Temporary or Not?
Main Menu
By using the Add Main Menu command of the add-in module, you add a TadxMainMenu, which is intended for
customizing main menu in an Office application that you specify in the SupportedApp property.
Like the toolbar component, it provides a visual designer for the Controls property. To add a custom top-level
menu item, just add a popup control to the command bar. Then you can populate it with other controls. Note,
however, that for all menu components, the controls can be buttons and pop-ups only. To add a custom button
to a built-in top-level menu item, you specify the ID of the top-level menu item in the OfficeId property of the
button control. For instance, the ID of the File menu item in all Office applications is 30002. See more details
about IDs of command bar controls in Using Built-in Command Bar Controls and Step #7 - Customizing Main
Menus in Your First Microsoft Office COM Add-in. See also Command Bar Controls, Built-in Control Connector.
In main applications of Office 2007, they replaced the command system with the Ribbon UI. So, instead of
adding custom items to the main menu, you need to add them to a custom or built-in Ribbon tab. Also, you can
add custom items to the menu of the Office Button. In Office 2010-2016, they added the Ribbon UI to all Office
applications and abandoned the Office button in favor of the File Tab, also known as Backstage View. Add-in
Express provides components allowing customizing both the File Tab and the Ribbon Office menu, see Step #7
- Customizing Main Menus in Your First Microsoft Office COM Add-in. Note, if you customize the Office Button
menu only, Add-in Express maps your controls to the Backstage View. If, however, both Office Button menu
and File tab are customized at the same time, Add-in Express ignores custom controls you add to the Office
Button menu.
Context Menu
The TadxContextMenu component allows you to add a custom command bar control to any context menu
available in all Office applications except for Outlook 2000 and Outlook 2013-2016. The component allows

83 Add-in Express™
www.add-in-express.com
Add-in Express for Office and Delphi VCL Add-in Express Components
connecting to a single context menu of a single host application. Like for the Main Menu component, you must
specify the SupportedApp property. To specify the context menu you want to connect to, just choose the
name of the context menu in the CommandBarName combo.
Note that context menu names for this combo were taken from Office 2007, the last Office version that
introduced new commandbar-based context menus. Therefore, it is possible that the targeted context menu is
not available in a pre-2007 Office version.
In Office 2010 and higher, you can customize both commandbar-based and Ribbon-based context menus. An
exception is Outlook 2013-2016 – it allows customizing Ribbon-based context menus only.
See also Step #8 – Customizing Context Menus in Your First Microsoft Office COM Add-in and Step #10 –
Customizing Context Menus in Outlook in Your First Microsoft Outlook COM Add-in.
Outlook Toolbars and Main Menus
While the look-and-feel of all Office toolbars is the same, Outlook toolbars differ from toolbars of other Office
applications because Outlook has toolbars in Outlook Explorer and Outlook Inspector windows that work in
quite different ways. Accordingly, Add-in Express includes Outlook-specific command bar components that
work correctly in multiple Explorer and Inspector windows scenarios: TadxOlExplorerCommandBar and
TadxOlInspectorCommandBar. In the same way, Add-in Express provides Outlook-specific versions of the
Main Menu component: TadxOlExplorerMainMenu and TadxOlInspectorMainMenu.
All of the components above provide the FolderName, FolderNames, and ItemTypes properties that add
context-sensitive features to the command bar. For instance, you can choose your toolbar to show up for e-
mails only. To achieve this just specify a correct value in the ItemTypes property editor.
Connecting to Existing Command Bars
In Office, all command bars are identified by their names. Keeping it in mind, you can add a custom or built-in
control to any existing command bar. The only thing you need to know is the command bar name. Use our free
Built-in Controls Scanner to get the names of all command bars and controls existing in any Office

84 Add-in Express™
www.add-in-express.com
Add-in Express for Office and Delphi VCL Add-in Express Components
application. Then you can specify any of the command bar names in the CommandBarName property of the
appropriate command bar component.
Command Bar Controls
The Office Object Model (OOM) includes the following command bar controls: CommandBarButton,
CommandBarComboBox, and CommandBarPopup. Using the correct property settings of the
CommandBarComboBox component, you can extend the list with edits and dropdowns.
What follows below is a list of controls available for Add-in Express command bars:
TadxCommandBarButton
TadxCommandBarComboBox
TadxCommandBarEdit
TadxCommandBarPopup
TadxCommandBarDropDownList
TadxCommandBarControl (you use this item to add built-in controls to your command bars)
TadxCommandBarAdvancedControl (reserved for future use).
Please note that due to the nature of command bars (remember, a 'command bar' stands for toolbar, menu,
and context menu), [context] menu items can be buttons, combo boxes, and pop-ups only.
Command bar components provide the Controls property. Clicking it in the Object Inspector window in Delphi
invokes the appropriate visual designer. On the picture below, you can see the visual designer to populate a
toolbar with custom controls.
Using the designer, you can populate your command bars with controls and set up their properties at design
time. At run-time, you use the Controls collection of your command bar. Every control (built-in and custom)
added to this collection will be added to the corresponding toolbar at your add-in startup.

85 Add-in Express™
www.add-in-express.com
Add-in Express for Office and Delphi VCL Add-in Express Components
Command Bar Control Properties and Events
The main property of any command bar control (they descend from TadxCommandBarControl) is the
OfficeId property. To add a built-in control to your toolbar, specify its ID in the OfficeId property of a
corresponding command bar control component. To find out the ID of every built-in control in any Office
application, use our free Built-in Controls Scanner utility. To add a custom control onto the toolbar, leave
OfficeId unchanged.
To add a separator before any given control, set its BeginGroup property to true.
Set up the control's appearance using a large number of its properties, such as Enabled and Visible, Style
and State, Caption and ToolTipText, DropDownLines and DropDownWidth, etc. You also control the
size (Height, Width) and location (Before, AfterId, and BeforeId) properties. To provide your command
bar buttons with a default list of icons, drop an ImageList component onto the add-in module and specify the
ImageList in the Images property of the module. Do not forget to set the button's Style property to either
adxMsoButtonIconAndCaption or adxMsoButtonIcon.
Use the OlExplorerItemTypes, OlInspectorItemTypes, and OlItemTypesAction properties to add
context-sensitivity to controls on Outlook-specific command bars. The OlItemTypesAction property defines
an action that Add-in Express will perform with the control when the current item's type coincides with that
specified by you.
To handle user actions, use the Click event for buttons and the Change event for edit, combo box, and drop
down list controls. Also use the DisableStandardAction property available for built-in buttons added to your
command bar. To intercept events of any built-in control, see Built-in Control Connector.
Command Bar Control Types
The Office Object Model contains the following control types available for toolbars: button, combo box, and
pop-up. Using the correct property settings of the combo box component, you can extend the list with edits and
dropdowns.
Please note that due to the nature of command bars, menu and context menu items can only be buttons and
pop-ups (item File in any main menu is a sample of a popup).
Using Built-in Command Bar Controls
Add-in Express connects to a built-in control using the ID that you supply in the OfficeID property. That is, if
you specify the ID of a control not equal to 1, Add-in Express adds it to your toolbar. Using this approach, you
can override the standard behavior of a built-in button on a given toolbar:
Add a new toolbar component to the module
Specify the toolbar name in the CommandBarName property
Add a TadxCommandBarButton to the command bar

86 Add-in Express™
www.add-in-express.com
Add-in Express for Office and Delphi VCL Add-in Express Components
Specify the ID of the built-in button in the TadxCommandBarButton.OfficeId property
Set DisableStandardAction to true
Now you can handle the Click event of the button
You can find the IDs using the free Built-in Controls Scanner utility. Download it at http://www.add-in-
express.com/downloads/controls-scanner.php .
Built-in Control Connector
Built-in controls of an Office application have predefined IDs. You can find the IDs using the free Built-in
Controls Scanner utility .
The Built-in Control Connector component allows overriding the standard action of any built-in control without
adding it onto any command bar.
Add TadxBuiltInControl onto TadxCOMAddinModule. Set its Id property to the command bar control ID.
To connect the component to the command bar control, leave its CommandBar property empty. To connect the
component to the control on a given toolbar, specify the toolbar in the CommandBar property. To override the
default action of the control, use the Action event. The component traces the context and when any change
happens, it reconnects to the currently active instance of the command bar control with the given Id, taking this
task away from you.
Connecting to built-in Ribbon controls is described in Office Ribbon Components
Keyboard Shortcut
Every Office application provides built-in keyboard combinations that allow shortening the access path for
commands, features, and options of the application. Add-in Express allows adding custom keyboard
combinations and processing both custom and built-in ones.
Add the component onto TadxCOMAddinModule, choose the keyboard shortcut you need in the
ShortcutText property, set the HandleShortCuts property of the Add-in Express module to true and
process the Action event of the KeyboardShortcut component.
Outlook Bar Shortcut Manager
Outlook provides us with the Outlook Bar (Navigation Pane in Outlook 2003). The Outlook Bar displays Shortcut
groups consisting of Shortcuts that you can target at a Microsoft Outlook folder, a file-system folder, or a file-
system path or URL. You use the Outlook Bar Shortcut Manager to customize the Outlook Bar with your
shortcuts and groups.
This component is available for TadxCOMAddinModule. Use the Groups collection of the component to create
a new shortcut group. Use the Shortcuts collection of a short group to create a new shortcut. To connect to
an existing shortcut or shortcut group, set the Caption properties of the corresponding TadxOlBarShortcut

87 Add-in Express™
www.add-in-express.com
Add-in Express for Office and Delphi VCL Add-in Express Components
and/or TadxOlBarGroup components equal to the caption of the existing shortcut or shortcut group. Please
note that there is no other way to identify the group or shortcut.
That is why your shortcuts and shortcut groups must be named uniquely for Add-in Express to remove only the
specified ones (and not those having the same names) when the add-in is uninstalled. That is why you have to
do this yourself. Depending on the type of its value, the Target property of the TadxOlBarShortcut
component allows you to specify different shortcut types. If the type is MAPIFolder, the shortcut represents a
Microsoft Outlook folder. If the type is a String, the shortcut represents a file-system path or a URL.
Outlook Property Page
Outlook allows extending its Options dialog with custom pages. You see this dialog when you choose Tools |
Options menu. In addition, Outlook allows adding such page to the Folder Properties dialog. You see this dialog
when you choose the Properties item in the folder context menu. The Outlook Add-in project wizard allows
creating such pages.
The FolderName, FolderNames, and ItemTypes properties of the Outlook folder pages work in the same
way as those of Outlook-specific command bars.
Specify reactions required by your business logics in the Apply event handler. In the page controls' event
handlers, use the UpdatePropertyPageSite method to mark the page as Dirty.
Advanced Outlook Regions and Advanced Office Task Panes
Add-in Express allows COM add-ins to show Advanced Form and View Regions in Outlook and Advanced Task
Panes in Excel, Word, and PowerPoint; versions 2000-2016 are supported.
Introducing Advanced Task Panes in Word, Excel and PowerPoint
In Add-in Express terms, an advanced Office task pane is a sub-pane, or a dock, of the main Excel, Word or
PowerPoint window that may host native Delphi forms. The screenshot below shows a sample task pane
embedded into all available Excel docks.

88 Add-in Express™
www.add-in-express.com
Add-in Express for Office and Delphi VCL Add-in Express Components

89 Add-in Express™
www.add-in-express.com
Add-in Express for Office and Delphi VCL Add-in Express Components
Introducing Advanced Outlook Form and View Regions
In Add-in Express terms, an advanced Outlook region is a sub-pane, or a dock, of Outlook windows that hosts
native Delphi forms. There are two types of advanced regions – Outlook view regions (sub-panes on the
Outlook Explorer window) and Outlook form regions (sub-panes of the Outlook Inspector window).
Outlook view regions are specified in the ExplorerLayout property of the item (=
TadxOlFormsCollectionItem). Outlook form regions are specified in the InspectorLayout property of
the item. That is, one TadxOlFormsCollectionItem can show your form in a view and form region. Note
that you must also specify the item's ExplorerItemTypes and/or InspectorItemTypes properties;
otherwise, the form (an instance of TadxOlForm) will never be shown.
Here is the list of Outlook view regions:
Four regions around the list of mails, tasks, contacts etc. The region names are LeftSubpane,
TopSubpane, RightSubpane, BottomSubpane (see the screenshot below). A restriction: these
regions are not available for Calendar folders in Outlook 2010-2016.
One region below the Navigation Pane – BottomNavigationPane (see the screenshot below)
One region below the To-Do Bar – BottomTodoBar (see the screenshot below)
One region below the Outlook Bar (Outlook 2000 and 2002 only) – BottomOutlookBar. A restriction: this
region is not available in Outlook 2016.

90 Add-in Express™
www.add-in-express.com
Add-in Express for Office and Delphi VCL Add-in Express Components
Four regions around the Explorer window (Outlook 2007-2016 only) – DockLeft, DockTop, DockRight,
DockBottom (see the screenshot below). The restrictions for these regions are:
1. Docked regions are not available for pre-2007 versions of Outlook
2. Hidden state is not supported in docked layouts
3. Docked panes have limitations on the minimum height or width

91 Add-in Express™
www.add-in-express.com
Add-in Express for Office and Delphi VCL Add-in Express Components
Four regions around the Reading Pane – LeftReadingPane, TopReadingPane, RightReadingPane,
BottomReadingPane (see the screenshot below).
The WebViewPane region (see the screenshot below). Note that it uses Outlook properties in order to
replace the items grid with your form (see also WebViewPane).

92 Add-in Express™
www.add-in-express.com
Add-in Express for Office and Delphi VCL Add-in Express Components
The FolderView region (see two screenshots below). Unlike WebViewPane, it allows the user to switch
between the original Outlook view and your form. A restriction: this region is not available for Calendar
folders in Outlook 2010-2016.
The ReadingPane region (see two screenshots above).

93 Add-in Express™
www.add-in-express.com
Add-in Express for Office and Delphi VCL Add-in Express Components
And here is the list of Outlook form regions:
Four regions around the body of an e-mail, task, contact, etc. The region names are LeftSubpane,
TopSubpane, RightSubpane, BottomSubpane (see the screenshot below).
The InspectorRegion region (see two screenshots below) allows switching between your form and the
Outlook inspector pane.

94 Add-in Express™
www.add-in-express.com
Add-in Express for Office and Delphi VCL Add-in Express Components
The CompleteReplacement inspector region shown in the screenshot below is similar to the
InspectorRegion with two significant differences: a) it doesn't show the header and in this way, it
doesn't allow switching between your form and the Outlook inspector pane and b) it is activated
automatically.
Hello, World!
The process of adding custom panes to a particular application is described in the respective parts of the
following samples:

95 Add-in Express™
www.add-in-express.com
Add-in Express for Office and Delphi VCL Add-in Express Components
Outlook – in Your First Microsoft Outlook COM Add-in see Step #15 – Adding Custom Task Panes in
Outlook 2000-2016
Excel – in Your First Microsoft Office COM Add-in, see Step #11 – Adding Custom Task Panes in Excel
2000-2016
PowerPoint – in Your First Microsoft Office COM Add-in, see Step #12 – Adding Custom Task Panes for
PowerPoint 2000-2016
Word – in Your First Microsoft Office COM Add-in, see Step #13 – Adding Custom Task Panes for Word
2000-2016
The UI Mechanics
An Absolute Must-Know
Here are the three main points you should know:
there are application-specific <Manager> components; every <Manager> component provides a collection;
each <Item> from the collection binds a <Form> (an application-specific descendant of TForm) to the
visualization and context (Outlook-only) settings;
you never create an instance of a <Form> in the way you create an instance of TForm; instead, the
<Manager> creates instances of the <Form> for you either automatically or at your request;
the Visible property of a <Form> instance is true when the instance is embedded into a window region
(as specified by the visualization settings) regardless of the actual visibility of the instance; the Active
property of the <Form> instance is true when the instance is shown on top of all other instances in the
same region.
Anywhere in this section, a term in angle brackets, such as <Manager> or <Form> above, specifies a
component, class, or class member, the actual name of which is application-dependent. Every such
term is covered in the corresponding chapter of this manual.
Region States and UI-Related Properties and Events
As mentioned in An Absolute Must-Know, the <Manager> creates instances of the <Form>.
To prevent an instance from being created you cancel one of the events listed below:

96 Add-in Express™
www.add-in-express.com
Add-in Express for Office and Delphi VCL Add-in Express Components
Table 1. Events that occur before a form instance is created.
Application <Manager> type Event
Excel TadxExcelTaskPanesManager OnADXBeforeTaskPaneInstanceCreate
Outlook TadxOlFormsManager OnADXBeforeFormInstanceCreate
OnADXBeforeFormInstanceCreateEx
PowerPoint TadxPowerPointTaskPanesManager OnADXBeforeTaskPaneInstanceCreate
Word TadxWordTaskPanesManager OnADXBeforeTaskPaneInstanceCreate
An instance of the <Form> (further on it is referenced as form) is considered visible if it is embedded into a
region. The form may be actually invisible either due to the region state (see below) or because other forms in
the same region hide it. Anyway, in this case <Form>.Visible returns true.
To prevent embedding the form into a region, you can set <Form>.Visible to false in these events.
Table 2. Events that occur before a form instance is embedded into a sub-pane.
Application <Form> type Event
Excel TadxExcelTaskPane OnADXBeforeTaskPaneShow
Outlook TadxOlForm OnADXBeforeFormShow
PowerPoint TadxPowerPointTaskPane OnADXBeforeTaskPaneShow
Word TadxWordTaskPane OnADXBeforeTaskPaneShow
When the form is shown in a region, the OnActivate event occurs and <Form>.Active becomes true.
When the user moves the focus onto the form, the <Form> generates the OnADXEnter event. When the form
loses focus, the OnADXLeave event occurs. When the form becomes actually invisible, it generates the
OnDeactivate event. When the corresponding <Manager> removes the form from its region,
<Form>.Visible becomes false and the form generates the OnADXAfterFormHide event in Outlook,
OnADXAfterTaskPaneHide event in Excel, Word, and PowerPoint.
In accordance to the value that you specify for the <Item>.DefaultRegionState property, the form may be
initially shown in any of the following region states: Normal, Hidden (collapsed to a 5px wide strip), Minimized
(reduced to the size of the form caption).

97 Add-in Express™
www.add-in-express.com
Add-in Express for Office and Delphi VCL Add-in Express Components
Note however that DefaultRegionState will work only when you show the form in a particular sub-pane for
the very first time and no other forms have been shown in that sub-pane before. You can reproduce this
situation on your PC by choosing Reset Regions in the context menu of the manager component.
You can change the state of your form at run-time using the <Form>.RegionState property. When showing
your Outlook form in some sub-panes, you may need to show the native Outlook view or form that your form
overlays; use the TadxOlForm.ActivateStandardPane() method
When the region is in the hidden state, the user can click on the splitter and the region will get back to the
normal state.
When the region is in the normal state, the user can choose any of the options below:
change the region size by moving the splitter; this raises size-related events of the form
hide the form by clicking on the "dotted" mini-button or by double-clicking anywhere on the splitter; this fires
the OnDeactivate event of the <Form>; this option isn't available for the end user if you set
TadxOlFormsCollectionItem.IsHiddenStateAllowed = False
close the form by clicking on the Close button in the form header; this fires the OnADXCloseButtonClick
event of the <Form>. The event is cancellable, see The Close Button and the Header; if the event isn't
cancelled, the OnDeactivate event occurs, then the pane is being removed from the region
(<Form>.Visible = false) and finally, the <OnADXAfterFormHide> event of the <Form> occurs
show another form by clicking the header and choosing an appropriate item in the popup menu; this fires
the OnDeactivate event on the first form and the OnActivate event on the second form
transfer the region to the minimized state by clicking the arrow in the right corner
of the form header; this fires the OnDeactivate event of the form.
When the region is in the minimized state, the user can choose either of the two
options below:
return the region to the normal state by clicking the arrow at the top of the slim
profile of the form region; this raises the OnActivate event of the form and
changes the Active property of the form to true

98 Add-in Express™
www.add-in-express.com
Add-in Express for Office and Delphi VCL Add-in Express Components
expand the form itself by clicking on the form's button; this opens the form so that it overlaps a part of the
Outlook window near the form region; this also raises the OnActivate event of the form and sets the
Active property of the form to true.
drag an Outlook item, Excel chart, file, selected text, etc. onto the form button; this fires the
OnADXDragOverMinimized event of the form; the event allows you to check the object being dragged
and to decide if the form should be restored.
The Close Button and the Header
The Close button is shown if the CloseButton property of the <Item> is true. The header is always
displayed when there are two or more forms in the same region. When there is just one form in a region, the
header is shown only if the AlwaysShowHeader property of the <Item> is true. Clicking on the Close button
in the form header fires the OnADXCloseButtonClick event of the <Form>, the event is cancellable:
procedure TadxOlForm1.adxOlFormADXCloseButtonClick(Sender: TObject;
Args: TadxOlCloseButtonClickEventArgs);
begin
//Args.CloseForm := false;
end;
Accessing a Form Instance
Add-in Express forms (panes) are based on the windowing of the corresponding Office application – Excel,
Word, Outlook, and PowerPoint. At run time, Add-in Express intercepts the messages the application sends to
its windows and reacts to the messages so that your form is shown, hidden, resized, etc. along with the
application's windows.
In Excel 2000-2010 and PowerPoint 2000-2007, a single instance of the <Form> is always created for a given
<Item> because these applications show documents in a single main window. Word is an application that
shows multiple windows, and in this situation, the Word Task Panes Manager creates one instance of the task
pane for every document window opened in Word.
Outlook is a specific host application. It shows several instances of two window types simultaneously. In
addition, the user can navigate through the folder tree and select, create and read several Outlook item types.
Accordingly, an ADXOlFormsCollectionItem can generate and show several instances of ADXOlForm at
the same time. Find more details on managing custom panes in Outlook in Advanced Outlook Regions.
To access the form, which is currently active in Excel or PowerPoint, you use the TaskPaneInstance
property of the <Item>; in Word, the property name is CurrentTaskPaneInstance; in Outlook, it is the
GetCurrentForm method. To access all instances of the <Form> in Word, you use the

99 Add-in Express™
www.add-in-express.com
Add-in Express for Office and Delphi VCL Add-in Express Components
TaskPaneInstances property of ADXWordTaskPanesCollectionItem; in Outlook, you use the
FormInstances method of ADXOlFormsCollectionItem (find more details in Form Region Instancing).
It is essential that Add-in Express panes are built on the windowing of the host application, not on the events of
the application's object model. This means that getting an instance of an Add-in Express pane in a certain event
may result in getting nil if the call is issued before the pane is shown or after it is hidden. For instance, it is
often the case with WindowActivate/WindowDeactivate in Excel, Word, and PowerPoint. Below is a list of
events where Add-in Express panes may be inaccessible:
Table 3. Events in which Add-in Express panes may be inaccessible
Excel WindowActivate, WindowDeactivate, WorkbookActivate,
WorkbookDeactivate, NewWorkbook, WorkbookOpen, WorkbookBeforeClose
Outlook NewInspector, Inspector.Activate, Inspector.Close,
Inspector.Deactivate, NewExplorer, Explorer.Activate, Explorer.Close,
Explorer.Deactivate
PowerPoint WindowActivate, WindowDeactivate, NewPresentation,
AfterNewPresentation, PresentationOpen, AfterPresentationOpen,
PresentationBeforeClose, PresentationClose
Word WindowActivate, WindowDeactivate, NewDocument, DocumentOpen,
DocumentChange, DocumentBeforeClose
So, you may encounter a problem if your add-in retrieves a pane instance in an event above. To bypass this
problem, we suggest modifying the code of the add-in so that it gets notified about a pane instance being
shown or hidden (instead of getting the pane instance by handling the events above).
Use the ADXBeforeTaskPaneShow event of the task pane class (Excel, Word, and PowerPoint) and the
TadxOlForm.ADXBeforeFormShow (Outlook) event to be notified about the specified pane instance being
shown. When the form becomes hidden you'll get TadxOlForm.ADXAfterFormHide (Outlook) and the
ADXAfterTaskPaneHide event of the task pane class (Excel, Word, and PowerPoint).
Controlling Form Visibility
To prevent a form from being displayed in the host application's window, you can set <Form>.Visible to
false in the events listed in Table 2. Events that occur before a form instance is embedded into a sub-pane.
By setting the Enabled property of an <Item> to false, you delete all form instances created for that
<Item>. To hide any given form (i.e. to remove it from the region), call its Hide method.
You can check that a form is not available in the UI (say, you cancelled the <OnBeforInstanceCreate> or
<OnBeforeFormShow> events or the user closed it) by checking the Visible property of the form:
function TAddInModule.DoesPaneExistInTheUI(): Boolean;

100 Add-in Express™
www.add-in-express.com
Add-in Express for Office and Delphi VCL Add-in Express Components
var
Pane: TadxWordTaskPane1;
begin
Pane :=
adxWordTaskPanesManager1.Items[0].CurrentTaskPaneInstance
as TadxWordTaskPane1;
if Pane <> nil then
Result := Pane.Visible
else
Result := false;
end;
If the form is not available in the UI, you can show such a form in one step:
for Outlook, you call the ApplyTo method of the <Item>; the method accepts the parameter, which is
either Outlook2000._Explorer or Outlook2000._Inspector;
for Excel, Word, and PowerPoint, you call the ShowTaskPane method of the <Item>
The methods above also transfer the region showing the form to the normal state.
If the Active property of your form is false, that is if your form is hidden by other forms in the region, then
you can call the Activate method of the <Form> to show the form on top of all other forms in that region.
Note that if the region is in either minimized or hidden state, calling Activate will also transfer it to the normal
state.
Note that your form does not restore its Active state in subsequent sessions of the host application in regions
showing several forms. In other words, if several add-ins show several forms in the same region and the current
session ends with a given form on top of all other forms in that region, the subsequent start of the host
application may show some other form as active. This is because events are given to add-ins in an
unpredictable order. When dealing with several forms of a given add-in, they are created in the order
determined by their locations in the <Items> collection of the <Manager>.
In Outlook, due to context-sensitivity features provided by the <Item>, an instance of your form will be created
whenever the current context matches that specified by the corresponding <Item>.
Resizing the Forms
There are two values of the Splitter property of the <Item>. The default one is sbStandard. This value
shows the splitter allowing the user to change the form size as required. The form size is stored in the registry
so that the size is restored whenever the user starts the host application.
You can only resize your form programmatically, if you set the Splitter property to sbNone. Of course, no
splitter will be shown in this case. Changing the Splitter property programmatically does not affect a form

101 Add-in Express™
www.add-in-express.com
Add-in Express for Office and Delphi VCL Add-in Express Components
currently loaded into its region (that is, having Visible = true). Instead, it will be applied to any newly
shown form.
If the form is shown in a given region for the first time and no forms were ever shown in this region, the form will
be shown using the appropriate dimensions that you set at design time. On subsequent host application
sessions, the form will be shown using the dimensions set by the user.
Coloring up the Form
By default, the background color of the form is set automatically to match the current Office 2007-2016 color
scheme. To use the background color of your own in these Office versions (as well as in Office 2003), you need
to set <Item>.UseOfficeThemeForBackground := true.
Tuning the Settings at Run-Time
To add/remove an <Item> to/from the collection and to customize the properties of an <Item> at add-in start-
up, you use the <Initialize> event of the <Manager>; the event's name is OnInitialize for Outlook and
OnADXInitalize for Excel, Word and PowerPoint.
Changing the Enable, Cached (Outlook only), <FormClassName> properties at run-time deletes all form
instances created by the <Item>.
Changing the InspectorItemTypes, ExplorerItemTypes, ExplorerMessageClasses,
ExplorerMessageClass, InspectorMessageClasses, InspectorMessageClass, FolderNames,
FolderName properties of the ADXOlFormsCollectionItem deletes all non-visible form instances.
Changing the <Position> property of the <Item> changes the position for all visible form instances.
Changing the Splitter and Tag properties of the <Item> does not do anything for the currently visible form
instances. You will see the change of the splitter when the <Manager> shows a new instance of the <Form>.
What Window the Pane is Shown for
To get an object corresponding to the host application's window that the form is shown for, use the following
members:
Table 4. Accessing the host application's window object from Add-in Express forms
Excel TadxExcelTaskPane.WindowObj – returns Excel.Window
Outlook TadxOlForm.InspectorObj – returns Outlook.Inspector, TadxOlForm.ExplorerObj
– returns Outlook.Explorer; these properties may also return null (Nothing in VB.NET)

102 Add-in Express™
www.add-in-express.com
Add-in Express for Office and Delphi VCL Add-in Express Components
PowerPoint TadxPowerPointTaskPane.WindowObj – returns PowerPoint.DocumentWindow
Word TadxWordTaskPane.WindowObj – returns Word.Window
Excel Task Panes
Please see The UI Mechanics above for the detailed description of how Add-in Express panes work. Below you
see the list containing some generic terms mentioned in An Absolute Must-Know and their Excel-specific
equivalents:
<Manager> - TadxExcelTaskPanesManager, the Excel Task Panes Manager
<Item> - TadxExcelTaskPanesCollectionItem
<Form> - TadxExcelTaskPane
Application-specific features
TadxExcelTaskPane provides useful events that are unavailable in the Excel object model:
OnADXBeforeCellEdit and OnADXAfterCellEdit.
Keyboard and Focus
TadxExcelTaskPane provides the OnADXKeyFilter event. It deals with the feature of Excel that captures
the focus if a key combination handled by Excel is pressed. By default, Add-in Express panes do not pass key
combinations to Excel. Thus, you can be sure that the focus will not leave the pane unexpectedly.
Just to understand this Excel feature, imagine that you need to let the user press Ctrl+S and get the workbook
saved while your pane is focused. In such a scenario, you have two ways out:
You process the key combination in the code of the pane and use the Excel object model to save the
workbook.
Or you send this key combination to Excel using the OnADXKeyFilter event.
Besides the obvious difference between the two ways above, the former leaves the focus on your pane while
the latter effectively moves it to Excel because of the focus-capturing feature just mentioned.
The algorithm of key processing is as follows. Whenever a single key is pressed, it is sent to the pane. When a
key combination is pressed, TadxExcelTaskPane determines if the combination is a shortcut to the pane. If it
is, the keystroke is sent to the pane. If it is not, OnADXKeyFilter is fired and the key combination is passed to
the event handler. Then the event handler specifies whether to send the key press to Excel or to the pane. The
latter is the default behavior. Note that sending the key combination to Excel will result in moving the focus off
the pane. The above implies that the OnADXKeyFilter event never fires for shortcuts on the pane's controls.

103 Add-in Express™
www.add-in-express.com
Add-in Express for Office and Delphi VCL Add-in Express Components
In addition, OnADXKeyFilter is never fired for hot keys (Alt + an alphanumeric symbol). If
TadxExcelTaskPane determines that the pane cannot process the hot key, it sends the hot key to Excel,
which activates its main menu. After the user has navigated through the menu by pressing arrow buttons, Esc,
and other hot keys, opened and closed Excel dialogs, TadxExcelTaskPane will get focus again.
Wait a Little and Focus Again
The pane provides a simple infrastructure that allows implementing the Wait a Little schema - see the
ADXPostMessage method and the OnADXPostMessageReceived event.
Currently we know at least one situation when this trick is required. Imagine that you show a pane and you
need to set the focus on a control on the pane. It is not a problem to do this in, say the OnActivate event.
Nevertheless, it is useless because Excel, continuing its initialization, moves the focus off the pane. With the
above-mentioned method and event you can make your pane look like it never loses focus: in the OnActivate
event handler, you call the ADXPostMessage method and, in the OnADXPostMessageReceived event, you
set the focus on the control.
Advanced Outlook Regions
Please see The UI Mechanics above for the detailed description of how Add-in Express panes work. Below you
see the list containing some generic terms mentioned in An Absolute Must-Know and their Outlook-specific
equivalents:
<Manager> - TadxOlFormsManager, the Outlook Forms Manager
<Item> - TadxOlFormsCollectionItem
<Form> - TadxOlForm
Context-Sensitivity of Your Outlook Form
Whenever the Outlook Forms Manager detects a context change in Outlook, it searches the
TadxOlFormsCollection collection for enabled items that match the current context and if any match is
found, it shows or creates the corresponding instances.
TadxOlFormsCollectionItem provides a number of properties that allow specifying the context settings for
your form. Say, you can specify item types for which your form will be shown. Note that in case of explorer, the
item types that you specify are compared with the default item type of the current folder. In addition, you can
specify the names of the folders for which your form will be shown in the FolderName and FolderNames
properties. These properties also work for Inspector windows – in this case, the parent folder of the Outlook
item is checked. An example of the folder path is "\\Personal Folders\Inbox".

104 Add-in Express™
www.add-in-express.com
Add-in Express for Office and Delphi VCL Add-in Express Components
A special value in FolderName is an empty string (''), which means "all folders". You can also specify
message class (es) for which your form will be shown. Note that all context-sensitivity properties of
TadxOlFormsCollectionItem are processed using the OR Boolean operation.
In advanced scenarios, you can also use the OnADXBeforeFormInstanceCreate event of
TadxOlFormsCollectionItem and the ADXBeforeFormShow event of TadxOlForm in order to prevent
your form from being shown (see also Accessing a Form Instance). In addition, you can use events provided by
TadxOlForm in order to check the current context. Say, you can use the OnADXBeforeFolderSwitch or
OnADXSelectionChange events of TadxOlForm.
Caching Forms
By default, whenever Add-in Express needs to show a form, it creates a new instance of that form. You can
change this behavior by choosing an appropriate value of the TadxOlFormsCollectionItem.Cached
property. The values of this property are:
csNewInstanceForEachFolder – it shows the same form instance whenever the user navigates to the
same Outlook folder.
csOneInstanceForAllFolders – it shows the same form instance for all Outlook folders.
csNone – no form caching is used.
Caching works within the same Explorer window: when the user opens another Explorer window, Add-in
Express creates another set of cached forms. Forms shown in Inspector windows cannot be cached.
Is It Inspector or Explorer?
Check the InspectorObj and ExplorerObj properties of TadxOlForm. These properties return COM
objects that will be released when your form is removed from its region. This may occur several times in the
lifetime of a given form instance because Add-in Express may remove your form from a given region and then
embed the form to the same region in order to comply with Outlook windowing.
WebViewPane
When this value (see Introducing Advanced Outlook Form and View Regions) is chosen in the
ExplorerLayout property of TadxOlFormsCollectionItem, Add-in Express uses the WebViewUrl and
WebViewOn properties of Outlook.MAPIFolder (also Outlook.Folder in Outlook 2007) in order to show
your form as a home page for a given folder(s).
Unfortunately, due to a bug in Outlook 2002 , Add-in Express has to scan all folders in Outlook in order to set
and restore the WebViewUrl and WebViewOn properties. The first consequence is a delay at startup if the
current profile contains thousands of folders. A simple way to prevent the delay is to disable the corresponding
item(s) of the Items collection of the Forms Manager at design time and enable it in the

105 Add-in Express™
www.add-in-express.com
Add-in Express for Office and Delphi VCL Add-in Express Components
AddinStartupComplete event of the add-in module. Because PublicFolders usually contains many folders,
Add-in Express does not allow using WebViewPane for PublicFolders and all folders below it. Outbox and Sync
Issues and all folders below them are not supported as well when using WebViewPane.
Because of the need to scan Outlook folders, WebViewPane produces another delay when the user works in
the Cached Exchange Mode (see the properties of the Exchange account in Outlook) and the Internet
connection is slow or broken. To bypass this problem, Add-in Express allows reading EntryIDs of those folders
from the registry. Naturally, you are supposed to write appropriate values to the registry at add-in start-up. Here
is the code:
procedure TAddInModule.SaveDefaultFoldersEntryIDToRegistry(
PublicFoldersEntryID, PublicFoldersAllPublicFoldersEntryID,
FolderSyncIssuesEntryID: string);
var
Reg: TRegistry;
begin
Reg := TRegistry.Create;
try
if Reg.OpenKey(self.RegistryKey
+ '\' + ADXXOL + '\'
+ 'FoldersForExcludingFromUseWebViewPaneLayout', true) then begin
if (PublicFoldersEntryID <> EmptyStr) then begin
Reg.WriteString('PublicFolders', PublicFoldersEntryID);
end;
if (PublicFoldersAllPublicFoldersEntryID <> EmptyStr) then begin
Reg.WriteString('PublicFoldersAllPublicFolders',
PublicFoldersAllPublicFoldersEntryID);
end;
if (FolderSyncIssuesEntryID <> EmptyStr) then begin
Reg.WriteString('FolderSyncIssues', FolderSyncIssuesEntryID);
end;
end;
finally
Reg.CloseKey;
Reg.Free;
end;
end;
Form Region Instancing
The user may open multiple Explorer and Inspector windows. That is, the Outlook Forms Manager will create
multiple instances of your form region class now and then. How to retrieve the form instance shown in a
particular Outlook window? How to get all form instances?

106 Add-in Express™
www.add-in-express.com
Add-in Express for Office and Delphi VCL Add-in Express Components
TadxOlFormsCollectionItem.GetForm()
This method returns an instance of your form region in the specified Outlook window.
TadxOlFormsCollectionItem.GetCurrentForm()
This method returns an instance of your form region in the active Outlook window.
Consider the following scenarios:
Calling GetCurrentForm() in the Click event of a Ribbon button is safe because the event can occur in
the active Outlook window only; accordingly, GetCurrentForm() returns the form instance embedded
into the Inspector (Explorer) window in which the button is clicked.
GetCurrentForm() will never find e.g. an Inspector form region if an Explorer window is active;
Some add-in or antivirus may cause the ExplorerSelectionChange event to fire in an inactive Explorer
window; that is, using GetCurrentForm() in an Explorer-related event may produce a wrong result. To
avoid this, use GetForm() or make sure that GetCurrentForm() is called in the active window.
TadxOlFormsCollectionItem.FormInstances[index]
This method allows enumerating all instances of your form region created for the specified
TadxOlFormCollectionItem. Use the FormInstanceCount property to get the total number of form
instances created for this TadxOlFormCollectionItem.
From a Form Instance to the Outlook Object Model
The Outlook Forms Manager creates an instance of your form when the Outlook context matches the settings
of the corresponding TadxOlFormsCollectionItem.
After creating the form instance, the manager sets a number of properties providing entry points to the Outlook
object model; note that these properties are not set when the form region's constructor is running. The
properties are listed below.
TadxOlForm.ExplorerObj If the form is embedded (TadxOlForm.Visible=true) into an Outlook
Explorer window, returns a reference to the corresponding
Outlook2000.Explorer object. Otherwise, returns nil.
TadxOlForm.InspectorObj If the form is embedded (TadxOlForm.Visible=true) into an Outlook
Inspector window, returns a reference to the corresponding
Outlook2000.Inspector object. Otherwise, returns nil.
TadxOlForm.FolderObj If the form is embedded into an Outlook Explorer window
(TadxOlForm.ExplorerObj is not nil), returns a reference to an
Outlook2000.MAPIFolder object representing the current folder in the

107 Add-in Express™
www.add-in-express.com
Add-in Express for Office and Delphi VCL Add-in Express Components
Explorer window.
If the form is embedded into an Outlook Inspector window
(TadxOlForm.InspectorObj is not nil), returns a reference to an
Outlook2000.MAPIFolder object representing the parent folder of the
Outlook item which is shown in the Inspector window.
TadxOlForm.FolderItemsObj If the form is embedded into an Outlook Explorer window
(TadxOlForm.ExplorerObj is not nil), returns a reference to an
Outlook2000.Items object representing the collection of items of the
current folder in the Explorer window.
If the form is embedded into an Outlook inspector window
(TadxOlForm.InspectorObj is not nil), returns a reference to an
Outlook2000.Items object representing the collection of items in the
parent folder of the Outlook item which is shown in the Inspector window.
TadxOlForm.OutlookAppObj Returns a reference to an Outlook2000.Application object
representing the Outlook application into which the add-in is loaded.
Smart Tag
The Kind property of the TadxSmartTag component allows you to choose from two text recognition strategies:
using a list of words in the RecognizedWords string collection, or implementing a custom recognition process
based on the Recognize event of the component. Use the ActionNeeded event to change the Actions
collection according to the current context. The component raises the PropertyPage event when the user
clicks the Property button in the Smart Tags tab (Tools | AutoCorrect Options menu) for your smart tag.
RTD Topic
Use the String## properties to identify the topic of your RTD server. To handle RTD server startup situations
nicely, specify the default value for the topic and using the UseStoredValue property, specify if the RTD
function in Excel returns the default value (UseStoredValue := false) or doesn't change the displayed value
(UseStoredValue := true). The RTD Topic component provides you with the Connect, Disconnect, and
RefreshData events. The last one occurs (for enabled topics only) whenever Excel calls the RTD function.
Host Application Events
Add-in Express provides event components for all Office applications on the Tool Palette: Just add appropriate
Add-in Express event components to the module, and use their event handlers to respond to the host
application events. However, we recommend you to make use of the events provided by the add-in module
before you start using event components.

108 Add-in Express™
www.add-in-express.com
Add-in Express for Office and Delphi VCL Add-in Express Components
MSForms Controls
Add-in Express provides MS Forms control components on the Tool Palette. These components are to be used
on the TadxExcelSheetModule and TadxWordDocumentModule. Add an the appropriate MS Forms
Control Connector to the module. Use the ControlName property of the connector to specify the underlying
control on the Excel worksheet or Word document. Respond to the events provided by the control connector.

109 Add-in Express™
www.add-in-express.com
Add-in Express for Office and Delphi VCL Tips and Notes
Tips and Notes
Terminology
In this document, on our site, and in all our texts we use the terminology suggested by Microsoft for all toolbars,
their controls, and for all interfaces of the Office Type Library. For example:
Command bar is a toolbar, a menu bar, or a context menu.
Command bar control is one of the following: a button, an edit box, a combo box, or a pop-up.
Pop-up can stand for a pop-up menu, a pop-up button on a command bar or a submenu on a menu bar.
Add-in Express uses interfaces from the Office Type Library. We do not describe them here. Please refer to the
VBA help and to the application type libraries.
Getting Help on COM Objects, Properties and Methods
To get assistance with host applications’ objects, their properties, and methods as well as help info, use the
Object Browser. Go to the VBA environment (in the host application, choose menu Tools | Macro | Visual Basic
Editor or just press {Alt+F11}), press {F2}, select the host application in the topmost combo and/or specify a
search string in the search combo. Select a class /property /method and press {F1} to get the help topic that
relates to the object.
COM Add-ins Dialog
In Office 2010-2016 you click File Tab | Options and, on the Add-ins tab, choose COM Add-ins in the Manage
dropdown and click Go.
In Word, Excel, PowerPoint and Access 2007 you click the Office Menu button, then click {Office application}
options and choose the Add-ins tab. Now choose COM Add-ins in the Manage dropdown and click Go.
In all other Office applications, you need to add the COM Add-ins command to a toolbar or menu of your
choice. To do so, follow the steps below:
Open the host application (Outlook, Excel, Word, etc.)
On the Tools menu, click Customize.
Click the Commands tab.
In the Categories list, click the Tools category.

110 Add-in Express™
www.add-in-express.com
Add-in Express for Office and Delphi VCL Tips and Notes
In the Commands list, click COM Add-Ins and drag it to a toolbar or menu of your choice.
In Office 2000-2003, the COM Add-ins dialog shows only add-ins registered in HKCU. In Office 2007-
2016, HKLM-registered add-ins are shown too. See also Registry Entries.
How to Get Access to the Add-in Host Applications
In the add-in module, Add-in Express wizards generate the <HostName>App properties. They return the
Application object (of the OleVariant type) of the host application in which the add-in is currently running.
To identify the host application, you can also use the HostType property of the module.
Registry Entries
COM Add-ins registry entries are located in the following registry branches:
{HKCU or HKLM}\Software\Microsoft\Office\<OfficeApplication>\AddIns\<Add-in
ProgID>
HKEY_CLASSES_ROOT\CLSID\<Add-in Express Project GUID>
See also How to find if Office 64-bit is installed on the target machine.
ControlTag vs. Tag Property
Add-in Express identifies all its controls (command bar controls) by the ControlTag property (the Tag property
of the CommandBarControl interface). The value of this property is generated automatically and you do not
need to change it. For your own needs, use the Tag property instead.
Pop-ups
According to the Microsoft terminology, the term “pop-up” can be used for several controls: pop-up menu, pop-
up button, and submenu. With Add-in Express, you can create your own pop-up as an element of your controls
command bar collection and add any control to it via the Controls property.
However, pop-ups have an annoying feature: if an edit box or a combo box is added to a pop-up, their events
are fired very oddly. Please don’t regard this bug as that of Add-in Express.
Edits and Combo Boxes and the Change Event
The Change event occurs only when the value is changed and the focus is moved off the combobox. This is by
design.
111 Add-in Express™
www.add-in-express.com
Add-in Express for Office and Delphi VCL Tips and Notes
Built-in Controls and Command Bars
You can connect an Add-in Express command bar component to any built-in command bar. For example, you
can add your own controls to the "Standard" command bar or remove some controls from it. To do this just add
a new command bar component to the add-in module and specify the name of the built-in command bar you
need via the CommandBarName property.
In addition, you can add any built-in controls to your own command bars. To do this just add an
ADXCommandBarControl instance to the ADXCommandBar.Controls collection and specify the ID of the
built-in control you need via the Id property.
CommandBar.SupportedApps
Use this property to specify if the command bar is to appear in some or all host applications supported by the
add-in.
Outlook Command Bar Visibility Rules
You can use the FolderName, FolderNames and ItemTypes properties to bind your toolbars to certain
Outlook folders. Your toolbar is shown for a folder:
If its full name (includes the folder path) is found in the FolderName or FolderNames properties.
Or, if the folder type is found in the ItemTypes property.
Removing Custom Command Bars and Controls
Add-in Express removes custom command bars and controls when the add-in is uninstalled. However, this
does not apply to Outlook and Access add-ins. You should set the Temporary property of custom command
bars (and controls) to true to notify the host application that it can remove them itself. If you need to remove a
toolbar or button yourself, use the Tools | Customize dialog.
My Add-in Is Always Disconnected
If your add-in fires exceptions at the startup, the host application can block the add-in and move it to the
Disabled Items list. To find the list, go to "Help" in the host application and then click "About". At the bottom of
the About dialog, there is the Disabled Items button. Check it to see if the add-in is listed there (if so, select it
and click the enable button).
Update Speed for an RTD Server
Microsoft limits the minimal interval between updates to 2 seconds. There is a way to change this minimum
value but Microsoft doesn't recommend doing this.
112 Add-in Express™
www.add-in-express.com
Add-in Express for Office and Delphi VCL Tips and Notes
Sequence of Events When an Office 2007-2016 Custom Task Pane Shows up
AddinModule.OnTaskPaneBeforeCreate
AddinModule.OnTaskPaneAfterCreate
AddinModule.OnTaskPaneBeforeShow
TaskPane.OnVisibleStateChange
AddinModule.OnTaskPaneAfterShow
Adding an Office 2007-2016 Custom Task Pane to an Existing Add-in Express Project
Add an instance of ActiveForm to the project (File | New | Other | ActiveX | Active Form)
Change its AxBorderStyle property to afbNone.
Add the following declaration to the private section of the ActiveForm
procedure WMMouseActivate(var Message: TWMMouseActivate); message
WM_MOUSEACTIVATE;
Change the method code to the following:
var
FocusedWindow: HWND;
CursorPos: TPoint;
begin
inherited;
FocusedWindow := Windows.GetFocus;
if not SearchForHWND(Self, FocusedWindow) then begin
Windows.GetCursorPos(CursorPos);
FocusedWindow := WindowFromPoint(CursorPos);
Windows.SetFocus(FocusedWindow);
Message.Result := MA_ACTIVATE;
end;
Add the following function used by the WMMouseActivate method (place it before the method):
function SearchForHWND(const AControl: TWinControl; Focused: HWND): boolean;
var
i: Integer;
begin
Result := (AControl.Handle = Focused);
if not Result then
for i := 0 to AControl.ControlCount - 1 do

113 Add-in Express™
www.add-in-express.com
Add-in Express for Office and Delphi VCL Tips and Notes
if AControl.Controls[i] is TWinControl then begin
if TWinControl(AControl.Controls[i]).Handle = Focused then begin
Result := True;
Break;
end
else
if TWinControl(AControl.Controls[i]).ControlCount > 0 then begin
Result := SearchForHWND(TWinControl(AControl.Controls[i]), Focused);
if Result then Break;
end;
end;
end;
Add and override the ActiveForm destructor using the following code:
destructor TMyTaskPane.Destroy;
var
ParkingHandle: HWND;
begin
ParkingHandle := FindWindowEx(0, 0, 'DAXParkingWindow', nil);
if ParkingHandle <> 0 then
SendMessage(ParkingHandle, WM_CLOSE, 0, 0);
inherited Destroy;
end;
Now you add an item to the TaskPanes collection of TAddinModule and set its ControlProgID property
to the ProgID of the ActiveForm – just select it from the dropdown list.
Remember about the Title property – the host application generates an exception if this property is left
empty.
Clear the Target File Extension field in the project properties (Project | Options | Application).
Temporary or Not?
According to the help reference for the Office object model contained within Office.DLL (see Getting Help on
COM Objects, Properties and Methods), temporary command bars and controls are removed by the host
application when it is closed.
Normally, the developer has the following alternative: if command bars and controls are temporary, they are
recreated whenever the add-in starts; if they are non-temporary, the installer removes those command bars and
controls from the host. Looking from another angle, you will see that the real alternative is the time required for
start-up against the time required for uninstalling the add-in (the host must be run to remove command bars).
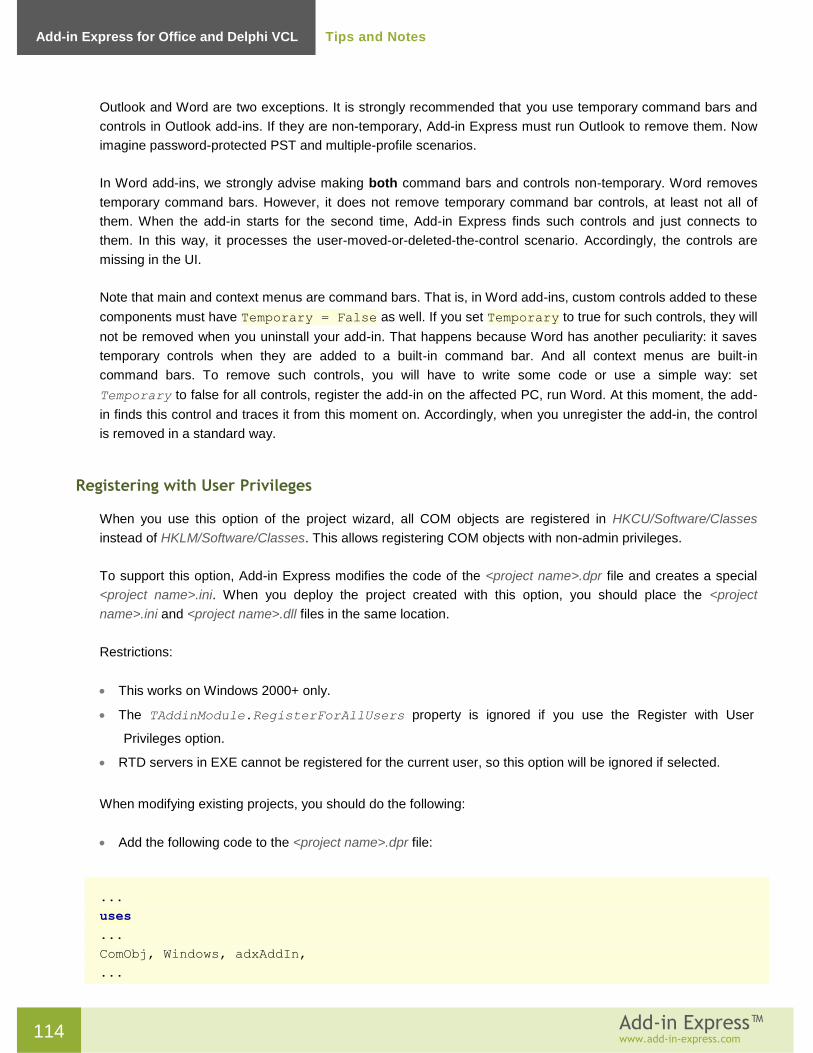
114 Add-in Express™
www.add-in-express.com
Add-in Express for Office and Delphi VCL Tips and Notes
Outlook and Word are two exceptions. It is strongly recommended that you use temporary command bars and
controls in Outlook add-ins. If they are non-temporary, Add-in Express must run Outlook to remove them. Now
imagine password-protected PST and multiple-profile scenarios.
In Word add-ins, we strongly advise making both command bars and controls non-temporary. Word removes
temporary command bars. However, it does not remove temporary command bar controls, at least not all of
them. When the add-in starts for the second time, Add-in Express finds such controls and just connects to
them. In this way, it processes the user-moved-or-deleted-the-control scenario. Accordingly, the controls are
missing in the UI.
Note that main and context menus are command bars. That is, in Word add-ins, custom controls added to these
components must have Temporary = False as well. If you set Temporary to true for such controls, they will
not be removed when you uninstall your add-in. That happens because Word has another peculiarity: it saves
temporary controls when they are added to a built-in command bar. And all context menus are built-in
command bars. To remove such controls, you will have to write some code or use a simple way: set
Temporary to false for all controls, register the add-in on the affected PC, run Word. At this moment, the add-
in finds this control and traces it from this moment on. Accordingly, when you unregister the add-in, the control
is removed in a standard way.
Registering with User Privileges
When you use this option of the project wizard, all COM objects are registered in HKCU/Software/Classes
instead of HKLM/Software/Classes. This allows registering COM objects with non-admin privileges.
To support this option, Add-in Express modifies the code of the <project name>.dpr file and creates a special
<project name>.ini. When you deploy the project created with this option, you should place the <project
name>.ini and <project name>.dll files in the same location.
Restrictions:
This works on Windows 2000+ only.
The TAddinModule.RegisterForAllUsers property is ignored if you use the Register with User
Privileges option.
RTD servers in EXE cannot be registered for the current user, so this option will be ignored if selected.
When modifying existing projects, you should do the following:
Add the following code to the <project name>.dpr file:
...
uses
...
ComObj, Windows, adxAddIn,
...

115 Add-in Express™
www.add-in-express.com
Add-in Express for Office and Delphi VCL Tips and Notes
type
TDummyComServer = class(TObject)
private
procedure FactoryRegister(Factory: TComObjectFactory);
procedure FactoryUnRegister(Factory: TComObjectFactory);
end;
procedure TDummyComServer.FactoryRegister(Factory: TComObjectFactory);
begin
UpdateFactory(Factory, True);
end;
procedure TDummyComServer.FactoryUnRegister(Factory: TComObjectFactory);
begin
UpdateFactory(Factory, False);
end;
function DllRegisterServer: HResult;
begin
Result := E_FAIL;
try
if CheckConfigSection() then begin
RegisterToHKCU := True;
with TDummyComServer.Create do
try
ComClassManager.ForEachFactory(ComServer, FactoryRegister);
finally
Free;
end;
Result := S_OK;
end;
except
end;
if Result <> S_OK then Result := ComServ.DllRegisterServer();
end;
function DllUnregisterServer: HResult;
begin
Result := E_FAIL;
try
if CheckConfigSection() then begin
RegisterToHKCU := True;
with TDummyComServer.Create do
try
ComClassManager.ForEachFactory(ComServer, FactoryUnRegister);
finally
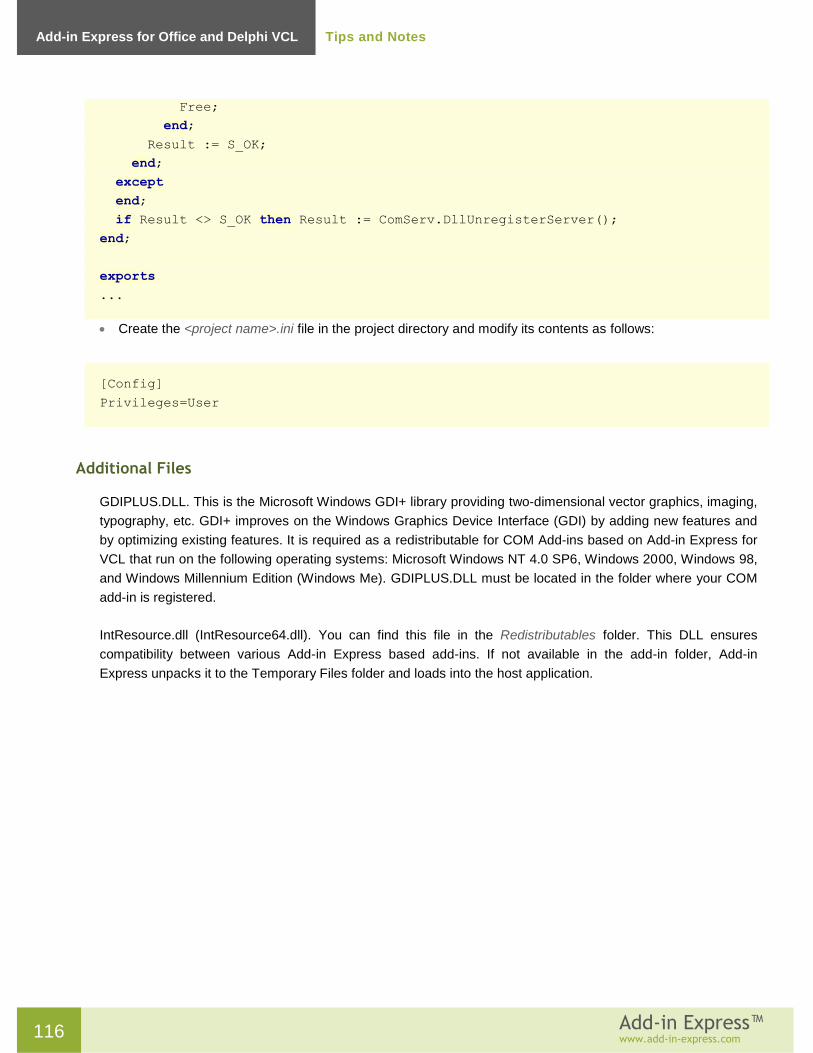
116 Add-in Express™
www.add-in-express.com
Add-in Express for Office and Delphi VCL Tips and Notes
Free;
end;
Result := S_OK;
end;
except
end;
if Result <> S_OK then Result := ComServ.DllUnregisterServer();
end;
exports
...
Create the <project name>.ini file in the project directory and modify its contents as follows:
[Config]
Privileges=User
Additional Files
GDIPLUS.DLL. This is the Microsoft Windows GDI+ library providing two-dimensional vector graphics, imaging,
typography, etc. GDI+ improves on the Windows Graphics Device Interface (GDI) by adding new features and
by optimizing existing features. It is required as a redistributable for COM Add-ins based on Add-in Express for
VCL that run on the following operating systems: Microsoft Windows NT 4.0 SP6, Windows 2000, Windows 98,
and Windows Millennium Edition (Windows Me). GDIPLUS.DLL must be located in the folder where your COM
add-in is registered.
IntResource.dll (IntResource64.dll). You can find this file in the Redistributables folder. This DLL ensures
compatibility between various Add-in Express based add-ins. If not available in the add-in folder, Add-in
Express unpacks it to the Temporary Files folder and loads into the host application.

117 Add-in Express™
www.add-in-express.com
Add-in Express for Office and Delphi VCL Tips and Notes
How to find if Office 64-bit is installed on the target machine
Remember that the 64-bit version of Office can be installed on Windows 64-bit only.
If Outlook is installed, then the value below exists in this registry key:
Outlook 2010-2016:
Registry view: both 32-bit and 64-bit
Key: HKLM\SOFTWARE\Microsoft\Office\{14, 15 or 16}.0\Outlook\InstallRoot
Value name: Bitness
That value can be "x64" or "x86"; "x64" means Outlook 64-bit is installed.
If Outlook is not installed, you can check the following values in the following 64-bit registry key:
Excel, Word, PowerPoint 2010-2016:
Registry view: 64-bit
Key: HKLM\Microsoft\Office\{14, 15 or 16}.0\{application}\InstallRoot
Value name: Path
If that value exists, then the corresponding 64-bit application is installed.
Excel Workbooks
Sometimes you need to automate a given Excel workbook (template). You can do it with
TadxExcelSheetModule that represents one worksheet of the workbook. For the module to recognize the
workbook, you need to fill the following properties: Document, Worksheet, PropertyID, and
PropertyValue. When you fill the PropertyID and PropertyValue properties, the design time code of the
module creates the property in the workbook and specifies its value.
A typical scenario of the module usage includes creating the workbook and designing it with MS Forms
controls. Accordingly, in the IDE, you set up the PropertyID and PropertyValue properties, add Add-in
Express MSForms control components to the module and bind them to the MS Forms controls on the
worksheet. The module provides a full set of events available for the Excel Workbook class.
For the Add-in Express components available for the module see the following chapters: Command Bars:
Toolbars, Menus, and Context Menus, Command Bar Controls, Built-in Control Connector, MSForms Controls,
and Host Application Events.
Word Documents
To automate a given Word document, you use the TadxWordDocumentModule. For the module to recognize
the document, you need to fill the following properties: Document, PropertyID, and PropertyValue. When

118 Add-in Express™
www.add-in-express.com
Add-in Express for Office and Delphi VCL Tips and Notes
you fill the PropertyID and PropertyValue properties, the design time code of the module creates the
property in the document and specifies its value.
A typical scenario of the module usage includes creating a document and designing it with MS Forms controls.
Accordingly, in the IDE, you set up PropertyID and PropertyValue properties, add Add-in Express
MSForms control components to the module and bind them to the MS Forms controls on the document. The
module provides a full set of events available for the Word Document class.
For the Add-in Express components available for the module see the following chapters: Command Bars:
Toolbars, Menus, and Context Menus, Command Bar Controls, Built-in Control Connector, MSForms Controls,
and Host Application Events. The module provides a full set of events available for a Word document.
Don't use any Office object models in the OnCreate and OnDestroy events
Although the add-in module provides the OnCreate and OnDestroy events, using them is not recommended.
The reason is simple: an instance of the module is created when you register/unregister the add-in. And there is
no guarantee that the host application of your add-in will be loaded at that time.

119 Add-in Express™
www.add-in-express.com
Add-in Express for Office and Delphi VCL Final Note
Final Note
If your questions are not answered here, please see the HOWTOs section on www.add-in-express.com . We
are adding sample projects to these pages. A number of sample projects are zipped and published at
http://www.add-in-express.com/downloads/adxvcl.php .


![Inside VCL for PHP / Delphi for PHP F÷ PHP GaGFGsG0Gy6ä$Î · GlGGGMGMG2GVGyFþ i '0¿ Inside VCL for PHP / Delphi for PHP F÷PHP GaGFGsG0Gy6ä$Î G0GXG]G2GnGTG=G\G{GFG 4 ' &kG](https://img.pdfslide.us/doc/110x75/5c01796609d3f2377a8d5369/inside-vcl-for-php-delphi-for-php-f-php-gagfgsg0gy6aei-glgggmgmg2gvgyfb.jpg)


![vcl final[1]](https://img.pdfslide.us/doc/110x75/577ce74c1a28abf10394cdc0/vcl-final1.jpg)