Embed Size (px)
Citation preview

Azure AD UseCases with step by step instruction:
1. Javaa. Java webapplication to AAD using Open ID Connectb. Java Web API to AAD using Oauth (Enable or protect Java Web API by Oauth)c. Java webapplication to Java Web API using Oauth
2. DotNeta. DotNet webapplication to AAD using Open ID Connectb. DOtNet Web API to AAD using Oauth (Enable or protect sample DOtNet Web API by
Oauth)c. DotNet webapplication to Dotnet Web API using Oauth
3. Cross Platforma. Dot Net webapplication to Java Web application integration (Browser Based)b. Integrate Java web application to Dot Net web apic. Integrate Dot net web application to Java Web Api
4. Oauth On behalfa. Dot NET API accessing another Dot Net Web API web API (OAuth on behalf)
5. TTS implementationa. Java application protected by Oauth to java web api protected by Siteminderb. Dotnet application protected by Oauth to DotNet application protected by Siteminderc. Dotnet application protected by Oauth to DotNet web api protected by Siteminder
6. Session timeout -a. Implement session timeout in java - Jsessionidb. Implement Dotnet session timeoutc. Other sessions time out (Access,Oauth etc)
7. SLO -Single Logout – seamless cascading logouta. Embed link for DotNet application log outb. Embed link for Java application Log out
8. B2C:
a. java B2C application protected by AAD B2Cb. java B2C application protected by AAD B2C invoking API protedtec by AAD B2Cc. Java B2C application protected by WB SM to use Azure AD B2C through Bridged. Java B2C application protected by APM to use Azure AD B2C through Bridgee. Java B2C application protected by IFC SM to use Azure AD B2C through Bridge
Introduction:

Usecases:
1.a Java web application to AAD using Open ID Connect
Web Browser to Web Application
This section describes steps to use Azure AD as Identity provider for web applications. The important components are,1. Azure AD - Identity Provider which verifies user’s identity and applications and issues security token once authentication is success2. An Application - that uses Azure AD for authentication. Application must be registered in AAD and unique app id is generated.3. Azure AD authentication libraries - For Java developers use, to communicate with AD and for validation of any token from Azure AD.
Authentication Flow for Browser to Web application
Web application redirects user's browser to authentication endpoint in Azure AD (Screenshot-2) when user requests for secure resources (Screenshot-1).
Screenshot-1

Screenshot-2
Upon successful authentication Azure AD creates an authentication token and returns a sign-in response to the application’s Reply URL that was configured in the Azure Management Portal while registering the application.
Developer Activities:
Java Web Applications uses Microsoft's implementation of the community-driven ADAL4J Libraries for integrating application to Azure AD.
Prerequisites to do this we need to register the application with Azure Ad as mentioned in last section and get Client ID and Secret key.
Here, we will configure the Java Web application to use OpenID Connect authentication protocol and ADAL4J to handle sign-in and sign-out requests.

1. First, Open the application web.xml file located under \war\WEB-INF\ and enter the application configuration values as below,
<?xml version="1.0"?><web-app id="WebApp_ID" version="2.4" xmlns="http://java.sun.com/xml/ns/j2ee" xmlns:xsi="http://www.w3.org/2001/XMLSchema-instance" xsi:schemaLocation="http://java.sun.com/xml/ns/j2eehttp://java.sun.com/xml/ns/j2ee/web-app_2_4.xsd"> <display-name>Archetype Created Web Application</display-name> <context-param> <param-name>authority</param-name> <param-value> https://login.microsoftonline.com/</param-value> </context-param> <context-param> <param-name>tenant</param-name> <param-value> TENANT_NAME</param-value> </context-param>
<filter> <filter-name>BasicFilter</filter-name> <filter-class>com.microsoft.aad.adal4jsample.BasicFilter</filter-class> <init-param> <param-name>client_id</param-name> <param-value>CLIENT_ID</param-value> </init-param> <init-param> <param-name>secret_key</param-name> <param-value>CLIENT_SECRET</param-value> </init-param> </filter>
<filter-mapping> <filter-name>BasicFilter</filter-name> <url-pattern>/secure/*</url-pattern> </filter-mapping></web-app>
The ‘CLIENT_ID’ is the Application Id assigned to the application in the registration portal.The ‘CLIENT_SECRET’ is the Application Secret key created in the portal while registering application.

The `TENANT_NAME’<TSTAD.WORLDBANK.ORG> is the tenant name of the application.
From the XML file we can infer that, whenever application users tries to view resource under /secure then it should pass through a filter called BasicFilter.
2. Create actual JSP pages under WebContent and other Secure resources under \WebContent\secure\
3. Now create other Java Helper files for BasicFilter Class. Create a folder in root directory to save all the Helper Java files. Ex. com.microsoft.aad.adal4jsample
4. Create the Authentication Model files (for BasicFilter)I. We need some more helper files for BasicFilter to handle requests
AuthHelper.java - has methods to determine user logged in status. AuthParameterNames.java - Variables ADAL4j requires
5. Finally create BasicFilter java File to handle requests from JSP files.(Refer the Java File below)
6. Now, resolve all Jar dependencies and build the application.I. Java 7 and above
II. Refer the source code in TFS for other project dependencies.7. Deploy and run the application to use Azure AD login.
REFERENCES:https://azure.microsoft.com/en-us/documentation/articles/active-directory-authentication-scenarios/https://azure.microsoft.com/en-us/documentation/articles/active-directory-protocols-oauth-code/https://docs.microsoft.com/en-us/azure/active-directory/active-directory-devquickstarts-webapp-javahttps://github.com/Azure-Samples/active-directory-java-webapp-openidconnecthttps://docs.microsoft.com/en-us/azure/active-directory/develop/active-directory-protocols-openid-connect-code
2.a: Java Web API to AAD using Oauth (Enable or protect Java Web API by Oauth)
2.b: Java webapplication to Java Web API using Oauth
Web Application to Web API
For a Web Application to get resources from Web API, it requires an authorization code to acquire an access token. To get authorization code, application redirects user to Azure AD’s authorization endpoint along with Client ID and redirect URI for the web application. After successful authentication by user, authorization code is issued by AAD.
Then web Application requests AAD's token end point for access token by providing authorization code, client application details and target resource (Web API). These information’s are validated by AAD and returns a JWT access token and a JWT refresh token.
The returned access token is set as appropriate header field in the request header with Key "Authorization". Value for this header is returned access token with a “Bearer” designation. WebAPI verifies the received token with AAD and if validation is successful then it responds with desired data resource.
Authentication Flow for Web Application to Web API

Developer Activities:
Integrate Web API to AAD:
Here, we will configure the Java Web API to use OAuth 2.0 authorization code and ADAL4J libraries for integrating with AAD.
8. First, Open the application web.xml file located under \war\WEB-INF\ and enter the application configuration values as below,
<?xml version="1.0" encoding="UTF-8"?><web-app id="WebApp_ID" version="2.4" xmlns="http://java.sun.com/xml/ns/j2ee" xmlns:xsi="http://www.w3.org/2001/XMLSchema-instance" xsi:schemaLocation="http://java.sun.com/xml/ns/j2ee http://java.sun.com/xml/ns/j2ee/web-app_2_4.xsd">
<display-name>Web API</display-name>
<context-param><param-name>authority</param-name><param-value>https://login.microsoftonline.com/</param-value>
</context-param><context-param>
<param-name>tenant</param-name><param-value>tstad.worldbank.org</param-value>
</context-param><context-param>
<param-name>resourceid</param-name><param-value>http://localhost:8080/greeting</param-value>
</context-param><filter>
<filter-name>BasicFilter</filter-name><filter-class>org.worldbank.b2b.aad.BasicFilter</filter-class>
</filter><filter-mapping>
<filter-name>BasicFilter</filter-name><url-pattern>/*</url-pattern>
</filter-mapping></web-app>
The “resourceid” is the Web Service Resource Id registered in Azure AD portal.From the XML file we can infer that, whenever an application tries to access resource under /
then it should pass through a filter called BasicFilter.
9. Create Java Helper files for BasicFilter Class.I. Create a folder in root directory to save all the Helper Java files.
Ex. org.worldbank.apiname.aadII. Inside this folder copy the files attached below,
AuthHelper.java - Has methods to determine authentication data.

AuthParameterNames.java - Variables ADAL4j requires
10. Finally create BasicFilter java File to handle requests from Web Application.(Refer the Java File below)
11. Now, resolve all Jar dependencies and build the Web API.I. Java 7 and above
II. Refer the source code in TFS for other project dependencies.12. Deploy and run the API to use Azure AD tokens.
To Consume Web API from Web Application:
Refer the code snippet below to fetch required data from Web API and configure in Web application controller files.Code Snippet:
private String getUsernamesFromGraph(String accessToken) {try {
String urlParameters = "action=check&inputData=testdata";byte[] postData =
urlParameters.getBytes( StandardCharsets.UTF_8 );
URL url = new URL("http://localhost:8080/greeting");
HttpURLConnection conn = (HttpURLConnection) url.openConnection();
conn.setDoOutput(true);
// optional default is GETconn.setRequestMethod("POST");
// Set the appropriate header fields in the request header.conn.setRequestProperty("Authorization", "Bearer " +
accessToken);

conn.setRequestProperty("Content-Type", "application/x-www-form-urlencoded");
conn.setUseCaches (false);
conn.setRequestProperty("Content-Length", Integer.toString(postData.length));
//Send request DataOutputStream wr = new
DataOutputStream( conn.getOutputStream()); wr.write( postData ); wr.close();
String goodRespStr = HttpClientHelper.getResponseStringFromConn(conn, true);
int responseCode = conn.getResponseCode();JSONObject response = HttpClientHelper.processGoodRespStr(responseCode,
XML.toJSONObject(goodRespStr).toString());return response.getJSONObject("responseMsg").toString();
} catch (Exception e) {// TODO Auto-generated catch block
e.printStackTrace();return null;
}}
To Consume Graph API from Web Application to get details from Azure:
The Graph API endpoint https://graph.windows.net/me?api-version=1.6 is the right one to get the UPI of the user. The complete reference is here: https://msdn.microsoft.com/en-us/library/azure/ad/graph/api/signed-in-user-operations which has information regarding how to call the API and the response. The UPI will be returned in the response in an attribute called “extension_d1f2c0509aca4d48927c1e519198c9f1_extensionAttribute14”.
However, in order to call this API, user would need to get an access token that identifies the user. The document https://docs.microsoft.com/en-us/azure/active-directory/develop/active-directory-protocols-oauth-code details how to get an access token using the authorization code. The token endpoint would be https://login.microsoftonline.com/worldbankgroup.org/oauth2/token and the resource would be https://graph.windows.net.

It is not recommended to access the token endpoints directly and fiddle with Authorization codes and access tokens. There are libraries which can be used to do this that abstracts a lot of the details. The ADAL library for PHP is here : https://github.com/introp-software/azure-activedirectory-library-for-php. The section “Authorization code flow” is what is relevant in this context which can be used to get an access token. So, essentially the steps to be followed are:
1. Get an access token for the Graph API either by using the ADAL library or directly using the token endpoint.
2. Call the Graph API endpoint https://graph.windows.net/me?api-version=1.6 with the access token in the Authorization endpoint.
REFERENCES:https://azure.microsoft.com/en-us/documentation/articles/active-directory-authentication-scenarios/https://azure.microsoft.com/en-us/documentation/articles/active-directory-protocols-oauth-code/https://github.com/Azure-Samples/active-directory-java-webapp-openidconnect
3.a DotNet webapplication to AAD using Open ID Connect
Developer Activity:Build DotNet MVC web application that uses OpenID Connect to sign-in users from a single Azure Active Directory tenant, using the ASP.Net OpenID Connect OWIN middleware.
Pre-requisites:
1. ClientID2. TenantID or Tenant name3. Instance4. PostLogoutRedirectURI
Note: AAD admin will provide the ClientID and TenantID/Name once after the application registration.
Create a startup class to initialize OpenID Connect ASP.Net OWIN middleware by passing the Client ID of the application and the URL of the Azure AD tenant where the application is registered. Startup file will fetch the info from web.config file by using the below code and call UseOpenIdConnectAuthentication() method. The middleware then takes care of downloading the Azure AD metadata, finding the signing keys, and finding the issuer name for the tenant. - Processing OpenID Connect sign-in responses by validating the signature and issuer in an incoming JWT, extracting the user's claims, and putting them on

ClaimsPrincipal.Current. - Integrating with the session cookie ASP.Net OWIN middleware to establish a session for the user.
private static string clientId = ConfigurationManager.AppSettings["ida:ClientId"];
private static string aadInstance = ConfigurationManager.AppSettings["ida:AADInstance"];
private static string tenant = ConfigurationManager.AppSettings["ida:Tenant"];
private static string postLogoutRedirectUri = ConfigurationManager.AppSettings["ida:PostLogoutRedirectUri"];
ConfigureAuth method contains 2 middleware to handle the Auth requests.
1. OpenIdConnectAuthentication – Responsible for redirecting to the IDP and consuming the JWS token and validate the user.
2. CookieAuthentication – Once the user is authenticated, CookieAuthetication middleware will set the authenticated cookie for user session. For subsequent call, it will validate against this cookie.
public void ConfigureAuth(IAppBuilder app)
{
app.SetDefaultSignInAsAuthenticationType(CookieAuthenticationDefaults.AuthenticationType);
app.UseCookieAuthentication(new CookieAuthenticationOptions());
app.UseOpenIdConnectAuthentication(
new OpenIdConnectAuthenticationOptions
{
ClientId = clientId,
Authority = authority,
PostLogoutRedirectUri = postLogoutRedirectUri,
RedirectUri = postLogoutRedirectUri,
Notifications = new OpenIdConnectAuthenticationNotifications
{
AuthenticationFailed = context =>
{
context.HandleResponse();
context.Response.Redirect("/Error?message=" + context.Exception.Message);

return Task.FromResult(0);
}
}
});
UseOpenIdConnectAuthentication method reads the application info from web.config file. Notifications is used to give any customized messages, example is custom error pages.
Update the below entries under AppSettings tag in web.config file with the application details.
<add key="ida:ClientId" value="[Enter client ID as obtained from Azure Portal, e.g. 82692da5-a86f-44c9-9d53-2f88d52b478b]" />
<add key="ida:Tenant" value="[Enter tenant name, e.g. contoso.onmicrosoft.com]" />
<add key="ida:AADInstance" value="https://login.microsoftonline.com/{0}" />
<add key="ida:PostLogoutRedirectUri" value="https://localhost:44320/" />
<add key="ida:ClientId" value="efd24e73-9722-42f4-a9f6-b02ef84f4cff" />
<add key="ida:Tenant" value="tstad.worldbank.org" /> or
<add key="ida:Tenant" value=" b39f3320-ad3f-47b9-894d-31e4d3d47acb " />
<add key="ida:AADInstance" value="https://login.microsoftonline.com/{0}" />
<add key="ida:PostLogoutRedirectUri" value="https://wbstst.worldbank.org/TestApp" />
Azure AD needs coordinates to communicate with the application when handling sign-on or exchanging tokens. These include the following:
Application ID URI: The identifier for an application. This value is sent to Azure AD during authentication to indicate which application the caller wants a token for. Additionally, this value is included in the token so that the application knows it was the intended target.
Reply URL and Redirect URI: In the case of a web API or web application, the Reply URL is the location to which Azure AD will send the authentication response, including a token if authentication was successful.
Client ID: The ID for an application, which is generated by Azure AD when the application is registered. When requesting an authorization code or token, the client ID and key are sent to Azure AD during authentication.

Key: The key that is sent along with a client ID when authenticating to Azure AD to call a web API.
Access the application:
When we access the web application which is integrated with Azure AD, the app URL will redirect to the azure login page along with the tenant_Id, client_id, nonce, redirect_URI, response_Mode, response_type, scope and state details.
Format is as below:
GET https://login.microsoftonline.com/{tenant}/oauth2/authorize?
client_id=XXXXX &response_type=XXXXX &redirect_uri=XXXXX &response_mode=XXXXX &scope=XXXXX
&state=XXXXX &nonce=XXXXX.
Example:
https://login.microsoftonline.com/b39f3320-ad3f-47b9-894d-31e4d3d47acb/oauth2/authorize?client_id=38114879-f304-40d2-b5e4-200ad3abd72f&redirect_uri=https%3a%2f%2fwbstst.worldbank.org%2foidcnetwebappwebapi%2f&response_mode=form_post&response_type=code+id_token&scope=openid+profile&state=OpenIdConnect.AuthenticationProperties%3dmFY-gVvoZVA_ArpvrySJEauIORmdzwdKSxw2DQBcpJ3F6tzzZkJnUYirFXMlEmhoVDpCr8UK7HOIqG4eStONpvi7EsZeIhpxokhjezY1gXuFeYL4F1IfqtWaRqNezrRL_qXUATK7fQriy1zwwlXI54WtGFgCBmwZDniOedQmyu7uS8miWiZwcDEkBygjZ7BklqtyVO2Hw18fbwXWaT9d7XtYP4ZnB6pMz77LCfLKy8plffNK-7kgfmXYLG6rkzhQiRROfLt-

59MF3kPq51F8rw&nonce=636150916646747907.NTM2ODQ3MjUtOWU1Ny00OWQzLThkZDQtNmM0OTA1MWY1NDJkOTc0YjRkMDMtYWZhYi00YWEzLTllYTctODljYmQyMmRjYzA3
Tenant ID: This is used to control who can sign into the application
Ex: b39f3320-ad3f-47b9-894d-31e4d3d47acb
client_id: The Application Id assigned to your app when you registered it with Azure AD
Ex: 38114879-f304-40d2-b5e4-200ad3abd72f
redirect_uri: The redirect_uri of your app, where authentication responses can be sent and received by your app. It must exactly match one of the redirect_uris you registered in the portal, except it must be url encoded.
Ex: https%3a%2f%2fwbstst.worldbank.org%2foidcnetwebappwebapi%2f
response_mode: Specifies the method that should be used to send the resulting authorization_code back to your app. Supported values are form_post for HTTP form post or fragment for URL fragment. For web applications we recommend using response_mode=form_post to ensure the most secure transfer of tokens to your application.
Ex: form_post
response_type: Must include id_token for OpenID Connect sign-in. It may also include other response_types, such as code.
Ex: code id_token
scope: A space-separated list of scopes. For OpenID Connect, it must include the scope openid, which translates to the "Sign you in" permission in the consent UI. You may also include other scopes in this request for requesting consent. Ex: openid profile
state: A value included in the request that will also be returned in the token response. It can be a string of any content that you wish. A randomly generated unique value is typically used for preventing cross-site request forgery attacks. The state is also used to encode information about the user's state in the app before the authentication request occurred, such as the page or view they were on.
Ex: OpenIdConnect.AuthenticationProperties%3dmFY-gVvoZVA_ArpvrySJEauIORmdzwdKSxw2DQBcpJ3F6tzzZkJnUYirFXMlEmhoVDpCr8UK7HOIqG4eStONpvi7EsZeIhpxokhjezY1gXuFeYL4F1IfqtWaRqNezrRL_qXUATK7fQriy1zwwlXI54WtGFgCBmwZDniOedQmyu7uS8miWiZwcDEkBygjZ7BklqtyVO2Hw18fbwXWaT9d7XtYP4ZnB6pMz77LCfLKy8plffNK-7kgfmXYLG6rkzhQiRROfLt-59MF3kPq51F8rw&nonce=636150916646747907.NTM2ODQ3MjUtOWU1Ny00OWQzLThkZDQtNmM0OTA1MWY1NDJkOTc0YjRkMDMtYWZhYi00YWEzLTllYTctODljYmQyMmRjYzA3
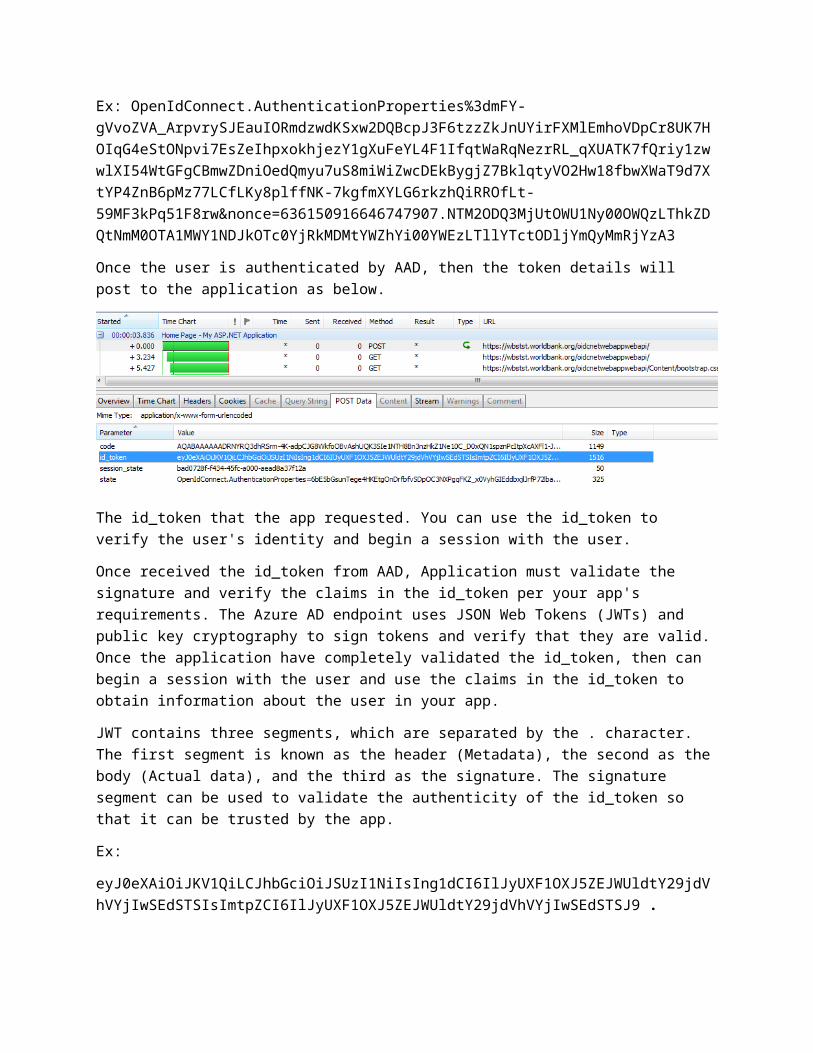
Once the user is authenticated by AAD, then the token details will post to the application as below.

The id_token that the app requested. You can use the id_token to verify the user's identity and begin a session with the user.
Once received the id_token from AAD, Application must validate the signature and verify the claims in the id_token per your app's requirements. The Azure AD endpoint uses JSON Web Tokens (JWTs) and public key cryptography to sign tokens and verify that they are valid. Once the application have completely validated the id_token, then can begin a session with the user and use the claims in the id_token to obtain information about the user in your app.
JWT contains three segments, which are separated by the . character. The first segment is known as the header (Metadata), the second as the body (Actual data), and the third as the signature. The signature segment can be used to validate the authenticity of the id_token so that it can be trusted by the app.
Ex:
eyJ0eXAiOiJKV1QiLCJhbGciOiJSUzI1NiIsIng1dCI6IlJyUXF1OXJ5ZEJWUldtY29jdVhVYjIwSEdSTSIsImtpZCI6IlJyUXF1OXJ5ZEJWUldtY29jdVhVYjIwSEdSTSJ9 .
eyJhdWQiOiIzODExNDg3OS1mMzA0LTQwZDItYjVlNC0yMDBhZDNhYmQ3MmYiLCJpc3MiOiJodHRwczovL3N0cy53aW5kb3dzLm5ldC9iMzlmMzMyMC1hZDNmLTQ3YjktODk0ZC0zMWU0ZDNkNDdhY2IvIiwiaWF0IjoxNDc5NTAwNTMzLCJuYmYiOjE0Nzk1MDA1MzMsImV4cCI6MTQ3OTUwNDQzMywiYW1yIjpbIndpYSIsIm1mYSJdLCJjX2hhc2giOiJfTjBlTTh2WFVhUmU3ZzZpb3FjaE53IiwiZmFtaWx5X25hbWUiOiJIYXphcmF0aGFpYWgiLCJnaXZlbl9uYW1lIjoiYzM1MjI3OSIsImlwYWRkciI6IjExMC4yMjcuMjQyLjg5IiwibmFtZSI6ImMzNTIyNzkgSGF6YXJhdGhhaWFoIiwibm9uY2UiOiI2MzYxNTA5NzQ0MDA1Njk3NzIuTURJeE5URmxZV0V0TWpNMk5DMDBNbVF4TFdGbVl6Z3RZVEV4Tm1GaE1UVTVNREEzWkRaak5UUmpOelV0T1dZMU1pMDBOR1JsTFdJMVlUY3ROMkkwTUdReU1EQmlPVFptIiwib2lkIjoiNjA2NzNlOTctYjBhNi00MDhmLWI0ODYtNDliODc3NTVmODIxIiwib25wcmVtX3NpZCI6IlMtMS01LTIxLTE3NDUzNTQxMzctMTQ4NDU2ODY4My0yNDcxMDU5ODkwLTM0MDIyNiIsInBsYXRmIjoiMyIsInN1YiI6InBpeV9RWjZaR01ZbmxpRkI4eXRvcDdqSEFLLXVRZE1MenB3ajFuNTdnU0EiLCJ0aWQiOiJiMzlmMzMyMC1hZDNmLTQ3YjktODk0ZC0zMWU0ZDNkNDdhY2IiLCJ1bmlxdWVfbmFtZSI6Im8zNjVpY2FtMDA3QHRzdGFkLndvcmxkYmFuay5vcmciLCJ1cG4iOiJvMzY1aWNhbTAwN0B0c3RhZC53b3JsZGJhbmsub3JnIiwidmVyIjoiMS4wIn0.
MF8RvhJ32fCybKBbcxDMnLovZWv2xtw5AFDBQQChQy_ulAY1pGxOwtZqhvNm_rCFo0SrlTfs1zeQpEwg_BOIcyuDLPO51tqqek-AKRJjari710Z-8MLkBaD8ydpiQHZY3MmcP3L4uk1DsDLmWXrceh5dE_7_yLL6-G35rlry2zVO_qKBtPhs-ksJoZHybM_vpOCXSpgck0m5z8d0jGzMRog6AwZbiYnRtAH8Rnl7t7jewROYF_vIlWXiSai8E0K8MIC7Un0sSMLsqYEP7pHT9CCLrXT3dCIU7zHxKQ4RWP05h02qwUHgVBr8AWcbmrefkjgcHOYPGJ1d8bbcrMXGbw

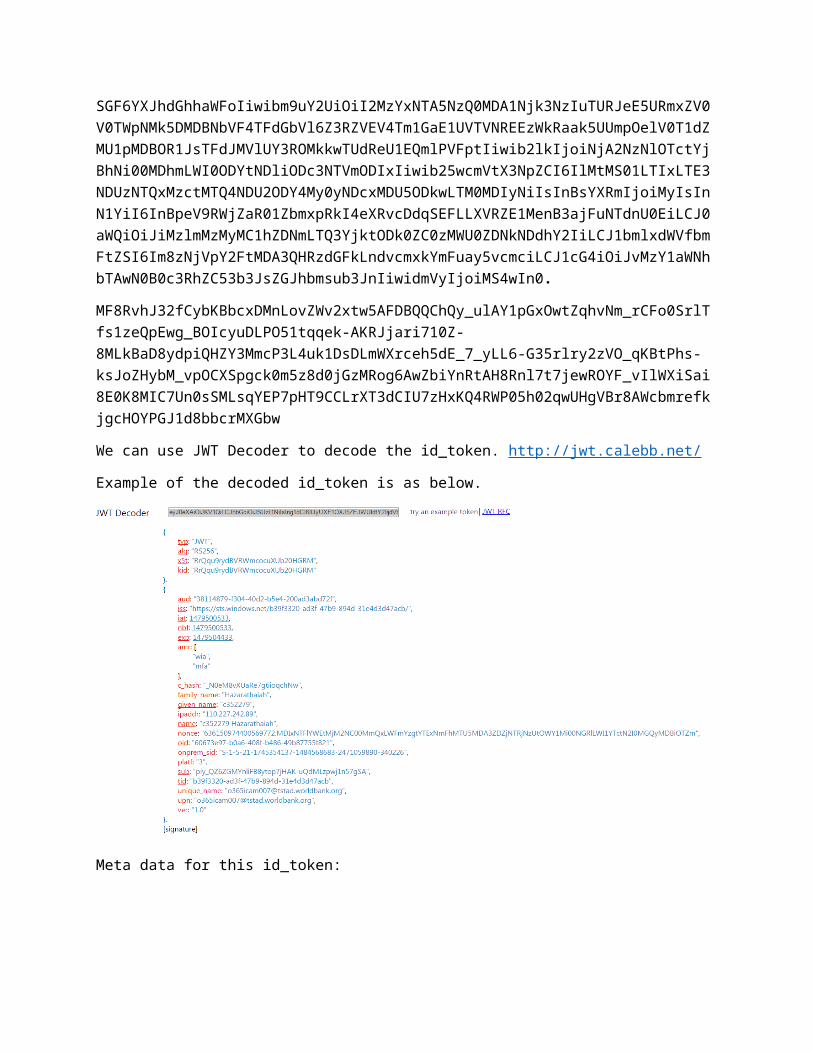
We can use JWT Decoder to decode the id_token. http://jwt.calebb.net/
Example of the decoded id_token is as below.
Meta data for this id_token:
Actual data is:

3.b DOtNet Web API to AAD using Oauth (Enable or protect sample DOtNet Web API by Oauth)
3.c DotNet webapplication to Dotnet Web API using Oauth
WebApp to WebAPI Using OAuthThe resource (Web API) should be consumed by a Client, so the client will be requesting the data from the resource (Web API), but in order for this request to be accepted by the resource, the client must send a valid access token obtained from the Authority service (Azure AD) with each request.
Developer Activities:Building the WebAPI (Backend resource):
Create an empty solution and name it “WebApiAzureActiveDirectory”, then add new empty ASP.NET Web application named “WebApiAzureAD.Api”.

Open NuGet Package Manager Console and install the below NuGet packages needed to setup Owin server and configure ASP.NET Web API to be hosted within an Owin server.
The package “Microsoft.Owin.Host.SystemWeb” is used to enable Owin server to run our API on IIS using ASP.NET request pipeline as eventually we’ll host this API on Microsoft Azure Websites which uses IIS.
The package “Microsoft.Owin.Security.ActiveDirectory” is responsible to configure Owin middle-ware server to use Microsoft Azure Active Directory to offload the authentication process to it.
Create a startup class
“ConfigureAuth(IAppBuilder app)” method tells our Web API that the authentication middle ware which will be used is going to be “Windows Azure Active Directory Bearer Tokens” for the specified Active Directory “Tenant” and “Audience” (APP ID URI). Now any Api Controller added to this Web Api and decorated with [Authorize] attribute will only understand bearer tokens issued from this specified Active Directory Tenant and Application, any other form of tokens will be rejected and HTTP status code 401 will be returned.
It is a good practice to store the values for your Audience, Tenant, Secrets, etc… in a configuration file and not to hard-code them, so open the web.config file and add the “appSettings” as below.

Create “WebApiConfig.cs” class under folder “App_Start” which contains the below code
Create a secure controller to serve the Orders. “secure” controller is a controller with [Authorize] attribute and can be accessed only when the request contains a valid access token issued by our Azure AD tenant for this app only.
Building the Client Application:
We are creating the Client application to access the webapi.

To build the client application, we can use any type of client application (console app, WPF, windows forms app, etc..). Here we are using windows form application to create a new project named “WebApiAzureAD.Client”.
Once the project is added to the solution, we need to add some new keys to the “app.config” file which we’ll use to communicate with our Azure AD tenant as below.
<appSettings> <add key="ida:AADInstance" value="https://login.microsoftonline.com/{0}" /> <add key="ida:Tenant" value="b39f3320-ad3f-47b9-894d-31e4d3d47acb" /> <add key="ida:ClientId" value="1c92b0cc-6d13-497d-87da-bef413c9f26f" /> <add key="ida:RedirectUri" value="http://WebApiAzureADClient" /> <add key="ApiResourceId" value="http://wbstst.worldbank.org/WebApiAzureAD" /> <add key="ApiBaseAddress" value="http://wbtst.worldbank.org/" /></appSettings>
“ClientId” key is coming from the “Client Id” value for the client we defined in Azure AD, and the same applies for the key “RedirectUri”.
For the value for “ApiResourceId” and “ApiBaseAddress” both values are coming from the back-end API application we already registered with Azure AD.
Install the below Nuget packages in order to be able to call the back-end API and our Azure AD tenant to obtain tokens.
Microsoft.Net.Http --> It is responsible to HttpClient for sending requests over HTTP, as well as HttpRequestMessage and HttpResponseMessage for processing HTTP messages.
Microsoft.IdentityModel.Clients.ActiveDirector --> It represents Azure AD Authentication Library (ADAL) which is used to enable a .NET client application to authenticate users against Azure AD and obtain access tokens to call back-end Web API.
Implement the logic in the client application as below which is responsible to obtain the access token from our Azure AD tenant, then use this access token to access the secured API end point.

This code will inform the client application what is the Uri/name for Azure AD tenant that it should call, the client id we obtained after registering the client application in Azure AD. As well we need to read the App Id Uri (ApiResourceId) which tells the client which Web API it should call to get the data from.
We’ve created an instance of the “AuthenticationContext” class, this instance will represent the authority that our client will work with.
Now we’ll call the method “AcquireToken” which will be responsible to do internally the heavy lifting for us and the communication with our authority to obtain an access token. To do so and as we are building client application we need to pass three parameters which they are: a. The resource which the token will be sent to, b. The client id. c. The redirect uri for this client.
AuthenticationContext class which is part of ADAL will take care of showing the authentication dialog in a popup and do the right communication with the correct end point where the end user will be able to provide his AD credentials, there is no need to write any extra single line of code to do this.
After the user provides his valid AD credentials, a token is obtained and returned as property in the “AuthenticationResult” response along with other properties.

Now we need to do an ordinary HTTP GET method to our secure end point (/api/orders) and we’ve to pass this obtained access token in the authorization header using a bearer scheme. If everything goes correctly we’ll receive HTTP status code 200 along with the secured orders data.
Testing the Solution:
Right click on Web Api project “WebApiAzureAD.Api” select “Debug” then “Start New Instance”, then jump to desktop application and do the same, start new instance, click on the button and you will see the ADAL authentication dialog popups as the image blow.
Fill the credentials for an AD user registered in our tenant and click sign in, if the credentials provided is correct you will receive an access token as the image below, this access token will be sent int the authorization header for the GET request and you will receive your orders data.

Now if you tried to click on the button again without terminating the client app, then you will notice that the ADAL authorization popup will not show up again and you get the token directly without providing any credentials from the built-in token cache which keeps track of the tokens.
3. Cross Platform -
a. Dot Net webapplication to Java Web application integration (Browser Based)
DotNet webapplication to Java Web ApplicationThere is nothing specific between .net and Java applications. This is just classic web based single sign on between multiple web applications. Follow the regular approach as below.
Developer Activity:Build DotNet MVC web application that uses OpenID Connect to sign-in users from a single Azure Active Directory tenant, using the ASP.Net OpenID Connect OWIN middleware.
Pre-requisites:
5. ClientID6. TenantID or Tenant name7. Instance8. PostLogoutRedirectURI
Note: AAD admin will provide the ClientID and TenantID/Name once after the application registration.
Create a startup class to initialize OpenID Connect ASP.Net OWIN middleware by passing the Client ID of the application and the URL of the Azure AD tenant where the application is registered. Startup file will fetch the info from web.config file by using the below code and call UseOpenIdConnectAuthentication() method. The middleware then takes care of downloading the Azure AD metadata, finding the signing keys, and finding the issuer name for the tenant. - Processing OpenID Connect sign-in responses by validating the signature and issuer in an incoming JWT, extracting the user's claims, and putting them on ClaimsPrincipal.Current. - Integrating with the session cookie ASP.Net OWIN middleware to establish a session for the user.
private static string clientId = ConfigurationManager.AppSettings["ida:ClientId"];
private static string aadInstance = ConfigurationManager.AppSettings["ida:AADInstance"];
private static string tenant = ConfigurationManager.AppSettings["ida:Tenant"];
private static string postLogoutRedirectUri = ConfigurationManager.AppSettings["ida:PostLogoutRedirectUri"];

ConfigureAuth method contains 2 middleware to handle the Auth requests.
3. OpenIdConnectAuthentication – Responsible for redirecting to the IDP and consuming the JWS token and validate the user.
4. CookieAuthentication – Once the user is authenticated, CookieAuthetication middleware will set the authenticated cookie for user session. For subsequent call, it will validate against this cookie.
public void ConfigureAuth(IAppBuilder app)
{
app.SetDefaultSignInAsAuthenticationType(CookieAuthenticationDefaults.AuthenticationType);
app.UseCookieAuthentication(new CookieAuthenticationOptions());
app.UseOpenIdConnectAuthentication(
new OpenIdConnectAuthenticationOptions
{
ClientId = clientId,
Authority = authority,
PostLogoutRedirectUri = postLogoutRedirectUri,
RedirectUri = postLogoutRedirectUri,
Notifications = new OpenIdConnectAuthenticationNotifications
{
AuthenticationFailed = context =>
{
context.HandleResponse();
context.Response.Redirect("/Error?message=" + context.Exception.Message);
return Task.FromResult(0);
}
}
});
UseOpenIdConnectAuthentication method reads the application info from web.config file. Notifications is used to give any customized messages, example is custom error pages.

Update the below entries under AppSettings tag in web.config file with the application details.
<add key="ida:ClientId" value="[Enter client ID as obtained from Azure Portal, e.g. 82692da5-a86f-44c9-9d53-2f88d52b478b]" />
<add key="ida:Tenant" value="[Enter tenant name, e.g. contoso.onmicrosoft.com]" />
<add key="ida:AADInstance" value="https://login.microsoftonline.com/{0}" />
<add key="ida:PostLogoutRedirectUri" value="https://localhost:44320/" />
<add key="ida:ClientId" value="efd24e73-9722-42f4-a9f6-b02ef84f4cff" />
<add key="ida:Tenant" value="tstad.worldbank.org" /> or
<add key="ida:Tenant" value=" b39f3320-ad3f-47b9-894d-31e4d3d47acb " />
<add key="ida:AADInstance" value="https://login.microsoftonline.com/{0}" />
<add key="ida:PostLogoutRedirectUri" value="https://wbstst.worldbank.org/TestApp" />
Azure AD needs coordinates to communicate with the application when handling sign-on or exchanging tokens. These include the following:
Application ID URI: The identifier for an application. This value is sent to Azure AD during authentication to indicate which application the caller wants a token for. Additionally, this value is included in the token so that the application knows it was the intended target.
Reply URL and Redirect URI: In the case of a web API or web application, the Reply URL is the location to which Azure AD will send the authentication response, including a token if authentication was successful.
Client ID: The ID for an application, which is generated by Azure AD when the application is registered. When requesting an authorization code or token, the client ID and key are sent to Azure AD during authentication.
Key: The key that is sent along with a client ID when authenticating to Azure AD to call a web API.
Access the application:
When we access the web application which is integrated with Azure AD, the app URL will redirect to the azure login page along with the tenant_Id, client_id, nonce, redirect_URI, response_Mode, response_type, scope and state details.

Format is as below:
GET https://login.microsoftonline.com/{tenant}/oauth2/authorize?
client_id=XXXXX &response_type=XXXXX &redirect_uri=XXXXX &response_mode=XXXXX &scope=XXXXX
&state=XXXXX &nonce=XXXXX.
Example:
https://login.microsoftonline.com/b39f3320-ad3f-47b9-894d-31e4d3d47acb/oauth2/authorize?client_id=38114879-f304-40d2-b5e4-200ad3abd72f&redirect_uri=https%3a%2f%2fwbstst.worldbank.org%2foidcnetwebappwebapi%2f&response_mode=form_post&response_type=code+id_token&scope=openid+profile&state=OpenIdConnect.AuthenticationProperties%3dmFY-gVvoZVA_ArpvrySJEauIORmdzwdKSxw2DQBcpJ3F6tzzZkJnUYirFXMlEmhoVDpCr8UK7HOIqG4eStONpvi7EsZeIhpxokhjezY1gXuFeYL4F1IfqtWaRqNezrRL_qXUATK7fQriy1zwwlXI54WtGFgCBmwZDniOedQmyu7uS8miWiZwcDEkBygjZ7BklqtyVO2Hw18fbwXWaT9d7XtYP4ZnB6pMz77LCfLKy8plffNK-7kgfmXYLG6rkzhQiRROfLt-59MF3kPq51F8rw&nonce=636150916646747907.NTM2ODQ3MjUtOWU1Ny00OWQzLThkZDQtNmM0OTA1MWY1NDJkOTc0YjRkMDMtYWZhYi00YWEzLTllYTctODljYmQyMmRjYzA3
Tenant ID: This is used to control who can sign into the application
Ex: b39f3320-ad3f-47b9-894d-31e4d3d47acb
client_id: The Application Id assigned to your app when you registered it with Azure AD
Ex: 38114879-f304-40d2-b5e4-200ad3abd72f

redirect_uri: The redirect_uri of your app, where authentication responses can be sent and received by your app. It must exactly match one of the redirect_uris you registered in the portal, except it must be url encoded.
Ex: https%3a%2f%2fwbstst.worldbank.org%2foidcnetwebappwebapi%2f
response_mode: Specifies the method that should be used to send the resulting authorization_code back to your app. Supported values are form_post for HTTP form post or fragment for URL fragment. For web applications we recommend using response_mode=form_post to ensure the most secure transfer of tokens to your application.
Ex: form_post
response_type: Must include id_token for OpenID Connect sign-in. It may also include other response_types, such as code.
Ex: code id_token
scope: A space-separated list of scopes. For OpenID Connect, it must include the scope openid, which translates to the "Sign you in" permission in the consent UI. You may also include other scopes in this request for requesting consent. Ex: openid profile
state: A value included in the request that will also be returned in the token response. It can be a string of any content that you wish. A randomly generated unique value is typically used for preventing cross-site request forgery attacks. The state is also used to encode information about the user's state in the app before the authentication request occurred, such as the page or view they were on.
Ex: OpenIdConnect.AuthenticationProperties%3dmFY-gVvoZVA_ArpvrySJEauIORmdzwdKSxw2DQBcpJ3F6tzzZkJnUYirFXMlEmhoVDpCr8UK7HOIqG4eStONpvi7EsZeIhpxokhjezY1gXuFeYL4F1IfqtWaRqNezrRL_qXUATK7fQriy1zwwlXI54WtGFgCBmwZDniOedQmyu7uS8miWiZwcDEkBygjZ7BklqtyVO2Hw18fbwXWaT9d7XtYP4ZnB6pMz77LCfLKy8plffNK-7kgfmXYLG6rkzhQiRROfLt-59MF3kPq51F8rw&nonce=636150916646747907.NTM2ODQ3MjUtOWU1Ny00OWQzLThkZDQtNmM0OTA1MWY1NDJkOTc0YjRkMDMtYWZhYi00YWEzLTllYTctODljYmQyMmRjYzA3
Once the user is authenticated by AAD, then the token details will post to the application as below.
The id_token that the app requested. You can use the id_token to verify the user's identity and begin a session with the user.

Once received the id_token from AAD, Application must validate the signature and verify the claims in the id_token per your app's requirements. The Azure AD endpoint uses JSON Web Tokens (JWTs) and public key cryptography to sign tokens and verify that they are valid. Once the application have completely validated the id_token, then can begin a session with the user and use the claims in the id_token to obtain information about the user in your app.
JWT contains three segments, which are separated by the . character. The first segment is known as the header (Metadata), the second as the body (Actual data), and the third as the signature. The signature segment can be used to validate the authenticity of the id_token so that it can be trusted by the app.
Ex:
eyJ0eXAiOiJKV1QiLCJhbGciOiJSUzI1NiIsIng1dCI6IlJyUXF1OXJ5ZEJWUldtY29jdVhVYjIwSEdSTSIsImtpZCI6IlJyUXF1OXJ5ZEJWUldtY29jdVhVYjIwSEdSTSJ9 .
eyJhdWQiOiIzODExNDg3OS1mMzA0LTQwZDItYjVlNC0yMDBhZDNhYmQ3MmYiLCJpc3MiOiJodHRwczovL3N0cy53aW5kb3dzLm5ldC9iMzlmMzMyMC1hZDNmLTQ3YjktODk0ZC0zMWU0ZDNkNDdhY2IvIiwiaWF0IjoxNDc5NTAwNTMzLCJuYmYiOjE0Nzk1MDA1MzMsImV4cCI6MTQ3OTUwNDQzMywiYW1yIjpbIndpYSIsIm1mYSJdLCJjX2hhc2giOiJfTjBlTTh2WFVhUmU3ZzZpb3FjaE53IiwiZmFtaWx5X25hbWUiOiJIYXphcmF0aGFpYWgiLCJnaXZlbl9uYW1lIjoiYzM1MjI3OSIsImlwYWRkciI6IjExMC4yMjcuMjQyLjg5IiwibmFtZSI6ImMzNTIyNzkgSGF6YXJhdGhhaWFoIiwibm9uY2UiOiI2MzYxNTA5NzQ0MDA1Njk3NzIuTURJeE5URmxZV0V0TWpNMk5DMDBNbVF4TFdGbVl6Z3RZVEV4Tm1GaE1UVTVNREEzWkRaak5UUmpOelV0T1dZMU1pMDBOR1JsTFdJMVlUY3ROMkkwTUdReU1EQmlPVFptIiwib2lkIjoiNjA2NzNlOTctYjBhNi00MDhmLWI0ODYtNDliODc3NTVmODIxIiwib25wcmVtX3NpZCI6IlMtMS01LTIxLTE3NDUzNTQxMzctMTQ4NDU2ODY4My0yNDcxMDU5ODkwLTM0MDIyNiIsInBsYXRmIjoiMyIsInN1YiI6InBpeV9RWjZaR01ZbmxpRkI4eXRvcDdqSEFLLXVRZE1MenB3ajFuNTdnU0EiLCJ0aWQiOiJiMzlmMzMyMC1hZDNmLTQ3YjktODk0ZC0zMWU0ZDNkNDdhY2IiLCJ1bmlxdWVfbmFtZSI6Im8zNjVpY2FtMDA3QHRzdGFkLndvcmxkYmFuay5vcmciLCJ1cG4iOiJvMzY1aWNhbTAwN0B0c3RhZC53b3JsZGJhbmsub3JnIiwidmVyIjoiMS4wIn0.
MF8RvhJ32fCybKBbcxDMnLovZWv2xtw5AFDBQQChQy_ulAY1pGxOwtZqhvNm_rCFo0SrlTfs1zeQpEwg_BOIcyuDLPO51tqqek-AKRJjari710Z-8MLkBaD8ydpiQHZY3MmcP3L4uk1DsDLmWXrceh5dE_7_yLL6-G35rlry2zVO_qKBtPhs-ksJoZHybM_vpOCXSpgck0m5z8d0jGzMRog6AwZbiYnRtAH8Rnl7t7jewROYF_vIlWXiSai8E0K8MIC7Un0sSMLsqYEP7pHT9CCLrXT3dCIU7zHxKQ4RWP05h02qwUHgVBr8AWcbmrefkjgcHOYPGJ1d8bbcrMXGbw
We can use JWT Decoder to decode the id_token. http://jwt.calebb.net/
Example of the decoded id_token is as below.
Meta data for this id_token:
Actual data is:

b. Integrate Java web application to Dot Net web api
c. Integrate Dot net web application to Java Web ApiDotnet WebApp call Java WebAPI Using
OAuthThe resource (Web API) should be consumed by a Client, so the client will be requesting the data from the resource (Web API), but in order for this request to be accepted by the resource, the client must send a valid access token obtained from the Authority service (Azure AD) with each request.
Building the Client Application:
We are creating the Client application to access the webapi.
To build the client application, we can use any type of client application (console app, WPF, windows forms app, etc..). Here we are using windows form application to create a new project named “WebApiAzureAD.Client”.
Once the project is added to the solution, we need to add some new keys to the “app.config” file which we’ll use to communicate with our Azure AD tenant as below.
<appSettings> <add key="ida:AADInstance" value="https://login.microsoftonline.com/{0}" /> <add key="ida:Tenant" value="b39f3320-ad3f-47b9-894d-31e4d3d47acb" /> <add key="ida:ClientId" value="1c92b0cc-6d13-497d-87da-bef413c9f26f" /> <add key="ida:RedirectUri" value="http://WebApiAzureADClient" /> <add key="ApiResourceId" value="http://wbstst.worldbank.org/j2ewebapi" /> <add key="ApiBaseAddress" value="http://wbtst.worldbank.org/" /></appSettings>
“ClientId” key is coming from the “Client Id” value for the client we defined in Azure AD, and the same applies for the key “RedirectUri”.
For the value for “ApiResourceId” and “ApiBaseAddress” both values are coming from the back-end API application we already registered with Azure AD.
Install the below Nuget packages in order to be able to call the back-end API and our Azure AD tenant to obtain tokens.
Microsoft.Net.Http --> It is responsible to HttpClient for sending requests over HTTP, as well as HttpRequestMessage and HttpResponseMessage for processing HTTP messages.

Microsoft.IdentityModel.Clients.ActiveDirector --> It represents Azure AD Authentication Library (ADAL) which is used to enable a .NET client application to authenticate users against Azure AD and obtain access tokens to call back-end Web API.
Implement the logic in the client application as below which is responsible to obtain the access token from our Azure AD tenant, then use this access token to access the secured API end point.
This code will inform the client application what is the Uri/name for Azure AD tenant that it should call, the client id we obtained after registering the client application in Azure AD. As well we need to read the App Id Uri (ApiResourceId) which tells the client which Web API it should call to get the data from.
We’ve created an instance of the “AuthenticationContext” class, this instance will represent the authority that our client will work with.
Now we’ll call the method “AcquireToken” which will be responsible to do internally the heavy lifting for us and the communication with our authority to obtain an access token. To do so and as we are building client application we need to pass three parameters which they are: a. The resource which the token will be sent to, b. The client id. c. The redirect uri for this client.

AuthenticationContext class which is part of ADAL will take care of showing the authentication dialog in a popup and do the right communication with the correct end point where the end user will be able to provide his AD credentials, there is no need to write any extra single line of code to do this.
After the user provides his valid AD credentials, a token is obtained and returned as property in the “AuthenticationResult” response along with other properties.
Now we need to do an ordinary HTTP GET method to our secure end point (/api/orders) and we’ve to pass this obtained access token in the authorization header using a bearer scheme. If everything goes correctly we’ll receive HTTP status code 200 along with the secured orders data.
Testing the Solution:
Right click on Web Api project “WebApiAzureAD.Api” select “Debug” then “Start New Instance”, then jump to desktop application and do the same, start new instance, click on the button and you will see the ADAL authentication dialog popups as the image blow.

Fill the credentials for an AD user registered in our tenant and click sign in, if the credentials provided is correct you will receive an access token as the image below, this access token will be sent int the authorization header for the GET request and you will receive your orders data.
Now if you tried to click on the button again without terminating the client app, then you will notice that the ADAL authorization popup will not show up again and you get the token directly without providing any credentials from the built-in token cache which keeps track of the tokens.

4 Oauth On behalf
Dot NET API accessing another Dot Net Web API web API (OAuth on behalf)Developer Activities:
Update the web.config files of both Web App and Web API with the details received from Admins.
Open the web app’s web.config file and update the below.
<add key="ida:ClientId" value="b9c10fa5-6beb-4ce9-8b7c-616bfc843f45" />
<add key="ida:AppKey" value="Yea3I3ToGHP4gx761ZP6M786aghwV/XJrLnxkckkcuU=" />
<add key="ida:Tenant" value="tstad.worldbank.org" />
<add key="ida:AADInstance" value="https://login.microsoftonline.com/{0}" />
<add key="ida:RedirectUri" value="https://wbstst.worldbank.org/oidcnetonbehalfof/" />
Now update the web api details with web app’s web.config file.
<add key="todo:TodoListResourceid" value="https://wbstst.worldbank.org/oauthnetonbehalfofwebapi" />
<add key="todo:TodoListBaseAddress" value="https://wbstst.worldbank.org/oauthnetonbehalfofwebapi" />
In this example, we will be calling graph api as a second web api. Add the entries as below.
<add key="ida:GraphResourceId" value="https://graph.windows.net" />
<add key="ida:GraphUserUrl" value="https://graph.windows.net/{0}/me?api-version=2013-11-08" />
Open the Web API’s web.config file and update the details which are received from Admins as below.
<add key="ida:Tenant" value="tstad.worldbank.org" />
<add key="ida:Audience" value="https://wbstst.worldbank.org/oauthnetonbehalfofwebapi" />
<add key="ida:ClientID" value="74e37b1b-36f8-4ae9-9e77-d12612c78fac" />
<add key="ida:AppKey" value="wb/GwAEX8eBDBoXS8Yfqp8vVJjgejhg5gAYTzXAIEl8=" />
<add key="ida:AADInstance" value="https://login.microsoftonline.com/{0}" />

Update the graph api’s details in web.config file.
<add key="ida:GraphResourceId" value="https://graph.windows.net" />
<add key="ida:GraphUserUrl" value="https://graph.windows.net/{0}/me?api-version=2013-11-08" />
Call the downline webapi as below by passing ResouceID, access token and user name.
5. TTS implementationa. Java application protected by Oauth to java web api protected by
Siteminder
Java Web Application - TTS
We use Token Translation Service for acquiring a SiteMinder/APM Cookie to access Siteminder or APM protected application or Web APIs. It is a service to get a SiteMinder/APM cookie needed for access to a backend service from a front end application authenticated against Azure AD using OpenID Connect/OAuth 2.0.
TTS is a REST endpoint which looks like an OAuth 2.0 Token Issuance Endpoint. Accepts OAuth 2.0 Authorization code, Refresh Tokens or Access Tokens issued by AAD and returns SiteMinder/APM cookie as response which looks like a regular OAuth 2.0 token
response. Makes it easy for developers to get SiteMinder/APM Cookies for downstream resources using standard ADAL libraries.
Web App to Web API Flow when both rely on AAD:
Web App to Web API Flow with Token Translation Service:

Admin Activities:
1. Register the Web API to use Azure Active DirectoryFirst register the TTS service as like other web API in Azure Active Directory.
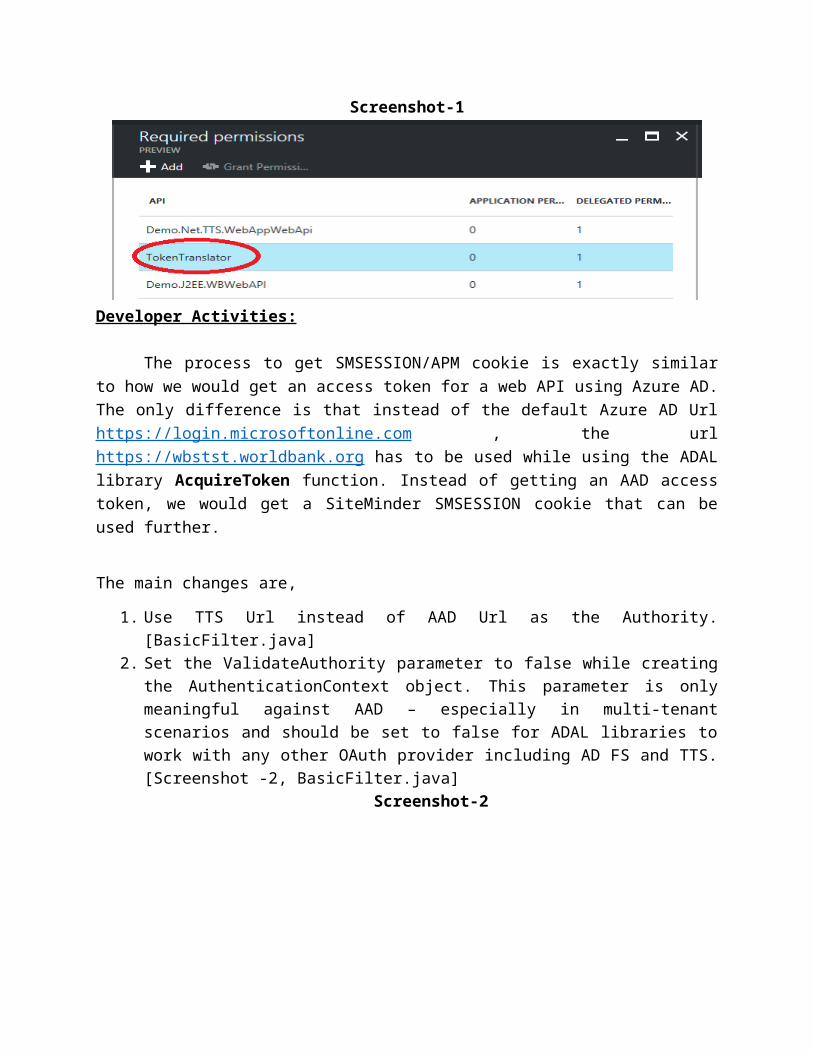
2. Configure Application to use TTS,a. Identify the application which needs Token translation service and add required
permissions to the application in AAD to get SMSESSION/APM cookie from TTS. [Screenshot - 1]
b. In AAD, instead of providing delegated permissions on the web app for the web API, the delegation permissions should be provided to the TTS application registered in Azure AD
Screenshot-1
Developer Activities:

The process to get SMSESSION/APM cookie is exactly similar to how we would get an access token for a web API using Azure AD. The only difference is that instead of the default Azure AD Url https://login.microsoftonline.com , the url https://wbstst.worldbank.org has to be used while using the ADAL library AcquireToken function. Instead of getting an AAD access token, we would get a SiteMinder SMSESSION cookie that can be used further.
The main changes are,
1. Use TTS Url instead of AAD Url as the Authority. [BasicFilter.java] 2. Set the ValidateAuthority parameter to false while creating the AuthenticationContext
object. This parameter is only meaningful against AAD – especially in multi-tenant scenarios and should be set to false for ADAL libraries to work with any other OAuth provider including AD FS and TTS. [Screenshot -2, BasicFilter.java]
Screenshot-2
3. Configure the resourceid in web.xml to use it while redirecting to AAD login.
<context-param> <param-name>resourceid</param-name> <param-value>https://wbstst.worldbank.org/TokenTranslationService</param-value> </context-param>
4. Configure filter class required in web.xml based on number of trust level. Here in demo application we have used Low and high trust levels and configured with two filter names. Filter 1 has Low trust application and another has High trust application.
5. Conditional access policy is used for High trust level application to protect the client application by MFA login. So the SMSESSION retrieved from TTS using this authorization code can be used for High trust siteminder application.
Verifying cookie retrieved from TTS,

Use the received SMSESSION token from TTS on configured demo applications protected by IFC and WB Siteminder with Low, Medium and High trust levels. To get SMSESSION cookie for these trust levels, we use single factor and Multi- factor authentication in AAD login.
Accessing TTS with authorization code from single factor login returns low trust SMSESSION cookie.
Similarly, authorization code from MFA returns High trust SMSESSION cookie from TTS.
Use the SMSESSION cookie retrieved from TTS to access siteminder/APM protected applications and fetch data from desired target.
Java Files:
Web.xml:
b. Dotnet application protected by Oauth to DotNet application protected by Siteminder
c. Dotnet application protected by Oauth to DotNet web api protected by Siteminder
6. Session timeout -a. Implement session timeout in java – Jsessionid
Session Timeout - Logout – Reauthenticate
Session timeout in a web application
The session-timeout element defines the default session timeout interval for all sessions created in the web application. We can configure the session timeout in deployment descriptor (web.xml).

<!-- ==================== Default Session Configuration ================= --><!-- You can set the default session timeout (in minutes) for all newly --><!-- created sessions by modifying the value below. --><web-app …> <session-config> <session-timeout>1</session-timeout> </session-config></web-app>
b. Implement Dotnet session timeoutc. Other sessions time out (Access,Oauth etc)
7. SLO -Single Logout – seamless cascading logouta. Embed link for DotNet application log out
8.Signout functionality 9. Add the PostLogoutRedirectUri in web.config file as below. Once after the user signout, the
application will redirect to the specified URI in this parameter.10.<appSettings>11. <add key="ida:PostLogoutRedirectUri" value="
https://wbtst.worldbank.org/testwebapp" />12. </appSettings>13. Fetch the postredirecturi as below from configuration file.14.private static string postLogoutRedirectUri =
ConfigurationManager.AppSettings["ida:PostLogoutRedirectUri"];15.Pass the postredirecturi value to authentication method along with other
parameters.16.app.UseOpenIdConnectAuthentication(17. new OpenIdConnectAuthenticationOptions18. {19. ClientId = clientId,20. Authority = authority,21. PostLogoutRedirectUri = postLogoutRedirectUri,22. RedirectUri = postLogoutRedirectUri,23.24. Call the signout method as below signout from the application.25.public void SignOut()26. {27. // Send an OpenID Connect sign-out request.28. HttpContext.GetOwinContext().Authentication.SignOut(29. OpenIdConnectAuthenticationDefaults.AuthenticationType,
CookieAuthenticationDefaults.AuthenticationType);30. }31.32.public void EndSession()33.{34. If AAD sends a single sign-out message to the app, end the user's session,
but don't redirect to AAD for sign out.35.

36. HttpContext.GetOwinContext().Authentication.SignOut(CookieAuthenticationDefaults. AuthenticationType);
37.}38.39.Logout URL will be as below.40.41. https://login.microsoftonline.com/{0}/oauth2/logout?
post_logout_redirect_uri={1}42.{0} is tenant ID.43.{1} is postredirectURI which will trigger once after the logout.44.45.46.47.Delete the cookies.48.49. foreach (string cookie in HttpContext.Current.Request.Cookies.AllKeys) 50. { 51.
HttpContext.Current.Response.Cookies[cookie].Expires=DateTime.Now.AddDays(-1);
52. }53.
a. Embed link for Java application Log out
Logout - Embed link for Java application Log out
Users can sign off from application using Application Logout link or with Azure AD logout endpoint. First one, invalidates the session and logs out the user from application. But the later, after invalidating session also redirects to Azure AD logout endpoint to sign out from AAD.

Azure AD Logout endpoint for B2E applications,
https://login.microsoftonline.com/{TENANAT_NAME}/oauth2/logout?post_logout_redirect_uri="+ URLEncoder.encode("http://www.worldbank.org/", "UTF-8")
Azure AD Logout endpoint for B2C applications,
https://login.microsoftonline.com/{B2C_TENANAT_NAME}/oauth2/v2.0/logout?p={POLICY_NAME}&post_logout_redirect_uri="+ URLEncoder.encode("http://www.worldbank.org/", "UTF-8")
Logout behavior:
1. After logout using ADAL library, if user don’t close the browser and access the java application again, it logs in user automatically.
2. If user closes all browsers and open new browser and access the application, it prompts for credential.
(i.e) Even after calling the Azure AD logout endpoint, users are not asked to explicitly login again the next time.

The reason behind this different behavior is because of multiple levels at which login information is cached and multiple levels at which SSO happens.
If the user also logging out from Azure AD, then they would actually be logging out properly from everywhere. But, when the next time user accesses the application, they would be redirected to Azure AD which will in turn redirect to AD FS at which point, the browser already has a cached Kerberos token (from the initial time that user logged in). Since AD FS is looking for Kerberos token from inside corp network that would be used to silently log user in again. This is this like cert auth where although users are authenticated again, it’s just seamless. Best thing is to get an HTTPWatch or Fiddler trace and see if the authentication request reaches AD FS again. If it does, then its fine as that is the expected behavior. If we want to test, we can use Firefox for testing too which cannot use Kerberos and will not seamlessly log us in.
9. B2C:
a. java B2C application protected by AAD B2C
B2C - Web Browser to Web Application
This section describes steps to use Azure AD B2C as Identity provider for web applications. The important components are,1. Azure AD B2C - Identity Provider which verifies user’s identity and applications and issues security token once authentication is success2. An Application - that uses Azure AD for authentication. Application must be registered in AAD and unique app id is generated.3. Azure AD authentication libraries - For Java developers use, to communicate with AD and for validation of any token from Azure AD.
Authentication Flow for Browser to Web application

Web application redirects user's browser to authentication endpoint in Azure AD (Screenshot-2) when user requests for secure resources (Screenshot-1).
Screenshot-1
Screenshot-2

Upon successful authentication Azure AD creates an authentication token and returns a sign-in response to the application’s Reply URL that was configured in the Azure Management Portal while registering the application.
Admin Activities:
Register an application to use Azure Active Directory1. Create Sign in, sign up, profile update and password reset policies in Azure
AD B2C.2. Register the application that wants to use Azure Active Directory and assign
policies for it. Get Client ID for the registered application.
Developer Activities:
Java Web Applications uses Microsoft's implementation of the community-driven ADAL4J Libraries for integrating application to Azure AD B2C.
Prerequisites to do this we need to register the application with Azure AD B2C as mentioned in last section and get Client ID.
Here, we will configure the Java Web application to use OpenID Connect authentication protocol and ADAL4J to handle sign-in and sign-out requests.
13. First, Open the application web.xml file located under \war\WEB-INF\ and enter

the application configuration values as below,
<?xml version="1.0"?><web-app id="WebApp_ID" version="2.4" xmlns="http://java.sun.com/xml/ns/j2ee" xmlns:xsi="http://www.w3.org/2001/XMLSchema-instance" xsi:schemaLocation="http://java.sun.com/xml/ns/j2eehttp://java.sun.com/xml/ns/j2ee/web-app_2_4.xsd"> <display-name>Archetype Created Web Application</display-name> <context-param> <param-name>authority</param-name> <param-value>https://login.microsoftonline.com/</param-value> </context-param> <context-param> <param-name>tenant</param-name> <param-value>B2C_TENANT_NAME</param-value> </context-param> <context-param> <param-name>issuer</param-name> <param-value>ISSUER_URL</param-value> </context-param> <context-param> <param-name>signinsignuppolicy</param-name> <param-value>POLICY_NAME</param-value> </context-param> <context-param> <param-name>PasswordResetPolicyId</param-name> <param-value>POLICY_NAME</param-value> </context-param> <context-param> <param-name>PasswordUpdatePolicyId</param-name> <param-value>POLICY_NAME</param-value> </context-param>
<filter> <filter-name>BasicFilter</filter-name> <filter-class>com.microsoft.aad.adal4jsample.BasicFilter</filter-class> <init-param> <param-name>client_id</param-name> <param-value>CLIENT_ID</param-value> </init-param> </filter>
<filter-mapping>
<filter-name>BasicFilter</filter-name> <url-pattern>/secure/*</url-pattern> </filter-mapping></web-app>
The ‘CLIENT_ID’ is the Application Id assigned to the application in the registration portal.The `TENANT_NAME’<WBGOTB2C.onmicrosoft.com> is the tenant name of the World bank in Azure AD B2C.
From the XML file we can infer that, whenever application users tries to view resource under /secure then it should pass through a filter called BasicFilter.
14. Create actual JSP pages under WebContent and other secure resources under \WebContent\secure\
15. Now create other Java Helper files for BasicFilter Class. Create a folder in root directory to save all the Helper Java files. Ex. com.microsoft.aad.adal4jsample
16. Create the Authentication Model files (for BasicFilter)I. We need some more helper files for BasicFilter to handle requests
AuthHelper.java - has methods to determine user logged in status. AuthParameterNames.java - Variables ADAL4j requires
17. Finally create BasicFilter java File to handle requests from JSP files.(Refer the Java File below)
18. Now, resolve all Jar dependencies and build the application.19. Deploy and run the application to use Azure AD B2C login.
Azure AD Logout endpoint for B2C applications,
https://login.microsoftonline.com/{B2C_TENANAT_NAME}/oauth2/v2.0/logout?p={POLICY_NAME}&post_logout_redirect_uri="+

URLEncoder.encode("http://www.worldbank.org/", "UTF-8")
Azure AD Password Reset/ Profile Update for B2C applications,
On clicking the password reset link in Login Page, all that happens by default is that AAD will redirect to the application with an error code indicating that user wants to reset the password. Remember that all the user related functionalities needed (password reset, profile updates, signin/signup) are modeled as policies in AAD B2C. So, once the application gets this error code, it has to send a login request to AAD with the password reset policy. This login request is exactly same as the signin/signup request except that now application has to use the password reset policy. So, password reset and profile updates do not have any separate links, but they are just login requests with a different policy.
PASSWORD RESET URL: https://login.microsoftonline.com/{B2C_TENANT_NAME}/oauth2/v2.0/authorize?response_type=id_token&scope=openid&response_mode=form_post&redirect_uri={APPLICATION_REDIRECT_URI}&client_id={CLIENT_ID}&nonce={NONCE_VALUE}&p={PASSWORDRESET_POLICY_NAME}
PROFILE UPDATE URL: https://login.microsoftonline.com/{B2C_TENANT_NAME}/oauth2/v2.0/authorize?response_type=id_token&scope=openid&response_mode=form_post&redirect_uri={APPLICATION_REDIRECT_URI}&client_id={CLIENT_ID}&nonce={NONCE_VALUE}&p={PROFILEUPDATE_POLICY_NAME}
REFERENCES:https://docs.microsoft.com/en-us/azure/active-directory-b2c/active-directory-b2c-reference-policies#create-a-password-reset-policy
https://docs.microsoft.com/en-us/azure/active-directory-b2c/active-directory-b2c-overview


![Java Web Services [4/5]: Java API for XML Web Services](https://img.pdfslide.us/doc/110x75/54bd47dd4a7959ae538b45e7/java-web-services-45-java-api-for-xml-web-services.jpg)