Embed Size (px)
Citation preview

Action Geometry Measurement Directions
There are just 10 measurements to be taken before your grand piano action and keyboard can be analyzed. This can easily be completed in under 30 minutes. With practice, just 15 minutes.
These measurements either directly indicate the “radial arms” in each of the three areas of the action, or they are used to calculate the radial arms. As long as the measurements are accurate, this is the best way to predict action regulation issues, and can help avoid weigh-off problems.
You will be measuring a piano key, wippen and hammer, shank and flange. A quick way to use these directions is to print them. Page 2 has a chart to enter your measurements.
The tools needed are:
1. A metal tape measure which uses millimeters.2. A 150 mm (6 inch) caliper which reads in millimeters (see pictures below).3. A sharp pencil.4. A small square, or a perfectly square piece of wood, at least 50mm (2 inches).5. This document, either displayed on a device or printed.6. If needed: a tool to adjust jack position relative to repetition.
Preparation, key and wippen marks.
The first measurements are on the key. Choose a key which is fairly straight at the end of a section. For instance the lowest tenor key such as key 21 on a Steinway B or D, or note 27 on a 26 bass piano.
Mark the capstan lift point. This point is where the capstan contacts the wippen. Draw a line on the key at 90 degrees to the key bottom as shown. Mark a corresponding line on the wippen heel cloth. If the capstan is angled, ignore the angle and draw lines directly above and below the capstan contact point, at 90 degrees to the key bottom.
If access to this area is difficult, use a small mirror, make a short pencil mark on the wippen heel cloth and top/side of key, directly below, and remove the stack. Then complete the pencil line on the key with your square. The wippen only needs the single contact point marked.
1

What is the action ratio or “AR”? The action ratio predicts the leverage of the front of the key to hammer travel. An AR of about 5 is normal, 4.9 to 5.1 is the best range and ensures the action will regulate and weigh off normally.
The action ratio can be calculated from the key ratio (KR), wippen ratio (WR) and shank ratio (SR). The formula is simple; AR = KR x WR x SR.
The WR is the simplest to calculate, just divide parameter 5 by 6. Most key ratios will be about 0.5, wippen ratios about 1.4 and shank ratios about 6 to 6.5. Calculating KR and SR are more complicated and are beyond the scope of these directions.
Radial arms: Key Wippen Shank
2Table 1
millimeters only
Piano Make
Serial number
Year
Key 1. Key front to balance rail hole. round to 0.5 mm
2. Key front to capstan lift point.
3.Key bottom to capstan top.
4. Key shoe height at balance rail (if any)
Wippen 5. Wippen center to back of jack. round to 0.1 mm
6. Wippen center to capstan lift point.
Hammer shank 7. Hammer shank center pin to hammer center line.
round to 0.1 mm
8. Hammer shank center pin to knuckle center.
9. Hammer strike distance (bore).
10. Hammer shank knuckle diameter.
1
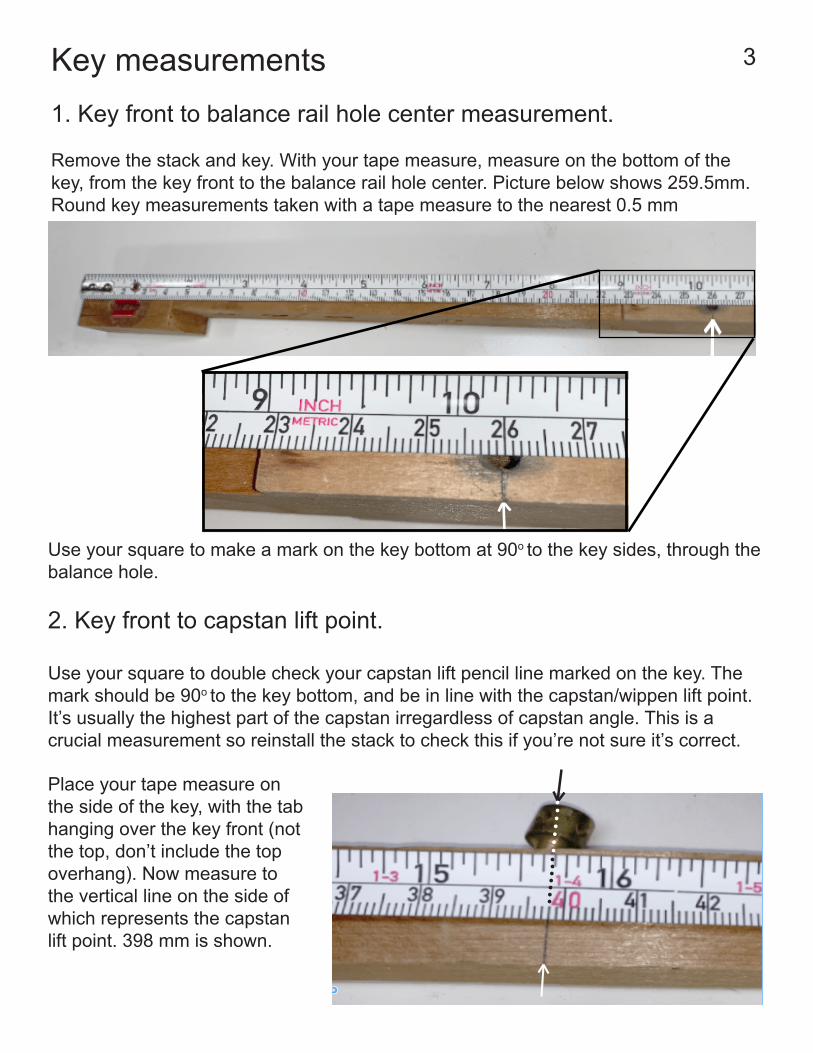
2. Key front to capstan lift point.
Use your square to double check your capstan lift pencil line marked on the key. The mark should be 90o to the key bottom, and be in line with the capstan/wippen lift point. It’s usually the highest part of the capstan irregardless of capstan angle. This is a crucial measurement so reinstall the stack to check this if you’re not sure it’s correct.
Key measurements1. Key front to balance rail hole center measurement.
Remove the stack and key. With your tape measure, measure on the bottom of the key, from the key front to the balance rail hole center. Picture below shows 259.5mm. Round key measurements taken with a tape measure to the nearest 0.5 mm
Use your square to make a mark on the key bottom at 90o to the key sides, through the balance hole.
3
Place your tape measure on the side of the key, with the tab hanging over the key front (not the top, don’t include the top overhang). Now measure to the vertical line on the side of which represents the capstan lift point. 398 mm is shown.
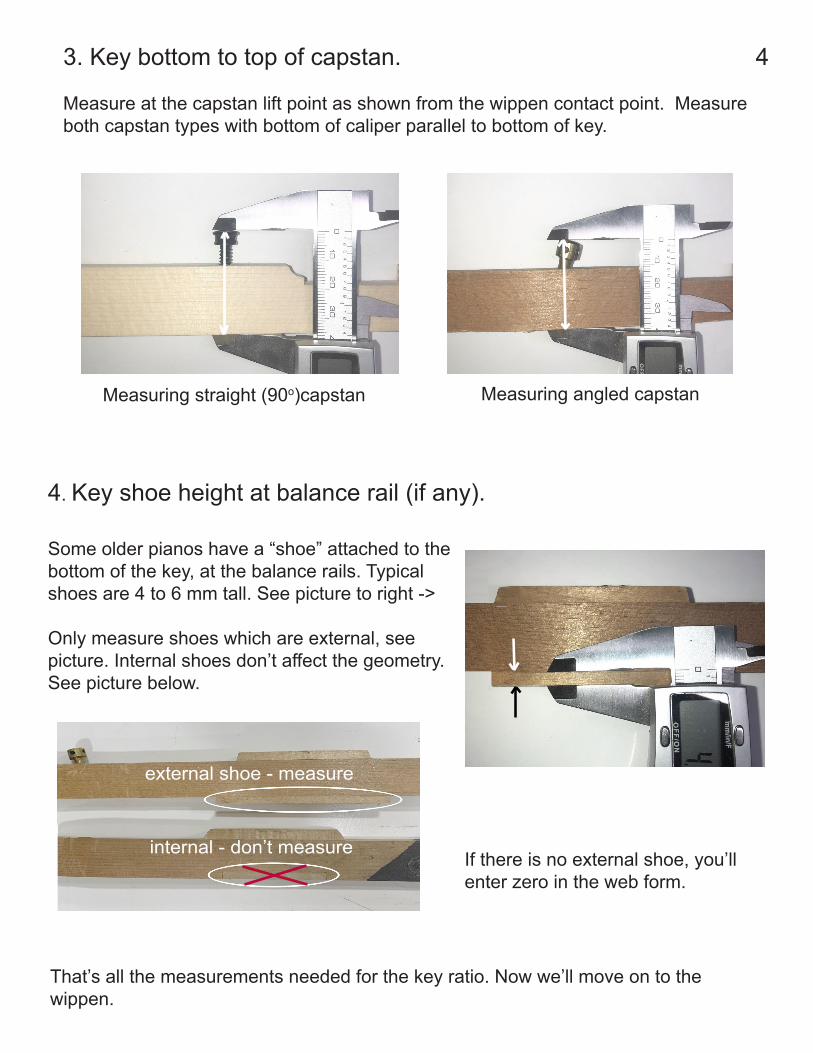
3. Key bottom to top of capstan.
Measure at the capstan lift point as shown from the wippen contact point. Measure both capstan types with bottom of caliper parallel to bottom of key.
Measuring angled capstanMeasuring straight (90o)capstan
Some older pianos have a “shoe” attached to the bottom of the key, at the balance rails. Typical shoes are 4 to 6 mm tall. See picture to right ->
Only measure shoes which are external, see picture. Internal shoes don’t affect the geometry.See picture below.
external shoe - measure
internal - don’t measure
That’s all the measurements needed for the key ratio. Now we’ll move on to the wippen.
If there is no external shoe, you’ll enter zero in the web form.
4. Key shoe height at balance rail (if any).
4

6. Wippen center to capstan lift point. Measure from the same center as in step 5, to the bottom of the wippen heel, where you marked it on page 1, Preparation.
Wippen measurements
5. Wippen center to back of jack.Measure from center of the flange center pin to the top rear of the jack, where the rounded edge starts. The jack should have already been aligned to the rear edge of the knuckle spline in the piano. Measure to the back edge of the jack, just before the rounded edge.
5

Hammer, shank and flange measurements.To help with measurement, as shown in the pictures below, draw two lines, one on the hammer center line, the other on the shank center on the hammer. Use your square as a straight edge. For clarity the hammer pictures show pencil lines as dotted lines.
7. Hammer shank center pin to center of hammer line.
Use the hammer center line you just drew, represented as a dotted line below.
While you’re in the neighborhood, measure the thickness of the shank at the shank center. It should be 6 mm. If not, please note the measurement in the comments of our the geometry web form.
8. Hammer shank center pin to knuckle center (spline center).
Center of pin to center of spline. Most modern parts will usually measure 17.0 mm. Other possibilities are 16.2, 16.0, or 15.5 mm.
6

9. Hammer strike distance (hammer bore).
Note that if the hammer is very worn, you should pad the hammer to the original size. Judging by the felt thickness on the sides can get you very close. If adding felt, check that the (unworn) felt thickness on the sides are the same as the felt on the top to approximate the original hammer size as closely as possible (white solid lines). The dotted lines highlight the pencil lines you drew just before step 7 above.
Another way to obtain the strike distance is to measure the string height and the hammer center pin height from the keybed. The strike distance is the string height minus hammer flange center height. If you will be replacing the hammers, string height minus hammer flange height is the best method to calculate the hammer bore distance.
7
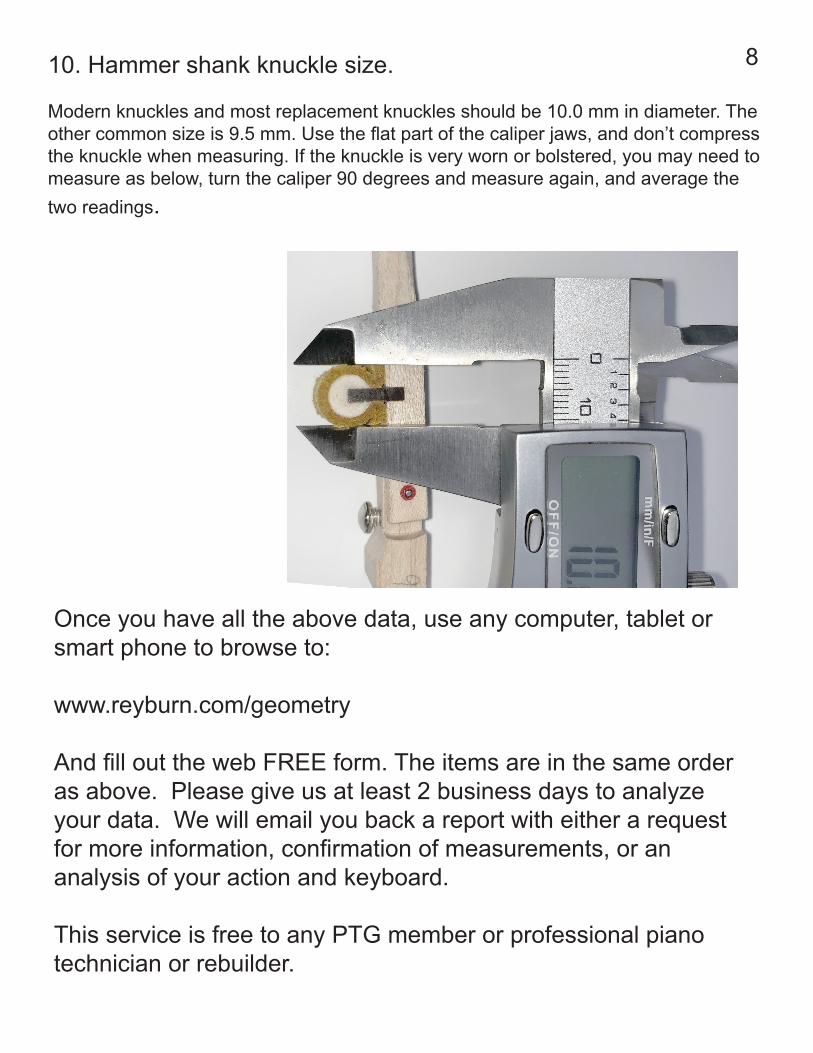
10. Hammer shank knuckle size.
Modern knuckles and most replacement knuckles should be 10.0 mm in diameter. The other common size is 9.5 mm. Use the flat part of the caliper jaws, and don’t compress the knuckle when measuring. If the knuckle is very worn or bolstered, you may need to measure as below, turn the caliper 90 degrees and measure again, and average the two readings.
Once you have all the above data, use any computer, tablet or smart phone to browse to:
www.reyburn.com/geometry
And fill out the web FREE form. The items are in the same order as above. Please give us at least 2 business days to analyze your data. We will email you back a report with either a request for more information, confirmation of measurements, or an analysis of your action and keyboard.
This service is free to any PTG member or professional piano technician or rebuilder.
8