Embed Size (px)
Citation preview
ActiLife DocumentationRelease 0.0.1
ActiGraph
September 30, 2014

Contents
1 Getting Started 31.1 Downloading and Installing . . . . . . . . . . . . . . . . . . . . . . . . . . . . . . . . . . . . . . . 31.2 Licensing . . . . . . . . . . . . . . . . . . . . . . . . . . . . . . . . . . . . . . . . . . . . . . . . . 31.3 Activation Over the Internet . . . . . . . . . . . . . . . . . . . . . . . . . . . . . . . . . . . . . . . 41.4 Activation Without an Internet Connection . . . . . . . . . . . . . . . . . . . . . . . . . . . . . . . 41.5 ActiLife New Feature Overview . . . . . . . . . . . . . . . . . . . . . . . . . . . . . . . . . . . . . 61.6 ActiLife Data Formats . . . . . . . . . . . . . . . . . . . . . . . . . . . . . . . . . . . . . . . . . . 7
2 ActiLife Menu Items 92.1 File Menu . . . . . . . . . . . . . . . . . . . . . . . . . . . . . . . . . . . . . . . . . . . . . . . . . 92.2 Edit Menu . . . . . . . . . . . . . . . . . . . . . . . . . . . . . . . . . . . . . . . . . . . . . . . . 152.3 Communication Menu . . . . . . . . . . . . . . . . . . . . . . . . . . . . . . . . . . . . . . . . . . 172.4 Tools Menu . . . . . . . . . . . . . . . . . . . . . . . . . . . . . . . . . . . . . . . . . . . . . . . . 182.5 Help Menu . . . . . . . . . . . . . . . . . . . . . . . . . . . . . . . . . . . . . . . . . . . . . . . . 21
3 Indices and tables 23
i

ii
ActiLife Documentation, Release 0.0.1
Contents:
Contents 1
ActiLife Documentation, Release 0.0.1
2 Contents
CHAPTER 1
Getting Started
1.1 Downloading and Installing
Download ActiLife 6 from http://www.theactigraph.com/actilife to a known location. Double-click the icon to startthe installer. After running the ActiLife6 installer, follow the installation instructions in the on-screen prompts.
Figure 1.1: ActiLife 6 Setup Icon
Note: Please be sure to remove any ActiGraph devices that you have connected to your computer during installation. Failure todo so could result in a faulty installation of your ActiLife software.
Note: Older versions of ActiLife (4 and 5) will be removed whenever ActiLife 6 is installed
After installing ActiLife, an icon similar to the one shown here will appear on your desktop. Double click the icon tostart ActiLife 6.
Figure 1.2: ActiLife 6 Desktop Shortcut
1.2 Licensing
ActiLife software is a licensed program and requires users to obtain a product key before the software can beactivated. If you have not purchased an ActiLife license, you may do so by visiting the ActiGraph store athttp://www.theactigraph.com/store . If you have misplaced your product key, contact ActiGraph sales support [email protected] in order to proceed. Once ActiLife 6 has been purchased or upgraded from a previous
3
ActiLife Documentation, Release 0.0.1
version, users are entitled to free updates for 12 months. After that period, an optional maintenance plan may bepurchased. It is highly recommended that users purchase the maintenance plan in order to guarantee access tothe newest updates, features, and bug fixes.
1.3 Activation Over the Internet
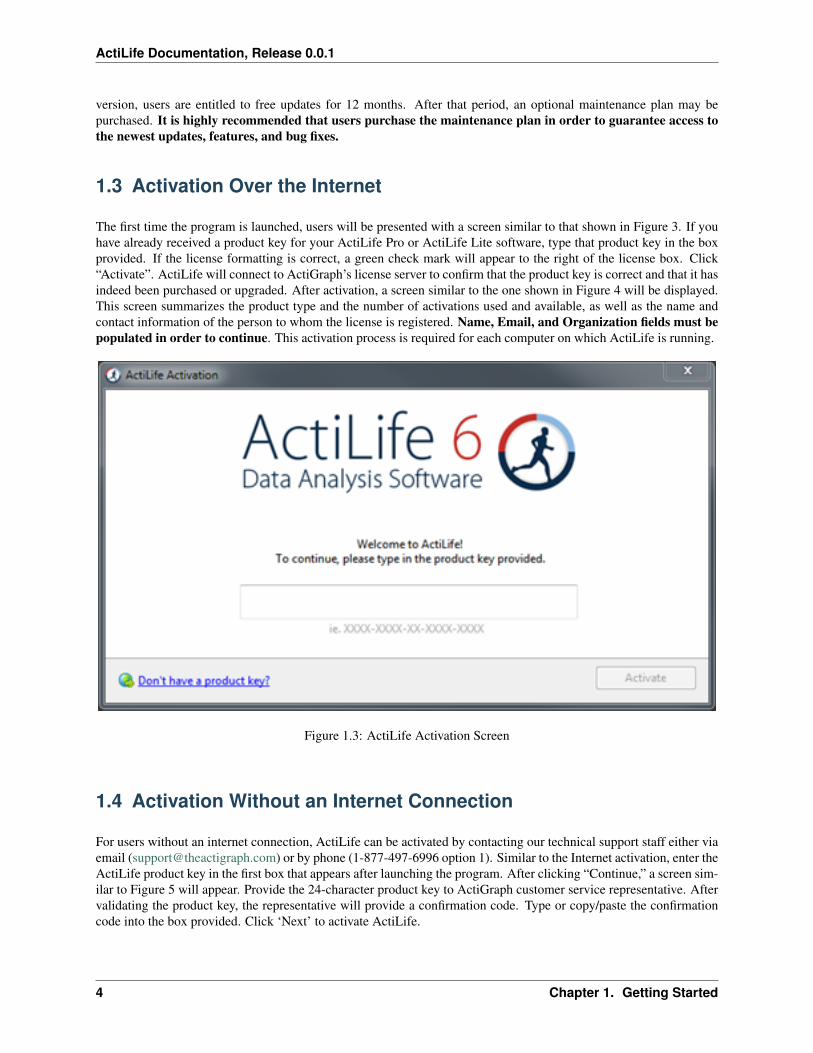
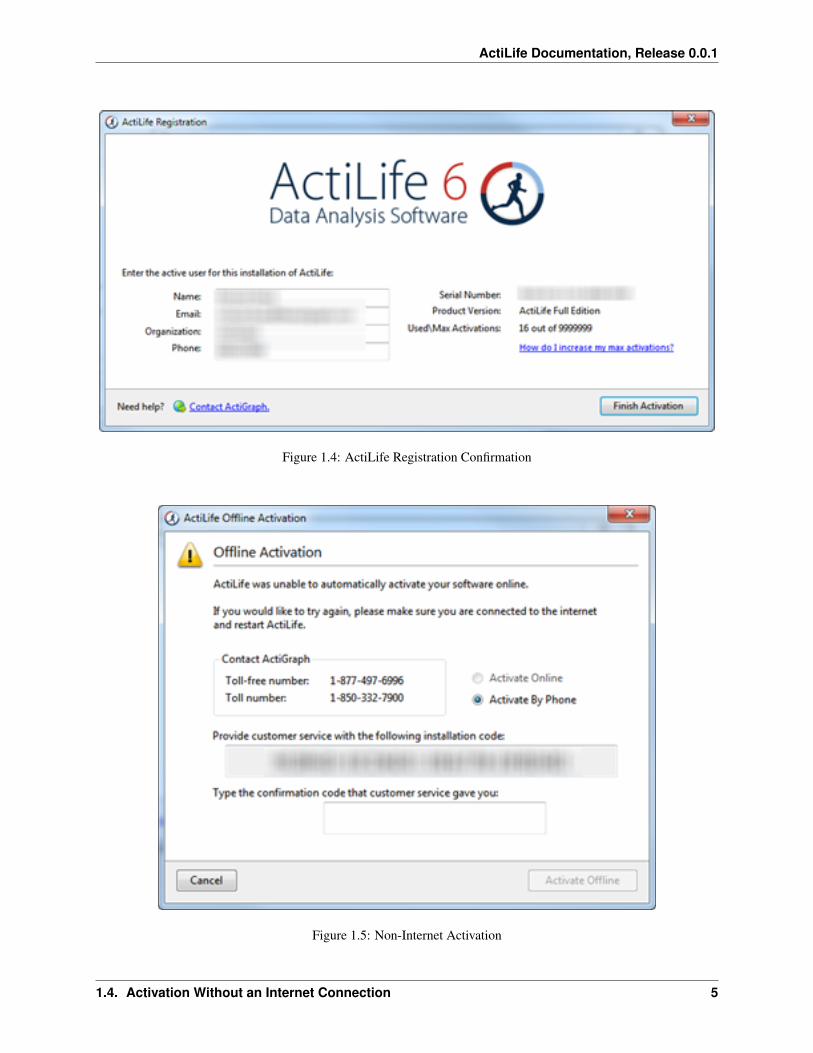
The first time the program is launched, users will be presented with a screen similar to that shown in Figure 3. If youhave already received a product key for your ActiLife Pro or ActiLife Lite software, type that product key in the boxprovided. If the license formatting is correct, a green check mark will appear to the right of the license box. Click“Activate”. ActiLife will connect to ActiGraph’s license server to confirm that the product key is correct and that it hasindeed been purchased or upgraded. After activation, a screen similar to the one shown in Figure 4 will be displayed.This screen summarizes the product type and the number of activations used and available, as well as the name andcontact information of the person to whom the license is registered. Name, Email, and Organization fields must bepopulated in order to continue. This activation process is required for each computer on which ActiLife is running.
Figure 1.3: ActiLife Activation Screen
1.4 Activation Without an Internet Connection
For users without an internet connection, ActiLife can be activated by contacting our technical support staff either viaemail ([email protected]) or by phone (1-877-497-6996 option 1). Similar to the Internet activation, enter theActiLife product key in the first box that appears after launching the program. After clicking “Continue,” a screen sim-ilar to Figure 5 will appear. Provide the 24-character product key to ActiGraph customer service representative. Aftervalidating the product key, the representative will provide a confirmation code. Type or copy/paste the confirmationcode into the box provided. Click ‘Next’ to activate ActiLife.
4 Chapter 1. Getting Started
ActiLife Documentation, Release 0.0.1
Figure 1.4: ActiLife Registration Confirmation
Figure 1.5: Non-Internet Activation
1.4. Activation Without an Internet Connection 5
ActiLife Documentation, Release 0.0.1
1.5 ActiLife New Feature Overview
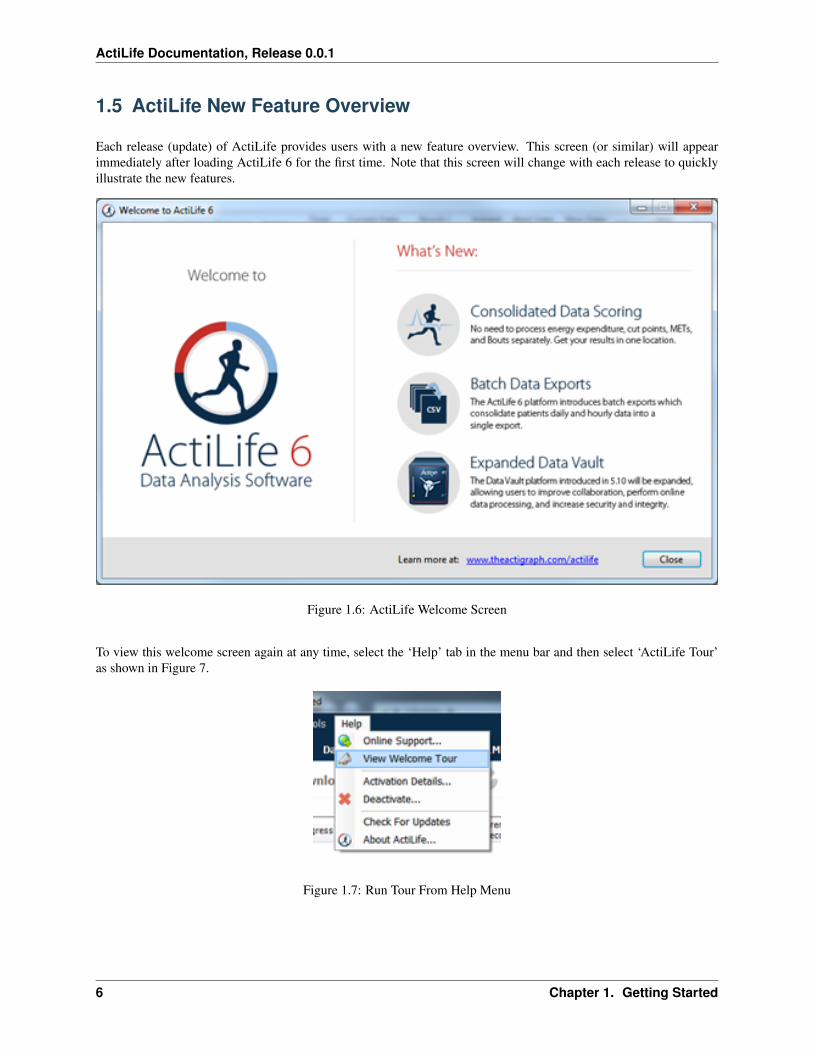
Each release (update) of ActiLife provides users with a new feature overview. This screen (or similar) will appearimmediately after loading ActiLife 6 for the first time. Note that this screen will change with each release to quicklyillustrate the new features.
Figure 1.6: ActiLife Welcome Screen
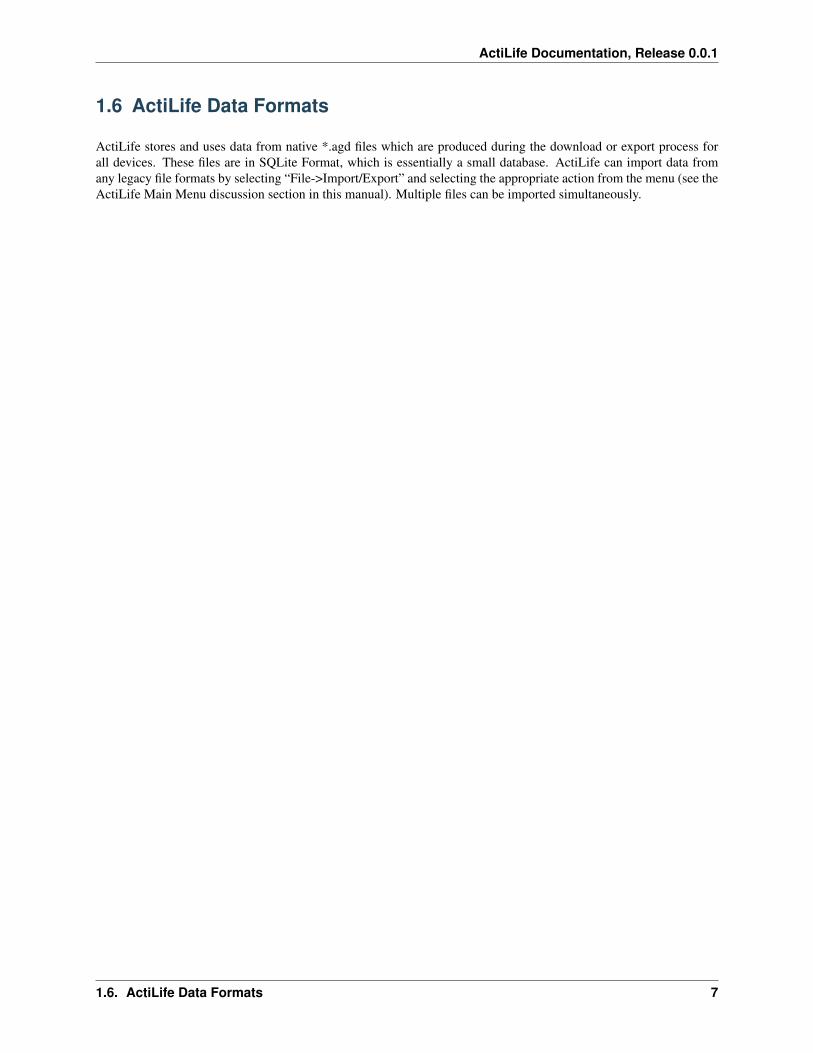
To view this welcome screen again at any time, select the ‘Help’ tab in the menu bar and then select ‘ActiLife Tour’as shown in Figure 7.
Figure 1.7: Run Tour From Help Menu
6 Chapter 1. Getting Started
ActiLife Documentation, Release 0.0.1
1.6 ActiLife Data Formats
ActiLife stores and uses data from native *.agd files which are produced during the download or export process forall devices. These files are in SQLite Format, which is essentially a small database. ActiLife can import data fromany legacy file formats by selecting “File->Import/Export” and selecting the appropriate action from the menu (see theActiLife Main Menu discussion section in this manual). Multiple files can be imported simultaneously.
1.6. ActiLife Data Formats 7
ActiLife Documentation, Release 0.0.1
8 Chapter 1. Getting Started
CHAPTER 2
ActiLife Menu Items
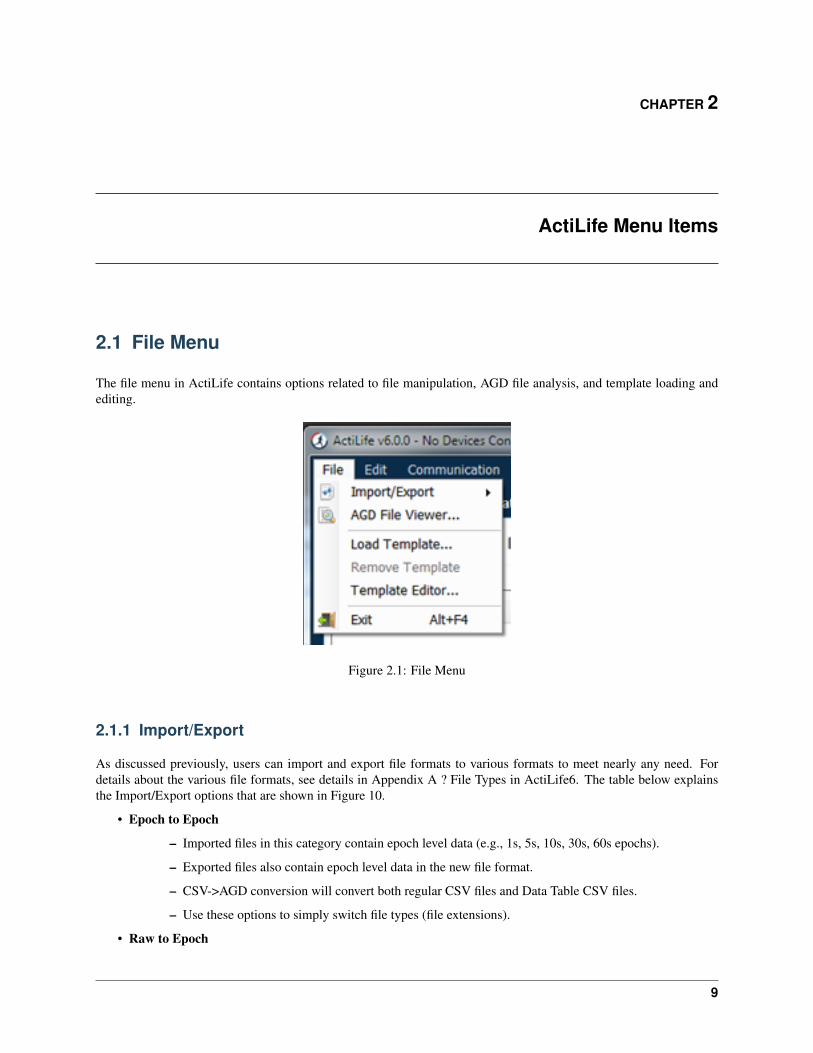
2.1 File Menu
The file menu in ActiLife contains options related to file manipulation, AGD file analysis, and template loading andediting.
Figure 2.1: File Menu
2.1.1 Import/Export
As discussed previously, users can import and export file formats to various formats to meet nearly any need. Fordetails about the various file formats, see details in Appendix A ? File Types in ActiLife6. The table below explainsthe Import/Export options that are shown in Figure 10.
• Epoch to Epoch
– Imported files in this category contain epoch level data (e.g., 1s, 5s, 10s, 30s, 60s epochs).
– Exported files also contain epoch level data in the new file format.
– CSV->AGD conversion will convert both regular CSV files and Data Table CSV files.
– Use these options to simply switch file types (file extensions).
• Raw to Epoch
9

ActiLife Documentation, Release 0.0.1
– Imported files in this category contain raw, 30Hz data or contain binary compressed data (*.gt3xformat). Note, 12Hz import files are not allowed. See Uncompressing *.gt3x Files for details.
– *.DAT files are file types used in ActiLife version 4.
– Exported files in this category contain epoch level data (e.g., 1s, 5s, 10s, 30s, 60s epochs).
– Exported files are first filtered then accumulated
– Supported export file formats include .CSV, .AGD, .DAT
• Raw to Raw
– Used to export binary*.gt3x files directly to *.csv format
– Both import and export file formats contain raw data at whatever frequency was used to produce the*.gt3x file
• Re-Integrate
– This feature is used to reintegrate epoch level post-filtered/post-accumulated *.agd files into largerepoch ?buckets.?
– E.g., reintegrating a 10s epoch file into a 60s epoch file.
– Files cannot be reintegrated into smaller epoch lengths (e.g., 15s -> 10s)
2.1.2 Converting to a Data Table vs. Standard .CSV
A data table *.csv file contains separate columns with corresponding headers for each data type collected by the deviceand also includes the Vector Magnitude sum of each axis if data is collected for all three axes. A standard *.csv fileproduced during conversion simply exports the data into *.csv format. Column headers are not included unless thatoption is by checking ?Add Column Headers to CSV? in the options menu.
2.1.3 Matlab? Export Option
Users can export native *.AGD files to *.MAT format for easy importing into MathWorks Matlab? mathematicalsoftware platform.
2.1.4 Re-Integrating
The ?Re-Integrate AGD File? option allows users to integrate AGD files to larger epoch periods (e.g., 1 second epochdata collection reintegrated to 60 second epoch periods for Sleep Analysis or Data Scoring). After selecting the file tobe reintegrated, selected the desired epoch length as shown and click ?OK.? The new file will be saved in the samedirectory as the existing file with an appended file name indicating the new epoch length.
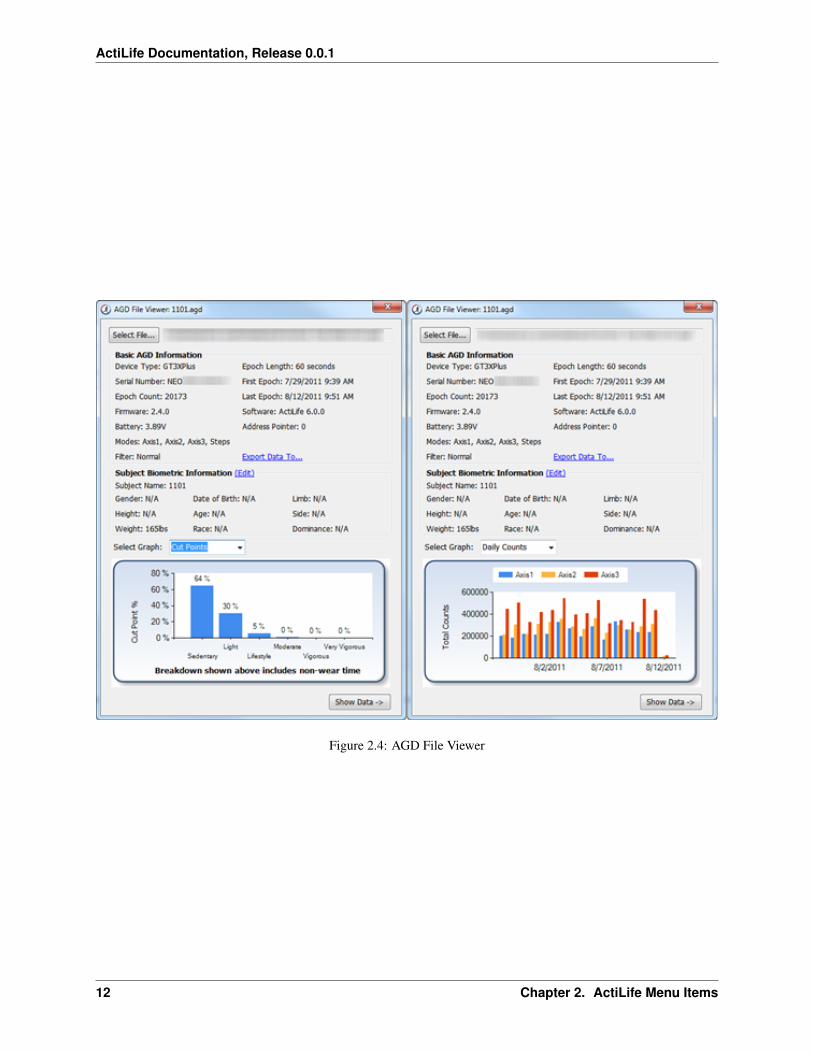
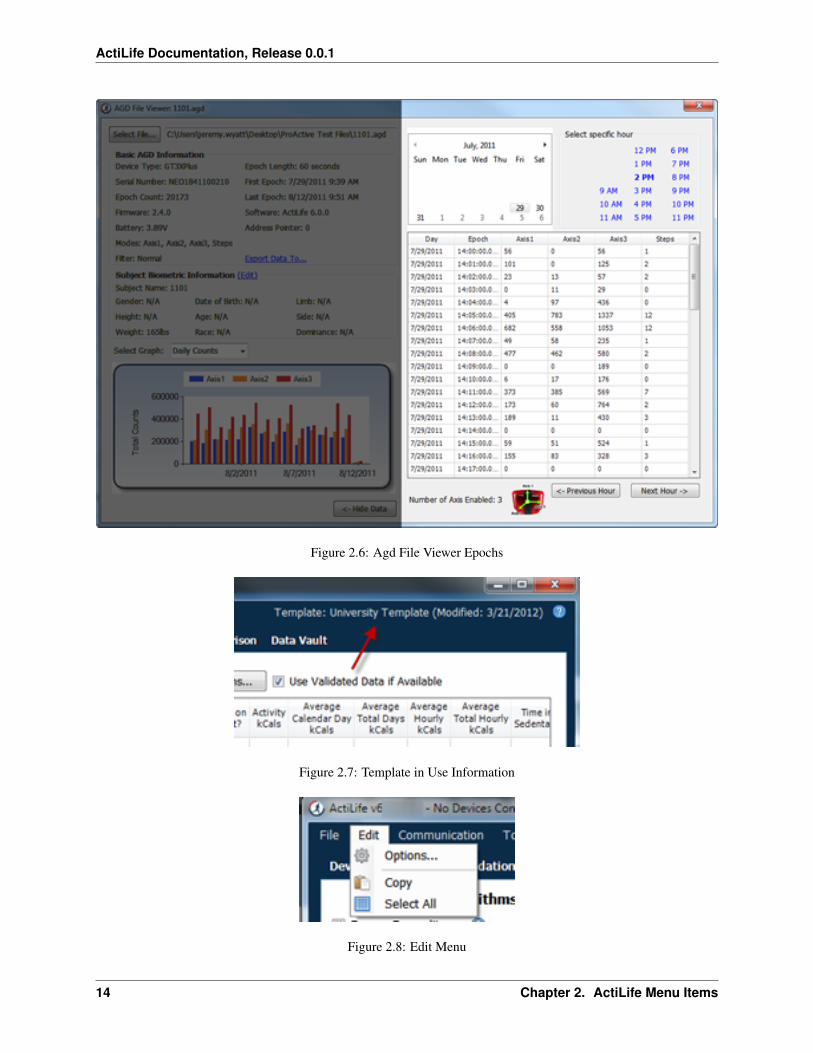
2.1.5 AGD File Viewer
The AGD File Viewer can be accessed from the File menu, by clicking ?finished downloading? from the Devices gridafter a download, or by double-clicking on an *.agd file from within Windows Explorer.
Using the AGD viewer, users can instantly view the data they?ve just downloaded. With ActiLife 6.1 and later, theAGD viewer provides a graphical summary view of both activity cut points (according to the stored cut points inActiLife) or daily activity counts which allow users to make quick observations about the subject?s compliance level(see Figure 12).
10 Chapter 2. ActiLife Menu Items

ActiLife Documentation, Release 0.0.1
Figure 2.2: ActiLife Import and Export Menu
Figure 2.3: Re-Integration Option
2.1. File Menu 11
ActiLife Documentation, Release 0.0.1
Figure 2.4: AGD File Viewer
12 Chapter 2. ActiLife Menu Items
ActiLife Documentation, Release 0.0.1
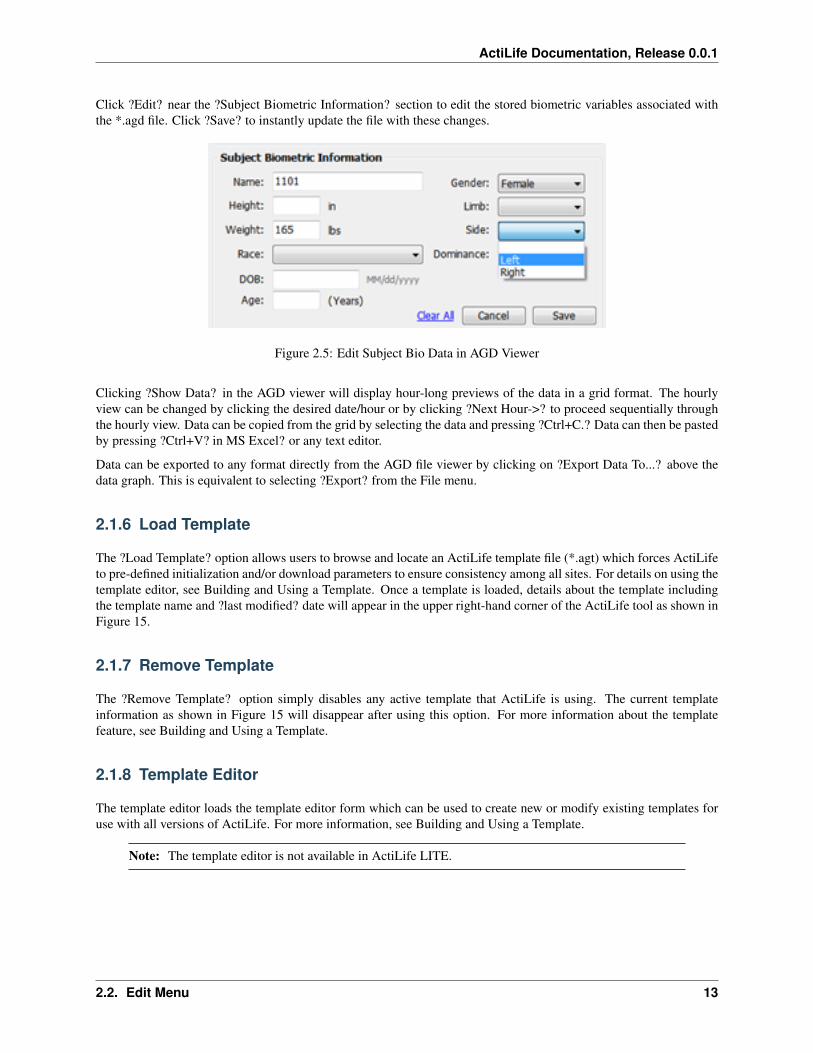
Click ?Edit? near the ?Subject Biometric Information? section to edit the stored biometric variables associated withthe *.agd file. Click ?Save? to instantly update the file with these changes.
Figure 2.5: Edit Subject Bio Data in AGD Viewer
Clicking ?Show Data? in the AGD viewer will display hour-long previews of the data in a grid format. The hourlyview can be changed by clicking the desired date/hour or by clicking ?Next Hour->? to proceed sequentially throughthe hourly view. Data can be copied from the grid by selecting the data and pressing ?Ctrl+C.? Data can then be pastedby pressing ?Ctrl+V? in MS Excel? or any text editor.
Data can be exported to any format directly from the AGD file viewer by clicking on ?Export Data To...? above thedata graph. This is equivalent to selecting ?Export? from the File menu.
2.1.6 Load Template
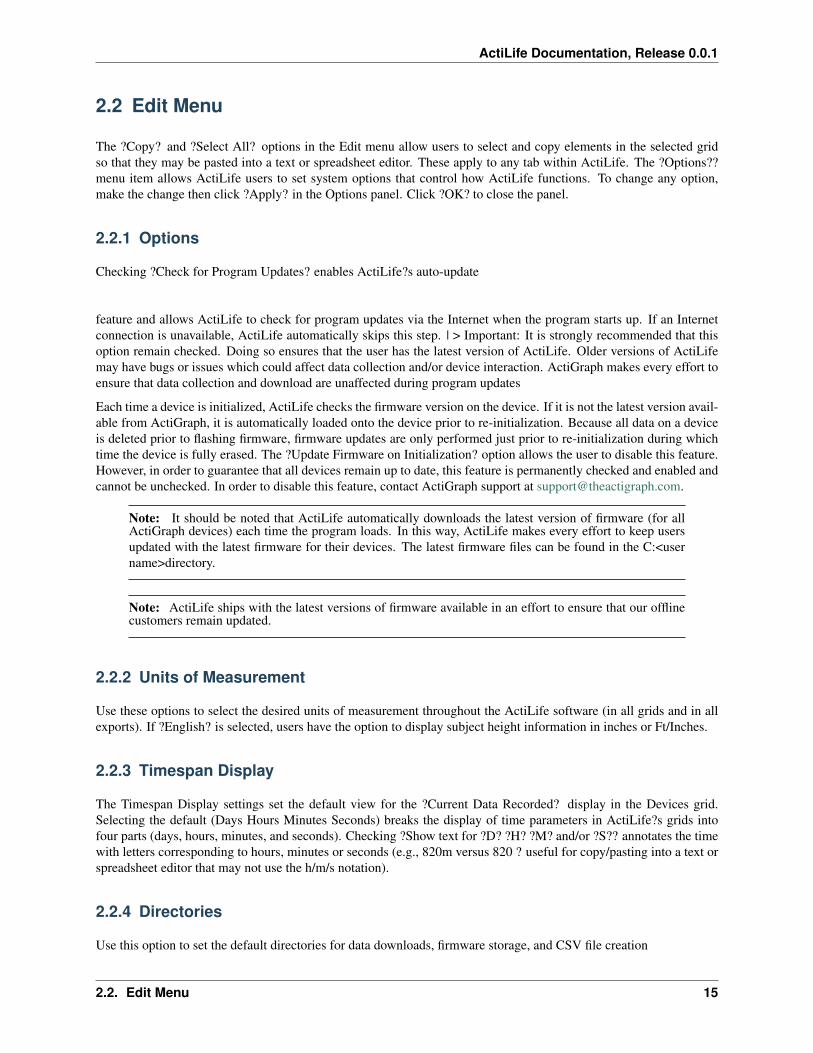
The ?Load Template? option allows users to browse and locate an ActiLife template file (*.agt) which forces ActiLifeto pre-defined initialization and/or download parameters to ensure consistency among all sites. For details on using thetemplate editor, see Building and Using a Template. Once a template is loaded, details about the template includingthe template name and ?last modified? date will appear in the upper right-hand corner of the ActiLife tool as shown inFigure 15.
2.1.7 Remove Template
The ?Remove Template? option simply disables any active template that ActiLife is using. The current templateinformation as shown in Figure 15 will disappear after using this option. For more information about the templatefeature, see Building and Using a Template.
2.1.8 Template Editor
The template editor loads the template editor form which can be used to create new or modify existing templates foruse with all versions of ActiLife. For more information, see Building and Using a Template.
Note: The template editor is not available in ActiLife LITE.
2.2. Edit Menu 13
ActiLife Documentation, Release 0.0.1
Figure 2.6: Agd File Viewer Epochs
Figure 2.7: Template in Use Information
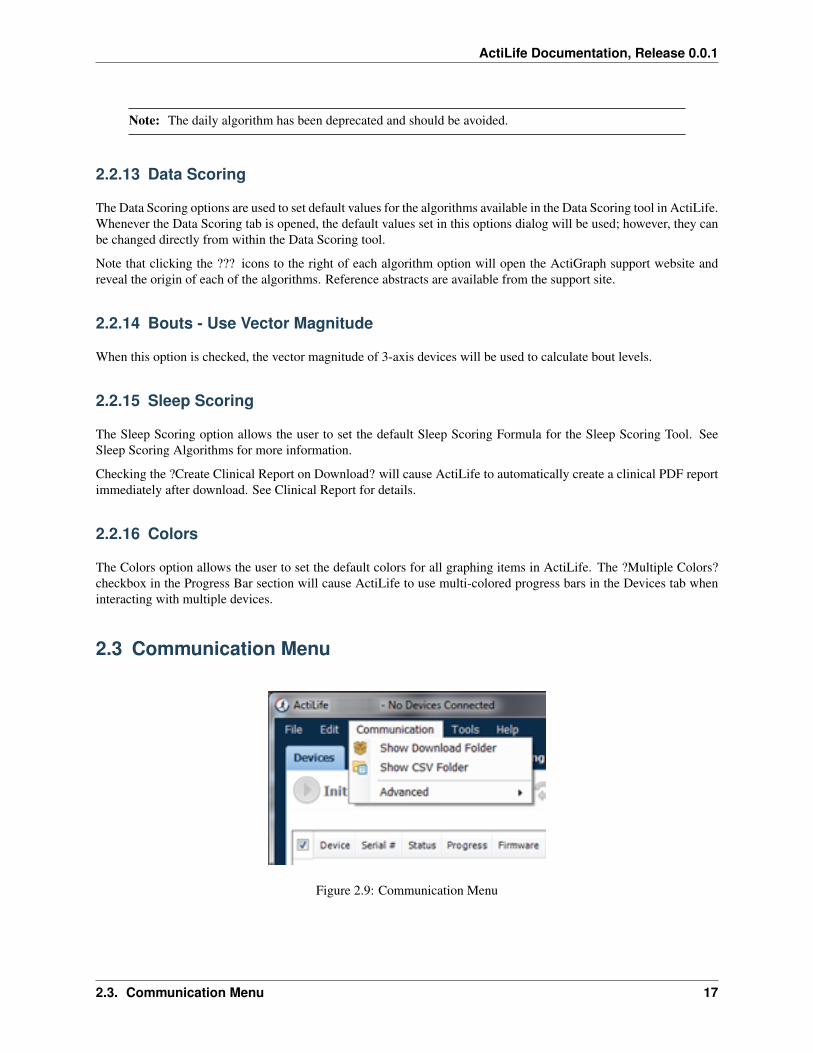
Figure 2.8: Edit Menu
14 Chapter 2. ActiLife Menu Items
ActiLife Documentation, Release 0.0.1
2.2 Edit Menu
The ?Copy? and ?Select All? options in the Edit menu allow users to select and copy elements in the selected gridso that they may be pasted into a text or spreadsheet editor. These apply to any tab within ActiLife. The ?Options??menu item allows ActiLife users to set system options that control how ActiLife functions. To change any option,make the change then click ?Apply? in the Options panel. Click ?OK? to close the panel.
2.2.1 Options
Checking ?Check for Program Updates? enables ActiLife?s auto-update
feature and allows ActiLife to check for program updates via the Internet when the program starts up. If an Internetconnection is unavailable, ActiLife automatically skips this step. | > Important: It is strongly recommended that thisoption remain checked. Doing so ensures that the user has the latest version of ActiLife. Older versions of ActiLifemay have bugs or issues which could affect data collection and/or device interaction. ActiGraph makes every effort toensure that data collection and download are unaffected during program updates
Each time a device is initialized, ActiLife checks the firmware version on the device. If it is not the latest version avail-able from ActiGraph, it is automatically loaded onto the device prior to re-initialization. Because all data on a deviceis deleted prior to flashing firmware, firmware updates are only performed just prior to re-initialization during whichtime the device is fully erased. The ?Update Firmware on Initialization? option allows the user to disable this feature.However, in order to guarantee that all devices remain up to date, this feature is permanently checked and enabled andcannot be unchecked. In order to disable this feature, contact ActiGraph support at [email protected].
Note: It should be noted that ActiLife automatically downloads the latest version of firmware (for allActiGraph devices) each time the program loads. In this way, ActiLife makes every effort to keep usersupdated with the latest firmware for their devices. The latest firmware files can be found in the C:<username>directory.
Note: ActiLife ships with the latest versions of firmware available in an effort to ensure that our offlinecustomers remain updated.
2.2.2 Units of Measurement
Use these options to select the desired units of measurement throughout the ActiLife software (in all grids and in allexports). If ?English? is selected, users have the option to display subject height information in inches or Ft/Inches.
2.2.3 Timespan Display
The Timespan Display settings set the default view for the ?Current Data Recorded? display in the Devices grid.Selecting the default (Days Hours Minutes Seconds) breaks the display of time parameters in ActiLife?s grids intofour parts (days, hours, minutes, and seconds). Checking ?Show text for ?D? ?H? ?M? and/or ?S?? annotates the timewith letters corresponding to hours, minutes or seconds (e.g., 820m versus 820 ? useful for copy/pasting into a text orspreadsheet editor that may not use the h/m/s notation).
2.2.4 Directories
Use this option to set the default directories for data downloads, firmware storage, and CSV file creation
2.2. Edit Menu 15

ActiLife Documentation, Release 0.0.1
2.2.5 Download Naming Convention
These options set the default naming convention for downloaded files. During the download process, users have theoption to change this option.
2.2.6 Create DAT and CSV with AGD Download
Use these options to create a *.dat or *.csv file at the time of download. Important: These options only work wheneveran AGD file is created. Hence, when downloading a GT3X+ device, *.dat and *.csv files will not be created whenthese options are checked unless the ?Create AGD File? is checked during the download process (see DownloadingGT3X+ Devices for details on creating an AGD file on download).
2.2.7 Add Column Headers to CSV
Checking this option will add column header labels to the columns in CSV (like ?Axis 1,? ?Axis 2,?, ?Axis 3,??Steps,? etc.) files when those files are created via export.
2.2.8 Compress GT3X Files
This option will apply maximum file compression to *.gt3x files when they are downloaded from GT3X+ devices.This compression can greatly reduce the file size of the *.gt3x zip files, but can double the post-processing time (i.e.,the time it takes to create an *.agd file from a *.gt3x file). For details on post-processing, see Uncompressing *.gt3xFiles.
2.2.9 Create Sub-Folders When Exporting “Raw to Epoch”
Check this option to create sub-folders for *.agd, *.dat, and/or *.csv files created when exporting from ?Raw to Epoch?files from the Import/Export menu.
2.2.10 Create AGD During Download of GT3X+ or ActiSleep+
When checked, this option tells ActiLife to automatically create an *.agd file immediately after downloading *.gt3xfiles from ActiSleep+, GT3X+ or wGT3X+ devices. For more information on these file types, see Appendix A ? FileTypes in ActiLife.
2.2.11 Scan of GT3X File
When downloading GT3X+, ActiSleep+, or wGT3X+ data, this option allows users to be notified of large gaps (nulldata or 0s) in the data which may indicate either a problem with the device itself or non-compliance with the deviceend-user. Setting this option to a certain percentage will prompt the user if there are more than that percentage of thedata contains 0s. For example, setting to 10% will cause notifications to appear when 10% or more of the data on thedevice contains null data (0s). Set this option to 100% to disable notifications.
2.2.12 Wear Time Validation
Wear Time Validation options are used to set the default values for the dataset filters in the Wear Time Validation tool.The user also has the option to switch between the Floating Window or Daily Wear Time Validation algorithms.
16 Chapter 2. ActiLife Menu Items
ActiLife Documentation, Release 0.0.1
Note: The daily algorithm has been deprecated and should be avoided.
2.2.13 Data Scoring
The Data Scoring options are used to set default values for the algorithms available in the Data Scoring tool in ActiLife.Whenever the Data Scoring tab is opened, the default values set in this options dialog will be used; however, they canbe changed directly from within the Data Scoring tool.
Note that clicking the ??? icons to the right of each algorithm option will open the ActiGraph support website andreveal the origin of each of the algorithms. Reference abstracts are available from the support site.
2.2.14 Bouts - Use Vector Magnitude
When this option is checked, the vector magnitude of 3-axis devices will be used to calculate bout levels.
2.2.15 Sleep Scoring
The Sleep Scoring option allows the user to set the default Sleep Scoring Formula for the Sleep Scoring Tool. SeeSleep Scoring Algorithms for more information.
Checking the ?Create Clinical Report on Download? will cause ActiLife to automatically create a clinical PDF reportimmediately after download. See Clinical Report for details.
2.2.16 Colors
The Colors option allows the user to set the default colors for all graphing items in ActiLife. The ?Multiple Colors?checkbox in the Progress Bar section will cause ActiLife to use multi-colored progress bars in the Devices tab wheninteracting with multiple devices.
2.3 Communication Menu
Figure 2.9: Communication Menu
2.3. Communication Menu 17
ActiLife Documentation, Release 0.0.1
2.3.1 Show Download Folder
The Show Download Folder simply opens ActiLife?s default download folder. This option is useful for locating filesdownloaded from devices in the Devices tab.
2.3.2 Show CSV Folder
The Show CSV Folder opens the default CSV conversion/download folder
2.3.3 Update Firmware From File
Within the ?Advanced? menu, the Update Firmware from File option allows users to manually upgrade (or downgrade)device firmware. From the Devices tab, select the devices that need to be upgraded then select the Update Firmwarefrom File option. A dialog box will allow the user to select a firmware file for each of the connected devices types.After the file has been selected, click ?OK to update the firmware.
Note: Manually upgrading or downgrading firmware is not
recommended. Doing so could render your ActiGraph device unusable and could void the product?s war-ranty. Contact ActiGraph support prior to manually changing the firmware. Under normal circumstances,ActiLife will automatically update the devices firmware.
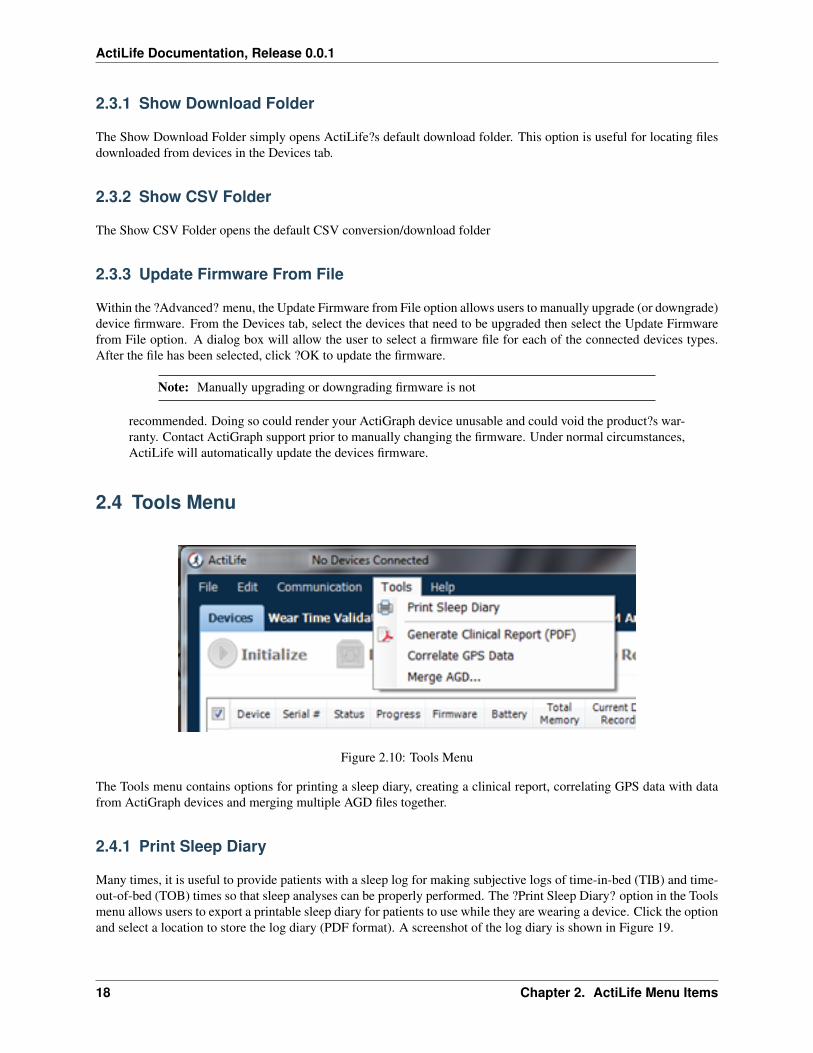
2.4 Tools Menu
Figure 2.10: Tools Menu
The Tools menu contains options for printing a sleep diary, creating a clinical report, correlating GPS data with datafrom ActiGraph devices and merging multiple AGD files together.
2.4.1 Print Sleep Diary
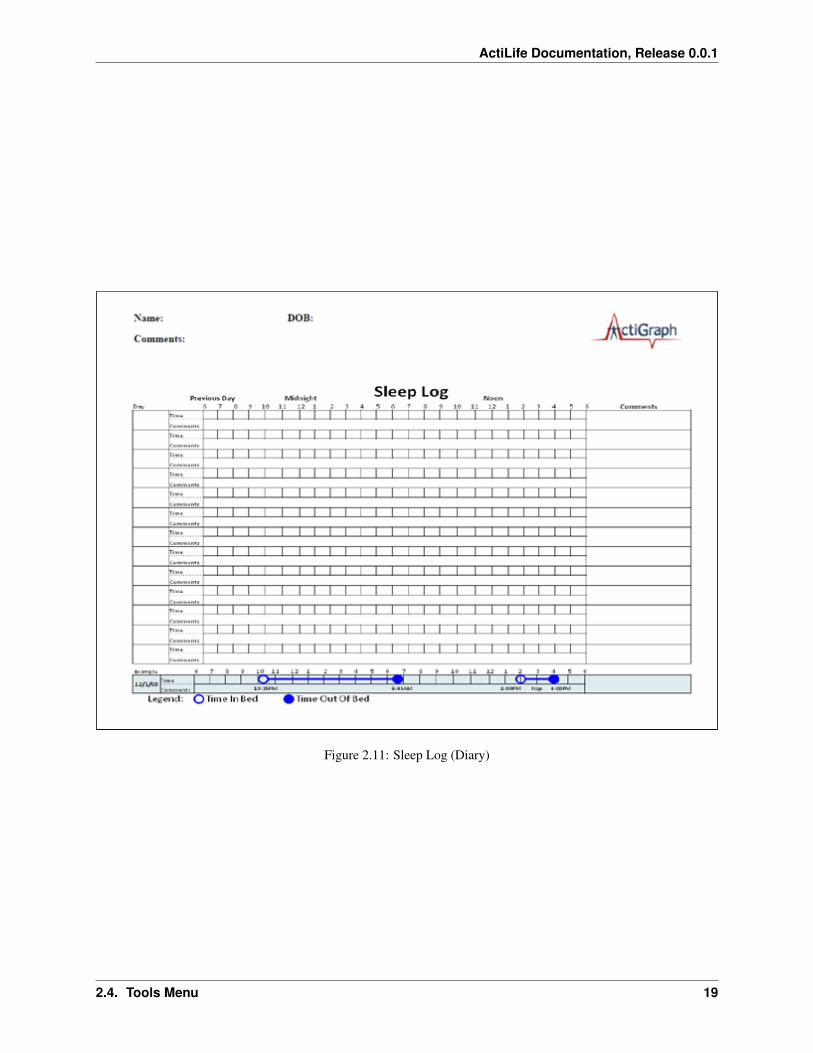
Many times, it is useful to provide patients with a sleep log for making subjective logs of time-in-bed (TIB) and time-out-of-bed (TOB) times so that sleep analyses can be properly performed. The ?Print Sleep Diary? option in the Toolsmenu allows users to export a printable sleep diary for patients to use while they are wearing a device. Click the optionand select a location to store the log diary (PDF format). A screenshot of the log diary is shown in Figure 19.
18 Chapter 2. ActiLife Menu Items
ActiLife Documentation, Release 0.0.1
Figure 2.11: Sleep Log (Diary)
2.4. Tools Menu 19

ActiLife Documentation, Release 0.0.1
2.4.2 Clinical Report
ActiLife can create a clinical report which contains the following information: - Subject and Device Information(Name, Weight, Device Serial Number, Start/End Time) - Wear Time Information - Energy Expenditure - Cut Points -Sleep Graphs - Sleep Period Breakdown and Summary
The clinical report can be used to quickly generate a report on an individual in a clinical environment without runningthrough all of the tools in ActiLife. ## GENERATING A CLINICAL REPORT ## When downloading data from anActiSleep or ActiSleep+ device, users can generate a Clinical Report by simply checking the box ?Create ClinicalReport on Download?? as shown in Figure 20.
Figure 2.12: Clinical Report on Download
The report can also be generated after a data download through the tools menu. Select the *.agd file that was generatedfrom an ActiSleep or ActiSleep+ device and click ?Open?.
2.4.3 Clinical Report Default Values
The Clinical Report generator uses the default values stored in the Wear Time Validation tool to calculate wear andnon-wear time. Similarly, the tool also uses the default algorithms selected in Data Scoring (on last program close)to calculate Energy Expenditure. To change the algorithms, open ActiLife, navigate to the Data Scoring tab, switchto a new energy expenditure algorithm and close the program. If sleep times have already been entered via the SleepAnalysis tool, the Clinical Report tool will use those times to calculate the sleep score and graph information in thereport. If not, the Auto Score feature will be utilized.
Note: The Clinical Report tool is only available for data collected
using the ActiSleep or ActiSleep+ devices. This feature can be enabled for non-ActiSleep devices for asmall fee. Contact ActiGraph support at [email protected] for more information.
2.4.4 Correlate GPS Data
More info coming soon.
20 Chapter 2. ActiLife Menu Items
ActiLife Documentation, Release 0.0.1
2.4.5 Merge AGD
More info coming soon.
2.5 Help Menu
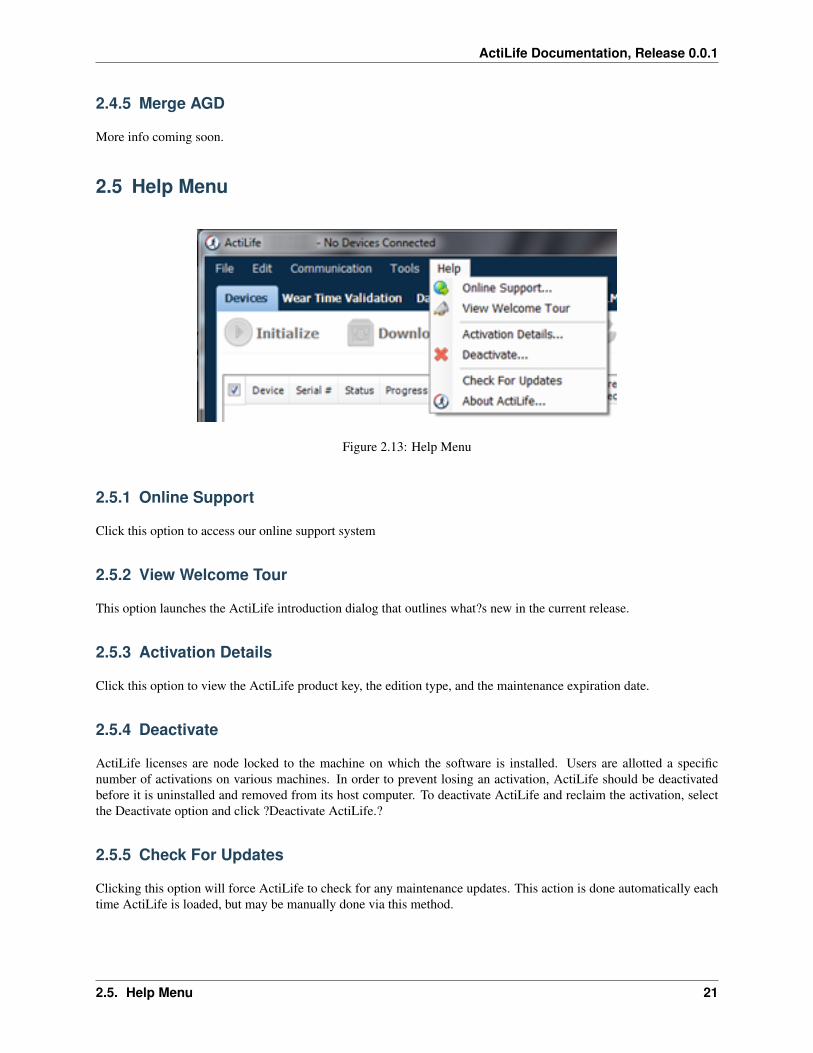
Figure 2.13: Help Menu
2.5.1 Online Support
Click this option to access our online support system
2.5.2 View Welcome Tour
This option launches the ActiLife introduction dialog that outlines what?s new in the current release.
2.5.3 Activation Details
Click this option to view the ActiLife product key, the edition type, and the maintenance expiration date.
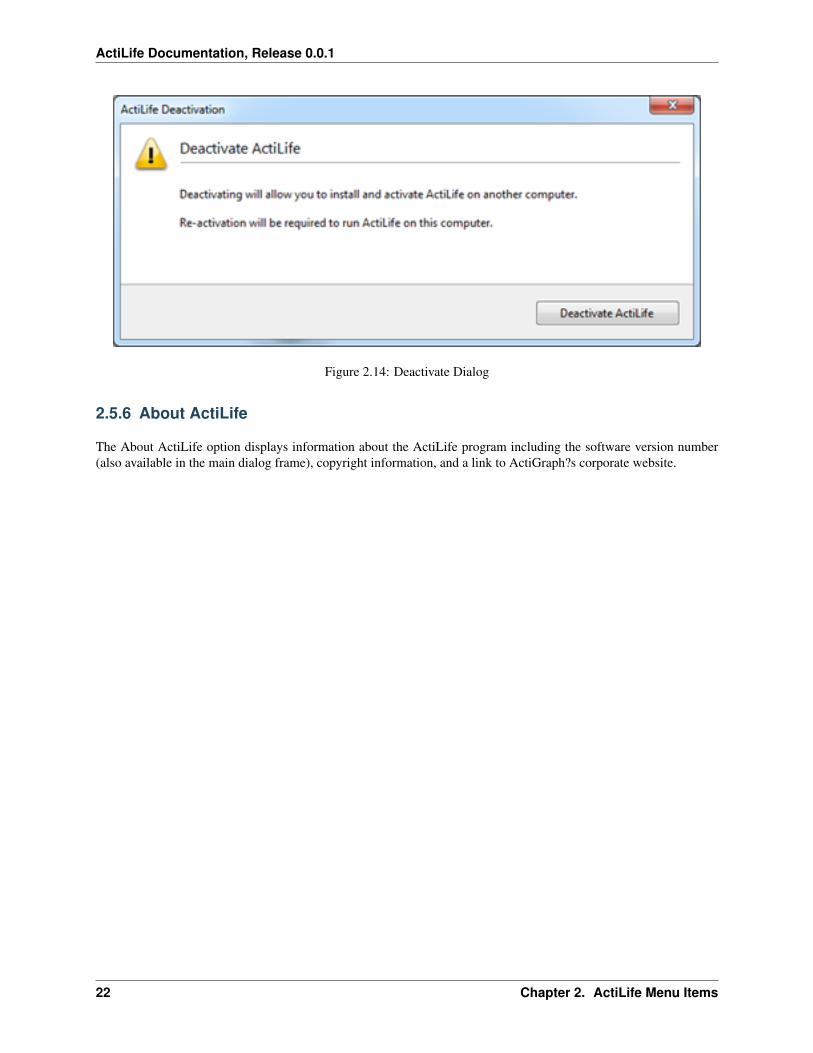
2.5.4 Deactivate
ActiLife licenses are node locked to the machine on which the software is installed. Users are allotted a specificnumber of activations on various machines. In order to prevent losing an activation, ActiLife should be deactivatedbefore it is uninstalled and removed from its host computer. To deactivate ActiLife and reclaim the activation, selectthe Deactivate option and click ?Deactivate ActiLife.?
2.5.5 Check For Updates
Clicking this option will force ActiLife to check for any maintenance updates. This action is done automatically eachtime ActiLife is loaded, but may be manually done via this method.
2.5. Help Menu 21
ActiLife Documentation, Release 0.0.1
Figure 2.14: Deactivate Dialog
2.5.6 About ActiLife
The About ActiLife option displays information about the ActiLife program including the software version number(also available in the main dialog frame), copyright information, and a link to ActiGraph?s corporate website.
22 Chapter 2. ActiLife Menu Items
CHAPTER 3
Indices and tables
• genindex
• modindex
• search
23
![Introduction - Windowsinteroperability.blob.core.windows.net/.../[MS-OXCDATA] … · Web viewMicrosoft publishes Open Specifications documentation for protocols, file formats, languages,](https://img.pdfslide.us/doc/110x75/5a9dcccc7f8b9abd0a8d45d7/introduction-win-ms-oxcdata-web-viewmicrosoft-publishes-open-specifications.jpg)

![Introduction - interoperability.blob.core.windows.netMS-OXOUM]-090410.d… · Web viewMicrosoft publishes Open Specifications documentation for protocols, file formats, languages,](https://img.pdfslide.us/doc/110x75/5d4ff60388c99387498b7551/introduction-ms-oxoum-090410d-web-viewmicrosoft-publishes-open-specifications.jpg)


![[MS-RPL]: Report Page Layout (RPL) Binary Stream Format€¦ · Microsoft publishes Open Specifications documentation (“this documentation”) for protocols, file formats, data](https://img.pdfslide.us/doc/110x75/5ec8f221d4b4d807bb39fd0e/ms-rpl-report-page-layout-rpl-binary-stream-format-microsoft-publishes-open.jpg)