Embed Size (px)
Citation preview


Contents
1 Introduction ....................................................................................................................5
2 QuickStart Guide ..............................................................................................................6
2.1 Files Connect System Requirements ......................................................................................... 6
2.2 Installing Files Connect .............................................................................................................. 7
2.3 First Run / Installing Your License .............................................................................................. 8
2.4 Configuring Your First Shared Volume ....................................................................................... 9
2.5 Configuring Your First Shared Print Queue ..............................................................................12
2.6 The Mac Client .........................................................................................................................13
2.7 Connecting from the Mac Finder .............................................................................................18
2.8 The Optional Files Connect Zidget™ ........................................................................................18
2.9 Additional Resources ...............................................................................................................19
3 Installing Files Connect ................................................................................................... 22
3.1 Getting Started ........................................................................................................................22
3.1.1 System Requirements ................................................................................................................................... 22 3.1.2 Getting Help ................................................................................................................................................... 24
3.2 Installing Files Connect ............................................................................................................24
3.2.1 Before you begin ........................................................................................................................................... 24 3.2.2 Installing Files Connect ................................................................................................................................. 25 3.2.3 Sharing the Print Server Directory ............................................................................................................... 26
3.3 Launching Files Connect the First Time ...................................................................................26
3.3.1 Automatically Importing SMB Shares .......................................................................................................... 26 3.3.2 Installing AppleTalk ....................................................................................................................................... 28 3.3.3 Using Kerberos .............................................................................................................................................. 29
3.4 Setting up Files Connect Clustering .........................................................................................29
3.4.1 Cluster Worksheet......................................................................................................................................... 31 3.4.2 Installing Files Connect on a Cluster ............................................................................................................ 33
3.5 Administering Files Connect on a Cluster ................................................................................48
3.6 Configuring the Files Connect server for Mac client and Zidget access ...............................49
3.7 Adding additional servers to the Master Server ......................................................................50
4 Upgrading Files Connect ................................................................................................. 51
5 Configuring Files Connect ............................................................................................... 52
5.1 Files Connect File Server ..........................................................................................................52
5.1.1 Starting and stopping the Files Connect File Server ................................................................................... 52 5.1.2 Configuring the Files Connect Server ........................................................................................................... 52 5.1.3 Configuring Network Reshare support ........................................................................................................ 73
5.2 Administering Files Connect remotely .....................................................................................81
5.3 Configuring Client Computers to Print to Files Connect ..........................................................81
5.3.1 Files Connect Zidget ...................................................................................................................................... 82
5.4 Installing and Configuring the Zidget on the Client .................................................................83
5.4.1 Adding a printer with the Zidget .................................................................................................................. 85 5.4.2 Mounting Files Connect shared volumes with the Zidget.......................................................................... 86

3 Copyright © Acronis International GmbH, 2002-2017
5.4.3 Mounting DFS shared volumes with the Zidget .......................................................................................... 86 5.4.4 Printer Setup Utility ....................................................................................................................................... 87 5.4.5 Using Bonjour Within the Print Dialog ......................................................................................................... 89 5.4.6 Using Print Accounting Features from a Client ........................................................................................... 98
5.5 Adding a printer from a Web Page ..........................................................................................98
5.6 Macintosh Client Configuration for DFS Support ..................................................................101
5.6.1 Files Connect Mac Client ............................................................................................................................. 101 5.6.2 Files Connect Zidget Option ....................................................................................................................... 101
5.7 Adding a License Number ......................................................................................................103
6 Searching with Files Connect ........................................................................................ 103
6.1 Enumeration Search ..............................................................................................................104
6.2 Catalog Search .......................................................................................................................104
6.3 Spotlight Search .....................................................................................................................104
6.4 Storing Search Index Files ......................................................................................................104
6.4.1 Verbose logging options ............................................................................................................................. 105 6.4.2 Enable Windows Error Reporting .............................................................................................................. 105 6.4.3 Archive Active Log File ................................................................................................................................ 105
7 Using Files Connect ...................................................................................................... 106
7.1 The Mac Client .......................................................................................................................106
7.2 Using the Files Connect File server ........................................................................................110
7.2.1 Creating Volumes for Use with Files Connect ........................................................................................... 110
7.3 Files Connect Users ................................................................................................................123
7.3.1 Connecting Macintosh Users...................................................................................................................... 124 7.3.2 Viewing Files Opened with Files Connect .................................................................................................. 125
7.4 Using the Log .........................................................................................................................126
7.4.1 Keeping track of activities with the Operation Log ................................................................................... 126 7.4.2 Using the Print Log ...................................................................................................................................... 127
7.5 Remapping Extensions ...........................................................................................................129
7.5.1 Associating a Type and Creator .................................................................................................................. 129 7.5.2 Creating a New Type and Creator .............................................................................................................. 130
7.6 Using the Files Connect Print Server ......................................................................................131
7.6.1 How the Print Server Works ....................................................................................................................... 131 7.6.2 Setting up Print Queues .............................................................................................................................. 131 7.6.3 Setting Up Processing Methods ................................................................................................................. 133 7.6.4 Controlling the Processing of Jobs ............................................................................................................. 137 7.6.5 Publishing A Print Queue ............................................................................................................................ 138
7.7 Using Print Accounting ..........................................................................................................139
7.7.1 Setting up Print Accounting ........................................................................................................................ 139
8 Backup & Disaster Recovery ......................................................................................... 143
9 Appendices .................................................................................................................. 145
9.1 Appendix A: Using the Registry Keys .....................................................................................145
9.1.1 Reconnecting a dropped session ............................................................................................................... 145 9.1.2 Sending password expiration notifications during session ...................................................................... 145 9.1.3 Scheduling re-indexing with EZIPUTIL ....................................................................................................... 146 9.1.4 Adding print log entries to text files........................................................................................................... 146 9.1.5 Customizing Files Connect Print Processing Log columns ........................................................................ 146 9.1.6 Columns ....................................................................................................................................................... 146
4 Copyright © Acronis International GmbH, 2002-2017
9.2 Appendix B: Monitoring Files Connect ..................................................................................147
9.2.1 Counters for Files Connect File Server ....................................................................................................... 147 9.2.2 Counters for Files Connect File Server Users ............................................................................................ 148 9.2.3 Counters for Files Connect File Server Volumes ....................................................................................... 149 9.2.4 Counters for Files Connect Printing ........................................................................................................... 149 9.2.5 Counters for Files Connect Print Queues .................................................................................................. 149
10 Supplemental Material ................................................................................................ 150
10.1 TCP/IP Ports ...........................................................................................................................150
10.2 Files Connect Support Tools ..................................................................................................150
10.2.1 Mac Support Applications and Tools ......................................................................................................... 151 10.2.2 Mac Performance Testing Applications ..................................................................................................... 151 10.2.3 Windows Support Tools and Scripts .......................................................................................................... 152 10.2.4 Windows Applications ................................................................................................................................ 152
10.3 Files Connect Compatibility Information ...............................................................................153
10.4 Windows Registry Keys ..........................................................................................................154
10.4.1 General Parameter Registry Keys -- Non-Refreshable ............................................................................. 155 10.4.2 General Parameter Registry Keys -- Refreshable ...................................................................................... 163 10.4.3 Debug Logging Registry Keys -- Refreshable ............................................................................................. 176 10.4.4 Debug Logging Registry Keys -- Non-Refreshable ..................................................................................... 178 10.4.5 Print Parameter Registry Keys -- Refreshable ........................................................................................... 179 10.4.6 Print Parameter Registry Keys -- Non-Refreshable ................................................................................... 181 10.4.7 Filename Policy Registry Keys -- Refreshable ............................................................................................ 181 10.4.8 HTTP Discovery Registry Keys -- Refreshable ............................................................................................ 184 10.4.9 Spotlight Registry Keys -- Refreshable ....................................................................................................... 186 10.4.10 HSM Registry Keys -- Refreshable .............................................................................................................. 188 10.4.11 VSS Registry Keys -- Refreshable ................................................................................................................ 189
10.5 Files Connect Streams ............................................................................................................189
11 Zidget Help .................................................................................................................. 190
12 Known issues ............................................................................................................... 193
13 What's New ................................................................................................................. 193
5 Copyright © Acronis International GmbH, 2002-2017
1 Introduction This guide provides the documentation of Files Connect installation, configuration and features.
About Files Connect
With Files Connect, Windows® computers can provide Apple Filing Protocol (AFP) file sharing and IP-printing to Macintosh® computers. Files Connect is optimized to provide the fastest file and print services available, resolve common Mac/Window file sharing issues, and provide support for Apple technologies such as Network Spotlight full-content search and Time Machine backup.
Files Connect includes the following services:
Files Connect File Server
Files Connect Print Server
With Files Connect, Macintosh users can connect to and mount directories on a Windows file server just as native AFP volumes. With the Files Connect Print Server installed, Macintosh users can create desktop printers that deliver print jobs to printers via the server automatically and just as easily as with AppleTalk. Files Connect’s integration into the existing network is seamless–Macintosh users continue using the same tools and applications for accessing servers and printers that they always have.

6 Copyright © Acronis International GmbH, 2002-2017
2 QuickStart Guide
In this section Files Connect System Requirements .......................................................... 6 Installing Files Connect .............................................................................. 7 First Run / Installing Your License .............................................................. 8 Configuring Your First Shared Volume ....................................................... 9 Configuring Your First Shared Print Queue .............................................. 12 The Mac Client ......................................................................................... 13 Connecting from the Mac Finder ............................................................. 18 The Optional Files Connect Zidget™ ........................................................ 18 Additional Resources ............................................................................... 19
2.1 Files Connect System Requirements Verify your server meets the requirements for Files Connect. It is recommended you quit any running programs, including the Services control panel, before starting the installation.
The following are the minimum system requirements for the Files Connect File & Print Server on Windows Server and Windows Workstation platforms and for connecting from Macintosh Clients. For optimal results, your Windows Server machine should be running the latest service pack from Microsoft®. Adding additional RAM to your server machine will greatly enhance Files Connect performance. The recommended system requirements for a particular implementation or application can vary so please contact us at http://www.acronis.com/en-us/contactsupportgl.html if you have questions or need assistance.
Operating System Requirements:
Windows Server Platforms:
Note: GroupLogic Appletalk is not supported on Windows Server 2012 and above.
Note: Older versions of Windows Server are supported by Files Connect versions older than 10.5. These include Windows Storage Server 2008 Service Pack 2, Windows Storage Server 2003 Service Pack 2 & R2 Service Pack 2, 2008 Service Pack 2, 2003 Service Pack 2 & 2003 R2 Service Pack 2 and are no longer supported for newer versions of Files Connect.
2016 Standard & Datacenter
2012 R2 Standard & Datacenter & Essentials
2012 Standard & Datacenter & Essentials
2008 R2 Service Pack 1
2011 Small Business Server Standard Update Rollup 3
Note: We do not support Windows Small Business Server 2011 Essentials!
Windows Storage Server 2012 R2
Windows Storage Server 2012
Windows Storage Server 2008 R2 Service Pack 1
Windows Powered NAS
7 Copyright © Acronis International GmbH, 2002-2017
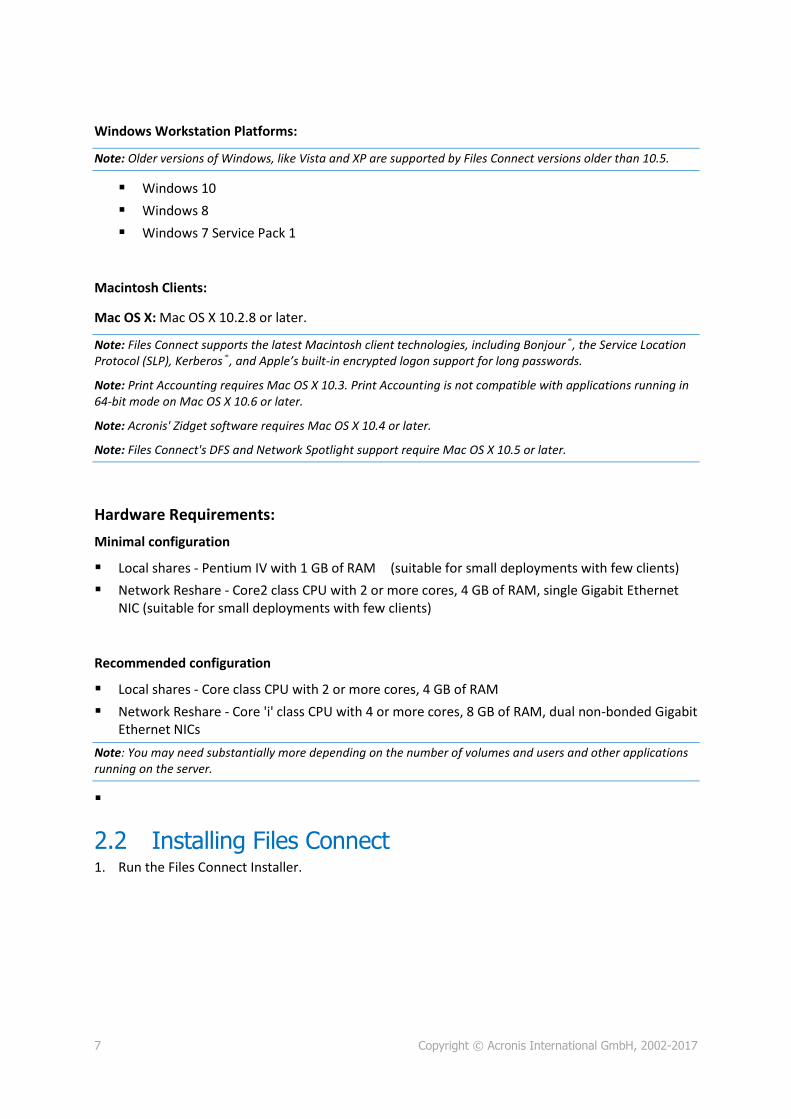
Windows Workstation Platforms:
Note: Older versions of Windows, like Vista and XP are supported by Files Connect versions older than 10.5.
Windows 10
Windows 8
Windows 7 Service Pack 1
Macintosh Clients:
Mac OS X: Mac OS X 10.2.8 or later.
Note: Files Connect supports the latest Macintosh client technologies, including Bonjour®, the Service Location Protocol (SLP), Kerberos®, and Apple’s built-in encrypted logon support for long passwords.
Note: Print Accounting requires Mac OS X 10.3. Print Accounting is not compatible with applications running in 64-bit mode on Mac OS X 10.6 or later.
Note: Acronis' Zidget software requires Mac OS X 10.4 or later.
Note: Files Connect's DFS and Network Spotlight support require Mac OS X 10.5 or later.
Hardware Requirements:
Minimal configuration
Local shares - Pentium IV with 1 GB of RAM (suitable for small deployments with few clients)
Network Reshare - Core2 class CPU with 2 or more cores, 4 GB of RAM, single Gigabit Ethernet NIC (suitable for small deployments with few clients)
Recommended configuration
Local shares - Core class CPU with 2 or more cores, 4 GB of RAM
Network Reshare - Core 'i' class CPU with 4 or more cores, 8 GB of RAM, dual non-bonded Gigabit Ethernet NICs
Note: You may need substantially more depending on the number of volumes and users and other applications running on the server.
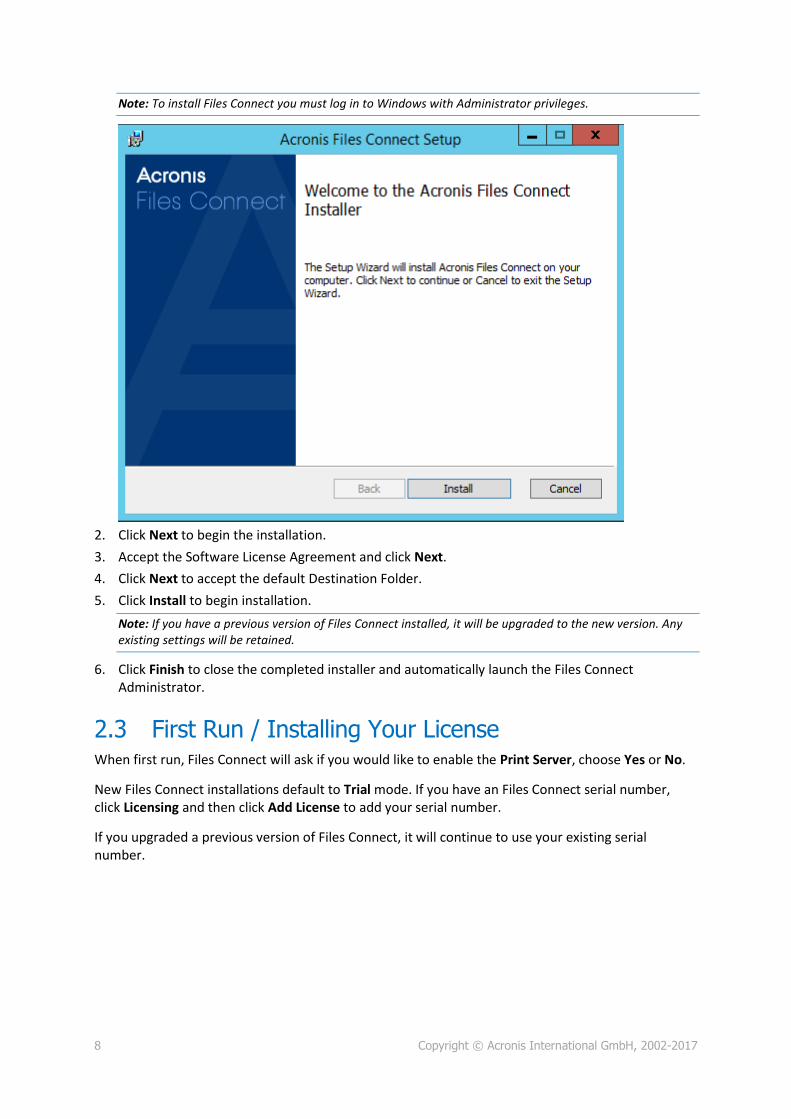
2.2 Installing Files Connect 1. Run the Files Connect Installer.
8 Copyright © Acronis International GmbH, 2002-2017
Note: To install Files Connect you must log in to Windows with Administrator privileges.
2. Click Next to begin the installation.
3. Accept the Software License Agreement and click Next.
4. Click Next to accept the default Destination Folder.
5. Click Install to begin installation.
Note: If you have a previous version of Files Connect installed, it will be upgraded to the new version. Any existing settings will be retained.
6. Click Finish to close the completed installer and automatically launch the Files Connect Administrator.
2.3 First Run / Installing Your License When first run, Files Connect will ask if you would like to enable the Print Server, choose Yes or No.
New Files Connect installations default to Trial mode. If you have an Files Connect serial number, click Licensing and then click Add License to add your serial number.
If you upgraded a previous version of Files Connect, it will continue to use your existing serial number.
9 Copyright © Acronis International GmbH, 2002-2017
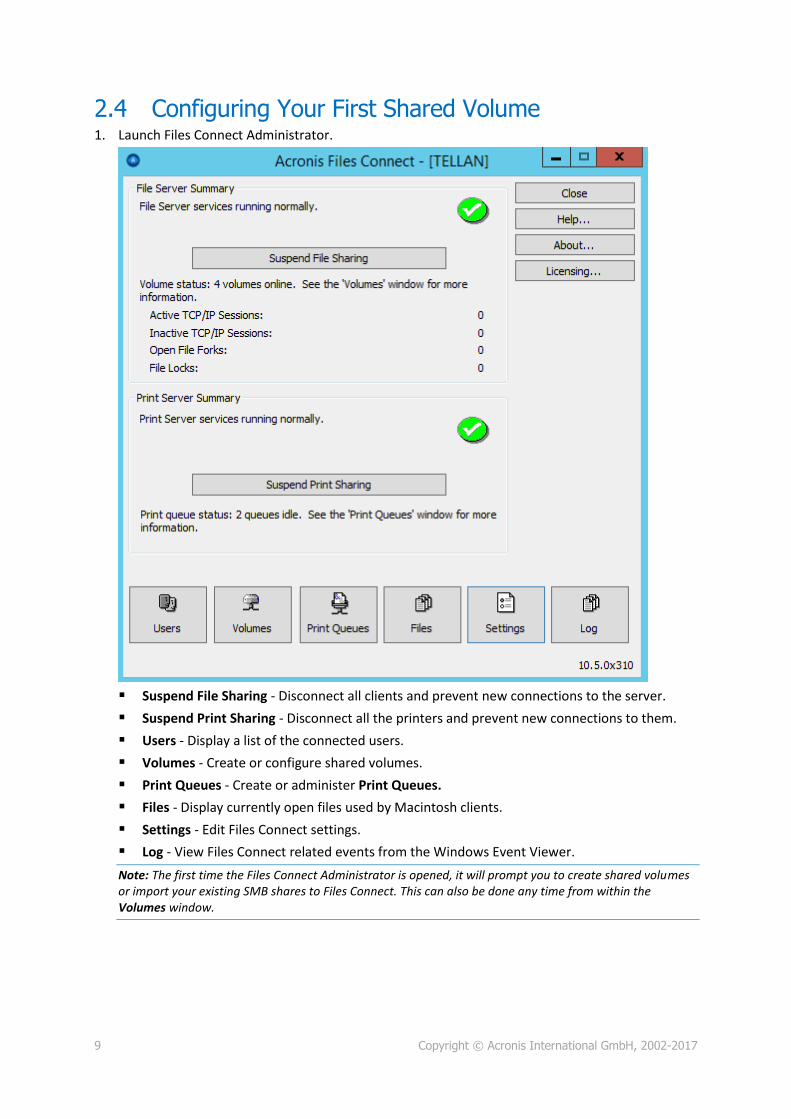
2.4 Configuring Your First Shared Volume 1. Launch Files Connect Administrator.
Suspend File Sharing - Disconnect all clients and prevent new connections to the server.
Suspend Print Sharing - Disconnect all the printers and prevent new connections to them.
Users - Display a list of the connected users.
Volumes - Create or configure shared volumes.
Print Queues - Create or administer Print Queues.
Files - Display currently open files used by Macintosh clients.
Settings - Edit Files Connect settings.
Log - View Files Connect related events from the Windows Event Viewer.
Note: The first time the Files Connect Administrator is opened, it will prompt you to create shared volumes or import your existing SMB shares to Files Connect. This can also be done any time from within the Volumes window.

10 Copyright © Acronis International GmbH, 2002-2017
2. Click Volumes. The Volumes window will appear.
Create - Create a volume.
Modify - Opens the Volume Properties window.
Remove - Removes the selected volume.
Restart - Restarts the volume.
Suspend - Take a volume temporarily offline so that clients cannot connect to it.
Note: Suspended volumes will be resumed every time the Files Connect service is restarted
Show in Explorer - Show the volume’s parent folder in Windows Explorer.
Import SMB Shares... - Reshare all folders shared with Windows file sharing (SMB) with Files Connect as well.

11 Copyright © Acronis International GmbH, 2002-2017
3. Click Create to create a new volume. The Volume Properties windows appears.
Apple Filing Protocol (AFP) file and search - This is the default setting and creates a volume
accessible by AFP. The volume will be accessible and searchable from the Files Connect Mac Client app and the Mac Finder. When opening files and browsing these volumes, the Mac will connect using AFP in either case.
Search only (Mac client will connect using SMB) - With this option, the volume will be displayed in the Files Connect Mac Client app and will be searchable, but it will not be shared as an AFP volume. Macs connecting to the Files Connect server using AFP will not see this volume. Macs will automatically connect to “Search only” volumes and files found in Files Connect Mac Client app search results using SMB. This connection uses preexisting Windows or NAS SMB file server shared volumes.
Volume is read-only - Prevent writing to the volume.
Allow guests to use volume - When checked, a Macintosh user can log into the file server without supplying a name and password.
Use volume as home directory - Filter out all directories except for a user’s home directory.
Reset permissions on move - Resets the permissions on moved files and folders to inherit from the destination folder.
Enforce Filename Policy - Enforces the filename policies that are defined in the global settings.
Volume supports ACLs - ACL support allows Mac OS X 10.4 and later clients to use Windows Access Control Lists.
Path - Choose path of the folder to share.
12 Copyright © Acronis International GmbH, 2002-2017
Convert shortcuts to aliases - When enabled, Files Connect will convert all .URL shortcuts in the volume to Mac-readable aliases.
Support Spotlight Searching - Enable Spotlight searching of file attributes and content.
Windows Search - When checked, this volume will use Windows Search as the default search engine for this volume.
Acronis Content Indexing - When checked, this volume will use Acronis Content Indexing as the default search engine for this volume.
Indexing Options- Configure where the index Create a file name index that speeds up searches.
Support Catalog Search - Marking this checkbox enables Catalog searching for this volume.
Support Time Machine backup - Advertises the volume to Time Machine clients.
4. Browse the path of the folder you want to share.
Note: The use of removable devices as volumes is not supported. (e.g.: Flash drives, USB drives, etc.)
5. Click OK to share the volume with Files Connect.
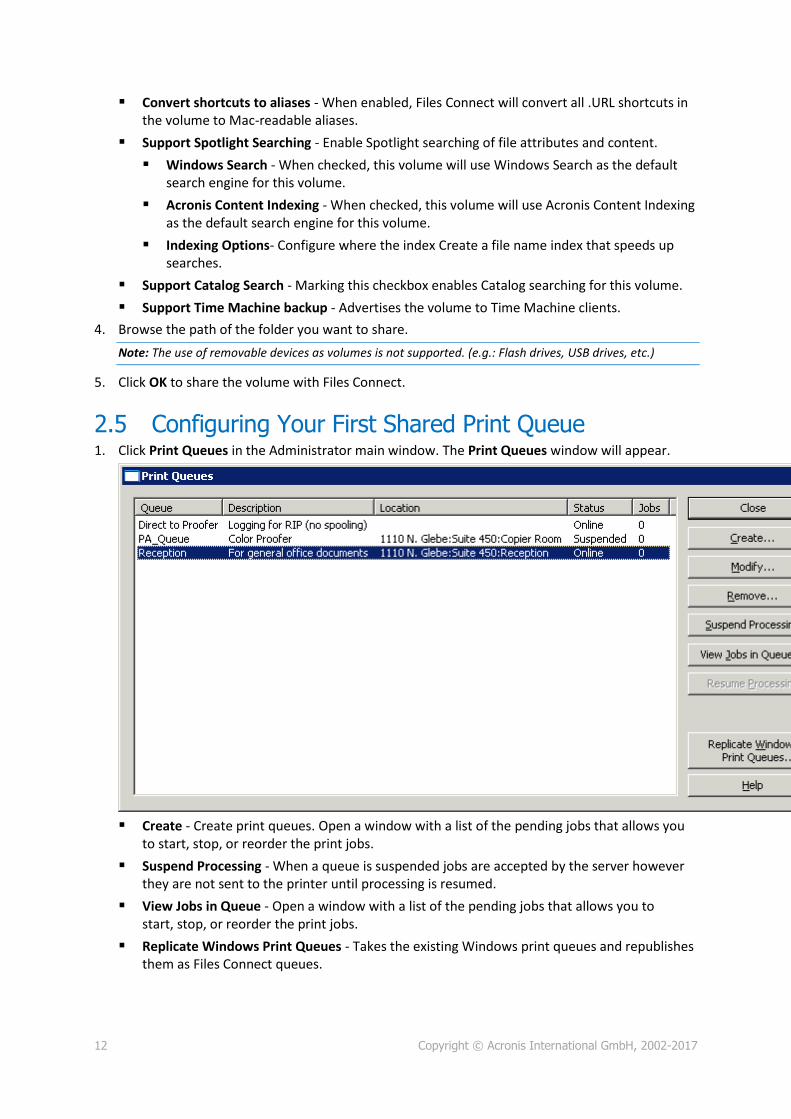
2.5 Configuring Your First Shared Print Queue 1. Click Print Queues in the Administrator main window. The Print Queues window will appear.
Create - Create print queues. Open a window with a list of the pending jobs that allows you
to start, stop, or reorder the print jobs.
Suspend Processing - When a queue is suspended jobs are accepted by the server however they are not sent to the printer until processing is resumed.
View Jobs in Queue - Open a window with a list of the pending jobs that allows you to start, stop, or reorder the print jobs.
Replicate Windows Print Queues - Takes the existing Windows print queues and republishes them as Files Connect queues.

13 Copyright © Acronis International GmbH, 2002-2017
2. Click Create to create a new Print Queue.
Name - The name that you will see when you print from a Macintosh. Where Files Connect
will send the jobs after they are received.
Publish queue - Whether the print queue should be discoverable by clients.
Processing - Where Files Connect will send the jobs after they are received.
File - The PPD to be used by clients when printing to this queue.
Print Accounting - Require the Macintosh client to supply job tracking information every time they print to this queue (refer to Using Print Accounting features from a Client (p. 98) and Using Print Accounting (p. 139) for additional information).
3. Enter a Name for the Print Queue.
4. Select a Processing method and enter the information required for the selected processing method.
5. Click OK.
2.6 The Mac Client Introduced in Files Connect 10.5, the Mac Client is by far the easiest way to connect to network resources.
You can get the Mac Client by opening the Web Service address of your Files Connect deployment with the proper port. e.g. http://filesconnect.neucott.com:8081
Once you've opened the address of Files Connect in a browser, you will see a button to download the Mac Client.

14 Copyright © Acronis International GmbH, 2002-2017
Installation
1. Download the Mac application and install it.
2. In your Menu Bar you will see the Files Connect icon.
3. The Files Connect options menu is opened by default. Select Preferences.
Note: If it isn't open, you can click on the icon to open it.
15 Copyright © Acronis International GmbH, 2002-2017
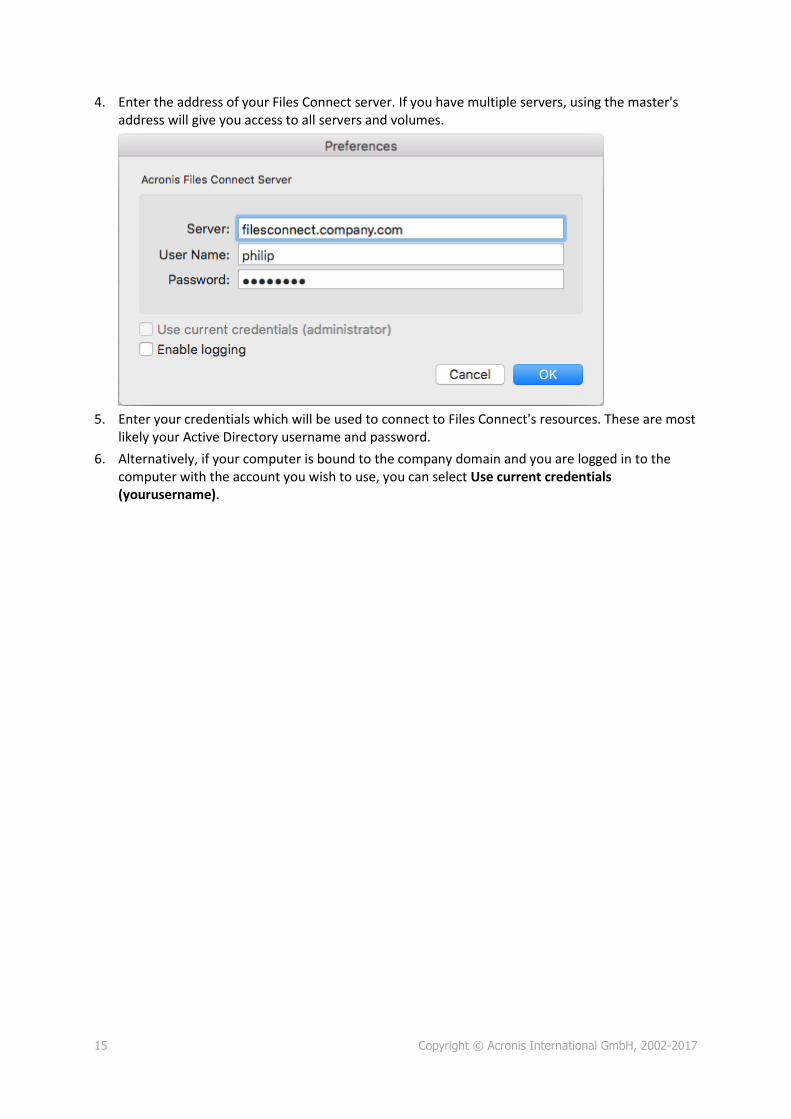
4. Enter the address of your Files Connect server. If you have multiple servers, using the master's address will give you access to all servers and volumes.
5. Enter your credentials which will be used to connect to Files Connect's resources. These are most
likely your Active Directory username and password.
6. Alternatively, if your computer is bound to the company domain and you are logged in to the computer with the account you wish to use, you can select Use current credentials (yourusername).

16 Copyright © Acronis International GmbH, 2002-2017
Usage
Once connected, you can navigate the available resources via the 4 tabs in the upper left. They allow you to view the available resources:
Only shares -
Servers and their respective shares -
DFS shares -

17 Copyright © Acronis International GmbH, 2002-2017
Printers -
To refresh the list of shares & printers, click on View in the menu bar and select Refresh. You can also use Command + R.
Multi-selection
You can multi-select items by using Command + Click or Shift + Click on them. This works for files and folders and also works for Shares and Servers when you want to search in a couple of specific shares instead of All Shares.
Search
You can search for files by many parameters like file type, creation date, filename, file content and more. The search will be performed only for the selected share(s)/server(s).
1. The quickest way to search is by clicking on the Files Connect icon in the Menu Bar and using the search field. By default, this will search in all available shares unless you have already used the app to specific shares. This will become the new default.
You can also click on the magnifying glass icon and select the search parameters from a list of recent search queries.
The default filter is by name and content if content search is enabled for the volumes being searched.
2. The other way to search for files is in the app itself, using the search bar. From there you can also configure the search parameters.
e.g. Searching for files that begin with X, and their file Kind is Executable.
Note: Whatever parameter you choose for the main search filter will be the new default until you change it. This does not include the additional filters you add like Kind, Any and etc.

18 Copyright © Acronis International GmbH, 2002-2017
Recent Searches
A list of 10 of the most recent searches will be available for you to pick from for quicker and easier access to files you search for often. The list is accessible from the magnifying icon both in the Menu Bar and in the app itself.
Mounting Shares and Finder integration
Double-clicking on a share or a found file will automatically mount the file share and open the file. A mounted share will have an unmount icon appear next to its name in the app and clicking it will unmount the share.
You can right-click on a file and select “Show in Finder”, which will open the Finder directly to the file(s)'s location. This also works for multiple selected files.
Bookmarks and Recent Files
Right-clicking on a a file or a number of selected files allows you to create bookmarks for the selected items. Afterwards, these bookmarks can be accessed from the Files Connect Menu Bar -> Bookmarks.
You can find a list of the 20 most recent files you've opened, in the Files Connect Menu Bar -> History.
2.7 Connecting from the Mac Finder 1. From the Finder, click on the Go menu and then Connect to Server.
2. Type afp:// and then the name of the server. For example, afp://server.mycompany.com.
3. Then select the volume you want to mount.
Make sure you connect with afp://. If you connect with smb:// you'll be connecting with the Windows SMB protocol and won't get the benefits of Files Connect.
Note: AFP volume names are case-sensitive. When you specify a volume to connect to, the case will need to match the volume name configured in the Files Connect Administrator > Volumes panel. Connecting to the server without specifying a volume will present a list of available volumes.
Note: You may also be able to see the server by clicking the Browse button.
Note: If you cannot connect using the name of the server, try with the IP address. For example, afp://10.1.5.27
2.8 The Optional Files Connect Zidget™ If you would like to your Mac users to be able to take advantage of the optional Files Connect Zidget™, you may need to add a DNS entry for AccessConnectServerList.yourdomain.com that points to the Files Connect server. More detailed instructions can be found in the Configuring Files Connect for Zidget Access (p. 49) article. Your users will then be able to install the Zidget from http://ServerList:8081

19 Copyright © Acronis International GmbH, 2002-2017
http://ExtremeZIPServerList:8081 to browse for printers and file servers through this simple Dashboard widget.
You can allow mobile clients to connect to your Volumes using the new Mobile Access feature. To enable it, open the Files Connect Administrator's Settings menu, go to the Mobile Access tab and select the checkbox.
For more information, please visit the Setting Mobile Access (p. 70) and Using Mobile Access (p. 121) sections.
2.9 Additional Resources
Network Reshares
With the introduction of “Network Reshare”, Files Connect now includes the ability to create file share volumes that point to folders located on other servers and NAS devices on your network. Macintosh clients continue to connect to Files Connect using the standard AFP file sharing protocol, while Files Connect utilizes the SMB/CIFS file sharing protocol to access files that are requested by Mac users from remote servers and NAS systems. By doing so, Mac users retain all the benefits of AFP file sharing while gaining access to resources that have traditionally only been available through SMB/Windows file sharing.
For in-depth information on the configuration and usage of Network Reshares, visit the following article: Configuring Network Reshare (p. 73).
Network Spotlight Search
Mac OS X 10.5 or later supports Spotlight searching of AFP file servers. Spotlight search allows files to be found by searching on content, in addition to file names and file attributes. When enabled, Spotlight search replaces both enumeration and catalog search and provides results when searching at both the root of a volume and within subfolders.
You can do Spotlight searches through the new Mac Client. For more information, read The Mac Client (p. 13).
20 Copyright © Acronis International GmbH, 2002-2017
For in-depth information on the configuration and usage of Spotlight Search, visit the following articles: Spotlight Search (p. 104), Spotlight Search Operations and Support Spotlight Search (p. 63).
Filename Policies
Because Files Connect sits in a key position between the file server and the Macintosh client, we can enforce policies on valid file names as well as file types to prevent the Macintosh users from breaking workflows. You can configure Files Connect to detect and reject the Macintosh client attempting to save (create, rename, move) files with characters that are “illegal” in Microsoft Explorer or other applications that don’t support the Unicode file system APIs. The administrator can configure what is allowed or deemed illegal. This list can include characters that cannot be displayed on Windows, “trailing spaces” Unicode characters not available in the default Windows font, any specified character, file names longer than “x” characters, or specific file extensions. Filename Policies do not affect existing files on the server or files that are copied using Windows file sharing.
For in-depth information on the configuration and usage of Filename Policies, visit the following article: Setting File Name Polic (p. 65)y.
DFS Support
Files Connect can be configured to make a Microsoft Distributed File System (DFS) available to Macintosh clients. In addition to the server side configuration, installation of the Files Connect Mac Client or Zidget dashboard widget (for Mac OS X 10.4 or later) is required for each Macintosh client that requires access to DFS. Details on the required client side configuration can be found here. DFS support also requires two settings on the Security tab of the Settings dialog. Valid Directory Services credentials must be entered and Support UNIX Permissions and ACLs must be enabled for DFS to function.
For in-depth information on the configuration and usage of DFS, visit the following article: DFS Support (p. 71).
ShadowConnect
ShadowConnect is a feature included with Files Connect 7.2 and later that leverages Microsoft Volume Shadow Copy Services (VSS) to allow Mac users to browse and restore previous versions of modified or deleted files. Using built-in Windows functionality, Windows users can right-click on a file located on a file server volume and select a Restore previous versions option. This allows them to browse a list of previously saved versions of the file, which they can choose to restore. Before ShadowConnect, Mac users were not able to take advantage this technology. By using ShadowConnect, Mac users can browse these same previous versions of files and folders using familiar Mac OS features, such as Cover Flow and Quick Look. After locating the desired version, ShadowConnect allows the Mac user to restore the file or folder to its original location or a copy can be made in a location of their choosing. ShadowConnect brings the ability to restore previous versions to Mac users, while providing enhanced browsing capabilities that make it easier than ever to find the file they're looking for.
For in-depth information on the configuration and usage of ShadowConnect, visit the following article: ShadowConnect http://www.acronis.com/en-us/support/documentation/ShadowConnect/index.html#33051.html.

21 Copyright © Acronis International GmbH, 2002-2017
22 Copyright © Acronis International GmbH, 2002-2017
3 Installing Files Connect
In this section Getting Started ......................................................................................... 22 Installing Files Connect ............................................................................ 24 Launching Files Connect the First Time.................................................... 26 Setting up Files Connect Clustering ......................................................... 29 Administering Files Connect on a Cluster ................................................ 48 Configuring the Files Connect server for Mac client and Zidget access49 Adding additional servers to the Master Server ...................................... 50
3.1 Getting Started With Files Connect, Windows® computers can provide AppleShare® IP file sharing and IP-printing, TCP/IP, and AppleTalk® print services to Macintosh® computers. Files Connect is optimized to provide the fastest file and print services available. Files Connect includes the following services:
Files Connect File Server
Files Connect Print Server
With Files Connect, Macintosh users can connect to and mount directories on a Windows file server just as if they also were native AppleShare volumes. With the Files Connect Print Server installed, Macintosh users can create desktop printers that deliver print jobs to printers via the server automatically and just as easily as with AppleTalk. Files Connect’s integration into the existing network is seamless–Macintosh users continue using the same tools and applications for accessing the server and printers that they always have, but the server delivers much higher performance. With Files Connect Print Accounting, the Macintosh clients must provide additional information such as a job code or employee ID before the server will accept the job.
In this section System Requirements .............................................................................. 22 Getting Help ............................................................................................. 24
3.1.1 System Requirements
The following are the minimum system requirements for the Files Connect File & Print Server on Windows Server and Windows Workstation platforms and for connecting from Macintosh Clients. For optimal results, your Windows Server machine should be running the latest service pack from Microsoft®. Adding additional RAM to your server machine will greatly enhance Files Connect performance. The recommended system requirements for a particular implementation or application can vary so please contact us at http://www.acronis.com/en-us/contactsupportgl.html if you have questions or need assistance.
Operating System Requirements:
Windows Server Platforms:
Note: GroupLogic Appletalk is not supported on Windows Server 2012 and above.

23 Copyright © Acronis International GmbH, 2002-2017
Note: Older versions of Windows Server are supported by Files Connect versions older than 10.5. These include Windows Storage Server 2008 Service Pack 2, Windows Storage Server 2003 Service Pack 2 & R2 Service Pack 2, 2008 Service Pack 2, 2003 Service Pack 2 & 2003 R2 Service Pack 2 and are no longer supported for newer versions of Files Connect.
2016 Standard & Datacenter
2012 R2 Standard & Datacenter & Essentials
2012 Standard & Datacenter & Essentials
2008 R2 Service Pack 1
2011 Small Business Server Standard Update Rollup 3
Note: We do not support Windows Small Business Server 2011 Essentials!
Windows Storage Server 2012 R2
Windows Storage Server 2012
Windows Storage Server 2008 R2 Service Pack 1
Windows Powered NAS
Windows Workstation Platforms:
Note: Older versions of Windows, like Vista and XP are supported by Files Connect versions older than 10.5.
Windows 10
Windows 8
Windows 7 Service Pack 1
Macintosh Clients:
Mac OS X: Mac OS X 10.2.8 or later.
Note: Files Connect supports the latest Macintosh client technologies, including Bonjour®, the Service Location Protocol (SLP), Kerberos®, and Apple’s built-in encrypted logon support for long passwords.
Note: Print Accounting requires Mac OS X 10.3. Print Accounting is not compatible with applications running in 64-bit mode on Mac OS X 10.6 or later.
Note: Acronis' Zidget software requires Mac OS X 10.4 or later.
Note: Files Connect's DFS and Network Spotlight support require Mac OS X 10.5 or later.
Hardware Requirements:
Minimal configuration
Local shares - Pentium IV with 1 GB of RAM (suitable for small deployments with few clients)
Network Reshare - Core2 class CPU with 2 or more cores, 4 GB of RAM, single Gigabit Ethernet NIC (suitable for small deployments with few clients)
Recommended configuration
Local shares - Core class CPU with 2 or more cores, 4 GB of RAM

24 Copyright © Acronis International GmbH, 2002-2017
Network Reshare - Core 'i' class CPU with 4 or more cores, 8 GB of RAM, dual non-bonded Gigabit Ethernet NICs
Note: You may need substantially more depending on the number of volumes and users and other applications running on the server.
3.1.2 Getting Help
You can open Help from the Windows menu in the Files Connect Administrator.
You can visit Acronis at: http://www.acronis.com.
You can find the latest releases of Files Connect at http://www.grouplogic.com/files/glidownload/ezipreleases.cfm
You can search the Knowledge base at http://www.kb.acronis.com
For the first year you own Files Connect, technical support and upgrades are included in the price of the product. After your first year of free support, you can purchase extended support. For technical support services, submit a support request at http://www.acronis.com/en-us/contactsupportgl.html or call 1.703.528.1555 Monday through Friday, 8:00 am to 6:00 pm ET. Have your Files Connect serial number ready for verification. In addition, you can send your questions to http://www.acronis.com/en-us/contactsupportgl.html.The Maintenance and Support program includes important benefits—e-mail, fax and telephone technical support services for problems that you encounter, upgrades, bug fixes, and other incremental releases of the software.
3.2 Installing Files Connect The primary component of Files Connect is a Windows Service that provides file and print sharing to Macintosh clients. Files Connect also includes an administrative tool with which you can configure shared volumes and other settings and a Gateway service which allows you to enable Acronis Access users to connect to your Volumes. The number of clients who can connect using Files Connect depends on your license and its client count. You can upgrade your client count as necessary. Files Connect counts multiple connections from one user account on one IP address as one user for licensing purposes.
In this section Before you begin ...................................................................................... 24 Installing Files Connect ............................................................................ 25 Sharing the Print Server Directory ........................................................... 26
3.2.1 Before you begin
This topic gives you the information you need before installing Files Connect.

25 Copyright © Acronis International GmbH, 2002-2017
Installing Files Connect on a Domain Controller is not recommended as it can cause issues with Kerberos.
Required Windows File Permissions for Shared Volumes
Files Connect relies on the SYSTEM account on the Windows server to perform many of its core functions. For this reason, any folder hierarchy that is shared as a volume with Files Connect requires that the SYSTEM account have Full Control access to the entire folder hierarchy. These permissions are the default for the Windows OS partition, but any additional disks or partitions containing Files Connect volumes must have SYSTEM = “Full Control” set to allow Files Connect to function properly. Please verify that all the volumes you share have this permission set.
Sharing the Root of a Drive
Although Files Connect supports sharing out the root of the drive, Windows treats permissions at the root of the file system differently from other folders. We recommend that you do not share out drive letters directly. Instead, you should create a sub-folder for your shared volume.
3.2.2 Installing Files Connect 1. Run the Files Connect Installer.
Note: To install Files Connect you must log in to Windows with Administrator privileges.
2. Click Next to begin the installation.
3. Accept the Software License Agreement and click Next.
4. Click Next to accept the default Destination Folder.

26 Copyright © Acronis International GmbH, 2002-2017
5. Click Install to begin installation.
Note: If you have a previous version of Files Connect installed, it will be upgraded to the new version. Any existing settings will be retained.
6. Click Finish to close the completed installer and automatically launch the Files Connect Administrator.
Note: For reinstallations, the Files Connect installer stops the Files Connect Service to perform the install. However, in some cases the installation fails because the Files Connect Service cannot be stopped. These cases include possible service errors, conflicts with other running processes, or installing while the Services Control Panel is open. If you experience installation failures, you can stop the Service manually from the Services Control Panel and proceed with the install.
3.2.3 Sharing the Print Server Directory
When you install Files Connect, the installer creates a directory called Files Connect Print Support. You have the option to share that directory for Macintosh clients. If you share the directory with the Files Connect File Server, Macintosh clients can mount the volume to download the optional Files Connect Macintosh Print Client. Macintosh clients do not need to use this program to print to the Files Connect Print Server; however, using it provides easy IP printing and makes it easy for Macintosh clients to use Bonjour (OS X), SLP (OS 9), or an IP address to find the Files Connect Print Server.
3.3 Launching Files Connect the First Time When you launch the Files Connect Administrator for the first time with no configured volumes (shares), Files Connect prompts you to create new volumes or import existing volumes. Files Connect can import existing volumes on your server that are shared using Windows file sharing (SMB).
If you are upgrading from a previous version, Files Connect checks for volumes shared with previous versions of Files Connect and automatically creates these Files Connect volumes.
In this section Automatically Importing SMB Shares ...................................................... 26 Installing AppleTalk .................................................................................. 28 Using Kerberos ......................................................................................... 29
3.3.1 Automatically Importing SMB Shares Note: All shares will be imported as "AFP" shares.

27 Copyright © Acronis International GmbH, 2002-2017
SMB Shares
Each time the Files Connect Administrator is launched, Files Connect checks for any SMB shares that are not being shared as Files Connect volumes. If any such volumes exist, the Import SMB Shares button within the Volumes dialog becomes active. If you choose to do so, Files Connect creates new AFP volumes for those SMB shares.
Files Connect does not replicate hidden shares (for example, C$). When Mac OS X clients copy files to a server with SMB, they do not have access to alternate streams, where resource fork and Finder information is usually stored. Instead, this resource fork and Finder information is written to a separate file, the “dot underscore” file. To the Macintosh client, this action happens behind the scenes—the dot underscore is hidden, and all they see is a single file that appears to contain resource fork and Finder information. But when you view these files from Windows, the dot underscore file is just another hidden file with no relation to the original data file. In Files Connect, the server can migrate resource and Finder information from the dot underscore file into alternate data streams of the file so that Macintosh clients have access to that information. When a Macintosh client requests information about a file or folder, Files Connect first tries to read from the file or folder’s Finder info stream (AFP_AfpInfo) and, in the case of a file, from its resource stream (AFP_Resource). If either one of these streams is missing, Files Connect tries to find a corresponding dot underscore file. If that file is present and contains the necessary data, the data are migrated into the appropriate stream. The dot underscore migration feature is enabled by default, but you can disable this feature. To disable this feature, set the refreshable registry value ServerMigratesDotUnderscoreFiles to 0 and if Files Connect is running use the Refresh Registry button in the Administrator to read in the new value. In addition, Files Connect contains an optional feature that allows Files Connect to delete a dot underscore file after its contents have been migrated into the data file. This feature is disabled by default, but you can enable this feature. To enable this feature, set the refreshable registry value

28 Copyright © Acronis International GmbH, 2002-2017
ServerDeletesMigratedDotUnderscoreFiles to 1 and refresh the registry. Since Files Connect migrates dot underscore information only when necessary, dot underscore migration may occur over time, as Files Connect explores new areas of the volume for the first time. Files Connect does not perform this migration all at once when the volume first comes online. If the dot underscore file is locked, or has different permissions than the corresponding data file, the information may not be copied to the AFP_Resource or AFP_Info streams. This fact is logged. The dot underscore migration is a transition feature and is not designed for simultaneous use with SMB. Files Connect does try to deal with AFP clients accessing a file while it is still being written with SMB, but this is not a supported use of the feature. Any changes that occur to dot underscore files after the initial migration is ignored by Files Connect, since the service always “prefers” its alternate streams to dot underscore files. Therefore, if a user alters the resource fork of a file over SMB after the resource fork information has been migrated by Files Connect, these changes are not migrated. While dot underscore files can contain information other than resource fork or Finder information, this other information is not migrated into the data file. The following types of information are not migrated:
File Comments
Real Name (File’s name as created on home file system)
Icon, B&W (Standard Macintosh black and white icon)
Icon, Color (Macintosh color icon)
File Dates Info (File creation date, modification date, and so on)
Macintosh File Info (Macintosh file information, attributes and so on)
Short Name (AFP short name)
Directory ID (AFP directory ID)
Note: SMB shares will not be migrated on a Windows Cluster Server installation of Files Connect.
In this section Importing SMB shares after first launch .................................................. 28 Naming Conventions for SMB volumes ................................................... 28
3.3.1.1 Importing SMB shares after first launch
The prompt for SMB importing that is described above is only performed once—the first time you launch the Files Connect Administrator. After first launch, use the Import SMB Shares button in the Volumes window of the Files Connect Administrator to bring shares over as Files Connect volumes. See Creating volumes (p. 111) for information about migrating volumes.
3.3.1.2 Naming Conventions for SMB volumes
Imported SMB volumes must adhere to the standards of Files Connect volume names. With Files Connect 8.0.4 or later, a name can have up to 127 characters for UTF16 and 190 for UTF8. Volumes over 27 characters cannot be used with Mac OS 10.4 and below. If any migrated or replicated shares have names that are too long, the names are truncated. In the event that a migrated or replicated share has a name matching a current Files Connect volume, Files Connect appends a number to its volume name, e.g. “Volume (2)”. The volume name may be truncated in order to have room to append the number.
3.3.2 Installing AppleTalk
When the AppleTalk protocol is installed on the server, Files Connect registers itself with AppleTalk. Mac OS 9 clients see Files Connect when they open the Chooser. If AppleTalk is not already installed,

29 Copyright © Acronis International GmbH, 2002-2017
you can install the AppleTalk protocol for Windows. To install the AppleTalk protocol, add it as a protocol in the Network Control Panel.
Note: Windows XP, Windows Vista, Windows Server 2008 and Windows Server 2012 do not include AppleTalk.
3.3.3 Using Kerberos
The Massachusetts Institute of Technology created Kerberos to address such network security issues as username/password exchange, network security, client computer security, and login persistence. Kerberos is a protocol that provides secure network authentication and support for “single sign-on” to network resources. With single sign-on support, a user logs in one time to a network domain (also called a realm) and, after he or she is authenticated, gains access to resources on other computers without resubmitting a user name and password. Kerberos works on the premise that only the client and. authenticating server share a piece of secret information and it provides a way to confirm that the shared information is accurate throughout the user’s session. When a user on a client computer types in a username and password and submits that information to a server to log in, Kerberos first authenticates the user and then issues a ticket that uniquely identifies the client for that session. The ticket is used for future access to other applications and shared volumes during the user’s session. Kerberos provides encrypted key exchange to ensure security on both internal networks (behind firewalls) and insecure networks such as the internet. Once a user is authenticated, all further communication is encrypted for privacy and security.
Files Connect supports the Kerberos extensions in the AFP protocol and works directly with Active Directory. It is registered as a Kerberos service provider and can authenticate Macintosh tickets. Since the tickets themselves are a standard format within Kerberos, Files Connect takes tickets from a Macintosh and passes them to Microsoft Windows Active Directory for authentication and then grants access to Windows server resources if Active Directory says the client has a valid ticket.
In this section Troubleshooting Kerberos ....................................................................... 29
3.3.3.1 Troubleshooting Kerberos
If you are having trouble getting Kerberos to work with Files Connect, use the following troubleshooting steps:
To verify that a client computer has communicated successfully with the Kerberos ticket authority and received a ticket for Files Connect, run the Kerberos application located in /System/Library/CoreServices. The active Kerberos tickets are listed in Kerberos.app.In addition, the Kerberos application can be used to destroy existing tickets before their normal expiration time.
To verify that a client computer is bound to the Active Directory Domain correctly and is running the right version of Kerberos modules, try connecting to the server from the Macintosh over SMB instead of AFP by typing smb://SERVER_NAME smb://SERVER_NAME into the Server Address field in the Connect To Server dialog. If you are required to log in then you will know that there is a general problem with Kerberos.
3.4 Setting up Files Connect Clustering Clustering provides fast failover and quick restart of the services provided by a failed server node. You set up an Files Connect cluster using Microsoft Cluster Servers (MSCS)—specially linked servers

30 Copyright © Acronis International GmbH, 2002-2017
running the Microsoft Cluster Service. If one server fails or is taken offline, the other server or servers in the cluster immediately take over the failed server’s operations. Applications running on the cluster are always available. Resources running on multiple servers appear to connected clients as a single system, referred to as an Files Connect virtual server. When a successful failover occurs because of a problem, the connected user sometimes cannot tell that service was interrupted. Files Connect is a cluster-aware application that you can use on active/active clustered configurations. Multiple instances of Files Connect can run on a single server node. Each instance has its own IP address and can be assigned its own shared volume. The configuration of multiple virtual servers provides server consolidation and load management benefits. Running multiple instances of Files Connect on a server node provides high reliability because each instance runs in isolation from the others. For help in configuring a cluster, see the following Cluster Worksheet. Files Connect supports the following services in clustered configurations:
active-active clustering
multiple virtual servers per node in a cluster
improved reliability and availability
eight node clusters in Windows 2003 & 2008
possible server consolidation
When you are running Files Connect in a clustered environment, the Files Connect Administrator window shows the following in the title bar:
the name of the server in upper case characters
the name of the service in upper or lower case as you typed it when you set up the service.
MSCS uses the following terms to describe the component parts of a cluster configuration. Do not confuse these terms as you proceed with installing Files Connect.
Node - A single member server in a cluster.
Resource - A hardware or software component that runs in a cluster, such as a disk, an IP address, a network name, or an instance of the Files Connect service.
Group - A combination of resources that are managed as a unit of failover. Groups are also known as resource groups or failover groups. A typical Files Connect failover group consists of a disk, an IP address, a network name, and an instance of Files Connect.
Dependency - A service or other resource that must be available first in order for the dependant service to start.
Failover - The process of moving resources or resource groups from one server to another. Failover can occur when one server experiences a failure of some sort or when you, the administrator, initiate the failover. This term is equivalent to the Microsoft Cluster Administrator action of moving a Cluster Group to another node.
Quorum Resource - A disk resource containing the failover information that is shared between nodes in a cluster.
Heartbeat - The communication between Cluster nodes tells the other nodes that the service is still running.
Virtual Server - A virtual server is a combination of configuration information and cluster resources, such as an IP address, network name and an application resource. An Files Connect Virtual Server (EVS) is defined by its unique IP address.

31 Copyright © Acronis International GmbH, 2002-2017
Active/Active - This term describes a configuration in which multiple nodes are Files Connect file servers running in production.
Active/Passive - This term describes a configuration in which one node is active in production and another node sits idle until a failover occurs.
Shared Storage - This term refers to the external SCSI or fibre channel storage system. Shared storage is a requirement for multi-node clusters. Although this storage is shared, only one node can access an external storage resource at any given time.
This diagram shows an example of a cluster setup.
Note: Each server has its own IP address. You can configure multiple shares for each virtual server.
In this section Cluster Worksheet ................................................................................... 31 Installing Files Connect on a Cluster ........................................................ 33
3.4.1 Cluster Worksheet
For each Files Connect service running on your cluster you will need the following:
1. A name for the unique Files Connect service (the first instance is created by default and is named ExtremeZ-IP)
2. A unique IP address and optionally a network name
3. Shared physical storage

32 Copyright © Acronis International GmbH, 2002-2017
4. A cluster group in which to put the new Files Connect service
To simplify this process we have provided a worksheet to prepare for your installation. Duplicate the worksheet for each additional Files Connect virtual server you would like to create. Information needed to install the software Files Connect Serial Number:
For each virtual server you want to set up, you will need to have unique values for all the sections below.
Information needed to create a new service:
Unique service name
Information needed to set up a new cluster group
Cluster Group name
Network name (DNS/Netbios name)
Unique service name (created above)
Volumes to be shared
Drive
Letter Volume Name
Is the volume shared with Windows?

33 Copyright © Acronis International GmbH, 2002-2017
3.4.2 Installing Files Connect on a Cluster
Before installing Files Connect on a new cluster, you must have installed and configured the clustering service on your servers. On Windows 2003 Server (Enterprise, Storage Node Server, or Datacenter Edition) you will need to install and configure Microsoft Cluster Service. On Windows Server 2008 (Enterprise or Datacenter Edition), you will need to install and configure the Failover Clustering role. In addition, you need the following:
An Files Connect cluster-enabled serial number that is encoded with the number of nodes and virtual servers for which it is licensed. Use a single serial number for all the nodes of the cluster.
A shared disk or disks where the Files Connect shared volumes will reside
An IP address and network name for each Files Connect virtual server you want to create; create a DNS entry for each IP address.
Note: If folders shared over SMB (for Windows clients) reside on the same physical disk as Files Connect shares, we recommend configuring DFS (Distributed File System) so that your Windows users can use one IP address or host name to access your shared volumes.
In this section Reviewing the Installation Procedure ...................................................... 33 Configuring Files Connect Services .......................................................... 33 Creating an Files Connect Service ............................................................ 34 Adding an Files Connect Service to a Cluster ........................................... 35 Creating a Windows 2008 Cluster Group ................................................. 35 Creating a Windows 2012 Role ................................................................ 42
3.4.2.1 Reviewing the Installation Procedure
Installation consists of the following four parts, each with a number of steps that are described in the following sections:
1. Use the installer and serial number provided by Acronis to install the Files Connect on each node of the cluster.
2. Use the Files Connect Administrator application to configure the necessary Files Connect service(s) on each node of the cluster.
3. Use the Microsoft Cluster Administrator application, provided with Windows 2003, or the Failover Cluster Management application, provided with Windows Server 2008, to configure the Microsoft clustering service.
4. Use the Files Connect Administrator application to configure shared folders and other features of the Files Connect service.
3.4.2.2 Configuring Files Connect Services
To operate, Files Connect requires the following four components:
IP Address
Network Name
Physical Disk
Files Connect Service
Place each set of components in its own cluster group or Files Connect Virtual Server (EVS). The number of EVSs created is based on the number of physical disks that need to be shared out with Files Connect. For example, if the volumes are on three physical disks, create three EVSs. This

34 Copyright © Acronis International GmbH, 2002-2017
configuration has the most flexibility; however, in some cases you may not want to use up multiple IP addresses. Then you can have multiple physical disks shared out by one EVS. The Cluster Worksheet (p. 31) can help you set up a plan for your cluster.
3.4.2.3 Creating an Files Connect Service
Each Files Connect virtual server you want to use requires an Files Connect service instance. Each of these Files Connect services requires a unique Service Name. When Files Connect is installed on a cluster enabled server, no services are created by default. In this step, you will create a new Files Connect service for each virtual server, on each node you want the service to run on.
Create a Files Connect Service
1. After completing the Files Connect installation process, or on a cluster server with an existing Files Connect installation, run the Files Connect Administrator application.
2. If Files Connect is being installed for the first time and no services exist, you will be prompted to create a service. Enter a name for the service and press OK. In this example, our service name is “Marketing”.
3. Write down the exact service name you enter as you will need it when configuring Microsoft
clustering in the next section. The service name will also be displayed in the title bar when you start the Files Connect Administrator.
4. After the service is created, it will appear in the Files Connect Services window. Files Connect Services will be shown each time the Files Connect Administrator is launched. It is used to select the service you would like to administer, as well as to add or remove additional services.
5. You will need to perform these steps on each cluster node that these Files Connect services will
run on.

35 Copyright © Acronis International GmbH, 2002-2017
3.4.2.4 Adding an Files Connect Service to a Cluster
You can configure the cluster for Files Connect in a number of ways:
If you already have set up a Cluster Group, simply add Files Connect as a generic service to your Cluster Group.
If you do not have any existing cluster group, follow the steps in the sections below, which take you through the process of using the Cluster Application Wizard® to configure the cluster group.
Or, you may use another method with which you are familiar.
If folders shared over SMB for Windows clients reside on the same physical disk as your Files Connect volumes, you can add the Files Connect service to an existing group. In addition, when using an active/active configuration with Windows SMB shares, you may want to install and configure Windows DFS (Distributed File System). DFS makes it easier for connected users to find shared folders on the network without having to learn multiple IPs or DNS names. For more information, see Microsoft’s DFS documentation. Although the Macintosh client does not support DFS, Files Connect has the ability to make DFS volumes available to Macintosh clients.
3.4.2.5 Creating a Windows 2008 Cluster Group
This is the recommended method for creating a new cluster group that includes an Files Connect service. If you already have a cluster group configured and would like to add Files Connect to that group, right click the cluster group and select Add Resource - Generic Service. Then follow the steps below to select the desired Files Connect service. This will bypass the cluster group network and storage configuration steps.
To create a cluster group, do the following:

36 Copyright © Acronis International GmbH, 2002-2017
1. Open Failover Cluster Management in Administrative Tools and select your cluster on the left pane.

37 Copyright © Acronis International GmbH, 2002-2017
2. Right click on the cluster name and select Configure a Service or Application. This will launch the High Availability Wizard. Click Next.

38 Copyright © Acronis International GmbH, 2002-2017
3. Select Generic Service and click Next.

39 Copyright © Acronis International GmbH, 2002-2017
4. You must now select the service to add. You may see multiple entries for Files Connect in the list. Each entry will display the Files Connect service name as defined when the service was created. See the clustering section for more information. Select the entry that includes the specific Files Connect service name you would like to configure and click Next.

40 Copyright © Acronis International GmbH, 2002-2017
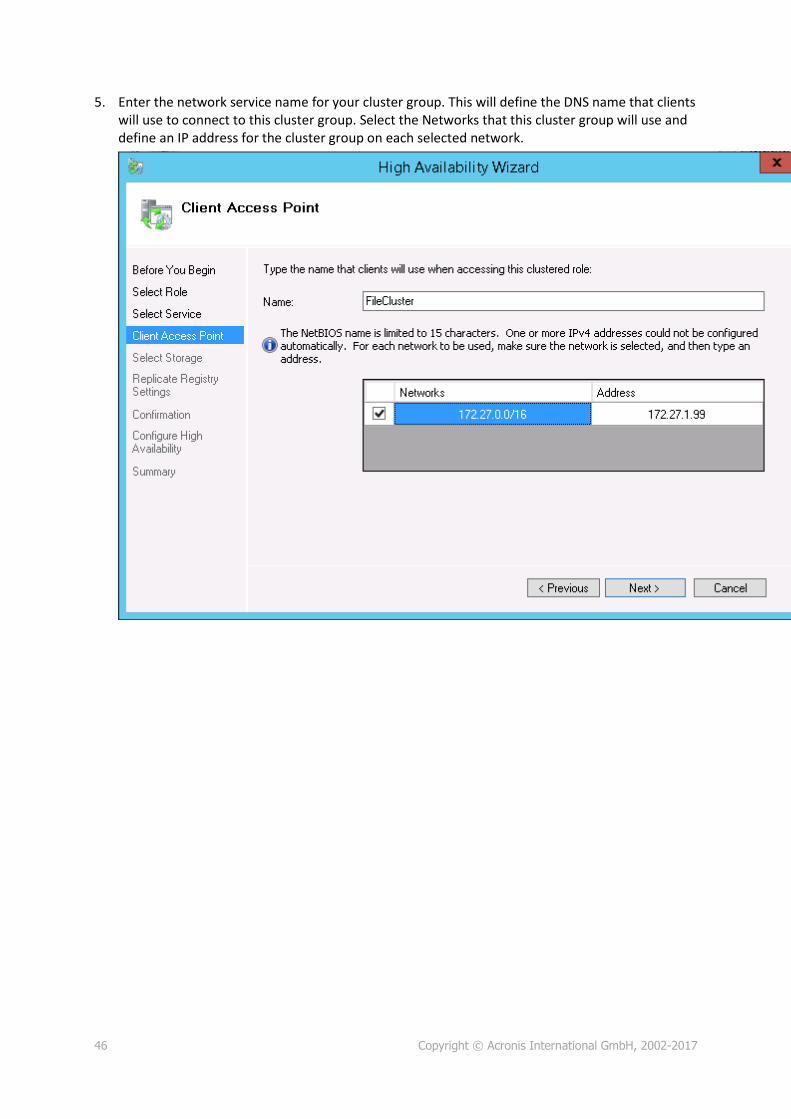
5. Enter the network service name for your cluster group. This will define the DNS name that clients will use to connect to this cluster group. Select the Networks that this cluster group will use and define an IP address for the cluster group on each selected network.

41 Copyright © Acronis International GmbH, 2002-2017
6. Select the volume(s) you would like to make available to this cluster group and click Next. These should be the volumes that contain the directories to be shared with Files Connect.
7. Click Next on the Replicate Registry Settings step. No changes are necessary.
8. Click Next on the Confirmation step.
In this section Setting Cluster Resource Dependencies .................................................. 41 Bringing the New Resource Online .......................................................... 42
Setting Cluster Resource Dependencies
To ensure that cluster services start-up in correct order, you must set resource dependencies for the IP Address, Network Name, and the Physical Disk.
To set resource dependencies for the IP Address, Network Name, and the Cluster Disk, do the following:
1. From Failover Cluster Management, under Other Resources for the cluster group, right click on the Files Connect File and Print Server resource.
2. Click Properties.
3. Select the Dependencies tab.
4. Add the IP Address, Network Name, and the Cluster Disk as dependencies.
5. Click OK.

42 Copyright © Acronis International GmbH, 2002-2017
Note: Since the Files Connect resource is created under the High Availability Wizard, all the nodes in the cluster are owners for the resource. If you do not want this configuration, you can change it before you bring the service online. To change the owners for the resource, click the Advanced Policies tab and modify the Possible Owners accordingly.
Bringing the New Resource Online
At completion of this configuration, the Files Connect resource may be offline. You can now bring the new resource online.
To bring the Files Connect resource online, do the following:
1. Right click the Files Connect File and Print Server resource.
2. Select Bring this resource online.
3.4.2.6 Creating a Windows 2012 Role
This is the recommended method for creating a new cluster group that includes an Files Connect service. If you already have a role configured and would like to add Files Connect to that role, right click on the role and select Add Resource -> Generic Service. Then follow the steps below to select the desired Files Connect service. This will bypass the role network and storage configuration steps.
To create a role, do the following:
1. Open Failover Cluster Management in Administrative Tools and select your cluster on the left pane.

43 Copyright © Acronis International GmbH, 2002-2017
2. Right click on Roles and select Configure a Role. This will launch the High Availability Wizard. Click Next.

44 Copyright © Acronis International GmbH, 2002-2017
3. Select Generic Service and click Next.

45 Copyright © Acronis International GmbH, 2002-2017
4. You must now select the service to add. You may see multiple entries for Files Connect in the list. Each entry will display the Files Connect service name as defined when the service was created. See the clustering section for more information. Select the entry that includes the specific Files Connect service name you would like to configure and click Next.
46 Copyright © Acronis International GmbH, 2002-2017
5. Enter the network service name for your cluster group. This will define the DNS name that clients will use to connect to this cluster group. Select the Networks that this cluster group will use and define an IP address for the cluster group on each selected network.

47 Copyright © Acronis International GmbH, 2002-2017
6. Select the volume(s) you would like to make available to this cluster group and click Next. These should be the volumes that contain the directories to be shared with Files Connect.
7. Click Next on the Replicate Registry Settings step. No changes are necessary.
8. Click Next on the Confirmation step.
In this section Setting Cluster Resource Dependencies .................................................. 47 Bringing the New Service Online.............................................................. 48
Setting Cluster Resource Dependencies
To ensure that cluster services start-up in correct order, you must set resource dependencies for the IP Address, Network Name, and the Physical Disk.
To set resource dependencies for the IP Address, Network Name, and the Cluster Disk, do the following:
1. From Failover Cluster Management, under the Resources tab for the role, right click on the Files Connect File and Print Server resource.
2. Click Properties.
3. Select the Dependencies tab.
4. Add the IP Address, Network Name, and the Cluster Disk as dependencies.
5. Click OK.

48 Copyright © Acronis International GmbH, 2002-2017
Note: Since the Files Connect resource is created under the High Availability Wizard, all the nodes in the cluster are owners for the resource. If you do not want this configuration, you can change it before you bring the service online. To change the owners for the resource, click the Advanced Policies tab and modify the Possible Owners accordingly.
Bringing the New Service Online
At completion of this configuration, the Files Connect resource may be offline. You can now bring the new resource online.
To bring the Files Connect resource online, do the following:
1. Right click the Files Connect File and Print Server resource.
2. Select Bring online.
3.5 Administering Files Connect on a Cluster In a clustered environment, the Files Connect administrator behaves differently than it does in a non-clustered environment. You should always execute administration tasks on the node currently running the Files Connect Virtual Server you want to administer. Starting the service from the Files Connect Administrator or the Services control panel is disabled for clustered configurations. Clustered services should be started ONLY from the Microsoft Cluster Administrator. If the service is started by some other means (an application or the Services control panel) the Cluster Administrator will not know the service is running and, if required, cannot manage a failover.
Administer services only from the node they are running on. Then, you can create volumes that point to a specific folder. On a cluster, a node can only access the disks in its cluster group. In order to select a folder with the Browse for folder dialog you must run the Files Connect administrator on the node where the Physical Disks are located. Using the Files Connect Administrator, you can create a volume on another node; however, you will need to enter the path manually.
1. When the Files Connect Administrator is started, you will be prompted to select the Files Connect
service that you want to administer.
2. Select an Files Connect Service and click OK.
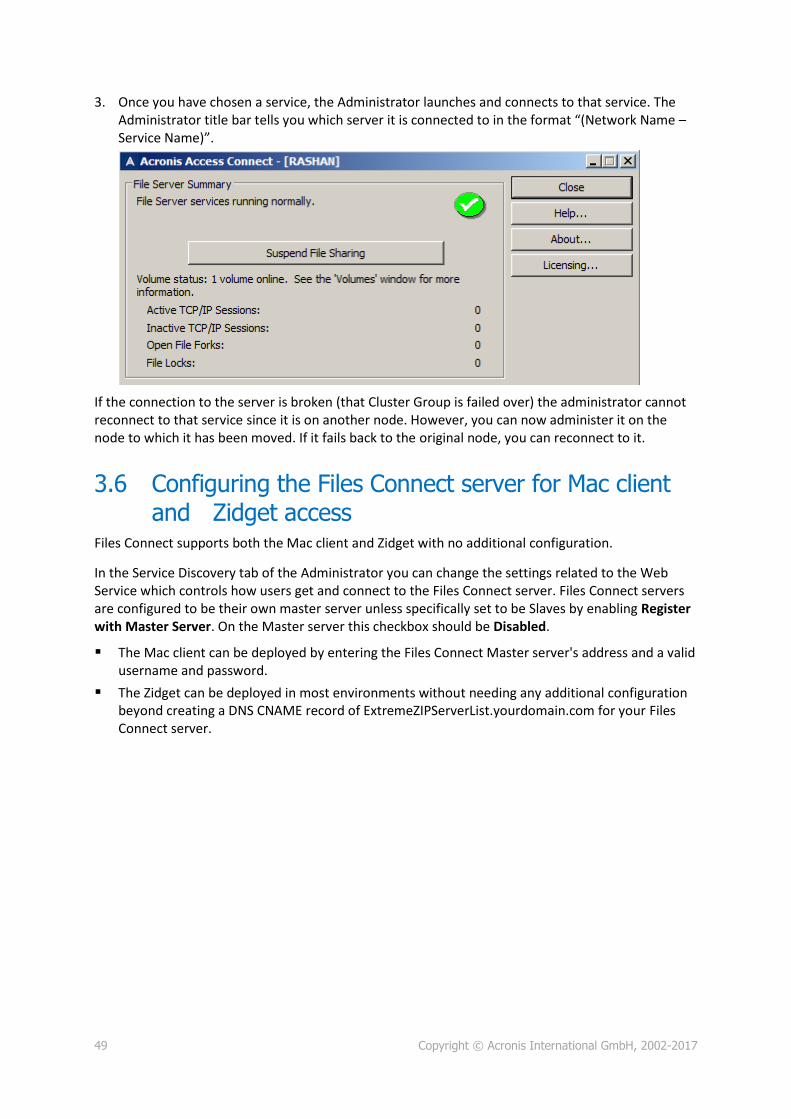
49 Copyright © Acronis International GmbH, 2002-2017
3. Once you have chosen a service, the Administrator launches and connects to that service. The Administrator title bar tells you which server it is connected to in the format “(Network Name – Service Name)”.
If the connection to the server is broken (that Cluster Group is failed over) the administrator cannot reconnect to that service since it is on another node. However, you can now administer it on the node to which it has been moved. If it fails back to the original node, you can reconnect to it.
3.6 Configuring the Files Connect server for Mac client and Zidget access
Files Connect supports both the Mac client and Zidget with no additional configuration.
In the Service Discovery tab of the Administrator you can change the settings related to the Web Service which controls how users get and connect to the Files Connect server. Files Connect servers are configured to be their own master server unless specifically set to be Slaves by enabling Register with Master Server. On the Master server this checkbox should be Disabled.
The Mac client can be deployed by entering the Files Connect Master server's address and a valid username and password.
The Zidget can be deployed in most environments without needing any additional configuration beyond creating a DNS CNAME record of ExtremeZIPServerList.yourdomain.com for your Files Connect server.

50 Copyright © Acronis International GmbH, 2002-2017
If you would like, you can also assign a server to a specific location. A location is composed of locations separated by colons that contains the hierarchy of zones/locations that the Zidget should use to display them.
An example for single level zone is “GLIHQ” and a multi-level location might be “Virginia:Arlington:1st Floor”. In addition to the location property of a print queue or file server, an administrator can also assign them descriptions. When a queue is selected, the status area of Zidget displays any description that the administrator has set for the queue. However, locations and descriptions are optional.
If no servers or print queues have locations assigned to them, then they are all displayed in Zidget as a list without any additional hierarchy.
If only some of the servers do not have a location, they will be displayed at the end of the list below the locations.
3.7 Adding additional servers to the Master Server If you have multiple Files Connect servers, designate one server to be the Master server that the Mac client and Zidget will contact to discover the other Files Connect servers on the network.
All Slave servers will be automatically registered with the Master server by enabling the Register with Master Server setting on the Slaves and entering the address of the Master server.

51 Copyright © Acronis International GmbH, 2002-2017
4 Upgrading Files Connect Upgrading to a new version of Files Connect is an easy and straightforward process. The Files Connect installer automatically detects the existing version and upgrades it to the newer one - you do not have to uninstall the previous version in order to install the new one.
Note: You may receive an inadvertent error message indicating that the service could not be stopped or that a file could not be removed. If you receive these errors, the best strategy is to manually stop the Files Connect service first, then re-run the installer.
Review the Backup & Disaster Recovery (p. 143) guidelines and perform a backup of your deployment before proceeding.
Upgrading to a new version of Files Connect:
Note: Upgrades from ExtremeZ-IP to Files Connect require no special configurations. Start the Files Connect installer and proceed with the steps below.
1. Start the Files Connect installer.
2. Press Next.
3. Accept the license agreement and press Next.
4. Press Install.
5. When the installation procedure completes, press Finish.
Upgrading to a new version of Files Connect on a Microsoft Failover Cluster:
Upgrading Files Connect on a cluster requires that you upgade your inactive nodes one by one, and finally failing-over the rest, so they can be upgraded as well.
1. Verify your clustered configuration has no issues. This is done by right-click on your cluster in Microsoft Failover Cluster Manager and selecting Validate Cluster. Follow the wizard until everything is verified and there are no errors. If errors are found, they must be fixed before proceeding with the upgrade.
2. Select one of your inactive clustered instances.
3. Start the Files Connect installer.
4. Press Next.
5. Accept the license agreement and press Next.
6. Press Install.
7. When the installation procedure completes, press Finish.
8. Repeat the above procedures until all inactive instances are upgraded.
9. Fail-over the active instance(s) to any of the upgraded instances. Once the active instance has become inactive, upgrade it as described above.
10. Confirm that Files Connect works correctly.

52 Copyright © Acronis International GmbH, 2002-2017
5 Configuring Files Connect
In this section Files Connect File Server .......................................................................... 52 Administering Files Connect remotely ..................................................... 81 Configuring Client Computers to Print to Files Connect .......................... 81 Installing and Configuring the Zidget on the Client ................................. 83 Adding a printer from a Web Page .......................................................... 98 Macintosh Client Configuration for DFS Support ................................... 101 Adding a License Number ...................................................................... 103
5.1 Files Connect File Server
In this section Starting and stopping the Files Connect File Server ................................ 52 Configuring the Files Connect Server ....................................................... 52 Configuring Network Reshare support .................................................... 73
5.1.1 Starting and stopping the Files Connect File Server
To start the Files Connect File Server, log into Windows with Administrator privileges and launch the Files Connect Administrator. If you have not already started the Files Connect service, the Files Connect Administrator asks if you want to start the service. In addition, you can start and stop the service from the Service Control Panel on a standalone server or the Cluster Administrator on a cluster server.
5.1.2 Configuring the Files Connect Server
This section gives an overview of configuring the Files Connect service. Use the Files Connect Administrator to view, disconnect, and send messages to connected users, create shared volumes, and adjust specific machine settings. You can configure the local computer or remote computers on which Files Connect is installed as long as you have Administrative privileges.
To configure Files Connect on the computer you are using, from the Windows Start menu, go to Programs/Files Connect and select Files Connect Administrator.
Note: In addition to the method described above, you can configure Files Connect from the command line using the EZIPUTIL.EXE. For more information about EZIPUTIL.EXE simply run the tool and you will be greeted with the 4 major categories: Volume, Server, Session and Print. Selecting any of them will present you with a list of available commands and examples.
In this section Setting up Files Connect ........................................................................... 53 Setting File Server Options ....................................................................... 54 Setting Print Server Options..................................................................... 57 Setting Security Options ........................................................................... 58 Setting Search Options ............................................................................. 61 Setting Filename Policy ............................................................................ 65 Service Discovery ..................................................................................... 68

53 Copyright © Acronis International GmbH, 2002-2017
Setting Mobile Access .............................................................................. 70 DFS ........................................................................................................... 71 Logging ..................................................................................................... 72
5.1.2.1 Setting up Files Connect
Before using Files Connect, review the default settings; you can make changes at this time or later.
The Settings dialog box has the following tabs: File Server, Print Server, Security, Search, Filename Policy, Service Discovery, and DFS.
To change settings, do the following:
1. Access the Files Connect Administrator window.
2. Click Settings.
3. Choose the settings appropriate for your use, then click OK to return to the Files Connect Administrator window.
Suspend File Sharing - Start/Suspend File Sharing Services.
Log - View a log of ExtremeZIP activity.
Users - View the users who are connected; disconnect users; send messages.

54 Copyright © Acronis International GmbH, 2002-2017
Volumes - Set up volumes you want to share.
Files - View files opened by users Macintosh clients. Displays the active TCP/IP sessions, open file forks and file locks.
Licensing - Add serial numbers.
Check for Updates - Check our web site for updates.
5.1.2.2 Setting File Server Options
Use the File Server Settings tab to change the way Files Connect interacts with Mac clients when it offers file sharing services.
In this section AFP Port.................................................................................................... 55 Logon Messages ....................................................................................... 55 Enabling Home Directory Support ........................................................... 55 Convert Windows Shortcuts to Mac links ................................................ 55 Enable Network Reshare support ............................................................ 55 Changing Types and Creators ................................................................... 56 Allow Guests to Connect .......................................................................... 56 Allow Clear Text Logins ............................................................................ 56 Allow Encrypted Logins ............................................................................ 56 Allow Kerberos Logons ............................................................................. 56 Enable ArchiveConnect ............................................................................ 56 Mark Offline Files ..................................................................................... 56
55 Copyright © Acronis International GmbH, 2002-2017
AFP Port
If required for your connection, make changes to the AFP port. Although rarely necessary, you can type a new port number for the TCP/IP port the file server uses; the default is 548.
Note: If Macintosh clients cannot connect to your server, Files Connect may be running on a port other than the default. In this case, Files Connect displays a message on the Files Connect Administrator window warning you that you have picked a non-default port.
Logon Messages
The logon message displays on the Macintosh users’ computers after they successfully log in. Leave the message blank if you do not want clients to receive a message when they log in. To increase the number of characters you can use in the message you send to clients, use the registry key. You can use as many as 500 characters; Macintosh clients using Mac OS 9 see fewer characters.
Note: Mac OS X 10.9 or later does not support sending messages.
Enabling Home Directory Support
If you are using some Files Connect volumes exclusively for home directories, check Enable Home Directory Support. In addition, you must enable home directory support for individual volumes when you set up the volumes; see the Volume Properties (p. 114) dialog box. This setting filters out all directories except the user’s home directory when the user asks for the contents of the volume.
Users do not see home directory volumes that do not contain their home directories.
If your users’ home directory locations are specified in their Microsoft Active Directory profile, choose Use Profile Home Directory.
If your users’ home directories are named to match their user names, choose Use User Name As Home Directory.
See the Knowledgebase article: http://www.grouplogic.com/knowledge/index.cfm/fuseaction/view/docID/210 http://www.grouplogic.com/knowledge/index.cfm/fuseaction/view/docID/210
Convert Windows Shortcuts to Mac links
Makes Windows shortcuts usable to Mac clients.
Enable Network Reshare support
Network Reshare allows Files Connect AFP file volumes to give access to folders located on other servers and NAS devices on your network. Macintosh clients continue to connect to Files Connect using the standard AFP file sharing protocol, while Files Connect utilizes the SMB/CIFS file sharing protocol to access files that are requested by Mac users from remote servers and NAS systems. By doing so, Mac users retain all the benefits of AFP file sharing while gaining access to resources that have traditionally only been available through SMB/Windows file sharing. For more information on Network Reshares, see this section: Configuring Network Reshare support. (p. 73)

56 Copyright © Acronis International GmbH, 2002-2017
Changing Types and Creators
Click the Types and Creators button to fill out the Macintosh Type/Creator to Extension Mappings dialog box to meet your specifications. See Remapping Extensions (p. 129) for more information on remapping MS-DOS extensions to Macintosh types.
Allow Guests to Connect
If you choose to allow guests to connect, a Macintosh user can log into the file server without supplying a name and password. Permission to connect does not give Macintosh clients access to your entire computer. You designate which volumes on your computer you want to share with Macintosh clients. See Creating a Volume (p. 111). The user’s privileges during that session are limited to the permissions normally given to the Everyone group under Windows.
Note: You must configure Windows XP and later Windows systems so that guests can access the server. See Configuring Guest Access for Windows XP and above in Appendix D here.
Allow Clear Text Logins
Checking this option lets Macintosh users connect by sending their passwords in clear-text form over the network. Clear-text passwords may be a security problem and are limited to 8 characters. Mac OS X versions 10.5 and later do not allow clear-text authentication.
Allow Encrypted Logins
If you select this option, Macintosh users can encrypt their passwords before sending them across the network. With encryption, users have greater security and can use longer passwords.
Allow Kerberos Logons
This option provides support for “single sign-on” to network resources. It applies only to users with Mac OS X 10.3.5 or greater. See the section Using Kerberos (p. 29) which describes Kerberos in more detail.
Enable ArchiveConnect
This option turns on enhanced ArchiveConnect support for any file archive volumes shared with Files Connect. ArchiveConnect is a separate Mac client-side application that enables Mac OS X clients to access file archives without triggering unintended retrieval of offline files.
Mark Offline Files
Select a custom label color that will be used to highlight offline files within the Mac OS X Finder.

57 Copyright © Acronis International GmbH, 2002-2017
5.1.2.3 Setting Print Server Options
To make changes to Print Server Settings, click Settings on the Files Connect Administrator window, then click the Print Server tab. Changes you make to print server settings take effect immediately after you click the Apply or OK button.
Retry offline jobs every - Change wait time for retrying jobs.
Delete jobs that have been offline for - Delete offline jobs.
Log print job processing results - Control whether or not the server logs print job processing results.
In this section Automatic Retry of Print Jobs .................................................................. 57 Deleting Offline Jobs ................................................................................ 58 Advanced Print Server Options ................................................................ 58
Automatic Retry of Print Jobs
When a job fails for any reason —LPR error code, TCP connection terminated, error from Windows print queue—the job status is set to Offline and it is sent to the end of the queue. Use the Print Server tab to configure the interval that will elapse before the server retries printing the job.
By default, Files Connect automatically retries offline jobs every five minutes until the job prints successfully. To disable this feature, uncheck the Retry offline jobs every . . . box. You can enter only one auto-retry interval, which applies to all offline jobs.
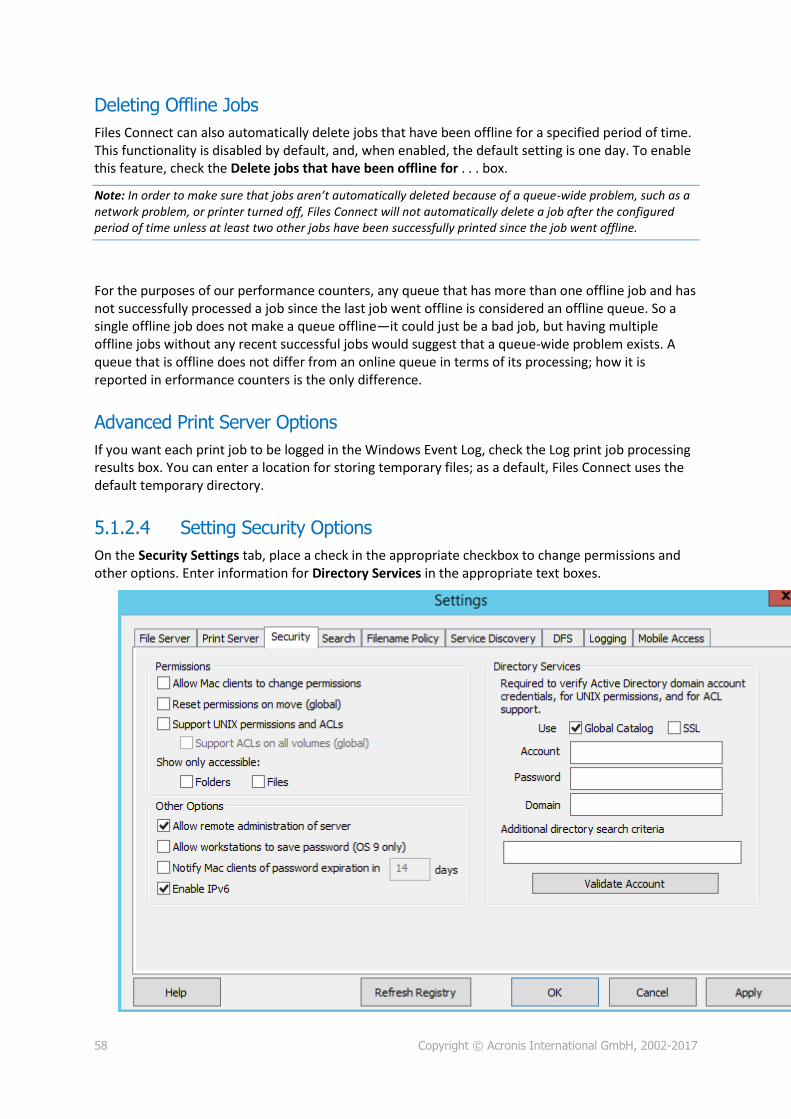
58 Copyright © Acronis International GmbH, 2002-2017
Deleting Offline Jobs
Files Connect can also automatically delete jobs that have been offline for a specified period of time. This functionality is disabled by default, and, when enabled, the default setting is one day. To enable this feature, check the Delete jobs that have been offline for . . . box.
Note: In order to make sure that jobs aren’t automatically deleted because of a queue-wide problem, such as a network problem, or printer turned off, Files Connect will not automatically delete a job after the configured period of time unless at least two other jobs have been successfully printed since the job went offline.
For the purposes of our performance counters, any queue that has more than one offline job and has not successfully processed a job since the last job went offline is considered an offline queue. So a single offline job does not make a queue offline—it could just be a bad job, but having multiple offline jobs without any recent successful jobs would suggest that a queue-wide problem exists. A queue that is offline does not differ from an online queue in terms of its processing; how it is reported in erformance counters is the only difference.
Advanced Print Server Options
If you want each print job to be logged in the Windows Event Log, check the Log print job processing results box. You can enter a location for storing temporary files; as a default, Files Connect uses the default temporary directory.
5.1.2.4 Setting Security Options
On the Security Settings tab, place a check in the appropriate checkbox to change permissions and other options. Enter information for Directory Services in the appropriate text boxes.

59 Copyright © Acronis International GmbH, 2002-2017
In this section Allow Mac Clients to Change Folder Permissions .................................... 59 Reset Permissions on Move ..................................................................... 59 Support UNIX permissions and ACLs ........................................................ 59 Support ACLs on all volumes (global) ....................................................... 59 Show Only Accessible: Folders, Files ........................................................ 60 Allow Remote Administration of Server .................................................. 60 Notify Mac Clients of Password Expiration .............................................. 60 Enable IPv6 ............................................................................................... 60 Verify Directory Services .......................................................................... 60
Allow Mac Clients to Change Folder Permissions
If you select this option, Macintosh clients can change folder permissions. With this option disabled, Mac clients are prevented from changing permissions the Windows Administrator has set on the server. Many Macintosh applications set unexpected permissions without user intervention. For increased reliability, it is recommend that Mac clients not be allowed to modify permissions unless this capability is required for a particular workflow.
Reset Permissions on Move
If you select this option, the behavior of the move operations changes so that, when folders or files are moved, their permissions are changed to those of their new parent folder.
Support UNIX permissions and ACLs
UNIX permissions and Access Control Lists (ACLs) require that the Files Connect service have access the list of users in Active Directory in order to resolve SID, UUID, UID, and name mappings. For UNIX permissions, the Macintosh client requests a name mapping for UID. However, for the ‘ls’ command the Macintosh uses AD and does the name mapping internally. Therefore, the Macintosh does not make a name request to Files Connect. If the UID Files Connect provides does not match the user’s UID obtained from Active Directory, then the Macintosh will not allow the user to change UNIX permissions at all. In addition, the client will not be able to determine the user’s group membership or if the user is the owner.
To verify your account, enter the requested information in the Directory Services text fields. This account will be used to search Active Directory to resolve account IDs. By default, Files Connect will search within your entire Active Directory forest to validate security credentials. If you would like Files Connect to only search the Domain specified, uncheck the Use Global Catalog option. Add additional search criteria, if necessary, and click Validate Account. If the credentials are invalid, the service will not be able to access Active Directory and UNIX permissions will be disabled. Files Connect DFS support requires that this option is enabled and that valid Directory Service credentials are entered.
Support ACLs on all volumes (global)
To support ACLs on all volumes, check this box.

60 Copyright © Acronis International GmbH, 2002-2017
Show Only Accessible: Folders, Files
If you check the Folders option, users will see only folders that they can access. If you check the Files option, users will only see files that they can access.
Allow Remote Administration of Server
This option lets Windows users, who have Administrative privileges, use the Remote Administration features of Files Connect to configure the server remotely; see Administering Files Connect Remotely (p. 81).
Notify Mac Clients of Password Expiration
You can require that Active Directory users change their sign-on password after a specified time. With this textbox, you can notify Macintosh users that their old passwords are about to expire and ask them to create new passwords.
Enable IPv6
If you would like to use IPv6, check the Enable IPv6 checkbox. On some versions of Windows you will need to install IPv6 manually before services such as Files Connect will be able to use it.
Verify Directory Services
UNIX permissions and ACLs require access to Active Directory in order to resolve SID, UUID, UID, and name mappings. For UNIX permissions, Finder requests a name mapping for UID. However, for ones, the Macintosh uses AD and does the name mapping internally. Therefore, the Macintosh does not make a name request to Files Connect. If the UID Files Connect provides does not match the user’s UID obtained from Active Directory, then the software will not allow the user to change UNIX permissions at all. In addition, the client will not be able to determine the user’s group membership or if the user is the owner.
To verify your account, enter the requested information in the Directory Services text fields. Add additional search criteria, if necessary, and click Validate Account. The SSL option can be selected to enable secure SSL communication with Active Directory. If the account is not valid, you may not be able to access Active Directory and UNIX permissions support will not be enabled. In addition, DFS support will not function.

61 Copyright © Acronis International GmbH, 2002-2017
5.1.2.5 Setting Search Options
To set search options, check the appropriate boxes and enter the relevant information.
In this section Spotlight Search ....................................................................................... 62 Catalog Search .......................................................................................... 64

62 Copyright © Acronis International GmbH, 2002-2017
Spotlight Search
In this section Acronis Content Indexing ......................................................................... 62 Windows Search Indexing ........................................................................ 63 Enable Spotlight Search on all volumes (global) ...................................... 63
Acronis Content Indexing
Acronis Content Indexing is the default and provides Network Spotlight support for reshare volumes on non-Windows machines (e.g. Network-attached storages (NAS')) and for StorNext volumes. It also indexes more files than Windows Search and indexes more of the file, making it easier to search.
Marking this checkbox, will allow indexing using Acronis Content Indexing.
Acronis Content Indexing will skip the indexing of archive stub files, so you can now use this indexing on volumes that are being archived with an Hierarchical storage management (HSM) system.
As of Files Connect 10.5 and newer, we have a new feature that continuously monitors local shares and network reshares for changes and updates the index immediately.
Note: You can enable or disable Spotlight searching on a per volume basis in the individual volume’s Volume Properties dialog. See the Volume Properties (p. 114) article. You can set this property at the time of initial volume creation or after the volume has been created. Enabling this setting takes effect for all new sessions using the volume.

63 Copyright © Acronis International GmbH, 2002-2017
Windows Search Indexing
Windows Search comes built into every modern Windows operating systems (see below for exceptions). Using Windows Search ensures that the index is automatically kept up to date by updating the index for every change. The main disadvantages of Windows Search are that it does not support resharing volumes on non-Windows machines and that it has issues when working with more than a couple of million indexed files.
Marking this checkbox will allow indexing using the built-in Windows Search. In addition to enabling this setting, Spotlight Search requires that the Microsoft Windows Search application is installed on the Files Connect server and is configured to index any volume where Spotlight Search is enabled.
Note: Windows Search is built into the Windows operating system starting from Windows Server 2008 and Windows Vista. With these or newer operating systems, no additional installation is required. On Windows 2003 Server and Windows XP, you can install it by running Windows Update. It is listed as an optional install.
Once installed, Windows Search can be configured to index the necessary volumes by right clicking the Windows Search icon in the Start bar and selecting Windows Search Options.
As of Files Connect 10.5, Windows Search supports searching by Windows or Mac file tags, but requires an add-on to be installed. To install it, do the following:
1. Navigate to your Files Connect installation folder (by default:C:\Program Files (x86)\Acronis\Access\Files Connect\)
2. Open the AppleTagAddOn folder and run the regHandler batch file. Make sure to run it as an administrator, to make sure that it is installed correctly.
3. It is recommended to restart the machine running Files Connect.
4. Rebuild the index for the desired volumes.
Note: You can enable or disable Spotlight searching on a per volume basis in the individual volume’s Volume Properties dialog. See the Volume Properties (p. 114) article. You can set this property at the time of initial volume creation or after the volume has been created. Enabling this setting takes effect for all new sessions using the volume.
Enable Spotlight Search on all volumes (global)
To support Spotlight Search on all volumes, select this box. After it has been enabled, the Acronis Content Indexing process will begin immediately for all volumes except volumes already configured to use Windows Search.
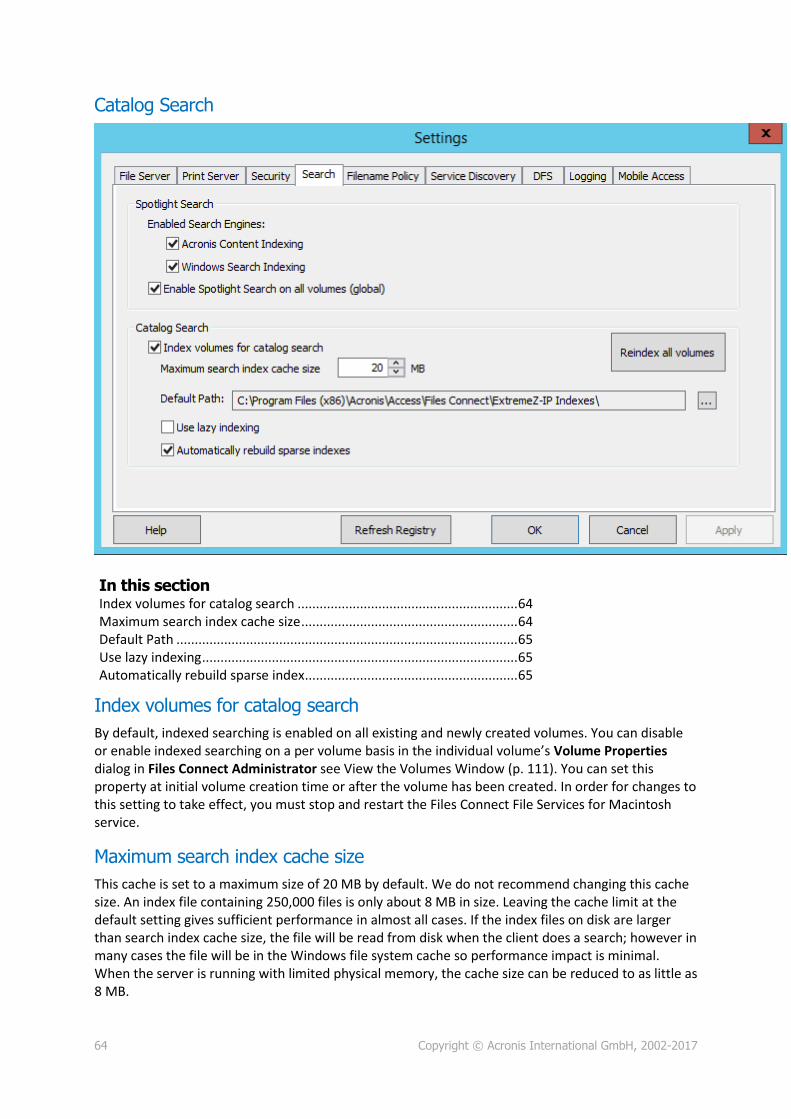
64 Copyright © Acronis International GmbH, 2002-2017
Catalog Search
In this section Index volumes for catalog search ............................................................ 64 Maximum search index cache size ........................................................... 64 Default Path ............................................................................................. 65 Use lazy indexing ...................................................................................... 65 Automatically rebuild sparse index .......................................................... 65
Index volumes for catalog search
By default, indexed searching is enabled on all existing and newly created volumes. You can disable or enable indexed searching on a per volume basis in the individual volume’s Volume Properties dialog in Files Connect Administrator see View the Volumes Window (p. 111). You can set this property at initial volume creation time or after the volume has been created. In order for changes to this setting to take effect, you must stop and restart the Files Connect File Services for Macintosh service.
Maximum search index cache size
This cache is set to a maximum size of 20 MB by default. We do not recommend changing this cache size. An index file containing 250,000 files is only about 8 MB in size. Leaving the cache limit at the default setting gives sufficient performance in almost all cases. If the index files on disk are larger than search index cache size, the file will be read from disk when the client does a search; however in many cases the file will be in the Windows file system cache so performance impact is minimal. When the server is running with limited physical memory, the cache size can be reduced to as little as 8 MB.

65 Copyright © Acronis International GmbH, 2002-2017
Default Path
By default on a standalone server, Files Connect stores index files in the Files Connect Indexes directory in the Files Connect application folder. If you would like to locate the index files in a different location, click Browse to select a new folder.
Note: If you modify the default path while Files Connect is running, all index files for volumes without individual custom paths are created in the new location.
Administrators can also specify custom index file paths for individual volumes; this setting overrides the global default path setting.
Note: In a clustered environment we recommend that you set the Default Path to be a location on the shared disk.
Use lazy indexing
By default, indexed searching uses any available system resource to keep its indexes current and cooperates with other system processes. It should not affect overall system performance adversely. However, when a server is under high load or is running many different services simultaneously, you can limit the system resources that search indexing consumes by enabling the Use lazy indexing checkbox. This setting takes effect immediately.
Automatically rebuild sparse index
In order to optimize runtime performance, the Files Connect index file entries for files that have been deleted or moved from a volume are not physically removed from the index file at the time the actual file is deleted. The indexed search service ignores these deleted entries to keep search results accurate. However, the index file grows over time and, as the file gets larger, slows search performance to a small extent. The rate at which the index file grows is dependent on the number of files being added, moved, and deleted on the file server. In order to keep Files Connect search performing at optimal levels, volumes’ indexes are routinely re-indexed and compacted. The interval at which this occurs is determined by the ratio of deleted (stale) records to valid entries in the index. By default, the Files Connect search service re-indexes an individual volume when approximately one-third of that volume’s index file records are deleted, stale records. Maintenance occurs on a per volume basis and only on volumes requiring re-indexing. While re-indexing, the volume’s existing search index is kept up to date and used to provide one hundred percent accurate search results. Re-indexing should not have any detrimental effect on other server processes while it is running. While Files Connect is re-indexing an individual volume, a status of “Reindexing” shows in the Volumes dialog of the Files Connect Administrator. If you prefer, you can schedule re-indexing on a set schedule during off-hours. You can use an EZIPUTIL command, described on the Appendices (p. 145) page used in a batch file or script and triggered by a scheduling service of your choice. If you choose this method of scheduled re-indexing, disable automatic re-indexing by removing the check in the Automatic rebuild of sparse indexes setting checkbox.
5.1.2.6 Setting Filename Policy
Because Files Connect sits in a key position between the file server and the Macintosh client, we can enforce policies on valid file names as well as file types to prevent the Macintosh users from breaking workflows. You can configure Files Connect to detect and reject the Macintosh client attempting to save (create, rename, move) files with characters that are “illegal” in Microsoft Explorer or other applications that don’t support the Unicode file system APIs. The administrator can configure what is allowed or deemed illegal. This list can include characters that cannot be displayed on Windows,

66 Copyright © Acronis International GmbH, 2002-2017
“trailing spaces” Unicode characters not available in the default Windows font, any specified character, file names longer than “x” characters, or specific file extensions. Filename Policies do not affect existing files on the server or files that are copied using Windows file sharing.
In this section Enforce Filename Policy ........................................................................... 66 Filename Policy Violations Report ........................................................... 66 Apply policy to all volumes ...................................................................... 67 Limit error messages to clients to one every ........................................... 67 Log failures to Windows Event Log every ................................................ 67 Custom message on error ........................................................................ 67 Do Not Allow ............................................................................................ 67
Enforce Filename Policy
Checking this setting will allow you to enforce filename policies set in Files Connect.
Filename Policy Violations Report
A report listing all existing files and folders that violate the presently configured filename policy can be created by clicking the Generate button. A confirmation dialog box will appear and allow you to access the folder containing the report’s output. This folder will contain a Report Summary text file and individual, comma-seperated summary files for each Files Connect volume on the server. These CSV files can be viewed in a spreadsheet application or text editor.

67 Copyright © Acronis International GmbH, 2002-2017
Apply policy to all volumes
You can enforce filename policies globally or on a per volume basis. A globally enabled feature takes precedence over a pervolume setting. Checking this setting applies filename policies across all Files Connect volumes and overrides individual volume policy settings.
Limit error messages to clients to one every
Checking this setting limits the number of error messages to one for each client at the specified time interval. You can set the time interval.
Log failures to Windows Event Log every
If you check this setting, the server will log errors to the Windows Event Log at the specified time interval.
Custom message on error Note: Mac OS X 10.9 and later does not support sending messages.
You can specify a custom message that will be appended to the standard filename policy error messages. For example: “This action violates company policy regarding filenames.” would lead to the following message being sent to the user: “File ‘foo.mp3’ cannot be created because the ‘mp3’ extension is not allowed. This action violates company policy regarding filenames.”
Do Not Allow
In this section, set characters, filenames, and extensions that your Macintosh users will not be able to save to your file server.
Characters illegal in Windows file or folder names — If you check this setting, users cannot save files with names that include characters illegal in Windows. The characters are / ? < > \ : * | and trailing spaces and trailing periods.
Characters Not Displayable in Windows Explorer — If you check this setting, users cannot save files with names that include characters that cannot be displayed in the font used by Windows Explorer (the default is Tahoma).
Custom error message - Custom message that will be added to the built-in description for each error.
Specific Characters - You can specify additional characters that you do not want users to include in filenames. Type the characters in this field without separators.
File names over —You can limit file names to a specified number of characters.
Folder names over —You can limit folder names to a specified number of characters.
File Paths longer than - You can limit the path length to a specified number of characters.
Note: The limit will be the entire Windows file path as it resides on the server. The file paths may appear shorter to the Mac clients.
Extension —You can restrict users from saving specific file extensions, such as mp3, mov and wav, by typing in the extension without the (.) dot precursor and clicking Add. To remove extensions from the list, highlight the extension and click Remove.

68 Copyright © Acronis International GmbH, 2002-2017
5.1.2.7 Service Discovery
Macintosh clients can use a number of different protocols to discover an Files Connect server, depending on what operating system is being used and how the administrator configures the server. Select the network protocols you want the server to use to register with—AppleTalk, Bonjour, Zidget/HTTP, or SLP— by placing a check in the appropriate checkboxes. The protocols available for discovering file, print, and DFS resources can be configured independently.
In this section Server Name ............................................................................................. 68 AppleTalk .................................................................................................. 69 Bonjour ..................................................................................................... 69 Web Service ............................................................................................. 69 Port ........................................................................................................... 69 Register with Master Server .................................................................... 69 Location .................................................................................................... 70 Description ............................................................................................... 70 SLP ............................................................................................................ 70 Register Service Connection Point ........................................................... 70
Server Name
The Server name appears in the login window whenever a Macintosh user connects to the server. This name also appears in the Mac OS X Connect to Server dialog and on earlier Mac OS systems in the Chooser and the Network Browser when Macintosh users browse the network. You may change the name; use uppercase and lowercase text.

69 Copyright © Acronis International GmbH, 2002-2017
AppleTalk
The AppleTalk protocol is primarily used by the Mac OS 9 Chooser. When AppleTalk is selected, Mac OS 9 users can see volumes and print queues in the Chooser without specifying the IP address, and Mac OS X users can see them in Connect to Server and Add Printer dialogs. To register the server on AppleTalk, the protocol must be installed on the Windows server. Windows XP, Vista, and Windows 2008 Servers do not include AppleTalk support.
Bonjour
Bonjour allows Mac OS X users to see volumes in the Connect to Server dialog and print queues in the Print Center.
Web Service
The Mac Client and the Files Connect Zidget both use the web service's address in order to function.
The Mac Client is the new app for Files Connect that makes it easy for users to connect to all the necessary resources and also has a powerful search engine.
The Zidget is a replacement for AppleTalk and Bonjour service discovery that works across subnets without your having to configure your router. The Zidget uses XML over HTTP to retrieve a list of Files Connect servers and their Print Queues from a Master Files Connect server. If there is a DNS entry in the default domain for ExtremeZIPServerList, the Zidget asks that server for a list of all the Files Connect servers on the network. They then query each server individually for its default zone or location and any print queues that it hosts.
Because the Files Connect Zidget uses standard HTML and XML, the administrators can use this protocol to create their own web interfaces as well. More details about how to do this can be found in the Zidget section of the manual.
Port
Enter the port used for client server communication between the server and the Mac client or Zidget.
On Files Connect 10.5 and newer, you can also select a certificate to be used for the newly added HTTPS port.
Note: Even if you turn off Zidget/HTTP Files Connect still uses this port to support the legacy Files Connect Print Components and Print Accounting. Only the new features are disabled.
Register with Master Server
This setting should be enabled only on Slave servers in order to register them with the Master server.
By enabling the Register with Master server checkbox, you are turning this server into a Slave to the server whose address you enter. The Master server will have its table of servers automatically populated for every Slave server that is registered this way.
The Mac Client and the Zidget support connecting to a single Master server to discover the other Files Connect servers on the network.

70 Copyright © Acronis International GmbH, 2002-2017
Location
This field specifies the location of the server. It is similar to an AppleTalk zone, but allows for multi-level hierarchies. The location is also the default location of print queues on the server, but you can assign a different location on a queue by queue basis. Zidget groups the AFP Server and print queue display based on location. If you want to have a hierarchy of locations, such as 1100 N. Glebe RD, Arlington, Virginia, enter the locations separated by colons (“Virginia:Arlington:1100 N. Glebe RD”).
Description
The optional description for the server. Zidget displays this description when the user selects a file server.
SLP
With SLP, Mac OS 9 users can see volumes and print queues in the Network Browser. Type the name of the SLP scope (or Neighborhood) in which you want the file server to appear when Mac OS 9 clients use the Network Browser. Type a host name, which is the name of the server provided to Macintosh clients when they use the Network Browser.
Register Service Connection Point
This option allows Files Connect to publish its existence using a Microsoft Service Connection Point (SCP). This technology is used to locate and contact other Files Connect servers in your Active Directory.
5.1.2.8 Setting Mobile Access
The Mobile Access feature allows Acronis Access mobile users to access your Files Connect Volumes, including the ability to view, upload, sync, annotate and edit files from within the Acronis Access mobile app.
Note: This feature is not yet supported on clustered versions of Files Connect.
Note: Volumes defined as Time Machine volumes and volumes that are configured as AFP Home Directories will NOT be shared out by the Mobile Access Gateway.
Enable access to Volumes from Acronis Access mobile apps - When enabled, Acronis Access mobile clients will be able to navigate to and access Files Connect Volumes. This setting is affects all volumes.
Mobile Gateway Connection Options
Address – Network IP address for the mobile access gateway service. This is also the address that the mobile clients will connect to.
Port - Network port that the mobile access gateway service will run on. The default port is 443. If you change the port, you will need to enter it at the end of the Gateway address when connecting from a mobile device.

71 Copyright © Acronis International GmbH, 2002-2017
Certificate – Choose an SSL or self-signed certificate for the mobile access gateway service. You can choose a certificate from the Microsoft Windows Certificate Store.
5.1.2.9 DFS
Files Connect can be configured to make a Microsoft Distributed File System (DFS) available to Macintosh clients. In addition to the server side configuration, installation of the Files Connect Mac Client or the Zidget dashboard widget (for Mac OS X 10.4 or later). Details on the required client side configuration can be found in the The Mac Client (p. 13) and Installing and Configuring the Zidget Client (p. 83) articles.
DFS support also requires two settings on the Security tab of the Settings dialog. Valid Directory Services credentials must be entered and Support UNIX Permissions and ACLs must be enabled for DFS to function.
In this section Namespaces ............................................................................................. 71 Target Servers .......................................................................................... 72
Namespaces
To add a namespace, click the Add button. You will be prompted to enter the path of your DFS namespace. Files Connect will attempt to verify that the DFS namespace entered is valid. If it is not valid, you will be prompted to correct the DFS namespace path.
Files Connect will automatically create a DFS virtual root volume in the ‘Files Connect DFS Volumes’ folder, located in the Files Connect program directory. This volume will contain links to target servers in the DFS namespace and will be added as a shared volume with a volume name matching your DFS

72 Copyright © Acronis International GmbH, 2002-2017
domain or host server name. The location where DFS virtual root volumes are created can be modified by selecting Advanced on the DFS settings tab.
You are returned to the DFS tab, which is updated with the newly added namespace’s information. You will find your namespace listed on the left and the target servers in that namespace listed on the right. The Valid column in the Namespaces list will indicate if the namespace was successfully validated. DFS namespaces can later be removed by selecting the namespace and clicking the Remove button.
Target Servers
The protocol used by Macintosh clients to connect to each target server can be configured on a per target server basis. When a namespace is first added, Files Connect will attempt to detect, for each target server in the namespace, whether it supports the AFP protocol. If AFP is supported, the target server will be set to AFP by default. If AFP support cannot be confirmed, the target server will be set to OFF. Links to target servers set to OFF will not be visible to Macintosh clients in the DFS volume(s). If you would like Macintosh clients to connect to a target server using SMB, you can select the SMB option for each individual server. If you later install Files Connect on a target server, you can return to the DFS settings tab and select AFP for that server.
5.1.2.10 Logging
Files Connect allows the customization and configuration of it’s logging functionality and it’s ability to generate Windows Error Reports.

73 Copyright © Acronis International GmbH, 2002-2017
5.1.3 Configuring Network Reshare support
In this section Introduction ............................................................................................. 73 A common use case: AFP access to NAS storage ..................................... 73 Requirements ........................................................................................... 73 Recommendations ................................................................................... 74 Limitations ................................................................................................ 74 Initial Network Reshare configuration ..................................................... 75 Network Reshare and Kerberos authentication ...................................... 78 Network Reshare volume configuration .................................................. 79 Mirroring SMB shares .............................................................................. 80
5.1.3.1 Introduction
Files Connect has traditionally only included the ability to share files and folders located on the Windows server where Files Connect is installed, or on storage that is directly attached to that server. A folder within this local storage can be selected as an Files Connect volume and made available to Macintosh users as a standard Mac AFP file share.
With the introduction of “Network Reshare” in version 8.0, Files Connect now includes the ability to create file share volumes that point to folders located on other servers and NAS devices on your network. Macintosh clients continue to connect to Files Connect using the standard AFP file sharing protocol, while Files Connect utilizes the SMB/CIFS file sharing protocol to access files that are requested by Mac users from remote servers and NAS systems. By doing so, Mac users retain all the benefits of AFP file sharing while gaining access to resources that have traditionally only been available through SMB/Windows file sharing.
Files Connect Network Reshare allows access to both standard SMB/CIFS file shares, as well as Distributed File System (DFS) file shares. More details on Network Reshare of DFS resources can be found in the Knowledge base article here.
5.1.3.2 A common use case: AFP access to NAS storage
A common real world Network Reshare use case involves Mac access to NAS storage, such as NetApp NAS systems. Most NAS systems do not include the ability to host AFP file shares. Mac users are left with no choice but to connect to NAS file shares using the native OS X SMB client. This typically results in suboptimal file browsing, transfer, and search performance, along with frequent Mac application incompatibilities, file name issues, file corruptions, etc.
Using Network Reshare, file shares on NAS systems can be made available to Macs through a Windows server running Files Connect. Macs connect to Files Connect AFP file shares and Files Connect interfaces with the NAS system through the NAS’s existing SMB/CIFS file shares. In this way, incompatibilities and issues on the Mac side are addressed by allowing native AFP access and Files Connect’s uses Windows server-side SMB access to NAS storage, which provides improved performance and throughput compared to Mac SMB client access. As a result, the performance of Mac AFP file share access though Files Connect to NAS storage is most often better than that same Mac accessing the same NAS files directly over SMB.
5.1.3.3 Requirements Windows 2003 Server, Windows 2008 Server (including R2 versions) or Windows 2012 (including
R2 versions) Server.
74 Copyright © Acronis International GmbH, 2002-2017
Note: If using Windows 2008 R2, make sure to install this MS hotfix: http://support.microsoft.com/kb/2647452 http://support.microsoft.com/kb/2647452
Files Connect Server 8.0 or later.
Files Connect trial license or Enterprise License Program (ELP) license.
The Network Reshare capability allows a single Files Connect server to give AFP file access to many additional file servers or NAS systems. This feature is only enabled in Files Connect trials http://www.grouplogic.com/enterprise-file-sharing/mac-windows-file-sharing/free-trial.html and on Files Connect Enterprise License Program http://www.grouplogic.com/enterprise-file-sharing/mac-windows-file-sharing/pricing-options.html (ELP) annual subscription licenses. This licensing option allows Files Connect to be installed on an unlimited number of servers in your enterprise, as well as to create Network Reshare volumes.
5.1.3.4 Recommendations
Files Connect Server Network Interface Card Performance Network Reshare routes all communication between your Mac clients and your file server or NAS storage through the Windows server where Files Connect is installed. Installing Files Connect on a server with the fastest available NICs, and ideally one or more dedicated NICs for communicating with the servers or NAS being reshared, will result in the highest level of performance.
Windows 2008 and SMB v2 While Network Reshare is compatible with Windows 2003 and 2008, the SMB v2 protocol supported by Windows 2008 consistently demonstrates higher levels of performance. Installing Files Connect on a Windows 2008 server and using remote storage that is running Windows 2008, or a NAS operating system that supports the SMB v2 protocol, will result in the best file sharing throughput for Mac users.
Kerberos for Files Connect Network Reshare In order to support Kerberos logins you will need configure Active Directory to “Trust this computer for delegation”. More information can be found in the following article Network Reshare and Kerberos authentication (p. 78)
5.1.3.5 Limitations To support real-time indexed filename search, Files Connect requires file system notifications
provided by Windows in order to keep its search index up to date when files change. These notifications are not available over the SMB connection Files Connect uses to access file servers and NAS systems being reshared. For this reason, traditional index-based filename search is disabled on Network Reshare volumes. Files Connect 9.0 introduces a new Acronis Content Indexing option. This indexing is performed based on a defined schedule, rather than tracking real-time changes. With this option enabled, users can take advantage of fast indexed filename searches.
To support full content Network Spotlight search, Files Connect utilizes either the Window Search index maintained by the Windows Search service on the server Files Connect is installed on, or the Acronis Content Indexing service. Windows Search can be configured to index remote shares that are hosted on a Windows Server that has Windows search installed and indexing. Acronis Content Indexing can be configured to index any remote shares, even those residing on a non-Windows server or NAS.
If Network Spotlight search, either using Windows Search or Acronis Content Indexing, is not enabled, Macs searching Files Connect Network Reshare volumes will receive search results

75 Copyright © Acronis International GmbH, 2002-2017
based on filename, but searches will take additional time to complete compared to searching indexed local volumes.
Finder color labels may be removed when saving/overwriting a file on an Files Connect Windows 2003 Network Reshare volume
If Files Connect server is installed on Windows 2003, opening and then saving an existing file that exists in a Network Reshare volume may result in the Finder color label on that file being removed.
It is required for the Files Connect service account to have unlimited rights in the file system as it is necessary in order to properly work with files and their metadata, including security descriptors. If the necessary rights are not given, you may encounter the "ERROR_INVALID_OWNER" error.
If you have more than one Active Directory server, and Files Connect is installed on your domain controller, you will encounter AD replication issues by following the Network Reshare and Kerberos authentication steps.
5.1.3.6 Initial Network Reshare configuration
Files Connect runs as a standard Windows service on the Windows server it is installed on. By default, the Files Connect service runs in the context of the Windows local SYSTEM account. By acting as this account, Files Connect has access to the files and folders in Files Connect volumes that are located directly on the server’s storage.
When Files Connect is configured with Network Reshare volumes, it also needs access to the files and folders on the remote file servers and NAS devices that are being reshared. In order for Files Connect to be allowed access to these files, the Files Connect service must be reconfigured to run in the context of an Active Directory (AD) user account that has Administrator access to the local Windows server and Full Control access to any necessary file shares that exist on remote servers or NAS systems being reshared.
Note: On the machine running the Files Connect service, you must not have a local account with the same name and password as the Active Directory account used by the Files Connect service.
If you’re using Windows 2008 R2, ensure you’ve installed this Microsoft hotfix. It addresses an issue that is directly related to Windows functionality used by Files Connect Network Reshare. Hotfix link:http://support.microsoft.com/kb/2647452 http://support.microsoft.com/kb/2647452
To configure Network Reshare:
1. Ensure you’ve upgraded to Files Connect version 8.0 or later and have launched the Files Connect Administrator application at least once and allowed the Files Connect service to start up.
2. Configuring the Active Directory account which will handle authentication for Files Connect:
a. In Active Directory: Create or identify an AD user account that will handle authentication for Files Connect. Ensure the AD account used is dedicated to this Files Connect server, has a fixed password, is not subject to group policies for password expiration and is a subject to any domain group policy necessary to grant the rights to "Act as part of the operating system" and "Log on as a service".
b. On the Files Connect Server: Add the dedicated Files Connect user account to the local Windows server Administrators group. This user needs Full Control permissions to the C:\Program Files (x86)\Group Logic\Files Connect folder and to any locally shared volumes.

76 Copyright © Acronis International GmbH, 2002-2017
c. On remote shares: The dedicated Files Connect account needs Full Control access to the remote shared volumes as defined in NTFS or NAS device permissions.
Note: On the EMC Isilon, true 'Full Control' requires granting the service account the Isilon right "Run as root".
Note: On NetApp, true 'Full Control' requires the service account to be part of NetApp's "Administrators" group.
3. Add the selected user to the Windows server’s local security policy
a. From Administrative Tools on the Start menu, open Local Security Policy. This policy is found under Security Settings -> Local Policies -> User Rights Assignment section.
b. Double click “Act as part of the operating system” and add the chosen user. You may have to reboot Windows for this setting to take effect.
4. Open the Services control panel.

77 Copyright © Acronis International GmbH, 2002-2017
5. Open the Extreme-Z IP File and Print Server for Macintosh service’s properties by right clicking on the service from the Services control panel.
a. Select the “Log On” tab and choose the “This account” radio button.
b. Configure the service to log on as the same AD service account used in step 3. Keep the Services control panel open. You will need it again in step 7.
6. Turn on Network Reshare support
a. Start the Files Connect Administrator application.
b. Click the Settings button.
c. Open the File Server tab.
d. Select the Enable Network Reshare support checkbox.
e. Click OK.

78 Copyright © Acronis International GmbH, 2002-2017
f. Press the Close button to close the Files Connect Administrator.
7. In the Services control panel restart the Extreme-Z IP File and Print Server for Macintosh service.
5.1.3.7 Network Reshare and Kerberos authentication
In order for Mac users using Kerberos to access SMB/CIFS reshares through Files Connect, delegation must be enabled in Active Directory. If your environment requires Kerberos authentication, you will need to update the Active Directory computer object for any Windows servers that are running Files Connect. The Files Connect server must be given permission to present delegated credentials to the SMB server on behalf of your users.
Note: If you have more than one Active Directory server, and Files Connect is installed on your domain controller, you will encounter AD replication issues with this setup.
To enable Kerberos authentication:
1. Open Active Directory Users and Computers and locate the Windows server that you have Files Connect installed on. It is commonly found in the Computers folder.
Note: If the computer object for the server that is running Files Connect is not located in the default “Computers” container in Active Directory, it is necessary to edit the ActiveDirectoryComputers registry key (p. 155) so the Files Connect service can construct the correct distinguished name for the Files Connect server's computer object.
Once the key is configured, restart the Files Connect service and proceed with the steps below. If the Files Connect server's computer object is in the default “Computers” container, there is no need to configure this key and you can proceed with the steps below.

79 Copyright © Acronis International GmbH, 2002-2017
2. Right-click on the Files Connect server and select Properties.
3. Open the Delegation tab.
4. Select “Trust this computer for delegation to specified services only”.
5. Select “Use any authentication protocol”, this is required for negotiation with the SMB server.
6. You must now add any Windows servers or NAS devices that you would like your users to be able to access through reshare. Click Add… to search for these Windows computers in AD and add them. Select only the “cifs” service type.
7. Repeat these steps for all Files Connect servers for which you want to enable Kerberos authentication.
Note: It may take 15 to 20 minutes for these changes to propagate through the Active Directory forest.
Configurations for the Files Connect dedicated AD account:
Configuring the permissions
1. Open Active Directory Users and Computers and locate the Files Connect dedicated account object.
2. Right-click on it and select Properties.
3. Open the Security tab and press Advanced.
Note: The Security tab may not appear until Active Directory Users & Computers > View > Advanced Features is enabled
4. Enter the name of the Files Connect dedicated account object and press OK.
5. Press Add and enter the name of the dedicated account object again and press OK.
6. On the Permissions Entry For window, select This object only for the Apply to field.
7. Select the Allow box for Write All properties and press OK.
8. Close all open dialogs by pressing OK.
9. Restart the Files Connect File and Print Server service.
10. Make sure that the Allow Kerberos Logons checkbox is enabled before proceeding with the next section. You can find it in the Files Connect Administrator - > Settings -> File Server.
Configuring the delegation
1. Open Active Directory Users and Computers and locate the Files Connect dedicated account.
2. Right-click on it and select Properties.
3. Open the Delegation tab.
4. Select the Trust this user for delegation to specified services only radio button and the Use any authentication button.
5. Press Add and enter the name of the machine where Files Connect is installed.
6. Select cifs and press OK.
7. Press Apply and close all remaining dialogs.
5.1.3.8 Network Reshare volume configuration
To configure a Network Reshare volume:
1. Launch the Files Connect Administrator application.
80 Copyright © Acronis International GmbH, 2002-2017
2. Click the Volumes button and the then click Create.
3. Click On another server. If you are not shown an option to choose On another server, you may be running a standard Files Connect retail license rather than the required Enterprise License Program (ELP) license.
4. Enter the UNC path of the SMB/CIFS file share that you would like to reshare as an Files Connect volume, then click OK. This UNC path is in the typical \\servername\sharename format. An example is: \\nas.mycompany.com\myshareDistributed File System (DFS) UNC paths can also be entered for Network Reshare volumes. DFS target resolution will all occur in the SMB reshare layer and Macs will be able to seamlessly browse and access the reshared DFS resource. For more details on DFS with Network Reshare, see our Accessing DFS files using Files Connect Network Reshare article.
5. In the Volume Properties dialog, modify the Volume Name if desired and click OK.
Note: If you receive an error stating that “The specified path is not available.” you may have entered an invalid UNC path, or the user account you selected in the Initial Network Reshare configuration steps above may not have Full Control access to this file share at this UNC path. If this is a Windows file share, ensure this user account has both “Sharing” and “Security” permissions to the file share.
5.1.3.9 Mirroring SMB shares
Files Connect can be configured to mirror a file server and all SMB shares on that server will automatically be added as AFP file share volumes in Files Connect. When setup to run automatically, any SMB shares that are added, modified or removed on the mirrored server will be automatically updated or removed from the Files Connect server. By default, updates to the mirrored shares are done automatically in a set time interval but you can also force and update manually if needed.
Note: If you choose to mirror multiple file servers, multiple NAS' or a server with a large number of SMB shares, Files Connect will create volumes for all of these shares. Depending on the number of shares, your server and network performance and your usage patterns, this could result in a heavy load on your Files Connect server.
We recommend that you add mirrored servers incrementally or in a test environment first, to determine the optimal limits for your specific environment.
Enabling the Mirroring of SMB shares
Mirroring is disabled by default and has some prerequisites in order to enable it.
Network Reshare support must be enabled and running properly.
You must edit the following registry keys:
HKEY_LOCAL_MACHINE\SYSTEM\CurrentControlSet\Services\ExtremeZ-IP\Parameters4\Refreshable\SupportServerMirroring - This is the main on/off switch for the Mirroring feature. Setting it to 1 will enable it.
HKEY_LOCAL_MACHINE\SYSTEM\CurrentControlSet\Services\ExtremeZ-IP\Parameters4\Refreshable\ServerMirroringInterval - This key controls the time interval between updates to the mirrored shares. The default is 900 seconds (15 minutes). Settings this interval to 0 will suspend the automatic updates.
After the registry settings are changed, you must open the Files Connect Administrator -> Settings and click on Refresh Registry.
Restart the Files Connect Administrator and Mirror Servers... will be enabled.

81 Copyright © Acronis International GmbH, 2002-2017
Mirroring a File Server
1. Open the Files Connect Administrator and go to Volumes.
2. Select Mirror Servers... .
3. Select Create... and enter the address of the server you wish to mirror SMB shares from.
4. Add an optional name for the server and select the desired search type - Acronis Content Indexing or Windows Search. The name will be displayed in the Mac Client, helping end-users to find what they need as there may be a lot of shares with the same name.
5. Click OK.
6. All SMB shares from the selected server will now be available as regular Volumes in the Files Connect Administrator. From there, you can manage their settings individually.
5.2 Administering Files Connect remotely You can configure Files Connect on a remote computer if Files Connect is already installed on that computer. You must have Windows Administrative privileges on the remote computer. The experience of administering a remote server is very similar to that of the local server Administrator, except that the title of the Administrator dialog box shows the name or IP Address of the remote computer whose Files Connect service you are configuring and you cannot browse for folders to share. Otherwise, you can configure the remote server just as you would a local server.
To administer a remote Files Connect server, do the following:
1. Hold down the Control key while you launch the Files Connect Administrator. Alternatively, if there is no local installation of Files Connect, Files Connect Administrator will start immediately in remote mode.
2. Type the name or IP Address of the remote computer and click OK.
3. The Administrator will attempt to use your Windows credentials to log onto the server. If necessary, you will be prompted for an alternate username and password.
5.3 Configuring Client Computers to Print to Files Connect
To make use of Files Connect printing, clients follow specific steps depending on their operating system. Once you add print queues through the Files Connect Administrator Print Queues dialog box, they are immediately available for clients to print to them. Printer Browser installers for Macintosh clients are copied onto your server’s drive when you install Files Connect. Macintosh clients can copy

82 Copyright © Acronis International GmbH, 2002-2017
to their computer, and install, an operating system specific Printer Browser installer from the Files Connect server. It is also possible to use Apple Remote Desktop to deploy the installer packages to multiple Macintosh computers.
A Macintosh user can select an Files Connect queue to print to in a number of ways, depending on the operating system they are using and the functionality they need. When using Mac OS X, the following are the primary ways to set up a printer:
Files Connect Zidget supports discovering printers across subnets, automatic PPD download, and adding queues that have been set up to require Print Accounting codes if the Macintosh also has the optional Files Connect print components on it. It is also available from inside any application, therefore; you can set up a printer when you need to print without leaving your current application. The slight downside is that you must install it on each Macintosh. Although simple to install, it does require additional work.
Bonjour discovery from within the print window of an application has the advantage of being built-in to Mac OS X. The native Mac OS X Bonjour discovery is also very simple to use. The disadvantage of Bonjour is that it does not support automatic PPD download or Print Accounting queues.
Files Connect Printer Browser works from within the Apple Printer Setup Utility. It supports automatic PPD download from the server and can be used to add queues that have been set up to require Print Accounting codes. The disadvantage to the custom Files Connect print components is that they have to be installed by someone with administrator rights on the client computer either manually or with Apple Remote Desktop. It also requires more training than the Zidget does.
When using Mac OS 9, there are two options for setting up a printer:
The built in Chooser desk accessory can use AppleTalk to locate and set up the printer.
Note: AppleTalk is not installed by default on Windows servers.
Files Connect Choose IP Printer is an optional install that supports faster printing. It uses the SLP and TCP/IP protocols.
The advantages and disadvantages are similar to the ones stated above for Mac OS X. The built-in Chooser is simple and well understood by Macintosh users, but the custom client has more features and is several times faster than printing with AppleTalk.
In this section Files Connect Zidget ................................................................................. 82
5.3.1 Files Connect Zidget
The Files Connect Zidget is a new way of connecting to Files Connect file and print servers. Zidget is a Dashboard Widget that the Macintosh user can use to discover and connect to a file server whether or not the server is in the user’s local subnet. Zidget also allows the Macintosh user to browse DFS namespaces that are shared through the Files Connect server. Using Zidget, the Macintosh user can also browse for and add Files Connect printers. Zidget will automatically download the PPD for the printer, and set up the print queue without the user having to use the Print Center.
The Zidget can also be used to add queues on the print server that receive jobs directly, or direct print printers that are advertised by the Files Connect server but do not route jobs through the print server. Zidget contacts a server called the Files Connect master server to retrieve a list of all the Files

83 Copyright © Acronis International GmbH, 2002-2017
Connect servers in your organization. It then contacts each of those servers to find out whether they are just file servers or if they also are print servers. If the server is a print server it then retrieves a list of all the print queues on that server. The servers as well as individual print queues can be assigned to locations or zones. Once the Zidget has retrieved information from all the servers it merges them into a list of locations for the user to choose from.
Although many customers may choose to mimic their existing AppleTalk zone structure, they can also use a more complex location-based method for organizing their print queues. For that matter, they can use any other hierarchical arrangement they would like, such as Color and Black and White. The location-based method can be hierarchical such as building, floor, and room.
5.4 Installing and Configuring the Zidget on the Client In order to make deployment of the Zidget as easy as possible, it can be downloaded directly from the HTTP server that is built into Files Connect. You can link to the URL for the Zidget from any web page, send it in an email, have users manually type it into a web browser, or distribute it any other way that you see fit. The Zidget could also be made part of the standard corporate deployment or installed in /Library/Widgets on multiple Macintoshes using technologies such as Apple Remote Desktop. If you have not already installed Zidget, the Files Connect server lets you download Zidget directly from the URL http://yourserver:8081 http://yourserver/.
Because the Zidget is HTTP based, it is trivial to add a Download Zidget link to your company’s intranet or support website. If the Zidget is downloaded by Safari, the download will automatically present the user with a dialog asking them if they want to install it. By default, Zidget will resolve ExtremeZIPServerList.yourdomain.com in DNS in order to find the Master Server from which it will retrieve a list of the available printers and file servers. If you are using the default setup and have created this DNS CNAME record to point to your Files Connect server, no further steps are required on the Macintosh to configure the Zidget after it has been installed.
To install Zidget on a Macintosh client, do the following:

84 Copyright © Acronis International GmbH, 2002-2017
1. In a web browser such as Safari, navigate to the Files Connect server (e.g. http://your-server:8081 http://your-server:8081/).
2. Click on the Download Zidget link. The file Zidget.wdgt.zip will be downloaded.
3. Click Install to confirm the dialog asking if you want the Zidget installed (if you have not disabled auto installation of widgets in Safari).
4. If your Master Server is something other than the default ExtremeZIPServerList, click the “i” icon to modify this setting. The Refresh Interval determines how often the available file servers, printers, and DFS namespaces in the Zidget are refreshed.
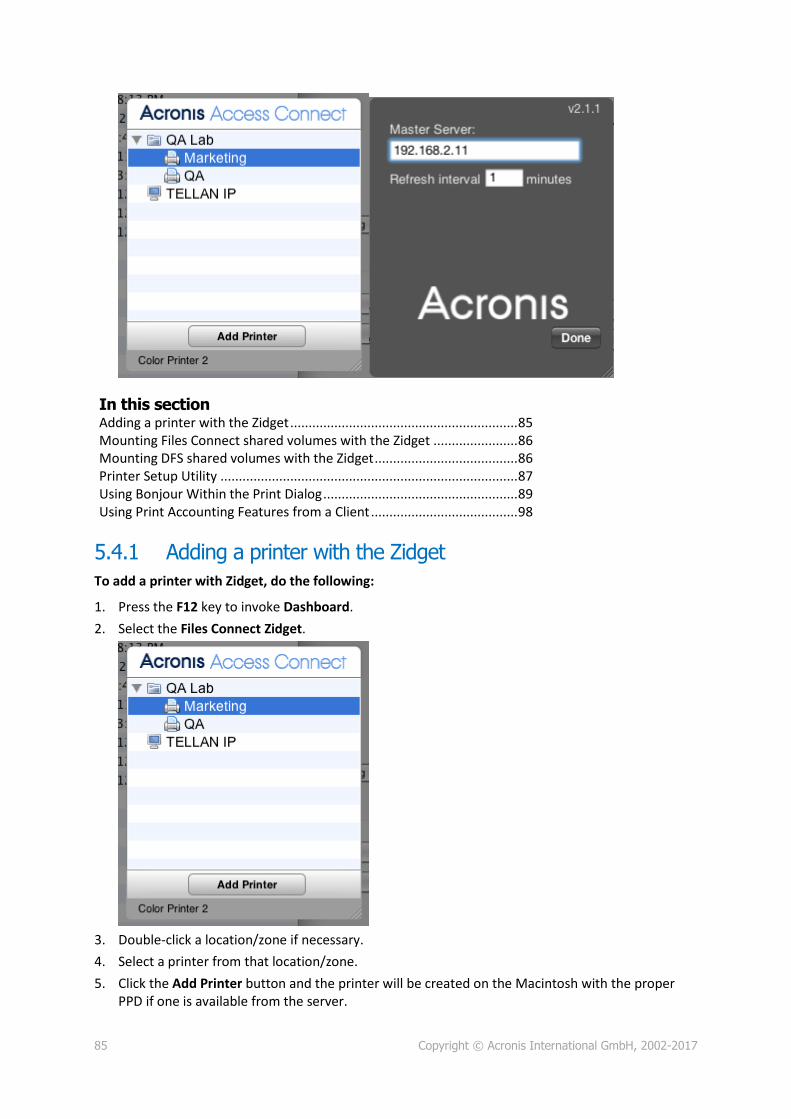
85 Copyright © Acronis International GmbH, 2002-2017
In this section Adding a printer with the Zidget .............................................................. 85 Mounting Files Connect shared volumes with the Zidget ....................... 86 Mounting DFS shared volumes with the Zidget ....................................... 86 Printer Setup Utility ................................................................................. 87 Using Bonjour Within the Print Dialog ..................................................... 89 Using Print Accounting Features from a Client ........................................ 98
5.4.1 Adding a printer with the Zidget
To add a printer with Zidget, do the following:
1. Press the F12 key to invoke Dashboard.
2. Select the Files Connect Zidget.
3. Double-click a location/zone if necessary.
4. Select a printer from that location/zone.
5. Click the Add Printer button and the printer will be created on the Macintosh with the proper PPD if one is available from the server.

86 Copyright © Acronis International GmbH, 2002-2017
6. The status section of the Zidget updates to say the printer was successfully created.
5.4.2 Mounting Files Connect shared volumes with the Zidget
To mount a shared volume with the Zidget:
1. Press the F12 key to invoke Dashboard.
2. Select the Files Connect Zidget.
3. Double-click a location/zone if necessary.
4. Select a server from that location/zone.
5. Click the Connect to Server button.
5.4.3 Mounting DFS shared volumes with the Zidget
To mount a DFS shared volume:
1. Press the F12 key to invoke Dashboard.
2. Select the Files Connect Zidget.
3. Double-click the DFS domain or server, in this example GROUPLOGIC.

87 Copyright © Acronis International GmbH, 2002-2017
4. Double-click the DFS root, in this example ProductionDFS.
5. Select a DFS target.
6. Click the Connect to Server button.
5.4.4 Printer Setup Utility
You can add an Files Connect print queue from the Printer Setup Utility in two ways. The most common way is to use the optional Macintosh print components that come with Files Connect. However, if you do not want to install any additional software on the Macintosh, you can use the built-in Bonjour browse capability to add a printer.
In this section Adding a Printer using the optional Files Connect Print Components .... 87 Adding a Printer using Bonjour from the Printer Setup Utility ................ 88
5.4.4.1 Adding a Printer using the optional Files Connect Print Components
If you have installed the Macintosh Print Components on the Macintosh, you can use the custom Files Connect Printer
To use the Files Connect components to add a printer, do the following:
1. Use the Printer Browse Module (PBM) to locate an Files Connect print queue.

88 Copyright © Acronis International GmbH, 2002-2017
2. Select ExtemeZ-IP Printers on the pop-up list. A list of the Files Connect Printers on the network appears.
3. Select the queue you want to use.
4. Click Add.
5.4.4.2 Adding a Printer using Bonjour from the Printer Setup Utility
To add a printer using Bonjour from the Printer Setup Utility, do the following:
1. Open the Printer Setup Utility or the Print & Fax System Preferences pane depending on what version of Mac OS X you are using.
2. Choose Add.
3. Pick your printer from the Printer Browser.
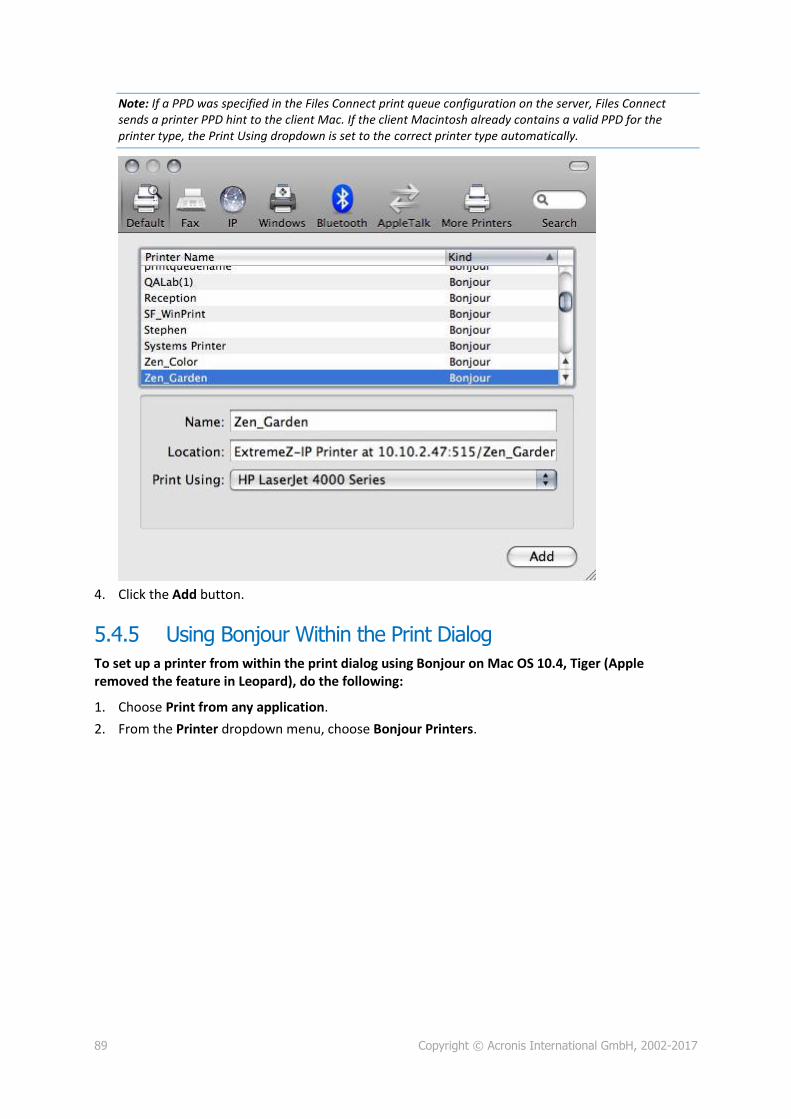
89 Copyright © Acronis International GmbH, 2002-2017
Note: If a PPD was specified in the Files Connect print queue configuration on the server, Files Connect sends a printer PPD hint to the client Mac. If the client Macintosh already contains a valid PPD for the printer type, the Print Using dropdown is set to the correct printer type automatically.
4. Click the Add button.
5.4.5 Using Bonjour Within the Print Dialog
To set up a printer from within the print dialog using Bonjour on Mac OS 10.4, Tiger (Apple removed the feature in Leopard), do the following:
1. Choose Print from any application.
2. From the Printer dropdown menu, choose Bonjour Printers.
90 Copyright © Acronis International GmbH, 2002-2017
3. Select the desired printer from the list.
In this section Choosing a Printer with Mac OS 9............................................................ 91 Using Bonjour from Windows .................................................................. 93

91 Copyright © Acronis International GmbH, 2002-2017
5.4.5.1 Choosing a Printer with Mac OS 9
Once they have installed the Choose IP Printer program, Mac OS 9 clients use Choose IP Printer on the Apple menu instead of the Chooser to find the Files Connect printers and set up desktop printers.

92 Copyright © Acronis International GmbH, 2002-2017

93 Copyright © Acronis International GmbH, 2002-2017
5.4.5.2 Using Bonjour from Windows
To set up a Bonjour printer from Windows, do the following:
1. Install Apple Bonjour for Windows, available at: http://www.apple.com/support/downloads/bonjourforwindows.html http://www.apple.com/support/downloads/bonjourforwindows.html

94 Copyright © Acronis International GmbH, 2002-2017
2. Once installed, run the Bonjour Printer Wizard.
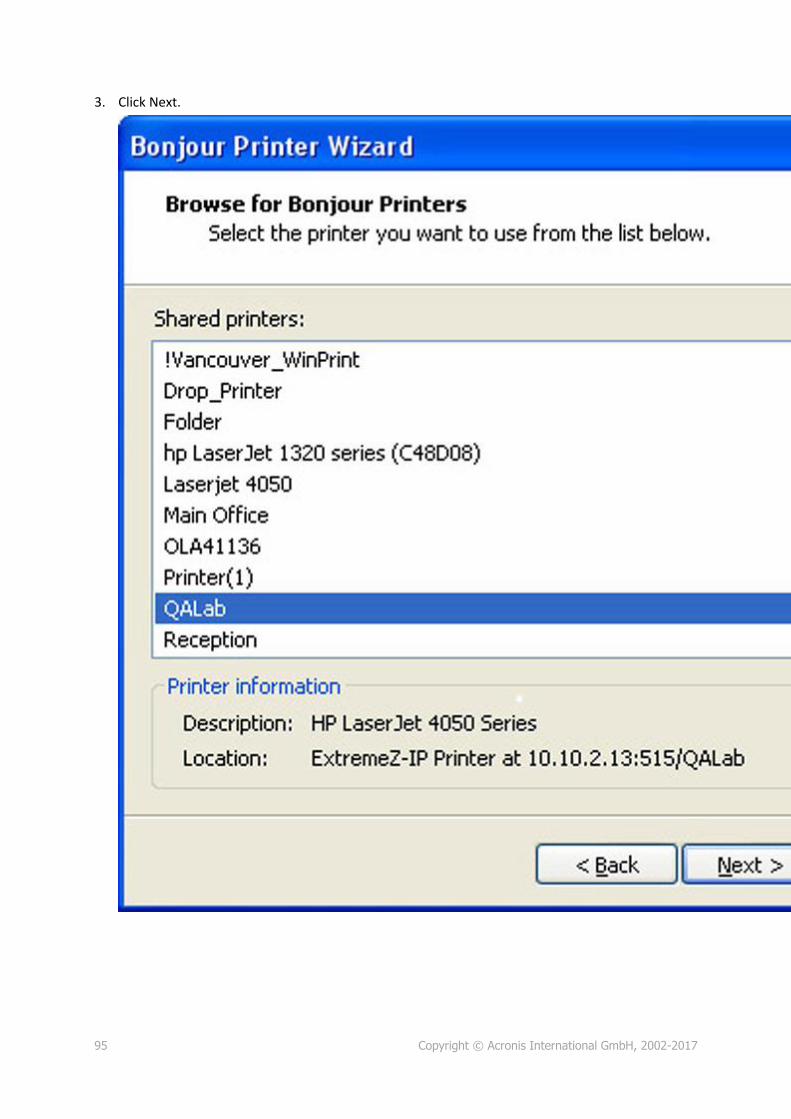
95 Copyright © Acronis International GmbH, 2002-2017
3. Click Next.

96 Copyright © Acronis International GmbH, 2002-2017
4. Select the printer you would like to install, then, click Next.
If a PPD was specified in the Files Connect print queue configuration on the server, Files Connect sends the printer model listed in the PPD to the Windows client. If the Windows client already contains a valid driver for the printer type, the printer manufacturer and model should be automatically selected.

97 Copyright © Acronis International GmbH, 2002-2017
5. If a PPD was not selected automatically, select the appropriate manufacturer and model and click Next.
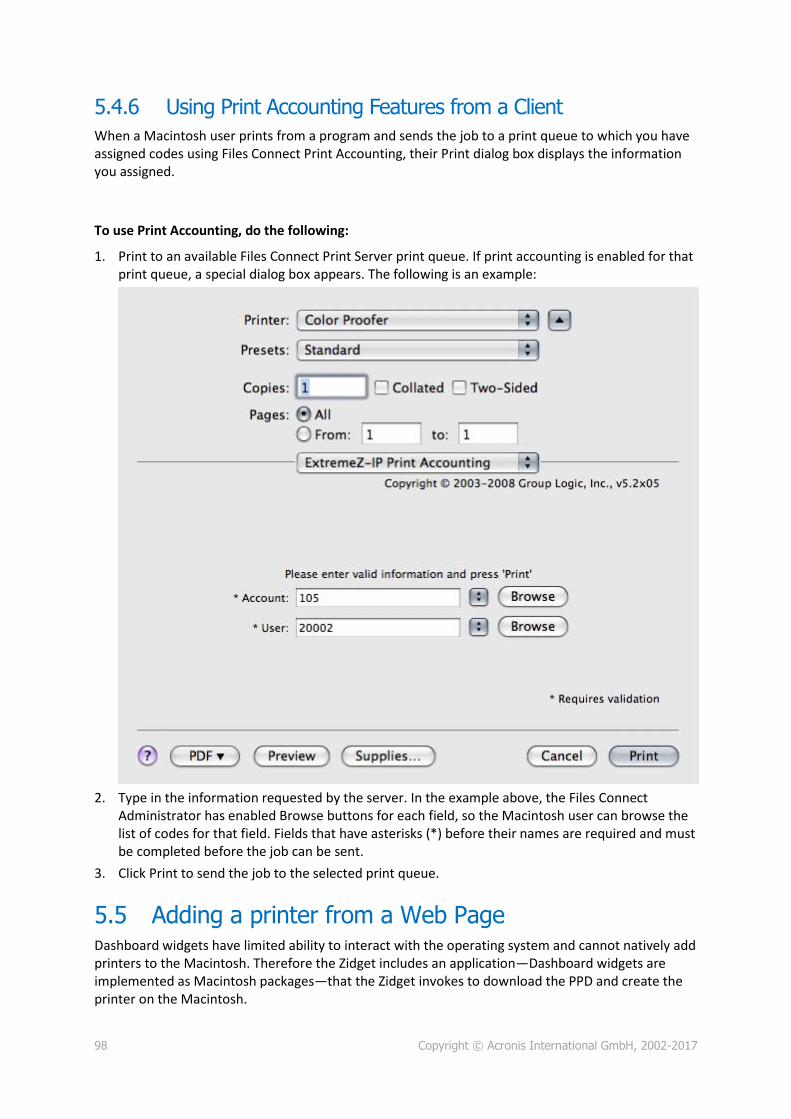
98 Copyright © Acronis International GmbH, 2002-2017
5.4.6 Using Print Accounting Features from a Client
When a Macintosh user prints from a program and sends the job to a print queue to which you have assigned codes using Files Connect Print Accounting, their Print dialog box displays the information you assigned.
To use Print Accounting, do the following:
1. Print to an available Files Connect Print Server print queue. If print accounting is enabled for that print queue, a special dialog box appears. The following is an example:
2. Type in the information requested by the server. In the example above, the Files Connect
Administrator has enabled Browse buttons for each field, so the Macintosh user can browse the list of codes for that field. Fields that have asterisks (*) before their names are required and must be completed before the job can be sent.
3. Click Print to send the job to the selected print queue.
5.5 Adding a printer from a Web Page Dashboard widgets have limited ability to interact with the operating system and cannot natively add printers to the Macintosh. Therefore the Zidget includes an application—Dashboard widgets are implemented as Macintosh packages—that the Zidget invokes to download the PPD and create the printer on the Macintosh.

99 Copyright © Acronis International GmbH, 2002-2017
The helper application can also be used as an Internet protocol helper for ezip:// URLs. This enables Safari or another web browser to create a printer when you click on a specially formatted link from a standard web page such as an office map with links for different areas. If you click on a URL to invoke the helper application, it asks if you want to add the printer. Whereas when Zidget invokes the helper application, the helper application operates silently.
Creating a web-based Printer Location Map is a very effective way to let users easily find and add printers. Taking a scan of the map and making a PDF in Adobe Acrobat is one simple way to create a web page with a map of the user’s floor. Acrobat will let you add links for areas of the picture without having to know any HTML.
To add a printer from a Web page, do the following:
1. Click the icon of the nearest printer on the map.
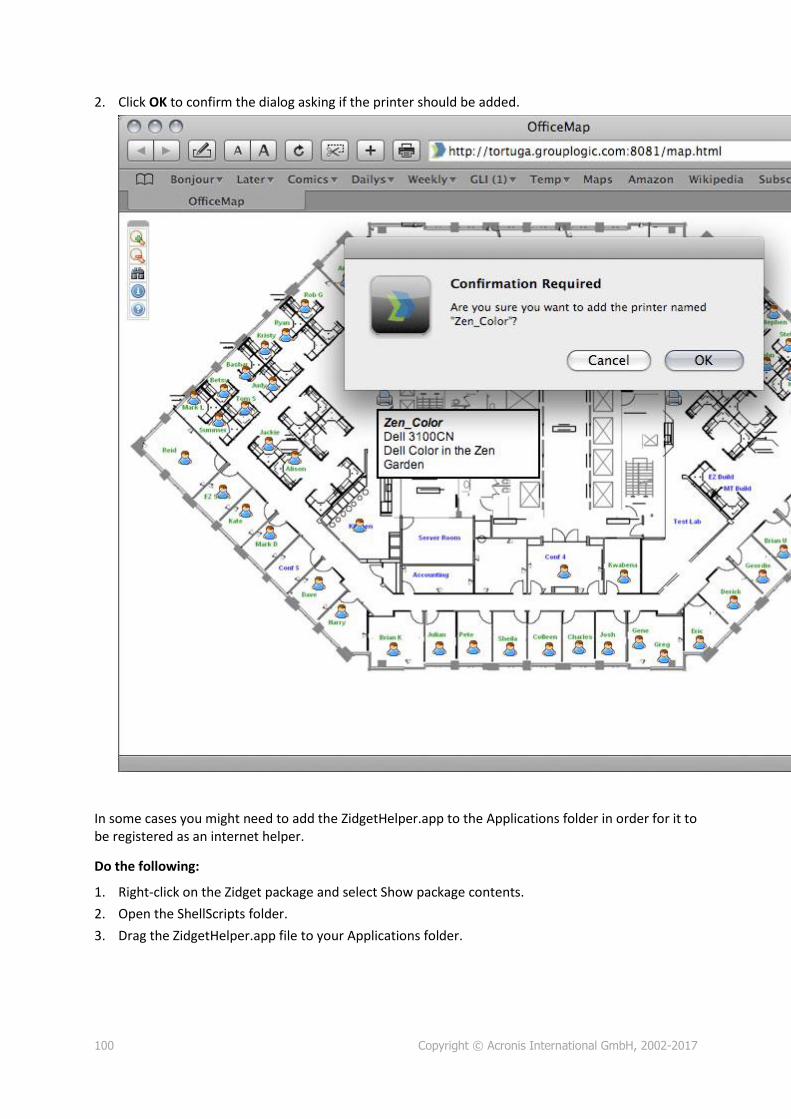
100 Copyright © Acronis International GmbH, 2002-2017
2. Click OK to confirm the dialog asking if the printer should be added.
In some cases you might need to add the ZidgetHelper.app to the Applications folder in order for it to be registered as an internet helper.
Do the following:
1. Right-click on the Zidget package and select Show package contents.
2. Open the ShellScripts folder.
3. Drag the ZidgetHelper.app file to your Applications folder.

101 Copyright © Acronis International GmbH, 2002-2017
5.6 Macintosh Client Configuration for DFS Support In order for Macintosh clients to access Files Connect DFS volumes, each client needs to be configured so that it can properly locate and mount DFS resources. This configuration can be accomplished through the installation of the Files Connect Mac client or Zidget.
Note: Zidget DFS support is compatible with Mac OS X 10.4 or later.
If Macintosh clients are using home directories located on DFS volumes, the Mac Client application must be installed. The Zidget does not support DFS home directories.
In this section Files Connect Mac Client ........................................................................ 101 Files Connect Zidget Option ................................................................... 101
5.6.1 Files Connect Mac Client
The Files Connect Mac client is the best way to connect your Macintosh users to all the resources shared with your Files Connect server.
It is a full-fledged app that has many advantages over the widget.
It can search through your file servers and shares. New search features for performing spotlight searches of AFP file volumes. Fast, full-content search of files in SMB file shares which can then be accessed by the Mac via SMB.
You can search through many volumes without mounting them but you can mount only desired volumes or resources.
All available printers are listed in a user-friendly manner.
For more information on the Mac Client and usage instructions, please visit The Mac Client (p. 13) section.
5.6.2 Files Connect Zidget Option The Files Connect Zidget is a simple way to configure a Macintosh client to access DFS. The Zidget allows Mac users to browse the DFS namespace and mount individual DFS target volumes. Once mounted, the user can access the chosen DFS target volumes through the Finder, as they would traditional shared volumes. The Zidget’s primary feature is that it is compatible with Mac OS X 10.4 or later and that it allows users full file search capabilities. Full details on installing, configuring, and accessing DFS with the Zidget can be found in the Macintosh Zidget Configuration.

102 Copyright © Acronis International GmbH, 2002-2017

103 Copyright © Acronis International GmbH, 2002-2017
5.7 Adding a License Number Using the Licensing button on the Files Connect Administrator window, you can enter a serial number for any upgrade without stopping the Files Connect service. When you enter license number while the Files Connect service is running; Macintosh clients stay connected and continue to use Files Connect volumes.
Note: Adding a new license number will replace the existing license number!
You need to enter a new license number when:
you have a trial version of Files Connect installed and you purchase a license for the product.
you are upgrading or downgrading your client count.
your ELP serial is expiring and you need to enter your new ELP serial.
you upgraded from a very old version and your previous perpetual serial was replaced with a new serial that can be used with current versions.
To add a serial number, do the following:
1. Open the Files Connect Administrator application.
2. Click Licensing on the main Files Connect Administrator window.
3. Click Add License, enter the serial number, and click OK.
4. The serial number will be displayed in the Active Licenses list and will take effect immediately.
5. Click Close to return to the Files Connect Administrator.
6 Searching with Files Connect The Mac OS performs three types of file searches – enumeration searches, index searches, and Spotlight searches.
In this section
104 Copyright © Acronis International GmbH, 2002-2017
Enumeration Search ............................................................................... 104 Catalog Search ........................................................................................ 104 Spotlight Search ..................................................................................... 104 Storing Search Index Files ...................................................................... 104
6.1 Enumeration Search When the Mac OS performs an enumeration search, it scans each file in the folder and all of its subfolders across the network. An enumeration search is performed if searching a subfolder of a volume or if catalog search is disabled. The process of the client enumerating the entire directory structure below the folder being searched results in drastically reduced search performance.
6.2 Catalog Search A catalog search issues a single search request that is processed on the server side. The Mac OS only issues an catalog search request when the Macintosh user is searching the root of a volume. Files Connect maintains a search index to accelerate these searches. This index contains the name of every file on your Files Connect volumes. With indexed searching enabled on the server, a Macintosh client can use the built-in Mac OS search functionality to perform fast searches of Files Connect volumes. No client side configuration or applications are necessary.
Instead of scanning your server’s drive each time a Macintosh client makes a search request and looking through every file in the volume, Files Connect checks the file name index to retrieve search results. Index search results can be provided only for searches initiated at the root of a volume. Any search performed below the root of a volume will result in the Mac OS performing an enumeration search.
Note: Please instruct your users to search the entire Files Connect volume for the fastest results.
6.3 Spotlight Search Mac OS X 10.5 or later supports Spotlight searching of AFP file servers. Spotlight search allows files to be found by searching on content, in addition to file names and file attributes. When enabled, Spotlight search replaces both enumeration and catalog search and provides results when searching at both the root of a volume and within subfolders.
6.4 Storing Search Index Files Files Connect creates a separate search index file for each Files Connect volume; the search index files are stored in a folder called Files Connect indexes. Placing index files in one location and excluding this folder from scanning prevents problems with virus scan software and backup applications. You can specify custom index file paths for individual volumes when you set up or modify a volume to be shared; see the section Creating a Volume (p. 111).
Note: To help you locate a search index for a volume, Files Connect begins each index file name with the name of the volume to which it belongs.
If you do not create a custom path, search index files are stored in a one of two locations.
Files Connect stand-alone server: Search index files are stored in a folder called Files Connect Indexes in the Files Connect application folder or the custom global location you have set.

105 Copyright © Acronis International GmbH, 2002-2017
Files Connect Cluster: Search index files are stored in a folder called Files Connect Indexes at the root of the drive on which the volume resides.
When starting EZIP for the first time, search indexes for a volume is created in the default index path unless you have set individual custom paths for a particular volume or volumes.
6.4.1 Verbose logging options
When enabled, these logging options increase the level of detail recorded in the Files Connect log file. Options are available for various aspects of Files Connect operations. These are typically only needed when working with Acronis technical support. Enabling verbose logging could potentially have an impact on performance and should be used for troubleshooting. The Reset all button will return all Files Connect logging to default settings.
6.4.2 Enable Windows Error Reporting
When enabled, Windows will give you the option of sending error reports in the event of an issue. These error reports can be used by Acronis to identify and address potential problems.
6.4.3 Archive Active Log File
Click this button to ZIP archive the current Files Connect log file and start a new log file. This can be used to reduce the size of your existing log file for archiving or to package your log file for delivery to Acronis technical support. Log files are located in the \Program Files\Group Logic\Files Connect\Logs\Files Connect\ folder on your system drive by default.

106 Copyright © Acronis International GmbH, 2002-2017
7 Using Files Connect
In this section The Mac Client ....................................................................................... 106 Using the Files Connect File server ........................................................ 110 Files Connect Users ................................................................................ 123 Using the Log .......................................................................................... 126 Remapping Extensions ........................................................................... 129 Using the Files Connect Print Server ...................................................... 131 Using Print Accounting ........................................................................... 139
7.1 The Mac Client Introduced in Files Connect 10.5, the Mac Client is by far the easiest way to connect to network resources.
You can get the Mac Client by opening the Web Service address of your Files Connect deployment with the proper port. e.g. http://filesconnect.neucott.com:8081
Once you've opened the address of Files Connect in a browser, you will see a button to download the Mac Client.
Installation
1. Download the Mac application and install it.
2. In your Menu Bar you will see the Files Connect icon.
3. The Files Connect options menu is opened by default. Select Preferences.

107 Copyright © Acronis International GmbH, 2002-2017
Note: If it isn't open, you can click on the icon to open it.
4. Enter the address of your Files Connect server. If you have multiple servers, using the master's
address will give you access to all servers and volumes.
5. Enter your credentials which will be used to connect to Files Connect's resources. These are most
likely your Active Directory username and password.
6. Alternatively, if your computer is bound to the company domain and you are logged in to the computer with the account you wish to use, you can select Use current credentials (yourusername).

108 Copyright © Acronis International GmbH, 2002-2017
Usage
Once connected, you can navigate the available resources via the 4 tabs in the upper left. They allow you to view the available resources:
Only shares -
Servers and their respective shares -
DFS shares -

109 Copyright © Acronis International GmbH, 2002-2017
Printers -
To refresh the list of shares & printers, click on View in the menu bar and select Refresh. You can also use Command + R.
Multi-selection
You can multi-select items by using Command + Click or Shift + Click on them. This works for files and folders and also works for Shares and Servers when you want to search in a couple of specific shares instead of All Shares.
Search
You can search for files by many parameters like file type, creation date, filename, file content and more. The search will be performed only for the selected share(s)/server(s).
1. The quickest way to search is by clicking on the Files Connect icon in the Menu Bar and using the search field. By default, this will search in all available shares unless you have already used the app to specific shares. This will become the new default.
You can also click on the magnifying glass icon and select the search parameters from a list of recent search queries.
The default filter is by name and content if content search is enabled for the volumes being searched.
2. The other way to search for files is in the app itself, using the search bar. From there you can also configure the search parameters.
e.g. Searching for files that begin with X, and their file Kind is Executable.
Note: Whatever parameter you choose for the main search filter will be the new default until you change it. This does not include the additional filters you add like Kind, Any and etc.

110 Copyright © Acronis International GmbH, 2002-2017
Recent Searches
A list of 10 of the most recent searches will be available for you to pick from for quicker and easier access to files you search for often. The list is accessible from the magnifying icon both in the Menu Bar and in the app itself.
Mounting Shares and Finder integration
Double-clicking on a share or a found file will automatically mount the file share and open the file. A mounted share will have an unmount icon appear next to its name in the app and clicking it will unmount the share.
You can right-click on a file and select “Show in Finder”, which will open the Finder directly to the file(s)'s location. This also works for multiple selected files.
Bookmarks and Recent Files
Right-clicking on a a file or a number of selected files allows you to create bookmarks for the selected items. Afterwards, these bookmarks can be accessed from the Files Connect Menu Bar -> Bookmarks.
You can find a list of the 20 most recent files you've opened, in the Files Connect Menu Bar -> History.
7.2 Using the Files Connect File server After using the Files Connect Settings dialog box to set up your server name, security and other settings, you can create the volumes you want to share and the printers you want your Macintosh clients to use. After completing these tasks, Macintosh clients can connect to your server and use the volumes and printers you set up. You can check the Users and File dialog boxes to see who is connected and which files they are accessing, In addition, you can send messages, disconnect users, and delete items from the files being viewed.
In this section Creating Volumes for Use with Files Connect ........................................ 110
7.2.1 Creating Volumes for Use with Files Connect
You can share NTFS directories located on your Windows system for Macintosh users. When Macintosh users connect, they see these directories as remote AppleShare “volumes.” Use the Volumes dialog box to create, modify, or delete individual volumes to share with Macintosh users.
In this section Viewing the Volume Window ................................................................ 111 Creating a Volume .................................................................................. 111 Volume Properties ................................................................................. 114 Using Custom Quotas ............................................................................. 118 Using Advanced Volume Properties....................................................... 119 Changing Permissions for Shared Files and Folders ............................... 119

111 Copyright © Acronis International GmbH, 2002-2017
Migrating or Replicating Volumes .......................................................... 120 Using Mobile Access............................................................................... 121
7.2.1.1 Viewing the Volume Window
Click Volume on the Administrator dialog box to display the Volumes dialog.
Create - Create a volume.
Modify - Opens the Volume Properties window.
Remove - Removes the selected volume.
Restart - Restarts the volume.
Suspend - Take a volume temporarily offline so that clients cannot connect to it.
Note: Suspended volumes will be resumed every time the Files Connect service is restarted
Show in Explorer - Show the volume’s parent folder in Windows Explorer.
Import SMB Shares... - Reshare all folders shared with Windows file sharing (SMB) with Files Connect as well.
7.2.1.2 Creating a Volume
Folders can only be shared as Files Connect volumes if they reside on an NTFS formatted disk. If you try to create a volume that is not on an NTFS formatted disk, Files Connect gives an error message.
Creating a Volume:
1. Create a new directory on an NTFS formatted volume on the server machine or find an existing directory that you want to use.
2. From the Files Connect Administrator window, click Volumes.
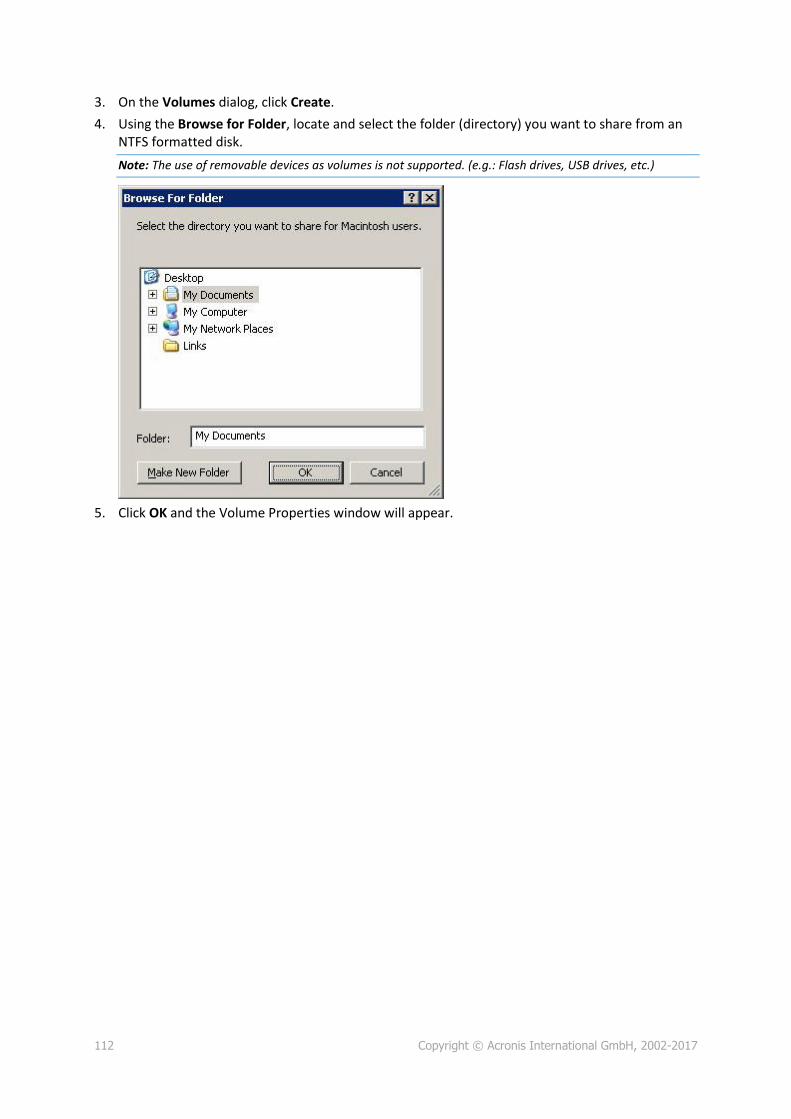
112 Copyright © Acronis International GmbH, 2002-2017
3. On the Volumes dialog, click Create.
4. Using the Browse for Folder, locate and select the folder (directory) you want to share from an NTFS formatted disk.
Note: The use of removable devices as volumes is not supported. (e.g.: Flash drives, USB drives, etc.)
5. Click OK and the Volume Properties window will appear.

113 Copyright © Acronis International GmbH, 2002-2017
Note: If you're in a clustered environment and are using Acronis Content Indexing you should set a custom index file path to a folder on the shared disk.
6. Edit the Volume Name if you want to change the name.
Note: With Files Connect 8.0.4 or later, a name can have up to 127 characters for UTF16 and 190 for UTF8. If you enter more, Files Connect will truncate the name. Volumes over 27 characters cannot be used with Mac OS 10.4 and below.
7. Choose any additional settings required.
8. Click OK to create the volume.
As soon as a volume’s status becomes Online for Clients, Macintosh clients can see and connect to it.

114 Copyright © Acronis International GmbH, 2002-2017
7.2.1.3 Volume Properties
These volume properties do NOT affect the mobile clients connecting to them. Only the Catalog search settings will affect it.
Apple Filing Protocol (AFP) file and search - This is the default setting and creates a volume accessible by AFP. The volume will be accessible and searchable from the Files Connect Mac Client app and the Mac Finder. When opening files and browsing these volumes, the Mac will connect using AFP in either case.
Search only (Mac client will connect using SMB) - With this option, the volume will be displayed in the Files Connect Mac Client app and will be searchable, but it will not be shared as an AFP volume. Macs connecting to the Files Connect server using AFP will not see this volume. Macs will automatically connect to “Search only” volumes and files found in Files Connect Mac Client app search results using SMB. This connection uses preexisting Windows or NAS SMB file server shared volumes.
Volume is read-only
Setting the Volume to read-only prohibits Macintosh users from changing any documents on the volume or adding any new files or folders.
Allow guests to use volume
If you want a Macintosh user who logs into Files Connect as a guest to access the volume, check this checkbox.

115 Copyright © Acronis International GmbH, 2002-2017
Use Volume as home directory
To filter the contents of this volume so that it only shows a user their own home directory, check this checkbox. In order for this feature to function, the server-wide Enable Home Directory Support option in the File Server Settings dialog box must also be enabled; see the Files Connect File Server (p. 52) article.
Reset permissions on move
If you would like files and folders to always inherit permissions from their parent folder after they have been moved, check this checkbox .
Note: If the directory that is moved contains a large number of sub-folders, resetting the permissions can take awhile.
Enforce Filename Policy
Enforcing Filename Policy will prevent Macintosh clients from saving files to the server that do not comply with the filename policies that the administrator has set in the global Filename Policy settings.
Volume supports ACLs
Click this check box if you want the volume to support Access Control Lists.
When enabled, Files Connect will convert all .URL shortcuts in the volume to Mac-readable aliases.
Search Settings
Support Spotlight Search
Enables Spotlight searching on the individual volume by Mac OS X 10.5 or later clients. You must choose the desired type of indexing (Acronis Content Indexing by default).
Note: Searching by Windows and Mac file tags is now supported by both types of indexing. For Windows Search, a small additional configuration is required, please visit Windows Search Indexing (p. 63).
Acronis Content Indexing
This type of indexing is built-in Files Connect and only requires that you enable it on the Search tab of the Settings dialog before it can be enabled for the specific volume.
Windows Search
This type of indexing relies on Microsoft Windows Search. To enable Windows Search indexing, you have to make sure Microsoft Windows Search is installed on the Files Connect server and must be enabled on the Search tab of the Settings dialog before it can be enabled for the specific volume.
Support Catalog Search
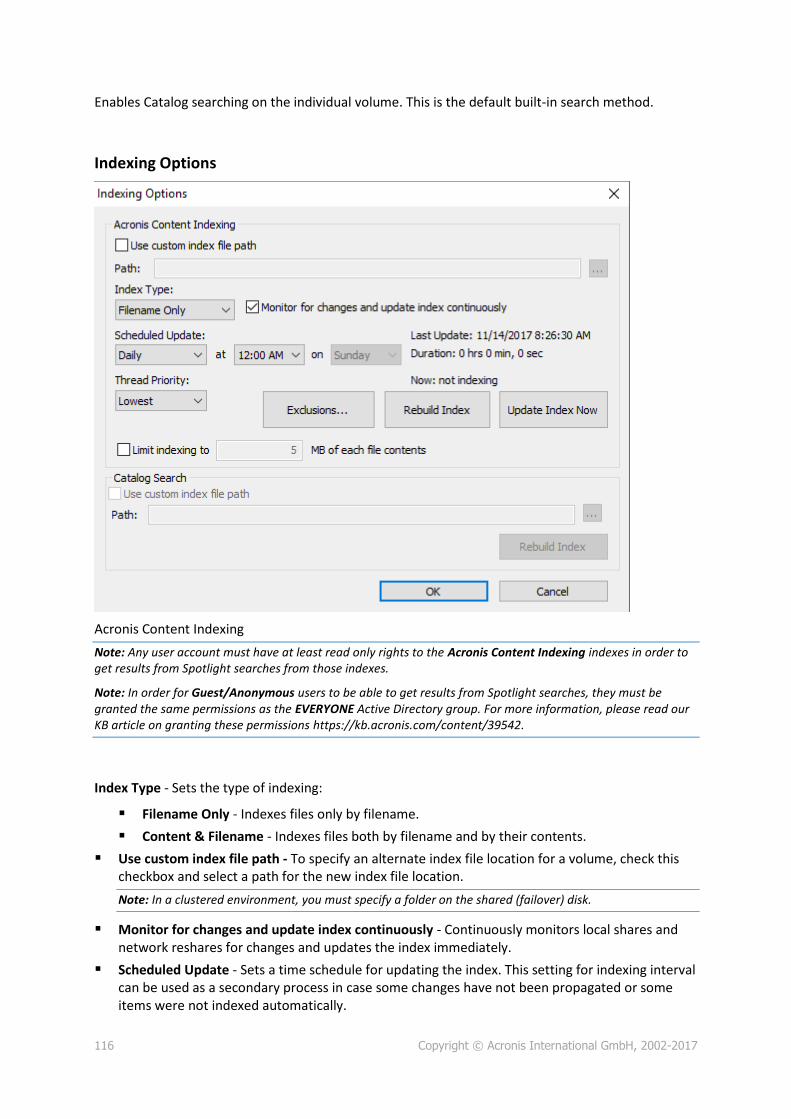
116 Copyright © Acronis International GmbH, 2002-2017
Enables Catalog searching on the individual volume. This is the default built-in search method.
Indexing Options
Acronis Content Indexing
Note: Any user account must have at least read only rights to the Acronis Content Indexing indexes in order to get results from Spotlight searches from those indexes.
Note: In order for Guest/Anonymous users to be able to get results from Spotlight searches, they must be granted the same permissions as the EVERYONE Active Directory group. For more information, please read our KB article on granting these permissions https://kb.acronis.com/content/39542.
Index Type - Sets the type of indexing:
Filename Only - Indexes files only by filename.
Content & Filename - Indexes files both by filename and by their contents.
Use custom index file path - To specify an alternate index file location for a volume, check this checkbox and select a path for the new index file location.
Note: In a clustered environment, you must specify a folder on the shared (failover) disk.
Monitor for changes and update index continuously - Continuously monitors local shares and network reshares for changes and updates the index immediately.
Scheduled Update - Sets a time schedule for updating the index. This setting for indexing interval can be used as a secondary process in case some changes have not been propagated or some items were not indexed automatically.

117 Copyright © Acronis International GmbH, 2002-2017
Thread Priority - Sets the process priority for indexing this volume.
Exclusions - Allows the administrator to exclude certain folders or files from the index, which can drastically improve indexing speed.
Rebuild Index - Initiates the creation of a new search index for the volume. The previous search index will be used to satisfy search requests until the new indexing process has been completed.
Update Index Now - Initiates an update of the existing index immediately.
Limit indexing to X MB of each file contents - Limits the indexing to only the first X megabytes of a file's contents.
Catalog Search
Use custom index file path - To specify an alternate index file location for a volume, check this checkbox and select a path for the new index file location.
Rebuild Index - Initiates the creation of a new search index for the volume. The previous search index will be used to satisfy search requests until the new indexing process has been completed.
ArchiveConnect
Bring online explicitly
ArchiveConnect is a separate Mac client-side application that enables Mac OS X clients to access file archives without triggering unintended retrieval of offline files. Normally, ArchiveConnect retrieves offline files automatically when a user double clicks to open them. This option requires the user to right click on an offline file and explicitly use a contextual menu option to bring the file online.
Time Machine
Support Time Machine backup
When you check the Allow Time Machine Backup box, Macintosh clients can use the selected Files Connect volume as a Time Machine backup destination. On the local network, Time Machine uses Bonjour to discover Time Machine supported volumes. Time Machine stores backup data as sparse disk image format or as HFS+. When you select a destination volume, Time Machine creates a disk image for the backup. By default, the Support Time Machine backup setting is disabled for a volume.
Note: You cannot enable Support Time Machine backup for volumes that are read-only or used as home directories.
When you enable Support Time Machine backup, Files Connect disables Volume is read only and Use volume as home directory. The opposite is also true.
Limit users without custom quotas to X GB
Check this box and enter a value to limit the size of Time Machine backups per user. When the Macintosh client connects to the server for the first time it sees the available space on the drive as whatever the quota was set to. On subsequent logins it will see the available space as the quota size minus however much space has been used by that user’s other backups. This quota applies to all users who do not have a custom quota assigned.
Note: Because Files Connect has to tell the Macintosh how much space is available immediately when the user logs in, prior to Time Machine opening a specific backup file, the quota is applied on a per user basis not a per

118 Copyright © Acronis International GmbH, 2002-2017
machine basis. If a user backs up both a desktop machine and a laptop, the quota will apply to the combined size of the backups.
Custom quotas
This button opens the Custom Quotas window.
7.2.1.4 Using Custom Quotas
You can use Custom Quotas to define user-based or group-based Time Machine backup quotas. Quotas can be assigned to users and groups that exist locally on the server or within Active Directory. Custom quota settings always override the Limit users without custom quotas setting. Custom user quotas always override custom group quotas.
Setting a custom quota:
1. Click the Custom Quotas button on the Volume Properties dialog box to open the Custom Quotas window.
2. Click Add to add a new user-based or group-based quota.
3. Use the Select Users or Groups dialog to choose the users or groups you would like to apply a quota to. You can pick more than one user or group at a time if you would like to set them all to the same quota value.

119 Copyright © Acronis International GmbH, 2002-2017
4. Enter the desired quota limit value in GB and click OK.
7.2.1.5 Using Advanced Volume Properties
You rarely need to use the Advanced Volume Properties dialog box. But, if you want to require that users enter an additional password, beyond their normal login password, when they mount volumes, you can use this dialog to establish that password. On this dialog, you can also limit the number of users that can use a specific volume.
Note: Users are unable to input a password for protected volumes on computers running Mac OSX El Capitan (10.11) and higher. This is an issue in Mac OSX 10.11 and higher.
Note: Volume specific passwords were eliminated in Mac OS X 10.5, but have been re-enabled in Mac OS X 10.6.
7.2.1.6 Changing Permissions for Shared Files and Folders
Files Connect uses the existing Windows user logon and passwords. Unless you enable ACL support, Windows and Macintosh computers handle folder and file properties differently and not all Windows access information is displayed on the Macintosh. Because Files Connect enforces Windows security settings, you should normally use Windows’s built-in tools for adjusting directory and file permissions. The standard Windows tools provide the most flexibility for setting up your security policy.
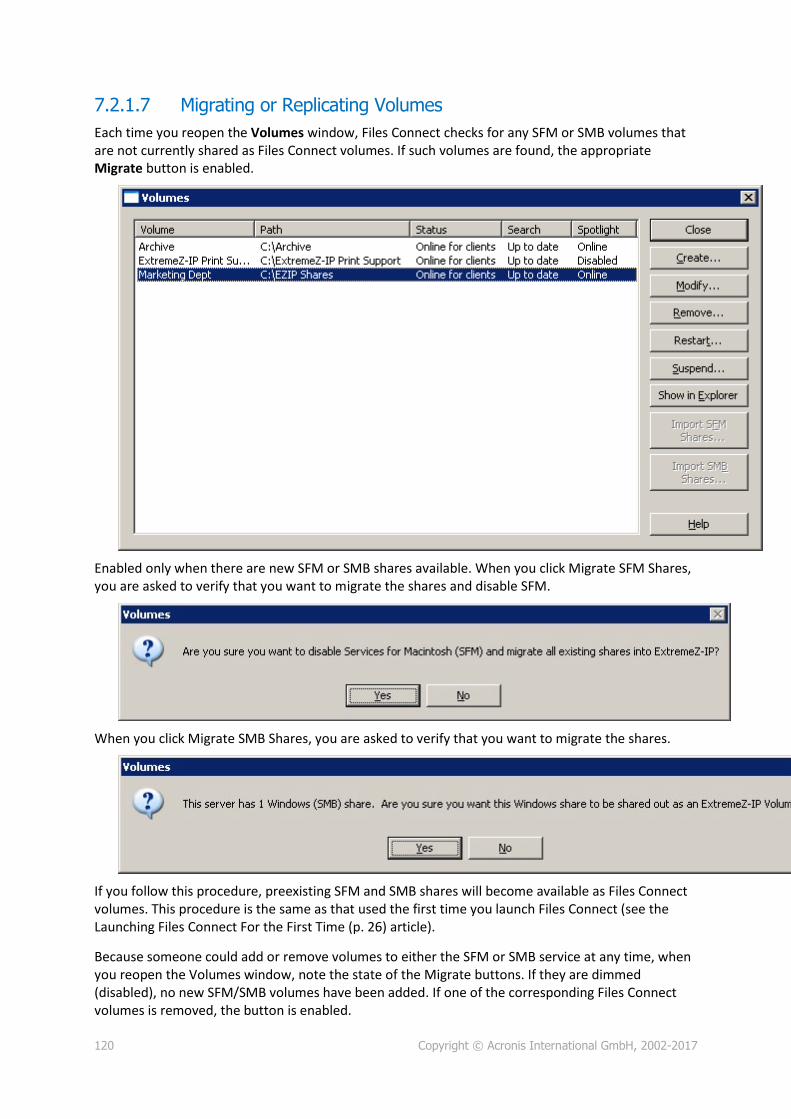
120 Copyright © Acronis International GmbH, 2002-2017
7.2.1.7 Migrating or Replicating Volumes
Each time you reopen the Volumes window, Files Connect checks for any SFM or SMB volumes that are not currently shared as Files Connect volumes. If such volumes are found, the appropriate Migrate button is enabled.
Enabled only when there are new SFM or SMB shares available. When you click Migrate SFM Shares, you are asked to verify that you want to migrate the shares and disable SFM.
When you click Migrate SMB Shares, you are asked to verify that you want to migrate the shares.
If you follow this procedure, preexisting SFM and SMB shares will become available as Files Connect volumes. This procedure is the same as that used the first time you launch Files Connect (see the Launching Files Connect For the First Time (p. 26) article).
Because someone could add or remove volumes to either the SFM or SMB service at any time, when you reopen the Volumes window, note the state of the Migrate buttons. If they are dimmed (disabled), no new SFM/SMB volumes have been added. If one of the corresponding Files Connect volumes is removed, the button is enabled.

121 Copyright © Acronis International GmbH, 2002-2017
Note: This button updates only when the Volumes window is opened. Changes occurring to SMB/SFM shares have no effect on the button state while the Volumes window remains opened.
7.2.1.8 Using Mobile Access
To allow Acronis Access mobile clients to connect to your Volumes:
1. Open the Files Connect Administrator.
2. Open the Settings menu
3. Open the Mobile Access tab.
4. Select the "Enable access to Volumes from Acronis Access mobile apps" checkbox.
5. Set an IP or DNS address for the Gateway.
6. Set a port for the Gateway.
7. Select an SSL certificate. You can use the default one, but that is not recommended in a production environment.
8. Press OK.
Connecting with a mobile client
To connect to the Gateway server, you have to add it through the mobile app. Afterwards you will be able to connect with a single tap. For in-depth information on using the mobile app, please visit the Client Guides documentation.
Requrements
In order to be able to connect to your Files Connect Volumes via mobile client from outside your company LAN, you need to provide your mobile device(s) with network access to your company's network. You can do this via VPN, HTTPs Reverse Proxy or opening a firewall port.
Supported devices:
Apple iPad 2nd generation and later.
Apple iPad mini 1st generation and later.
Apple iPhone 4S and later.
Apple iPod Touch 5th generation and later.
Android smartphones and tablets (devices with x86 processor architecture are not supported).
Windows smartphones and tablets (Windows RT is not supported).
Note: Windows devices will work with Files Connect servers version 6.0 and newer.
Supported OS's:
iOS 7 or later. iOS 8 or later is required for application updates.
Android 2.2 or later (devices with x86 processor architecture are not supported).
122 Copyright © Acronis International GmbH, 2002-2017
Windows 8.1 or later (Windows RT is not supported).
Note: Windows devices will work with Files Connect servers version 6.0 and newer.
The Files Connect app can be downloaded from:
For iOS http://www.grouplogic.com/web/meappstore.
For Android https://play.google.com/store/apps/details?id=com.grouplogic.mobilecho.
For Windows PC and Tablet or Phones. .
Connecting from iOS
1. In the Network section, tap the "+" button.
2. Select Add Files Connect Server.
3. Enter the Files Connect Server Address. You can enter the server DNS name or IP address.
4. Optionally, you can set a Display Name to help you identify your server in the list of Data Sources. If you don't set one, the server will be displayed with the Server Address.
5. Select the authentication method. You can choose between Username/Password and Client Certificate.
6. Enter the Username that will be used to connect to the server.
7. If you would like to save your password so you don't have to enter it every time you connect, enable Save Password.
Note: If you enable the Save Password option, a password field will appear and you will need to enter your password.
8. When done configuring the new server, tap the Save button.
Connecting from Android
1. Start the Files Connect app. You will be taken to the home screen.
2. Tap the Menu button on your device to open the Files Connect menu.
3. Tap the Add Server button.
4. Enter the server name or IP address of your Files Connect Gateway server. This is usually something like: acronisaccess.mycompany.com
5. Optionally, if you would like the server to appear in the app with a name other than the server name you just entered, enter an alternate Display Name for this server.
6. Enter your username. This is usually the same username you use to get to other company resources and your email account.
7. If you would like to save your password, tap the remember password checkbox and enter and confirm your password.
8. Tap Save to finish adding this server.
Connecting from Windows Mobile

123 Copyright © Acronis International GmbH, 2002-2017
1. Tap on Settings
2. Tap on Add Files Connect Server
3. Enter the server's address.
Note: Display name, Username and Password are optional. If you want the server to automatically authenticate you, enter a username and password.
4. Tap Add.
7.3 Files Connect Users The Users dialog box lets you view the users connected to the server, disconnect those users, or send messages to them. For information on user name and password entry See the section “Connecting Macintosh Users”. To view the Users dialog box, click Users on the Files Connect Administrator window.
Names and IP addresses identify users who are currently connected. Their connection and idle times are given. The dialog refreshes automatically. Click on a column title to sort the list by a column.
The status tells you if the Macintosh client is idle, sleeping, or being reconnected; see Reconnecting a Dropped User Session (p. 124).
Note: User accounts are defined in Windows. Files Connect uses this information to determine the user access privileges.
Disconnect - Disconnect a highlighted user or all users. Send Message - Send a message to a highlighted user or all connected users.
Note: Mac OS X 10.9 or later does not support sending messages.
The Status column tells you if the connection Active, Sleeping, or Waiting for Reconnect.
In this section Connecting Macintosh Users ................................................................. 124 Viewing Files Opened with Files Connect .............................................. 125

124 Copyright © Acronis International GmbH, 2002-2017
7.3.1 Connecting Macintosh Users
Files Connect supports Active Directory. When Macintosh users connect to the Files Connect server, they enter their user names and passwords. Files Connect authenticates this account against the primary domain of the Windows machine that it is running on. If this machine is not a member of a domain, the account must be a member of the local accounts that appear in Windows User Manager. If the machine is a member of a domain, then the user name you give the Macintosh user must be either a member of the primary domain, the local accounts, or a trusted domain.
You may specify to be authenticated against a specific domain by prefixing the user name with the domain name and a backslash (\). For example, to authenticate the user name Joe from the Marketing domain, in the user name portion of your AFP client logon enter MARKETING\joe. Files Connect clients on Mac OS 9 see a server name in their Chooser only if the AppleTalk protocol is installed on the Windows server and the client’s connection to the server supports AppleTalk.
Note: Macintosh OS 9 users can connect to a server, even if they cannot see the server name in the Chooser, by clicking AppleShare and then Server IP Address in the Chooser and entering the server IP address or DNS name.
In this section Reconnecting a Dropped User Session .................................................. 124
7.3.1.1 Reconnecting a Dropped User Session
Files Connect supports reconnecting user sessions in the event of a temporary network outage. In addition, it supports automatic closing of locked files after a Macintosh client crash or reboot.
In this section Reconnecting If a Session is Dropped .................................................... 124 Reconnecting with Kerberos .................................................................. 125
Reconnecting If a Session is Dropped
When Mac OS X clients connect to Files Connect, they receive an encrypted reconnect credential. In the event that the connection to the server is broken, Files Connect keeps the session alive by putting it into Waiting For Reconnect mode. While in this mode, all files and volumes opened by the session remain open. When the client machine reestablishes contact with the server, the client
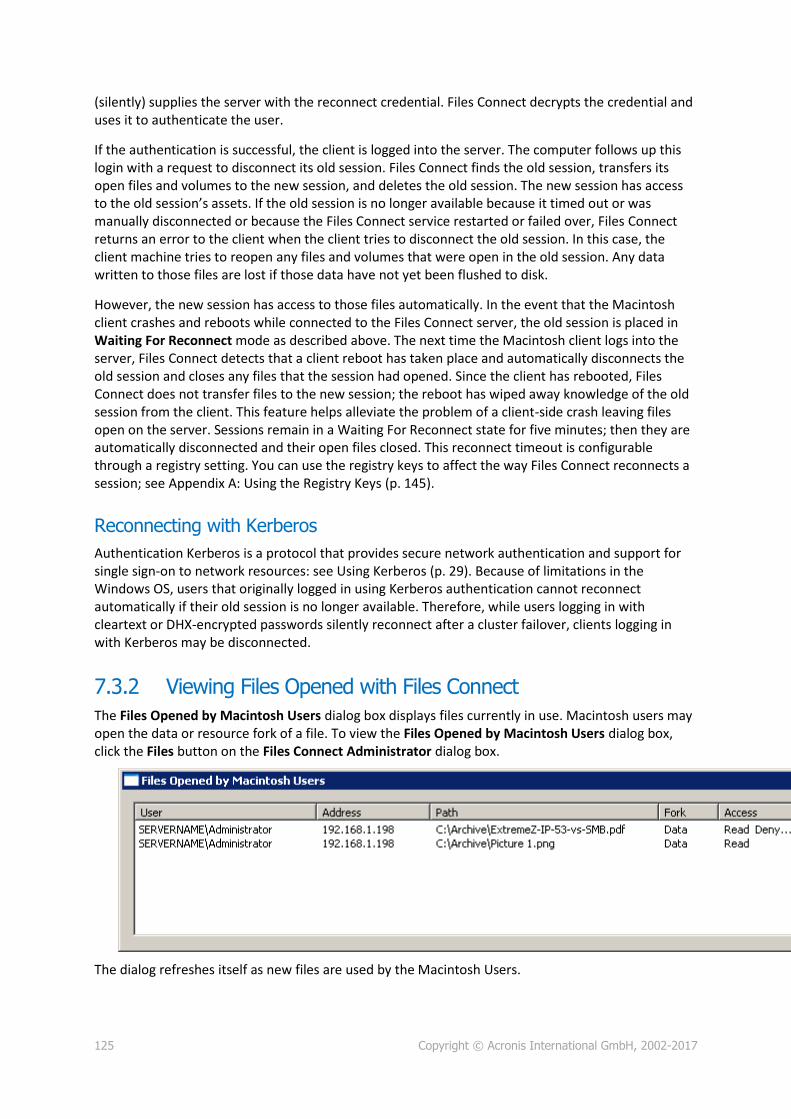
125 Copyright © Acronis International GmbH, 2002-2017
(silently) supplies the server with the reconnect credential. Files Connect decrypts the credential and uses it to authenticate the user.
If the authentication is successful, the client is logged into the server. The computer follows up this login with a request to disconnect its old session. Files Connect finds the old session, transfers its open files and volumes to the new session, and deletes the old session. The new session has access to the old session’s assets. If the old session is no longer available because it timed out or was manually disconnected or because the Files Connect service restarted or failed over, Files Connect returns an error to the client when the client tries to disconnect the old session. In this case, the client machine tries to reopen any files and volumes that were open in the old session. Any data written to those files are lost if those data have not yet been flushed to disk.
However, the new session has access to those files automatically. In the event that the Macintosh client crashes and reboots while connected to the Files Connect server, the old session is placed in Waiting For Reconnect mode as described above. The next time the Macintosh client logs into the server, Files Connect detects that a client reboot has taken place and automatically disconnects the old session and closes any files that the session had opened. Since the client has rebooted, Files Connect does not transfer files to the new session; the reboot has wiped away knowledge of the old session from the client. This feature helps alleviate the problem of a client-side crash leaving files open on the server. Sessions remain in a Waiting For Reconnect state for five minutes; then they are automatically disconnected and their open files closed. This reconnect timeout is configurable through a registry setting. You can use the registry keys to affect the way Files Connect reconnects a session; see Appendix A: Using the Registry Keys (p. 145).
Reconnecting with Kerberos
Authentication Kerberos is a protocol that provides secure network authentication and support for single sign-on to network resources: see Using Kerberos (p. 29). Because of limitations in the Windows OS, users that originally logged in using Kerberos authentication cannot reconnect automatically if their old session is no longer available. Therefore, while users logging in with cleartext or DHX-encrypted passwords silently reconnect after a cluster failover, clients logging in with Kerberos may be disconnected.
7.3.2 Viewing Files Opened with Files Connect
The Files Opened by Macintosh Users dialog box displays files currently in use. Macintosh users may open the data or resource fork of a file. To view the Files Opened by Macintosh Users dialog box, click the Files button on the Files Connect Administrator dialog box.
The dialog refreshes itself as new files are used by the Macintosh Users.
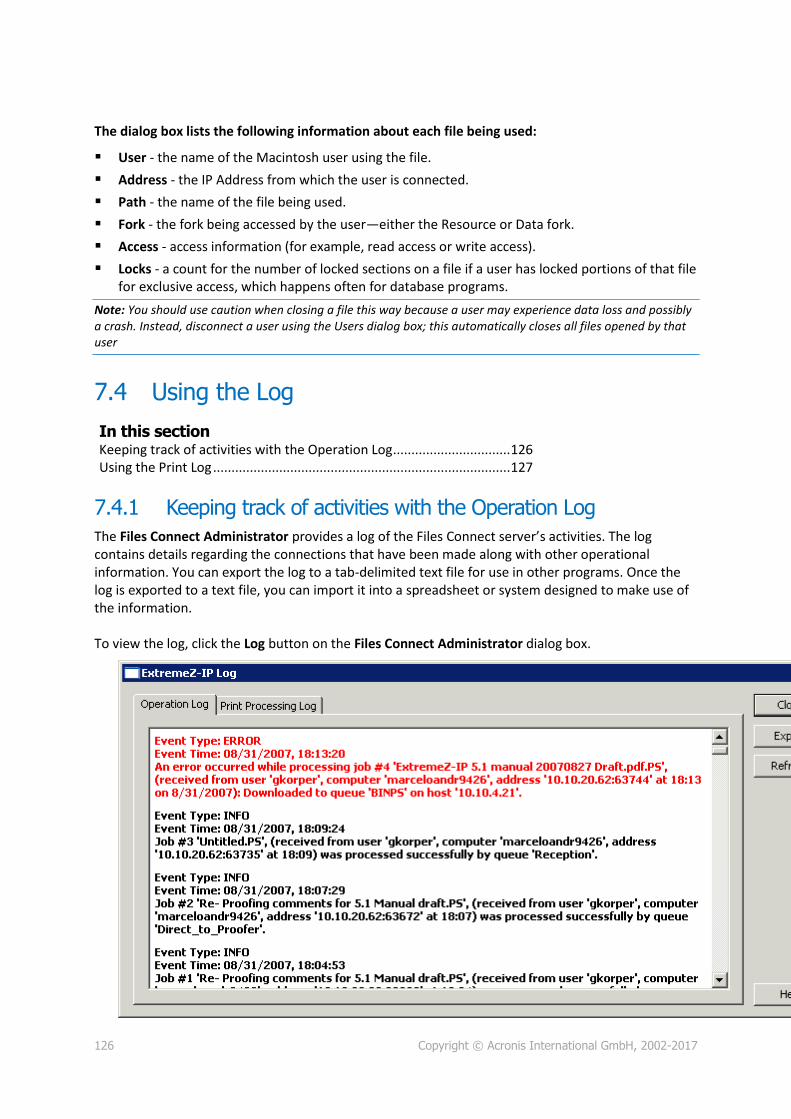
126 Copyright © Acronis International GmbH, 2002-2017
The dialog box lists the following information about each file being used:
User - the name of the Macintosh user using the file.
Address - the IP Address from which the user is connected.
Path - the name of the file being used.
Fork - the fork being accessed by the user—either the Resource or Data fork.
Access - access information (for example, read access or write access).
Locks - a count for the number of locked sections on a file if a user has locked portions of that file for exclusive access, which happens often for database programs.
Note: You should use caution when closing a file this way because a user may experience data loss and possibly a crash. Instead, disconnect a user using the Users dialog box; this automatically closes all files opened by that user
7.4 Using the Log
In this section Keeping track of activities with the Operation Log ................................ 126 Using the Print Log ................................................................................. 127
7.4.1 Keeping track of activities with the Operation Log
The Files Connect Administrator provides a log of the Files Connect server’s activities. The log contains details regarding the connections that have been made along with other operational information. You can export the log to a tab-delimited text file for use in other programs. Once the log is exported to a text file, you can import it into a spreadsheet or system designed to make use of the information. To view the log, click the Log button on the Files Connect Administrator dialog box.

127 Copyright © Acronis International GmbH, 2002-2017
You can view the type of entry, the time the entry was made, and the message about the entry.
In this section Exporting the Operation Log .................................................................. 127
7.4.1.1 Exporting the Operation Log
You can export the Log to save it in a text format in two ways:
To export the log within Files Connect, do the following:
1. From the Files Connect Log window, click Export to save the log as text.
2. Type a name and format.
3. Click Save to return to the log.
To export the log from the command line, do the following:
1. Navigate in a DOS prompt to the folder where Files Connect is installed.
2. Type EZIPUTIL PRINT /EXPORT_LOG /PATH:fullpathoflog where fullpathoflog specifies the location and name of the log file that should be exported, such as C:\Logs\file.txt. See the included sample batch file Export_Print_Log.bat that came with Files Connect.
7.4.2 Using the Print Log
You can view a log of Files Connect activities. The log tells you what jobs have been printed and other information.
To view the log, do the following:
1. Click Log on the Files Connect Administrators dialog box.

128 Copyright © Acronis International GmbH, 2002-2017
2. Click the Print Processing Log tab to display it. The Print Processing Log contains standard printing information. You can sort the log by any column by clicking on the column title. To toggle the sort between ascending and descending, click the column title a second time.
Using the registry keys, you can add each new print log entry to a specified text file automatically. See Appendix A: Using the Registry Keys” here (p. 145).
In this section Customizing Files Connect Print Processing Log Columns ..................... 128 Exporting the Print Log from Files Connect ........................................... 128
7.4.2.1 Customizing Files Connect Print Processing Log Columns
You can override the default configuration and customize your view of the Print Processing Log by using registry keys to display columns in any order. When you print the log, only those columns displayed in the log are printed. Change the registry keys to display and print different columns. See Appendix A: Using the Registry Keys here (p. 145) for instructions.
Note: Data for all columns are always stored; when you display different columns, the saved data are filtered.
If you use Print Accounting you can require Macintosh users to fill out code fields before printing. These are displayed in the Print Processing Log. See the following section for information about Print Accounting.
7.4.2.2 Exporting the Print Log from Files Connect
You can export either log in a tab-delimited text file for use in other programs. Once the log is exported to a text file, you can import it to a spreadsheet or system designed to make use of the information.

129 Copyright © Acronis International GmbH, 2002-2017
To export the log using the Export button, do the following:
1. Access the Files Connect Log dialog in the Files Connect Administrator.
2. To export a log, display its tab—Print Processing or Operation—and click Export.
3. Click Save to save the log. If you export the printing jobs, the file is named Files Connect Print Jobs.txt.
4. Click Close to return to the Files Connect Administrator.
To export either log using the command line, do the following:
1. Navigate in a command prompt to the folder where Files Connect is installed.
2. Type EZIPUTIL PRINT /EXPORT_LOG /PATH:fullpathoflog where “fullpathoflog” specifies the location and name of the log file that should be exported, such as C:\Logs\PrintAccounting.txt. See the included sample batch file Export_Print_Log.bat that came with Files Connect.
7.5 Remapping Extensions Macintosh programs use a document’s type and creator to launch particular applications from the Finder® automatically. Windows users normally do not have access to the Macintosh-specific type and creator information. With Files Connect, you can automatically map MS-DOS extensions to particular type/creator combinations. For example, you can map Adobe® Acrobat documents that have a PDF extension, to the Macintosh type “PDF” and creator “CARO.” Files Connect installs a number of default mappings for certain document types; you can change these at any time. You can create a new type and creator to assign to a document. You can also edit and delete types and creators.
In this section Associating a Type and Creator .............................................................. 129 Creating a New Type and Creator .......................................................... 130
7.5.1 Associating a Type and Creator
You can associate MS-DOS file extensions with Macintosh types and creators, create new types and creators, and edit or delete types and creators. For example, you may want to associate PDF files with Illustrator rather than Acrobat.
To associate files with a type and creator or to create new types and creators, do the following:
1. From the Files Connect Administrator, click Settings.

130 Copyright © Acronis International GmbH, 2002-2017
2. Click Types and Creators...
3. From the Files with MS-DOS Extension drop list at the top of the Macintosh Type/Creator to
Extension Mappings dialog box, select a new extension.
4. From the list of types and creators, select the entry you want to remap.
5. Click Associate. The extension is associated with the selected type and creator.
7.5.2 Creating a New Type and Creator
To create a new Type and Creator:
1. Click Add on the Macintosh Type/Creator to Extension Mappings dialog box.

131 Copyright © Acronis International GmbH, 2002-2017
2. Fill out the dialog box to meet your specifications.
3. Click OK to return to the Macintosh Type/Creator to Extension Mappings dialog box. The new type and creator is now listed in the database.
7.6 Using the Files Connect Print Server The Files Connect Print Server supports IP-based printing from Macintosh computers. Macintosh clients can print without using AppleTalk. Mac OS X clients set up printers using Zidget, Bonjour, or the Print Center. Mac OS 9 clients set up printers using the Chooser or Choose IP Printer, an Apple menu item.
In addition to these printing capabilities, your Mac OS X clients can access shared volumes as described in the Files Connect File Server chapter. Print Accounting, installed with the Files Connect Print Server, provides additional print support; you can capture, validate and track cost-accounting information with each print job as the user prints it.
In this section How the Print Server Works .................................................................. 131 Setting up Print Queues ......................................................................... 131 Setting Up Processing Methods ............................................................. 133 Controlling the Processing of Jobs ......................................................... 137 Publishing A Print Queue ....................................................................... 138
7.6.1 How the Print Server Works
After receiving a print job from a Macintosh, Files Connect uses one of several processing methods to process it. These methods include Windows print queues, AppleTalk printers, LPR printers, and “hot folders”—special output directories where additional software, such as a RIP or OPI server, can process the job. In addition, you can view the print jobs in progress, speed or delay processing of jobs, and delete jobs from the list. Macintosh clients can use IP or Appletalk to print to the Files Connect Print Server.
The Files Connect Print Server logs many aspects of the print jobs that your users send to the server—job name, name of the user that sent the job, time and date of printing, page size, number of pages, size of job in bytes, address of the computer that printed the job, and the name of the print queue used. You can export this log automatically to a text file that can be imported into an accounting or other cost-tracking system.
Print Accounting captures and tracks additional information of your choosing and requires that the Macintosh client enter one or more billing codes that you set up before printing to a queue. The accounting information is added to the log of the print job and can be imported into standard accounting and cost-tracking systems. See Using Print Accounting (p. 139) for additional information on using Print Accounting. For information on viewing or retrieving the log, see the article on Keeping track of activities with the log (p. 126).
7.6.2 Setting up Print Queues
A print queue is a virtual printer that Macintosh users can access. When Macintosh users print files to one of your printers, the resulting print job is delivered to your server and can be tracked and processed there. Read the section on creating print queues, then read the specific section on the following paragraphs to configure specific settings for the four types of print queues: Windows, LPR, Directory (Hot Folder), and AppleTalk.

132 Copyright © Acronis International GmbH, 2002-2017
In this section Creating A Print Queue .......................................................................... 132
7.6.2.1 Creating A Print Queue
To create a print queue, do the following:
1. On the Files Connect Administrator dialog box, click Print Queues.
Note: Click on a column title to sort the list of print queues.
2. Click Create to define a print queue. When a queue is suspended, jobs are accepted by the server.
However, they are not sent to the printer until processing is resumed. Create print queues. Open a window with a list of the pending jobs. From there you can start, stop, or reorder the print jobs. Takes the existing Windows print queues and republishes them as Files Connect queues as well.
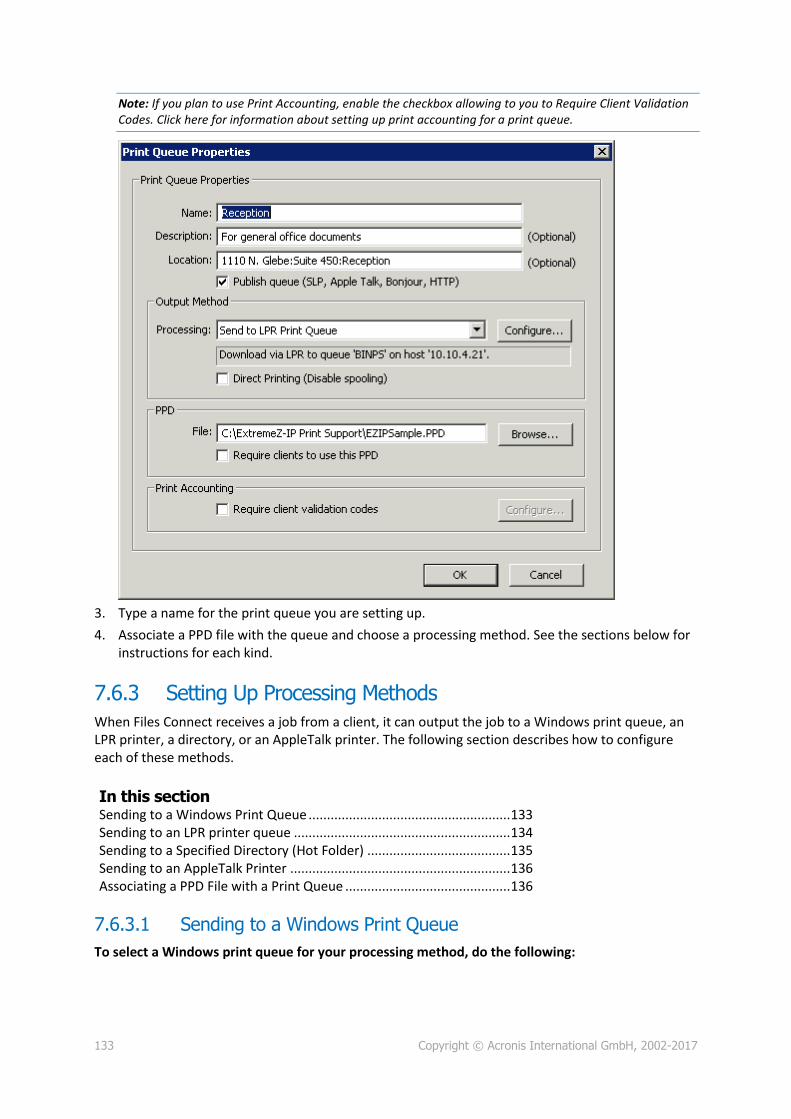
133 Copyright © Acronis International GmbH, 2002-2017
Note: If you plan to use Print Accounting, enable the checkbox allowing to you to Require Client Validation Codes. Click here for information about setting up print accounting for a print queue.
3. Type a name for the print queue you are setting up.
4. Associate a PPD file with the queue and choose a processing method. See the sections below for instructions for each kind.
7.6.3 Setting Up Processing Methods
When Files Connect receives a job from a client, it can output the job to a Windows print queue, an LPR printer, a directory, or an AppleTalk printer. The following section describes how to configure each of these methods.
In this section Sending to a Windows Print Queue ....................................................... 133 Sending to an LPR printer queue ........................................................... 134 Sending to a Specified Directory (Hot Folder) ....................................... 135 Sending to an AppleTalk Printer ............................................................ 136 Associating a PPD File with a Print Queue ............................................. 136
7.6.3.1 Sending to a Windows Print Queue
To select a Windows print queue for your processing method, do the following:

134 Copyright © Acronis International GmbH, 2002-2017
1. Select Send to Windows Print Queue on the Processing pull down menu of the Print Queue Properties dialog box.
You see a list of Windows printers that you have already shared for Windows clients on the server. The PPD to be used by clients when printing to this queue. The name that you will see when you print from a Macintosh. Where Files Connect will send the jobs after they are received. Require the Macintosh client to supply job-tracking information every time they print to this queue (refer to the Files Connect manual for additional configuration). Whether the print queue should be discoverable by clients.
2. Select a printer. If this list is empty, you must create a Windows printer from the Windows Print Wizard and set it to be shared.
7.6.3.2 Sending to an LPR printer queue
To select an LPR printer for your processing method, do the following:
1. In the Processing pull down menu of the Print Queue Properties dialog box, select Send to LPR Print Queue.

135 Copyright © Acronis International GmbH, 2002-2017
2. Type a name for the print queue you are setting up. Queue names must be unique; you cannot have two queues with the same name. See the section Controlling printing with an LPR printer for information about controlling the LPR print queue.
7.6.3.3 Sending to a Specified Directory (Hot Folder)
You can create a print queue that sends files to a specified directory or hot folder. You can choose a local folder or one from the network. For network locations you use a UNC path.
Note: If you select a network location, the Computer account for the server in Active Directory must be given access to the network location on the remote server. Giving a computer account access to a folder is performed the same way as giving a User account access to a folder.
To use a specified directory as your processing method, perform the following:

136 Copyright © Acronis International GmbH, 2002-2017
1. Select Send to Specified Directory in the Processing pull down menu of the Print Queue Properties dialog box.
2. Use the Browse for Folder dialog to locate and select the directory.
3. Click OK.
7.6.3.4 Sending to an AppleTalk Printer
To use an AppleTalk Printer as your processing method, do the following:
1. In the Processing pull down menu of the Print Queue Properties dialog box, select Send to AppleTalk Printer.
2. Type the Zone in which the printer is located or an asterisk (*) if you do not have zones on your
AppleTalk network.
3. Enter the name of the Printer. You can click Browse to search for the printer on your network.
7.6.3.5 Associating a PPD File with a Print Queue
You may associate a PostScript Printer Description (PPD) with each queue. PPDs are used on the Macintosh when creating printers. If you provide a PPD file for the print queue, Macintosh clients can
137 Copyright © Acronis International GmbH, 2002-2017
download and configure the printer for use on their desktops without having a PPD already installed on their machines.
The Files Connect server includes an option that automatically downloads the specified PPD to Macintosh users when they create printers. You should obtain and use PPD files that were created on a Macintosh, since they include additional information such as special icons to deliver the user experience that Macintosh users expect. Specifying a PPD when you set up a queue makes it available for download, but its presence on the server does not affect printing.
To associate a PPD file with a print queue, enter the path to the PPD file in the PPD section of the Print Queue Properties dialog box or use the Browse button to locate the correct PPD
Note: These files must be on a disk accessible by the server.
7.6.4 Controlling the Processing of Jobs
You can control the processing of jobs that Macintosh users send to the Files Connect server. On the Print Queues dialog, you can do the following:
view the status of each job in the queue in the Status column.
suspend processing of all jobs in a print queue and a particular job in a print queue.
resume processing when you want.
control which jobs are processed first.
delete jobs.
To access the Print Queues dialog, click Print Queues on the Files Connect Administrator window. This dialog lists the print queues available to Macintosh clients.
In this section Viewing and Managing Print Jobs .......................................................... 137
7.6.4.1 Viewing and Managing Print Jobs
You can view and manage jobs being processed in the Print Queue Jobs dialog box for one or more print queues at the same time.
To view a list of the jobs being processed in a print queue, do the following:
1. Highlight a print queue in the Print Queue dialog box.
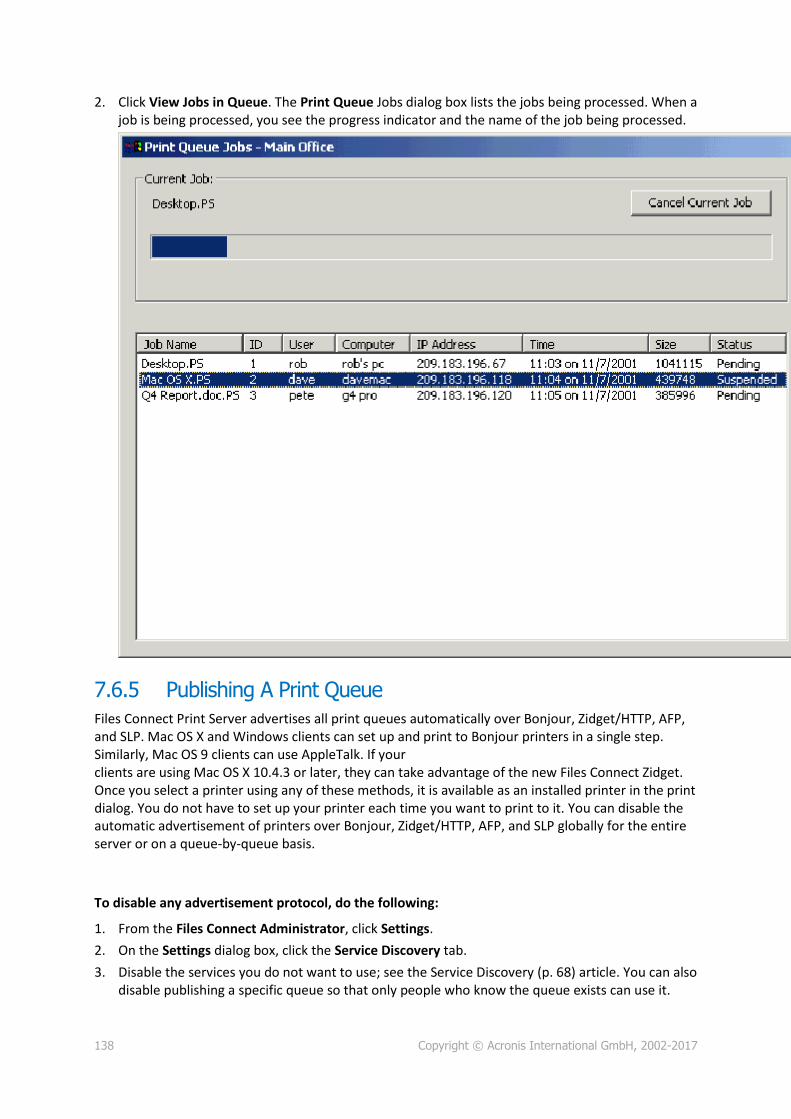
138 Copyright © Acronis International GmbH, 2002-2017
2. Click View Jobs in Queue. The Print Queue Jobs dialog box lists the jobs being processed. When a job is being processed, you see the progress indicator and the name of the job being processed.
7.6.5 Publishing A Print Queue
Files Connect Print Server advertises all print queues automatically over Bonjour, Zidget/HTTP, AFP, and SLP. Mac OS X and Windows clients can set up and print to Bonjour printers in a single step. Similarly, Mac OS 9 clients can use AppleTalk. If your clients are using Mac OS X 10.4.3 or later, they can take advantage of the new Files Connect Zidget. Once you select a printer using any of these methods, it is available as an installed printer in the print dialog. You do not have to set up your printer each time you want to print to it. You can disable the automatic advertisement of printers over Bonjour, Zidget/HTTP, AFP, and SLP globally for the entire server or on a queue-by-queue basis.
To disable any advertisement protocol, do the following:
1. From the Files Connect Administrator, click Settings.
2. On the Settings dialog box, click the Service Discovery tab.
3. Disable the services you do not want to use; see the Service Discovery (p. 68) article. You can also disable publishing a specific queue so that only people who know the queue exists can use it.

139 Copyright © Acronis International GmbH, 2002-2017
7.7 Using Print Accounting Print Accounting allows you to validate, capture, and track cost-accounting information with each print job as the user prints it. Information obtained through Print Accounting is logged with other information in the Print Processing Log. You can use the print accounting information for these and other tasks:
allocating proofing costs between clients and jobs.
tracking use of shared printing resources and assigning costs correctly to departments and jobs.
tracking the use of printers between employees, students, or projects.
ensuring that only authorized users can print to certain printers.
You can configure print queues to require that Macintosh users enter accounting codes before printers will accept jobs from them. You decide how many accounting codes are required for each print queue, the names of the codes, and whether the codes are optional or required. When codes are required, Macintosh users cannot print a job until codes are entered. You may allow clients to browse a list of valid accounting codes or pick from the most recently used codes on their computer.
Each print accounting code is associated with a text file that contains valid codes and descriptions—for example, an employee number/name ( 2312, Jane Smith), or project number/name ( Q98331A, Mockup for Acme Corp Annual Report). When clients print to a queue, they are prompted to enter the print accounting codes based on the configuration on the server. Validation is performed against this text file when the client prints, so you can update these codes and descriptions on the server without having to reconfigure the client.
In this section Setting up Print Accounting ................................................................... 139
7.7.1 Setting up Print Accounting
Print Accounting supports Macintosh clients using OS X 10.2.8 or later. You must modify a PPD for use with Mac OS X before using print accounting. See Modifying a PPD for use with Print Accounting (p. 141) for directions for modifying a PPD. Print Accounting is supported through TCP/IP or AppleTalk on Mac OS X. It is not available when printing from applications running in Classic mode under Mac OS X.
Files Connect also supports an option called Direct Printing with which you can route Print Accounting through the Files Connect server, while Macintoshes send jobs directly to a printer that supports the LPR/CUPS™ (Common UNIX Printing System) printing architecture.
In this section Creating a List of Codes for Customers .................................................. 139 Setting up a Print Queue to Provide Print Accounting Information ...... 140 Modifying a PPD for use with Print Accounting ..................................... 141
7.7.1.1 Creating a List of Codes for Customers
To use Print Accounting, you must first create text files containing the codes and descriptions for each code. If the codes already exist in another system, such as an accounting system, you can export them as tab delimited files and make any adjustments necessary to conform to the Files Connect format. For each print queue for which you want to use print accounting, create a separate file for

140 Copyright © Acronis International GmbH, 2002-2017
each code field that includes the code and its description, separated by a tab, in a word processor or text editor. If you use a word processing program, you must save the file as a text file.
For example, enter the information in the following way for employee identification:
123 <tab> Sue <return>
124 <tab> Jim
Note: If you change the code text files, Files Connect does not reload them automatically. To reload the codes after making changes, restart the Files Connect service or use the command line argument EZIPUTIL.EXE PRINT /REFRESH_CODES
7.7.1.2 Setting up a Print Queue to Provide Print Accounting Information
Once you define your codes and code descriptions, assign them to print queues as you set up print queues or modify them. You set up validation codes for each print queue; every Macintosh client using that print queue will have the same fields.
To set up a print queue to provide Print Accounting information, do the following:
1. In the Files Connect Administrator, click Print Queues.
2. Select an existing print queue and click Modify or click Create to create a new print queue.
3. Check the Require client validation codes checkbox.

141 Copyright © Acronis International GmbH, 2002-2017
4. To add the first code, click Configure. You can change the name of the code to anything you would like. This name appears next to the field on the Macintosh print dialog box.
5. If you want to require the Macintosh user to fill in the code before printing instead of it being
optional, check the checkbox Requires Validation. Use fields that do not require validation for information such as comments.
6. If you want the Macintosh user to be able to browse the code list, place a check in the Allow User to Browse Codes checkbox.
7. Click Browse to locate the text file that contains the codes you set up earlier.
8. Click OK to save the entered code or click Add to add additional code fields.
9. Provide the PPD for each Macintosh by placing it on the Files Connect server and configuring the print queue to require it.
7.7.1.3 Modifying a PPD for use with Print Accounting
On Mac OS X, the PPD selected for each print queue must be modified to include additional information, including the IP address of the server. Macintosh PPDs are normally in the folder /Library/Printers/PPDs/Contents/Resources. A sample PPD called Files ConnectSample.PPD is included with the software.
To modify a PPD for use with Print Accounting, follow these steps:
1. Find the PPD you want to modify.
2. Default PPDs are compressed in the gzip format. Expand one by double-clicking it.
3. Open the uncompressed PPD in a text editor.
4. Copy the following lines to the PPD from the Files Connect sample PPD:

142 Copyright © Acronis International GmbH, 2002-2017
*%****************************************************************************** *% Files Connect Print Accounting CUPS Filter *%****************************************************************************** *cupsFilter: “application/vnd.cups-postscript 0 Files Connect_filter” *Files Connect_Print_Accounting_IP: “192.168.1.5” *Files Connect_Print_Accounting_Queue_Name: “My Queue Name” *%****************************************************************************** *% Files Connect Print registering UI element for plugin invocation *%****************************************************************************** *OpenUI *Files ConnectValidationRequired/ValidationRequired: Boolean *DefaultFiles ConnectValidationRequired: False *Files ConnectValidationRequired True/Required: “” *Files ConnectValidationRequired False/Not Required: “” *?Files Connect_Validation_Required: “query code” *CloseUI: *Files ConnectValidationRequired
Note: If the PPD you are modifying already has a CUPS filter it may conflict with the Files Connect filter.
5. Modify the line Files Connect_Print_Accounting_IP to be the TCP/IP address of the Files Connect server.
6. Modify the line Files Connect_Print_Accounting_Queue_Name to be the name of the queue as it is specified in the Files Connect Administrator.
7. Modify the NickName of the PPD. There should be a line that starts *NickName:
8. This name will appear when selected during creation of a desktop printer. If you don’t modify the NickName and, instead, leave the original compressed PPD installed, you will not be able to select the modified one.
9. Save the PPD from the text editor with a .ppd extension. The standard TextEdit application asks you if you want to append a .txt extension. Click Don’t Append a .txt and do not re-compress the PPD.

143 Copyright © Acronis International GmbH, 2002-2017
8 Backup & Disaster Recovery Warning: The steps described below work only if you're using the same version. You cannot use this method to backup & recover from different versions.
e.g.: If you backup 8.0.4 and install 8.0.4 again, you can use the recovery, but if you install 8.0.5 you won't be able to use this method.
Backup and Recovery for a single server
Backup
To backup your current Files Connect setup, you must do the following:
1. Open the registry editor (Open a command prompt and type regedit).
2. Navigate to: HKEY_LOCAL_MACHINE\SYSTEM\CurrentControlSet\Services\ExtremeZ-IP\
3. Right click on the ExtremeZ-IP folder and press Export.
4. Save the registry backup some place safe (other machine, flash drive, etc.) in case the server fails.
5. Backup all shared folders (copy them on another machine, etc.).
6. If you have a license key, write it down. You can find the key in the Licensing tab of the Files Connect user interface or in the registry at:
For a 64bit OS: HKEY_LOCAL_MACHINE\SOFTWARE\Wow6432Node\Group Logic, Inc.\ExtremeZ-IP\7.0\ For a 32bit OS: HKEY_LOCAL_MACHINE\SOFTWARE\Group Logic, Inc.\ExtremeZ-IP\ 7.0\
To backup your current Files Connect clustered setup, you must do the following:
1. Open the registry editor (Open a command prompt and type regedit).
2. Navigate to: HKEY_LOCAL_MACHINE\SYSTEM\CurrentControlSet\Services\<instance>
Note: <instance> should be replaced by the name of your clustered Files Connect instance on the current server.
3. Right click on the <instance> folder and press Export.
4. Save the registry backup some place safe (other machine, flash drive, etc.) in case the server fails.
5. Backup all shared folders (copy them on another machine, etc.).
6. If you have a license key, write it down. You can find the key in the Licensing tab of the Files Connect user interface or in the registry at:
For a 64bit OS: HKEY_LOCAL_MACHINE\SOFTWARE\Wow6432Node\Group Logic, Inc.\ExtremeZ-IP\7.0\ For a 32bit OS: HKEY_LOCAL_MACHINE\SOFTWARE\Group Logic, Inc.\ExtremeZ-IP\ 7.0\
Recovery
To recover your settings:
1. Import the registry backup(s) to the registry.

144 Copyright © Acronis International GmbH, 2002-2017
2. Paste the folders you previously had shared (or create them again, but they should be in the same place with the same permissions).
3. Install a fresh copy of Files Connect (the same version you had before).
4. Input your license key.

145 Copyright © Acronis International GmbH, 2002-2017
9 Appendices
In this section Appendix A: Using the Registry Keys ..................................................... 145 Appendix B: Monitoring Files Connect................................................... 147
9.1 Appendix A: Using the Registry Keys You can use Windows registry keys to change some settings in Files Connect beyond what can be configured using the Files Connect Administrator.
The registry settings for the Files Connect service are located in the \HKLM\System\CurrentControlSet\Services\ExtremeZ-IP\ section of the registry. In the examples below this will be abbreviated as ...\RegistryKeyName. There are two main kinds of registry keys; refreshable and nonrefreshable. Refreshable keys take effect when you click the Refresh Registry button in the Files Connect Administrator. Nonrefreshable keys on the other hand will not take effect until the service is restarted.
9.1.1 Reconnecting a dropped session
Files Connect supports reconnecting user sessions in the event of a network outage, server crash, or cluster failover. In addition, it supports automatically closing locked files after a Macintosh client crash or reboot.
You can use the following registry keys to affect the way Files Connect reconnects after a session is disconnected: ...\Parameters4\Refreshable\
ServerSupportsReconnectUAM
ReconnectTimeout
ServerSupportsAFP3Reconnect
ReconnectServerKeyLifetime
ServerEmbedsPasswordInReconnectCredential
MaxDuplicateSessionsWaiting
ReconnectUAMExpirationInterval
9.1.2 Sending password expiration notifications during session
In addition to notifying Macintosh client users that their password is expiring at initial login, Files Connect can also be configured to notify users during their session. Notification during a session requires that notification at initial login is enabled. To do this, select the Notify Mac clients of password expiration option on the Security tab of the Settings dialog in the Files Connect Administrator. Here, you will also specify the number of days from expiration that the notification should begin. Next, you will edit the registry key named PasswordExpirationReminderInterval in: ...\Parameters4\Refreshable\

146 Copyright © Acronis International GmbH, 2002-2017
The value of this registry key determines the interval at which the client is notified of the upcoming password expiration in minutes.The interval can be configured from 1 minute to 1440 minutes (1 day).
9.1.3 Scheduling re-indexing with EZIPUTIL
By default, Files Connect automatically re-indexes file entries for its indexed search. But you can use EZIPUTIL in a batch file or script to schedule re-indexing on a set schedule during off-hours and trigger it with a scheduling service of your choice.
1. First, disable automatic re-indexing by removing the check in the Automatically rebuild sparse indexes checkbox found in the Search Settings dialog box (see section about “Settings”).
2. EZIPUTIL.exe is located in the chosen Files Connect program installation directory on the server. Use the following command, which is included in the EZIPUTIL utility, to trigger the re-indexing of a volume manually.
You can also use it in a script or batch file to schedule re-indexing during off-hours:
EZIPUTIL VOLUME /REINDEX /NAME:volumename /PATH:root directory path [/SERVICENAME:servicename]
SERVICENAME is needed only if Files Connect is running on a cluster.
9.1.4 Adding print log entries to text files
To configure the Files Connect server to add each new print log entry to a specified text file automatically, do the following. ..\Parameters4\PrintRefreshable
1. Modify the PrintAccountingLogFilePath in the registry.
2. Set the value to the full path where you want the logs (e.g., C:\Logs\Log.txt)
9.1.5 Customizing Files Connect Print Processing Log columns
You can use registry keys to override the default configuration and customize your view of the Print Processing Log to display various columns in any order. The two formats are IP Printing for regular Files Connect print support and Print Accounting for print accounting use. Both formats are configured in the same manner, but Print Accounting has more options and some special considerations. See ## for instructions on using the Print Processing Log.
9.1.6 Columns
A REG_SZ string entry in the registry controls custom configuration. The format for the string is to add types of data separated by a forward slash ‘/’. The format respects the order and number of types in the string value.
For example, if you wanted to restrict your view to job_name, job_dateandtime, and job_printer only, you would enter ‘job_name/job_dateandtime/job_printer’ as your string value.
job_id - a unique ID generated by Files Connect for this print job
job_name - name of the file being printed
job_user - name of user generating the print job
job_ip - IP address of computer that submitted the print job

147 Copyright © Acronis International GmbH, 2002-2017
job_datetime - month/day/year and time of day job was submitted
job_size - size of the file being printed
job_pagecount - number of pages in the print job
job_pagesize - the type of paper the job is being printed on
job_numcopies - number of copies in this print job
job_queue - name of the print queue that is processing the print job
job_printer - name of the printer processing the print job
job_date - month/day/year of submitted print job
job_time - time of day job was submitted
job_imagesize - dimensions in pixels of submitted print job
job_code1 Print Accounting information submitted with print job
job_code2 Print Accounting information submitted with print job
job_code3 Print Accounting information submitted with print job
job_code4 Print Accounting information submitted with print job
job_code5 Print Accounting information submitted with print job
By default, Files Connect has a specific column order. If no registry key is present, that order will be used. The following examples illustrate keys that would set up the default columns. They can be used as a starting point for customization. ..\Parameters4 \PrintRefreshable Registry Path: PrintAccountingLogFormat Type: REG_SZ Data(by default): job_name/job_user/job_host/job_ip/job_date/job_time/job_size/job_pagecount/job_pagesize/job_imagesize/ job_numcopies/job_queue/job_printer/job_code1/job_code2/job_code3/job_code4/job_code5
9.2 Appendix B: Monitoring Files Connect Files Connect allows administrators and Acronis’ support staff to “look inside” Files Connect to watch the load on the server, detect problems with shares and print queues, and diagnose performance bottlenecks. Files Connect supports counters for Windows Performance Monitor, Microsoft Operations Manager (MOM), and other instrumentation platforms that support Windows Management Interface (WMI), Microsoft’s generic interface for monitoring applications in production. WMI-aware applications alert administrators to errors and help diagnose problems. Most of the counters provided in Files Connect are global for the Files Connect instance or the server. For some of the users and volume counters, however, an administrator can choose to view a single instance. For example, “instance” could be the number of bytes per second for an individual user. Files Connect performance counters are compatible with both 32-bit and 64-bit versions of Windows 2003 Server, Windows Server 2008, Windows Server 2012. Windows XP, and Windows Vista and Windows 7.
9.2.1 Counters for Files Connect File Server Users (Total) - The number of currently-connected users, including users that are idle or sleeping

148 Copyright © Acronis International GmbH, 2002-2017
Users (Idle) - The number of currently-connected users that have been idle for at least 10 minutes
Users (Sleeping) - The number of currently-connected users that are sleeping
Users (Active) - The number of currently-connected users that are active (neither idle or sleeping)
Users (Waiting For Reconnect) - The number of sessions representing connections that have been terminated but are waiting for users to reconnect
AFPCommands Replied To - The number of AFP commands replied to
AFP Commands Replied To/sec - The number of AFP commands replied to per second
Volumes (Total) - The number of Files Connect volumes
Volumes (Offline) - The number of Files Connect volumes that are currently offline
Volumes (Online) - The number of Files Connect volumes that are currently online
User Disconnects - The number of times users have disconnected from the server in an ungraceful manner
Failed Logons - The number of times users have failed to login because of an invalid password, username or Kerberos ticket
Reconnects - The number of times users have reconnected to the server
Max Files Open - The maximum number of file forks that have been open at any one time
Max File Locks - The maximum number of files locks that have been in place at any one time
Max Users (Active) - The maximum number of users that have been active at any one time
Max Users (Idle) - The maximum number of users that have been idle at any one time
Max Users (Sleeping) - The maximum number of users that have been sleeping at any one time
Max Users (Total) - The maximum number of users logged-in at any one time
Max Users (Waiting For Reconnect) - The maximum number of sessions waiting for users to reconnect at any one time
Thread Pool Size - The total number of threads that are in the thread pool
Thread Pool (Working) - The number of threads in the thread pool that were actively working at the time of sampling
Thread Pool (Quiet) - The number of threads in the thread pool that have not done any work in over a minute
Thread Pool (Stalled) - The number of threads in the thread pool that have been processing a task for more than one minute
Max Thread Pool Size - The maximum number of threads in the thread pool at any one time
Max Thread Pool (Working) - The maximum number of threads in the thread pool that were actively working during any sample
User Licenses Used - The current number of user licenses being used
9.2.2 Counters for Files Connect File Server Users Open Forks - Number of open forks
File Locks - Number of file locks
Bytes Received/sec - Number of bytes read from the network per second
Bytes Transmitted/sec - Number of bytes sent on the network per second
Note: Users’ counters can be viewed as an individual user or as a total of all activity.

149 Copyright © Acronis International GmbH, 2002-2017
9.2.3 Counters for Files Connect File Server Volumes Cache Hit Rate - The node table cache hit rate
Bytes Read/sec - Number of bytes read from disk per second and returned to clients
Bytes Written/sec - Number of bytes written from disk per second
Note: Volume counters can be viewed per volume or as a total.
9.2.4 Counters for Files Connect Printing Print Queues - The number of print queues
Print Queues Online - The number of print queues currently online
Print Queues Offline - The number of print queues currently offline
Jobs Spooling - Current number of print jobs spooling
Bytes Printed/sec - The number of bytes printed per second
9.2.5 Counters for Files Connect Print Queues Print Jobs Offline - The number of print jobs currently offline
Job Errors - The number of print errors since Files Connect launch
Total Jobs Printed - The total number of jobs printed since Files Connect launch
Total Pages Printed - The total number of pages printed since Files Connect launch
Is Queue Online - Indication if the queue is online - 1 if yes, 0 if no
Note: Print Queue counters can be viewed per queue or as a total for all queues.

150 Copyright © Acronis International GmbH, 2002-2017
10 Supplemental Material
In this section TCP/IP Ports ........................................................................................... 150 Files Connect Support Tools ................................................................... 150 Files Connect Compatibility Information ............................................... 153 Windows Registry Keys .......................................................................... 154 Files Connect Streams ............................................................................ 189
10.1 TCP/IP Ports
Files Connect uses the following TCP/IP ports
TCP port 311 (default) - TCP/IP Port for Time Machine.
TCP Port 548 (default) - TCP/IP Port for AFP Connections.
TCP Port 8081 (default) - TCP/IP Port for Print Configuration.
TCP Port 8081 (default) – HTTP TCP/IP Port for client web services.
TCP Port 8085 (default) – HTTPS TCP/IP Port for client web services.
TCP Port 515 (default) - TCP/IP Port for Print Jobs.
TCP & UDP Port 427* - SLP Lookups.
TCP & UDP Port 427* - SLP Lookups (large data return).
TCP & UDP Port 5353* - Bonjour.
TCP & UDP Port 5353* - Bonjour (large data return).
*Both port types must be added.
Note: If you choose to not add the SLP and/or Bonjour ports, you should disable those features inside of Files Connect.
Additional AFP port notes
If another AFP server is already running on port 548 when Files Connect is installed, Files Connect will use the next available port, which will usually be 549. A Mac client computer will, by default, connect to AFP volumes on port 548.
It is possible to connect to a shared volume on another port by specifying the port as part of the server address. For example, you can connect to an AFP server running on port 549 by specifying "fileserver.example.com:549" in the Mac OS X "Connect to Server..." dialog.
When Files Connect is running on a port other than 548, a warning notice will be displayed in the main Files Connect Administrator window.
10.2 Files Connect Support Tools
Disclaimer: These tools are unsupported and for testing purposes only.
In this section Mac Support Applications and Tools ..................................................... 151
151 Copyright © Acronis International GmbH, 2002-2017
Mac Performance Testing Applications ................................................. 151 Windows Support Tools and Scripts ...................................................... 152 Windows Applications............................................................................ 152
10.2.1 Mac Support Applications and Tools
GetMore Info -- Enhanced "Get Info" Utility -- Download
This application obtains information about a file or folder. The information gathered is significantly greater than that provided by the Finder's "Get Info" command and can also be used to set information.
10.2.2 Mac Performance Testing Applications
Helios LanTest -- File Transfer Testing -- Webpage
Helios LanTest is an application that can be used to test AFP Server performance. It is most useful when comparing one server to another but can also be used for troubleshooting I/O problems.
Free For All -- File Transfer Testing -- Download
This application tests creating, deleting, and moving small files quickly.
Mount Volume -- Client Logon and Volume Mount Testing -- Download
This application mounts and unmounts a designated volume. Can also gather related performance data.
Play Catch -- File Transfer Testing -- Download
This application tests reading and writing file data and transferring files between selected folders.
Enumeration Performance -- Folder Enumeration Testing -- Download
This application gathers performance information on enumerating through a folder hierarchy.
Performance Test -- File Transfer Testing -- Download
This application gathers performance information for file transfers.
Search Performance -- Network Volume Search Testing -- Download
This application gathers performance information on catalog searches. Only tests "name contains" searches.

152 Copyright © Acronis International GmbH, 2002-2017
Exchange File -- AFP Exchange File Operation Testing -- Download
This application performs the AFP Exchange File operation, an operation used often by Macintosh applications.
File Utility -- File Transfer Testing -- Download
This application creates or deletes a large number of files and/or folders.
Lock File -- File Byte Range Locking Testing -- Download
This application performs byte range locking on a selected file.
10.2.3 Windows Support Tools and Scripts
Files Connect Debug Logging Registry Config Files -- Download
These files allow you to enable and disable various Files Connect debug logging options.
Streams -- Webpage
Alternate Data Streams are used by Files Connect to save Macintosh specific information on the NTFS file system. The Windows SysInternals Streams command line application can be used to view and manipulate these streams.
10.2.4 Windows Applications
Microsoft Network Monitor 3.1 OneClick -- Webpage
Microsoft Network Monitor is an application for capturing network traffic on the server. The OneClick version is a standalone application that does not require a complicated installation process or knowledge of network protocols. Microsoft designed this application to be used by their own support teams to assist with end user packet captures. The OneClick_ExtractOnly.exe includes the full installer for both the 64-bit and 32-bit versions Microsoft's Netmon if you want to perform more targeted packet captures using capture filters. The most common capture filters used for troubleshooting Files Connect are TCP.Port == 548 and/or IPv4.Address == x.x.x.x.
Robocopy (Windows Resource Kit) -- Webpage
Robocopy is a command line program that is capable of copying files including their security information and their Alternate Data Streams (which are used by Files Connect to store the resource fork and Macintosh metadata). Robocopy can is often used to do direct migrations of Macintosh data from one Windows server to another without having to use a Macintosh in the middle to perform the copy.

153 Copyright © Acronis International GmbH, 2002-2017
TextPad and Wintail -- TextPad Webpage -- Wintail Webpage
TextPad and Wintail are shareware applications that are good at dealing with large text files such as the Files Connect debug log. Baretail is particularly good for monitoring log files as they are being written to.
Process Monitor -- Webpage
As Microsoft says in the link, "Process Monitor is an advanced monitoring tool for Windows that shows real-time file system, Registry and process/thread activity. It combines the features of two legacy Sysinternals utilities, Filemon and Regmon, and adds an extensive list of enhancements including rich and non-destructive filtering, comprehensive event properties such session IDs and user names, reliable process information, full thread stacks with integrated symbol support for each operation, simultaneous logging to a file, and much more. Its uniquely powerful features will make Process Monitor a core utility in your system troubleshooting and malware hunting toolkit.
Process Explorer -- Webpage
As Microsoft says in the link above, "Ever wondered which program has a particular file or directory open? Now you can find out. Process Explorer shows you information about which handles and DLLs processes have opened or loaded.
The Process Explorer display consists of two sub-windows. The top window always shows a list of the currently active processes, including the names of their owning accounts, whereas the information displayed in the bottom window depends on the mode that Process Explorer is in: if it is in handle mode you'll see the handles that the process selected in the top window has opened; if Process Explorer is in DLL mode you'll see the DLLs and memory-mapped files that the process has loaded. Process Explorer also has a powerful search capability that will quickly show you which processes have particular handles opened or DLLs loaded."
10.3 Files Connect Compatibility Information
AppleTalk and Services for Macintosh Compatibility Information
On Windows 2003, you can easily install AppleTalk without installing SFM (Windows XP and Windows Vista do not come with support for AppleTalk). Please see the Files Connect Manual for more information.
Windows Server 2008 no longer includes AppleTalk or SFM.
If you have the AppleTalk protocol installed, then Files Connect will appear in the Chooser for Mac OS 9 users. Files Connect will log errors which occur trying to register on the AppleTalk network in the Windows Event log. If your server does not appear in the Chooser, look for an error in the Event Viewer "Application" section on the server.

154 Copyright © Acronis International GmbH, 2002-2017
Support for Microsoft Networking Domains
Files Connect supports Microsoft Active Directory. When you connect to an Files Connect server from the Macintosh, you normally enter your user name and password. Files Connect will authenticate this account against the primary domain of the Windows machine that it is running on. If this machine is not a member of a domain, then the account must be a member of the local accounts that appear in User Manager. If the machine is a member of a domain, then the user name you supply can be either a member of the primary domain, the local accounts or a trusted domain.
You may specify to be authenticated against a specific domain by prefixing the user name with the domain name and a backslash ('\'). For example, to authenticate using the account "rob" from the "MARKETING" domain, you would enter "MARKETING\rob" in the user name portion of your AFP client logon.
Files Connect uses the same technique for accessing owners and groups for folders in the sharing information using the Finder.
Be advised that older Macintosh clients prior to Mac OS 9.2 have only limited support for passwords longer than 8 characters.
Known Issues
Folders shared from Windows XP or 2003 will not have guest access enabled unless the "Network access: Let Everyone permissions apply to anonymous users" Local Security Setting is enabled. See http://support.microsoft.com/kb/278259 for more information about enabling this setting.
Start-up may take as long as a minute if Kerberos support is enabled within Files Connect but the server cannot access the active directory service or takes a long time to do so. If Kerberos is not needed, you can avoid the delay by disabling the checkbox Allow Kerberos Logins on the Security Settings dialog of Files Connect.
10.4 Windows Registry Keys Certain advanced features and debug options can be configured through the Windows Registry. We recommend that this configuration only be performed by advanced users.
Note: Unless otherwise specified, all of the following registry keys are of type DWORD.
Most of the following parameters are on/off: a value of 1 enables the particular features, while a value of 0 disables them. If the registry key does not already exist, create a new DWORD key and set it to the appropriate value.
Certain keys are "refreshable" -- that is, their state can be changed while the Files Connect service is running. The ones indicated as Refreshable take effect when the Refresh Registry button is clicked on the Settings dialog of the Files Connect Administrator. Keys that are not refreshable require that the Files Connect service be restarted before they take effect.
The keys are organized into the following sections:

155 Copyright © Acronis International GmbH, 2002-2017
In this section General Parameter Registry Keys -- Non-Refreshable ........................... 155 General Parameter Registry Keys -- Refreshable ................................... 163 Debug Logging Registry Keys -- Refreshable .......................................... 176 Debug Logging Registry Keys -- Non-Refreshable .................................. 178 Print Parameter Registry Keys -- Refreshable ........................................ 179 Print Parameter Registry Keys -- Non-Refreshable ................................ 181 Filename Policy Registry Keys -- Refreshable......................................... 181 HTTP Discovery Registry Keys -- Refreshable ......................................... 184 Spotlight Registry Keys -- Refreshable ................................................... 186 HSM Registry Keys -- Refreshable .......................................................... 188 VSS Registry Keys -- Refreshable ............................................................ 189
10.4.1 General Parameter Registry Keys -- Non-Refreshable
The following keys control certain features or behaviors of Files Connect. The keys in this section are not refreshable, meaning that changes do not take effect until the Files Connect service is restarted.
These keys should be added in the following registry location:
\HKEY_LOCAL_MACHINE\System\CurrentControlSet\Services\ExtremeZ-IP\Parameters4\NonRefreshable
ActiveDirectoryComputers
Description: When configuring Files Connect to support Kerberos constrained delegation for network reshare volumes, if the computer object for the server that is running Files Connect is not located in the default “Computers” container in Active Directory, it is necessary to edit this registry key so that Files Connect can construct the correct distinguished name for the server's computer object.
The Files Connect service can identify the server common name (CN) and the domain component (DC) segments of the distinguished name, so the ActiveDirectoryComputers registry key is where the custom organizational unit (OU) segments of the distinguished name can be entered.
e.g. If the canonical name of the Files Connect server’s computer object is: yourdomain.com/Marketing/3rdFloor/importantComputer
The distinguished name would be: CN=importantComputer,OU=3rdFloor,OU=Marketing,DC=yourdomain,DC=com
Since Files Connect can identify the CN=importantComputer and DC=yourdomain,DC=com segments, only the OU=3rdFloor and OU=Marketing segments would need to be added.
In this example, it would be necessary to set the value of the ActiveDirectoryComputers registry key to 'OU=3rdFloor,OU=Marketing’ (without the quotes) in order for the Files Connect service to work with the importantComputer computer object.
Default:
Type: string
Refreshable: No
156 Copyright © Acronis International GmbH, 2002-2017
AllowNonIndexedSearches
Description: Specifies whether or not the server allows searches that do not contain "name" as one of the criteria. These searches can be very slow and can cause the server to use a great deal of CPU while the search is occurring. Turning this key off will cause the server to reject search requests that don't include "name" as one of the criteria, and the server will send appopriate warning messages to the user attempting to perform these types of searches.
Default: On
Refreshable: No
CheckNtfsLastAccessUpdate
Description: Whether or not the server checks the status of the NtfsDisableLastAccessUpdate Windows registry setting when the server starts up. If this key is enabled and NtfsDisableLastAccessUpdate is off, Files Connect will log a warning to the Windows Event Log.
Default: On
Refreshable: No
ClientDisconnectTime
Description: Specifies the number of seconds the server will wait for an unresponsive client to disconnect before ungracefully terminating the connection.
Default: 30
Refreshable: No
ClientDisconnectAtShutdownTime
Description: Specifies the number of seconds the server will wait for an unresponsive client to disconnect at server shutdown before ungracefully terminating the connection. Note: this value must be greater than ClientDisconnectTime.
Default: 35
Refreshable: No
CreateCrashDumps
Description: Whether or not the server attempts to create crash dump files in the application directory if a service crash is detected.
Default: On
Refreshable: No
CreatePrecomposedMacRoman
Description: Controls whether Files Connect converts OS X MacRoman filenames into precomposed Unicode on the server. Enabling this feature will allow MacRoman files to be
157 Copyright © Acronis International GmbH, 2002-2017
displayed normally in Windows Explorer, and will allow for compatibility with third party applications such as Adobe Acrobat Distiller.
Default: Off
Refreshable: No
DebugLogFolder
Description: File Server will write the Files Connect Log to this folder.
Refreshable: No
DisconnectStalledSession
Description: Whether or not stalled sessions will be automatically disconnected.
Default: Yes
Refreshable: No
EntryExpirationTime
Description: The amount of time, in seconds, Files Connect will cache file system information on filesystems that do not fully support change notifications.
Default: 15
Refreshable: No
GlobalSearchIndexPath
Description: Specifies a global path where all the Catalog Search indexes will be located.
Default: '<installationPath>\ExtremeZ-IP Indexes\'. It will be empty on a Cluster.
Type: string
Refreshable: No
GlobalDtSearchIndexPath
Description:
Default: '<installationPath>\ExtremeZ-IP dtSearch Indexes\'. It will be empty on a Cluster.
Type: string
Refreshable: No
SupportAFP3
Description: Enables support for AFP 3.1 (disabling this feature forces Files Connect to support AFP 2.2 only). AFP 3.1 features include support for filenames over 32 characters, file sizes over 2GB, and Unicode strings.
Default: On
Refreshable: No

158 Copyright © Acronis International GmbH, 2002-2017
SupportAFP32
Description: Enables support for AFP 3.2 (disabling this feature forces Files Connect to support AFP 3.1 if the SupportAFP3 key is enabled). AFP 3.2 features include support for Access Control Lists (ACLs) and extended attributes.
Default: On
Refreshable: No
IPAddress
Description: Specifies a subset of one or more available IPv4 addresses for use by Files Connect. If this key does not exist, Files Connect will function on all active server IPv4 addresses. This key is of type REG_MULTI_SZ (multi string) and must be added using "regedt32.exe". The value of the key should be a list of IPv4 addresses separated by linefeeds (e.g. "192.168.1.101"). This setting is honored on clustered servers running Files Connect 5.2.2 or later, but is ignored on clustered servers running earlier versions of Files Connect.
Default: Does not exist
Refreshable: No
IPv6Address
Description: Specifies a subset of one or more available IPv6 addresses for use by Files Connect. If this key does not exist, Files Connect will function on all active server IPv6 addresses. This key is of type REG_MULTI_SZ (multi string) and must be added using "regedt32.exe". The value of the key should be a list of IPv6 addresses separated by linefeeds (e.g. "2001:1::6045:1ff7:ed9c:91b2"). This setting is ignored on clustered servers.
Default: Does not exist
Refreshable: No
IPv6Enabled
Description: Enables support for IPv6 connection for both AFP & LPR when IPv6 stack is installed on the server.
Default: On
Refreshable: No
IPv6Strict
Description: Controls protection level on IPv6 connection. The valid values are 10 (unrestricted), 20 (default), and 30 (strict). If the value is set to 30 (strict), only same site local IPv6 address can be connected. If the value is set to 20 (default), both same site local & external IPv6 addresses can be connected. If set to 10 (unrestricted), any IPv6 addresses can be connected including Teredo NAT Traversal address.
Default: 20
Refreshable: No
159 Copyright © Acronis International GmbH, 2002-2017
LogMemorySettingsNotOptimized
Description: Controls whether Files Connect logs messages "Memory settings for this server are not optimized correctly".
Default: On
Refreshable: No
MaxSearchIndexSize
Description: Maximum amount of RAM available for indexed search caching in Megabytes. For maximum search performance, assuming available system RAM, this is best set to be equal to or greater than total size of all search index files on the server. An index file containing 1 million files should be about 32 MB in size. Note that this setting is a maximum RAM cap. If your server only contains 20 MB of index files, Files Connect search will only use 20 MB of RAM, even if this is left at the default 200 MB setting.
Default: 200
Refreshable: No
MaxOutstandingTickles
Description: The maximum number of tickles the client can fail to respond to before the server terminates the connection.
Default: 5
Refreshable: No
MaxUnflushedIDs
Description: The number of unflushed ID/index pairs that can be saved in memory before a flush is forced.
Default: 60
Refreshable: No
PerformanceCounters
Description: The Windows performance counters that are outputted to the log each time Files Connect logs performance data. This multi-string can contain multiple lines, where each line is <description>,<counter path>. The keyword "Backup & Recovery Online" can be specified in the counter path - this will be replaced by whatever the service name is. Note that the values entered into this setting replace the default counters.
Default:
"ZIP CPU Usage", "\Process(Backup & Recovery Online)\% Processor Time"
"Handles", "\Process(Backup & Recovery Online)\Handle Count"
"Threads", "\Process(Backup & Recovery Online)\Thread Count"
"Pool Paged Bytes", "\Memory\Pool Paged Bytes"
160 Copyright © Acronis International GmbH, 2002-2017
"Pool Nonpaged Bytes", "\Memory\Pool Nonpaged Bytes"
"Page Faults/sec", "\Process(Backup & Recovery Online)\Page Faults/sec"
Refreshable: No
RespondsToTickles
Description: Whether or not the server responds to a tickle from the client with another tickle.
Default: Off
Refreshable: No
RenameLogAtStartup
Description: Files Connect Debug Log will be renamed (saved off) at every service startup.
Default: 1
Refreshable: No
SupportAFP33
Description: Enables support for AFP 3.3 (disabling this feature forces Files Connect to support AFP 3.2 if the SupportAFP32 key is enabled).
Default: On
Refreshable: No
SupportFileIDs
Description: When enabled, the File Server will support file ID operations.
Default: On
Refreshable: No
SupportNetworkReshares
Description: When enabled, the File Server will allow resharing of remote servers and shares.
Default: Off
Refreshable: No
ServerUsesDefaultTypeCreator
Description: Prior to Files Connect 4.0.3, files with no type and creator information were given a default type/creator of text/dosa. In version 4.0.3, this default behavior was changed so that files with unknown type and creator received a blank type and creator. This change was made for performance reasons - this allows for greater performance when copying many small files, particularly over Gigabit. However, some customers may rely on the previous default behavior, where unknown files would appear as text. For these customers, the ServerUsesDefaultTypeCreator registry key should be enabled.

161 Copyright © Acronis International GmbH, 2002-2017
Default: Off
Refreshable: No
ServerRevertsToSystemForAFPInfo
Description: Fixes a rare problem where the default mechanism for accessing finder info is extremely slow on particular systems. The problem would manifest itself as extremely poor performance - on the order of minutes to simply display the root of the mounted volume. Please contact GroupLogic Support before enabling this key.
Default: Off
Refreshable: No
StartFileServerAtStartup
Description: Whether or not the Files Connect file server should be brought online at service start.
Default: On
Refreshable: No
StartPrintServerAtStartup
Description: Whether or not the Files Connect print server should be brought online at service start.
Default: On, unless Files Connect was upgraded from a previous version of Files Connect that did not a print server license
Refreshable: No
SupportUNIXPermissions
Description: Whether or not the server supports UNIX permissions.
Default: Off
Refreshable: No
StartupDelaySeconds
Description: If this key is set, Files Connect will wait the specified number of seconds after its Windows service starts before actually starting the Files Connect file and print services. This can be used in cases where Files Connect is dependent on network or storage resources that take longer than normal to become available when a server is started.
Default: 0
Refreshable: No
ServerLogsPerformanceStats
Description: Specifies whether or not the server loads the performance data helper DLL at startup and uses that DLL to output performance statistics to the log. Disabling this feature

162 Copyright © Acronis International GmbH, 2002-2017
(which is enabled by default) can address rare issues where Files Connect hangs at startup when trying to load the PDH.dll.
Default: On
Refreshable: No
TickleTime
Description: Specifies how often, in seconds, the server will send a "tickle" packet to the client to keep the client connection alive. This packet will only be sent if there has been no other traffic on the socket on that time.
Default: 30
Refreshable: No
ThreadPoolDefaultStackSize
Description: The default stack size of threads in the thread pool, in bytes. A value of 0 indicates that threads created in the thread pool should use the default process stack size (usually 1MB).
Default: 0
Refreshable: No
ThreadPoolInitialNumberThreads
Description: The number of threads initially assigned to the thread pool.
Default: 50
Refreshable: No
ThreadPoolMaxNumberThreads
Description: The maximum number of threads that can be placed into the thread pool.
Default: 500
Refreshable: No
TCP_SO_RCVBUF
Description: Size of socket receive buffer
Default: 65536
Refreshable: No
TCP_SO_SNDBUF
Description: Size of socket send buffer
Default: 46720
Refreshable: No

163 Copyright © Acronis International GmbH, 2002-2017
ThreadStackSize
Description: The size of a fragment of the process address space that will be reserved to accommodate the stack frame for each newly created thread, in kilobytes. This feature is only available on Windows XP and Windows Server 2003; valid values for this parameter are 256 to 1024.
Default: 1024
Refreshable: No
UseMacStylePermissions
Description: Enables Mac style permissions.
Default: Off
Refreshable: No
UseSearchIndexing
Description: Enables / disables search indexing globally.
Default: On
Refreshable: No
UseLazyIndexing
Description: Specifies the use of "Lazy" search indexing which will cause indexing to take longer under moderate to high server load but will have less of an impact on other server processes.
Default: Off
Refreshable: No
UseAutoReindexing
Description: Specifies whether sparse search indexes will be automatically rebuilt after they become 1/3rd stale entries.
Default: On
Refreshable: No
10.4.2 General Parameter Registry Keys -- Refreshable
The following keys control certain features or behaviors of Files Connect. The keys in this section are refreshable and take effect when the Refresh Registry button is clicked on the Settings dialog of the Files Connect Administrator or when the service is started.
These keys should be added in the following registry location:
\HKEY_LOCAL_MACHINE\System\CurrentControlSet\Services\ExtremeZ-IP\Parameters4\Refreshable

164 Copyright © Acronis International GmbH, 2002-2017
AccessRightsExpirationInterval
Description: How long, in minutes, Files Connect will cache user access rights before reloading the access rights from disk. Access rights must be periodically reloaded if group membership changes are to be noticed.
Default: 5
Refreshable: Yes
AdjustModificationDates
Description: When this Registry key is set to '1', for any file where the modified date is older than the created date, Files Connect will change the modified date presented to the Mac client to be equal to the created date. The actual modified date on disk will not be changed as a result of enabling this key. Enabling this feature may have a significant impact on workflows and is not recommended without extensive testing.
Default: 0
Refreshable: Yes
AllowPartialHexFooMatch
Description: Whether Files Connect does partial matching of OS-9 style ("hex foo") filenames. This can be disabled to restore pre-6.0.3 functionality, but doing so could cause failures is certain Mac applications.
Default: On
Refreshable: Yes
CopyFileExBypassCacheThreshold
Description: Files larger than this size will bypass the system cache when copied server-side.
Default: 2000 [MB]
Refreshable: Yes
DefaultDomainName
Description: DefaultDomainName allows for the specification of one or more default domains. At login, Files Connect will attempt to log the user into the specified domains in the order they appear in the list.
Default: Off (blank string)
Type: Multi-string
Refreshable: Yes
DFSSyncInterval
Description: [DFS capable servers only.] How often, in seconds, the DFS namespace will be reenumerated. If this is 0 then the lowest value for TimeToLive will be used.

165 Copyright © Acronis International GmbH, 2002-2017
Default: 0
Refreshable: Yes
DFSUpServerRecheckInterval
Description: [DFS capable servers only.] How often, in seconds, Files Connect will check to see if a server marked as down is back online. It takes a long time for the check to timeout if the server is still down, so this should generally be larger than DFSDownServerRecheckInterval (below).
Default: 300
Refreshable: Yes
DFSDownServerRecheckInterval
Description: [DFS capable servers only.] How often, in seconds, Files Connect will check to see if a server marked as up is has gone offline. Since an up server responds immediately, this can be done frequently as compared to DFSUpServerRecheckInterval (above).
Default: 60
Refreshable: Yes
DefaultGlobalUmask
Description: UNIX permissions bits that should be removed from any client requests to modify UNIX permissions. For example, if the client attempts to set UNIX permissions to 777 and DefaultGlobalUmask is 022, UNIX permissions will be set to 755.
Default: 0
Refreshable: Yes
DefaultGlobalPermissions
Description: UNIX permissions bits that should be added from any client requests to modify UNIX permissions. For example, if the client attempts to set UNIX permissions to 700 and DefaultGlobalUmask is 022, UNIX permissions will be set to 722.
Default: 0
Refreshable: Yes
DFSUseAdminNamespaceName
Description: Whether the Files Connect DFS code uses the namespace name as entered (if enabled), or as it appears in the DFS enumeration (if disabled).
Default: Off
Refreshable: Yes

166 Copyright © Acronis International GmbH, 2002-2017
DisplaySerialInUI
Description: Whether or not the Files Connect Administrator (local or remote) will display the serial number in the About Box and Licensing dialog.
Default: On
Refreshable: Yes
EnumerationPerformanceOnLocalVolume
Description: Enables Enumeration Performance on local volumes. Set to 1 to enable.
Default: Off
Refreshable: Yes
EventLogOnWrap
Description: EventLogOnWrap determines whether a message will be written to the event log every time the change journal wraps.
Default: On
Refreshable: Yes
FullCrashDump
Description: When set to 'On' Files Connect will generate larger crash dumps containing more detailed debugging information. These will typically be 100 to 200 MB in size, instead of the 2 to 12 MB in size when this setting is set to 'Off'.
Default: Off
Refreshable: Yes
ForcedPasswordChangePeriod
Description: The period, in days, before a user's password expires that Files Connect forces the user to change their password. This can be used to help ensure that users change their passwords before expiration.
Default: 0
Refreshable: Yes
IgnoreExchangeFileSecuritySwap
Description: Whether or not the server ignores code to swap Access Control Lists (ACLs) during an ExchangeFile operation. This setting is only honored when UNIX permission support is disabled. When enabled, the file server will emulate the (incorrect) behavior in Files Connect 5.1.3 and earlier.
Default: Off
Refreshable: Yes
167 Copyright © Acronis International GmbH, 2002-2017
IgnoreOffspringCount
Description: When set to 'On', Files Connect will not count the number of items in any folder during an enumeration. This could potentially speed up enumeration performance, but might effect some third party applications. It is recommended you consult with GroupLogic Support before enabling this setting.
Default: Off
Refreshable: Yes
IdleTimeoutOpenForks
Description: If idle users are timed out (see above), this controls the amount of time Files Connect will wait before disconnecting an idle user with open forks. These users could potentially lose data. Setting this to 0 will prevent idle users with open forks from being timed out. This value is specified in minutes.
Default: 1440 [24 hours]
Refreshable: Yes
IdleTimeoutNoOpenForks
Description: If idle users are timed out (see above), this controls the amount of time Files Connect will wait before disconnecting an idle user with no open forks. Setting this to 0 will prevent idle users with no open forks from being timed out. This value is specified in minutes.
Default: 360 [6 hours]
Refreshable: Yes
KeepOwnerSetByWindows
Description: Whether or not Files Connect will keep the owner of files as set by Windows. If disabled, Files Connect will set the owner to the user that create the file. This can differ from the owner assigned by Windows, as files created by members of the Administrators group are assigned an owner of "Administrators" by Windows.
Default: Off
Refreshable: Yes
LoginMsgW
Description: The logon message sent to users immediately after login. This setting is normally edited through the Files Connect Administrator, but this setting can be edited directly in order to support longer logon messages. The Administrator restricts logon messages to 199 characters for compatability for OS 9, but by editing this registry value directly, the message length can be increased to 1024 characters. Note that while Files Connect supports logon messages up to 1024 characters, current versions of Macintosh OS X will fail to display messages longer than 500 characters.
Default: Blank
Refreshable: Yes

168 Copyright © Acronis International GmbH, 2002-2017
MaxNodeTableSize
Description: Size of the node table cache (in MB). The cache contains a list of information about files that are being shared. Setting a different cache size allows you to adjust the tradeoff between performance and memory usage. Files Connect retains information in RAM for the most recently accessed files, up to the limit specified. If a Mac user requests a file that is not in the node table cache, Files Connect goes to disk to retrieve the information and stores it in the node table. If the maximum cache size has been reached, Files Connect discards the oldest entry in the node table. You can specify the maximum size in the Cache Size text box of the File Server Setttings dialog. The maximum allowed size is 500MB. It is possible to set a higher size via a registry key, but doing so may cause severe problems. contact GroupLogic Support if you are interested in experimenting with sizes greater than 500MB.
Default: 20
Refreshable: Yes
MaxDuplicateSessionsWaiting
Description: The maximum number of sessions that can be waiting for reconnect from a single IP address with a single username.
Default: 5
Refreshable: Yes
MappingFlushFrequency
Description: How often, in seconds, Files Connect flushes new ID/index pairs to disk. Decreasing this setting will reduce performance, but can ensure that newly created file IDs get committed to disk in the event of a server crash.
Default: 600 [10 minutes]
Refreshable: Yes
MigrateHiddenSMBShares
Description: If disabled, the file server will not migrate hidden SMB shares.
Default: 0
Refreshable: Yes
MaxIORequestsPerSession
Description: The maximum number of simultaneous outstanding I/O requests for an individual session.
Default: 250
Refreshable: Yes

169 Copyright © Acronis International GmbH, 2002-2017
MaxEnumerationListSize
Description: The maximum amount of memory, in MB, Files Connect will devote to caching enumeration information.
Default: 32
Refreshable: Yes
MaxIdPathMapSize
Description: The maximum size, in megabytes, of the ID/path map. This in-memory data structure is only used in environments where at least one Files Connect volume is on a non-NTFS filesystem.
Default: 800
Refreshable: Yes
PasswordExpirationReminderInterval
Description: How often, in minutes, to send connected users a message indicating that there password is about to expire. The "SendPasswordExpirationWarnings" setting must be enabled for this feature to take effect.
Default: 0
Refreshable: Yes
PruningInterval
Description: PruningInterval specifies the frequency that Files Connect will walk its list of Macintosh file IDs and remove obsolete records.
Default: 10080 [one week]
Refreshable: Yes
PasswordExpirationWarningThreshold
Description: Number of days prior to expiration to begin warning (value should be between 1 and 366). This can also be configured in the Files Connect Administrator.
Default: 14 Days
Refreshable: Yes
ReplayCacheSize
Description: Size of the replay cache (number of cached reply requests).
Default: 32
Refreshable: Yes

170 Copyright © Acronis International GmbH, 2002-2017
RetryOpeningReparsePoints
Description: Whether or not Files Connect should retry opening reparse points when encounting a reparse error.
Default: Yes
Refreshable: Yes
ReconnectServerKeyLifetime
Description: Number of minutes that the reconnect server key is valid before a new key is automatically generated.
Default: 2 weeks (20160 minutes)
Refreshable: Yes
ReconnectUAMExpirationInterval
Description: Number of seconds that reconnect credentials are valid before they expire.
Default: 2 days (172800 seconds)
Refreshable: Yes
ReconnectTimeout
Description: Number of minutes session waiting for reconnect will wait before disconnecting.
Default: 5 minutes
Refreshable: Yes
ReindexOnWrap
Description: ReindexOnWrap determines whether volumes will be automatically reindexed when the change journal wraps.
Default: On
Refreshable: Yes
ServerSupportsReconnectUAM
Description: If the server supports the Reconnect UAM.
Default: On
Refreshable: Yes
SetEOFOnResize
Description: SetEOFOnResize governs whether end of file for files being written to the server is updated as the file is in the act of being written.
171 Copyright © Acronis International GmbH, 2002-2017
Default: Off
Refreshable: Yes
SendPasswordExpirationWarnings
Description: Enables password expiration notifications. This can also be configured in the Files Connect Administrator.
Default: Off
Refreshable: Yes
ServerEmbedsPasswordInReconnectCredential
Description: If the server embeds the user's password inside its reconnect credential. Doing this allows users to reconnect even after the server has been rebooted because all authentication data exists inside the credential. However, enabling this feature does mean that all users passwords are encrypted with the same server key.
Default: On
Refreshable: Yes
SleepTimeout
Description: Amount of time (in minutes) before timing out sleeping sessions.
Default: 1440
Refreshable: Yes
ServerTruncatesOS9Comments
Description: Truncates OS 9-style comments to 127 bytes, rather than the default of 199 bytes. Enabling this key fixes a bug in Photoshop CS2, which crashes when encoutering comments that are larger than 127 characters. Even though Photoshop CS2 is an OS X application, it makes a request for OS 9 comments. This problem is known to occur in Mac OS 10.4.6.
Default: Off
Refreshable: Yes
ServerIgnoresReadOnlyFolders
Description: If enabled, the server will not display any folders as locked, even if they are marked "read-only" in Windows. The read-only attribute on Windows does not truly map to the Macintosh locked attribute, since read-only directories on Windows can be renamed, deleted and have files added and removed from it. Folders are marked read-only on Windows if they have a customized view, such as a custom icon. Starting with OS 10.4.6, folders over the network can appear as locked. Enabling this setting will also cause the server to ignore requests to change the locked status of the folder.
Default: On
Refreshable: Yes

172 Copyright © Acronis International GmbH, 2002-2017
ServerDisconnectsGhostedUsers
Description: Whether or not the server will disconnect ghosted users when clients log in. A ghosted user is defined as a user that had logged in from the logging-in user's machine with the same user/domain name as the logging-in user. This feature can ensure that clients that are waiting for reconnect get disconnected before the reconnect timeout in the event that the clients do not reconnect.
Default: 1
Refreshable: Yes
ServerMigratesDotUnderscoreFiles
Description: Whether or not Files Connect will migrate SMB dot underscore (._) files to resource fork and finder information streams.
Default: Yes
Refreshable: Yes
ServerDeletesMigratedDotUnderscoreFiles
Description: Whether or not Files Connect will delete SMB dot underscore (._) files after migrating to resource fork and finder information streams.
Default: No
Refreshable: Yes
ServerNotificationTime
Description: How often, in seconds, the server will send clients notifications that the volumes they have open have changed. Set 0 to disable server notifications.
Default: 10
Refreshable: Yes
ServerResetsPermissionsOnMove
Description: Whether or not Files Connect will reset permissions on folders after a move so that the folder inherits from its new parent folder.
Default: No
Refreshable: Yes
ServerRemovesTemporaryItems
Description: Whether or not Files Connect will delete "Temporary Items" and ".TemporaryItems" folders at shutdown.
Default: No
Refreshable: Yes

173 Copyright © Acronis International GmbH, 2002-2017
ServerCreatesEmptyStreams
Description: Whether or not the service creates empty alternate data streams as a marker that there are no dot underscore files to migrate. This feature was enabled in earlier versions of Files Connect but was disabled because the creation of so many empty alternate streams could interfere with Windows-side activity, such as Rampage.
Default: Off
Refreshable: Yes
ServerConvertsShortcutsToLinks
Description: Whether or not the server displays Windows Shortcut (.lnk) files to Macintosh clients as symbolic links.
Default: On
Refreshable: Yes
SupportACLs
Description: Whether or not the server supports Access Control Lists (ACLs).
Default: Off
Refreshable: Yes
ServerOpensExchangeFileHandlesByFullPath
Description: Whether or not the server opens folders by full path (as opposed to file ID) when doing ExchangeFiles operation. This setting is useful on Windows 2008, which can blue screen if Mac clients save files to an Files Connect volume through a client application using the ExchangeFiles command. This command is used by a number of applications, including Microsoft Word. By opening folders by full path rather than ID during ExchangeFile processing, this Windows 2008 bug can be bypassed. Microsoft is aware of the issue and will be issuing a fix at an unspecified date. Because this change is only useful as a way to workaround the Windows 2008 issue, this setting is ignored on Windows 2003.
Default: On for Windows 2008 (and later), off for earlier OS versions
Refreshable: Yes
ServerAllows8Dot3Names
Description: Whether or not the server files supports the access of files and folders using their Windows 8.3 filename. While Files Connect does not communicate these 8.3 filenames to Mac clients, workflows such as Prinergy that involve Windows and Mac components can result in Mac clients making requests for files and folders by these names.
Default: Off
Refreshable: Yes

174 Copyright © Acronis International GmbH, 2002-2017
ServerAllowsLargeEABuffers
Description: Whether or not Files Connect supports extended attributes buffers larger than 4Kb. As of Mac OS 10.5.6, the "ditto" command fails to duplicate files containing extended attributes when these files are located on a remote server. Enabling this setting allows Files Connect to workaround this client-side issue.
Default: Off
Refreshable: Yes
SupportSCP
Description: Whether or not the server will register itself in Active Directory as a Service Connection Point (SCP).
Default: On
Refreshable: Yes
ShowInaccessibleFiles
Description: Controls whether users are able to see files for which they do not have at least "read attributes". The "read attributes" property does not imply the ability to read a file, but only to be able to see what the permissions and other attributes of the file are.
Default: On
Refreshable: Yes
ShowInaccessibleFolders
Description: Controls whether users are able to see folders for which they have neither read nor write access
Default: On
Refreshable: Yes
ServerUsesRelativeHandles
Description: Controls whether or not Files Connect will open file handles relative to folder handles. This setting should be disable for users of CommVault Simpana software.
Default: On
Refreshable: Yes
SlowAFPCommandLogFrequency
Description: Frequency, in seconds, in which the server logs information about slow AFP commands. Setting this value to 0 will disable slow AFP command logging.
Default: 3600 (1 hour)
Refreshable: Yes

175 Copyright © Acronis International GmbH, 2002-2017
SupportCopyFileEx
Description: Whether or not the server supports new server-side copy semantics for improved performance.
Default: Yes
Refreshable: Yes
TimeoutIdleUsers
Description: Controls whether or not idle users are timed out after some period of time.
Default: Off
Refreshable: Yes
UnixOwnerPermissionsMode
Description: This registry key is in effect only when Support UNIX permissions and ACLs is enabled in the product. Gives the administrator full control over files that have no owner or the owner is disabled or unreachable.
Default: 7 (on upgrades it will be 0)
Refreshable: Yes
UNIXCalculatedPermissionsMode
Description: Determines how UNIX permissions are calculated for files and folders that don't already have UNIX permissions assigned. If 0, the Windows GetEffectiveRightsFromACL call is used to determine UNIX permissions. If 1, calls to GetEffectiveRightsFromACL are avoided when possible to improve performance. If 2, UNIX permissions are always returned as 777 (full rights) if no explicit UNIX permissions have been assigned.
Default: 1
Refreshable: Yes
UNIXGroupPermissionsMode
Description: Determines how group UNIX permissions are calculated for files and folders that don't already have UNIX permissions assigned. If 0, the calculation mode as set by UNIXCalculatedPermissionsMode is used. If 1, group permissions are the sum of the permissions for all groups (not just the primary group). If 2, group UNIX permissions are always returned as 7 (full rights) if no explicit UNIX permissions have been assigned.
Default: 0
Refreshable: Yes
WriteFlushThreshold
Description: Specifies the number of bytes that can be written to a open fork before Files Connect forces a flush of that data to disk. Setting this value to 0 indicates that these flushes

176 Copyright © Acronis International GmbH, 2002-2017
should never occur. Small values force a large number of flushes, which help prevent periodic long file system delays by spreading out flushes over a large number of writes.
Default: 0
Refreshable: Yes
10.4.3 Debug Logging Registry Keys -- Refreshable
The following keys control certain debug logging features of Files Connect. Generally, they should only be changed or enabled when requested by Acronis Support. The keys in this section are refreshable and take effect when the Refresh Registry button is clicked on the Settings dialog of the Files Connect Administrator or when the service is started.
These keys should be added in the following registry location:
\HKEY_LOCAL_MACHINE\System\CurrentControlSet\Services\ExtremeZ-IP\Parameters4\DebugRefreshable
AppleDoubleIntegrity
Description: Whether or not Files Connect performs extra runtime checking of its AppleDouble code.
Default: On
Refreshable: Yes
CopyDebugLog
Description: Whether or not Files Connect can create new debug logs when encountering an error or at user request.
Default: On
Refreshable: Yes
CriticalSectionMonitorLogFrequencyInMilliseconds
Description: The frequency (in milliseconds) of critical section monitor logging (if enabled). Default is one minute.
Default: 60000
Refreshable: Yes
DebugLogLimit
Description: # of MB to limit log file size (should be between 1 and 999)
Default: 200
Refreshable: Yes

177 Copyright © Acronis International GmbH, 2002-2017
DebugLogThrowThreadException
Description: Server will throw exception and crash, for testing generation of DrWatson logs. contact GroupLogic for instructions on usage.
Default: Off
Refreshable: Yes
DisplayTimeAsNumeric
Description: Choose whether the time is displayed as a numeric value or h-m-s-ms. Select 0 for hours-minutes-seconds-milliseconds or 1 for a numeric value.
Default: Off
Refreshable: Yes
EventLogNoFC
Description: Will put information in the event log if the service does not have full control permissions.
Default: On
Refreshable: Yes
IdPathMapIntegrity
Description: Whether or not Files Connect performs extra runtime checking of its internal ID/path map.
Default: Off
Refreshable: Yes
MaxLogArchiveSize
Description: Number of MB of old logs to keep before the oldest logs are automatically removed. Logs are automatically archived into .zip files to conserve space. If this is set to 0, archiving will not take place and there will be no limit to the cumulative size of the log files.
Default: 200 [MB]
Refreshable: Yes
NetworkReshareIntegrity
Description: When enabled, Network Reshare volume integrity will be checked at runtime. This will have an effect on performance.
Default: Off
Refreshable: Yes

178 Copyright © Acronis International GmbH, 2002-2017
RenameCopyDebugLog
Description: When set to 1, the current log will be renamed and a new one created when users request a new log be created. When set to 0, the current log will be copied rather than renamed. CopyDebugLog must be set to 1 for this key to take effect.
Default: On
Refreshable: Yes
SpoolingLog
Description: Server will spool to a new log when the active log hits it's size limit (see DebugLogLimit above).
Default: On
Refreshable: Yes
SupportWER
Description: Whether or not Files Connect supports Windows Error Reporting (WER).
Default: On
Refreshable: Yes
10.4.4 Debug Logging Registry Keys -- Non-Refreshable
The following keys control certain debug logging features of Files Connect. Generally, they should only be changed or enabled when requested by AcronisSupport. The keys in this section are not refreshable, meaning that changes do not take effect until the Files Connect service is restarted
The non-refreshable debug logging keys are located in: \HKEY_LOCAL_MACHINE\System\CurrentControlSet\Services\ExtremeZ-IP\Parameters4\DebugNonRefreshable
CompareMicrosecondsToTickCount
Description: Server will log timing statistics at startup
Default: On
Refreshable: No
DebugLogFolder
Description: Directory in which log subfolders are placed.
Default: Files Connect application directory
Type: String
Refreshable: No
179 Copyright © Acronis International GmbH, 2002-2017
RenameLogAtStartup
Description: At startup Files Connect will rename any existing log with current date and time for easy archiving.
Default: On
Refreshable: No
UseCriticalSectionMonitor
Description: Logs details about critical sections within Files Connect
Default: Off
Refreshable: No
10.4.5 Print Parameter Registry Keys -- Refreshable
The following keys control certain features or behaviors of the Files Connect Print Server, if installed. The keys in this section are refreshable and take effect when the Refresh Registry button is clicked on the Settings dialog of the Files Connect Administrator or when the service is started.
These keys should be added in the following registry location:
\HKEY_LOCAL_MACHINE\System\CurrentControlSet\Services\ExtremeZ-IP\Parameters4\PrintRefreshable
PersistentMappedNetworkFolderPrintQueues
Description: Print Queues configured with 'Send To Specified Directory' whose paths are to network folders will map the network folder to a local drive that will persist as long as the Files Connect server is running. If the registry key is set to 0, mapped network folders persist only for each individual print job.
Default: On
Refreshable: Yes
PrintAccountingLogFilePath
Description: Full path for outputting Print Accounting log information.
Default: N/A
Type: String
Refreshable: Yes
ServerCombinesLPRPackets
Description: If enabled, Files Connect will take LPR packets that were previously sent separately and combine them into larger packets.
Default: On
180 Copyright © Acronis International GmbH, 2002-2017
Refreshable: Yes
ServerCombinesLPRPackets
Description: If enabled, Files Connect will take LPR packets that were previously sent separately and combine them into larger packets.
Default: On
Refreshable: Yes
ServerAutoDeleteOfflineJobsTime
Description: How long (in seconds) a job can be offline before the server automatically deletes it. Set to 0 to disable deletion of offline jobs.
Default: 0
Refreshable: Yes
ServerLogsJobErrorFrequency
Description: How often (in seconds) the server should log errors that occur during auto-retry of jobs that are offline.
Default: 3600 [1 hour]
Refreshable: Yes
ServerAutoRetryJobsFrequency
Description: How often (in seconds) the server should auto-retry a job that is offline.
Default: 300 [5 minutes]
Refreshable: Yes
ServerPrintJobTimeout
Description: How long, in milliseconds, a job being sent to a remote printer can be "stuck" before the print server takes the job offline.
Default: 300000 [5 minutes]
Refreshable: Yes
IPPrintLPRPort
Description: The port used by Files Connect to listen for incoming (LPR) print jobs.
Default: 515
Refreshable: Yes

181 Copyright © Acronis International GmbH, 2002-2017
PostscriptCodePage
Description: The Macintosh code page used when parsing postscript files. By default, this setting is copied from the system registry value "HKEY_LOCAL_MACHINE\SYSTEM\CurrentControlSet\Control\Nls\CodePage\MACCP".
Default: 10000
Refreshable: Yes
ZidgetSupportsPrintAccounting
Description: Due to a conflict between OS 9 Print Accounting support and support for the new Files Connect Zidget, OS 9 Print Accounting support has been disabled by default in Files Connect 5.1. In order to reenable OS 9 Print Accounting support, please set this registry value to 0. Note that doing this will prevent Zidget clients from properly accessing print accounting queues.
Default: On
Refreshable: Yes
10.4.6 Print Parameter Registry Keys -- Non-Refreshable
The following keys control certain features or behaviors of the Files Connect Print Server, if installed. The keys in this section are not refreshable, meaning that changes do not take effect until the Files Connect service is restarted.
These keys should be added in the following registry location:
\HKEY_LOCAL_MACHINE\System\CurrentControlSet\Services\ExtremeZ-IP\Parameters4\PrintNonRefreshable
PrintSupportEnabled
Description: Whether or not the print server is enabled. Set to 0 to disable. When disabled, print cannot be enabled through the Administrator.
Default: On
Refreshable: No
SupportPrintAccounting
Description: Whether or not the print server supports Print Accounting. Set to 0 to disable.
Default: On
Refreshable: No
10.4.7 Filename Policy Registry Keys -- Refreshable
The following keys control certain features or behaviors of the Files Connect Filename Policy feature. The keys in this section are refreshable and take effect when the Refresh Registry button is clicked on the Settings dialog of the Files Connect Administrator or when the service is started.

182 Copyright © Acronis International GmbH, 2002-2017
These keys should be added in the following registry location:
\HKEY_LOCAL_MACHINE\System\CurrentControlSet\Services\ExtremeZ-IP\Parameters4\Refreshable\FilenamePolicy
AppliesToAllVolumes
Description: Whether or not the filename policy applies to all volumes. Set to 1 to enable.
Default: On
Refreshable: Yes
AppliesToTemporaryItems
Description: Whether or not filename policies apply to temporary items folders.
Default: Off
Refreshable: Yes
ErrorMessage
Description: Custom error message to send to users that violate the filename policy.
Default:
Type: String
Refreshable: Yes
EventLogMessageFrequency
Description: How often, in seconds, Files Connect will log a message to the Windows Event log when a particular user violates the filename policy.
Default: 600 [10 minutes]
Refreshable: Yes
GloballyEnabled
Description: Whether or not the filename policy feature is globally enabled. Set to 1 to enable.
Default: On
Refreshable: Yes
IllegalCharacters
Description: A list of characters that will be disallowed in file and folder names by the filename policy.
Default:
Type: String
Refreshable: Yes

183 Copyright © Acronis International GmbH, 2002-2017
IllegalExtensions
Description: A list of extensions that will be disallowed in filenames by the filename policy.
Default:
Type: Multi-String
Refreshable: Yes
MaxLengthFileName
Description: The maximum length of file names. Set to 0 to disable this filename policy rule.
Default: 0
Refreshable: Yes
MaxLengthFolderName
Description: The maximum length of folder names. Set to 0 to disable this filename policy rule.
Default: 0
Refreshable: Yes
MaxLengthPathName
Description: The maximum full path length for files and folders. Set to 0 to disable this filename policy rule.
Default: 0
Refreshable: Yes
RejectPolicyFailures
Description: Whether or not violations of the filename policy are rejected (if value is 1), or if the user is warned but the action is allowed (value of 0).
Default: 1
Refreshable: Yes
RestrictNonDisplayable
Description: When enabled, the filename policy will restrict characters that cannot be displayed in Windows Explorer. Set to 1 to enable.
Default: Off
Refreshable: Yes
PreventDS_StoreFileCreation
Description: When enabled, Files Connect will prevent the creation of .DS_Store files.
Default: Off

184 Copyright © Acronis International GmbH, 2002-2017
Refreshable: Yes
UserMessageFrequency
Description: How often, in seconds, a user can be sent a message indicating that they violated the filename policy.
Default: 5
Refreshable: Yes
10.4.8 HTTP Discovery Registry Keys -- Refreshable
The following keys control certain features or behaviors of the Files Connect HTTP Discovery feature. The keys in this section are refreshable and take effect when the Refresh Registry button is clicked on the Settings dialog of the Files Connect Administrator or when the service is started.
These keys should be added in the following registry location:
\HKEY_LOCAL_MACHINE\System\CurrentControlSet\Services\ExtremeZ-IP\Parameters4\Refreshable\HTTPDiscovery
HTTPDiscoveryFileOption
Description: Whether or not the Files Connect File Server is discoverable over HTTP.
Default: On
Refreshable: Yes
HTTPDiscoveryPrintOption
Description: Whether or not the Files Connect Print Server is discoverable over HTTP.
Default: On
Refreshable: Yes
HTTPDiscoveryMasterHostName
Description: Name of the Files Connect HTTP Discovery master server.
Default: "ExtremeZIPServerList"
Type: String
Refreshable: Yes
HTTPDiscoveryServerPort
Description: TCP port number for HTTP Discovery.
Default: 8081
Refreshable: Yes
185 Copyright © Acronis International GmbH, 2002-2017
HTTPDiscoveryServerZone
Description: HTTP Discovery zone name.
Default: "Global"
Type: String
Refreshable: Yes
HTTPDiscoveryServerResolvesIPAddresses
Description: Whether or not Files Connect will attempt to embed a fully qualifed name into the server list XML file if the client (Zidget) contacts the server via an IP address.
Default: On
Refreshable: Yes
HTTPDiscoveryDocumentRoot
Description: Location of the HTTP server's HTML files. This can be set such that different nodes of a cluster share the same HTML files.
Default: Blank, which indicates files will be pulled from "<application directory>\HTML Files\", e.g. "C:\Program Files\Group Logic\Files Connect\HTML Files\"
Refreshable: Yes
HTTPDiscoveryDFSOption
Description: When enabled, DFS volumes will be discovered by HTTP Discovery Service.
Default: On
Refreshable: Yes
HTTPDiscoveryExtraContentTypes
Description: List of content types supported by Files Connect's internal web server along with their associated extensions. A standard set of extensions (html, xml, gif, jpg, ico, zip) are automatically assigned their appropriate content types. This registry settings allows for the customization of additional content types. The format is "extension,content type", with each pair on its own line.
Default: css,text/css | js,application/x-javascript | pdf,application/pdf | doc,application/msword | htm,text/html
Refreshable: Yes
HTTPDiscoveryMinimumZidgetVersion
Description: Minimum Zidget version number. Any clients who connect with an older version of the Zidget will be prompted to upgrade. Setting this version can be used in cases where clients do not have permission to upgrade the Zidget, and it is desired to have the upgrade prompt disabled. Please contact GroupLogic Support for more information.

186 Copyright © Acronis International GmbH, 2002-2017
Refreshable: Yes
10.4.9 Spotlight Registry Keys -- Refreshable
The following keys control certain features or behaviors of Files Connect Network Spotlight support. The keys in this section are refreshable and take effect when the Refresh Registry button is clicked on the Settings dialog of the Files Connect Administrator or when the service is started.
These keys should be added in the following registry location:
\HKEY_LOCAL_MACHINE\System\CurrentControlSet\Services\ExtremeZ-IP\Parameters4\Spotlight\Refreshable\
dtSearchVerifyIndex
Description: Controls whether dtSearch index(es) are verified when checking their existence.
Default: Off
Refreshable: Yes
dtSearchExcludeFromIndexingList
Description: Comma separated list of strings, paths and/or file types to not index.
Default: ''
Type: string
Refreshable: Yes
DtSearchIndexIsAccentSensitive
Description: When enabled, items with special characters (e.g. ä, ö) will not be found if you search for their unaccented counterparts (e.g. a, o).
Default: Off
Refreshable: Yes
SpotlightEnabled
Description: Whether or not the Network Spotlight feature is enabled.
Default: Off
Refreshable: Yes
NumSpotlightSearchResults
Description: The maximum number of results that can be returned in a Spotlight search. A value of 0 represents "unlimited".
Default: 1000
Refreshable: Yes

187 Copyright © Acronis International GmbH, 2002-2017
SpotlightKeypressDelay
Description: The amount of time, in milliseconds, to wait before processing a Spotlight search request. This delay allows users to type in search fields without generating a series of search requests. For example, without the delay, typing in "test" would result in four searches, the first three of which will be quickly cancelled: "t", "te", "tes" and finally "test".
Default: 150
Refreshable: Yes
SpotlightEnabledAllVolumes
Description: Whether or not Spotlight support is automatically enabled for all volumes. If disabled, Spotlight support will be configured on a volume-by-volume basis.
Default: Off
Refreshable: Yes
SpotlightUsesWindowsKindClassification
Description: Whether or not the server uses Windows’ classification of files into various "kinds" when Mac clients perform a Spotlight "kind" search. For example, if the Mac client searches for "kind = Movie", the server will perform a lookup using the Windows "video" kind, and return the appropriate results. If the setting is 0, the server will take the Mac "kind", map it to a UTI, and then perform a search based on the set of file extensions that match the UTI. For example, if the Mac client searches for "kind = Movie", the server will map that to "public.movie" and find files with the corresponding extensions (e.g. .mov, .mpg). The advantage of using the Windows kinds is that the search is faster - the downside is that there are a few file types that are categorized differently on Mac and Windows. For example, .m4p (iTunes) files are considered Audio by Mac clients, but are given a Windows kind of "unknown".
Default: On
Refreshable: Yes
SpotlightIgnoresUnknownTerms
Description: Whether or not the server will ignore Spotlight search terms it doesn't understand. For example, with this setting enabled, if the client searches for "name = test and audio bit rate = 4096", the server will ignore the "audio bit rate" term and simply return hits matching "name = test". With the setting disabled, any search containing one or more unknown search terms will automatically return 0 results.
Default: On
Refreshable: Yes
SpotlightDefaultSearchIsBeginsWith
Description: Whether or not the default Spotlight search is a "begins with" search, or (if disabled) a "contains" search.
Default: On

188 Copyright © Acronis International GmbH, 2002-2017
Refreshable: Yes
10.4.10 HSM Registry Keys -- Refreshable
The following keys control certain features or behaviors of Files Connect ArchiveConnect support. The keys in this section are refreshable and take effect when the Refresh Registry button is clicked on the Settings dialog of the Files Connect Administrator or when the service is started.
These keys should be added in the following registry location:
\HKEY_LOCAL_MACHINE\System\CurrentControlSet\Services\ExtremeZ-IP\Parameters4\HSM\Refreshable\
AlwaysAttemptReadOnlyRecall
Description: When enabled, if Files Connect fails to open a recall handle with Read/Write access it will always attempt to open a handle with read access regardless of the Read/Write access error. Set to 1 to enable.
Default: Off
Refreshable: Yes
BringOnlineExplicitlyBlocksCopies
Description: Whether or not the "bring online explicitly" feature blocks file copies.
Default: On
Refreshable: Yes
HSMSupportEnabled
Description: Whether or not ArchiveConnect support is enabled.
Default: Off
Refreshable: Yes
HSMIntegrity
Description: When enabled, HSM processing is checked for internal consistency. This may affect performance.
Default: Off
Refreshable: Yes
OfflineColorLabel
Description: The color label to apply to offline files. Possible values are "grey", "green", "purple", "blue", "yellow", "red" and "orange".
Default: grey

189 Copyright © Acronis International GmbH, 2002-2017
Refreshable: Yes
10.4.11 VSS Registry Keys -- Refreshable
The following keys control certain features or behaviors of Files Connect ShadowConnect support. The keys in this section are refreshable and take effect when the Refresh Registry button is clicked on the Settings dialog of the Files Connect Administrator or when the service is started.
These keys should be added in the following registry location:
\HKEY_LOCAL_MACHINE\System\CurrentControlSet\Services\ExtremeZ-IP\Parameters4\VSS\Refreshable\
VSSSupportEnabled
Description: Whether or not ShadowConnect support is enabled.
Default: Off
Refreshable: Yes
VSSMaxPreviewFileSize
Description: The largest size, in megabytes, of a file the ShadowConnect client code will automatically preview.
Default: 20
Refreshable: Yes
10.5 Files Connect Streams Files Connect uses Windows NTFS alternate data streams to store information needed for serving files to Macintosh clients. Because alternate data streams cannot normally be seen in Windows, two command-line utilities, cpstream and delstream, are included with Files Connect. These two utilities allow access to alternate data streams on NTFS volumes.These command line utilities are low-level tools, and should only be used for specific problems. Normally, you will want to contact GroupLogic before using them.
cpstream allows you to copy the secondary stream to a second visible location.
delstream allows you to delete a secondary stream of an NTFS file or directory.
The most important secondary stream used by Files Connect is called "GLIAFP_Mapping"; this stream is used to store the mapping between NTFS file IDs and Macintosh file IDs. It is located in the topmost directory of a Macintosh share. For example, if you were sharing the directory, "D:\Macintosh Files" as a volume for Macintosh users, then Files Connect would create an invisible NTFS secondary stream in this directory.
If you are experiencing a problem accessing your Files Connect volumes, you may want to make a copy of this stream and send it to GroupLogic.

190 Copyright © Acronis International GmbH, 2002-2017
To do this, you would use cpstream to copy it to a visible location. In the example above, you would issue the following command to make a visible copy of the stream called "EZIPINDEX": cpstream "D:\Macintosh Files:GLIAFP_Mapping" "EZIPINDEX" You can then send the "EZIPINDEX" file to GroupLogic, and it may help us diagnose your problem.
In order to correct a problem with an index stream, you may need to remove the index stream.
The "delstream" utility can be used to this. Before removing the index stream, stop the Files Connect service in the Services control panel. DO NOT DELETE THE INDEX STREAM WHILE Files Connect IS RUNNING. After Files Connect is stopped, issue the following command to removed the index stream: delstream "D:\Macintosh Files:GLIAFP_Mapping" When you restart Files Connect, it will begin to rebuild the index stream. This may resolve problems you are experiencing. In addition to the mapping stream Files Connect will periodically prune the mapping to remove old invalid data. If the server is stopped during pruning a second stream will exists "GLIAFP_MappingPruned". When deleting the original mapping, users should also remove this mapping to insure all streams are removed. An example would be: delstream "D:\Macintosh Files:GLIAFP_MappingPruned"
11 Zidget Help The Files Connect Zidget is a Dashboard widget that helps you easily locate Files Connect file servers and printers on your network.

191 Copyright © Acronis International GmbH, 2002-2017
The Zidget can display file servers and printers either in groups, without groups, or a combination of both, depending on how your systems administrator has configured Files Connect. In the example above, the first listing "Support" is a group. You can expand the group by selecting "Support" and either clicking the Open Location button or double clicking the group.
Expanding the group will reveal any file servers, printers, and subgroups located within in it. Your systems administrator may choose to use these groups to organize resources by location, department, purpose, etc.
To connect to a file server, you can double click it or simply select it and click the Connect To Server button. Your Dashboard will immediately minimize and you will be presented with the Mac OS X server login dialog.

192 Copyright © Acronis International GmbH, 2002-2017
Note: When you select a group, file server, or printer, the status bar at the bottom of the Zidget will display an optional description created by your systems administrator.
To add a printer, you can double click it or simply select it and click the Add Printer button. Your Dashboard will remain visible but you will receive a Printer Added confirmation in the status bar at the bottom of the Zidget.
The printer will be available for use immediately and will be shown in the Mac OS X Printer Setup Utility.
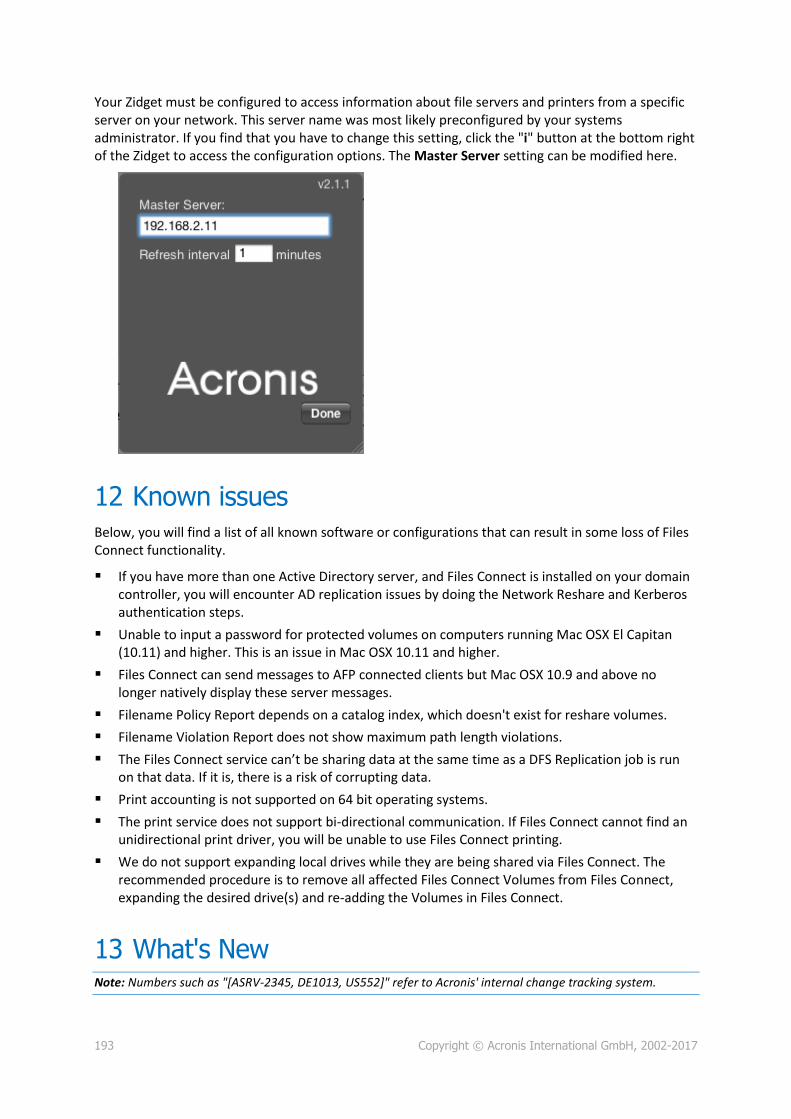
193 Copyright © Acronis International GmbH, 2002-2017
Your Zidget must be configured to access information about file servers and printers from a specific server on your network. This server name was most likely preconfigured by your systems administrator. If you find that you have to change this setting, click the "i" button at the bottom right of the Zidget to access the configuration options. The Master Server setting can be modified here.
12 Known issues Below, you will find a list of all known software or configurations that can result in some loss of Files Connect functionality.
If you have more than one Active Directory server, and Files Connect is installed on your domain controller, you will encounter AD replication issues by doing the Network Reshare and Kerberos authentication steps.
Unable to input a password for protected volumes on computers running Mac OSX El Capitan (10.11) and higher. This is an issue in Mac OSX 10.11 and higher.
Files Connect can send messages to AFP connected clients but Mac OSX 10.9 and above no longer natively display these server messages.
Filename Policy Report depends on a catalog index, which doesn't exist for reshare volumes.
Filename Violation Report does not show maximum path length violations.
The Files Connect service can’t be sharing data at the same time as a DFS Replication job is run on that data. If it is, there is a risk of corrupting data.
Print accounting is not supported on 64 bit operating systems.
The print service does not support bi-directional communication. If Files Connect cannot find an unidirectional print driver, you will be unable to use Files Connect printing.
We do not support expanding local drives while they are being shared via Files Connect. The recommended procedure is to remove all affected Files Connect Volumes from Files Connect, expanding the desired drive(s) and re-adding the Volumes in Files Connect.
13 What's New Note: Numbers such as "[ASRV-2345, DE1013, US552]" refer to Acronis' internal change tracking system.
194 Copyright © Acronis International GmbH, 2002-2017
Acronis periodically releases "hot fixes" to its products to provide customers with access to bug fixes and new features before a full public release is available. Typically, a version will go through a number of hot fix releases (e.g., 7.1.2x1, 7.1.2x2, etc.) before a full product release. Customers can use this information to evaluate whether to update to the latest hot fix.
Note: Prior to ExtremeZ-IP 5.2, ExtremeZ-IP File Server and ExtremeZ-IP Print Server contained separate release notes. In the version history below, file and print items are listed separately for versions 5.1.3 and earlier, and listed together for 5.2 and later.
Files Connect 10.5.2 (Released: September 25, 2017).
This release has been tested to work with macOS 10.13 High Sierra. The Mac Dashboard widget (also known as the ‘Zidget’) is currently not compatible with macOS 10.13. All other features and functions have been verified to be compatible.
Bug Fixes:
Fixed a potential issue saving a file using an AFP connection when it was initially created using an SMB connection
Fixed an issue where files might not open from the Mac Client app, if the volume they reside on was already mounted using the Finder
Fixed an issue where the creation date on a file might be changed when performing a ‘command + drag’ move
Fixed an issue with Acronis Content Indexing of volumes with an apostrophe character in the name
Miscellaneous stability and performance improvements
Files Connect 10.5.1 (Released: August 28, 2017)
ENHANCEMENTS:
Improved server logging to reduce volume of redundant log messages
Improved upgrade install process on cluster servers.
Miscellaneous improvements to Mac client application.
Server performance and stability improvements.
Acronis Files Connect 10.5 (Released: June 20th)
Access Connect has been re-branded to Files Connect.
ENHANCEMENTS:
The new Acronis Files Connect Mac Client application allows users to access all file share, DFS and network printer resources available via Acronis Files Connect and to perform complex Spotlight searches on one or all of these resources.
You can now automatically register Slave servers with the Master server via a new setting in the Acronis Files Connect Administrator.
Added Acronis Content Indexing real-time search index updates for the most up to date search results and lower server resource usage.

195 Copyright © Acronis International GmbH, 2002-2017
Added integrated Windows Search controls for easy automatic indexing with Windows Search directly from the Acronis Files Connect admin console.
Improved handling of archived files for enabling Acronis Content Indexing Spotlight search, even if a volume is managed by a HSM / file system archiving solution.
You can now search for files specifically by their Mac or Windows file tags.
Added an option to exclude certain files or folders from Acronis Content Indexing.
Added an option to limit the amount of each file that will be indexed by Acronis Content Indexing.
General search speed performance improvements.
Access Connect 10.0.6 (Released: May 17th)
BUG FIXES:
Fixed an issue where Spotlight searches from the Finder could fail to return results if additional search criteria were added to the search query.
Fixed an issue that could occur when the option to convert Windows shortcuts to Mac aliases was enabled.
Acronis Access Connect 10.0.5 (Released: April 2017)
ENHANCEMENTS:
Added a new option for filtering excessive client enumeration requests from the Mac Finder. This issue is commonly encountered from clients using macOS 10.9 or later. For more details on enabling this option, please contact Acronis Access Connect Support: http://www.acronis.com/en-us/mobilitysupport/
Improved support for accessing file shared archived with Caminosoft HSM.
Added a Volume Properties option to convert Windows .URL shortcuts to Mac alias. If these shortcuts point to UNC paths that Acronis Access Connect is giving AFP file share access to, Mac users will be able to double-click the .URL file to open the item it points to.
Acronis Access Connect 10.0.4 (Released: June 2016)
ENHANCEMENTS:
Add a new Spotlight Refreshable 'dtSearchExcludeFromIndexingList' REG_MULTI_SZW registry key that can be used to exclude paths, file names, and file types from Acronis Content Search indexing. Multiple exclusions need to be added one per line. Details on the format for these exclusions can be found here:Windows Registry Keys (p. 154). ACNT-72
BUG FIXES:
Fixed an issue with searching for exact multi-word phrases within file contents using Network Spotlight with Acronis Content Indexing. ACNT-1017
Fixed an issue where the file modification date shown in the Finder for files returned in Network Spotlight search results could be incorrect if the modification year of the file was 2000 or earlier. ACNT-12

196 Copyright © Acronis International GmbH, 2002-2017
Acronis Access Connect 10.0.3 (Released: December 2015)
BUG FIXES:
Fixed an issue where Spotlight searches with Acronis Content Indexing would not return any results from folder hierarchies where ' - ' was part of the folder name as in 'foo - bar'. [US11092]
Fixed an issue where after installing Access Connect, SCCM and AppAssure processes would fail to startup. [11086]
Acronis Access Connect 10.0.2 (Released: September 2015)
ENHANCEMENTS:
Acronis Access Connect is now certified with Mac OS X 10.11 ‘El Capitan’ clients. [US108972]
Acronis Content Indexing engine has been updated to the 7.80 release of dtSearch. [US10844]
An event is now added to the Event Log at startup if the Directory Services credentials configured in Access Connect are invalid. [US10999]
For new installations, the defaults settings for 'SupportAppleTalk' 'SupportAppleTalkPrinting' 'AllowKerberosLogin' 'AllowClearTextLogin' are now OFF. [US11029]
For new installations, the default value for 'UNIXOwnerPermissionsMode' has been changed from from 0 to 7. [US9975]
Added NonRefreshable 'MitigatedCriticalSectionTimeout' registry key to add more control as to when Access Connect will disconnect stalled sessions. [US10591]
Volumes on a Microsoft Failover Cluster will automatically default to placing Acronis Content Indexes at the root of the physical disk. [US9411]
BUG FIXES:
Fixed an issue where ArchiveConnect offline file Finder color labels we’re not set properly in the admin UI with non-English localization. [US10593]
Addressed potential excess memory usage when an update to an Acronis Content Index failed. [US10869]
Fixed an issue where Auto-Reconnect could fail for Active Directory users with a space in the user name. [US10241]
Fixed an issue where Acronis Content Indexing would not index the contents of .CSV files. [US10678]
Fixed an issue where NonRefreshable 'GlobalDtSearchIndexPath' was not working. [US10380]
Fixed an issue where repeated saves in Microsoft Word may not delete intermediary temporary files on Network Reshare volumes. To address this behavior if encountered, set the Refreshable 'AttemptFileDeleteWithOpenFork' registry key to ON. [US9284]
Acronis Access Connect 10.0.1 (Released: June 2015)
BUG FIXES:
Fixed an issue that could occur when upgrading from ExtremeZ-IP 9 to Acronis Access Connect 10 on a Microsoft Failover Cluster. [US10875]

197 Copyright © Acronis International GmbH, 2002-2017
Fixed occasional issues when enabling the Mobile Access feature / service. [US10794] [DE14428] [US10865] [US10842] [US10842] [US10883]
Fixed an issue where newly added volumes might not immediately appear for mobile users. [DE14533]
Acronis Access Connect 10.0.0 (Released: May 2015)
ExtremeZ-IP has been renamed to Access Connect.
ENHANCEMENTS:
Added the ability for mobile users to access file share volumes using the Acronis Access iOS, Android and Windows mobile clients. The mobile apps can preview, sync, edit and annotate files located on these file volumes, using built-in Office editing and PDF annotation capabilities. This new feature can be enabled on the "Mobile Access" Settings tab in the Access Connect Administrator console.
Added Spotlight Refreshable 'dtSearchVerifyIndex' registry key, default is OFF. When enabled Acronis Content Indexes will be verified at startup and when the registry is refreshed. [US10346]
Added Refreshable 'EnumerationPerformanceOnLocalVolume' registry key, default is OFF. [US9485]
New installs will set the the Acronis Access Connect service startup type to 'Automatic (Delayed Start)'. [US6338]
Added Refreshable 'DtSearchIndexIsAccentSensitive' registry key for Acronis Content Indexes, default is OFF. If this key is ON, files with accented characters will only be found if the search query string contains those specific accented characters. [US10324]
Added NonRefreshable 'LoadPerformanceDLL' registry key, default is ON. [US10264]
Global Spotlight Search defaults to Acronis Content Indexing for all new volumes. [US10227]
Volumes can now be configured manually when Global Spotlight Search is enabled. [US10228]
Global Spotlight Search is now enabled by default for new installs. [US10299]
Added NonRefreshable 'ActiveDirectoryComputers' to allow customization of Acronis Access Connect server location within Active Directory. This setting is used to help verify if Kerberos Constrained Delegation is configured correctly for the server, if necessary. [US9970]
Hyphens are now word delimiters in Acronis Content Indexes. [US10235]
Acronis Content Indexing engine has been updated to the 7.79 release of dtSearch. [US9681]
BUG FIXES:
Fixed a memory leak in the content index update process. [US8667]
Fixed an issue that affected the Finder displaying color labels with the ’EnumerationPerformance' registry key ON [US10496]
Fixed an issue where the Finder could display font files incorrectly with 'EnumerationPerformance' ON. [US8376]
Fixed an issue that could occur during editing with Adobe InDesign. [US10513]
Fixed an issue with Network Reshare volumes containing empty AppleDouble files created by robocopy. [US10245]
Fixed issues with EZIPUTIL. [US10268]
Fixed an issue where Mac client disconnects could crash Acronis Access Connect. [US8475]
198 Copyright © Acronis International GmbH, 2002-2017
Fixed an issue where Microsoft Office file creation dates were changing to modification date after being edited. [US9131]
ExtremeZ-IP 9.0.5 (Released: April 2015)
ENHANCEMENTS:
Added Spotlight Refreshable 'dtSearchVerifyIndex' registry key, default is OFF. When enabled Acronis Content Indexes will be verified at startup and when the registry is refreshed. [US10346]
Added Refreshable 'EnumerationPerformanceOnLocalVolume' registry key, default is OFF. [US9485]
New installs will set the the ExtremeZ-IP service startup type to 'Automatic (Delayed Start)'. [US6338]
Added Refreshable 'DtSearchIndexIsAccentSensitive' registry key for Acronis Content Indexes, default is OFF. If this key is ON, files with accented characters will only be found if the search query string contains those specific accented characters. [US10324]
Added NonRefreshable 'LoadPerformanceDLL' registry key, default is ON. [US10264]
Global Spotlight Search defaults to Acronis Content Indexing for all new volumes. [US10227]
Volumes can now be configured manually when Global Spotlight Search is enabled. [US10228]
Global Spotlight Search is now enabled by default for new installs. [US10299]
Added NonRefreshable 'ActiveDirectoryComputers' to allow customization of ExtremeZ-IP server location within Active Directory. This setting is used to help verify if Kerberos Constrained Delegation is configured correctly for the server, if necessary. [US9970]
Hyphens are now word delimiters in Acronis Content Indexes. [US10235]
Acronis Content Indexing engine has been updated to the 7.79 release of dtSearch. [US9681]
BUG FIXES:
Fixed a memory leak in the content index update process. [US8667]
Fixed an issue that affected the Finder displaying color labels with the ’EnumerationPerformance' registry key ON [US10496]
Fixed an issue where the Finder could display font files incorrectly with 'EnumerationPerformance' ON. [US8376]
Fixed an issue that could occur during editing with Adobe InDesign. [US10513]
Fixed an issue with Network Reshare volumes containing empty AppleDouble files created by robocopy. [US10245]
Fixed issues with EZIPUTIL. [US10268]
Fixed an issue where Mac client disconnects could crash ExtremeZ-IP. [US8475]
Fixed an issue where Microsoft Office file creation dates were changing to modification date after being edited. [US9131]
ExtremeZ-IP 9.0.4 (Released: November 2014)
ENHANCEMENTS:

199 Copyright © Acronis International GmbH, 2002-2017
Acronis Content Indexing now includes a 'Filename Only' index type option. With this option chosen, search indexes will only contain filenames and will omit file content. This will result in much smaller search index files and faster indexing. [US9671]
Acronis Content Indexing is now the default indexing engine for Network Reshare volumes [US9513]
Added Refreshable 'EnumerationPerformanceOnLocalVolume' to govern enumeration performance enhancements on volumes other than Network Reshares [US9485]
BUG FIXES:
Fixed an occasional crash of ExtremeZ-IP when sharing Network Reshare volumes [US9775]
Fixed an issue where 'dtSearchDebugLogging' was being turned on accidentally [US9709]
Fixed an issue with Acronis Content Indexing and the processing of I/O errors [US9545]
Fixed an issue when Acronis Content Indexing was configured to continuously update the index [DE13027]
Fixed erroneous Spotlight 'root of volume being indexed' logging [US9546]
Fixed an issue where ExtremeZ-IP could hang when a volume was removed while Acronis Content Indexing was actively updating the index [DE12845]
ExtremeZ-IP 9.0.3 (Released: October 2014)
ENHANCEMENTS:
Added French, Russian, Japanese and Chinese localization [US9534]
BUG FIXES:
Event Log messages are now localized [DE12574]
ExtremeZ-IP 9.0.2 (Released: October 2014)
ENHANCEMENTS:
ExtremeZ-IP now supports OS X 10.10 Yosemite
Acronis Content indexing now indexes all words in a file name for searching
Changed text "Support Spotlight Search on All Volumes" to "Enable Spotlight Search on All Volumes"
BUG FIXES:
Fixed occasional crash of ExtremeZ-IP when doing network reshares
Fixed ExtremeZ-IP start up on Windows 2003 R2 Server
ExtremeZ-IP Admin interface would change displayed UNC paths to start with "\\" instead of "UNC\\"
Fixed ExtremeZ-IP crash when running filename policy reports

200 Copyright © Acronis International GmbH, 2002-2017
ExtremeZ-IP 9.0.1 (Released: September 2014)
ENHANCEMENTS:
Added German localization.
Replaced built-in Help with links to the up to date online Web Help.
BUG FIXES:
Fixed a bug where ExtremeZ-IP would sometimes display "Not Indexing" when preparing to index a large volume.
ExtremeZ-IP 9.0 (Released: September 2014)
ENHANCEMENTS:
New 'Acronis Content Indexing' - This new file name and content indexing option is compatible with all ExtremeZ-IP volumes, residing locally on the ExtremeZ-IP server or on another file server or NAS being accessed through ExtremeZ-IP’s 'Network Reshare feature'. This provides nearly instantaneous file name and content ’Network Spotlight’ search, even on remote file servers and NAS. [US5846]
ExtremeZ-IP is now certified for use with StorNext 5.0. [US7572]
ExtremeZ-IP is now certified for use with Symantec Enterprise Vault 11 [US8750]
Configuration of Network Reshare volumes is more informative, especially regarding Kerberos Constrained Delegation. [US7494]
The advanced setting 'Ignore Offspring Count' has been removed from the ExtremeZ-IP Administrator UI. [US6881]
ShadowConnect is now certified for Mac OS 10.8 and 10.9 [US8420]
BUG FIXES:
Fixed issues with Bonjour installation and uninstallation [US6296 US8794]
ExtremeZ-IP 8.1.2 (Released: April 2014)
ENHANCEMENTS:
The "Zidget" Dashboard widget is now compatible with OS X Mavericks.
Further enumeration performance enhancements.
BUG FIXES:
Fixed a crash when moving folders on Network Reshare volumes with EnumerationPerformance ON. [US8091]
Fixed an issue when listing volumes through the EZIPUTIL command line application. [US7812]

201 Copyright © Acronis International GmbH, 2002-2017
Fixed an issue where folders could not be deleted because a '.DS_Store' file was still in existence. This is controlled by the refreshable 'DeleteDS_StoreFileWhenDeletingFolder' registry key. [US7918]
Fixed a bug where enumerating the volume root would show fewer items in the folder than were actually there. This is controlled by the Refreshable 'EnumerateExtraItems' registry key. [US7666]
Fixed a slow memory leak when supporting Spotlight search on Network Reshare volumes. [US7969]
ExtremeZ-IP 8.1.1 (Released: October 2013)
ENHANCEMENTS:
ExtremeZ-IP is now certified to run on Windows Server 2012 R2.
BUG FIXES:
Fixed a bug where DFS targets were not being enumerated on Network Reshare volumes. [US7443]
ExtremeZ-IP 8.1.0 (Released: October 2013)
IMPORTANT NOTE:
The ExtremeZ-IP 8.1 release MUST be installed if your server is configured with Time Machine volumes and you have OS X 10.9 "Mavericks" clients backing up with Time Machine.
ENHANCEMENTS:
ExtremeZ-IP is compatible with OS X 10.9 "Mavericks". [US2741]
ExtremeZ-IP now logs when the root of a Spotlight search enabled volume is not being indexed by the Windows Search backend. [US5770]
BUG FIXES:
Spotlight searching is now supported on Network Reshare volumes where the UNC path is a FQDN. [US5750]
Fixed a bug where folders would flash and redraw on OS X 10.8 "Mountain Lion" and later OSes. [DE9063]
Fixed a bug where enumerating folders could lead to excessive memory usage. [US7319]
ExtremeZ-IP 8.0.6 (Released: August 2013)
ENHANCEMENTS:
Improved Folder Enumeration performance for Mac clients. This can be especially noticeable for folders with large numbers (100+) of files in them. Improvements on local / SAN disks may be up to 2x, while on Network Reshare Volumes enumeration performance may improve 20-30x.

202 Copyright © Acronis International GmbH, 2002-2017
The default for the new Refreshable 'EnumerationPerformance' registry key is OFF. Set this key to ON for improved performance. [US6334]
The default for the 'SpotlightDefaultContentSearchIsFileNameOnly' is now OFF. When OFF, Spotlight searches will include file name, file contents, and file metadata in the search results. When ON, Spotlight searches will include just file name and file contents in the search results. [US6396]
The default for the NonRefreshable 'EntryExpirationTime' registry key was changed from 15 to 300 seconds for better performance with Network Reshare volumes. [US6395]
The default for the Refreshable 'UsePrimaryDomainController' registry key is now OFF. ExtremeZ-IP will find and use nearby domain controllers. [US6398]
BUG FIXES:
Spotlight searches from within the Open file dialog of Adobe InDesign will now return results. [US6807]
Fixed a bug where NTFS circular reference disk corruption could still occur on ExtremeZ-IP volumes that resided within Mount Points. [DE7824][DE7825]
ExtremeZ-IP 8.0.5 (Released: May 2013)
ENHANCEMENTS:
ExtremeZ-IP will disallow the illegal move of a folder into one of its subfolders. [US6468]
ExtremeZ-IP will reference move destination folders by name instead of ID to avoid possible NTFS circular reference disk corruption. [US6468]
Added Refreshable 'UsePrimaryDomainController' registry key to allow finding a different domain controller when OFF. [US6398]
BUG FIXES:
* Fixed a bug where Adobe Illustrator could not save to an ExtremeZ-IP volume within a Mount Point. [US6212]
ExtremeZ-IP 8.0.4 (Released: April 2013)
ENHANCEMENTS:
ExtremeZ-IP will detect and avoid circular directory reference NTFS disk corruption. [US5888]
ExtremeZ-IP supports Windows Server 2012 Essentials. [US5842]
Added 'SpotlightDefaultContentSearchIsFileNameOnly' registry key. This key is on by default, meaning file searches issued through the Mac Finder match on file name only. When off, additional file metadata (copyright, title, author, etc) will also be included in search results. [US5980]
BUG FIXES:

203 Copyright © Acronis International GmbH, 2002-2017
Fixed an issue where spooling the log would cause ExtremeZ-IP to crash when refreshing the Bonjour configuration. [US5453]
Fixed an issue where AppleDouble files were visible to Windows users. [US5960]
Fixed an issue where ExtremeZ-IP would wrongly interpret a file as a Volume Shadow Copy file and would crash when processing. [US6141]
ExtremeZ-IP 8.0.3 (Released: November 2012)
ENHANCEMENTS:
ExtremeZ-IP is now certified to run on Windows Server 2012.
GroupLogic Appletalk is not supported on Windows Server 2012.
ExtremeZ-IP now supports 'Network Spotlight' file content search for 'Network Reshare' volumes residing on SMB/CIFS accessible Windows NTFS storage. [US5544]
Added 'Send message to connected client(s)' support to EZIPUTIL command line utility. [US3743]
BUG FIXES:
Fixed a bug where Network Reshare volume disconnects were not being detected and the volume had to be manually restarted. [US5647]
Fixed a bug where after installing the ExtremeZ-IP 8.0.2 upgrade, a legacy Bonjour dialog was being displayed. [US5500]
Fixed a bug where multiple initializations of Bonjour could result in an ExtremeZ-IP crash. [US5453]
Fixed an issue where the ExtremeZ-IP Administrator application would not automatically request to run with Administrator privileges. [US5529]
Fixed an issue where the 'UNIXOwnerPermissionsMode' key was not taking effect as a Refreshable registry key. [DE5498]
ExtremeZ-IP 8.0.2 (Released: September 2012)
ENHANCEMENTS:
There is now a 64-bit version of the ezipapi.dll. [US4889]
Network Home Directories are supported on Network Reshare volumes. [DE5259]
ExtremeZ-IP Mac client applications; Zidget, ArchiveConnect, and DFSConnect are Mountain Lion Gatekeeper compatible. [US5757]
BUG FIXES:
Fixed a problem where duplicate SPNs would cause Kerberos logins to fail. [US4982]
Fixed a problem in ArchiveConnect where double-clicking a file was bringing it online when it should not have. [US4127]
Fixed firewall exception issues with various ExtremeZ-IP ports. [DE5056][DE5130]
Fixed a problem where firewall blocking of Bonjour UDP port 5353 would lead to excessive logging. [US4924]
204 Copyright © Acronis International GmbH, 2002-2017
Fixed an issue where Spotlight searches within Mac Save dialogs were not returning any results. [US4704]
Fixed an issue where Spotlight searches using 'mdls' were not returning any results. [US5268]
Fixed an issue where lingering AppleDouble files would cause folder deletion to fail because folder was not empty. [US5003]
Fixed an issue where a file could not be modified or deleted if the file's owner has been removed from Active Directory. [US5082]
ExtremeZ-IP 8.0.1 (Released: June 2012)
ENHANCEMENTS:
ExtremeZ-IP supports version 3.0.0x10 of the Windows Bonjour service. [DE5018]
BUG FIXES:
Fixed a problem on Windows 2003 systems which resulted in excessive logging. [US4773]
Fixed a problem where the ExtremeZ-IP service would take too long to shut down. [DE5018]
Fixed a bug that caused ExtremeZ-IP to crash when the first Active Directory profile-based Network Home Directory user logs on, and network home directory support is enabled. [US4754]
Fixed a bug with Bonjour and firewall settings which caused the Bonjour service to lose connectivity. [US4728]
Fixed a problem with ASSERT logging when restarting network reshare volumes. [DE4856]
Fixed a bug where ExtremeZ-IP Service can hang at startup because of critical section deadlock when DFS support is enabled [US4714]
Fixed a bug when registering ExtremeZ-IP's Bonjour services on specific network interface indexes. This bug would cause the Bonjour Service to log an error in the Windows event log. [DE5033]
ExtremeZ-IP 8.0.0 (Released: June 2012)
ENHANCEMENTS:
Network Reshare support. Network Reshare allows an ExtremeZ-IP server to proxy access to file shares on a secondary file server or NAS device. ExtremeZ-IP uses the SMB/CIFS protocol to access the remote file server or NAS device. These files are presented to the Mac client as a standard APF volume. For more information, see: http://support.grouplogic.com/?p=3989
Files residing in DFS namespaces can now be made available as ExtremeZ-IP Network Reshare AFP volumes. For more information, see: http://support.grouplogic.com/?p=3991
ArchiveConnect is now compatible with ExtremeZ-IP Network Reshare AFP volumes. For more information, see: http://support.grouplogic.com/?p=3993
Changed how we initially access files and folders to provide a better client experience with ArchiveConnect. This change prevents files from being unnecessarily scanned by anti-virus applications or brought on-line. [DE3069][7.5.0x122]
BUG FIXES:

205 Copyright © Acronis International GmbH, 2002-2017
Fixed a bug where Spotlight searches begun in folders with single quotes in their names would return no results. [US4333][7.5x156]
Fixed a bug where long Spotlight queries could cause buffer overrun and the ExtremeZ-IP server would crash. [US4398][7.5x154]
Updated the version of Bonjour installed by ExtremeZ-IP to Bonjour 3.0. This fixed a bug where all Bonjour connectivity could cease an hour or two after startup of the ExtremeZ-IP server. [US3691][7.5x163]