Embed Size (px)
Citation preview
Acronis Cyber CloudIntegration with Ninja One
R E V I S I O N : 1 / 6 / 2 0 2 2Integration Guide
acronis.com

Table of contents1 Introduction 3
2 Glossary 4
3 Prerequisites 5
4 How the integration works 6
5 Setup 7
6 Upload scripts to Ninja One 8
7 Deploy Acronis Cyber Protection agent (Windows, Linux and macOS) 11
8 Uninstall the Acronis Cyber Protection agent (Windows, Linux and macOS) 12
9 Manage Protection Plan (Windows, Linux and macOS) 13
10 Perform Acronis scans and tasks (Windows, Linux and macOS) 14
11 Monitoring 15
2 © Acronis International GmbH, 2003-2022

1 IntroductionThis document describes how to enable and configure the integration of Acronis Cyber Cloud with Ninja One.
Once setup, the integration enables you to:
l Deploy Acronis on Windows, Linux and Mac devices l Monitor protected devices l Apply and revoke protection plans l Run the following types of automated tasks - backup, antivirus scan, malware scan, vulnerability
assessment and patch management l Uninstall Acronis agents from Windows, Linux and Mac devices
All this functionality is available from within Ninja One, without having to go to the Acronis Cyber Protect web interface.
3 © Acronis International GmbH, 2003-2022

2 Glossary l MSP - A Managed Service Provider, who uses both Ninja One and Acronis Cyber Protect l Customer - A client of the MSP l Partner tenant - the MSP account on Acronis Cyber Cloud l Customer tenant - the customer account on Acronis Cyber Cloud
4 © Acronis International GmbH, 2003-2022

3 PrerequisitesTo use this integration, you should have:
l At least a single, fully configured Ninja One account l An Acronis Cyber Cloud account with:
o at least one customer tenant and one user, setup with Acronis administration permissions o at least one protection plan, configured to be used as the default one
5 © Acronis International GmbH, 2003-2022
4 How the integration worksThe solution consists of a set of scripts run on workloads.
Those scripts are downloaded from Acronis, uploaded to and scheduled from Ninja One.
If anywhere throughout this document, you have to provide a registration token, here are the steps to obtain it:
1. Log in to the Acronis Cyber Protection console.
2. Click Add Device and scroll down to Registration token. Then click GENERATE.
3. Select a token with a maximum lifetime value and click GENERATE TOKEN.
4. Copy the token you just generated.
6 © Acronis International GmbH, 2003-2022
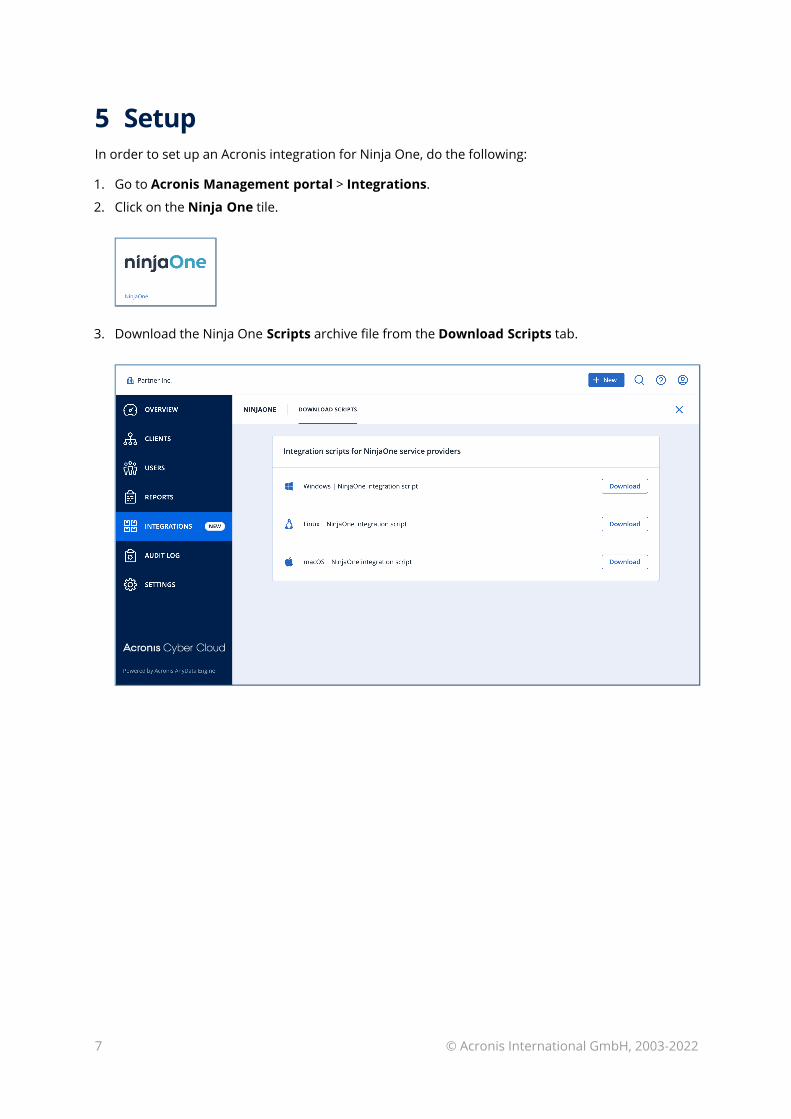
5 SetupIn order to set up an Acronis integration for Ninja One, do the following:
1. Go to Acronis Management portal > Integrations.
2. Click on the Ninja One tile.
3. Download the Ninja One Scripts archive file from the Download Scripts tab.
7 © Acronis International GmbH, 2003-2022

6 Upload scripts to Ninja One 1. Go to Ninja One > Configuration > Scripting > Import New Script.
2. Locate the scripts downloaded from Acronis and upload individually the ones of your choice.
3. Next: a. Give a proper name (similar to the script's file name)
b. Enter a description
c. Assign to a category
d. Select the language of the imported script (PowerShell for Windows and ShellScript for Linux)
e. Select an operating system
f. Select architecture (All is recommended)
g. For each of the following scripts: i. Acronis_install_agent: in the New Preset Parameter field, add a parameter by entering
the currently used Acronis Datacenter URL, followed by a blank space and Acronis registration token (see "How the integration works" (p. 6)). Click on the + button to create a parameter. The newly created parameter should resemble the following example: "https://mc-beta-cloud.acronis.com 79AE-07AD-440C"
Click Save, then Close.
ii. Acronis_scans: add the following 5 individual parameters: l backup l av_scan l malware_scan l vulnerability_assessment
8 © Acronis International GmbH, 2003-2022

l patch_management
iii. Acronis_manage_protection_plan: add the following 2 separate parameters: l Acronis registration token (see "How the integration works" (p. 6)) l Acronis registration token, followed by a blank space and "yes"
9 © Acronis International GmbH, 2003-2022
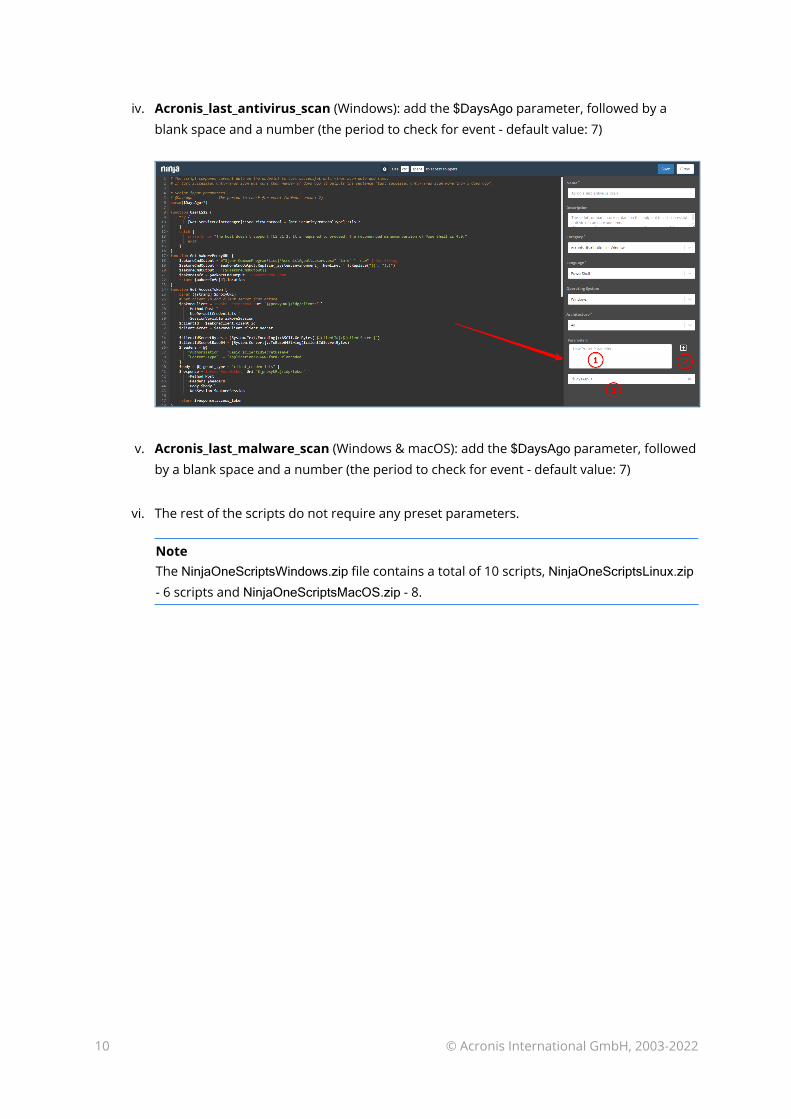
iv. Acronis_last_antivirus_scan (Windows): add the $DaysAgo parameter, followed by a blank space and a number (the period to check for event - default value: 7)
v. Acronis_last_malware_scan (Windows & macOS): add the $DaysAgo parameter, followed by a blank space and a number (the period to check for event - default value: 7)
vi. The rest of the scripts do not require any preset parameters.
NoteThe NinjaOneScriptsWindows.zip file contains a total of 10 scripts, NinjaOneScriptsLinux.zip - 6 scripts and NinjaOneScriptsMacOS.zip - 8.
10 © Acronis International GmbH, 2003-2022
7 Deploy Acronis Cyber Protection agent (Windows, Linux and macOS)
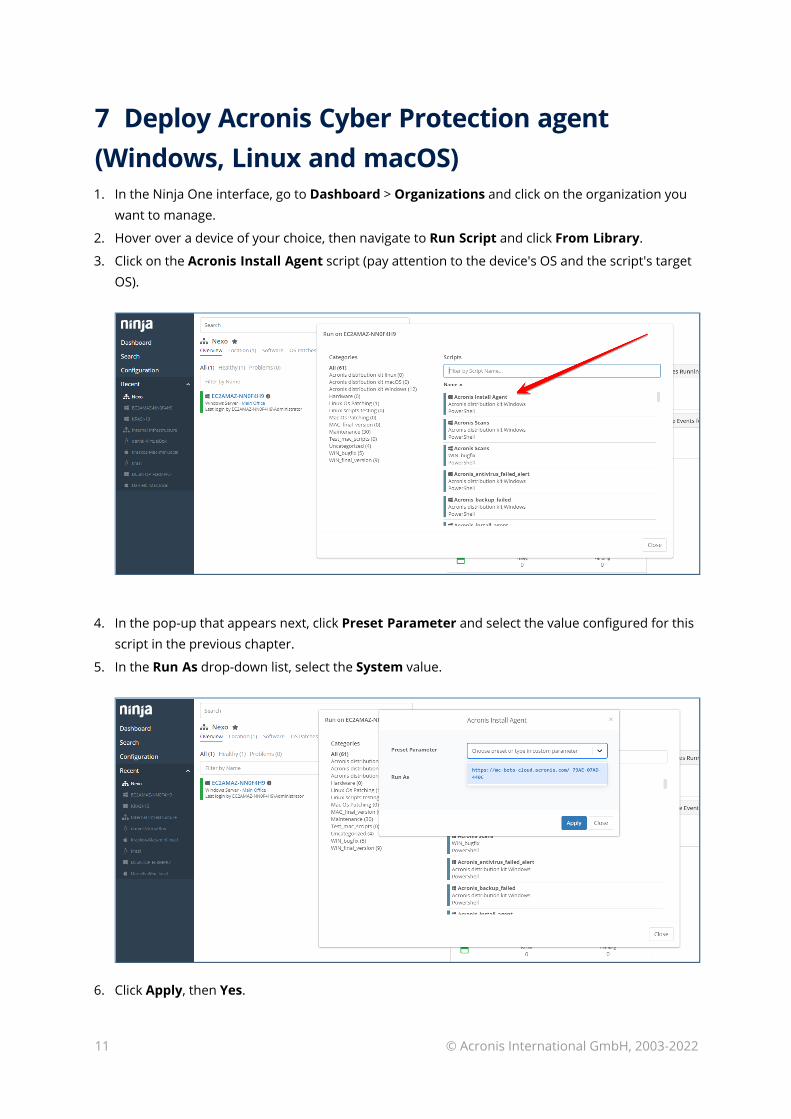
1. In the Ninja One interface, go to Dashboard > Organizations and click on the organization you want to manage.
2. Hover over a device of your choice, then navigate to Run Script and click From Library.
3. Click on the Acronis Install Agent script (pay attention to the device's OS and the script's target OS).
4. In the pop-up that appears next, click Preset Parameter and select the value configured for this script in the previous chapter.
5. In the Run As drop-down list, select the System value.
6. Click Apply, then Yes.
11 © Acronis International GmbH, 2003-2022

8 Uninstall the Acronis Cyber Protection agent (Windows, Linux and macOS)
1. In the Ninja One interface, go to Dashboard > Organizations and click on the organization you want to manage.
2. Hover over a device of your choice, then navigate to Run Script and click From Library.
3. Click on the Acronis Uninstall Agent script (pay attention to the device's OS and the script's target OS).
4. In the pop-up that appears next: a. Leave the Preset Parameter field empty
b. In the Run As drop-down list, select System.
5. Click Apply, then Yes.
12 © Acronis International GmbH, 2003-2022

9 Manage Protection Plan (Windows, Linux and macOS)
1. In the Ninja One interface, go to Dashboard > Organizations and click on the organization you want to manage.
2. Hover over a device of your choice, then navigate to Run Script and click From Library.
3. Click on the Acronis manage protection plan script (pay attention to the device's OS and the script's target OS).
4. In the pop-up that appears next: a. If you want to apply a protection plan, associated with this token: click Preset Parameter
and select the value with Acronis registration token only
b. If you want to revoke a protection plan, associated with this token, click Preset Parameter and select the value with Acronis registration token, followed by yes
5. In the Run As drop-down list, select the System value.
6. Click Apply, then Yes.
13 © Acronis International GmbH, 2003-2022

10 Perform Acronis scans and tasks (Windows, Linux and macOS)
1. In the Ninja One interface, go to Dashboard > Organizations and click on the organization you want to manage.
2. Hover over a device of your choice, then navigate to Run Script and click From Library.
3. Click on the Acronis scans script (pay attention to the device's OS and the script's target OS).
4. In the pop-up that appears next, click the Preset Parameter drop-down list and select one of the following values, which represents the type of task that needs to be run: l backup l av_scan l malware_scan l vulnerability_assessment l patch_management
5. In the Run As drop-down list, select the System value.
6. Click Apply, then Yes.
14 © Acronis International GmbH, 2003-2022
11 MonitoringThe following scripts are currently in use:
l Acronis_backup_failed - counts the number of open alerts of backup failed type and outputs the "x backups failed" sentence.
l Acronis_antivirus_failed_alert - counts the number of open alerts of "Active Protection service is not running" & "Continuous Data Protection failed" types and outputs the "Active protection service failed x times" sentence.
l Acronis_malware_detected_alert - counts cumulatively the total number of open alerts of "Malware is detected and blocked (ODS)" and "Malware is detected and blocked (RTP)" types and outputs the "x MALWARE THREADS has been found" sentence.
l Acronis_last_backup - compares the current endpoint date to the last successful backup date and time. If last successful backup is later than the number of days ago, it outputs the "Last succesful backup more than x days ago" sentence.
l Acronis_last_antivirus_scan - compares the current endpoint date to the last successful antivirus scan date and time. If last successful antivirus scan was later than the number of days ago, it outputs the "Last succesful antivirus scan more than x days ago" sentence.
l Acronis_last_malware_scan - compares the current endpoint date to the last successful antimalware scan date and time. If last successful antimalware scan was later than the number of days ago, it outputs the "Last succesful antimalware scan more than x days ago" sentence.
Each of the monitoring scripts can be set as either manually or repetitively executed with a Ninja One scheduled task.
In order to manually run a monitoring script:
1. In the Ninja One interface, go to Dashboard > Organizations and click on the organization you want to manage.
2. Hover over a device of your choice, then navigate to Run Script and click From Library.
3. Click on the monitoring script you want to run.
4. In the pop-up that appears next, select Preset Parameter, in case the script requires any.
5. In the Run As drop-down list, select the System value.
6. Click Apply, then Yes.
15 © Acronis International GmbH, 2003-2022
In order to create a Ninja One scheduled task for repetitive monitoring script execution:
1. Navigate to Configuration > Tasks.
2. Click New Task in the top right corner.
3. For the newly created task, specify: a. name
b. schedule
c. optionally, description.
4. Click Add Script in the top right to specify what script to run in the task. This will open the Script Library. You can select any of the Acronis monitoring scripts listed there.
5. While adding scripts to your scheduled task, you will be prompted to specify Preset parameters and one of the following ways to run the script as: l System l current user l using your store credentials.
6. In the Run As drop-down list, select the System value.
7. Next, navigate to the Targets tab on the left page side.
8. Click Add in the top right.
9. Specify any desired organization(s), device(s) and/or group(s) to run the task on, then click Apply.
10. Finally, click Save.
16 © Acronis International GmbH, 2003-2022