Embed Size (px)
Citation preview
Acronis Cyber Cloud
Integration with
ConnectWise Manage
INTEGRATION GUIDE Revision: 9/2/2019
2 Copyright © Acronis International GmbH, 2003-2019
Table of contents
1 Introduction ....................................................................................................................3
2 Prerequisites ...................................................................................................................3
3 Setting up integration ......................................................................................................3
3.1 Creating an API member in ConnectWise Manage ................................................................... 3
3.2 Setting up integration with ConnectWise Manage ................................................................... 4
4 Integration scenarios .......................................................................................................5
4.1 Provisioning (automatic or manual) .......................................................................................... 5
4.2 Billing (Pay-as-you-go or Prepaid).............................................................................................. 5
4.3 Ticket synchronization ............................................................................................................... 5
5 Configuring integration ....................................................................................................6
5.1 Configuring the product mapping ............................................................................................. 6
5.2 Managing agreements in ConnectWise Manage ....................................................................... 8
5.3 Configuring the provisioning settings ......................................................................................10
5.4 Configuring the company mapping .........................................................................................11
5.5 Configuring the alert mapping .................................................................................................12
5.6 Viewing tickets that originated from customer alerts .............................................................12
3 Copyright © Acronis International GmbH, 2003-2019
1 Introduction This document describes how to integrate Acronis Cyber Cloud with ConnectWise Manage.
The integration allows you to do the following:
Provisioning of the Acronis Cyber Cloud services to new and existing ConnectWise Manage customers by using the ConnectWise Manage console.
Automatic billing of backup customers in the ConnectWise Manage console, based on their usage of Acronis Cyber Cloud.
Automatic creation of tickets for backup, recovery, or quota-related issues in the ConnectWise Manage console.
2 Prerequisites You must have active accounts in Acronis Cyber Cloud and ConnectWise Manage.
3 Setting up integration To set up integration between Acronis Cyber Cloud and ConnectWise Manage
1. Create an API user and get API keys on the ConnectWise Manage site (p. 3).
2. Set up integration by specifying this data on the Acronis Cyber Cloud site (p. 4).
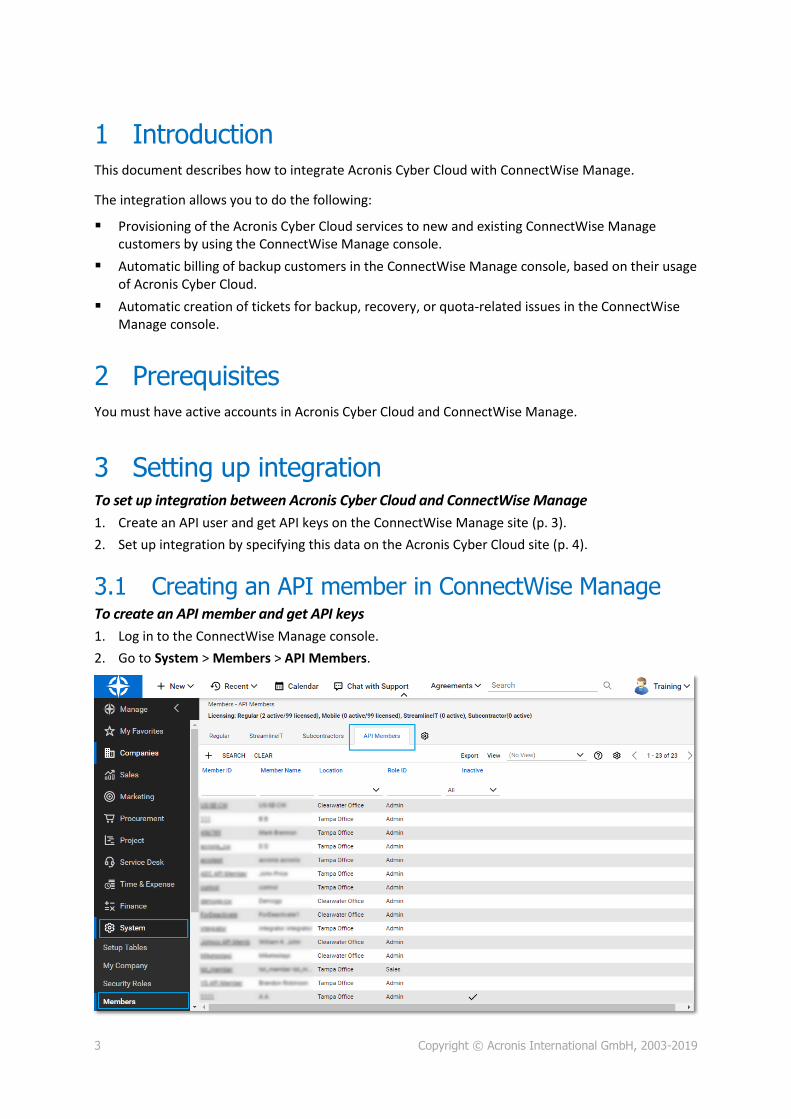
3.1 Creating an API member in ConnectWise Manage To create an API member and get API keys
1. Log in to the ConnectWise Manage console.
2. Go to System > Members > API Members.
4 Copyright © Acronis International GmbH, 2003-2019
Note This API member does not use a Manage User License.
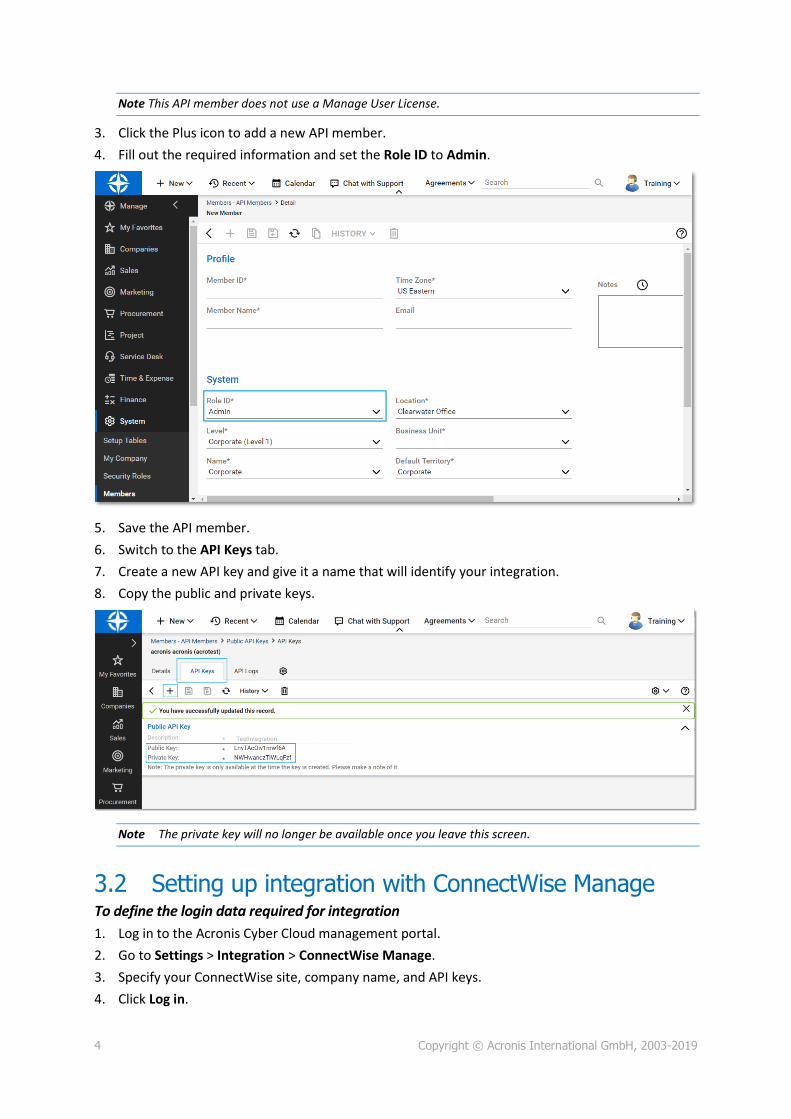
3. Click the Plus icon to add a new API member.
4. Fill out the required information and set the Role ID to Admin.
5. Save the API member.
6. Switch to the API Keys tab.
7. Create a new API key and give it a name that will identify your integration.
8. Copy the public and private keys.
Note The private key will no longer be available once you leave this screen.
3.2 Setting up integration with ConnectWise Manage To define the login data required for integration
1. Log in to the Acronis Cyber Cloud management portal.
2. Go to Settings > Integration > ConnectWise Manage.
3. Specify your ConnectWise site, company name, and API keys.
4. Click Log in.

5 Copyright © Acronis International GmbH, 2003-2019
As a result, you have configured the integration between Acronis Cyber Cloud and ConnectWise Manage.
4 Integration scenarios
4.1 Provisioning (automatic or manual) Automatic provisioning means that when you create a customer in ConnectWise Manage, a corresponding tenant will be automatically created in Acronis Cyber Cloud and Acronis services will be provisioned for it.
Manual provisioning means that a corresponding tenant will not be automatically created in Acronis Cyber Cloud. You may need manual provisioning when you already have customer accounts in ConnectWise Manage and Acronis Cyber Cloud, and you want to map them manually. Another case is when you have a customer account in ConnectWise Manage and you want to create a corresponding tenant manually in Acronis Cyber Cloud.
To set up provisioning
1. Configure product mapping (p. 6).
2. Create an agreement (p. 8).
3. Depending on the type of provisioning:
Automatic: configure the provisioning settings (p. 10).
Manual: configure the company mapping (p. 11).
4.2 Billing (Pay-as-you-go or Prepaid) Pay-as-you-go (PAYG) billing means charging a customer for the actual resource usage on a defined rate. If the PAYG billing is defined, resource usage is synchronized from Acronis Cyber Cloud to ConnectWise Manage with a 15 minutes interval.
Prepaid billing implies setting quotas to Acronis Cyber Cloud offering items based on the total quantity of additions defined in ConnectWise Manage.
To set up billing
1. Configure product mapping (p. 6).
2. Create an agreement (p. 8).
3. Configure the company mapping (p. 11).
4.3 Ticket synchronization Ticket synchronization translates Acronis Cyber Cloud alerts into ConnectWise Manage tickets. You can configure creating and auto-closing rules, as well as assign the priority, status, and other parameters of tickets.
To set up automatic ticket synchronization
1. Configure alert mapping (p. 12).
2. Configure company mapping (p. 11).
6 Copyright © Acronis International GmbH, 2003-2019
5 Configuring integration
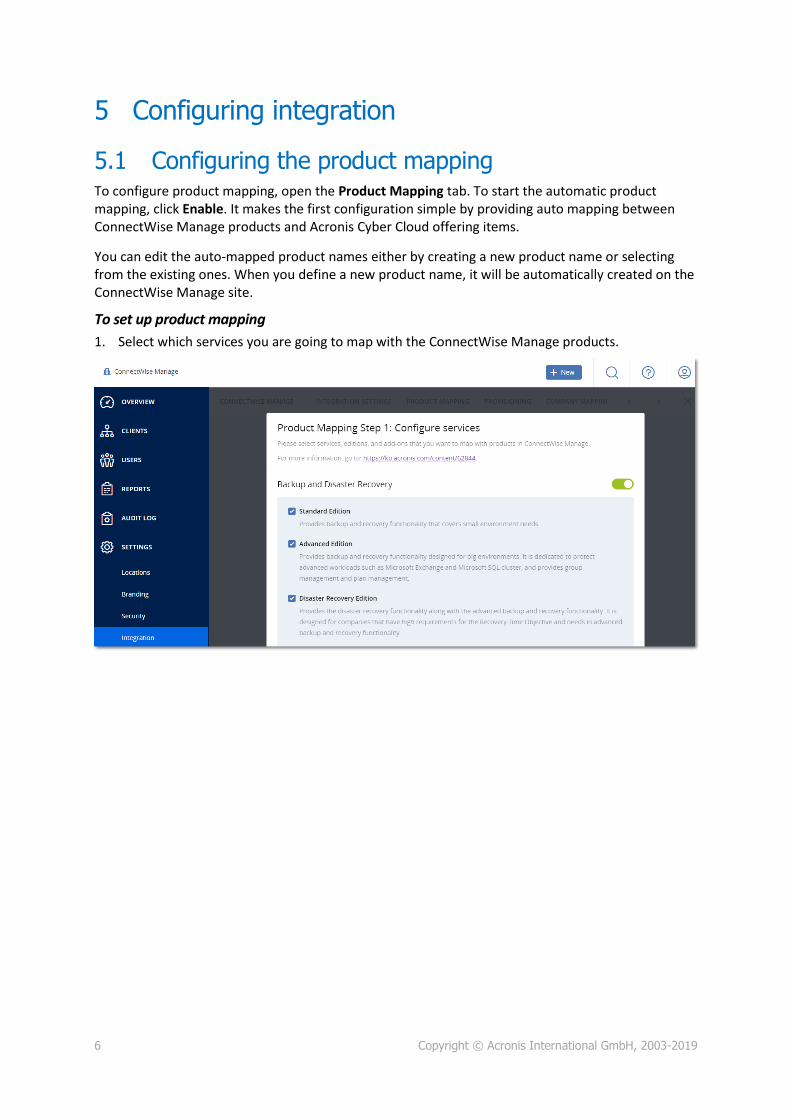
5.1 Configuring the product mapping To configure product mapping, open the Product Mapping tab. To start the automatic product mapping, click Enable. It makes the first configuration simple by providing auto mapping between ConnectWise Manage products and Acronis Cyber Cloud offering items.
You can edit the auto-mapped product names either by creating a new product name or selecting from the existing ones. When you define a new product name, it will be automatically created on the ConnectWise Manage site.
To set up product mapping
1. Select which services you are going to map with the ConnectWise Manage products.

7 Copyright © Acronis International GmbH, 2003-2019
2. Configure the product mapping. Select the corresponding ConnectWise Manage product for each of the offering items.
Edit the product name in ConnectWise if needed:
Specify a new product name by clicking the name in the ConnectWise product column. After completing all of the wizard steps, the new product will be created on the ConnectWise Manage site.
Select the product name from the list of existing ones. After completing all of the wizard steps, the offering items will be mapped with the existing ConnectWise Manage products.
Deselect the offering items that you do not want to provision.
Select Free if you want to provision the data source for all tenants, without mapping to the ConnectWise Manage products.
8 Copyright © Acronis International GmbH, 2003-2019
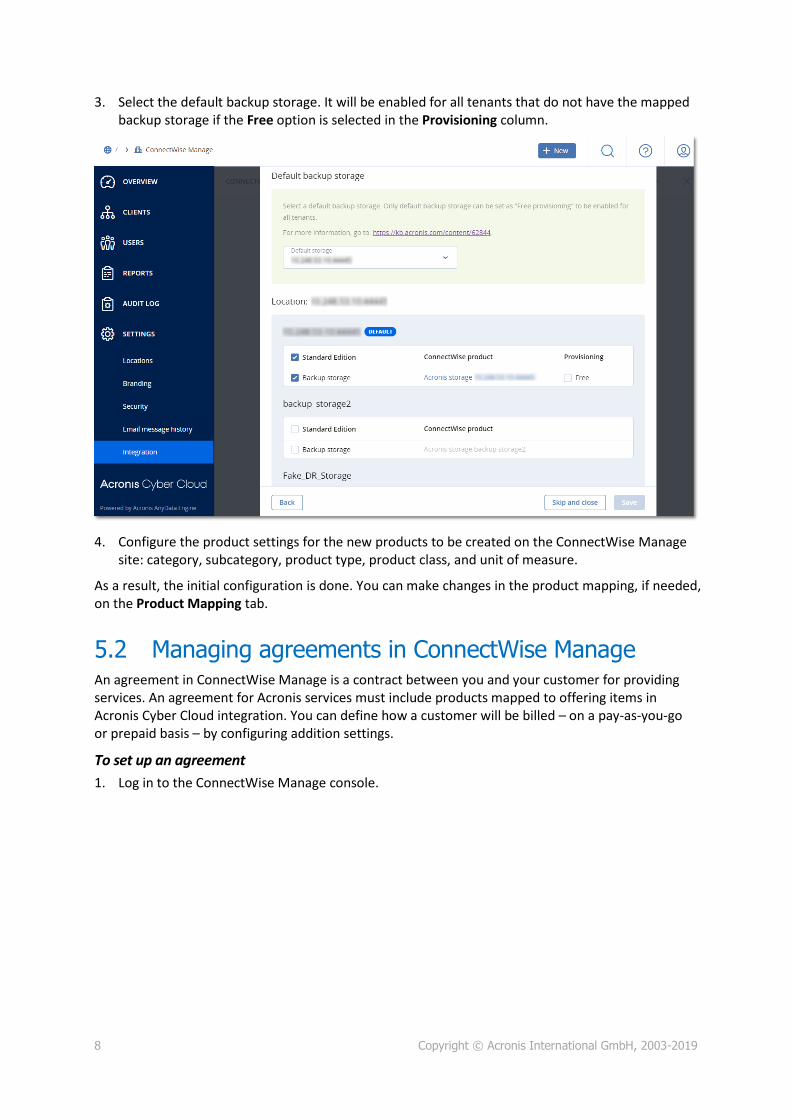
3. Select the default backup storage. It will be enabled for all tenants that do not have the mapped backup storage if the Free option is selected in the Provisioning column.
4. Configure the product settings for the new products to be created on the ConnectWise Manage site: category, subcategory, product type, product class, and unit of measure.
As a result, the initial configuration is done. You can make changes in the product mapping, if needed, on the Product Mapping tab.
5.2 Managing agreements in ConnectWise Manage An agreement in ConnectWise Manage is a contract between you and your customer for providing services. An agreement for Acronis services must include products mapped to offering items in Acronis Cyber Cloud integration. You can define how a customer will be billed – on a pay-as-you-go or prepaid basis – by configuring addition settings.
To set up an agreement
1. Log in to the ConnectWise Manage console.
9 Copyright © Acronis International GmbH, 2003-2019
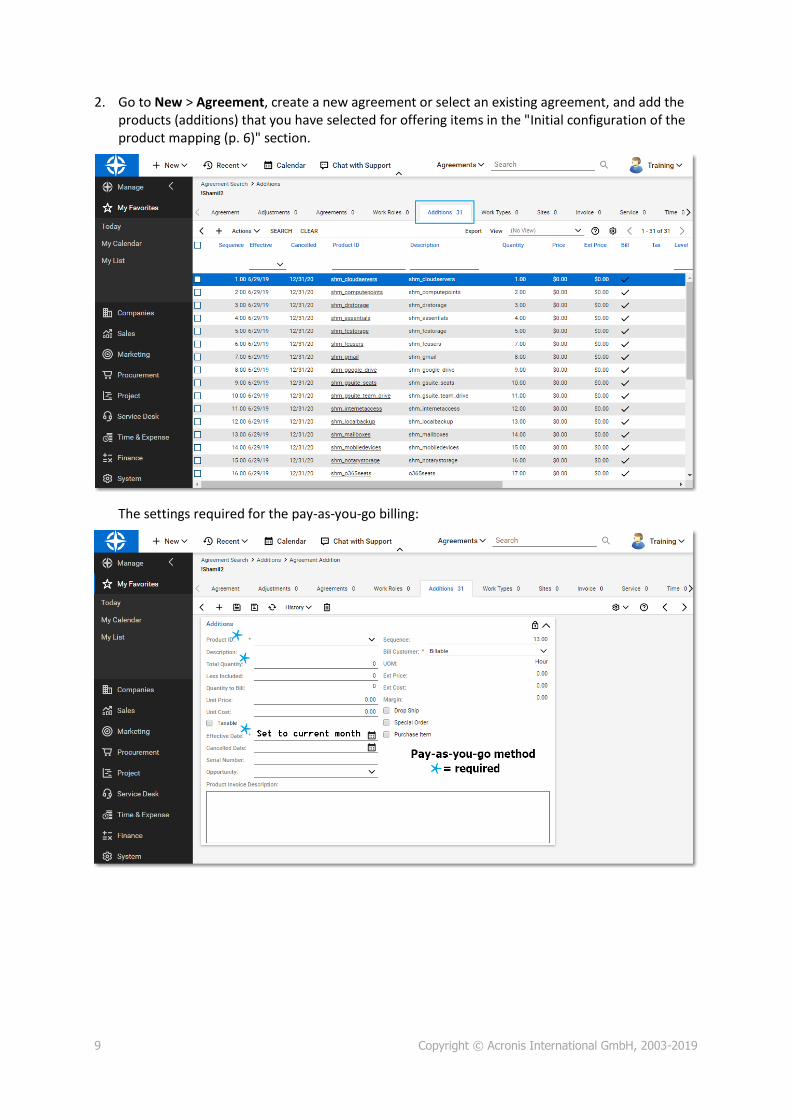
2. Go to New > Agreement, create a new agreement or select an existing agreement, and add the products (additions) that you have selected for offering items in the "Initial configuration of the product mapping (p. 6)" section.
The settings required for the pay-as-you-go billing:
10 Copyright © Acronis International GmbH, 2003-2019
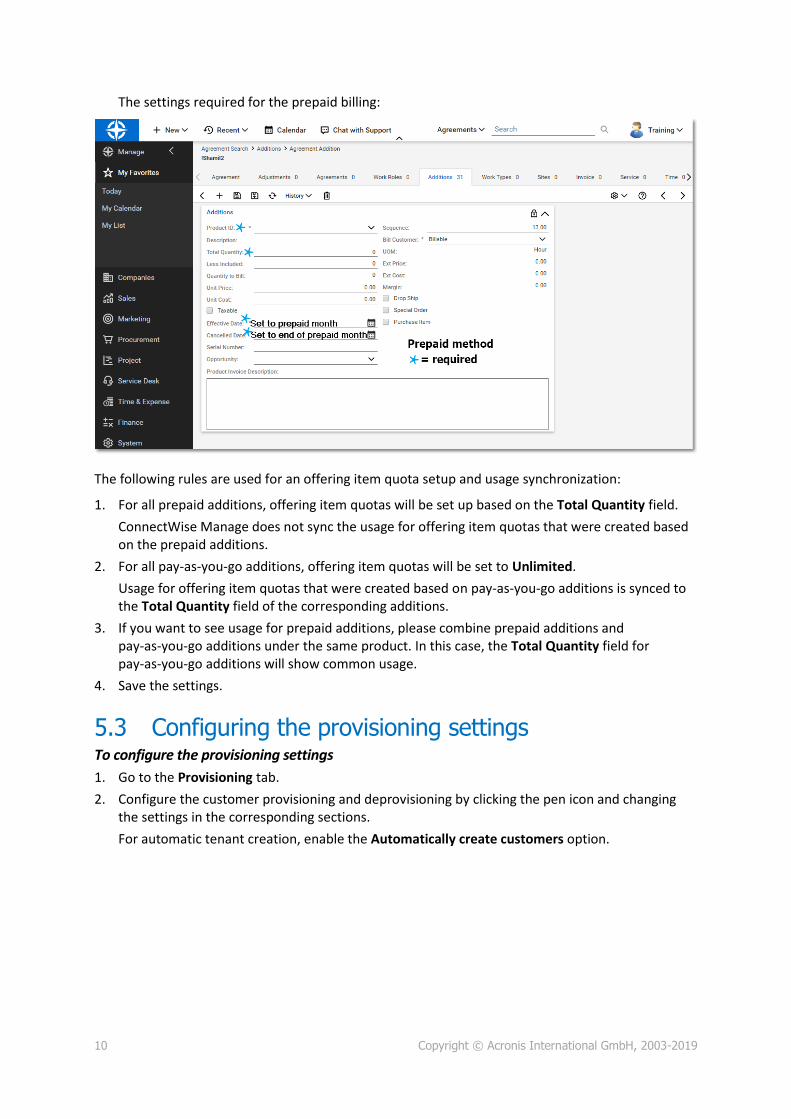
The settings required for the prepaid billing:
The following rules are used for an offering item quota setup and usage synchronization:
1. For all prepaid additions, offering item quotas will be set up based on the Total Quantity field.
ConnectWise Manage does not sync the usage for offering item quotas that were created based on the prepaid additions.
2. For all pay-as-you-go additions, offering item quotas will be set to Unlimited.
Usage for offering item quotas that were created based on pay-as-you-go additions is synced to the Total Quantity field of the corresponding additions.
3. If you want to see usage for prepaid additions, please combine prepaid additions and pay-as-you-go additions under the same product. In this case, the Total Quantity field for pay-as-you-go additions will show common usage.
4. Save the settings.
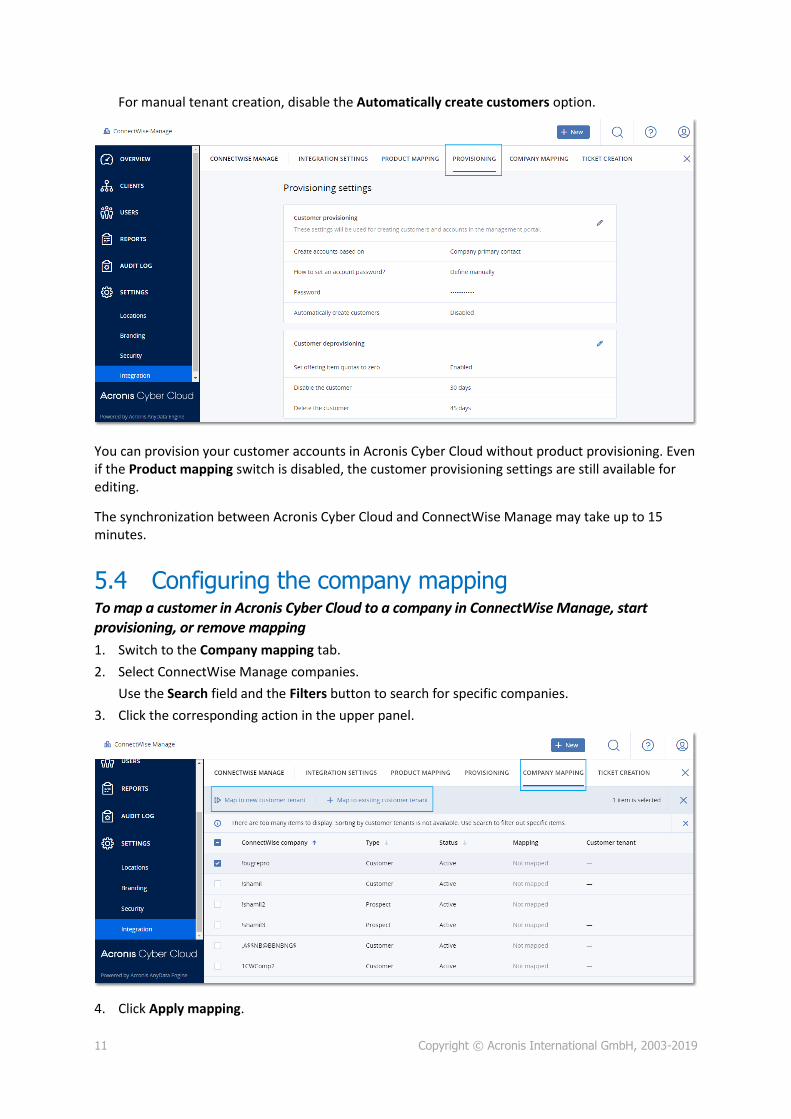
5.3 Configuring the provisioning settings To configure the provisioning settings
1. Go to the Provisioning tab.
2. Configure the customer provisioning and deprovisioning by clicking the pen icon and changing the settings in the corresponding sections.
For automatic tenant creation, enable the Automatically create customers option.
11 Copyright © Acronis International GmbH, 2003-2019
For manual tenant creation, disable the Automatically create customers option.
You can provision your customer accounts in Acronis Cyber Cloud without product provisioning. Even if the Product mapping switch is disabled, the customer provisioning settings are still available for editing.
The synchronization between Acronis Cyber Cloud and ConnectWise Manage may take up to 15 minutes.
5.4 Configuring the company mapping To map a customer in Acronis Cyber Cloud to a company in ConnectWise Manage, start provisioning, or remove mapping
1. Switch to the Company mapping tab.
2. Select ConnectWise Manage companies.
Use the Search field and the Filters button to search for specific companies.
3. Click the corresponding action in the upper panel.
4. Click Apply mapping.
12 Copyright © Acronis International GmbH, 2003-2019
The synchronization between the cloud platform and ConnectWise Manage may take up to 15 minutes.
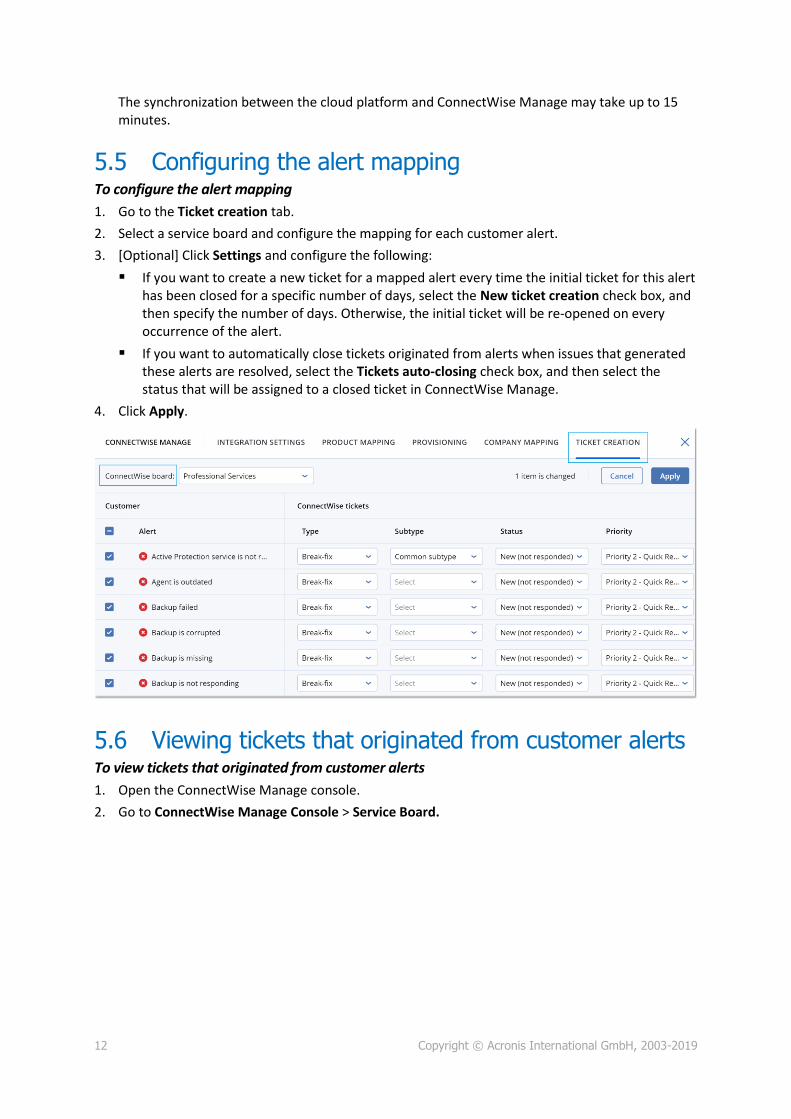
5.5 Configuring the alert mapping To configure the alert mapping
1. Go to the Ticket creation tab.
2. Select a service board and configure the mapping for each customer alert.
3. [Optional] Click Settings and configure the following:
If you want to create a new ticket for a mapped alert every time the initial ticket for this alert has been closed for a specific number of days, select the New ticket creation check box, and then specify the number of days. Otherwise, the initial ticket will be re-opened on every occurrence of the alert.
If you want to automatically close tickets originated from alerts when issues that generated these alerts are resolved, select the Tickets auto-closing check box, and then select the status that will be assigned to a closed ticket in ConnectWise Manage.
4. Click Apply.
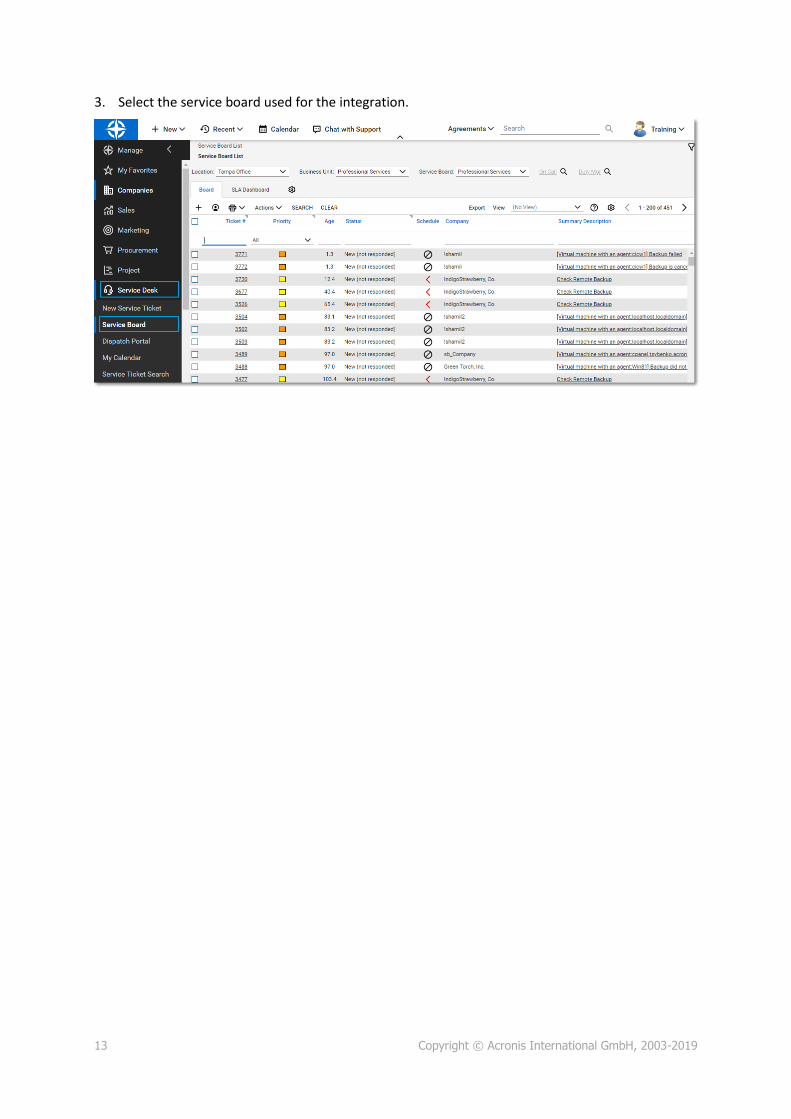
5.6 Viewing tickets that originated from customer alerts To view tickets that originated from customer alerts
1. Open the ConnectWise Manage console.
2. Go to ConnectWise Manage Console > Service Board.
13 Copyright © Acronis International GmbH, 2003-2019
3. Select the service board used for the integration.