Embed Size (px)
Citation preview
DocuSign Quick Start Guide
221 Main Street, Suite 1000, San Francisco, CA 94105 Ι Tel. 866.219.4318 Ι www.docusign.com Ι © DocuSign, Inc.
DocuSign Custom Account Branding Overview Branding your DocuSign® account is an excellent way to add the look and feel of your organization’s brand to the sending, signing, and email process making it easier for users to identify envelopes coming from your organization.
The DocuSign Account Custom Branding feature lets you set the colors, logo and text for your account to enhance the sending and signing experience. You can create any number of brand profiles with different settings to reflect each of your corporate brands or different internal divisions or departments.
When you create or change a branding profile, it applies to everyone using that profile and affects all envelopes sent with that profile.
Note: The Account Branding feature is only supported in certain DocuSign plans. Your account might not support this feature. For more information about which options are available for your account, check your account plan or contact your Account Manager.
You must have the Manage Account option enabled to configure account brand profiles. The changes made will affect the look and feel of the entire account.
The procedures in this guide assume that you are logged on to the console.
Table of Contents Branding and Brand Profiles ................................................................................................................ 2 Accessing the Branding Page .............................................................................................................. 2 Adding and Editing Brand Profiles ....................................................................................................... 3 Exporting, Importing and Deleting Branding Profiles .......................................................................... 11 Brand Profiles and Groups................................................................................................................. 12 Brand Profiles in Envelopes and Templates ...................................................................................... 12 Brand Profiles and Disclosures .......................................................................................................... 14 Legacy Account Brand Information .................................................................................................... 15 For More Information ......................................................................................................................... 17
2
221 Main Street, Suite 1000, San Francisco, CA 94105 Ι Tel. 866.219.4318 Ι www.docusign.com Ι © DocuSign, Inc.
DocuSign Custom Account Branding Quick Start Guide
Branding and Brand Profiles When working with custom branding, it is important to understand brand profiles and how they are used by groups and in envelopes.
Each brand profile has specified colors, logos, links and other settings for console sending, emails, and recipient signing. An account can have any number of brand profiles associated with it. This lets you create different brand profiles for your corporate brands or different internal divisions or departments.
After setting up your brand profiles, you can associate those profiles with your user Groups. The brand profiles associated with the group are the only brands users in that group can use. If a user is a member of multiple groups, they will have access to all the brand profiles for all their groups and the default account brand profile is their default brand profile. Account administrators always have access to all brand profiles.
If the user has access to multiple brand profiles, when they are creating a template or sending an envelope, they can select the brand profile used in the template or envelope.
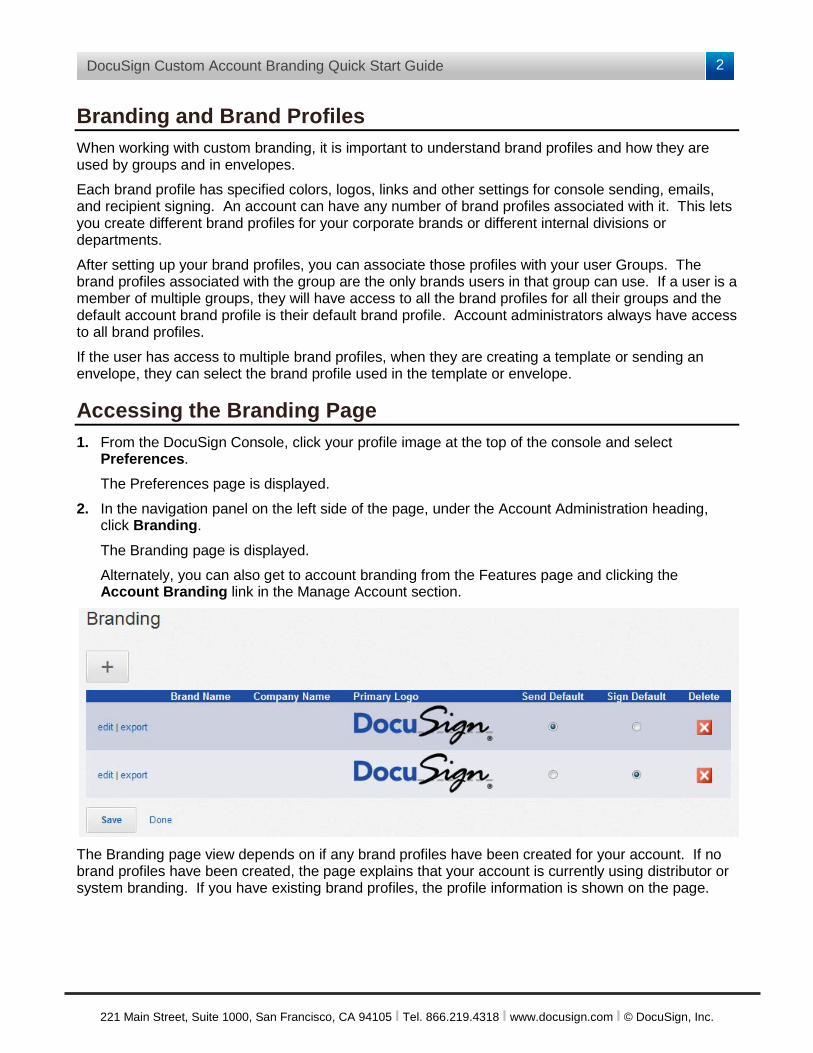
Accessing the Branding Page 1. From the DocuSign Console, click your profile image at the top of the console and select
Preferences.
The Preferences page is displayed.
2. In the navigation panel on the left side of the page, under the Account Administration heading, click Branding.
The Branding page is displayed.
Alternately, you can also get to account branding from the Features page and clicking the Account Branding link in the Manage Account section.
The Branding page view depends on if any brand profiles have been created for your account. If no brand profiles have been created, the page explains that your account is currently using distributor or system branding. If you have existing brand profiles, the profile information is shown on the page.
3
221 Main Street, Suite 1000, San Francisco, CA 94105 Ι Tel. 866.219.4318 Ι www.docusign.com Ι © DocuSign, Inc.
DocuSign Custom Account Branding Quick Start Guide
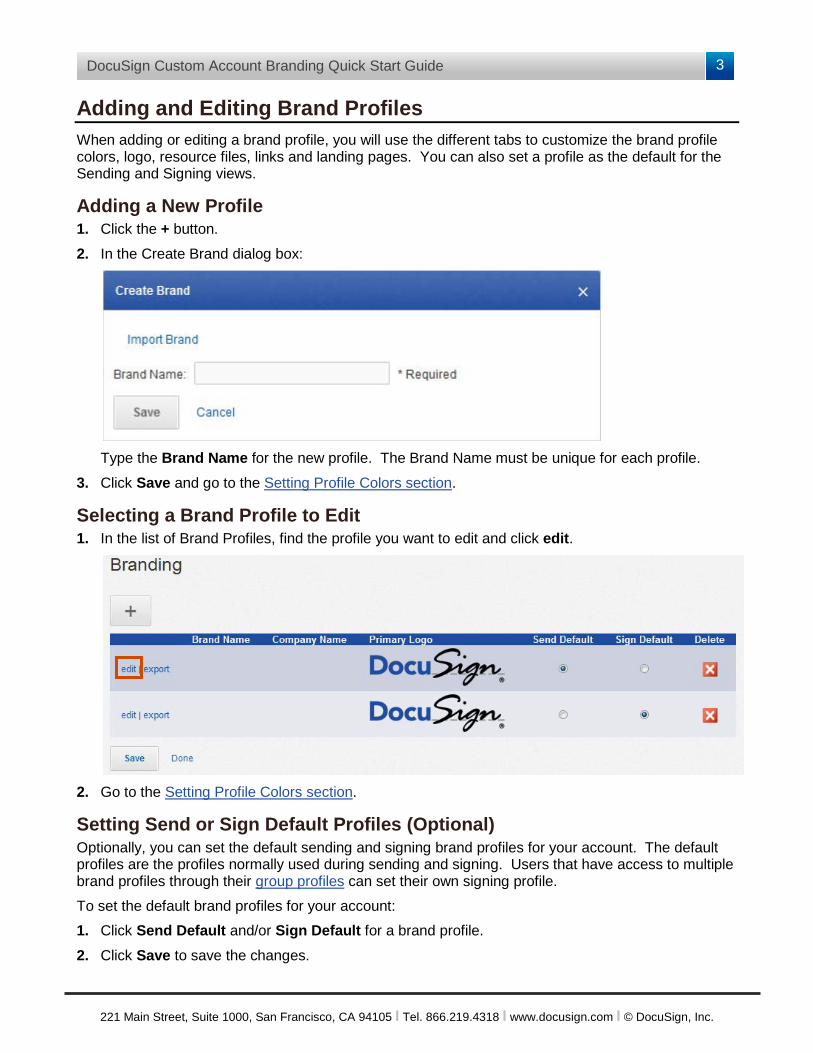
Adding and Editing Brand Profiles When adding or editing a brand profile, you will use the different tabs to customize the brand profile colors, logo, resource files, links and landing pages. You can also set a profile as the default for the Sending and Signing views.
Adding a New Profile 1. Click the + button.
2. In the Create Brand dialog box:
Type the Brand Name for the new profile. The Brand Name must be unique for each profile.
3. Click Save and go to the Setting Profile Colors section.
Selecting a Brand Profile to Edit 1. In the list of Brand Profiles, find the profile you want to edit and click edit.
2. Go to the Setting Profile Colors section.
Setting Send or Sign Default Profiles (Optional) Optionally, you can set the default sending and signing brand profiles for your account. The default profiles are the profiles normally used during sending and signing. Users that have access to multiple brand profiles through their group profiles can set their own signing profile.
To set the default brand profiles for your account:
1. Click Send Default and/or Sign Default for a brand profile.
2. Click Save to save the changes.
4
221 Main Street, Suite 1000, San Francisco, CA 94105 Ι Tel. 866.219.4318 Ι www.docusign.com Ι © DocuSign, Inc.
DocuSign Custom Account Branding Quick Start Guide
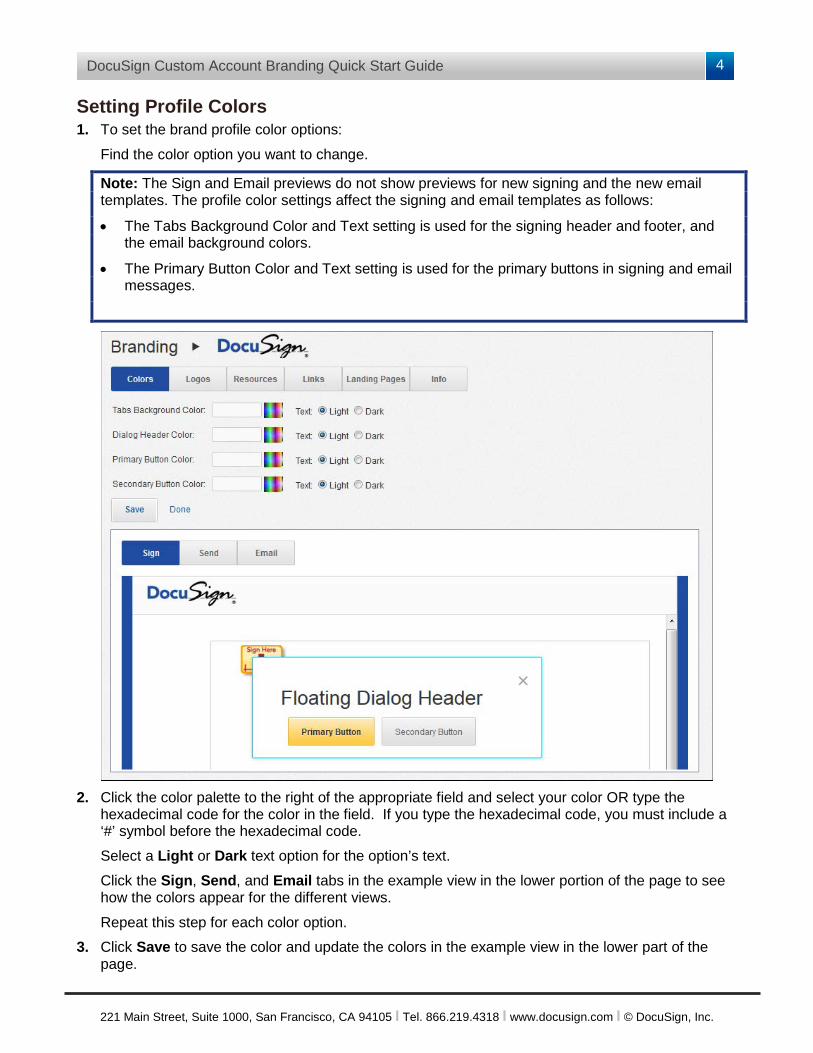
Setting Profile Colors 1. To set the brand profile color options:
Find the color option you want to change.
Note: The Sign and Email previews do not show previews for new signing and the new email templates. The profile color settings affect the signing and email templates as follows:
• The Tabs Background Color and Text setting is used for the signing header and footer, and the email background colors.
• The Primary Button Color and Text setting is used for the primary buttons in signing and email messages.
2. Click the color palette to the right of the appropriate field and select your color OR type the
hexadecimal code for the color in the field. If you type the hexadecimal code, you must include a ‘#’ symbol before the hexadecimal code.
Select a Light or Dark text option for the option’s text.
Click the Sign, Send, and Email tabs in the example view in the lower portion of the page to see how the colors appear for the different views.
Repeat this step for each color option.
3. Click Save to save the color and update the colors in the example view in the lower part of the page.
5
221 Main Street, Suite 1000, San Francisco, CA 94105 Ι Tel. 866.219.4318 Ι www.docusign.com Ι © DocuSign, Inc.
DocuSign Custom Account Branding Quick Start Guide
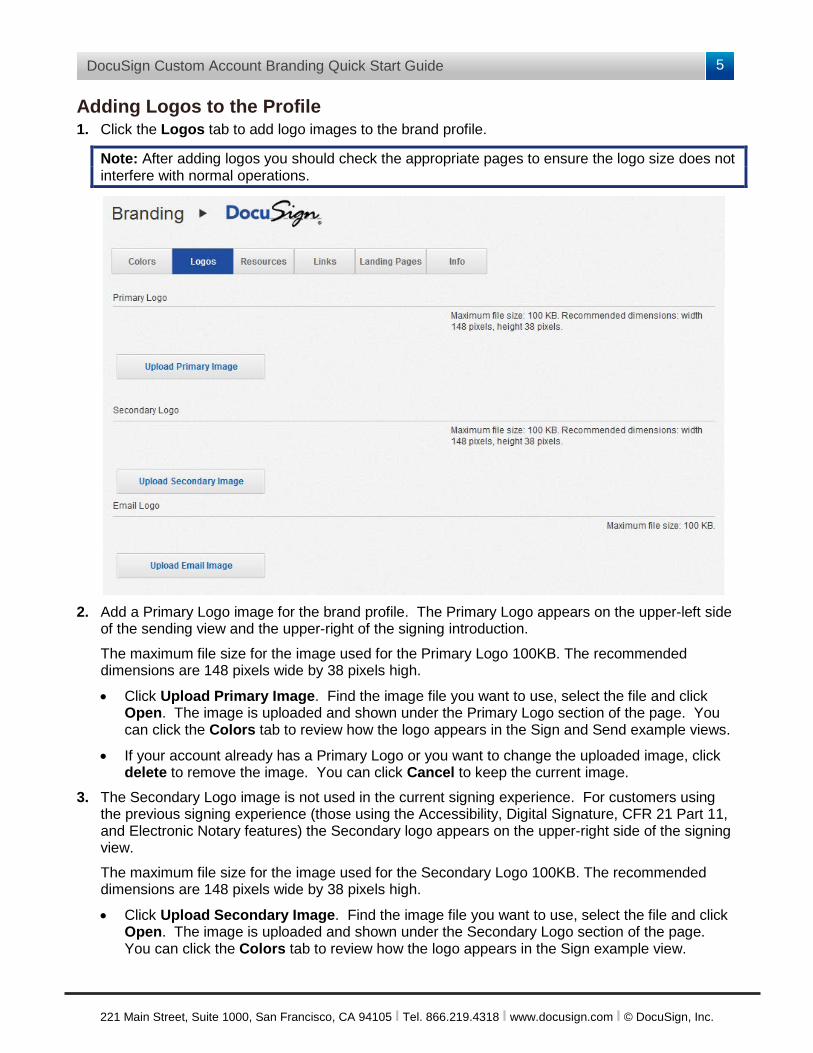
Adding Logos to the Profile 1. Click the Logos tab to add logo images to the brand profile.
Note: After adding logos you should check the appropriate pages to ensure the logo size does not interfere with normal operations.
2. Add a Primary Logo image for the brand profile. The Primary Logo appears on the upper-left side
of the sending view and the upper-right of the signing introduction.
The maximum file size for the image used for the Primary Logo 100KB. The recommended dimensions are 148 pixels wide by 38 pixels high.
• Click Upload Primary Image. Find the image file you want to use, select the file and click Open. The image is uploaded and shown under the Primary Logo section of the page. You can click the Colors tab to review how the logo appears in the Sign and Send example views.
• If your account already has a Primary Logo or you want to change the uploaded image, click delete to remove the image. You can click Cancel to keep the current image.
3. The Secondary Logo image is not used in the current signing experience. For customers using the previous signing experience (those using the Accessibility, Digital Signature, CFR 21 Part 11, and Electronic Notary features) the Secondary logo appears on the upper-right side of the signing view.
The maximum file size for the image used for the Secondary Logo 100KB. The recommended dimensions are 148 pixels wide by 38 pixels high.
• Click Upload Secondary Image. Find the image file you want to use, select the file and click Open. The image is uploaded and shown under the Secondary Logo section of the page. You can click the Colors tab to review how the logo appears in the Sign example view.
6
221 Main Street, Suite 1000, San Francisco, CA 94105 Ι Tel. 866.219.4318 Ι www.docusign.com Ι © DocuSign, Inc.
DocuSign Custom Account Branding Quick Start Guide
• If your account already has a Secondary Logo or you want to change the uploaded image, click delete to remove the image. You can click Cancel to keep the current image.
4. Optionally, add an Email Logo image for the email messages. The email logo appears in the upper-left side of an email message.
The maximum image file size for the Email Logo is 100KB.
• Click Upload Email Image. Find the image file you want to use, select the file and click Open. The image is uploaded and shown under the Email Logo section of the page. You can click the Colors tab to review how the logo appears in the Email example view.
• If your account already has an Email Logo or you want to change the uploaded image, click delete to remove the image. You can click Cancel to keep the current image.
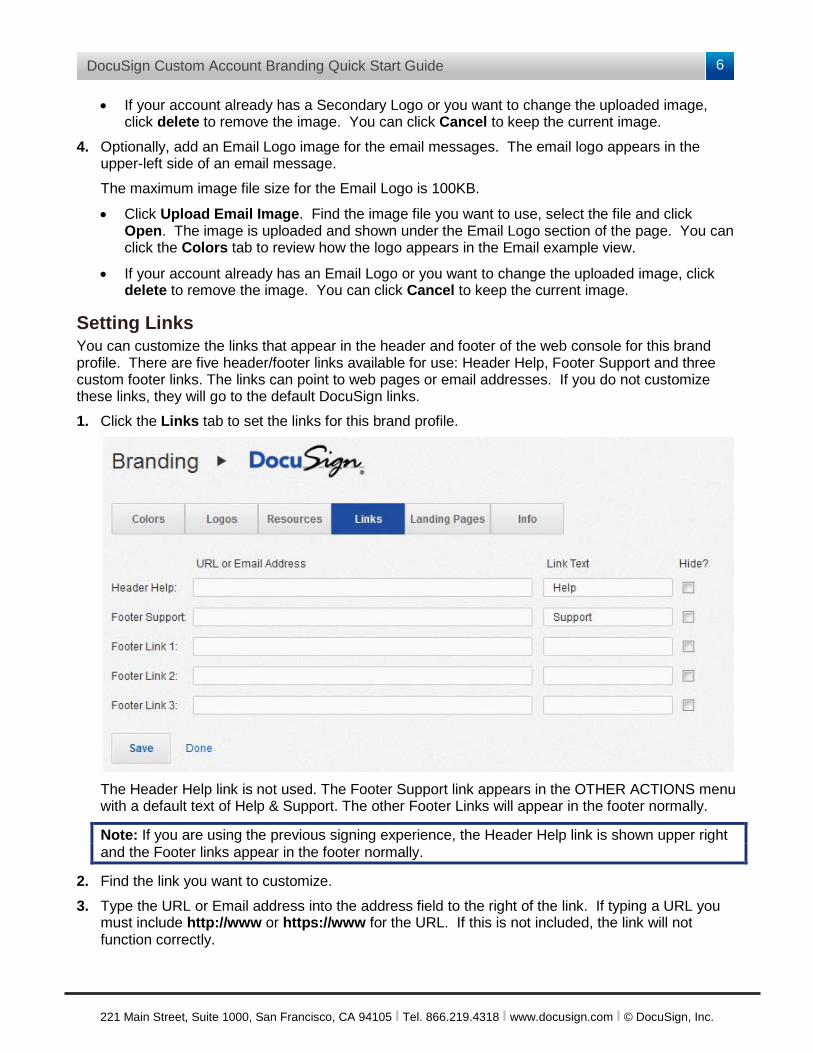
Setting Links You can customize the links that appear in the header and footer of the web console for this brand profile. There are five header/footer links available for use: Header Help, Footer Support and three custom footer links. The links can point to web pages or email addresses. If you do not customize these links, they will go to the default DocuSign links.
1. Click the Links tab to set the links for this brand profile.
The Header Help link is not used. The Footer Support link appears in the OTHER ACTIONS menu with a default text of Help & Support. The other Footer Links will appear in the footer normally.
Note: If you are using the previous signing experience, the Header Help link is shown upper right and the Footer links appear in the footer normally.
2. Find the link you want to customize.
3. Type the URL or Email address into the address field to the right of the link. If typing a URL you must include http://www or https://www for the URL. If this is not included, the link will not function correctly.
7
221 Main Street, Suite 1000, San Francisco, CA 94105 Ι Tel. 866.219.4318 Ι www.docusign.com Ι © DocuSign, Inc.
DocuSign Custom Account Branding Quick Start Guide
4. To change Link Text and hide links. The Link Text for the Help and Support links is pre-defined, but can be changed. For Footer Links 1, 2 and 3 you can type your own text in the Link Text field.
Select Hide? for the link to hide (not display) a link. Links that are hidden do not appear in the Console.
Note: If the Footer Link 1, 2 and 3 fields are blank, they are automatically hidden.
5. Click Save to save the Link settings.
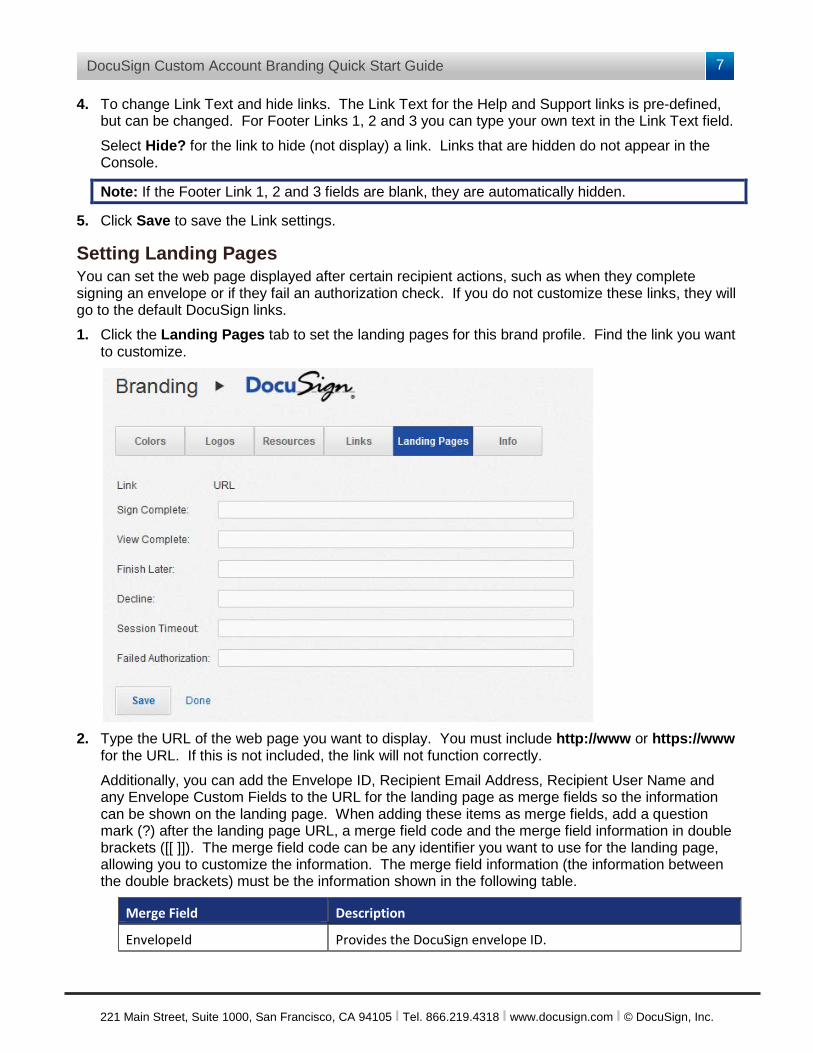
Setting Landing Pages You can set the web page displayed after certain recipient actions, such as when they complete signing an envelope or if they fail an authorization check. If you do not customize these links, they will go to the default DocuSign links.
1. Click the Landing Pages tab to set the landing pages for this brand profile. Find the link you want to customize.
2. Type the URL of the web page you want to display. You must include http://www or https://www
for the URL. If this is not included, the link will not function correctly.
Additionally, you can add the Envelope ID, Recipient Email Address, Recipient User Name and any Envelope Custom Fields to the URL for the landing page as merge fields so the information can be shown on the landing page. When adding these items as merge fields, add a question mark (?) after the landing page URL, a merge field code and the merge field information in double brackets ([[ ]]). The merge field code can be any identifier you want to use for the landing page, allowing you to customize the information. The merge field information (the information between the double brackets) must be the information shown in the following table.
Merge Field Description
EnvelopeId Provides the DocuSign envelope ID.
8
221 Main Street, Suite 1000, San Francisco, CA 94105 Ι Tel. 866.219.4318 Ι www.docusign.com Ι © DocuSign, Inc.
DocuSign Custom Account Branding Quick Start Guide
Merge Field Description
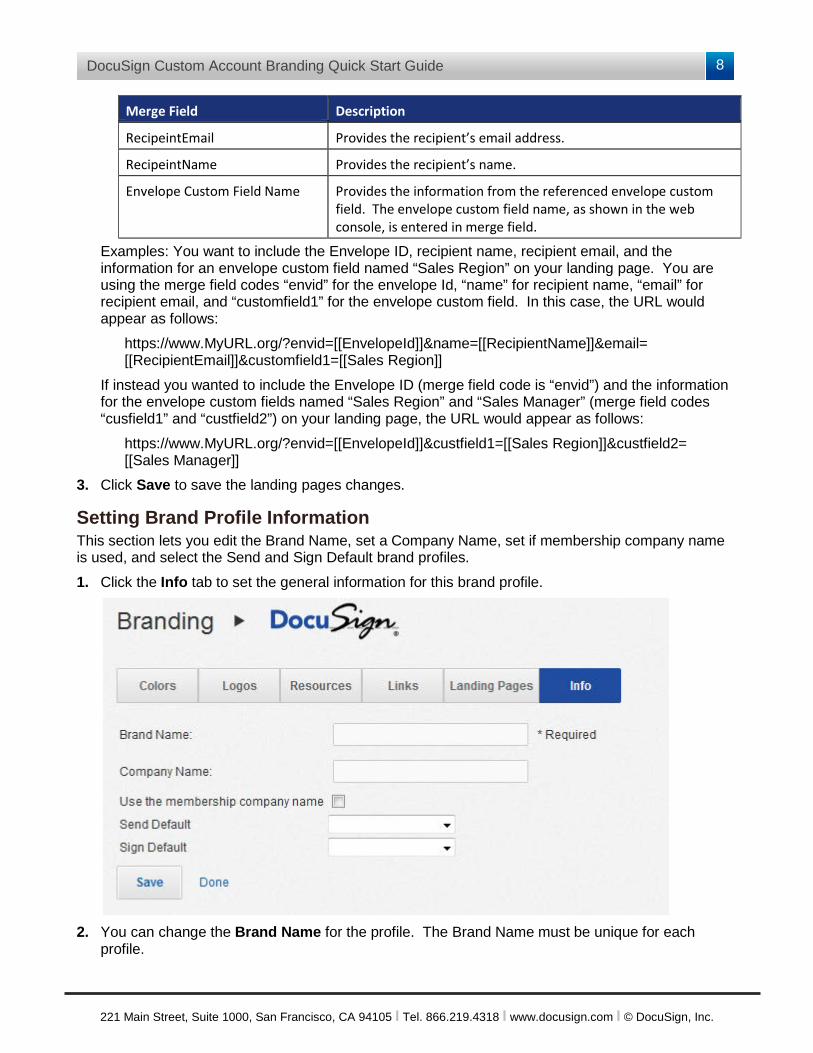
RecipeintEmail Provides the recipient’s email address.
RecipeintName Provides the recipient’s name.
Envelope Custom Field Name Provides the information from the referenced envelope custom field. The envelope custom field name, as shown in the web console, is entered in merge field.
Examples: You want to include the Envelope ID, recipient name, recipient email, and the information for an envelope custom field named “Sales Region” on your landing page. You are using the merge field codes “envid” for the envelope Id, “name” for recipient name, “email” for recipient email, and “customfield1” for the envelope custom field. In this case, the URL would appear as follows:
https://www.MyURL.org/?envid=[[EnvelopeId]]&name=[[RecipientName]]&email= [[RecipientEmail]]&customfield1=[[Sales Region]]
If instead you wanted to include the Envelope ID (merge field code is “envid”) and the information for the envelope custom fields named “Sales Region” and “Sales Manager” (merge field codes “cusfield1” and “custfield2”) on your landing page, the URL would appear as follows:
https://www.MyURL.org/?envid=[[EnvelopeId]]&custfield1=[[Sales Region]]&custfield2= [[Sales Manager]]
3. Click Save to save the landing pages changes.
Setting Brand Profile Information This section lets you edit the Brand Name, set a Company Name, set if membership company name is used, and select the Send and Sign Default brand profiles.
1. Click the Info tab to set the general information for this brand profile.
2. You can change the Brand Name for the profile. The Brand Name must be unique for each
profile.
9
221 Main Street, Suite 1000, San Francisco, CA 94105 Ι Tel. 866.219.4318 Ι www.docusign.com Ι © DocuSign, Inc.
DocuSign Custom Account Branding Quick Start Guide
3. Optionally, you can add a Company Name that is associated with the profile. If a company name is entered, it will be used as the Sender Company in email communications using this profile (unless Use the membership company name is selected) and in the consumer disclosure (if enabled in the consumer disclosure). If a company name is not entered and Use the membership company name is not selected, then the account name is used as the Sender Company in email communications. See Brand Profiles and Consumer Disclosures for more information about how company name works.
4. Optionally, you can select Use the membership company name. If this is selected, the Company listed in the sender’s Personal Info profile is used as the Sender Company in email communications and the consumer disclosure (if enabled in the consumer disclosure). If this is not selected, the Company Name, entered in the previous step, is used as the Sender Company. If this is not selected and there is no entry in the Company Name field, then the account name is used as the Sender Company.
5. Optionally, you can select the Send Default and Sign Default brand profiles for your account.
6. Click Save to save the brand profile information.
Resource Files Resource files are an optional method to control the text elements in your account sending view, signing view and for emails sent by your account. The ability to use the resource file option is not normally enabled for an account; contact your Account Manager or DocuSign Support for more information about enabling this option in your account.
Important: Using resource files for account branding is an advanced function. The resource files are XML files and this option should only be used if you have an experienced XML programmer available to work with your resource files. Changes to resource file must be done with an XML editor; files changed with other applications might not function correctly when uploaded to the DocuSign system.
DocuSign uses three master resource files; one for sending (DocuSign_SendResources.xml), one for signing (DocuSign_SignResources.xml) and one for email messages (DocuSign_EmailResources.xml). In addition to setting text elements, the signing resource file also controls some of the dialog boxes displayed in the signing view.
To use resource files, you will download the appropriate master resource file for the information you want to change, modify the resource file and then upload your modified file to the DocuSign system. When you upload a modified resource file, only the differences between your modified file and the master file are saved by the system. You can modify and upload one, two or all of the master resource files to customize them for your account. If you do not upload a modified resource file, the system will use default information in the master resource file.
You can upload two different resource files for signing resources; one for general signing and one for captive (embedded) signing. If you upload both files, normal remote signers will see the information in the Signing Resource file and captive (embedded) signers will see the information in the Captive Signing Resource file.
For more information about specific resource files, please refer to the information guide for that file:
Signing Resource file:
• Version 1.1
Email Resource file:
• Version 1.1

10
221 Main Street, Suite 1000, San Francisco, CA 94105 Ι Tel. 866.219.4318 Ι www.docusign.com Ι © DocuSign, Inc.
DocuSign Custom Account Branding Quick Start Guide
1. If you are using a Sending Resources file in your account:
IMPORTANT: The resource files are subject to change without notice. If you customize the resource files, please review your sending view with each new DocuSign release.
• To download the Master Sending Resource file, in the Sending Resources section select the download language for the master resource file and click the Download Master button.
• To upload a custom Sending Resource file, in the Sending Resources section click Upload Resource. Find the sending resource file you want to upload, select the file and click Open.
• To download your custom Sending Resource file, click the Download Your Resource button. This option is not available if you have not uploaded a custom file.
2. If you are using Signing Resource files in your account:
IMPORTANT: The resource files are subject to change without notice. If you customize the resource files, please review your signing views with each new DocuSign release.
• To download a Master Signing Resource file, in the Signing Resources section select the download language for the master resource file and click the Download Master button.
• To upload a custom Signing or Captive Signing Resource file, in the Signing Resources section click Upload Resource or Upload Captive Resource. Find the signing resource file you want to upload, select the file and click Open.
• To download your custom Signing or Captive Signing Resource file, click the Download Your Resource button. This option is not available if you have not uploaded a custom file.
3. If you are using an Email Resource file in your account:
IMPORTANT: The resource files are subject to change without notice. If you customize the resource files, please review your email views with each new DocuSign release.
11
221 Main Street, Suite 1000, San Francisco, CA 94105 Ι Tel. 866.219.4318 Ι www.docusign.com Ι © DocuSign, Inc.
DocuSign Custom Account Branding Quick Start Guide
• To download the Master Email Resource file, in the Email Resources section select the download language for the master resource file and click the Download Master button.
• To upload a custom Email Resource file, in the Email Resources section click Upload Resource. Find the email resource file you want to upload, select the file and click Open.
• To download your custom Email Resource file, click the Download Your Resource button. This option is not available if you have not uploaded a custom file.
Exporting, Importing and Deleting Branding Profiles You can export brand profiles to save or for use with other accounts. Additionally, you can import brand profiles into your account. This allows you to create and make changes to a brand profile in a Preview or Demo account, when the brand profile changes are complete, you can export it and then import it into your Production account.
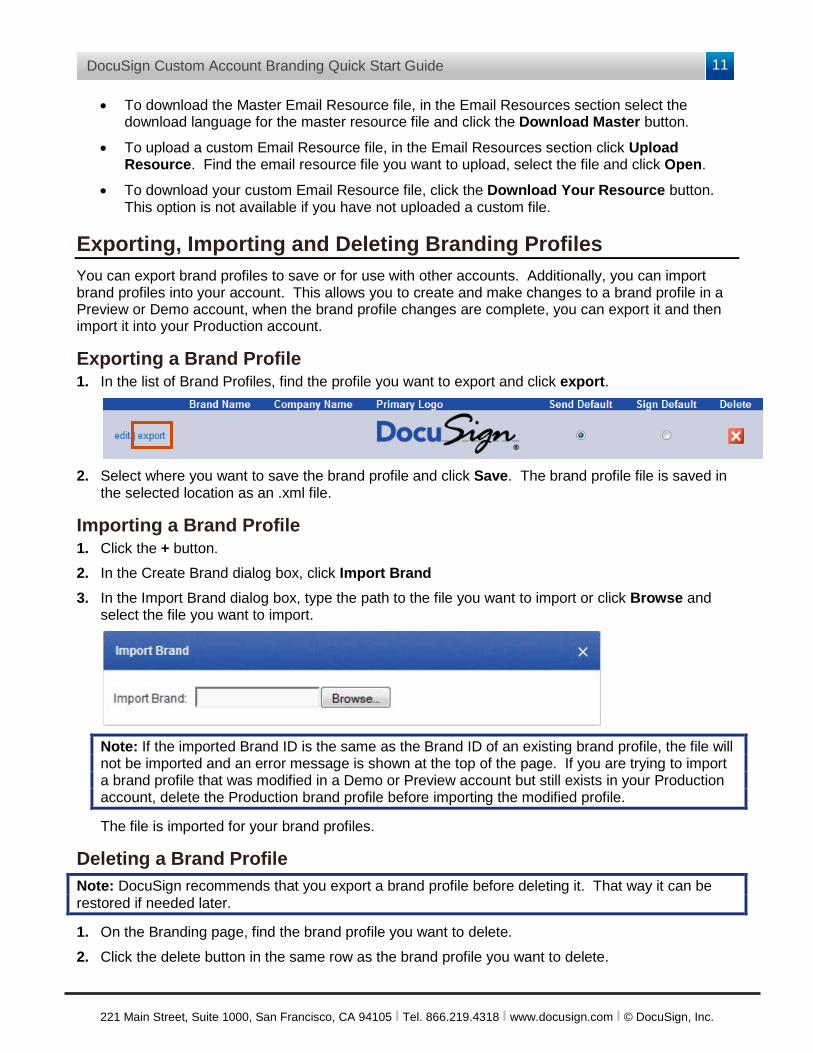
Exporting a Brand Profile 1. In the list of Brand Profiles, find the profile you want to export and click export.
2. Select where you want to save the brand profile and click Save. The brand profile file is saved in
the selected location as an .xml file.
Importing a Brand Profile 1. Click the + button.
2. In the Create Brand dialog box, click Import Brand
3. In the Import Brand dialog box, type the path to the file you want to import or click Browse and select the file you want to import.
Note: If the imported Brand ID is the same as the Brand ID of an existing brand profile, the file will not be imported and an error message is shown at the top of the page. If you are trying to import a brand profile that was modified in a Demo or Preview account but still exists in your Production account, delete the Production brand profile before importing the modified profile.
The file is imported for your brand profiles.
Deleting a Brand Profile Note: DocuSign recommends that you export a brand profile before deleting it. That way it can be restored if needed later.
1. On the Branding page, find the brand profile you want to delete.
2. Click the delete button in the same row as the brand profile you want to delete.
12
221 Main Street, Suite 1000, San Francisco, CA 94105 Ι Tel. 866.219.4318 Ι www.docusign.com Ι © DocuSign, Inc.
DocuSign Custom Account Branding Quick Start Guide
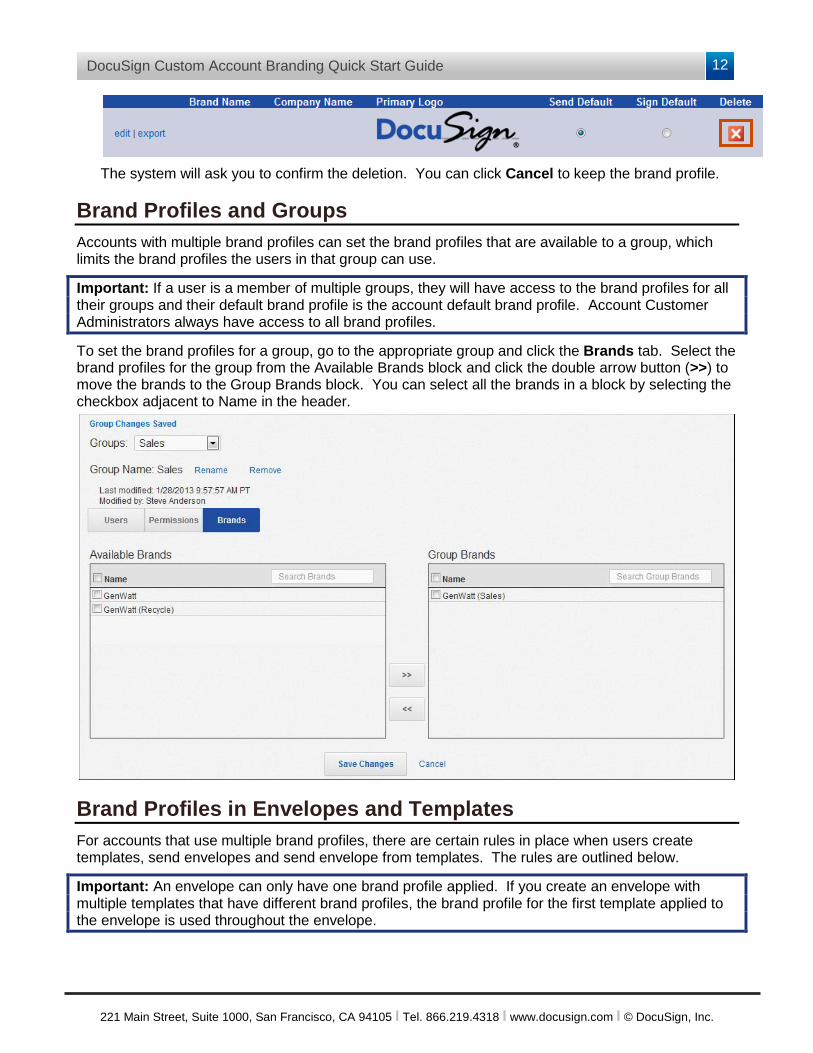
The system will ask you to confirm the deletion. You can click Cancel to keep the brand profile.
Brand Profiles and Groups Accounts with multiple brand profiles can set the brand profiles that are available to a group, which limits the brand profiles the users in that group can use.
Important: If a user is a member of multiple groups, they will have access to the brand profiles for all their groups and their default brand profile is the account default brand profile. Account Customer Administrators always have access to all brand profiles.
To set the brand profiles for a group, go to the appropriate group and click the Brands tab. Select the brand profiles for the group from the Available Brands block and click the double arrow button (>>) to move the brands to the Group Brands block. You can select all the brands in a block by selecting the checkbox adjacent to Name in the header.
Brand Profiles in Envelopes and Templates For accounts that use multiple brand profiles, there are certain rules in place when users create templates, send envelopes and send envelope from templates. The rules are outlined below.
Important: An envelope can only have one brand profile applied. If you create an envelope with multiple templates that have different brand profiles, the brand profile for the first template applied to the envelope is used throughout the envelope.
13
221 Main Street, Suite 1000, San Francisco, CA 94105 Ι Tel. 866.219.4318 Ι www.docusign.com Ι © DocuSign, Inc.
DocuSign Custom Account Branding Quick Start Guide
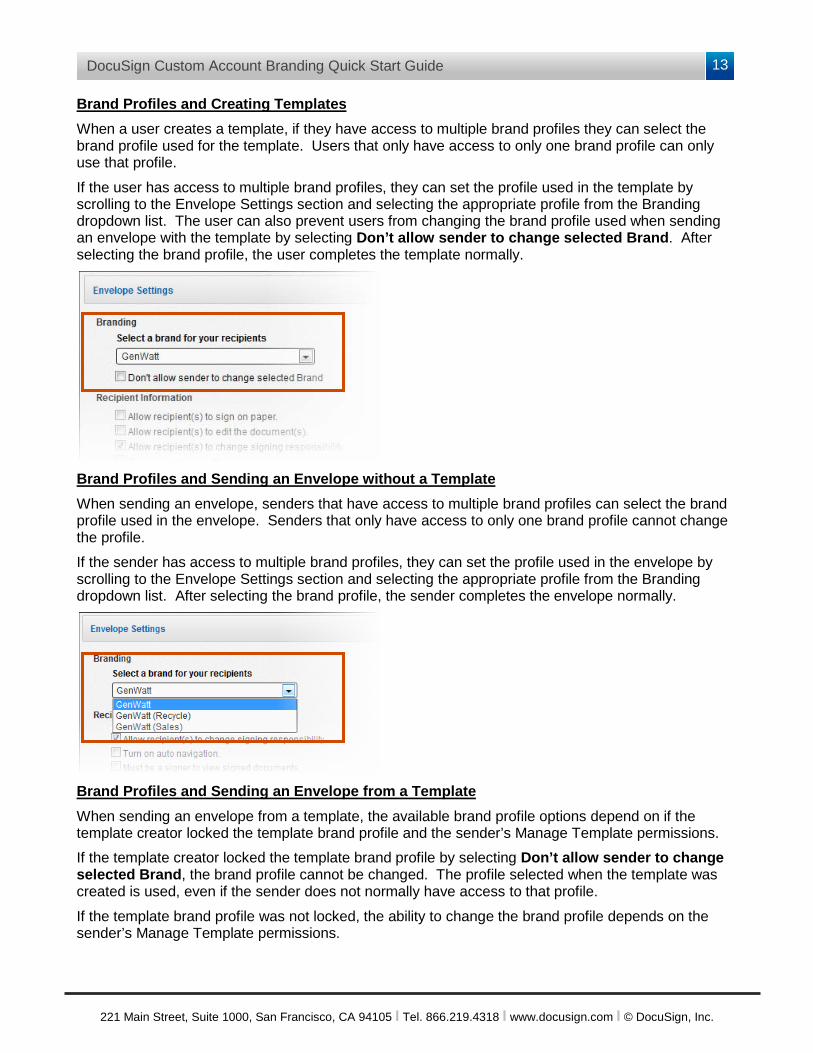
Brand Profiles and Creating Templates When a user creates a template, if they have access to multiple brand profiles they can select the brand profile used for the template. Users that only have access to only one brand profile can only use that profile.
If the user has access to multiple brand profiles, they can set the profile used in the template by scrolling to the Envelope Settings section and selecting the appropriate profile from the Branding dropdown list. The user can also prevent users from changing the brand profile used when sending an envelope with the template by selecting Don’t allow sender to change selected Brand. After selecting the brand profile, the user completes the template normally.
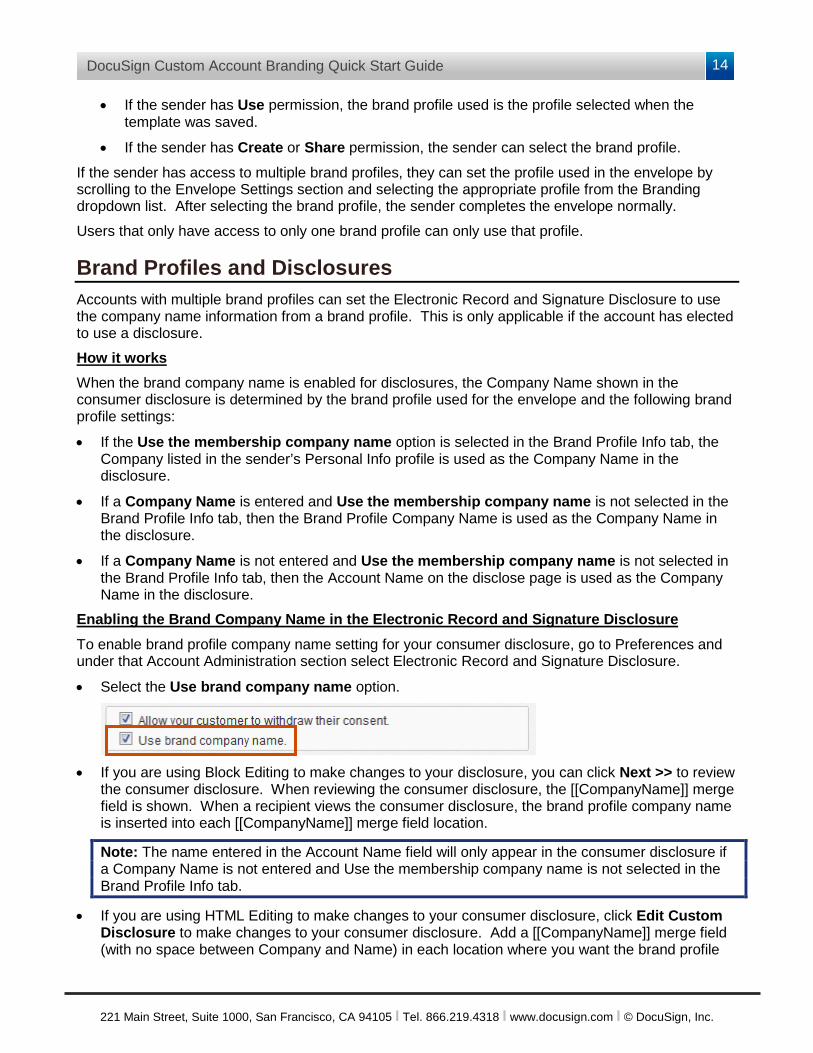
Brand Profiles and Sending an Envelope without a Template When sending an envelope, senders that have access to multiple brand profiles can select the brand profile used in the envelope. Senders that only have access to only one brand profile cannot change the profile.
If the sender has access to multiple brand profiles, they can set the profile used in the envelope by scrolling to the Envelope Settings section and selecting the appropriate profile from the Branding dropdown list. After selecting the brand profile, the sender completes the envelope normally.
Brand Profiles and Sending an Envelope from a Template When sending an envelope from a template, the available brand profile options depend on if the template creator locked the template brand profile and the sender’s Manage Template permissions.
If the template creator locked the template brand profile by selecting Don’t allow sender to change selected Brand, the brand profile cannot be changed. The profile selected when the template was created is used, even if the sender does not normally have access to that profile.
If the template brand profile was not locked, the ability to change the brand profile depends on the sender’s Manage Template permissions.
14
221 Main Street, Suite 1000, San Francisco, CA 94105 Ι Tel. 866.219.4318 Ι www.docusign.com Ι © DocuSign, Inc.
DocuSign Custom Account Branding Quick Start Guide
• If the sender has Use permission, the brand profile used is the profile selected when the template was saved.
• If the sender has Create or Share permission, the sender can select the brand profile.
If the sender has access to multiple brand profiles, they can set the profile used in the envelope by scrolling to the Envelope Settings section and selecting the appropriate profile from the Branding dropdown list. After selecting the brand profile, the sender completes the envelope normally.
Users that only have access to only one brand profile can only use that profile.
Brand Profiles and Disclosures Accounts with multiple brand profiles can set the Electronic Record and Signature Disclosure to use the company name information from a brand profile. This is only applicable if the account has elected to use a disclosure.
How it works When the brand company name is enabled for disclosures, the Company Name shown in the consumer disclosure is determined by the brand profile used for the envelope and the following brand profile settings:
• If the Use the membership company name option is selected in the Brand Profile Info tab, the Company listed in the sender’s Personal Info profile is used as the Company Name in the disclosure.
• If a Company Name is entered and Use the membership company name is not selected in the Brand Profile Info tab, then the Brand Profile Company Name is used as the Company Name in the disclosure.
• If a Company Name is not entered and Use the membership company name is not selected in the Brand Profile Info tab, then the Account Name on the disclose page is used as the Company Name in the disclosure.
Enabling the Brand Company Name in the Electronic Record and Signature Disclosure To enable brand profile company name setting for your consumer disclosure, go to Preferences and under that Account Administration section select Electronic Record and Signature Disclosure.
• Select the Use brand company name option.
• If you are using Block Editing to make changes to your disclosure, you can click Next >> to review
the consumer disclosure. When reviewing the consumer disclosure, the [[CompanyName]] merge field is shown. When a recipient views the consumer disclosure, the brand profile company name is inserted into each [[CompanyName]] merge field location.
Note: The name entered in the Account Name field will only appear in the consumer disclosure if a Company Name is not entered and Use the membership company name is not selected in the Brand Profile Info tab.
• If you are using HTML Editing to make changes to your consumer disclosure, click Edit Custom Disclosure to make changes to your consumer disclosure. Add a [[CompanyName]] merge field (with no space between Company and Name) in each location where you want the brand profile
15
221 Main Street, Suite 1000, San Francisco, CA 94105 Ι Tel. 866.219.4318 Ι www.docusign.com Ι © DocuSign, Inc.
DocuSign Custom Account Branding Quick Start Guide
company name to appear. When a recipient views the disclosure, the brand profile company name is inserted into each [[CompanyName]] merge field location.
• After making all your changes, click Save to save the changes.
Legacy Account Brand Information If your account used Account Branding before the addition of multiple brand profiles (before February 2013), your brand profiles are available and can be modified as described in the previous procedures. Additionally, there are some other actions and options for your legacy brand profiles.
Legacy Brand Names The previous account branding option did not require a Brand Name. Anytime you edit or save a legacy brand profile file, the system will automatically ask you to provide a Brand Name.
Legacy Customized Email Content If your previous account branding had customized support messages and links for the Envelope Send and Envelope Complete emails, you can still access and edit that information. Use the following instructions to make changes to the email content.
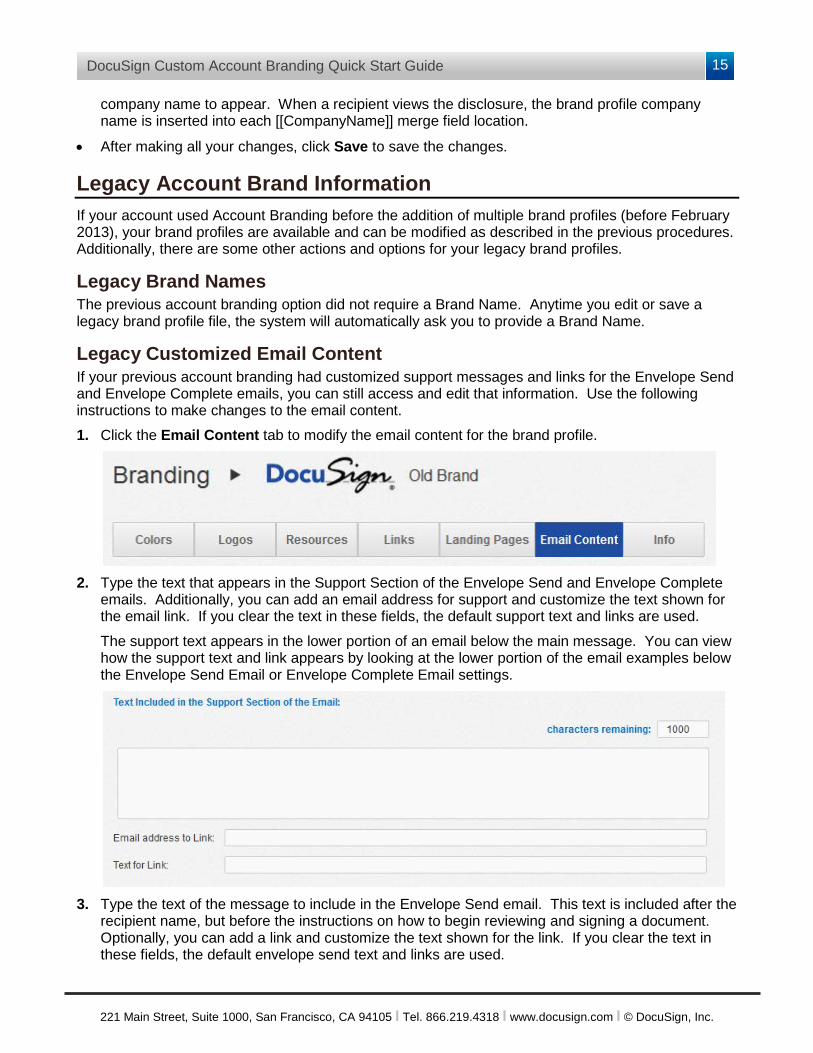
1. Click the Email Content tab to modify the email content for the brand profile.
2. Type the text that appears in the Support Section of the Envelope Send and Envelope Complete
emails. Additionally, you can add an email address for support and customize the text shown for the email link. If you clear the text in these fields, the default support text and links are used.
The support text appears in the lower portion of an email below the main message. You can view how the support text and link appears by looking at the lower portion of the email examples below the Envelope Send Email or Envelope Complete Email settings.
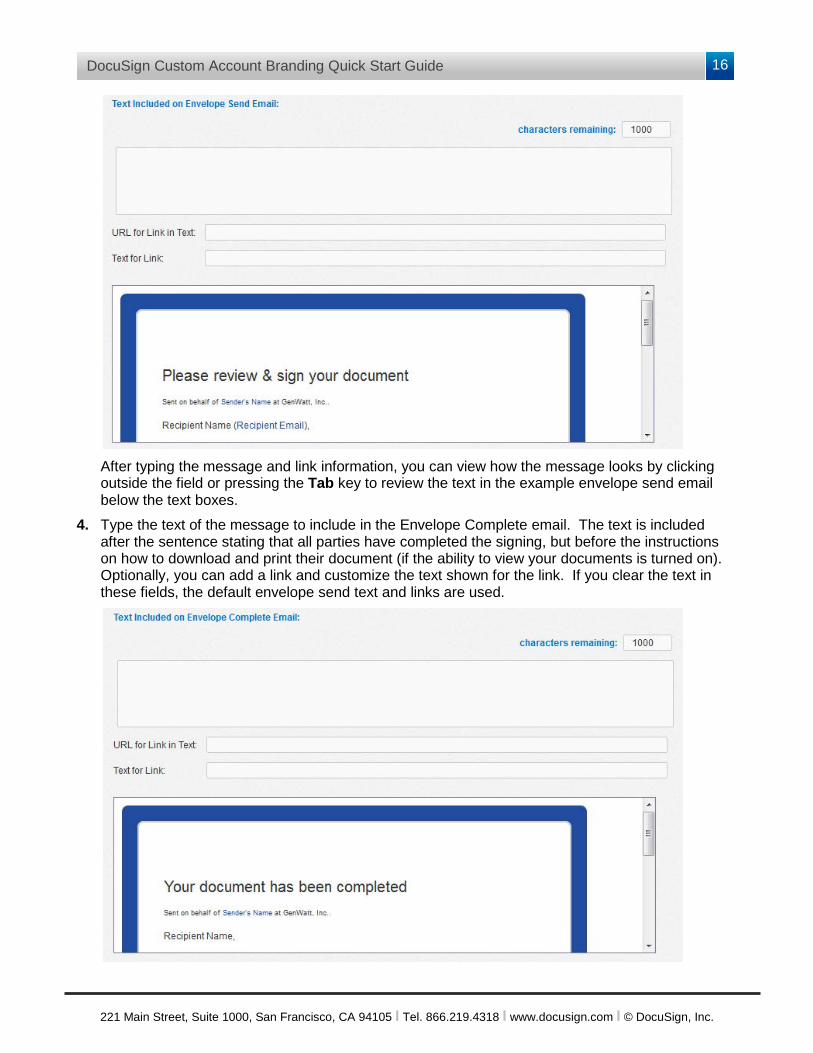
3. Type the text of the message to include in the Envelope Send email. This text is included after the
recipient name, but before the instructions on how to begin reviewing and signing a document. Optionally, you can add a link and customize the text shown for the link. If you clear the text in these fields, the default envelope send text and links are used.
16
221 Main Street, Suite 1000, San Francisco, CA 94105 Ι Tel. 866.219.4318 Ι www.docusign.com Ι © DocuSign, Inc.
DocuSign Custom Account Branding Quick Start Guide
After typing the message and link information, you can view how the message looks by clicking outside the field or pressing the Tab key to review the text in the example envelope send email below the text boxes.
4. Type the text of the message to include in the Envelope Complete email. The text is included after the sentence stating that all parties have completed the signing, but before the instructions on how to download and print their document (if the ability to view your documents is turned on). Optionally, you can add a link and customize the text shown for the link. If you clear the text in these fields, the default envelope send text and links are used.
17
221 Main Street, Suite 1000, San Francisco, CA 94105 Ι Tel. 866.219.4318 Ι www.docusign.com Ι © DocuSign, Inc.
DocuSign Custom Account Branding Quick Start Guide
After typing the message and link information, you can view how the message looks by clicking outside the field or pressing the Tab key to review the text in the example envelope complete email below the text boxes.
5. Click Save to save the email content changes.
For More Information For more information about this and additional DocuSign features, go to the DocuSign Support Site.
18
221 Main Street, Suite 1000, San Francisco, CA 94105 Ι Tel. 866.219.4318 Ι www.docusign.com Ι © DocuSign, Inc.
DocuSign Custom Account Branding Quick Start Guide
Copyright, Trademark and Patent Information Copyright ©2003-2016 DocuSign, Inc. All rights reserved. (https://www.docusign.com/IP) on the DocuSign website. All other trademarks and registered trademarks are the property of their respective holders. No part of this document may be reproduced or transmitted in any form or by any means, electronic or mechanical, for any purpose, without the express written permission of DocuSign, Inc. Under the law, reproducing includes translating into another language or format. Every effort has been made to ensure that the information in this manual is accurate. DocuSign, Inc. is not responsible for printing or clerical errors. Information in this document is subject to change without notice. Version: May 2016 If you have any comments or feedback on our documentation, please send them to us at: [email protected].
Summary of changes for this version:
• Updated plan information note.