Embed Size (px)
Citation preview
MINISTRY OF HEALTH
ACCELERATE! Meaningful Use of
ICT ICT Technical Training
Participant Manual
August 2015

August 2015
AfyaInfo is a technical assistance program to support the Government of Kenya to strengthen their health information systems. The program is implemented by Abt Associates, Inc. in partnership with Training Resources Group, ICF International, the University of Oslo, Knowing Inc., the Kenya Medical Training College, and the University of Nairobi. It is funded by the United States Agency for International Development (USAID), under the AIDS Support and Technical Assistance Resources (AIDSTAR) Sector II IQC, contract number GHH-I-00-07-00064-00 AID-623-TO-11-00005, Kenya Health Information System.
DISCLAIMER:
The author’s views expressed in this publication do not necessarily reflect the views of the United States Agency for International Development or the United States Government.
Table of Contents
Table of Contents ............................................................................................................................... iii ACCELERATE! Meaningful Use of ICT Objectives ....................................................................... 4
Agenda .................................................................................................................................................. 5
Objectives .............................................................................................................................................. 5
Agenda .................................................................................................................................................. 5
Introduction of the Kenya e-Health Information Systems Interoperability Standards and Guidelines Data /System Governance and Change Management Guidelines ........................... 9
Session: Overview of the ICT environment.................................................................................... 11
Local Area Network (LAN) Solution ............................................................................................. 12
Active Equipment (Workstations, Servers and Atrust) ................................................................ 14
Session: Userful –Deployment of EMRs/EHRs ............................................................................... 29
Session: Maintenance and Support and practical session ............................................................ 30
Session: ICT officer roles and responsibilities ................................................................................ 30
Resources ............................................................................................................................................. 31
ICT Handbook and Official Documentation i i i
ACCELERATE! Meaningful Use of ICT Objectives
ACCELERATE! Meaningful Use of ICT -- ICT Technical Training
Learning Objectives The Accelerate! Meaningful Use of ICT - ICT Technical Training is intended to enable participants to:
• Equip County ICT officers and ICT Officers from USG Implementing Partners with skills and tools to configure and maintain the ICT equipment including network management, configuration, onboarding and visualization of applications (EMRs), troubleshooting and maintenance.
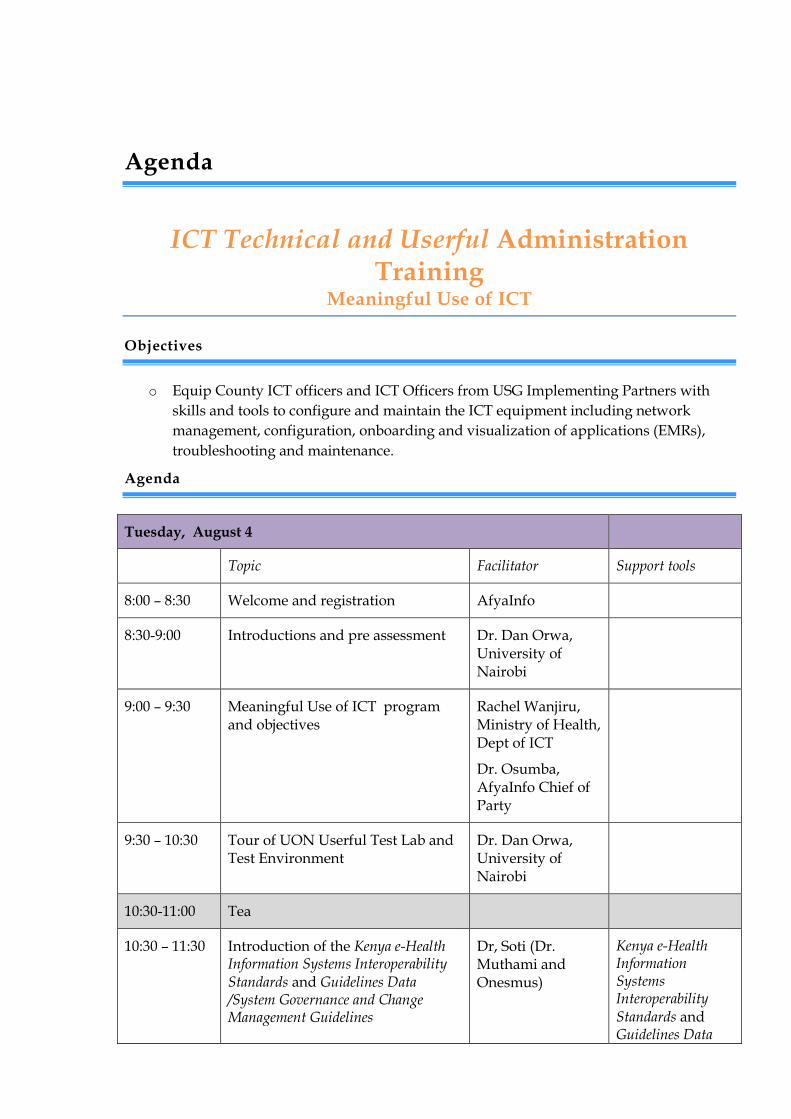
Agenda
ICT Technical and Userful Administration Training
Meaningful Use of ICT
Objectives
o Equip County ICT officers and ICT Officers from USG Implementing Partners with skills and tools to configure and maintain the ICT equipment including network management, configuration, onboarding and visualization of applications (EMRs), troubleshooting and maintenance.
Agenda
Tuesday, August 4
Topic Facilitator Support tools
8:00 – 8:30 Welcome and registration AfyaInfo
8:30-9:00 Introductions and pre assessment Dr. Dan Orwa, University of Nairobi
9:00 – 9:30 Meaningful Use of ICT program and objectives
Rachel Wanjiru, Ministry of Health, Dept of ICT
Dr. Osumba, AfyaInfo Chief of Party
9:30 – 10:30 Tour of UON Userful Test Lab and Test Environment
Dr. Dan Orwa, University of Nairobi
10:30-11:00 Tea
10:30 – 11:30 Introduction of the Kenya e-Health Information Systems Interoperability Standards and Guidelines Data /System Governance and Change Management Guidelines
Dr, Soti (Dr. Muthami and Onesmus)
Kenya e-Health Information Systems Interoperability Standards and Guidelines Data
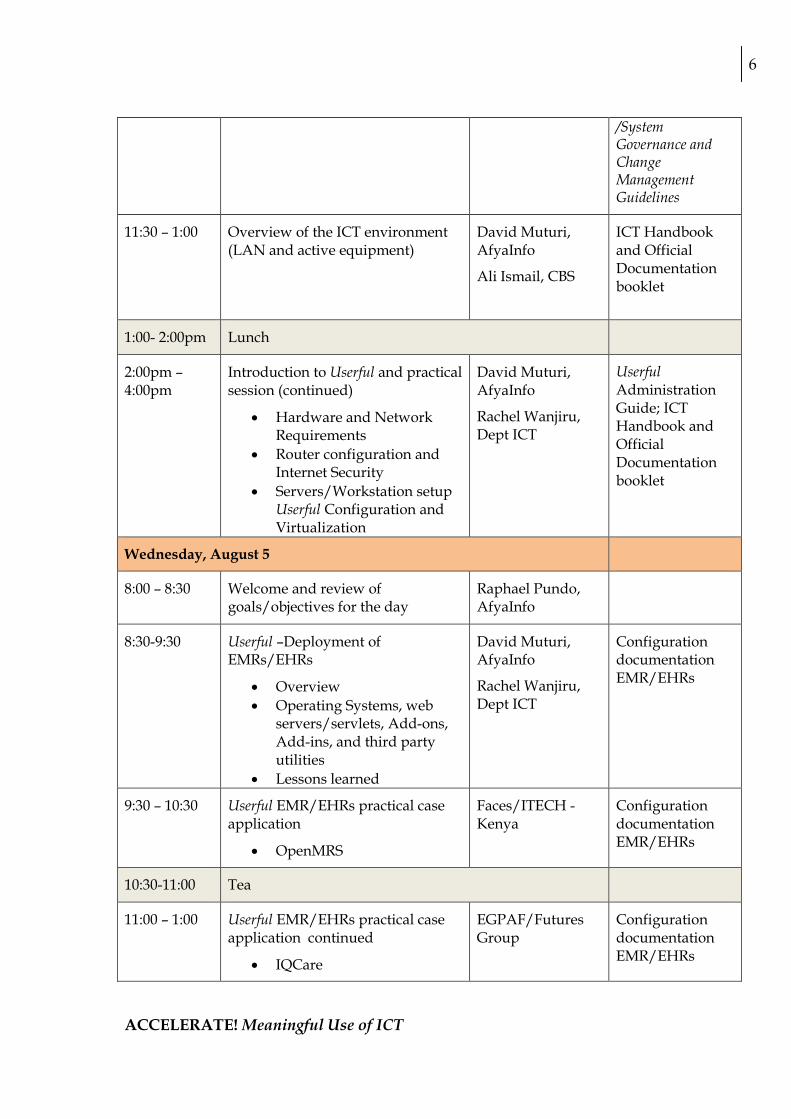
6
/System Governance and Change Management Guidelines
11:30 – 1:00 Overview of the ICT environment (LAN and active equipment)
David Muturi, AfyaInfo
Ali Ismail, CBS
ICT Handbook and Official Documentation booklet
1:00- 2:00pm Lunch
2:00pm – 4:00pm
Introduction to Userful and practical session (continued)
• Hardware and Network Requirements
• Router configuration and Internet Security
• Servers/Workstation setup Userful Configuration and Virtualization
David Muturi, AfyaInfo
Rachel Wanjiru, Dept ICT
Userful Administration Guide; ICT Handbook and Official Documentation booklet
Wednesday, August 5
8:00 – 8:30 Welcome and review of goals/objectives for the day
Raphael Pundo, AfyaInfo
8:30-9:30 Userful –Deployment of EMRs/EHRs
• Overview • Operating Systems, web
servers/servlets, Add-ons, Add-ins, and third party utilities
• Lessons learned
David Muturi, AfyaInfo
Rachel Wanjiru, Dept ICT
Configuration documentation EMR/EHRs
9:30 – 10:30 Userful EMR/EHRs practical case application
• OpenMRS
Faces/ITECH -Kenya
Configuration documentation EMR/EHRs
10:30-11:00 Tea
11:00 – 1:00 Userful EMR/EHRs practical case application continued
• IQCare
EGPAF/Futures Group
Configuration documentation EMR/EHRs
ACCELERATE! Meaningful Use of ICT
7
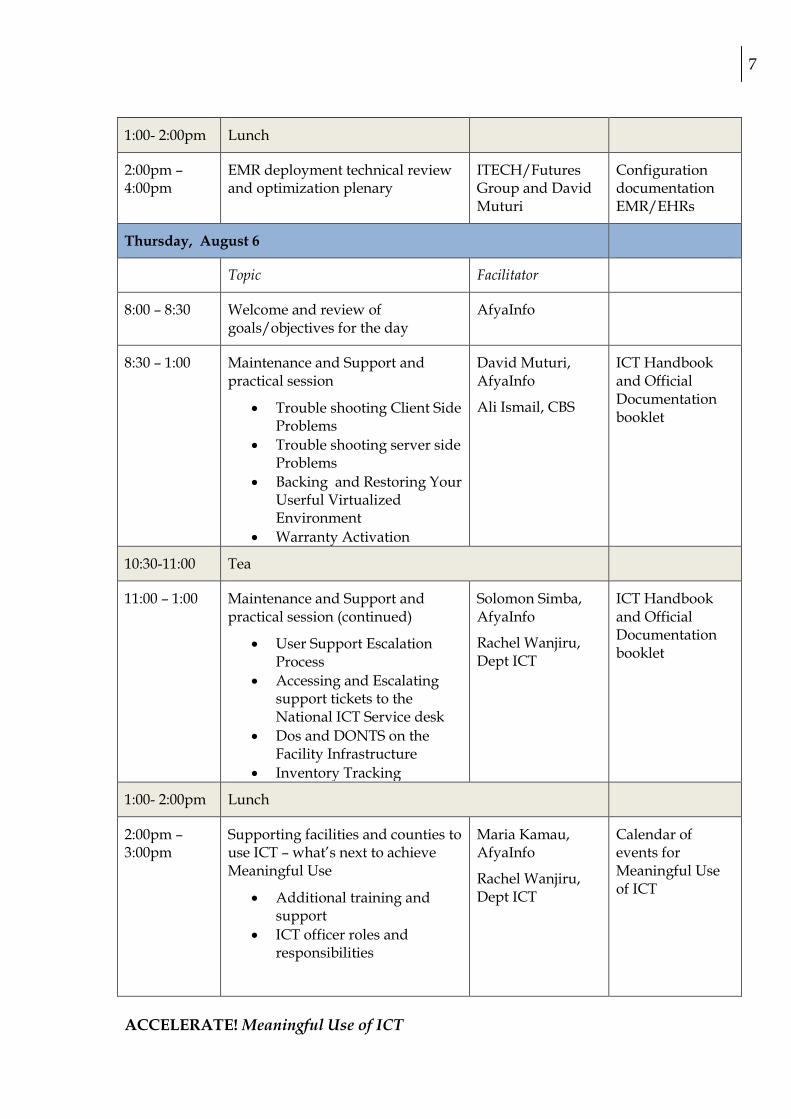
1:00- 2:00pm Lunch
2:00pm – 4:00pm
EMR deployment technical review and optimization plenary
ITECH/Futures Group and David Muturi
Configuration documentation EMR/EHRs
Thursday, August 6
Topic Facilitator
8:00 – 8:30 Welcome and review of goals/objectives for the day
AfyaInfo
8:30 – 1:00 Maintenance and Support and practical session
• Trouble shooting Client Side Problems
• Trouble shooting server side Problems
• Backing and Restoring Your Userful Virtualized Environment
• Warranty Activation
David Muturi, AfyaInfo
Ali Ismail, CBS
ICT Handbook and Official Documentation booklet
10:30-11:00 Tea
11:00 – 1:00 Maintenance and Support and practical session (continued)
• User Support Escalation Process
• Accessing and Escalating support tickets to the National ICT Service desk
• Dos and DONTS on the Facility Infrastructure
• Inventory Tracking
Solomon Simba, AfyaInfo
Rachel Wanjiru, Dept ICT
ICT Handbook and Official Documentation booklet
1:00- 2:00pm Lunch
2:00pm – 3:00pm
Supporting facilities and counties to use ICT – what’s next to achieve Meaningful Use
• Additional training and support
• ICT officer roles and responsibilities
Maria Kamau, AfyaInfo
Rachel Wanjiru, Dept ICT
Calendar of events for Meaningful Use of ICT
ACCELERATE! Meaningful Use of ICT

8
3:00-4:30 Closing
• Post training assessment • Certifications
Dr. Osumba, AfyaInfo
Dr. Soti, MOH
Dr. Dan Orwa, UON
ACCELERATE! Meaningful Use of ICT
Introduction of the Kenya e-Health Information Systems Interoperability Standards and Guidelines Data /System Governance and Change Management Guidelines
Reference Materials/Handouts:
• Introduction of the Kenya e-Health Information Systems Interoperability Standards
• Guidelines Data /System Governance and Change Management Guidelines Acceptable Use1 Policies to govern intranet
- Users may have read or write privileges or both. This should be determined and approved by the respective head of department and head of ICT.
- Intranet users and groups should be constituted with explicit authority of head of department and head of ICT. The groups can be based on departments, division, programs or projects
- Users should not use the intranet rights assigned to them to pursue personal interests and this includes doing private business, advertising, and other commercial purposes which also includes sale of goods and services.
- User IDs and passwords should not be disclosed or shared. - Any user violating the rights and privileges extended to him/her shall have the
account deactivated by the ICT unit. Policies to govern internet
- All internet users in the MoH should use the internet for research and other ethical usage.
- All internet users need to be aware of phishing and corrupted web links that may lead to virus infections or other distractions.
- Pornographic sites and other offensive materials should not be accessed, shared, downloaded or watched in the office.
- The ICT unit shall preserve the right to disconnect or discontinue active usage
of the internet. IT security principles
1 GoK Health Sector ICT Standards and Guidelines, pages 39 & 40
10
• Establishing controlled areas in the facility • Using physical access control measures such as lockable cabinets and keys to
doors • Ensuring physical protection against lightening, wind, building collapse, water
damage, temperature and humidity and fire. Protecting against damage from electrical outages includes safeguards such as an alternative power supply and surge protection.
• Access to information resources is managed through the use of multiple types of accounts, including; User, Privileged, Service, Maintenance and Guest accounts. Accounts are established in a manner that ensures access is granted based on clearances, need to know, separation of duties, and least privilege basis.
• In addition to use of different types of accounts, identification is the process of associating a person or information resource with a unique enterprise-wide identifier (e.g., a user logon ID). A logon ID is used in conjunction with other security services, such as authentication measures, to track activities and hold users accountable for their actions. EMPHASIZE that users are responsible for all actions performed on technology resources under their logon ID.
• Protection of the network includes the implementation of the physical, administrative, and technical security controls and processes that safeguard the confidentiality, availability, and integrity of the network. They ensure, for example, detection of unauthorized access, recovery procedures are in place and working, appropriate response to computer security incidents.
Patient privacy, data and record confidentiality
• Access to patient level-data should be limited only to authorized persons as per existing regulations and should maintain audit trails of the users and service providers for easier management of the access processes.
ACCELERATE! Meaningful Use of ICT
Session: Overview of the ICT environment
Reference Materials/Handouts:
• List of supported facilities • Warrenty copies • Copies of LAN layout and floor maps for each county
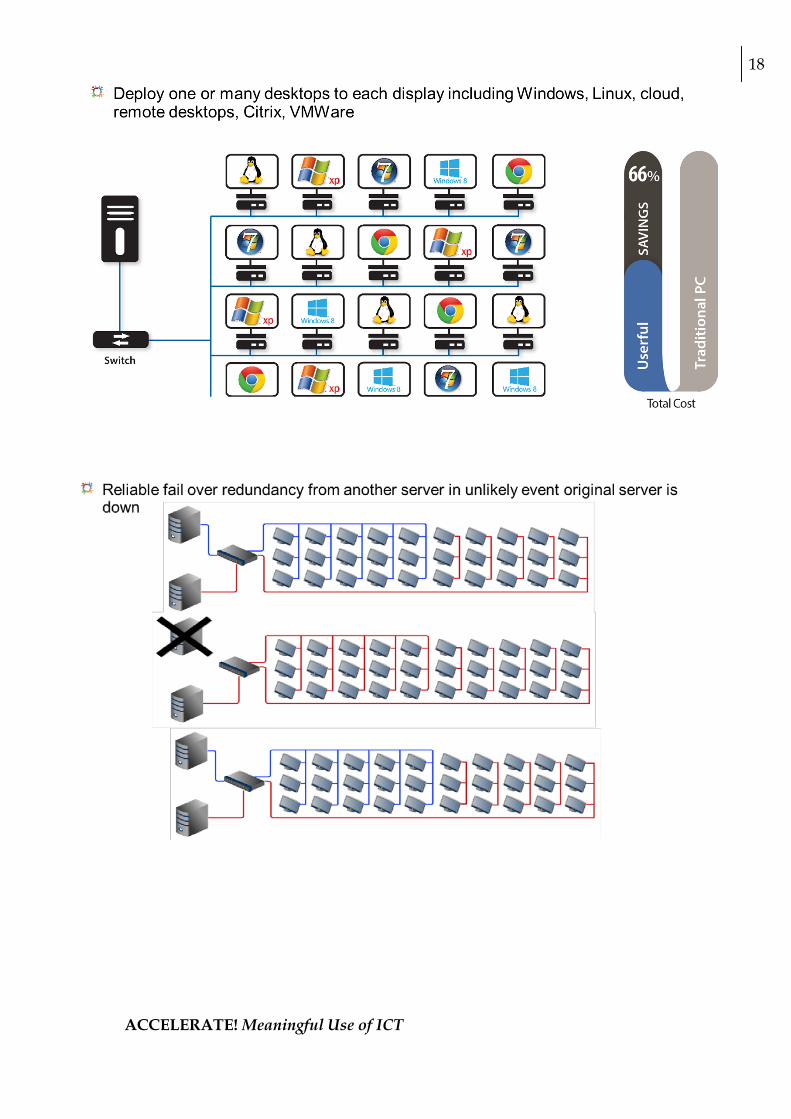
To strengthen county capacity to produce and use high-quality data, at every level from the facility up to the CHMT, AfyaInfo is deploying its resource-appropriate ICT infrastructure to all focal counties (i.e., to CHMTs and selected facilities). AfyaInfo supported the expansion of ICT infrastructure in facilities that deliver high volumes of core HIV and AIDS, maternal and child health, and reproductive health services. The introduction of this state-of-the-art ICT infrastructure at the county level gives facilities the needed capabilities in efficient data collection and reporting, and the ability to implement and integrate other applications such as electronic medical records, telemedicine, e-referral, and e-learning options. The ICT deployment follows the AfyaInfo model of empowering the county through the CHMT to manage health information, and empowering selected health facilities to produce and use data and to transmit it to the county, by using modern information and communication technologies. At the centre of this technology is the desktop visualization infrastructure demonstrated on the Userful multiplatform software and Atrust zero clients Userful, an open standards-based desktop virtualization environment, provides a wide range of options to the unit to implement many of the existing open-source operating systems, including LINUX, UNIX, and all versions of Microsoft Windows. Additionally, Userful seamlessly works with many of the open standards based thin- and zero-client devices, including those made by HP, Dell, etc. The project focused on sustainability of the ICT hardware from the outset: Hardware
To reduce overall capital investment costs and reduce utility bills, AfyaInfo-selected zero-client devices that have a low capital (Capex) and operational (Opex) footprint, as well as low power consumption, at only 3 watts compared with the 110 watts consumed by ordinary desktops.
To reduce replacement costs and system management overheads, AfyaInfo selected the zero-client devices that have no moving parts and are designed not to have any memory or processing capabilities of their own.
To ensure future scalability of the technology investments in each facility, AfyaInfo provided between 23 and 46 network points per facility, depending on the size and type of facility. The equipment, such as switches and routers, is capable of connecting with all types of
12
network media and channels, such as fibre optic, 3G cellular networks, copper and wireless fidelity (wi-fi).
Software
To limit licensing fees, AfyaInfo selected the default operating system Linux, which is license-free and also less prone to viruses than the Windows versions.
To reduce annual licensing expenses, AfyaInfo also selected Userful, as the application comes with an in-built open-source office suite – the Libre office.
Local Area Network (LAN) Solution
Structured Network Cabling A structured cabling solution using Siemon cabling components was used. The network infrastructure within the site will enable centralized data communication for all of its users. The design installed ensures smooth integration; the UTP CAT 6 cable installed for data purposes is capable of carrying voice, data and video.
• All cabling done by a certified Siemon engineer • Supports Ethernet at 10/100/1000mbps • Siemon 4-pair unshielded twisted pair (UTP) Category 6 for horizontal cabling • 40x25mm PVC trunking and terminated the cabling onto 100x50mm service
plates on the 100mmx50mm trunking • 20 year warranty on all Siemon cabling.
Copper Patch Panel
Distribution point uses a Category 6 modular patch panel.. It consists of a 19” rack mountable panel. The panel supports terminations of 24 points of the 4 pair cables. The panel will support emerging technologies such as the 622mbps ATM using parallel transmission schemes. The panel is mounted in the administration cabinet.
• The patch panels installed are all labelled for easy administration for the user and the network administrator
• All cables have been terminated.
ACCELERATE! Meaningful Use of ICT
13
Modular Patch Cords The Siemon Giga Speed Cords are designed to assure high performance over longer distances. They are available in 1 meter which was used at the telecommunication closet and at 3 meters which was used in the User area. They are ideal for high activity environments that require reliable data transmissions. Through an exclusive design and manufacturing process, impedance characteristics for gig speed cords are closely matched to impedance levels for gig speed cables, minimizing signal reflection and significantly increasing performance margins. Attenuation improvement exceeding the cordage requirement of EIA/TIA 568A and ISO/IEC 11801 maintains performance over longer distances than standard cords. The patch cords are factory made and have 20 years warranty. 3m (10ft) patch cords have been provided for patching from the wall outlet to the work stations. The other 3.33ft (1m) patch cords have been chosen appropriately for good cable management on the rack. The cord supports speeds of 10/100/1000mbps.
Data Outlets
Face Plate
The range of UK/Ireland Standard Information Outlets consist of the faceplates, which are flush-mounted, duplex, 2-gang UK/Ireland standard faceplate designed to accept two modules. It also mounts in a German/Benelux standard electrical box with centre plate mounting dimensions of 2.3622 in (6cm) centre to centre.
Category (Cat) 6 Modules
The Cat 6 module provides performance far exceeding Cat 6 connecting hardware performance specifications. It also insures backwards compatibility with components and systems of lower performing categories. Installers and end users benefit from other rich features incorporated into the Cat 6 module. Its compact design is ideal for high density applications. . Also, the angled Cat 6 modules are just as versatile – perfect for flush mount applications or with the Cat 6 series patch panels or surface mount (SM) boxes. This solution makes it possible to configure a wide variety of mixed media solutions.
Equipment Cabinets
• Installed 9U wall mount cabinets which are lockable with a glass door • Power outlets were provided with sufficient forced cooling facilities for all
cabinets installed • Cooling of cabinet is done by two fans in each cabinet. The fans extract hot air
form the cabinet and allow cold air in.
ACCELERATE! Meaningful Use of ICT
14
Labeling Convention
The data points were labeled following the international labeling convention. This requires that the network point labeled indicate the unique identifier of the network point to enable easier troubleshooting. The points also have to follow each other in a sequential way.
Example:
Do1, Do1
Denotation: D means Data Point, 01 is the first network point
Testing of the Data Points
To ensure that the structured cabling meetings the Category 6 standards – the ability to support 1000mbps data rates and offer the potential for carrying data at gigabyte rates, the data points were tested and certified using the FLUKE DTX cable analyzer, which is the leading industry standard category cable tester. The tested data point results have been included in this document and will support any warranty requests to Seimon on their cables and accessories.
Active Equipment (Workstations, Servers and Atrust)
Atrust warranty
The Atrust zero client has 1 year manufacture warranty. The solid design of the device reduces breakdown due to the absence of moving parts.
Cisco 881 G W K9 This top of the range multi-channel router comes with limited lifetime warranty
HP ProDisplay The monitor comes with 1 year manufacturer warranty
ACCELERATE! Meaningful Use of ICT
15
HP Switch The HP 1910 Switch Series, part of the HP OfficeConnect portfolio, delivers Fast Ethernet connectivity for cost-conscious smaller organizations. The switches are ideal for environments that require advanced features for granular control and where smart-managed flexibility is a must for easy network configuration and management.
The 1910 Switch Series are advanced smart-managed fixed configuration switches in an easy-to-administer solution. Customizable features include basic layer 2 features like VLANs and link aggregation as well as advanced features such as Layer 3 static routing and ACLs.
The HP 1910 Switch Series features easy-to-use, out of the box, plug-and-play deployment.
The series offers a complete portfolio of choices for increased flexibility. It consists of five rack-mountable models with internal power supplies including three non-Power over Ethernet (PoE) models: 8-, 24- and 48- port; two PoE+ models: 8- and 24- port. All models come with 2 combo uplink ports.
These smart-managed switches use an intuitive Web management interface to simplify deployment and management while offering you greater granularity of control of key features.
HP Z230 Small Form Factor Workstation The workstation is a Small Form Factor (SFF) design that can be oriented as a desktop horizontally or vertically (using the included vertical stand), and the small form factor—measuring just 3.95 by 13.3 by 15.1 inches (HWD)—means that you can set it up almost anywhere.
On the front of the compact tower are four USB ports (two USB 2.0, two USB 3.0), along with one headset jack and a second headphone jack. On the back of the system are six more USB ports (four USB 2.0, two USB 3.0) as well as two PS/2 ports for older peripherals, three full-size DisplayPorts (output from Intel integrated graphics) and both DVI and DisplayPort outputs from the discrete Nvidia Quadro GPU, which is capable of running two displays simultaneously.
Getting into the case for maintenance and upgrades is simple, thanks to an easy open latch that gives you immediate tools-free internal access. Inside you'll find Nvidia Quadro K600 graphics, and two 500GB Seagate Hard drives (7,200rpm) in RAID 0, with an additional 128GB solid-state drive (SSD). A fourth bay was available for another hard drive or an optical drive. Everything is powered by a 240W power
ACCELERATE! Meaningful Use of ICT
16
supply, and there's some room for upgrades—the system with support up to 32GB of RAM, and has several low-profile PCIe ports available.
The combination of 1TB of hard drive space and a 128GB SSD boot drive is a big plus for anyone working with large video files or giant data sets, and HP doesn't clutter them up with extraneous stuff. Our review unit came with Windows 7 Professional (64-bit) out of the box, along with Office 365 (30-day trial), PDF Complete Corporate Edition, CyberLink Media Suite, and a few Nvidia drivers. For added business functionality, it also features Intel vPro with Intel AMT 9.0. Hewlett-Packard covers the Z230 with a limited three-year warranty, which includes next-business-day parts and labor, and 24/7 phone support.
PC Back-UPS APC Back-UPS 650VA, AVR, 230V, Africa
Part Number: BX650CI-AF
HP LaserJet Pro
The M425dn features a generous 3.5-inch control panel that lets you scroll through the print, scan, and copy functions. Designed with the workforce in mind, it also features automatic duplexing to save you money on double-sided printing as well as an automatic power switch that flips to save energy in the office.
The HP LaserJet Pro 400 also gives users the ability to register the printer with the company's ePrintCenter app store for use directly on the touch screen. The ePrintCenter is an online hub where you can view job history, change settings, add printers to your account, browse and install apps, and cancel print jobs. All of the extra applications are free, and HP breaks them down into categories within the app store: entertainment, home, kids, news/blogs, photo, and tickets. Each one promises to streamline the printing experience by offering shortcuts to your favorite coupons, news articles, weather reports, recipes, and so on.
The ePrintCenter also lets you set up an ePrint account for use with mobile devices like tablets or smartphones that don't have a USB port to connect with a traditional printer. ePrint bypasses this issue by enabling you to send jobs directly to the printer using a unique e-mail address. With that address, you can print from virtually any device that can send out messages.
ACCELERATE! Meaningful Use of ICT
17
Session: Introduction to Userful Reference Materials/Handouts:
• Userful Administration Guide • Userful ICT staff training: http://youtu.be/Sy-SbuTHzrs • Userful End-user training: http://youtu.be/JcEQvPFL8_I
Virtual environment definition ______________________________________________________________________________________________________________________________________________________________________________________________________________________________________________________________________________________________________________________________________________________________________________________________________ Why Userful Desktop over other public computing options? Userful, offers better service at half the typical cost of other public computing systems. Userful Desktop frees local staff from the burden of maintaining and policing a suite of public computers. Harnessing the power of one CPU to run multiple user stations saves on hardware and upgrade costs. Why does Userful Desktop make use of Linux and open source software, rather than Microsoft Windows? Userful selected Linux and open source software to use with Userful Desktop because they were the best choices for a public computing environment in which stability, economy and security are the chief concerns. The base system requirements for Linux are much lower than for current versions of Windows, allowing more computing power to be shared by each station. Although Client Users may initially be more familiar with Microsoft Windows and Office, we have found that most adapt very quickly to the new software. What applications are allowed to run on Userful Desktop? Userful platform can handle over 40 applications which can be preloaded onto Userful Desktop, including full-featured word processing, presentation, project management, photo editing, multimedia playback, drawing and others. Client Users can also use the Internet browser to access many more applications online.
ACCELERATE! Meaningful Use of ICT
18
ACCELERATE! Meaningful Use of ICT

Minimum system requirements for Userful MultiSeat For 1 up to 11 stations
Quad Core Processor 8 GB RAM 2 high-speed USB controller interfaces 1TB HDD
For 12 up to 25 stations (USB-over-LAN only)
Quad Core Processor -- Xeon or i7 class 32 GB RAM minimum 2 high-speed USB controller interfaces 2TB HDD
Ideal network setup with one switch:
U
serf
ul F
or S
uper
Use
rs a
nd IT
Adm
inis
trat
ors
Job
Aid
Userful for Super Users and IT Administrators • Description:
• Setting up Userful is similar to setting up other Operating Systems. The installation file image (.ISO) files are required for installation.
• Userful is a desktop virtualization environment that uses one computer (server) to run multiple user stations (computers).
• The Userful Desktop can handle applications including internet browsing word processing, presentation, project management, photo editing, multimedia playback, drawing and others.
• You do NOT need to install Microsoft Windows on Userful Desktops, but in case this is needed for specific applications, all versions of MS Windows OS are supported including 64-bit.
• The Userful Desktop uses Linux and open source software which is better suited to public computing systems.
• End users are NOT able to access another user’s profile, cannot change another user’s password or change another user’s files and data saved on the workstation.
• Tasks: 1) Installation of Userful (IT Administrators)
• The installation of Userful requires the latest version of the software on a DVD. If this is not available, download the installation file from the website. The location is: http://support.userful.com/wiki/index.php/Manuals/Userful_Multiplatform/Installation#Download_the_File. You also need an .iso file writer e.g. Nero or Ashampoo to write the downloaded file to the DVD-R disk. It is advisable to write the DVD at slow speeds e.g. 4x or 8x.
• To install Userful Multiplatform environment on a new PC, choose the optical drive as the default boot device in the system bios. Place the bootable DVD into the drive and follow the onscreen instructions as shown below.
• Minimum hardware and LAN requirements include: o Workstation to provide computing resources to either zero or thin
clients. In this case the zero clients are the Atrust devices. The selected set up uses Ethernet local area network and has the following hardware requirements for workstations:
For 1 to 11 stations: o Quad Core Processor o 8 GB RAM o 2 high-speed USB controller interfaces o 1TB HDD
For 12 to 25 stations (USB-over-LAN only): o Quad Core Processor -- Xeon or i7 class o 32 GB RAM minimum
o 2 high-speed USB controller interfaces o 2TB HDD
o LAN Specifications: Wired Local Area Network with a minimum throughput of
1000mbps DHCP Server device e.g. router
Userful Installation Procedure:
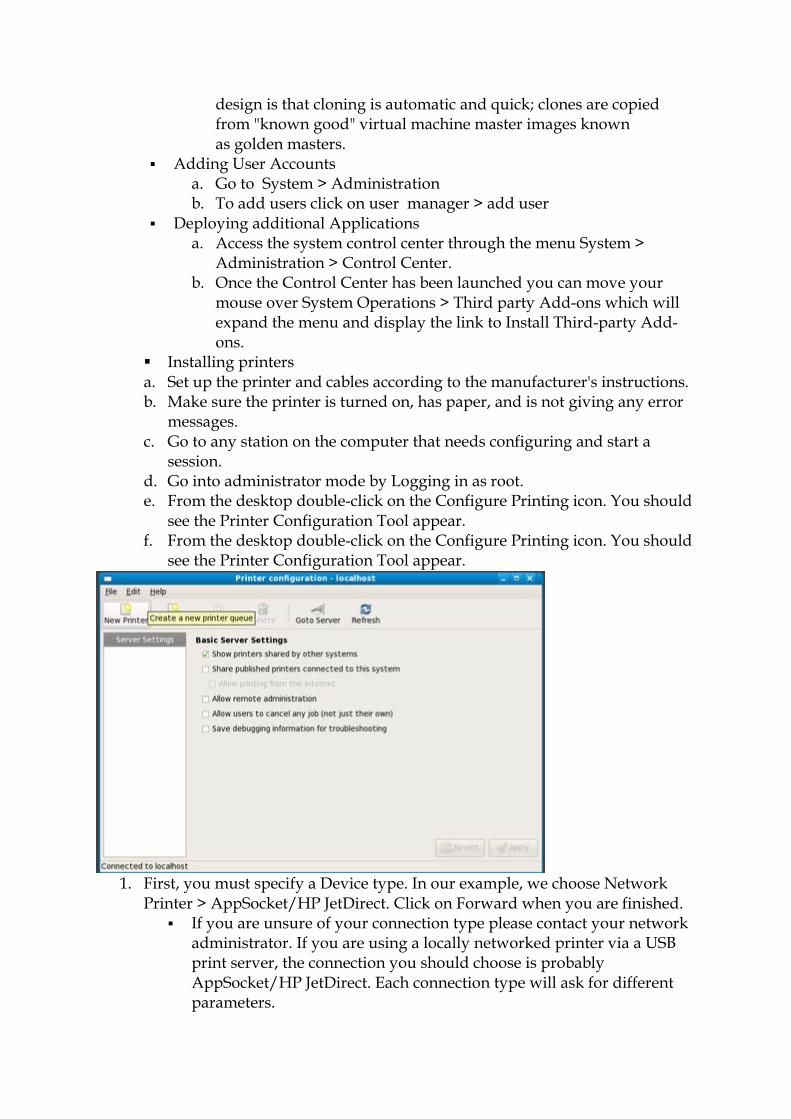
a) After inserting disk to optical drive and starting the machine the screen below should appear. Ensure the Install Userful option is highlighted and press enter.
b) Select Default and click next to proceed to next steps until Userful is installed on the PC. Refer to the Userful Administrators’ Guide for the installation steps. 2) Management of Userful Environment (Both Super users and IT Admins)
• Setting up Stations a. Connect all the Zero client devices for each workstation, position
each monitor and the Atrust device (with attached keyboard, mouse and network cable).
b. Power on all workstations and then turn on the host pc. c. To configure the client workstations, click on the menu item System >
Administration > Control Center > Station Mapping. • Assigning Clients to Host PC
a. To assign a station to the host PC, click an empty check box (a check mark will appear), then click the "Apply" button.
b. To release a station from the host PC, click a checked box (the check mark will disappear), then click the "Apply" button.
Note: Several stations can be assigned and/or released simultaneously by clicking multiple check boxes.
Mapping Stations to Virtual Machine Profiles o "Station Mapping" lets a system administrator configure what type
of Virtual Desktop session to launch on each station. With a "mapped" session, end users no longer need to login to the native Linux desktop to start the virtual desktop session. Once the system administrator has mapped a Virtual Machine (VM) session to a station, a "clone" of the master VM will automatically launch as a full-screen session on that client station. A key advantage Userful's
design is that cloning is automatic and quick; clones are copied from "known good" virtual machine master images known as golden masters.
Adding User Accounts a. Go to System > Administration b. To add users click on user manager > add user
Deploying additional Applications a. Access the system control center through the menu System >
Administration > Control Center. b. Once the Control Center has been launched you can move your
mouse over System Operations > Third party Add-ons which will expand the menu and display the link to Install Third-party Add-ons.
Installing printers a. Set up the printer and cables according to the manufacturer's instructions. b. Make sure the printer is turned on, has paper, and is not giving any error
messages. c. Go to any station on the computer that needs configuring and start a
session. d. Go into administrator mode by Logging in as root. e. From the desktop double-click on the Configure Printing icon. You should
see the Printer Configuration Tool appear. f. From the desktop double-click on the Configure Printing icon. You should
see the Printer Configuration Tool appear.
1. First, you must specify a Device type. In our example, we choose Network
Printer > AppSocket/HP JetDirect. Click on Forward when you are finished. If you are unsure of your connection type please contact your network
administrator. If you are using a locally networked printer via a USB print server, the connection you should choose is probably AppSocket/HP JetDirect. Each connection type will ask for different parameters.
2. Fill in the connection parameters on the right side of the page. For example, if you are using AppSocket/HP JetDirect you will be asked for these:
Hostname -- this field is for entering the IP address of your printer. If you are setting up a network printer youmust enter the IP address to continue. If you are unsure of your printer’s IP address contact the person who manages your network to find out.
Port number -- this should default to port 9100. If you wish to use a different port you may enter it. However, please ensure that the printer's port is properly set up for this. Under most circumstances there is no reason to use a different port number.
3. Once you have entered your connection parameters, click on the Forward button on the bottom right to continue.
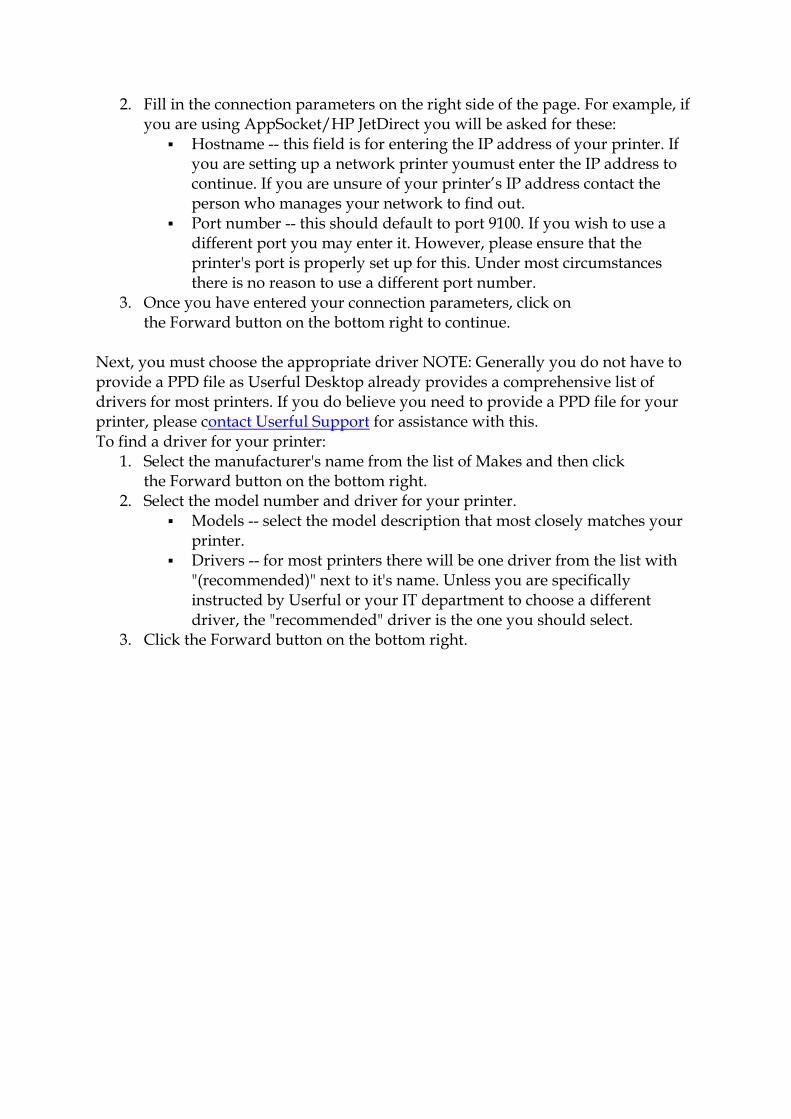
Next, you must choose the appropriate driver NOTE: Generally you do not have to provide a PPD file as Userful Desktop already provides a comprehensive list of drivers for most printers. If you do believe you need to provide a PPD file for your printer, please contact Userful Support for assistance with this. To find a driver for your printer:
1. Select the manufacturer's name from the list of Makes and then click the Forward button on the bottom right.
2. Select the model number and driver for your printer. Models -- select the model description that most closely matches your
printer. Drivers -- for most printers there will be one driver from the list with
"(recommended)" next to it's name. Unless you are specifically instructed by Userful or your IT department to choose a different driver, the "recommended" driver is the one you should select.
3. Click the Forward button on the bottom right.
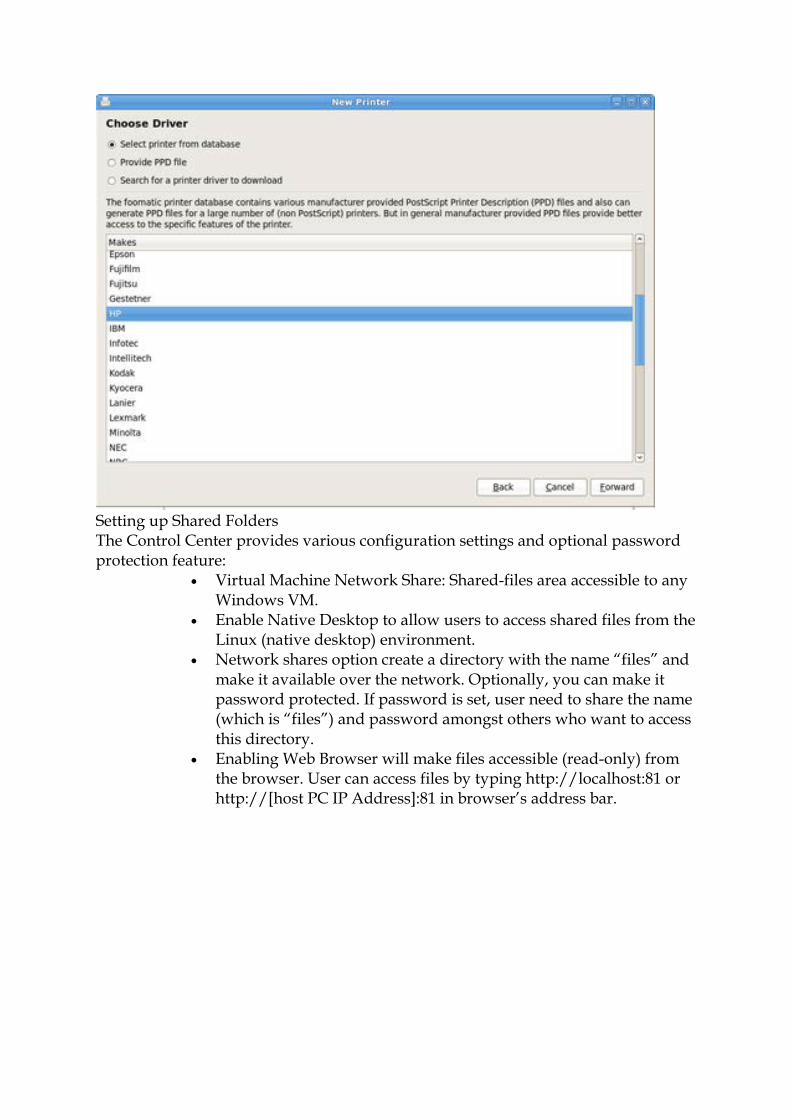
Setting up Shared Folders The Control Center provides various configuration settings and optional password protection feature:
• Virtual Machine Network Share: Shared-files area accessible to any Windows VM.
• Enable Native Desktop to allow users to access shared files from the Linux (native desktop) environment.
• Network shares option create a directory with the name “files” and make it available over the network. Optionally, you can make it password protected. If password is set, user need to share the name (which is “files”) and password amongst others who want to access this directory.
• Enabling Web Browser will make files accessible (read-only) from the browser. User can access files by typing http://localhost:81 or http://[host PC IP Address]:81 in browser’s address bar.
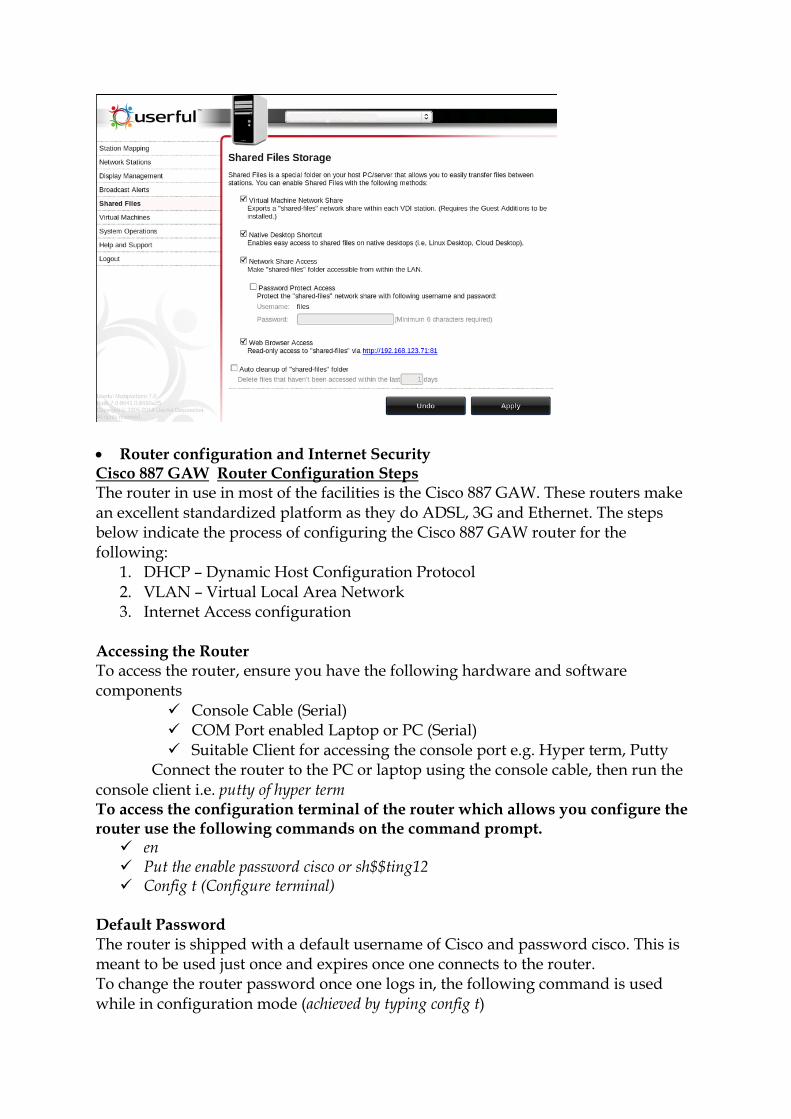
• Router configuration and Internet Security Cisco 887 GAW Router Configuration Steps The router in use in most of the facilities is the Cisco 887 GAW. These routers make an excellent standardized platform as they do ADSL, 3G and Ethernet. The steps below indicate the process of configuring the Cisco 887 GAW router for the following:
1. DHCP – Dynamic Host Configuration Protocol 2. VLAN – Virtual Local Area Network 3. Internet Access configuration
Accessing the Router To access the router, ensure you have the following hardware and software components
Console Cable (Serial) COM Port enabled Laptop or PC (Serial) Suitable Client for accessing the console port e.g. Hyper term, Putty
Connect the router to the PC or laptop using the console cable, then run the console client i.e. putty of hyper term To access the configuration terminal of the router which allows you configure the router use the following commands on the command prompt. en Put the enable password cisco or sh$$ting12 Config t (Configure terminal)
Default Password The router is shipped with a default username of Cisco and password cisco. This is meant to be used just once and expires once one connects to the router. To change the router password once one logs in, the following command is used while in configuration mode (achieved by typing config t)
username root privilege 15 password 0 sh$$ting12 For the facilities the above was used to configure the default password the other used username was name of facility as username and cisco as password. Changing the Host Name As a standard we have been using the name of the facility as the hostname i.e. akalahc for akala Health Centre. To change the hostname type hostname when in configuration mode and then type the name of the router. Configuring DHCP To configure the router to be able to issue out ip addresses AUTOMATICALLY TO CLIENTS use the commands below: Config t ip dhcp pool DATA
o network 192.168.7.0 255.255.255.0 o default-router 192.168.7.1 o exit
exit copy run start (This command is used to save the running configuration to the
ROM of the router and should be run whenever any configuration changes have been effected on the router)
Configuring the VLAN To configure the VLAN use the commands below
interface Vlan1 o ip address 192.168.7.1 255.255.255.0
exit Copy run start
Configuring the Internet 3G connectivity (using safaricom)
Add the Safaricom User name and Password Type the command below but this time not in configuration mode
cellular 0 gsm profile create 1 Safaricom chap sfc sfc Enter configuration mode
Config t Add the DNS server IP for safaricom to the DHCP POOL ideally to direct the router where to resolve domain names i.e. domain name lookup. Type
ip dhcp pool DATA o dns-server 196.201.216.21 196.201.208.2 o exit
exit
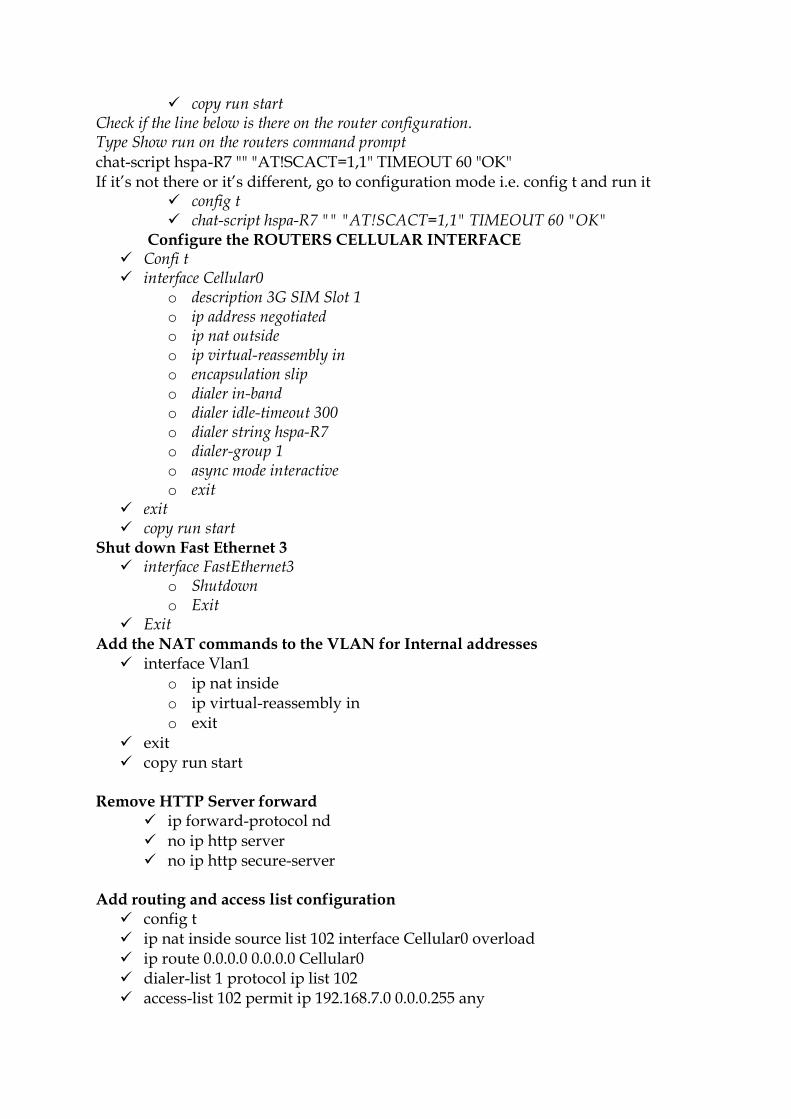
copy run start Check if the line below is there on the router configuration. Type Show run on the routers command prompt chat-script hspa-R7 "" "AT!SCACT=1,1" TIMEOUT 60 "OK" If it’s not there or it’s different, go to configuration mode i.e. config t and run it
config t chat-script hspa-R7 "" "AT!SCACT=1,1" TIMEOUT 60 "OK"
Configure the ROUTERS CELLULAR INTERFACE Confi t interface Cellular0
o description 3G SIM Slot 1 o ip address negotiated o ip nat outside o ip virtual-reassembly in o encapsulation slip o dialer in-band o dialer idle-timeout 300 o dialer string hspa-R7 o dialer-group 1 o async mode interactive o exit
exit copy run start
Shut down Fast Ethernet 3 interface FastEthernet3
o Shutdown o Exit
Exit Add the NAT commands to the VLAN for Internal addresses interface Vlan1
o ip nat inside o ip virtual-reassembly in o exit
exit copy run start
Remove HTTP Server forward
ip forward-protocol nd no ip http server no ip http secure-server
Add routing and access list configuration config t ip nat inside source list 102 interface Cellular0 overload ip route 0.0.0.0 0.0.0.0 Cellular0 dialer-list 1 protocol ip list 102 access-list 102 permit ip 192.168.7.0 0.0.0.255 any
exit copy run start
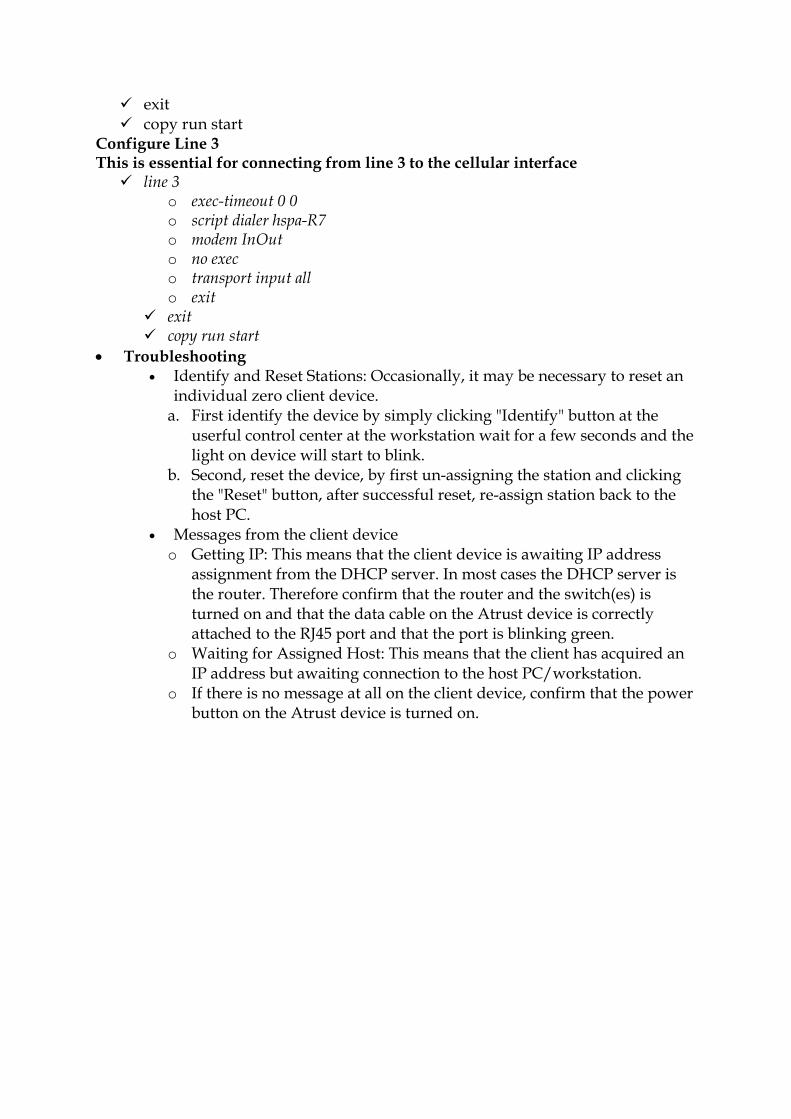
Configure Line 3 This is essential for connecting from line 3 to the cellular interface line 3
o exec-timeout 0 0 o script dialer hspa-R7 o modem InOut o no exec o transport input all o exit
exit copy run start
• Troubleshooting • Identify and Reset Stations: Occasionally, it may be necessary to reset an
individual zero client device. a. First identify the device by simply clicking "Identify" button at the
userful control center at the workstation wait for a few seconds and the light on device will start to blink.
b. Second, reset the device, by first un-assigning the station and clicking the "Reset" button, after successful reset, re-assign station back to the host PC.
• Messages from the client device o Getting IP: This means that the client device is awaiting IP address
assignment from the DHCP server. In most cases the DHCP server is the router. Therefore confirm that the router and the switch(es) is turned on and that the data cable on the Atrust device is correctly attached to the RJ45 port and that the port is blinking green.
o Waiting for Assigned Host: This means that the client has acquired an IP address but awaiting connection to the host PC/workstation.
o If there is no message at all on the client device, confirm that the power button on the Atrust device is turned on.
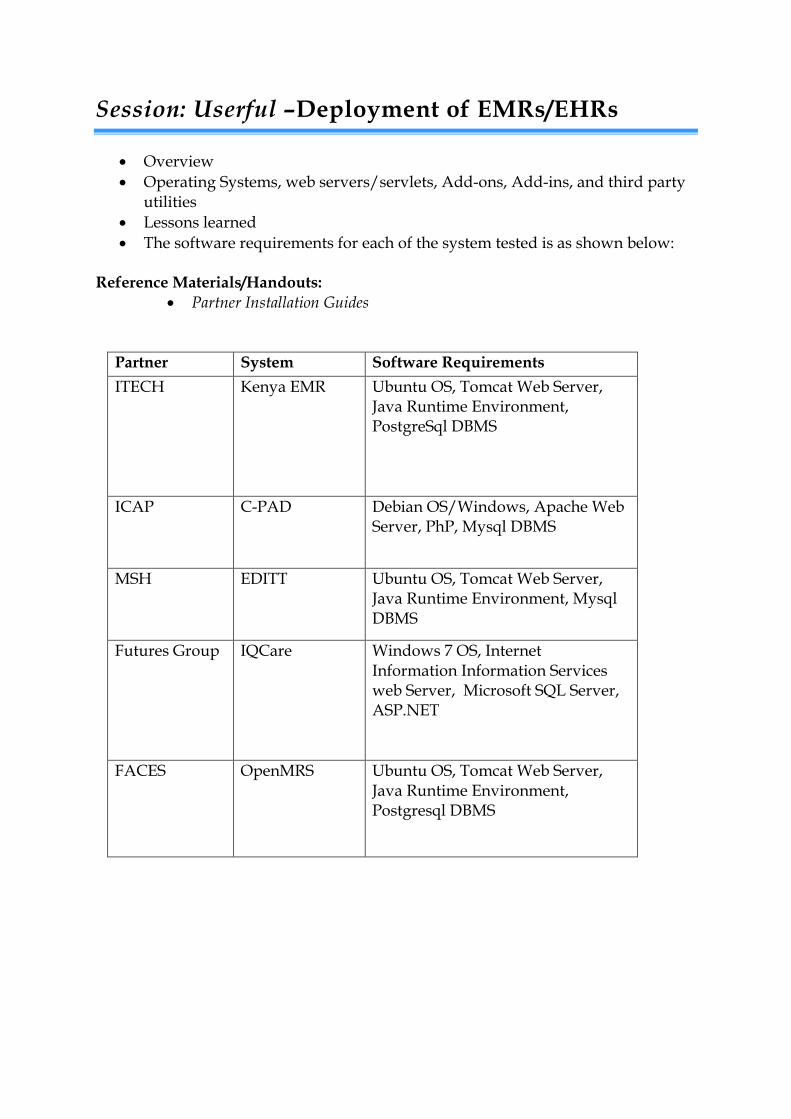
Session: Userful –Deployment of EMRs/EHRs
• Overview • Operating Systems, web servers/servlets, Add-ons, Add-ins, and third party
utilities • Lessons learned • The software requirements for each of the system tested is as shown below:
Reference Materials/Handouts:
• Partner Installation Guides
Partner System Software Requirements ITECH Kenya EMR Ubuntu OS, Tomcat Web Server,
Java Runtime Environment, PostgreSql DBMS
ICAP C-PAD Debian OS/Windows, Apache Web Server, PhP, Mysql DBMS
MSH EDITT Ubuntu OS, Tomcat Web Server, Java Runtime Environment, Mysql DBMS
Futures Group IQCare Windows 7 OS, Internet Information Information Services web Server, Microsoft SQL Server, ASP.NET
FACES OpenMRS Ubuntu OS, Tomcat Web Server, Java Runtime Environment, Postgresql DBMS
Session: Maintenance and Support and practical session
• Trouble shooting Client Side Problems • Trouble shooting server side Problems • Backing and Restoring Your Userful Virtualized Environment • Warranty Activation
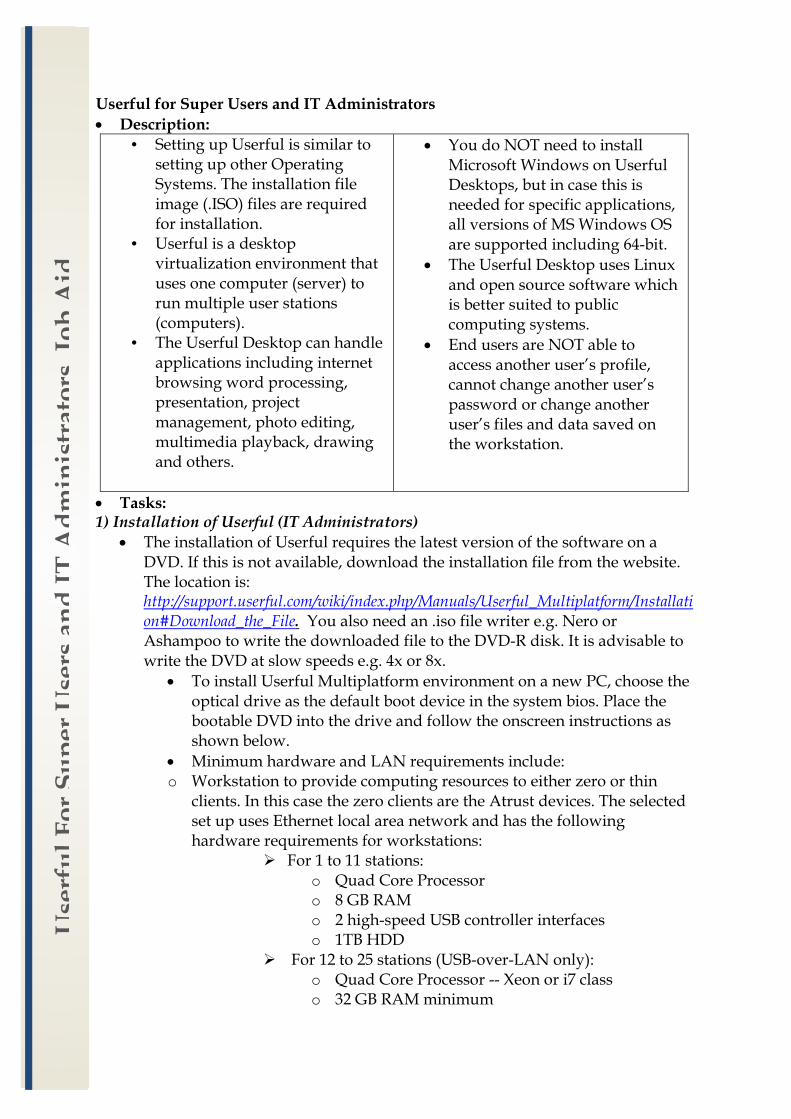
Escalation of ICT Environment Issues (Both Super Users and IT Admins) In an event that the facility has tried all the above troubleshooting methods with limited success, the super user can escalate the issue to the county level (County IT team or the HRIO). If the facility has internet connectivity, the facility can raise a ticket on the national MOH HIS Service desk at: servicedesk.health.go.ke Reference Materials/Handouts:
• Escalation process and protocol
Session: ICT officer roles and responsibilities
Roles and Responsibilities for Users of Health Information Systems Definition: A user role is a set of permissions that specifies whether or not its holder has access to a given function or a portion of the application.
i. Server administrator The roles are:
1. Installing, configuring and managing existing and new hardware and software
2. Applying operating system and application updates, patches, and configuration changes
3. Migration-process management for the routine reporting systems 4. Analysing system logs and identifying potential issues with the application
and the hosting environment 5. Testing, introducing and integrating new technologies and system changes
into existing hosting environments as per the change management process 6. Performing routine audits of systems and application 7. Answering technical queries and assisting users 8. Ensuring security of the application and hosting environment 9. Documenting the configuration of the application and the operating system 10. Troubleshooting and resolution of any reported problems through the Service
Desk 11. Application and environment performance tuning; configuring, adding, and
deleting file systems
12. Ensuring that the network infrastructure is up and running 13. Ensuring that system backup and recovery policies are implemented
The authorised people with these rights shall be at least two ICT officers.
ii. System Administrator The system administrator shall:
1. Have administrative rights over other users 2. Facilitate the migration process for the application upon authorisation by the
change management committee 3. Test, introduce and integrate new technologies and system changes into
existing hosting environments as per the change management process 4. Participate in the migration process for the application 5. Answer technical queries and assist users 6. Troubleshoot any reported problems
There shall be at least two authorised officers from HIS and ICT. Resources
Health Information Applications eSCM: http://kenyapharma.org/site/login KEMSA LMIS: http://lmis.kemsa.co.ke/ DHIS: www.hiskenya.org MCUL: www.ehealth.or.ke/MCUL MFL: www.ehealth.or.ke National Help-desk contact: [email protected] Portal: portal servicedesk.health.go.ke.

Notes ______________________________________________________________________________________________________________________________________________________________________________________________________________________________________________________________________________________________________________________________________________________________________________________________________________________________________________________________________________________________________________________________________________________________________________________________________________________________________________________________________________________________________________________________________________________________________________________________________________________________________________________________________________________________________________________________________________________________________________________________________________________________________________________________________________________________________________________________________________________________________________________________________________________________________________________________________________________________________________________________________________________________________________________________________________________________________________________________________________________________________________________________________________________________________________________________________________________________________________________________________________________________________

Notes ______________________________________________________________________________________________________________________________________________________________________________________________________________________________________________________________________________________________________________________________________________________________________________________________________________________________________________________________________________________________________________________________________________________________________________________________________________________________________________________________________________________________________________________________________________________________________________________________________________________________________________________________________________________________________________________________________________________________________________________________________________________________________________________________________________________________________________________________________________________________________________________________________________________________________________________________________________________________________________________________________________________________________________________________________________________________________________________________________________________________________________________________________________________________________________________________________________________________________________________________________________________________________