Embed Size (px)
Citation preview
AC2-GP
Multi-Sweetener Dispenser
Operations Manual
D-19-090RevG

AC2-GP Multi-Sweetener Dispenser
FEATURES • Easy to install – plug in, load, dispense • Easy refill and service • Accurate, preprogrammed, consistent
portions • Drink Count Data available • Clean dispense – quick cutoff avoids
messy spills • Dispenses two products • Feet are movable to slide under
neighboring appliances
SureShot Technical Assistance Center 1-888-777-9990 or 902-865-9602 [email protected] [email protected] www.sureshotdispensing.com A.C. Dispensing Equipment Inc. 100 Dispensing Way Lower Sackville, Nova Scotia Canada B4C 4H2
TABLE OF CONTENTS THE DISPENSER....................................... 1 MAIN COMPONENTS ................................ 1
Servicing and Warranty........................... 2 Inspect for Damage................................. 2 Reshipment ............................................. 2 Unpacking the Dispenser ........................ 2
DISPENSER REQUIREMENTS................. 3 Safety Precautions .................................. 3 Electrical.................................................. 3 Locating the Dispenser in Your Facility... 3 Repositioning Feet (Optional) ................. 4
CLEANING.................................................. 5 Recommended Cleaning Schedule ........ 5 Exterior .................................................... 5 Button Panel............................................ 5 Catch Tray and Screen ........................... 6 Top and Transition Piece (Fill-in-Place models only) ............................................ 6 Inside Compartment................................ 6 Dispense Tube ........................................ 6 Product Hoppers and Augers.................. 7
SET-UP....................................................... 9 Power Supply .......................................... 9 Language Setting .................................... 9
OPERATING INSTRUCTIONS................. 10 Button Panel – Disabling and Enabling. 10 Opening the Dispenser Door................. 10 Product Hoppers ................................... 10 Removing Hoppers ............................... 11 Loading Hoppers................................... 11 Filling Hoppers with Product ................. 12 Dispensing Product ............................... 13
STANDARD BUTTON PANEL LAYOUT.. 13 LCD DISPLAY........................................... 14 PROGRAM MODE.................................... 14
Target Adjust ......................................... 14 Volume Adjust ....................................... 15 Drink Count Data................................... 15 Product .................................................. 15 Language .............................................. 15
TROUBLESHOOTING.............................. 16 SERVICE .................................................. 17 WIRING DIAGRAM................................... 18 WARRANTY ..............................................19

AC2-GP Multi-Sweetener Dispenser • SureShot Technical Assistance Center: 1-888-777-9990 or 902-865-9602 1
AC2-GP
Dispenser may not be exactly as shown
MULTI-SWEETENER DISPENSER OPERATIONS MANUAL
Important: Read this Manual now and retain it for future reference
THE DISPENSER
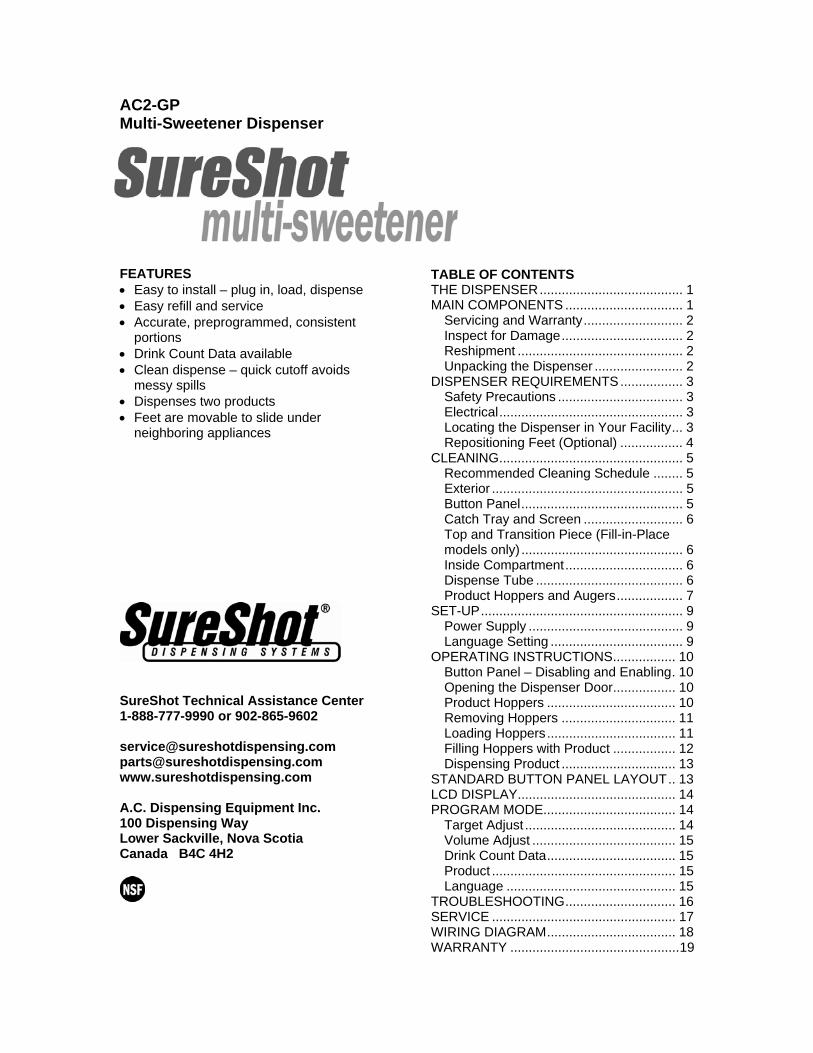
The SureShot Dispensing Systems® AC2-GP Multi-Sweetener Dispenser automatically dispenses controlled portions of two dry products such as sugar and other alternative products for use in coffee, milkshakes, hot chocolate, health drinks and other beverages. The product is dispensed by touching selection buttons on the front of the dispenser. The dispenser has been preconfigured to industry-standard defaults. Each button press is preset independently to accurately dispense a specified amount of product using our unique, state-of-the-art microprocessor technology. The products to dispense are contained in product hoppers inside the dispenser. The auger style dispense system is designed to work with dry products with similar consistency to sugar granules.
MAIN COMPONENTS
Program Mode Buttons
Program Mode
Adjustment Up
Adjustment Down
Panel Disable
LCD Display Window
Button Panel
Infrared Programming Window
Program Mode Buttons
Catch Tray and Screen
Cup Guide (optional)
Dispenser Top Transition Piece
SPECIFICATIONS Weight: 29.0 lbs/13.2 kg (empty dispenser) Dimensions (LxWxH): 17.75" x 4.0" x 24" (without feet) 17.75" x 8.5" x 24.75" (with feet) Hopper Capacity: Top Hopper 6.0 lbs/2.7 kg (granular sugar) Bottom Hopper 2.5 lbs/1.1 kg (granular sugar) Hoppers are made of food-grade plastic.
AC2-GP Multi-Sweetener Dispenser • SureShot Technical Assistance Center: 1-888-777-9990 or 902-865-9602 2
Servicing and Warranty Standard warranty is one year, on-site parts and labour. Access to USA and Canada-wide Technical Service Network. The Warranty (page 19) will be null and void if the dispenser is serviced by unqualified personnel. Under warranty, service technicians must be approved and dispatched by the SureShot Technical Assistance Center. Contact the SureShot Technical Assistance Center at 1-888-777-9990 or 902-865-9602 for approval. The customer is responsible for all costs not approved by SureShot Dispensing Systems®.
Inspect for Damage
Note: Damages incurred during shipment are not the responsibility of SureShot Dispensing Systems® and are not covered by Warranty. If you haven’t already done so, inspect packaging material for damage. Note any damage in detail. Unpack the dispenser immediately following the directions below. Examine the dispenser for damage. Report any damage to the transportation company and file a claim for damages within 24 hours. Your immediate inspection and reporting protects you against loss. Notify SureShot Dispensing Systems® within 24 hours of any damage claims. No returns will be accepted without prior approval. Obtain an authorized return number by contacting the SureShot Technical Assistance Center at 1-888-777-9990 or 902-865-9602.
Reshipment If packaging is not available, it may be purchased from the SureShot Parts Department by calling 1-888-777-9990 or 902-865-9602. Ensure pieces which may shift in transit are secured using masking tape. No returns will be accepted without prior approval. Obtain an authorized return number by contacting the SureShot Technical Assistance Center at 1-888-777-9990 or 902-865-9602.
Unpacking the Dispenser 1. Remove the dispenser from the packaging.
a. Open the box. b. Remove the packing material. c. Remove power supply and catch tray. d. Carefully lift the dispenser out of the box and place it on the counter.
2. Prior to use, read this Operations Manual and store it for future reference. 3. Remove the plastic protective covering from the stainless steel exterior.
Hold the dispenser firmly at the top and peel in sections from top to bottom. 4. Remove the plastic protective covering from the catch tray screen.
AC2-GP Multi-Sweetener Dispenser • SureShot Technical Assistance Center: 1-888-777-9990 or 902-865-9602 3
DISPENSER REQUIREMENTS Safety Precautions
• Always plug the dispenser into an approved electrical outlet. • The dispenser includes a microcontroller and must be operated on grounded
electrical wiring at all times. • Unplug the dispenser from its electrical source before servicing. • Do not immerse the dispenser in water. • Observe all safety precautions with this dispenser that you would with any electrical
appliance. • The dispense auger is powered by a motor with a turning shaft. To avoid possible
injury or equipment damage, keep hands and objects clear of the auger and shaft when equipment is plugged in.
Electrical • The power requirement is 120 V AC, 0.6 amp, single ph, 60 Hz. • The dispenser has an in-line power supply with both AC and DC power cords
attached. • The DC power cord fits into a receptacle at the back of the dispenser. • The AC power cord is furnished with a UL-approved 3-prong attachment plug. This
plug is designed to fit a receptacle with provisions for a grounding pin. • Do not immerse power supply. Keep power supply in a dry location. • The dispenser includes a microcontroller and must be operated on grounded
electrical wiring at all times. Failure to do so will void the Warranty.
Locating the Dispenser in Your Facility • This dispenser is not suitable for outdoor use. • Place the dispenser where it will best serve your operation.
Place the dispenser at the appropriate serving height so that users of the dispenser can operate the button panel and easily place and remove cups.
• Do not place the dispenser too close to a source of heat or moisture. • The dispenser must be placed on a level surface. • Counters, platforms or shelves should be strong enough to support the dispenser
and a full product load. The empty dispenser weighs 29 lbs/13.2 kg. With sugar loaded in both product hoppers, the dispenser weighs 37.5 lbs/17 kg.
• Apply appropriate sticker (if supplied) to front of door above button panel for products to be dispensed. Ensure surface is clean. Cleaning with isopropyl alcohol is recommended.
AC2-GP Multi-Sweetener Dispenser • SureShot Technical Assistance Center: 1-888-777-9990 or 902-865-9602 4
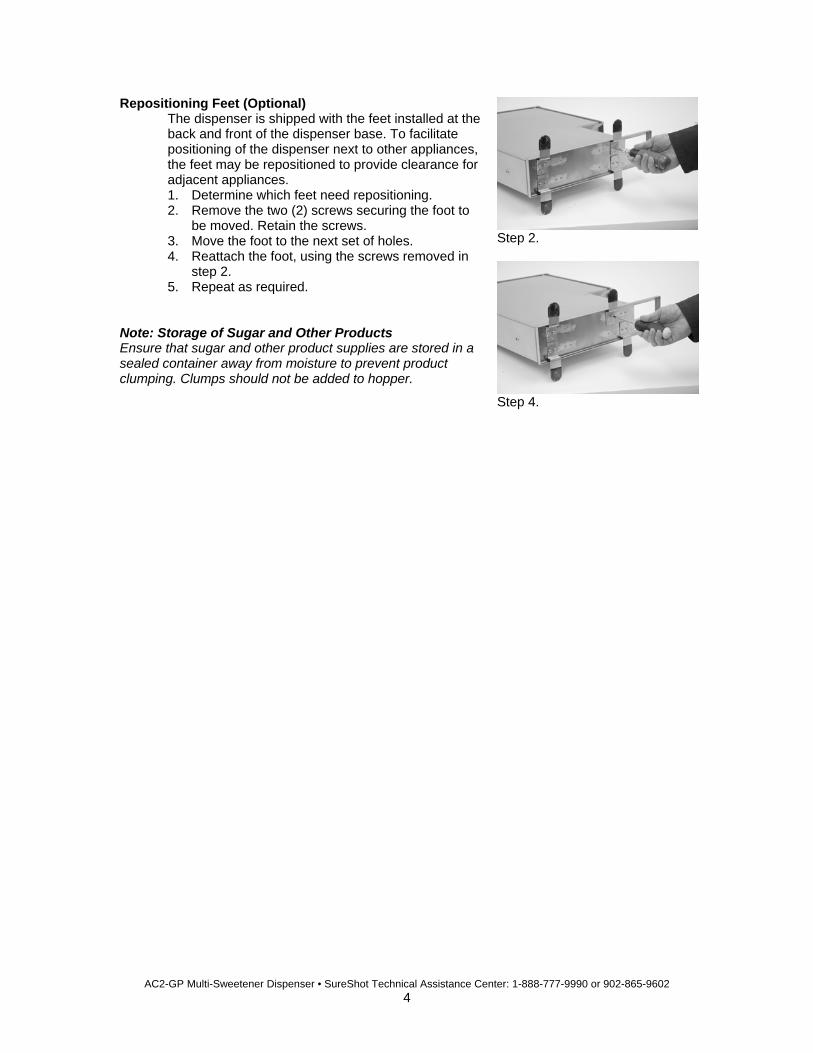
Repositioning Feet (Optional) The dispenser is shipped with the feet installed at the back and front of the dispenser base. To facilitate positioning of the dispenser next to other appliances, the feet may be repositioned to provide clearance for adjacent appliances. 1. Determine which feet need repositioning. 2. Remove the two (2) screws securing the foot to
be moved. Retain the screws. 3. Move the foot to the next set of holes. 4. Reattach the foot, using the screws removed in
step 2. 5. Repeat as required.
Note: Storage of Sugar and Other Products Ensure that sugar and other product supplies are stored in a sealed container away from moisture to prevent product clumping. Clumps should not be added to hopper.
Step 2.
Step 4.
AC2-GP Multi-Sweetener Dispenser • SureShot Technical Assistance Center: 1-888-777-9990 or 902-865-9602 5
CLEANING
• Clean and dry the dispenser thoroughly, following all instructions, before first use. • Air drying completely is required to prevent clumping of products. • Do not use any abrasive materials or cleaners on the dispenser. • The dispenser must not be cleaned by water jet. • Do not spray any liquid or cleaners in or around the dispense tip area or inside the
dispenser. Liquid could damage electrical components of the dispenser. Recommended Cleaning Schedule
Equipment Procedure Frequency
Exterior See page 5
Button Panel See page 5
Catch Tray and Screen See page 6
Daily
Top and Transition Piece (Fill-in-Place models only)
See page 6
Inside Compartment See page 6
Dispense Tube See page 6
Product Hoppers and Augers See page 7
Every 2 weeks
Exterior
1. Wipe exterior surfaces using a soft cloth dampened with warm, clean soapy water. A stainless steel cleaner is recommended. Use on stainless steel surfaces only. Note: Do not allow stainless steel cleaner to come in contact with the plastic button panel.
Button Panel
1. Disable button panel. a. Press and hold the Panel Disable button on the button panel for 3 seconds
until you hear 2 beeps. Lights on the button panel will flash in sequence. 2. Wipe the panel with a soft cloth dampened with warm, clean soapy water. 3. Rinse with a soft cloth dampened with warm, clean water. 4. Enable button panel to return to regular button panel operation.
a. Press and hold the Panel Disable button on the button panel for 3 seconds until you hear 1 beep.
Note: Button panel will enable automatically after 3 minutes of being disabled.
AC2-GP Multi-Sweetener Dispenser • SureShot Technical Assistance Center: 1-888-777-9990 or 902-865-9602 6
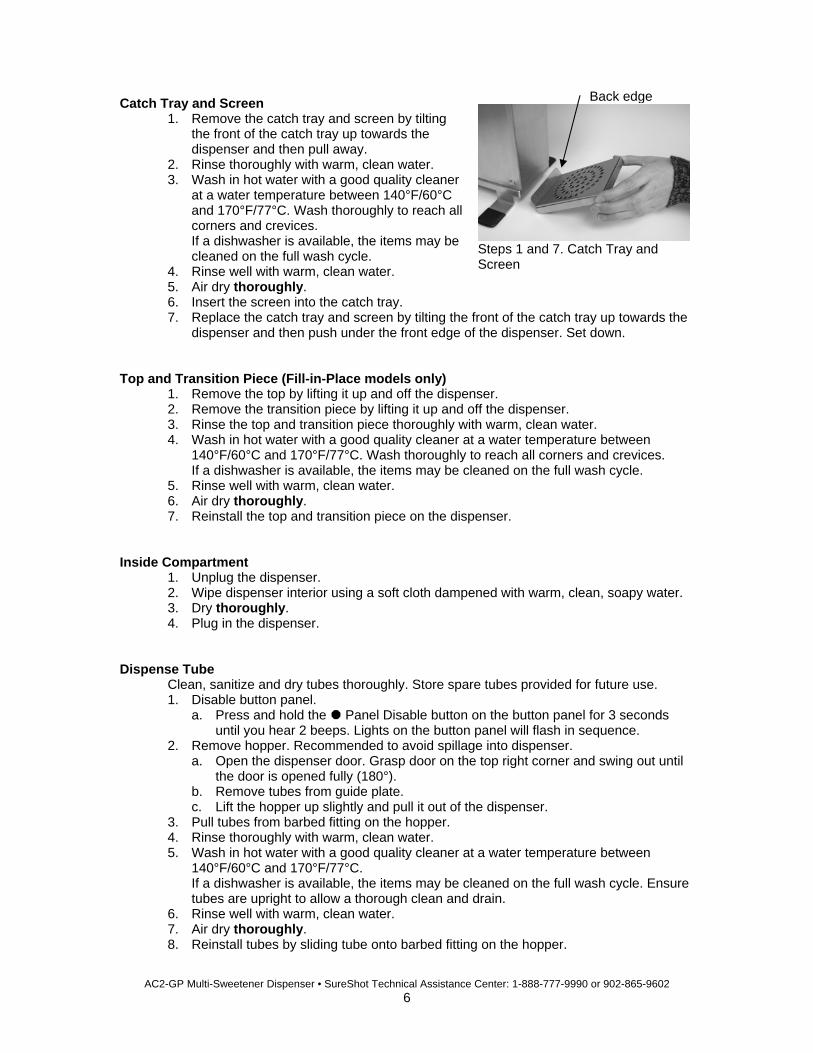
Catch Tray and Screen 1. Remove the catch tray and screen by tilting
the front of the catch tray up towards the dispenser and then pull away.
2. Rinse thoroughly with warm, clean water. 3. Wash in hot water with a good quality cleaner
at a water temperature between 140°F/60°C and 170°F/77°C. Wash thoroughly to reach all corners and crevices. If a dishwasher is available, the items may be cleaned on the full wash cycle.
4. Rinse well with warm, clean water. 5. Air dry thoroughly. 6. Insert the screen into the catch tray. 7. Replace the catch tray and screen by tilting the front of the catch tray up towards the
dispenser and then push under the front edge of the dispenser. Set down. Top and Transition Piece (Fill-in-Place models only)
1. Remove the top by lifting it up and off the dispenser. 2. Remove the transition piece by lifting it up and off the dispenser. 3. Rinse the top and transition piece thoroughly with warm, clean water. 4. Wash in hot water with a good quality cleaner at a water temperature between
140°F/60°C and 170°F/77°C. Wash thoroughly to reach all corners and crevices. If a dishwasher is available, the items may be cleaned on the full wash cycle.
5. Rinse well with warm, clean water. 6. Air dry thoroughly. 7. Reinstall the top and transition piece on the dispenser.
Inside Compartment
1. Unplug the dispenser. 2. Wipe dispenser interior using a soft cloth dampened with warm, clean, soapy water. 3. Dry thoroughly. 4. Plug in the dispenser.
Dispense Tube
Clean, sanitize and dry tubes thoroughly. Store spare tubes provided for future use. 1. Disable button panel.
a. Press and hold the Panel Disable button on the button panel for 3 seconds until you hear 2 beeps. Lights on the button panel will flash in sequence.
2. Remove hopper. Recommended to avoid spillage into dispenser. a. Open the dispenser door. Grasp door on the top right corner and swing out until
the door is opened fully (180°). b. Remove tubes from guide plate. c. Lift the hopper up slightly and pull it out of the dispenser.
3. Pull tubes from barbed fitting on the hopper. 4. Rinse thoroughly with warm, clean water. 5. Wash in hot water with a good quality cleaner at a water temperature between
140°F/60°C and 170°F/77°C. If a dishwasher is available, the items may be cleaned on the full wash cycle. Ensure tubes are upright to allow a thorough clean and drain.
6. Rinse well with warm, clean water. 7. Air dry thoroughly. 8. Reinstall tubes by sliding tube onto barbed fitting on the hopper.
Steps 1 and 7. Catch Tray and Screen
Back edge
AC2-GP Multi-Sweetener Dispenser • SureShot Technical Assistance Center: 1-888-777-9990 or 902-865-9602 7
Product Hoppers and Augers 1. Unplug the dispenser. 2. Remove the top and transition piece by lifting them up
and off the dispenser (fill-in-place models only). 3. Remove hopper.
a. Open the dispenser door. Grasp door on the top right corner and swing out until the door is opened fully (180°).
b. Remove tubes from guide plate. c. Lift the hopper up slightly and pull it out of the
dispenser. 4. Empty the product hoppers.
a. Remove the sugar or other product. Retain for future use.
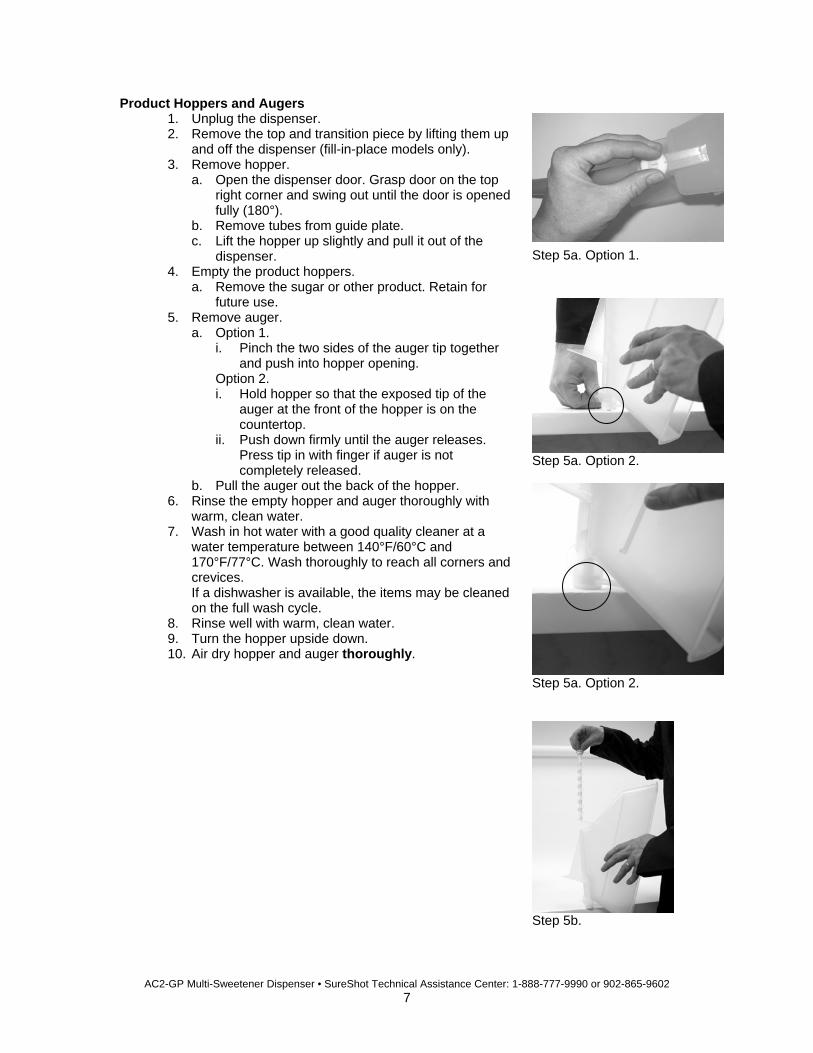
5. Remove auger. a. Option 1.
i. Pinch the two sides of the auger tip together and push into hopper opening.
Option 2. i. Hold hopper so that the exposed tip of the
auger at the front of the hopper is on the countertop.
ii. Push down firmly until the auger releases. Press tip in with finger if auger is not completely released.
b. Pull the auger out the back of the hopper. 6. Rinse the empty hopper and auger thoroughly with
warm, clean water. 7. Wash in hot water with a good quality cleaner at a
water temperature between 140°F/60°C and 170°F/77°C. Wash thoroughly to reach all corners and crevices. If a dishwasher is available, the items may be cleaned on the full wash cycle.
8. Rinse well with warm, clean water. 9. Turn the hopper upside down. 10. Air dry hopper and auger thoroughly.
Step 5a. Option 1.
Step 5a. Option 2.
Step 5a. Option 2.
Step 5b.
AC2-GP Multi-Sweetener Dispenser • SureShot Technical Assistance Center: 1-888-777-9990 or 902-865-9602 8
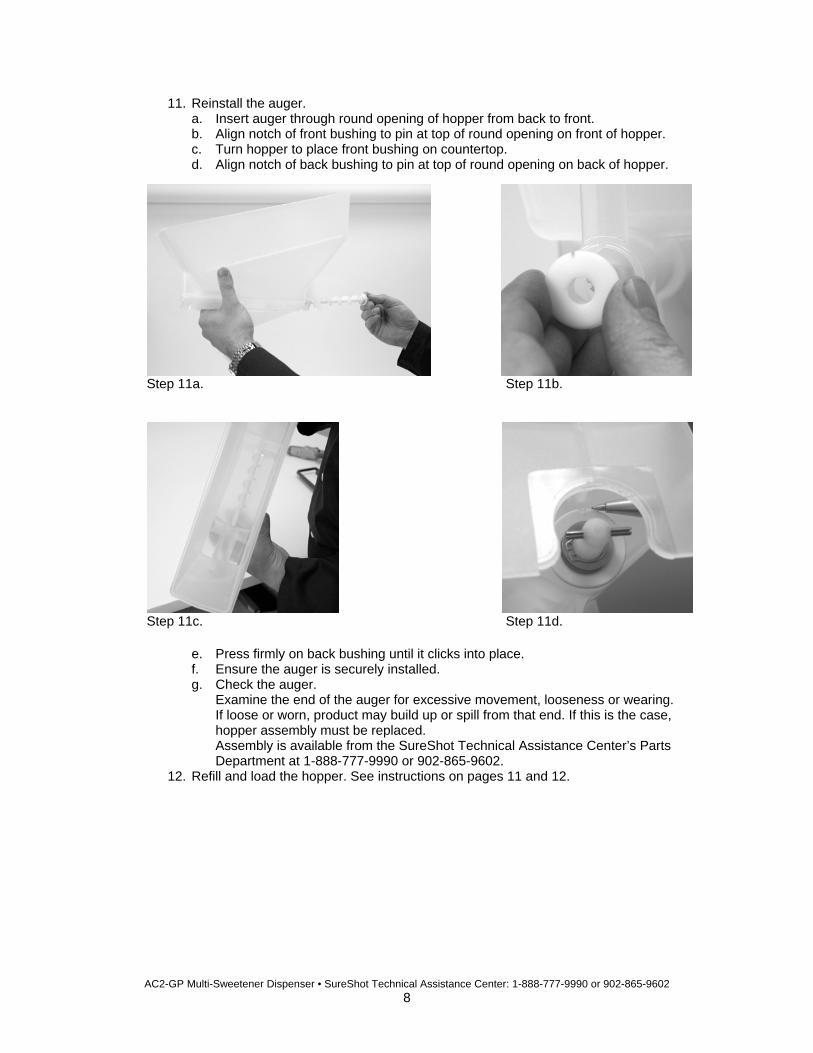
11. Reinstall the auger. a. Insert auger through round opening of hopper from back to front. b. Align notch of front bushing to pin at top of round opening on front of hopper. c. Turn hopper to place front bushing on countertop. d. Align notch of back bushing to pin at top of round opening on back of hopper.
e. Press firmly on back bushing until it clicks into place. f. Ensure the auger is securely installed. g. Check the auger.
Examine the end of the auger for excessive movement, looseness or wearing. If loose or worn, product may build up or spill from that end. If this is the case, hopper assembly must be replaced. Assembly is available from the SureShot Technical Assistance Center’s Parts Department at 1-888-777-9990 or 902-865-9602.
12. Refill and load the hopper. See instructions on pages 11 and 12.
Step 11a. Step 11b.
Step 11c. Step 11d.
AC2-GP Multi-Sweetener Dispenser • SureShot Technical Assistance Center: 1-888-777-9990 or 902-865-9602 9
SET-UP Power Supply
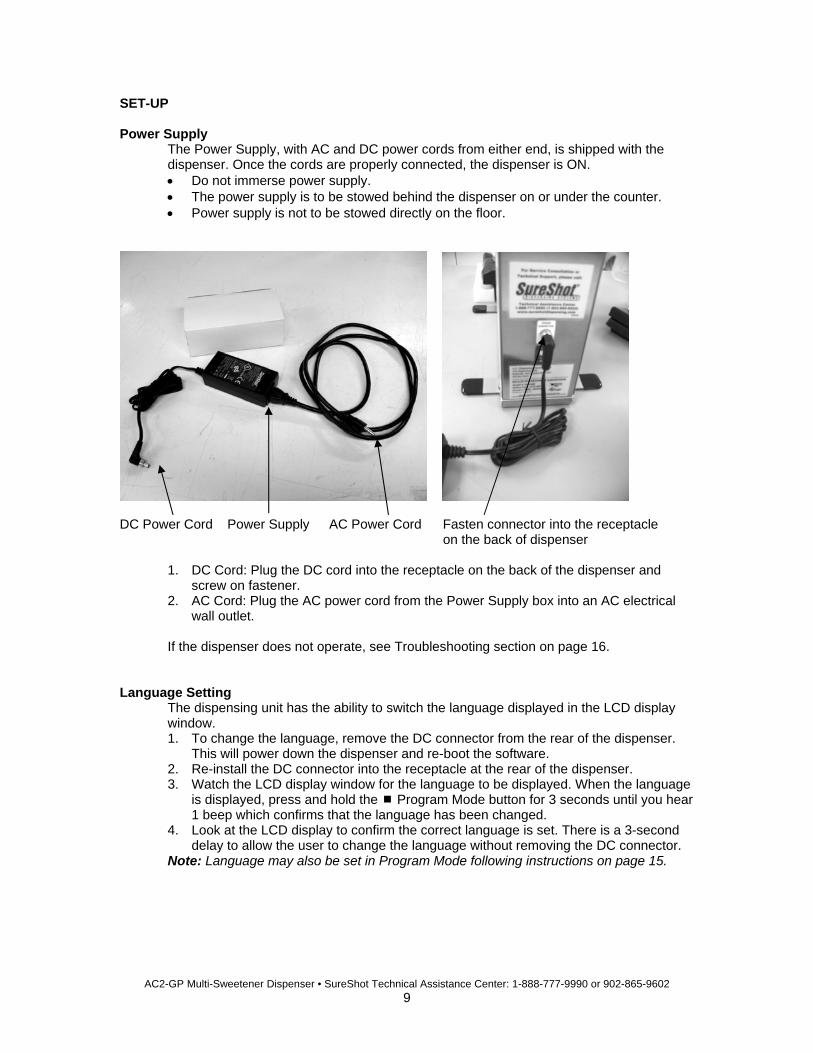
The Power Supply, with AC and DC power cords from either end, is shipped with the dispenser. Once the cords are properly connected, the dispenser is ON. • Do not immerse power supply. • The power supply is to be stowed behind the dispenser on or under the counter. • Power supply is not to be stowed directly on the floor.
DC Power Cord Power Supply AC Power Cord Fasten connector into the receptacle on the back of dispenser
1. DC Cord: Plug the DC cord into the receptacle on the back of the dispenser and screw on fastener.
2. AC Cord: Plug the AC power cord from the Power Supply box into an AC electrical wall outlet.
If the dispenser does not operate, see Troubleshooting section on page 16.
Language Setting The dispensing unit has the ability to switch the language displayed in the LCD display window. 1. To change the language, remove the DC connector from the rear of the dispenser.
This will power down the dispenser and re-boot the software. 2. Re-install the DC connector into the receptacle at the rear of the dispenser. 3. Watch the LCD display window for the language to be displayed. When the language
is displayed, press and hold the Program Mode button for 3 seconds until you hear 1 beep which confirms that the language has been changed.
4. Look at the LCD display to confirm the correct language is set. There is a 3-second delay to allow the user to change the language without removing the DC connector.
Note: Language may also be set in Program Mode following instructions on page 15.
AC2-GP Multi-Sweetener Dispenser • SureShot Technical Assistance Center: 1-888-777-9990 or 902-865-9602 10
OPERATING INSTRUCTIONS Note: Before starting dispenser, ensure all dispenser requirements (page 3), cleaning (page 5) and set-up (page 9) instructions have been followed.
Button Panel – Disabling and Enabling
When opening the door for any reason, it is recommended that you disable the button panel. 1. Disable button panel.
a. Press and hold the Panel Disable button on the button panel for 3 seconds until you hear 2 beeps. Lights on the button panel will flash in sequence.
2. Enable button panel. a. To enable the button panel, press and hold the Panel Disable button on the
button panel for 3 seconds until you hear 1 beep. Note: Button panel will enable automatically after 3 minutes of being disabled.
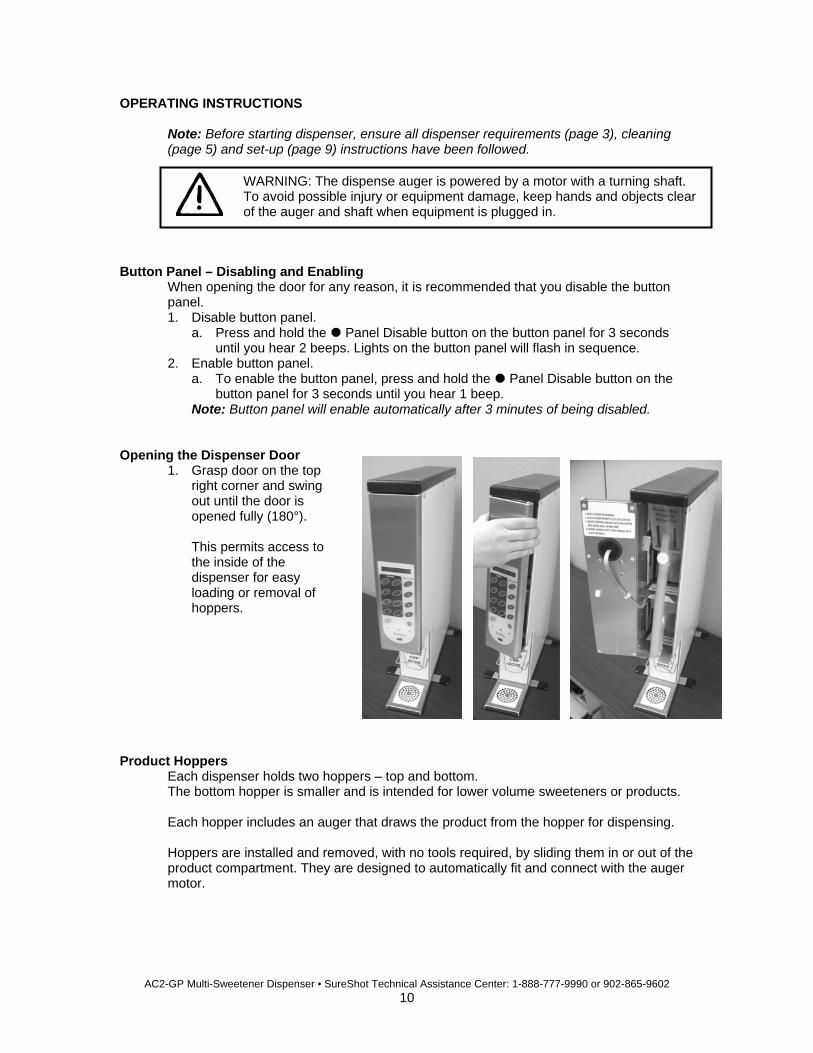
Opening the Dispenser Door
1. Grasp door on the top right corner and swing out until the door is opened fully (180°).
This permits access to the inside of the dispenser for easy loading or removal of hoppers.
Product Hoppers
Each dispenser holds two hoppers – top and bottom. The bottom hopper is smaller and is intended for lower volume sweeteners or products. Each hopper includes an auger that draws the product from the hopper for dispensing. Hoppers are installed and removed, with no tools required, by sliding them in or out of the product compartment. They are designed to automatically fit and connect with the auger motor.
WARNING: The dispense auger is powered by a motor with a turning shaft. To avoid possible injury or equipment damage, keep hands and objects clear of the auger and shaft when equipment is plugged in.
AC2-GP Multi-Sweetener Dispenser • SureShot Technical Assistance Center: 1-888-777-9990 or 902-865-9602 11
Removing Hoppers Bottom Hopper for All Models and Top Hopper for Non Fill-in-Place Models 1. Open the dispenser door.
a. Grasp door on the top right corner and swing out until the door is opened fully (180°).
2. Remove tubes from guide plate. 3. Lift the hopper up slightly and pull it out of the dispenser.
Top Hopper for Fill-in-Place Models 1. Open the dispenser door.
a. Grasp door on the top right corner and swing out until the door is opened fully (180°).
2. Remove top and transition piece from dispenser. 3. Remove tubes from guide plate. 4. Lift the hopper up slightly and pull it out of the dispenser.
Loading Hoppers
1. Make sure you have a hopper filled with the correct product.
2. Open the dispenser door. a. Grasp door on the top right corner and swing out until
the door is opened fully (180°). 3. Load hopper into the appropriate product compartment.
Large hopper – Top compartment for higher volume products.
Small hopper – Bottom compartment for lower volume products.
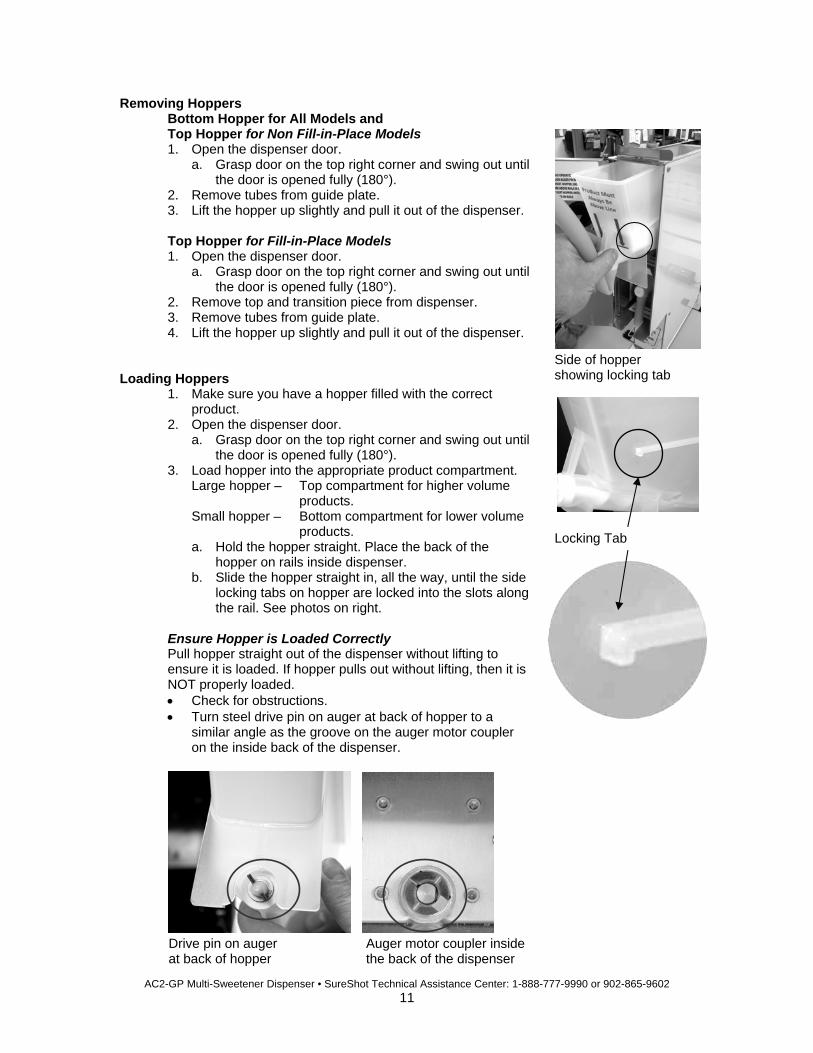
a. Hold the hopper straight. Place the back of the hopper on rails inside dispenser.
b. Slide the hopper straight in, all the way, until the side locking tabs on hopper are locked into the slots along the rail. See photos on right.
Ensure Hopper is Loaded Correctly Pull hopper straight out of the dispenser without lifting to ensure it is loaded. If hopper pulls out without lifting, then it is NOT properly loaded. • Check for obstructions. • Turn steel drive pin on auger at back of hopper to a
similar angle as the groove on the auger motor coupler on the inside back of the dispenser.
Side of hopper showing locking tab
Locking Tab
Drive pin on auger Auger motor coupler inside at back of hopper the back of the dispenser
AC2-GP Multi-Sweetener Dispenser • SureShot Technical Assistance Center: 1-888-777-9990 or 902-865-9602 12
Filling Hoppers with Product Note: Ensure that sugar and other product supplies are stored in a sealed container away from moisture to prevent product clumping. Clumps should not be added to hopper.
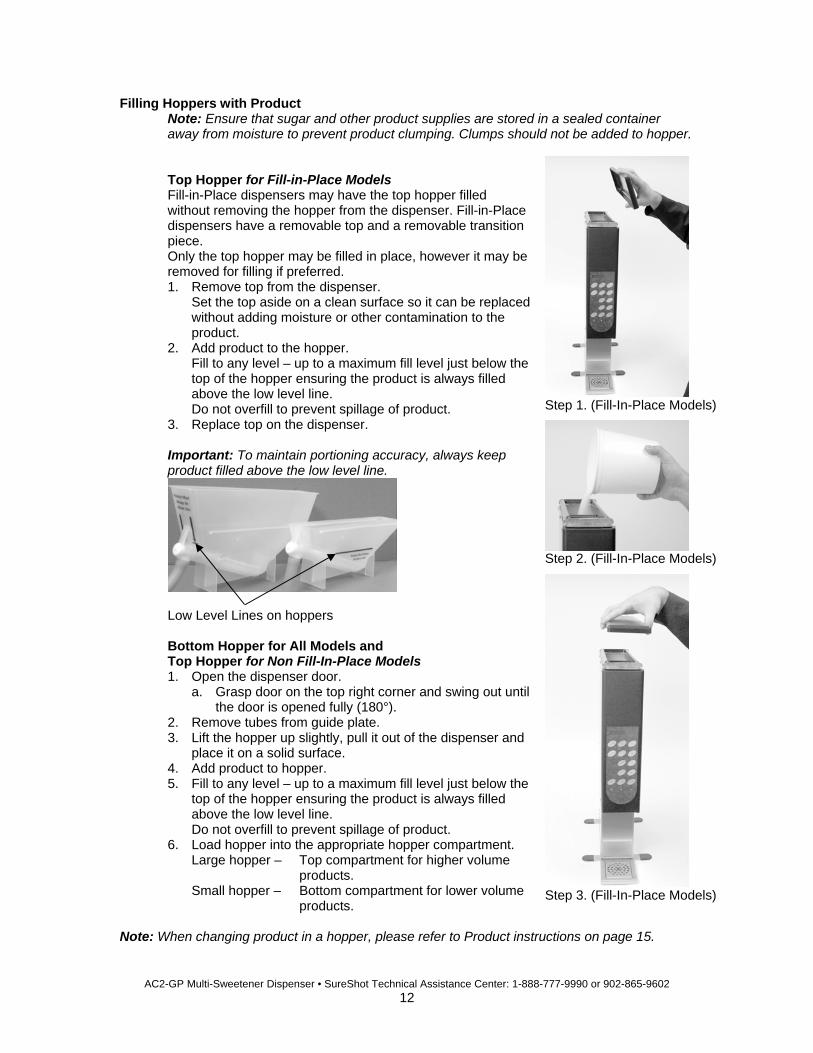
Top Hopper for Fill-in-Place Models Fill-in-Place dispensers may have the top hopper filled without removing the hopper from the dispenser. Fill-in-Place dispensers have a removable top and a removable transition piece. Only the top hopper may be filled in place, however it may be removed for filling if preferred. 1. Remove top from the dispenser.
Set the top aside on a clean surface so it can be replaced without adding moisture or other contamination to the product.
2. Add product to the hopper. Fill to any level – up to a maximum fill level just below the top of the hopper ensuring the product is always filled above the low level line. Do not overfill to prevent spillage of product.
3. Replace top on the dispenser.
Important: To maintain portioning accuracy, always keep product filled above the low level line.
Low Level Lines on hoppers
Bottom Hopper for All Models and Top Hopper for Non Fill-In-Place Models 1. Open the dispenser door.
a. Grasp door on the top right corner and swing out until the door is opened fully (180°).
2. Remove tubes from guide plate. 3. Lift the hopper up slightly, pull it out of the dispenser and
place it on a solid surface. 4. Add product to hopper. 5. Fill to any level – up to a maximum fill level just below the
top of the hopper ensuring the product is always filled above the low level line. Do not overfill to prevent spillage of product.
6. Load hopper into the appropriate hopper compartment. Large hopper – Top compartment for higher volume
products. Small hopper – Bottom compartment for lower volume
products.
Note: When changing product in a hopper, please refer to Product instructions on page 15.
Step 1. (Fill-In-Place Models)
Step 2. (Fill-In-Place Models)
Step 3. (Fill-In-Place Models)
AC2-GP Multi-Sweetener Dispenser • SureShot Technical Assistance Center: 1-888-777-9990 or 902-865-9602 13
Button panel may not be exactly as shown.
Dispensing Product 1. Place empty cup under dispense point.
An empty cup is ideal otherwise steam from a hot beverage will enter the dispense tube and may cause sugar to clump.
2. Select button for desired amount or cup size (depending on model). 3. Select beverage modifier button if applicable. Eg. Iced Coffee (not available on all
models.) 4. Allow product to flow into cup. 5. Remove cup. 6. Fill cup with desired beverage.
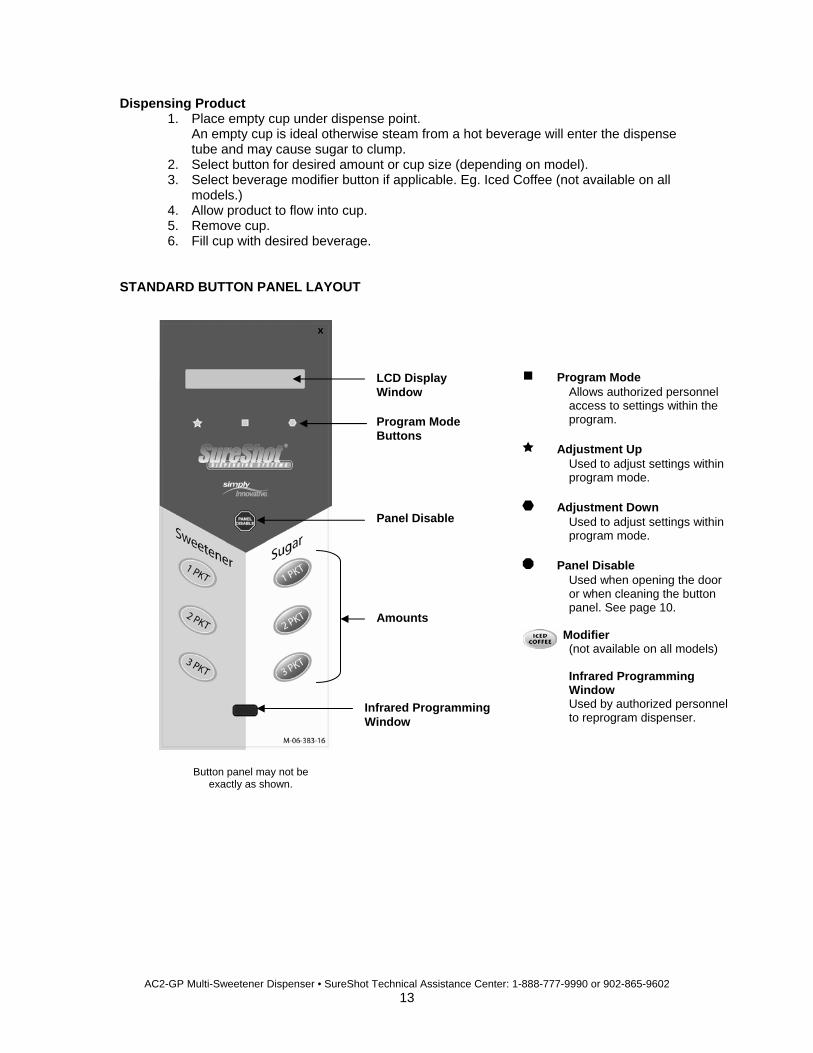
STANDARD BUTTON PANEL LAYOUT
Program Mode Allows authorized personnel access to settings within the program.
Adjustment Up
Used to adjust settings within program mode.
Adjustment Down
Used to adjust settings within program mode.
Panel Disable
Used when opening the door or when cleaning the button panel. See page 10.
Modifier
(not available on all models) Infrared Programming Window Used by authorized personnel to reprogram dispenser.
LCD Display Window
Program Mode Buttons
Panel Disable
Infrared Programming Window
Amounts
AC2-GP Multi-Sweetener Dispenser • SureShot Technical Assistance Center: 1-888-777-9990 or 902-865-9602 14
LCD DISPLAY The Display window at the top of the button panel shows the current operational status of the dispenser.
Display Operational Status
Make Selection Dispenser is ready to dispense.
Beverage Modifier (not available on all models)
A modifier has been selected. E.g. Iced Coffee.
Dispensing… Dispenser is dispensing the selection(s) made.
Program Mode: Not used in daily operations.
Target Adjust Changes amounts dispensed for each product and size.
Volume Adjust Percentage change to dispense amounts across all sizes for each product.
Drink Count Provides total number of drinks dispensed for each product.
Product Changes specifications when product is changed in hopper.
Language Switches the language displayed in the LCD display window.
Service Used by qualified personnel for servicing the dispenser.
P1S1, P2S1, etc. Product and Size Selected If these messages appear, touch and hold the Program Mode button until you hear 2 beeps. Release after the beep. LCD returns to Select Product.
Panel Disabled Appears if the Panel Disable feature has been activated.
ESW_xxxxVy.y.y Indicates Program number (xxxx) and version (y.y.y). Displays when machine is first plugged in.
Note: Once product is dispensed, the LCD returns to Make Selection. If an incomplete selection is made, dispenser will time out after 3 seconds and return to Make Selection.
PROGRAM MODE
Note: Dispenser can be reprogrammed using the Infrared Programming Window with an external device (FOB) provided by Sureshot Dispensing Systems®.
Target Adjust
Dispense amounts may be changed for each size and product. Amounts have been pre-set to your organizations specifications. 1. Press and hold the Program Mode button until you hear 2 beeps. 2. Press the Program Mode button repeatedly until the LCD displays Target Adjust. 3. Select the appropriate Amount button. 4. Press the Adjustment Up or Adjustment Down button to desired amount
(measured in grams). 5. Repeat for each Amount button requiring change. 6. Press and hold the Program Mode button until you hear 2 beeps to exit Program
Mode.
AC2-GP Multi-Sweetener Dispenser • SureShot Technical Assistance Center: 1-888-777-9990 or 902-865-9602 15
Volume Adjust Dispense amounts may be changed as an overall percentage increase or decrease to all sizes for each product. Default is zero. 1. Press and hold the Program Mode button until you hear 2 beeps. 2. Press the Program Mode button repeatedly until the LCD displays Volume Adjust. 3. Select any Amount button for appropriate product. 4. Press the Adjustment Up or Adjustment Down button to desired percentage
change. Change will apply to all sizes for selected product. 5. Press and hold the Program Mode button until you hear 2 beeps to exit Program
Mode. Drink Count Data
The AC2-GP dispenser provides Drink Count Data. This shows the total number of dispenses for each size. 1. Press and hold the Program Mode button until you hear 2 beeps. 2. Press the Program Mode button repeatedly until the LCD displays Drink Count. 3. Select an Amount button. LCD shows the number of drinks for this size. 4. Select each Amount button until you have all the Drink Count Data required. 5. Press and hold the Program Mode button until you hear 2 beeps to exit Program
Mode.
To Clear Drink Count Data 1. Follow Drink Count Data steps 1, 2 and 3 above. 2. For current selection, press the Adjustment Down button twice. 3. Drink Count should now be set to 0. 4. Repeat for each size as required. 5. Press and hold the Program Mode button until you hear 2 beeps to exit Program
Mode. Product
Changing product in a hopper requires changing the Product setting. Default products have been pre-set to your organizations specifications. Note: The Product setting alters how the equipment dispenses specific products. Dispense amount settings do not change. See Target Adjust on page 14. 1. Press and hold the Program Mode button until you hear 2 beeps. 2. Press the Program Mode button repeatedly until the LCD displays Product. 3. Select any amount button for the appropriate product hopper. 4. Press the Adjustment Up or Adjustment Down button repeatedly until desired
product is displayed. 5. Press and hold the Program Mode button until you hear 2 beeps to exit Program
Mode. Language
Text in display can be switched between different languages. 1. Press and hold the Program Mode button until you hear 2 beeps. 2. Press the Program Mode button repeatedly until the LCD displays Language. 3. Press the Adjustment Up or Adjustment Down button repeatedly until desired
language is displayed. 4. Press and hold the Program Mode button until you hear 2 beeps to exit Program
Mode.
AC2-GP Multi-Sweetener Dispenser • SureShot Technical Assistance Center: 1-888-777-9990 or 902-865-9602 16
TROUBLESHOOTING Problem Action
Dispenser does not have power
1. Make sure the external power supply is plugged into an active power source. If power source does not have power, have a qualified person check your facility’s fuse box or circuit breaker to restore power.
2. Make sure the power supply is connected to the dispenser. If you still do not hear the motor, contact the SureShot Technical Assistance Center at 1-888-777-9990 or 902-865-9602.
Dispenser will not dispense product
1. Make sure the power cord is plugged into the wall outlet and the dispenser and that the power source is active.
2. Unplug the dispenser, wait 10 seconds, then plug the dispenser back in. This resets the microprocessor.
3. Ensure there is product in the hopper. 4. Ensure the dispense tube is clear of any blockages. 5. Ensure the hopper is properly inserted into the dispenser.
Check that the side locking tabs on hopper are locked into the slots along the rail inside the dispenser. Pull hopper straight out of the dispenser without lifting to ensure it is loaded. If hopper pulls out without lifting, then it is NOT properly loaded. See page 11.
6. If dispenser beeps once but will not dispense, this may indicate that product has jammed the auger which prevents it from rotating. a. Place a screwdriver tip into slot of front auger tip. Apply
pressure in a clockwise direction. b. Press dispense button. Auger should release.
7. Remove the hopper from the dispenser. Check to see if the product is clumping inside the hopper. If it is, a. Ensure no moisture is getting into the hopper. b. Ensure the dispenser is dried thoroughly after cleaning. c. Ensure the sugar or other products are stored away from
moisture in a sealed container so that no clumps are added to the hopper.
If product is still clumping, empty the product hopper and fill it with new product.
If product still does not dispense, contact the SureShot Technical Assistance Center at 1-888-777-9990 or 902-865-9602.
Inconsistent amounts of product are being dispensed
1. Ensure hopper(s) are filled above low level line. Fill hopper if necessary.
2. Remove any product clumps or foreign material from hopper. 3. Ensure dispense tube is clear of any blockages.
If necessary, clean (see page 6) or replace with spare tubes provided. Clean, sanitize, dry thoroughly and store spare tubes for future use.
4. Make sure the product is of good consistency and is not damp. If this does not correct the problem, contact the SureShot Technical Assistance Center at 1-888-777-9990 or 902-865-9602.
AC2-GP Multi-Sweetener Dispenser • SureShot Technical Assistance Center: 1-888-777-9990 or 902-865-9602 17
No display in the LCD window
1. Make sure the power cord is plugged into the wall outlet and the dispenser and that the power source is active.
2. Check to ensure the door cord is not cut or broken. If this does not correct the problem, contact the SureShot Technical Assistance Center at 1-888-777-9990 or 902-865-9602.
There is product inside on the floor of the dispenser
1. Ensure hopper has not been overfilled. 2. Check the auger.
a. Examine the end of the auger for excessive movement, looseness, or wearing.
b. If loose or worn, product may build up or spill from that end. If this is the case, hopper assembly must be replaced.
Assembly is available from the SureShot Technical Assistance Center’s Parts Department at 1-888-777-9990 or 902-865-9602.
Dispenser door does not close fully
This indicates a product hopper is not loaded properly. 1. Open the dispenser door.
a. Grasp door on the top right corner and swing out until the door is opened fully (180°).
2. Check for obstructions. 3. Load hopper into the appropriate product compartment.
a. Hold the hopper straight. Place the back of the hopper on rails inside the dispenser.
b. Slide the hopper straight in, all the way, until the side locking tabs on hopper are locked into the slots along the rail. Note: Pull hopper straight out of the dispenser without lifting to ensure it is loaded. If hopper pulls out without lifting, then it is NOT properly loaded. Turn steel drive pin on auger at back of hopper to a similar angle as the groove on the auger motor coupler at the inside back of the dispenser. See page 11.
If this does not correct the problem, contact the SureShot Technical Assistance Center at 1-888-777-9990 or 902-865-9602.
Door will not latch 1. Ensure screw on top of door, opposite the hinge, is engaging with the hole in the metal tab directly above it when closed. Metal tab may require adjusting up or down by bending slightly.
SERVICE
If you are within the Warranty Period for your dispenser, please contact: SureShot Technical Assistance Center
A.C. Dispensing Equipment, Inc. 1-888-777-9990 or 902-865-9602 www.sureshotdispensing.com
If your Warranty has expired, contact your local Service Technician.
Note: The Serial Number, Model Number and Option Code of your dispenser are located on the Product Identification Label on the outside of the dispenser. Please refer to these numbers when contacting the SureShot Technical Assistance Center. These numbers are crucial in helping us provide prompt and effective service. This will save you time.
AC2-GP Multi-Sweetener Dispenser • SureShot Technical Assistance Center: 1-888-777-9990 or 902-865-9602 18
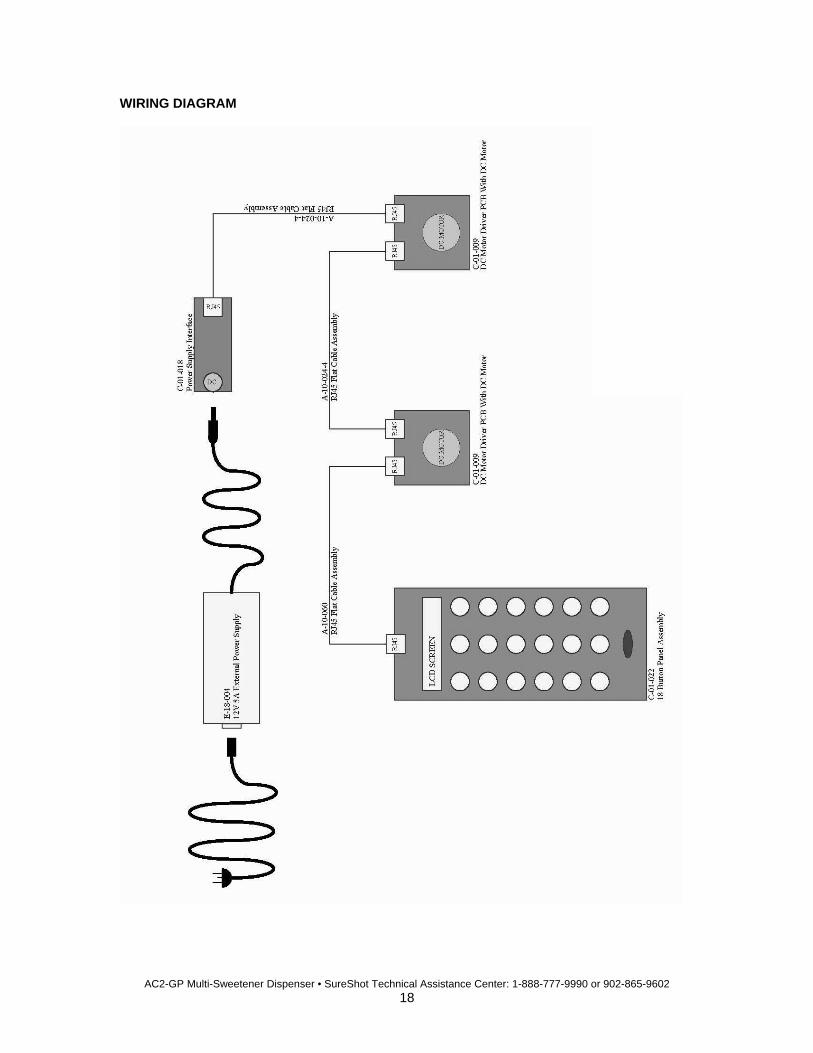
WIRING DIAGRAM
AC2-GP Multi-Sweetener Dispenser • SureShot Technical Assistance Center: 1-888-777-9990 or 902-865-9602 19
USA AND CANADA WARRANTYThis dispenser is covered by a one (1) year on-site warranty, unless otherwise specified.
All dispensing equipment manufactured by A.C. Dispensing Equipment Inc. is warranted against defects in materials and workmanship for a period of one (1) year from the date of purchase. A.C. Dispensing Equipment Inc.'s obligation under this warranty is limited to the repair of defects as outlined by an A.C. Dispensing Equipment Inc. factory-authorized service agency or one of its sub-service agencies. This Warranty does not apply to installation or problems caused by installation. This Warranty does not apply to normal preventative maintenance, maintenance or adjustments deemed appropriate by A.C. Dispensing Inc.
THIS WARRANTY WILL BE NULL AND VOID IF THE WARRANTY REGISTRATION CARD IS NOT RETURNED TO A.C. DISPENSING EQUIPMENT INC. WITHIN 60 DAYS OF PURCHASE.
This warranty is subject to the following conditions: • This warranty applies to the original owner only and is not assignable. • Only pre-authorized service agencies directed by A.C. Dispensing Equipment Inc. are to be utilized. • Should any product fail to function in its intended manner under normal use within the limits defined in this warranty, at the option of A.C. Dispensing Equipment Inc., such product will be repaired or replaced by A.C. Dispensing Equipment Inc. or its Authorized Service Agency. A.C. Dispensing Equipment Inc. will be responsible only for charges incurred or service performed by its Authorized Service Agencies. The use of other than A.C. Dispensing Equipment Inc. Authorized Service Agencies will void this warranty and A.C. Dispensing Equipment Inc. will not be responsible for such work or any charges associated with such work. The closest A.C. Dispensing Equipment Inc. Authorized Service Agency must be used and must be dispatched by A.C. Dispensing Equipment Inc.
TIME PERIOD: One year on parts and labour, effective from the date of purchase. The Authorized Service Agency may, at its option, require proof of purchase. Parts replaced under this Warranty are warranted for the unexpired portion of the original product warranty only.
Toll-Free Service is available at 1-888-777-9990 or 1-902-865-9602 A service consultant is available to assist you during our normal business hours. All service-related issues will be addressed by a return telephone call the next business day.
WARRANTY PROCEDURE: 1. Secure the Serial Number, Model Number and Option Code from the data label located on the outside of the equipment. 2. Call the number provided on the service label on the dispenser. 3. Our Technical Assistance Center staff will discuss the issue with you and, if necessary, dispatch a technician to your location
for repairs. If after-hours or emergency service is required, A.C. Dispensing Equipment Inc. will not be responsible for any additional charges.
4. To order parts, call the service center and the appropriate parts will be sent to your location or that of the servicing agency.
The following conditions are not covered by this Warranty: • Equipment failure related to improper installation, improper utility connection or supply or problems due to ventilation. • Equipment that has not been properly maintained, calibration of controls, adjustments, damage from improper cleaning and
water damage to controls. • Equipment that has not been used in an appropriate manner or has been subject to misuse or misapplication, neglect, abuse,
accident, alteration, negligence, damage during transit, delivery or installation, fire, flood, riot or act of God. • Equipment on which the model number or serial number has been removed or altered.
If the equipment has been changed, altered, modified or repaired by other than a qualified service technician during or after the warranty period, then the manufacturer shall not be liable for any damages to any person or to any property which may result from the use of the equipment thereafter.
This Warranty does not cover services performed at overtime or premium labour rates. Should service be required at times which normally involve overtime or premium labour rates, the owner shall be charged for the difference between normal service rates and such premium rates. A.C. Dispensing Equipment Inc. does not assume any liability for extended delays in replacing or repairing any items beyond its control.
In all cases, the use of other than A.C. Dispensing Equipment Inc. authorized OEM replacement parts will void this Warranty.
This equipment is intended for commercial use only. Warranty is void if equipment is installed in other than commercial applications.
THE FOREGOING WARRANTY IS IN LIEU OF ANY AND ALL OTHER WARRANTIES EXPRESSED OR IMPLIED, INCLUDING ANY IMPLIED WARRANTY OF MERCHANTABILITY OR FITNESS AND CONSTITUTES THE ENTIRE LIABILITY OF A.C. DISPENSING EQUIPMENT INC. IN NO EVENT DOES THE LIMITED WARRANTY EXTEND BEYOND THE TERMS STATED HEREIN.
A.C. Dispensing Equipment Inc. 100 Dispensing Way
Lower Sackville Nova Scotia, Canada B4C 4H2
1-888-777-9990 or 1-902-865-9602 14/07/2009 www.sureshotdispensing.com
AC2-GP Multi-Sweetener Dispenser • SureShot Technical Assistance Center: 1-888-777-9990 or 902-865-9602
A.C. Dispensing Equipment Inc. 100 Dispensing Way
Lower Sackville Nova Scotia, Canada B4C 4H2
1-888-777-9990 or 1-902-865-9602 www.sureshotdispensing.com


![CR-1 : @TAWAS B LIB.TAWAS B(SCH 1):PAGE1 TAWASnotebookschematic.org/data/NOTEBOOK/attachments/SC... · resume gp[6] gp[7] gp[8] gp[9] 3.3v 3.3v 3.3v 3.3v gp[23] gp[24] gp[25] gp[26]](https://img.pdfslide.us/doc/110x75/5f812ff679030c23f20de0bd/cr-1-tawas-b-libtawas-bsch-1page1-ta-resume-gp6-gp7-gp8-gp9-33v.jpg)