Embed Size (px)
Citation preview

ABELMed
PortalConfiguration Guide

May 2016
This document contains or refers you to current
information on using the features in ABELMed EHR–EMR /
PM.
No part of this publication may be reproduced,
transmitted, stored in a retrieval system, nor translated
into any human or computer language, in any form or by
any means, electronic, mechanical, magnetic, optical,
chemical, manual or otherwise, without the prior written
permission of the copyright owner, ABELMed Inc. 3310
South Service Rd., Burlington, Ontario, Canada L7N 3M6.
The copyrighted software that accompanies this booklet is
licensed to the End User only for use in strict accordance
with the End User License Agreement, which should be
read carefully before commencing use of the software.
Information in this document is subject to change without
notice and does not represent a commitment on the part of
ABELMed Inc.
ABELMed™ is a registered trademark of ABELMed Inc.

ABELMed Portal Configuration Guide 3
Table of Contents
Before you Configure Portal ........................................................... 4Server Requirements .............................................................. 4Portal Requirements ............................................................... 5Patient Visit Summary Feature Requirements........................ 7Register with MyABEL ............................................................ 8
Configuring Portal .......................................................................... 9Step 1 - Test Port Forwarding.................................................. 9Step 2 - Enter Client ID/Sub-Domain Name .......................... 10Step 3 - Configure your Email Account ..................................11Step 4 - Activate Portal .......................................................... 13
Testing Portal ............................................................................... 14Step 1 - Create a Test Patient................................................ 14Step 2 - Generate a Portal Key.............................................. 15Step 3 - Book an Appointment ............................................... 16Step 3 - Launch Portal Administration ................................... 17Step 4 - Create a Rule ........................................................... 18Step 5 - Send the Appointment Confirmation ........................ 19Step 6 - Create a Portal Account for the Test Patient ............ 22Training.................................................................................. 25
May 25, 2016

4 Before you Conf igure Portal
Before you Configure PortalThe following requirements must be met by your office before
Portal Setup can begin. Your IT representative will most likely
be necessary to perform several of these tasks.
Server Requirements
Prior to installing, you
should exclude the Portal
Administration .exe file
from any anti‐virus
program you have
running to prevent it
from being blocked.
1 You must be running ABELMed version 12.18 or higher
on the Server and Microsoft SQL Server 2008 or higher.
2 Your office must have Internet access from your Server
(Internet is only required on the Server, not every machine
that will use Portal).
3 Your Server must have a non‐changing IP Address.This
can be done by either:
a. Making the server’s IP address static, OR
b. Subscribe to a DNS service that will resolve the
dynamic IP address to a human‐recognizable name
(e.g. ‐ the dynamic IP address will always resolve to
myoffice.dyndns.org.
4 Make sure port 1506 is opened for inbound and
outbound data transfer. See “Step 1 ‐ Test Port
Forwarding” on page 9
5 If your office is using a router, you must setup port
forwarding on the router to access the officeʹs server.
Port 1506 is the default port used for communication
between the officeʹs server and the portal. *If you wish
to change the port number, please contact your
ABELMed Portal Implementation Specialist.
6 Make sure the Internet Time for your office is set to
automatically synchronize with time.windows.com.
May 25, 2016

ABELMed Portal Configuration Guide 5
Portal Requirements1 A privately registered email domain must be used to
send your emails.
• This privately registered and owned email domain
must be configured with specific authentication
settings. This is required to verify ownership of your
sending domain so that emails can be sent from
ABELMed Portal with a high deliverability and
reputation rate. The email address
[email protected] is an example of a
privately registered email domain.
• You may already own a privately registered domain
if you have your own practice website, such as
www.streetdental.com.
IMPORTANT: ABELMed Portal integrated email
service does not support Public Email Domains such as
gmail.com, yahoo.com, bellnet.ca, rogers.com. The
email address [email protected] is an example of
a public email domain.
2 Choose the Sending Email Address from your
registered domain that you will be using to send emails
to your patients.
If you do not own a registered domain (or do not have
a practice website), contact your IT/Computer Service
Provider to assist you with purchasing a domain name
and configuring a new email address for your practice.
(Domains can be easily purchased at very low cost, $10
‐$50 per year, from sources such as 10dollar.ca or
GoDaddy.com, etc.)
3 Perform the following instructions located at this link
to configure your domain authentication settings: How
to Setup SPF and DKIM for Your Sending Domains.
May 25, 2016

6 Before you Conf igure Portal
4 Using the integrated email settings along with a
registered email domain will benefit from
authentication leading to improved email
deliverability. Article on Why email authentication is a
good thing.
5 Choose a sub‐domain name for your portal.
For simplicity sake, the sub‐domain name is often similar to
your office’s website name. For example, if your website
domain is www.streetmedical.com, then you might name
your domain www.streetmedical.abelportal.com.
6 If you have a business logo and want it to appear on
your portal website and on emails sent to your patients,
provide the following:
• Two (2) logo image files, e.g. one banner image for the
website and one image for the email.
• The images must be in .PNG format.
• The maximum allowable size for the email image is400
pixels (width) x 160 pixels (height).
• The maximum allowable size for the banner is 800 pixels
(width) x 250 pixels (height)
May 25, 2016

ABELMed Portal Configuration Guide 7
Patient Visit Summary Feature RequirementsThis portal feature allows you to send a summary of a
patient’s visit to their portal account. If you plan on using
this feature, please follow the steps below:
1 A Windows user account must be logged in on the
officeʹs server at all times.
2 Modify Microsoft Word application DCOM
configuration settings as follows:
a. Click the Windows Start button and choose
Run. Type ʺdcomcnfgʺ and then press Enter.
b. Expand Component Services ‐> Computers ‐>
My Computer ‐> DCOM Config
c. Locate the Microsoft Office Word application.
The name may vary depending on which
version you have installed.
d. If you can’t locate the application by name, try
locating it by Application ID. It should be
{00020906‐0000‐0000‐C000‐000000000046}. If
you cannot find it at all, go to step 3.
e. Right click on the Word application and choose
Properties.
May 25, 2016

8 Before you Conf igure Portal
f. Select the Security tab and verify that the Use
Default Access Permissions and Use Default
Launch Permissions are selected.
g. Select the Identity tab and change the user
account to The Interactive User. Click Apply
and OK.
Note: Only perform the next step if you could not
complete step 2(d) on the previous page.
3 Change the Microsoft Word application DCOM
configuration settings 32 bit as follows:
a. Click the Windows Start button and choose
Run. Type ʺmmc ‐32ʺ and press Enter.
b. On the ʹConsole1 ‐ [Console Root]ʹ window,
click File ‐> Add/Remove Snap‐in.
c. Select Component Services from the ʹAvailable
snap‐insʹ list on the left and add it to the
ʹSelected snap‐insʹ list.
d. Perform the steps shown in Step 2 on the
previous page (except 2d).
e. Exit the console.
Register with MyABELThe files required to install ABELMed Portal are located on
our MyABEL website. In order to access these files you
must have a MyABEL account.
To Register:
1 Log on to www.myabel.com.
2 Click MyABEL Registration.
3 Complete the registration form and fax it to us at 866‐
337‐5558 or email it to [email protected].
A temporary account password will be emailed to you.
May 25, 2016

ABELMed Portal Configuration Guide 9
Configuring PortalFollow carefully each of the steps outlined in this section to
successfully configure portal.
Step 1 - Test Port Forwarding
Important: Portal
configuration should be
completed by your IT
representative.
You can use free services offered on the web to determine if
a port is opened by following the steps below:
To Test Port Forwarding with Shields Up:
1 Open a web browser and navigate to www.grc.com.
2 Click ʺServicesʺ and choose ʺShieldsUP!ʺ
Firewall: Portal 1506
must be opened to allow
portal to communicate
with the server at ABEL.
3 Click the Proceed button and then type ʺ1506ʺ in the text box
4 Click the User Specified Custom Port Probe button.
5 If the Status column shows Stealth, the port is NOT OPEN
which is not what you want.
6 If the Status column shows Open!, the port IS OPEN and
you can proceed with the ABELMed Portal installation.
May 25, 2016

10 Conf igur ing Portal
Step 2 - Enter Client ID/Sub-Domain NameOnce you’ve installed Portal Administration, the first step
is to enter your Client ID and your new sub‐domain name
See “Portal Requirements” on page 5 for a description of
sub‐domain.
To Enter the Client ID and Sub-Domain Name
1 On the ABELPortal window, click the Settings button.
The Settings window appears.
2 Click the icon beside Client ID.
3 Type your Client ID as shown in Setup > System Setup
in ABELMed.
4 Click the icon beside Website Address.
5 Type your sub‐domain name in the Website Address
https:// field. See “Portal Requirements” on page 5.
May 25, 2016

ABELMed Portal Configuration Guide 11
Step 3 - Configure your Email AccountYou can send emails to your patients using ABELMed’s
integrated email service, or your own SMTP email server.
IMPORTANT: Instructions for both methods are shown in
this section; however, we strongly recommend that you
use ABELMed’s integrated email service.
Using ABELMed’s Integrated Email Service
Important: Mandrill
Integration operates in
the background and will
not affect how you
manage your
appointment
confirmation and
reminder emails in
ABELMed Portal
1 On the Settings window in Portal Administration, click
Configure Email Settings.
2 The Email Server Configuration window appears.
3 Type the Sending Email Address you are going to use to
send emails to your patients. Normally, this would be
your office email address, but not necessarily.
4 Click Use Mandrill Integration, the integrated email
service used by ABELMed. The remaining fields are
now inactive and no further configuration is required.
5 Click Save to activate the service.
May 25, 2016
12 Conf igur ing Portal
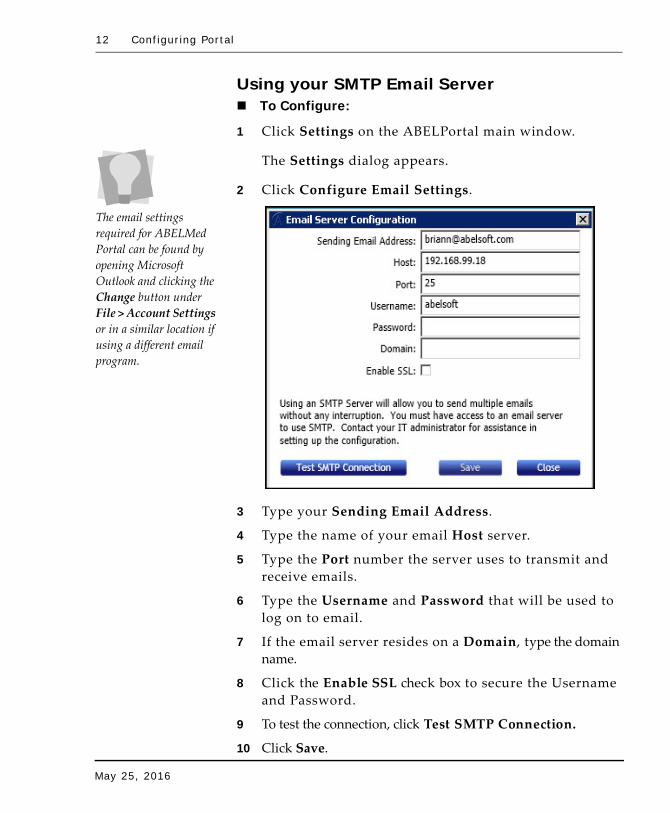
Using your SMTP Email Server
The email settings
required for ABELMed
Portal can be found by
opening Microsoft
Outlook and clicking the
Change button under
File > Account Settings
or in a similar location if
using a different email
program.
To Configure:
1 Click Settings on the ABELPortal main window.
The Settings dialog appears.
2 Click Configure Email Settings.
3 Type your Sending Email Address.
4 Type the name of your email Host server.
5 Type the Port number the server uses to transmit and
receive emails.
6 Type the Username and Password that will be used to
log on to email.
7 If the email server resides on a Domain, type the domain
name.
8 Click the Enable SSL check box to secure the Username
and Password.
9 To test the connection, click Test SMTP Connection.
10 Click Save.
May 25, 2016
ABELMed Portal Configuration Guide 13
Step 4 - Activate Portal Once you have Portal configured, the next step is to contact us
using either of the following methods:
• Email the information below to [email protected]
with Attn: ABELMed Portal Setup in the Subject line.
• Your Customer ID
• Your Clinic Name
• Your telephone number
• Your DNS name or static IP address
• Your chosen website sub‐domain name
• Y o u r Private Domain Email (for sending
emails to patients)
• Your banner and email logo images as an attachment
• A support representative will finalize your ABELMed
Portal setup and contact you to proceed with testing.
May 25, 2016

14 Test ing Portal
Testing PortalOnce you’ve submitted your Portal configuration
information to ABEL, an ABEL support representative will
review the information and then send you an email
confirming Portal has been activated.You can then proceed
with the following testing steps.
Step 1 - Create a Test Patient 1 Click File > New Patient.
2 Enter a fictional First Name, Last Name and Birthdate.
3 Enter your own Mobile phone number and Email
address.
May 25, 2016

ABELMed Portal Configuration Guide 15
4 Click the Contact Settings button.
The Edit Contact Permission dialog appears.
5 Depending on what the patient has agreed to, move
through and check/uncheck the following options:
• Allow Appointment Reminders if they agree to
receive email reminders.
• Allow News & Promo if they agree to receive news
and promotional emails from your practice.
6 Click OK.
Step 2 - Generate a Portal Key
Only generate one key
number for a patient. If
you generate a portal key
number for a patient who
already has one, the
patient will be forced to
re‐register their account
in ABELMed Portal.
In order to register for ABELMed Portal, your patients will
require a Portal Key number. This number can be generated
by anyone in your office and is used as a security feature to
protect the confidentiality of patient health information.
To Generate a Portal Key Number:
1 Open the patient’s record.
2 Click the Personal tab.
3 Click the Portal Key Generator button.
The Generate Portal Key dialog appears.
May 25, 2016

16 Test ing Portal
4 Click Generate Portal Key.
A dialog appears displaying the new Portal Key
number.
5 Write down the number and forward it to the patient.
They will need to enter this number in the Registration
Key field in order to successfully register with
ABELMed Portal.
Step 3 - Book an Appointment1 Click File > Schedule.
2 Double‐click in an open time slot for tomorrow’s date.
The Patient Selection window appears.
3 Select the fictional user you added in step 1.
The Appointment Edit window appears.
4 Enter a Work to Do.
5 Click OK.
May 25, 2016

ABELMed Portal Configuration Guide 17
Step 3 - Launch Portal Administration1 Click Start > Programs > Portal Administration.
The ABEL Security dialog appears.
2 Type the Administration Manager ’s User ID and
Password.
3 Click OK to display the Portal Administration window.
May 25, 2016

18 Test ing Portal
Step 4 - Create a Rule1 Click Send Appointment Messages in the middle of he
screen.
2 Click Appointment Rules in the lower‐left corner.
The Appointment Rules window appears.
3 Click Add New Rule.
The Add/Edit Appointment Rule dialog appears.
4 Click the down‐arrow beside Message Template and
select Appointment Confirmation.
5 Click Save twice.
6 Click Close
The Appointment Messages window appears.
May 25, 2016

ABELMed Portal Configuration Guide 19
Step 5 - Send the Appointment Confirmation1 On the Appointment Messages window, select
tomorrow’s date in the From field.
2 Click Refresh.
3 Click on the Appointment Confirmation message
template.
Notice that all appointments for the date shown are
listed.
4 In the list, locate your fictional patient and check the
box in the Send Email and the Send SMS column.
Make sure you uncheck these columns beside the other
appointments listed to avoid sending them
confirmations.
May 25, 2016
20 Test ing Portal
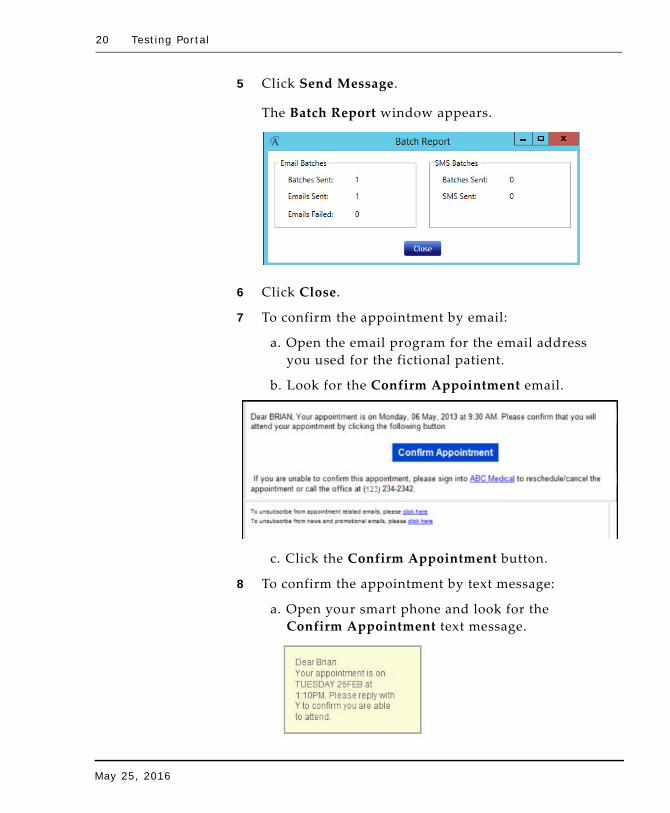
5 Click Send Message.
The Batch Report window appears.
6 Click Close.
7 To confirm the appointment by email:
a. Open the email program for the email address
you used for the fictional patient.
b. Look for the Confirm Appointment email.
c. Click the Confirm Appointment button.
8 To confirm the appointment by text message:
a. Open your smart phone and look for the
Confirm Appointment text message.
May 25, 2016

ABELMed Portal Configuration Guide 21
b. Press the required character on your keypad to
confirm the appointment.
The ABELPortal web page appears stating
ʺSuccess, your appointment has been confirmedʺ
Now that the test patient has confirmed the
appointment via email, it will appear in Portal
Administration waiting your acceptance as shown in
the next step.
9 Go to the Portal Administration main window and
click the icon beside the appointment.
10 Go to Scheduler and verify that the appointment state
for the appointment is ʺConfirmedʺ.
May 25, 2016

Step 6 - Create a Portal Account for the Test Patient
Important: Before you can register your ABELMed Portal
account, you must obtain an 8‐character Registration Key
from your medical office.
To Create a New Account:
1 Access the ABELPortal website.
2 Click Register.
3 Click New User.
The Register Your Account page appears (see
following page).
4 Type your First and Last Name.

ABELMed Portal Configuration Guide 23
5 Type your Email address.
6 Enter your Birth Date:
a. Click the down‐arrows and select the month
and day you were born.
b. Delete the phrase ʺEnter Full Yearʺ and then
type the year you were born. Use the yyyy
format (e.g. 1982)
7 Type a Username (must be at least 6 characters and can
contain only letters and numbers, no special
characters).
8 Type a Password (must be at least 7 characters).
May 25, 2016

24 Test ing Portal
9 Type your password again in the Confirm Password
field.
10 Type the 8‐character Registration Key given to you by
your medical office. If you do not have one, contact
their office and let them know you need one to sign on
to ABELMed Portal.
11 Click Register.
The Choose Your Security Questions and Answers
page appears.
Since ABELMed Portal contains confidential medical
information you must complete three sets of security
questions. The answers you provide will be used to
identify you in the event you forget your password.
12 Click the down‐arrow in the first set and choose one
question from the list to answer.
13 Type the answer in the blank field provided.
14 If you do not like any of the questions listed, you can
create your own question.
15 Select the Choose your own security question option
in the list and type the question and then the answer as
shown in the example below.
16 Repeat the above steps for each set of questions. It is
recommended that you pick a different question for
each set.
17 Once youʹve finished, click the Submit button to return
to the Sign In page and exit.
May 25, 2016

TrainingABELMed Inc. strongly suggests you arrange internet‐based
training to configure your ABELMed Portal settings and
features. On‐site training is also available at an extra cost.
Once you’ve activated your Portal, an ABELMed
representative will contact you to arrange training.
Remember, unlike your ABELMed system in your office,
ABELMed Portal will be used by your patients and you will
be sending correspondence to them.
• You want the messages you send to be clear and
comprehensive.
• You want your patients to have access to the features
you want them to use and to not have access to the
features you’d rather they not use.

Notes

ABELMed Portal Configuration Guide 27
Burlington, Ontario, L7N 3M6800.267.ABEL (2235)
866.337.5558 toll free fax
May 25, 2016

28 Notes
May 25, 2016