Embed Size (px)
Citation preview
998-5104D 1
Abaxis Data Manager Installation Instructions
The Abaxis Data Manager (ADM) is a 32 bit Windows® application that saves Blood
Chemistry Analyzer and VetScan HM5. Analyzer results as files on a 32 bit or 64 bit
Windows® PC.
Using the Abaxis Data Manager you will:
Save Abaxis Blood Chemistry Analyzer results as files on a Windows® PC.
Save VetScan HM5 Analyzer results as files on a Windows® PC.Save Piccolo
Classic, Piccolo xpress, VetScan and VetScan VS2 results in PDF format.
Save VetScan HM5 / HM5c results in PDF format.
Save Blood Chemistry Analyzer and VetScan HM5 Analyzer results as a
Combined Report in PDF format.
Automatically print PDF reports and text files.
Send results from the Blood Chemistry Analyzer and / or VetScan HM5 Analyzer
directly to Abaxis Data Manager and PMS applications at the same time.
Upload results from Blood Chemistry Analyzer and VetScan HM5 Analyzer for
remote diagnostics.
Automatically establish a connection with up to eight (8) Abaxis Analyzers
simultaneously.
This installation guide describes the essential tasks needed to install and configure the
Abaxis Data Manager. You will have successfully completed the Abaxis Data Manager
installation when you can transmit data from the Abaxis Analyzer and VetScan
HM5Analyzer and view analyzer result files stored on the local PC.
Required Materials
Abaxis Blood Chemistry Analyzer.
Abaxis VetScan HM5 or HM5c.
998-5104D 2
Piccolo xpress and VetScan VS2 require software version 2.1.33 or greater.
VetScan HM5 require software version 1.40 or greater. VetScan HM5c require
software version 2.0 or greater.
Windows Vista, 7 or 8.1 (x86 or x64) PC, Professional or higher with 2GB or more of
RAM, high speed Internet connection and administrator privileges.
USB Type A Male / Type B Male Cable for Piccolo xpress and VetScan VS2
Analyzers.
USB Type A Male / Type B Male Cable for VetScan HM5 Analyzers.
Serial Cable - Male / Female for Piccolo Classic and VetScan Classic Analyzers.
USB and serial cables are available from Abaxis Technical Support 1-800-822-2947.
The screen shots in these instructions are from a typical Windows 7 installation. Dialog
boxes shown may vary slightly in other versions of Windows.
998-5104D 3
Abaxis Data Manager Installation
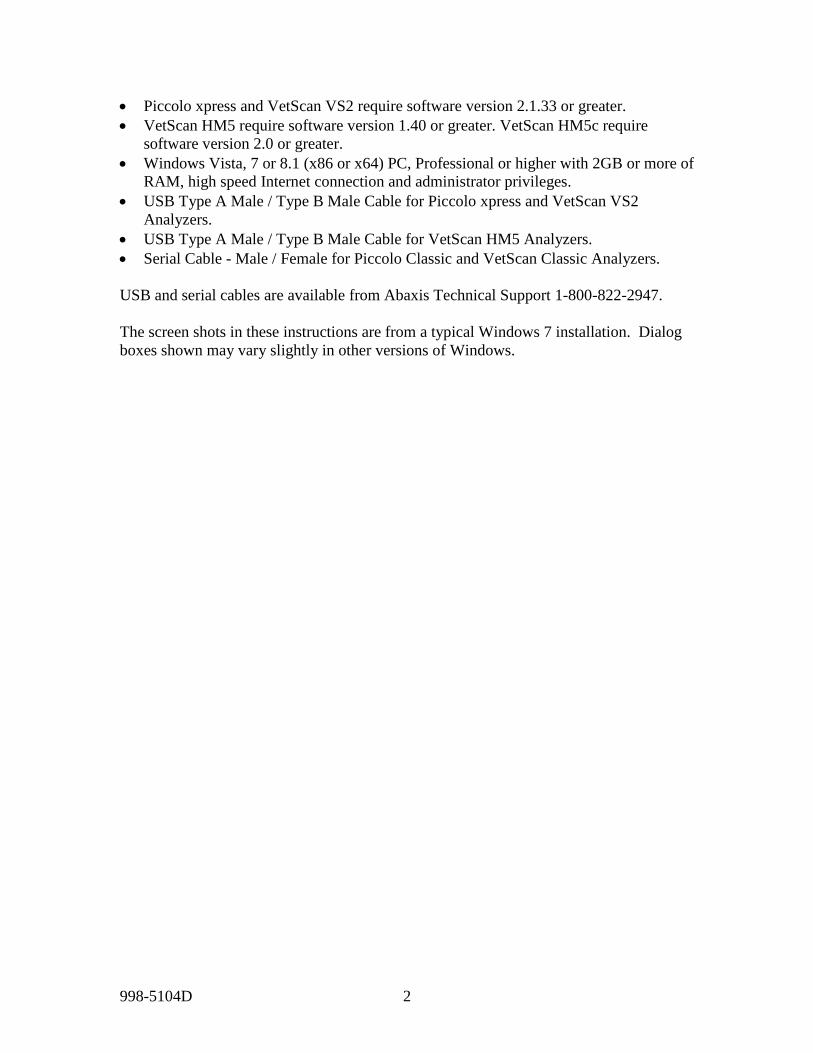
Install Abaxis Data Manager
Open Internet Explorer.
Navigate to:
http://www.abaxis.com/ad
m
If Adobe Reader is not
installed on your PC select
the Get Adobe Reader®
logo.
Follow the onscreen
instructions to download and
install Adobe Reader®.
Select the link Abaxis Data
Manager Download to
download the software
File Download
Save AbaxisDataManager_v1.X.X
.exe
Run As Administrator
AbaxisDataManager_v1.X.X
.exe from the saved location
The installation files start
extracting to the same folder
998-5104D 4
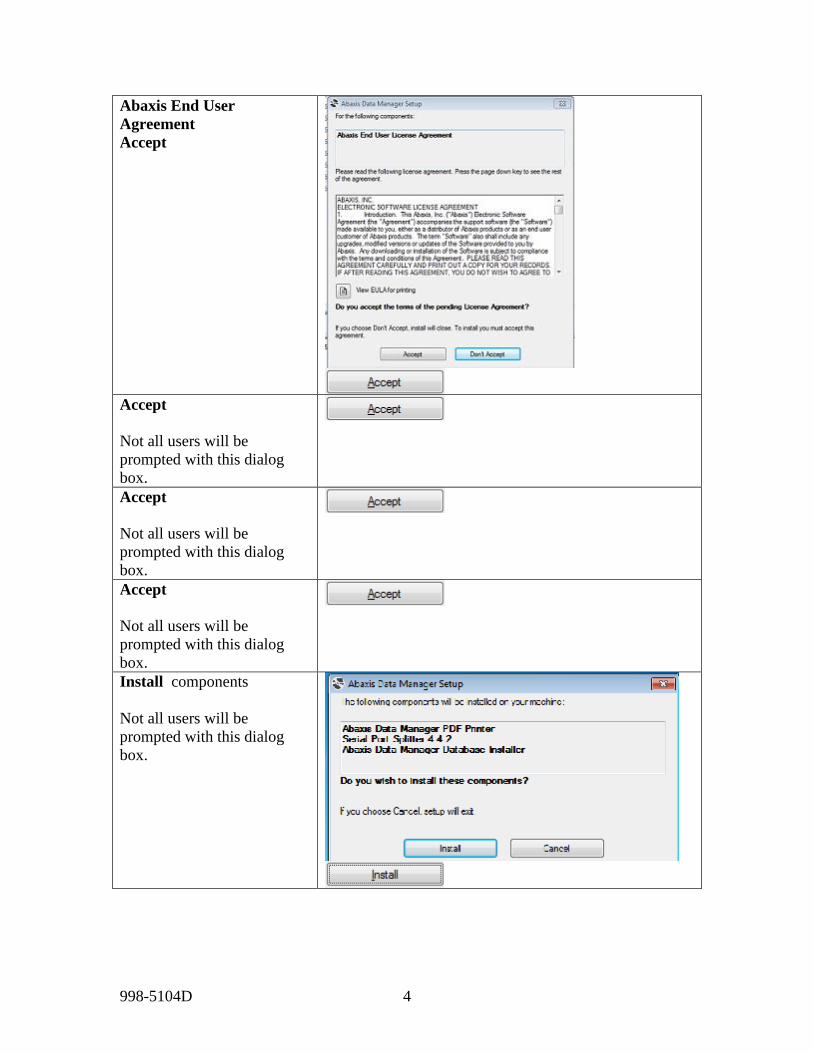
Abaxis End User
Agreement
Accept
Accept
Not all users will be
prompted with this dialog
box.
Accept
Not all users will be
prompted with this dialog
box.
Accept
Not all users will be
prompted with this dialog
box.
Install components
Not all users will be
prompted with this dialog
box.
998-5104D 5
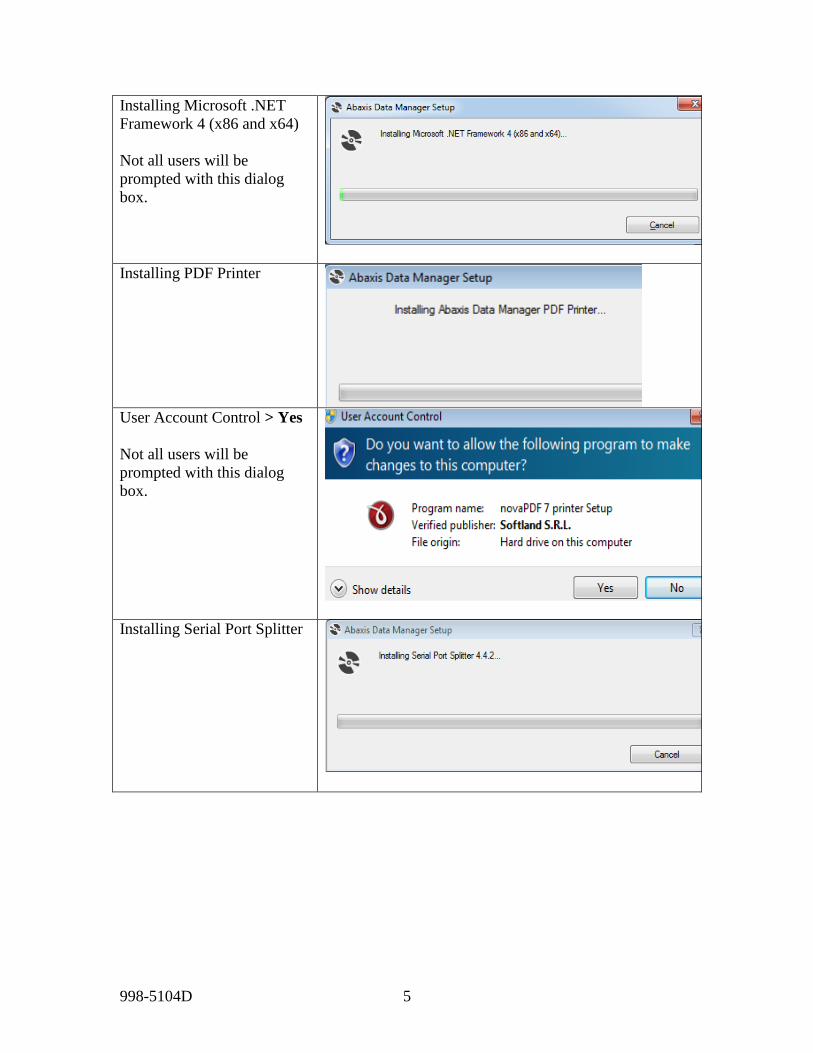
Installing Microsoft .NET
Framework 4 (x86 and x64)
Not all users will be
prompted with this dialog
box.
Installing PDF Printer
User Account Control > Yes
Not all users will be
prompted with this dialog
box.
Installing Serial Port Splitter
998-5104D 6
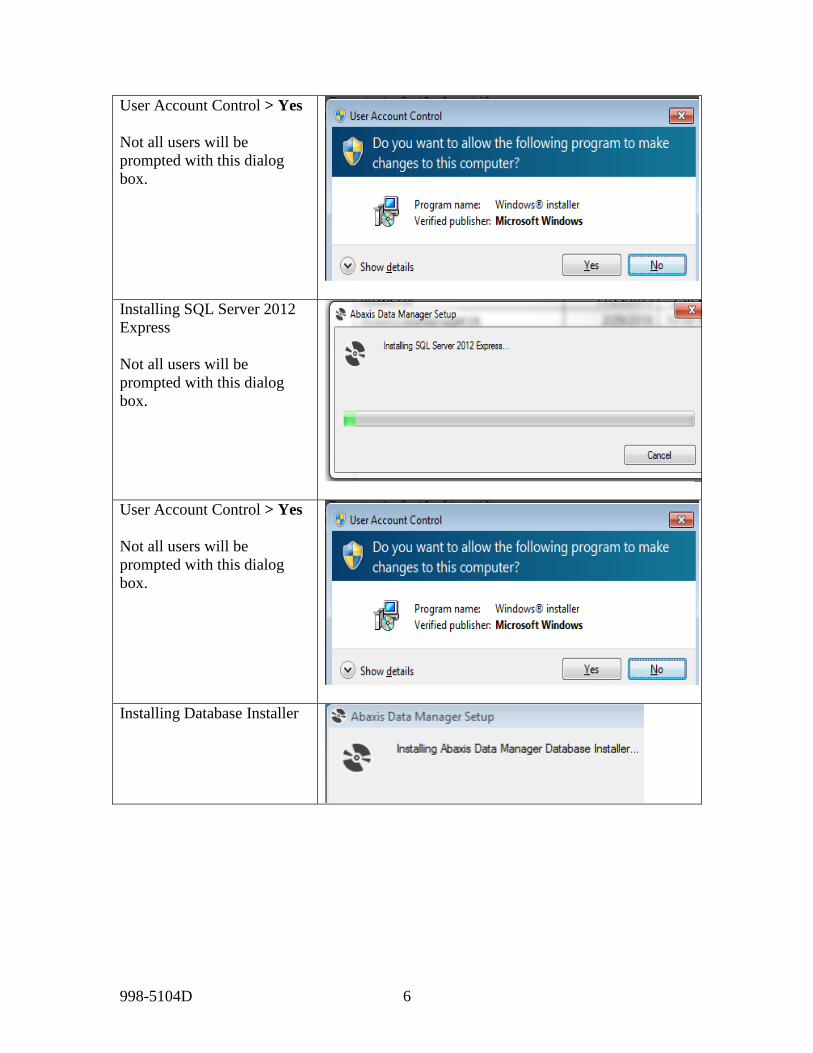
User Account Control > Yes
Not all users will be
prompted with this dialog
box.
Installing SQL Server 2012
Express
Not all users will be
prompted with this dialog
box.
User Account Control > Yes
Not all users will be
prompted with this dialog
box.
Installing Database Installer
998-5104D 7
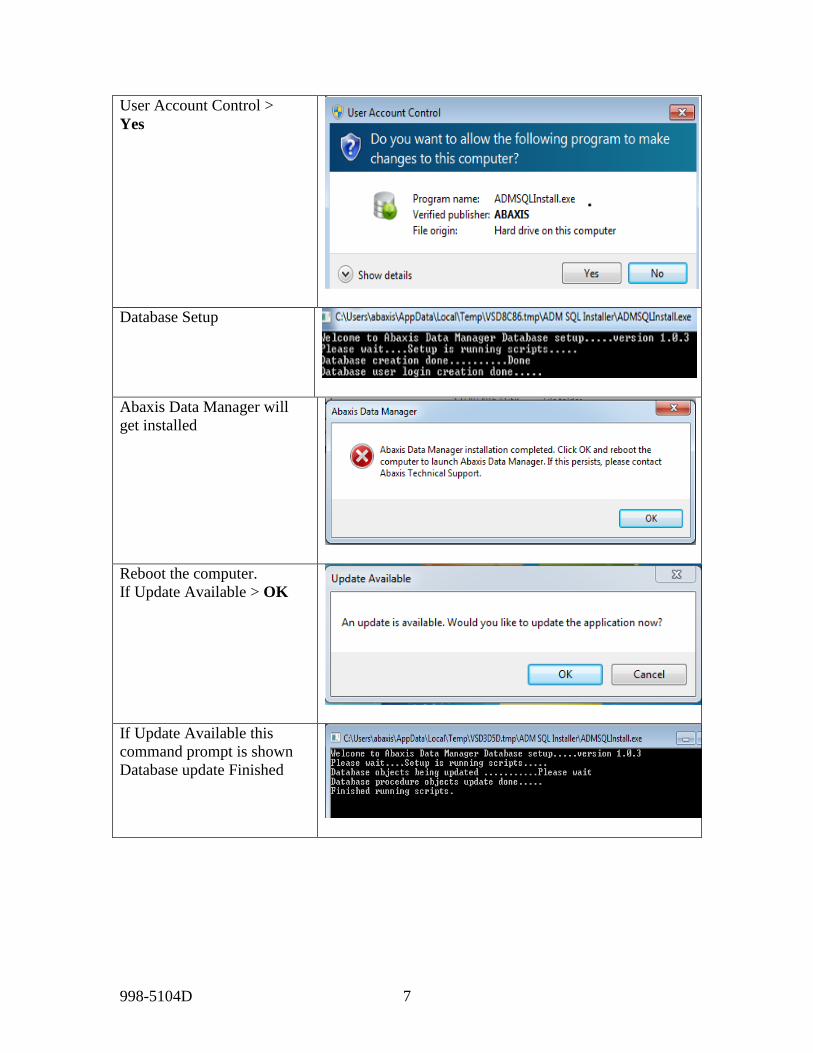
User Account Control >
Yes
Database Setup
Abaxis Data Manager will
get installed
Reboot the computer.
If Update Available > OK
If Update Available this
command prompt is shown
Database update Finished
998-5104D 8
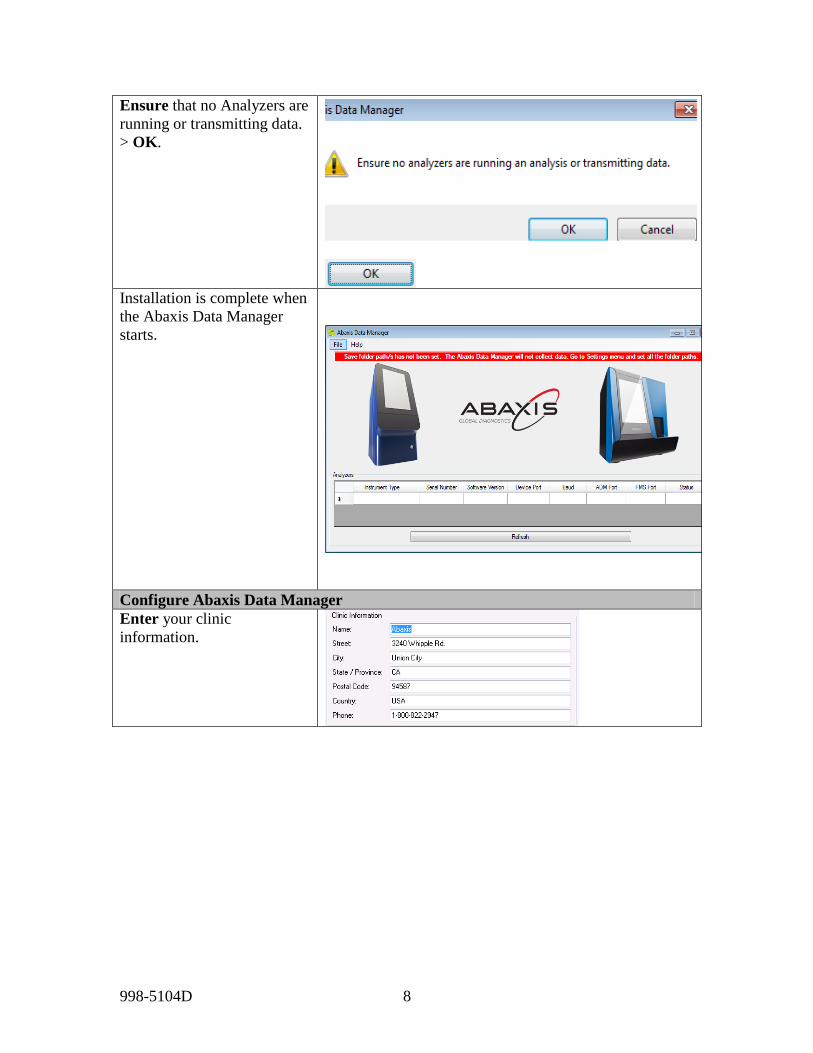
Ensure that no Analyzers are
running or transmitting data.
> OK.
Installation is complete when
the Abaxis Data Manager
starts.
Configure Abaxis Data Manager Enter your clinic
information.
998-5104D 9
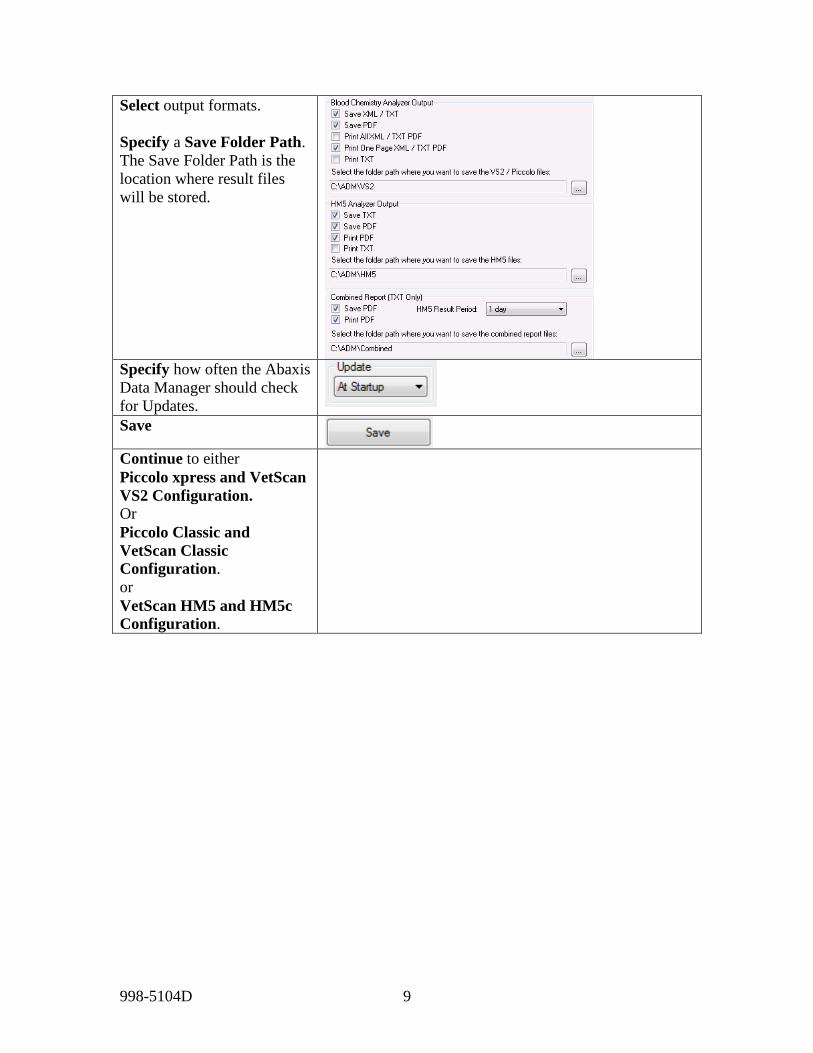
Select output formats.
Specify a Save Folder Path.
The Save Folder Path is the
location where result files
will be stored.
Specify how often the Abaxis
Data Manager should check
for Updates.
Save
Continue to either
Piccolo xpress and VetScan
VS2 Configuration. Or
Piccolo Classic and
VetScan Classic
Configuration.
or
VetScan HM5 and HM5c
Configuration.
998-5104D 10
Piccolo xpress and VetScan VS2 Configuration
Configure Analyzer
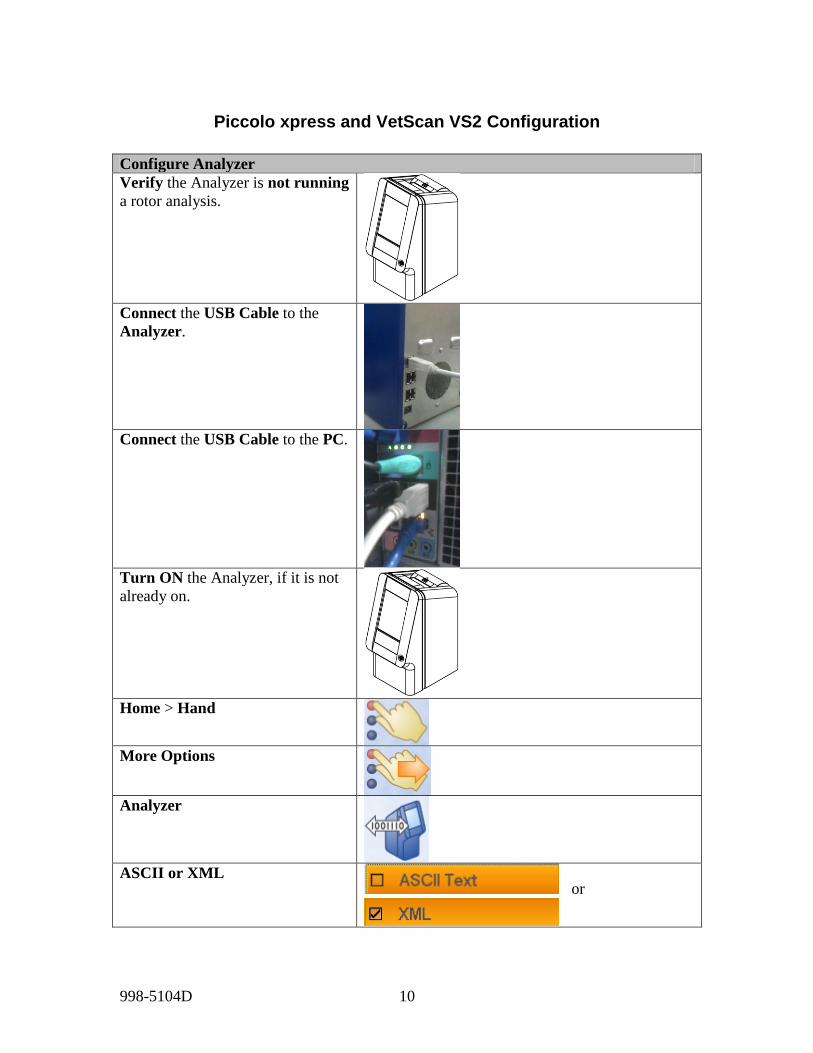
Verify the Analyzer is not running
a rotor analysis.
Connect the USB Cable to the
Analyzer.
Connect the USB Cable to the PC.
Turn ON the Analyzer, if it is not
already on.
Home > Hand
More Options
Analyzer
ASCII or XML
or
998-5104D 11
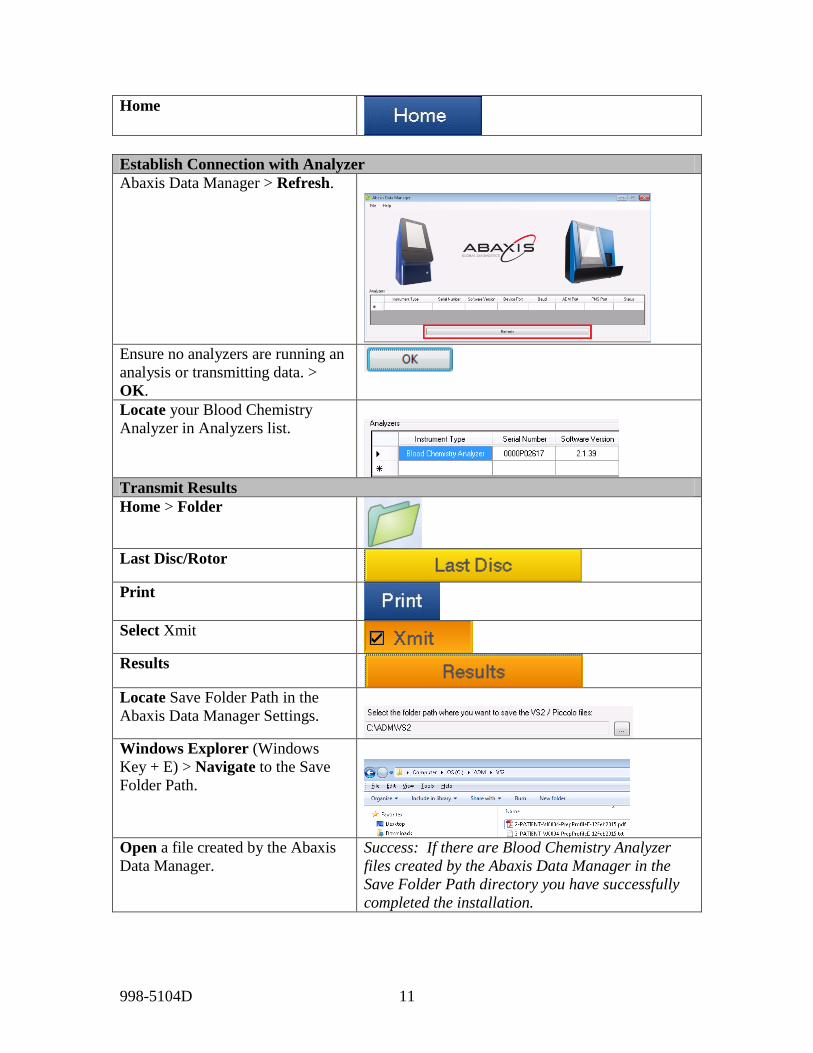
Home
Establish Connection with Analyzer
Abaxis Data Manager > Refresh.
Ensure no analyzers are running an
analysis or transmitting data. >
OK.
Locate your Blood Chemistry
Analyzer in Analyzers list.
Transmit Results
Home > Folder
Last Disc/Rotor
Select Xmit
Results
Locate Save Folder Path in the
Abaxis Data Manager Settings.
Windows Explorer (Windows
Key + E) > Navigate to the Save
Folder Path.
Open a file created by the Abaxis
Data Manager.
Success: If there are Blood Chemistry Analyzer
files created by the Abaxis Data Manager in the
Save Folder Path directory you have successfully
completed the installation.
998-5104D 12
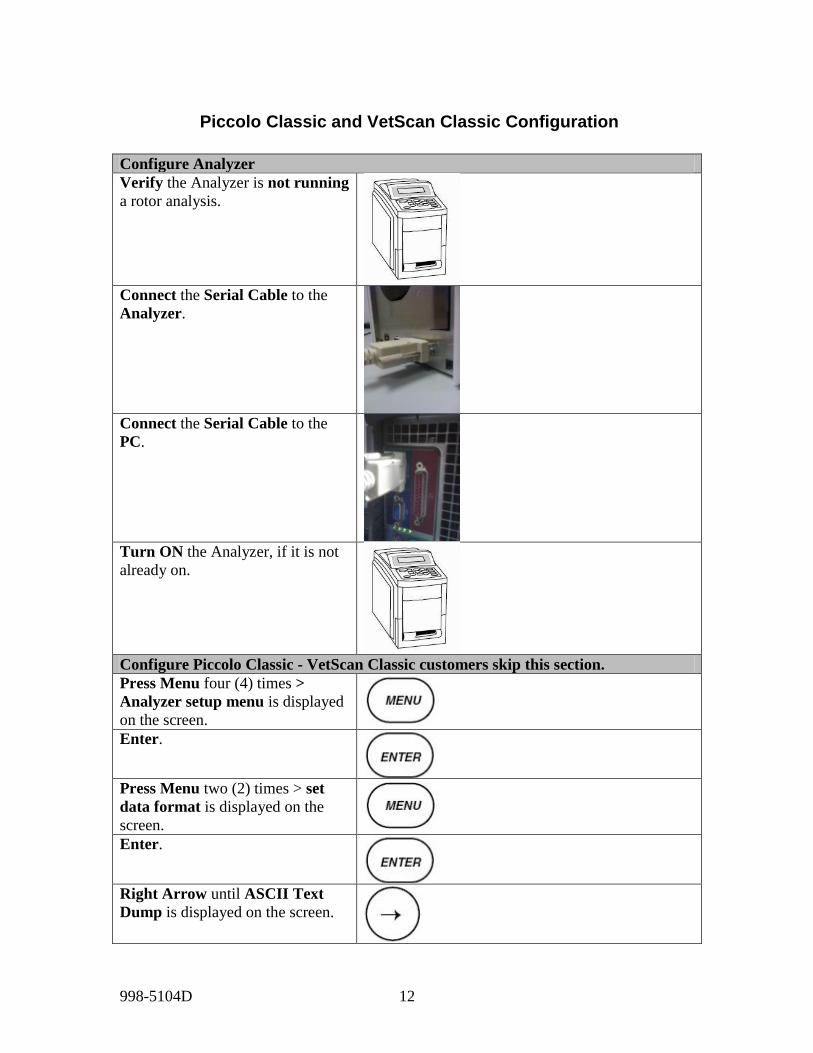
Piccolo Classic and VetScan Classic Configuration
Configure Analyzer
Verify the Analyzer is not running
a rotor analysis.
Connect the Serial Cable to the
Analyzer.
Connect the Serial Cable to the
PC.
Turn ON the Analyzer, if it is not
already on.
Configure Piccolo Classic - VetScan Classic customers skip this section.
Press Menu four (4) times >
Analyzer setup menu is displayed
on the screen. Enter.
Press Menu two (2) times > set
data format is displayed on the
screen. Enter.
Right Arrow until ASCII Text
Dump is displayed on the screen.
998-5104D 13
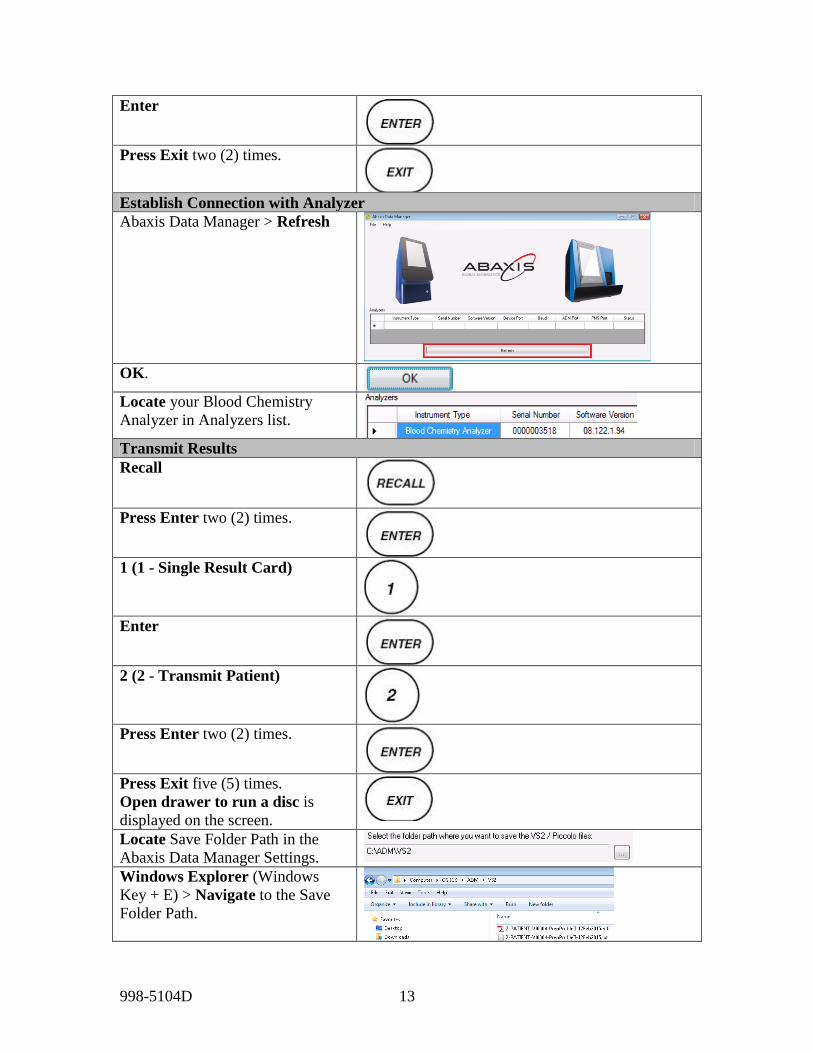
Enter
Press Exit two (2) times.
Establish Connection with Analyzer
Abaxis Data Manager > Refresh
OK.
Locate your Blood Chemistry
Analyzer in Analyzers list.
Transmit Results
Recall
Press Enter two (2) times.
1 (1 - Single Result Card)
Enter
2 (2 - Transmit Patient)
Press Enter two (2) times.
Press Exit five (5) times.
Open drawer to run a disc is
displayed on the screen.
Locate Save Folder Path in the
Abaxis Data Manager Settings.
Windows Explorer (Windows
Key + E) > Navigate to the Save
Folder Path.

998-5104D 14
Open a file created by the Abaxis
Data Manager.
Success: If there are Blood Chemistry Analyzer
files created by the Abaxis Data Manager in the
Save Folder Path directory you have successfully
completed the installation.
998-5104D 15
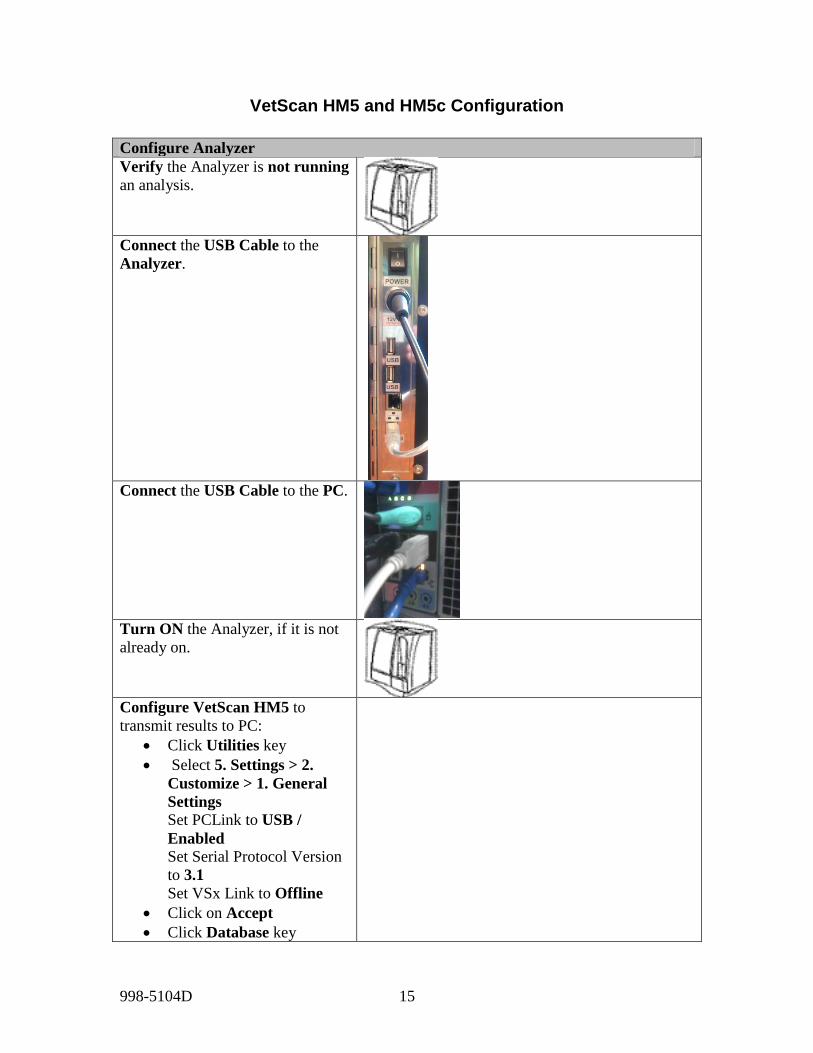
VetScan HM5 and HM5c Configuration
Configure Analyzer
Verify the Analyzer is not running
an analysis.
Connect the USB Cable to the
Analyzer.
Connect the USB Cable to the PC.
Turn ON the Analyzer, if it is not
already on.
Configure VetScan HM5 to
transmit results to PC:
Click Utilities key
Select 5. Settings > 2.
Customize > 1. General
Settings Set PCLink to USB /
Enabled
Set Serial Protocol Version
to 3.1
Set VSx Link to Offline
Click on Accept
Click Database key
998-5104D 16
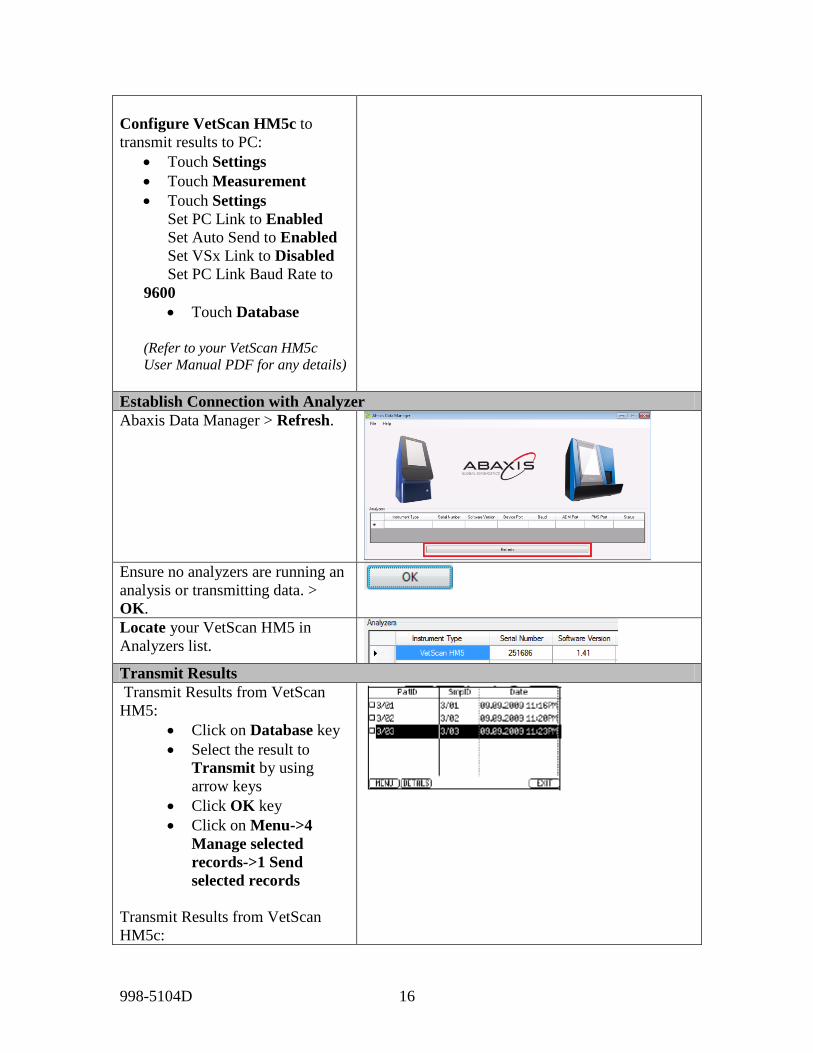
Configure VetScan HM5c to
transmit results to PC:
Touch Settings
Touch Measurement
Touch Settings
Set PC Link to Enabled
Set Auto Send to Enabled
Set VSx Link to Disabled
Set PC Link Baud Rate to
9600
Touch Database
(Refer to your VetScan HM5c
User Manual PDF for any details)
Establish Connection with Analyzer
Abaxis Data Manager > Refresh.
Ensure no analyzers are running an
analysis or transmitting data. >
OK.
Locate your VetScan HM5 in
Analyzers list.
Transmit Results
Transmit Results from VetScan
HM5:
Click on Database key
Select the result to
Transmit by using
arrow keys
Click OK key
Click on Menu->4
Manage selected
records->1 Send
selected records
Transmit Results from VetScan
HM5c:
998-5104D 17
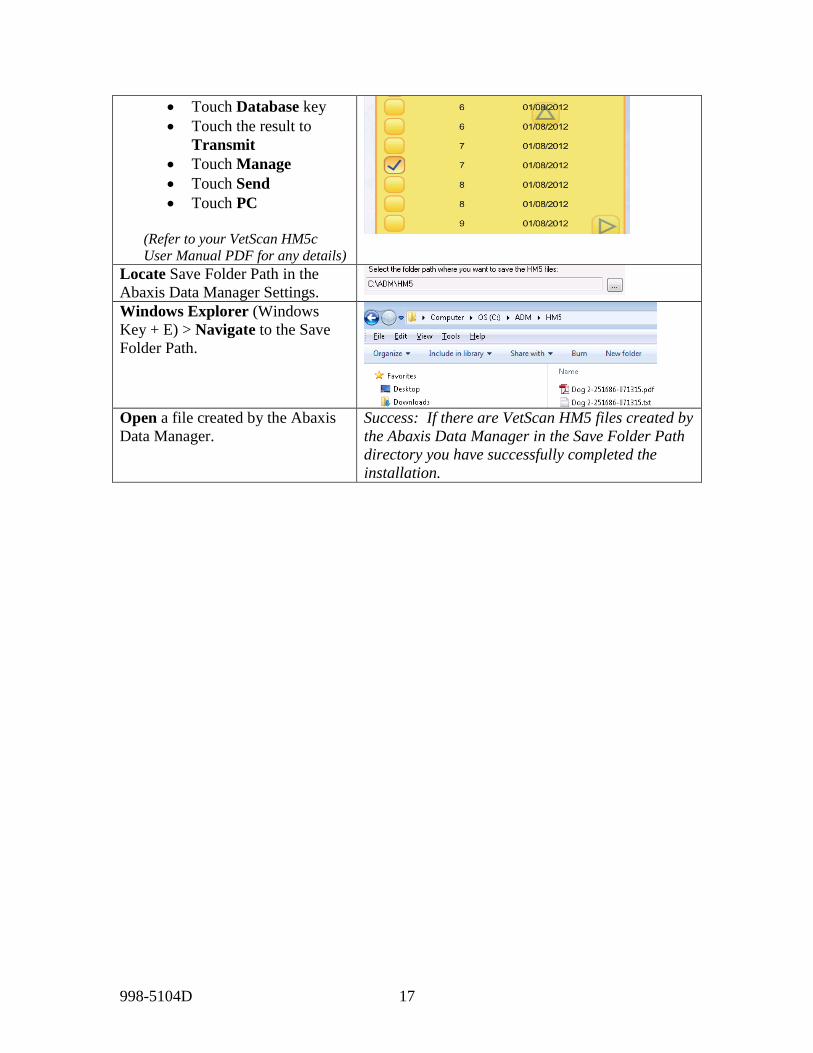
Touch Database key
Touch the result to
Transmit
Touch Manage
Touch Send
Touch PC
(Refer to your VetScan HM5c
User Manual PDF for any details)
Locate Save Folder Path in the
Abaxis Data Manager Settings.
Windows Explorer (Windows
Key + E) > Navigate to the Save
Folder Path.
Open a file created by the Abaxis
Data Manager.
Success: If there are VetScan HM5 files created by
the Abaxis Data Manager in the Save Folder Path
directory you have successfully completed the
installation.