Embed Size (px)
Citation preview

Abacus 32 Windows Menu System
- 1 -
Abacus 32 V6.00
We would like to thank all the Abacus users for their support. There have been a number of major enhancements to Abacus, as well as a number of fixes. This release contains full 32bit windows features. With this release you may either activate the windows features, or leave things as they are in the DOS environment. This release will be the final version where either the Windows or DOS can be activated. The DOS environment will be eliminated in all future releases. Enhancements and Changes in this release:
1) Abacus 32 Windows Menu System (see notes on page 12) 2) In the Abacus 32 Windows Version, all dates now appear with a 4 digit year. 3) Windows Printing System (see notes on page 22) 4) Report generator with over 90 reports (see release notes for V5.50 for list of reports) 5) Fax number added to Customer statements (menu ABC)
To print the Customer Fax Number on the customer statement, it must be added to the current active customer statement form in UIS –Util – Initialize – Setup Forms
6) Enforce Customer Credit limit (menu ABI) set up under UICR 7) Enhance Customer Label printing (mune ACRL) 8) Cheque Amount in words to checks (menus CDAP and CDP)
Increase dollar amounts in payroll to $9,999,999,999.99 Check amount in words added to the A/P Cheque and Payroll Cheque forms. To print the Cheque amount in words on the cheques, the cheque form must be modified within UIS – Util – Initialize – Setup Forms.
Please take note: When printing the check amount in words, if the check amount words to be printed, is wider then the width of the check, it will be printed in the old format of “Exactly$999999&99cts”

Abacus 32 Windows Menu System
- 2 -
9) Direct deposit available for Canadian Payroll users.(see notes in payroll documentation for setup)
10) Changed to a four digit year on cheques for both payroll and payables (menus CDP and CDAD). You now have full control how the date fields are printed. You will need to edit the form in Abacus under UIS and locate the date fields and edit them. When you edit the date fields, you will see the "Print Mask" contains MM/DD/YY. This will need to be changed. The new mask must start with @D(space) and followed by the format you want the date printed in. Any of the following examples will work:
@D MM/DD/YYYY @D MM-DD-YYYY @D DD/MM/YYYY @D YYYY/MM/DD
Any combination of DD, MM, and YYYY, with or without separator characters will work. 11) Increased selling price to $9,999,999.99 (menus ABI and ABO). The unit selling price
maximum amount has been increased to $9,999,999.999. Note if you plan on amounts this large; don’t forget to modify the required forms in UIS – Initialize – Setup Forms to allow an amount this large to be printed.
12) Changed Batch detail reports in DBASE/Batch View for funtions OR, ST and BI (menu DB) When printing the detail for batches with a JR type of “BI”, “OR”, or “ST”, the report printed, has been modified to print more informative data
13) Allow Credit against GL’s for Jobs (CRE) 14) Credit amounts within A/R are aged according to their dates (menu ACA) 15) Current Active Period may be changed by SUP user, even if others are currently signed
in.(see notes on page 10) 16) In Inventory Edit, (menu IE) allow edit of serial numbers LIFO and FIFO

Abacus 32 Windows Menu System
- 3 -
17) In Inventory Edit, (menu IE) the F8-Requence has changed.
When in Inventory – Edit, the F8-ReSeq now defaults to Abort.
If Reset is selected, all the sequence numbers will be reset to “000000”.

Abacus 32 Windows Menu System
- 4 -
18) You may now change the order of the bank account G/L (Menu CRE and CDA) When assigning a bank account to the transaction, when F1 is pressed, you are presented with a list of all the banks that have been setup in Abacus. The transaction will always default to the bank account assigned to ID 0. In the previous versions, you could not change the order of the accounts. Now you may “ShftUP” or “ShftDN” the order of the banks.
19) Allow reset of batch (menu USR) other than Full, so that not all users logged in need to exit program
20) In Order Entry (menu OE) you can now add a Department Range 21) A number of functions that had taken a long time to complete have been greatly
increased in speed.
Void Checks (CDAV) Year End Close (GAY) Period Sale Close(GAP) File Reorganize (USF) as well as most posting functions.

Abacus 32 Windows Menu System
- 5 -
Version 32 V6.00
RELEASE NOTE
THERE HAVE BEEN A NUMBER OF MAJOR CHANGES MADE TO ABACUS. PLEASE PRINT AND READ ALL OF THE UPDATE NOTES TO FAMILIARIZE YOURSELF WITH THE CHANGES.
Please Read and Follow the UPDATE Notes.
Installation Instructions:
1. Run Abacus function USUU to ensure no other users are signed into Abacus. If other users are showing as being in Abacus, ensure that they are in fact signed off, and then run function USR to reset the network flags.
2. BACKUP your data. CD ROM Installation If the installation requests the entry of a CD-Key and you do not have one, contact Silver Mountain Software at 905-853-6922. 3. Insert the CD into the drive:
A) If you are running Windows 2000,XP or Vista the installation program should automatically start. If auto run is disabled or the program does not start, preceed to Step B)
B) Open My Computer or Explorer and open your DVD/CD drive and Double Click on the ABSETUP.EXE to start the installation

Abacus 32 Windows Menu System
- 6 -
4. You will be presented with the following screen:
Your choices:
1- New Installation Will install a new copy of Abacus on the drive you select.
2- Install Abacus
Will install the update to Abacus at the location you enter.
3- Search for Existing Install Will search all hard drive and present all the Abacus installations located and ask which one to update.
4- Update Licenses Only
If you have purchased extra user licenses, the Licenses only will be updated.
5- View/Print Documentation Will open an explorer window and display all the documentation PDF files on the CD. Q- Quit This will quit the installation program. If the New Installation option is selected, you will be presented with the available drives and the free space on each drive. NOTE: You must have 75MB of free space to install Abacus. Start Abacus II and answer Yes to upgrade if requested. Proceed with the Release Notes and perform the tasks required.

Abacus 32 Windows Menu System
- 7 -
Version 32 V6.00
Release Notes These release notes include all program changes since version 5.00
System Section
Abacus V6.00 is being release as a full 32 bit windows application and the old legacy DOS application. If you intend on running the DOS version, you will need to run the ABC.BAT in your windows short-cut.
The following notes on Windows 95/98 and the file handles refer to the DOS version and are not an issue with the Windows Version.
WINDOWS 95/98 (Is Not recommended and not supported)
� Windows 95/98 has a tendency to not correctly allocate memory to DOS applications. When creating a shortcut to run Abacus, edit the properties of the shortcut (right/click mouse on shortcut and select properties). Select the Memory Tab and set the initial environment to 1024 and Extended (XMS) memory to between 4096 and 8192. This will ensure that enough memory is available for Abacus.
File Handles (Take special note of this) If you get a DOS ERROR 4, ensure that the “FILES=” in the CONFIG.SYS file in the C:\ directory on the computer where the error occurred, is set to “FILES =200”.
This indicates that the “FILES=” in the CONFIG.SYS on the particular workstation are set too low and will prevent you from running Abacus multiple menu items.
If you plan on using the new DOS Version of Abacus, you will have to take note, that the file handles will be an issue. Abacus will open a number of files as you run the menu items. As these files are opened, the system keeps track of them in what are called files handles. The default number of file handles with Windows 95/98 & ME is only set to 30 and with Windows 2000, XP and Vista the default is set to 40. These file handles will quickly and will result in the program generating a DOS ERROR 4 (not enough file handles)

Abacus 32 Windows Menu System
- 8 -
SPECIAL NOTE TO WINDOWS ME USERS
The SYSTEM.INI file located in the \WINDOWS directory controls the File Handles.
Edit the SYSTEM.INI file, locate the section heading beginning with [386Enh], and add the following line above the line starting the next section: PerVMFiles=170 This adds 170 to the default of 30 file handles, giving you a total of 200 file handles.
SPECIAL NOTE TO NT & WINDOWS 2000, XP & Vista USERS
The CONFIG.NT file located in the \WINNT\SYSTEM32 directory controls the File Handles. It is located near the bottom of the CONFIG.NT file and defaults to FILES=40. This should be increased to 200 or higher.

Abacus 32 Windows Menu System
- 9 -
Creating an Icon on Your Desktop
If each user in your organization wishes to use the new Abacus 32 Windows system you will need to create a new shortcut on each workstation that accesses Abacus on the network. The following procedure will explain how to create the shortcut with the icon as shown below.
Desktop Program Shortcut
To create an Abacus 32 program shortcut on your desktop: 1. Right click your mouse anywhere on your desktop 2. Choose New 3. Click on Shortcut 4. In the command line type: X:\ABACUS2\AB32.EXE (Where X is the drive Abacus is
installed or press browse to locate it) 5. Mouse Click on the Next button. 6. Type in “Abacus 32” for the name of the shortcut. 7. Mouse Click on Finish.
If your Abacus program were located on a network drive or in a different program directory you would replace the above command with the appropriate information. If you are unsure of where it is located please contact your system administrator

Abacus 32 Windows Menu System
- 10 -
Login Screen & Data Locations
Once your icon has been created – double-click it, and the above screen will appear Click on the Log into Abacus 32 button or press Enter. The Login Screen will appear as shown below. Type in your User ID: e.g. SUP If you user id is 3 characters long the cursor will automatically drop to the Password field if it is shorter than 3 characters press Enter to move to the Password field or click the mouse in the Password field. Enter your Password: e.g. SUPERU If your password is 6 characters long the cursor will automatically drop to the Date field if it is shorter than 6 characters press Enter to move to the Date field or click the mouse in the Date field. If you do not wish to change the Date press Enter to move to the Fiscal Period field. If you wish to change the Fiscal Period that Abacus will use as the default press F1 or click on the Drop Down Button, then using either the up/down arrow keys or the mouse highlight an alternate fiscal period and press Enter or click the mouse to select.

Abacus 32 Windows Menu System
- 11 -
Note: You only have 3 attempts to login correctly after that you will need to re-launch the Abacus Program (AB32.EXE). Also, if you have more than one data location setup in Abacus an Account Books Available box will appear. Select the set of Abacus books you wish to work on and it will proceed to the Log Screen as shown above.
If you do not see the data location listed in the box you can press F8 or click Other to direct Abacus to use an alternate set of books or press Esc or click Cancel to exit without entering the Abacus program.

Abacus 32 Windows Menu System
- 12 -
Abacus 32 Windows Menu A full Windows 32bit Menu System has been included with Abacus V6.0. ABACUS 32 MAIN MENU
The Abacus Main Menu is comprised of 4 components: • Abacus Title/Menu Bar
The Abacus menu bar is very similar to the DOS menu. The File and Help menu items have been added and the Quit DOS menu item has been removed.

Abacus 32 Windows Menu System
- 13 -
• Abacus Toolbar The Abacus Toolbar is customizable for you to place functions that you will use regularly, for example, File Reorganize (USF) or Batch View (DB). The toolbar also has the speed button. You will use the speed button to create Toolbar items as well as Speed buttons, which will be found on your Abacus Desktop.
• Abacus Desktop
The Abacus Desktop is where you will customize your Speed buttons. You can have up to 12 Speed buttons defined. • Abacus Status Bar
This portion of the desktop will inform you of the current company books you are working in as well as fiscal period and current date. It also shows you the current Abacus user id logged in and the computer system name and the user id logged on to that particular computer.

Abacus 32 Windows Menu System
- 14 -
• Exiting the Abacus Windows System You now have 3 different ways to exit Abacus. First, you can click File from the Abacus Menu bar and then click Exit or by pressing the Alt-F keys and then the letter E. Second, you can click the in the top right corner of the Abacus Program Screen. Third, you can click the far right Exit Program button on the Toolbar as shown below.
After you have selected one of the 3 methods the following screen will appear to ensure that is what you really want to do. Either confirm or deny your decision.
A note when exiting the system, if you have an open program function such as Batch View (DB) and it is minimized on the Windows Taskbar the system will warn you that you have an open program and will make you close it before you can proceed to exit the Abacus system.

Abacus 32 Windows Menu System
- 15 -
Setting Up a Toolbar Menu Item The icons on the Toolbar can be personalized so that each individual user id in Abacus can setup their own Toolbar. Note: Each user has to login to Abacus to create their own set of Toolbar icons. To begin, click on the Speed button on the Toolbar. The following screen will appear.
Click on the Toolbar or press Alt-T simultaneously to proceed with the Toolbar setup. Once you have done that the following screen will appear.
You can have a maximum of 12 Toolbar Items plus the Speed and Exit Program buttons.

Abacus 32 Windows Menu System
- 16 -
Use the first column to type a description of the Toolbar item. It can be a maximum of 18 characters long. This description will appear in a yellow highlighted box when the mouse is over the Toolbar icon as shown below.
The second column is where you can assign a function or an Abacus menu item to the Toolbar icon as shown below. Click on the Drop Down Button or press F1 to see a list of all the Abacus menu items. You can scroll up or down the list by pressing the up/down arrow keys or using your mouse. Also, if you know which menu item you want to assign you can press the first letter of the Abacus menu item to go directly to that group. For example, we use the Batch View (DB) function on a regular basis, presses D for D/base and the system will zoom to the D/base menu items. Once you have highlighted DB – Batch View press Enter or click on the item to select it.

Abacus 32 Windows Menu System
- 17 -
Then by pressing the Select Icon button on the right of the row we can assign an icon from an extensive list as shown below.
Use the left/right arrow keys to scroll through the list. Press the double-arrow buttons on either side to go to the top/bottom of the list. Click on the icon you wish to use. In our example we choose the Camera icon. Once you have selected the icon for the Toolbar menu our screen will appear as below.

Abacus 32 Windows Menu System
- 18 -
At this point if we are satisfied with our choice and description we can click on the Save button or press PgDn to save it. If you are not satisfied with the description and icon for Batch View simply click the Cancel button with your mouse or press Esc. If you save your new Toolbar item your Toolbar will appear as below.
Note: If you setup more than 1 Toolbar item at a time and press Esc or click Cancel You will lose any and all changes or additions that you made since launching the Toolbar creation tool.

Abacus 32 Windows Menu System
- 19 -
Setting Up a Desktop Speed Button The Speed buttons on the Abacus desktop can be personalized so that each individual user can setup their own Speed buttons. Note: Each user has to login to Abacus to create their own set of Speed Buttons. To begin, click on the Speed button on the Toolbar. The following screen will appear.
Click on the Speed Buttons or press Alt-S simultaneously to proceed with the Speed Button setup. Once you have done that the following screen will appear.
You can have a maximum of 12 Speed Buttons on your Abacus desktop. Use the first and second column of each row to type a description of the item. Each column field can be a maximum of 18 characters long. This description will appear in a light cyan colour box.

Abacus 32 Windows Menu System
- 20 -
The third column is where you can assign the function or an Abacus menu item to the Speed button. For example, we are assigning the Payables Invoice Entry (PIE) function that we perform on a frequent basis to this Speed button as shown below.
At this point if you are satisfied with your choice and description click on the Save button or press PgDn to save it. If you are not satisfied with the description for Payable Invoice Entry click the Cancel button with your mouse or press Esc.

Abacus 32 Windows Menu System
- 21 -
If you choose to save your Speed button entry the Abacus desktop will appear as shown below.

Abacus 32 Windows Menu System
- 22 -
Windows Printing: (Take special note)
This is a major change within the system and should be reviewed.
Special Notes for the DOS Version (ABC.BAT):
If you leave Windows Printing set to No, there will be no change from the way the system has worked to date. If you set Windows Printing to YES, whenever printing, the standard windows printer dialog will appear and you may then select the printer destination. When the window print system is turned on, it is recommended that Abacus BE RUN IN A WINDOW AS APPOSED TO FULL SCREEN MODE. IE: If Abacus appears in full screen mode (the windows desktop can not be seen), then hold the Alt key down and press Enter to switch to windowed mode. If the screen size displayed in windowed mode is too small, edit the icon on the desktop, by pressing the right button on the mouse while on the icon and then select properties. Select the Screen Tab (in Windows 95/98/ME) or Options Tab (Windows NT/2000/XP) and select the “Window” bullet (Not Full-screen). Then select the Font Tab and increase or decrease the font size being used until the window’s size suits your visual needs. If you turn on windows printing and leave Abacus in full screen mode, whenever printing, Windows will minimize the Abacus screen onto the Start Bar, so that you may see the windows print dialog. If the Abacus program is minimized, you just need to click on the instance of Abacus on the Start Bar to restore it on the screen.
All Users Take Note: With Windows Printing, whenever printing, the standard windows printer dialog will appear and you may then select the printer destination. With Windows printing is to be used on a computer, you MUST install the fonts that are included in the \ABACUS2 directory on ALL COMPUTERS running Abacus. To install the fonts:
1) Open the Control Panel Folder. 2) Select the Fonts Icon. 3) Then select the menu item File/Install New Font. 4) Change to the drive that contains the Abacus2 directory. 5) Open the Abacus2 folder. 6) Click on the Select “All” button. 7) Click on the “OK” button.
If you get a message the font is already install (click OK) 8) Close all the windows

Abacus 32 Windows Menu System
- 23 -
Note: 1) If you are using Dot Matrix Printers, when Windows printing is turned on, the printers will print in graphics mode. This may result in a significant increase in the amount of time require to print. You may edit the printer properties and reduce the print resolution on the printer. This will greatly increase the print speed 2) If you are using pre-printed forms such as invoices or checks, you should test that the alignment of the data is still correct. This may be done in Abacus under UIS (Util-Initialize-Setup Forms). Locate the “Current Form” and press F5-Print. DOS Version (ABC.BAT) Turning On Windows Printing.
Windows printing is turned on or off for each individual user. In Abacus menu item Util-Passwords (UP), Press “F5-Modify” on each user and enter “Yes” in the Windows Printing field.
(Only optional if using the DOS format of Abacus)
Whenever you print with windows printing enabled, the Abacus print dialog will appear as below.

Abacus 32 Windows Menu System
- 24 -
There is no need to select a printer type and the “Printer change” has been eliminated.
When the “Select alternate output device” is selected, the follow screen will appear:
Your selections are: P. Output to Printer – sends output to the Windows printer dialog. F. Save To FILE – sends the report data to a .TXT file for later use by Excel or another spreadsheet program. V. View On Screen – sends the report to the Windows Print System for previewing before printing. Q. Quit Abort Selection – leaves the current Output selection in place.
After selecting “Continue with displayed parameters”, with FILE as the Output selected, you will be asked to specify the location and name of file to be created.

Abacus 32 Windows Menu System
- 25 -
While the report is running, the print activity indicator will continue to change between the following characters 0, o, and • to indicate that the program is running.
If the Output was set to “View”, after the report has been generated, you will be presented with the following windows screen.

Abacus 32 Windows Menu System
- 26 -

Abacus 32 Windows Menu System
- 27 -
Print Preview Title Bar
Item A - Send document to printer. Item B - Email the document. Item C - Return to 1 to 1 screen sze Item D - Reduce To Minimum Size Item E - Increase Magnification Item F - Reduce Magnification Item G - Go to first page Item H - Skip backward one page Item I - Skip forward one page. Item J - Go to the last page. Item K - Help (List of short-cut keys) Item L - Exit the document preview.
Printer Dialog
When a report is sent to the printer, the standard window printer dialog is presented.

Abacus 32 Windows Menu System
- 28 -
Navigating within the new Abacus Program Abacus 32 V6.00 is a typical Windows program with all the standard keys functioning as expected, with a few exceptions.
1) When editing data, the “Enter” key DOES NOT ACCEPT THE SCREEN. The “Enter” key moves to the next data entry field, or accepts the screen if on the last entry field. The “Tab” and “Shift Tab” still function as expected within any windows program.
2) The F-Keys function as they did in the DOS version of Abacus. Press them and they are activated, if there is a function assigned to them.
3) When editing, the “Page Down” key will accept the screen as entered (If all the
data is valid), or will stop at the next key field within the screen being edited.
4) The “Esc” key will cancel/quit the current screen. This is equivalent to pressing the “F10-Quit” key.
5) You can also click the mouse on a particular entry field and the cursor will move
there as long as all the previous fields contain valid data. If a field does not contain valid data, a message will appear and the cursor will be positioned on that field. For example if a field requires a G/L account number and you did not enter one, then the cursor will stop on the G/L account field.

Abacus 32 Windows Menu System
- 29 -
Abacus Menu Navigation There are a number of ways to select something to run from within the Abacus menu system.
1) You can set up “Speed Buttons” and “Toolbar Buttons” and click on them with your mouse (refer to the previous section on setting up Speed and Toolbar Buttons)
2) You can use the mouse and navigate through the menu and click on the item you
want to run.
3) You can press and release the “Alt” key and the hot keys will be underlined on the menu system and all you have to do is press the individual letters one after the other until the menu item you select is opened. For example: To run a Balance sheet, press and release the “Alt” key and then press the letters G, F, S, B in succession.
Abacus 32 Windows Menu System
- 30 -
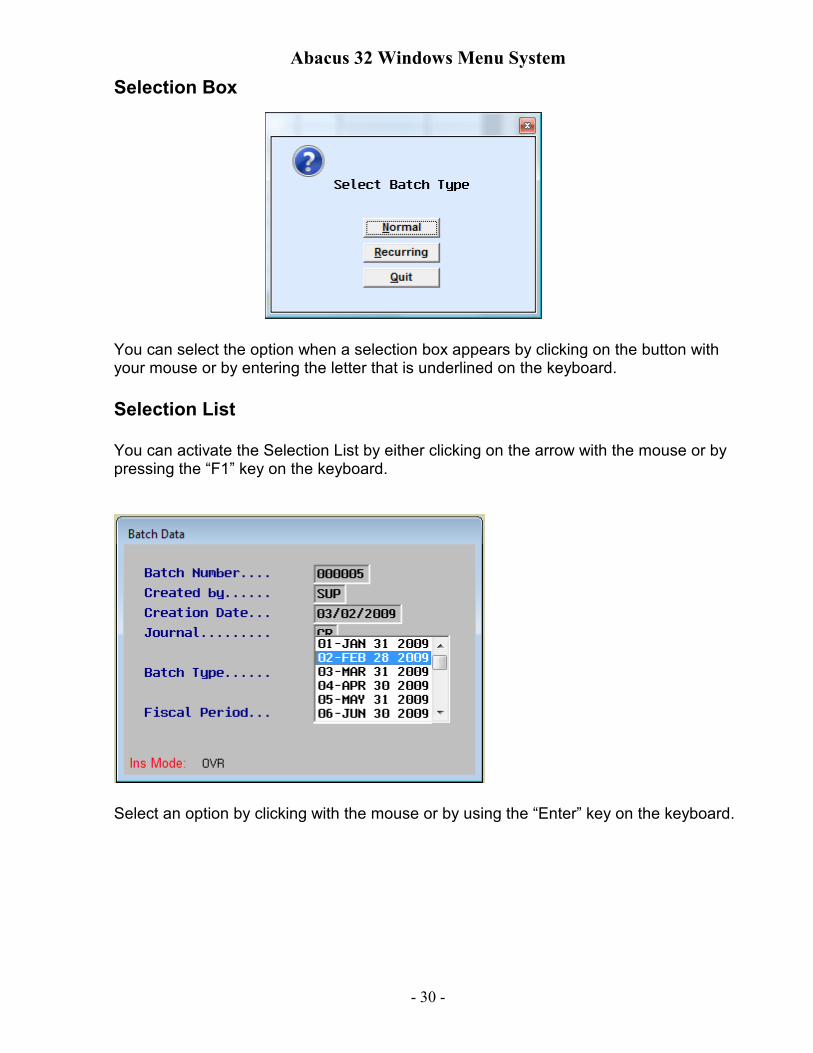
Selection Box
You can select the option when a selection box appears by clicking on the button with your mouse or by entering the letter that is underlined on the keyboard.
Selection List You can activate the Selection List by either clicking on the arrow with the mouse or by pressing the “F1” key on the keyboard.
Select an option by clicking with the mouse or by using the “Enter” key on the keyboard.

Abacus 32 Windows Menu System
- 31 -
Edit Screen
On an Edit Screen, as you enter the information you can move from field to field by selecting any of the following:
1) When a field is full, it will automatically move to the next field. 2) Pressing the “Enter” key will move you to the next field. 3) The ”Down” arrow or “Tab” will move you to the next field. 4) The “Up” arrow or “Shift Tab” will move you to the previous field. 5) The “Page Up” will move you to the first field or if you are already on the first field,
it will move you to the previous screen on a multi screen edit. 6) You can use the mouse to click on the next field. 7) “Page Down” or “F8” will accept the screen (if all the data is correct) or stay at the
next field that is invalid or required to be entered. 8) “Esc” or “F10” will Abandon/Abort the screen entry. 9) The F-keys may be activated by using the mouse or by pressing the associated F-
key on the keyboard.

Abacus 32 Windows Menu System
- 32 -
Lookup/Browse Screens
To navigate a Lookup/Browse screen, you can select any of the following:
1) The “Enter” key, “F2”-key or clicking on the “F2” button with the mouse will perform the same task of selecting the currently highlighted item.
2) “ESC” or “F10-Quit” will abort the Lookup/Browse window. 3) To move around inside the Lookup/Browse, use the “Up” or “Down” arrow to move
up or down inside the Lookup/Browse. 4) The left and right arrow keys will move you horizontally inside the Lookup/Browse. 5) The “Page Up/Page Down” will move you a screen length up or down inside the
Lookup/Browse screen. 6) The “Home” key will take you to the first item at the very top of the Lookup/Browse
List. 7) The “End” key will take you to the last item at the very bottom of the
Lookup/Browse List. 8) “Ctrl-Home” will take you to the first column and “Ctrl-End” will take you to the last
column. 9) Typing on the keyboard will enter keys into the “Quick Lookup” at the top of the
Browse list. As you type the, the Browse will skip forward to the matching key record. If the key record cannot be found for the keys entered, the letter will be discarded and not displayed in the “Quick Lookup” line.
NOTE: The “Quick Lookup” is automatically cleared if an F-key is pressed on any vertical movement occurs.
Abacus 32 Windows Menu System
- 33 -
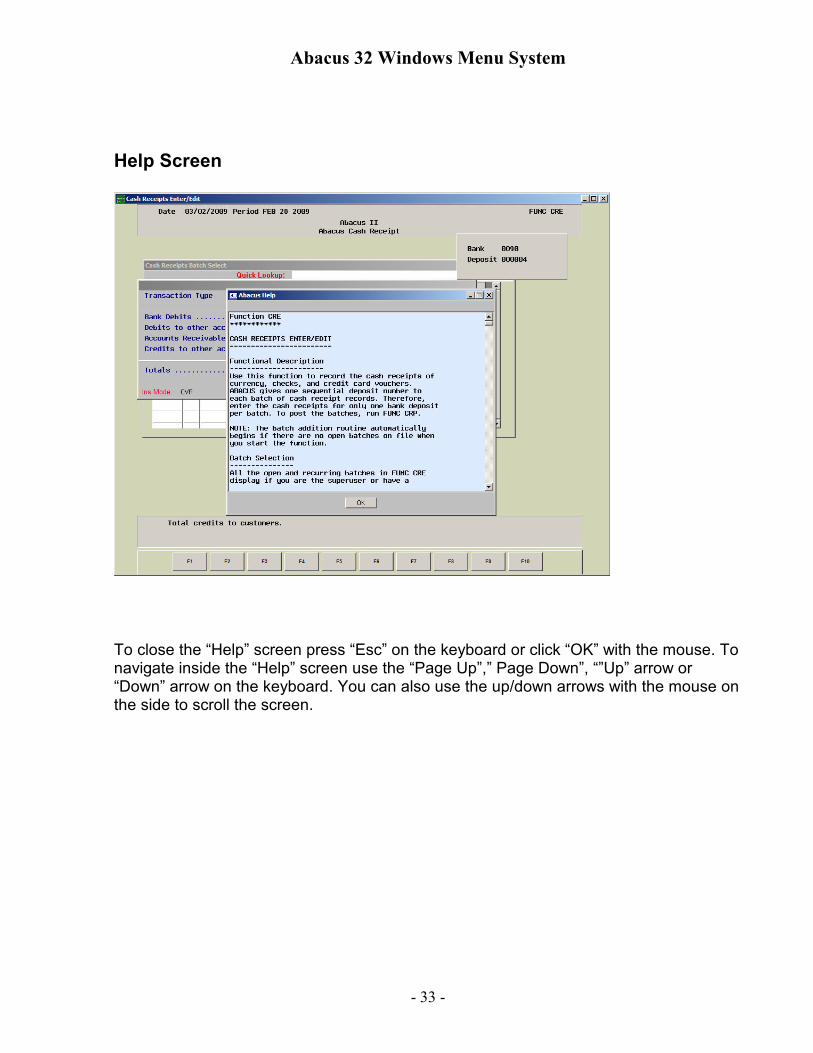
Help Screen
To close the “Help” screen press “Esc” on the keyboard or click “OK” with the mouse. To navigate inside the “Help” screen use the “Page Up”,” Page Down”, “”Up” arrow or “Down” arrow on the keyboard. You can also use the up/down arrows with the mouse on the side to scroll the screen.