Embed Size (px)
Citation preview
Last Update: 8 September 2017
Front cover
A Technical Introduction to the Use of Trusted Platform Module 2.0 with Linux
Introduces the new features and functions of TPM 2.0
Demonstrates the use of Intel TXT and Trusted Boot
Lists the available TPM 2.0 tools on Linux
Provides the example of utilizing data encryption and signature verification
Neo Cui
2 A Technical Introduction to the Use of Trusted Platform Module 2.0 with Linux
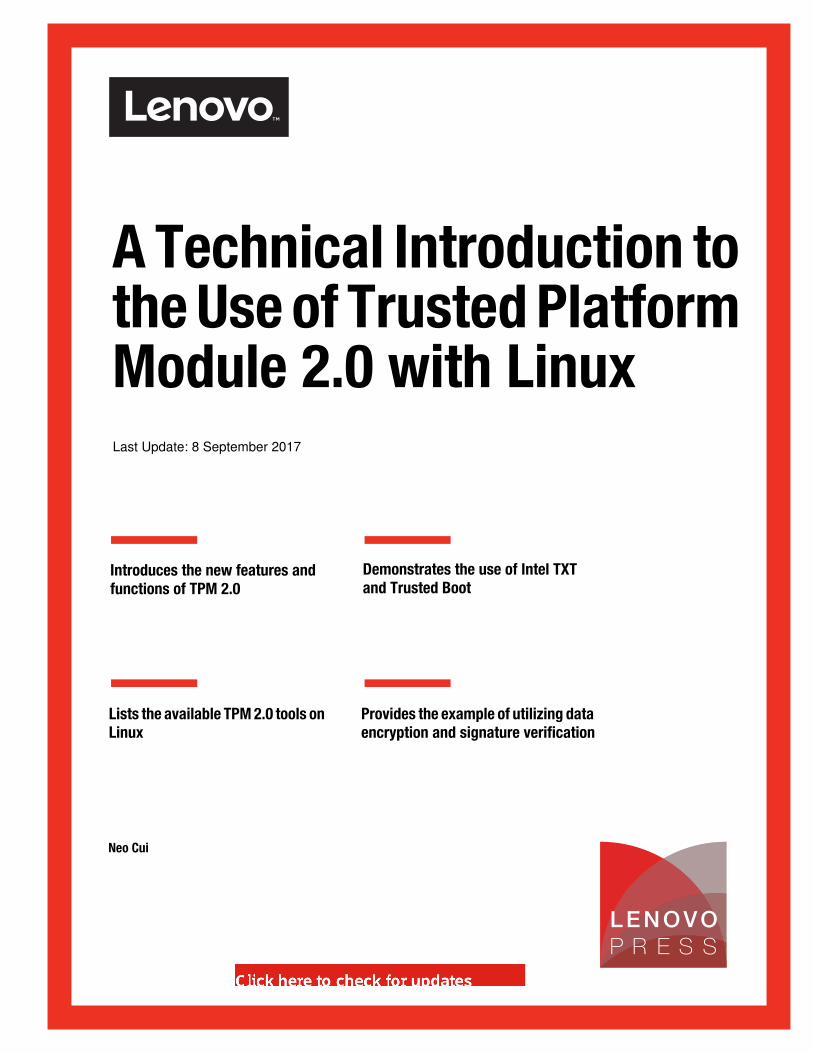
Abstract
The Trusted Platform Module (TPM) is a cryptographic component of many Lenovo® servers that provides additional security features. The TPM is an integral part of hardware-based security in Lenovo servers related to tasks such as user authentication, remote access, and data protection. Some system functions, such as Intel Trusted Execution Technology (Intel TXT), make use of TPM enhancements to strengthen system security.
This document covers a brief introduction to TPM 2.0 technology. It provides step-by-step instructions on how to enable TPM 2.0 on Lenovo servers running Linux. The document assumes the reader is already familiar with TPM 1.2 and the administration of Linux systems.
At Lenovo Press, we bring together experts to produce technical publications around topics of importance to you, providing information and best practices for using Lenovo products and solutions to solve IT challenges.
See a list of our most recent publications at the Lenovo Press web site:
http://lenovopress.com
Contents
Introduction . . . . . . . . . . . . . . . . . . . . . . . . . . . . . . . . . . . . . . . . . . . . . . . . . . . . . . . . . . . . . . 3TPM 2.0 deployment . . . . . . . . . . . . . . . . . . . . . . . . . . . . . . . . . . . . . . . . . . . . . . . . . . . . . . . 7Using TPM 2.0 under Linux on Lenovo servers . . . . . . . . . . . . . . . . . . . . . . . . . . . . . . . . . . 12Change history . . . . . . . . . . . . . . . . . . . . . . . . . . . . . . . . . . . . . . . . . . . . . . . . . . . . . . . . . . . 26Authors. . . . . . . . . . . . . . . . . . . . . . . . . . . . . . . . . . . . . . . . . . . . . . . . . . . . . . . . . . . . . . . . . 26Notices . . . . . . . . . . . . . . . . . . . . . . . . . . . . . . . . . . . . . . . . . . . . . . . . . . . . . . . . . . . . . . . . . 27Trademarks . . . . . . . . . . . . . . . . . . . . . . . . . . . . . . . . . . . . . . . . . . . . . . . . . . . . . . . . . . . . . 28
Do you have the latest version? We update our papers from time to time, so check whether you have the latest version of this document by clicking the Check for Updates button on the front page of the PDF. Pressing this button will take you to a web page that will tell you if you are reading the latest version of the document and give you a link to the latest if needed. While you’re there, you can also sign up to get notified via email whenever we make an update.
Introduction
TPM 2.0 is defined by the Trusted Computing Group (TCG) as the replacement for TPM 1.2. TPM 2.0 enhances the security of a server to prevent hacking and malware damage. TPM 2.0 is a feature available in most ThinkSystem™, System x® and ThinkServer® systems.
Major changes in TPM 2.0
The TPM 2.0 specification introduces new features beyond those in the existing TPM 1.2 specification, as summarized below1:
� No Opt-in/Opt-out: The choice of whether the administrator can enable or disable TPM is typically provided through opt-in or opt-out mechanisms. In addition, the platform manufacturer (Lenovo) can specify whether or not the administrator can disable the TPM 2.0 functions.
� Seeds and keys: The keys in TPM 2.0 are derived from seeds stored in the TPM. The Key Derivation Function (KDF) is used to create Endorsement Keys (EKs) and Storage Root Key (SRKs).
– The EK is a 2048-bit RSA key pair used as a cryptographic identity to distinguish and authenticate an individual TPM.
– The SRK is used for Root of Trust for Storage (RTS) which provides protection for data held in external storage devices. The RTS provides confidentiality and integrity for the external data.
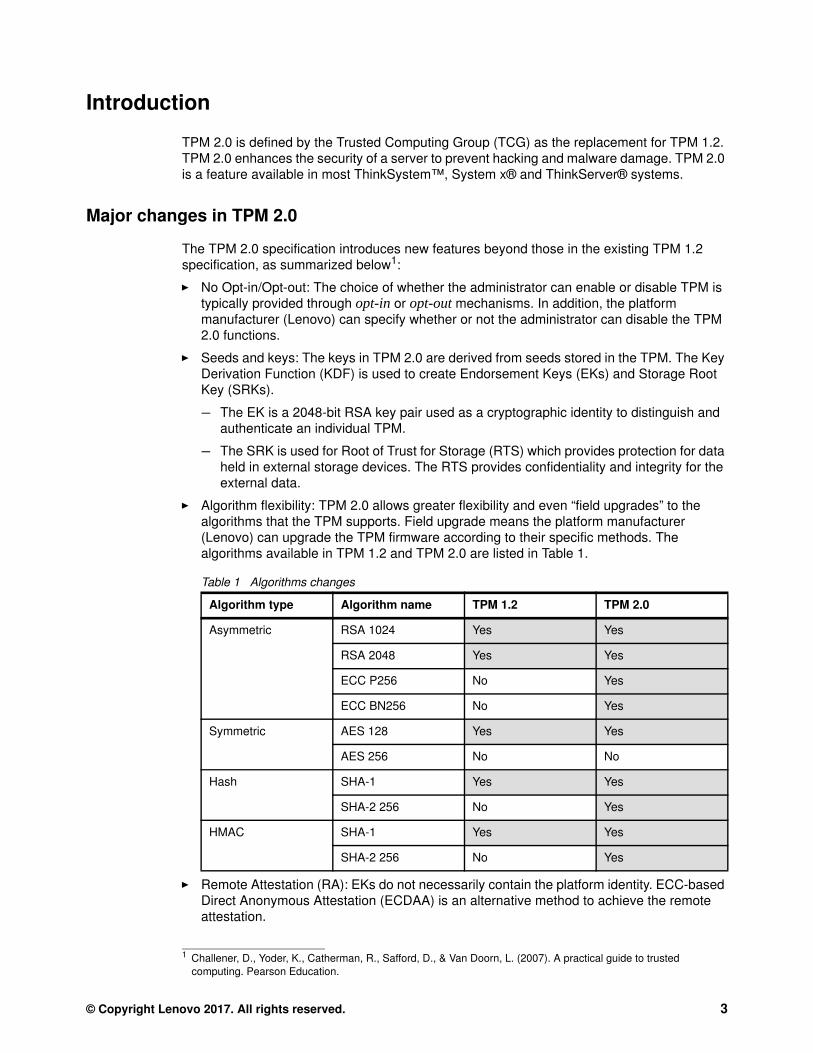
� Algorithm flexibility: TPM 2.0 allows greater flexibility and even “field upgrades” to the algorithms that the TPM supports. Field upgrade means the platform manufacturer (Lenovo) can upgrade the TPM firmware according to their specific methods. The algorithms available in TPM 1.2 and TPM 2.0 are listed in Table 1.
Table 1 Algorithms changes
� Remote Attestation (RA): EKs do not necessarily contain the platform identity. ECC-based Direct Anonymous Attestation (ECDAA) is an alternative method to achieve the remote attestation.
1 Challener, D., Yoder, K., Catherman, R., Safford, D., & Van Doorn, L. (2007). A practical guide to trusted computing. Pearson Education.
Algorithm type Algorithm name TPM 1.2 TPM 2.0
Asymmetric RSA 1024 Yes Yes
RSA 2048 Yes Yes
ECC P256 No Yes
ECC BN256 No Yes
Symmetric AES 128 Yes Yes
AES 256 No No
Hash SHA-1 Yes Yes
SHA-2 256 No Yes
HMAC SHA-1 Yes Yes
SHA-2 256 No Yes
© Copyright Lenovo 2017. All rights reserved. 3
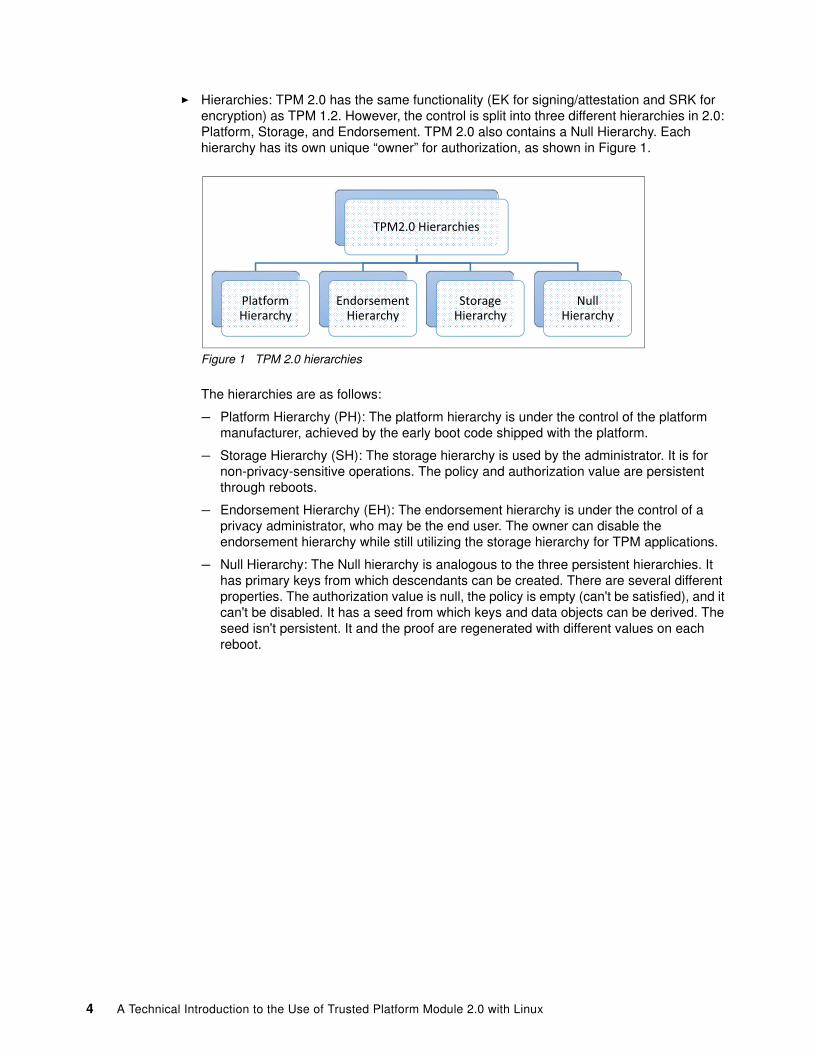
� Hierarchies: TPM 2.0 has the same functionality (EK for signing/attestation and SRK for encryption) as TPM 1.2. However, the control is split into three different hierarchies in 2.0: Platform, Storage, and Endorsement. TPM 2.0 also contains a Null Hierarchy. Each hierarchy has its own unique “owner” for authorization, as shown in Figure 1.
Figure 1 TPM 2.0 hierarchies
The hierarchies are as follows:
– Platform Hierarchy (PH): The platform hierarchy is under the control of the platform manufacturer, achieved by the early boot code shipped with the platform.
– Storage Hierarchy (SH): The storage hierarchy is used by the administrator. It is for non-privacy-sensitive operations. The policy and authorization value are persistent through reboots.
– Endorsement Hierarchy (EH): The endorsement hierarchy is under the control of a privacy administrator, who may be the end user. The owner can disable the endorsement hierarchy while still utilizing the storage hierarchy for TPM applications.
– Null Hierarchy: The Null hierarchy is analogous to the three persistent hierarchies. It has primary keys from which descendants can be created. There are several different properties. The authorization value is null, the policy is empty (can't be satisfied), and it can't be disabled. It has a seed from which keys and data objects can be derived. The seed isn't persistent. It and the proof are regenerated with different values on each reboot.
TPM2.0 Hierarchies
Platform Hierarchy
Endorsement Hierarchy
Storage Hierarchy
Null Hierarchy
4 A Technical Introduction to the Use of Trusted Platform Module 2.0 with Linux
TPM 2.0 software stack
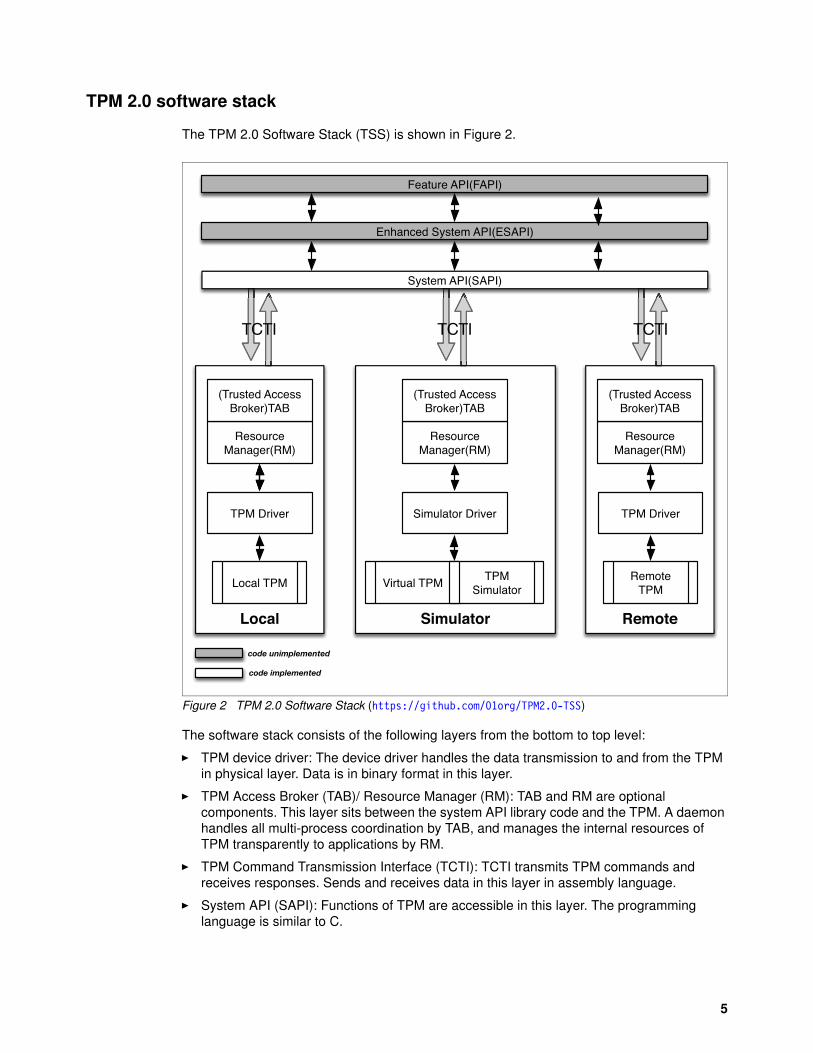
The TPM 2.0 Software Stack (TSS) is shown in Figure 2.
Figure 2 TPM 2.0 Software Stack (https://github.com/01org/TPM2.0-TSS)
The software stack consists of the following layers from the bottom to top level:
� TPM device driver: The device driver handles the data transmission to and from the TPM in physical layer. Data is in binary format in this layer.
� TPM Access Broker (TAB)/ Resource Manager (RM): TAB and RM are optional components. This layer sits between the system API library code and the TPM. A daemon handles all multi-process coordination by TAB, and manages the internal resources of TPM transparently to applications by RM.
� TPM Command Transmission Interface (TCTI): TCTI transmits TPM commands and receives responses. Sends and receives data in this layer in assembly language.
� System API (SAPI): Functions of TPM are accessible in this layer. The programming language is similar to C.
RemoteSimulatorLocal
Virtual TPMLocal TPMTPM
Simulator
TPM Driver
Resource Manager(RM)
(Trusted Access Broker)TAB
Simulator Driver
Remote TPM
TPM Driver
Resource Manager(RM)
(Trusted Access Broker)TAB
System API(SAPI)
Enhanced System API(ESAPI)
Feature API(FAPI)
Resource Manager(RM)
(Trusted Access Broker)TAB
TCTI TCTI TCTI
code unimplemented
code implemented
5
� Enhanced System API (ESAPI): This layer is under development and has not been implemented yet. This layer requires much TPM knowledge but provides some sessions management and support for cryptographic capabilities.
� Feature API (FAPI): This layer is under development and has not been implemented yet. Most user applications should be achieved in this layer. To do the programming, use Java, C++, or some other higher-level language.
TPM 2.0 functions
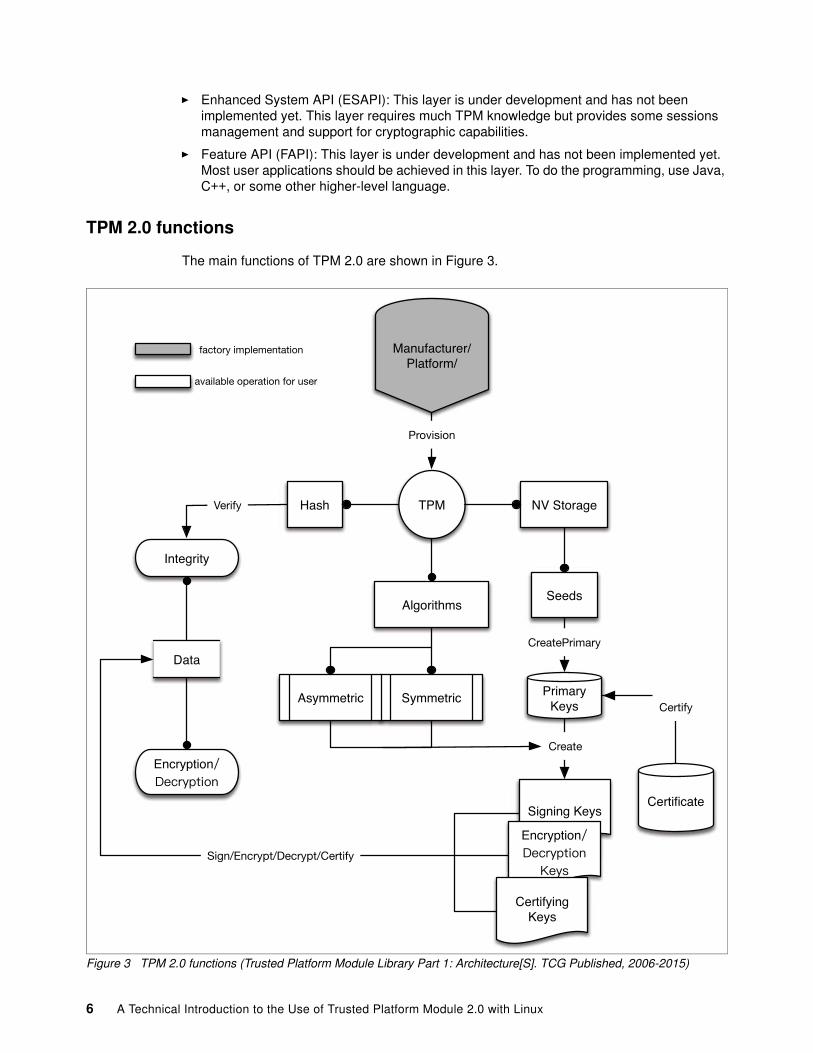
The main functions of TPM 2.0 are shown in Figure 3.
Figure 3 TPM 2.0 functions (Trusted Platform Module Library Part 1: Architecture[S]. TCG Published, 2006-2015)
Primary Keys
Hash
Algorithms
SymmetricAsymmetric
Integrity
Encryption
NV StorageTPM
Data
Certificate
Manufacturer/Platform/
Provision
Seeds
Verify
CreatePrimary
Certify
Signing Keys
Encryption
Certifying Keys
Create
Sign/Encrypt/Decrypt/Certify
factory implementation
available operation for user
6 A Technical Introduction to the Use of Trusted Platform Module 2.0 with Linux
The functions shown in Figure 3 on page 6 are as follows:
� Provisioning: The TPM can be used once it has been provisioned. Provisioning includes all TPM setup that occurs perhaps only once in a typical TPM lifetime. The provisioning process includes generating keys and secrets, inserting certificates, and enabling or disabling certain TPM features. The provisioning process covers three parties: the TPM manufacturer, the platform, and the end user.
� Keys: TPM keeps the data safe through keys. The TPM can both generate and import external keys and it supports both symmetric and asymmetric keys.
Primary keys are the root keys in the hierarchy. TPM 2.0 achieves multiple SRKs by primary seeds in TPM NV Storage. TPM 2.0 can create an unlimited number of primary keys combining key-derivation function (KDF).
TPM 2.0 creates different attribute keys by primary keys and algorithms, such as keys for signing, encryption/decryption, or certifying.
� Data safe: The signing keys can sign the data to confirm the authenticity of data. The ability of an application or data to use the encryption/decryption keys while keeping them safe is the TPM’s greatest strength. The hash function of TPM can verify the integrity of data.
TPM 2.0 deployment
This section introduces detailed information about the TPM 2.0 chipset on Lenovo servers and how to enable TPM 2.0 in UEFI.
TPM 2.0 in Lenovo servers
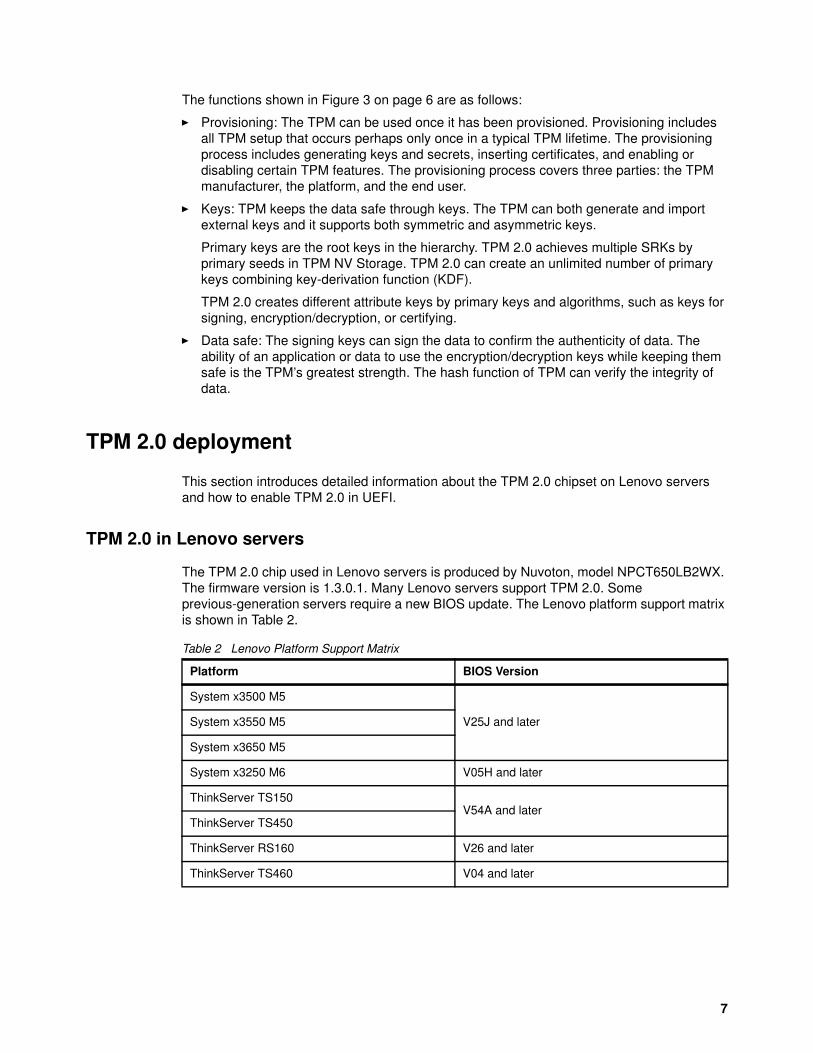
The TPM 2.0 chip used in Lenovo servers is produced by Nuvoton, model NPCT650LB2WX. The firmware version is 1.3.0.1. Many Lenovo servers support TPM 2.0. Some previous-generation servers require a new BIOS update. The Lenovo platform support matrix is shown in Table 2.
Table 2 Lenovo Platform Support Matrix
Platform BIOS Version
System x3500 M5
V25J and laterSystem x3550 M5
System x3650 M5
System x3250 M6 V05H and later
ThinkServer TS150V54A and later
ThinkServer TS450
ThinkServer RS160 V26 and later
ThinkServer TS460 V04 and later
7
TPM 2.0 is supported by the Linux 3.20 kernel. The TPM 2.0 driver is included in Red Hat Enterprise Linux 7.3 and SUSE Linux Enterprise Server 12 SP2, however, only SLES 12 SP2 currently integrates the TPM 2.0 tool in the user space. The main functions that relate to TPM 2.0 under Linux are tboot (Trusted Boot) and data encryption/decryption.
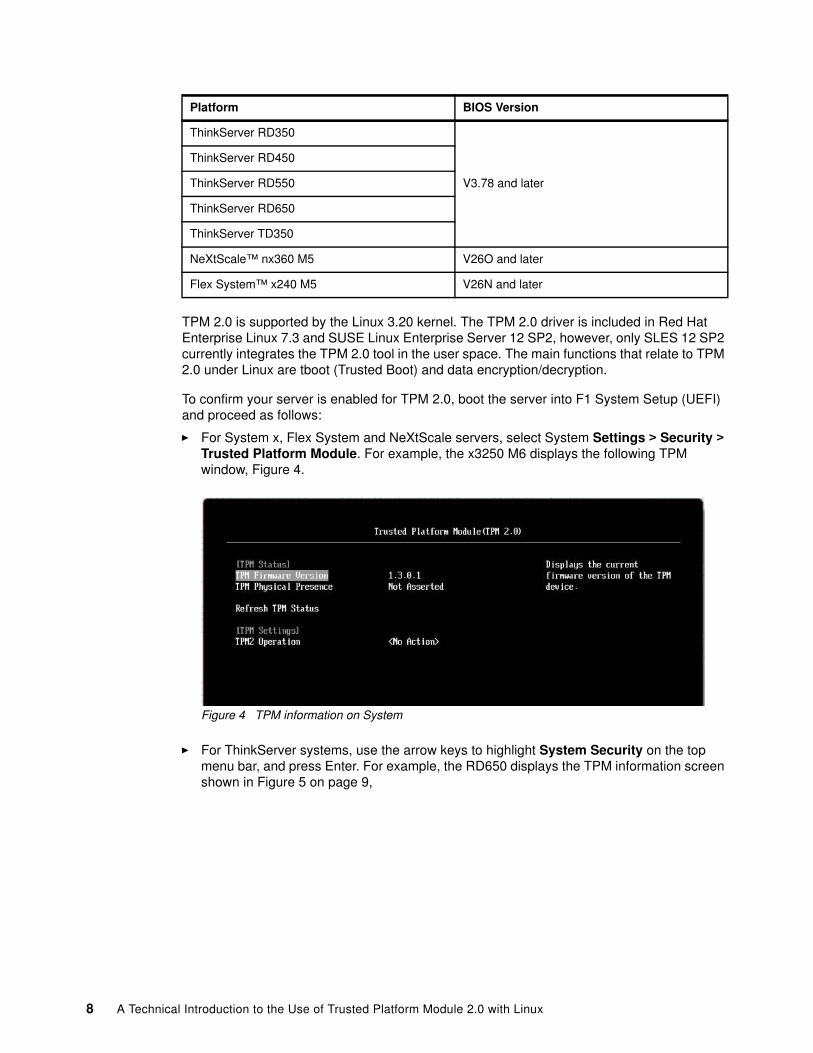
To confirm your server is enabled for TPM 2.0, boot the server into F1 System Setup (UEFI) and proceed as follows:
� For System x, Flex System and NeXtScale servers, select System Settings > Security > Trusted Platform Module. For example, the x3250 M6 displays the following TPM window, Figure 4.
Figure 4 TPM information on System
� For ThinkServer systems, use the arrow keys to highlight System Security on the top menu bar, and press Enter. For example, the RD650 displays the TPM information screen shown in Figure 5 on page 9,
ThinkServer RD350
V3.78 and later
ThinkServer RD450
ThinkServer RD550
ThinkServer RD650
ThinkServer TD350
NeXtScale™ nx360 M5 V26O and later
Flex System™ x240 M5 V26N and later
Platform BIOS Version
8 A Technical Introduction to the Use of Trusted Platform Module 2.0 with Linux
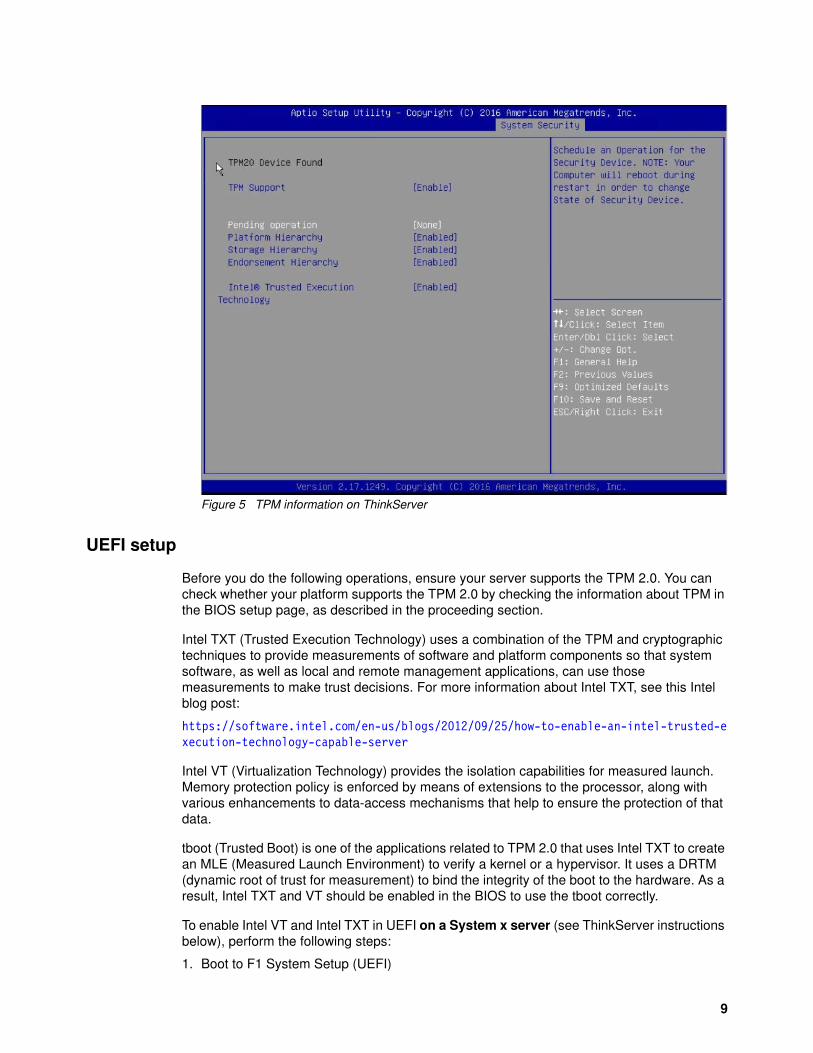
Figure 5 TPM information on ThinkServer
UEFI setup
Before you do the following operations, ensure your server supports the TPM 2.0. You can check whether your platform supports the TPM 2.0 by checking the information about TPM in the BIOS setup page, as described in the proceeding section.
Intel TXT (Trusted Execution Technology) uses a combination of the TPM and cryptographic techniques to provide measurements of software and platform components so that system software, as well as local and remote management applications, can use those measurements to make trust decisions. For more information about Intel TXT, see this Intel blog post:
https://software.intel.com/en-us/blogs/2012/09/25/how-to-enable-an-intel-trusted-execution-technology-capable-server
Intel VT (Virtualization Technology) provides the isolation capabilities for measured launch. Memory protection policy is enforced by means of extensions to the processor, along with various enhancements to data-access mechanisms that help to ensure the protection of that data.
tboot (Trusted Boot) is one of the applications related to TPM 2.0 that uses Intel TXT to create an MLE (Measured Launch Environment) to verify a kernel or a hypervisor. It uses a DRTM (dynamic root of trust for measurement) to bind the integrity of the boot to the hardware. As a result, Intel TXT and VT should be enabled in the BIOS to use the tboot correctly.
To enable Intel VT and Intel TXT in UEFI on a System x server (see ThinkServer instructions below), perform the following steps:
1. Boot to F1 System Setup (UEFI)
9
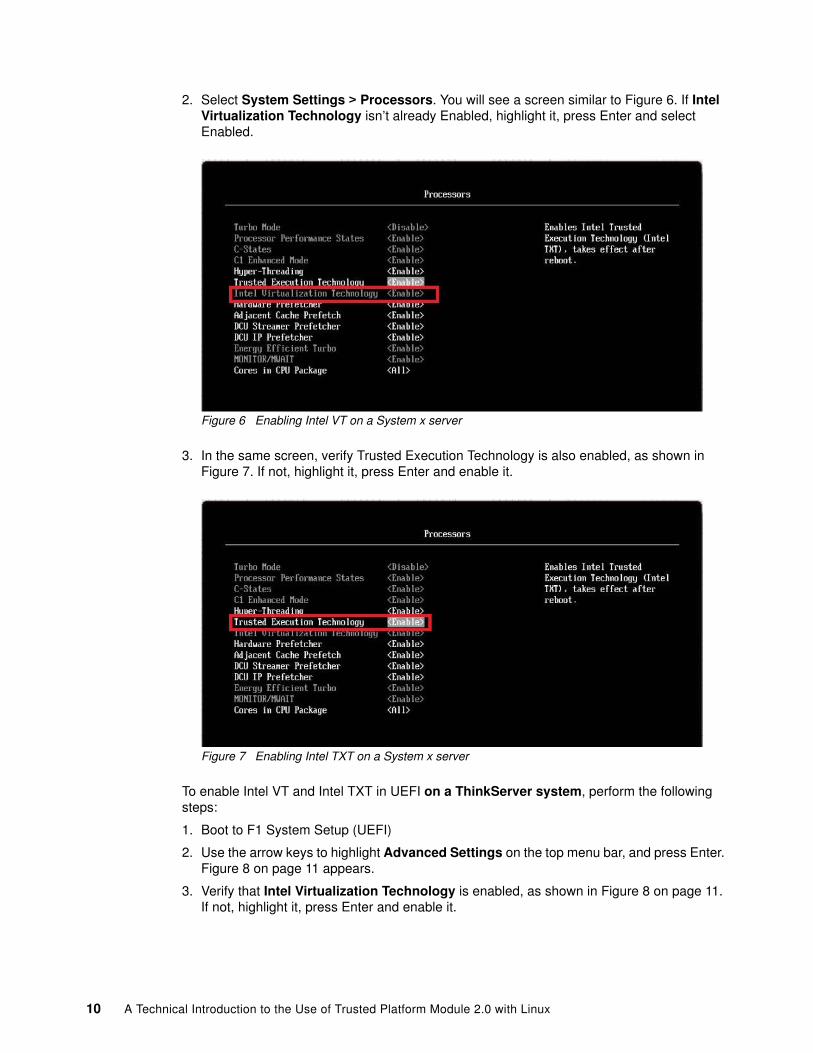
2. Select System Settings > Processors. You will see a screen similar to Figure 6. If Intel Virtualization Technology isn’t already Enabled, highlight it, press Enter and select Enabled.
Figure 6 Enabling Intel VT on a System x server
3. In the same screen, verify Trusted Execution Technology is also enabled, as shown in Figure 7. If not, highlight it, press Enter and enable it.
Figure 7 Enabling Intel TXT on a System x server
To enable Intel VT and Intel TXT in UEFI on a ThinkServer system, perform the following steps:
1. Boot to F1 System Setup (UEFI)
2. Use the arrow keys to highlight Advanced Settings on the top menu bar, and press Enter. Figure 8 on page 11 appears.
3. Verify that Intel Virtualization Technology is enabled, as shown in Figure 8 on page 11. If not, highlight it, press Enter and enable it.
10 A Technical Introduction to the Use of Trusted Platform Module 2.0 with Linux
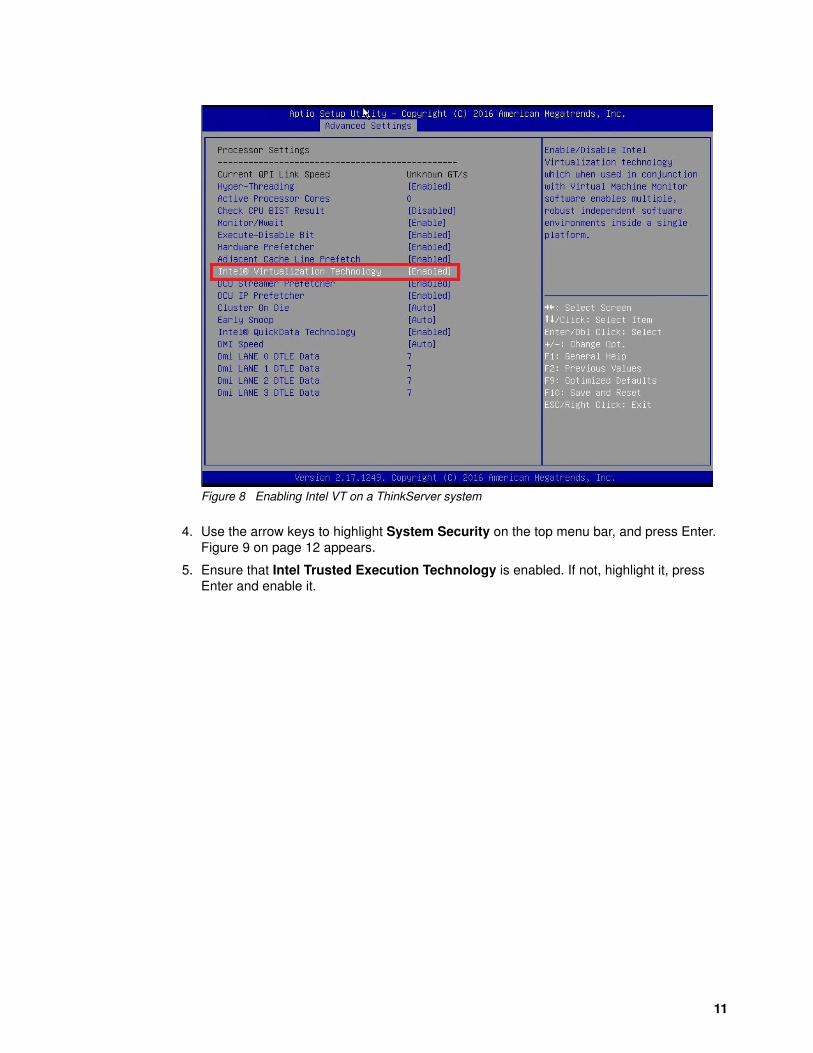
Figure 8 Enabling Intel VT on a ThinkServer system
4. Use the arrow keys to highlight System Security on the top menu bar, and press Enter. Figure 9 on page 12 appears.
5. Ensure that Intel Trusted Execution Technology is enabled. If not, highlight it, press Enter and enable it.
11
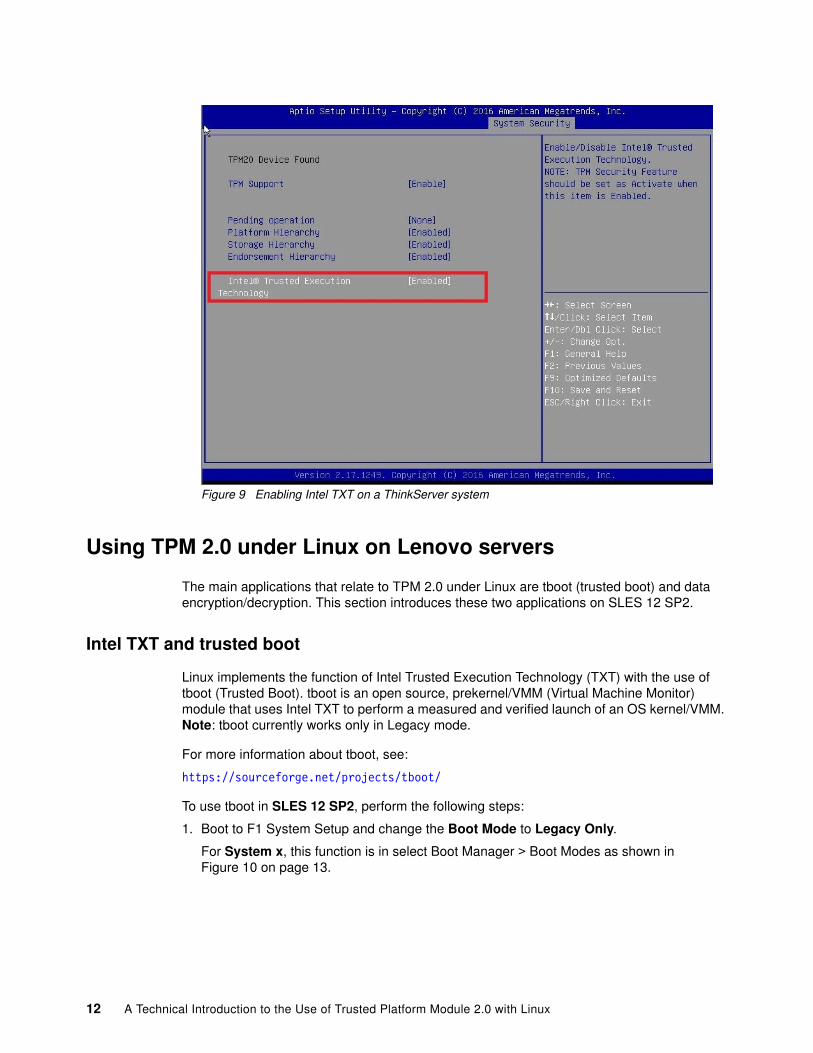
Figure 9 Enabling Intel TXT on a ThinkServer system
Using TPM 2.0 under Linux on Lenovo servers
The main applications that relate to TPM 2.0 under Linux are tboot (trusted boot) and data encryption/decryption. This section introduces these two applications on SLES 12 SP2.
Intel TXT and trusted boot
Linux implements the function of Intel Trusted Execution Technology (TXT) with the use of tboot (Trusted Boot). tboot is an open source, prekernel/VMM (Virtual Machine Monitor) module that uses Intel TXT to perform a measured and verified launch of an OS kernel/VMM. Note: tboot currently works only in Legacy mode.
For more information about tboot, see:
https://sourceforge.net/projects/tboot/
To use tboot in SLES 12 SP2, perform the following steps:
1. Boot to F1 System Setup and change the Boot Mode to Legacy Only.
For System x, this function is in select Boot Manager > Boot Modes as shown in Figure 10 on page 13.
12 A Technical Introduction to the Use of Trusted Platform Module 2.0 with Linux
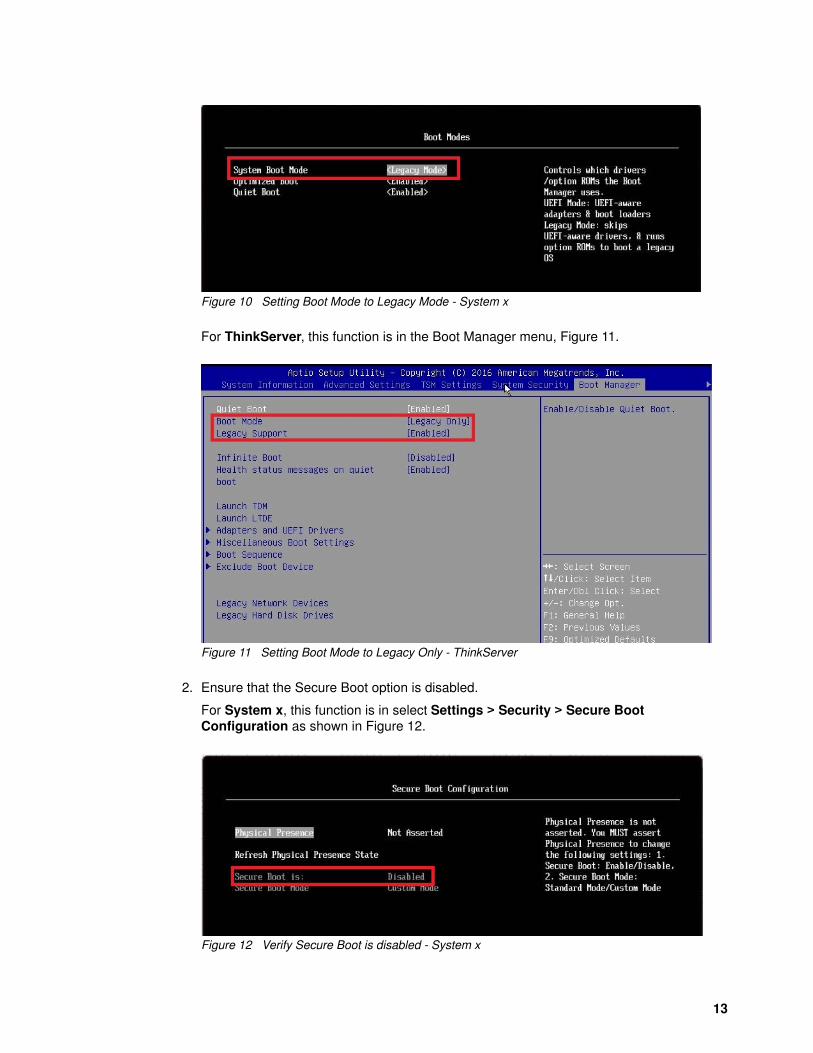
Figure 10 Setting Boot Mode to Legacy Mode - System x
For ThinkServer, this function is in the Boot Manager menu, Figure 11.
Figure 11 Setting Boot Mode to Legacy Only - ThinkServer
2. Ensure that the Secure Boot option is disabled.
For System x, this function is in select Settings > Security > Secure Boot Configuration as shown in Figure 12.
Figure 12 Verify Secure Boot is disabled - System x
13

For ThinkServer, this function is in the System Security menu, Figure 13.
Figure 13 Verify Secure Boot is disabled - ThinkServer
3. Verify that Intel Trusted Executions Technology is enabled. See the instructions in “UEFI setup” on page 9.
4. We choose SLES 12.2 as the demonstrate platform because SLES 12.2 integrates the TPM 2.0 tools in its package. First, install the SLES 12.2 on your Lenovo server.
5. Boot into SLES 12 SP2 and install the tboot package by running the following command:
zypper install tboot
The output of the command is shown in Figure 14.
Figure 14 tboot Packages Installation
6. Build the initial ramdisk of tboot for preloading modules by running command mkinitrd in the terminal. The output is shown in Figure 15 on page 15.
linux-vhcq:~ # zypper in tboot Loading repository data. Reading installed packages. Resolving package dependencies.
The following 3 NEW packages are going to be installed: libtspil tboot trousers
3 new packages to install. Overall download size: 1.3 MiB. Already cached: 0 B. After the operation,additional 2.4 MiB will be used. Continue? [y/n/? shows all options] (y): y Retrieving package trousers-0.3.13-1.39.x86_64 (1/3), 598.2 KiB (878.9 KiB unpacked) Retrieving package libtspi1-0.3.13-1.39.x86_64 (2/3), 145.7 KiB (449.7 KiB unpacked) Retrieving package tboot-20160518_1.9.4-6.2.x86_64 (3/3), 561.6 KiB (1.1 MiB unpacked) Checking for file conflicts: ...........................................[done] (1/3) Installing: trousers-0.3.13-1.39.x86 64 ..........................[done](2/3) Installing: libtspil-0.3.13-1.39. x86-64 .........................[done](3/3) Installing: tboot-20160518_1.9.4-6.2.x86 64 ......................[done]linux-vhcq:~ #
14 A Technical Introduction to the Use of Trusted Platform Module 2.0 with Linux
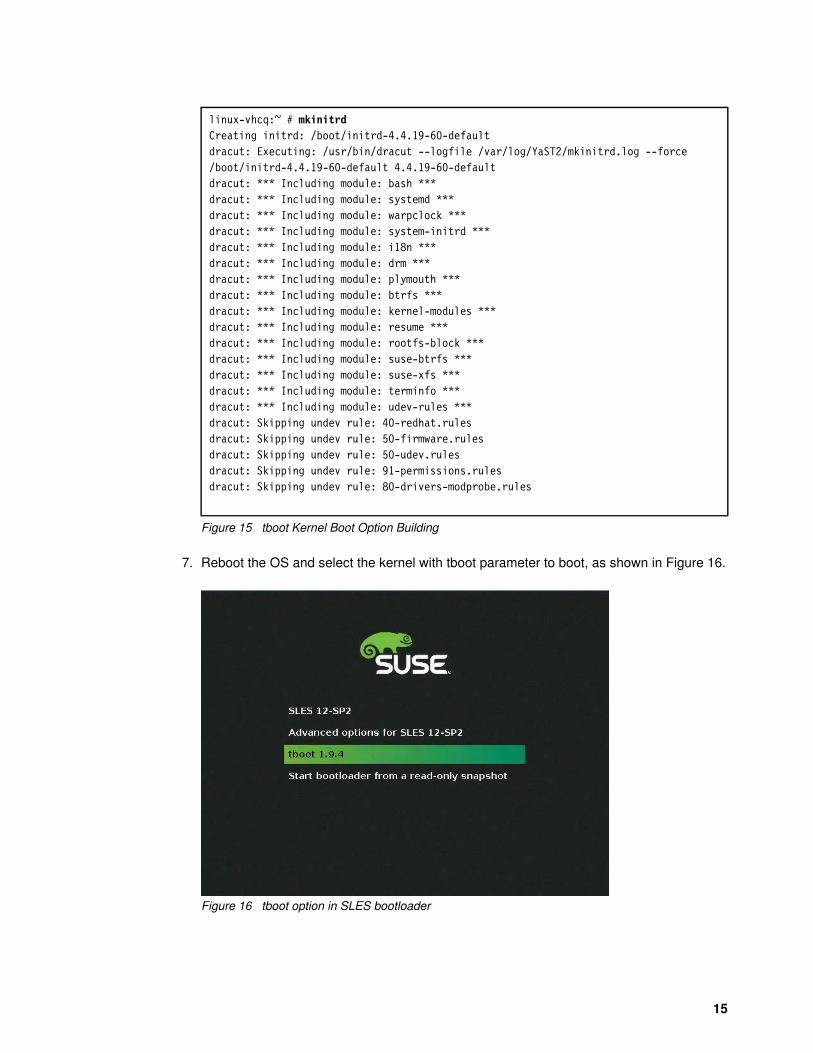
Figure 15 tboot Kernel Boot Option Building
7. Reboot the OS and select the kernel with tboot parameter to boot, as shown in Figure 16.
Figure 16 tboot option in SLES bootloader
linux-vhcq:~ # mkinitrd Creating initrd: /boot/initrd-4.4.19-60-default dracut: Executing: /usr/bin/dracut --logfile /var/log/YaST2/mkinitrd.log --force/boot/initrd-4.4.19-60-default 4.4.19-60-default dracut: *** Including module: bash ***dracut: *** Including module: systemd ***dracut: *** Including module: warpclock ***dracut: *** Including module: system-initrd ***dracut: *** Including module: i18n ***dracut: *** Including module: drm ***dracut: *** Including module: plymouth ***dracut: *** Including module: btrfs ***dracut: *** Including module: kernel-modules ***dracut: *** Including module: resume ***dracut: *** Including module: rootfs-block ***dracut: *** Including module: suse-btrfs ***dracut: *** Including module: suse-xfs ***dracut: *** Including module: terminfo ***dracut: *** Including module: udev-rules ***dracut: Skipping undev rule: 40-redhat.rules dracut: Skipping undev rule: 50-firmware.rules dracut: Skipping undev rule: 50-udev.rulesdracut: Skipping undev rule: 91-permissions.rulesdracut: Skipping undev rule: 80-drivers-modprobe.rules
15
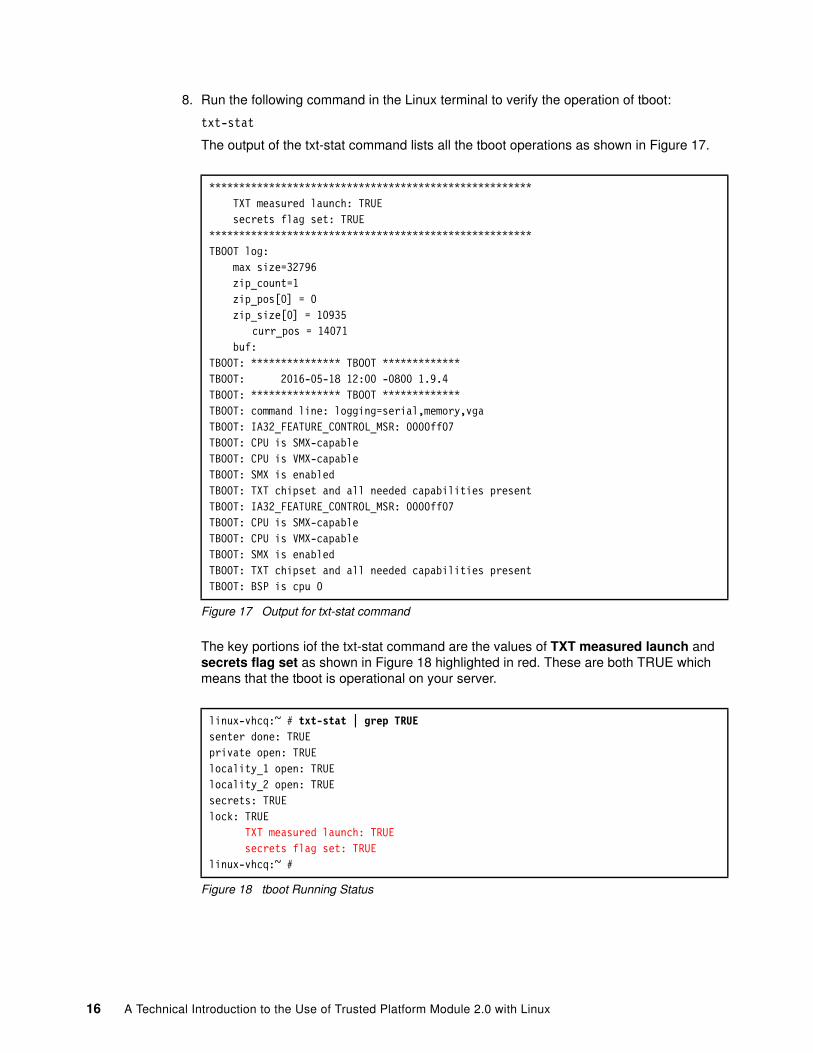
8. Run the following command in the Linux terminal to verify the operation of tboot:
txt-stat
The output of the txt-stat command lists all the tboot operations as shown in Figure 17.
Figure 17 Output for txt-stat command
The key portions iof the txt-stat command are the values of TXT measured launch and secrets flag set as shown in Figure 18 highlighted in red. These are both TRUE which means that the tboot is operational on your server.
Figure 18 tboot Running Status
****************************************************** TXT measured launch: TRUE secrets flag set: TRUE ******************************************************TBOOT log: max size=32796 zip_count=1 zip_pos[0] = 0 zip_size[0] = 10935
curr_pos = 14071 buf: TBOOT: *************** TBOOT *************TBOOT: 2016-05-18 12:00 -0800 1.9.4TBOOT: *************** TBOOT *************TBOOT: command line: logging=serial,memory,vga TBOOT: IA32_FEATURE_CONTROL_MSR: 0000ff07 TBOOT: CPU is SMX-capable TBOOT: CPU is VMX-capable TBOOT: SMX is enabled TBOOT: TXT chipset and all needed capabilities present TBOOT: IA32_FEATURE_CONTROL_MSR: 0000ff07 TBOOT: CPU is SMX-capable TBOOT: CPU is VMX-capable TBOOT: SMX is enabled TBOOT: TXT chipset and all needed capabilities present TBOOT: BSP is cpu 0
linux-vhcq:~ # txt-stat | grep TRUE senter done: TRUE private open: TRUE locality_1 open: TRUE locality_2 open: TRUE secrets: TRUE lock: TRUE TXT measured launch: TRUE secrets flag set: TRUE linux-vhcq:~ #
16 A Technical Introduction to the Use of Trusted Platform Module 2.0 with Linux
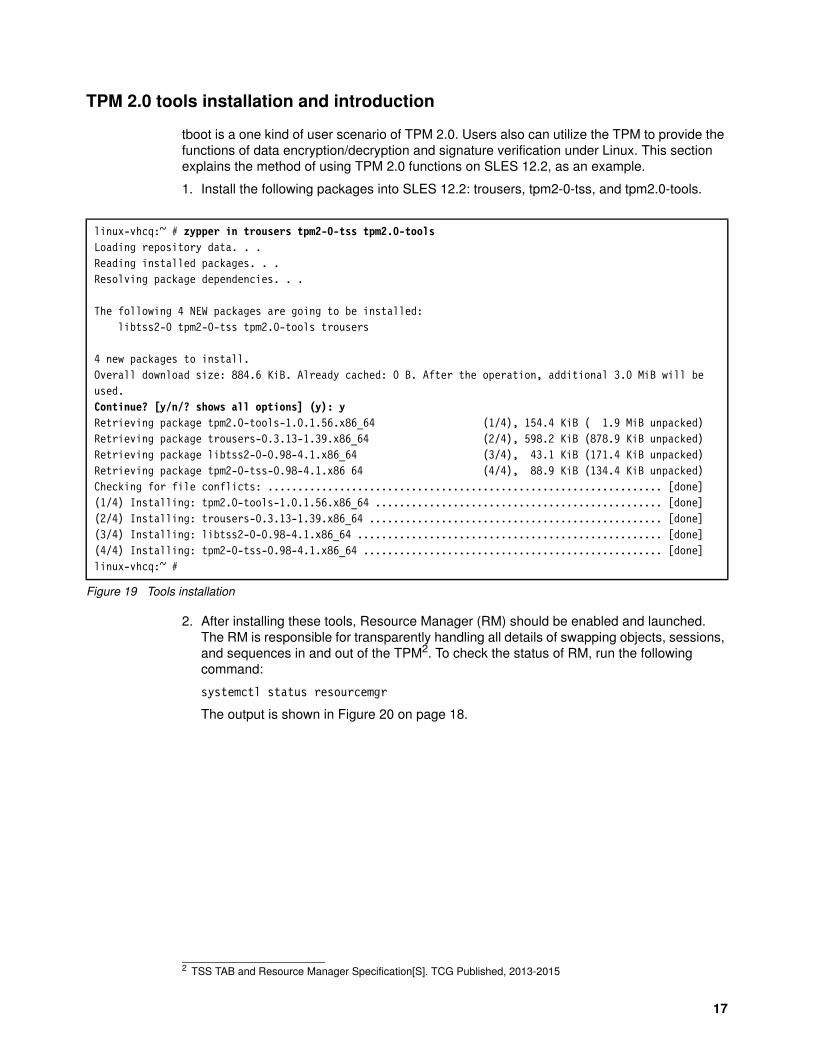
TPM 2.0 tools installation and introduction
tboot is a one kind of user scenario of TPM 2.0. Users also can utilize the TPM to provide the functions of data encryption/decryption and signature verification under Linux. This section explains the method of using TPM 2.0 functions on SLES 12.2, as an example.
1. Install the following packages into SLES 12.2: trousers, tpm2-0-tss, and tpm2.0-tools.
Figure 19 Tools installation
2. After installing these tools, Resource Manager (RM) should be enabled and launched. The RM is responsible for transparently handling all details of swapping objects, sessions, and sequences in and out of the TPM2. To check the status of RM, run the following command:
systemctl status resourcemgr
The output is shown in Figure 20 on page 18.
linux-vhcq:~ # zypper in trousers tpm2-0-tss tpm2.0-tools Loading repository data. . . Reading installed packages. . . Resolving package dependencies. . .
The following 4 NEW packages are going to be installed: libtss2-0 tpm2-0-tss tpm2.0-tools trousers
4 new packages to install. Overall download size: 884.6 KiB. Already cached: 0 B. After the operation, additional 3.0 MiB will be used.Continue? [y/n/? shows all options] (y): yRetrieving package tpm2.0-tools-1.0.1.56.x86_64 (1/4), 154.4 KiB ( 1.9 MiB unpacked)Retrieving package trousers-0.3.13-1.39.x86_64 (2/4), 598.2 KiB (878.9 KiB unpacked) Retrieving package libtss2-0-0.98-4.1.x86_64 (3/4), 43.1 KiB (171.4 KiB unpacked) Retrieving package tpm2-0-tss-0.98-4.1.x86 64 (4/4), 88.9 KiB (134.4 KiB unpacked)Checking for file conflicts: .................................................................. [done](1/4) Installing: tpm2.0-tools-1.0.1.56.x86_64 ................................................ [done](2/4) Installing: trousers-0.3.13-1.39.x86_64 ................................................. [done](3/4) Installing: libtss2-0-0.98-4.1.x86_64 ................................................... [done](4/4) Installing: tpm2-0-tss-0.98-4.1.x86_64 .................................................. [done]linux-vhcq:~ #
2 TSS TAB and Resource Manager Specification[S]. TCG Published, 2013-2015
17
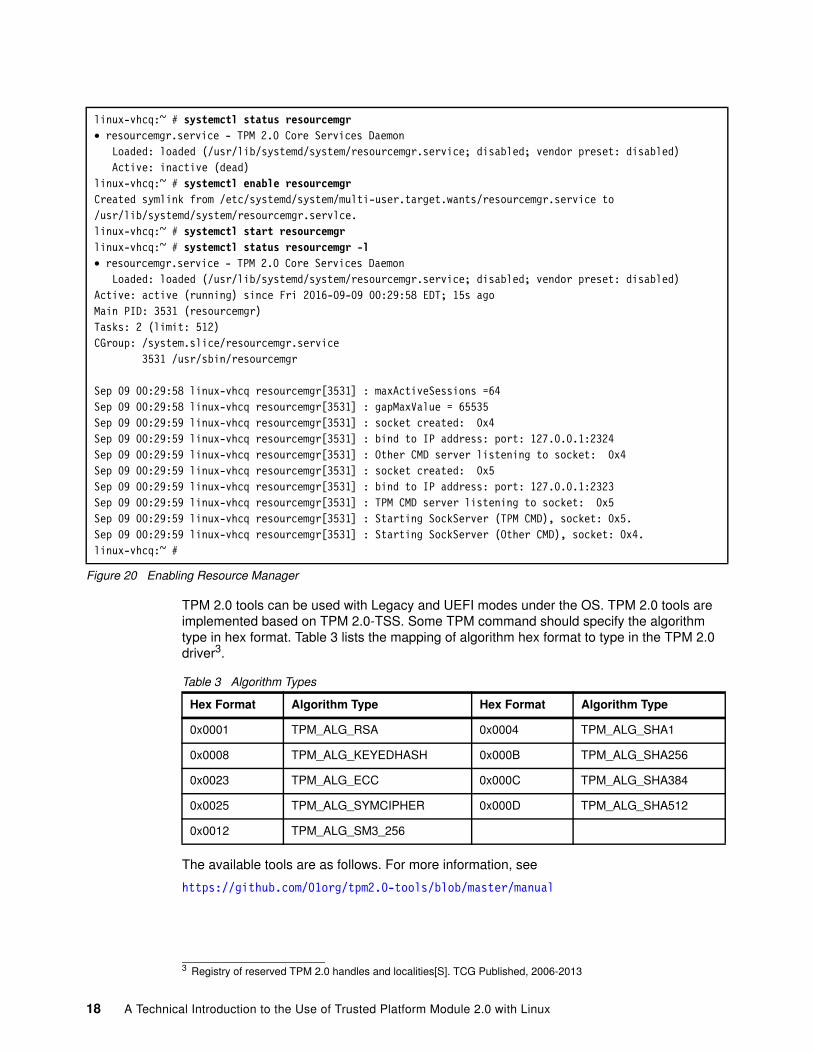
Figure 20 Enabling Resource Manager
TPM 2.0 tools can be used with Legacy and UEFI modes under the OS. TPM 2.0 tools are implemented based on TPM 2.0-TSS. Some TPM command should specify the algorithm type in hex format. Table 3 lists the mapping of algorithm hex format to type in the TPM 2.0 driver3.
Table 3 Algorithm Types
The available tools are as follows. For more information, see
https://github.com/01org/tpm2.0-tools/blob/master/manual
linux-vhcq:~ # systemctl status resourcemgr • resourcemgr.service - TPM 2.0 Core Services Daemon Loaded: loaded (/usr/lib/systemd/system/resourcemgr.service; disabled; vendor preset: disabled) Active: inactive (dead) linux-vhcq:~ # systemctl enable resourcemgr Created symlink from /etc/systemd/system/multi-user.target.wants/resourcemgr.service to /usr/lib/systemd/system/resourcemgr.servlce. linux-vhcq:~ # systemctl start resourcemgr linux-vhcq:~ # systemctl status resourcemgr -l• resourcemgr.service - TPM 2.0 Core Services Daemon Loaded: loaded (/usr/lib/systemd/system/resourcemgr.service; disabled; vendor preset: disabled) Active: active (running) since Fri 2016-09-09 00:29:58 EDT; 15s agoMain PID: 3531 (resourcemgr)Tasks: 2 (limit: 512)CGroup: /system.slice/resourcemgr.service 3531 /usr/sbin/resourcemgr
Sep 09 00:29:58 linux-vhcq resourcemgr[3531] : maxActiveSessions =64 Sep 09 00:29:58 linux-vhcq resourcemgr[3531] : gapMaxValue = 65535Sep 09 00:29:59 linux-vhcq resourcemgr[3531] : socket created: 0x4Sep 09 00:29:59 linux-vhcq resourcemgr[3531] : bind to IP address: port: 127.0.0.1:2324Sep 09 00:29:59 linux-vhcq resourcemgr[3531] : Other CMD server listening to socket: 0x4Sep 09 00:29:59 linux-vhcq resourcemgr[3531] : socket created: 0x5Sep 09 00:29:59 linux-vhcq resourcemgr[3531] : bind to IP address: port: 127.0.0.1:2323Sep 09 00:29:59 linux-vhcq resourcemgr[3531] : TPM CMD server listening to socket: 0x5Sep 09 00:29:59 linux-vhcq resourcemgr[3531] : Starting SockServer (TPM CMD), socket: 0x5.Sep 09 00:29:59 linux-vhcq resourcemgr[3531] : Starting SockServer (Other CMD), socket: 0x4.linux-vhcq:~ #
3 Registry of reserved TPM 2.0 handles and localities[S]. TCG Published, 2006-2013
Hex Format Algorithm Type Hex Format Algorithm Type
0x0001 TPM_ALG_RSA 0x0004 TPM_ALG_SHA1
0x0008 TPM_ALG_KEYEDHASH 0x000B TPM_ALG_SHA256
0x0023 TPM_ALG_ECC 0x000C TPM_ALG_SHA384
0x0025 TPM_ALG_SYMCIPHER 0x000D TPM_ALG_SHA512
0x0012 TPM_ALG_SM3_256
18 A Technical Introduction to the Use of Trusted Platform Module 2.0 with Linux
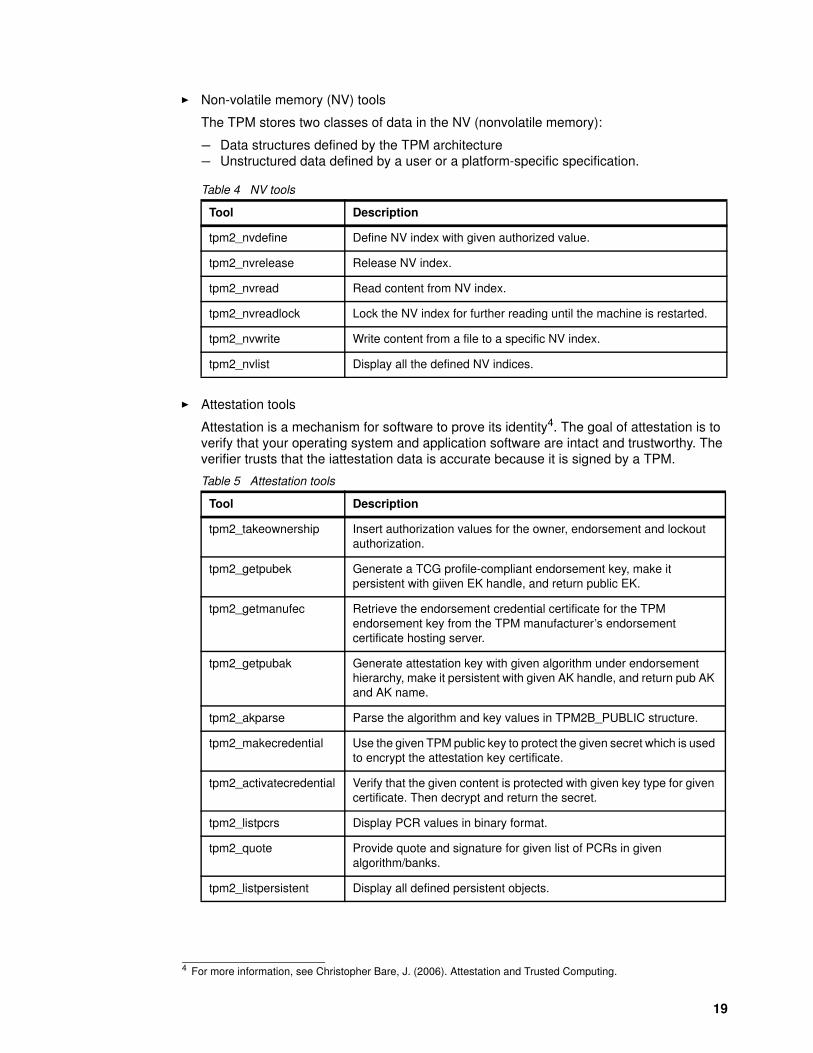
� Non-volatile memory (NV) tools
The TPM stores two classes of data in the NV (nonvolatile memory):
– Data structures defined by the TPM architecture– Unstructured data defined by a user or a platform-specific specification.
Table 4 NV tools
� Attestation tools
Attestation is a mechanism for software to prove its identity4. The goal of attestation is to verify that your operating system and application software are intact and trustworthy. The verifier trusts that the iattestation data is accurate because it is signed by a TPM.
Table 5 Attestation tools
Tool Description
tpm2_nvdefine Define NV index with given authorized value.
tpm2_nvrelease Release NV index.
tpm2_nvread Read content from NV index.
tpm2_nvreadlock Lock the NV index for further reading until the machine is restarted.
tpm2_nvwrite Write content from a file to a specific NV index.
tpm2_nvlist Display all the defined NV indices.
4 For more information, see Christopher Bare, J. (2006). Attestation and Trusted Computing.
Tool Description
tpm2_takeownership Insert authorization values for the owner, endorsement and lockout authorization.
tpm2_getpubek Generate a TCG profile-compliant endorsement key, make it persistent with giiven EK handle, and return public EK.
tpm2_getmanufec Retrieve the endorsement credential certificate for the TPM endorsement key from the TPM manufacturer’s endorsement certificate hosting server.
tpm2_getpubak Generate attestation key with given algorithm under endorsement hierarchy, make it persistent with given AK handle, and return pub AK and AK name.
tpm2_akparse Parse the algorithm and key values in TPM2B_PUBLIC structure.
tpm2_makecredential Use the given TPM public key to protect the given secret which is used to encrypt the attestation key certificate.
tpm2_activatecredential Verify that the given content is protected with given key type for given certificate. Then decrypt and return the secret.
tpm2_listpcrs Display PCR values in binary format.
tpm2_quote Provide quote and signature for given list of PCRs in given algorithm/banks.
tpm2_listpersistent Display all defined persistent objects.
19
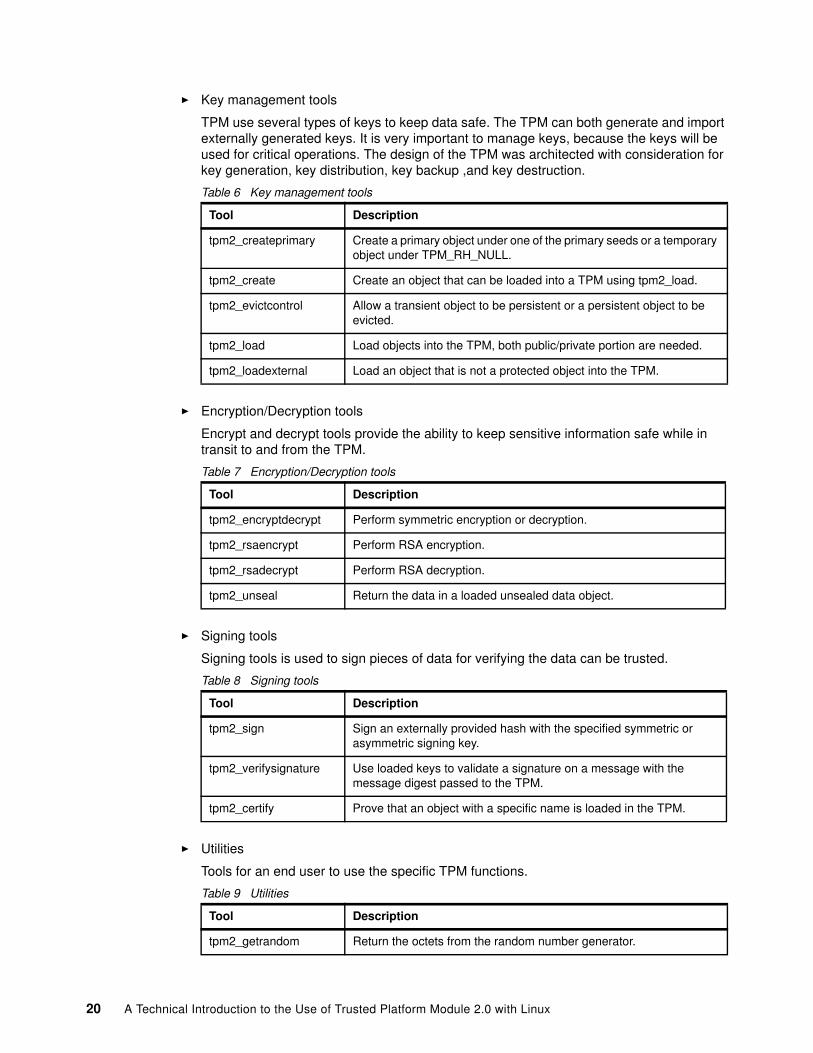
� Key management tools
TPM use several types of keys to keep data safe. The TPM can both generate and import externally generated keys. It is very important to manage keys, because the keys will be used for critical operations. The design of the TPM was architected with consideration for key generation, key distribution, key backup ,and key destruction.
Table 6 Key management tools
� Encryption/Decryption tools
Encrypt and decrypt tools provide the ability to keep sensitive information safe while in transit to and from the TPM.
Table 7 Encryption/Decryption tools
� Signing tools
Signing tools is used to sign pieces of data for verifying the data can be trusted.
Table 8 Signing tools
� Utilities
Tools for an end user to use the specific TPM functions.
Table 9 Utilities
Tool Description
tpm2_createprimary Create a primary object under one of the primary seeds or a temporary object under TPM_RH_NULL.
tpm2_create Create an object that can be loaded into a TPM using tpm2_load.
tpm2_evictcontrol Allow a transient object to be persistent or a persistent object to be evicted.
tpm2_load Load objects into the TPM, both public/private portion are needed.
tpm2_loadexternal Load an object that is not a protected object into the TPM.
Tool Description
tpm2_encryptdecrypt Perform symmetric encryption or decryption.
tpm2_rsaencrypt Perform RSA encryption.
tpm2_rsadecrypt Perform RSA decryption.
tpm2_unseal Return the data in a loaded unsealed data object.
Tool Description
tpm2_sign Sign an externally provided hash with the specified symmetric or asymmetric signing key.
tpm2_verifysignature Use loaded keys to validate a signature on a message with the message digest passed to the TPM.
tpm2_certify Prove that an object with a specific name is loaded in the TPM.
Tool Description
tpm2_getrandom Return the octets from the random number generator.
20 A Technical Introduction to the Use of Trusted Platform Module 2.0 with Linux
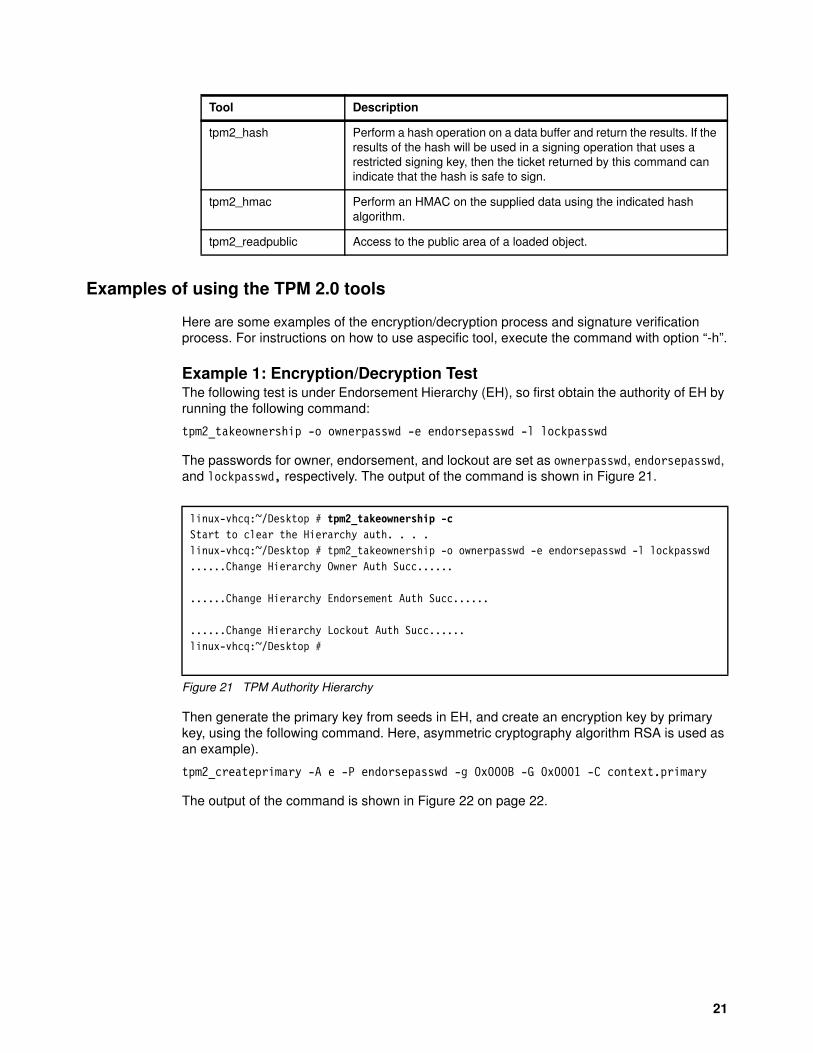
Examples of using the TPM 2.0 tools
Here are some examples of the encryption/decryption process and signature verification process. For instructions on how to use aspecific tool, execute the command with option “-h”.
Example 1: Encryption/Decryption TestThe following test is under Endorsement Hierarchy (EH), so first obtain the authority of EH by running the following command:
tpm2_takeownership -o ownerpasswd -e endorsepasswd -l lockpasswd
The passwords for owner, endorsement, and lockout are set as ownerpasswd, endorsepasswd, and lockpasswd, respectively. The output of the command is shown in Figure 21.
Figure 21 TPM Authority Hierarchy
Then generate the primary key from seeds in EH, and create an encryption key by primary key, using the following command. Here, asymmetric cryptography algorithm RSA is used as an example).
tpm2_createprimary -A e -P endorsepasswd -g 0x000B -G 0x0001 -C context.primary
The output of the command is shown in Figure 22 on page 22.
tpm2_hash Perform a hash operation on a data buffer and return the results. If the results of the hash will be used in a signing operation that uses a restricted signing key, then the ticket returned by this command can indicate that the hash is safe to sign.
tpm2_hmac Perform an HMAC on the supplied data using the indicated hash algorithm.
tpm2_readpublic Access to the public area of a loaded object.
Tool Description
linux-vhcq:~/Desktop # tpm2_takeownership -cStart to clear the Hierarchy auth. . . .linux-vhcq:~/Desktop # tpm2_takeownership -o ownerpasswd -e endorsepasswd -l lockpasswd......Change Hierarchy Owner Auth Succ......
......Change Hierarchy Endorsement Auth Succ......
......Change Hierarchy Lockout Auth Succ......linux-vhcq:~/Desktop #
21
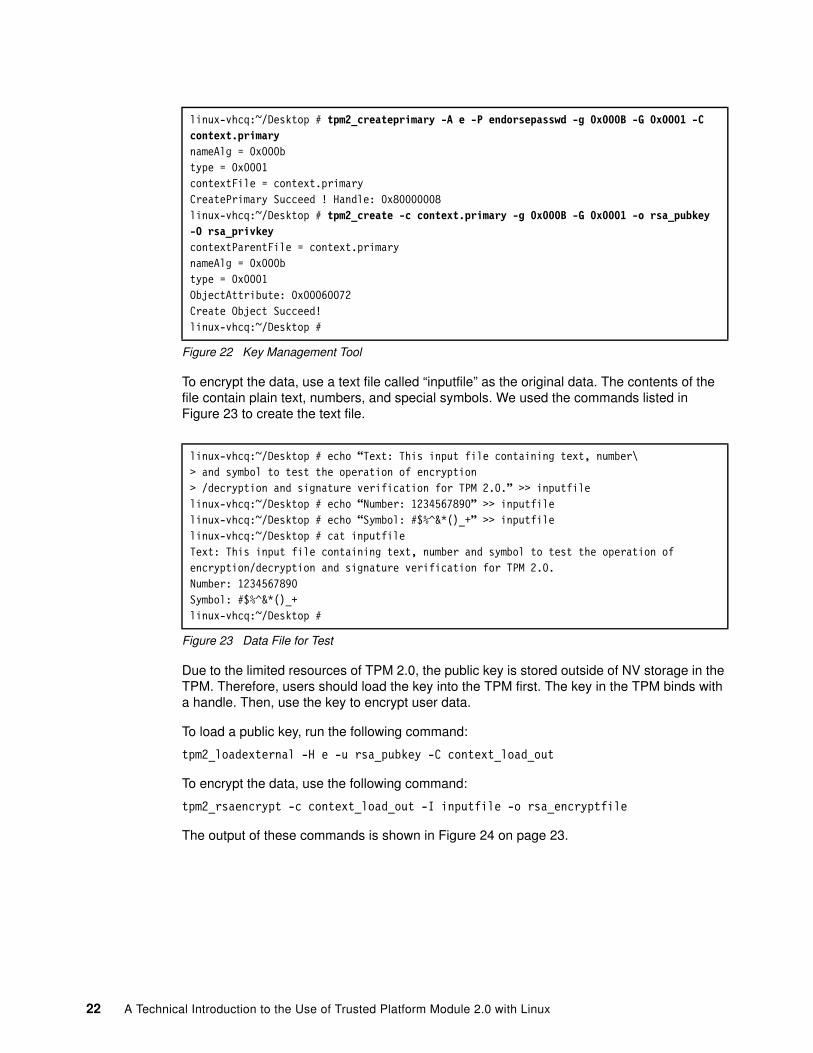
Figure 22 Key Management Tool
To encrypt the data, use a text file called “inputfile” as the original data. The contents of the file contain plain text, numbers, and special symbols. We used the commands listed in Figure 23 to create the text file.
Figure 23 Data File for Test
Due to the limited resources of TPM 2.0, the public key is stored outside of NV storage in the TPM. Therefore, users should load the key into the TPM first. The key in the TPM binds with a handle. Then, use the key to encrypt user data.
To load a public key, run the following command:
tpm2_loadexternal -H e -u rsa_pubkey -C context_load_out
To encrypt the data, use the following command:
tpm2_rsaencrypt -c context_load_out -I inputfile -o rsa_encryptfile
The output of these commands is shown in Figure 24 on page 23.
linux-vhcq:~/Desktop # tpm2_createprimary -A e -P endorsepasswd -g 0x000B -G 0x0001 -C context.primarynameAlg = 0x000btype = 0x0001contextFile = context.primaryCreatePrimary Succeed ! Handle: 0x80000008linux-vhcq:~/Desktop # tpm2_create -c context.primary -g 0x000B -G 0x0001 -o rsa_pubkey -O rsa_privkeycontextParentFile = context.primarynameAlg = 0x000btype = 0x0001ObjectAttribute: 0x00060072Create Object Succeed!linux-vhcq:~/Desktop #
linux-vhcq:~/Desktop # echo “Text: This input file containing text, number\> and symbol to test the operation of encryption> /decryption and signature verification for TPM 2.0.” >> inputfilelinux-vhcq:~/Desktop # echo “Number: 1234567890” >> inputfilelinux-vhcq:~/Desktop # echo “Symbol: #$%^&*()_+” >> inputfilelinux-vhcq:~/Desktop # cat inputfileText: This input file containing text, number and symbol to test the operation of encryption/decryption and signature verification for TPM 2.0.Number: 1234567890Symbol: #$%^&*()_+linux-vhcq:~/Desktop #
22 A Technical Introduction to the Use of Trusted Platform Module 2.0 with Linux
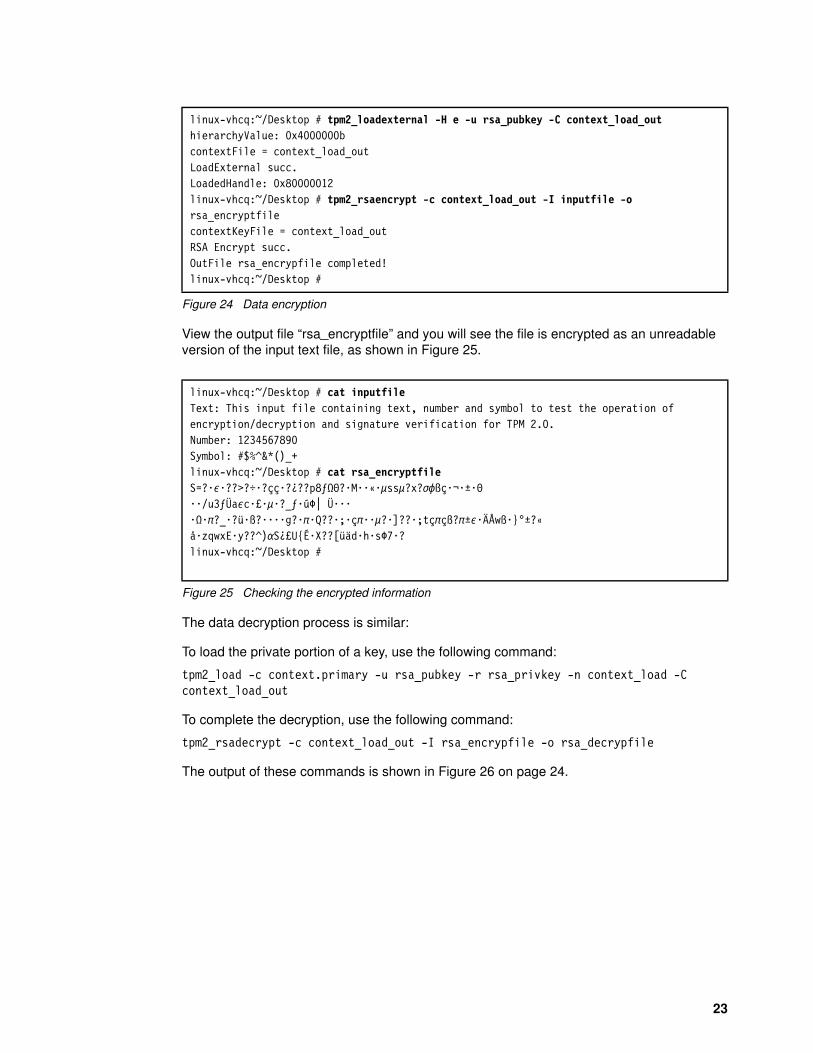
Figure 24 Data encryption
View the output file “rsa_encryptfile” and you will see the file is encrypted as an unreadable version of the input text file, as shown in Figure 25.
Figure 25 Checking the encrypted information
The data decryption process is similar:
To load the private portion of a key, use the following command:
tpm2_load -c context.primary -u rsa_pubkey -r rsa_privkey -n context_load -C context_load_out
To complete the decryption, use the following command:
tpm2_rsadecrypt -c context_load_out -I rsa_encrypfile -o rsa_decrypfile
The output of these commands is shown in Figure 26 on page 24.
linux-vhcq:~/Desktop # tpm2_loadexternal -H e -u rsa_pubkey -C context_load_outhierarchyValue: 0x4000000bcontextFile = context_load_outLoadExternal succ.LoadedHandle: 0x80000012linux-vhcq:~/Desktop # tpm2_rsaencrypt -c context_load_out -I inputfile -o rsa_encryptfilecontextKeyFile = context_load_outRSA Encrypt succ.OutFile rsa_encrypfile completed!linux-vhcq:~/Desktop #
linux-vhcq:~/Desktop # cat inputfileText: This input file containing text, number and symbol to test the operation of encryption/decryption and signature verification for TPM 2.0.Number: 1234567890Symbol: #$%^&*()_+linux-vhcq:~/Desktop # cat rsa_encryptfileS=?•ε•??>?÷•?çç•?¿??p8ƒΩΘ?•M••«•μssμ?x?σφß畬•±•Θ••/u3ƒÜaεc•£•μ•?_ƒ•úΦ| Ü••• •Ω•π?_•?ü•ß?••••g?•π•Q??•;•çπ••μ?•]??•;tçπçß?π±ε•ÄÅwß•}°±?« å•zqwxE•y??^)αS¿£U{É•X??[üäd•h•sΦ7•?linux-vhcq:~/Desktop #
23
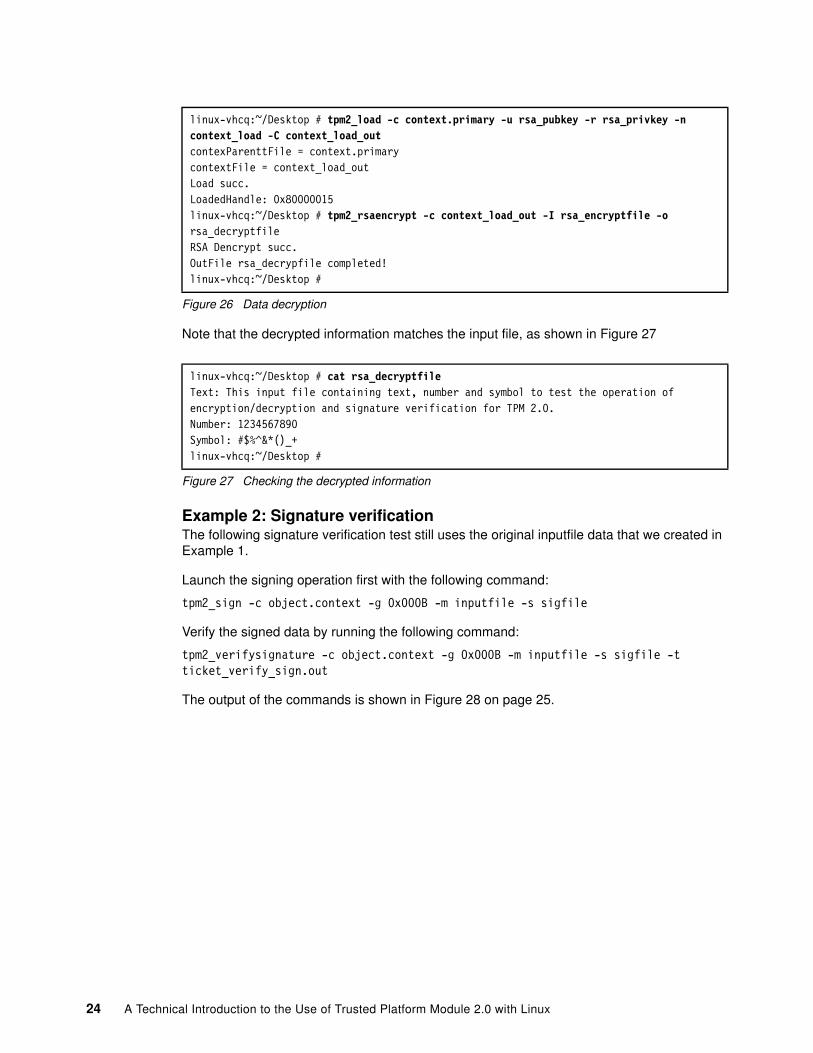
Figure 26 Data decryption
Note that the decrypted information matches the input file, as shown in Figure 27
Figure 27 Checking the decrypted information
Example 2: Signature verificationThe following signature verification test still uses the original inputfile data that we created in Example 1.
Launch the signing operation first with the following command:
tpm2_sign -c object.context -g 0x000B -m inputfile -s sigfile
Verify the signed data by running the following command:
tpm2_verifysignature -c object.context -g 0x000B -m inputfile -s sigfile -t ticket_verify_sign.out
The output of the commands is shown in Figure 28 on page 25.
linux-vhcq:~/Desktop # tpm2_load -c context.primary -u rsa_pubkey -r rsa_privkey -n context_load -C context_load_outcontexParenttFile = context.primarycontextFile = context_load_outLoad succ.LoadedHandle: 0x80000015linux-vhcq:~/Desktop # tpm2_rsaencrypt -c context_load_out -I rsa_encryptfile -o rsa_decryptfileRSA Dencrypt succ.OutFile rsa_decrypfile completed!linux-vhcq:~/Desktop #
linux-vhcq:~/Desktop # cat rsa_decryptfileText: This input file containing text, number and symbol to test the operation of encryption/decryption and signature verification for TPM 2.0.Number: 1234567890Symbol: #$%^&*()_+linux-vhcq:~/Desktop #
24 A Technical Introduction to the Use of Trusted Platform Module 2.0 with Linux
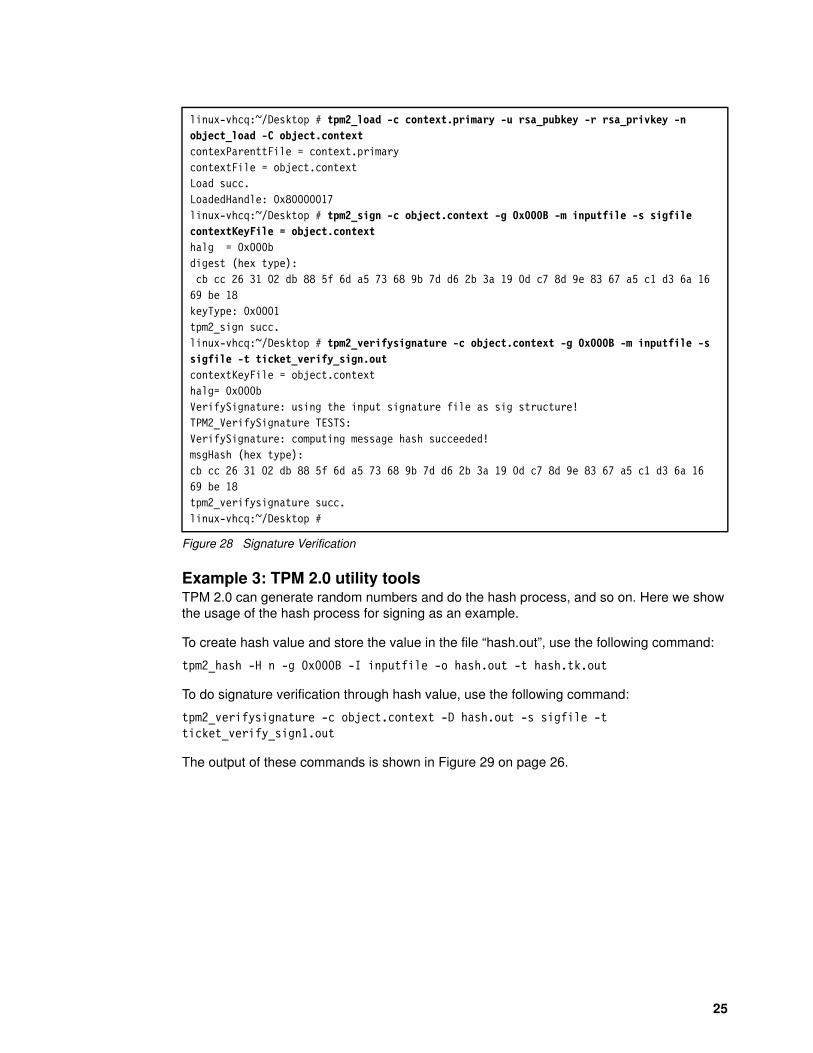
Figure 28 Signature Verification
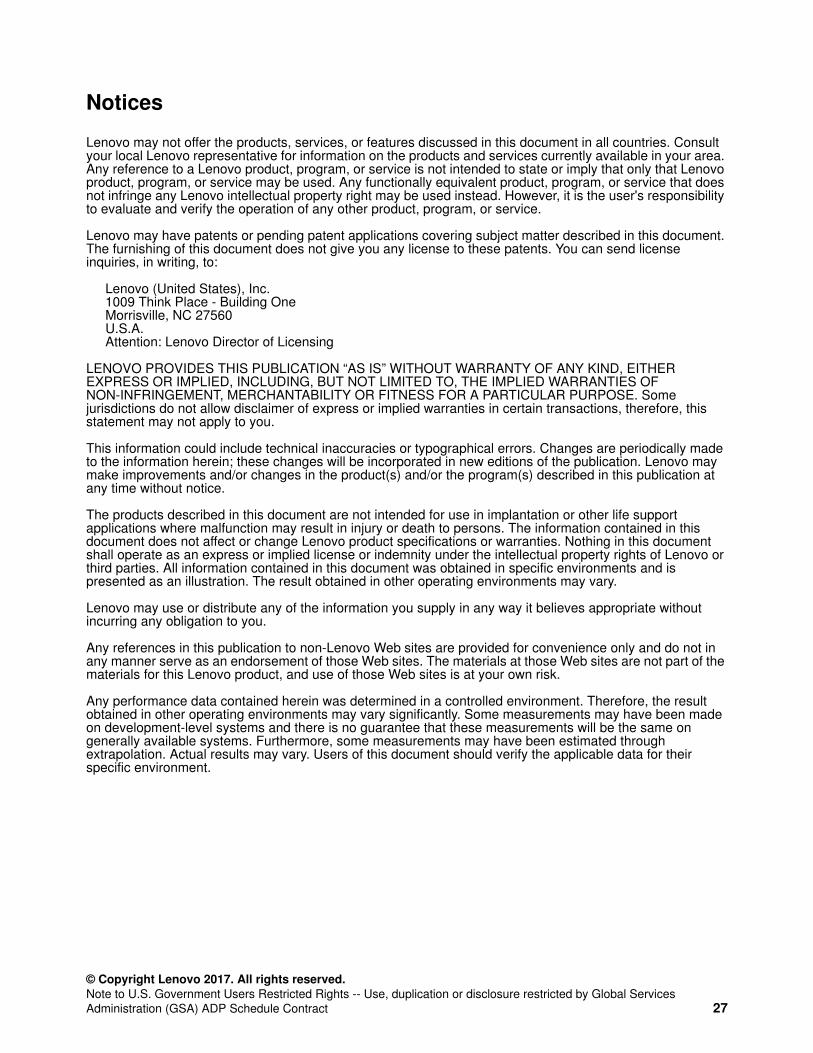
Example 3: TPM 2.0 utility toolsTPM 2.0 can generate random numbers and do the hash process, and so on. Here we show the usage of the hash process for signing as an example.
To create hash value and store the value in the file “hash.out”, use the following command:
tpm2_hash -H n -g 0x000B -I inputfile -o hash.out -t hash.tk.out
To do signature verification through hash value, use the following command:
tpm2_verifysignature -c object.context -D hash.out -s sigfile -t ticket_verify_sign1.out
The output of these commands is shown in Figure 29 on page 26.
linux-vhcq:~/Desktop # tpm2_load -c context.primary -u rsa_pubkey -r rsa_privkey -n object_load -C object.contextcontexParenttFile = context.primarycontextFile = object.contextLoad succ.LoadedHandle: 0x80000017linux-vhcq:~/Desktop # tpm2_sign -c object.context -g 0x000B -m inputfile -s sigfilecontextKeyFile = object.contexthalg = 0x000bdigest (hex type): cb cc 26 31 02 db 88 5f 6d a5 73 68 9b 7d d6 2b 3a 19 0d c7 8d 9e 83 67 a5 c1 d3 6a 16 69 be 18keyType: 0x0001tpm2_sign succ.linux-vhcq:~/Desktop # tpm2_verifysignature -c object.context -g 0x000B -m inputfile -s sigfile -t ticket_verify_sign.outcontextKeyFile = object.contexthalg= 0x000bVerifySignature: using the input signature file as sig structure!TPM2_VerifySignature TESTS:VerifySignature: computing message hash succeeded!msgHash (hex type):cb cc 26 31 02 db 88 5f 6d a5 73 68 9b 7d d6 2b 3a 19 0d c7 8d 9e 83 67 a5 c1 d3 6a 16 69 be 18tpm2_verifysignature succ.linux-vhcq:~/Desktop #
25
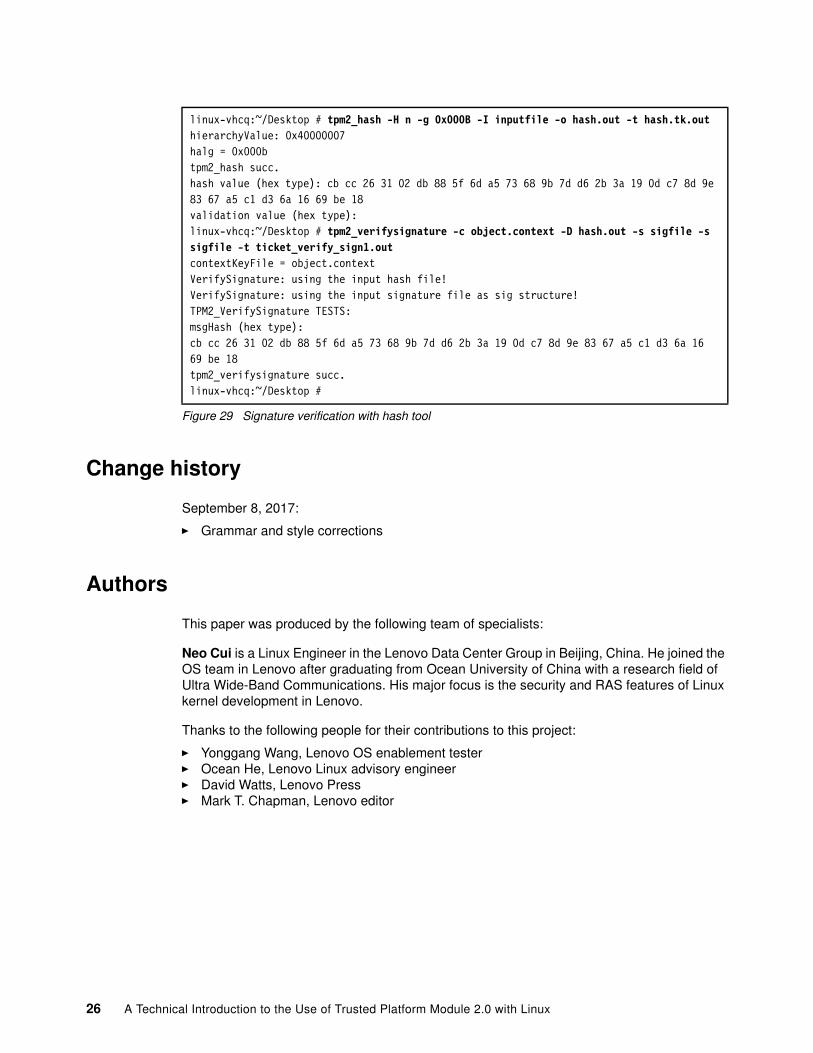
Figure 29 Signature verification with hash tool
Change history
September 8, 2017:
� Grammar and style corrections
Authors
This paper was produced by the following team of specialists:
Neo Cui is a Linux Engineer in the Lenovo Data Center Group in Beijing, China. He joined the OS team in Lenovo after graduating from Ocean University of China with a research field of Ultra Wide-Band Communications. His major focus is the security and RAS features of Linux kernel development in Lenovo.
Thanks to the following people for their contributions to this project:
� Yonggang Wang, Lenovo OS enablement tester� Ocean He, Lenovo Linux advisory engineer� David Watts, Lenovo Press� Mark T. Chapman, Lenovo editor
linux-vhcq:~/Desktop # tpm2_hash -H n -g 0x000B -I inputfile -o hash.out -t hash.tk.outhierarchyValue: 0x40000007halg = 0x000btpm2_hash succ.hash value (hex type): cb cc 26 31 02 db 88 5f 6d a5 73 68 9b 7d d6 2b 3a 19 0d c7 8d 9e 83 67 a5 c1 d3 6a 16 69 be 18validation value (hex type):linux-vhcq:~/Desktop # tpm2_verifysignature -c object.context -D hash.out -s sigfile -s sigfile -t ticket_verify_sign1.outcontextKeyFile = object.contextVerifySignature: using the input hash file!VerifySignature: using the input signature file as sig structure!TPM2_VerifySignature TESTS:msgHash (hex type):cb cc 26 31 02 db 88 5f 6d a5 73 68 9b 7d d6 2b 3a 19 0d c7 8d 9e 83 67 a5 c1 d3 6a 16 69 be 18tpm2_verifysignature succ.linux-vhcq:~/Desktop #
26 A Technical Introduction to the Use of Trusted Platform Module 2.0 with Linux
Notices
Lenovo may not offer the products, services, or features discussed in this document in all countries. Consult your local Lenovo representative for information on the products and services currently available in your area. Any reference to a Lenovo product, program, or service is not intended to state or imply that only that Lenovo product, program, or service may be used. Any functionally equivalent product, program, or service that does not infringe any Lenovo intellectual property right may be used instead. However, it is the user's responsibility to evaluate and verify the operation of any other product, program, or service.
Lenovo may have patents or pending patent applications covering subject matter described in this document. The furnishing of this document does not give you any license to these patents. You can send license inquiries, in writing, to:
Lenovo (United States), Inc.1009 Think Place - Building OneMorrisville, NC 27560U.S.A.Attention: Lenovo Director of Licensing
LENOVO PROVIDES THIS PUBLICATION “AS IS” WITHOUT WARRANTY OF ANY KIND, EITHER EXPRESS OR IMPLIED, INCLUDING, BUT NOT LIMITED TO, THE IMPLIED WARRANTIES OF NON-INFRINGEMENT, MERCHANTABILITY OR FITNESS FOR A PARTICULAR PURPOSE. Some jurisdictions do not allow disclaimer of express or implied warranties in certain transactions, therefore, this statement may not apply to you.
This information could include technical inaccuracies or typographical errors. Changes are periodically made to the information herein; these changes will be incorporated in new editions of the publication. Lenovo may make improvements and/or changes in the product(s) and/or the program(s) described in this publication at any time without notice.
The products described in this document are not intended for use in implantation or other life support applications where malfunction may result in injury or death to persons. The information contained in this document does not affect or change Lenovo product specifications or warranties. Nothing in this document shall operate as an express or implied license or indemnity under the intellectual property rights of Lenovo or third parties. All information contained in this document was obtained in specific environments and is presented as an illustration. The result obtained in other operating environments may vary.
Lenovo may use or distribute any of the information you supply in any way it believes appropriate without incurring any obligation to you.
Any references in this publication to non-Lenovo Web sites are provided for convenience only and do not in any manner serve as an endorsement of those Web sites. The materials at those Web sites are not part of the materials for this Lenovo product, and use of those Web sites is at your own risk.
Any performance data contained herein was determined in a controlled environment. Therefore, the result obtained in other operating environments may vary significantly. Some measurements may have been made on development-level systems and there is no guarantee that these measurements will be the same on generally available systems. Furthermore, some measurements may have been estimated through extrapolation. Actual results may vary. Users of this document should verify the applicable data for their specific environment.
© Copyright Lenovo 2017. All rights reserved.Note to U.S. Government Users Restricted Rights -- Use, duplication or disclosure restricted by Global Services Administration (GSA) ADP Schedule Contract 27
This document was created or updated on September 8, 2017.
Send us your comments via the Rate & Provide Feedback form found athttp://lenovopress.com/lp0599
Trademarks
Lenovo, the Lenovo logo, and For Those Who Do are trademarks or registered trademarks of Lenovo in the United States, other countries, or both. These and other Lenovo trademarked terms are marked on their first occurrence in this information with the appropriate symbol (® or ™), indicating US registered or common law trademarks owned by Lenovo at the time this information was published. Such trademarks may also be registered or common law trademarks in other countries. A current list of Lenovo trademarks is available on the Web at http://www.lenovo.com/legal/copytrade.html.
The following terms are trademarks of Lenovo in the United States, other countries, or both:
Flex System™Lenovo®NeXtScale™
Lenovo(logo)®System x®ThinkServer®
ThinkSystem™
The following terms are trademarks of other companies:
Intel, and the Intel logo are trademarks or registered trademarks of Intel Corporation or its subsidiaries in the United States and other countries.
Linux is a trademark of Linus Torvalds in the United States, other countries, or both.
Other company, product, or service names may be trademarks or service marks of others.
28 A Technical Introduction to the Use of Trusted Platform Module 2.0 with Linux