Embed Size (px)
Citation preview

WARRIORA QUILT PATTERN BY
uiltsSuzy in partnership with
Finished size: 56” x 65.5” | Fabric: Swan Lake @SuzyQuilts @BirchFabric #WarriorQuilt #BirchFabrics
100% ORGANIC FABRIC MADE WITH LOVE, NOT PESTICIDES.birchfabrics.com + [email protected]
Active hyperlinks, so click where you see an underline!
uiltsSuzy SUZYQUILTS.COM | COPYRIGHT 2016 SUZY QUILTS All rights reserved. Duplication of any kind is prohibited. 2+
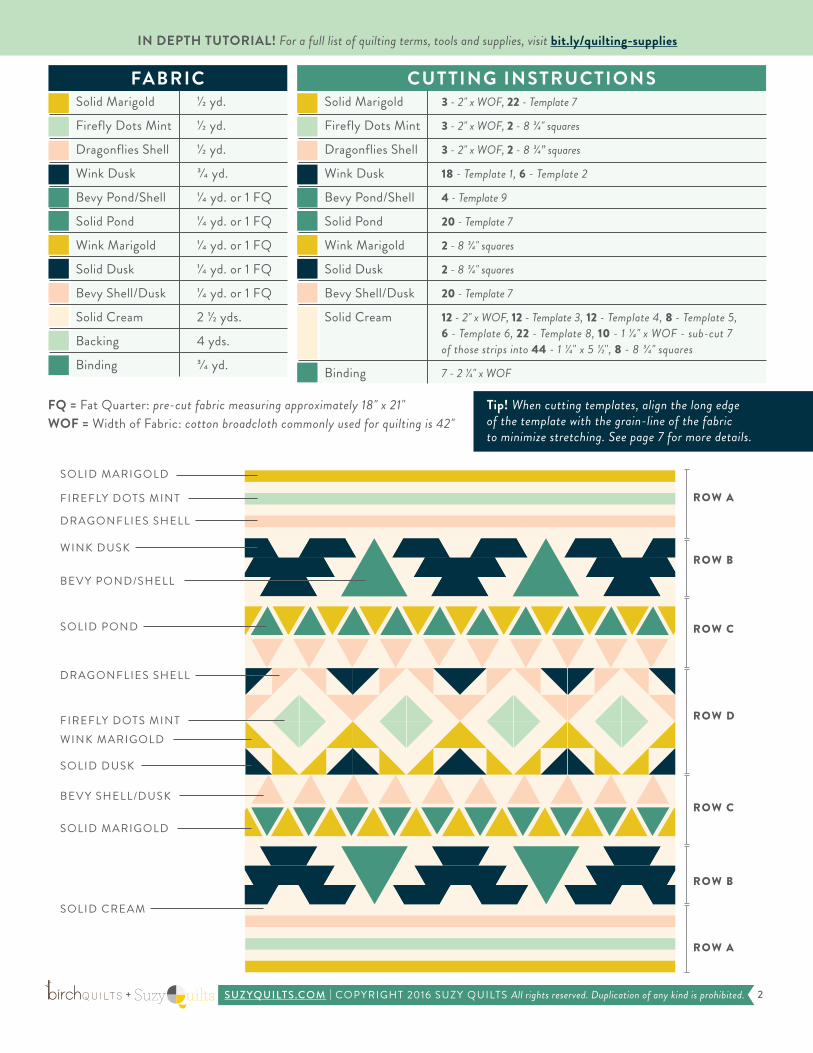
Solid Marigold 1/2 yd.
Firefly Dots Mint 1/2 yd.
Dragonflies Shell 1/2 yd.
Wink Dusk 3/4 yd.
Bevy Pond/Shell 1/4 yd. or 1 FQ
Solid Pond 1/4 yd. or 1 FQ
Wink Marigold 1/4 yd. or 1 FQ
Solid Dusk 1/4 yd. or 1 FQ
Bevy Shell/Dusk 1/4 yd. or 1 FQ
Solid Cream 2 1/2 yds.
Backing 4 yds.
Binding 3/4 yd.
FABRIC
SOLID MARIGOLD
FIREFLY DOTS MINT
DRAGONFLIES SHELL
WINK DUSK
BEVY POND/SHELL
SOLID MARIGOLD
SOLID POND
BEVY SHELL/DUSK
SOLID DUSK
DRAGONFLIES SHELL
FIREFLY DOTS MINTWINK MARIGOLD
SOLID CREAM
Solid Marigold 3 - 2" x WOF, 22 - Template 7
Firefly Dots Mint 3 - 2" x WOF, 2 - 8 3/4" squares
Dragonflies Shell 3 - 2" x WOF, 2 - 8 3/4” squares
Wink Dusk 18 - Template 1, 6 - Template 2
Bevy Pond/Shell 4 - Template 9
Solid Pond 20 - Template 7
Wink Marigold 2 - 8 3/4" squares
Solid Dusk 2 - 8 3/4" squares
Bevy Shell/Dusk 20 - Template 7
Solid Cream 12 - 2" x WOF, 12 - Template 3, 12 - Template 4, 8 - Template 5, 6 - Template 6, 22 - Template 8, 10 - 1 1/4" x WOF - sub-cut 7 of those strips into 44 - 1 1/4" x 5 1/2", 8 - 8 3/4" squares
Binding 7 - 2 1/4" x WOF
CUTTING INSTRUCTIONS
FQ = Fat Quarter: pre-cut fabric measuring approximately 18" x 21"WOF = Width of Fabric: cotton broadcloth commonly used for quilting is 42"
ROW A
ROW B
ROW C
ROW D
ROW A
ROW B
ROW C
IN DEPTH TUTORIAL! For a full list of quilting terms, tools and supplies, visit bit.ly/quilting-supplies
Tip! When cutting templates, align the long edge of the template with the grain-line of the fabric to minimize stretching. See page 7 for more details.

uiltsSuzy SUZYQUILTS.COM | COPYRIGHT 2016 SUZY QUILTS All rights reserved. Duplication of any kind is prohibited. 3+
1. Place the 3 - 2" x WOF strips of Solid Marigold right sides together and sew to create 1 long strip. Trim that strip down to 2 - 2" x 56 1/2" strips. Tip! Sew seams on a 45˚ angle to make them visually blend. Fig.3
2. Repeat Step 1 for each of the 3 - 2" x WOF strips of Firefly Dots Mint and Dragonflies Shell.
3. Use this same technique for the Solid Cream, however, instead of 2 - 2” x 56 1/2” strips, make 8 - 2" x 56 1/2" strips. For Row A, you will only need 6 of those strips. Set the remaining 2 aside for Row C.
4. Assemble 2 identical Row A as seen in Fig.4.
ROW ASSEMBLY
The Warrior quilt is comprised of 7 rows – 4 of them unique and 3 of them are duplicates of previous rows.
ROW A - Make 2
Fig. 3
sew here
Fig. 4
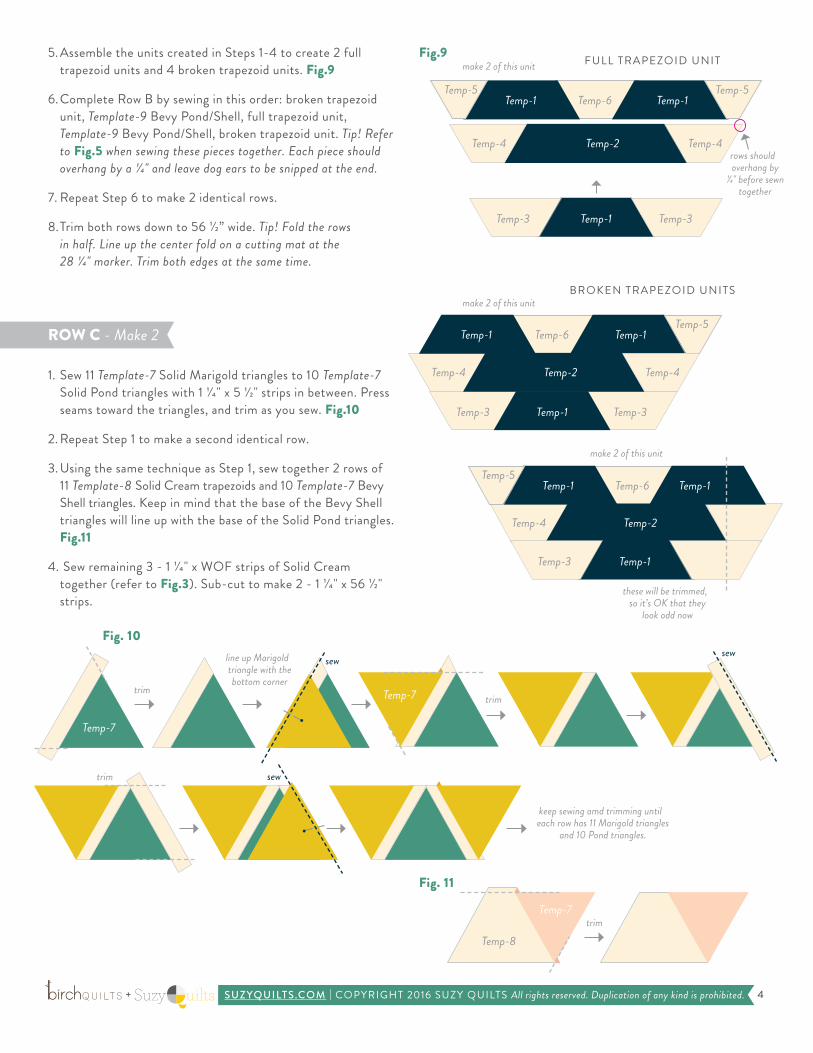
1. Sew a Template-3 Solid Cream trapezoid to each side of 6 Template-1 Wink Dusk trapezoids. Be sure to leave a 1/4" overhang as seen in Fig.5. Press seam to the side and trim the dog ears. Make 6 of these units (3 for each Row B).
2. Sew a Template-4 Solid Cream trapezoid to both sides of a Template-2 Wink Dusk trapezoids for a total of 6 units. Fig.6
3. With 4 Template-1 Wink Dusk trapezoids, 4 Template-5 and 2 Template-6 Solid Cream trapezoids, make 2 units as seen in Fig.7.
4. With 8 Template-1 Wink Dusk trapezoids, 4 Template-5 and 4 Template-6 Solid Cream trapezoids, make 4 units, 2 with Template-5 trapezoids on the left, and 2 with Template-5 trapezoids on the right. Fig.8
ROW B - Make 2
Fig. 5 dog ear
make 6 of this unit
Fig. 6 make 6 of this unit
Temp-1Temp-3
Temp-2Temp-4 Temp-4
Temp-3
Fig. 7 make 2 of this unit
Temp-1 Temp-1Temp-5 Temp-5
Temp-6
Temp-1 Temp-1Temp-5
Temp-6
Temp-1 Temp-1Temp-5
Temp-6
Fig. 8 make 2 of each unit
uiltsSuzy SUZYQUILTS.COM | COPYRIGHT 2016 SUZY QUILTS All rights reserved. Duplication of any kind is prohibited. 4+
Temp-4
5. Assemble the units created in Steps 1-4 to create 2 full trapezoid units and 4 broken trapezoid units. Fig.9
6. Complete Row B by sewing in this order: broken trapezoid unit, Template-9 Bevy Pond/Shell, full trapezoid unit, Template-9 Bevy Pond/Shell, broken trapezoid unit. Tip! Refer to Fig.5 when sewing these pieces together. Each piece should overhang by a 1/4" and leave dog ears to be snipped at the end.
7. Repeat Step 6 to make 2 identical rows.
8. Trim both rows down to 56 1/2” wide. Tip! Fold the rows in half. Line up the center fold on a cutting mat at the 28 1/4" marker. Trim both edges at the same time.
Fig.9make 2 of this unit
these will be trimmed, so it’s OK that they
look odd now
1. Sew 11 Template-7 Solid Marigold triangles to 10 Template-7 Solid Pond triangles with 1 1/4" x 5 1/2" strips in between. Press seams toward the triangles, and trim as you sew. Fig.10
2. Repeat Step 1 to make a second identical row.
3. Using the same technique as Step 1, sew together 2 rows of 11 Template-8 Solid Cream trapezoids and 10 Template-7 Bevy Shell triangles. Keep in mind that the base of the Bevy Shell triangles will line up with the base of the Solid Pond triangles. Fig.11
4. Sew remaining 3 - 1 1/4" x WOF strips of Solid Cream together (refer to Fig.3). Sub-cut to make 2 - 1 1/4" x 56 1/2" strips.
ROW C - Make 2
trim
line up Marigold triangle with the bottom corner
Fig. 10
trim
Fig. 11
trim
Temp-1Temp-3 Temp-3
Temp-2Temp-4 Temp-4
Temp-1 Temp-1Temp-5 Temp-5
Temp-6
Temp-1 Temp-1Temp-5
Temp-6
Temp-3 Temp-3
Temp-2 Temp-4
make 2 of this unit
Temp-1 Temp-1Temp-5
Temp-6
Temp-2Temp-4
Temp-1Temp-3
make 2 of this unit
Temp-7
Temp-7
Temp-7
Temp-8
Temp-1
rows should overhang by
1/4" before sewn together
sew
sew
sew
keep sewing amd trimming until each row has 11 Marigold triangles
and 10 Pond triangles.
trim
FULL TRAPEZOID UNIT
BROKEN TRAPEZOID UNITS

uiltsSuzy SUZYQUILTS.COM | COPYRIGHT 2016 SUZY QUILTS All rights reserved. Duplication of any kind is prohibited. 5+
5. Sew 1 - 1 1/4" x 56 1/2" strip to the base of a row of Marigold and Pond triangles.
6. Line up the bases of the Bevy Shell triangles with the bases of the Solid Pond triangles (with the 1 1/4" x 56 1/2" strip in between). Pin and sew rows together. Square up the sides of the row with a ruler and trim excess. Fig.12
7. From Row A Step 3, you had 2 - 2" x 56 1/2" Solid Cream strips; sew one of those to the top of the Marigold and Pond row. Fig.13
8. Repeat Steps 1 - 7 to make a second identical row.
Fig. 12
Fig. 13make 2 identical rows
1. Place 1 - 8 3/4" Solid Cream square on top of each Firefly Dots Mint, Wink Marigold, Solid Dusk and Dragonflies Shell square for a total of 8 pairs of squares.
2. On backside of the Solid Cream squares, draw two guidelines diagonally, one horizontally and one vertically. Fig.14
3. For each pair, sew a 1/4" from the guidelines. Fig.15
4. Cut along the guidelines. Fig.16
5. Press the seams toward the colored fabric and trim dog ears. Each half square triangle should be 4" unfinished, so trim them as needed. Fig.17
6. After Step 5, there are 16 half square triangle units in each of the 4 colors. Arrange them as seen in Fig.18. Line up the seams, pin and sew together to complete Row D. Tip! Press the seams in each row the opposite direction as the row beside it. This will help the seams nestle into each other and alleviate bulk.
ROW D - Make 1 Fig.14 Fig.15
Fig.16 Fig.17
Fig.18
dog ear
uiltsSuzy SUZYQUILTS.COM | COPYRIGHT 2016 SUZY QUILTS All rights reserved. Duplication of any kind is prohibited. 6+
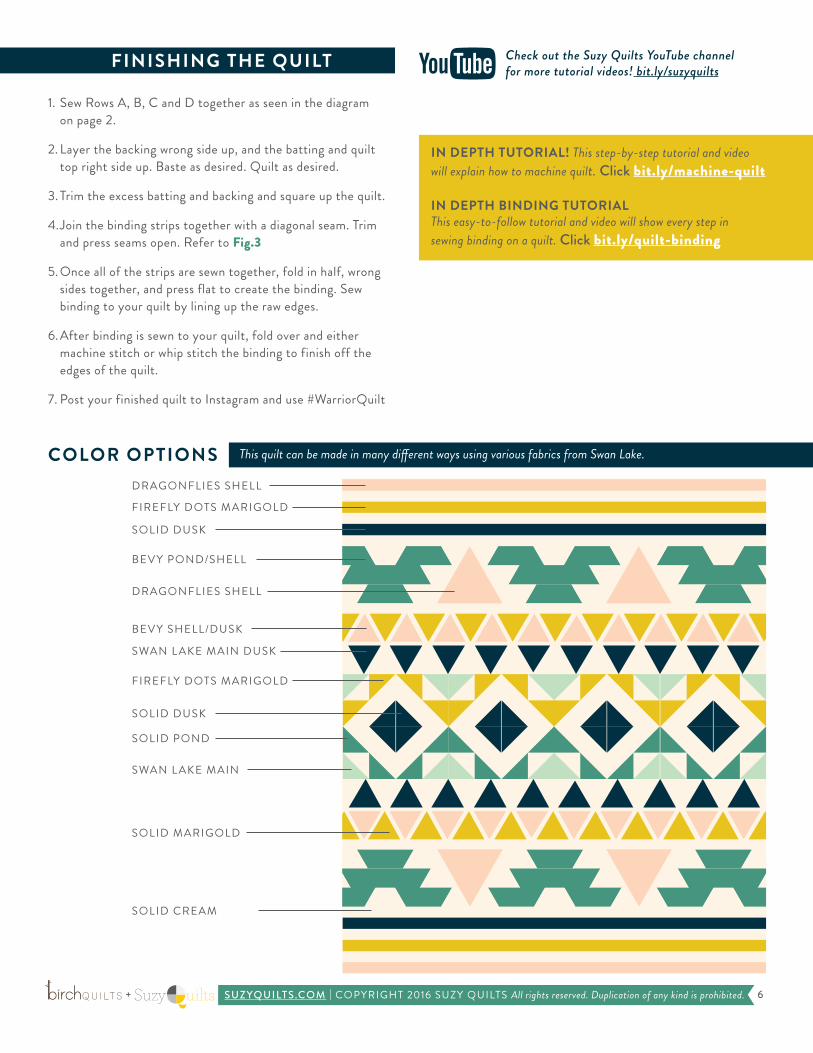
FINISHING THE QUILT
1. Sew Rows A, B, C and D together as seen in the diagram on page 2.
2. Layer the backing wrong side up, and the batting and quilt top right side up. Baste as desired. Quilt as desired.
3. Trim the excess batting and backing and square up the quilt.
4. Join the binding strips together with a diagonal seam. Trim and press seams open. Refer to Fig.3
5. Once all of the strips are sewn together, fold in half, wrong sides together, and press flat to create the binding. Sew binding to your quilt by lining up the raw edges.
6. After binding is sewn to your quilt, fold over and either machine stitch or whip stitch the binding to finish off the edges of the quilt.
7. Post your finished quilt to Instagram and use #WarriorQuilt
Check out the Suzy Quilts YouTube channel for more tutorial videos! bit.ly/suzyquilts
DRAGONFLIES SHELL
FIREFLY DOTS MARIGOLD
SOLID DUSK
BEVY POND/SHELL
DRAGONFLIES SHELL
BEVY SHELL/DUSK
SOLID MARIGOLD
SOLID POND
SWAN L AKE MAIN
SOLID CREAM
COLOR OPTIONS This quilt can be made in many different ways using various fabrics from Swan Lake.
FIREFLY DOTS MARIGOLD
SWAN L AKE MAIN DUSK
SOLID DUSK
IN DEPTH BINDING TUTORIAL This easy-to-follow tutorial and video will show every step in sewing binding on a quilt. Click bit.ly/quilt-binding
IN DEPTH TUTORIAL! This step-by-step tutorial and video will explain how to machine quilt. Click bit.ly/machine-quilt
uiltsSuzy SUZYQUILTS.COM | COPYRIGHT 2016 SUZY QUILTS All rights reserved. Duplication of any kind is prohibited. 7+
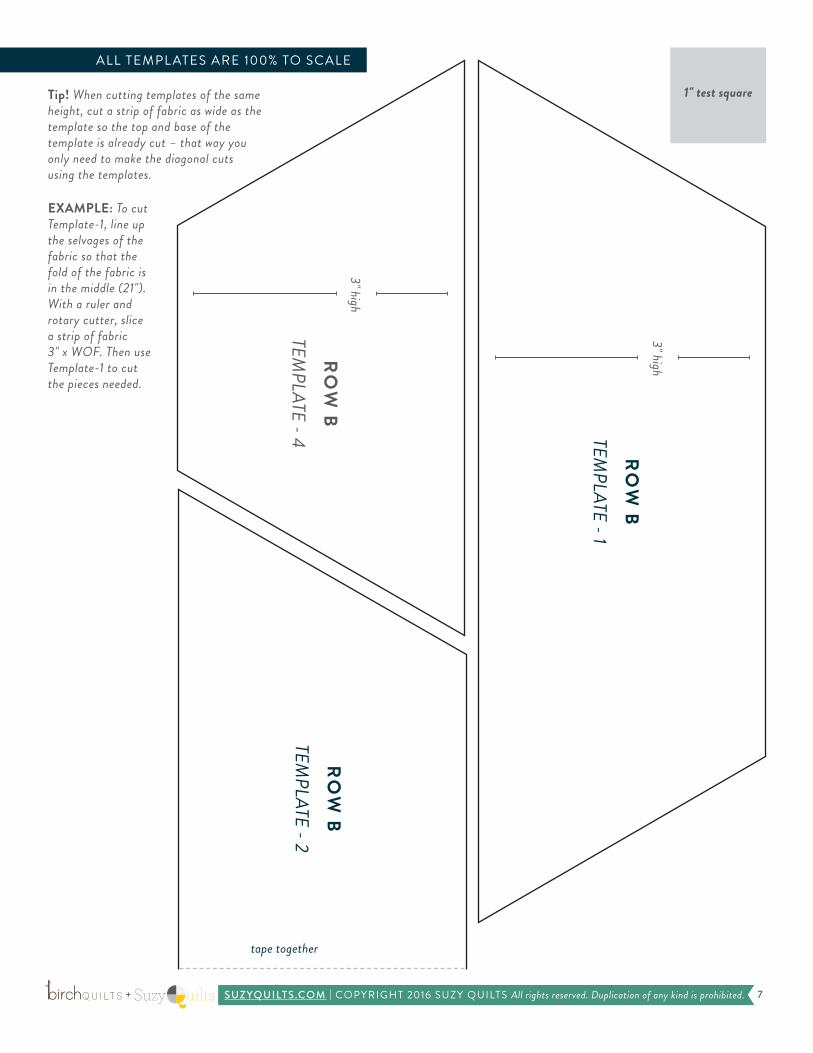
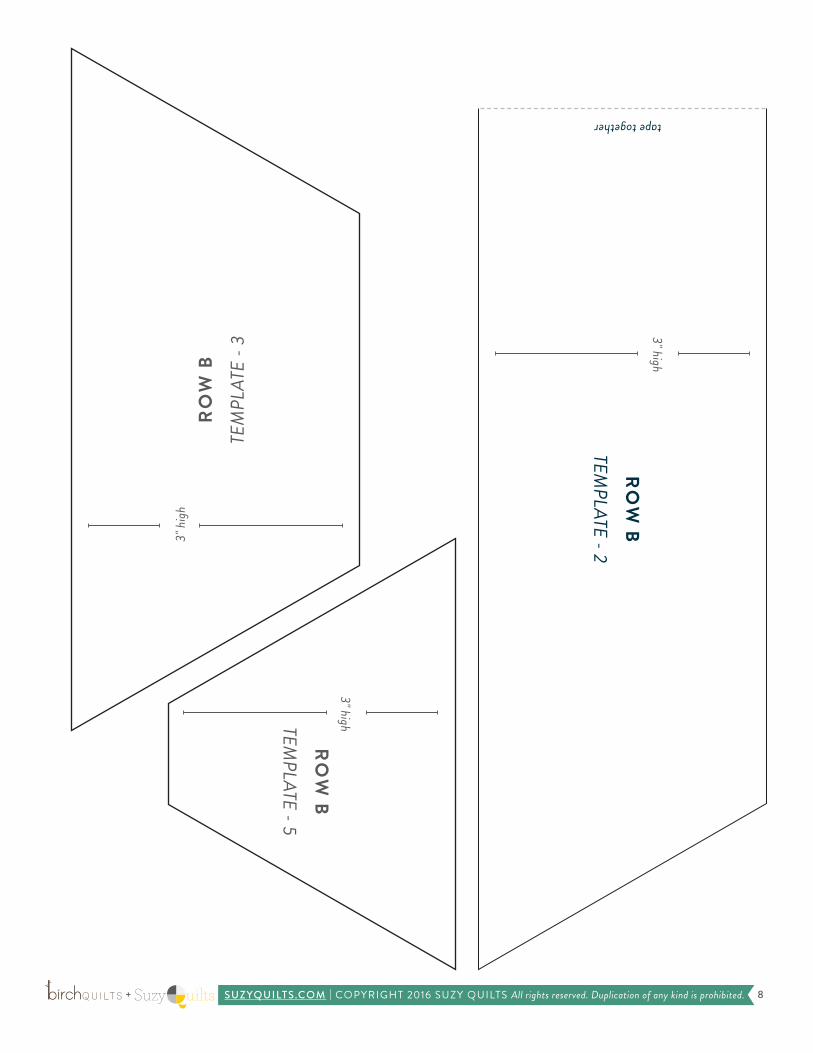
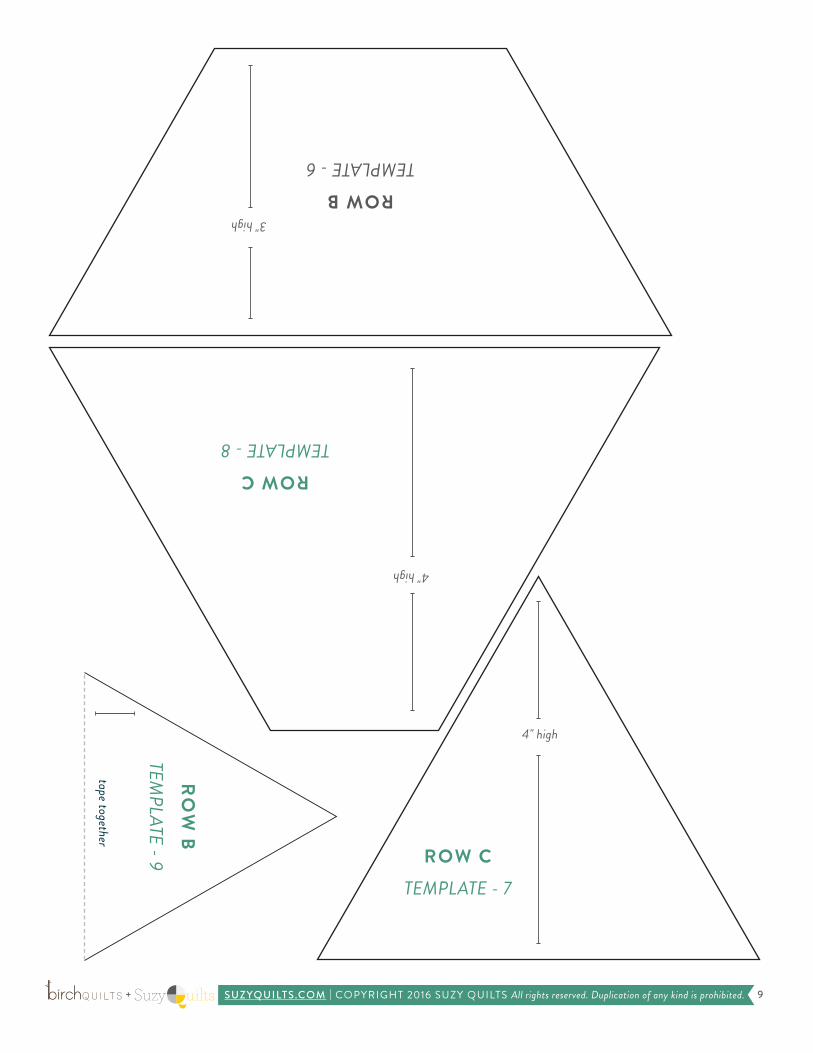
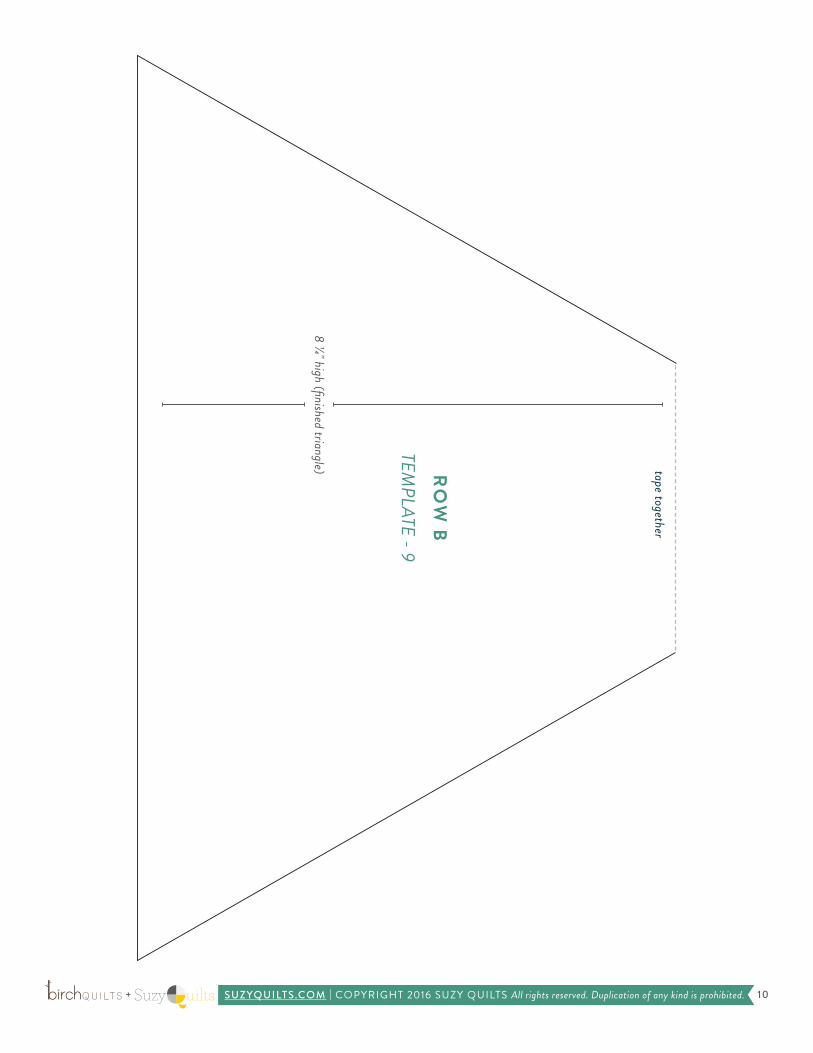
ALL TEMPL ATES ARE 100% TO SCALE
RO
W B
TEMPLATE - 1
RO
W B
TEMPLATE - 2
tape together
RO
W B
TEMPLATE - 4
3" high
3" high
Tip! When cutting templates of the same height, cut a strip of fabric as wide as the template so the top and base of the template is already cut – that way you only need to make the diagonal cuts using the templates.
EXAMPLE: To cut Template-1, line up the selvages of the fabric so that the fold of the fabric is in the middle (21"). With a ruler and rotary cutter, slice a strip of fabric 3" x WOF. Then use Template-1 to cut the pieces needed.
1" test square
uiltsSuzy SUZYQUILTS.COM | COPYRIGHT 2016 SUZY QUILTS All rights reserved. Duplication of any kind is prohibited. 8+
RO
W B
TEMPLATE - 2
tape together
RO
W B
TEM
PLAT
E - 3
RO
W B
TEMPLATE - 5
3" h
igh
3" high
3" high
uiltsSuzy SUZYQUILTS.COM | COPYRIGHT 2016 SUZY QUILTS All rights reserved. Duplication of any kind is prohibited. 9+
ROW BTEMPLATE - 6
ROW CTEMPLATE - 7
ROW CTEMPLATE - 8
3" high
RO
W B
TEMPLATE - 9
tape together
4" high
4" high
uiltsSuzy SUZYQUILTS.COM | COPYRIGHT 2016 SUZY QUILTS All rights reserved. Duplication of any kind is prohibited. 10+
RO
W B
TEMPLATE - 9
tape together
8 1/4" high (finished triangle)