Embed Size (px)
Citation preview


! A properly installed and maintained flat roof can be one of a building’s biggest assets while a leaking or failing roof can quickly become a building’s biggest expense. We’ve put this simple guide together in order to help building owners and facilities managers better understand and care for their rubber roofs and to make better decisions when it come times to replace the roof. !!We hope you find this rubber roofing guide helpful but in the event you don't find the information you need, please contact us with any questions or stop in our office for tour of our facility.!!Thank You!!Owner Aaron Perry !!!Email [email protected] !2936 Clifty Drive !Madison IN 47250 !!(855) 274 - 0444!(812) 274 - 0444!!WWW. ExxteriorProInc.com !! !

TABLE OF CONTENTS!
!How to Inspect Rubber Roofing & Roof Inspection Checklist…………………….4!
4 Common Rubber Roofing Problems……………………………………………….8!
!Rubber Roofing: 4 Not So Obvious Signs Your Rubber Roof is Leaking………..11!
!Rubber Roofing Replacement: Low Cost High Value Option……………………..14!
!Simple Ways to Extend the Life of a Rubber Roof…………………………………17!
!!!!
!!
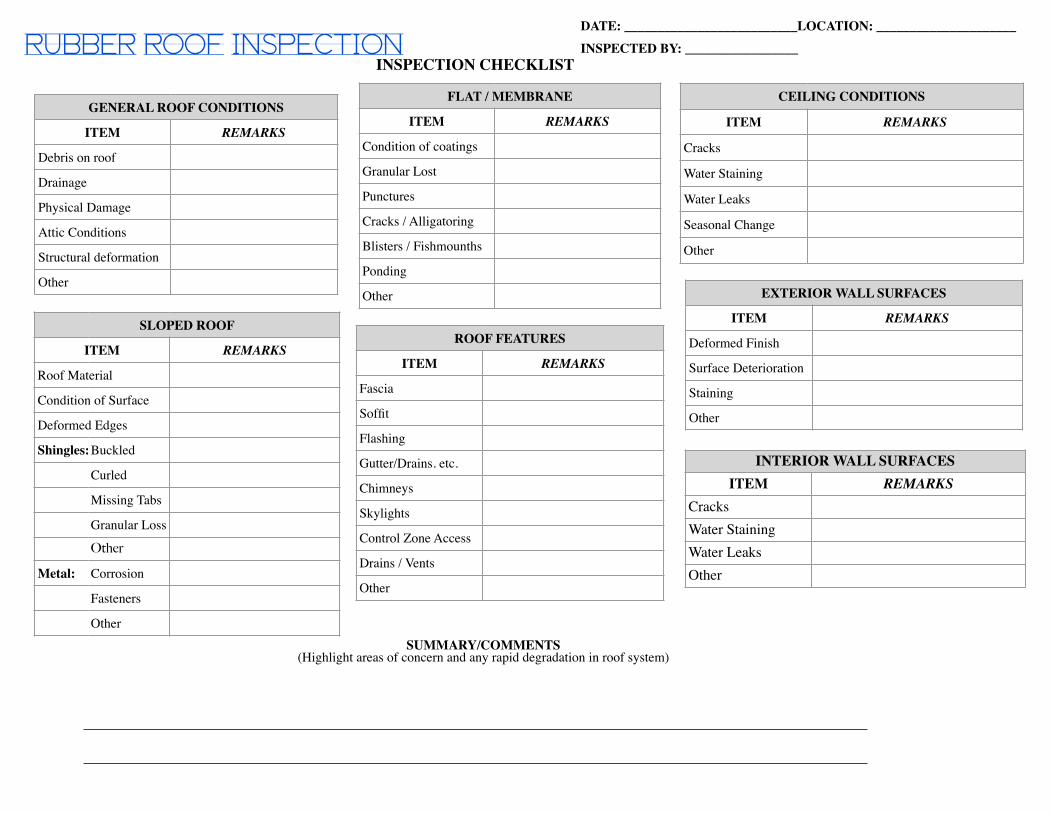
GENERAL ROOF CONDITIONS
ITEM REMARKS
Debris on roof
Drainage
Physical Damage
Attic Conditions
Structural deformation
Other
DATE: __________________________LOCATION: _____________________ INSPECTED BY: _________________
FLAT / MEMBRANE
ITEM REMARKS
Condition of coatings
Granular Lost
Punctures
Cracks / Alligatoring
Blisters / Fishmounths
Ponding
Other
INSPECTION CHECKLIST
SLOPED ROOF
ITEM REMARKS
Roof Material
Condition of Surface
Deformed Edges
Shingles:Buckled
Curled
Missing Tabs
Granular Loss
Other
Metal: Corrosion
Fasteners
Other
ROOF FEATURES
ITEM REMARKS
Fascia
Soffit
Flashing
Gutter/Drains. etc.
Chimneys
Skylights
Control Zone Access
Drains / Vents
Other
CEILING CONDITIONS
ITEM REMARKS
Cracks
Water Staining
Water Leaks
Seasonal Change
Other
EXTERIOR WALL SURFACES
ITEM REMARKS
Deformed Finish
Surface Deterioration
Staining
Other
INTERIOR WALL SURFACESITEM REMARKS
CracksWater StainingWater LeaksOther
SUMMARY/COMMENTS (Highlight areas of concern and any rapid degradation in roof system)
RUBBER ROOF INSPECTION

!!!!!!!!!!!!!!
!!!
ROOF PLANS AND DETAILS
R - Roof VentU - HVAC UnitJ - Flag Pole
W - Ponded WaterP - Parapet or Fire
Wall
A - Access HatchB - Base FlashingC - Cap FlashingD - Roof Drain
E - Expansion Joint Cover
F - Fascia & Gravel StopG - Gutter SystemH - Vent / Fan HoodK - Chimney
V - Vents PipeL - LadderS - SkylightT - Walkway
Preventive Roof Maintenance Proper roof maintenance will: ✓ Increase the life expectancy of your roof ✓ Save you the high cost of roof replacement ✓ Protect your assets from costly damage
For Further Information Contact us Exterior Pro Inc.
2936 Clifty dr. Madison IN 47250
(812)274-0444 www.ExteriorProInc.com
Sketch roof plan. Include north arrows the location on the items listed below, approximate dimensions of building, roofing materials, and other relevant items located on the roof.
USE THIS AREA ONLY IF DEFICIENCIES ARE OBSERVED.
RUBBER ROOF INSPECTION

Section 1: How to Inspect Rubber Roofing!

!How to Inspect Rubber Roofing!
Each year approximately 6 million sq. feet of rubber roofing are installed in Indiana and it’s not only because Firestone, a major rubber roofing manufacture, is located in Indiana, a properly installed and maintained rubber roof can last for many years. EPDM Rubber roofing is typically installed in Indiana in one of three ways, loose laid and held down by river stone or Ballasted, Mechanically attached with screws and bars, or fully adhered or glued down. Regardless of how your EPDM roof was installed, these tips will help you do a better job inspecting your flat roof.
1. Visual checkup. Walking the roof is a great way to start your inspection. You are looking for anything that might stand out as a problem such as a tear, puncture, or hole in the membrane. Leaking roofs are not alway a mystery, many times the problems can easily be found by doing a visual inspection or the roof. Check drains and gutters to make sure they aren’t clogged and are allowing water to pass as well as coping caps on top of walls to ensure they aren't loose or missing from wind. As you walk the roof pay attention to the constancy of insulation below the rubber, a “soft spot” or place in the roof that compresses more when stepped on may be evidence of a leak.
2. Transitions, Penetrations, and Seams. Rubber roofs most often leak because the seams have separated. Seams are found where deck sheet meet and over lap, at the transitions between the deck sheet and parapet wall, penetrations such as stack flashings, pitch pans, curbs for HVAC units, and drains. EPDM seams are made by priming the rubber sheets and applying seam tape; this adheres the rubber sheets together. The flashing can be primed and adhered directly to rubber sheet. In both case the adhesion and durability of the seam is affected by temperature and moisture present during the initial installation. Check for separated seams on deck sheets and around flashings.
3. Terminations and coping caps. Any place where termination bar is used has the potential to leak due to shrinkage of the rubber over time, loosened or missing fasteners, insufficient caulking behind and on top of termination bar, and deteriorated masonry above termination bar especially on parapet walls or walls of connecting buildings. Your inspection should include taking a close look at the termination bar but also the coping cap. Check for gaps between sections and for areas that require cutting during installation such as inside and out corners of building or height changes in parapets. Many of these sections depend on a sealant or caulking where pieces but together.
4. Debris and Third party damage. An effort should be made to keep roof top clean of natural debris like sticks and leaves but also debris left by service companies such as HVAC contractors. Things like small screws or metal shavings need little more than to be stepped on to puncture or cut the rubber. Implementing a roof top sign in sheet will help your facilities manager monitor roof activities in which companies can leave behind garbage.

Taking care of your rubber roof will not only extend its life cycle, it can help you avoid costly emergency roof repairs. Scheduled repairs and routine maintenance are usually much cheaper and effective.!
Section 2: Four Common Rubber roofing Problems!
!
!!
!!!!!!!!!!!!
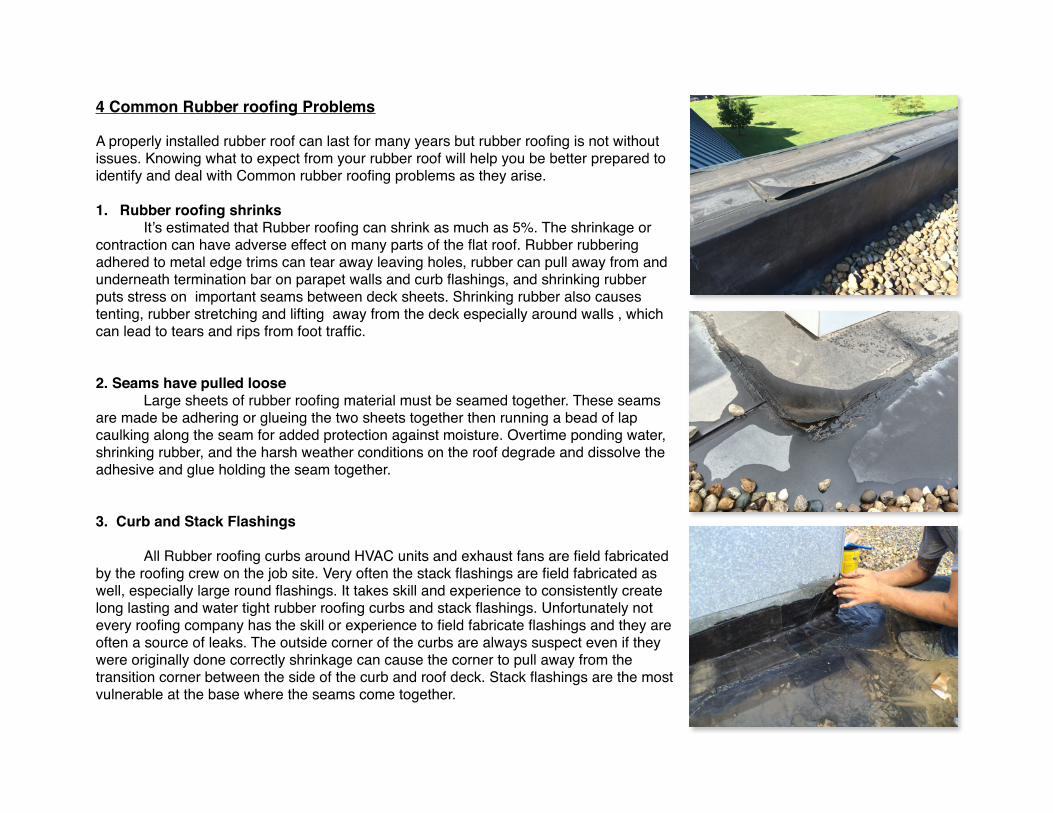
4 Common Rubber roofing Problems! !
A properly installed rubber roof can last for many years but rubber roofing is not without issues. Knowing what to expect from your rubber roof will help you be better prepared to identify and deal with Common rubber roofing problems as they arise. !!1. Rubber roofing shrinks !! It’s estimated that Rubber roofing can shrink as much as 5%. The shrinkage or contraction can have adverse effect on many parts of the flat roof. Rubber rubbering adhered to metal edge trims can tear away leaving holes, rubber can pull away from and underneath termination bar on parapet walls and curb flashings, and shrinking rubber puts stress on important seams between deck sheets. Shrinking rubber also causes tenting, rubber stretching and lifting away from the deck especially around walls , which can lead to tears and rips from foot traffic. !!!2. Seams have pulled loose !! Large sheets of rubber roofing material must be seamed together. These seams are made be adhering or glueing the two sheets together then running a bead of lap caulking along the seam for added protection against moisture. Overtime ponding water, shrinking rubber, and the harsh weather conditions on the roof degrade and dissolve the adhesive and glue holding the seam together. !!!3. Curb and Stack Flashings!!! All Rubber roofing curbs around HVAC units and exhaust fans are field fabricated by the roofing crew on the job site. Very often the stack flashings are field fabricated as well, especially large round flashings. It takes skill and experience to consistently create long lasting and water tight rubber roofing curbs and stack flashings. Unfortunately not every roofing company has the skill or experience to field fabricate flashings and they are often a source of leaks. The outside corner of the curbs are always suspect even if they were originally done correctly shrinkage can cause the corner to pull away from the transition corner between the side of the curb and roof deck. Stack flashings are the most vulnerable at the base where the seams come together.!

4.Punctures Easily !!! Rubber roofing is easily punctured by dropping a sharp tool, HVAC service panel, or by stepping on a screw or debris left behind by maintenance crews. Most rubber roofing is un-reinforced which mean it does not have any fabric inside the membrane to give added strength. Once cut or torn, rubber roofing can “zipper” or quickly allows small rips to become large ones by zippering open. Wind has the ability to blow rubber and cause it to zipper open once its cut or torn. That small piece of rubber flapping in the breeze can quickly become large tears and expensive leaks.!!!By performing regular inspection of your rubber roof you can stay on top of the common rubber roofing problems.!!
!

Section 3: Rubber Roofing - 4 Not so Obvious Signs your Rubber Roof is Leaking!!!!!!!!!!!!!!!!!!!!!!!!!!!
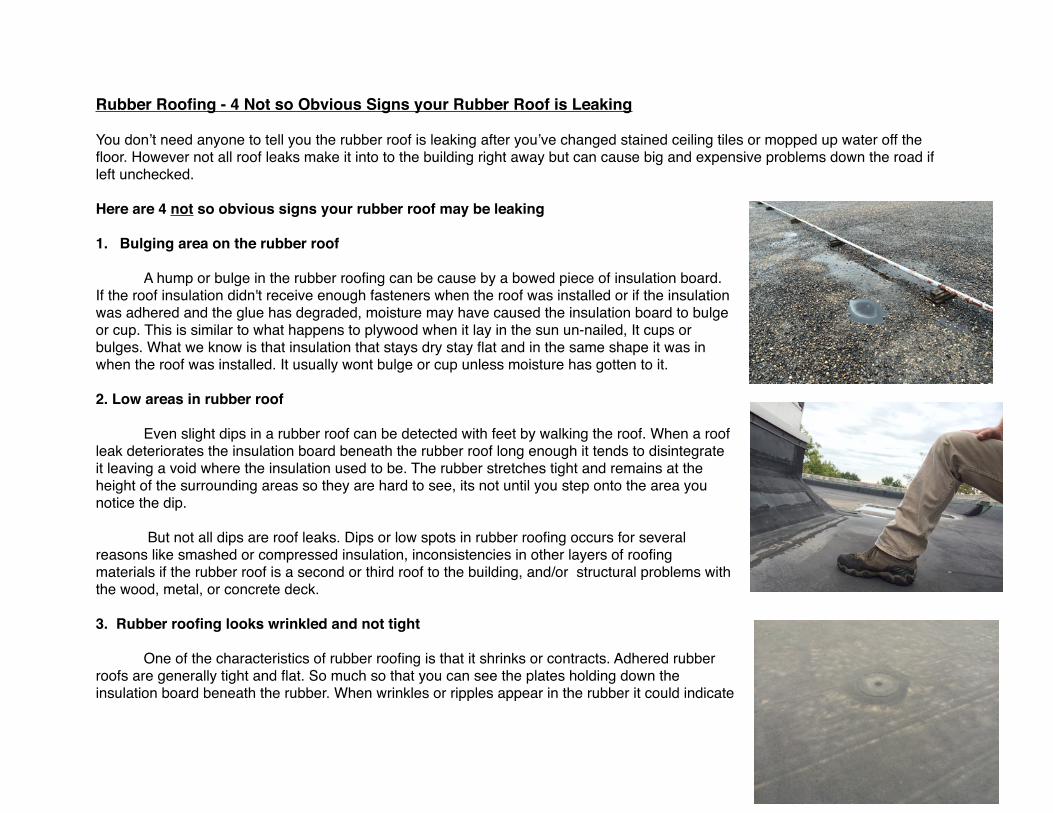
Rubber Roofing - 4 Not so Obvious Signs your Rubber Roof is Leaking !! !You don’t need anyone to tell you the rubber roof is leaking after you’ve changed stained ceiling tiles or mopped up water off the floor. However not all roof leaks make it into to the building right away but can cause big and expensive problems down the road if left unchecked. !!Here are 4 not so obvious signs your rubber roof may be leaking!!1. Bulging area on the rubber roof!!! A hump or bulge in the rubber roofing can be cause by a bowed piece of insulation board. If the roof insulation didn't receive enough fasteners when the roof was installed or if the insulation was adhered and the glue has degraded, moisture may have caused the insulation board to bulge or cup. This is similar to what happens to plywood when it lay in the sun un-nailed, It cups or bulges. What we know is that insulation that stays dry stay flat and in the same shape it was in when the roof was installed. It usually wont bulge or cup unless moisture has gotten to it. !!2. Low areas in rubber roof !!! Even slight dips in a rubber roof can be detected with feet by walking the roof. When a roof leak deteriorates the insulation board beneath the rubber roof long enough it tends to disintegrate it leaving a void where the insulation used to be. The rubber stretches tight and remains at the height of the surrounding areas so they are hard to see, its not until you step onto the area you notice the dip.!!! But not all dips are roof leaks. Dips or low spots in rubber roofing occurs for several reasons like smashed or compressed insulation, inconsistencies in other layers of roofing materials if the rubber roof is a second or third roof to the building, and/or structural problems with the wood, metal, or concrete deck. !!3. Rubber roofing looks wrinkled and not tight !!! One of the characteristics of rubber roofing is that it shrinks or contracts. Adhered rubber roofs are generally tight and flat. So much so that you can see the plates holding down the insulation board beneath the rubber. When wrinkles or ripples appear in the rubber it could indicate

that moisture has entered under the rubber membrane and deteriorated the adhesive that glues the rubber to the insulation board. The rubber wrinkles as it is no longer glued down in that spot. !!4. Seams will push out small amounts of water. !!! Inspecting your rubber roof after a good rain has the benefit of being able to push on suspect seams and flashings to see if small amounts of water come out. Many times you can squeeze water out of failing seams and identity leaks that you couldn't have known other wise were leaks just by a visual inspection alone. Often when you apply pressure to a seam you will see bubbles if the area is still wet from rain. This is also a sign that water is entering the seam, as the. !!!! Be aware that not all roof leaks leave stained ceiling tiles or drips inside the building. Being proactive towards your rubber roof will give you the upper hand against roof leaks and allow you to plan for maintenance and roof replacement when the time comes. !!!!!!!!!!!!!!!!!!!

Section 4: Rubber Roofing Replacement-Low Cost High Value Option!!!!!!!!!!!!!!!!!!!!!!!!!!!
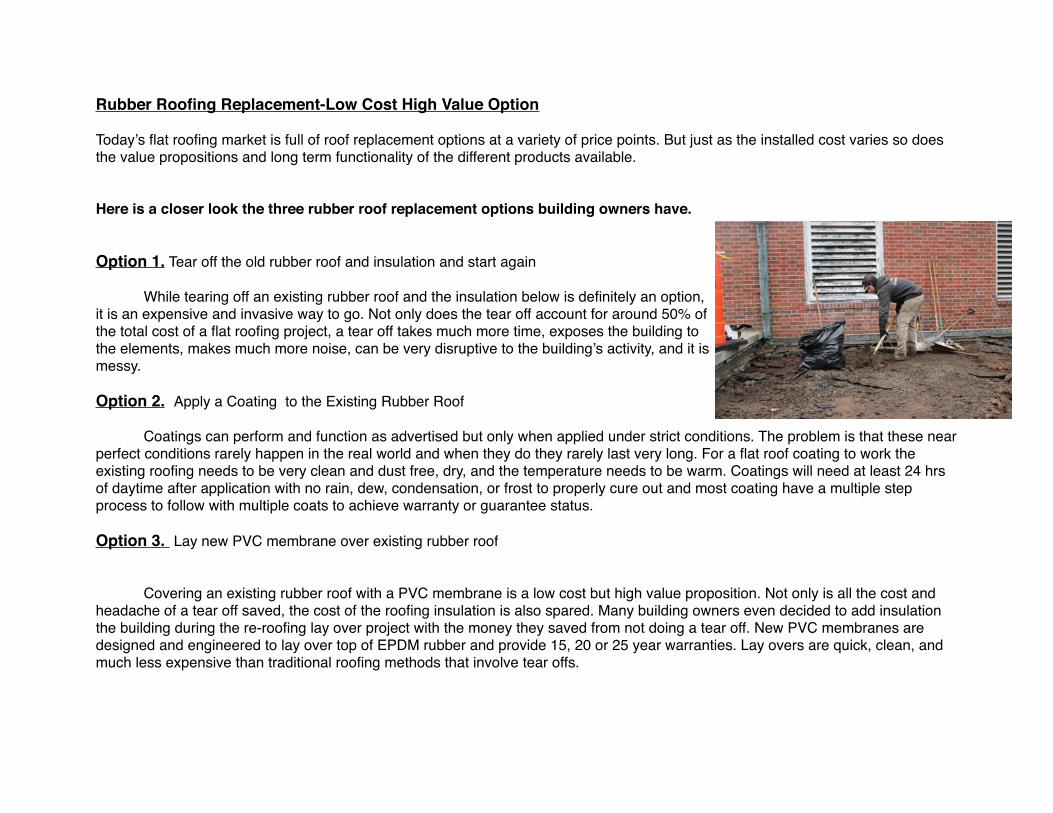
Rubber Roofing Replacement-Low Cost High Value Option!!Today’s flat roofing market is full of roof replacement options at a variety of price points. But just as the installed cost varies so does the value propositions and long term functionality of the different products available. !!!Here is a closer look the three rubber roof replacement options building owners have. !!!Option 1. Tear off the old rubber roof and insulation and start again !!! While tearing off an existing rubber roof and the insulation below is definitely an option, it is an expensive and invasive way to go. Not only does the tear off account for around 50% of the total cost of a flat roofing project, a tear off takes much more time, exposes the building to the elements, makes much more noise, can be very disruptive to the building’s activity, and it is messy. !!Option 2. Apply a Coating to the Existing Rubber Roof !!! Coatings can perform and function as advertised but only when applied under strict conditions. The problem is that these near perfect conditions rarely happen in the real world and when they do they rarely last very long. For a flat roof coating to work the existing roofing needs to be very clean and dust free, dry, and the temperature needs to be warm. Coatings will need at least 24 hrs of daytime after application with no rain, dew, condensation, or frost to properly cure out and most coating have a multiple step process to follow with multiple coats to achieve warranty or guarantee status. !!Option 3. Lay new PVC membrane over existing rubber roof!!!! Covering an existing rubber roof with a PVC membrane is a low cost but high value proposition. Not only is all the cost and headache of a tear off saved, the cost of the roofing insulation is also spared. Many building owners even decided to add insulation the building during the re-roofing lay over project with the money they saved from not doing a tear off. New PVC membranes are designed and engineered to lay over top of EPDM rubber and provide 15, 20 or 25 year warranties. Lay overs are quick, clean, and much less expensive than traditional roofing methods that involve tear offs. !!

Covering a black rubber roof with a with white PVC membrane can reduce roof top temps by 50 to 80 degrees meaning an over all summer time cooling saving of up the 15%!!What if your rubber roof is covered with Stone?!!A PVC lay over can still be done but the rock will have to be removed. Large vacuums trucks pull rock from the rubber roof and leave surface clean and suitable for a PVC lay over. !!Who can do a lay over?!!Anyone with a rubber roof that needs replaced. The two requirements to install the new membrane directly over top of the old rubber is 1) that the existing insulation not be saturated with moisture and 2) that the deck is not rotten or rusted to the point that it cannot hold a screw. This is why protecting your rubber roof from excessive leaking until you are ready to replace it is very important. If your roof becomes saturated you’ll have no choice but to tear it off and start again. !!!

Section 5: Simple Ways to Extend The Life of a Rubber Roof!!!!!!!!!!!!!!!!!!!!!!!!!!!
Simple Ways to Extend The Life of a Rubber Roof!!!Rubber roofs can provide years of service when properly cared for and maintained. And even though advances in flat roofing are pushing the market towards thicker, re-enforced and white rubberized roofing membranes, getting the most out of your existing EPDM rubber roof just makes good business sense.!!Here are some simple ways to care for and maintain you rubber roof !!!1. Become pro active towards roof maintenance instead of passive !!Most problems that occur with rubber roofs can be detected by means of a visual inspection a couple of time a year. With a little training you can learn how to spot problem areas quickly and identify potential future leaks. Being pro-active towards you roof will not only allow you to better plan for your maintenance and or replace cost, you will avoid the disruptions to your schedule that time robbing roof leaks tend to create. Discovering roof leaks while the weather is still good as opposed to finding out in the dead of winter will not only mean roof can be repair quickly, it could also prevent several months of collateral damage an uncheck leak can cause. Plan on inspecting your roof or roofs twice a year at a minimum. !!2. Be prepared to make minor repairs on the spot!!If you are in charge of performing roof inspections take it upon yourself to find out what type of roofing system you have and who the manufacture is. Once you know who manufacture is you can purchase sealants and caulking that are either the exact type and made for your roof or at least compatible with your existing rubber roof. Applying tar, sealants, or the caulking is not compatible with the rubber roof may not only void the warranty but it may cause more damage than good. Take along caulking and sealants with you as your perform your inspections and correct loose, missing or deteriorated caulking as you find it. !!3. Remove Roof Top Debris immediately !!Third party damage is absolutely the most common reason properly installed rubber roofs leak. Holes are easily made for tools being dropped, HVAC unit doors being set on rubber, screws being dropped and stepped on, and from old satellite and antennas being drug across or laid down and left on top of roofs. As you perform your inspection pick up loose screws, nails, debris and anything else not essential to the functioning for the roof. Keep your rubber roof clean. !!

Ensure Roof drains, scuppers, and gutters are clean and attempt to remove debris from roof. Cleaning leaves and debris from a roof drain only to throw it a few feet away does little good as it will end up back in the drain the next rain event. !!!4.Build a relationship with a flat roofing contractor!!Developing a good working relationship with a flat roofing contractor will allow you to have repairs done quickly and effectively. Over time the repair crew will learn more about your building’s roof but also how your business functions. Interactions between your employees and/or maintenance crew and those of the roofing company should become more meaningful and productive over time if not cheaper, especially if you are managing multiple buildings on a large campus. Decent Flat roofing contractors will enjoy and reciprocate the respect you show them and will work harder to keep your business and your buildings dry. !!!!!!!!!!!!!!!!!!!!!!!!!