Embed Size (px)
Citation preview
A Programmer’s Guide to Ethereum and Serpent
Kevin [email protected]
Mitchell [email protected]
Ahmed [email protected]
Andrew [email protected]
Elaine [email protected]
Contents
1 Introduction 2
2 Ethereum Tools 22.1 Acquiring the Virtual Machine . . . . . . . . . . . . . . . . . . . . . . . . . . 22.2 Installing Pyethereum and Serpent . . . . . . . . . . . . . . . . . . . . . . . 3
3 Using Pyethereum Tester 43.1 Public and Private Keys . . . . . . . . . . . . . . . . . . . . . . . . . . . . . 53.2 Testing Contracts with Multiple Parties . . . . . . . . . . . . . . . . . . . . . 6
4 Language Reference 64.1 The log() Function . . . . . . . . . . . . . . . . . . . . . . . . . . . . . . . . 64.2 Variables . . . . . . . . . . . . . . . . . . . . . . . . . . . . . . . . . . . . . . 7
Special Variables . . . . . . . . . . . . . . . . . . . . . . . . . . . . . 74.3 Control Flow . . . . . . . . . . . . . . . . . . . . . . . . . . . . . . . . . . . 84.4 Loops . . . . . . . . . . . . . . . . . . . . . . . . . . . . . . . . . . . . . . . 94.5 Arrays . . . . . . . . . . . . . . . . . . . . . . . . . . . . . . . . . . . . . . . 94.6 Strings . . . . . . . . . . . . . . . . . . . . . . . . . . . . . . . . . . . . . . . 10
Short Strings . . . . . . . . . . . . . . . . . . . . . . . . . . . . . . . 10Long Strings . . . . . . . . . . . . . . . . . . . . . . . . . . . . . . . . 10
4.7 Functions . . . . . . . . . . . . . . . . . . . . . . . . . . . . . . . . . . . . . 11Special Function Blocks . . . . . . . . . . . . . . . . . . . . . . . . . 11
4.8 Sending Wei . . . . . . . . . . . . . . . . . . . . . . . . . . . . . . . . . . . . 124.9 Persistant Data Structures . . . . . . . . . . . . . . . . . . . . . . . . . . . . 12
Self.storage[] . . . . . . . . . . . . . . . . . . . . . . . . . . . . . . . . 13
1
4.10 Hashing . . . . . . . . . . . . . . . . . . . . . . . . . . . . . . . . . . . . . . 134.11 Random Number Generation . . . . . . . . . . . . . . . . . . . . . . . . . . . 144.12 The Callstack . . . . . . . . . . . . . . . . . . . . . . . . . . . . . . . . . . . 14
5 Simple Serpent Contract Example - Namecoin 15
6 Basic Serpent Contract Example - Easy Bank 16
7 Moderate Serpent Contract Example - Bank 18
8 Student Exercise - Mutual Credit System 20
9 Resource Overview 21
1 Introduction
The goal of this document is to teach you everything you need to know about Ethereum inorder to start developing your own Ethereum contracts and decentralized apps. So, what isEthereum? Ethereum can be seen as a decentralized platform that uses the network unitEther as the fuel to power all contracts on the network. Ethereum is more than a cryptocur-rency (even though mining is involved), it is a network that enables and powers Ethereumcontracts. So what is an Ethereum contract? Think of it as a program that aims to providedecentralized services including: voting systems, domain name registries, financial exchanges,crowdfunding platforms, company governance, self-enforcing contracts and agreements, in-tellectual property, smart property, and distributed autonomous organizations. Ethereum isthe ubiquitous bitcoin. It uses a similar underlying blockchain technology as bitcoin whilebroadening the scope of what it is capable of accomplishing. [4, 1]
2 Ethereum Tools
2.1 Acquiring the Virtual Machine
We have made a virtual machine that contains all of the necessary software. The virtualmachine is running Ubuntu 14.04 LTS, Pyethereum and Serpent 2.0. Pyethereum is theprogram that allows for us to interact with the blockchain and test our contracts. We willbe using Pyethereum, but there are also Ethereum implementations in C++ (cpp-ethereum)and Go (go-ethereum). Serpent 2.0 will allow for us to compile our serpent code into thestack-based language that is actually executed on the blockchain.
The Virtual Machine has been tested using VMWare Fusion (https://www.vmware.com/products/fusion) and VirtualBox (https://www.virtualbox.org/), however, it shouldwork with any VM software that supports VMDK files. The Virtual Machine is available fromhttps://drive.google.com/file/d/0BzlG8wGYwTrGWlp0LWctYVIxRVU/view?usp=sharing.The username is ”user” and the password is ”dees”.
2

2.2 Installing Pyethereum and Serpent
NOTE: This section is not required if the provided virtual machine is used. Wehave preinstalled all of the necessary applications to program Ethereum contracts usingPyethereum and Serpent. This section goes over installing a native copy of Pyethereumand Serpent on your machine and give a brief overview of what each component does.
This section assumes you are comfortable with the command line and have git installed. Ifyou need assistance getting git installed on your local machine, please consult http://git-scm.com/book/en/v2/Getting-Started-Installing-Git.
First, lets install Pyethereum. In order to install Pyethereum, we first need to downloadit. Go to a directory you don’t mind files being downloaded into, and run the followingcommand:
git clone https://github.com/ethereum/pyethereum
This command clones the code currently in the ethereum repository and copies it to yourcomputer. Next, change into the newly downloaded pyethereum directory and execute thefollowing command
git branch develop
This will change us into the develop branch. This code is usually stable, and we foundthat it has better compatibility with the more modern versions of Serpent. Please note thatlater on, this step may not be necessary as the Ethereum codebase becomes more stable, butwith the current rapid development of Ethereum, things are breaking constantly, so it paysto be on the cutting edge.
Finally, we need to install Pyethereum. Run the following command:
python setup.py install --user
This actually installs Pyethereum on our computer. Note that commands may be differentif you are on a non-Unix-like platform. We recommend running Ethereum on Unix-likeoperating systems such as Mac OS X and Linux.
Now, we are going to install serpent. The steps are extremely similar. Go to the directorythat you downloaded ethereum into and run the following commands:
git clone https://github.com/ethereum/serpent
cd serpent
git branch develop
python setup.py install --user
Now that Pyethereum and Serpent are installed, we should test that they are working.Go to the pyethereum/tests directory and run the following command:
python pytest -m test_contracts.py
If the test states that it was successful, then everything is installed correctly and you areready to continue with this guide!
3
3 Using Pyethereum Tester
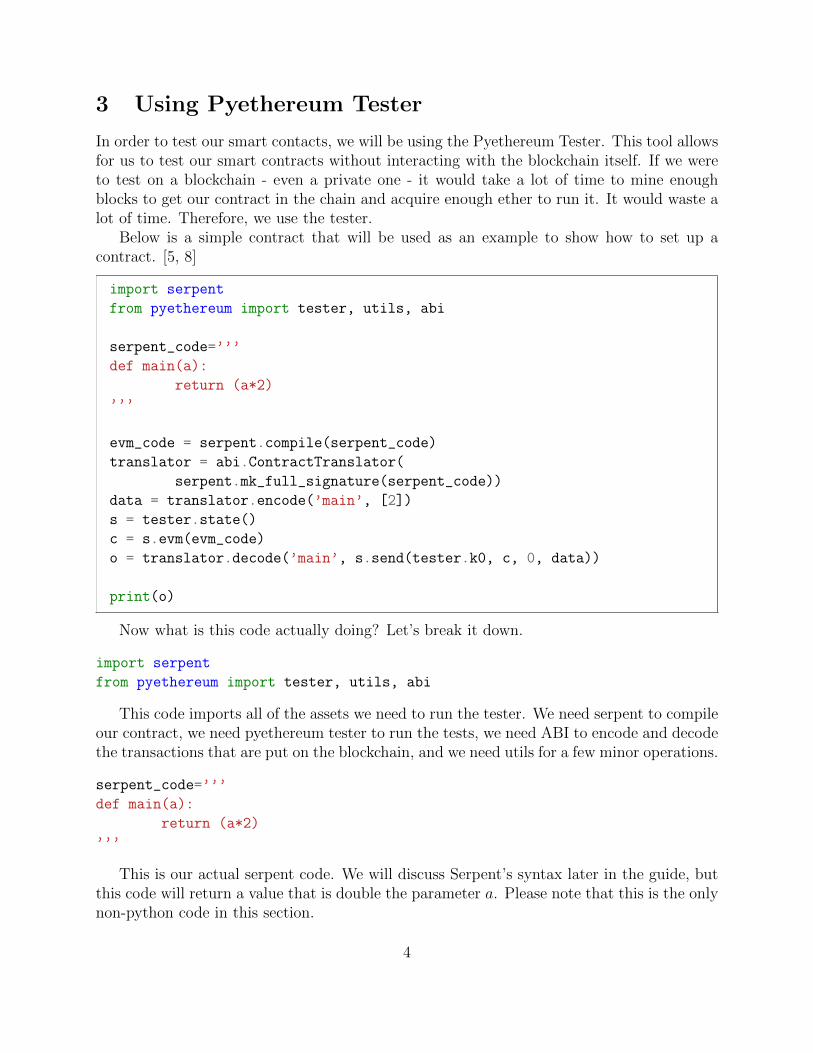
In order to test our smart contacts, we will be using the Pyethereum Tester. This tool allowsfor us to test our smart contracts without interacting with the blockchain itself. If we wereto test on a blockchain - even a private one - it would take a lot of time to mine enoughblocks to get our contract in the chain and acquire enough ether to run it. It would waste alot of time. Therefore, we use the tester.
Below is a simple contract that will be used as an example to show how to set up acontract. [5, 8]
import serpent
from pyethereum import tester, utils, abi
serpent_code=’’’
def main(a):
return (a*2)
’’’
evm_code = serpent.compile(serpent_code)
translator = abi.ContractTranslator(
serpent.mk_full_signature(serpent_code))
data = translator.encode(’main’, [2])
s = tester.state()
c = s.evm(evm_code)
o = translator.decode(’main’, s.send(tester.k0, c, 0, data))
print(o)
Now what is this code actually doing? Let’s break it down.
import serpent
from pyethereum import tester, utils, abi
This code imports all of the assets we need to run the tester. We need serpent to compileour contract, we need pyethereum tester to run the tests, we need ABI to encode and decodethe transactions that are put on the blockchain, and we need utils for a few minor operations.
serpent_code=’’’
def main(a):
return (a*2)
’’’
This is our actual serpent code. We will discuss Serpent’s syntax later in the guide, butthis code will return a value that is double the parameter a. Please note that this is the onlynon-python code in this section.
4

evm_code = serpent.compile(serpent_code)
translator = abi.ContractTranslator(
serpent.mk_full_signature(serpent_code))
Here, we finally get ready to run our actual code. The evm code variable holds ourcompiled code. This is the byte code that we will actually ”run” using ethereum. Thetranslator variable holds the code that will allow for us to encode and decode the code thatwill be run on the blockchain.
data = translator.encode(’main’, [2])
s = tester.state()
The data variable holds our encoded variables. We are going to call the main() function,and we are going to send one parameter to it, the number 2. We encode using the translator.Next, we are going to create a state (essentially a fake blockchain). This state is what wewill run our contract on.
c = s.evm(evm_code)
o = translator.decode(’main’, s.send(tester.k0, c, 0, data))
The c variable holds our contract. The evm() function puts our contract onto our fakeblockchain. Finally, we run a transaction. We use the send() function to execute the contract(whose address is stored in c). The entity sending the transaction is tester.k0 who is a fakeprivate key used for testing. It signs and ”authorizes” the transaction. We are sending noether into the contract, so the third parameter is a zero. Finally, we send our encoded data.
o = translator.decode(’main’, s.send(tester.k0, c, 0, data))
print(o)
Finally here, we will use our translator to decode out what the function returned. Wewill print that using the standard python print() function.
The code can be executed using the command ”python file name.py”. When executed,this code will output double the input parameter. So this code will output the number 4.[5, 8]
3.1 Public and Private Keys
All cryptocurrencies are based on some form of public key encryption. What does this mean?It means that messages can be encrypted with one key (the private key) and unencryptedwith the public key. The Pyethereum tester provides us with fake addresses we can use fortesting (tester.k0 - tester.k9). However, these are private addresses that we are using to signtransactions. This tells the world that we have authorized this transaction to exist. Otherscan confirm this by using our public key.
Now, lets say we want someone to be able to submit public keys to a contract as aparameter. How do we calculate the public keys from the private tester keys we have? Thereis a function in pyethereum’s utils that allows for us to do this:
5
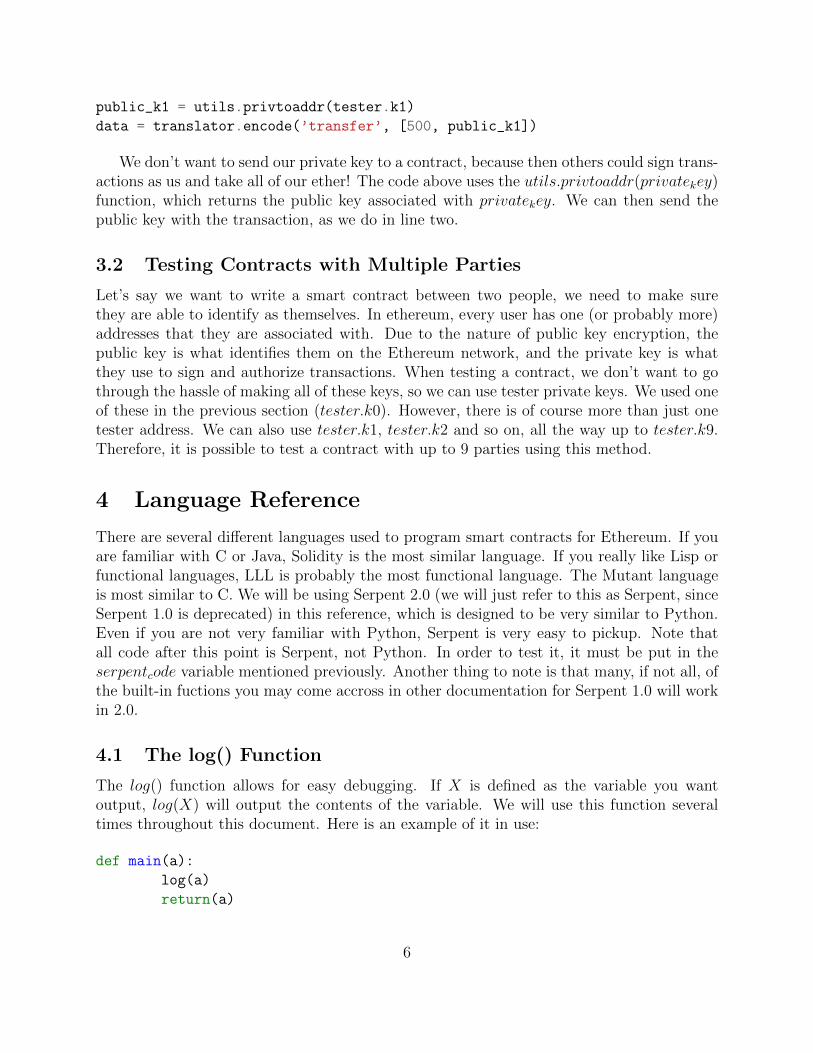
public_k1 = utils.privtoaddr(tester.k1)
data = translator.encode(’transfer’, [500, public_k1])
We don’t want to send our private key to a contract, because then others could sign trans-actions as us and take all of our ether! The code above uses the utils.privtoaddr(privatekey)function, which returns the public key associated with privatekey. We can then send thepublic key with the transaction, as we do in line two.
3.2 Testing Contracts with Multiple Parties
Let’s say we want to write a smart contract between two people, we need to make surethey are able to identify as themselves. In ethereum, every user has one (or probably more)addresses that they are associated with. Due to the nature of public key encryption, thepublic key is what identifies them on the Ethereum network, and the private key is whatthey use to sign and authorize transactions. When testing a contract, we don’t want to gothrough the hassle of making all of these keys, so we can use tester private keys. We used oneof these in the previous section (tester.k0). However, there is of course more than just onetester address. We can also use tester.k1, tester.k2 and so on, all the way up to tester.k9.Therefore, it is possible to test a contract with up to 9 parties using this method.
4 Language Reference
There are several different languages used to program smart contracts for Ethereum. If youare familiar with C or Java, Solidity is the most similar language. If you really like Lisp orfunctional languages, LLL is probably the most functional language. The Mutant languageis most similar to C. We will be using Serpent 2.0 (we will just refer to this as Serpent, sinceSerpent 1.0 is deprecated) in this reference, which is designed to be very similar to Python.Even if you are not very familiar with Python, Serpent is very easy to pickup. Note thatall code after this point is Serpent, not Python. In order to test it, it must be put in theserpentcode variable mentioned previously. Another thing to note is that many, if not all, ofthe built-in fuctions you may come accross in other documentation for Serpent 1.0 will workin 2.0.
4.1 The log() Function
The log() function allows for easy debugging. If X is defined as the variable you wantoutput, log(X) will output the contents of the variable. We will use this function severaltimes throughout this document. Here is an example of it in use:
def main(a):
log(a)
return(a)
6

This code will output the variable stored in a. Since we passed in a three, it should be athree. Below is the output of the log function:
(’LOG’, ’c305c901078781c232a2a521c2af7980f8385ee9’, [3L], [])
The part that is important to us is the third piece of data stored in the tupple, specifically,the [3L]. This tells us that the value in the variable is a three. Unfortunately, the rest ofthis function is not well documented currently.
4.2 Variables
Assigning variables in Serpent is very easy. Simply set the variable equal to whatever youwould like the variable to equal. Here’s a few examples:
a = 5
b = 10
c = 7
a = b
If we printed out the variables a, b and c, we would see 10, 10 and 7, respectively.
Special Variables Serpent creates several special variables that reference certain pieces ofdata or pieces of the blockchain that may be important for your code. We have reproducedthe table from the official Serpent 2.0 wiki tutorial (and reworded portions) for your referencebelow. [7]
7
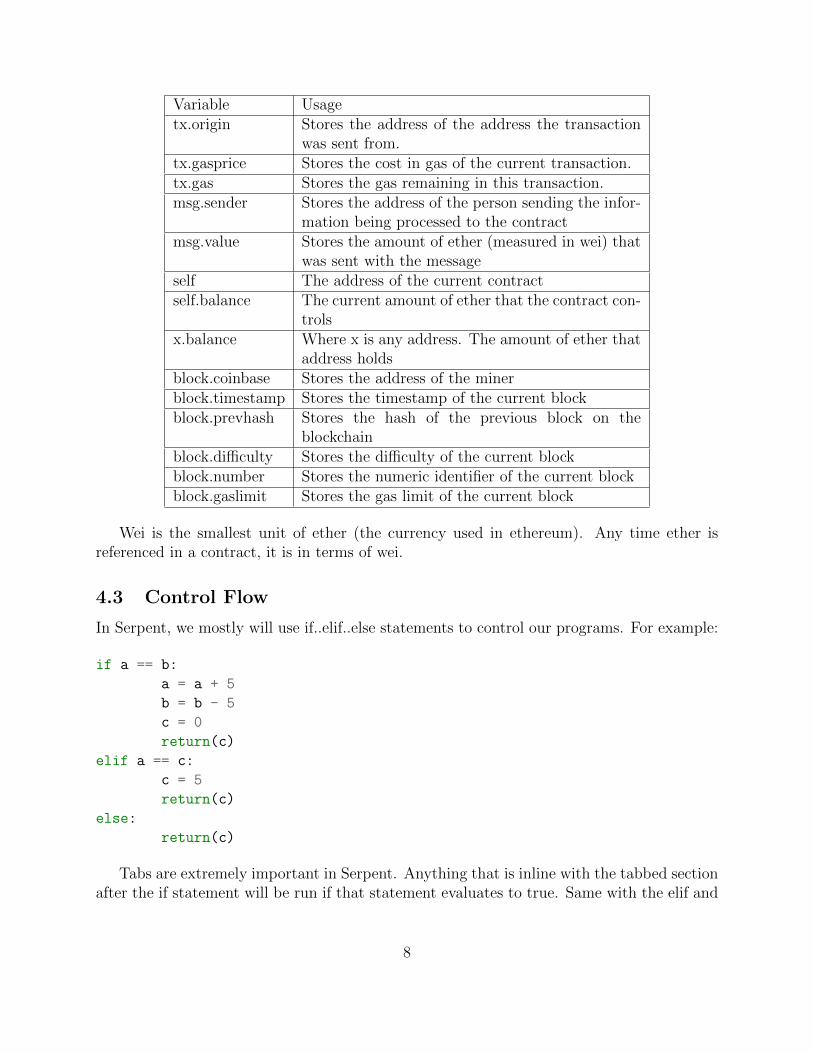
Variable Usagetx.origin Stores the address of the address the transaction
was sent from.tx.gasprice Stores the cost in gas of the current transaction.tx.gas Stores the gas remaining in this transaction.msg.sender Stores the address of the person sending the infor-
mation being processed to the contractmsg.value Stores the amount of ether (measured in wei) that
was sent with the messageself The address of the current contractself.balance The current amount of ether that the contract con-
trolsx.balance Where x is any address. The amount of ether that
address holdsblock.coinbase Stores the address of the minerblock.timestamp Stores the timestamp of the current blockblock.prevhash Stores the hash of the previous block on the
blockchainblock.difficulty Stores the difficulty of the current blockblock.number Stores the numeric identifier of the current blockblock.gaslimit Stores the gas limit of the current block
Wei is the smallest unit of ether (the currency used in ethereum). Any time ether isreferenced in a contract, it is in terms of wei.
4.3 Control Flow
In Serpent, we mostly will use if..elif..else statements to control our programs. For example:
if a == b:
a = a + 5
b = b - 5
c = 0
return(c)
elif a == c:
c = 5
return(c)
else:
return(c)
Tabs are extremely important in Serpent. Anything that is inline with the tabbed sectionafter the if statement will be run if that statement evaluates to true. Same with the elif and
8
else statements. This will also apply to functions and loops when we define those later on.[7]
Important to also note is the not modifier. For example, in the following code:
if not (a == b):
return(c)
The code in the if statement will not be run if a is equal to b. It will only run if they aredifferent. The not modifier is very similar to the ! modifier in Java and most other languages.[7]
4.4 Loops
Serpent supports while loops, which are used like so:
somenum = 10
while somenum > 1:
log(somenum)
somenum = somenum - 1
This code will log each number starting at 10, decrementing and outputting until it getsto 1. [6]
4.5 Arrays
Arrays are very simple in serpent. A simple example is below:
def main():
arr1 = array(1024)
arr1[0] = 10
arr1[129] = 40
return(arr1[129])
This code above simply creates an array of size 1024, assigns 10 to the zero-th index andassigns 40 to index 129. It then returns the value at index 129 in the array [7, 6].
Functions that can be used with Arrays include:
• slice(arr, items=s, items=e) where arr is an array, s is the start address and e is theend address. This function splits out the portion of the array between s and e, wheres <= e. That portion of the array is returned.
• len(arr) returns the length of the arr array.
Returning arrays is also possible [7]. In order to return an array, append : arr to the endof the array in the return statement. For example:
9
def main():
arr1 = array(10)
arr1[0] = 10
arr1[5] = 40
return(arr1:arr)
This will return an array where the values were initialized to zero and address 0 and 5will be initialized to 10 and 40, respectively [7].
4.6 Strings
Serpent uses two different types of strings. The first is called short strings. These are treatedlike a number by Serpent and can be manipulated as such. Long strings are treated like anarray by serpent, and are treated as such. Long strings are very similar to strings in C, forexample. As a contract programmer, we must make sure we know which variables are shortstrings and which variables are long strings, since we will need to treat these differently. [7]
Short Strings Short strings are very easy to work with since they are just treated asnumbers. Let’s declare a couple new short strings:
str1 = "string"
str2 = "string"
str3 = "string3"
Very simple to do. Comparing two short strings is also really easy:
return (str1 == str2)
return (str1 == str3)
The first return statement will output 1 which symbolizes true while the second statementwill output 0 which symbolizes false. [7]
Long Strings Long strings are implemented similarly to how they are in C, where thestring is just an array of characters. There are several commands that are used to work withlong strings:
• In order to define a new long string, do the following:
arbitrary_string = text("This is my string")
• If you would like to change a specific character of the string, do the following:
arbitrary_string = text("This is my string")
setch(arbitrary_string, 5, "Y")
10

In the setch() function, we are changing the fifth index of the string arbitrary stringto ′Y ′.
• If you would like to have the ASCII value of a certain index returned, do the follow-ing:
arbitrary_string = text("This is my string")
getch(arbitrary_string, 5)
This will retrieve the ASCII value at the fifth index in arbitrary string.
• All functions that work on arrays will also work on long strings.
[7, 6]
4.7 Functions
Functions work in Ethereum very similarly to how they work in other languages. You canprobably infer how they are used from some of the previous examples. Here is an examplewith no parameters:
def main():
#Some operations
return(0)
And here is an example with three parameters:
def main(a,b,c):
#Some operations
return(0)
Defining functions is very simple and makes code a lot easier to read and write [7].But how do we call these functions from within a contract? We must call them usingself.function name(params). Any time we reference a function within the contract, wemust call it from self (a reference to the current contract). Note that any function can becalled directly by a user. For example, lets say we have a function A and a function B. If Bhas the logic that sends ether and A just does the check, and A calls B to send the ether,an aversary could simply call funcion B and get the ether without ever going through thechecks. We can fix this by not putting that type of logic in seperate functions.
Special Function Blocks There are three different special function blocks. These areused to declare functions that will always execute before certain other functions.
First, there is init. The init function will be run once when the contract is created. It isgood for declaring variables before they are used in other functions.
Next, there is shared. The shared function is executed before init and any other func-tions.
Finally, there is the any function. The any function is executed before any other functionexcept the init function [7].
11

4.8 Sending Wei
Contracts not only can have ether (currency) sent to them (via msg.value), but they can alsosend ether themselves. msg.value holds the amount of wei that was sent with the contract.
In order to send wei to another user, we use the send function. For example, lets say Iwanted to send 50 wei to the user’s address stored in x, I would use the code below.
send(x, 50)
This would then send 50 wei from this contract’s pool of ether (the ether that otherusers/contracts have sent to it), to the address stored in x.
How do we get a user’s address? The easiest way is to store it when that user sendsa command to the contract. The user’s address will be stored in msg.sender. If we savethat address in persistent storage, we can access it later when needed [7] (we will go overpersistent storage in the next section).
One thing to note is that the send function will send all of the remaining gas in thecontract to the destination address, minus 25. if we want to define how much gas to send,we specify it as the first parameter. If we wanted to send only 100 gas, we would send thefollowing:
send(100,x, 50)
4.9 Persistant Data Structures
Persistant data structures can be declared using the data declaration. This allows for thedeclaration of arrays and tupples. For example, the following code will declare a two dimen-sional array:
data twoDimArray[][]
Very simple, the next example will declare an array of tupples. The tupples contain twoitems each - item1 and item2.
data arrayWithTupples[](item1, item2)
These variables will be persistent throughout the contract’s execution (In any command/-function called by any user to the same contract instance). Please note that data shouldnot be declared inside of a function, rather should be at the top of the contract before anyfunction definitions.
Now, lets say I wanted to access the data in these structures. How would I do that? Itssimple, the arrays use standard array syntax and tupples can be accessed using a period andthen the name of the value we want to access. Lets say, for example I wanted to access theitem1 value from the arrayWithTupples strucutre from the second array address, I woulddo that like so:
12

x = self.arrayWithTupples[2].item1
And that will put the item1 value stored in the self.arrayWithTupples array into x.[7] Note that we will need the self declaration so the contract knows we are referencing thearrayWithTupples structure in this contract.
Self.storage[] Ethereum also supplies a persistent key-value store called self.storage[].This is mostly used in older contracts and also is used in our example below for simplicity.Essentially, put the key in the brackets and set it equal to the value you want. An exampleis below when I set the value y to the key x.
self.storage["x"] = "y"
Now whenever self.storage[”x”] is called, it will return y. For simple storage, self.storage[]is useful, but for larger contracts, we reccomend the use of data (unless you need a key valuestorage, of course). [7, 6]
4.10 Hashing
Serpent allows for hashing using three different hash functions - SHA3, SHA-256 and RIPEMD-160. The function takes the parameters a and s where a is the array of elements to be hashedand s is the size of the array to be hashed. For example, we are going to hash the array[4,5,5,11,1] using SHA-256 and return the value below. [7]
def main(a):
bleh = array(5)
bleh[0] = 4
bleh[1] = 5
bleh[2] = 5
bleh[3] = 11
bleh[4] = 1
return(sha256(bleh, items=5))
The output is [9295822402837589518229945753156341143806448999392516673354862354350599884701L]The function definitions are:
• x = sha3(a, size = s) for SHA3
• x = sha256(a, size = s) for SHA-256
• x = ripemd160(a, size = s) for RIPEMD-160
Please note that any inputs to the hash function can be seen by anyone looking at theblock chain. Therefore, when keeping secrets between two parties, the hash values shouldbe computed off of the blockchain then only the hash value put on the block chain. Whenwe want to decode the secret in the hash, we should then send the nonce and the text tothe blockchain, rehash it, and compare them with the prestored hash value. There is moredetail about this process in the section ”Failing to Use Cryptography”.
13
4.11 Random Number Generation
In order to do random number generation, you must use one of the previous blocks as aseed. Then, use modulus to ensure that the random number is in the necessary range. Inthe following examples, we will do just this.
In this example, we will the function will take a parameter a. It will generate a numberbetween 0 and a (including zero).
def main(a):
raw = block.prevhash
if raw < 0:
raw = 0 - raw
return(raw%a)
Note that we must make sure that the raw number is positive. [3]If we wanted the lowest number to be a number other than zero, we must add that
number to the random number generated.Now, when we are referencing previous blocks, we need to make sure there are blocks
before our current block that we can reference. On the actual ethereum blockchain, thiswould not be a big deal since once we build one block on the genesis block, we will alwayshave a previous block. When testing, however, we will need to create more blocks. This willalso give us more ether if our tester runs out of ether. The code to mine a block is below:
s.mine(n=1,coinbase=tester.a0)
where n refers to the number of blocks to be mined and coinbase refers to the testeraddress that will ”do” the mining. Note that this is python code, and the s variable referencesthe current state of the ”blockchain”. You can not mine from inside of a Serpent contract.This function must be used after we have create the state [8]
4.12 The Callstack
The maximum callstack in Ethereum is of size 1024. An attacker could call a contract withan already existing callstack. If a send function (or any function) is called while already atthe maximum callstack size, it will create the exception, but the execution of the contractwill continue. Therefore, they could cause certain portions of the contract to be skipped.To solve this, put the following code at the beginning of your functions to ensure that anattacker can not try to skip portions of the contact:
if self.test_callstack() != 1: return(-1)
Then create the function testcallstack():
def test_callstack(): return(1)
This will add a function to the callstack. If an attacker tries to break the callstack by 1,it will cause the contract to not execute.
14
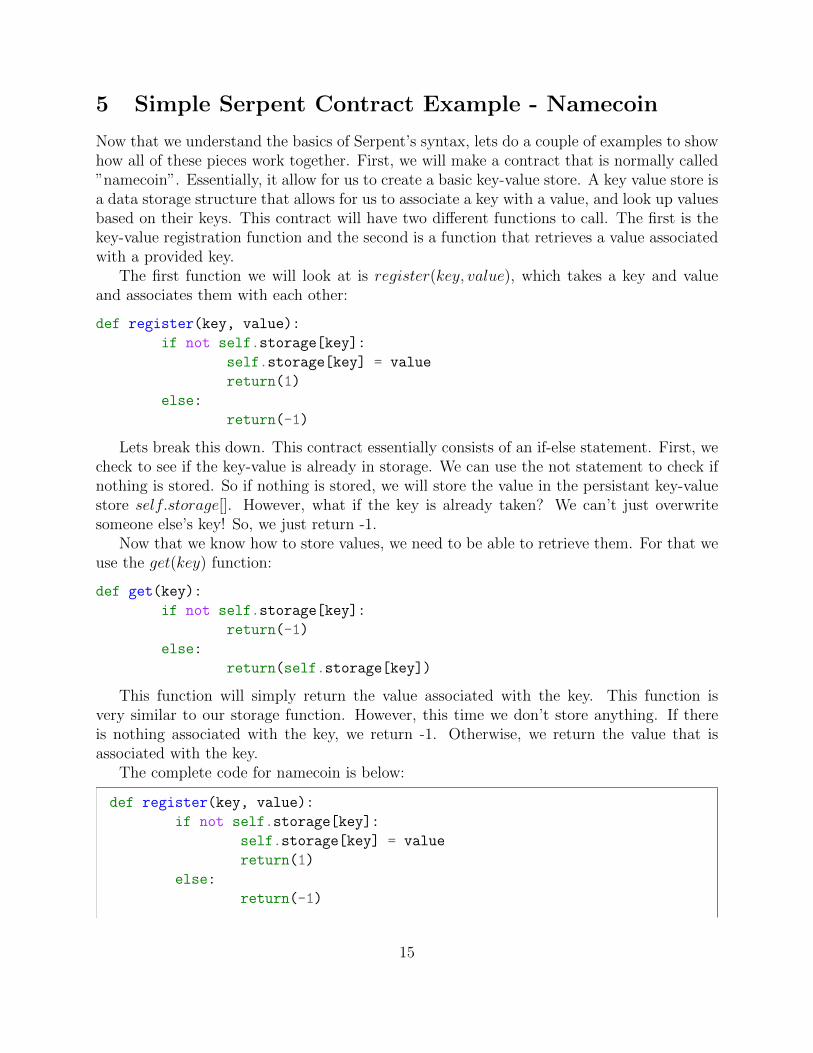
5 Simple Serpent Contract Example - Namecoin
Now that we understand the basics of Serpent’s syntax, lets do a couple of examples to showhow all of these pieces work together. First, we will make a contract that is normally called”namecoin”. Essentially, it allow for us to create a basic key-value store. A key value store isa data storage structure that allows for us to associate a key with a value, and look up valuesbased on their keys. This contract will have two different functions to call. The first is thekey-value registration function and the second is a function that retrieves a value associatedwith a provided key.
The first function we will look at is register(key, value), which takes a key and valueand associates them with each other:
def register(key, value):
if not self.storage[key]:
self.storage[key] = value
return(1)
else:
return(-1)
Lets break this down. This contract essentially consists of an if-else statement. First, wecheck to see if the key-value is already in storage. We can use the not statement to check ifnothing is stored. So if nothing is stored, we will store the value in the persistant key-valuestore self.storage[]. However, what if the key is already taken? We can’t just overwritesomeone else’s key! So, we just return -1.
Now that we know how to store values, we need to be able to retrieve them. For that weuse the get(key) function:
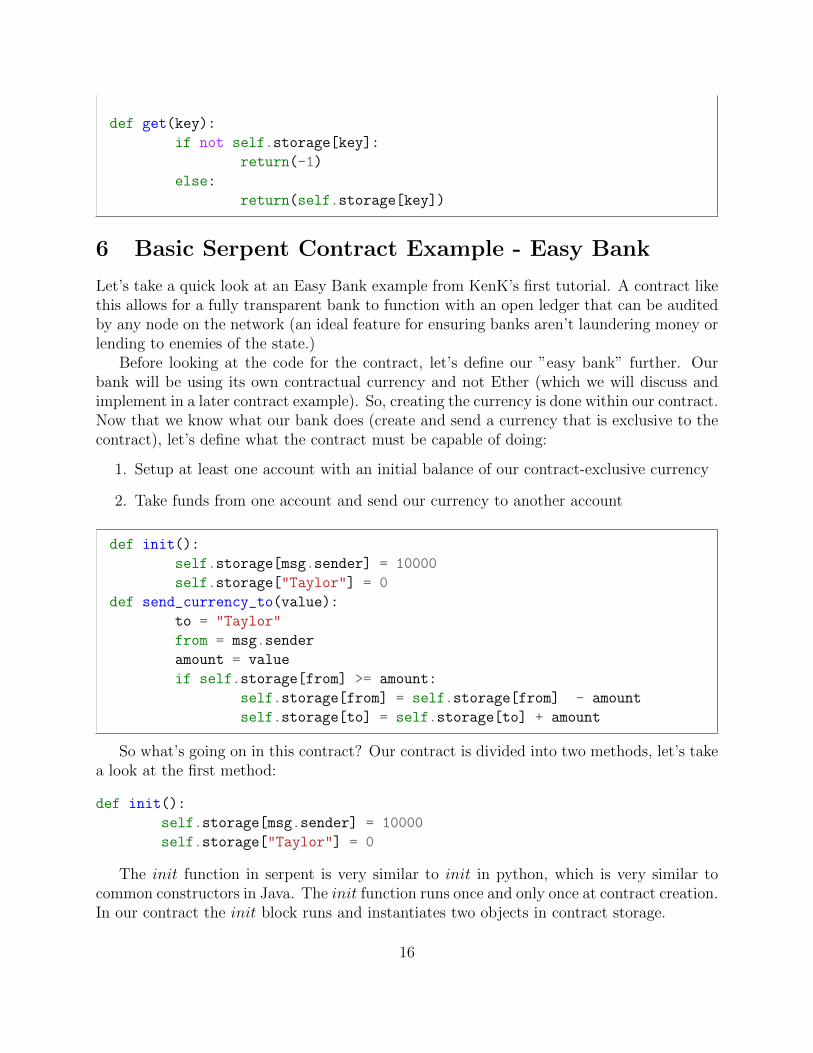
def get(key):
if not self.storage[key]:
return(-1)
else:
return(self.storage[key])
This function will simply return the value associated with the key. This function isvery similar to our storage function. However, this time we don’t store anything. If thereis nothing associated with the key, we return -1. Otherwise, we return the value that isassociated with the key.
The complete code for namecoin is below:
def register(key, value):
if not self.storage[key]:
self.storage[key] = value
return(1)
else:
return(-1)
15
def get(key):
if not self.storage[key]:
return(-1)
else:
return(self.storage[key])
6 Basic Serpent Contract Example - Easy Bank
Let’s take a quick look at an Easy Bank example from KenK’s first tutorial. A contract likethis allows for a fully transparent bank to function with an open ledger that can be auditedby any node on the network (an ideal feature for ensuring banks aren’t laundering money orlending to enemies of the state.)
Before looking at the code for the contract, let’s define our ”easy bank” further. Ourbank will be using its own contractual currency and not Ether (which we will discuss andimplement in a later contract example). So, creating the currency is done within our contract.Now that we know what our bank does (create and send a currency that is exclusive to thecontract), let’s define what the contract must be capable of doing:
1. Setup at least one account with an initial balance of our contract-exclusive currency
2. Take funds from one account and send our currency to another account
def init():
self.storage[msg.sender] = 10000
self.storage["Taylor"] = 0
def send_currency_to(value):
to = "Taylor"
from = msg.sender
amount = value
if self.storage[from] >= amount:
self.storage[from] = self.storage[from] - amount
self.storage[to] = self.storage[to] + amount
So what’s going on in this contract? Our contract is divided into two methods, let’s takea look at the first method:
def init():
self.storage[msg.sender] = 10000
self.storage["Taylor"] = 0
The init function in serpent is very similar to init in python, which is very similar tocommon constructors in Java. The init function runs once and only once at contract creation.In our contract the init block runs and instantiates two objects in contract storage.
16
Our init method, from a general perspective, intializes one account with a balance of10,000U (this will be how we donote our contract-exclusive currency) and another accountwith a balance of 0U. In our Ethereum contract, storage is handled with key value pairs.Every contract has their own storage which is accessed by calling self.storage[key]. So inour example the easy bank’s contract storage now has a value of 10,000U at key msg.sender(we’ll identify what this is in a moment) and at the key ”Taylor” there is a value of 0U.
Awesome. So who is msg.sender? msg.sender is the person who is sending the specificmessage to the contract - which in this case is us. msg.sender is unique and assigned andverified by the network. We now have a heightened understanding of init, lets look at oursend method.
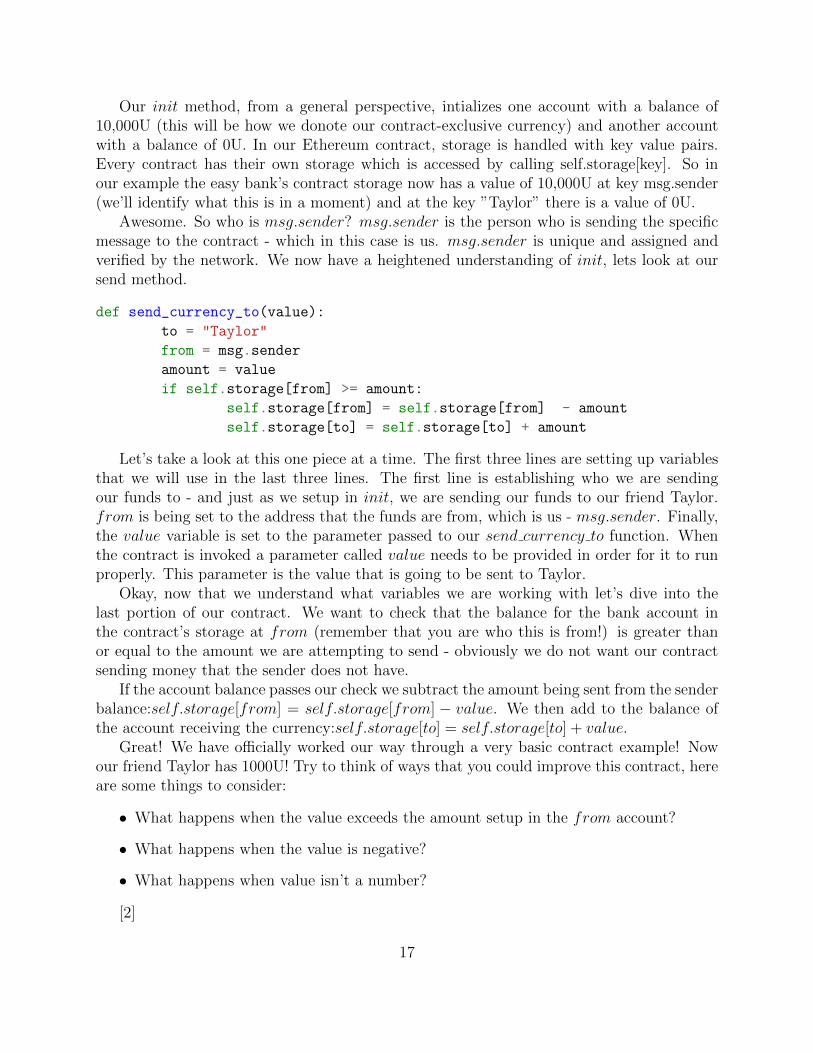
def send_currency_to(value):
to = "Taylor"
from = msg.sender
amount = value
if self.storage[from] >= amount:
self.storage[from] = self.storage[from] - amount
self.storage[to] = self.storage[to] + amount
Let’s take a look at this one piece at a time. The first three lines are setting up variablesthat we will use in the last three lines. The first line is establishing who we are sendingour funds to - and just as we setup in init, we are sending our funds to our friend Taylor.from is being set to the address that the funds are from, which is us - msg.sender. Finally,the value variable is set to the parameter passed to our send currency to function. Whenthe contract is invoked a parameter called value needs to be provided in order for it to runproperly. This parameter is the value that is going to be sent to Taylor.
Okay, now that we understand what variables we are working with let’s dive into thelast portion of our contract. We want to check that the balance for the bank account inthe contract’s storage at from (remember that you are who this is from!) is greater thanor equal to the amount we are attempting to send - obviously we do not want our contractsending money that the sender does not have.
If the account balance passes our check we subtract the amount being sent from the senderbalance:self.storage[from] = self.storage[from] − value. We then add to the balance ofthe account receiving the currency:self.storage[to] = self.storage[to] + value.
Great! We have officially worked our way through a very basic contract example! Nowour friend Taylor has 1000U! Try to think of ways that you could improve this contract, hereare some things to consider:
• What happens when the value exceeds the amount setup in the from account?
• What happens when the value is negative?
• What happens when value isn’t a number?
[2]
17

7 Moderate Serpent Contract Example - Bank
Let’s take a quick look at a smart contract that impelements a bank. A contract like thisallows for a fully transparent bank to function with an open ledger that can be audited byany node on the network (an ideal feature for ensuring banks aren’t laundering money orlending to enemies of the state.)
Before looking at the code for the contract, let’s define our bank further. Our bankwill allow users to store Ether in units of Wei. It must be capable of the following actionsallowing users to:
1. Deposit money into their account.
2. Transfer money from their account to another account.
3. Withdraw their money.
4. Check their balance.
def deposit():
if not self.storage[msg.sender]:
self.storage[msg.sender] = 0
self.storage[msg.sender] += msg.value
return(1)
def withdraw(amount):
if self.storage[msg.sender] < amount:
return(-1)
else:
self.storage[msg.sender] -= amount
send(0, msg.sender, amount)
return(1)
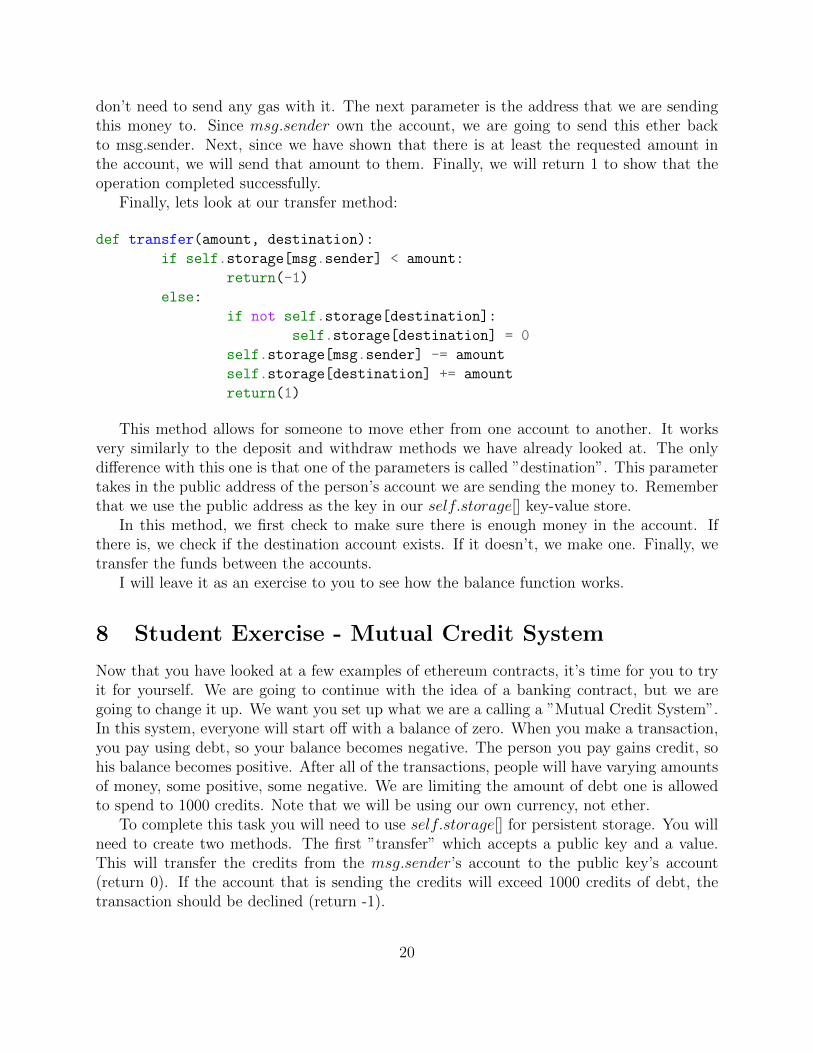
def transfer(amount, destination):
if self.storage[msg.sender] < amount:
return(-1)
else:
if not self.storage[destination]:
self.storage[destination] = 0
self.storage[msg.sender] -= amount
self.storage[destination] += amount
return(1)
def balance():
if not self.storage[msg.sender]:
return(-1)
18

else:
return(self.storage[msg.sender])
So what’s going on in this contract? Our contract is divided into four methods, let’s takea look at the first method:
def deposit():
if not self.storage[msg.sender]:
self.storage[msg.sender] = 0
self.storage[msg.sender] += msg.value
return(1)
This method is a relatively simple method. It allows for a user to deposit funds into theiraccount. Similar to our Namecoin example, we are using self.storage[] so we can associatethe address of the person who owns the account with the value of the ether they are storingin their account. We do this on the third and fourth lines, where we use msg.sender asthe key. msg.sender stores the address of whomever sent the command. The other built-invariable reference we use is msg.value. This stores the amount of ether (measured in wei)that is sent with the transaction. When ether is sent with a command to a contract, it isstored by the contract. Therefore, we just need to account for how much each person owes.This is stored as the value we are associating with the key in self.storage[].
This method first checks if the person already has an account. If they don’t, we makeone for them and give it a zero balance. Next, it adds the value sent with the deposit to theperson’s account (stored in self.storage[]). Then, it returns 1. Since something will alwaysbe deposited, there isn’t really an error condition that can occur (where we may returnsomething else).
def withdraw(amount):
if self.storage[msg.sender] < amount:
return(-1)
else:
self.storage[msg.sender] -= amount
send(0, msg.sender, amount)
return(1)
This method here is doing essentially the opposite of the of the deposit method. Herewe are taking amount ether out of our account and sending it to ourself. First, we check tomake sure they have enough to withdraw. If we don’t, we return -1. We could technicallyreturn anything, but in this guide, we use negative numbers to symbolize that there is anerror. If they do have enough wei in there account, we simply subtract that from that fromtheir account (still using msg.sender as a key). However, how do we send that wei backto the account owner? Simple! We simply use the send function. The send function takesthree parameters. First, it takes the amount of gas we are sending with the contract. Sincewe are going to assume that this is being refunded to a user and not another contract, we
19
don’t need to send any gas with it. The next parameter is the address that we are sendingthis money to. Since msg.sender own the account, we are going to send this ether backto msg.sender. Next, since we have shown that there is at least the requested amount inthe account, we will send that amount to them. Finally, we will return 1 to show that theoperation completed successfully.
Finally, lets look at our transfer method:
def transfer(amount, destination):
if self.storage[msg.sender] < amount:
return(-1)
else:
if not self.storage[destination]:
self.storage[destination] = 0
self.storage[msg.sender] -= amount
self.storage[destination] += amount
return(1)
This method allows for someone to move ether from one account to another. It worksvery similarly to the deposit and withdraw methods we have already looked at. The onlydifference with this one is that one of the parameters is called ”destination”. This parametertakes in the public address of the person’s account we are sending the money to. Rememberthat we use the public address as the key in our self.storage[] key-value store.
In this method, we first check to make sure there is enough money in the account. Ifthere is, we check if the destination account exists. If it doesn’t, we make one. Finally, wetransfer the funds between the accounts.
I will leave it as an exercise to you to see how the balance function works.
8 Student Exercise - Mutual Credit System
Now that you have looked at a few examples of ethereum contracts, it’s time for you to tryit for yourself. We are going to continue with the idea of a banking contract, but we aregoing to change it up. We want you set up what we are a calling a ”Mutual Credit System”.In this system, everyone will start off with a balance of zero. When you make a transaction,you pay using debt, so your balance becomes negative. The person you pay gains credit, sohis balance becomes positive. After all of the transactions, people will have varying amountsof money, some positive, some negative. We are limiting the amount of debt one is allowedto spend to 1000 credits. Note that we will be using our own currency, not ether.
To complete this task you will need to use self.storage[] for persistent storage. You willneed to create two methods. The first ”transfer” which accepts a public key and a value.This will transfer the credits from the msg.sender’s account to the public key’s account(return 0). If the account that is sending the credits will exceed 1000 credits of debt, thetransaction should be declined (return -1).
20
You will also need to implement a balance method that takes in the public key the senderwants the balance of, and returns the balance of that public key.
For more information on Mutual Credit Systems, visit http://p2pfoundation.net/
Mutual_Credit.
9 Resource Overview
This guide is provided as a ”one stop shop” for a quick way to learn how to programsmart contracts with ethereum. However, the platform is always changing and it wouldbe impossible for this guide to cover everything. We have provided some links below thatprovide some additional insight into programming ethereum contracts. All of these sourceswere actually used in creating this guide.
• Ethereum Wiki - https://github.com/ethereum/wiki/wiki - This source has somefantastic tutorials and reference documentation about the underlying systems thatpower Ethereum. This should be your first stop when you have problems with Ethereum.
• Serpent Tutorial - https://github.com/ethereum/wiki/wiki/Serpent - This is theofficial serpent tutorial that is on the Ethereum Wiki. It gives a good, brief overviewof many of the most used components of serpent and goes over basic testing.
• KenK’s Tutorials - Most of these tutorials use old versions of Serpent, but should beupdated soon. These give a great overview of some of Ethereum’s more advancedfeatures. Note that these tutorials use cpp-ethereum and not pyethereum.
– Part 1: http://forum.ethereum.org/discussion/1634/tutorial-1-your-first-contract
– Part 2: http://forum.ethereum.org/discussion/1635/tutorial-2-rainbow-coin
– Part 3: http://forum.ethereum.org/discussion/1636/tutorial-3-introduction-to-the-javascript-api
References
[1] V. Buterin. Ethereum white paper. https://www.ethereum.org/pdfs/
EthereumWhitePaper.pdf, 2014.
[2] KenK. Kenk’s first contract tutorial. http://forum.ethereum.org/discussion/1634/tutorial-1-your-first-contract”, 2014.
[3] PeterBorah. ethereum-powerball. https://github.com/PeterBorah/ethereum-
powerball/tree/master/contracts, 2014.
21
[4] Elaine Shi and Andrew Miller. Undergraduate ethereum lab at mary-land and insights gained. https://docs.google.com/presentation/d/1esw_
lizWG06zrWaOQKcbwrySM4K9KzmRD3rtBUx0zEw/edit?usp=sharing”, 2015.
[5] Pyethereum team. pyethereum/tests/test contracts.py. https://github.com/
ethereum/pyethereum/blob/develop/tests/test_contracts.py, 2015.
[6] Ethereum Wiki. Serpent 1.0 (old). https://github.com/ethereum/wiki/wiki/
Serpent-1.0-(old), 2015.
[7] Etheruem Wiki. Serpent. https://github.com/ethereum/wiki/wiki/Serpent, 2015.
[8] Pyethereum Wiki. Using pyethereum.tester. https://github.com/ethereum/
pyethereum/wiki/Using-pyethereum.tester, 2014.
22