Embed Size (px)
Citation preview

A Practical Guide to Carlson Survey 2016
Rick Ellis Douglas L. Aaberg, PLS Duke Gardner
A CADapult Press Publication

ii
Copyright Copyright © CADapult Press, Inc. 2016 All rights reserved. No part of this publication may be reproduced in any form, or by any means electronic, mechanical, recording, photocopying, or otherwise, without written permission from the publisher, except for brief quotations used in reviews, or for marketing purposes specific to the promotion of this work. ISBN: 978-1-934865-26-2 Although CADapult Press has made every attempt to ensure the accuracy of the contents of this book, the publisher and author make no representations or warranty with respect to accuracy or completeness of the contents in this book, including without limitation warranties of fitness for a particular purpose. The datasets included in this book are for training purposes only. Carlson Survey and Carlson Civil are registered trademarks of Carlson Software. AutoCAD Civil 3D, AutoCAD Map 3D, and AutoCAD® are registered trademarks of Autodesk, Inc. All other trademarks are the property of their respective owners. Published in the United States of America by: CADapult Press, Inc, (503) 829-8929 [email protected] Printed and manufactured in the United States of America

iii
About the Author Rick Ellis has worked with and taught Civil/Survey CAD software since the mid-90s. He is the Author of several critically acclaimed books on AutoCAD Map 3D and other CAD packages. He continues to work on projects in a production environment, in addition to teaching classes to organizations both large and small. This practical background and approach has made him an award winning speaker at Autodesk University, a member of the national speaker team for the AUGI CAD Camps and a sought after instructor by organizations around the world. Rick can be reached at: [email protected] Douglas L. Aaberg, PLS is a licensed Professional Land Surveyor in the Commonwealth of Massachusetts and in the State of Colorado. His career in the Land Surveying/Civil Engineering business spans four decades. Having used Carlson Software exclusively since 1998, Doug is a recognized expert in applying the continually expanding capability of Carlson’s programming to the everyday “work flow” of land surveyors and engineers. After owning and operating his own company for fifteen years, Doug now dedicates his time consulting to both large and small land survey and engineering firms through on-site training, remote support and individually tailored documentation. Duke Gardner has served the land surveying and civil engineering communities for over 35 years in a wide variety of support roles. His focus on the theory as well as the practice skills needed to achieve successful implementation made him an excellent partner in the author team for this guide. Acknowledgements Thank you to Carlson Software for their cooperation. A special thanks to Gary Rosen and Lauren Lax from Carlson Software for their assistance and encouragement. Without it this book would not have been possible.
Exercise Data I would like to thank the City of Springfield, Oregon for providing the data for parts of this book. The dataset provided is for illustration purposes only. While it is based on real world information to add relevance to the exercises, it has been altered and modified to more effectively demonstrate certain features as well as to protect all parties involved. The data should not be used for any project work and may not represent actual places or things. It is prohibited to redistribute this data beyond your personal use as a component of training.

iv
A Practical Guide to Carlson Survey 2016 Introduction Congratulations on choosing this course to help you learn how to use Carlson Survey 2016. The term “practical” is used in the title because this course focuses on what you need to effectively use Carlson Software, and does not complicate your learning experience with unnecessary details of every feature in the product. Each lesson contains the concepts and principles of each feature to provide you with the background and foundation of knowledge that you need to complete the lesson. You then work through real world exercises to reinforce your understanding and provide you with practice on common tasks that other professionals are performing with Carlson Survey in the workplace every day. You can take the lessons in this course in whatever order is appropriate for your personal needs. If you want to concentrate on specific features, the lesson for those features does not require that you complete prior lessons. With this course organization, you can customize your own individual approach to learning Carlson Survey. When you complete this course, you will have the background and knowledge to apply Carlson Survey to your job tasks, and become more effective and productive in your job. Course Objectives The objectives of this course are performance based. In other words, once you have completed the course, you will be able to perform each objective listed. If you are already familiar with Carlson Software, you will be able to analyze your existing workflows, and make changes to improve your performance based on the tools and features that you learn and practice in this course. After completing this course, you will be able to:
• Navigate the Pull-down Menus and Ribbon Menus • Set up Carlson Software to use the Project approach • Utilize various COGO tools • Enter Raw Survey Data at the Command Prompt • Enter Raw Survey Data in the Carlson Raw Data Editor • Adjust a Traverse with Compass and Angle Balance • Adjust a Traverse with Carlson SurvNet • Enter Deed Data to Create a Deed File • Perform a Deed Correlation with Field Data • Create and Edit Lots and Areas • Utilize Carlson LotNet to Generate Lots and Setbacks • Edit and Annotate LotNet Lots • Setup Field to Finish Codes and Generate 2D and 3D Geometry • Utilize Various Critical Coordinate File Utilities • Utilize the Point History to Record all Edits to Coordinate Files • Use Special Linetypes for Map Creation

v
Prerequisites Before starting this course, you should have a basic working knowledge of CAD. While a deep understanding of all CAD functionality is not required, but you should be able to:
• Pan and Zoom in the drawing screen. • Describe what layers are and change the current layer. • Create basic CAD geometry, such as lines, polylines and circles. • Use Object Snaps. • Describe what blocks are, and how to insert them. • Perform basic CAD editing functions such as Erase, Copy, and Move.
If you are not familiar with these functions, you can refer to the Help system throughout the course to gain the fundamental skills needed to complete the exercises. This text builds on the foundation of knowledge established in A Practical Guide to Carlson Software Fundamentals 2016. While a mastery of the material in that book is not mandatory to the successful completion of this text, it is highly recommended as a prerequisite to this courseware. Those topics include:
• Working with Points and Point Data • Managing Point Groups • Working with Surfaces • Generating and Labeling Contours • Performing Basic Drawing and Editing in CAD • Importing and Exporting Land XML Data • Working with Google Earth and World files • Generating Linework Labels
Conventions The course uses the following icons and formatting to draw your attention to guidelines that increase your effectiveness in Carlson Software, or provide deeper insight into a subject.
The magnifying glass indicates that this text provides deeper insights into the subject.
The compass indicates that this text provides guidance that is based on the experience of other users of Carlson Software. This guidance is often in the form of how to perform a task more efficiently.

vi
Downloading and Installing the Datasets In order to perform the exercises in this book, you must download a zip file and install the datasets. Type the address below into your web browser to download the dataset. www.cadapult-software.com/datasets/APG_SURVEY2016.zip Unzip the Files Unzip the file APG_SURVEY2016.zip directly to the C drive. The dataset will be copied to the folder: C:\Carlson Projects\
A folder called APG Survey 2016 Data is created that contains several folders with source data for the exercises in this book.
There are folders called APG Survey 2016 Chapter X These folders contain project files and drawings that are used to start the corresponding Chapters.
There are also folders created called APG 2016 Lesson X_X These folders contain project files and drawings where the lesson number of the folder corresponds to the lesson numbers in the book. This will allow you to jump in at the beginning of many of the lessons in the book, and do just the specific exercises that you want, if you do not have time to work through the book from cover to cover.
Exercises The exercises in this course have been designed to represent common tasks that are performed by civil engineers, surveyors, designers and drafters. The data included in the exercises are typical drawings, point files and other data used by professionals like you. Exercises provide higher level process information throughout the exercise tasks. You are given information about not only what to do, but why you are doing it. Many images are included to help guide you.
vii
Table of Contents
Chapter 1 A First Look at Carlson Survey 2016 .....................................................................................1 1.1 Lesson: A Guided Tour through the Pull-down Menus ..........................................................................2 1.2 Lesson: A Guided Tour through the Ribbon Menus ............................................................................ 14
Chapter 2 Working with Coordinate Geometry and Survey ............................................................... 19 2.1 Introduction to Coordinate Geometry ................................................................................................... 20 2.2 Lesson: Setting up and Configuring Carlson Survey ........................................................................... 24
2.2.1 Setting up Carlson Survey to Work with External Data .................................................... 28 2.2.2 Create a New Drawing ..................................................................................................... 33 2.2.3 Configure General Settings and Points Default Settings ................................................. 35
2.3 Lesson: Two Methods for Entering Field Survey Data ........................................................................ 38 2.3.1 Entering Traverse and Side Shot Data Using Carlson COGO ......................................... 42 2.3.2 Entering Data Using the Carlson Raw Data Editor .......................................................... 50
2.4 Lesson: Adjusting and Modifying Field Data ........................................................................................ 54 2.4.1 Adjusting a Traverse ......................................................................................................... 55
2.5 Lesson: Entering Deeds and Record Information ................................................................................ 60 2.5.1 Setting up Deed Defaults.................................................................................................. 62 2.5.2 Entering Record Deed Information ................................................................................... 63
2.6 Lesson: Creating a "Fit" ....................................................................................................................... 71 2.6.1 Creating New Points for Record Locations ...................................................................... 72 2.6.2 Making an Initial Analysis of Field vs Record Data .......................................................... 75 2.6.3 Deed Correlation .............................................................................................................. 76
Chapter 3 Data Collectors and Post Processing ................................................................................. 83 3.1 Lesson: Introduction to Data Collectors ............................................................................................... 84
3.1.1 Working with the Data Collector Programs ...................................................................... 88 3.2 Lesson: Working with the Raw Data Editor.......................................................................................... 92
3.2.1 Processing, Editing and Reporting a Traverse Closure ................................................... 93 3.3 Lesson: SurvNET ................................................................................................................................. 99
3.3.1 Creating a SurvNET Project ........................................................................................... 107 3.3.2 Processing Data With SurvNET ..................................................................................... 113 3.3.3 Adding Additional Traverse Data .................................................................................... 119 3.3.4 Constraining the Network ............................................................................................... 121 3.3.5 Add Sideshot Ellipses ..................................................................................................... 124 3.3.6 Generating Final Coordinates ........................................................................................ 125

viii
Chapter 4 Area/Layout .......................................................................................................................... 129 4.1 Lesson: Offsets, Intersections and Cul-De-Sacs ................................................................................ 130
4.1.1 Creating Right of Way and Offset Lines ......................................................................... 133 4.1.2 Creating a Cul-De-Sac .................................................................................................... 135
4.2 Lesson: Creating and Sizing Lots ....................................................................................................... 138 4.2.1 Creating Lots ................................................................................................................... 140 4.2.2 Resizing Lots with Hinged Area ...................................................................................... 141 4.2.3 Resizing Lots with Sliding Side Area .............................................................................. 142 4.2.4 Modify a lot by using AutoCAD Grips .............................................................................. 143
4.3 Lesson: Lot Areas, Annotations and Setback Lines ........................................................................... 145 4.3.1 Setting the Area Defaults ................................................................................................ 147 4.3.2 Annotating the Lot Areas ................................................................................................ 152 4.3.3 Setting up the Auto Annotate by Layer defaults Geometry (by Layers) ......................... 153 4.3.4 Alternate Setup - Load the Supplied Default Settings. ................................................... 177 4.3.5 Annotating the Plan ......................................................................................................... 180 4.3.6 Cleaning up The Annotations .......................................................................................... 181 4.3.7 Creating Setback Lines ................................................................................................... 189
Chapter 5 LotNET .................................................................................................................................. 191 5.1 Lesson: The Automated Process of Creating Lots and Roadways .................................................... 192
5.1.1 Setting up LotNET ........................................................................................................... 194 5.1.2 Designing a Subdivision .................................................................................................. 198
5.2 Lesson: Modifications and Redesign .................................................................................................. 206 5.2.1 Modifying Lots Created by LotNET ................................................................................. 208 5.2.2 Storing your design as an external .LOT file ................................................................... 219
5.3 Lesson: Annotations, Cleanup and Subareas .................................................................................... 223 5.3.1 Annotating the Subdivision ............................................................................................. 224 5.3.2 Renumber Lots ................................................................................................................ 226 5.3.3 Sub-Areas ....................................................................................................................... 226
Chapter 6 Working with Field to Finish ............................................................................................... 231 6.1 Lesson: Introduction to Field to Finish ................................................................................................ 232 6.2 Lesson: Setting up Field to Finish Codes and Settings ...................................................................... 235
6.2.1 Creating a New Drawing for Field to Finish .................................................................... 240 6.2.2 Creating a Field to Finish Code File (.FLD file) ............................................................... 242 6.2.3 Creating/Editing a Field to Finish Code .......................................................................... 246 6.2.4 Setting the Special Codes ............................................................................................... 254

ix
6.3 Lesson: Drawing with Field to Finish ................................................................................................. 258 6.3.1 Drawing Field to Finish Entities ...................................................................................... 261
6.4 Lesson: Using the Field to Finish Inspector ....................................................................................... 263 6.4.1 Using the Field to Finish Inspector ................................................................................. 265
6.5 Lesson: An Example of What Can be Done with Field to Finish ....................................................... 267 6.5.1 Putting it all Together ...................................................................................................... 269
Chapter 7 Ten More Essential Tools ................................................................................................... 277 7.1 Lesson: Using the Carlson Survey Inverse Command ...................................................................... 279
7.1.1 Inverse Between Two Points .......................................................................................... 281 7.2 Lesson: Creating a Coordinate File from an Existing Drawing .......................................................... 284
7.2.1 Update CRD from Drawing ............................................................................................. 286 7.3 Copying or Merging Two Coordinate Files......................................................................................... 290
7.3.1 The Copy/Merge CRD File Command ........................................................................... 292 7.3.2 Updating the Drawing ..................................................................................................... 296
7.4 Lesson: Creating a Point Comparison Report ................................................................................... 298 7.4.1 Creating a Point Comparison Report ............................................................................. 300
7.5 Lesson: Point History and the QA/QC of Coordinate Files ................................................................ 303 7.5.1 Reviewing Point History .................................................................................................. 304
7.6 Lesson: Aligning Geometry to Points ................................................................................................. 313 7.6.1 The 2D Align Command ................................................................................................. 314
7.7 Lesson: Calculating Curves ............................................................................................................... 317 7.7.1 Using Curve Calc ............................................................................................................ 319 7.7.2 Plotting a Curve .............................................................................................................. 320
7.8 Lesson: Creating and Editing Polylines ............................................................................................. 322 7.8.1 Using Join Nearest ......................................................................................................... 325 7.8.2 Editing Polylines ............................................................................................................. 325
7.9 Lesson: Drawing Special Line Types ................................................................................................. 330 7.9.1 Change Polyline Linetype ............................................................................................... 332 7.9.2 Create a Tree Line .......................................................................................................... 334
7.10 Lesson: Legal Description Writer ....................................................................................................... 335 7.10.1 Creating a Legal Description .......................................................................................... 342
Chapter: Area/Layout
130 Lesson: Offsets, Intersections and Cul-De-Sacs
4.1 Lesson: Offsets, Intersections and Cul-De-Sacs
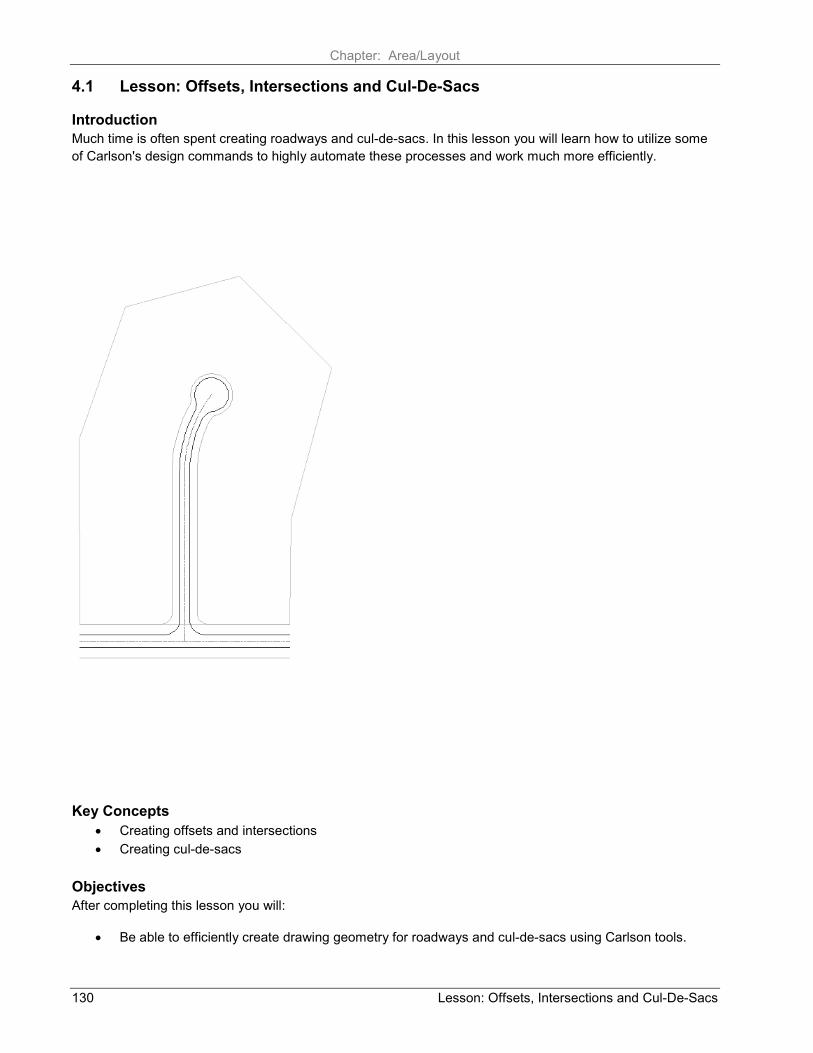
Introduction Much time is often spent creating roadways and cul-de-sacs. In this lesson you will learn how to utilize some of Carlson's design commands to highly automate these processes and work much more efficiently.
Key Concepts • Creating offsets and intersections • Creating cul-de-sacs
Objectives After completing this lesson you will:
• Be able to efficiently create drawing geometry for roadways and cul-de-sacs using Carlson tools.

Chapter: Area/Layout
Lesson: Offsets, Intersections and Cul-De-Sacs 131
Introduction For the surveyor, calculating lot lines within an existing boundary can be a tedious and time consuming task. In days not so long ago, a surveyor or design engineer would sit and "number crunch" entering in COGO commands like bearing/bearing intersections or bearing/distance intersections to create lines, arcs and offsets.
In today's CAD climate, you have graphic tools that can perform those same tasks in a fraction of the time. However, the design of a subdivision (Roads and Lots) is still a constantly changing environment, with modifications from clients, overlaying regulations and budget constraints.
It is imperative to learn the many methods of designing a subdivision utilizing every tool available to ensure that the process is completed as quick and accurate as possible and that the inevitable revisions can be made easily.
It is important to mention that in a later chapter, you will be introduced to a powerful program called LotNET. LotNET combines all of the steps in creating roads and lots, automates the process and ties it directly to other civil design programs such as RoadNET.
Offsets and Intersections
The Offsets and Intersections layout utility automates the process of creating geometry for roads, including intersections, based on selected centerlines.
The Layer column is the layer on which each offset will be created. In this case the default is EOP (edge of pavement) and ROW (right of way).

Chapter: Area/Layout
132 Lesson: Offsets, Intersections and Cul-De-Sacs
The Primary Roads column has two sub columns: Offset is the offset distance from the centerline for the corresponding layer. Radius is the return radii created at each intersection of roads for the corresponding layer.
The Secondary Roads columns are set up identically to the primary roads. Additional offsets and layers may be created as desired.
Design Cul-de-Sac
The Design Cul-de-Sac layout utility automates the process of creating geometry for Cul-de-Sacs. Similar to the Offsets and Intersection dialog box, this dialog box is where you set the desired geometric properties for the cul-de-sac.
The Offset field is for creating an offset cul-de-sac. The offset is calculated from the picked point in the previous step and is measured perpendicular to the incoming tangent bearing.
The Center R. creates an island at the center of the cul-de-sac at the specified radius.
Tear Drop Mode creates a tear drop style cul-de-sac at the specified Set Back.
Under the Radii column:
Outside specifies the outside radius for each of the corresponding layers
Filet specifies the return radii where the cul-de-sac meets the incoming offset lines

Chapter: Area/Layout
Lesson: Offsets, Intersections and Cul-De-Sacs 133
Exercises: Create Right of Ways and a Cul-De-Sac Creating right of way lines and cul-de-sacs can done easily by setting factors like offset widths and radii in the Carlson Offset and Intersection command.
You do the following:
• Open a supplied drawing • Create Right of Way lines from centerlines • Create a Cul-de-Sac
4.1.1 Creating Right of Way and Offset Lines
In this exercise you will create right of way and edge of pavement offset lines at specified distances with connecting radii. You will use the Carlson Area\Layout Utilities' Offsets and Intersections command.
1. Open the drawing: C:\Carlson Projects\APG Survey 2016 Chapter 4\DWGS\Lots.dwg
The drawing file contains a perimeter boundary line and two centerlines.
2. Select Ribbon: Area/Layout ⇒ Layout ⇒ Offsets & Intersections.
Alternatively from the pull-down menu: Select: Area/Layout ⇒ Layout Utilities ⇒ Offsets & Intersections.

Chapter: Area/Layout
134 Lesson: Offsets, Intersections and Cul-De-Sacs
3. At the command line prompt: Select all PRIMARY road polylines select the Horizontal Polyline on the south side of the boundary.
4. Press [Enter] to complete the selection.
5. At the command line prompt: Select all SECONDARY road polylines select the Vertical Polyline within the boundary.
6. Press [Enter] to complete the selection.
This opens the Offsets and Intersections dialog box.
7. Enter the offset dimensions as shown:
Primary Roads
• EOP Offset 15 Radius 35 • ROW Offset 40 Radius 25
Secondary Roads
• EOP Offset 12 Radius 35 • ROW Offset 30 Radius 25
8. Click <<Finish 2D>>.

Chapter: Area/Layout
Lesson: Offsets, Intersections and Cul-De-Sacs 135
The 2D polylines representing the Right of Way and Edge of Pavement lines are placed in the drawing and look like the graphic below.
4.1.2 Creating a Cul-De-Sac
In this exercise you will attach a cul-de-sac to the dead end road centered within the boundary lines.
1. Continue working in the drawing from the previous exercise.
2. Select Ribbon: Area/Layout ⇒ Layout ⇒ Cul-de-Sacs.
Alternatively from the pull-down menu: Select: Area/Layout ⇒ Layout Utilities ⇒ Cul-De-Sacs.

Chapter: Area/Layout
136 Lesson: Offsets, Intersections and Cul-De-Sacs
3. At the command line prompt: Select all offset polylines to end with cul-de-sac Select by a crossing window (upper right to lower left) the 5 lines at the end of the roadway.
4. Press [Enter] to complete the selection set.
These are the lines created in the previous step that correspond to ROW and EOP as well as the original centerline.
5. At the command line prompt: Pick cul-de-sac center projection onto centerline: Select the End Point at the end of the centerline.
This represents the base point of the cul-de-sac.
Note the End Point object snap is provided by the program automatically.
This opens the Design Cul-De-Sac dialog box.
6. Set the EOP Outside offset to 40.
7. Set the EOP Filet to 35.
8. Set the ROW Outside offset 50.
9. Set the ROW Filet to 25.
Note: It is important the layers used are the same as those in the previous exercise.

Chapter: Area/Layout
Lesson: Offsets, Intersections and Cul-De-Sacs 137
10. Click <<Finish 2D>>.
The resulting cul-de-sac is placed in the drawing and is connected to the previous entities to create a continuous polyline.
11. Save the drawing.
Lesson Review: In this lesson you created right of way lines, edge of pavement lines and a cul-de-sac all from two existing centerlines.