Embed Size (px)
Citation preview
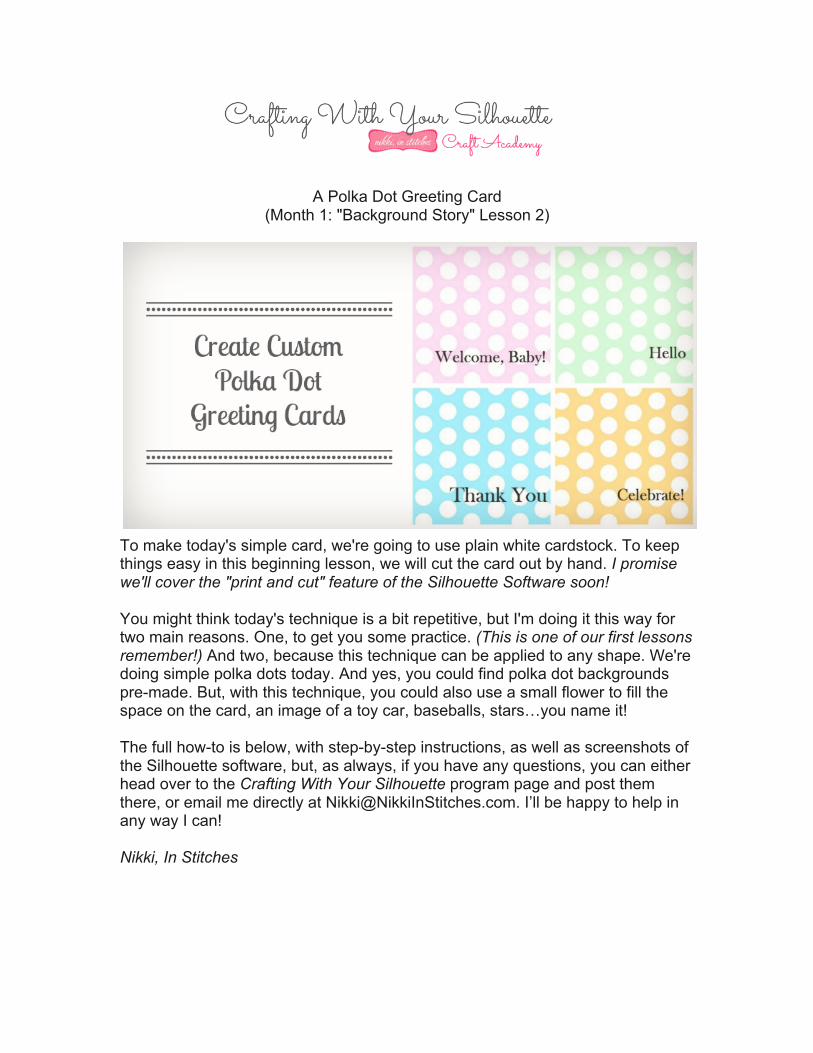
A Polka Dot Greeting Card (Month 1: "Background Story" Lesson 2)
To make today's simple card, we're going to use plain white cardstock. To keep things easy in this beginning lesson, we will cut the card out by hand. I promise we'll cover the "print and cut" feature of the Silhouette Software soon! You might think today's technique is a bit repetitive, but I'm doing it this way for two main reasons. One, to get you some practice. (This is one of our first lessons remember!) And two, because this technique can be applied to any shape. We're doing simple polka dots today. And yes, you could find polka dot backgrounds pre-made. But, with this technique, you could also use a small flower to fill the space on the card, an image of a toy car, baseballs, stars…you name it! The full how-to is below, with step-by-step instructions, as well as screenshots of the Silhouette software, but, as always, if you have any questions, you can either head over to the Crafting With Your Silhouette program page and post them there, or email me directly at [email protected]. I’ll be happy to help in any way I can! Nikki, In Stitches
Supplies: • Silhouette cutting system and software • White cardstock paper • Printer • Cutting mat, rotary cutter and acrylic ruler (A pair of scissors will work just
fine, too!) • Bone folder and straight edge (This ensures a nice, crisp fold for your
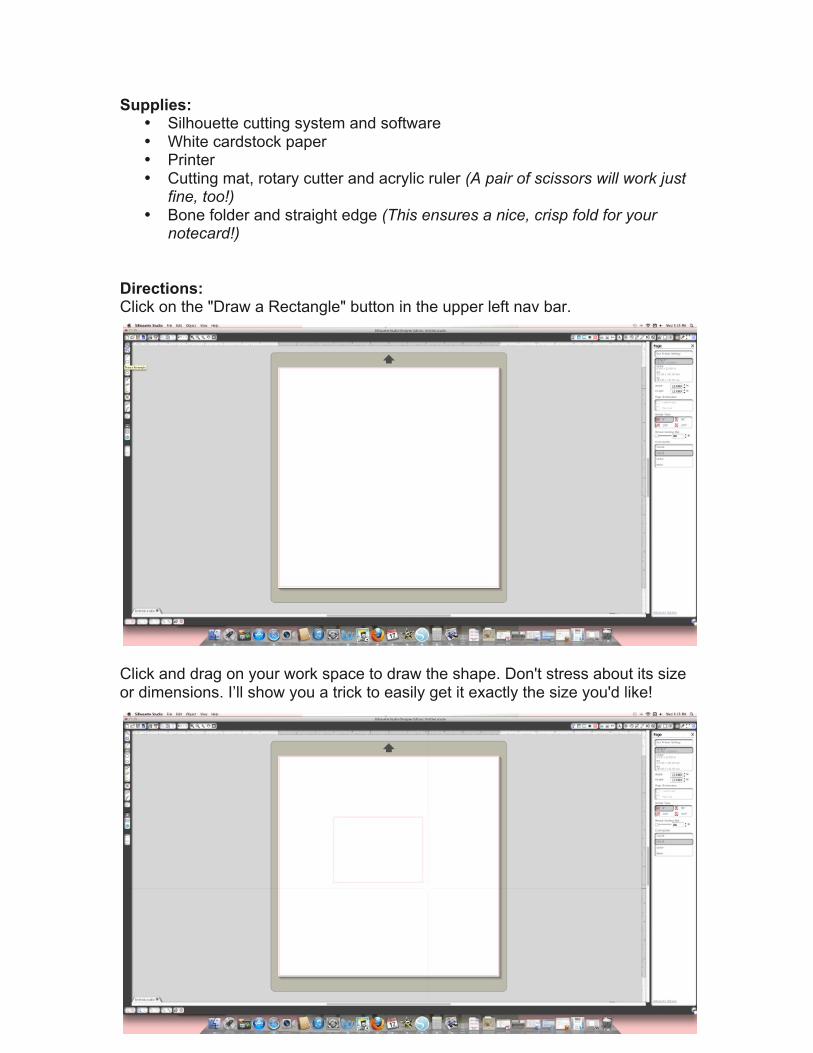
notecard!) Directions: Click on the "Draw a Rectangle" button in the upper left nav bar. Click and drag on your work space to draw the shape. Don't stress about its size or dimensions. I’ll show you a trick to easily get it exactly the size you'd like!
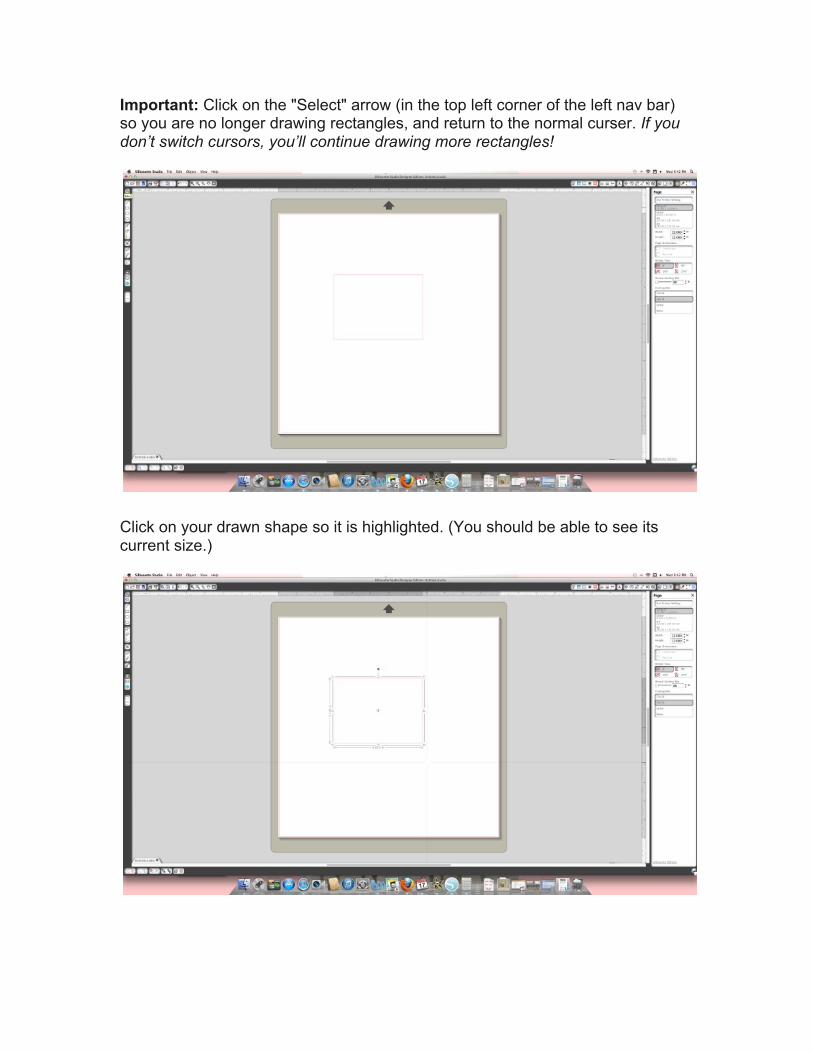
Important: Click on the "Select" arrow (in the top left corner of the left nav bar) so you are no longer drawing rectangles, and return to the normal curser. If you don’t switch cursors, you’ll continue drawing more rectangles! Click on your drawn shape so it is highlighted. (You should be able to see its current size.)
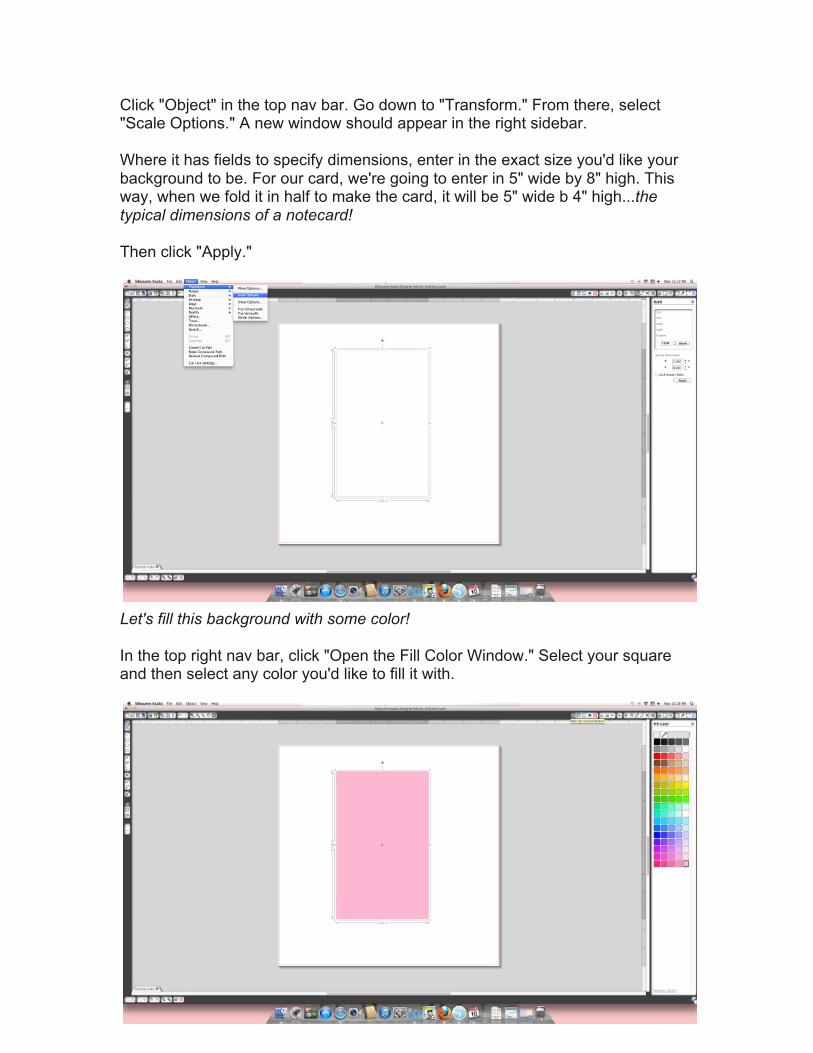
Click "Object" in the top nav bar. Go down to "Transform." From there, select "Scale Options." A new window should appear in the right sidebar. Where it has fields to specify dimensions, enter in the exact size you'd like your background to be. For our card, we're going to enter in 5" wide by 8" high. This way, when we fold it in half to make the card, it will be 5" wide b 4" high...the typical dimensions of a notecard! Then click "Apply." Let's fill this background with some color! In the top right nav bar, click "Open the Fill Color Window." Select your square and then select any color you'd like to fill it with.
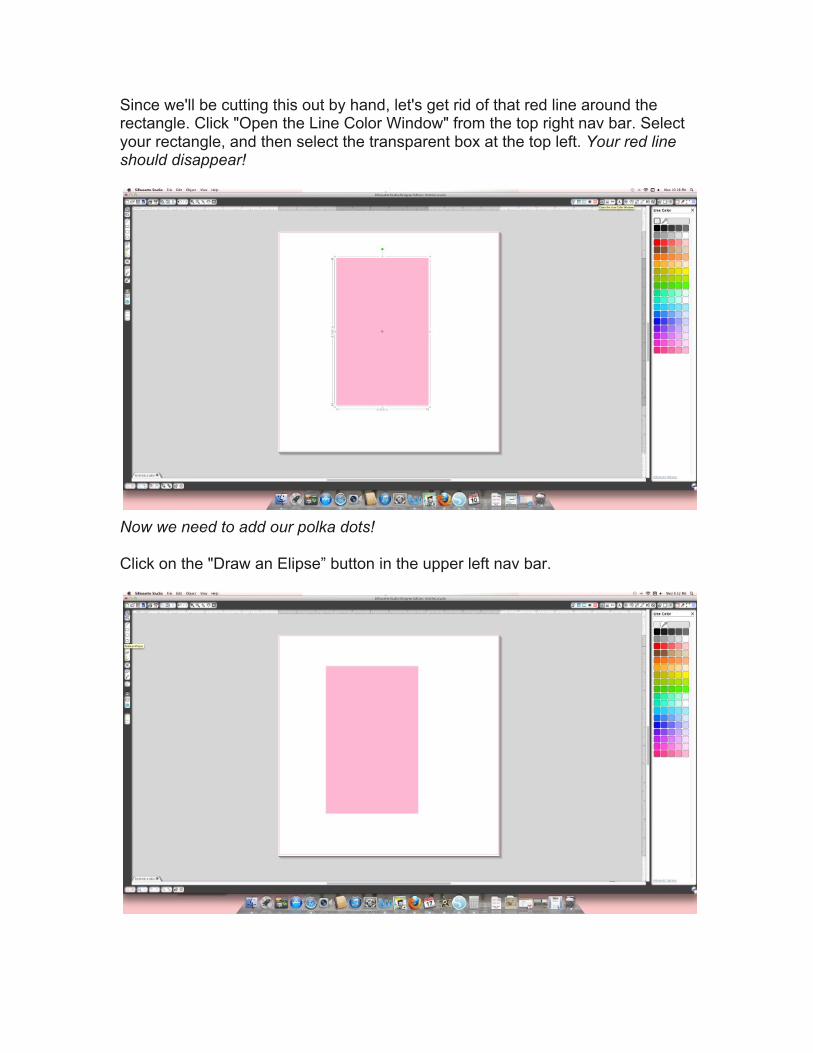
Since we'll be cutting this out by hand, let's get rid of that red line around the rectangle. Click "Open the Line Color Window" from the top right nav bar. Select your rectangle, and then select the transparent box at the top left. Your red line should disappear! Now we need to add our polka dots! Click on the "Draw an Elipse” button in the upper left nav bar.
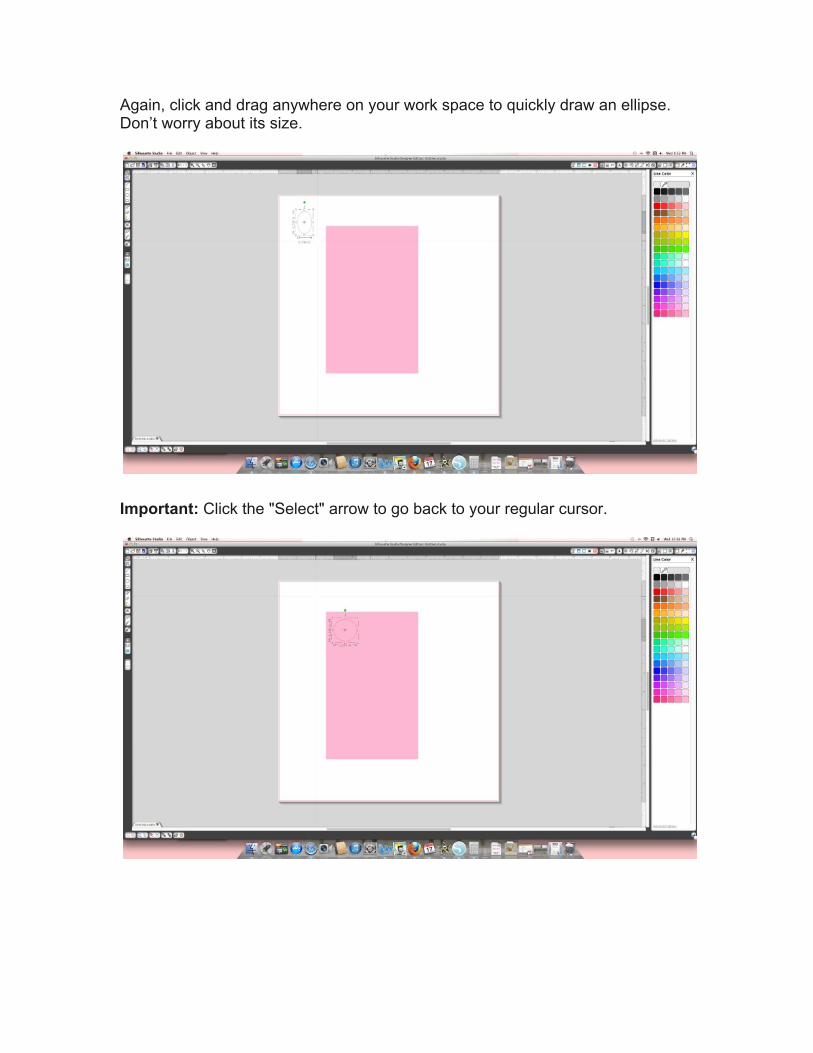
Again, click and drag anywhere on your work space to quickly draw an ellipse. Don’t worry about its size. Important: Click the "Select" arrow to go back to your regular cursor.
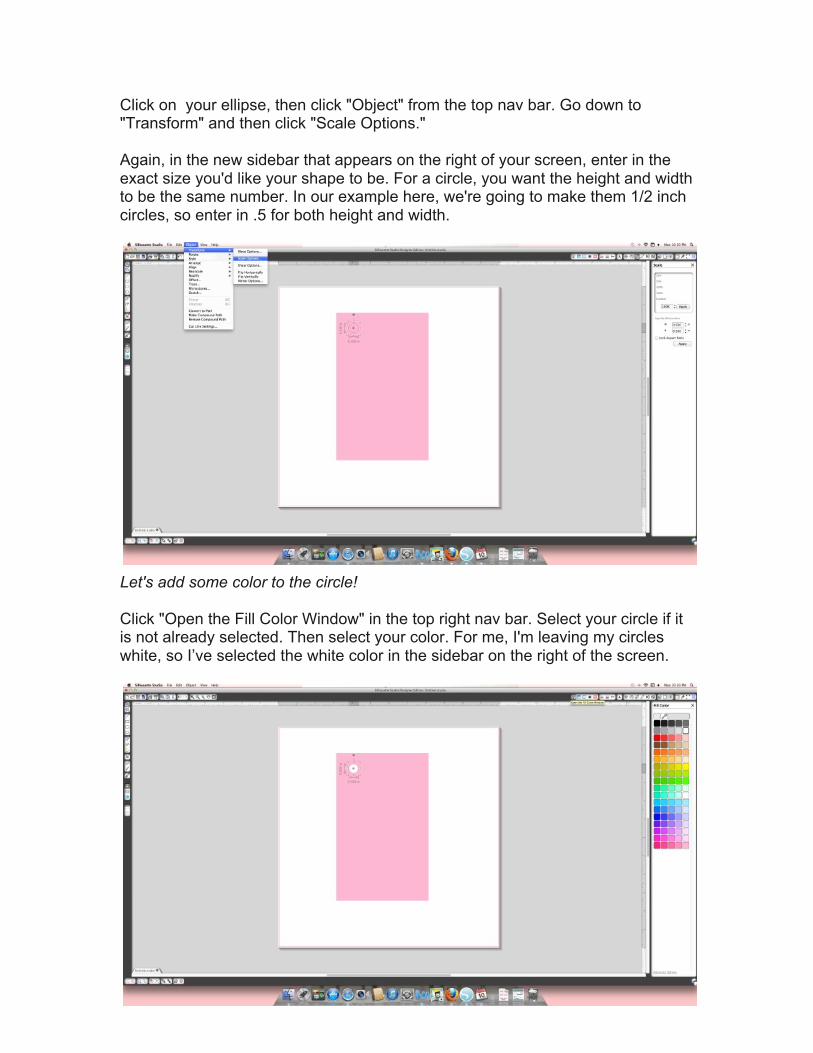
Click on your ellipse, then click "Object" from the top nav bar. Go down to "Transform" and then click "Scale Options." Again, in the new sidebar that appears on the right of your screen, enter in the exact size you'd like your shape to be. For a circle, you want the height and width to be the same number. In our example here, we're going to make them 1/2 inch circles, so enter in .5 for both height and width. Let's add some color to the circle! Click "Open the Fill Color Window" in the top right nav bar. Select your circle if it is not already selected. Then select your color. For me, I'm leaving my circles white, so I’ve selected the white color in the sidebar on the right of the screen.
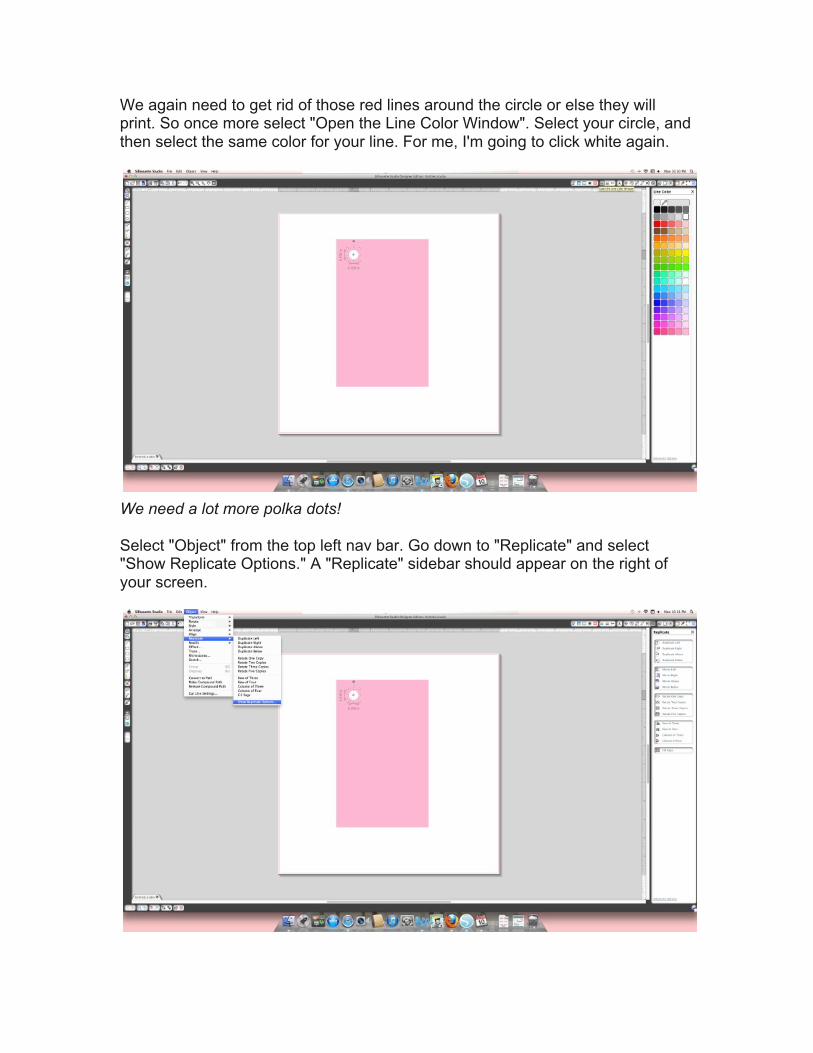
We again need to get rid of those red lines around the circle or else they will print. So once more select "Open the Line Color Window". Select your circle, and then select the same color for your line. For me, I'm going to click white again. We need a lot more polka dots! Select "Object" from the top left nav bar. Go down to "Replicate" and select "Show Replicate Options." A "Replicate" sidebar should appear on the right of your screen.
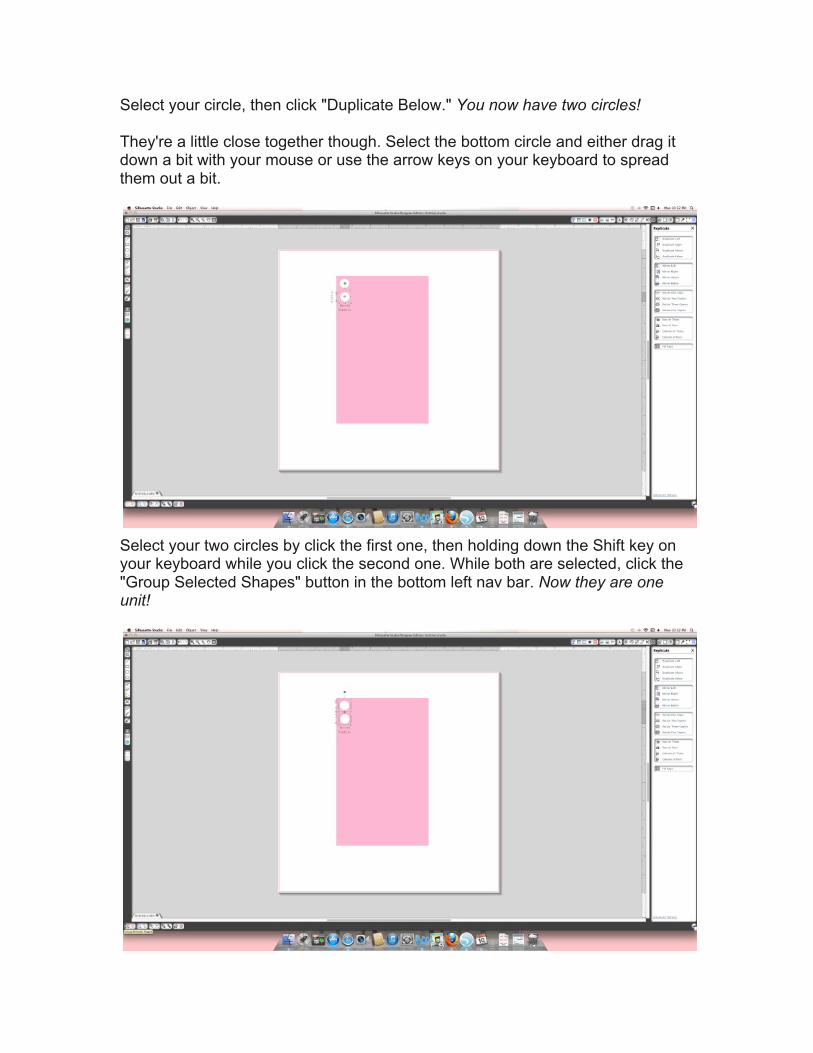
Select your circle, then click "Duplicate Below." You now have two circles! They're a little close together though. Select the bottom circle and either drag it down a bit with your mouse or use the arrow keys on your keyboard to spread them out a bit. Select your two circles by click the first one, then holding down the Shift key on your keyboard while you click the second one. While both are selected, click the "Group Selected Shapes" button in the bottom left nav bar. Now they are one unit!
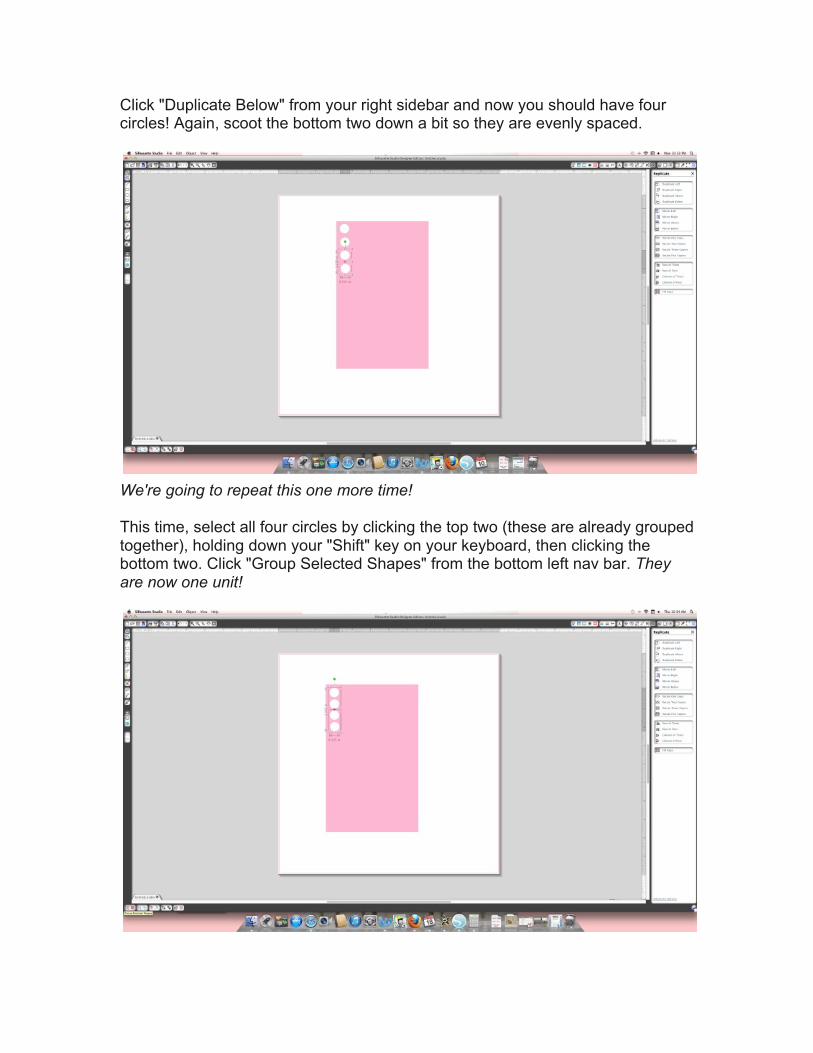
Click "Duplicate Below" from your right sidebar and now you should have four circles! Again, scoot the bottom two down a bit so they are evenly spaced. We're going to repeat this one more time! This time, select all four circles by clicking the top two (these are already grouped together), holding down your "Shift" key on your keyboard, then clicking the bottom two. Click "Group Selected Shapes" from the bottom left nav bar. They are now one unit!
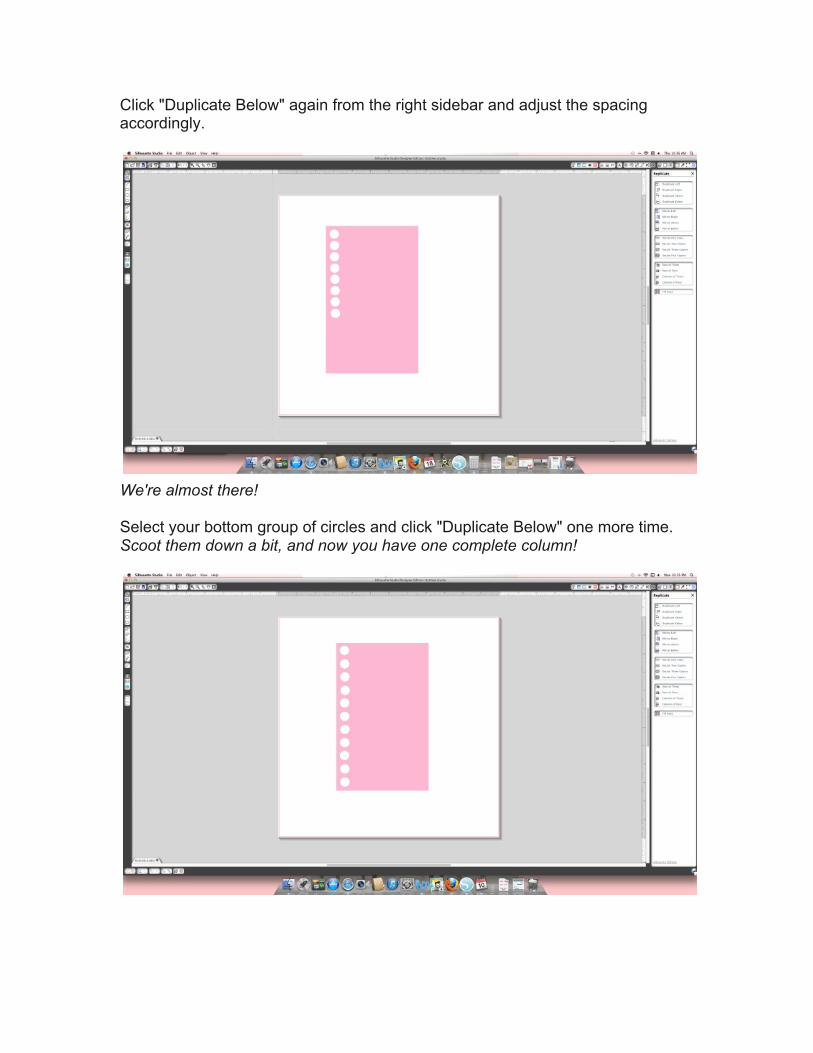
Click "Duplicate Below" again from the right sidebar and adjust the spacing accordingly. We're almost there! Select your bottom group of circles and click "Duplicate Below" one more time. Scoot them down a bit, and now you have one complete column!
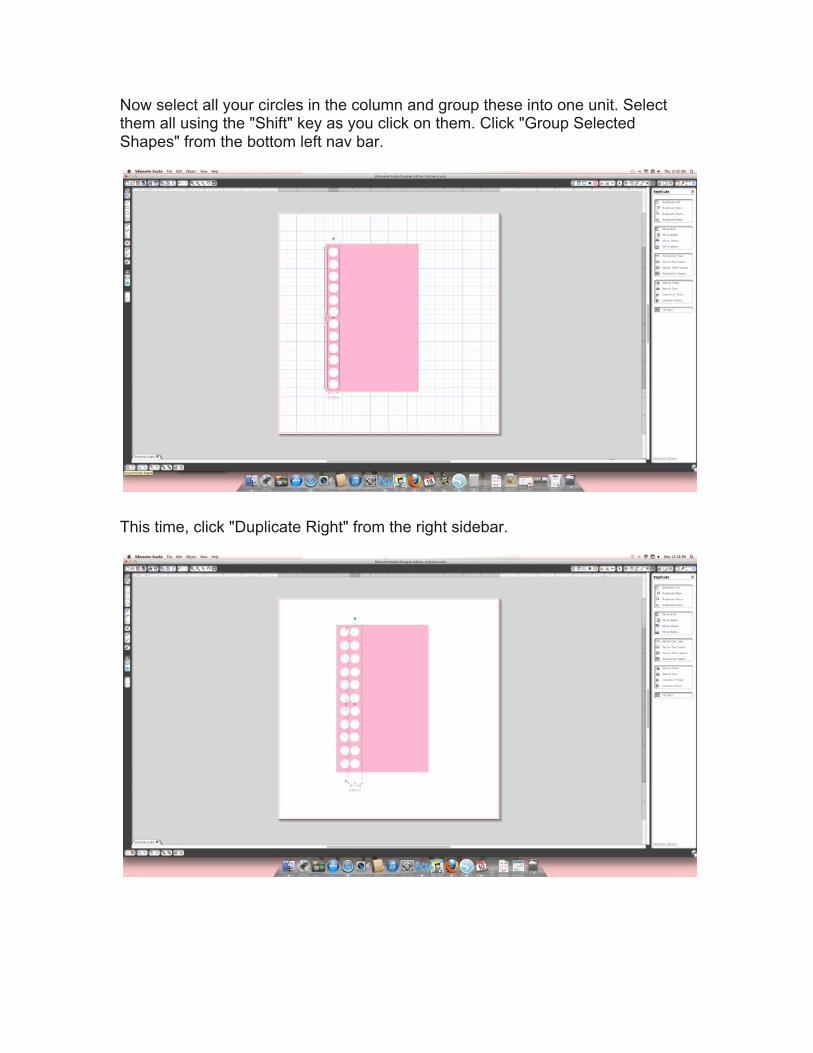
Now select all your circles in the column and group these into one unit. Select them all using the "Shift" key as you click on them. Click "Group Selected Shapes" from the bottom left nav bar. This time, click "Duplicate Right" from the right sidebar.

Again, these need some adjusting. They need to be pushed to the right a bit, and in true polka dot style these should be offset from the first column. Adjust them by dragging them with your mouse or using the arrow keys on your keyboard. One last grouping…I promise! Group all of these together! Select all your circles and click "Group Selected Shapes" from the bottom left nav bar.
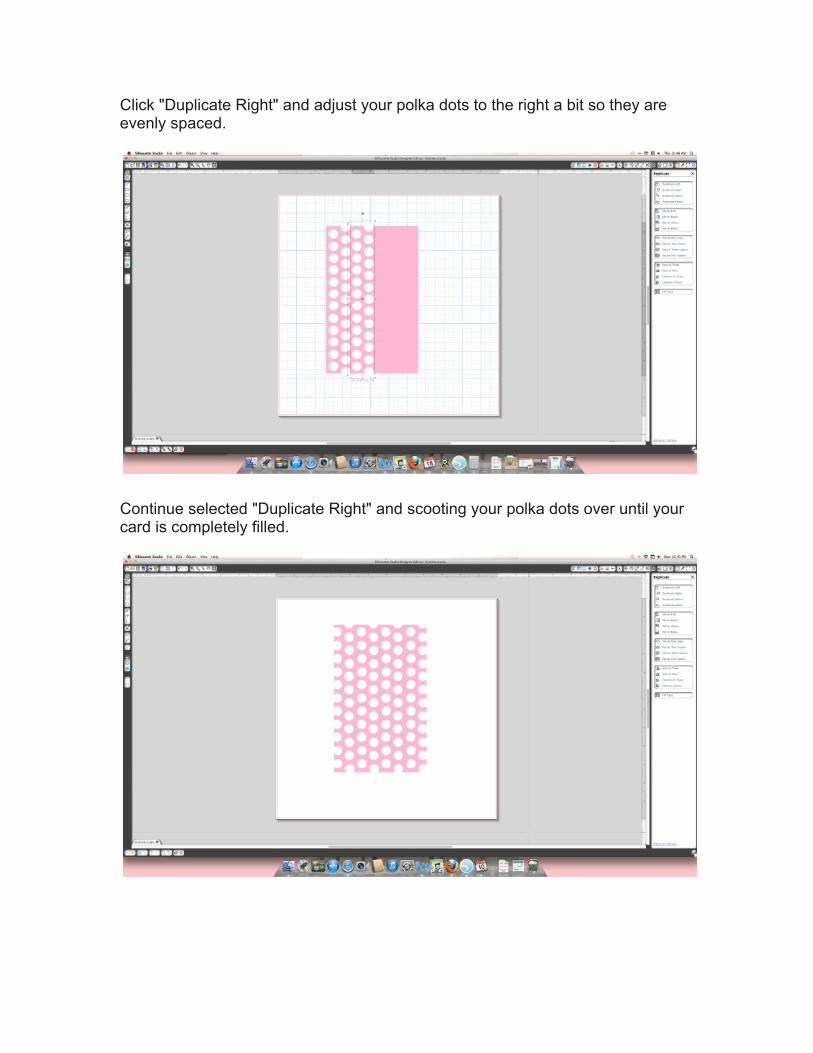
Click "Duplicate Right" and adjust your polka dots to the right a bit so they are evenly spaced. Continue selected "Duplicate Right" and scooting your polka dots over until your card is completely filled.
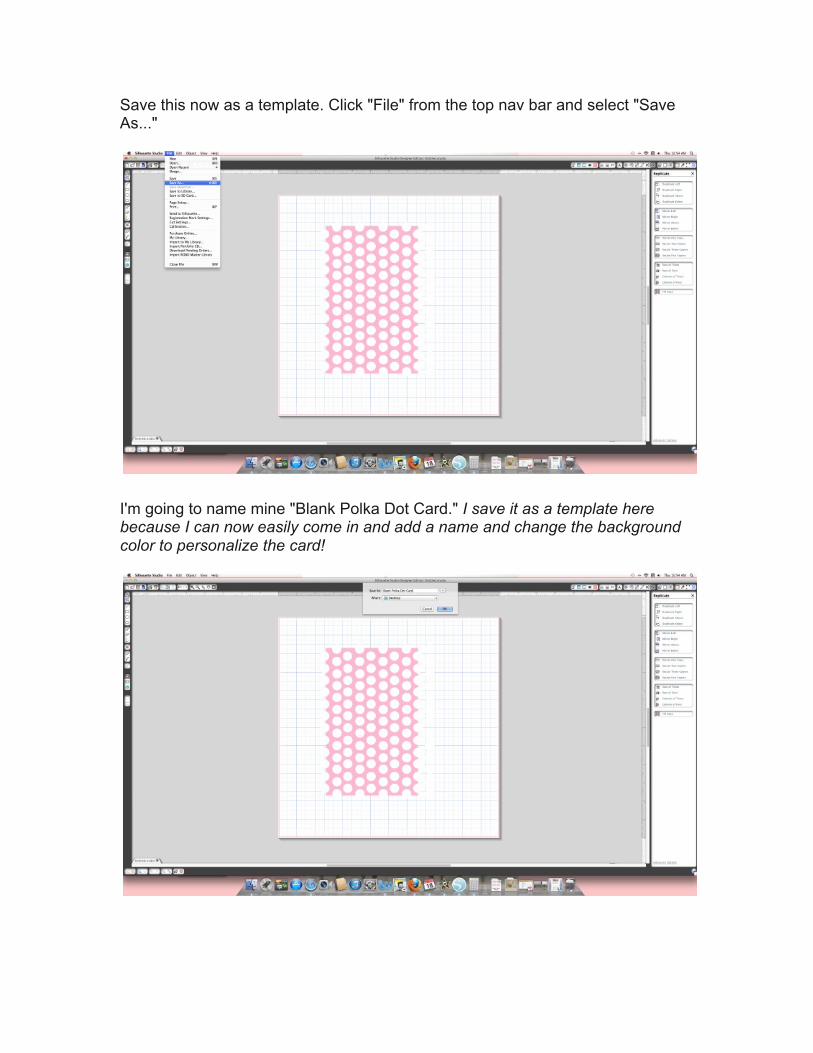
Save this now as a template. Click "File" from the top nav bar and select "Save As..." I'm going to name mine "Blank Polka Dot Card." I save it as a template here because I can now easily come in and add a name and change the background color to personalize the card!
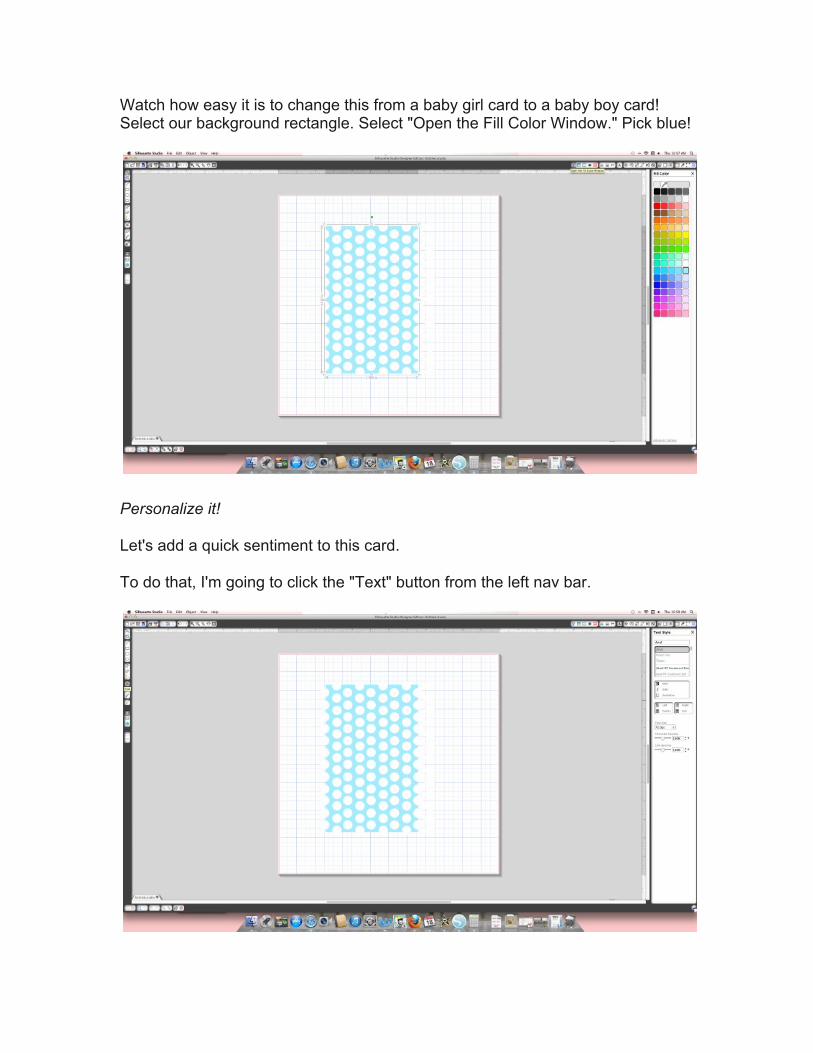
Watch how easy it is to change this from a baby girl card to a baby boy card! Select our background rectangle. Select "Open the Fill Color Window." Pick blue! Personalize it! Let's add a quick sentiment to this card. To do that, I'm going to click the "Text" button from the left nav bar.

I then like to just click anywhere on the work space and type the name "Thank You" Then click anywhere outside of the text box so that the software knows you are finished typing. From here click the "Open the Fill Color Window" and select your desired text color. I'm going to go with a medium grey. If your sentiment is not changing colors, it is more than likely because your text is not selected.
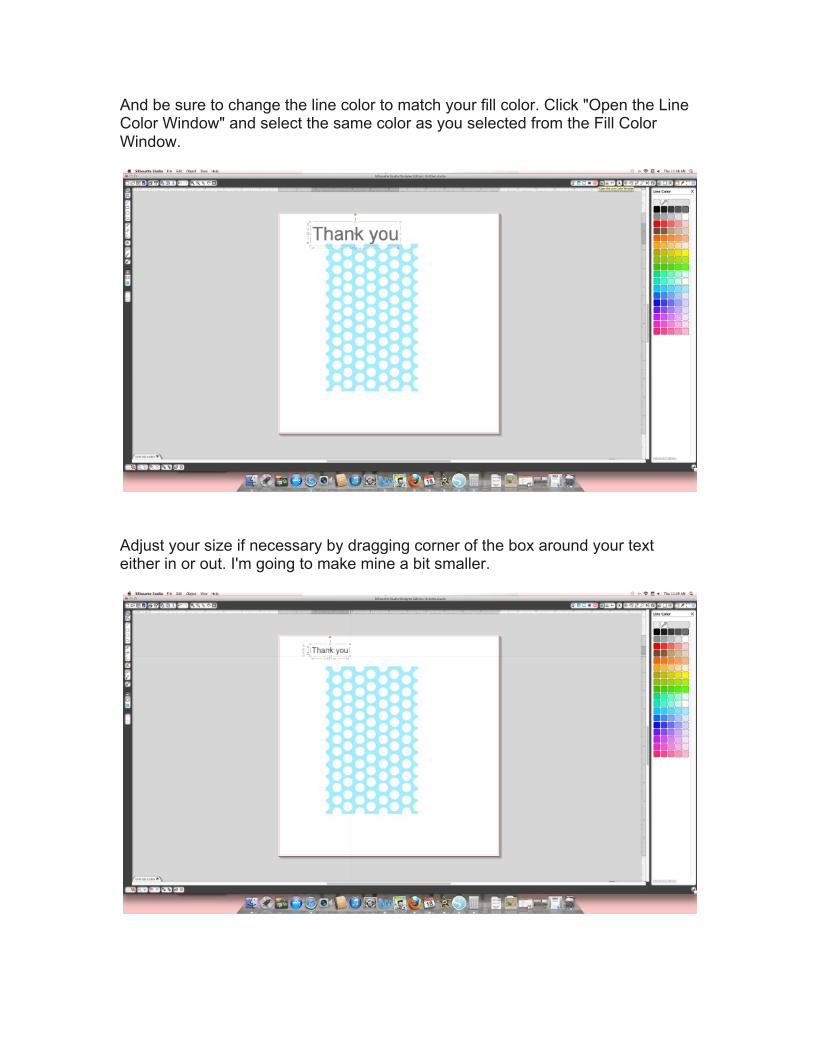
And be sure to change the line color to match your fill color. Click "Open the Line Color Window" and select the same color as you selected from the Fill Color Window. Adjust your size if necessary by dragging corner of the box around your text either in or out. I'm going to make mine a bit smaller.

Drag your text into place wherever you’d like it. And then to change the font, click “Open The Text Styles Window" button from the top right nav bar, and make sure your sentiment is selected. You can scroll through any of the fonts you have available to use by clicking through them. I think I'm going to keep this one simple and go with "Baskerville Old Face." As far as the design goes, we're finished!
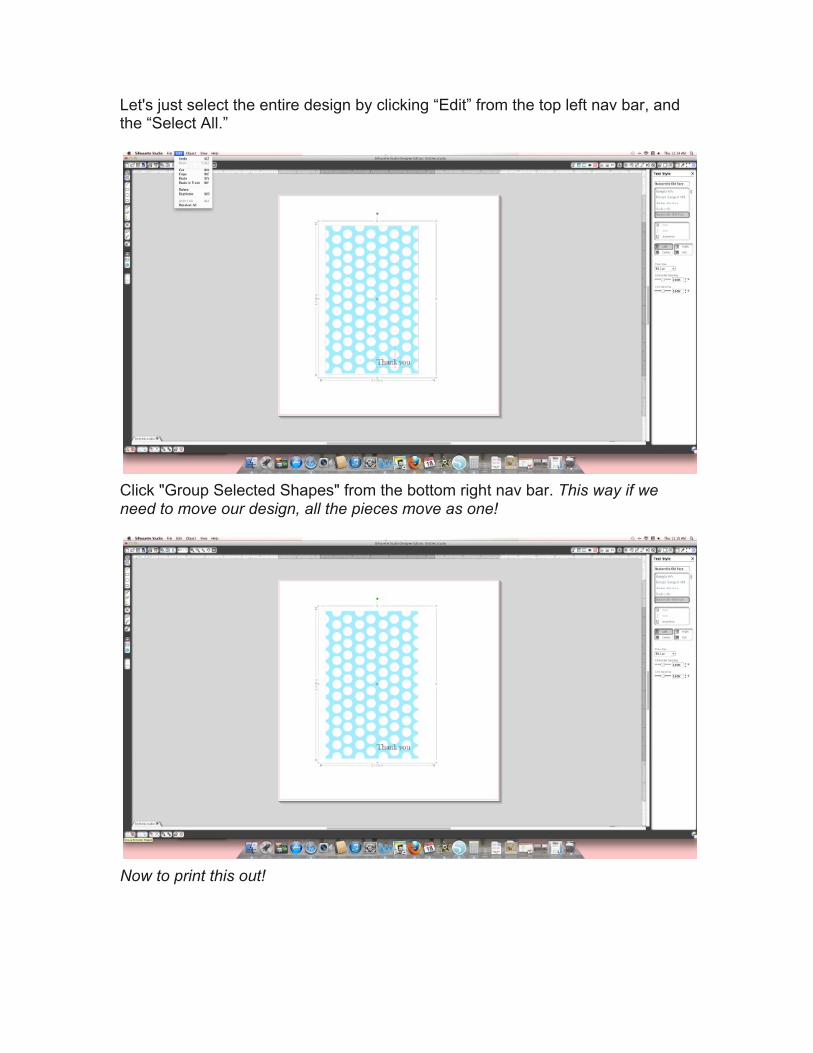
Let's just select the entire design by clicking “Edit” from the top left nav bar, and the “Select All.” Click "Group Selected Shapes" from the bottom right nav bar. This way if we need to move our design, all the pieces move as one! Now to print this out!
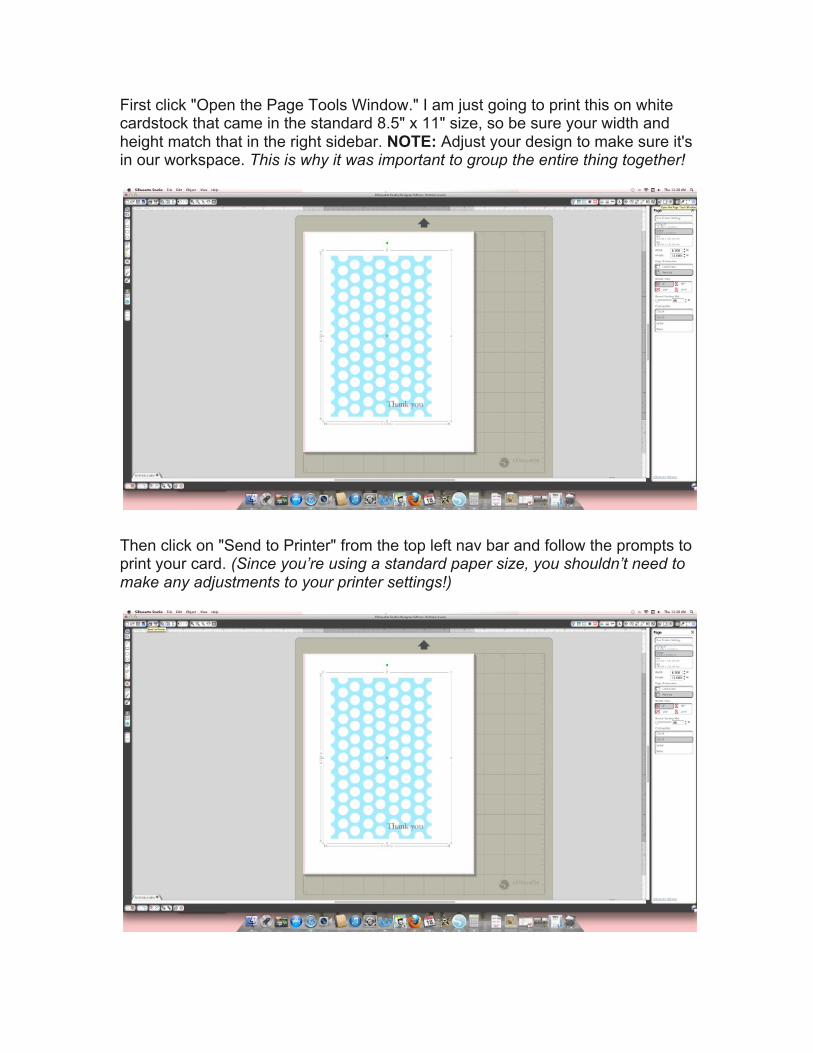
First click "Open the Page Tools Window." I am just going to print this on white cardstock that came in the standard 8.5" x 11" size, so be sure your width and height match that in the right sidebar. NOTE: Adjust your design to make sure it's in our workspace. This is why it was important to group the entire thing together! Then click on "Send to Printer" from the top left nav bar and follow the prompts to print your card. (Since you’re using a standard paper size, you shouldn’t need to make any adjustments to your printer settings!)
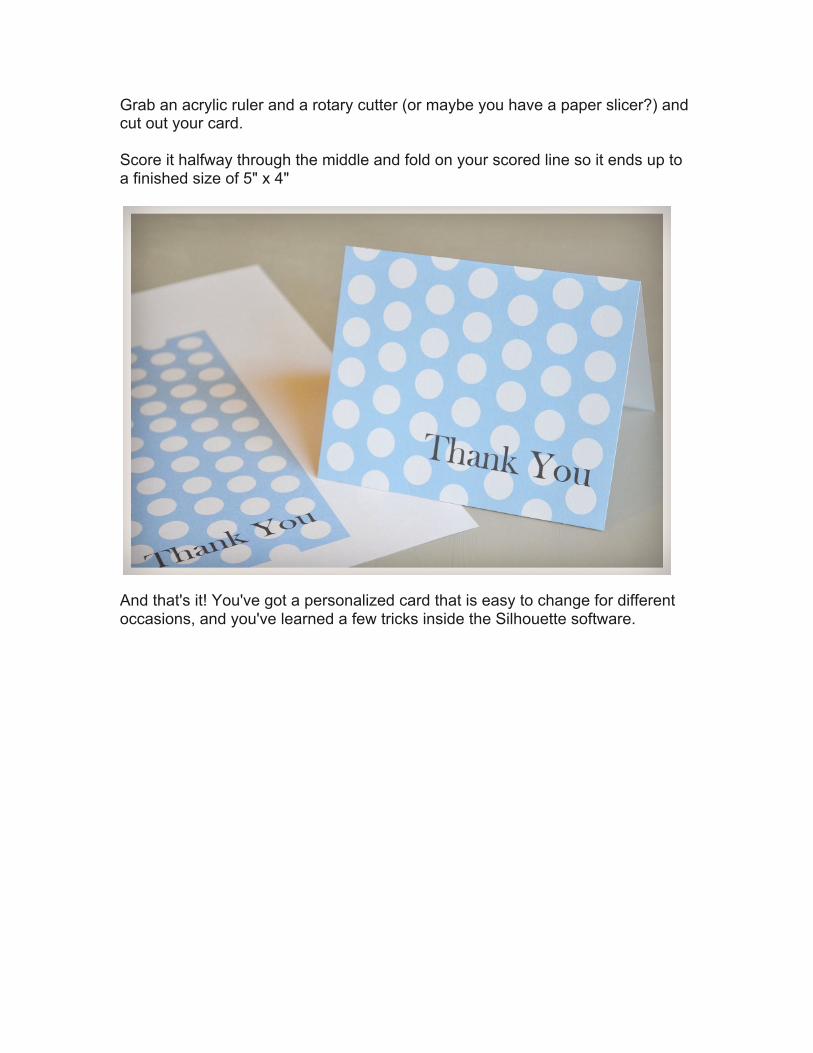
Grab an acrylic ruler and a rotary cutter (or maybe you have a paper slicer?) and cut out your card. Score it halfway through the middle and fold on your scored line so it ends up to a finished size of 5" x 4" And that's it! You've got a personalized card that is easy to change for different occasions, and you've learned a few tricks inside the Silhouette software.