Embed Size (px)
Citation preview
A Patient’s Guide to
Caring for your Urostomy
Please bring this booklet with you to the hospital
when you come for your surgery.
Name:
FP.123.C191.PHC (2020.12.08)

A Patient’s Guide to Caring For Your Urostomy© 2020 Providence Health Care
The information in this book has been adapted from a number of sources – our thanks to all.
References available upon request.In particular, we would like to acknowledge the Nurses Specialized in Wound, Ostomy and Continence
Canada (NSWOCC).
And thank you members of the PHC Wound Ostomy team and Vancouver Regional Ostomy Committee.
Edited by Hedda EybenIllustrations & layout by Gary Cody and Max Foss
A
P P R OVE
DPATI
ENTThis material has been
reviewed and approved by
patients, families and staff.
Disclaimer:This material is for informational purposes only. It does not replace the advice or counsel of a doctor or health care professional. Your health authority makes every effort to provide information that is accurate and timely, but makes no guarantee in this regard. Each individual responds differently and your course may not be exactly as described. You should consult with, and rely only on the advice of, your physician or health care professional.
The information in this document is intended solely for the person to whom it was given by the health care team. If you have questions, please talk to a member of your team.
Table of contentsIntroduction . . . . . . . . . . . . . . . . . . . . . . . . . . . . . . . . . . . . . . . . . . . . . . . 1The urinary system? . . . . . . . . . . . . . . . . . . . . . . . . . . . . . . . . . . . . . . . . 2What is a urostomy? . . . . . . . . . . . . . . . . . . . . . . . . . . . . . . . . . . . . . . . . . 2The surgery . . . . . . . . . . . . . . . . . . . . . . . . . . . . . . . . . . . . . . . . . . . . . . . . 2Care for your urostomy . . . . . . . . . . . . . . . . . . . . . . . . . . . . . . . . . . . . . . 4 Hair removal around your stoma . . . . . . . . . . . . . . . . . . . . . . . . . . . 5 Daily life with your urostomy . . . . . . . . . . . . . . . . . . . . . . . . . . . . . . . . 5 How often should I change my pouch . . . . . . . . . . . . . . . . . . . . . . 5 How do I change my pouch . . . . . . . . . . . . . . . . . . . . . . . . . . . . . . . . 5 How to empty your urostomy pouch . . . . . . . . . . . . . . . . . . . . . . . . 5Night drainage bottle . . . . . . . . . . . . . . . . . . . . . . . . . . . . . . . . . . . . . . . 6 How to use a night drainage bottle . . . . . . . . . . . . . . . . . . . . . . . . . 6 Cleaning the night drainage system . . . . . . . . . . . . . . . . . . . . . . . . 7 When should bag, bottle, tubing and adapter be replaced? . . . . 8Bathing and showering . . . . . . . . . . . . . . . . . . . . . . . . . . . . . . . . . . . . . . 8 Tips for keeping your skin healthy . . . . . . . . . . . . . . . . . . . . . . . . . 8How to obtain a urine sample . . . . . . . . . . . . . . . . . . . . . . . . . . . . . . . . 9Going out and about . . . . . . . . . . . . . . . . . . . . . . . . . . . . . . . . . . . . . . . . 9Swimming and hot tubs . . . . . . . . . . . . . . . . . . . . . . . . . . . . . . . . . . . . . 9Urinary leg bag . . . . . . . . . . . . . . . . . . . . . . . . . . . . . . . . . . . . . . . . . . . . 9If you come back to the hospital . . . . . . . . . . . . . . . . . . . . . . . . . . . . . 10 Activities after surgery (first 6 to 8 weeks) . . . . . . . . . . . . . . . . . . . . . 10Urinary crystals . . . . . . . . . . . . . . . . . . . . . . . . . . . . . . . . . . . . . . . . . . . . 11 How to treat urinary crystals . . . . . . . . . . . . . . . . . . . . . . . . . . . . . . 11Urinary tract infections (UTIs) . . . . . . . . . . . . . . . . . . . . . . . . . . . . . . . 11 How to prevent a UTI? . . . . . . . . . . . . . . . . . . . . . . . . . . . . . . . . . . . 11Parastomal hernia . . . . . . . . . . . . . . . . . . . . . . . . . . . . . . . . . . . . . . . . . . 12 How do I prevent a parastomal hernia? . . . . . . . . . . . . . . . . . . . . . 12Resources . . . . . . . . . . . . . . . . . . . . . . . . . . . . . . . . . . . . . . . . . . . . .13Changing your urostomy step-by-step . . . . . . . . . . . . . . . . . . . .14Notes . . . . . . . . . . . . . . . . . . . . . . . . . . . . . . . . . . . . . . . . . . . . . . . . .15
1
Most BC residents are eligible for coverage for ostomy supplies under Fair Pharmacare. This plan provides coverage based on your family’s net income from 2 years previous (e.g. for 2016 the deductible is based on 2014 income). First Nations Health Authority (FNHA) or NHIB is also now using Pharmacare to cover their members’ supply costs.
Please be sure to read this booklet and write down any questions. There is a section for notes at the end of this booklet.
If you have received a pre-operative ostomy kit, please review the materials in the kit. Practice with the ostomy appliance and write down any questions. You can talk to your ostomy nurse at the hospital.
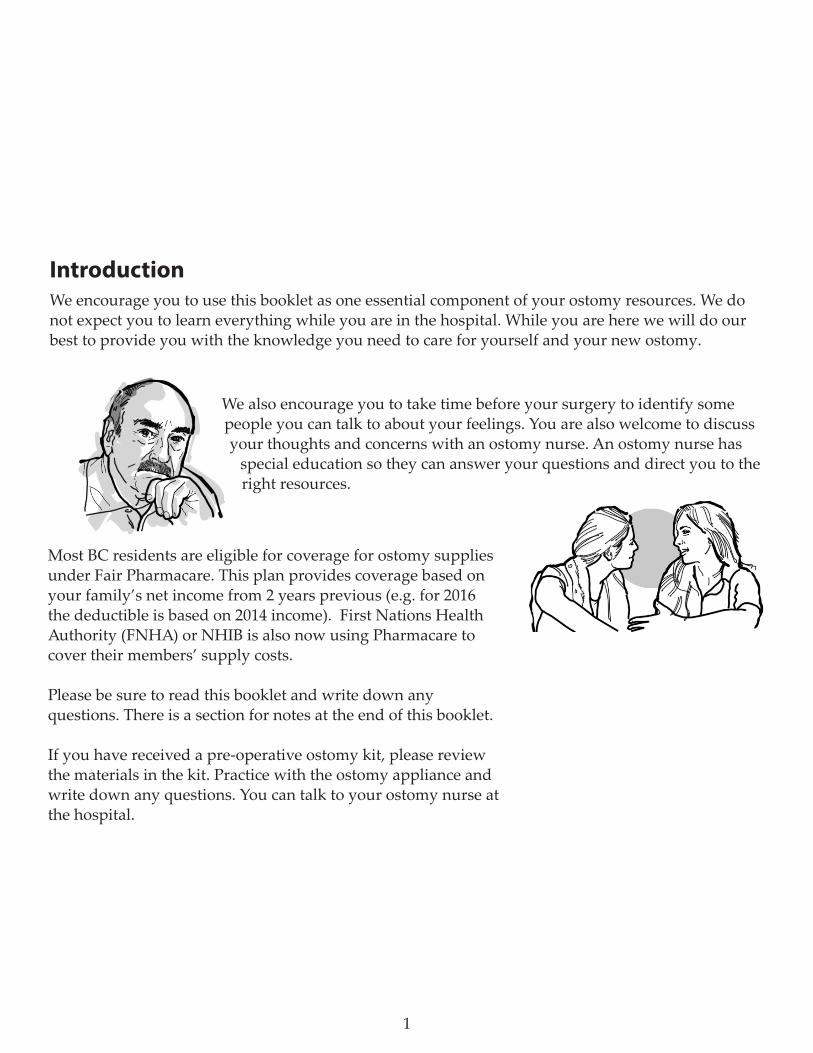
IntroductionWe encourage you to use this booklet as one essential component of your ostomy resources. We do not expect you to learn everything while you are in the hospital. While you are here we will do our best to provide you with the knowledge you need to care for yourself and your new ostomy.
We also encourage you to take time before your surgery to identify some people you can talk to about your feelings. You are also welcome to discuss your thoughts and concerns with an ostomy nurse. An ostomy nurse has
special education so they can answer your questions and direct you to the right resources.
2
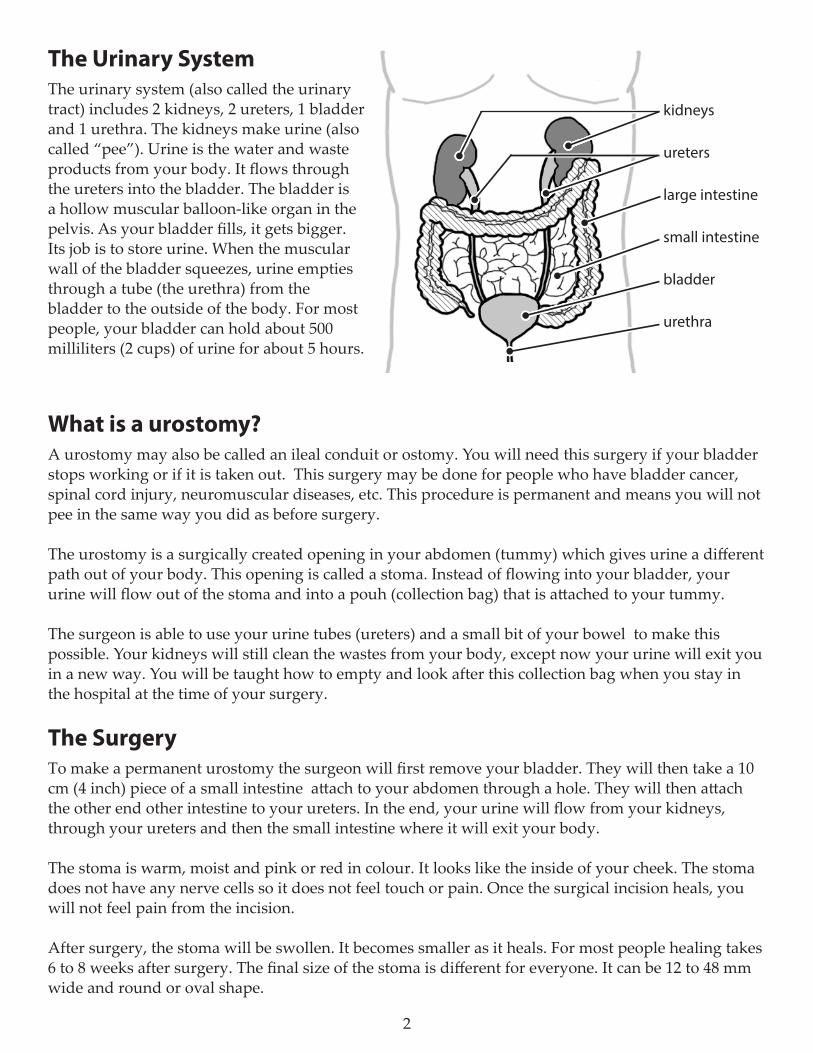
The Urinary System The urinary system (also called the urinary tract) includes 2 kidneys, 2 ureters, 1 bladder and 1 urethra. The kidneys make urine (also called “pee”). Urine is the water and waste products from your body. It flows through the ureters into the bladder. The bladder is a hollow muscular balloon-like organ in the pelvis. As your bladder fills, it gets bigger. Its job is to store urine. When the muscular wall of the bladder squeezes, urine empties through a tube (the urethra) from the bladder to the outside of the body. For most people, your bladder can hold about 500 milliliters (2 cups) of urine for about 5 hours.
What is a urostomy?A urostomy may also be called an ileal conduit or ostomy. You will need this surgery if your bladder stops working or if it is taken out. This surgery may be done for people who have bladder cancer, spinal cord injury, neuromuscular diseases, etc. This procedure is permanent and means you will not pee in the same way you did as before surgery.
The urostomy is a surgically created opening in your abdomen (tummy) which gives urine a different path out of your body. This opening is called a stoma. Instead of flowing into your bladder, your urine will flow out of the stoma and into a pouh (collection bag) that is attached to your tummy.
The surgeon is able to use your urine tubes (ureters) and a small bit of your bowel to make this possible. Your kidneys will still clean the wastes from your body, except now your urine will exit you in a new way. You will be taught how to empty and look after this collection bag when you stay in the hospital at the time of your surgery.
The SurgeryTo make a permanent urostomy the surgeon will first remove your bladder. They will then take a 10 cm (4 inch) piece of a small intestine attach to your abdomen through a hole. They will then attach the other end other intestine to your ureters. In the end, your urine will flow from your kidneys, through your ureters and then the small intestine where it will exit your body.
The stoma is warm, moist and pink or red in colour. It looks like the inside of your cheek. The stoma does not have any nerve cells so it does not feel touch or pain. Once the surgical incision heals, you will not feel pain from the incision.
After surgery, the stoma will be swollen. It becomes smaller as it heals. For most people healing takes 6 to 8 weeks after surgery. The final size of the stoma is different for everyone. It can be 12 to 48 mm wide and round or oval shape.
kidneys
large intestine
small intestine
bladder
urethra
ureters
3
The stoma has many tiny blood vessels close to its surface. It may bleed slighty when you clean it. This may occur occasionally but should not cause you any concern. Some medical treatments (chemotherapy) and medications (blood thinners) can also make the stoma bleed. The stoma does not have a muscle to hold it closed (a sphincter). This means that you cannot control the flow of your urine and you will need to wear a urostomy pouch to collect urine on the outside of your body. You will wear the pouch outside of your body all of the time.
The small intestine normally makes mucus. You may see a large amount of mucus in the urine after your surgery, but this will become less over time. Long term your urine will be clear and light yellow to amber in colour and should have some “shreds” of mucus. The amount of mucus varies from person to person. Your urostomy works right away after surgery. Due to swelling after surgery, there will be two stents (tiny plastic tubes) from your ureters through your stoma. These temporary stents help keep the ureters open, allowing urine to drain out of the stoma. These stents stay in for 5 days to 3 weeks. Your surgeon will determine when the stents need to be taken out. The stents may be taken out during your hospital stay or left in when you go home. The stents may fall out on their own and this is normal. In the operating room after surgery, a urostomy pouch is put over your stoma and connected to a bedside drainage bag. The pouch is clear so that nurses and doctors can assess your stoma’s appearance and urine output. Nurses will check the condition of your stoma and make sure the urostomy pouch is intact. For most people, the urine is bloody after surgery. This is normal for the first few days.
After the surgery, most people go home in about 3 to 7 days.
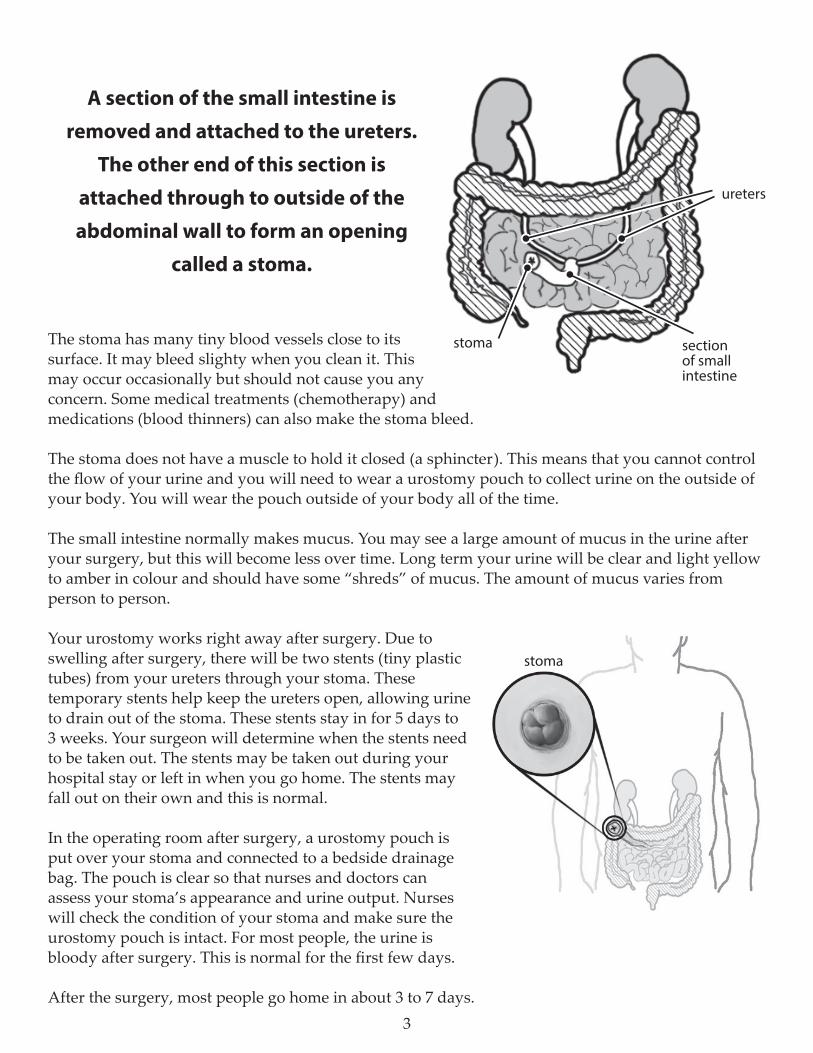
stoma
ureters
stoma section of small intestine
A section of the small intestine is
removed and attached to the ureters.
The other end of this section is
attached through to outside of the
abdominal wall to form an opening
called a stoma.
4
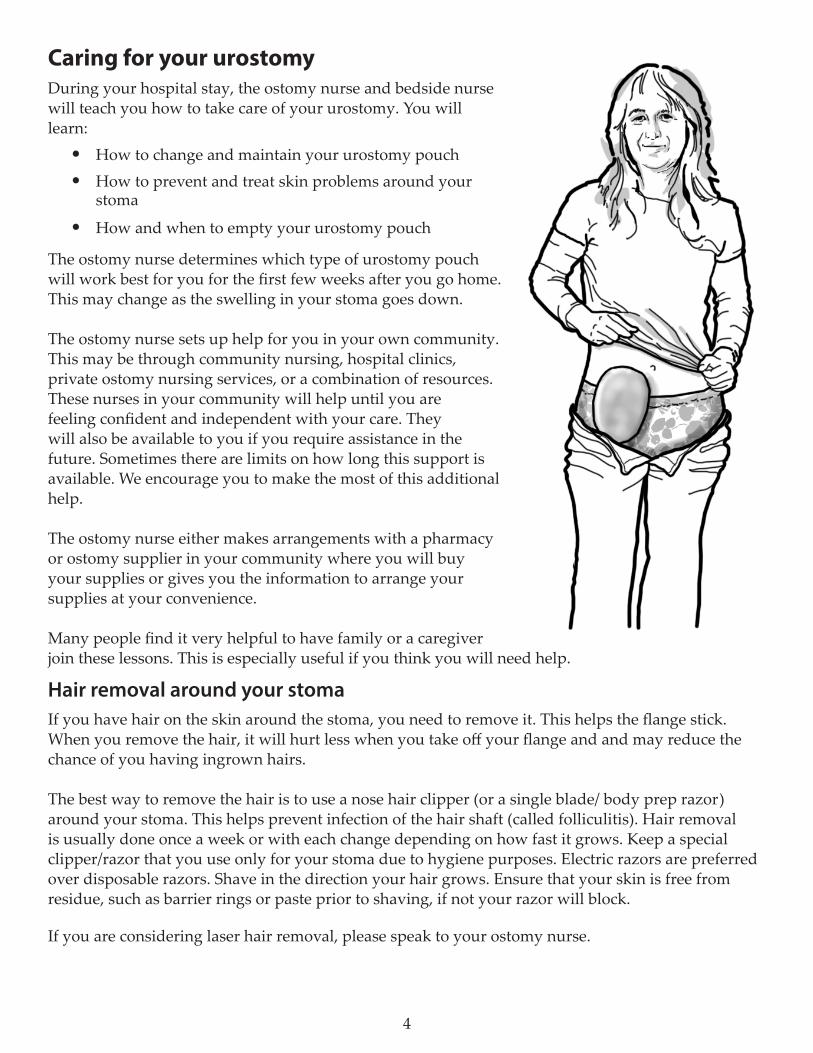
Caring for your urostomyDuring your hospital stay, the ostomy nurse and bedside nurse will teach you how to take care of your urostomy. You will learn:
• How to change and maintain your urostomy pouch• How to prevent and treat skin problems around your
stoma
• How and when to empty your urostomy pouch
The ostomy nurse determines which type of urostomy pouch will work best for you for the first few weeks after you go home. This may change as the swelling in your stoma goes down.
The ostomy nurse sets up help for you in your own community. This may be through community nursing, hospital clinics, private ostomy nursing services, or a combination of resources. These nurses in your community will help until you are feeling confident and independent with your care. They will also be available to you if you require assistance in the future. Sometimes there are limits on how long this support is available. We encourage you to make the most of this additional help.
The ostomy nurse either makes arrangements with a pharmacy or ostomy supplier in your community where you will buy your supplies or gives you the information to arrange your supplies at your convenience.
Many people find it very helpful to have family or a caregiver join these lessons. This is especially useful if you think you will need help.
Hair removal around your stoma If you have hair on the skin around the stoma, you need to remove it. This helps the flange stick. When you remove the hair, it will hurt less when you take off your flange and and may reduce the chance of you having ingrown hairs.
The best way to remove the hair is to use a nose hair clipper (or a single blade/ body prep razor) around your stoma. This helps prevent infection of the hair shaft (called folliculitis). Hair removal is usually done once a week or with each change depending on how fast it grows. Keep a special clipper/razor that you use only for your stoma due to hygiene purposes. Electric razors are preferred over disposable razors. Shave in the direction your hair grows. Ensure that your skin is free from residue, such as barrier rings or paste prior to shaving, if not your razor will block.
If you are considering laser hair removal, please speak to your ostomy nurse.
5
Daily life with a urostomy pouch
How often should I change my pouch?Different people wear their urostomy pouches for different lengths of time. We call this “wear time.” Wear time is how long you can wear your pouch without leaks or skin irritation. For most people the wear time is 2 to 4 days. If you do not have any leaks or skin irritation you can try wearing it for longer. The best time of the day to change your pouch is first thing in the morning before you eat or drink. The urostomy is less active at this time. If your pouch leaks, change it immediately.
Make sure you have enough pouches available so that you do not run out. Do not wait until you are on your last pouch before ordering your supplies.
How do I change my pouch?Please follow the step-by-step instructions for changing your urostomy pouch on page 15.
Check your skin every time you change the appliance. The skin around the stoma should look like the rest of your abdomen. It should not be red or irritated. If you have concerns about the skin around your stoma, make an appointment with an ostomy nurse in your community.
How to empty your pouchYou can empty your pouch several ways:
• standing in front of toilet and empty pouch into toilet bowl • sitting on toilet seat with your bottom near the back of the seat. Then emptying the urine from
your pouch between your legs into the toilet bowl • sitting facing the wall (toilet tank) and rest your arm on the back on the tank (or bathroom
urinal) for support while you empty between your legs into the toilet.
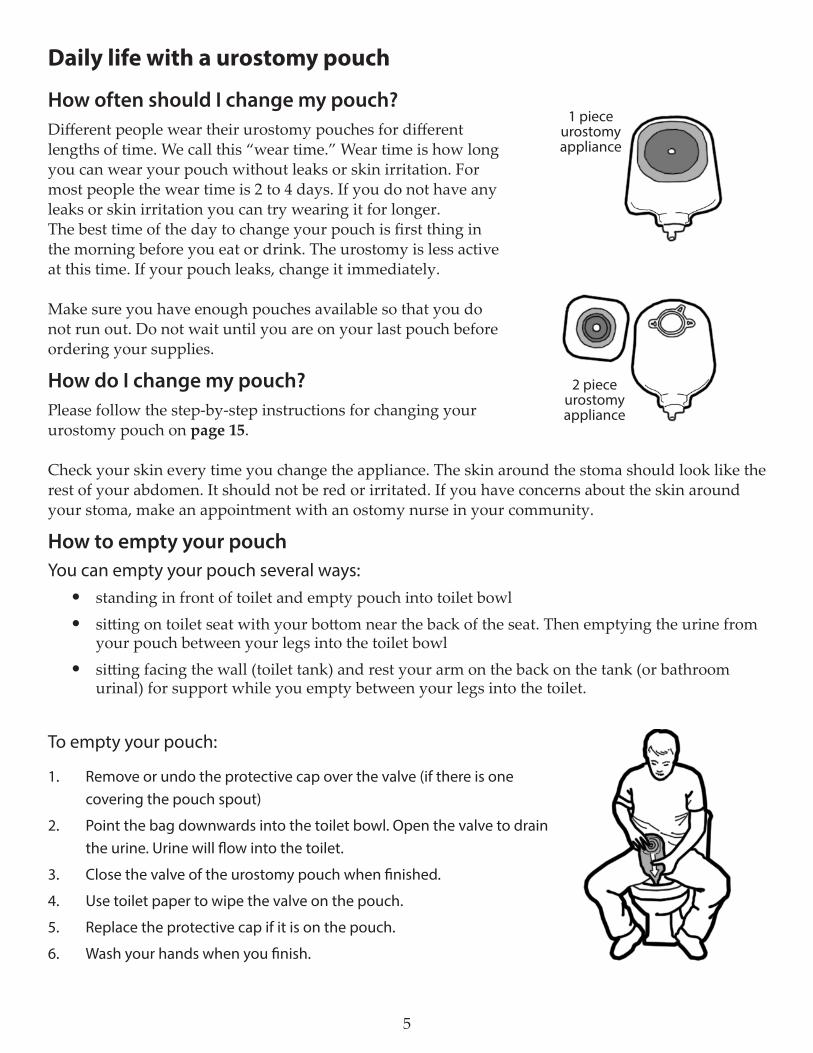
To empty your pouch:
1. Remove or undo the protective cap over the valve (if there is one covering the pouch spout)
2. Point the bag downwards into the toilet bowl. Open the valve to drain the urine. Urine will flow into the toilet.
3. Close the valve of the urostomy pouch when finished.
4. Use toilet paper to wipe the valve on the pouch.
5. Replace the protective cap if it is on the pouch.
6. Wash your hands when you finish.
1 pieceurostomyappliance
2 pieceurostomyappliance
6
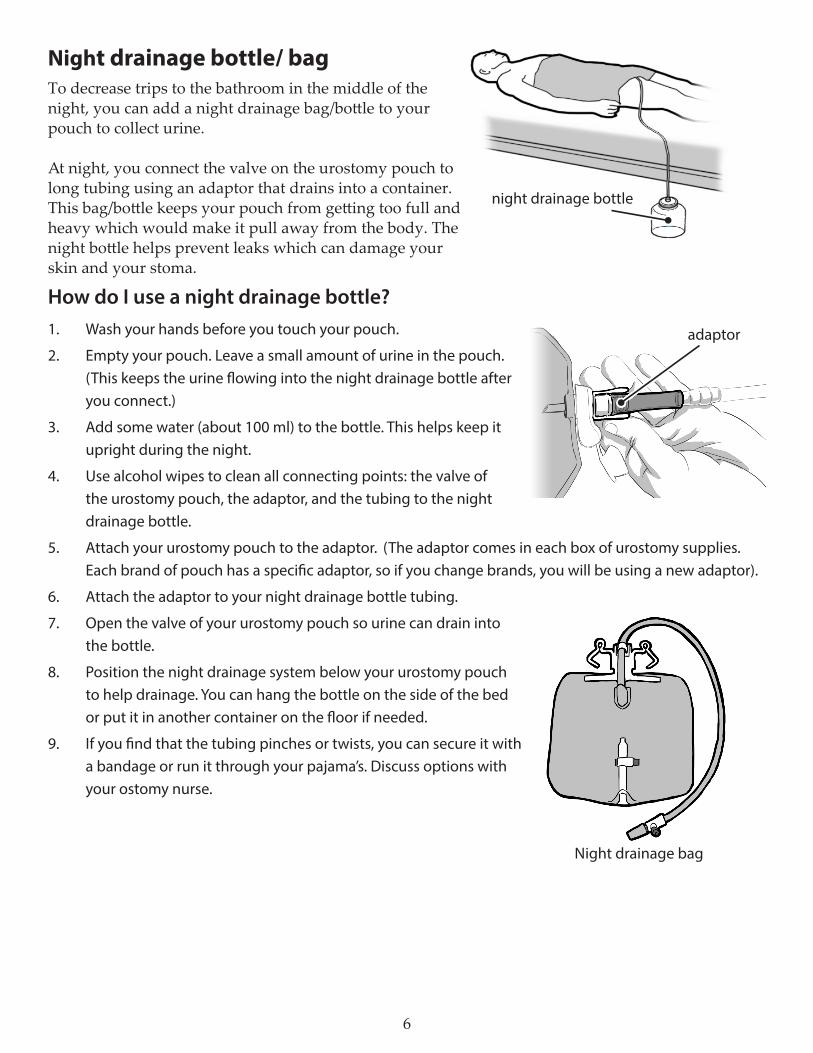
How do I use a night drainage bottle?1. Wash your hands before you touch your pouch.
2. Empty your pouch. Leave a small amount of urine in the pouch. (This keeps the urine flowing into the night drainage bottle after you connect.)
3. Add some water (about 100 ml) to the bottle. This helps keep it upright during the night.
4. Use alcohol wipes to clean all connecting points: the valve of the urostomy pouch, the adaptor, and the tubing to the night drainage bottle.
5. Attach your urostomy pouch to the adaptor. (The adaptor comes in each box of urostomy supplies. Each brand of pouch has a specific adaptor, so if you change brands, you will be using a new adaptor).
6. Attach the adaptor to your night drainage bottle tubing.
7. Open the valve of your urostomy pouch so urine can drain into the bottle.
8. Position the night drainage system below your urostomy pouch to help drainage. You can hang the bottle on the side of the bed or put it in another container on the floor if needed.
9. If you find that the tubing pinches or twists, you can secure it with a bandage or run it through your pajama’s. Discuss options with your ostomy nurse.
Night drainage bottle/ bagTo decrease trips to the bathroom in the middle of the night, you can add a night drainage bag/bottle to your pouch to collect urine. At night, you connect the valve on the urostomy pouch to long tubing using an adaptor that drains into a container. This bag/bottle keeps your pouch from getting too full and heavy which would make it pull away from the body. The night bottle helps prevent leaks which can damage your skin and your stoma.
night drainage bottle
adaptor
Night drainage bag

7
How do I clean my night drainage system?Clean your adaptor and the night drainage system every morning after use. This prevents infection and helps keep your bag/bottle clean. Speak to your ostomy nurse for more details.
You will need to clean the detachable urinary system (e.g. leg bag, urinary drainage bag, or night drainage bottle) that attaches to your urostomy pouch. This is cleaned every time you detach it from your urostomy pouch in order to reduce the risk of infection and help your drainage system stay clean. Do not clean your urostomy pouch. This should be discarded with each change.
Cleaning your night drainage system is a 2 step process. You must first clean the system with a soap solution and then disinfect it with vinegar. There are some commercially available pre-mixed solutions available (e.g. Urolux or Hollister M9 cleaner/decrystallizer). If you choose to use these solutions, follow the manufacturer’s directions.
To clean your night dranage system:
1. Wash and dry your hands thoroughly.
2. Prepare the two solutions that you will need for the procedure.
3. Wash hands again.
4. Close the drainage tap of your Urostomy pouch.
5. Gently disconnect your pouch from the tubing of the night drainage system.
6. Empty the contents of your night drainage system into the toilet.
7. If using a urinary bag, make sure the drainage spout is closed before the next step.
8. Wash hands again
9. Pour the Soap Solution (see For Cleansing) into the bag/bottle tubing. Some people find using a squirt bottle or funnel makes it easier to pour the solution down the tubing.
10. Wash hands again
11. Shake the bag/bottle gently for 30 seconds.
12. Open the clamp (or remove the cap from the bottle) and empty the solution into the toilet.
13. Close the clamp (or place the cap back on the bottle) of the drainage system.
14. Pour the Vinegar (see For Disinfecting) into the tubing and shake gently for 30 seconds.
15. Let stand for 10-15 minutes and then open the clamp and empty out the solution.
16. Leave the drainage spout (or top of bottle) open.
17. Allow to air dry. It can be laid on a clean surface or you can loop the tubing over a towel rack or shower bar. Make sure the ends of the tubing do not touch the floor.
18. Wash and dry your hands thoroughly.
For Cleaning:Soap SolutionIn a container, mix a few drips of liquid dish soap into 250ml (1 cup) of potable tap water.
For Disinfecting:Vinegar SolutionMix together 1 part white vinegar to 3 parts water. Example:¼ cup white vinegar + ¾ cups tap water.
8
When should bag, bottle, tubing and adapter be replaced?
• If you have been treated for a urinary tract infection (UTI), change your bag or bottle and then resume routine changes as listed below.
• A night drainage bottle should be replaced when there is clouding, odour or discoloration or every 6 months, whichever comes first.
• A bedside urinary bag or leg bag and tubing should be replaced every month.
• The adapter should be changed when it loosens or doesn’t fit anymore. This is usually every 2-3 pouch changes depending on how many adapters have been included in the box of ostomy supplies. Each company provides a different amount of adapters.
Bathing and showeringWhen you have a bath or shower, you can take your urostomy pouch completely off or keep it on. If wearing a 2 piece system the pouch needs to remain on to make the system waterproof. It is not waterproof if you wear the pouch without the flange. A one piece pouch is completely waterproof.
When you change your pouch, we recommend taking it off, and having a shower without it. This lets your skin breathe. Do not use bar soap directly on your stoma or the skin directly around it. It is ok to let your shampoo or body wash to run over the area as long as you rinse it with water really well.
On the days you shower with your pouch on, dry the outside of the pouch with a towel. If you use a hair dryer be very careful. Use a cool setting as the heat from the hair dryer can melt the pouch.
When you bathe, do not use soaps or soap-like products that contain moisturizers, bath oil or lotions on the skin around your stoma. They can stop your pouch from sticking. If you do, make sure to wash off the soap to allow adherence of your pouching system.
Tips for keeping your skin healthy There are some things you can do to keep the skin around your stoma healthy and also help the flange to stick.
• Do not use soap or rubbing alcohol to clean around your stoma. This will strip away the protective oil on your skin and cause skin irritation and skin damage.
• Do not use baby wipes or store-bought cleansers to clean your skin. These can leave a residue that irritates your skin and stops the flange from sticking.
• Any creams or moisturizer (including medicated creams) can stop the flange from sticking. Do not use them unless your ostomy nurse tells you to try them. If your physician orders any creams or lotions to be applied beneath your flange please contact your ostomy nurse for guidance.
• There are products specially designed for the skin around the stoma, such as adhesives and ostomy powder. Do not use these unless your ostomy nurse tells you to.
9
How to obtain a urine sampleIf you have signs and symptoms of urinary tract infection, your doctor will likely ask you to get a urine sample through your urostomy. Remember to indicate that your urine sample is obtained from your urostomy on your lab requisition.
To get a sample:
1. Take off your urostomy pouch and wash your hands.
2. Clean your stoma with warm water as usual
3. Lean your body forward so that the stoma points down.
4. Hold the urine specimen container under the stoma to catch the urine that dribbles out.
5. Continue until you have 10 to 20 ml of urine in the container.
6. Put on the urostomy pouch and wash your hands.
7. When you give to the lab, ask them to label the sample as obtained directly from an urostomy/ ileal conduit stoma
If you are unable to obtain urine from your stoma using these instructions, make an appointment with an ostomy nurse. They can help you get a sample.
Going out and aboutAlways carry spare urostomy supplies with you. Many people carry an emergency zipper-lock bag with pouching supplies, paper towel, water and a garbage bag. In very hot or cold weather, it is best to carry your supplies with you and not leave in a car unless you place them in a cooler to keep them from being exposed to extreme temperatures.
Swimming and hot tubsOnce your incision is completely closed in 2 to 3 months, you can swim and use hot tubs and saunas. Spending time in the water can loosen the adhesive seal on your flange. You may need to replace your pouch after being in the water. If you can, wait 1 to 2 hours after a pouch change before you swim. This helps the pouch stick. If you are nervous about swimming, test it out first. Lie in a bath full of water with your pouch under the water to see what happens. There are also accessories to help secure the pouch if you want extra support. Talk to your ostomy nurse for more information.
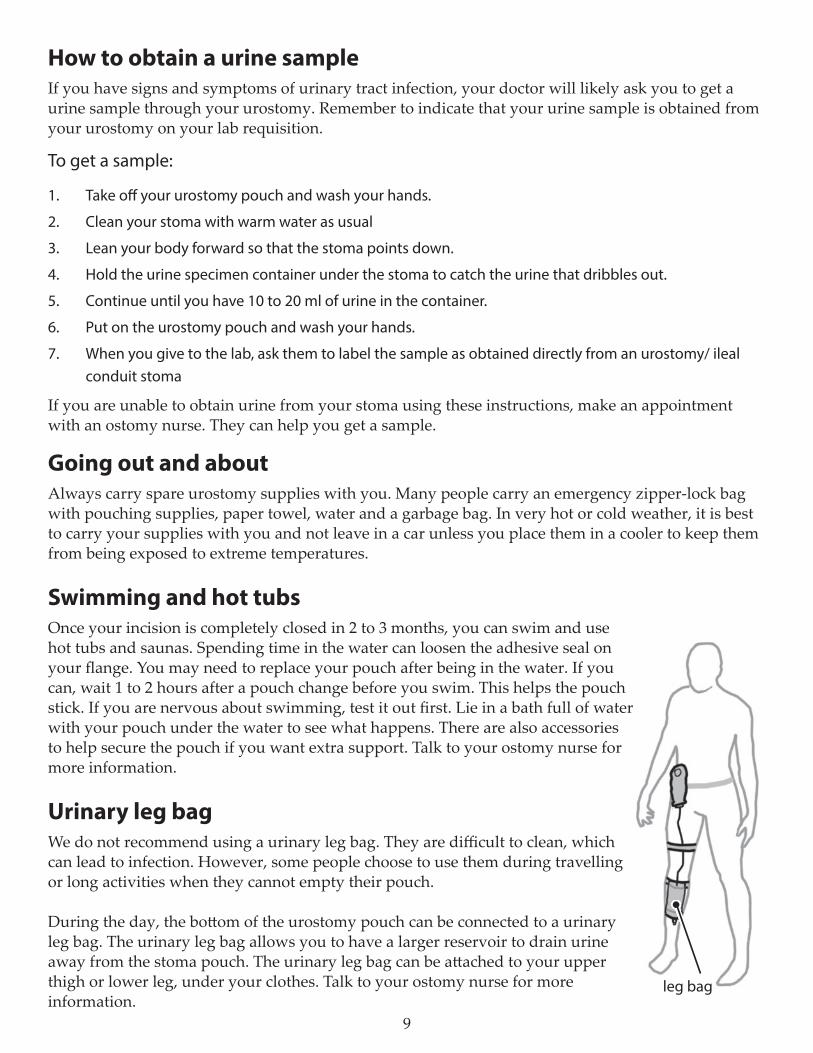
Urinary leg bagWe do not recommend using a urinary leg bag. They are difficult to clean, which can lead to infection. However, some people choose to use them during travelling or long activities when they cannot empty their pouch.
During the day, the bottom of the urostomy pouch can be connected to a urinary leg bag. The urinary leg bag allows you to have a larger reservoir to drain urine away from the stoma pouch. The urinary leg bag can be attached to your upper thigh or lower leg, under your clothes. Talk to your ostomy nurse for more information.
leg bag
10
If you come back to the hospital If you need to go back into the hospital, remember to bring your own urostomy supplies. Hospitals have basic urostomy supplies. They do not have the wide variety of supplies that are available in the community and may not have your specific supplies.
Activities after surgery (first 6 to 8 weeks)It is important to increase your activity gradually so that you don’t strain your abdominal muscles or hurt your incisions. For the first 6 to 8 weeks after surgery, avoid strenuous activities.
For example, DO NOT do any of these things:• Do not try to sit up using only your abdominal muscles. When you get out of bed, roll on your
side first and then push up on your elbow.• No lifting or straining of your abdominal muscles (e.g. golfing). Do not lift, pull, or push
anything more than 5 to 10 pounds. For example: No lifting baskets of laundry; do not pick up or carry your dog or your children; do not lift more than 2 liters of milk or a very small bag of groceries.
• Coughing, sneezing, and straining all put pressure on your abdomen. To support your abdominal muscles, hold a pillow or your hands firmly against your abdomen when you cough or sneeze.
Instead, DO the following:• Be cautious and thoughtful of your movements.• Ensure you use proper body mechanics when lifting, pulling or pushing for anything less
than 5-10 pounds. You should have been taught or received information about proper body mechanics while in the hospital from the nursing staff of physiotherapist.
• Light activities such as walking are safe and will help your healing. Your surgeon will tell you when you can return to other activities. If doing something causes discomfort, stop right away.
• Talk to your surgeon about any specific limits. Regular physical exercise such as walking and swimming will strengthen your abdominal muscles. This kind of exercise is also good for overall health and wellness.
• Many people find seeing a Pelvic Floor Physiotherapist very helpful and is recommended during recovery when possible. Contact a Physiotherapist within your community but ensure you ask if they have a experience with “pelvic floor therapy”.
11
Urinary crystalsUrinary crystals on the stoma or surrounding skin are caused by alkaline urine. (Urine is usually acidic.) The crystals look like white, gritty particles. Sometimes, the skin is discoloured. These crystals cause stoma irritation, skin discomfort, pouch leakage, and/or bleeding. Proper cleaning, diet (including drinking plenty of fluids) to keep your urine acidic, and careful fitting of the flange will help prevent urinary crystals.
If you notice these crystals or skin discoloration, see your ostomy nurse for assessment.
How to treat urinary crystalsWhen you have a buildup of urinary crystals on or around your stoma, mix together 1 part white vinegar and 1 part water. For example, you might use ½ cup white vinegar and ½ cup water. Dampen a small towel in this mixture. Put the towel on the stoma and the skin around the stoma, for 10 minutes when you are changing your pouch. Your stoma may turn white afterwards. This is normal. Clean the area with a paper towel and water and finish changing your pouch.
Urinary tract infections (UTIs)A urinary tract infection (UTI) is an infection in any part of your urinary system – your kidneys and ureters. Urinary tract infections can be serious for a person living with a urostomy. Make an appointment with your family doctor if you notice any of these signs:
• Dark, cloudy, foul smelling urine.• More mucus than normal in your urine.• Fever.• Lower back or side pain (over your kidneys).• Loss of appetite.• Nausea and/or vomiting.
• Feeling unwell.
How to prevent a UTI?• Drink plenty of fluids (at least 1.5 to 2 liters a day)• Avoid large amounts of caffeine and alcohol• Use a night drainage bottle at night to direct urine away from the stoma• Empty your pouch often. Keep it less than 1/3 or ½ full. • Before changing your pouch, wash your hands with soap and water. Dry them with a clean
paper towel. Put all your supplies on a clean surface.• Change your night drainage system as recommended by the manufacturer or your ostomy
nurse.
If you have a urinary tract infection, change your urostomy pouch, night drainage system, and urinary leg bag. This will help prevent you from getting another infection.
12
Parastomal herniaA ‘parastomal hernia’ is a medical condition where part of your intestine sticks out through a weak place in your abdominal wall. This may look like a bulge. As long as the hernia is not painful or causing any problems, you may not need urgent assistance. Contact your surgeon and ostomy nurse about a hernia belt, urostomy pouch fitting and other options.
If the bowel becomes blocked or twisted, it is an emergency. Please go to the nearest emergency department if you are experiencing the following:
• Nausea and/or vomiting.• Skin around the stoma feels hot when you touch it.• Pain and/or swelling in the abdomen.
How do I prevent a parastomal hernia?For the first 3 months after surgery:
• Always support your abdominal area with a pillow or your hands when you cough or sneeze.• Do not lift, push or pull anything that weighs more than 10 pounds. Avoid do anything that
involves heavy lifting or straining.• Avoid constipation by drinking more water and getting more fibre in your diet. Straining
during a bowel movement can put unnecessary stress on your abdominal muscles.• When you get out of bed, roll on your side first. Then push up on your elbow to support your
body. Do not try to sit up using only your abdominal muscles.
Here are some things you can do to reduce your risk.• Stop smoking.• Maintain a healthy diet to avoid constipation.• Do regular physical exercise such as walking and swimming.
• Talk to your ostomy nurse about a hernia belt or if you plan to lose or gain weight.
Additionally, there are certain exercises which can help prevent parastomal hernia. Please speak to your doctor or ostomy nurse for more details. Some parastomal hernia’s are not preventable and are no fault of yours.
IMPORTANT:Call your surgeon, family doctor or ostomy nurse if you notice any of these signs:
• Signs and symptoms of a urinary tract infection (Refer to page 11 when done Urinary tract infection section)
• An unusual change in your stoma size or color• Skin irritation or skin breakdown around the stoma • Bleeding from the stoma opening (or a moderate amount of blood in the pouch
several times when emptying it)• Nausea and/or vomiting with increasing abdominal pain
13
Nurses Specialized in Wound, Ostomy and Continence Canada (NSWOCC)Website: www.nswoc.caPhone: 888-739-5072
United Ostomy Association of Canada Inc. (UOAC)Website: www.ostomycanada.caPhone: 1-888-969-9698
Vancouver United Ostomy AssociationWebsite: www.uoavancovuer.comUnited Ostomy Association of America (UOAA)Website: www.uoaa.org/Phone: 1-800-826-0826
Bladder Cancer CanadaWebsite: www.bladdercancercanada.orgPhone: 1-866-674-8889
Canadian Cancer SocietyWebsite: www.cancer.ca/en/cancer-information/cancer-type/bladder/bladder-cancer/Phone: 1-866-786-3934
Canadian Urological Association (CUA)Website: www.cua.orgPhone: 1-514-395-0376
Wound Ostomy & Continence Nurses Society Website: wocn.org/Phone: 1-888-224-WOCN
HollisterWebsite: www.hollister.caPhone: 1-800-263-7400
Coloplast Website: www.coloplast.caPhone: 1-877-820-7008
Salts Healthcare Website: www.salts.co.ukPhone: 1-877-927-4953
Marlen Canada Website: www.marlencanada.caPhone: 1-844-379-9101
ConvaTec Website: www.convatec.caPhone: 1-800-465-6302
B Braun Website: www.bbraun.caPhone: 1-800-624-2920
ResourcesThe resources bellow are used to provide additional patient support. No endorsement are made by the Health Care Authorities.
14
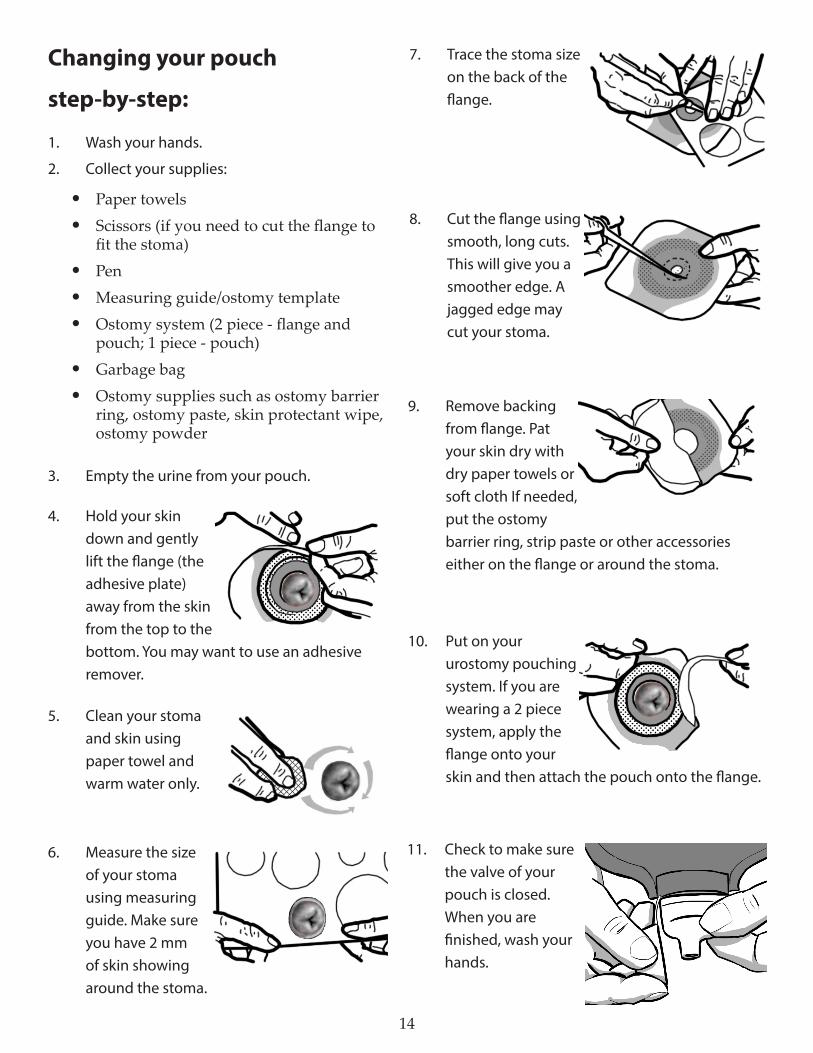
4. Hold your skin down and gently lift the flange (the adhesive plate) away from the skin from the top to the bottom. You may want to use an adhesive remover.
5. Clean your stoma and skin using paper towel and warm water only.
6. Measure the size of your stoma using measuring guide. Make sure you have 2 mm of skin showing around the stoma.
7. Trace the stoma size on the back of the flange.
1. Wash your hands.
2. Collect your supplies:
• Paper towels• Scissors (if you need to cut the flange to
fit the stoma)• Pen• Measuring guide/ostomy template• Ostomy system (2 piece - flange and
pouch; 1 piece - pouch)• Garbage bag• Ostomy supplies such as ostomy barrier
ring, ostomy paste, skin protectant wipe, ostomy powder
3. Empty the urine from your pouch.
8. Cut the flange using smooth, long cuts. This will give you a smoother edge. A jagged edge may cut your stoma.
9. Remove backing from flange. Pat your skin dry with dry paper towels or soft cloth If needed, put the ostomy barrier ring, strip paste or other accessories either on the flange or around the stoma.
10. Put on your urostomy pouching system. If you are wearing a 2 piece system, apply the flange onto your skin and then attach the pouch onto the flange.
11. Check to make sure the valve of your pouch is closed. When you are finished, wash your hands.
Changing your pouch
step-by-step:

15
Notes