Embed Size (px)
Citation preview

DISTRIBUTED FILE NAMESPACE SOLUTION WITH HYBRID CLOUD STORAGE
A Microsoft Azure StorSimple and Distributed File System Namespace (DFS -N) deployment guide

Copyright This document is provided "as-is." Information and views expressed in this document, including URL and other Internet website references, may change without notice. Some examples depicted herein are provided for illustration only and are fictitious. No real association or connection is intended or should be inferred. This document does not provide you with any legal rights to any intellectual property in any Microsoft product. You may copy, use and modify this document for your internal, reference purposes. © 2015 Microsoft Corporation. All rights reserved. Microsoft, Microsoft Azure, StorSimple, Active Directory, Hyper-V, Internet Explorer, Silverlight, SQL Server, Windows, Windows PowerShell, and Windows Server are trademarks of the Microsoft group of companies. All other trademarks are the property of their respective owners.

Contents DISTRIBUTED FILE NAMESPACE SOLUTION WITH HYBRID CLOUD STORAGE ................................................. 1
Copyright ......................................................................................................................................... 2
Introduction .................................................................................................................................... 5
DFS-N domain vs. standalone namespaces .................................................................................... 5
Use cases ......................................................................................................................................... 6
Detailed Architecture ...................................................................................................................... 7
Single datacenter: global namespace and NAS replacement ..................................................... 7
Deploying DFS-N on a domain controller (preferred method) ............................................... 7
Deploying DFS-N on a file server ............................................................................................. 8
Multiple datacenters: multi-site availability and disaster recovery ......................................... 10
Multi-site availability ............................................................................................................. 10
Disaster recovery ................................................................................................................... 12
Remote sites and branches: content availability and distribution ........................................... 14
BranchCache overview and modes ....................................................................................... 15
Main office architecture ........................................................................................................ 16
Remote Office Architecture ................................................................................................... 16
Implementation Steps ................................................................................................................... 17
Steps to enable DFS-N on Windows Server 2012 ..................................................................... 17
Steps to configure the StorSimple 8000 series appliance ......................................................... 20
Step 1: Create a new service ................................................................................................. 20
Step 2: Get the service registration key ................................................................................ 21
Step 3: Configure and register the device through Windows PowerShell for StorSimple .... 22
Step 4: Complete the minimum device setup ....................................................................... 25
Step 5: Create a volume container ........................................................................................ 26
Step 6: Create a volume ........................................................................................................ 27
Step 7: Mount, initialize, and format a volume ..................................................................... 29
Steps to configure a single datacenter: global namespace and NAS replacement .................. 30
Step 1: Create a DFS-N (global namespace) for StorSimple volumes ................................... 30
Step 2: Add folders to the namespace .................................................................................. 34
Steps to configure multiple datacenters: multi-site availability and disaster recovery ........... 36
Multi-site availability ............................................................................................................. 36
Disaster Recovery .................................................................................................................. 38

Remote sites and branches: content availability and distribution ........................................... 39
Main office implementation steps ........................................................................................ 40
Remote Office Implementation Steps ................................................................................... 43
Limitations..................................................................................................................................... 46
Appendix A .................................................................................................................................... 47
Appendix B .................................................................................................................................... 48
Appendix C: Use PuTTY to connect to the device serial console .................................................. 49
Appendix D: Initialize StorSimple volumes on a Windows Server host ........................................ 51
Figure 1: Single Datacenter Implementation .................................................................................. 9
Figure 2: Multiple Datacenters Implementation .......................................................................... 11
Figure 3: Disaster Recovery options with complete site failover ................................................. 13
Figure 4: StorSimple Implementation for Remote Sites using BranchCache ............................... 16

Introduction
Microsoft Azure StorSimple is a Hybrid Cloud Storage (HCS) solution that addresses the
complexities of unstructured data commonly associated with file shares. StorSimple uses
Microsoft Azure cloud storage as an extension of on-premises storage and automatically tiers
data across on-premises devices and the cloud. StorSimple provides the ability to create
multiple LUNs of different sizes which are presented to the Windows Server host via the iSCSI
protocol. StorSimple also provides the ability to clone and fail over the volumes to other
StorSimple devices in the same datacenter, different datacenters, or to a virtual appliance in
Azure. The StorSimple solution addresses IT challenges in storing, managing, and protecting
large datasets across multiple datacenters. Application workloads that consume and serve the
data are deployed and managed by the administrator using other tools.
This paper explains how to deploy StorSimple, Windows file servers, and Windows Server
Distributed File System Namespace (DFS-N) to create a single global namespace for all the
shares created in StorSimple. It describes how system administrators can take advantage of
DFS-N during disaster recovery from one StorSimple appliance to another, and maintain the
same share names. This provides transparency and continuity to end users during disaster
recovery and removes the need for manual tasks and changes post recovery. This paper also
outlines how to use BranchCache to distribute content to remote sites and branches, and
includes a reference architecture and best practices for using DFS-N and BranchCache along
with StorSimple for large deployments.
This paper focuses on use cases, a specific implementation, and best practices. It assumes the
reader has basic knowledge of StorSimple, DFS-N, and BranchCache. If needed, refer to the
appendix for additional material.
The information in this paper applies to the Microsoft Azure StorSimple General Availability
(GA) release running on Windows Server 2012.
DFS-N domain vs. standalone namespaces
When you deploy and use DFS-N, a fundamental architecture decision that cannot be easily
changed later is whether to deploy a domain-based namespace or a standalone namespace.
Domain-based namespace: A domain-based namespace leverages the functionality of Active Directory Domain Services (AD DS) by storing root information about the DFS-N path in AD DS. The path that users refer to uses the name of the domain, and it will not need to change because your namespace server name changed. (The path will change only if you change your domain name.)

Standalone namespace: A standalone namespace relies on a single server to provide the namespace information to your clients. With a standalone DFS, that server name becomes part of the main path to the namespace.
Recommendation: When implementing DFS-N along with StorSimple, we strongly recommend
that you use a domain-based namespace.
Using domain-based namespaces with StorSimple provides the following advantages:
Simple high availability and disaster recovery for the namespace
When you use a domain-based namespace implementation, the information about the
namespace is stored in AD DS and the memory cache on each namespace server. In most
multisite implementations, customers already have multiple domain controllers for
availability and disaster recovery. Because namespace information is kept in AD DS,
namespace information has the same availability and disaster recovery as AD DS.
Note
For detailed information about the two namespace types, see Choosing the DFS Namespace
Type (http://msdn.microsoft.com/en-us/library/cc770287.aspx).
Use of the domain name as the root name for network-attached storage (NAS)
DFS-N allows you to use StorSimple as an alternative to NAS. In an organization, it is very
unlikely that the domain name will change frequently. By using a domain-based namespace,
you can use a name such as \\contoso.com\share to indicate a share. This provides multiple
StorSimple volumes with a unique root name that represents a NAS device.
A unique name for file shares during disaster recovery
Domain-based namespace implementation gives you the ability to maintain the same file
share name at the time of disaster recovery when volumes are failed over from the original
StorSimple appliance to another StorSimple appliance used for disaster recovery. This will
be discussed in greater detail in the sections "Use cases," "Detailed architecture," and
"Implementation steps."
Use cases
There are three use cases in which StorSimple can be implemented along with DFS-N. The
following sections will discuss these use cases and implementations.
Single datacenter: global namespace and NAS replacement
Deploy and manage multiple file shares within a single global namespace with StorSimple,
using the cloud for extended capacity, backup, and disaster recovery.
Multiple datacenters : multi-site availability and disaster recovery

Span global namespace across multiple datacenters and achieve business continuity across
sites without investing in complex and expensive replication topology.
Remote sites and branches: content availability and distribution
Distribute content to remote branches and achieve cost-effective wide-area network (WAN)
acceleration, content caching, and peer-to-peer caching through the combined use of
Microsoft Azure, StorSimple, DFS-N, and BranchCache.
Detailed Architecture
This section describes the architecture and topology required to accomplish each of the three
use cases.
Single datacenter: global namespace and NAS replacement
This use case describes the architecture of StorSimple in a single datacenter implementation
that uses the DFS-N feature to define a global namespace for the StorSimple shares.
StorSimple enables you to create volumes that are presented to file servers as iSCSI targets.
Typically, file shares are referenced by paths that include the file share server name (for
example, \\myfileserver1\shareA). When multiple file servers are deployed, users need to
access several different paths (for example, \\myfileserver1\shareA and
\\myfileserver2\shareB). Using multiple file server names means that you have to manage
multiple share names, and if you move a StorSimple volume to another file server, the old share
name will no longer be valid. Using DFS-N, you can put shareA and shareB under one
namespace (for example, \\mycompany\shareA and \\mycompandy\shareB) even though these
shares are hosted on separate file servers. With one global namespace for the shares, you can
employ multiple StorSimple appliances as network attached storage (NAS) under one
namespace.
You can implement DFS-N on a domain controller server or file server, or you can provision it as
standalone server just for the DFS namespace role. A single namespace server can handle
numerous requests per second. When it comes to single datacenter or site, you need only one
server running the DFS namespace role unless you need to create a high availability
environment. (Figure 1 illustrates a single datacenter implementation.)
You can use either of the following methods to implement the DFS-N role for the single
datacenter implementation.
Deploying DFS-N on a domain controller (preferred method)
You can enable the DFS-N role on a domain controller server. It is generally assumed that
domain controllers are good candidates to become namespace servers because, in small
deployments, they are usually not too busy. Domain controllers are likely to also be running
other services such as DNS. Namespace information is stored in AD DS, just as it is when you
implement the domain-based namespace. If you configure the DFS-N role on a domain
controller server, it can provide some performance benefits when resolving the targets on the
network.
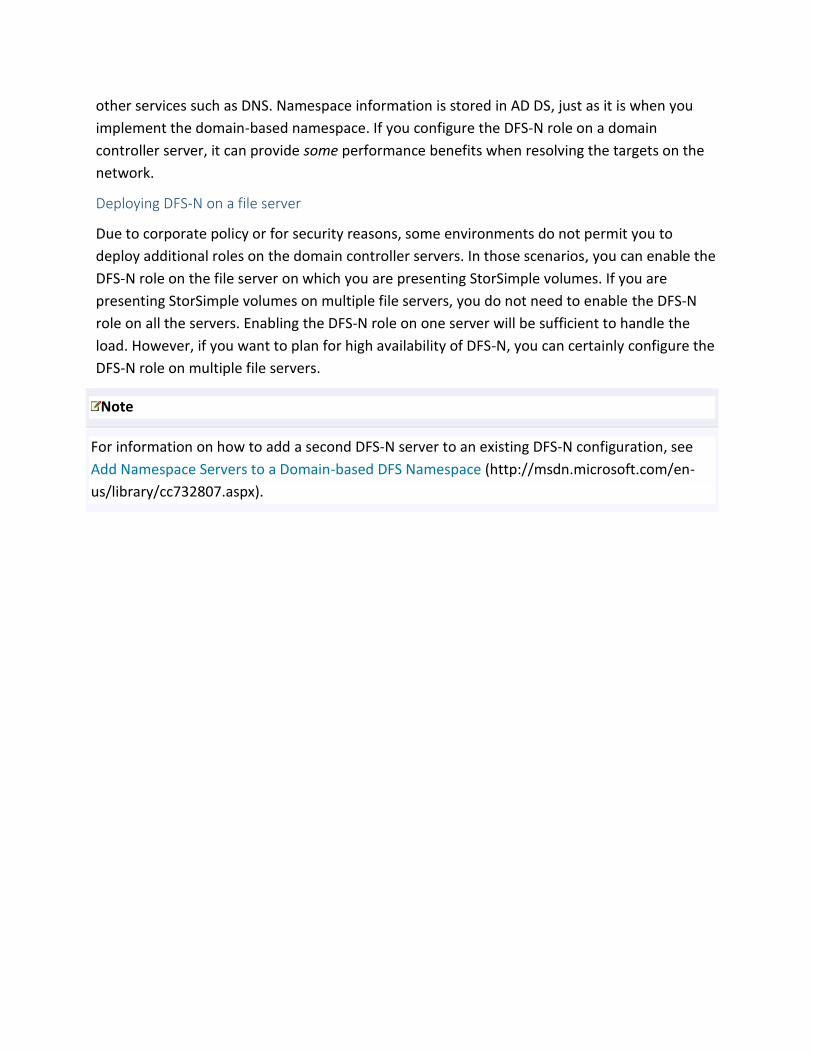
Deploying DFS-N on a file server
Due to corporate policy or for security reasons, some environments do not permit you to
deploy additional roles on the domain controller servers. In those scenarios, you can enable the
DFS-N role on the file server on which you are presenting StorSimple volumes. If you are
presenting StorSimple volumes on multiple file servers, you do not need to enable the DFS-N
role on all the servers. Enabling the DFS-N role on one server will be sufficient to handle the
load. However, if you want to plan for high availability of DFS-N, you can certainly configure the
DFS-N role on multiple file servers.
Note
For information on how to add a second DFS-N server to an existing DFS-N configuration, see
Add Namespace Servers to a Domain-based DFS Namespace (http://msdn.microsoft.com/en-
us/library/cc732807.aspx).

Figure 1: Single datacenter implementation1
Figure 1 shows the recommended reference architecture for implementing StorSimple with
DFS-N in a single site or independent datacenter environment. It presents four StorSimple
volumes to file servers (FS1 and FS2). Two of the volumes, share1 and share2, are presented to
FS1 and the other two volumes, share3 and share4, are presented to FS2. Because the DFS-N
role is installed (either on a domain controller or on a file server), users are able to access these
shares as \\contoso.com\share\Vol1, \\contoso.com\share\Vol2, and so on, instead of
\\fs1\Vol1 and so on. This gives system administrators flexibility to move StorSimple volumes
from one server to another without making any change in the share names presented to end
users.
Table 1 provides the detailed list of StorSimple volumes along with the DFS-N shares that will be
presented to the users.
1 You can use either a physical machine or a virtual machine to run domain controller/DFS-N/file servers.

Table 1: StorSimple volumes and DFS share structure for a single datacenter implementation
StorSimple
appliance
StorSimple
volume
File
server File share DFS namespace DFS-N share
8100/8600
Vol1 FS1 \\FS1\Vol1
Contoso.com\Share
\\Contoso.com\Share\Vol1
Vol2 FS1 \\FS1\Vol2 \\Contoso.com\Share\Vol2
Vol3 FS2 \\FS2\Vol3 \\Contoso.com\Share\Vol3
Vol4 FS2 \\FS2\Vol4 \\Contoso.com\Share\Vol4
Multiple datacenters: multi-site availability and disaster recovery
This use case describes how you can use Azure to extend a global namespace across multiple
datacenters and achieve business continuity across sites without investing in complex and
expensive replication topology. The first part discusses how you can use DFS-N to create a
global namespace for volumes residing on multiple StorSimple appliances. The second part
describes how you can use StorSimple with Azure to provide business continuity without
affecting business/user productivity when a disaster happens.
Multi-site availability
As shown in in Figure 2, the customer topology consists of two datacenters with a StorSimple
appliance in each. Each StorSimple appliance provides primary storage volumes to support file
shares in its site and serves as the disaster recovery target for the other StorSimple appliance.
In this architecture, each appliance has sufficient capacity available for disaster recovery, but is
active all the time. The benefit of this is that it does not require a dedicated standby site or
unused infrastructure reserved just for disaster recovery.
When implementing a StorSimple solution with DFS-N, you can create a global namespace for
all the StorSimple volumes even if they reside on multiple StorSimple appliances. In addition to
the recommendations for implementing a single datacenter implementation, we recommend
the following when you implement a multi-site StorSimple solution:
One DFS-N server per site
You should have at least one DFS-N server per site. You don’t have to create a new
namespace. Instead, you should add the new server with the DFS-N role to the existing
namespace. Having a DFS-N server at the site can help resolve referrals within the site.
Note
For information on how to add a second DFS-N server to an existing DFS-N, see Add Namespace
Servers to a Domain-based DFS Namespace (http://msdn.microsoft.com/en-
us/library/cc732807.aspx).

One domain controller per site
We recommend that you have one domain controller or read only domain controller per
site to handle domain authentication within the site. Having one domain controller or read
only domain controller per site helps client machines to resolve their namespace referrals
from the nearest namespace server by using Active Directory site configuration information.
This is another reason why you should use DFS-N and also why you should have one
namespace server per site. When you have at least one domain controller per site, you have
the option to enable DFS-N root scalability. This allows the namespace server to work with
the nearest domain controller.
Note
For information about DFS-N scalability considerations, see the blog post DFS Namespace
Scalability Considerations (http://blogs.technet.com/b/filecab/archive/2012/08/26/dfs-
namespace-scalability-considerations.aspx).
Register StorSimple under the same StorSimple Manager service
As part of business continuity, if you are using multiple physical appliances, please make
sure that all are registered under the same StorSimple Manager service. If the appliances
are not registered in the same service, you will not be able to fail over one device to
another.
Figure 2: Multiple datacenters implementation
In the implementation shown in Figure 2, each datacenter has 4 shares. Datacenter 1 includes
the domain-based namespace role (\\Contoso.com\Share) to provision network shares for the
users. To enable the global namespace, datacenter2 contains the second namespace server

(configured for the existing namespace), along with a read only domain controller. This
implementation provides clients/users the ability to access StorSimple shares across multiple
sites with one namespace, without worrying about where or how those shares are provisioned.
When a user who is sitting near datacenter1, requests \\contoso.com\share\vol1, the
namespace server in datacenter1 handles the referral and redirects to FS1. By enabling root
scalability with domain controllers on both the sites, when the user who sits near datacenter1
requests \\contoso.com\share\vol5, the namespace server in datacenter1 still handles the
referral locally and redirect to FS3 in datacenter2.
Table 2 contains a detailed list of StorSimple volumes and DFS-N shares that are presented to
the users in a multiple datacenter environment.
Table 2: List of StorSimple volumes and DFS-N shares
Datacenter StorSimple
appliance
StorSimple
volume
File server File share DFS namespace DFS-N share
Datacenter1 8100/8600 Vol1 FS1 \\FS1\Vol1 Contoso.com\Share \\Contoso.com\Share\Vol1
Vol2 FS1 \\FS1\Vol2 \\Contoso.com\Share\Vol2
Vol3 FS2 \\FS2\Vol3 \\Contoso.com\Share\Vol3
Vol4 FS2 \\FS2\Vol4 \\Contoso.com\Share\Vol4
Datacenter2 8100/8600 Vol5 FS3 \\FS3\Vol5 \\Contoso.com\Share\Vol5
Vol6 FS3 \\FS3\Vol6 \\Contoso.com\Share\Vol6
Vol7 FS4 \\FS4\Vol7 \\Contoso.com\Share\Vol7
Vol8 FS4 \\FS4\Vol8 \\Contoso.com\Share\Vol8
Table 1: StorSimple volumes and DFS share structure for multiple datacenters
Disaster recovery
For this scenario, consider a situation in which one of the datacenter sites in a multi-site
configuration fails. Figure 3 depicts a situation in which datacenter1 fails completely and users
do not have access to anything, including the StorSimple appliance that was installed at
datacenter1.
For business continuity and disaster recovery, all the shares must be available from
datacenter2. A read-only domain controller and DFS-N are already available on Datacenter2;
therefore, users will continue to access shares without any interruption, as long as they are
accessing the shares that are redirected to file server FS3 and FS4. Because both sites had a
domain controller and DFS-N server, the solution is fault tolerant and can handle user requests.
When datacenter1 fails, users who were accessing datacenter1 for namespace information will
begin to contact the namespace server located in datacenter2 for referrals.

Figure 3: Disaster Recovery options with complete site failover
2
To bring datacenter1 StorSimple volumes back online:
1. Use the latest cloud snapshot to fail over the appliance.
To bring the StorSimple volumes online on another StorSimple appliance, you must fail over
the offline StorSimple appliance in datacenter1 to the online StorSimple appliance in
datacenter2.
Note
For information on how to perform a device failover from one StorSimple appliance to another
StorSimple appliance, see Disaster recovery (DR) and device failover
(http://msdn.microsoft.com/en-us/library/dn772379.aspx#failover).
Failover is a quick process (minutes) because StorSimple instantly restores each volume and
downloads minimal metadata required to bring the volumes online.
When the volumes are online in datacenter2, you need to modify the ACRs of the volumes
to start presenting those volumes to file server FS3 and FS4. After the volumes are
presented to FS3 and FS4, you need to mount the volumes and create file shares for
StorSimple volumes.
2. Modify the namespace folder targets.
2 This failover use case assumes that users connected to datacenter1 have a failover network connection to
datacenter2.

Complete the steps to modify the namespace target folder for paths
\\contoso.com\share\vol1... \\contoso.com\share\vol4 to start pointing to file server FS3
and FS4. For example, before the disaster \\contoso.com\share\vol was pointing to
\\FS1\vol1. It should be point now to \\FS3\vol1.
3. Promote the read only domain controller to domain controller. As an optional step, the
system administrator may want to promote the read only domain controller in datacenter2
to domain controller.
Note
For information on how to promote a read only domain controller to a domain controller, see
Deploy Active Directory Domain Services (AD DS) in Your Enterprise
(http://technet.microsoft.com/en-us/library/hh472160.aspx).
When these steps are completed, all the shares will be available to the users, just as they were
before datacenter1 failed. Users from the datacenter1 region will experience higher latency as
they access files hosted by file servers in a more remote datacenter2, but the namespace and
UNC paths used will be exactly the same, and downtime will be reduced to the time it takes to
complete the above steps.
Table 3 lists the StorSimple volumes and DFS-N shares presented to users after failover from
datacenter1 to datacenter2.
Table 3: List of StorSimple volumes and DFS-N shares after failover
Datacenter StorSimple
appliance
StorSimple
volume
File
server File share DFS namespace DFS-N share
Datacenter2 8100/8600
Vol1 FS3 \\FS3\Vol1
Contoso.com\Share
\\Contoso.com\Share\Vol1
Vol2 FS3 \\FS3\Vol2 \\Contoso.com\Share\Vol2
Vol3 FS4 \\FS4\Vol3 \\Contoso.com\Share\Vol3
Vol4 FS4 \\FS4\Vol4 \\Contoso.com\Share\Vol4
Vol5 FS3 \\FS3\Vol5 \\Contoso.com\Share\Vol5
Vol6 FS3 \\FS3\Vol6 \\Contoso.com\Share\Vol6
Vol7 FS4 \\FS4\Vol7 \\Contoso.com\Share\Vol7
Vol8 FS4 \\FS4\Vol8 \\Contoso.com\Share\Vol8
Table 2: StorSimple Volumes and DFS Share Structure after failover from Datacenter1 to Datacenter2
Remote sites and branches: content availability and distribution
This use case describes how to combine and leverage Microsoft Azure, StorSimple, DFS-N, and
BranchCache to distribute the content to remote branches and achieve a cost-effective solution
for content caching without investing in expensive WAN acceleration solutions. Figure 4 shows
the detailed architecture for implementing this solution. Using this architecture, you can have

one main office that is connected to multiple remote offices. The following sections discuss
what you need to implement in the main office and remote offices, respectively.
BranchCache overview and modes
The following sections give brief overview of BranchCache and different modes of
implementation. If you need detailed reference material on BranchCache, please see Appendix
B.
What is BranchCache?
BranchCache is a WAN bandwidth optimization technology that is included in some editions of
the Windows Server® 2012 and Windows® 8 operating systems, as well as in some editions of
Windows Server® 2008 R2 and Windows® 7. To optimize WAN bandwidth when users access
content on remote servers, BranchCache caches content from the main office or hosted cloud
content servers at branch office locations, allowing client computers at branch offices to access
the content locally rather than over the WAN.
At branch offices, content is stored either on servers that are configured to host the cache or, if
no server is available in the branch office, on client computers that are running Windows 8 or
Windows 7. After a client computer requests and receives content from the main office and the
content is cached at the branch office, other computers at the same branch office can obtain
the content locally rather than downloading the content from the content server over the WAN
link.
When subsequent requests for the same content are made by client computers, the clients
download content information from the server instead of the actual content. Content
information consists of hashes that are calculated using chunks of the original content, and are
extremely small compared to the content in the original data. Client computers then use the
content information to locate the content from a cache in the branch office, whether the cache
is located on a client computer or on a server. Client computers and servers also use content
information to secure cached content so that it cannot be accessed by unauthorized users.
BranchCache increases end user productivity by improving content query response times for
clients and servers in branch offices, and can also help improve network performance by
reducing traffic over WAN links through on-wire deduplication.
BranchCache modes BranchCache has two modes of operation: distributed cache mode and hosted cache mode.
Distributed cache mode: When you deploy BranchCache in distributed cache mode, the content cache at a branch office is distributed among client computers.

Hosted cache mode: When you deploy BranchCache in hosted cache mode, the content cache at a branch office is hosted on one or more server computers, which are called hosted cache servers.
The following section describes the architecture with a focus on how you can implement
StorSimple along with BranchCache in your main and remote offices. Figure 4 provides a
reference architecture for the implementation.
Main office architecture
As discussed in the single datacenter use case described previously, you can use DFS-N to
define the global namespace for the StorSimple shares. To make use of the BranchCache
feature, you must install the BranchCache for network files role service of the File Services
server role. In addition, you must enable BranchCache on some or all file shares on each of the
file servers. These steps should be performed on file servers on which you have provisioned
StorSimple volumes via an iSCSI connection.
Figure 4: StorSimple Implementation for remote sites using BranchCache
Remote Office Architecture
At each remote office location, BranchCache can be configured to maintain the remote office
cache in Hosted Cache server or peer-to-peer mode. We recommend using Hosted Cache server

mode to ensure predictable caching irrespective of the number of clients available in the
remote office. This also enables configuration of the hosted cache size and because the hosted
server is only a cache, it can easily be rebuilt from scratch without any data loss. Therefore, no
additional investment in backup and recovery of that server is required.
After a hosted cache server is configured, it will automatically begin caching local content of
files accessed by users and use that content to serve subsequent requests. You also have the
option of pre-populating the cache by running a command line tool on a dataset that will
fingerprint and chunk the data and place it in the cache. In addition you can enable peer-to-
peer caching among the users to improve performance by making data more readily available.
Implementation Steps
This section provides step-by-step instructions and best practices for implementing the three
use cases.
Steps to enable DFS-N on Windows Server 2012
This section provides instructions for enabling DFS N on Windows Server 2012.
To enable DFS-N
1. On the Server Manager page, click Add roles and features to start the Add Roles and
Features wizard.

2. Choose Role-Based or feature-based installation (if not selected already), and then click
Next.
3. Click Select a server from the server pool, and then select the server on which you will
enable the DFS-N feature. Click Next.

4. Select Server Roles, expand File and Storage Services, and then expand File and iSCSI
Service. Select the DFS Namespace check box, and then click Next.
5. Follow the rest of steps in the wizard to complete the DFS-N installation and configuration.

Steps to configure the StorSimple 8000 series appliance
To configure the StorSimple 8000 series appliance, you will complete the following steps:
Step 1: Create a new service.
Step 2: Get the service registration key.
Step 3: Configure and register the device.
Step 4: Complete the minimum device setup.
Step 5: Create a volume container.
Step 6: Create a volume.
Step 7: Mount, initialize, and format a volume.
Step 1: Create a new service
A StorSimple Manager service can manage multiple StorSimple devices. Perform the following
steps to create a new StorSimple Manager service.
To create a new service
1. Using your Microsoft account credentials, log on to the Azure Management Portal at this
URL: https://manage.windowsazure.com.
2. In the Management Portal, click New > Data Services > StorSimple Manager > Quick
Create.
3. In the form that is displayed, do the following:
a. Supply a unique Name for your service. This is a friendly name that can be used to
identify the service. The name can have between 2 and 50 characters that can be
letters, numbers, and hyphens. The name must start and end with a letter or a number.
b. Supply a Location for your service. Location refers to the geographical region where you
want to deploy your device.
c. Choose a Subscription from the drop-down list. The subscription is linked to your billing
account. This field is not present if you have only one subscription.
d. Select Create a new storage account to automatically create a storage account with the
service.
e. Click Create StorSimple Manager Service.

You will be directed to the Service landing page. The service creation will take a few
minutes. After the service is successfully created, you will be notified appropriately and the
status of the service will change to Active.
Step 2: Get the service registration key
After the StorSimple Manager service is running, you will need to get the service registration
key. This key is used to register and connect your StorSimple device with the service.

Perform the following steps in the Management Portal to get the service registration key.
To get the service registration key
1. On the StorSimple Manager service page, click the service that you created. This will take
you to the Quick Start page. You can click the quick start icon to access the Quick Start
page at any time.
2. Click Get service registration key. You can also click Registration Key at the bottom of the
page. You will have to wait for a few minutes while the key is retrieved. In the Service
Registration Key dialog box, do the following:
a. Locate the Service Registration Key.
b. Click the copy icon to copy the key and save it for later use.
3. Click the check icon to close this dialog box and return to the Quick Start page.
Step 3: Configure and register the device through Windows PowerShell for StorSimple
Use Windows PowerShell for StorSimple to complete the initial setup of your StorSimple device
as explained in the following procedure.
To configure and register the device
1. Access the Windows PowerShell interface. For procedures, go to Appendix C: Use PuTTY to
connect to the device serial console. Be sure to follow the procedure exactly or you will not
be able to access the console.
2. In the session that opens, press the Enter key one time to get a command prompt.
3. You will be prompted to choose the language you would like to set for your device. Specify
the language, and then press Enter.
4. In the serial console menu that is presented, choose option 1 to log on with full access.
5. Perform the following steps to configure the minimum required network settings for your
device:

a. At the command prompt, type your password. The default device password is
Password1.
b. Type the following command:
Invoke-HcsSetupWizard
c. A setup wizard will appear to help you configure the network settings for the device.
Supply the following:
IP address for DATA 0 network interface
Subnet mask
Gateway
IP address for Primary DNS server
IP address for Primary NTP server
d. For security reasons, the device administrator password expires after the first session,
and you will need to change it for subsequent sessions. When prompted, provide a
device administrator password. A valid device administrator password must be between
8 and 15 characters. The password must contain a combination of three of the
following: lowercase, uppercase, numeric, and special characters.
e. The StorSimple Snapshot Manager password is also set here. (You use the StorSimple
Snapshot Manager password when you authenticate a device to your Windows host.)
When prompted, provide a 14 to 15 character password. The password must contain a
combination of three of the following: lowercase, uppercase, numeric, and special
characters.
You can reset the StorSimple Snapshot Manager password from the StorSimple
Manager service interface.

f. The final step in the setup wizard involves registering your device with the StorSimple
Manager service. For this, you will need the service registration key that you obtained in
Step 2: Get the service registration key.
g. After the device is registered, a Service Data Encryption key will appear. Copy this key
and save it in a safe location. This key will be required with the service registration key
to register additional devices with the StorSimple Manager service.
h. Exit the serial console.
6. Return to the Management Portal. In the Management Portal:
a. Double-click your StorSimple Manager service to access the Quick Start page.
b. Click View connected devices.
c. On the Devices page, verify that the device has successfully connected to the service by
looking up the status. The device status should be Online.

Step 4: Complete the minimum device setup
For the minimum device configuration of your StorSimple device, you are required to:
Set up the secondary DNS server.
Enable iSCSI on your DATA 0 network interface.
Assign fixed IP addresses to both the controllers.
Perform the following steps in the Management Portal to complete the minimum device setup.
To complete the minimum device setup
1. Select the device and click Quick Start. Click complete device setup to start the Configure
Device wizard.
2. In the Configure Device wizard, do the following:
a. Supply a friendly name for your device. The default device name reflects information
such as the device model and serial number. You can assign a friendly name of up to 64
characters to manage your device.
b. Set the time zone based on the geographic location in which the device is being
deployed.
c. Under DNS Settings, provide an address for your Secondary DNS Server. If you are using
IPv6, the field will be populated based on the IPv6 prefix provided in the Windows
PowerShell interface.

d. Under iSCSI enabled interfaces, enable at least one network for iSCSI. Typically this is
the DATA 0 interface on your system.
e. Click the arrow icon .
f. Provide the fixed IP addresses for Controller 0 and Controller 1. The controller fixed IP
addresses need to be free IPs within the subnet accessible by the device IP address. If
the DATA 0 interface was configured for IPv4, the fixed IP addresses need to be
provided in the IPv4 format. If you provided a prefix for IPv6 configuration, the fixed IP
addresses will be populated automatically in these fields.
g. Click the check icon .
3. You will return to the device Quick Start page.
Step 5: Create a volume container
A volume container has storage account, bandwidth, and encryption settings for all the volumes
that it contains. You will need to create a volume container before you can start provisioning
volumes on your StorSimple device.
Perform the following steps in the Management Portal to create a volume container.
To create a volume container
1. In the device Quick Start page, click Add a volume container.
2. In the Create Volume Container dialog box:
a. Supply a Name for your volume container. The name must be 3 to 32 characters long.
b. Select a Storage Account to associate with this volume container. You can choose the
default account that is generated at the time of service creation. You can also use the
Add new option to specify a storage account that is not linked to this service
subscription.
Important
Please provision and use a storage account that is close to your region.
d. Select Enable Cloud Storage Encryption to enable encryption of the data sent from the
device to the cloud.
c. Provide and confirm a Cloud Storage Encryption Key that is 8 to 32 characters long. This
key is used by the device to access encrypted data.

d. Select Unlimited in the Specify bandwidth drop-down list if you wish to consume all the
available bandwidth. You can also set this option to Custom to employ bandwidth
controls and specify a value between 1 and 1,000 Mbps.
e. Click the check icon to save this volume container and exit the wizard. The newly
created volume container will be listed on the Volume containers page.
Step 6: Create a volume
After you create a volume container, you can provision a storage volume on the StorSimple
device for your servers. Perform the following steps in the Management Portal to create a
volume:
To create a volume
1. On the device Quick Start page, click Add a volume. This opens the Add a volume wizard.
2. In the Add a volume wizard, under Basic Settings:
a. Type a Name for your volume.
b. Specify the Provisioned Capacity for your volume.
Important
You can set volume capacity between 1 GB and 64 TB. As a best practice, we recommend a
maximum provisioned capacity of 16 TB per volume. You always have the option to increase the
capacity of the volume.
c. In the drop-down list, select the Usage Type for your volume. For less frequently
accessed archival data, select an Archive volume. For all other types of data, specify
Primary volume.
d. Click the arrow icon to go to the next page.
3. Under Additional Settings, add a new access control record (ACR):
a. Supply a Name for your ACR.
b. Under iSCSI Initiator Name, provide the iSCSI Qualified Name (IQN) of your Windows
host.
c. Under Default backup for this volume, select the Enable check box. The default backup
creates a policy that executes at 22:30 each day (device time) and creates a cloud
snapshot of the volume.

Important
For each volume, you should configure a backup policy with a cloud snapshot. This ensures that
your data will be backed up in the cloud at least once per day.
d. Click the check icon . A volume will be created with the specified settings.
4. Follow steps 1 through 3 to create four volumes (Vol 1—Vol 4) using ACR values of file
server FS1 and FS2.
5. Define the backup policies for all the four volumes to ensure that you are taking cloud
snapshots of each volume at least once per day.

Step 7: Mount, initialize, and format a volume
Perform the following steps on your file servers to mount the StorSimple volumes that you
created.
To mount, initialize, and format a volume
1. Start the Microsoft iSCSI initiator on your file servers.
2. In the iSCSI Initiator Properties window, perform the following steps:
a. On the Discovery tab, click Discover Portal.
b. In the Discover Target Portal dialog box, supply the IP address of your iSCSI-enabled
network interface.
c. Click OK.
3. On the Targets tab of the iSCSI Initiator Properties window, locate the Discovered targets.
The device status should appear as Inactive. Select the target device and click Connect.
After the device is connected, the status should change to Connected.
4. On your Windows host, press the Windows Logo key + X, and then click Run.
5. In the Run dialog box, type Diskmgmt.msc. Click OK, and the Disk Management dialog box
will appear. The right pane will show the volumes on your host.
6. Initialize your volumes by following the steps in Appendix D: Initialize StorSimple volumes
on a Windows Server host.
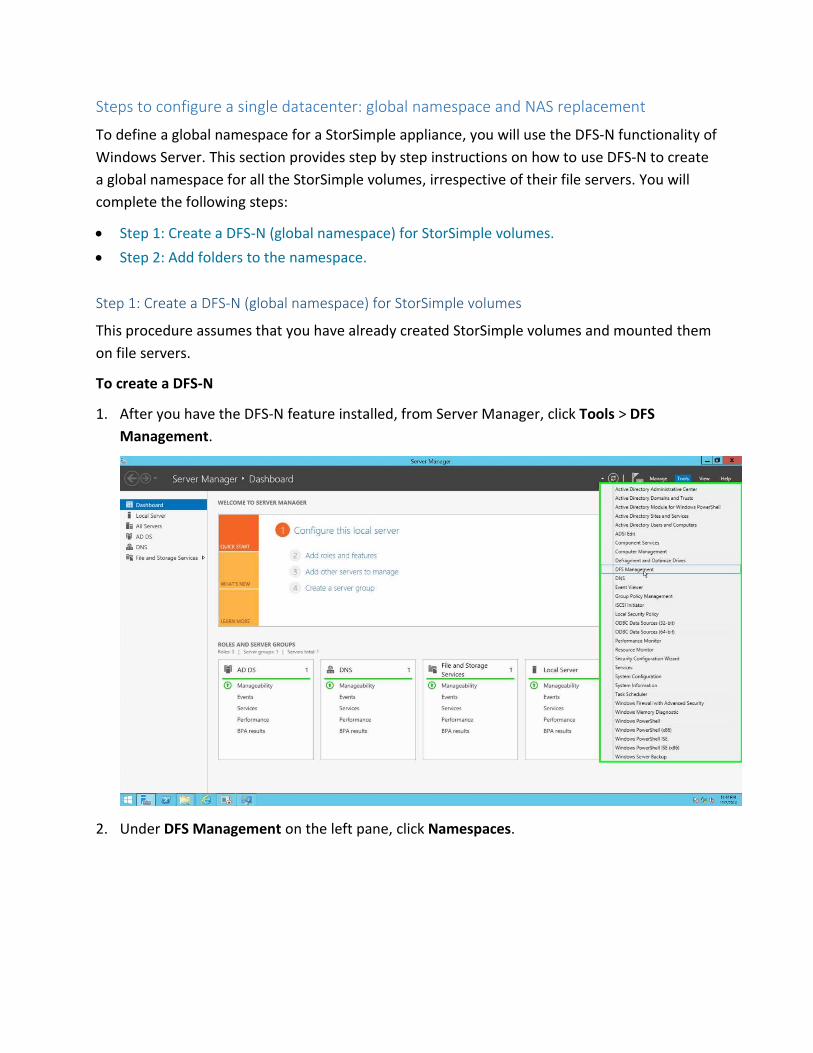
Steps to configure a single datacenter: global namespace and NAS replacement
To define a global namespace for a StorSimple appliance, you will use the DFS-N functionality of
Windows Server. This section provides step by step instructions on how to use DFS-N to create
a global namespace for all the StorSimple volumes, irrespective of their file servers. You will
complete the following steps:
Step 1: Create a DFS-N (global namespace) for StorSimple volumes.
Step 2: Add folders to the namespace.
Step 1: Create a DFS-N (global namespace) for StorSimple volumes
This procedure assumes that you have already created StorSimple volumes and mounted them
on file servers.
To create a DFS-N
1. After you have the DFS-N feature installed, from Server Manager, click Tools > DFS
Management.
2. Under DFS Management on the left pane, click Namespaces.

3. Click New Namespace on the right pane to start the New Namespace wizard.
4. Enter the name of the namespace server, and then click Next.

5. Enter a Name for the namespace that you want to create.
6. Click Edit Settings to choose the appropriate permissions for your DFS share.

7. Select the type of namespace and click Next. As discussed previously in this document, you
should choose Domain-based namespace. Select the Enable Windows Server 2008 mode
option to support increased scalability and access-based enumeration.
8. Review your namespace settings, and then click Create to provision the namespace for your
StorSimple share.

After completing these steps, you will have created a namespace such as \\contoso.com\share,
with no folder redirecting to StorSimple volumes.
Step 2: Add folders to the namespace
After you created the namespace, you need to add folders with folder targets pointing to the
file shares of the StorSimple volumes: for example, \\FS1\Vol1. These will make each
StorSimple volume appear to users as a folder under the namespace.
To add the folders and targets
1. Under DFS Management, expand Namespaces and select the namespace in which you need
to add folders. After you selected the namespace, click New Folder on the Action pane.

2. In the New Folder wizard, specify the Name of the folder. Click Add to add the folder target
that will point to the StorSimple volume share.
3. Repeat steps 1 and 2 to create folders for all the shares of the StorSimple volumes.

After you complete the steps, you will have created a global namespace for StorSimple
volumes. In this example, we created a global namespace for the Contoso domain. The
following table provides information about the global namespace and shares used to access the
StorSimple volumes.
Global namespace StorSimple volume shares
Contoso.com\Share
\\Contoso.com\Share\Vol1
\\Contoso.com\Share\Vol2
\\Contoso.com\Share\Vol3
\\Contoso.com\Share\Vol4
Steps to configure multiple datacenters: multi-site availability and disaster recovery
Multi-site availability
When implementing a namespace along with StorSimple in a multiple datacenter environment,
we recommend that you configure one namespace server per site to improve availability and
performance. You should also consider having a domain controller at each site to optimize
namespace scalability. You will complete the following steps:
Step 1: Add namespace servers to a domain-based DFS namespace
Step 2: Optimize the namespace for scalability

Step 1: Add namespace servers to a domain-based DFS namespace
To add the namespace servers
1. From Server Manager, select Tools, and then click DFS Management.
2. In the console tree, under the Namespaces node, right-click a domain-based namespace,
and then click Add Namespace Server.
3. Enter the path to another server, or click Browse to locate a server.
Step 2: Optimize the namespace for scalability
To optimize the namespace
1. From Server Manager, select Tools, and then click DFS Management.
2. In the console tree, under the Namespaces node, right-click a domain-based namespace,
and then click Properties.
3. On the Advanced tab, select Optimize for scalability.

Note
You should only use this option if there are more than 16 namespace servers. This helps to
reduce the load on the primary domain controller (PDC) emulator, but increases the time
required for changes to the namespace to replicate to all namespace servers. Until changes
replicate to all servers, users might have an inconsistent view of the namespace.
For information on DFS scalability, please refer to DFS Namespace Scalability Considerations
(http://blogs.technet.com/b/filecab/archive/2012/08/26/dfs-namespace-scalability-
considerations.aspx).
Disaster Recovery
For the disaster recovery scenario, you will need to fail over StorSimple appliance volumes to
the appliance located in Datacenter2. After the volumes are failed over, you will need to update
the namespace folder target information with the updated share information for the
StorSimple volumes. This section describes the steps required to fail over to another StorSimple
appliance by using cloud snapshots of the volumes.
Important
You can only perform a failover from one StorSimple appliance to another if both appliances
are registered under the same StorSimple Manager service.

To perform the failover
1. Use your Microsoft account credentials to log on to the Azure Management Portal at this
URL: https://manage.windowsazure.com
2. Click StorSimple and select the StorSimple Manager service in which the devices are
registered.
3. On the Devices page, select the offline (source) device and click Failover.
4. In the Failover wizard, under Choose volume container to failover:
a. In the list of volume containers, select the volume containers that you would like to fail
over.
Note
Only the volume containers with associated cloud snapshots and offline volumes are
displayed.
b. Under Choose a target device for the volumes in the selected containers, select a
target device from the drop-down list of available devices. Only the devices that have
the available capacity are displayed in the drop-down list.
c. Review all the failover settings under Confirm failover. Click the check icon .
5. After the failover process is completed, go to the Devices page.
a. Select the device that was used as the target device for the failover process.
b. Go to the Volume Containers page. All the volume containers, along with the volumes
from the old device, should be listed.
6. Modify the ACRs of the failed over volumes to point them to new file servers.
After the StorSimple volumes are mounted on new file servers and have updated share
information, you will need to use DFS Management to update the folder target information
with the new share information for the StorSimple volumes.
Remote sites and branches: content availability and distribution
As discussed in the architecture section of this document, you can use the StorSimple solution
along with hosted BranchCache mode to provide content availability to your remote offices.
This section describes the configuration steps that you need to perform for both the main and
the remote offices.

Main office implementation steps
This section describes the detailed steps that you need to perform at the main office. It
describes the following steps:
Step 1: Enable the BranchCache feature on the file server
Step 2: Create and configure Group Policy for BranchCache hash publication
Step 3: (Optional) Add the new file servers to an existing BranchCache file server OU
Step 1: Enable the BranchCache feature on the file server
As a first step in implementing the BranchCache feature, you will need to enable the
BranchCache for network files role on your file server. In this example scenario, you will enable
this feature on file servers FS1 and FS2.
To enable the BranchCache feature
1. In Server Manager, click Manage, and then click Add Roles and Features. The Add Roles and
Features wizard opens. Click Next.
2. On the Select Installation Type page, make sure that Role-based or feature-based
installation is selected, and then click Next.
3. On the Select destination server page, make sure that the correct server is selected, and
then click Next.
4. On the Select Server Roles page, under Roles, verify that the File and Storage Services role
is already installed; click the arrow to the left of the role name to expand the selection of
role services, and then click the arrow to the left of File and iSCSI Services.
5. Select the check box for BranchCache for Network Files, and then click Next.
Important
We recommend that you do not select the check box for Data Deduplication as StorSimple
already provides storage-level deduplication. BranchCache will still apply deduplication to the file
server data on the wire and in the cache, but the data on the file server itself will not be
deduplicated.
6. On the Select features page, click Next.
7. On the Confirm Installation Selections page, review your selections and then click Install.
The progress pane is displayed during installation. When installation is complete, click
Close.

Step 2: Create and configure Group Policy for BranchCache hash publication
Using Active Directory Domain Services (AD DS), you can use domain Group Policy to enable
BranchCache hash publication for the file server. To do so, you must create an organizational
unit (OU), add file server to the OU, create a BranchCache hash publication Group Policy object
(GPO), and then configure the GPO.
Note
You only need to create and configure GPO during first time setup.
If you decided to add a new file server to your infrastructure, you only need to follow the
procedure from Step 3: (Optional) Add the new file servers to an existing BranchCache file
server OU.
To create and configure Group Policy
1. Create the BranchCache file servers organizational unit. (This step creates an organizational
unit (OU) in AD DS for BranchCache file servers.)
a. On a computer on which AD DS is installed, in Server Manager, click Tools, and then click
Active Directory Users and Computers. The Active Directory Users and Computers
console opens.
b. In the Active Directory Users and Computers console, right-click the domain to which
you want to add an OU. For example, if your domain is named contoso.com, right click
contoso.com. Point to New, and then click Organizational Unit. The New Object –
Organizational Unit dialog box opens.
c. In the New Object – Organizational Unit dialog box, in Name, type a name for the new
OU. For example, if you want to name the OU BranchCache file servers, type
BranchCache file servers, and then click OK.
2. Move the file server to the BranchCache file servers OU. (This step adds the BranchCache
file servers FS1 and FS2 to an OU in AD DS.
a. On a computer on which AD DS is installed, in Server Manager, click Tools, and then click
Active Directory Users and Computers. The Active Directory Users and Computers
console opens.
b. In the Active Directory Users and Computers console, locate the computer account for a
BranchCache file server, left-click to select the account, and then drag and drop the
computer account on the BranchCache file servers OU that you previously created.

c. Repeat the previous step for each BranchCache file server in the domain that you want
to move to the OU.
3. Create the BranchCache hash publication Group Policy object. (This step creates the
BranchCache hash publication GPO.)
a. Open Windows PowerShell, type mmc, and then press ENTER. The Microsoft
Management Console (MMC) opens.
b. In the MMC, on the File menu, click Add/Remove Snap-in. The Add or Remove Snap-ins
dialog box opens.
c. In the Add or Remove Snap-ins dialog box, in Available snap-ins, double-click Group
Policy Management, and then click OK.
d. In the Group Policy Management MMC, expand the path to the BranchCache file servers
OU that you previously created.
e. Right-click BranchCache file servers, and then click Create a GPO in this domain, and
Link it here. The New GPO dialog box opens. In Name, type a name for the new Group
Policy object (GPO). For example, if you want to name the object BranchCache Hash
Publication, type BranchCache Hash Publication. Click OK.
4. Configure the BranchCache hash publication GPO. (This step configures the BranchCache
hash publication GPO so that all file servers that you add to your OU will have the same
hash publication policy setting applied to them.)
a. Run Windows PowerShell as an Administrator, type mmc, and then press ENTER. The
Microsoft Management Console (MMC) opens.
b. In the MMC, on the File menu, click Add/Remove Snap-in. The Add or Remove Snap-ins
dialog box opens.
c. In the Add or Remove Snap-ins dialog box, in Available snap-ins, double-click Group
Policy Management, and then click OK.
d. In the Group Policy Management MMC, expand the path to the BranchCache hash
publication GPO that you previously created.
e. Right-click the BranchCache Hash Publication GPO and click Edit. The Group Policy
Management Editor console opens.
f. In the Group Policy Management Editor console, expand the following path: Computer
Configuration > Policies > Administrative Templates > Network > Lanman Server.

g. In the Group Policy Management Editor console, click Lanman Server. In the details
pane, double-click Hash Publication for BranchCache. The Hash Publication for
BranchCache dialog box opens.
h. In the Hash Publication for BranchCache dialog box, click Enabled.
i. In Options, click Allow hash publication for all shared folders, and then choose the
Allow hash publication for all shared folders.
j. Click OK.
Step 3: (Optional) Add the new file servers to an existing BranchCache file server OU
This step is required only if you added new file servers to your infrastructure and want to
enable the BranchCache role on those servers.
To add the new file servers to the existing BranchCache file server OU
1. On a computer on which AD DS is installed, in Server Manager, click Tools, and then click
Active Directory Users and Computers. The Active Directory Users and Computers console
opens.
2. In the Active Directory Users and Computers console, locate the computer account for a
BranchCache file server, left-click to select the account, and then drag and drop the
computer account on the BranchCache file servers OU that you previously created.
3. Repeat the previous step for each BranchCache file server in the domain that you want to
move to the OU.
Remote office implementation Steps
This section provides setup instructions with detailed steps which you must perform at the
remote office. During remote office implementation, you need to complete the following steps:
Step 1: Deploy the hosted cache servers
Step 2: Configure the BranchCache client computers
Step 1: Deploy the hosted cache servers
This step installs and configures BranchCache hosted cache servers that are located in branch
offices so that they can deploy BranchCache hosted cache mode.
To deploy the hosted cache servers
1. On the computer that you want to configure as a hosted cache server, start Windows
PowerShell, and run the following command at the Windows PowerShell prompt. This
installs the BranchCache feature.
Install-WindowsFeature BranchCache -IncludeManagementTools

2. Use the following command to configure the domain joined computer as a hosted cache
server:
Enable-BCHostedServer -RegisterSCP
3. To verify that the hosted cache server is configured correctly, type the following command
at the Windows PowerShell prompt, and then press ENTER.
Get-BCStatus
Note
After you run this command, in the section HostedCacheServerConfiguration, the value for
HostedCacheServerIsEnabled is True. If you configured a domain joined hosted cache server
to register a service connection point (SCP) in Active Directory, the value for
HostedCacheScpRegistrationEnabled is True.
Important
As a best practice, we do not recommend prehashing and preloading content on hosted cache
servers. It is best to let clients in the remote office access the data to generate the cache with
required data only.
Step 2: Configure the BranchCache client computers
This step configures domain-joined client computers to use BranchCache hosted cache mode
via GPO.
1. On a computer on which the AD DS server role is installed, open Server Manager, select the
local server, click Tools, and then click Group Policy Management. The Group Policy
Management console opens.
2. In the Group Policy Management console, expand the following path: Forest: contoso.com >
Domains > contoso.com > Group Policy Objects, where corp.contoso.com is the name of the
domain where the BranchCache client computer accounts that you want to configure are
located.
3. Right-click Group Policy Objects, and then click New. The New GPO dialog box opens. Type
a Name for the new GPO. For example, if you want to name the object BranchCache Client
Computers, type BranchCache Client Computers. Click OK.
4. In the Group Policy Management console, make sure that Group Policy Objects is selected,
and, in the details pane, right-click the GPO that you just created. For example, if you
named your GPO BranchCache Client Computers, right-click BranchCache Client Computers.
Click Edit. The Group Policy Management Editor console opens.

5. In the Group Policy Management Editor console, expand the following path: Computer
Configuration > Policies > Administrative Templates: Policy definitions (ADMX files)
retrieved from the local computer > Network > BranchCache.
6. Click BranchCache, and then, in the details pane, double-click Turn on BranchCache. The
Turn on BranchCache dialog box opens.
7. In the Turn on BranchCache dialog box, click Enabled, and then click OK.
8. In the Group Policy Management Editor console, make sure that BranchCache is still
selected, and then, in the details pane, double-click Enable Automatic Hosted Cache
Discovery by Service Connection Point. The policy setting dialog box opens.
9. In the Enable Automatic Hosted Cache Discovery by Service Connection Point dialog box,
click Enabled, and then click OK.
10. To enable client computers to download and cache content from BranchCache file server-
based content servers:
a. In the Group Policy Management Editor console, make sure that BranchCache is still
selected.
b. In the details pane, double-click BranchCache for network files. The Configure
BranchCache for network files dialog box opens.
c. In the Configure BranchCache for network files dialog box, click Enabled. In Options,
type a numeric value, in milliseconds, for the maximum round trip network latency time,
and then click OK.
Note
By default, client computers cache content from file servers if the round trip network
latency is longer than 80 milliseconds.
11. To configure the amount of hard disk space allocated on each client computer for the
BranchCache cache:
a. In the Group Policy Management Editor console, make sure that BranchCache is still
selected.
b. In the details pane, double-click Set percentage of disk space used for client computer
cache. The Set percentage of disk space used for client computer cache dialog box
opens.
c. Click Enabled, and then in Options type a numeric value that represents the percentage
of hard disk space used on each client computer for the BranchCache cache. Click OK.

12. To specify the default age, in days, for which segments are valid in the BranchCache data
cache on client computers:
a. In the Group Policy Management Editor console, make sure that BranchCache is still
selected.
b. In the details pane, double-click Set age for segments in the data cache. The Set age for
segments in the data cache dialog box opens.
c. Click Enabled, and then, in the details pane, type the number of days that you prefer.
Click OK.
13. Configure additional BranchCache policy settings for client computers as appropriate for
your deployment.
14. Refresh Group Policy on branch office client computers by running the command gpupdate
/force, or by rebooting the client computers.
Limitations
This solution does not support the following capabilities and features:
Environments that do not use Active Directory: This solution is focused on enterprises with Active Directory and uses Active Directory to deploy and manage the DFS-N and BranchCache, and to simplify the disaster recovery configuration.
Upstream content acceleration: BranchCache is used in Use Case 3 to enable acceleration of content downloaded from the main office/datacenter to remote offices. This works well for scenarios in which the majority of traffic and acceleration is required in that downstream direction. User writes and data uploads from each remote office to the main datacenter are not accelerated.
Multi-site paired replication: This solution addresses content availability and distribution, and enables collaboration without requiring any active replication of content and without managing multiple replicas in different sites. Instead all content resides in Microsoft Azure and is made globally available through StorSimple, DFS-N, and BranchCache. The active working set is pushed down and cached locally for the user. No prior replication or pre-defined pairs are required.

Appendix A
The following sources provide additional information about DFS, DFS-N, Active Directory,
disaster recovery, and failover.
Overview of DFS Namespaces http://technet.microsoft.com/en-us/library/cc730736.aspx DFS Namespaces and DFS Replication Overview http://technet.microsoft.com/en-us/library/jj127250.aspx Deploying DFS Namespaces http://msdn.microsoft.com/en-us/library/cc771424.aspx DFS Step-by-Step Guide for Windows Server 2008 http://technet.microsoft.com/en-us/library/cc732863.aspx Windows Server DFS Namespaces (DFS-N) Reference http://blogs.technet.com/b/josebda/archive/2009/12/30/windows-server-dfs-namespaces-reference.aspx Choose a Namespace Type http://msdn.microsoft.com/en-us/library/cc770287.aspx Add Namespace Servers to a Domain-based DFS Namespace http://msdn.microsoft.com/en-us/library/cc732807.aspx DFS Namespace Scalability Considerations http://blogs.technet.com/b/filecab/archive/2012/08/26/dfs-namespace-scalability-considerations.aspx Optimize Namespace Polling http://msdn.microsoft.com/en-us/library/cc732193.aspx Microsoft Azure StorSimple Device Deployment Walkthrough Guide http://msdn.microsoft.com/en-us/library/cc757754.aspxDisaster recovery (DR) and device failover http://msdn.microsoft.com/en-us/library/dn772379.aspx#failover Deploy Active Directory Domain Services (AD DS) in Your Enterprise http://technet.microsoft.com/en-us/library/hh472160.aspx Disaster recovery (DR) and device failover http://msdn.microsoft.com/en-us/library/dn772379.aspx#failover

Appendix B
The following sources provide additional information about BranchCache.
BranchCache Overview
http://technet.microsoft.com/en-us/library/hh831696.aspx
Deploy BranchCache
http://technet.microsoft.com/en-us/library/jj572991
Deploy Hosted Cache Servers (Optional)
http://technet.microsoft.com/en-us/library/jj572967.aspx
Peer Caching
http://msdn.microsoft.com/en-us/library/aa964314(v=vs.85).aspx
Core Network Companion Guide: Deploying BranchCache Hosted Cache Mode
http://technet.microsoft.com/library/jj862369.aspx

Appendix C: Use PuTTY to connect to the device serial console
To connect to the Windows PowerShell for StorSimple, you need to use terminal emulation
software such as PuTTY. You can use PuTTY when you access the device directly through the
serial console or by opening a telnet session from a remote computer.
To connect through the serial console
1. Connect your serial cable to the device (directly or through a USB-serial adapter).
2. To identify your COM port, click Control Panel, and then click Device Manager.
3. Identify the COM port as shown in the following illustration.
4. Start PuTTY. In the right pane, change the Connection type to Serial.
5. In the right pane, type the appropriate COM port. Make sure that the serial configuration
parameters are set as follows.
Speed: 115,200
Data bits: 8
Stop bits: 1
Parity: None

Flow control: None
These settings are shown in the following illustration.
Note
If the default flow control setting does not work, try setting the flow control to XON/XOFF.
6. Click Open to start a serial session.

Appendix D: Initialize StorSimple volumes on a Windows Server host
Perform the following steps to initialize your StorSimple device volumes on a Windows Server
host.
To initialize and format volumes on a Windows Server host
1. In the Disk Management window, the mounted volumes will appear as shown in the
following illustration.
Right-click the discovered volume (click the disk name), and then click Online.
2. Right-click the volume (click the disk name) again, and then click Initialize.
3. To format a simple volume, perform the following steps:
a. Select the volume, right-click it (click the right area), and click New Simple Volume.
b. In the New Simple Volume wizard, specify the volume size and drive letter, and
configure the volume as an NTFS file system.

c. Specify a 64 KB allocation unit size. This allocation unit size works well with the
deduplication algorithms used in the StorSimple solution.
d. Perform a quick format.