Embed Size (px)
Citation preview
www.weavingmehome.com Pattern 1, The Skinny Scarf, page 1
Introduction
Definitions
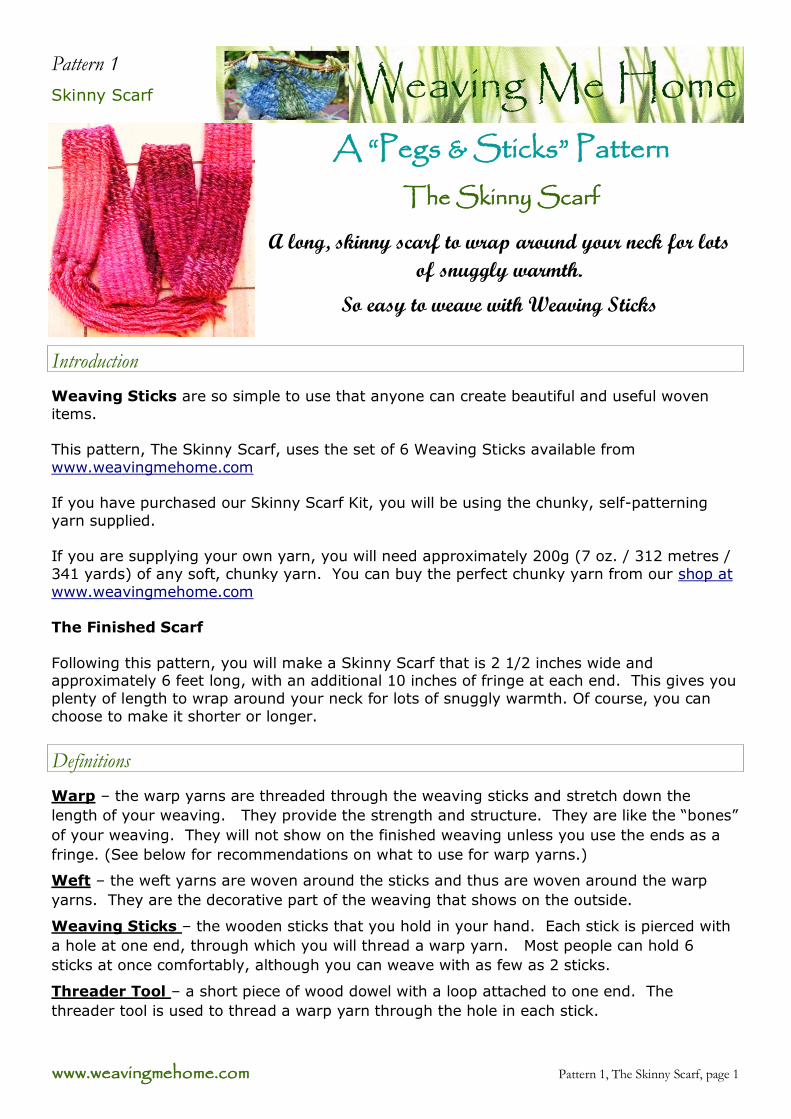
Pattern 1
Skinny Scarf
A “Pegs & Sticks” Pattern
The Skinny Scarf
Weaving Sticks are so simple to use that anyone can create beautiful and useful woven
items.
This pattern, The Skinny Scarf, uses the set of 6 Weaving Sticks available from
www.weavingmehome.com
If you have purchased our Skinny Scarf Kit, you will be using the chunky, self-patterning
yarn supplied.
If you are supplying your own yarn, you will need approximately 200g (7 oz. / 312 metres /
341 yards) of any soft, chunky yarn. You can buy the perfect chunky yarn from our shop at
www.weavingmehome.com
The Finished Scarf
Following this pattern, you will make a Skinny Scarf that is 2 1/2 inches wide and approximately 6 feet long, with an additional 10 inches of fringe at each end. This gives you
plenty of length to wrap around your neck for lots of snuggly warmth. Of course, you can
choose to make it shorter or longer.
Warp – the warp yarns are threaded through the weaving sticks and stretch down the
length of your weaving. They provide the strength and structure. They are like the “bones”
of your weaving. They will not show on the finished weaving unless you use the ends as a
fringe. (See below for recommendations on what to use for warp yarns.)
Weft – the weft yarns are woven around the sticks and thus are woven around the warp
yarns. They are the decorative part of the weaving that shows on the outside.
Weaving Sticks – the wooden sticks that you hold in your hand. Each stick is pierced with
a hole at one end, through which you will thread a warp yarn. Most people can hold 6
sticks at once comfortably, although you can weave with as few as 2 sticks.
Threader Tool – a short piece of wood dowel with a loop attached to one end. The
threader tool is used to thread a warp yarn through the hole in each stick.
A long, skinny scarf to wrap around your neck for lots
of snuggly warmth.
So easy to weave with Weaving Sticks

www.weavingmehome.com Pattern 1, The Skinny Scarf, page 2
Warping (Threading) the Sticks
What to Use for Warp Yarns?
If you have purchased our complete Skinny Scarf Kit, you will be using the chunky yarn
supplied.
If you are supplying your own yarn, use any soft, chunky yarn. (I recommend wool or acrylic
or wool/acrylic blends.) However, be sure to use a smooth-ish yarn, so that the weaving can
easily slide down the warp (don’t use bobble or knobby yarn). If the warp is going to show in
the fringe, use an appropriate colour.
Measure and Cut the Warp Yarns
You will cut 6 warp yarns, each measuring 16 feet in length.
The easiest way to measure a long length of yarn is to wrap it
around a ruler the appropriate number of times, then cut.
Thread the Sticks
Place the loop of the threader tool through the hole in the end
of a stick. Place one end of a warp yarn into the loop of the
threader tool.
Pull the loop of the threader tool back through the hole in the
stick, bringing the end of the warp yarn with it. Then remove
the threader tool from the yarn.
Pull on the end of the warp yarn until ½ of the warp yarn lies on either side of the stick
(both ends of the warp yarn meeting and the stick lying halfway along the length of the
warp yarn).
Repeat for the other 5 sticks.
With a loose, over-hand knot, you can tie the bottom ends of the warp yarns together. This
may prevent them from becoming tangled, although some weavers prefer not to tie the
warps yarns together. Try both ways and see what works best for you.
www.weavingmehome.com Pattern 1, The Skinny Scarf, page 3
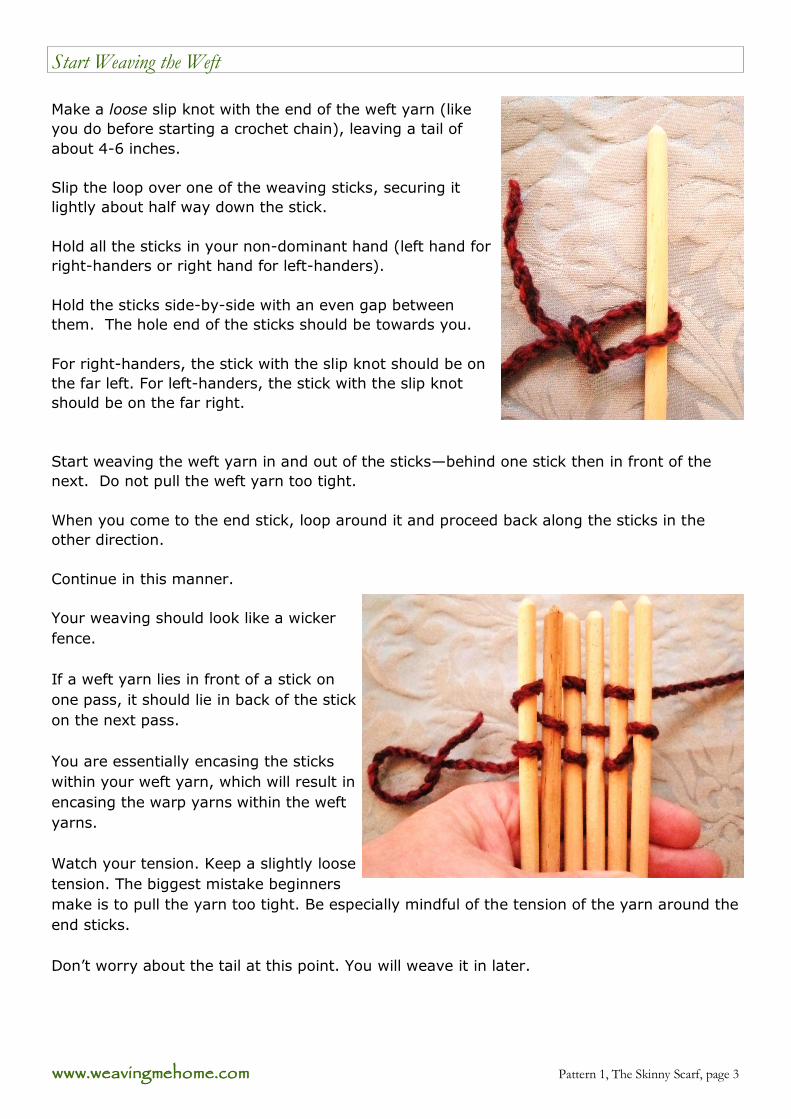
Start Weaving the Weft
Make a loose slip knot with the end of the weft yarn (like
you do before starting a crochet chain), leaving a tail of
about 4-6 inches.
Slip the loop over one of the weaving sticks, securing it
lightly about half way down the stick.
Hold all the sticks in your non-dominant hand (left hand for
right-handers or right hand for left-handers).
Hold the sticks side-by-side with an even gap between
them. The hole end of the sticks should be towards you.
For right-handers, the stick with the slip knot should be on
the far left. For left-handers, the stick with the slip knot
should be on the far right.
Start weaving the weft yarn in and out of the sticks—behind one stick then in front of the
next. Do not pull the weft yarn too tight.
When you come to the end stick, loop around it and proceed back along the sticks in the
other direction.
Continue in this manner.
Your weaving should look like a wicker
fence.
If a weft yarn lies in front of a stick on
one pass, it should lie in back of the stick
on the next pass.
You are essentially encasing the sticks
within your weft yarn, which will result in
encasing the warp yarns within the weft
yarns.
Watch your tension. Keep a slightly loose
tension. The biggest mistake beginners
make is to pull the yarn too tight. Be especially mindful of the tension of the yarn around the
end sticks.
Don’t worry about the tail at this point. You will weave it in later.
www.weavingmehome.com Pattern 1, The Skinny Scarf, page 4
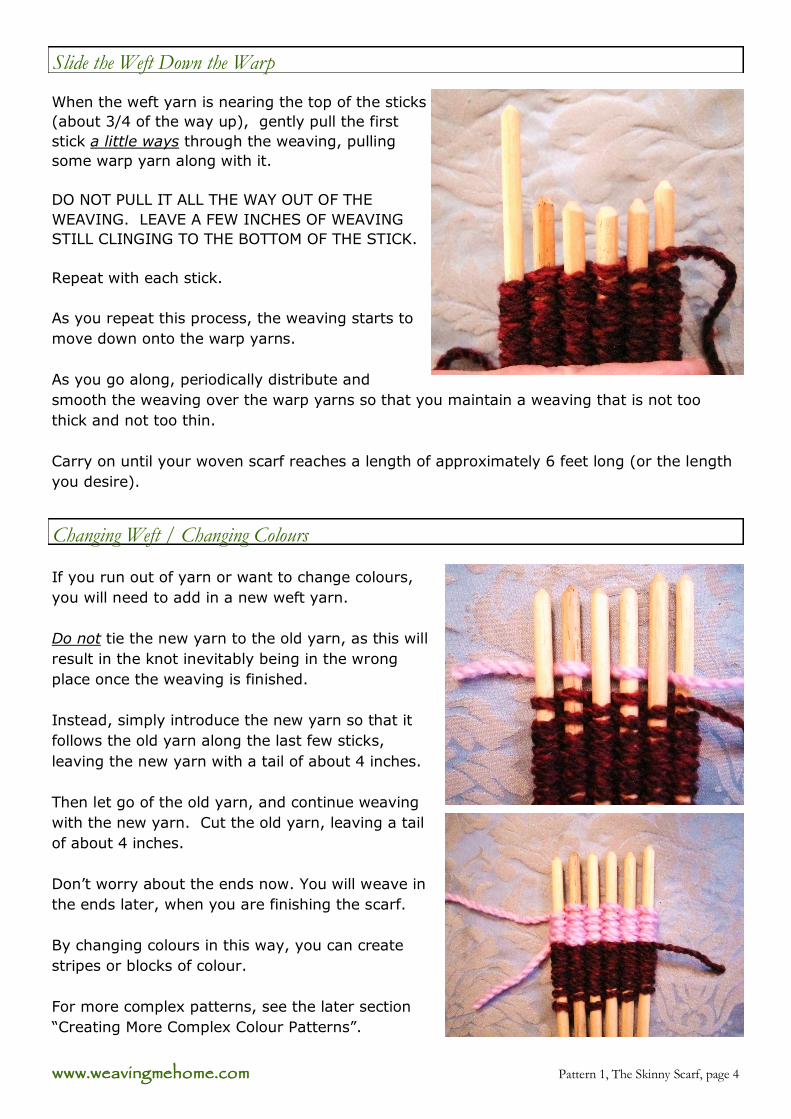
Changing Weft / Changing Colours
If you run out of yarn or want to change colours,
you will need to add in a new weft yarn.
Do not tie the new yarn to the old yarn, as this will
result in the knot inevitably being in the wrong
place once the weaving is finished.
Instead, simply introduce the new yarn so that it
follows the old yarn along the last few sticks,
leaving the new yarn with a tail of about 4 inches.
Then let go of the old yarn, and continue weaving
with the new yarn. Cut the old yarn, leaving a tail
of about 4 inches.
Don’t worry about the ends now. You will weave in
the ends later, when you are finishing the scarf.
By changing colours in this way, you can create
stripes or blocks of colour.
For more complex patterns, see the later section
“Creating More Complex Colour Patterns”.
Slide the Weft Down the Warp
When the weft yarn is nearing the top of the sticks
(about 3/4 of the way up), gently pull the first
stick a little ways through the weaving, pulling
some warp yarn along with it.
DO NOT PULL IT ALL THE WAY OUT OF THE
WEAVING. LEAVE A FEW INCHES OF WEAVING
STILL CLINGING TO THE BOTTOM OF THE STICK.
Repeat with each stick.
As you repeat this process, the weaving starts to
move down onto the warp yarns.
As you go along, periodically distribute and
smooth the weaving over the warp yarns so that you maintain a weaving that is not too
thick and not too thin.
Carry on until your woven scarf reaches a length of approximately 6 feet long (or the length
you desire).

www.weavingmehome.com Pattern 1, The Skinny Scarf, page 5
Tie Off and Create the Fringe
Distribute and smooth the weaving over the warp yarns so that you have a woven scarf that
is not too thick and not too thin.
You don’t want the scarf so thin that the warp yarns show through; the warp yarns should
be well hidden in the weaving. You may find it helpful to lay the scarf out flat on a table
while you do this.
At this point, you will see why it is helpful to have plenty of warp yarn to work with, as you
must be careful not to pull the ends of the warp yarns up into the weaving.
Adjusting the Tension
Starting on one end of the scarf, separate the warp yarns so that you can clearly see them.
Note that two warp yarns exit each warp channel. These two warp yarns will be referred to
as a “warp pair”.
You are going to tie each warp pair to the one next to it, thus securing the end of the weav-
ing. BUT FIRST, WE WILL ADD IN SOME MORE FRINGE YARNS.
Measure and cut 4 lengths of yarn, each measuring 2 feet in length.
Take this group of 4 fringe yarns, and place it between two warp pairs, so that ½ of the
fringe yarn lies on either side of each warp pair.
Tie the warp pairs together with an overhand knot,
catching the group of fringe yarns between them.
Make the knot snug against the edge of the weav-
ing, so that it actually disappears into the warp
channel a little.
Repeat the overhand knot to secure it.
Continued on next page...
Removing the Weaving Sticks
Once your scarf is the length you desire, it is time to remove the weaving sticks.
Pull the weaving sticks (and thus the warp yarns) through the weaving, one by one, until an
approximately equal length of warp yarn lies at the top and bottom of the weaving.
Cut the warp yarns from the weaving sticks, cutting close to each stick.
www.weavingmehome.com Pattern 1, The Skinny Scarf, page 6
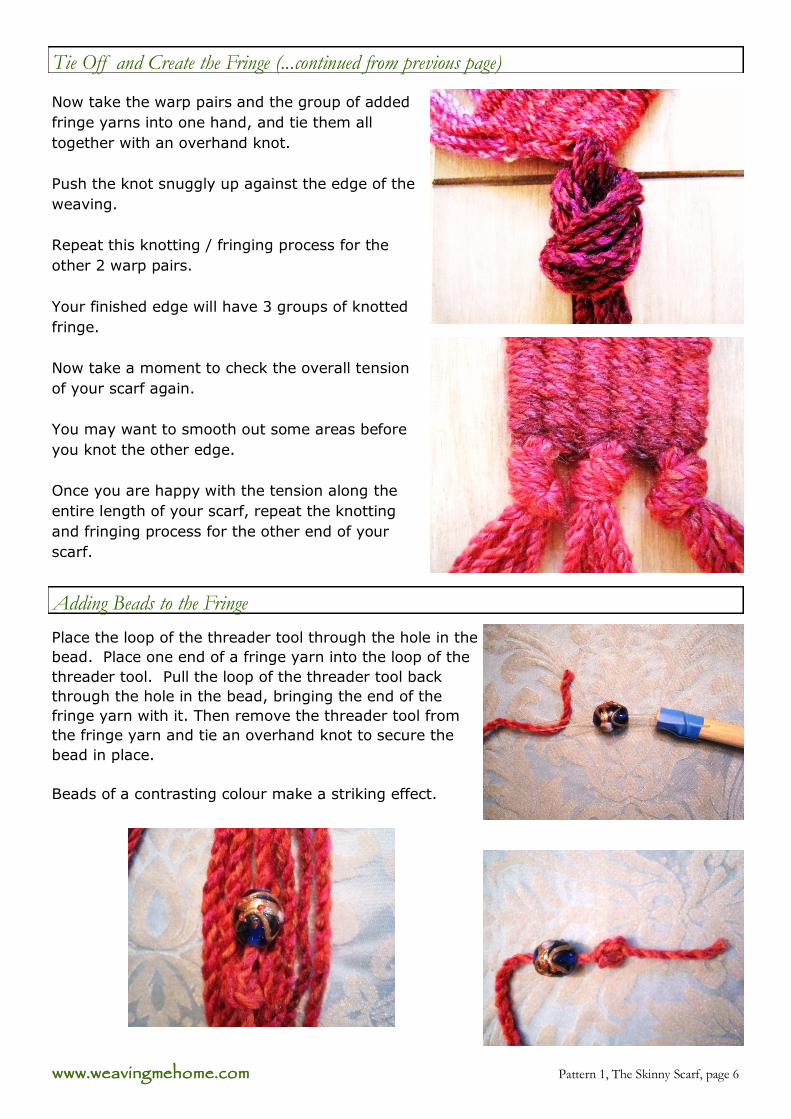
Tie Off and Create the Fringe (...continued from previous page)
Now take the warp pairs and the group of added
fringe yarns into one hand, and tie them all
together with an overhand knot.
Push the knot snuggly up against the edge of the
weaving.
Repeat this knotting / fringing process for the
other 2 warp pairs.
Your finished edge will have 3 groups of knotted
fringe.
Now take a moment to check the overall tension
of your scarf again.
You may want to smooth out some areas before
you knot the other edge.
Once you are happy with the tension along the
entire length of your scarf, repeat the knotting
and fringing process for the other end of your
scarf.
Adding Beads to the Fringe
Place the loop of the threader tool through the hole in the
bead. Place one end of a fringe yarn into the loop of the
threader tool. Pull the loop of the threader tool back
through the hole in the bead, bringing the end of the
fringe yarn with it. Then remove the threader tool from
the fringe yarn and tie an overhand knot to secure the
bead in place.
Beads of a contrasting colour make a striking effect.

www.weavingmehome.com Pattern 1, The Skinny Scarf, page 7
More Ideas and Resources
Join the Pegs & Sticks Ravelry group:
http://www.ravelry.com/groups/pegs--sticks
More ideas at the Weaving Me Home blog:
www.weavingmehome.com/blog
More patterns, weaving sticks, peg looms, kits, and yarn at the Weaving Me Home shop:
www.weavingmehome.com/shop
Creating More Complex Colour Patterns
You may wish to try this more complex colour pattern to add even
more visual interest to your scarf.
With colour A, weave across all 6 sticks, back and forth a few times.
Then weave across only 5 sticks, back and forth a few times.
Then weave across only 4 sticks, back and forth and few times.
Then weave across only 3 sticks, back and forth a few times.
Then weave across only 2 sticks, back and forth a few times.
Now start colour B from the opposite side (the far right stick in these
photos. Wrap the yarn around the first stick a few times.
Then weave across 2 sticks a few times.
Then weave across 3 sticks a few times.
Then weave across 4 sticks a few times.
Then weave across 5 sticks a few times.
Then weave across all 6 sticks a few times.
You can see that with colour B you have filled in the
open steps left by colour A.
With experimentation, you can create new patterns of
your own: weaving steps, triangles, diamonds, waves,
and zig-zags in an array of colours.
Weaving in the Ends
As a very last step, you will hide any loose ends.
Using a tapestry needle, crochet hook, or the threader tool,
weave loose ends into the nearest warp channel.
Then cut the ends close to the weaving.
The cut end will disappear into the weaving, becoming
virtually invisible.