Embed Size (px)
Citation preview
A Homeowner’s Guideto New Cabinetry
Installation • Final Adjustments • Care and Cleaning

Medallion cabinets are certified by the Kitchen Cabinet Manufacturers Association (KCMA). Thisassures you that Medallion cabinets comply with the rigorous standards set by the American NationalStandards Institute (ANSI).
Medallion Cabinetry, Inc. warrants its Designer Gold and Designer cabinetry to be free ofdefects in material and/or workmanship under normal residential usage to the original pur-chaser of the cabinetry for as long as they own their home. Medallion warrants its Silverlinecabinetry to be free of defects in material and/or workmanship under normal residential usageto the original purchaser of the cabinetry for up to ten years or as long as they own theirhome, whichever is sooner.
These warranties are only applicable to product used in residential applications within the United Statesand are not transferable to subsequent owners.
Our obligation under these warranties shall be limited to the repair or replacement of any part or partsthat prove defective as determined by our review. These warranties do not cover the cost of installation,removal, subsequent damage, or transportation of the defective product, regardless of who performsthe work.
These warranties shall become void if Medallion’s products are misused, abused, mishandled, improp-erly stored, changed, modified, or subjected to extreme temperatures or extreme moisture levels, actsof God or the effects of normal wear and tear. These warranties do not apply to cabinetry ordered andpurchased unfinished.
Natural woods vary in color and exhibit color changes as they age. Cabinet colorsdarken or lighten over time due to sunlight, smoke, household cleaners and other environmental con-ditions. Painted face frames and other painted product may eventually have visible cracking around thejoint areas. These variations are considered the natural characteristics of the material in relation to theirenvironment and are not covered under these warranties. Medallion reserves the right to substitute dis-continued product with the most similar styling, wood species, and color available at the time your claimis submitted.
These warranties are the exclusive warranties of Medallion Cabinetry, Inc. and are in lieu of all otherwarranties, expressed or implied, including the implied warranties of merchantability and fitness for aparticular purpose.
These warranties give you specific legal rights. You may have other rights which vary from state to state.
To obtain performance under these limited warranties, first contact your authorized Medallion Cabinetrydealer, who will arrange for an inspection.Adated sales receipt as proof of purchase is required to obtainbenefits from these warranties. If a dealer is unavailable, please write to: Warranty Department,Medallion Cabinetry, Inc. at the address listed below, with an explanation of the defect..
These warranties are effective on product manufactured on or after January 3, 2000. Medallion’s nor-mal operating procedures and policies apply to the administration of these warranties.
180 Industrial Blvd. • Waconia, MN 55387
1
L i m i t e d Wa r ra n t yL i m i t e d W a r r a n t y
© 2005Medallion Cabinetry, Inc. an ELKAY COMPANY. All rights reserved.
2
Toprotect yourwarranty, please read all instructions carefully before beginninginstallation. Improper installationmay causemalfunction of doors, faulty draweralignment and operation. Final cabinet adjustment requirements are included inthis step by step guide.
These instructions,while accurate,may not address themany variations andexceptions encounteredwhile installing cabinetry.To that end,we offer theseinstructions as a guide to proper cabinet installation. If you encounter variationsin your kitchen, please consult a licensed professional.
You will need:
• Chalkline• Countersink• Electric drill with various bits• 4' level• 10' or 12' wood extension rule or tape measure• Carpenter’s square 24" x 16"• Step ladder• Screwdrivers• Screws for countertop (length depends on countertop and shim thickness)• Pan head sheet metal screws:#8 x 2 1/2" for mounting wall and base cabinets#10 x 3" with flatwashers for mounting ceiling hung cabinets#8 x 2 1/2" for joining face frames
• Wood shims• Two 4" C-clamps or carpenter style clamps• Two 1x2x36" wood strips for countertop support with each base Lazy Susan• 2x4 wall cleat or 2x4 T-brace for installing wall cabinets
NOTE: Please inspect ALL of the cabinetry for damages and color variation beforeyou begin to tear out your existing kitchen. Report all issues at one time to yourdealer and not as you install the product. Multiple replacement requests will furtherdelay your project. Once received by Medallion, replacement products will be readyto ship in 7 business days and will ship via cycle truck to your dealer. Remember,installation of the product indicates acceptance and will not be eligible for replace-ment or credit.
3
Installation Instructions 3
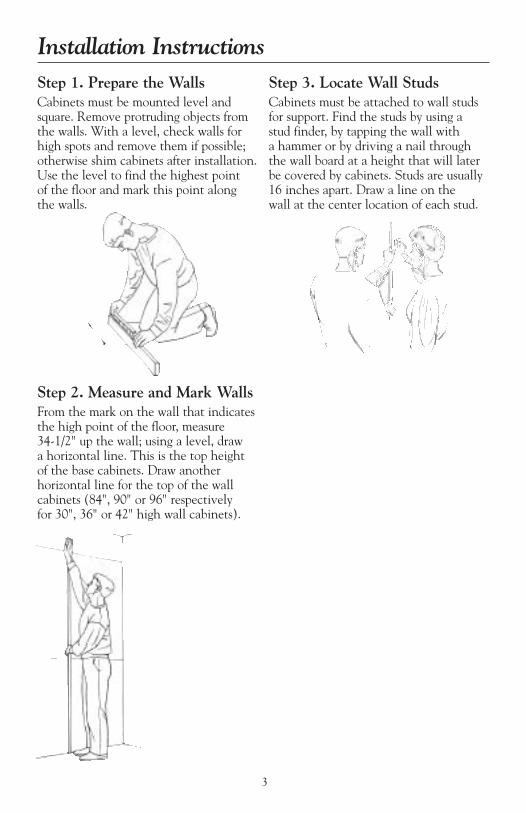
Step 2. Measure and Mark WallsFrom the mark on the wall that indicatesthe high point of the floor, measure34-1/2" up the wall; using a level, drawa horizontal line. This is the top heightof the base cabinets. Draw anotherhorizontal line for the top of the wallcabinets (84", 90" or 96" respectivelyfor 30", 36" or 42" high wall cabinets).
Step 3. Locate Wall StudsCabinets must be attached to wall studsfor support. Find the studs by using astud finder, by tapping the wall witha hammer or by driving a nail throughthe wall board at a height that will laterbe covered by cabinets. Studs are usually16 inches apart. Draw a line on thewall at the center location of each stud.
Step 1. Prepare the WallsCabinets must be mounted level andsquare. Remove protruding objects fromthe walls. With a level, check walls forhigh spots and remove them if possible;otherwise shim cabinets after installation.Use the level to find the highest pointof the floor and mark this point alongthe walls.
4
4. Installing Wall CabinetsFor ease of installation, remove doorsfrom the cabinets by unscrewing thehinge from the cabinet front frame.Set the doors aside, stacking themfront to front to avoid damage.Remove shelves. Install the cornerwall cabinet first. Use a T-brace ornail a 2x4 cleat to the wall at theproper height to support the cabinetsduring installation. With the cabinettop placed at the line you marked onthe wall, transfer the location of thewall studs to the inside of the cabinet.Then, at the wall stud marks, use a3/32" twist drill bit to drill pilot holesthrough the hanger rails in the backof the cabinet at top and bottom.Drill these holes into the wall studsalso, to a depth of about 1-3/4".Use a 3/16" twist drill bit to enlargethe holes in the hanger rails only.Fasten the cabinet to the wall usingtwo #8x2-1/2" pan head sheet metalscrews at top and bottom hanger rails.Do not tighten screws completely untilcabinet has been shimmed as needed.
DO NOT USE NAILS TOINSTALL CABINETS TO WALL.Be sure to use a level to check againstthe front, sides and bottom of eachcabinet during installation (see detailsin Step 9).NOTE: Tightening hanger rails againsta crooked wall without shims can causethe joint between the hanger rail andthe cabinet to break. In time, thecabinet could fall off the wall.
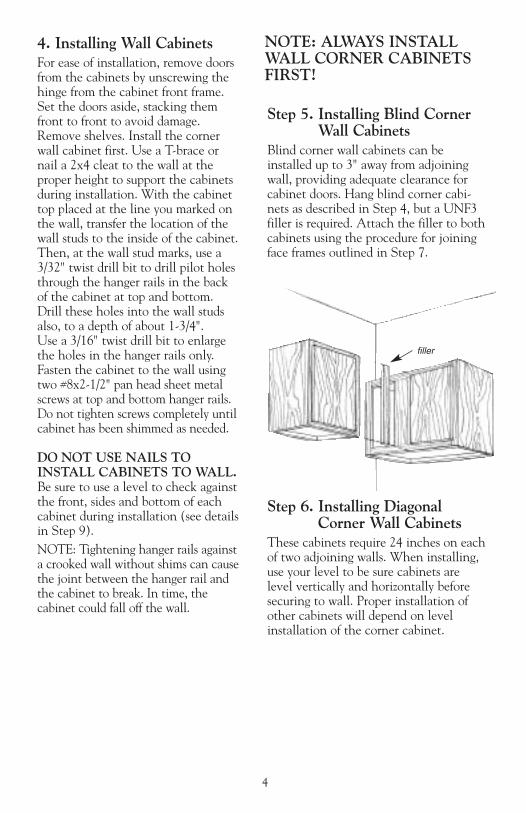
Step 5. Installing Blind CornerWall Cabinets
Blind corner wall cabinets can beinstalled up to 3" away from adjoiningwall, providing adequate clearance forcabinet doors. Hang blind corner cabi-nets as described in Step 4, but a UNF3filler is required. Attach the filler to bothcabinets using the procedure for joiningface frames outlined in Step 7.
Step 6. Installing DiagonalCorner Wall Cabinets
These cabinets require 24 inches on eachof two adjoining walls. When installing,use your level to be sure cabinets arelevel vertically and horizontally beforesecuring to wall. Proper installation ofother cabinets will depend on levelinstallation of the corner cabinet.
filler
NOTE: ALWAYS INSTALLWALL CORNER CABINETSFIRST!
5
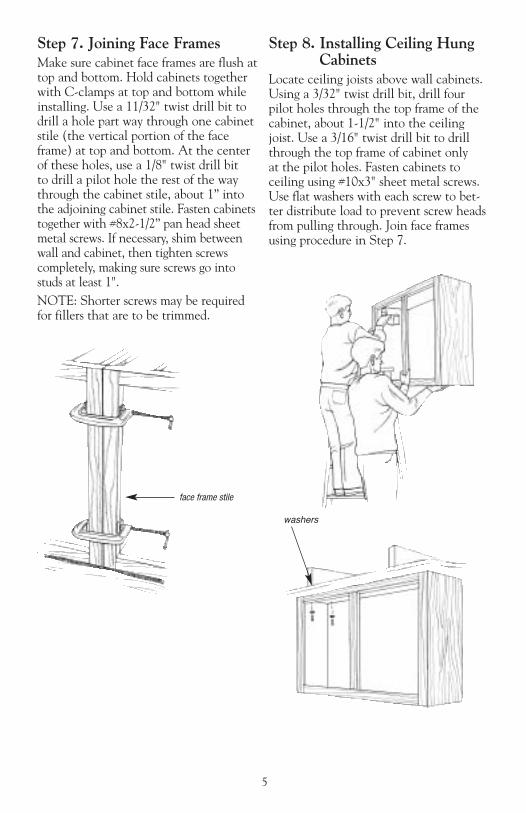
Step 7. Joining Face FramesMake sure cabinet face frames are flush attop and bottom. Hold cabinets togetherwith C-clamps at top and bottom whileinstalling. Use a 11/32" twist drill bit todrill a hole part way through one cabinetstile (the vertical portion of the faceframe) at top and bottom. At the centerof these holes, use a 1/8" twist drill bitto drill a pilot hole the rest of the waythrough the cabinet stile, about 1” intothe adjoining cabinet stile. Fasten cabinetstogether with #8x2-1/2” pan head sheetmetal screws. If necessary, shim betweenwall and cabinet, then tighten screwscompletely, making sure screws go intostuds at least 1".NOTE: Shorter screws may be requiredfor fillers that are to be trimmed.
Step 8. Installing Ceiling HungCabinets
Locate ceiling joists above wall cabinets.Using a 3/32" twist drill bit, drill fourpilot holes through the top frame of thecabinet, about 1-1/2" into the ceilingjoist. Use a 3/16" twist drill bit to drillthrough the top frame of cabinet onlyat the pilot holes. Fasten cabinets toceiling using #10x3" sheet metal screws.Use flat washers with each screw to bet-ter distribute load to prevent screw headsfrom pulling through. Join face framesusing procedure in Step 7.
face frame stile
washers

6
Step 9. Leveling CabinetsAfter hanging each wall cabinet, checkwith a level against front, sides and bottomof cabinet to ensure it is plumb and level.If necessary, shim between wall andcabinets to correct for uneven walls.You may need to loosen screws slightlyto insert shims. Shim ceiling-hungcabinets as necessary between ceilingand cabinet. After alignment, tightenall screws securely.
Step 10. Installing Base CabinetsInstall base cabinets after ceiling or wall-hung cabinets. For ease of installation,remove doors from the cabinets byunscrewing the hinge from the cabinetfront frame. Remove the drawers. Set thedoors aside, stacking them front to frontto avoid damage. Remove shelves. Startfrom one corner. Using a 1/8" twist drillbit, drill holes through the top rail at backof cabinet at stud location marked onwall, about 1-1/2" into the stud. Securecabinet to the wall using #8x2-1/2" sheetmetal screws, making sure screws go intostuds at least 1”. Use a level to checkagainst front, sides and top of cabinet(see Step 14). Shim between wall andcabinet and between floor and cabinetas necessary to keep cabinet plumb andlevel and aligned with base cabinet markon wall from Step 2.NOTE: Tightening hanger rails againsta crooked wall without shims can breakjoint between hanger rail and cabinet.
incorrect correct
Step 12. Installing Lazy SusanBase Cabinet
Square and level installation assuressmooth operation, as well as properinstallation of remaining cabinets.Provide support for the countertop inthe corner behind the Lazy Susan bysecuring two 36” lengths of 1x2 stockto the wall; level these two pieces withthe base cabinet mark from Step 2.
Step 13. Fastening BaseCabinets Together
Fasten adjoining cabinets together usingthe procedure for joining face frames(Step 7).
filler
Step 11. Installing Base Cabinetswith Blind Corner
NOTE: ALWAYS START IN THECORNER! Since each unit differs,check layout drawing to determine prop-er distance from adjoining wall. Positionand secure cabinets using same procedureas for base cabinets (Step 10), exceptthat a BF3 filler is required. Attach basefiller to both base cabinets using proce-dure for joining face frames (Step 7).

7
Step 14. Leveling CabinetsCheck each cabinet as it is attached towall, front to back and across front edgewith a level. Be certain cabinet is levelin both directions. Shim between cabinetand floor or between cabinet and wall tokeep base units level and plumb. Shimbetween back rail and wall as necessaryto prevent rail from bowing when securedto wall. Tighten all screws.
Step 15. Installing CountertopFollow countertop manufacturer’sinstructions for proper installation.Base cabinet I-beams should be utilizedwhen attaching countertop. Be carefulto use the proper length screw and not toover-tighten, damaging the countertop.Screws should be placed no further than1” from the front or back of the cabinet.
Step 16. Adjusting Cabinet DoorsReplace doors and drawers removedduring installation and adjust as needed.Loosen vertical adjustment screw oneach hinge. Align cabinet door to frame,then re-tighten screws. Loosen horizontaladjustment screws, reducing gap betweendoors by moving left or right, then tightenscrews. See hinge illustrations next page.
incorrect correct
incorrect correct
Base Cabinet I-beam
8
Problem:Space between two butt doors exceeds1/8" or is uneven or doors do not lineup properly.
All cabinets require final adjustments after initial installation.
Solution:This could be a result of improperadjustment of door hinges, the cabinetis not installed “square,” or door warpagedue to insufficient humidity. Loosenmounting screws and shim to makecabinet plumb, level and square. Loosenhinge screws and readjust. If necessary,install humidity control to keep relativehumidity to 35%.
Problem:Door does not close properly againstcabinet face frame at either top or bottom.
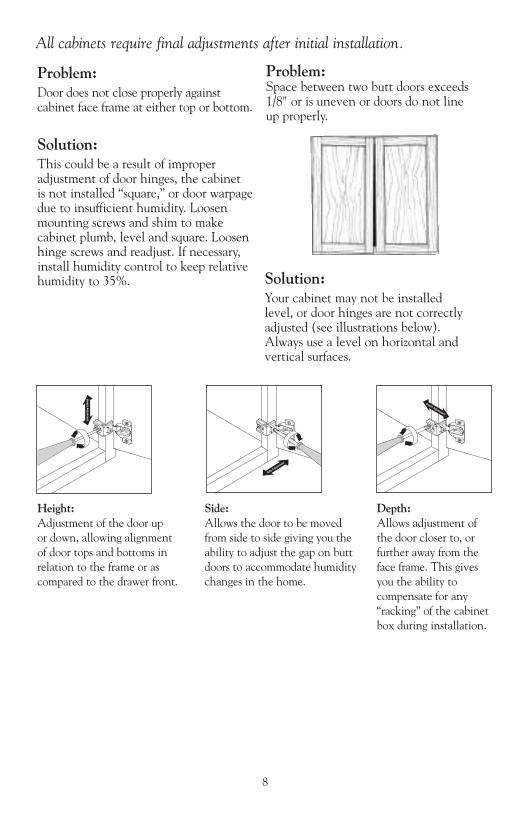
Height: Side: Depth:Adjustment of the door up Allows the door to be moved Allows adjustment ofor down, allowing alignment from side to side giving you the the door closer to, orof door tops and bottoms in ability to adjust the gap on butt further away from therelation to the frame or as doors to accommodate humidity face frame. This givescompared to the drawer front. changes in the home. you the ability to
compensate for any“racking” of the cabinetbox during installation.
Heig
htAdjustm
ent
Side A
djustm
ent
Depth Adjustment
Solution:Your cabinet may not be installedlevel, or door hinges are not correctlyadjusted (see illustrations below).Always use a level on horizontal andvertical surfaces.
9
Problem:Drawer does not close evenly or drawermovement in/out is stiff.
Solution:Adjust drawer guide member attachedfrom front edge of cabinet to back, bymanually realigning the drawer guidewithin the socket itself at the back ofthe cabinet (see illustration below).Once realigned, check that drawerguide rollers stay in tracks and operatesmoothly.
Problem:Drawer front does not fit flush with cabinet.
Solution:Cabinet may not be installed level.Loosen mounting screws and shimto make cabinet plumb and level.Adjust drawer guide member attachedfrom front edge of cabinet to back, bymanually realigning the drawer guidewithin the socket itself at the backof the cabinet (see illustration above).Once realigned, check that drawerguide rollers stay in tracks andoperate smoothly.
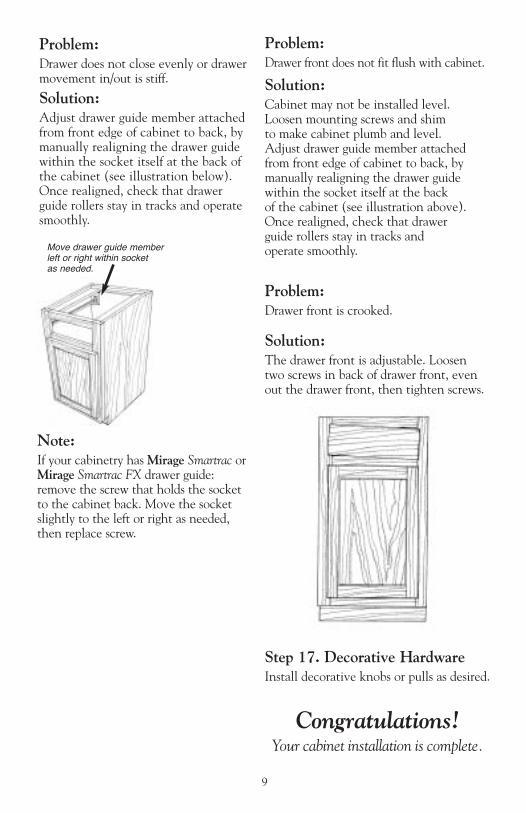
Problem:Drawer front is crooked.
Solution:The drawer front is adjustable. Loosentwo screws in back of drawer front, evenout the drawer front, then tighten screws.
Move drawer guide memberleft or right within socketas needed.
Note:If your cabinetry hasMirage Smartrac orMirage Smartrac FX drawer guide:remove the screw that holds the socketto the cabinet back. Move the socketslightly to the left or right as needed,then replace screw.
Step 17. Decorative HardwareInstall decorative knobs or pulls as desired.
Congratulations!Your cabinet installation is complete.

10
Maintenance of CabinetryInterior and Exterior• Clean at least once monthly to protectwood and bring out its natural beautyby wiping surface with a clean,damp cloth, then dry.
• To remove soil or grease, use sudsfrom common dishwashing liquid(not detergent). Wipe clean withdamp cloth. Dry thoroughly.
• During routine kitchen use, immediatelydry cabinets near sink, range, dishwasher,oven and baseboards where water splashesand spills often occur, to prevent damageto your cabinetry finish.
• To protect your cabinets’ finish,never use cleaners containing bleach,ammonia or abrasives on your cabinetry.
• Do NOT wax cabinet surfaces.
To repair small scratches,nicks and dents• Most cabinet scratches can be touched upby using a special kit available from yourdealer which includes a touch-up marker,filler pencil and fast-dry touch-up.Start with the touch-up marker.
• If scratches or nicks still show afterusing a touch-up marker, use a fillerpencil. Simply rub the pencil overfillingthe scratched area and wipe awayexcess with a clean soft cloth. Thenapply a protective coating of clearFast-Dry Touch-Up or a clear acrylicspray (available in the paint section ofyour local hardware store).
• Never use sandpaper or any other typeof abrasive paper or material to “evenout” a scratch, as it will damage thecabinet finish.
Special Care InstructionsBreadboard care and cleaning:Before initial use, wipe entire board withmineral oil and allow it to soak into thewood. After routine use, wipe clean witha damp cloth and dry thoroughly.To prevent warpage, cracking, and toensure long-lasting durability, occasionallysand board lightly with sandpaper andreapply mineral oil. DO NOT IMMERSEINWATER. DO NOT CLEAN INDISHWASHER.
White cabinetry next to self-cleaningoven:When utilizing the “self-cleaning”feature on your self-cleaning oven, openall drawers and doors wide on cabinetryinstalled next to your oven.This will prevent possible damage and/ordiscoloration to your cabinetry that canoccur due to high heat build-up next toyour oven.
Cabinet Care & Cleaning
ImmediatelyAs soon as your cabinets are installed, wipe all surfaces with a soft, damp clothand dry immediately.Never use kitchen cloths or sponges that might have detergent or grease on them.

Additional InformationNature has provided that variations in graining and color may be evident in yourwood cabinetry. Since most wood cabinetry is constructed from several pieces,variations occur because each piece accepts stain in a different way.We feel the beauty of real hardwood is created by these infinite variations of grain,texture and color. This is the nature of hardwood, and unusual graining will not beconsidered reason for replacement.Some of our door styles use solid wood raised center panels. Commonly, a small amountof expansion and contraction will occur, depending on the season and humidity.Our classic white cabinets use a unique thermofoil bonding process for a tough,chip-resistant exterior that’s durable and easy to maintain. Painted surfaceswill develop hairline cracks at joints, caused by seasonal humidity changes and theexpansion/contraction of the wood. This is the nature of hardwood, and hairlinecracks on painted surfaces will not be considered reason for replacement.Should you have any further questions regarding the care and maintenance ofyour cabinetry, please contact your dealer.
Medallion Cabinetry, Inc.anELKAY COMPANY
180 Industrial BoulevardWaconia, Minnesota 55387(952) 442-5171Fax (952) 442-83161-800-543-4074www.medallioncabinetry.com
LITDBRC-HOMEGDE 25M 0805