Embed Size (px)
Citation preview
7/28/2019 A Homebuilt Solar Kiln for Hardwoods
http://slidepdf.com/reader/full/a-homebuilt-solar-kiln-for-hardwoods 1/10
A Homebuilt Solar Kiln for Hardwoods
Dieter Steinmann
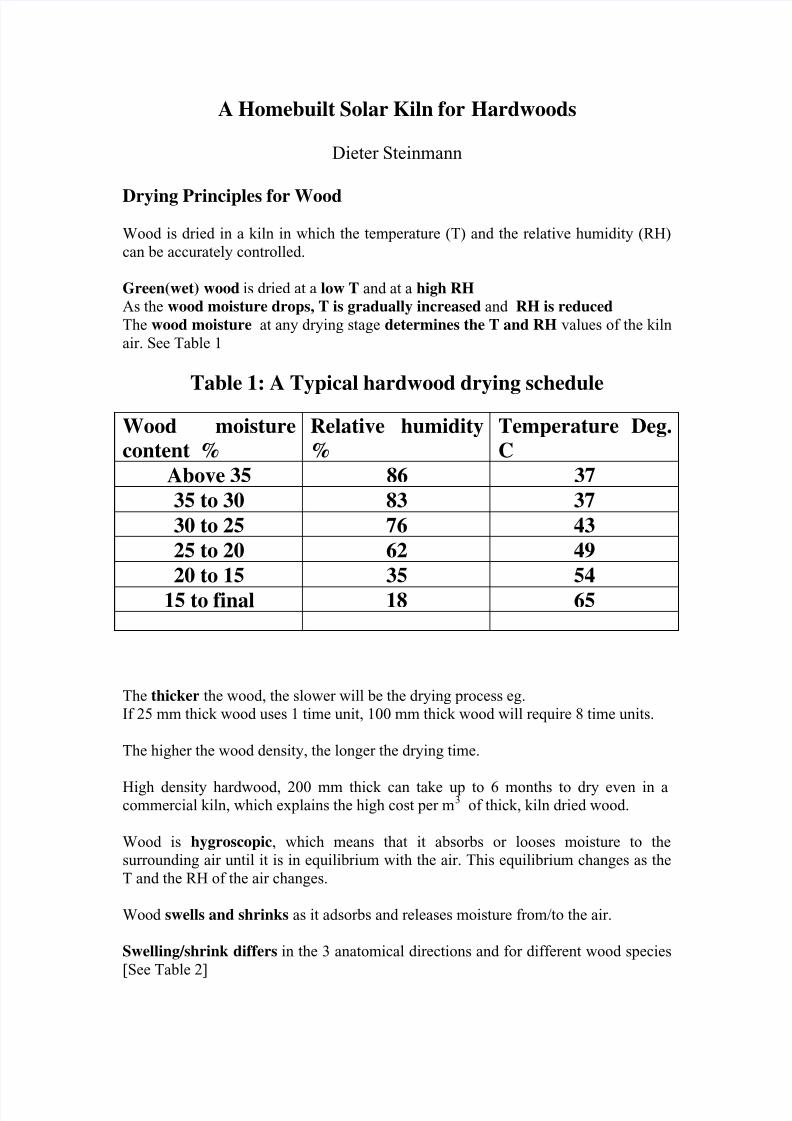
Drying Principles for Wood
Wood is dried in a kiln in which the temperature (T) and the relative humidity (RH)
can be accurately controlled.
Green(wet) wood is dried at a low T and at a high RH
As the wood moisture drops, T is gradually increased and RH is reduced
The wood moisture at any drying stage determines the T and RH values of the kiln
air. See Table 1
Table 1: A Typical hardwood drying schedule
Wood moisture
content %
Relative humidity
%
Temperature Deg.
C
Above 35 86 37
35 to 30 83 37
30 to 25 76 43
25 to 20 62 49
20 to 15 35 54
15 to final 18 65
The thicker the wood, the slower will be the drying process eg.
If 25 mm thick wood uses 1 time unit, 100 mm thick wood will require 8 time units.
The higher the wood density, the longer the drying time.
High density hardwood, 200 mm thick can take up to 6 months to dry even in acommercial kiln, which explains the high cost per m3 of thick, kiln dried wood.
Wood is hygroscopic, which means that it absorbs or looses moisture to the
surrounding air until it is in equilibrium with the air. This equilibrium changes as the
T and the RH of the air changes.
Wood swells and shrinks as it adsorbs and releases moisture from/to the air.
Swelling/shrink differs in the 3 anatomical directions and for different wood species
[See Table 2]

7/28/2019 A Homebuilt Solar Kiln for Hardwoods
http://slidepdf.com/reader/full/a-homebuilt-solar-kiln-for-hardwoods 2/10
Table 2: Percentage shrinkage for a change in wood
moisture from 30 % to 0%
Wood species Tangential Radial LongitudinalKarri 12.1% 7.9% 0.24%
Kiaat 3.6% 2.1% 0.23%
Conclusion:
Wood drying in a conventional kiln is a complicated process that:
Must be done carefully to avoid damage to the wood Requires accurate control of the drying conditions
Requires good understanding of the process
Requires expensive equipment
Requires a lot of time.
Solar Kiln Drying is much less complicated and expensive and only takes about 20%
longer than conventional drying!

7/28/2019 A Homebuilt Solar Kiln for Hardwoods
http://slidepdf.com/reader/full/a-homebuilt-solar-kiln-for-hardwoods 3/10
Principles of Solar Kiln Drying
Fig. 1: Typical layout of a solar kiln showing the airflow pattern.
Wood is stacked in a double skinned solar kiln with transparent roof and walls
The wood is covered to protect it from direct sunshine (Fig. 1)
The sun heats the inside of the kiln and the air
The warm kiln air is circulated by a fan through the wood stack to heat it. (Fig. 2)

7/28/2019 A Homebuilt Solar Kiln for Hardwoods
http://slidepdf.com/reader/full/a-homebuilt-solar-kiln-for-hardwoods 4/10
Fig. 2: Fan mounted in (transparent) fan wall above wood stacks
The wood releases its moisture into the kiln air
A small blower blows this moist air into the space between the two skins and back
into the kiln via vent holes in the inner skin. (Fig. 3)

7/28/2019 A Homebuilt Solar Kiln for Hardwoods
http://slidepdf.com/reader/full/a-homebuilt-solar-kiln-for-hardwoods 5/10
Fig. 3 Interior of a solar kiln during loading. The small blower (top
left) and a feed back vent hole under table can be seen.
When the temperature outside the kiln drops below the dew point of the kiln air, themoisture condenses on the inside of the outer skin
This condensate collects between the skins and is drained through weep holes to the
outside of the kiln.
The above process removes the water from the wood and releases it outside the kiln
This process repeats itself in day/night cycles.
As the wood dries, the drying process slows down and the rate of moisture loss from
the wood decreases and therefore the RH in the kiln decreases.
At the same time less energy is used to evaporate the water and the kiln temperature
increases. These conditions agree with the drying schedule in Table 1.
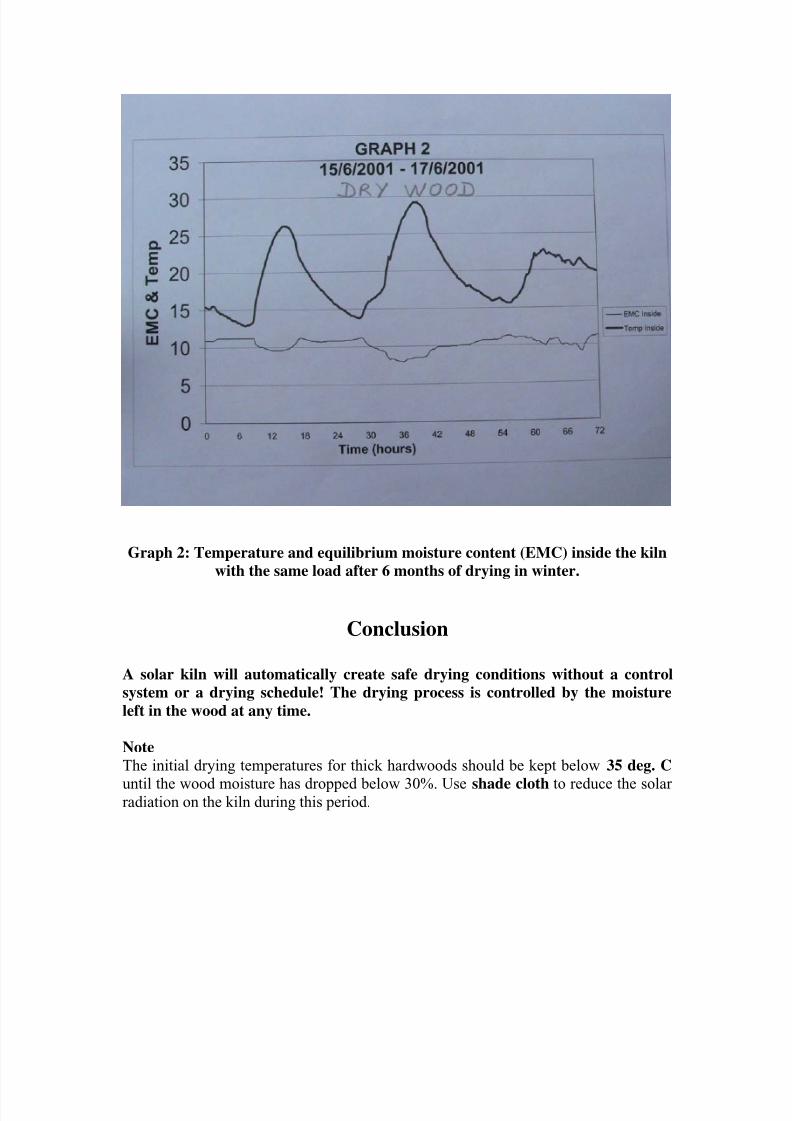
(Compare Graphs 1 and 2)
Note that Graph 1 was recorded for a green load of wood in summer and Graph 2 for
the same load of dry wood in winter.
The lower, thinner line. marked as EMC represents the moisture content of the kiln
air. The average EMC of 10 % in Graph 2 means that the wood in the kiln can dry to
as low as 10% moisture content under these circumstances if given enough time.

7/28/2019 A Homebuilt Solar Kiln for Hardwoods
http://slidepdf.com/reader/full/a-homebuilt-solar-kiln-for-hardwoods 6/10
Graph 1: Temperature and equilibrium moisture content (EMC) inside a kiln
just after loading with green wood in summer
7/28/2019 A Homebuilt Solar Kiln for Hardwoods
http://slidepdf.com/reader/full/a-homebuilt-solar-kiln-for-hardwoods 7/10
Graph 2: Temperature and equilibrium moisture content (EMC) inside the kiln
with the same load after 6 months of drying in winter.
Conclusion
A solar kiln will automatically create safe drying conditions without a control
system or a drying schedule! The drying process is controlled by the moisture
left in the wood at any time.
Note
The initial drying temperatures for thick hardwoods should be kept below 35 deg. C
until the wood moisture has dropped below 30%. Use shade cloth to reduce the solar radiation on the kiln during this period.

7/28/2019 A Homebuilt Solar Kiln for Hardwoods
http://slidepdf.com/reader/full/a-homebuilt-solar-kiln-for-hardwoods 8/10
The construction of a Solar Kiln
The kiln floor should be level, sturdy and dry even during the rainy season. Drain
water away from the kiln. Use a sheet of plastic as a moisture barrier against ground
moisture and use a layer of bricks to lift the floor 50 to 100 mm above ground level.
Framework of wood or pipe is made to a suitable size to accommodate the stack of
wood you intend to dry and allow for air circulation.
[See Fig 1 for a typical kiln layout]
A tunnel shape is recommended for easy construction.
Cover both ends of the tunnel with any material. Allow for a door to load the kiln.
Cover top and sides with a double layer of ultra violet stabelized transparent plastic
sheet sealed all around its 4 edges
Ensure that the kiln air can not leak out of the kiln!!
Stack the wood in the kiln in such a way that an electric fan can blow the kiln air
through the stack. Baffle the stack to the fan to ensure that no air by-passes the
stack. An air speed through the stack of 1,5 m/sec is sufficient.
Fit a small blower fan (50- 150 watt) to the inside of the kiln structure and use a
suitable air duct to blow the air between the two skins of the kiln at a point near the
top of the kiln and about halfway along its length. (Fig 3)
Cut vent holes through the inner skin of the kiln, about 200 mm above ground level
and at 2 metre spacing all along both sides of the kiln. These vent holes are required
to feed the air from the small blower back into the kiln.
NB Make these holes small enough to allow a slight pressure build-up between the
two skins to keep them apart when the blower is running.
Drying wood in the kiln
1 Stack the wood in the kiln allowing for uniform airflow around each piece of wood.
2 Use stickers/spacers of uniform thickness to separate boards
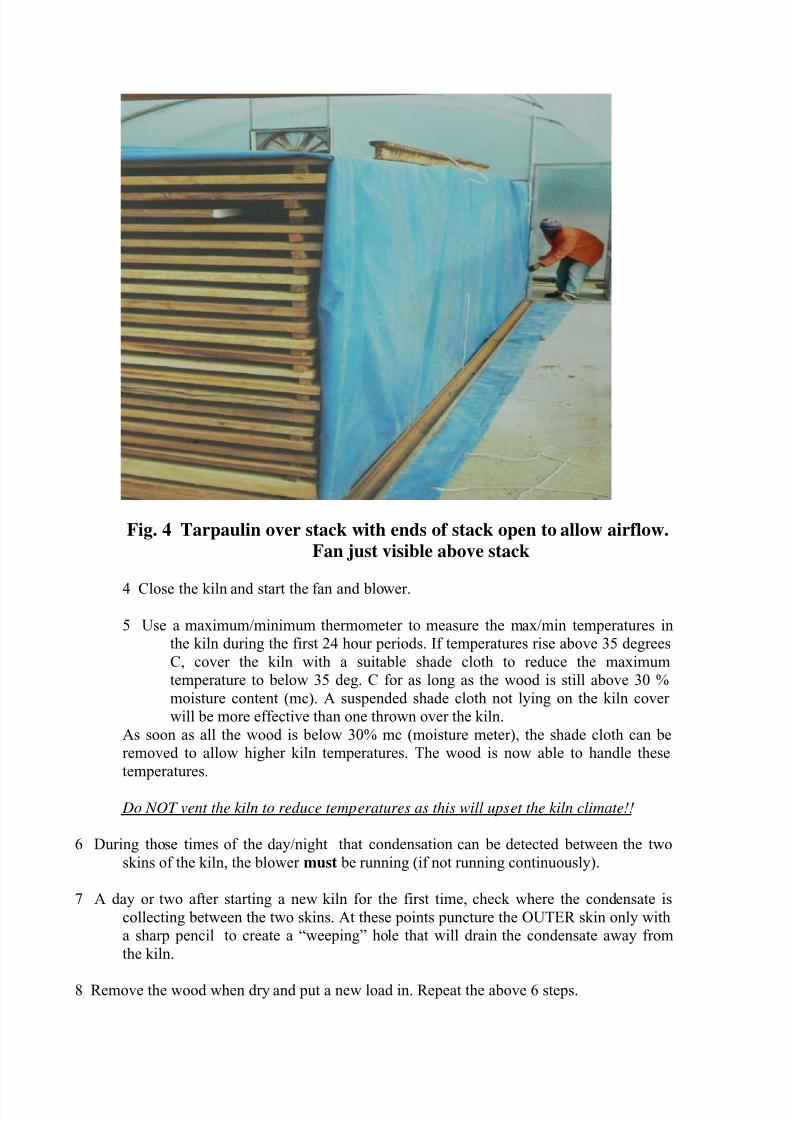
3 Cover the top and two sides of the stack with a heavy tarpaulin or black plastic
sheet and extend the sheet to form a tunnel into which the fan can blow to
force all its air through the stack
7/28/2019 A Homebuilt Solar Kiln for Hardwoods
http://slidepdf.com/reader/full/a-homebuilt-solar-kiln-for-hardwoods 9/10
Fig. 4 Tarpaulin over stack with ends of stack open to allow airflow.
Fan just visible above stack
4 Close the kiln and start the fan and blower.
5 Use a maximum/minimum thermometer to measure the max/min temperatures in
the kiln during the first 24 hour periods. If temperatures rise above 35 degrees
C, cover the kiln with a suitable shade cloth to reduce the maximum
temperature to below 35 deg. C for as long as the wood is still above 30 %
moisture content (mc). A suspended shade cloth not lying on the kiln cover
will be more effective than one thrown over the kiln.
As soon as all the wood is below 30% mc (moisture meter), the shade cloth can be
removed to allow higher kiln temperatures. The wood is now able to handle these
temperatures.
Do NOT vent the kiln to reduce temperatures as this will upset the kiln climate!!
6 During those times of the day/night that condensation can be detected between the two
skins of the kiln, the blower must be running (if not running continuously).
7 A day or two after starting a new kiln for the first time, check where the condensate is
collecting between the two skins. At these points puncture the OUTER skin only with
a sharp pencil to create a “weeping” hole that will drain the condensate away from
the kiln.
8 Remove the wood when dry and put a new load in. Repeat the above 6 steps.
7/28/2019 A Homebuilt Solar Kiln for Hardwoods
http://slidepdf.com/reader/full/a-homebuilt-solar-kiln-for-hardwoods 10/10
Notes
Drying time ?? You need a wood moisture meter to measure the moisture content of the
wood and determine if it is dry.As a very rough guide: 38 mm thick ironwood boards required 4 months at
Stormsriver to reach 12% moisture content.
Mixing of wood species is allowed. “Over drying” is very unlikely but the less dense pieces
will take a shorter time to dry, so it is better to have a moisture meter to check when
these pieces are ready to use.
Adding “green” wood to a partially dried load will retard the drying of the partially dried
load and may expose the “green” wood to too high temperatures and too low
humidities at that stage. This practice is not recommended.
Dieter Steinmann
Tel. 021 88 66 043 (h)
E-mail: [email protected]
24 April 2006