Embed Size (px)
Citation preview

1
April 2014 Horticulture/HighTunnels/2014-02pr
A High Tunnel for Strong Winds
and Space Utility Ron Patterson, Carbon County Ag/4-H Agent
The use of high tunnels in Utah can help to extend growing seasons by several weeks. A properly managed high tunnel will improve the quality of fruits and vegetables by protecting them from the elements. But, high tunnels also require more management than traditional growing practices. For various fact sheets about growing in high tunnels go to http://tunnel.usu.edu. The initial high tunnel design by Utah State University Extension is fairly inexpensive, but temporary and easy to move (Black, et al., 2011); this is a very good entry-level model. Commercial high tunnels are much more durable, but are costly and difficult to move. This modified high tunnel is a middle-of-the-road design for cost and relocation concerns. A 17.5 x 36 foot high tunnel built in 2013 cost $1.40 per square foot. According to World Media Group, LLC (“Carbon County Weather,” 2014) the average wind speed for Carbon County in April is about 45 mph (http://www.usa.com/carbon-county-ut-weather.htm). It is not uncommon to have sustained winds of 50 – 60 mph. This design stood up to everything Carbon County weather threw at it during the 2012 and 2013 growing seasons. During those same seasons a low-cost PVC model on the same property had several rebar stakes pull up and/or PVC ribs break in the wind. There were also puncture holes in the plastic on the windward side
as the wind pushed the side of the tunnel onto the trellis structure. For optimum ventilation a high tunnel should be oriented perpendicular to the prevailing winds. However, some of the author’s economy model high tunnels have been damaged by crosswinds. Jett (2010) suggests one approach to reduce the effect of potentially damaging wind is to orient the high tunnel so the end of the tunnel faces into the prevailing wind. In this case care must be taken to not have the windward door open while the leeward door is closed, which may create a balloon effect. In some areas, the strong prevailing winds don’t always come from the same direction. This high tunnel was designed to stand up to changing wind directions. All other site placement (Black et al., 2011) and ventilation considerations (Black and Drost, 2010) are just as important for this tunnel design as for other designs. A common disadvantage with high tunnels that have slanted (rounded) sides is that it is difficult to use the space efficiently. Commercial high tunnels typically have straight, or nearly straight, sides that are 4 – 5 feet high, making it possible to till and plant out to the edge. This modified high tunnel is 17.5 feet wide, has straight sidewalls, and can be built to any length. It is easy to ventilate and is sturdy enough to

2
withstand the typical strong spring winds of Carbon County. Space Utility The USU Extension economy high tunnel (Black et al., 2011) is 14′ wide. The high tunnel described in this bulletin is 17.5′ wide. The growing area of this high tunnel is 25% greater than the economy model (17.5/14 = 1.25). Trellising crops such as indeterminate tomatoes and cucumbers utilizes vertical space and makes good use of the high tunnel growing area. Typical PVC high tunnels have slanted sides and will hold three rows of trellised crops such as tomatoes or cucumbers (if the outside trellises are shortened to about 5.5’), or three rows of a bush-type crop, such as zucchini or peppers. Due to the straight side-walls of this 17.5′ high tunnel, the author was able to add two more rows of trellised crops, or two rows of a bush-type crop, effectively increasing the number of plants by 67% with only a 25% increase in width (5 rows/3 rows = 1.67). The author’s experience has shown that shorter crops such as spinach or lettuce can be planted out to the edge of either high tunnel, but they are not easy to manage within 12″ of the slanted walls. This makes a 14′ high tunnel essentially a 12′ wide growing area. Thus, even for short crops, from an ease-of-management point of view the 17.5′ foot high tunnel, with straight walls, has 45.8% more manageable growing area with only a 25% increase in width (17.5/12 = 1.458).
Figure 1. Note the 1.5″ PVC pipes that fit over the T-posts. The T-posts are 3′ apart and the high tunnel is 17.5′ wide. The PVC pipe does not need to go all the way to the ground, and will be easier to remove if only 18″ long.
Rib Construction The modified high tunnel is easy to construct and easy to move. The ribs are set 3 feet apart. Each rib consists of:
2 – 6 foot T-posts 2 – 18″ sections of 1.5″ schedule 40 PVC
pipe 2 – 45o 1.5″ PVC elbows 1 – 20 foot section schedule 40 PVC pipe
(1″ or 1.5″) If 1″ PVC pipe is used for the arch then 2 –
1.5″ to 1″ PVC reducer bushings are needed. Each 6 foot T-post should be 5 feet tall once it is driven into the ground. Drive them so they are the same height over the entire length of the wall. The 18x1.5″ PVC pipe will slide over the T-post (Fig. 1). Sometimes the top of the T-post needs to have a point or two filed so the PVC pipe will slide over it easily.
Figure 2. This joint assembly has been glued. Note the reducer in the 45o elbow so the arch pipe is 1 inch. The pipe clamp holds the purlin in place. The T-posts along the wall are spaced three feet apart and the opposite wall is 17.5 feet away. For the roof arch use 1″ or 1.5″ pipe. The 1″ pipe will be less likely to push the T-posts outward in soft soil, due to greater flexibility. The 1.5″ pipe will be stronger for light snow loads but bracing is still necessary when snow is possible.
A 45o 1.5″ elbow is attached at the top of the 18 inch section of 1.5″ pipe. Repeat for the opposing T-post.
For a 1″roof arch use a 1.5 to 1″ reducer bushing (Fig. 2) to fit the other end of the elbow to the arch piece. For 1.5″ roof arch

3
the elbow does not need to be reduced. Remove the bell end of a 20′ length of PVC
pipe and slide it into the top end of the 45o elbow.
Insert the other end into the opposing T-post assembly and one rib is installed.
The 45o elbow should be glued, or screwed with a 1 inch grabber screw, to the 1.5″ x 18″ T-post sleeve (Fig. 2). The screw makes disassembly possible (Fig. 3). The rest of the assembly does not need to be glued or screwed and replacing broken parts is easier and cheaper if they are not permanently fastened.
Figure 3. This joint assembly is stabilized with a grabber screw and can be disassembled if desired.
Figure 4. The ridge purlin will keep the roof ribs evenly spaced.
Figure 5. Two 2 or 2 ½″ screws can hold the ridge purlin to the ribs. This is a cheap way to fasten the ridge purlin, but is a bit of a challenge to install. Screws may weaken over time and break.
Figure 6. Aluminum cross connectors are designed to hold two pipes perpendicular to each other and can be adjusted to the right position before they are tightened. Measure outside diameter of pipe to ensure they fit over the ribs and purlins. To keep the arch ribs evenly spaced, fasten at least one ridge purlin to the arch ribs (Fig. 4). Purlins can be fastened with either a 2.5″ screw (the screws have been known to fail over time) or cross connectors designed to clamp the two 1″ pieces (1.315″ x 1.315″) together (Figs. 5 & 6). For 1.5″ PVC arch fasten a 1″ PVC purlin to the rib with a 1.9″ x 1.315″ cross connector. For additional stability, add more purlins, splitting the distance

4
between the ridge and the sidewalls. This will add a little bit to the overall cost of construction. End Wall and Door Construction The end walls are constructed between the last two T-posts at each end of the high tunnel. The wall is secured to those T-posts with plumber’s strap and two additional T-posts are fastened to the inside of the door frame uprights for additional support. Plumber’s strap is used to fasten the T-posts to the door frame. The doors should open outward.
Figure 7. This end wall uses a minimum of construction materials, but with the angle braces and t-post supports on the inside it has withstood spring and summer winds for two growing seasons and is still in good shape. The doors are constructed of 2x4s and are constructed to fit the site, rather than have specific instructions. Black et al. (2011), provide an excellent materials list and instructions on door construction in their Constructing a Low-cost High Tunnel fact sheet. The key things to remember:
The door needs to be wide enough to for equipment that will be used in the high tunnel.
The door should have top vents. The end walls are also constructed of 2x4s and are constructed on site rather than have specific instructions. The main point to remember is that at least one framing piece needs to be at an angle different from 90o to provide sturdiness (Fig. 7). Sidewall Construction One thing that wears out the plastic cover quickly is when it flaps against the ribs in the wind. Some designs use twine or cords over the top of the high
tunnel to hold the plastic in place (Black et al., 2011). Cords can wear holes in the plastic if the cords are not under tension. Even when they are under tension they can wear holes where the cord crosses over the ridge purlin. With this modified design, there are no cords going over the top of the structure. The roof plastic is attached to 2x4 purlins mounted at the top of the side walls. Use construction nail plates to fasten the 2x4s together end-to-end. These purlins are on the outside of the sidewall. Fasten them to the side posts using pipe bracket or plumber’s strap and 1.5″ screws (Figs. 2 & 8). The advantage of the plumber’s strap is that it can be fastened loosely, allowing the purlin to be pulled down, keeping the plastic cover taut.
Figure 8. Plumber’s strap can be used to hold the purlin to the sidewall. A screw will hold the purlin up until the covering is in place. Then the screw can be removed and the anchor ties can be used to keep the cover taut. Anchoring the Cover To attach the plastic to the structure, wiggle wire tracks are screwed to the 2x4 purlins (Figs. 9 & 10). Wiggle tracks and wire can also be used to attach the plastic to the end walls (Fig. 15). While adding to the cost, the advantage to wiggle wire is that attaching the plastic is quicker and simpler. It also provides a way to attach shade cloth, if desired. Anchor stakes are made of 3/8″ or ½″ rebar. The rebar can be bent like a candy cane at the top, or a chain link or a washer can be welded near the top. Welded anchors are easier to drive into the ground

5
Figure 9. Wiggle wire and track fastened to the purlin.
Figure 10. Wiggle wire holds the plastic in the track. Eye screws are used for both anchoring and ventilation. because they are straight. Regardless of the design, the stake should be at least 18″ long to provide a good anchor. If the anchors are angled into the ground at 10 – 15o off vertical and offset from the T-post 6 – 8 inches they will be less likely to pull up from strong winds (Fig. 11). Anchoring the Structure Wind blowing over a high tunnel will create lift, just like the lift occurring under airplane wings. If the high tunnel is not properly anchored, wind can lift the structure right off the T-posts. To anchor the sidewall purlins to the ground, screw a 1-13/16″ eye screw through the plastic into the purlin at each rib just beneath the wiggle wire track (Fig. 10). These are the only holes you will make in the plastic. The
reason for placing the eye screw at the rib is that it will also be used for side ventilation.
Figure 11. Ground anchor offset slightly and angled into the ground. The white background is actually inside the high tunnel. Run twine or cord from the eye screw to the anchor stake in the ground. These steps outline a simple way to do this:
Tie the end of the cord to the stake. At about 2/3 of the way up create a loop by
tying an overhand knot on a bight (Fig. 12). Continue the run up to the eye screw and
back down to the loop (Fig. 13). Add 4 – 6 inches for enough cord to tie the
knot then cut the cord. Thread the cord through the eye screw then
back down through the loop (Fig. 13). Tie it off with a slipknot so it can be easily
adjusted when needed (Fig. 14). The cord/twine attached to the anchor serves two purposes: it holds the high tunnel down, and keeps the side curtain plastic from flapping in the wind.
6
Figure 12. An overhand knot in a bight creates a non-slipping loop.
Figure 13. Run the cord through the eye screw and back through the loop.
Figure 14. Tie off with a slip knot so it can be easily untied. Cover The plastic cover goes from ground to ground as a single piece. The plastic is attached in the wiggle wire track with enough to drape down to the ground on each side.
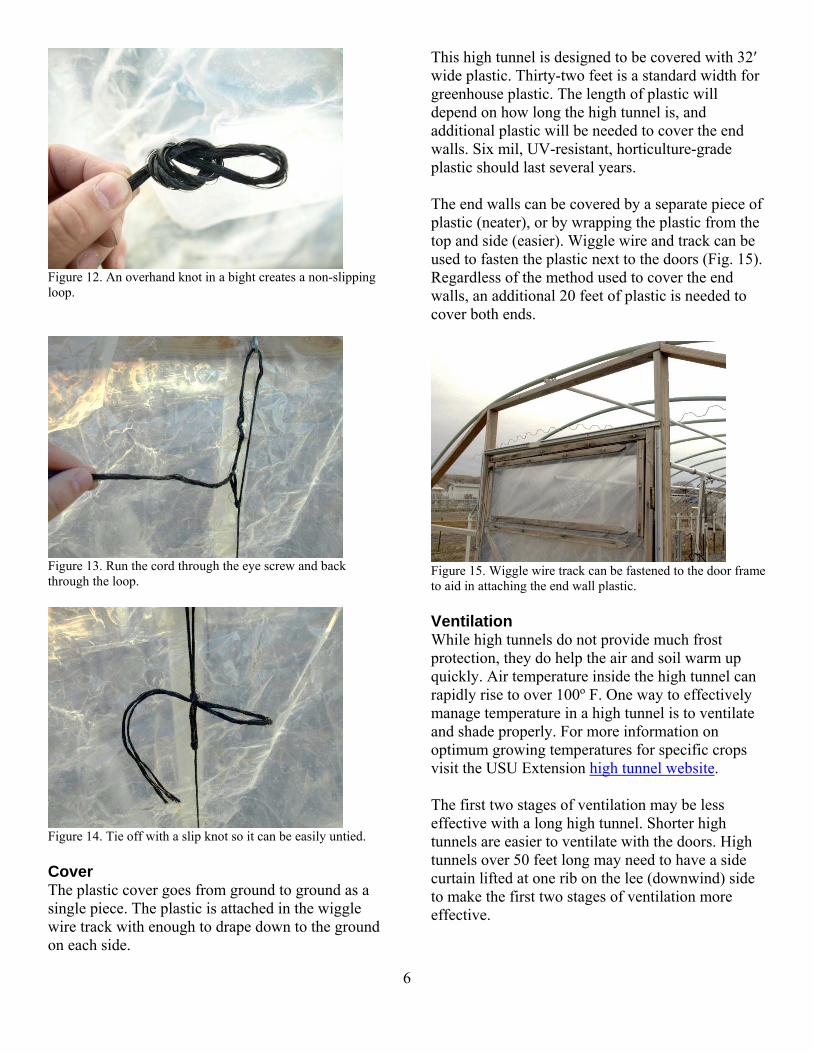
This high tunnel is designed to be covered with 32′ wide plastic. Thirty-two feet is a standard width for greenhouse plastic. The length of plastic will depend on how long the high tunnel is, and additional plastic will be needed to cover the end walls. Six mil, UV-resistant, horticulture-grade plastic should last several years. The end walls can be covered by a separate piece of plastic (neater), or by wrapping the plastic from the top and side (easier). Wiggle wire and track can be used to fasten the plastic next to the doors (Fig. 15). Regardless of the method used to cover the end walls, an additional 20 feet of plastic is needed to cover both ends.
Figure 15. Wiggle wire track can be fastened to the door frame to aid in attaching the end wall plastic. Ventilation While high tunnels do not provide much frost protection, they do help the air and soil warm up quickly. Air temperature inside the high tunnel can rapidly rise to over 100o F. One way to effectively manage temperature in a high tunnel is to ventilate and shade properly. For more information on optimum growing temperatures for specific crops visit the USU Extension high tunnel website. The first two stages of ventilation may be less effective with a long high tunnel. Shorter high tunnels are easier to ventilate with the doors. High tunnels over 50 feet long may need to have a side curtain lifted at one rib on the lee (downwind) side to make the first two stages of ventilation more effective.

7
Figure 16. Dropping the door vent may be enough for a cold day. The first stage of ventilation is to open the door vent (Fig. 16). This is basically a window that can be opened while leaving the door closed. If it is a sunny, but cold day, the door vent may be all that is needed. It is possible to automate door vents with solar powered vent openers, but the vent framing should be made of materials lighter than 2x4 lumber and should open from the bottom up rather than from the top down. The second stage of ventilation is to open the doors (Fig. 17). If it is a sunny, cool (not cold) day, opening the two doors may be enough to keep the temperatures within a good range.
Figure 17. On a cool, sunny day the door may need to be opened. The third stage of ventilation is to lift the side curtain on the lee side of the high tunnel and open the doors (Fig. 20). Lifting the side curtain of this high tunnel is easy.
Attach a cord to the rib on the inside with a 1″ ‘S’ hook on the loose end (Fig. 18).
It will require 10 – 12 inches to go from the rib, around the rolled-up side curtain, to the eye screw—add enough length to tie onto the rib and the hook. A 10 inch bungee cord will serve the same purpose.
The side curtain is lifted and the hooked end is brought under the side curtain and hooked to the eye screw used for the ground anchor (Fig. 19).
When it is time to drop the sides simply unhook the cord and let the side curtain drape down to the ground.
Any number of cords can be lifted to help regulate high tunnel temperatures.
The final stage of ventilation is to open both side curtains and both doors. In some areas of Utah, particularly along the Wasatch Front, mid-summer temperatures may necessitate the removal of the plastic by mid-June.
Figure 18. Attach a twine or cord to the rib and put a hook on the loose end. Ten inch bungee cords also work well.

8
Shading Bright sunlight can cause sunburn damage to fruit and Utah’s sunlight is very bright. To cut down the intensity of the light either cover the high tunnel with a shade cloth or apply a whitewash to the plastic cover on the high tunnel. The shade cloth can be used either with or without the plastic cover. In some of the higher elevations the removal of the plastic and covering with a shade cloth may actually drop late summer temperatures to where yield can be negatively affected. In lower elevations leaving the plastic covering on, even with a shade cloth, may result in high temperatures that negatively affect yield and fruit quality.
Figure 19. Lift the side curtain and use the ventilation tie to keep it up. Around early- to mid-June in most areas of Utah it is a good idea to start providing some protection from the sun, especially for tomatoes and peppers. Either with or without the high tunnel plastic a 30% shade cloth can be placed over the high tunnel and fastened into the wiggle wire track. Other shading options require leaving the plastic on. A commercial shading compound, white latex paint diluted 1:20 with water, or a homemade whitewash is sprayed onto the outside of the plastic (D. E. Worwood, personal communication, November 19, 2013). The
whitewash can be made by mixing 1 cup of flour with two quarts of water. This can be applied with a hand sprayer. It may need to be re-applied three or four times throughout the season or after rain events. Moving and Supports The most difficult part of moving the high tunnel is removing and resetting the T-posts. If the high tunnel is only to be moved to the next space over then only one row of T-posts needs to be moved.
Figure 20. Lift both side curtains and open both doors for full ventilation.
Figure 21. 2x4s can brace the arch during light snow loads. This is a narrower high tunnel but the concept is the same. Due to its partial PVC construction this high tunnel is susceptible to damage from snow loads. Early and late season bracing of the roof are necessary. Bracing can be accomplished by fastening 2x4 supports along the arch purlin(s) every 4 – 6 ribs (Fig. 21). The slope of this high tunnel does not shed the snow as readily as steeper-sided models so

9
it is recommended that no more than 2 inches of snow be allowed to accumulate on the structure. Summary High tunnels need to be managed. The space is valuable and high density planting is recommended. If properly managed, fruit quality and yields will be better than outdoor-grown plants. To maximize the space, vertical growing such as trellising, for indeterminate tomatoes and cucumbers should be considered. Cool season plants can be grown through much of the winter, but care must be taken with possible snow-load damage. However, cool season plants are difficult to grow during hot summer days. Additional Notes If you are recycling old T-posts, be sure they are the right size. Some of the older T-posts are larger and the 1.5″ PVC pipe will not fit over them. The PVC pipe will last longer if it is painted with an exterior latex paint. If wiggle wire and cross connector clamps cannot be purchased locally, they can found online by entering “wiggle wire” or “cross connector” into your search engine. Before ordering, measure the outside (OD) diameter of the pipe so you purchase the correct sized cross connectors.
Photography Acknowledgment: Dennis Worwood provided Figures 2, 6, 9, & 16. All other photographs provided by the author. References Black, B. & Drost, D. (2010). Temperature
Management in High Tunnels. Utah State University Extension Publications [On-line]. http://extension.usu.edu/files/publications/publication/Horticulture_HighTunnels_2010-04.pdf.
Black, B., Drost, D. Rowley, D. & Heflebower, R.
(2011). Constructing a Low-cost High Tunnel. Utah State University Extension Publications [On-line]. http://extension.usu.edu/files/publications/publication/HG_High_Tunnels_2008-01photos.pdf.
Jett, L. W. (2010). Design and Construction of High
Tunnels in W. Va. WVU Extension Service [On-line]. http://anr.ext.wvu.edu/commercial_horticulture/high_tunnels/high_tunnel_design_and_construction.
World Media Group, LLC. (2014). Carbon County
Weather [On-line]. http://www.usa.com/carbon-county-ut-weather.htm.
Utah State University is committed to providing an environment free from harassment and other forms of illegal discrimination based on race, color, religion, sex, national origin, age (40 and older), disability, and veteran’s status. USU’s policy also prohibits discrimination on the basis of sexual orientation in employment and academic related practices and decisions. Utah State University employees and students cannot, because of race, color, religion, sex, national origin, age, disability, or veteran’s status, refuse to hire; discharge; promote; demote; terminate; discriminate in compensation; or discriminate regarding terms, privileges, or conditions of employment, against any person otherwise qualified. Employees and students also cannot discriminate in the classroom, residence halls, or in on/off campus, USU-sponsored events and activities. This publication is issued in furtherance of Cooperative Extension work, acts of May 8 and June 30, 1914, in cooperation with the U.S. Department of Agriculture, Kenneth L. White, Vice President for Extension and Agriculture, Utah State University.