Embed Size (px)
Citation preview
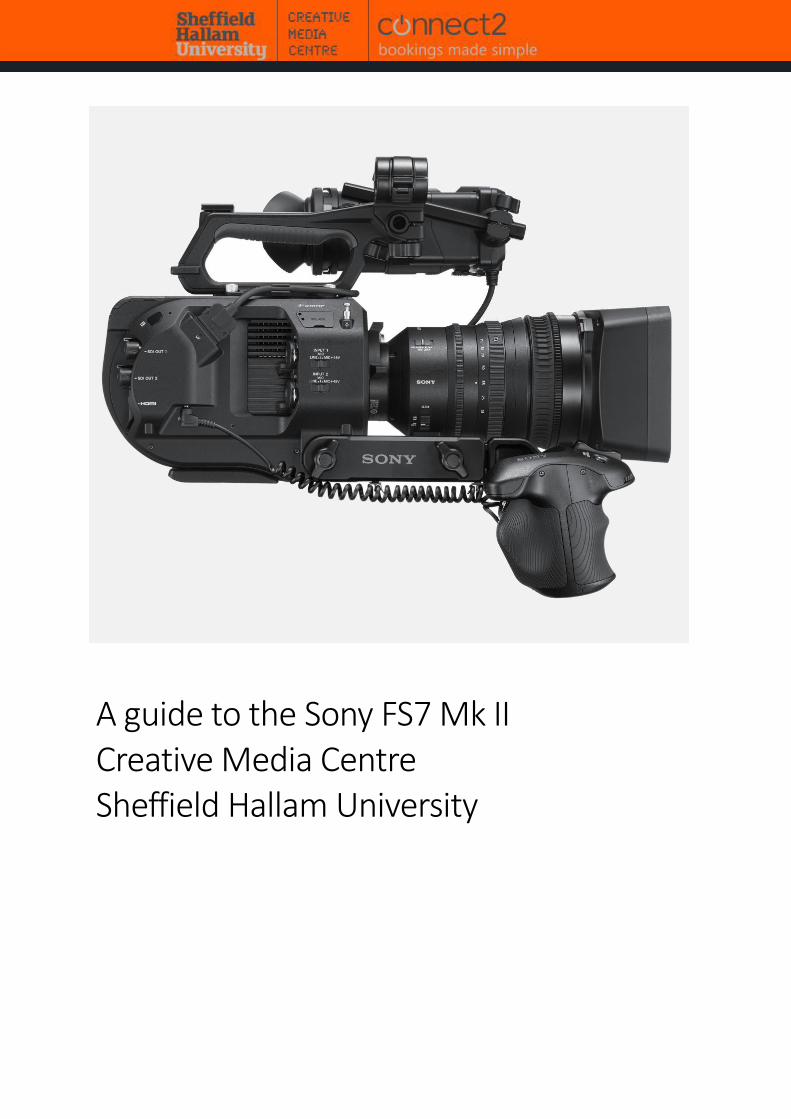
A guide to the Sony FS7 Mk II Creative Media Centre Sheffield Hallam University
David Turner Sony FS7 II Setup & Operation Creative Media Centre March 2019
1
Table of Contents
1. Choose frame rate: .......................................................................................................... 2
2. Choose shooting mode: Custom or Cine ............................................................................ 2
3. Select the Codec .............................................................................................................. 3
4. Setting the Recording Format .......................................................................................... 4
5. Setting up Audio via on-board audio................................................................................. 4
6. Setting up Audio via an external audio recorder................................................................ 5
Display Options, Video Output and User Menu ................................................................ 7
Custom mode or Cine EI mode, what one should you choose? .......................................... 8
Custom Mode and Hypergammas ...................................................................................10
Custom Mode Matrix Settings .........................................................................................15
Cine EI Mode and S-Log2/S-Log3 .....................................................................................16
Cine EI and Exposure Index .............................................................................................18
Focus Control and Focus Aids ..........................................................................................23
Exposure Tools ...............................................................................................................25
David Turner Sony FS7 II Setup & Operation Creative Media Centre March 2019
2
Sony FS7
Further to the induction you have had on the Sony FS7 II, this document provides further information about the settings on the FS7 and how to use them. Along with the online manual, you should have everything you need to learn how to operate the camera with optimum efficiency and artistic expression. This guide goes through the different aspects of the cameras functions in detail and explains them and how to utilise them. Starting with the basics:
1. Choose frame rate: Main Frame Rates: 25 fps PAL 50 fps PAL 23.98 fps NTSC 29.97 fps NTSC 59.94 fps NTSC
Menu: System/Country – NTSC or PAL
2. Choose shooting mode: Custom or Cine
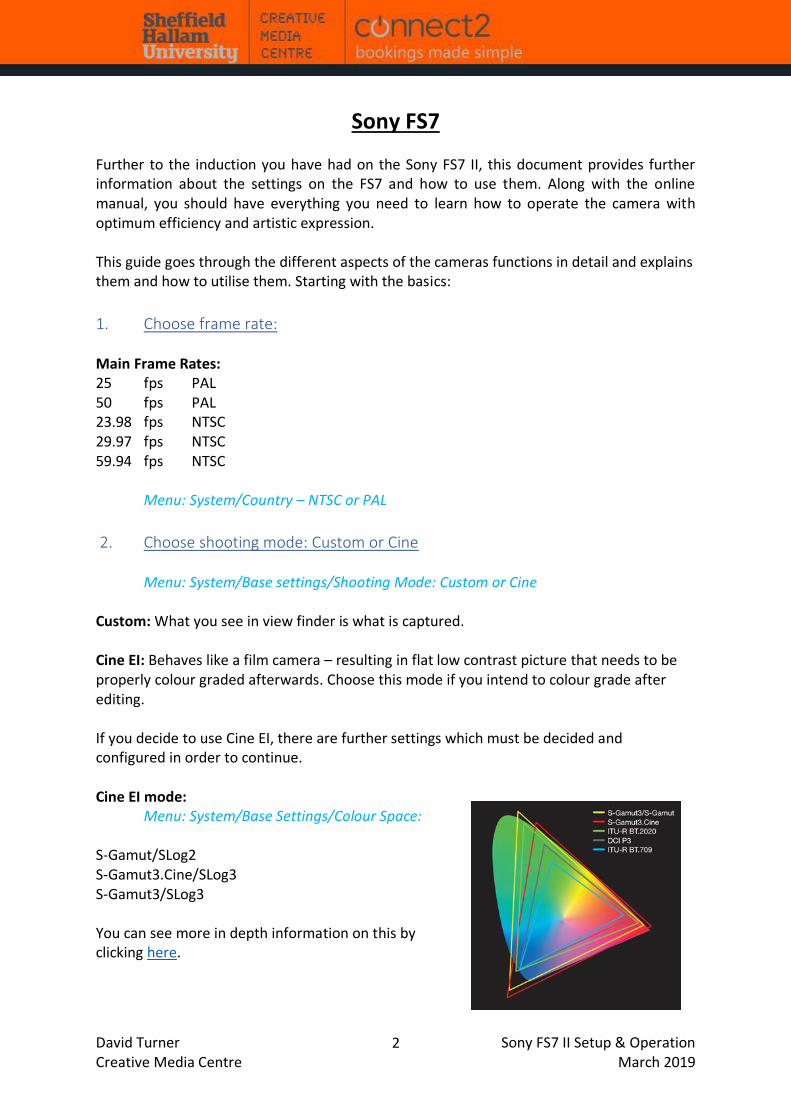
Menu: System/Base settings/Shooting Mode: Custom or Cine Custom: What you see in view finder is what is captured. Cine EI: Behaves like a film camera – resulting in flat low contrast picture that needs to be properly colour graded afterwards. Choose this mode if you intend to colour grade after editing. If you decide to use Cine EI, there are further settings which must be decided and configured in order to continue. Cine EI mode:
Menu: System/Base Settings/Colour Space:
S-Gamut/SLog2 S-Gamut3.Cine/SLog3 S-Gamut3/SLog3 You can see more in depth information on this by clicking here.
David Turner Sony FS7 II Setup & Operation Creative Media Centre March 2019
3
3. Select the Codec There are 3 standard codecs built in:
1. Mpeg HD422 Mpeg2, 8 bit, 4:2:2. HD only (1920x1080 & 1280x720) Progressive + Interlace, No S&Q (Slow-motion).
2. XAVC-L Long G.O.P Codec. More efficient than XAVC-I, due to the way frames are recorded. Processor heavy for editing, but only requires ¼ of the storage space when compared to XAVC. 8 bit, so not the same quality as XAVC-I.
3. XAVC-I (Choose this for high quality 4k, unless storage space is an issue) High Quality, 10 bit, 4:2:2. HD + 4K (1920x1080, 3840x2160, 4096x2160).
With the XDCA-FS7 extension unit you also get:
4. ProRes 422 Larger file sizes than XAVC-L or XAVC-L. Codec is not as efficient. But very high quality, 10 bit, 4:2:2. HD only, No S&Q motion.
5. ProRes 422 HQ - (Most pro productions would use ProRes HQ over ProRes) Larger file sizes than XAVC-L or XAVC-L. Codec is not as efficient. Higher quality than ProRes, 10 bit, 4:2:2. HD only, No S&Q motion.
There is another mode called RAW – Which can be used to record to external storage such as Atomos or ideally Odyssey 7Q. Remember: If you want to do slow motion or effects, you need to choose XAVC-I or XAVC-L. ProRes & ProRes HQ do not shoot slow mo.
Menu: System/Codec: Choose appropriate codec
David Turner Sony FS7 II Setup & Operation Creative Media Centre March 2019
4
4. Setting the Recording Format The options you get for frame size differ depending on what codec you are working in. Mpeg HD 4:2:2: 1280x720p HD, 1920x1080p HD, 1920x1080i HD. XAVC-I: 1920x1080p HD, 1920x1080i HD,
3840x2160p UHD or Quad HD 4K, Most TV sets comply to this. 4096x 2160p Full 4K. Wider aspect ratio 17:9 not 16:9. Will need anamorphic bars or cropping.
XAVC-L: 1920x1080p HD, 1920x1080i HD, 3840x2160p UHD or Quad HD 4K,
Most TV sets comply to this. For HD formats, you can choose the megabit rate: 25, 35 or 50mbps. 50mbps is best possible image quality in HD. 35mbps for general production work. That is your video settings set. Next on to Audio.
5. Setting up Audio via on-board audio Using audio inputs on the camera: You can have up to 4 channels of audio with an additional microphone on the body of the camera. You can set the on-board mic to capture ambient sound as it may be useful alongside extra external microphones.
Menu: Audio/Audio Input: CH3 Input Select: Set to internal Mic To set channel 3 level to manual or auto:
Menu: Audio/Audio Input: CH3 Input Control: Manual or Automatic On the right side of the camera set Channel 1 and 2 input settings: Set XLR input switches to Mic or Mic +48 if external power is required. +48 phantom power shortens battery life, so use Mic only if mic is self-powered by another source. Gain settings: (Other side of camera) Gain settings: Auto/manual. In manual mode,
audio levels should be peaking around 80% of the scale. If it’s in the red, the audio is clipping.
David Turner Sony FS7 II Setup & Operation Creative Media Centre March 2019
5
6. Setting up Audio via an external audio recorder Using an external audio device: Another option is to use an external audio recording device to capture the audio. On-board audio is often lacking on cameras and DSLR’s and limited in inputs, so having a dedicated audio device is beneficial. This is due to higher quality audio, multiple In/Outs and flexibility, and the ability to synchronise to timecode. With the FS7 you are limited to 2 channels of audio in its current form. You however link as many of our Zoom F4 audio recorders together, (currently our highest quality portable recorders), to create multiple channels that are all timecode stamped. To setup a 1 x Zoom F4 with the FS7 all you need is the following:
1 x Zoom F4 1 x BNC Lead
If you require more inputs, book multiples of the same equipment above. Zoom F4 settings:
Menu: Timecode (TC)/Mode/Mode: Ext Auto Rec The other 3 options in this menu are set to off. Menu: Timecode (TC)/FPS: 25 (Pal)
FS7 Settings:
Plug the BNC cable in to the ‘Timecode In/Out’ on the back of the FS7. Move the switch to ’Output’ just underneath the socket. Plug the other end of the BNC into the ‘Timecode In’ on the back of the F4.
If you have more than one Zoom F4, plug the 2nd BNC cable in to the ‘Timecode Out’ on the 1st Zoom F4, and plug the other end in to the ‘Timecode In’ on the 2nd Zoom F4. Set the 2nd Zoom to exactly the same Timecode settings as the first. It will then daisy chain and pick up the timecode. All devices connected should now read the same timecode as the camera once recording starts and following the cameras operation. Pressing ‘Record’ on the camera will start the Zooms’ recording simultaneously and they will stop in the same way. You can also mix the audio channels on-board using the F4’s internal mixer and then output a single stereo wav file to the cameras inputs. Switch then inputs to ‘Line’ in order to do this. Then you will have all audio and video in one file. Alternatively, this can be synchronised in post, allowing for more audio editing and mixing to be performed.

David Turner Sony FS7 II Setup & Operation Creative Media Centre March 2019
6
Please note: if you are using more than one Zoom F4, you would need an external audio mixer to mix the main outputs of each F4 together, in order to send one stereo channel into the camera.
David Turner Sony FS7 II Setup & Operation Creative Media Centre March 2019
7
Display Options, Video Output and User Menu Display button: Turns On/Off info on view finder. Menu: VF/Display On/Off: You can turn off items that are displayed if you want less clutter on the screen. Histogram: Menu: VF/Video Signal Monitor: 4 options depending on what you would like to use. Histogram is at the bottom. Source: SDI2. Viewfinder Screen markers: To display rule of 3rd’s guides, safety zone and other viewfinder markers that help you to frame shots: Menu: VF/Marker In this menu, you can turn on many different options and change colours so it helps to frame shots and allows you to see the helpful guides in different light situations. View the cameras status immediately in one place: To immediately see how the camera is set up: Press ‘Status’ and use ‘sel/set’ button to scroll through set up configuration. There is a lot of information in here covering every aspect of the cameras configuration. Video Outs: SDI outputs:
SDI 1: is always clean and shows no overlay. Fixed to HD, will not output 4k.
SDI 2: Can show overlays if set correctly.
HDMI: Can output 4k. SDI will not output if you use HDMI. When recording in HD, the camera can output SDI and HDMI at the same time. However, it will not when shooting in 4k. The “User’ Menu. You can add or remove items from here that contain functions and features you want to access quickly in one place. This allows quick access and stops you having to trawl through the menu. Menu: User/Edit User Menu: Add/Remove items from the menu to your custom configuration. Saving the cameras setup configuration for quick recall. Menu: File/All File: Allows you to save camera configurations on an SD card and recall them at a later date. Menu item will be greyed out if no SD car is installed.

David Turner Sony FS7 II Setup & Operation Creative Media Centre March 2019
8
Custom mode or Cine EI mode, what one should you choose? Custom mode: What you see in the viewfinder is what you get. It will not look any different from the camera’s viewfinder to the end users’ TV. Cine EI Cine EI records at a much higher dynamic range than Custom format. You take advantage of this higher dynamic range by colour grading the footage afterwards. Because of this higher dynamic range, it includes far more information than standard TV’s and displays can show, so it will look washed out and flat with very low colour saturation in the viewfinder. This is normal and is how it is supposed to look. It must be colour graded afterwards in order to bring back the shadows, highlights, lowlights, contrast and colours that have been captured by the increased dynamic range. The following image shows the colour graded image afterwards. You can turn on a LUT (Look up table), to show you how the video will look with the colour correction/grading already added. You can add this ‘LUT’ to the viewfinder. Menu: Video/Monitor LUT Go to ‘viewfinder’ and change to on.
David Turner Sony FS7 II Setup & Operation Creative Media Centre March 2019
9
Please Note: If you turn on any other settings, such as ‘SDI1 & Internal Rec’ this will record the LUT on the footage to the cameras memory card. Which means you will be recording the image with the LUT applied and this cannot be undone. You can output the LUT to HDMI or SDI2 for external monitors, but leave ‘SDI1 & Internal Rec’ to Off. You can also change the LUT with the settings above this option in the menu to different options if required.
David Turner Sony FS7 II Setup & Operation Creative Media Centre March 2019
10
Custom Mode and Hypergammas Custom mode records in Rec.709, which is standard gamma for TV’s and most displays. This is the easiest way to shoot footage as it requires no colour grading afterwards and can go straight from edit to screen. There are some settings that allow you control of certain aspects of the footage should you feel the need to improve it slightly. To do this you can change the gamma mode in Custom mode settings, which affords you some ability to balance shadows/highlights. Menu: Paint: Gamma Category:
STD HG (Hypergamma) User S-Log2 S-Log3
HG or Hypergamma is the best choice for shooting footage that is going straight to screen after editing without being colour graded. HG adds a film like roll off to the footage and handles over exposure better than standard gammas, so this is the one to choose. HG has 6 profiles that you can choose from by going to: Menu/Paint: Gamma Select In the HG mode, there are 6 options: HG1 3250G36 HG2 4600G30 HG3 3259G40 HG4 4609G33 HG7 8009G40 HG8 8009G33
David Turner Sony FS7 II Setup & Operation Creative Media Centre March 2019
11
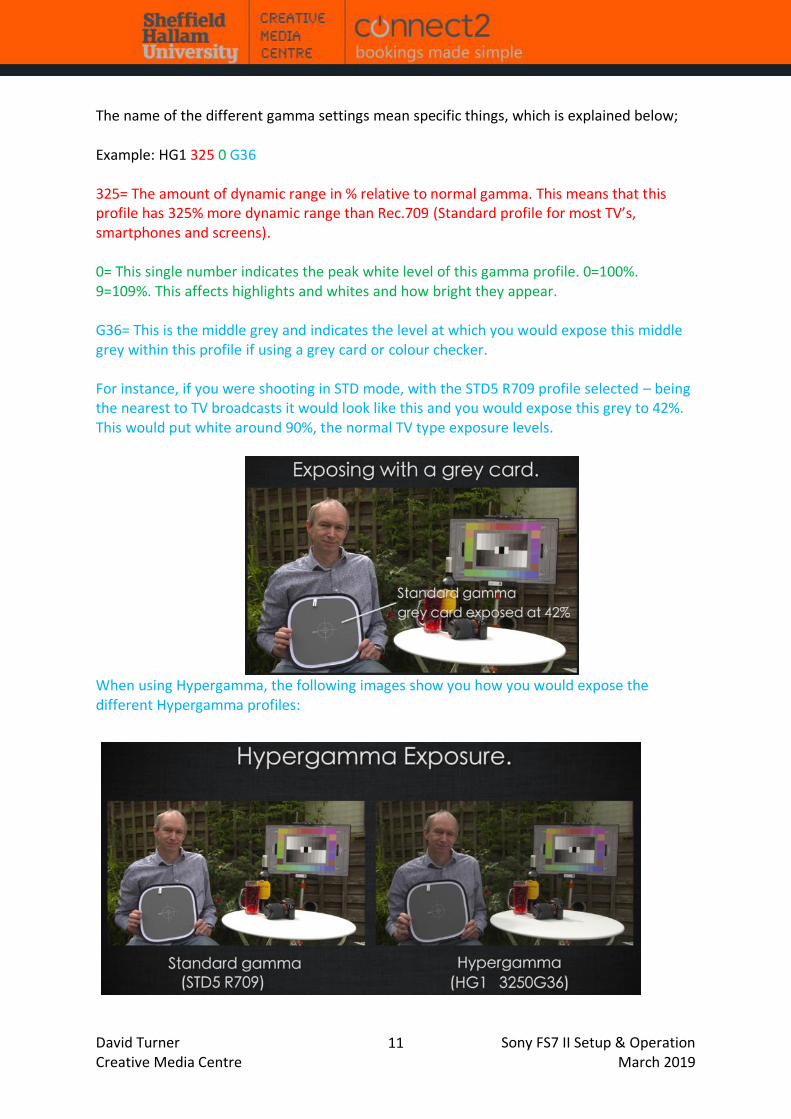
The name of the different gamma settings mean specific things, which is explained below; Example: HG1 325 0 G36 325= The amount of dynamic range in % relative to normal gamma. This means that this profile has 325% more dynamic range than Rec.709 (Standard profile for most TV’s, smartphones and screens). 0= This single number indicates the peak white level of this gamma profile. 0=100%. 9=109%. This affects highlights and whites and how bright they appear. G36= This is the middle grey and indicates the level at which you would expose this middle grey within this profile if using a grey card or colour checker. For instance, if you were shooting in STD mode, with the STD5 R709 profile selected – being the nearest to TV broadcasts it would look like this and you would expose this grey to 42%. This would put white around 90%, the normal TV type exposure levels.
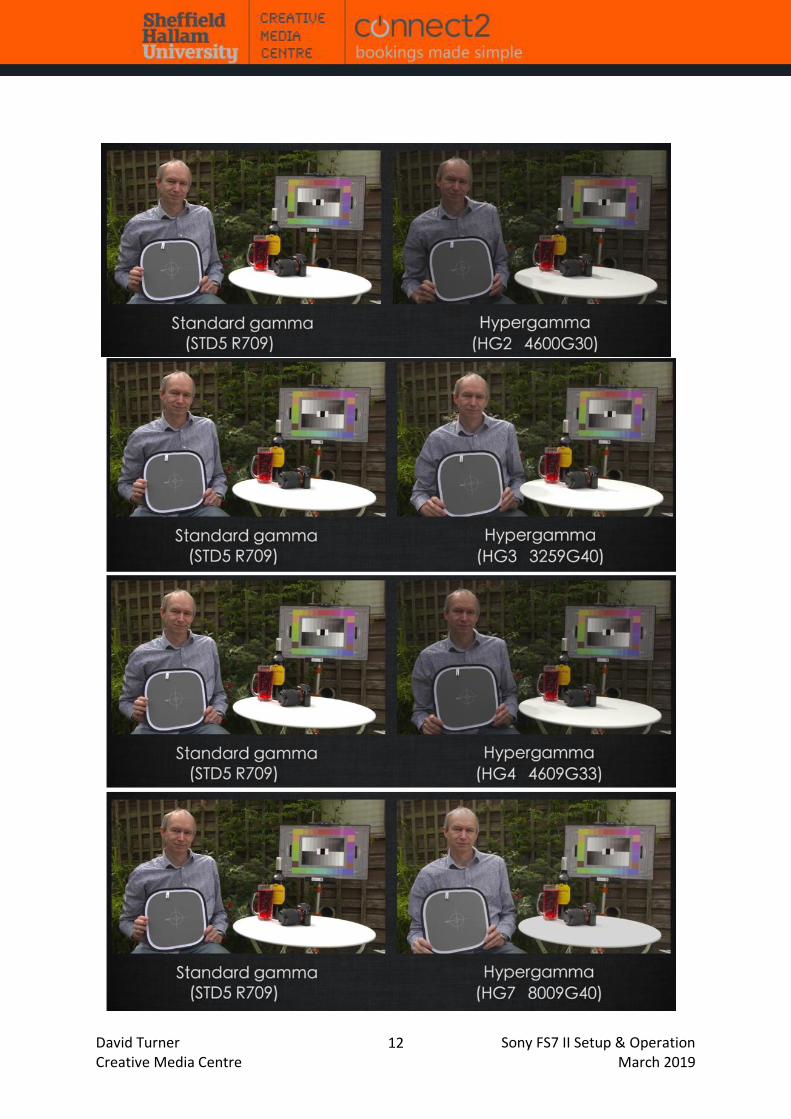
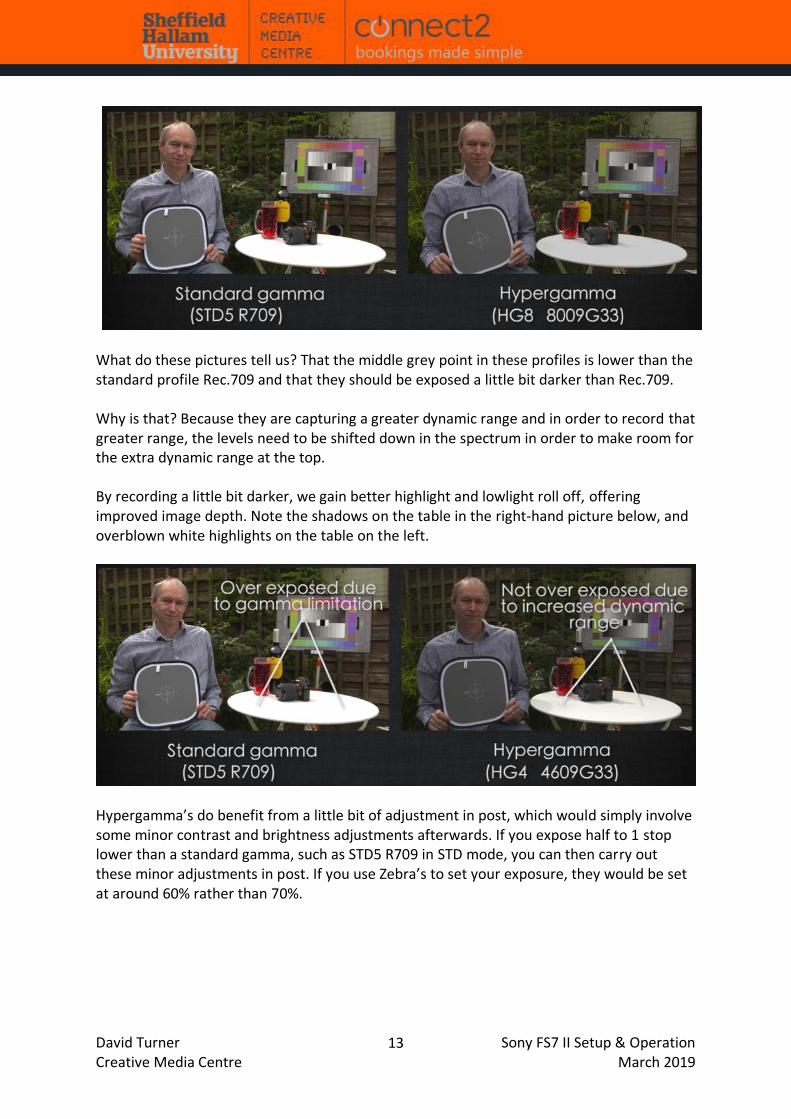
When using Hypergamma, the following images show you how you would expose the different Hypergamma profiles:
David Turner Sony FS7 II Setup & Operation Creative Media Centre March 2019
12
David Turner Sony FS7 II Setup & Operation Creative Media Centre March 2019
13
What do these pictures tell us? That the middle grey point in these profiles is lower than the standard profile Rec.709 and that they should be exposed a little bit darker than Rec.709. Why is that? Because they are capturing a greater dynamic range and in order to record that greater range, the levels need to be shifted down in the spectrum in order to make room for the extra dynamic range at the top. By recording a little bit darker, we gain better highlight and lowlight roll off, offering improved image depth. Note the shadows on the table in the right-hand picture below, and overblown white highlights on the table on the left.
Hypergamma’s do benefit from a little bit of adjustment in post, which would simply involve some minor contrast and brightness adjustments afterwards. If you expose half to 1 stop lower than a standard gamma, such as STD5 R709 in STD mode, you can then carry out these minor adjustments in post. If you use Zebra’s to set your exposure, they would be set at around 60% rather than 70%.
David Turner Sony FS7 II Setup & Operation Creative Media Centre March 2019
14
What Hypergamma you use depends on what lighting situation you are faced with. In a high contrast scene, a 460% or 800% will produce the best results; so HG2, HG4, HG7 or HG8. In low light or low contrast scenes, a Hypergamma with a smaller dynamic range such as, HG1 or HG3, which both have a 325% curve would be best. They can appear with a little less contrast than standard gamma, but a little contrast adjustment in post fixes this. Best gamma profile for broadcast ungraded TV productions are: HG1 3250G36 HG2 4600G30 This is because they have a 100% peak white level and are ready for screen straight away without any further work being required, so will be broadcast safe. For web and most other types of productions the following are best as they have a peak white level of 109%. HG3 3259G40
HG4 4609G33 HG7 8009G40 HG8 8003G33 If you use any of the above 4 profiles that Have A ‘9’ for white peak level, you will need to change the ‘white clip’ settings in Menu: Paint/White Clip/Level, to set it up correctly. These have a 109% peak white level, but the default camera setting is 105.0%, so this needs to be adjusted to 109%. Something to try is HG3, for indoor scenes and interviews and HG4 for exterior and bright scenes.
David Turner Sony FS7 II Setup & Operation Creative Media Centre March 2019
15
Custom Mode Matrix Settings Not to touch too much on this, but it allows you to select different colour profiles when shooting in Custom mode. For instance, fluorescent lights often have a high green tint to them. By using FL Light mode, it eliminates the green and show a more natural colour. Menu: Paint/Matrix/Preset Select: Matrix Select:
Standard - This is as standard profiles High Saturation - High saturation FL Light - For use under fluorescent lights Cinema - Cinema like look, low saturation F55 7009 Like - Copies profile of the F55 camera BT2020
David Turner Sony FS7 II Setup & Operation Creative Media Centre March 2019
16
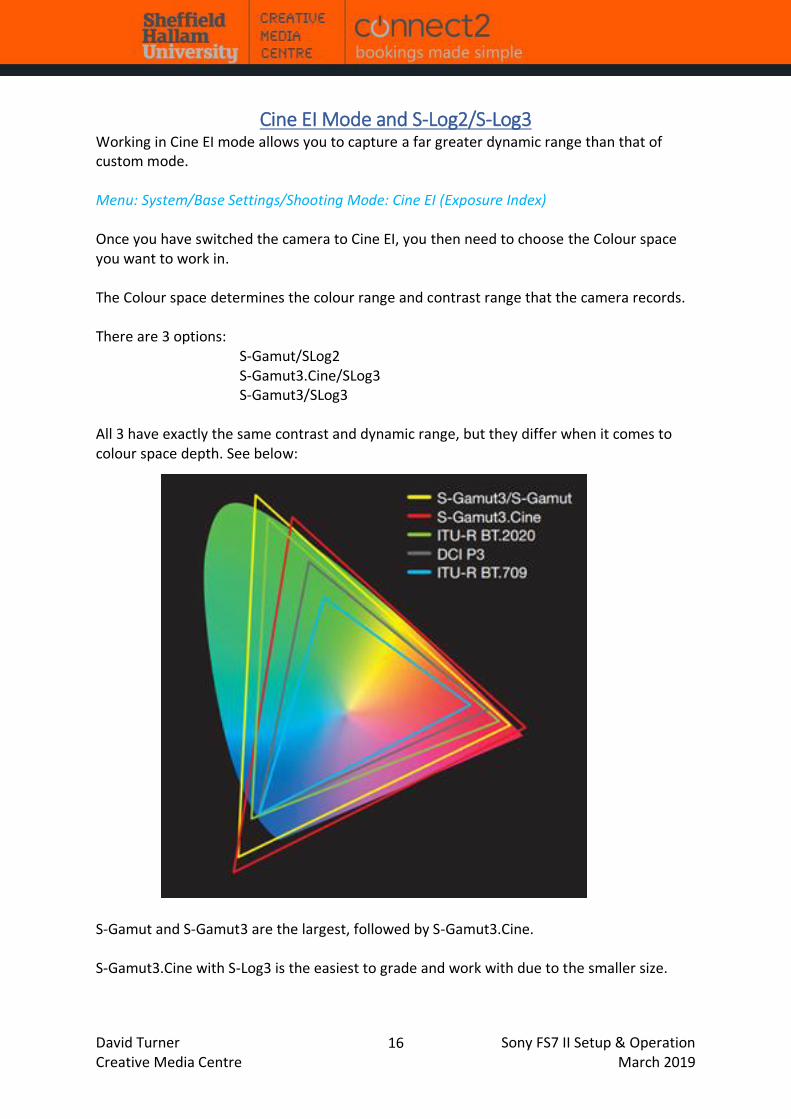
Cine EI Mode and S-Log2/S-Log3 Working in Cine EI mode allows you to capture a far greater dynamic range than that of custom mode. Menu: System/Base Settings/Shooting Mode: Cine EI (Exposure Index) Once you have switched the camera to Cine EI, you then need to choose the Colour space you want to work in. The Colour space determines the colour range and contrast range that the camera records. There are 3 options: S-Gamut/SLog2 S-Gamut3.Cine/SLog3 S-Gamut3/SLog3 All 3 have exactly the same contrast and dynamic range, but they differ when it comes to colour space depth. See below:
S-Gamut and S-Gamut3 are the largest, followed by S-Gamut3.Cine. S-Gamut3.Cine with S-Log3 is the easiest to grade and work with due to the smaller size.
David Turner Sony FS7 II Setup & Operation Creative Media Centre March 2019
17
When shooting in S-Log2 or S-Log3, the images on the viewfinder will look low contrast and flat because they will not match the way the viewfinder shows colours and contrast. This is fine and is how it is supposed to look. You can however, put a LUT or Look up table on the image whilst shooting so that it will look as it would in normal Rec.709. By doing this you can expose as you would normally for Rec.709. To turn this on go to the following: Menu: Video/Monitor LUT: In here you will have the option of turning on a LUT for the outputs such as SDI 1 & 2 and HDMI and if you scroll down, the viewfinder. Its best to have SDI 2 and HDMI LUT’s ‘On’ as well as the viewfinder. So, if you are using external monitors, they can show the corrected imagery as well. Do not turn on SDI & Internal Rec LUT. If you shoot with this setting turned on, the video will be recorded with the LUT applied. Once this has been recorded you can’t remove the LUT to get back to the S-Log3 footage. Although it is worth noting that it will not allow you to turn on the LUT for the HDMI output or the viewfinder, unless you set the Output Format to 1920x1080. It will then allow you to turn on viewfinder LUT, but HDMI still remains un-selectable! When the LUT is applied, either if your viewing via a monitor from the SDI or HDMI output, you expose exactly the same way as you would with normal footage, or as we now know Rec.709. So, if Zebra’s are set to 70%, you would see some slight zebra stripes on someone’s face when in shot. The High-Low Key Function The camera is capturing 14 stops of dynamic range, whereas the LUT is showing far less. In order to check highlights and lowlights are not blown out, you can use the High-Low Key function. You can use it by assigning it to an assignable button. In Cine EI mode, the Auto Iris function is not applicable, so assign it to button 1. Menu: System/Assignable Button/<1>: Set to High/Low Key When you press this button once, the viewfinder will go dark, allowing you to check the exposure of the highlights. You can then adjust accordingly and know that the highlights are not blown out, as you can’t see them normally. When you press the button a second time, it will show the low lights and allow you to check those also. A 3rd time will put the setting back to normal.
David Turner Sony FS7 II Setup & Operation Creative Media Centre March 2019
18
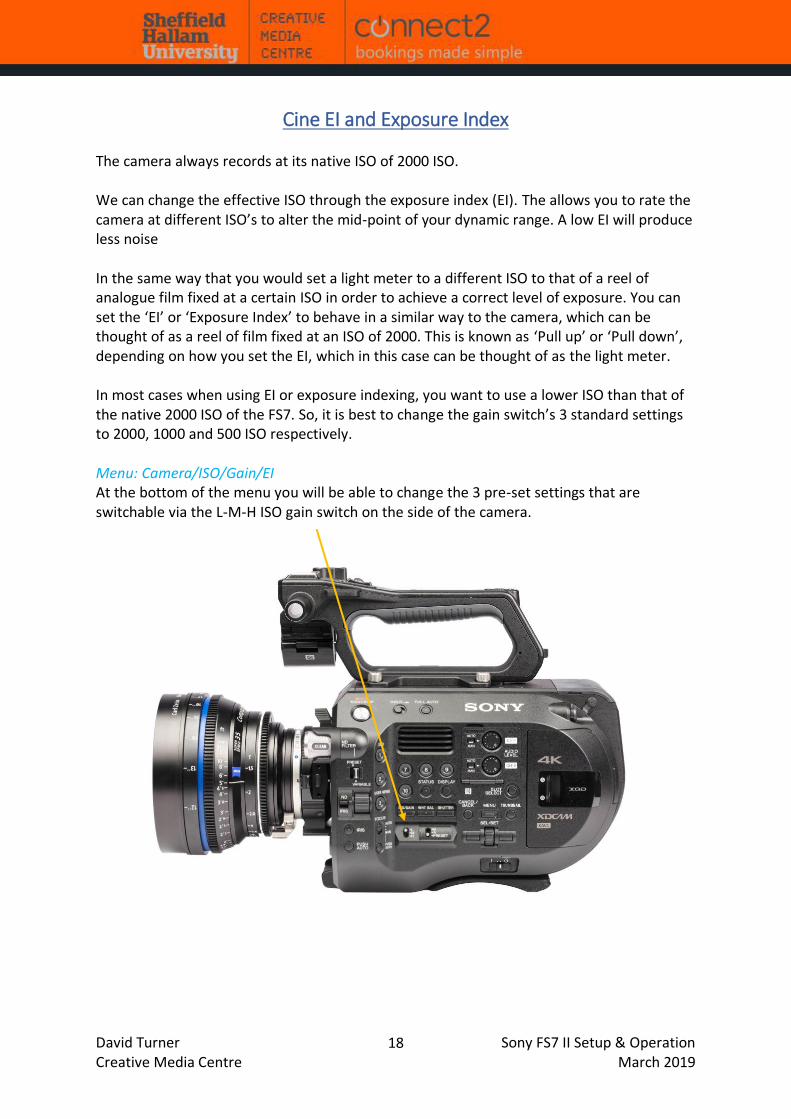
Cine EI and Exposure Index The camera always records at its native ISO of 2000 ISO. We can change the effective ISO through the exposure index (EI). The allows you to rate the camera at different ISO’s to alter the mid-point of your dynamic range. A low EI will produce less noise In the same way that you would set a light meter to a different ISO to that of a reel of analogue film fixed at a certain ISO in order to achieve a correct level of exposure. You can set the ‘EI’ or ‘Exposure Index’ to behave in a similar way to the camera, which can be thought of as a reel of film fixed at an ISO of 2000. This is known as ‘Pull up’ or ‘Pull down’, depending on how you set the EI, which in this case can be thought of as the light meter. In most cases when using EI or exposure indexing, you want to use a lower ISO than that of the native 2000 ISO of the FS7. So, it is best to change the gain switch’s 3 standard settings to 2000, 1000 and 500 ISO respectively. Menu: Camera/ISO/Gain/EI At the bottom of the menu you will be able to change the 3 pre-set settings that are switchable via the L-M-H ISO gain switch on the side of the camera.

David Turner Sony FS7 II Setup & Operation Creative Media Centre March 2019
19
So how does EI work? The image on the left is our footage, shot in native 2000 ISO in S-Log. The image on the right is shown in the viewfinder with a LUT applied to show us how it will look when graded.
When this footage is taken in to an editor and graded it will look very good.
But… The one thing that affects grading the most is how much ‘noise’ there is in the image, and how much noise there is relative to the brightness of the image.
David Turner Sony FS7 II Setup & Operation Creative Media Centre March 2019
20
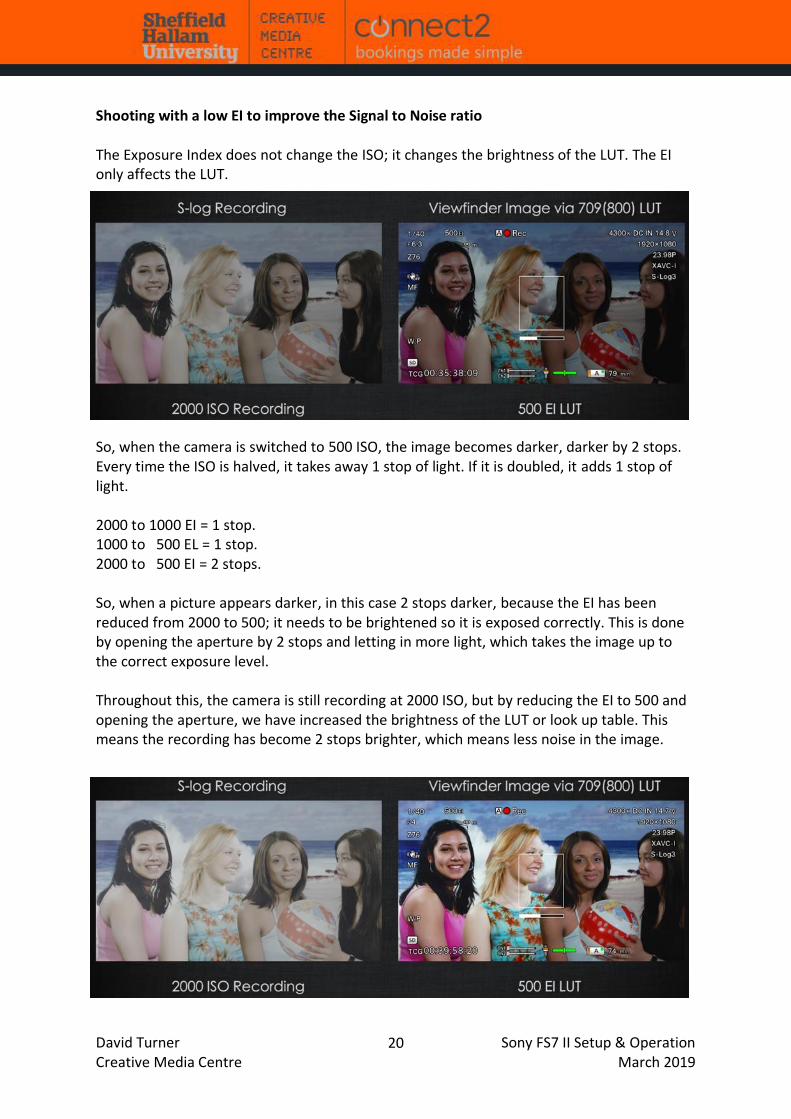
Shooting with a low EI to improve the Signal to Noise ratio The Exposure Index does not change the ISO; it changes the brightness of the LUT. The EI only affects the LUT.
So, when the camera is switched to 500 ISO, the image becomes darker, darker by 2 stops. Every time the ISO is halved, it takes away 1 stop of light. If it is doubled, it adds 1 stop of light. 2000 to 1000 EI = 1 stop. 1000 to 500 EL = 1 stop. 2000 to 500 EI = 2 stops. So, when a picture appears darker, in this case 2 stops darker, because the EI has been reduced from 2000 to 500; it needs to be brightened so it is exposed correctly. This is done by opening the aperture by 2 stops and letting in more light, which takes the image up to the correct exposure level. Throughout this, the camera is still recording at 2000 ISO, but by reducing the EI to 500 and opening the aperture, we have increased the brightness of the LUT or look up table. This means the recording has become 2 stops brighter, which means less noise in the image.
David Turner Sony FS7 II Setup & Operation Creative Media Centre March 2019
21
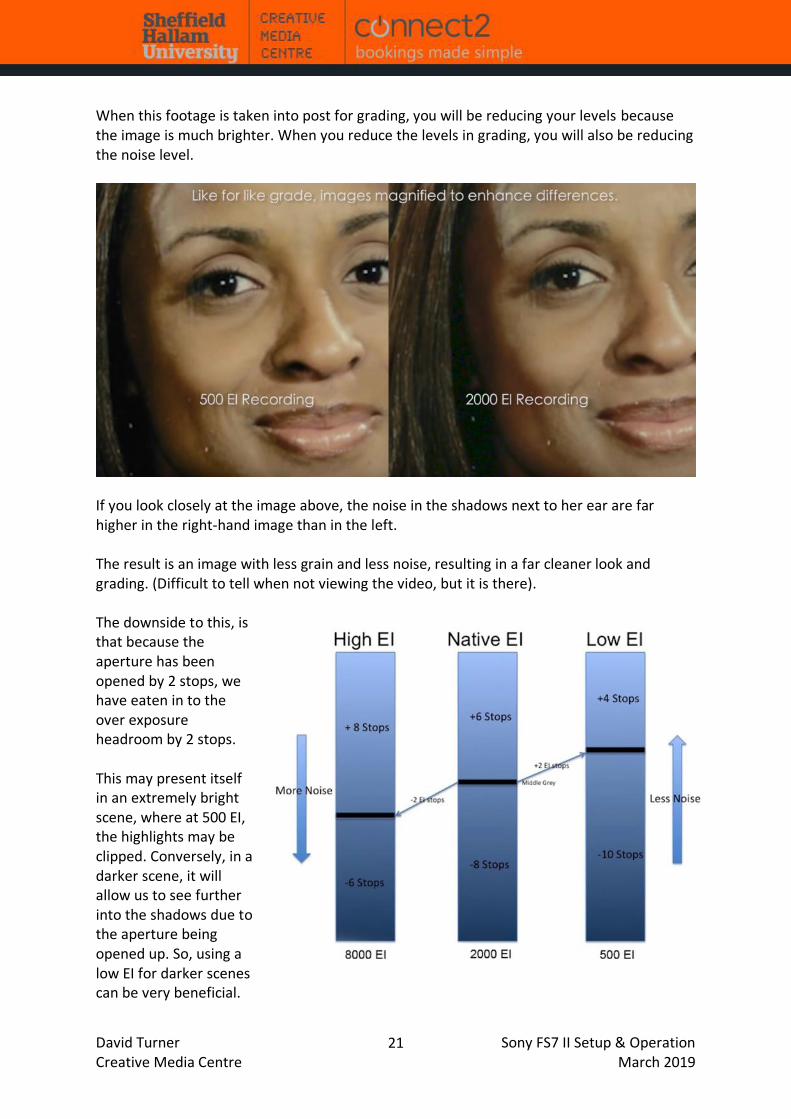
When this footage is taken into post for grading, you will be reducing your levels because the image is much brighter. When you reduce the levels in grading, you will also be reducing the noise level.
If you look closely at the image above, the noise in the shadows next to her ear are far higher in the right-hand image than in the left. The result is an image with less grain and less noise, resulting in a far cleaner look and grading. (Difficult to tell when not viewing the video, but it is there). The downside to this, is that because the aperture has been opened by 2 stops, we have eaten in to the over exposure headroom by 2 stops. This may present itself in an extremely bright scene, where at 500 EI, the highlights may be clipped. Conversely, in a darker scene, it will allow us to see further into the shadows due to the aperture being opened up. So, using a low EI for darker scenes can be very beneficial.
David Turner Sony FS7 II Setup & Operation Creative Media Centre March 2019
22
Here are some recommendations for exposure settings when in Cine EI mode: 800 to 1000 EI: Minimal loss of over exposure headroom, with only a 1 stop difference from the cameras fixed 2000 ISO, but you gain a significant improvement in signal to noise ratio, which produces a far cleaner less grainy image. So, if shooting in 4k, it is far more likely to produce the smooth, crisp and sharp high resolution 4k finish that you are after.
David Turner Sony FS7 II Setup & Operation Creative Media Centre March 2019
23
Focus Control and Focus Aids
Auto Focus Auto Focus On/Off switch on the side of the camera. Auto focus will only work with Sony E-Mount lenses and it may not function correctly with a Met bones adapter. The Sony 18-110mm lens on the camera is changed from Auto focus to manual focus via moving the focusing ring backwards (towards camera body) for manual and forwards again for auto focus. When the lens is in manual mode, the auto/manual focus switch on the camera does not operate. Auto/man switch set to manual: Lens ring forward position: Manual focus Auto/man switch set to Auto: Lens ring forward position: Auto Focus One Push Auto Focus If you have the focus ring forwards, with auto focus on, and the camera set to manual, you have the ability to auto focus quickly or if you want to set the initial focus. You can do this by pressing Push Auto button and keeping it pressed until the camera focuses. This button is directly under the focus Manual/auto switch. This will also eliminate the camera hunting for focus. AF Assists Menu: Camera/Focus: AF Assist Having this setting on allows you to manually adjust the focus whilst auto focus is on. If it is switched off, you cannot do so. Focus Aids These tools will help you check focus. Focus Magnifier: This is assigned to button 4 on the hand grip. 1st press = x4 magnification, 2nd press: x8 magnification, 3rd press: back to normal. No effect on recording or camera HDMI or SDI outputs. Peaking: This can be turned off via the side of the viewfinder or in the menu. There are 2 modes: Normal and Colour. Normal Mode: White peaking colour, selectable Normal or High frequency mode. High freq. mode sets the peaking so it only responds to a fine detail level providing a high level of focus accuracy. This can be however, difficult to see or get used too. Colour: This allows you to select either Red, Yellow, Blue. Frequency is ineffective. It only operates in Normal mode. This is far easier to see on the viewfinder, but it does show a

David Turner Sony FS7 II Setup & Operation Creative Media Centre March 2019
24
deeper range of focus, so you have to really check that the focus is on point where you want it to be. Otherwise you may find the focus to wide a range to know exactly what is in focus. Focus Assis Indicator A square box appears in the centre of the viewfinder with a line underneath it. The box will measure the contrast within that box and the idea is to get the white line underneath it to go as far to the right side of the line as possible. This will indicate the maximum focus you can achieve. Note that it never goes all the way across, half to 2/3rds is about maximum sharpness in focus.
David Turner Sony FS7 II Setup & Operation Creative Media Centre March 2019
25
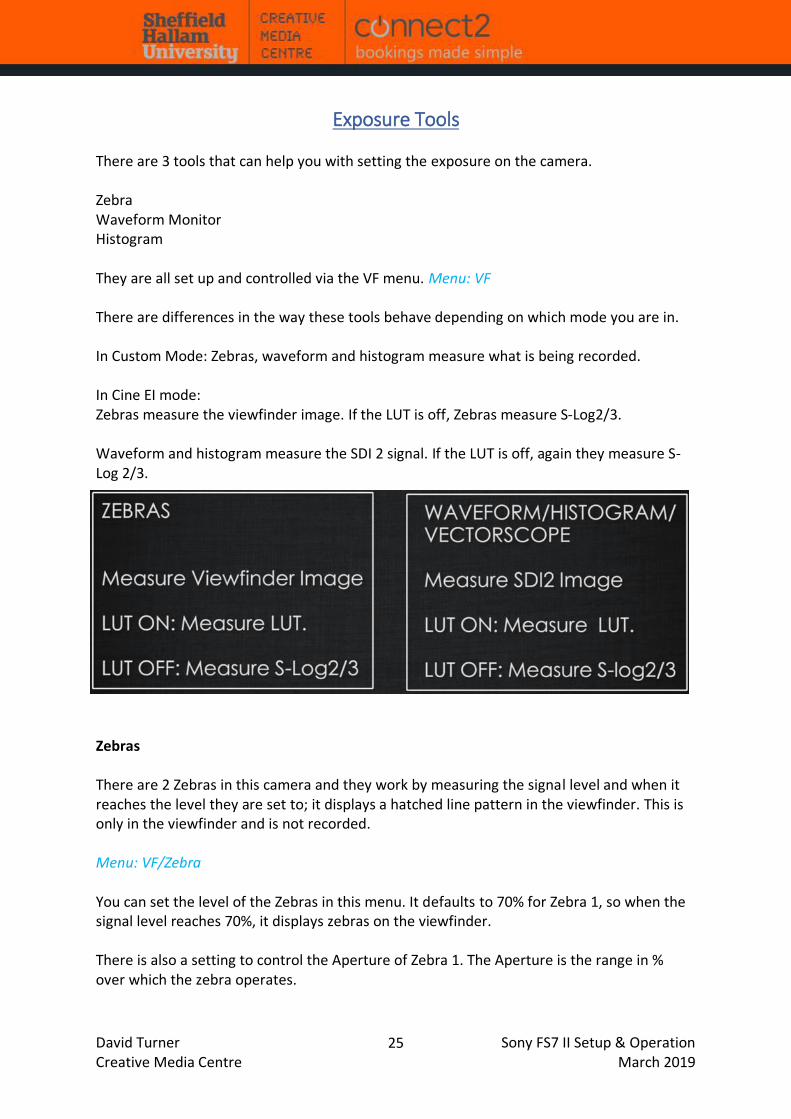
Exposure Tools There are 3 tools that can help you with setting the exposure on the camera. Zebra Waveform Monitor Histogram They are all set up and controlled via the VF menu. Menu: VF There are differences in the way these tools behave depending on which mode you are in. In Custom Mode: Zebras, waveform and histogram measure what is being recorded. In Cine EI mode: Zebras measure the viewfinder image. If the LUT is off, Zebras measure S-Log2/3. Waveform and histogram measure the SDI 2 signal. If the LUT is off, again they measure S-Log 2/3.
Zebras There are 2 Zebras in this camera and they work by measuring the signal level and when it reaches the level they are set to; it displays a hatched line pattern in the viewfinder. This is only in the viewfinder and is not recorded. Menu: VF/Zebra You can set the level of the Zebras in this menu. It defaults to 70% for Zebra 1, so when the signal level reaches 70%, it displays zebras on the viewfinder. There is also a setting to control the Aperture of Zebra 1. The Aperture is the range in % over which the zebra operates.
David Turner Sony FS7 II Setup & Operation Creative Media Centre March 2019
26
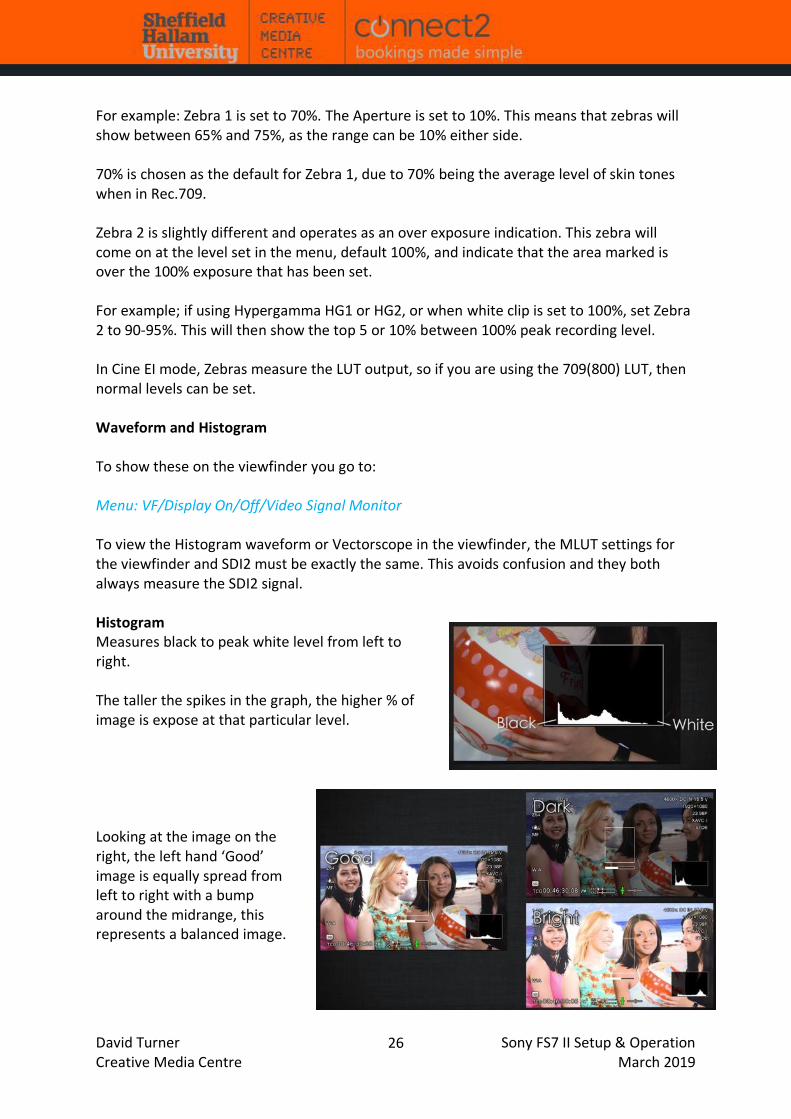
For example: Zebra 1 is set to 70%. The Aperture is set to 10%. This means that zebras will show between 65% and 75%, as the range can be 10% either side. 70% is chosen as the default for Zebra 1, due to 70% being the average level of skin tones when in Rec.709. Zebra 2 is slightly different and operates as an over exposure indication. This zebra will come on at the level set in the menu, default 100%, and indicate that the area marked is over the 100% exposure that has been set. For example; if using Hypergamma HG1 or HG2, or when white clip is set to 100%, set Zebra 2 to 90-95%. This will then show the top 5 or 10% between 100% peak recording level. In Cine EI mode, Zebras measure the LUT output, so if you are using the 709(800) LUT, then normal levels can be set. Waveform and Histogram To show these on the viewfinder you go to: Menu: VF/Display On/Off/Video Signal Monitor To view the Histogram waveform or Vectorscope in the viewfinder, the MLUT settings for the viewfinder and SDI2 must be exactly the same. This avoids confusion and they both always measure the SDI2 signal. Histogram Measures black to peak white level from left to right. The taller the spikes in the graph, the higher % of image is expose at that particular level. Looking at the image on the right, the left hand ‘Good’ image is equally spread from left to right with a bump around the midrange, this represents a balanced image.

David Turner Sony FS7 II Setup & Operation Creative Media Centre March 2019
27
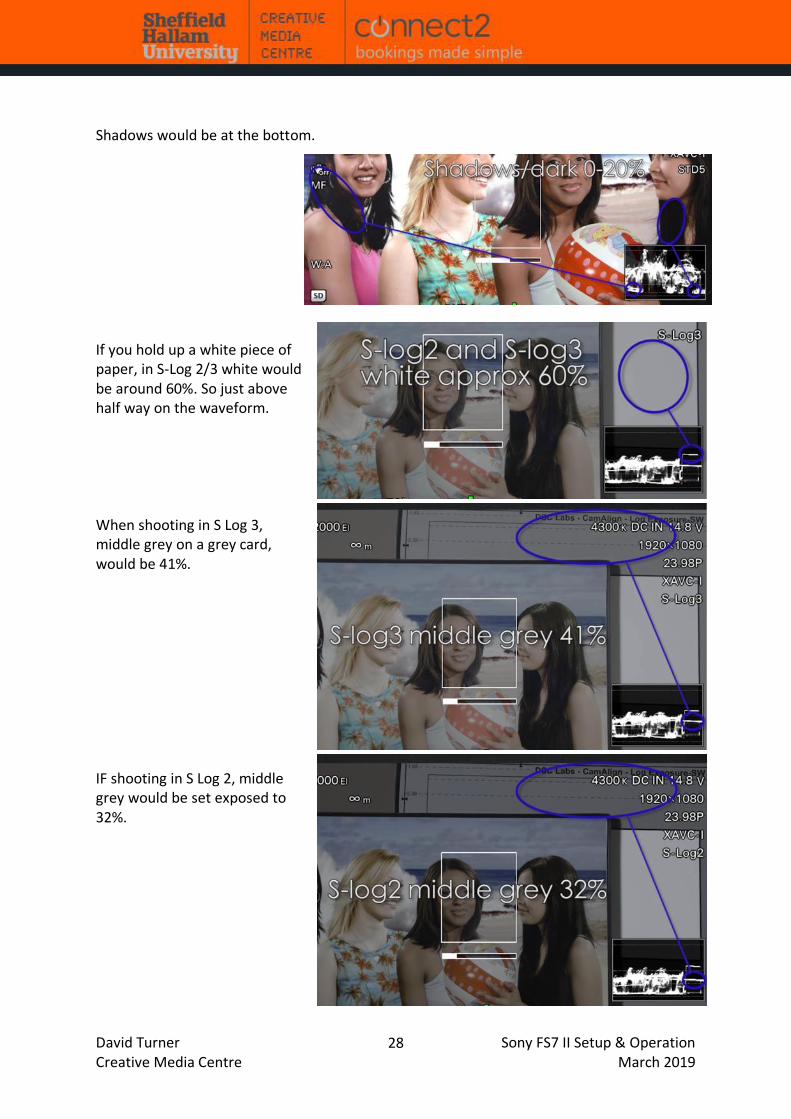
Waveform The Waveform is different form the histogram in that the left side of the waveform, represents the left side of the image and the right side the right side of the image. The top shows highlights at 109%, then white at 100%, and black at 0% is at the bottom. As you open the aperture, the levels on the waveform will go upwards. When looking at Rec.709 gamma, for a good balance, skin tones would be around ¾’s of the way to the top. Clouds and highlights would be at the top
David Turner Sony FS7 II Setup & Operation Creative Media Centre March 2019
28
Shadows would be at the bottom. If you hold up a white piece of paper, in S-Log 2/3 white would be around 60%. So just above half way on the waveform. When shooting in S Log 3, middle grey on a grey card, would be 41%. IF shooting in S Log 2, middle grey would be set exposed to 32%.
David Turner Sony FS7 II Setup & Operation Creative Media Centre March 2019
29
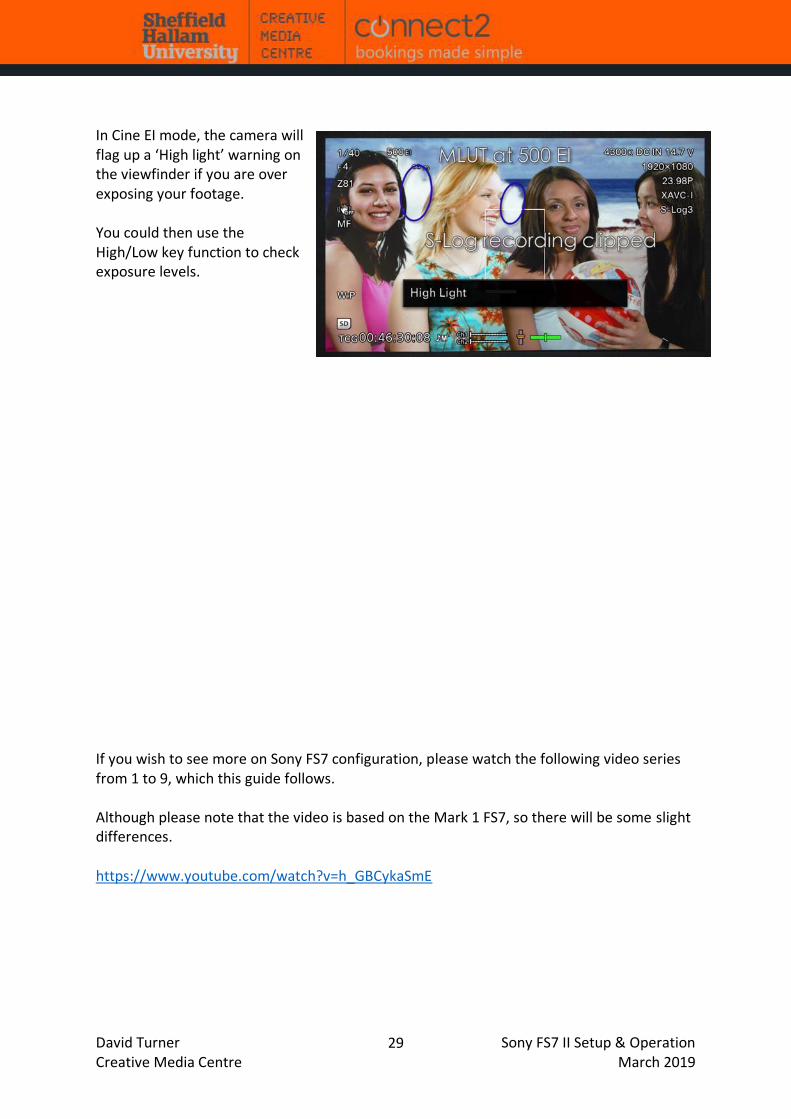
In Cine EI mode, the camera will flag up a ‘High light’ warning on the viewfinder if you are over exposing your footage. You could then use the High/Low key function to check exposure levels. If you wish to see more on Sony FS7 configuration, please watch the following video series from 1 to 9, which this guide follows. Although please note that the video is based on the Mark 1 FS7, so there will be some slight differences. https://www.youtube.com/watch?v=h_GBCykaSmE