Embed Size (px)
Citation preview

David Turner Sony A7III Settings Guide Creative Media Centre November 2019
A Guide to the
Creative Media Centre Sheffield Hallam University
David Turner Sony A7III Settings Guide Creative Media Centre November 2019
Table of Contents
Introduction ..................................................................................................................... 1
What is in the kit? ............................................................................................................. 2
Gimbal Controls & Buttons ................................................................................................ 4
Button Descriptions .......................................................................................................... 5
The Camera Control Interface Module ............................................................................... 6
Setting up the Crane 3 Lab ................................................................................................ 7
Balancing the Crane 3 Lab ................................................................................................13
Adjusting Setting for Optimal Performance .......................................................................16
OLED Display Descriptions ................................................................................................18
Modes of movement .......................................................................................................19
ZY-Play Application ..........................................................................................................22
Configuring the Sony A7III to Work with the Crane 3 ..........................................................24
Sony A7III Working Limitations .........................................................................................24
Compatible Lenses ..........................................................................................................26
Included Accessories and setup/usage ..............................................................................27
Appendices .....................................................................................................................28

David Turner Sony A7III Settings Guide Creative Media Centre October 2019
1
Introduction
This guide will show you how to setup, configure and use the Zhiyun Crane 3 Lab gimbal with our Sony A7 III mirrorless video cameras for optimal performance for your film production projects. The Zhiyun Crane 3 Lab is a video camera gimbal primarily created for mirrorless and DSLR camera systems. The gimbal supports up to 4.5kg’s of payload and allows remote control of focus and zoom controls, including camera settings on the fly via the gimbal and the associated smartphone application. Application information: ZY-Play. (Link to App Stores: Apple, Android). The gimbal will provide smooth seamless video shots in either slow or fast paced dynamic movement and camera operation eliminating all stabilisation issues related to camera shake and unwanted vibration via cameraman movement. The gimbal provides the ability for an additional crew member to act as a focus puller to operate the focus/zoom controls via the app alongside the gimbal operator to further increase the professionalism of the potential cinematography on set. So, go through this document and by the end of it you will be able to set the Crane 3 up perfectly and with practice, get the shots you want. Whilst it will work out the box once balanced, in order to get the best of it, as with anything, you need to practice with it and learn how the different modes work and what they can be used for.

David Turner Sony A7III Settings Guide Creative Media Centre November 2019
2
What is in the kit?
Backpack The backpack should contain all of the following items:
1 x Backpack rain cover
1 x Zhiyun Crane 3 Lab Gimbal (incl. 1 TransMount)
2 x TransMounts (1 on Gimbal, 1 on Mini Tripod)
6 x 18650 Zhiyun batteries
1 x Battery charger + USB charging cable
1 x Mini Tripod (incl. 1 TransMount) (Doubles as Gimbal Bottom Handle)
1 x Phone holder mount with thumb screw
1 x TransMount Telescopic Monopod with detachable Legs
1 x TransMount Multifunctional Camera Belt with locking buckle.
Focus, Zoom & Cable box containing the following: 1 x Focus servo
1 x Zoom servo
2 x Lens Gear wrap around bands
2 x USB-C to L-Shaped USB-C servo cables
1 x HDMI Mini to HDMI micro cable
1 x USB 3.0 to HMDI multi able
1 x Velcro Cable Tie (For cables on A7 when mounted)
Camera Base Plate bag containing the following 15 parts: Base Plate (made up of 15 parts)
1 x Base Plate
1 x Base Plate Mount Screw
1 x Extendable lens support bracket
1 x Camera lens support
2 x Lens servo support brackets
2 x Mounting poles (For servos)
7 x Thumb screws

David Turner Sony A7III Settings Guide Creative Media Centre November 2019
3
Quick Release Plate
Zoom Servo Follow Focus Servo
Follow Focus Servo
Components
Zoom Servo Components
Phone Holder
Tripod
Camera Belt
Telescopic Monopod
Batteries & Chargers
TransMount
TransMount
Cables & Servo Kit Box

David Turner Sony A7III Settings Guide Creative Media Centre November 2019
4
Gimbal Controls & Buttons
1. Quick Release Plate 2. Quick Release Plate Latch 3. Quick Release Plate Thumb Screw
4. Camera Image Transmission & Control Module
5. Pan Axis Latch 6. ¼” Threaded Hole 7. Power Button 8. Follow Focus Wheel 9. Joystick 10. Tripod 11. Thumb Screw 12. Roll Axis Motor 13. Roll Axis Latch 14. Control Stick
15. Tilt Axis Motor 16. Thumb Screw 17. Tilt Axis Latch 18. Thumb Screw 19. Pan Axis Motor 20. Battery Compartment 21. USB Power Outlet 5V/1A 22. Mode Button
15
16
17
18
19
20
21
22
23
11
2 3
415
6
8
71
9
10
11
12
13
14

David Turner Sony A7III Settings Guide Creative Media Centre November 2019
5
Button Descriptions
1. Power Button Long press for 3 seconds to power ON/Off. Double press to enter/exit standby mode.
2. Pan Following Mode (PF) - Single click to enter ‘Pan Follow’ mode. 3. Locking Mode - Single click to enter ‘Locking’ (L) mode. 4. Follow Focus Controller
Once Servo Follow Focus Controller (Lite) is connected to the Crane 3. 5. Joystick - 4-way control of camera. 6. Zoom Rocker
Once servo Zoom/Focus Controller (Max) is connected to the Crane 3. 7. Parameter Dial 8. Following Mode (F) - Single Click to enter ’Following’ mode. 9. POV Mode/Vortex Mode (POV)
Single click to enter/exit ‘Point Of View’ mode, click again to return to previous mode. Double click to enter/exit ‘Vortex’ mode. Click again to return to previous mode.
10. Reset (RE) – Single click to rest motors to mode starting point. 11. TV – Single click to set shutter speed. 12. AV - Single click to set aperture value. 13. ISO - Single click to set ISO value. Right click to set ISO value. 14. PhoneGo Mode (GO) – Press and hold to enter and stay in ‘PhoneGo’ Mode, which enables fast
following speed of the three axes on the Crane 3. 15. Video – Single click to start/End video recording. 16. Live Preview (LV) – Single click to control camera to flip up reflex mirror to enter live preview mode.
(Not-applicable on Sony A7III).

David Turner Sony A7III Settings Guide Creative Media Centre November 2019
6
17. Photo Half press to enable auto zoom function of camera. Full press to take a photo.
18. Right () In main screen, single press to move to next option. In main screen, single press to confirm selection.
19. Dial – In menu screen, rotate dial to switch between options. 20. Menu (⚫⚫⚫) – Single press to enter/Exit main screen. 21. Left ()
In main screen, single press to move to next option In main screen, single press to return to previous screen.
The Camera Control Interface Module
No. Interface Function Output Input
1 Wi-Fi Switch Turn on/off the Wi-Fi of the stabilizer N/A N/A
2 Servo Follow Focus & Servo Zoom/Focus Controller Interface
Connect and control servo follow focus or servo zoom/ focus controller
11V/2A N/A
3 Servo Follow Focus & Servo Zoom/Focus Controller Interface
Connect and control servo follow focus or servo zoom/ focus controller
11V/2A N/A
4 DC 8.0V Power Outlet
Can be used to power the A7III, with DC coupler. (Not
avail. through stores/not tested.) Do not try if
you have your own DC Coupler, talk to us first.
8V/2A N/A
5 Mini HDMI Interface Receive HDMI video signals from the camera N/A
6 Camera Control Interface
1. Connect and control the camera via the
control cable. 2. Can be used to charge mirrorless cameras
such as Sony mirrorless cameras
5V/1A N/A
7 USB Charging Outlet Can be used to charge external devices such as mobile phones
5V/1A N/A

David Turner Sony A7III Settings Guide Creative Media Centre November 2019
7
Setting up the Crane 3 Lab
When you loan out a Zhiyun Crane 3 Lab Gimbal, it should be in the ‘locked for storage’ position in the backpack, as in figure 1.
Please Read Before Starting: The Crane 3 Lab gimbal ‘must’ be balanced correctly before use in order
for it to work efficiently and it must be balanced every time a different lens is used. If it’s not balanced correctly, it will drain the batteries much faster than normal as well as place extra stresses on the balancing servos. This has the potential to shorten the life of the gimbal or may even damage it, possibly requiring an expensive repair. So, to avoid problems with the equipment and whilst on your shoot, always balance the gimbal correctly every time a change is made and every time before use. It only takes 5 minutes when practiced, and could save you time and repair costs.
To save time on set, balance the Crane 3 with camera and specified lenses at home before you go out on your shoot. If you’re really prepared, balance the camera with each lens you intend to use and write down all 7 axis measurements from the gimbals arms and quick release plate for each lens. You can then take the Crane 3 out of the bag on set, choose your lens, and then re-attach the camera, baseplate and focus/zoom servos according to the 7 axis measurements you took earlier, which will then require little or no adjustments. (3 x Axes from Gimbal arms and 4 x Axes from camera quick release plate, (tripod mount screw forward/backward, quick release plate forward/backward adjustment, quick release plate mount left/right adjustment, servo arm attachment forward/backward)).
Fig 1. Locked for Storage Fig 2. Locked for Installation

David Turner Sony A7III Settings Guide Creative Media Centre November 2019
8
Step 1. Tripod
Attach the tripod to the base of the Crane 3. The top of the tripod should have one half of the ‘TransMount’ attached: Whilst the other half should be on the bottom of the Crane 3. Pull down the collar on the lower half of the TransMount, the attach the Crane 3’s top half. It should drop in to the TransMount. Make sure the collar pops back up to its original position again. Put gimbal and tripod on a flat level surface and make sure one of the tripod legs is underneath the handle. This will ensure the Crane 3 does not tip over backwards when the camera is attached.
Step 2. Locked for Installation Configure the Crane 3 to ‘Locked for Installation’ by unlocking latch 2, move the arm into position and re-lock the latch. Do the same with latch 3 (See fig.2). Latches 2 and 3 lock automatically in to place just by setting in the latch to the ‘lock’ position and moving the gimbal arm back to its aligned position.
Step 3. Attach Camera to Quick Release Plate Firstly, you will need to remove the Sony A7III’s strap.
1
2
3
Fig 3. Latches

David Turner Sony A7III Settings Guide Creative Media Centre November 2019
9
Please remove the strap and both of the plastic guides carefully and retain them in a safe place in
order to re-attach them when you have finished with the equipment. Please be aware that we expect you to re-attach the A7’s strap in the correct manner before it is returned. You will be asked to do this at ‘Check in’ if it has not already been done.
Secondly, make sure you have installed a fresh battery and both memory cards in the Sony A7III before you start. Once the camera is installed on the Crane 3, depending on what lens you are using, you may find you have to take everything apart to install them. The Sony A7III, when using the standard FE2.8/24-70mm GM lens that comes in the kit, along with ‘both the Focus and Zoom servos’ should sit around 2.6cm at the middle of the base plate screw. (‘cm’ scale on underside of plate). Next, move the lens support arm forward so that the lens support sits in-between the Zoom ring and the Focus ring on the Sony 24-70mm GM lens. Make sure it sits in a position where it’s not on a moving part of either rings, then tighten the arm thumb screw and both front thumb screws. If it rests on either rings this could interfere with the servos ability to move the rings. Placement will differ depending on what lens you are using and you may not even need it if the lens is of a short enough focal length. You can still use the Follow Focus and Zoom controls, by removing just the lens support plate and leaving the arm in place with the servo’s mounted.
Fig 4. Quick Release Plate Camera Mounting screw, with measurement ruler underneath
Lens Support Arm & Thumb Screw
Measurement rulers
Lens Support Plate & Thumb Screws
Servo Arm Mounting holes -Underneath
Measurement ruler underneath
David Turner Sony A7III Settings Guide Creative Media Centre November 2019
10
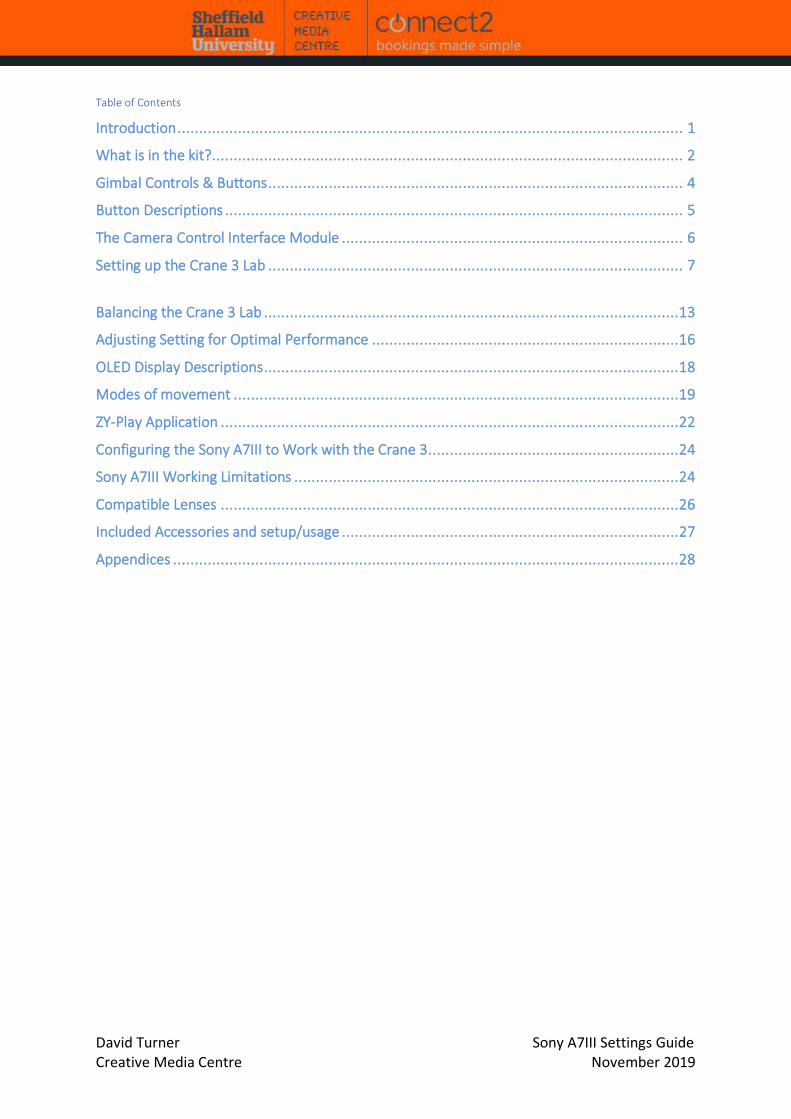
Step 4. Mounting Follow Focus and Zoom Control Servos Before the camera is mounted on the Crane 3 the lens gears must be installed along with the servos. The servos and all cables live in the Servo Kit box. The servo mounts should already be attached in place on the lens support arm, on the quick release plate. Two thumb screws for each arm with a short mounting rod and a thread on one end. If you have to put them on yourself, here are the individual parts.
This what they look like assembled. This mounts to the underside of the quick release plate just behind the lens support plate where there are 2 holes. One servo on each side of the lens.
Servo cables
Camera Control Cables Servos & Lens Gears
Fig5. Servos mounted in place

David Turner Sony A7III Settings Guide Creative Media Centre November 2019
11
Wrap the lens gears around the Focus and Zoom rings, teeth outwards and secure in place. They should be tight, but not so tight that you risk breaking them or the lens. Our Samyang lenses already have teeth, so you should be able to use them without the lens gear wraps. They will need to be adjusted so that they do not interfere with the focus/zoom ring travel. For the 24-70mm GM lens, place the connecting fastener at +/- 50mm on the zoom ring. This will keep it from interfering with the travel. As the focus ring rotates without a stopping point, put the fastener in a similar place as the Zoom lens gear wrap and adjust it for clearance whilst operating the
focus wheel once the camera is on and balanced. Now move the servo motors into place so the servo cog and lens gear teeth mesh together. The cables can be connected once you have placed the camera on the Crane 3.
Step 5. Mount the Camera With the Crane 3 in the ‘Locked for Installation’ mode (see page 6), Slide the camera on to the mounting plate by releasing the ‘Quick Release Plate Latch’ and once in place, lock the plate into place by tightening the latch. As a rough guide for the Sony 24-70mm F2.8 GM kit lens; the back edge of the camera base plate, next to the silver release button on the gimbal itself, sits at roughly 3.6cm on the cameras base plate. These measurements will vary depending on what lens is being used and where the camera sits on the quick release plate, and in turn where that sits on its own mount. If only using Focus or Zoom or neither servos, again the weight distribution will be different, so will require a different setup. Now that you have the camera mounted correctly on the quick release plate, the lens support plate correctly adjusted (if required), along with the servo motors mounted each side of the lens, the 4 required cables need to be installed and then its ready to be balanced.
Step 6. Install Cables There are 4 cables that need to be installed before the camera can be balanced. 2 x Servo USB-C cables to control the Focus/Zoom Servo motors. 2 x cables to connect the camera to the Image transmission and Control module and 2 cables for the HDMI and Multi-USB slots on the Sony A7III.

David Turner Sony A7III Settings Guide Creative Media Centre November 2019
12
Install the ‘L’ shaped USB-C cables to the connections on each motor and to the Focus/Zoom control cable inserts on the front of the Image transmission and Control module. Then install cable ‘A’ (HDMI Mini to HMDI Micro) to the Sony A7III HDMI slot and the other cable to the USB Micro slot. Then finish by installed the cables in to the Image transmission and Control module. They are HDMI mini and USB 3.0 respectively and can only go in to one of 2 slots. Once installed the Crane 3 can be balanced.
Fig. 7 Servo Cable Connections
David Turner Sony A7III Settings Guide Creative Media Centre November 2019
13
Balancing the Crane 3 Lab
Now the Sony A7III is mounted on the Crane 3 with your chosen lens, servo motors and cables installed, it can be balanced.
You may find the Zoom motor and mount get in the way whilst trying to operate the quick release
plate latch. In which case, reposition the zoom gear wrap as far forwards as possible on the zoom ring, and reposition the zoom motor. This will give you enough clearance to operate it without obstruction. (Once again, ensure a fresh battery and all SD cards are installed and lens cap removed before mounting if not already done so).
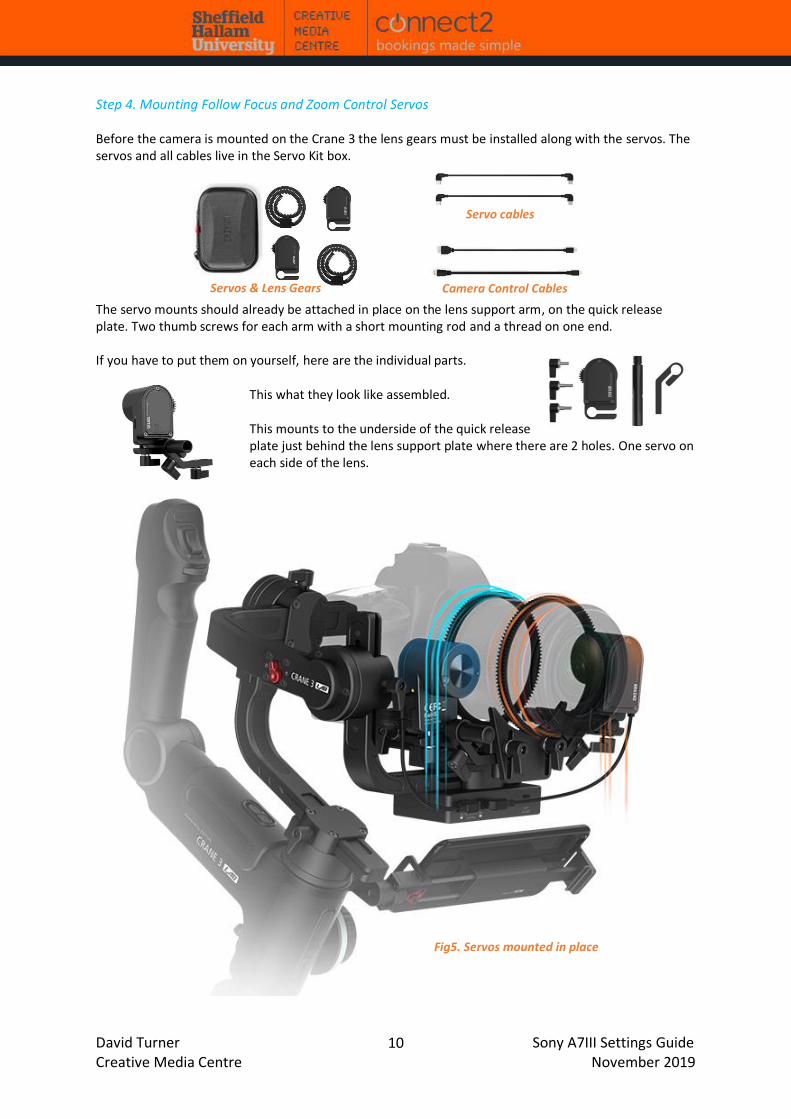
Step 1. Camera Grip distance from Tilt motor Loosen the quick release plate thumb screw, move the camera grip as close to the tilt axis motor as possible.
Step 2. Tilt axis - Horizontal Unlock the tilt axis and quick release plate latch and move the camera forward or backwards until the camera stays still and is level with the lens facing to the front. Lock the quick release plate latch back in place.
If the camera will not balance at this point
and you can’t get enough movement back or forwards to balance it, the camera must be moved along on the base plate.
Step 3. Tilt axis - Vertical Point the lens directly upwards and loosen the tilt axis thumb screw. Move the camera backwards or forwards until it stays level pointing directly upwards, re-tighten the tilt axis thumb screw. Move the camera back to a forward-facing position and re-lock the tilt axis.

David Turner Sony A7III Settings Guide Creative Media Centre November 2019
14
Step 4. Roll Axis Unlick the Roll axis, loosen the roll axis thumb screw. Push the camera left or right until it stays level and horizontal to the ground. Re-tighten the Roll axis thumb screw. Re-lock the roll axis.
Don’t forget, the camera’s hand grip was moved as close as it will go to the Tilt axis motor in
step 1. If you didn’t do that, you may find the camera will not balance and falls over on one side. In which case, carry out step one, and then come straight back to this step.

David Turner Sony A7III Settings Guide Creative Media Centre November 2019
15
Step 5. Pan Axis Unlock the pan axis, Loosen the pan axis thumb screw, and hold the entire gimbal on its side by using the tripod in handle mode, so it is horizontal to the ground. Once again, the camera should stay still and level and not move in whichever position you place it in. Move the mounting arm backward and forward until it stays still. You should now be able to unlock the other axes and find the camera will stay in whatever position you place it in. The camera is now balance and ready for use, once you’ve learned how to operate it! When you correctly balance the Crane 3, it will prolong its run time and prevent any possible issues such as overheating or damage to the motors.
Before turning on the Crane 3 gimbal, you ‘Must’ ensure you have unlocked all 3 axis locks and
configured the motor torque values (Follow instructions in the next section). Running the gimbal with locked axis latches will prompt the gimbal to alert you to this, but before that it will overheat the motors and possibly damage them.
David Turner Sony A7III Settings Guide Creative Media Centre November 2019
16
Adjusting Setting for Optimal Performance
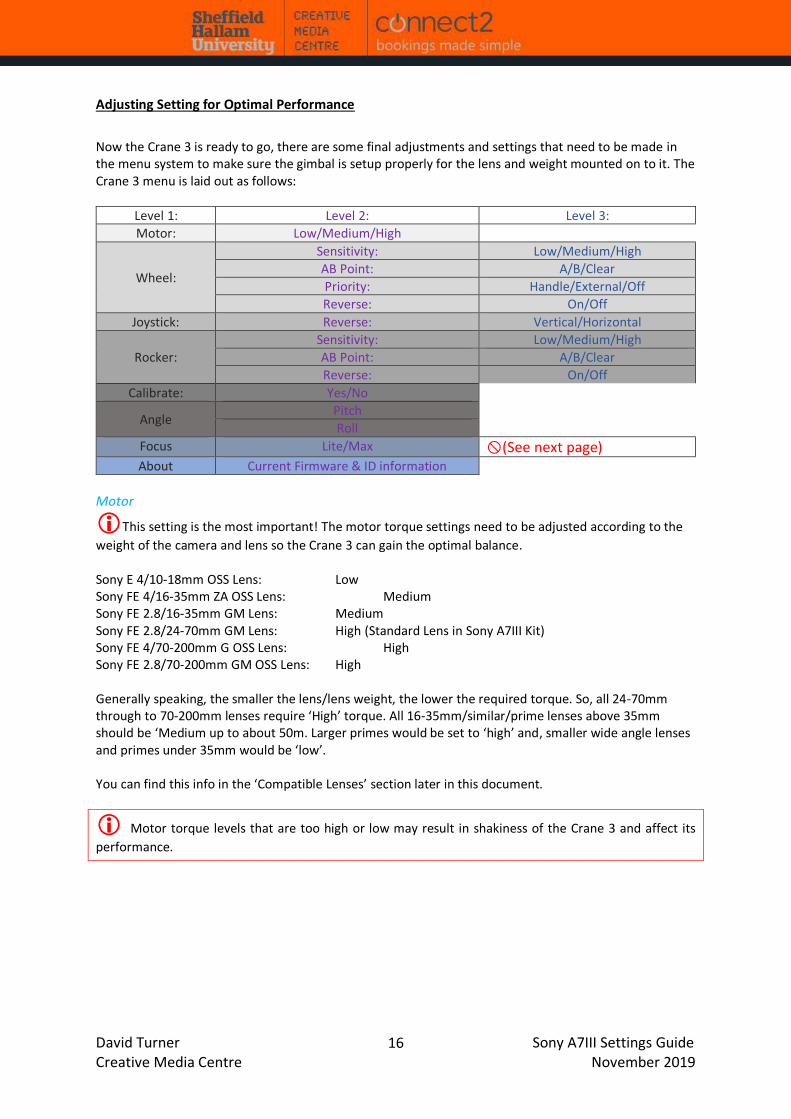
Now the Crane 3 is ready to go, there are some final adjustments and settings that need to be made in the menu system to make sure the gimbal is setup properly for the lens and weight mounted on to it. The Crane 3 menu is laid out as follows:
Level 1: Level 2: Level 3:
Motor: Low/Medium/High
Wheel:
Sensitivity: Low/Medium/High
AB Point: A/B/Clear
Priority: Handle/External/Off
Reverse: On/Off
Joystick: Reverse: Vertical/Horizontal
Rocker:
Sensitivity: Low/Medium/High
AB Point: A/B/Clear
Reverse: On/Off
Calibrate: Yes/No
Angle Pitch
Roll
Focus Lite/Max (See next page) About Current Firmware & ID information
Motor
This setting is the most important! The motor torque settings need to be adjusted according to the
weight of the camera and lens so the Crane 3 can gain the optimal balance. Sony E 4/10-18mm OSS Lens: Low Sony FE 4/16-35mm ZA OSS Lens: Medium Sony FE 2.8/16-35mm GM Lens: Medium Sony FE 2.8/24-70mm GM Lens: High (Standard Lens in Sony A7III Kit) Sony FE 4/70-200mm G OSS Lens: High Sony FE 2.8/70-200mm GM OSS Lens: High Generally speaking, the smaller the lens/lens weight, the lower the required torque. So, all 24-70mm through to 70-200mm lenses require ‘High’ torque. All 16-35mm/similar/prime lenses above 35mm should be ‘Medium up to about 50m. Larger primes would be set to ‘high’ and, smaller wide angle lenses and primes under 35mm would be ‘low’. You can find this info in the ‘Compatible Lenses’ section later in this document.
Motor torque levels that are too high or low may result in shakiness of the Crane 3 and affect its
performance.

David Turner Sony A7III Settings Guide Creative Media Centre November 2019
17
Wheel This refers to the focus wheel and allows you to set the sensitivity of the focus wheel, an ‘A/B’ In/Out point for specific focus requirement, and if you want to handle mounted focus wheel given priority or the external ZY-Play app. You can also revers the rotation of the wheel if you prefer to operate the other way around, which is a personal choice.
Joystick You can have the joystick work in opposing directions depending on your personal preference.
Rocker Much the same as the ‘wheel menu, it allows you to selected the sensitivity, an A/B In/Out point and to reverse the control if you wish.
Calibrate If the gimbal is not balancing properly and when reset does not move to an upright position, it may need calibration. This option takes you through a 6-step calibration process to correct the gimbals settings. This can be found later in appendix section.
Angle Allows you to change the ‘pitch’ and ‘roll’ of the gimbal. Unless this has previously been set to something other than ‘0.00’, it is best to leave this alone, unless there is a specific requirement to set the gimbal to a position other than fully upright.
Focus This is an update function that allows you to update toe firmware of the servo motors.
Do not attempt to update! If you attempt an update or use this menu function by accident, you
may find the servo motors become unresponsive afterwards and the orange LED on each motor will be flashing quickly. Proceeding through this menu system and confirming the update when it’s not done in the correct manner renders the servo motors in-operable. You will have to bring it back in so we can fix
it.
About
This menu item shows you the current firmware version and equipment ID. If the firmware on the Crane 3 you are using is out of date, please do not attempt to update it
yourself. Leave it as it is and inform us when returning the equipment. If an update is performed incorrectly, it can render the equipment in-operable and may require it to be sent back to the
manufacturer for repair.
Most of these settings are personal to your own operating requirements. The only item that must be set is the motor torque levels and to check that the angle menu has not been changed and left as is. It’s a good idea to visit the ‘Wheel’ and ‘Rocker’ menus to set the sensitivity of those item’s, as you may find they do not turn quick enough or are too fast for what you are trying to do.

David Turner Sony A7III Settings Guide Creative Media Centre November 2019
18
OLED Display Descriptions
There are several icons that appear on the OLED display on the handle that denote what mode you are in and can also display other relevant information.

David Turner Sony A7III Settings Guide Creative Media Centre November 2019
19
Modes of movement
The table below shows the modes of operation and how they work in each different setting.
Pan Following Mode (PF): Single click PF mode button to enter The camera pans left/right following the movement of the stabilizer while the tilt and roll axes are locked. Push the joystick up/down to control the tilt axis.
Locking Mode (L): Single click Locking mode button to enter This mode locks the movement of all three axes to keep the camera fixed on a shooting direction. Pushing the joystick up/down and left/right allows manual control of the tilt axis and pan axis.
Point of View Mode (POV): Single click POV mode button to enter This mode allows the camera to roll left/right at a Max. angle of 45° and all the three motors with unlimited 360° rotation following the movement of the stabilizer.
Following Mode (F) : Single click Following mode button to enter The camera pans and tilts following the movement of the stabilizer. Pushing the joystick left/right allows manual control of the roll axis.

David Turner Sony A7III Settings Guide Creative Media Centre November 2019
20
Motors circled in red are free to move in line with the movement of the stabilizer handle while motors circled in grey are locked. We suggest you spend some time before your shoot familiarising yourself with the different modes of the Crane 3. Get to grips with each mode and its advantages and limitations, so when you arrive on set, you will know exactly what modes to use and when depending on the type of shots you are trying to achieve. Manual Angle Lock: Under ‘Pan Following’ mode (PF) and ‘Locking’ mode (L), you can manually rotate the camera to a certain angle, then loosen the grip and the camera position will be fixed. Under ‘Pan Following’ mode (PF) , you can manually adjust the angle of tilt axis. Under ‘Locking’ mode (L), you can manually adjust the angle of pan axis and tilt axis.
PhoneGo Mode (GO): Press and hold PhoneGo mode button to enter The camera pans left/right and tilts up/ down following the movement of the stabilizer in fast speed while the roll axis is locked.
Vortex Mode (V): Double click POV mode button to enter The camera tilts with a 90° angle following the movement of the handle while the roll axis is locked. Please use this mode in an underslung gesture and push the joystick right/left to rotate the pan axis.

David Turner Sony A7III Settings Guide Creative Media Centre November 2019
21
There is an easy way to think of the modes and how they work, which is if you visualise them in a line from right to left. The further to the right, the more the stabilizer itself controls the movement. The further left you go, the more the joystick controls the movement. Mode: L PF F POV
The ‘Phone GO’ mode is a variant on ‘F’ mode, and ‘Vortex Mode’ is completely different and designed for using the stabilizer in an ‘underslung’ position.
Tilt, Roll, Pan Axes are locked. All Controlled via Joystick: (Up/Down, Left/Right). Stabilizer movement has no effect.
Tilt, Roll Axes are locked. Pan Axis controlled via movement of the stabilizer. Joystick controls Tilt.
Roll Axis locked. Tilt & Pan Axis controlled via movement of the stabilizer. Joystick
controls Roll.
Tilt, Roll & Pan Axes controlled via movement of stabilizer. Joystick also controls roll to
45˚ maximum.
David Turner Sony A7III Settings Guide Creative Media Centre November 2019
22
ZY-Play Application
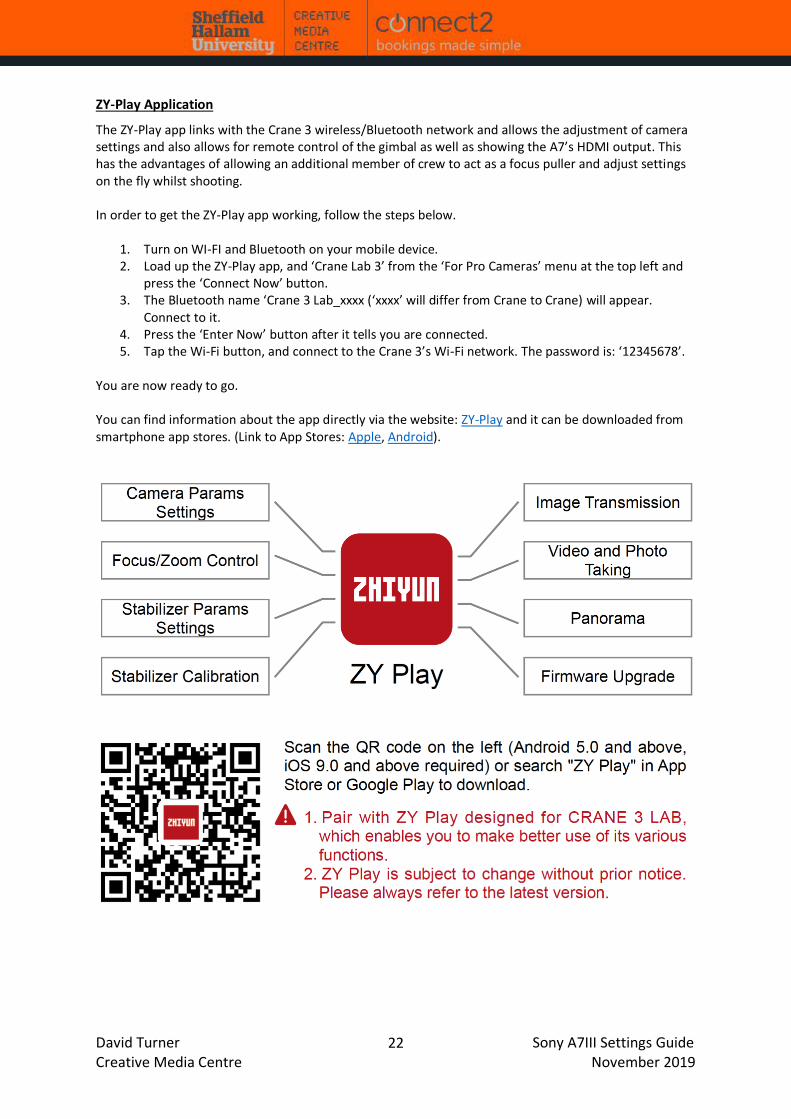
The ZY-Play app links with the Crane 3 wireless/Bluetooth network and allows the adjustment of camera settings and also allows for remote control of the gimbal as well as showing the A7’s HDMI output. This has the advantages of allowing an additional member of crew to act as a focus puller and adjust settings on the fly whilst shooting. In order to get the ZY-Play app working, follow the steps below.
1. Turn on WI-FI and Bluetooth on your mobile device. 2. Load up the ZY-Play app, and ‘Crane Lab 3’ from the ‘For Pro Cameras’ menu at the top left and
press the ‘Connect Now’ button. 3. The Bluetooth name ‘Crane 3 Lab_xxxx (‘xxxx’ will differ from Crane to Crane) will appear.
Connect to it. 4. Press the ‘Enter Now’ button after it tells you are connected. 5. Tap the Wi-Fi button, and connect to the Crane 3’s Wi-Fi network. The password is: ‘12345678’.
You are now ready to go. You can find information about the app directly via the website: ZY-Play and it can be downloaded from smartphone app stores. (Link to App Stores: Apple, Android).

David Turner Sony A7III Settings Guide Creative Media Centre November 2019
23
The phone mount can be attached in two locations and twists once screwed in. It can then be set to the angle of your choice. Or alternatively, an extra crew member or focus puller can operate the controls whilst holding the phone, or perhaps an iPad for a bigger viewpoint. Just bear in mind the limitations of the Sony A7III’s outputs listed in the next section when connected to the Crane 3 whilst using the app. Here are some examples of the ZY-Play Apps interface.
Focus/Zoom Controls Gimbal Modes
Strength Adjustment Aperture Adjustment

David Turner Sony A7III Settings Guide Creative Media Centre November 2019
24
Configuring the Sony A7III to Work with the Crane 3
In order for the Sony A7III to work correctly with the Zhiyun Crane, you need to change
the way the camera works when a USB cable is plugged in. The A7 normally defaults to ‘Auto’ or ‘Mass Storage’ in the USB Connection settings. When this is the case, the screen on the A7 will be fixed to the ‘USB Mass Storage’ mode notification screen and will not change. In order to get the live view showing on screen when the cable is plugged in, you need to change ‘USB Connection’ to ‘PC Remote’. Once this is done the camera will operate as required. Setup: Setup4 (Menu page 4/7): USB Connection: Set to ‘PC Remote’. Focus Magnifier. This will turn off the focus magnifier when adjusting focus, which will disable the screen magnification. Camera 1 (Menu page 13/14): AF in Focus Mag & MF Asist:: Set to Off You will also need to disable the sensor that switches between view finder and monitor, if it detects something near the view finder. The stabilizer does affect the sensor and will turn off the camera monitor at certain points. Camera 2 (Menu page 6/9): FINDER/Monitor: Set to Monitor(Manual)
Sony A7III Working Limitations
Movie Mode
There are a few limitations when using the Sony A7III with the Zhiyun Crane 3 that you need to be
aware of when working with it. Due to Sony A7III’s operating functionality, the HDMI and Multi outputs will not operate at the same time when the Sony A7III is set to ‘Movie’ mode. Once the Multi cable is plugged in to the camera, the HDMI output stops working. Whilst in ‘Movie’ mode with both ‘HDMI’ and ‘Multi’ cables plugged in, you lose the following functionality:
• No HDMI output
• No ISO control via app or handle controls.
• No WB control via app or handle controls.
• No AV, TV or EV via app or handle controls.
• No adjustment of settings once camera is recording. However, this still allows control of the ‘Focus’ and ‘Zoom’ controls on the app. Considering that you are unlikely to want to adjust shutter speed, aperture, ISO, exposure compensation or white balance during a shot, this is not as much of an issue as it sounds. The important controls, i.e. focus and zoom work as they should.

David Turner Sony A7III Settings Guide Creative Media Centre November 2019
25
The A7III can still output a live preview via the HDMI output in ‘Movie’ mode, providing the ‘Multi’ output cable is not plugged in. By doing that, you gain the video output, but still have no control of TV, AV, ISO and EV settings. As they do not work even if the multi cable is plugged in there is no difference, but would still afford you focus and zoom control remotely.
‘M’ or Stills Mode When the Sony A7III is set to ‘M’ for manual mode, or what is considered stills mode, you get full working functionality:
• Working HDMI output. (Sony A7III’s maximum HDMI output is 1080HD).
• Shutter Speed, Aperture, EV, ISO, WB, Zoom, Focus all work from the app and the gimbals handle controls.
• Histogram
• Scene Mode: Gimbal, Walking, Motion, Custom
• Focus and Zoom work along with movement controls. When set to ‘M’ or ‘Stills’ mode, you may find when adjusting the focus when the camera is set to ‘manual focus’, ‘focus magnification’ will probably be on. This means when the focus is adjusted the screen will zoom in to allow for finer focus adjustment. This is in turn transmitted to the ZY-Play app, and unless a button is pressed on the A7 the magnification box will not disappear and return the screen to normal. Pressing the shutter button removes this, or alternatively you can turn it off by going to the following setting:
Camera 1: Focus Assist (Menu page 13): MF Assist: Set to Off. This does not happen when recording so won’t necessarily be a problem. It could however, if you are planning shots in manual focus before recording to plan focus points. ‘M’ mode does not allow you to adjust any settings whilst recording either, but this is normal and as mentioned, you are unlikely to need to adjust whilst recording.
Please Note: Whilst in ‘M’ (Stills) mode the Sony A7III records video in the configuration set in ‘Movie’
mode. The ‘Peaking’, ‘Zebra’, ‘Picture Profile’ and ‘Gamma Disp. Assist’ all work in the same way in stills mode. Having not identified any issues with using the A7III in this mode as of yet, I would suggest this would be the better mode to choose to gain full functionality of the gimbal, HDMI output and ZY-Play.

David Turner Sony A7III Settings Guide Creative Media Centre November 2019
26
Compatible Lenses
Here is a list of our lenses that are compatible with the Crane 3 and the Sony A7III. They all fit with different requirements and mounting positions, which is determined by their length and weight and where they need to be in order to balance correctly. The telephoto lenses in particular or any other long or high weight lenses will require very careful balancing and may require the removal of the rubber eye piece on the electronic view finder. Please only mount compatible lenses in the manner described. There are no other ways to mount these lenses and if you attempt to do so, not only will they not work, it may result in damage to the gimbal, lens or both. If a lens is on the ‘in-compatible’ list, then it means we have attempted to mount a Sony A7 with this lens and found that it will not balance correctly and is too long or too heavy. Please do not mount in-compatible lenses if they are on this list, as we have already tried. Lens Compatible Focus Servo Zoom Servo
Sony Sony E 4/10-18mm OSS Lens Sony FE 4/16-35mm ZA OSS Lens Sony FE 2.8/16-35mm GM Lens Sony FE 2.8/24-70mm GM Lens Sony FE 4/70-200mm G OSS Lens Sony FE 2.8/70-200mm GM OSS Lens * *
Canon Canon 24-70mm Ultrasonic Canon 35-105mm 1:3.5
Samyang 135mm T2.2 ED UMC ** (Aperture) (Focus) 14mm, 24mm, 35mm, 50mm, & 85mm ** (Aperture) (Focus) Please read the marked items below and how they correspond the lenses above. * Remove EVF eye piece. Will not go past roughly 40° due to insufficient clearance from roll axis arm). ** These Samyang Prime lenses are manual lenses and have a fixed focal length and therefore no Zoom function. Firstly; due to the way in which the ‘Focus’ ring works, they require the ‘Max’ Follow Focus & Zoom Control Servo Motor to operate the focus ring. Do not use the ‘Lite’ Follow Focus Servo Motor’ as it is not strong enough to operate the focus ring. You can therefore if you wish, use the ‘Lite’ Follow Focus Servo Motor’ to operate the Aperture ring. This will mean the follow focus wheel will operate the lens aperture ring and the zoom rocker switch will operate the focus.
In-Compatible Lenses Lens Compatible Focus Servo Zoom Servo Canon 70-200mm 1:2.8 L IS II Sigma 70-200mm 1:2.8 APO DG HSM Canon 300mm 2.8 The Metabones mount included in the Sony A7III kits when mounted on the quick release plate will not go past 1cm on the quick release base plate measurement scale. Wide angle and short lenses, mount via the camera tripod mount. Longer lenses, mount via the metabones mount. It’s also worth noting, that a metabones adapter changes the focal length of any lens used and may affect the auto focus functionality, in which case switch modes on the metabones.
David Turner Sony A7III Settings Guide Creative Media Centre November 2019
27
Included Accessories and setup/usage
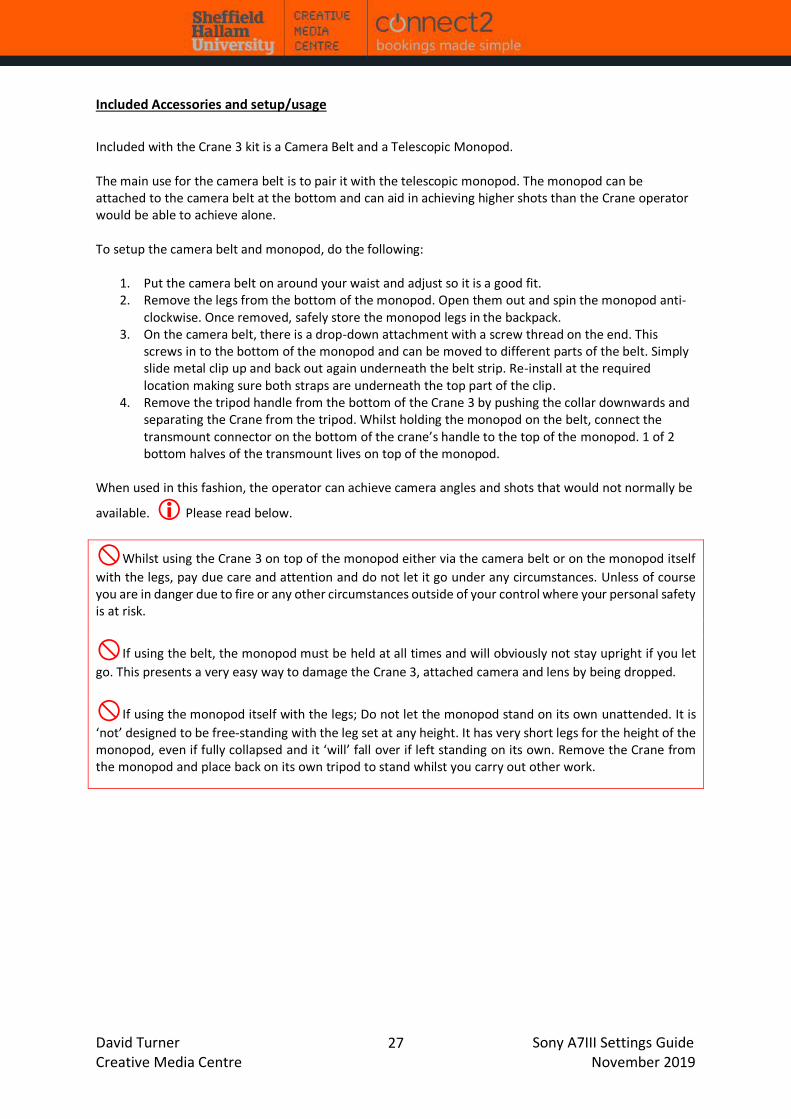
Included with the Crane 3 kit is a Camera Belt and a Telescopic Monopod. The main use for the camera belt is to pair it with the telescopic monopod. The monopod can be attached to the camera belt at the bottom and can aid in achieving higher shots than the Crane operator would be able to achieve alone. To setup the camera belt and monopod, do the following:
1. Put the camera belt on around your waist and adjust so it is a good fit. 2. Remove the legs from the bottom of the monopod. Open them out and spin the monopod anti-
clockwise. Once removed, safely store the monopod legs in the backpack. 3. On the camera belt, there is a drop-down attachment with a screw thread on the end. This
screws in to the bottom of the monopod and can be moved to different parts of the belt. Simply slide metal clip up and back out again underneath the belt strip. Re-install at the required location making sure both straps are underneath the top part of the clip.
4. Remove the tripod handle from the bottom of the Crane 3 by pushing the collar downwards and separating the Crane from the tripod. Whilst holding the monopod on the belt, connect the transmount connector on the bottom of the crane’s handle to the top of the monopod. 1 of 2 bottom halves of the transmount lives on top of the monopod.
When used in this fashion, the operator can achieve camera angles and shots that would not normally be
available. Please read below.
Whilst using the Crane 3 on top of the monopod either via the camera belt or on the monopod itself
with the legs, pay due care and attention and do not let it go under any circumstances. Unless of course you are in danger due to fire or any other circumstances outside of your control where your personal safety is at risk.
If using the belt, the monopod must be held at all times and will obviously not stay upright if you let
go. This presents a very easy way to damage the Crane 3, attached camera and lens by being dropped.
If using the monopod itself with the legs; Do not let the monopod stand on its own unattended. It is
‘not’ designed to be free-standing with the leg set at any height. It has very short legs for the height of the monopod, even if fully collapsed and it ‘will’ fall over if left standing on its own. Remove the Crane from the monopod and place back on its own tripod to stand whilst you carry out other work.

David Turner Sony A7III Settings Guide Creative Media Centre November 2019
28
Appendices
Calibration When do you need to calibrate the Crane 3?
When How
1. Slight deviation is found in the tilt angle of the camera in level position after turning on.
2. Slight deviation is found in the roll angle of the camera in level position after turning on.
3. Frequent small angle correction is found when the camera is in level position while the stabilizer stays still.
Initializing the stabilizer
1. Slight deviation is found in the level position after the
initialization of the stabilizer. 2. The stabilizer has not been used for a long time. 3. The stabilizer undergoes significant temperature difference in
operation environments.
Six-side calibration
Slight deviation is found in the tilt or roll angle of the camera in level position after initialization and six-side calibration of the stabilizer.
Fine tuning the motors
Initialization Method
1. Correctly install the batteries. 2. Hold the quick release plate with one hand. Long press the power button to turn on stabilizer.
After powering on the stabilizer, motors will produce forces. Please hold tight the quick release plate and double click the power button to enable the stabilizer to enter standby mode.
3. Put the stabilizer still on a table surface, and wait for about 30 sec., and the stabilizer will automatically complete initialization.
David Turner Sony A7III Settings Guide Creative Media Centre November 2019
29

David Turner Sony A7III Settings Guide Creative Media Centre November 2019
30

David Turner Sony A7III Settings Guide Creative Media Centre November 2019
31
Trouble Shooting If you are having problems with the Crane 3 and it is not operating correctly, or is showing any of the following alerts on the OLED display on the handle, the steps below should explain everything you need to know to get it working correctly. If you are still in doubt or having trouble after reading through these, come and talk to us in store.