Embed Size (px)
Citation preview
�*TO ORDER CALL 800-325-4�80 OR VISIT STARKBROS.COM.
a GrowinG LeGacy Since 1816
GUiDe To SUcceSSFUL PLanTinG anD GrowinG
22
gardening The rewards of
Inside this helpful guide you’ll find the best, time-proven
ways to care for your Stark Bro’s trees and plants.
We want to be sure you know how to grow the biggest,
juiciest and tastiest apples, peaches, pears, cherries,
nectarines, plums and other fruits. And we want you to
harvest them as soon as possible from your own yard.
It’s fun and easy to make your yard bountiful and beautiful
with fruit trees. Yard size doesn’t limit your ability to
grow your own fruit. Miniature and dwarf fruit trees, for
example, yield crops of full-size fruit. Nothing tastes better
than fresh, fully tree-ripened fruit, unless it’s a homemade
pie with a fresh fruit filling.
The harvest is just one of the rewards of growing fruit
trees. There’s the natural beauty of trees and plants, the
knowledge that you created that beauty with your own two
hands and the wonderful sense of relaxation that comes
with growing something.
Your satisfaction is even greater when you can share the
bounty of your yard with family and friends.
We hope you enjoy all the rewards of gardening year
after year. We also want to thank you so much for your
purchase. We’re certain you will be glad you decided to
grow Stark Bro’s trees and plants.
Cameron G. Brown, President
3
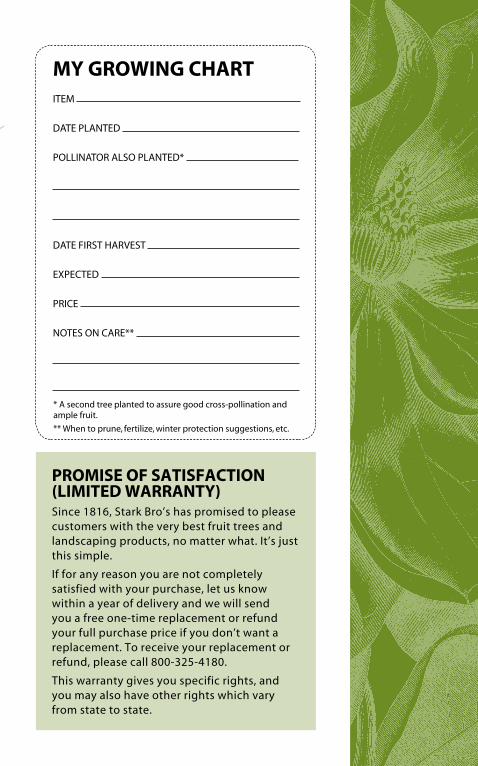
gardening MY GROWING CHART Item
Date planteD
pollInator also planteD*
Date fIrst harvest
expecteD
prIce
notes on care**
PROMISE Of SATISfACTION (LIMITED WARRANTY)since 1816, stark Bro’s has promised to please customers with the very best fruit trees and landscaping products, no matter what. It’s just this simple.
If for any reason you are not completely satisfied with your purchase, let us know within a year of delivery and we will send you a free one-time replacement or refund your full purchase price if you don’t want a replacement. to receive your replacement or refund, please call 800-325-4180.
this warranty gives you specific rights, and you may also have other rights which vary from state to state.
* a second tree planted to assure good cross-pollination and ample fruit.
** When to prune, fertilize, winter protection suggestions, etc.
*TO ORDER CALL 800-325-4�80 OR VISIT STARKBROS.COM.
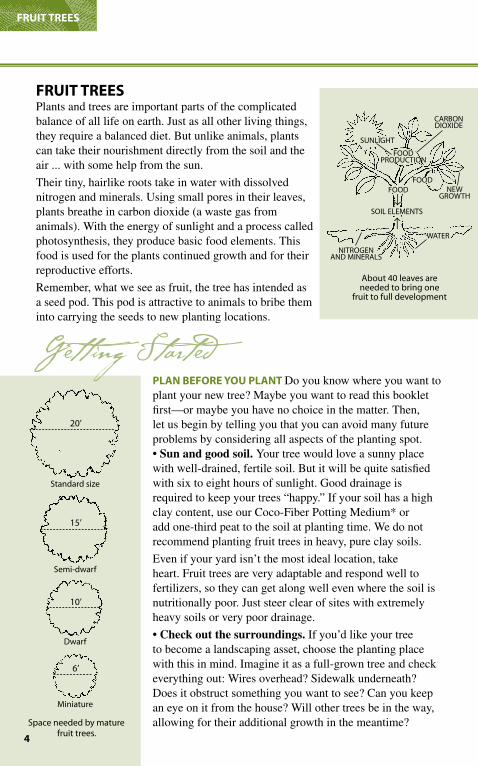
about 40 leaves are needed to bring one
fruit to full development
fooD proDuctIon
sunlIGht
carBon DIoxIDe
neW GroWth
fooDfooD↑
soIl elements
↑Water
nItroGenanD mInerals
fRuIT TREES
20’
standard size
space needed by mature fruit trees.
fRuIT TREESPlants and trees are important parts of the complicated balance of all life on earth. Just as all other living things, they require a balanced diet. But unlike animals, plants can take their nourishment directly from the soil and the air ... with some help from the sun.
Their tiny, hairlike roots take in water with dissolved nitrogen and minerals. Using small pores in their leaves, plants breathe in carbon dioxide (a waste gas from animals). With the energy of sunlight and a process called photosynthesis, they produce basic food elements. This food is used for the plants continued growth and for their reproductive efforts.
Remember, what we see as fruit, the tree has intended as a seed pod. This pod is attractive to animals to bribe them into carrying the seeds to new planting locations.
Getting StartedPLAN BEfORE YOu PLANT Do you know where you want to plant your new tree? Maybe you want to read this booklet first—or maybe you have no choice in the matter. Then, let us begin by telling you that you can avoid many future problems by considering all aspects of the planting spot.• Sun and good soil. Your tree would love a sunny place with well-drained, fertile soil. But it will be quite satisfied with six to eight hours of sunlight. Good drainage is required to keep your trees “happy.” If your soil has a high clay content, use our Coco-Fiber Potting Medium* or add one-third peat to the soil at planting time. We do not recommend planting fruit trees in heavy, pure clay soils.
Even if your yard isn’t the most ideal location, take heart. Fruit trees are very adaptable and respond well to fertilizers, so they can get along well even where the soil is nutritionally poor. Just steer clear of sites with extremely heavy soils or very poor drainage.
• Check out the surroundings. If you’d like your tree to become a landscaping asset, choose the planting place with this in mind. Imagine it as a full-grown tree and check everything out: Wires overhead? Sidewalk underneath? Does it obstruct something you want to see? Can you keep an eye on it from the house? Will other trees be in the way, allowing for their additional growth in the meantime?
4
15’
semi-dwarf
10’
Dwarf
6’
miniature
*TO ORDER CALL 800-325-4�80 OR VISIT STARKBROS.COM.
Even a year or two after planting, your tree will be very difficult to transplant. So take the time to plant it in just the right place.
• Space wisely. First-time fruit tree growers often ask about recommended planting distances from patios, sewer lines, water pipes and so on. Ordinarily, patios will not be a problem because the soil beneath them will be dry and compacted. Therefore, the roots will not grow into this area as much. It’s still recommended, however, that you plant at least 8-10’ away from patios, water pipes and sewer pipes since the root size will usually be about one-third larger than the above-ground tree size. You might not expect sewer and water lines to be affected since they are buried so deeply. But, since sewer and water lines tend to be wet, roots will grow to them and around them if the tree is planted too close. However, by planting your trees far enough away from these items, you can avoid this problem.
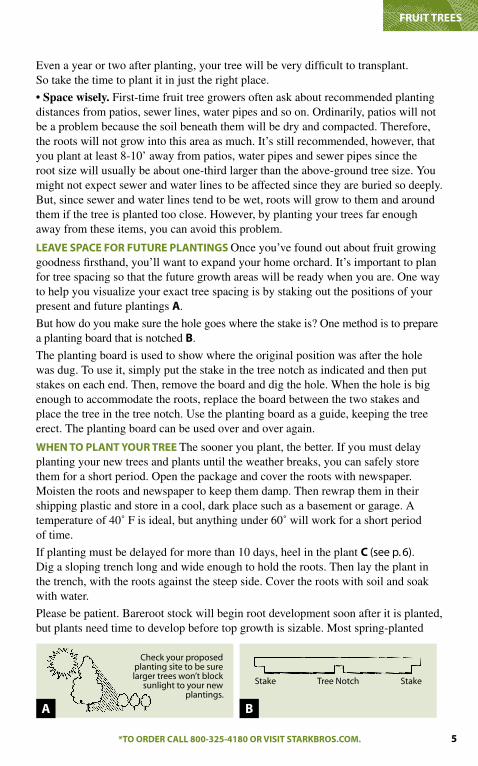
LEAVE SPACE fOR fuTuRE PLANTINGS Once you’ve found out about fruit growing goodness firsthand, you’ll want to expand your home orchard. It’s important to plan for tree spacing so that the future growth areas will be ready when you are. One way to help you visualize your exact tree spacing is by staking out the positions of your present and future plantings A.
But how do you make sure the hole goes where the stake is? One method is to prepare a planting board that is notched B.
The planting board is used to show where the original position was after the hole was dug. To use it, simply put the stake in the tree notch as indicated and then put stakes on each end. Then, remove the board and dig the hole. When the hole is big enough to accommodate the roots, replace the board between the two stakes and place the tree in the tree notch. Use the planting board as a guide, keeping the tree erect. The planting board can be used over and over again.
WHEN TO PLANT YOuR TREE The sooner you plant, the better. If you must delay planting your new trees and plants until the weather breaks, you can safely store them for a short period. Open the package and cover the roots with newspaper. Moisten the roots and newspaper to keep them damp. Then rewrap them in their shipping plastic and store in a cool, dark place such as a basement or garage. A temperature of 40˚ F is ideal, but anything under 60˚ will work for a short period of time.
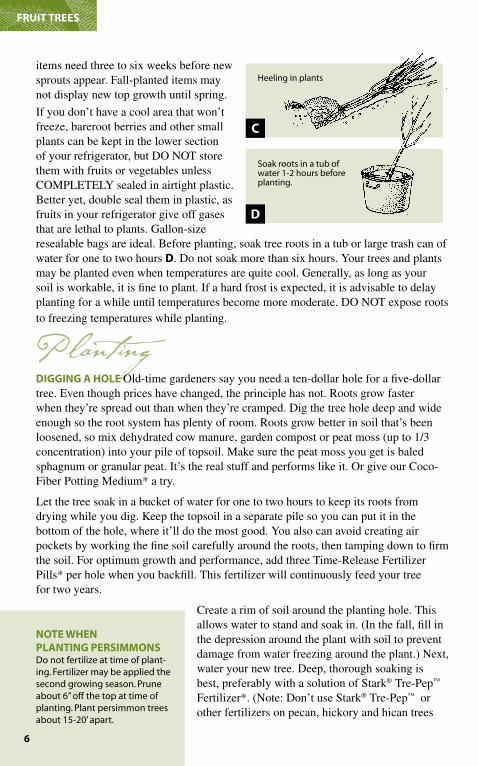
If planting must be delayed for more than 10 days, heel in the plant C (see p. 6). Dig a sloping trench long and wide enough to hold the roots. Then lay the plant in the trench, with the roots against the steep side. Cover the roots with soil and soak with water.
Please be patient. Bareroot stock will begin root development soon after it is planted, but plants need time to develop before top growth is sizable. Most spring-planted
5
fRuIT TREES
B
stake tree notch stake
check your proposed planting site to be sure larger trees won’t block
sunlight to your new plantings.
A
� *TO ORDER CALL 800-325-4�80 OR VISIT STARKBROS.COM.�
items need three to six weeks before new sprouts appear. Fall-planted items may not display new top growth until spring.
If you don’t have a cool area that won’t freeze, bareroot berries and other small plants can be kept in the lower section of your refrigerator, but DO NOT store them with fruits or vegetables unless COMPLETELY sealed in airtight plastic. Better yet, double seal them in plastic, as fruits in your refrigerator give off gases that are lethal to plants. Gallon-size resealable bags are ideal. Before planting, soak tree roots in a tub or large trash can of water for one to two hours D. Do not soak more than six hours. Your trees and plants may be planted even when temperatures are quite cool. Generally, as long as your soil is workable, it is fine to plant. If a hard frost is expected, it is advisable to delay planting for a while until temperatures become more moderate. DO NOT expose roots to freezing temperatures while planting.
PlantingDIGGING A HOLE Old-time gardeners say you need a ten-dollar hole for a five-dollar tree. Even though prices have changed, the principle has not. Roots grow faster when they’re spread out than when they’re cramped. Dig the tree hole deep and wide enough so the root system has plenty of room. Roots grow better in soil that’s been loosened, so mix dehydrated cow manure, garden compost or peat moss (up to 1/3 concentration) into your pile of topsoil. Make sure the peat moss you get is baled sphagnum or granular peat. It’s the real stuff and performs like it. Or give our Coco-Fiber Potting Medium* a try.
Let the tree soak in a bucket of water for one to two hours to keep its roots from drying while you dig. Keep the topsoil in a separate pile so you can put it in the bottom of the hole, where it’ll do the most good. You also can avoid creating air pockets by working the fine soil carefully around the roots, then tamping down to firm the soil. For optimum growth and performance, add three Time-Release Fertilizer Pills* per hole when you backfill. This fertilizer will continuously feed your tree for two years.
Create a rim of soil around the planting hole. This allows water to stand and soak in. (In the fall, fill in the depression around the plant with soil to prevent damage from water freezing around the plant.) Next, water your new tree. Deep, thorough soaking is best, preferably with a solution of Stark® Tre-Pep™ Fertilizer*. (Note: Don’t use Stark® Tre-Pep™ or other fertilizers on pecan, hickory and hican trees
NOTE WHEN PLANTING PERSIMMONS Do not fertilize at time of plant-ing. fertilizer may be applied the second growing season. prune about 6” off the top at time of planting. plant persimmon trees about 15-20’ apart.
C
D
soak roots in a tub of water 1-2 hours before planting.
heeling in plants
fRuIT TREES
�
�*TO ORDER CALL 800-325-4�80 OR VISIT STARKBROS.COM.
at planting.) This effective starter fertilizer helps trees and plants grow quickly and vigorously. After watering, be sure to add enough soil to fill the hole to ground level.
Fruit trees require fertile soil for good growth. If the soil pH where you plant your tree is 6.0-7.0, you’re in good shape. Take a look at the established trees and plants around the site. If they look healthy and are growing well, just follow the recommended fertilization program for your fruit trees. Steer clear of soils that are extremely heavy or very poorly drained.
One final point: Please be sure to remove the name tag from your tree. As the tree grows, this small piece of plastic can choke off its circulation, damaging or killing the tree. If you’d like to keep the tag on your tree, retie it loosely with soft twine.
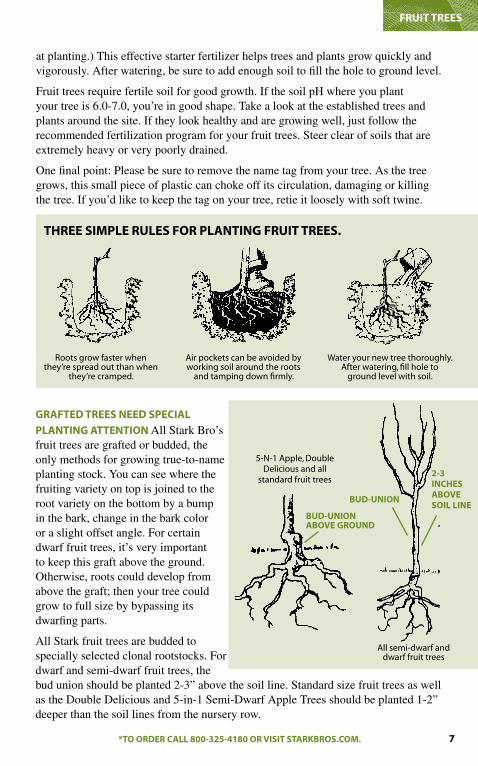
roots grow faster when they’re spread out than when
they’re cramped.
air pockets can be avoided by working soil around the roots
and tamping down firmly.
Water your new tree thoroughly. after watering, fill hole to
ground level with soil.
THREE SIMPLE RuLES fOR PLANTING fRuIT TREES.
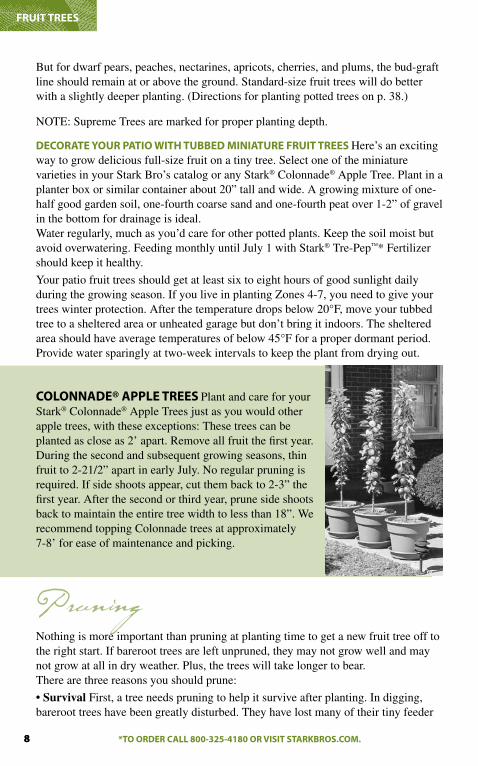
BuD-uNIONABOVE GROuND
BuD-uNION
2-3 INCHES ABOVE SOIL LINE
fRuIT TREES
all semi-dwarf and dwarf fruit trees
GRAfTED TREES NEED SPECIAL
PLANTING ATTENTION All Stark Bro’s fruit trees are grafted or budded, the only methods for growing true-to-name planting stock. You can see where the fruiting variety on top is joined to the root variety on the bottom by a bump in the bark, change in the bark color or a slight offset angle. For certain dwarf fruit trees, it’s very important to keep this graft above the ground. Otherwise, roots could develop from above the graft; then your tree could grow to full size by bypassing its dwarfing parts.
All Stark fruit trees are budded to specially selected clonal rootstocks. For dwarf and semi-dwarf fruit trees, the bud union should be planted 2-3” above the soil line. Standard size fruit trees as well as the Double Delicious and 5-in-1 Semi-Dwarf Apple Trees should be planted 1-2” deeper than the soil lines from the nursery row.
5-n-1 apple, Double Delicious and all
standard fruit trees
8
But for dwarf pears, peaches, nectarines, apricots, cherries, and plums, the bud-graft line should remain at or above the ground. Standard-size fruit trees will do better with a slightly deeper planting. (Directions for planting potted trees on p. 38.)
NOTE: Supreme Trees are marked for proper planting depth.
DECORATE YOuR PATIO WITH TuBBED MINIATuRE fRuIT TREES Here’s an exciting way to grow delicious full-size fruit on a tiny tree. Select one of the miniature varieties in your Stark Bro’s catalog or any Stark® Colonnade® Apple Tree. Plant in a planter box or similar container about 20” tall and wide. A growing mixture of one-half good garden soil, one-fourth coarse sand and one-fourth peat over 1-2” of gravel in the bottom for drainage is ideal.Water regularly, much as you’d care for other potted plants. Keep the soil moist but avoid overwatering. Feeding monthly until July 1 with Stark® Tre-Pep™* Fertilizer should keep it healthy.
Your patio fruit trees should get at least six to eight hours of good sunlight daily during the growing season. If you live in planting Zones 4-7, you need to give your trees winter protection. After the temperature drops below 20°F, move your tubbed tree to a sheltered area or unheated garage but don’t bring it indoors. The sheltered area should have average temperatures of below 45°F for a proper dormant period. Provide water sparingly at two-week intervals to keep the plant from drying out.
Pruning Nothing is more important than pruning at planting time to get a new fruit tree off to the right start. If bareroot trees are left unpruned, they may not grow well and may not grow at all in dry weather. Plus, the trees will take longer to bear. There are three reasons you should prune:
• Survival First, a tree needs pruning to help it survive after planting. In digging, bareroot trees have been greatly disturbed. They have lost many of their tiny feeder
8
fRuIT TREES
COLONNADE® APPLE TREES Plant and care for your Stark® Colonnade® Apple Trees just as you would other apple trees, with these exceptions: These trees can be planted as close as 2’ apart. Remove all fruit the first year. During the second and subsequent growing seasons, thin fruit to 2-21/2” apart in early July. No regular pruning is required. If side shoots appear, cut them back to 2-3” the first year. After the second or third year, prune side shoots back to maintain the entire tree width to less than 18”. We recommend topping Colonnade trees at approximately 7-8’ for ease of maintenance and picking.
*TO ORDER CALL 800-325-4�80 OR VISIT STARKBROS.COM.
�
roots which are needed to absorb moisture and nutrients. But the top is still full size. This imbalance can cause tree growth to be weak and retarded.
• Stimulation In addition, cutting the tree back stimulates stronger, more vigorous growth from the remaining buds. After a single growing season, a tree you prune will be bigger than a matching unpruned tree.
• Shaping Even more important, your fruit tree needs to be shaped. The natural shape of a fruit tree is not always the best for maximum fruit production. Trees you receive from Stark Bro’s have been pruned in the nursery row for proper shaping, but correct pruning must continue at home—starting at planting time.
Please note: All Custom Grafted Multiple Variety trees and all Supreme Trees have been pre-pruned. If you requested your fruit trees be pre-pruned by our professionals, do not prune them again when you plant. Plan to prune your fruit trees during every dormant season. In Zone 6 and farther north, you should wait until late winter. A good reference book, such as Pruning Made Easy*, can be invaluable for answering questions and guiding you through the pruning process.
SIMPLE PRuNING RuLES Always make selective pruning cuts, keeping the desired tree shape in mind. Never uniformly hedge back all the limbs of a fruit tree to the same height. Then, in order:
1. Remove dead, injured and diseased limbs first.
2. Thin out competing limbs, crossing limbs, and one branch of forked limbs.
3. Remove lateral limbs (side branches) that sweep back toward the center of the tree or straight.
4. Prune back any strong growing limbs that remain by removing one-quarter to one-third of the growth that occurred in the previous year.
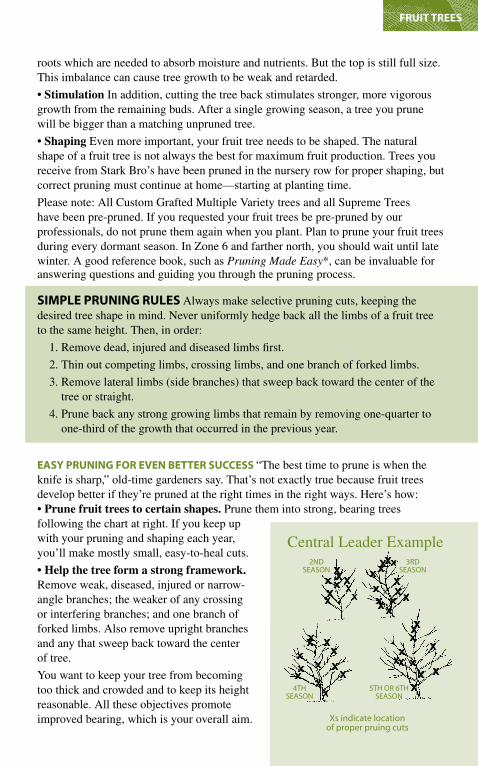
EASY PRuNING fOR EVEN BETTER SuCCESS “The best time to prune is when the knife is sharp,” old-time gardeners say. That’s not exactly true because fruit trees develop better if they’re pruned at the right times in the right ways. Here’s how:• Prune fruit trees to certain shapes. Prune them into strong, bearing trees following the chart at right. If you keep up with your pruning and shaping each year, you’ll make mostly small, easy-to-heal cuts.
• Help the tree form a strong framework. Remove weak, diseased, injured or narrow-angle branches; the weaker of any crossing or interfering branches; and one branch of forked limbs. Also remove upright branches and any that sweep back toward the center of tree.
You want to keep your tree from becoming too thick and crowded and to keep its height reasonable. All these objectives promote improved bearing, which is your overall aim.
fRuIT TREES
2nDseason
3rD season
4thseason
5th or 6thseason
xs indicate location of proper pruing cuts
Central Leader Examplexx x
xx
xx
x xx
xx
xx
xx
xx x
xxx
x
x xx
xx
xx
x
xx
x
x
x
xxx
x
xxx
x
xx
�0 *TO ORDER CALL 800-325-4�80 OR VISIT STARKBROS.COM.
Try to achieve the general shape of the model trees in the drawings on page 9, yet allow your tree to express its own individuality. You’ll be pleased with the results. A good reference book, such as our Pruning Made Easy*, can answer questions and guide you through the pruning process.
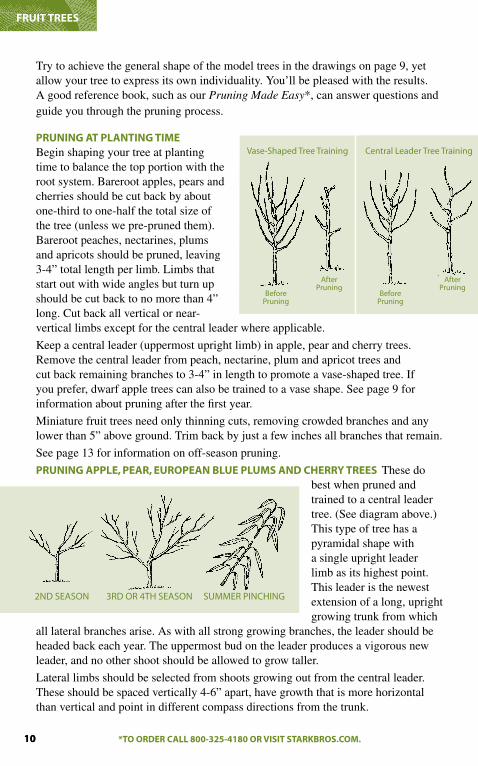
PRuNING AT PLANTING TIME Begin shaping your tree at planting time to balance the top portion with the root system. Bareroot apples, pears and cherries should be cut back by about one-third to one-half the total size of the tree (unless we pre-pruned them). Bareroot peaches, nectarines, plums and apricots should be pruned, leaving 3-4” total length per limb. Limbs that start out with wide angles but turn up should be cut back to no more than 4” long. Cut back all vertical or near-vertical limbs except for the central leader where applicable.
Keep a central leader (uppermost upright limb) in apple, pear and cherry trees. Remove the central leader from peach, nectarine, plum and apricot trees and cut back remaining branches to 3-4” in length to promote a vase-shaped tree. If you prefer, dwarf apple trees can also be trained to a vase shape. See page 9 for information about pruning after the first year.
Miniature fruit trees need only thinning cuts, removing crowded branches and any lower than 5” above ground. Trim back by just a few inches all branches that remain.
See page 13 for information on off-season pruning.
PRuNING APPLE, PEAR, EuROPEAN BLuE PLuMS AND CHERRY TREES These do best when pruned and trained to a central leader tree. (See diagram above.) This type of tree has a pyramidal shape with a single upright leader limb as its highest point. This leader is the newest extension of a long, upright growing trunk from which
all lateral branches arise. As with all strong growing branches, the leader should be headed back each year. The uppermost bud on the leader produces a vigorous new leader, and no other shoot should be allowed to grow taller.
Lateral limbs should be selected from shoots growing out from the central leader. These should be spaced vertically 4-6” apart, have growth that is more horizontal than vertical and point in different compass directions from the trunk.
�0
3rD or 4th season2nD season summer pInchInG
fRuIT TREES
vase-shaped tree training
after pruning
after pruning
central leader tree training
Beforepruning
Before pruning
*TO ORDER CALL 800-325-4�80 OR VISIT STARKBROS.COM.
��*TO ORDER CALL 800-325-4�80 OR VISIT STARKBROS.COM.
PRuNING PEACH, NECTARINE, JAPANESE RED PLuM AND APRICOT TREES These do best when pruned and trained to a vase-shaped tree. (See diagram on p. 10.) This type of tree has no central leader. (Remove at planting time.) The shape of the tree is controlled by selecting and maintaining three to five main scaffold limbs arising from the trunk. These limbs should point in different directions and originate no less than 18” and no more than 36” from the ground. Prune as shown, balancing growth evenly between the scaffold limbs.
PRuNING MINIATuRE PEACH, NECTARINE AND APRICOT TREES These do not require shaping cuts. However, because they grow so densely, they require regular dormant thinning cuts to remove competing and crossing limbs.
PRuNING WHIPS (uNBRANCHED TREES) Prune back to 28-36” above the ground at planting time. After the new branches have grown 3-5”, select a shoot to become the leader and scaffold limbs
TIPS fROM THE PROS
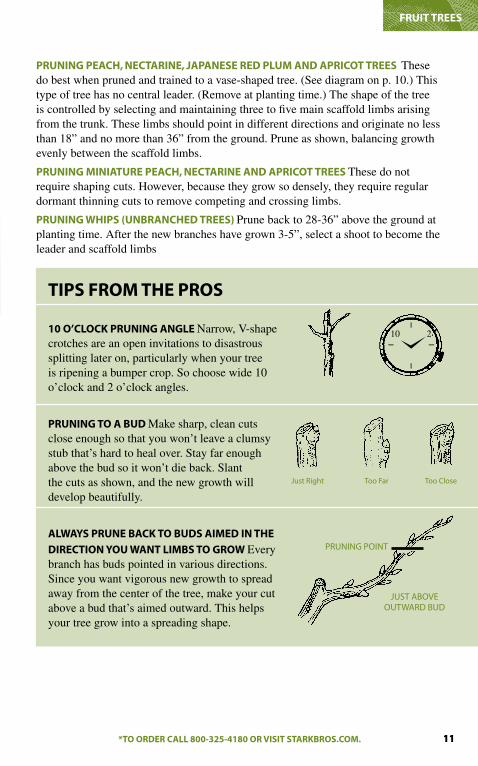
�0 O’CLOCK PRuNING ANGLE Narrow, V-shape crotches are an open invitations to disastrous splitting later on, particularly when your tree is ripening a bumper crop. So choose wide 10 o’clock and 2 o’clock angles.
PRuNING TO A BuD Make sharp, clean cuts close enough so that you won’t leave a clumsy stub that’s hard to heal over. Stay far enough above the bud so it won’t die back. Slant the cuts as shown, and the new growth will develop beautifully.
ALWAYS PRuNE BACK TO BuDS AIMED IN THE
DIRECTION YOu WANT LIMBS TO GROW Every branch has buds pointed in various directions. Since you want vigorous new growth to spread away from the center of the tree, make your cut above a bud that’s aimed outward. This helps your tree grow into a spreading shape.
��
prunInG poInt
just aBove outWarD BuD
fRuIT TREES
after pruning
10 2
just right too far too close
�2
Growing TipsYou’ve taken care of the most important things: Your tree has been carefully planted and properly pruned. But the first few seasons, there are several extra things to do.
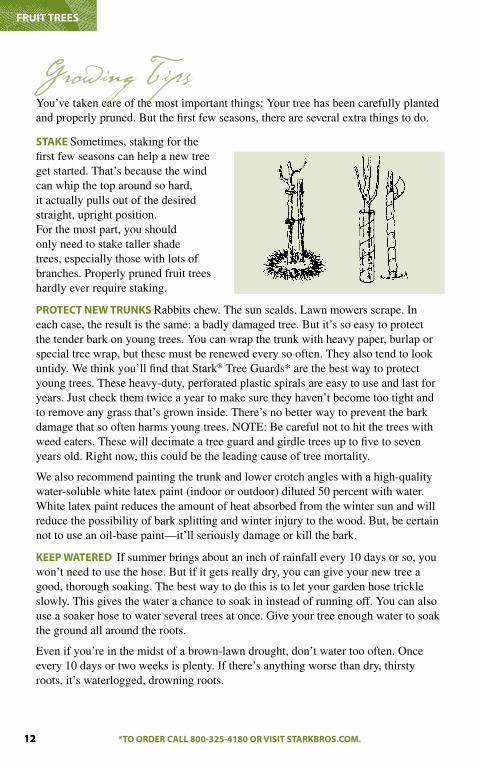
STAKE Sometimes, staking for the first few seasons can help a new tree get started. That’s because the wind can whip the top around so hard, it actually pulls out of the desired straight, upright position.For the most part, you should only need to stake taller shade trees, especially those with lots of branches. Properly pruned fruit trees hardly ever require staking.
PROTECT NEW TRuNKS Rabbits chew. The sun scalds. Lawn mowers scrape. In each case, the result is the same: a badly damaged tree. But it’s so easy to protect the tender bark on young trees. You can wrap the trunk with heavy paper, burlap or special tree wrap, but these must be renewed every so often. They also tend to look untidy. We think you’ll find that Stark® Tree Guards* are the best way to protect young trees. These heavy-duty, perforated plastic spirals are easy to use and last for years. Just check them twice a year to make sure they haven’t become too tight and to remove any grass that’s grown inside. There’s no better way to prevent the bark damage that so often harms young trees. NOTE: Be careful not to hit the trees with weed eaters. These will decimate a tree guard and girdle trees up to five to seven years old. Right now, this could be the leading cause of tree mortality.
We also recommend painting the trunk and lower crotch angles with a high-quality water-soluble white latex paint (indoor or outdoor) diluted 50 percent with water. White latex paint reduces the amount of heat absorbed from the winter sun and will reduce the possibility of bark splitting and winter injury to the wood. But, be certain not to use an oil-base paint—it’ll seriously damage or kill the bark.
KEEP WATERED If summer brings about an inch of rainfall every 10 days or so, you won’t need to use the hose. But if it gets really dry, you can give your new tree a good, thorough soaking. The best way to do this is to let your garden hose trickle slowly. This gives the water a chance to soak in instead of running off. You can also use a soaker hose to water several trees at once. Give your tree enough water to soak the ground all around the roots.
Even if you’re in the midst of a brown-lawn drought, don’t water too often. Once every 10 days or two weeks is plenty. If there’s anything worse than dry, thirsty roots, it’s waterlogged, drowning roots.
�2
fRuIT TREES
*TO ORDER CALL 800-325-4�80 OR VISIT STARKBROS.COM.
�3
Unless you’re in an area where irrigation is usually needed for normal plant growth, you probably won’t need to water after the first growing season.
Although a little depression in the soil aids summer watering, it’s important to bring the soil around the tree up to the level of the surrounding soil for the winter. If that’s not done, water could freeze around the trunk and injure the tree.
WHAT If MY TREE DOESN’T LEAf OuT QuICKLY? We ship dormant bareroot stock. Many novices think the tree is dead, but it is just “sleeping.” When planting in spring, the tree should leaf out within three to six weeks of planting. If not, try scratching the trunk with your thumbnail. If the underlying tissue is greenish, the tree is still alive. At this point, it should still grow. If it is dry and brownish, call Customer Service at 800-325-4180.
CuLTIVATE AND MuLCH Remember to keep the surface of the soil loosely worked during the spring months. Then, when summer arrives, you can cover the cultivated soil with a thick blanket of mulch. This helps keep the ground cool and moist, and it also prevents weed competition. Typar® Tree Circles* are convenient ways to protect roots and control weeds, or you can use peat, chopped leaves, straw, compost, grass clippings or well-rotted manure. Layer mulch 4-6” deep, but keep it a few inches away from the trunk. Then, in late fall or early winter, remove the mulch to prevent mice from nesting near your trees.
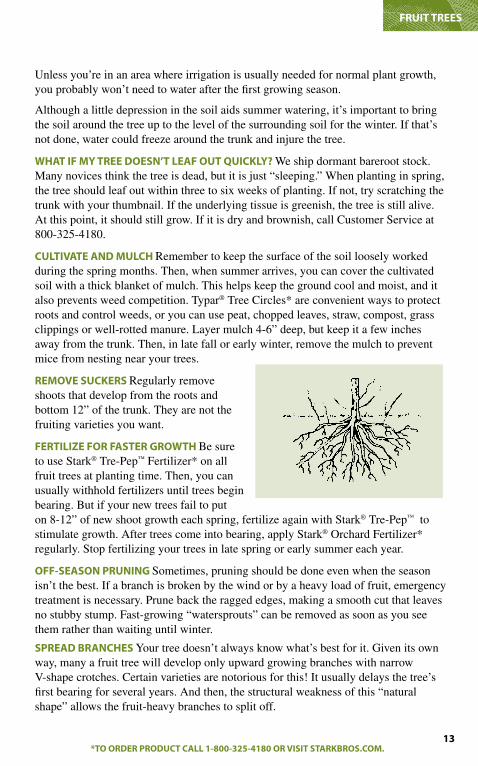
REMOVE SuCKERS Regularly remove shoots that develop from the roots and bottom 12” of the trunk. They are not the fruiting varieties you want.
fERTILIZE fOR fASTER GROWTH Be sure to use Stark® Tre-Pep™ Fertilizer* on all fruit trees at planting time. Then, you can usually withhold fertilizers until trees begin bearing. But if your new trees fail to put on 8-12” of new shoot growth each spring, fertilize again with Stark® Tre-Pep™ to stimulate growth. After trees come into bearing, apply Stark® Orchard Fertilizer* regularly. Stop fertilizing your trees in late spring or early summer each year.
Off-SEASON PRuNING Sometimes, pruning should be done even when the season isn’t the best. If a branch is broken by the wind or by a heavy load of fruit, emergency treatment is necessary. Prune back the ragged edges, making a smooth cut that leaves no stubby stump. Fast-growing “watersprouts” can be removed as soon as you see them rather than waiting until winter.
SPREAD BRANCHES Your tree doesn’t always know what’s best for it. Given its own way, many a fruit tree will develop only upward growing branches with narrow V-shape crotches. Certain varieties are notorious for this! It usually delays the tree’s first bearing for several years. And then, the structural weakness of this “natural shape” allows the fruit-heavy branches to split off.
fRuIT TREES
*TO ORDER PRODuCT CALL �-800-325-4�80 OR VISIT STARKBROS.COM.
�4
Additionally, when all the branches grow upward, they crowd each other for light and air circulation. And this problem only gets worse as the years go by.
So here’s how to help your tree develop a sturdy, uncrowded structure that will bear earlier. It’s called branch spreading and there are different ways to do it:
• Spreaders. Just pull down the tree’s side branches to the ideal 10 o’clock/2 o’clock position, using our Limb Spreaders*, made of weather- and ultraviolet-
resistant, high-quality molded plastic. They’re bright red, lightweight and easy to handle.
• Tying down. Another way to spread branches is to bend them down to nearly horizontal, tying them in that position with soft twine to a stake driven into the ground. Just make sure the twine doesn’t become “choking tight.”
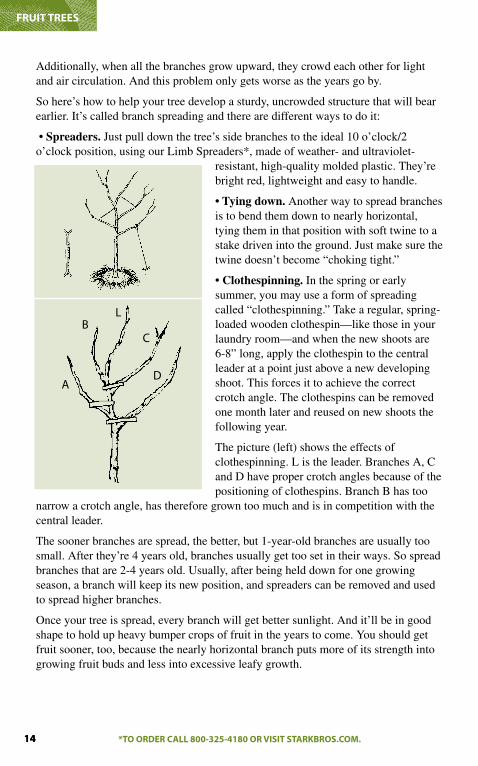
• Clothespinning. In the spring or early summer, you may use a form of spreading called “clothespinning.” Take a regular, spring-loaded wooden clothespin—like those in your laundry room—and when the new shoots are 6-8” long, apply the clothespin to the central leader at a point just above a new developing shoot. This forces it to achieve the correct crotch angle. The clothespins can be removed one month later and reused on new shoots the following year.
The picture (left) shows the effects of clothespinning. L is the leader. Branches A, C and D have proper crotch angles because of the positioning of clothespins. Branch B has too
narrow a crotch angle, has therefore grown too much and is in competition with the central leader.
The sooner branches are spread, the better, but 1-year-old branches are usually too small. After they’re 4 years old, branches usually get too set in their ways. So spread branches that are 2-4 years old. Usually, after being held down for one growing season, a branch will keep its new position, and spreaders can be removed and used to spread higher branches.
Once your tree is spread, every branch will get better sunlight. And it’ll be in good shape to hold up heavy bumper crops of fruit in the years to come. You should get fruit sooner, too, because the nearly horizontal branch puts more of its strength into growing fruit buds and less into excessive leafy growth.
�4
fRuIT TREES
a
Bl
c
D
*TO ORDER CALL 800-325-4�80 OR VISIT STARKBROS.COM.

�5�5
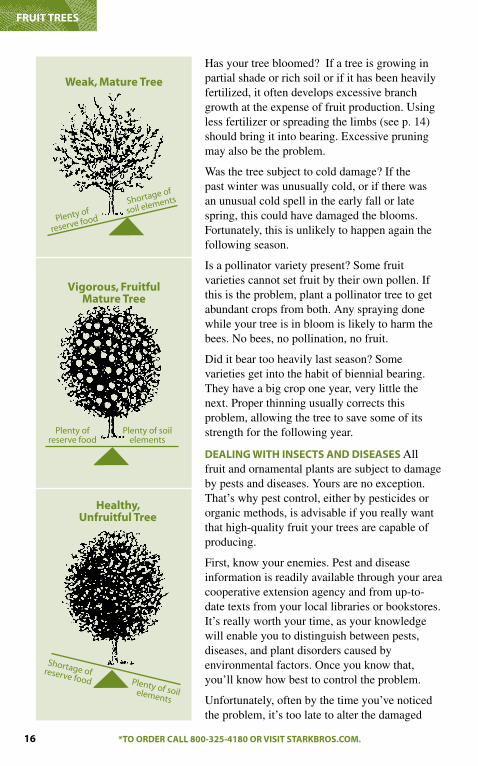
Maintaining HealthMost every time a fruit tree won’t bear, the problem is a lack of balance in the tree’s life system. Here’s how it works: The roots require water, nitrogen and other soil elements, and the leaves take in air and sunlight to produce food. When the tree has more food than it needs for itself, it uses the surplus to make fruit.
Normally, there is a healthy balance between the leaves and the roots ... they work well together. But sometimes, outside influences can upset this balance. By taking corrective measures, the balance can be restored.
If YOuR TREE LOOKS uNHEALTHY, WITH LIGHT LEAVES AND SHORT TWIGS If a tree has plenty of food reserves but lacks sufficient soil elements, the leaves will be light green and slender twigs will be short (less than 10” annual growth for a mature fruit tree). This tree is weak, and even though it often bears a lot of undersize fruit, it lacks the healthy growth needed for continued production. Try these corrective measures:
• Apply fertilizer with high nitrogen content. Stark® Orchard Fertilizer* is recommended.
• Water well if the soil is dry.
• Prune in early spring (see instructions on p. 8-11).
• Spray regularly to keep leaves healthy.
If YOuR TREE LOOKS uNHEALTHY, WITH DARK LEAVES AND LONG TWIGS If a tree has plenty of soil elements but is low on food reserves, the leaves will be dark green and slender twigs will grow very long (over 15” annual growth for a mature apple tree). This is the normal state for a young tree, but when it causes nonbearing in an older tree, try some of these corrective measures:
• Withhold fertilizer, discontinue cultivation.
• Protect leaves from insects and diseases.
• Prune lightly, mostly thinning out to let the remaining branches get more light.
• Bend limbs down (see p. 14) so center of tree gets more light.
If you can help your tree maintain this healthy balance, it can produce big crops of fruit year after year. So if you can help tip the scale in the right direction, it’s well worth your time and trouble.
If YOuR fRuIT TREE REfuSES TO BEAR When fruit trees don’t bear, there must be a reason. Often you can do something to help bring them into bearing.
First, how old is your tree? Most dwarf fruit trees will bear their first crop the second or third season after planting. But for various reasons, certain trees may not be ready for bearing until a year, even two years later. Standard-size trees take longer: apples and pears, from three to five years; peaches and nectarines about two or three years; cherries, apricots and plums, from three to five years.
fRuIT TREES
*TO ORDER CALL 800-325-4�80 OR VISIT STARKBROS.COM.
��
Has your tree bloomed? If a tree is growing in partial shade or rich soil or if it has been heavily fertilized, it often develops excessive branch growth at the expense of fruit production. Using less fertilizer or spreading the limbs (see p. 14) should bring it into bearing. Excessive pruning may also be the problem.
Was the tree subject to cold damage? If the past winter was unusually cold, or if there was an unusual cold spell in the early fall or late spring, this could have damaged the blooms. Fortunately, this is unlikely to happen again the following season.
Is a pollinator variety present? Some fruit varieties cannot set fruit by their own pollen. If this is the problem, plant a pollinator tree to get abundant crops from both. Any spraying done while your tree is in bloom is likely to harm the bees. No bees, no pollination, no fruit.
Did it bear too heavily last season? Some varieties get into the habit of biennial bearing. They have a big crop one year, very little the next. Proper thinning usually corrects this problem, allowing the tree to save some of its strength for the following year.
DEALING WITH INSECTS AND DISEASES All fruit and ornamental plants are subject to damage by pests and diseases. Yours are no exception. That’s why pest control, either by pesticides or organic methods, is advisable if you really want that high-quality fruit your trees are capable of producing.
First, know your enemies. Pest and disease information is readily available through your area cooperative extension agency and from up-to-date texts from your local libraries or bookstores. It’s really worth your time, as your knowledge will enable you to distinguish between pests, diseases, and plant disorders caused by environmental factors. Once you know that, you’ll know how best to control the problem.
Unfortunately, often by the time you’ve noticed the problem, it’s too late to alter the damaged
shortage of
soil elements
plenty of
reserve food
Weak, Mature Tree
plenty of soil elements
plenty of reserve food
Vigorous, fruitful Mature Tree
fRuIT TREES
plenty of soil elements
shortage of reserve food
Healthy, unfruitful Tree
*TO ORDER CALL 800-325-4�80 OR VISIT STARKBROS.COM.
fruit. You can only prevent further damage before it happens—and hopefully prevent it from happening next year.
If you are located in a fruit-growing region, or near a wooded area or abandoned orchard site, you will be hard-pressed by pests and diseases. Also, bear in mind that many pests and diseases flourish in wet weather.
If you’re lucky, pests will hardly ever cause trouble in your area. Other places may seem to attract pests like magnets. But when you look at the pests shown on these pages, it’s encouraging to know that you’ll probably never be troubled by many of them. And, if you’re satisfied with less-than-perfect fruit, you could get an acceptable crop with very little spraying.
Few pests actually cause permanent damage to your tree. For the most part, you start fresh each season. But if a pest harms part of this year’s crop, it’s likely to happen again, so you’d better take preventive measures next year. Of course, if a pest gets so overwhelming as to weaken your tree, it may need a healthy growing season to fully recover. Good sanitary practices in the orchard can keep pests and disease from overwintering.
If a pest or disease problem is affecting your fruit tree before it’s of bearing age, follow the recommended spray programs. (See spray chart pgs. 20-21.)
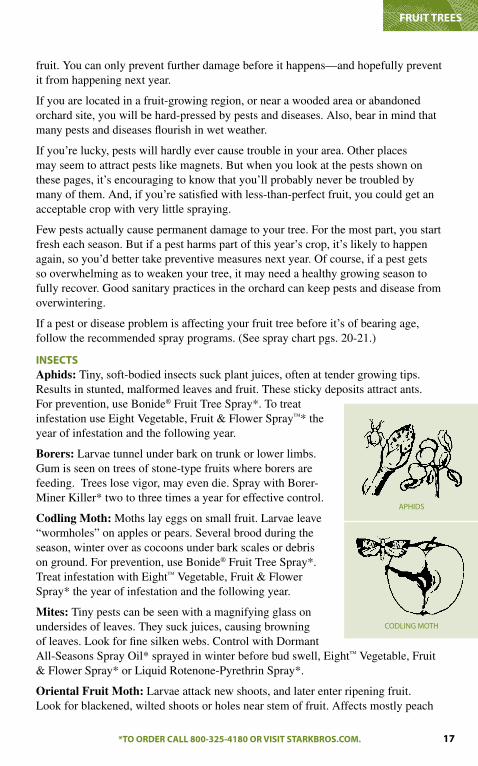
INSECTS Aphids: Tiny, soft-bodied insects suck plant juices, often at tender growing tips. Results in stunted, malformed leaves and fruit. These sticky deposits attract ants. For prevention, use Bonide® Fruit Tree Spray*. To treat infestation use Eight Vegetable, Fruit & Flower Spray™* the year of infestation and the following year.
Borers: Larvae tunnel under bark on trunk or lower limbs. Gum is seen on trees of stone-type fruits where borers are feeding. Trees lose vigor, may even die. Spray with Borer-Miner Killer* two to three times a year for effective control.
Codling Moth: Moths lay eggs on small fruit. Larvae leave “wormholes” on apples or pears. Several brood during the season, winter over as cocoons under bark scales or debris on ground. For prevention, use Bonide® Fruit Tree Spray*. Treat infestation with Eight™ Vegetable, Fruit & Flower Spray* the year of infestation and the following year.
Mites: Tiny pests can be seen with a magnifying glass on undersides of leaves. They suck juices, causing browning of leaves. Look for fine silken webs. Control with Dormant All-Seasons Spray Oil* sprayed in winter before bud swell, Eight™ Vegetable, Fruit & Flower Spray* or Liquid Rotenone-Pyrethrin Spray*.
Oriental Fruit Moth: Larvae attack new shoots, and later enter ripening fruit. Look for blackened, wilted shoots or holes near stem of fruit. Affects mostly peach
fRuIT TREES
aphIDs
coDlInG moth
��*TO ORDER CALL 800-325-4�80 OR VISIT STARKBROS.COM.
and nectarine trees. For prevention, use Bonide® Fruit Tree Spray*. Use Eight™ Vegetable, Fruit & Flower Spray* the year of infestation and the following year.
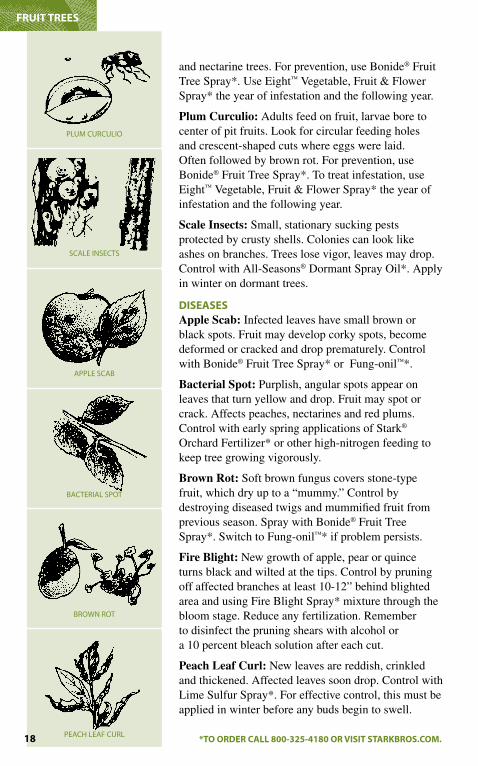
Plum Curculio: Adults feed on fruit, larvae bore to center of pit fruits. Look for circular feeding holes and crescent-shaped cuts where eggs were laid. Often followed by brown rot. For prevention, use Bonide® Fruit Tree Spray*. To treat infestation, use Eight™ Vegetable, Fruit & Flower Spray* the year of infestation and the following year.
Scale Insects: Small, stationary sucking pests protected by crusty shells. Colonies can look like ashes on branches. Trees lose vigor, leaves may drop. Control with All-Seasons® Dormant Spray Oil*. Apply in winter on dormant trees.
DISEASES Apple Scab: Infected leaves have small brown or black spots. Fruit may develop corky spots, become deformed or cracked and drop prematurely. Control with Bonide® Fruit Tree Spray* or Fung-onil™*.
Bacterial Spot: Purplish, angular spots appear on leaves that turn yellow and drop. Fruit may spot or crack. Affects peaches, nectarines and red plums. Control with early spring applications of Stark® Orchard Fertilizer* or other high-nitrogen feeding to keep tree growing vigorously.
Brown Rot: Soft brown fungus covers stone-type fruit, which dry up to a “mummy.” Control by destroying diseased twigs and mummified fruit from previous season. Spray with Bonide® Fruit Tree Spray*. Switch to Fung-onil™* if problem persists.
Fire Blight: New growth of apple, pear or quince turns black and wilted at the tips. Control by pruning off affected branches at least 10-12” behind blighted area and using Fire Blight Spray* mixture through the bloom stage. Reduce any fertilization. Remember to disinfect the pruning shears with alcohol or a 10 percent bleach solution after each cut.
Peach Leaf Curl: New leaves are reddish, crinkled and thickened. Affected leaves soon drop. Control with Lime Sulfur Spray*. For effective control, this must be applied in winter before any buds begin to swell.
fRuIT TREES
plum curculIo
scale Insects
apple scaB
BacterIal spot
BroWn rot
peach leaf curl�8 *TO ORDER CALL 800-325-4�80 OR VISIT STARKBROS.COM.
MYTHS ABOuT SPRAYINGThere are plenty of myths about spraying; for example:
Myth: It takes too much time.
Fact: Actually, it takes less than five minutes to spray each full-grown dwarf fruit tree. If only mowing a lawn could be such fast work!
Myth: Sprays are dangerous.
Fact: All spray materials we offer at Stark Bro’s have been fully registered with the Environmental Protection Agency. (Always use according to product label.) They’re fussy about potential dangers.
Myth: Sprays might contaminate the fruit.
Fact: Bonide® Fruit Tree Spray* forms a thin barrier film on the surface of the tree, leaves and fruit. You can be confident it never enters the fruit. A simple rinse removes any dusty residue.
Myth: Sprayers are difficult to operate.
Fact: Modern pressurized spray units make it convenient to spray, reaching all branches of a mature dwarf fruit tree from the ground. Very little effort is needed to do a good job.
Myth: Spraying must be done frequently.
Fact: Only six to eight sprayings are recommended each season, following the proper schedule. That’s a much less demanding schedule than mowing the lawn.
You’ll find dozens of different sprays on the market under many brand names. While somewhat similar, they have important differences in formulation.Bonide® Fruit Tree Spray* is the easiest, most effective way to control fruit tree insects and diseases. It applies to so many problems. With a late winter application of All-Seasons® Dormant Spray Oil*, followed with properly timed applications of this one combination spray, you can control most every fruit tree pest.
Because Bonide® Fruit Tree Spray* contains a mild insecticide, it should not be used during bloom. Give the bees a chance to pollinate your trees.
Our orchard experts have researched every sort of spray material available. They know the strengths and weaknesses of every one of them. Above all, they feel obligated to provide the best possible spray to Stark Bro’s customers. It’s a service designed to help people get the most out of their trees. You can be sure if there were any other spray that would work just as well, Stark Bro’s would be offering it, too.
Bonide® Fruit Tree Spray* is a good preventative spray. If an infestation occurs, follow the spray chart on p. 20-21.
Be sure to exercise common sense when using Bonide® Fruit Tree Spray* (or any spray material, for that matter). When concentrated, it’s a potent mixture that deserves “top shelf” treatment to keep it out of the reach of children. Read all the instructions on the package ... yes, even if you’ve used it many times before. After all, it’s all too easy to get careless with familiar things.
If you’ll follow the proven spray program that has been developed by Stark Bro’s professionals, you’ll surely get a plentiful crop of beautiful homegrown fruit. That’s why you planted these fruit trees, and those are the results you have a right to expect for your time and attention.
fRuIT TREES
��
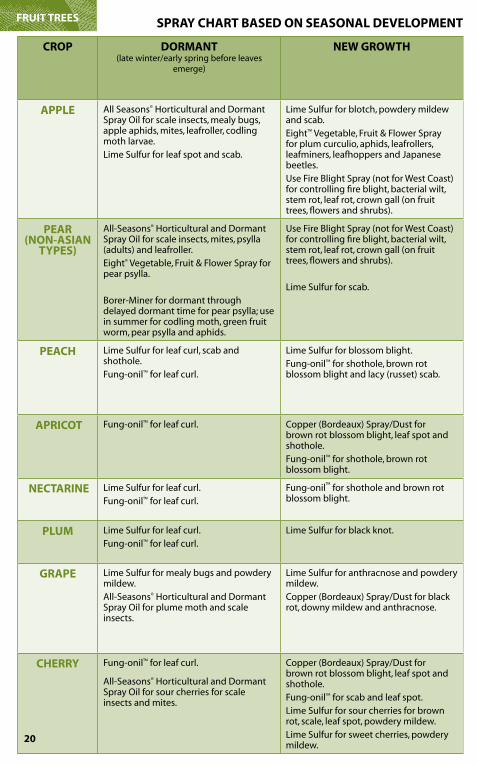
CROP DORMANT(late winter/early spring before leaves
emerge)
NEW GROWTH AfTER fLOWERING AfTER PETAL DROP(avoid spraying during full
bloomstage to allow bees to pollinate)
GENERAL COMMENTS fOR ALL SPRAYING
NATuRAL CONTROLS
APPLE all seasons® horticultural and Dormant spray oil for scale insects, mealy bugs, apple aphids, mites, leafroller, codling moth larvae. lime sulfur for leaf spot and scab.
lime sulfur for blotch, powdery mildew and scab.eight™ vegetable, fruit & flower spray for plum curculio, aphids, leafrollers, leafminers, leafhoppers and japanese beetles. use fire Blight spray (not for West coast) for controlling fire blight, bacterial wilt, stem rot, leaf rot, crown gall (on fruit trees, flowers and shrubs).
copper (Bordeaux) spray/Dust for bitter rot, black rot, blotch, powdery mildew and anthracnose.lime sulfur for blotch.
spray every 14 days with Bonide® fruit tree spray as a preventative measure. cease spraying 21 days before harvest. no more than 8 applications per season.
serenade® Garden Disease control can be used for bacterial spot, scab, powdery mildew, rust, gray mold, leaf blight, and more. liquid rotenone-pyrethrins spray for insects. lime sulfur spray as a fungicide, but is not to be used on Delicious apples.
PEAR (NON-ASIAN
TYPES)
all-seasons® horticultural and Dormant spray oil for scale insects, mites, psylla (adults) and leafroller. eight® vegetable, fruit & flower spray for pear psylla.
Borer-miner for dormant through delayed dormant time for pear psylla; use in summer for codling moth, green fruit worm, pear psylla and aphids.
use fire Blight spray (not for West coast) for controlling fire blight, bacterial wilt, stem rot, leaf rot, crown gall (on fruit trees, flowers and shrubs).
lime sulfur for scab.
eight™ vegetable, fruit & flower spray for codling moth, pear psylla and aphids.
copper (Bordeaux) spray/Dust for leaf spot and scab. lime sulfur for pear psylla and mites. liquid rotenone-pyrethins spray for aphids, leafhoppers and japanese beetles.
serenade® Garden Disease control can be used for bacterial spot, scab, powdery mildew, rust, gray mold, leaf blight, and more. liquid rotenone-pyrethrins spray for insects.
PEACH lime sulfur for leaf curl, scab and shothole. fung-onil™ for leaf curl.
lime sulfur for blossom blight. fung-onil™ for shothole, brown rot blossom blight and lacy (russet) scab.
lime sulfur for brown rot, leaf spot and powdery mildew. spray every 14 days with Bonide® fruit tree spray as a preventive measure. no more than 8 applications per season.
serenade® Garden Disease control can be used for bacterial spot, scab, powdery mildew, rust, gray mold, leaf blight, and more. liquid rotenone-pyrethrins spray for insects.
APRICOT fung-onil™ for leaf curl. copper (Bordeaux) spray/Dust for brown rot blossom blight, leaf spot and shothole. fung-onil™ for shothole, brown rot blossom blight.
NECTARINE lime sulfur for leaf curl. fung-onil™ for leaf curl.
fung-onil™ for shothole and brown rot blossom blight.
lime sulfur for shothole, powdery mildew, brown rot and leaf spot.
PLuM lime sulfur for leaf curl.fung-onil™ for leaf curl.
lime sulfur for black knot. lime sulfur for blotch, powdery mildew and brown rot.
liquid rotenone-pyrethrins spray for aphids, leafhoppers, japanese beetles and mites.
GRAPE lime sulfur for mealy bugs and powdery mildew. all-seasons® horticultural and Dormant spray oil for plume moth and scale insects.
lime sulfur for anthracnose and powdery mildew. copper (Bordeaux) spray/Dust for black rot, downy mildew and anthracnose.
liquid rotenone-pyrethrins spray for aphids, leafhoppers, japanese beetles.
spray every 14 days with Bonide® fruit tree spray as a preventive measure. no more than 7 applications per season.
liquid rotenone-pyrethrins spray for insects. serenade® Garden Disease control can be used for bacterial spot, scab, powdery mildew, rust, gray mold, leaf blight, and more.
CHERRY fung-onil™ for leaf curl.
all-seasons® horticultural and Dormant spray oil for sour cherries for scale insects and mites.
copper (Bordeaux) spray/Dust for brown rot blossom blight, leaf spot and shothole. fung-onil™ for scab and leaf spot.lime sulfur for sour cherries for brown rot, scale, leaf spot, powdery mildew.lime sulfur for sweet cherries, powdery mildew.
liquid rotenone-pyrethrins spray for aphids, leafhoppers, japanese beetles.
spray every 14 days with Bonide® fruit tree spray as a preventive measure. no more than 7 applications per season.
liquid rotenone-pyrethrins spray for insects. serenade® Garden Disease control can be used for bacterial spot, scab, powdery mildew, rust, gray mold, leaf blight, and more.
SPRAY CHART BASED ON SEASONAL DEVELOPMENT fRuIT TREES
20
CROP DORMANT(late winter/early spring before leaves
emerge)
NEW GROWTH AfTER fLOWERING AfTER PETAL DROP(avoid spraying during full
bloomstage to allow bees to pollinate)
GENERAL COMMENTS fOR ALL SPRAYING
NATuRAL CONTROLS
APPLE all seasons® horticultural and Dormant spray oil for scale insects, mealy bugs, apple aphids, mites, leafroller, codling moth larvae. lime sulfur for leaf spot and scab.
lime sulfur for blotch, powdery mildew and scab.eight™ vegetable, fruit & flower spray for plum curculio, aphids, leafrollers, leafminers, leafhoppers and japanese beetles. use fire Blight spray (not for West coast) for controlling fire blight, bacterial wilt, stem rot, leaf rot, crown gall (on fruit trees, flowers and shrubs).
copper (Bordeaux) spray/Dust for bitter rot, black rot, blotch, powdery mildew and anthracnose.lime sulfur for blotch.
spray every 14 days with Bonide® fruit tree spray as a preventative measure. cease spraying 21 days before harvest. no more than 8 applications per season.
serenade® Garden Disease control can be used for bacterial spot, scab, powdery mildew, rust, gray mold, leaf blight, and more. liquid rotenone-pyrethrins spray for insects. lime sulfur spray as a fungicide, but is not to be used on Delicious apples.
PEAR (NON-ASIAN
TYPES)
all-seasons® horticultural and Dormant spray oil for scale insects, mites, psylla (adults) and leafroller. eight® vegetable, fruit & flower spray for pear psylla.
Borer-miner for dormant through delayed dormant time for pear psylla; use in summer for codling moth, green fruit worm, pear psylla and aphids.
use fire Blight spray (not for West coast) for controlling fire blight, bacterial wilt, stem rot, leaf rot, crown gall (on fruit trees, flowers and shrubs).
lime sulfur for scab.
eight™ vegetable, fruit & flower spray for codling moth, pear psylla and aphids.
copper (Bordeaux) spray/Dust for leaf spot and scab. lime sulfur for pear psylla and mites. liquid rotenone-pyrethins spray for aphids, leafhoppers and japanese beetles.
serenade® Garden Disease control can be used for bacterial spot, scab, powdery mildew, rust, gray mold, leaf blight, and more. liquid rotenone-pyrethrins spray for insects.
PEACH lime sulfur for leaf curl, scab and shothole. fung-onil™ for leaf curl.
lime sulfur for blossom blight. fung-onil™ for shothole, brown rot blossom blight and lacy (russet) scab.
lime sulfur for brown rot, leaf spot and powdery mildew. spray every 14 days with Bonide® fruit tree spray as a preventive measure. no more than 8 applications per season.
serenade® Garden Disease control can be used for bacterial spot, scab, powdery mildew, rust, gray mold, leaf blight, and more. liquid rotenone-pyrethrins spray for insects.
APRICOT fung-onil™ for leaf curl. copper (Bordeaux) spray/Dust for brown rot blossom blight, leaf spot and shothole. fung-onil™ for shothole, brown rot blossom blight.
NECTARINE lime sulfur for leaf curl. fung-onil™ for leaf curl.
fung-onil™ for shothole and brown rot blossom blight.
lime sulfur for shothole, powdery mildew, brown rot and leaf spot.
PLuM lime sulfur for leaf curl.fung-onil™ for leaf curl.
lime sulfur for black knot. lime sulfur for blotch, powdery mildew and brown rot.
liquid rotenone-pyrethrins spray for aphids, leafhoppers, japanese beetles and mites.
GRAPE lime sulfur for mealy bugs and powdery mildew. all-seasons® horticultural and Dormant spray oil for plume moth and scale insects.
lime sulfur for anthracnose and powdery mildew. copper (Bordeaux) spray/Dust for black rot, downy mildew and anthracnose.
liquid rotenone-pyrethrins spray for aphids, leafhoppers, japanese beetles.
spray every 14 days with Bonide® fruit tree spray as a preventive measure. no more than 7 applications per season.
liquid rotenone-pyrethrins spray for insects. serenade® Garden Disease control can be used for bacterial spot, scab, powdery mildew, rust, gray mold, leaf blight, and more.
CHERRY fung-onil™ for leaf curl.
all-seasons® horticultural and Dormant spray oil for sour cherries for scale insects and mites.
copper (Bordeaux) spray/Dust for brown rot blossom blight, leaf spot and shothole. fung-onil™ for scab and leaf spot.lime sulfur for sour cherries for brown rot, scale, leaf spot, powdery mildew.lime sulfur for sweet cherries, powdery mildew.
liquid rotenone-pyrethrins spray for aphids, leafhoppers, japanese beetles.
spray every 14 days with Bonide® fruit tree spray as a preventive measure. no more than 7 applications per season.
liquid rotenone-pyrethrins spray for insects. serenade® Garden Disease control can be used for bacterial spot, scab, powdery mildew, rust, gray mold, leaf blight, and more.
SPRAY CHART BASED ON SEASONAL DEVELOPMENT fRuIT TREESREAD AND fOLLOW ALL LABEL INSTRuCTIONS
2�
22 *TO ORDER CALL 800-325-4�80 OR VISIT STARKBROS.COM.
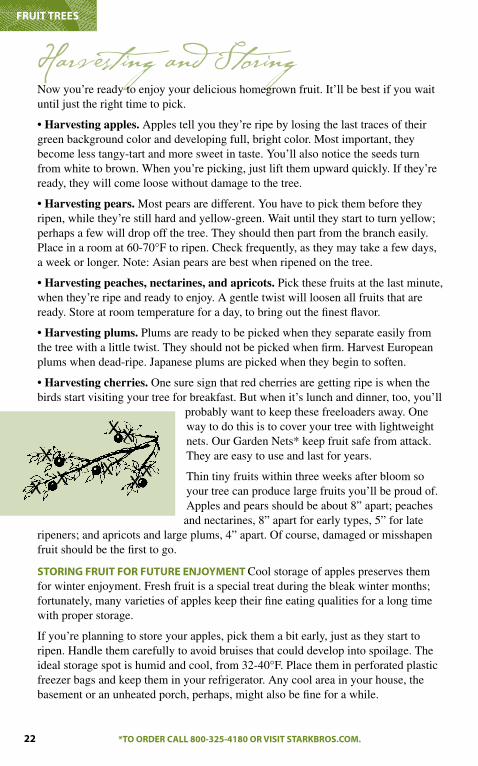
Harvesting and StoringNow you’re ready to enjoy your delicious homegrown fruit. It’ll be best if you wait until just the right time to pick.
• Harvesting apples. Apples tell you they’re ripe by losing the last traces of their green background color and developing full, bright color. Most important, they become less tangy-tart and more sweet in taste. You’ll also notice the seeds turn from white to brown. When you’re picking, just lift them upward quickly. If they’re ready, they will come loose without damage to the tree.
• Harvesting pears. Most pears are different. You have to pick them before they ripen, while they’re still hard and yellow-green. Wait until they start to turn yellow; perhaps a few will drop off the tree. They should then part from the branch easily. Place in a room at 60-70°F to ripen. Check frequently, as they may take a few days, a week or longer. Note: Asian pears are best when ripened on the tree.
• Harvesting peaches, nectarines, and apricots. Pick these fruits at the last minute, when they’re ripe and ready to enjoy. A gentle twist will loosen all fruits that are ready. Store at room temperature for a day, to bring out the finest flavor.
• Harvesting plums. Plums are ready to be picked when they separate easily from the tree with a little twist. They should not be picked when firm. Harvest European plums when dead-ripe. Japanese plums are picked when they begin to soften.
• Harvesting cherries. One sure sign that red cherries are getting ripe is when the birds start visiting your tree for breakfast. But when it’s lunch and dinner, too, you’ll
probably want to keep these freeloaders away. One way to do this is to cover your tree with lightweight nets. Our Garden Nets* keep fruit safe from attack. They are easy to use and last for years.
Thin tiny fruits within three weeks after bloom so your tree can produce large fruits you’ll be proud of. Apples and pears should be about 8” apart; peaches and nectarines, 8” apart for early types, 5” for late
ripeners; and apricots and large plums, 4” apart. Of course, damaged or misshapen fruit should be the first to go.
STORING fRuIT fOR fuTuRE ENJOYMENT Cool storage of apples preserves them for winter enjoyment. Fresh fruit is a special treat during the bleak winter months; fortunately, many varieties of apples keep their fine eating qualities for a long time with proper storage.
If you’re planning to store your apples, pick them a bit early, just as they start to ripen. Handle them carefully to avoid bruises that could develop into spoilage. The ideal storage spot is humid and cool, from 32-40°F. Place them in perforated plastic freezer bags and keep them in your refrigerator. Any cool area in your house, the basement or an unheated porch, perhaps, might also be fine for a while.
fRuIT TREES
*TO ORDER CALL 800-325-4�80 OR VISIT STARKBROS.COM.
x
x x x
x
x
x
x
23*TO ORDER CALL 800-325-4�80 OR VISIT STARKBROS.COM.
You can also extend the enjoyment of many pears and plums in similar fashion. Pick when they are not quite ripe, and place them in the refrigerator immediately. Bring them out to ripen at room temperature when you’re ready to use them.
It’s best to inspect stored fruit every week or so to check for any spoilage. That way, you can remove any that are developing soft spots or brown areas. This keeps spoilage from “spreading” to nearby fruit. Remember, “One bad apple spoils the whole barrel.”
NuT TREES
HOW ABOuT ORGANIC GROWING? Many gardeners and fruit growers have recently joined the organic growing trend. They’re very excited about it, and they’re convinced that organically grown crops have special qualities that make the extra trouble worthwhile. However, in our experience, organic gardening is not the easiest way to grow things.
Frankly, the best way to get lots of blemish-free fruit is to use conventional chemical sprays. Even though organic growers have scored some fine successes with vegetables using organic methods, it’s much harder to get undamaged fruit without resorting to chemicals.
However, we can offer some tips for organic growers. First, start with varieties that have high levels of disease resistance. Second, become a “bookworm” and consume a few organic gardening guidebooks. They’ll give you complete information and suggestions on alternative control methods. Rodale’s Organic Gardening magazine is generally considered to be the leading publication in the organic movement. Even if you’re not dedicated to 100 percent organic gardening, you’ll find this magazine chock-full of specialized growing materials and methods that will allow you to cut down on the amount of pesticides used.
NuT TREESThere’s more to growing enjoyment than fresh fruit. We think everyone ought to plant at least one or two nut trees in the yard. It’s probably the greatest combination ever: a magnificent hardwood shade tree plus a yearly crop of big, meaty nuts.
In fact, there’s only one bad thing to say about nut trees: They can be so stubborn to get started. Once they’re growing, though, they are about as carefree as a tree can be. So the extra attention you give nut trees at planting time is well worth it when you consider how trouble-free they’ll be in all the years ahead.
PLANTING One of the most important things you can do for your new nut tree is to plant it as soon as you get it. If you wait a few days, make sure to keep the roots moist at all times.
Many nut trees have just one main root, almost like a giant skinny carrot. With most nut trees, this tap root should not be trimmed or bent when planted, so you’ll dig a hole deeper than the root itself. The tap root of a seedling pecan tree, however, should be pruned before planting.
fRuIT TREES/NuT TREES
24 *TO ORDER CALL 800-325-4�80 OR VISIT STARKBROS.COM.
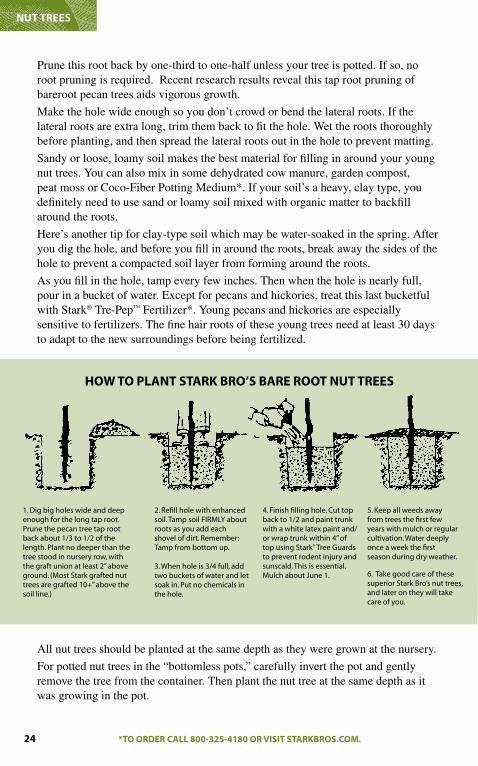
Prune this root back by one-third to one-half unless your tree is potted. If so, no root pruning is required. Recent research results reveal this tap root pruning of bareroot pecan trees aids vigorous growth.
Make the hole wide enough so you don’t crowd or bend the lateral roots. If the lateral roots are extra long, trim them back to fit the hole. Wet the roots thoroughly before planting, and then spread the lateral roots out in the hole to prevent matting.
Sandy or loose, loamy soil makes the best material for filling in around your young nut trees. You can also mix in some dehydrated cow manure, garden compost, peat moss or Coco-Fiber Potting Medium*. If your soil’s a heavy, clay type, you definitely need to use sand or loamy soil mixed with organic matter to backfill around the roots.
Here’s another tip for clay-type soil which may be water-soaked in the spring. After you dig the hole, and before you fill in around the roots, break away the sides of the hole to prevent a compacted soil layer from forming around the roots.
As you fill in the hole, tamp every few inches. Then when the hole is nearly full, pour in a bucket of water. Except for pecans and hickories, treat this last bucketful with Stark® Tre-Pep™ Fertilizer*. Young pecans and hickories are especially sensitive to fertilizers. The fine hair roots of these young trees need at least 30 days to adapt to the new surroundings before being fertilized.
All nut trees should be planted at the same depth as they were grown at the nursery.
For potted nut trees in the “bottomless pots,” carefully invert the pot and gently remove the tree from the container. Then plant the nut tree at the same depth as it was growing in the pot.
NuT TREES
1. Dig big holes wide and deep enough for the long tap root. prune the pecan tree tap root back about 1/3 to 1/2 of the length. plant no deeper than the tree stood in nursery row, with the graft union at least 2’’ above ground. (most stark grafted nut trees are grafted 10+” above the soil line.)
2. refill hole with enhanced soil. tamp soil fIrmlY about roots as you add each shovel of dirt. remember: tamp from bottom up.
3. When hole is 3/4 full, add two buckets of water and let soak in. put no chemicals in the hole.
4. finish filling hole. cut top back to 1/2 and paint trunk with a white latex paint and/or wrap trunk within 4” of top using stark® tree Guards to prevent rodent injury and sunscald. this is essential. mulch about june 1.
5. Keep all weeds away from trees the first few years with mulch or regular cultivation. Water deeply once a week the first season during dry weather.
HOW TO PLANT STARK BRO’S BARE ROOT NuT TREES
6. take good care of these superior stark Bro’s nut trees, and later on they will take care of you.
*TO ORDER CALL 800-325-4�80 OR VISIT STARKBROS.COM.

25*TO ORDER CALL 800-325-4�80 OR VISIT STARKBROS.COM.
For bareroot trees, there will be a noticeable color difference between the roots and the trunk. Plant at the depth that this color difference begins.
SPACING One of the best things you can do to help your young nut trees grow into big trees is to give them adequate space when planting. For walnut and hickory trees, leave 25’ to 50’ between trees. Space pecans at 40’ to 70’ apart. Filberts and almonds can be planted about 15’ to 20’ apart.
NOTE: Many plants, including fruit trees, may not grow if planted within 50’ of black walnut trees.
PROPER WATERING Give your tree another good soaking of water five days after planting. After that, keep the surroundng soil moist but not saturated.
PRuNING With your bare root trees planted securely in the ground, ready to grow, here comes the hard part. Muster the courage to give your new tree a drastic prun-ing, cutting off at least one-third to one-half of the top (but not below the bud/graft union). This forces it to grow a strong sprout that will become the main trunk. Take our word for it: This severe pruning at planting time gets your new tree off to the best possible start. Potted nut trees do not need pruning.
fLOWERING AND POLLINATION Of NuT TREES As we’ve said before, a nut tree is a great combination tree to have in your yard. Nut trees make wonderful shade trees, and they also provide you with bountiful crops of meaty nuts year after year.
We’ve pretty well covered the basics of caring for your nut trees. Now let’s discuss how to improve the crops you harvest.
Proper pollination is an important factor affecting how nut trees bear. You know that flowers on a fruit tree all blossom at the same time. But this isn’t true with nut trees. Sometimes, the female flowers on a nut tree do not mature at the same time the male flowers are ready to shed their pollen.
This is why we recommend you plant certain varieties together. When you can plant more than one nut tree, it helps ensure proper pollination. And better pollination will give you more nuts, and larger nuts with heavier kernels.
POLLINATION PARTNERS With that in mind, we’d like to make some recommendations on what varieties make good pollination partners.
In the North and Midwest, Stark® Surecrop Pecan is self-pollinating. Stark® Surecrop and Colby Pecan are both good pollinators for Starking® Hardy Giant™ Pecan. Likewise, the Stark® Surecrop Pecan and Starking® Hardy Giant Pecan can pollinate the Colby Pecan.
As for our Missouri Hardy Pecans, Missouri Mammoth Hickories, Hazelnuts, Carpathian Walnut seedlings, Black Walnut seedlings and Chinese Chestnut seedlings, plant another tree of the same species for pollination.
CARPATHIAN WALNuTS If you’re growing grafted Carpathian walnuts, plant at least two different varieties for better pollination, or plant a seedling Carpathian with a grafted Carpathian. Some Carpathian walnuts will bear nuts without a pollinator. But for larger crops of bigger nuts, it’s best to plant two varieties. Black walnuts and Carpathian walnuts will not cross-pollinate because of different blooming dates.
NuT TREES
2� *TO ORDER CALL 800-325-4�80 OR VISIT STARKBROS.COM.
NuT GROWING TIPS• Mulch. Mulching with any organic material over black plastic (except in the Deep South) helps keep weeds down and conserves moisture the first year. Since pecan trees grow best with warm soil and air temperatures above 70°F, wait to apply a mulch around them until the soil temperature is warmer than this. Black mulch material should be no closer than 3” from the trunk.
• Protect. Young tree trunks are especially vulnerable to sunscald and rodent damage, so we strongly recommend using a Stark® Tree Guard* around the trunk. Just remember to keep weeds pulled back from the base of the Tree Guard.
• Fertilize. Fertilizing young trees properly is important. This is why we recommend using only Stark® Tre-Pep™ Fertilizer* when planting certain nut trees, except pecans, hickories, hicans and persimmons. Mixed properly, Stark® Tre-Pep™ Fertilizer* gives your young trees a good start. Other fertilizers may be too strong. As your pecan trees begin to come into bearing age, it is essential to provide Zinc Sulphate* as a feed during the spring. Zinc is necessary for normal tree growth and the development of the nuts.
GRAPESThere’s truly something special about a bountiful harvest of grapes! Yet, this richly rewarding experience is within reach of most everyone.
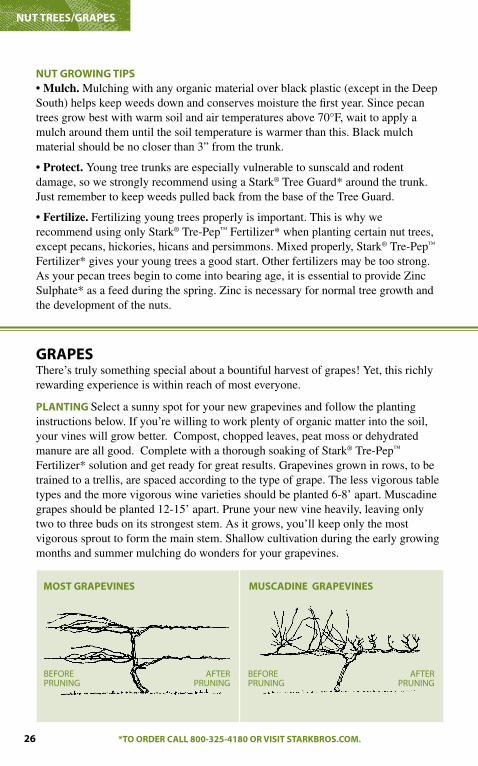
PLANTING Select a sunny spot for your new grapevines and follow the planting instructions below. If you’re willing to work plenty of organic matter into the soil, your vines will grow better. Compost, chopped leaves, peat moss or dehydrated manure are all good. Complete with a thorough soaking of Stark® Tre-Pep™ Fertilizer* solution and get ready for great results. Grapevines grown in rows, to be trained to a trellis, are spaced according to the type of grape. The less vigorous table types and the more vigorous wine varieties should be planted 6-8’ apart. Muscadine grapes should be planted 12-15’ apart. Prune your new vine heavily, leaving only two to three buds on its strongest stem. As it grows, you’ll keep only the most vigorous sprout to form the main stem. Shallow cultivation during the early growing months and summer mulching do wonders for your grapevines.
NuT TREES/GRAPES
MOST GRAPEVINES
BeforeprunInG
afterprunInG
MuSCADINE GRAPEVINES
BeforeprunInG
afterprunInG
*TO ORDER CALL 800-325-4�80 OR VISIT STARKBROS.COM.
2�*TO ORDER CALL 800-325-4�80 OR VISIT STARKBROS.COM.
TRAINING To start out the second year, begin training the vine on a permanent sup-port. Make sure this trellis support is strong enough, because it will soon be holding up lots of heavy bunches of grapes. Select the best side canes to form the “double T” shape. This training is used in most vineyards because it’s the most productive. Your crop of grapes will be produced on new growth from 1-year-old stems, so it pays to keep old wood to a bare minimum. In late winter, from the third year on, your grape-vine should be pruned severely. On each of the four “arms,” select a good pencil-size stem as the fruiting cane, trimming it back to keep about eight to 10 buds. Near the base of each of these fruiting canes, leave a stubby stem with two buds to form next year’s fruiting canes. All other canes are pruned away. Keep doing this each year to maintain your vine in the very best of bearing condition. This pruning system may sound drastic, but it really works!
Muscadine grapes are more productive with a different type of training. This “single T” shape has a row of short, upward growing branches. In late winter, the canes are cut back to leave only three to four buds above the horizontal main stem. For the best quality fruit, you may need the protection of regular spraying. Black rot causes reddish-brown spots on leaves first, then affects the fruit, which shrivels and dries up. Timely applications of Copper (Bordeaux) Spray/Dust* will prevent and eliminate black rot. Berry moth appears as worms feeding on the fruit and can be controlled with Bonide® Fruit Tree Spray*. Be sure to destroy fallen leaves and fruit.
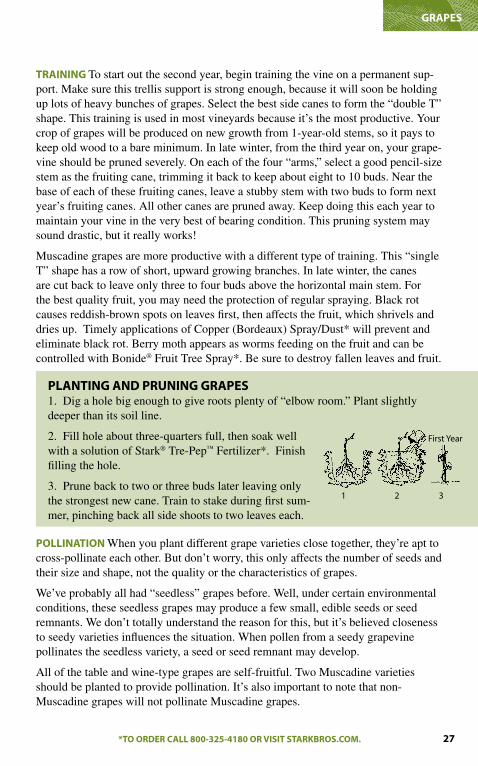
PLANTING AND PRuNING GRAPES 1. Dig a hole big enough to give roots plenty of “elbow room.” Plant slightly deeper than its soil line.
2. Fill hole about three-quarters full, then soak well with a solution of Stark® Tre-Pep™ Fertilizer*. Finish filling the hole.
3. Prune back to two or three buds later leaving only the strongest new cane. Train to stake during first sum-mer, pinching back all side shoots to two leaves each.
POLLINATION When you plant different grape varieties close together, they’re apt to cross-pollinate each other. But don’t worry, this only affects the number of seeds and their size and shape, not the quality or the characteristics of grapes.
We’ve probably all had “seedless” grapes before. Well, under certain environmental conditions, these seedless grapes may produce a few small, edible seeds or seed remnants. We don’t totally understand the reason for this, but it’s believed closeness to seedy varieties influences the situation. When pollen from a seedy grapevine pollinates the seedless variety, a seed or seed remnant may develop.
All of the table and wine-type grapes are self-fruitful. Two Muscadine varieties should be planted to provide pollination. It’s also important to note that non-Muscadine grapes will not pollinate Muscadine grapes.
GRAPES
1 2 3
first Year
28 *TO ORDER CALL 800-325-4�80 OR VISIT STARKBROS.COM.
STRAWBERRIES If ever there was a perfect plant, it would have to be the strawberry. Not only are strawberries almost everyone’s favorite fruit, they’re one of the easiest to grow.
PLANTING Plant them early in spring, while the ground is still cool and moist, and in a sunny spot, if possible. Strawberries will thrive in nearly any garden soil, even
doing well among sand or rocks.
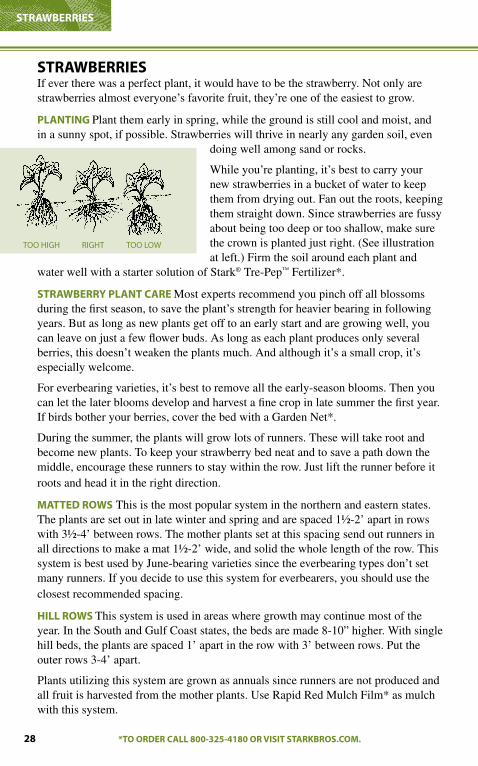
While you’re planting, it’s best to carry your new strawberries in a bucket of water to keep them from drying out. Fan out the roots, keeping them straight down. Since strawberries are fussy about being too deep or too shallow, make sure the crown is planted just right. (See illustration at left.) Firm the soil around each plant and
water well with a starter solution of Stark® Tre-Pep™ Fertilizer*.
STRAWBERRY PLANT CARE Most experts recommend you pinch off all blossoms during the first season, to save the plant’s strength for heavier bearing in following years. But as long as new plants get off to an early start and are growing well, you can leave on just a few flower buds. As long as each plant produces only several berries, this doesn’t weaken the plants much. And although it’s a small crop, it’s especially welcome.
For everbearing varieties, it’s best to remove all the early-season blooms. Then you can let the later blooms develop and harvest a fine crop in late summer the first year. If birds bother your berries, cover the bed with a Garden Net*.
During the summer, the plants will grow lots of runners. These will take root and become new plants. To keep your strawberry bed neat and to save a path down the middle, encourage these runners to stay within the row. Just lift the runner before it roots and head it in the right direction.
MATTED ROWS This is the most popular system in the northern and eastern states. The plants are set out in late winter and spring and are spaced 1½-2’ apart in rows with 3½-4’ between rows. The mother plants set at this spacing send out runners in all directions to make a mat 1½-2’ wide, and solid the whole length of the row. This system is best used by June-bearing varieties since the everbearing types don’t set many runners. If you decide to use this system for everbearers, you should use the closest recommended spacing.
HILL ROWS This system is used in areas where growth may continue most of the year. In the South and Gulf Coast states, the beds are made 8-10” higher. With single hill beds, the plants are spaced 1’ apart in the row with 3’ between rows. Put the outer rows 3-4’ apart.
Plants utilizing this system are grown as annuals since runners are not produced and all fruit is harvested from the mother plants. Use Rapid Red Mulch Film* as mulch with this system.
too hIGh rIGht too loW
STRAWBERRIES
*TO ORDER CALL 800-325-4�80 OR VISIT STARKBROS.COM.
2�*TO ORDER CALL 800-325-4�80 OR VISIT STARKBROS.COM.
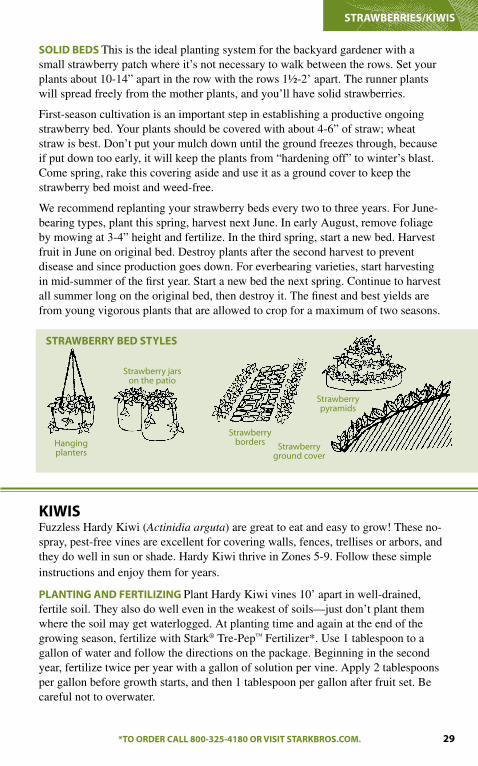
SOLID BEDS This is the ideal planting system for the backyard gardener with a small strawberry patch where it’s not necessary to walk between the rows. Set your plants about 10-14” apart in the row with the rows 1½-2’ apart. The runner plants will spread freely from the mother plants, and you’ll have solid strawberries.
First-season cultivation is an important step in establishing a productive ongoing strawberry bed. Your plants should be covered with about 4-6” of straw; wheat straw is best. Don’t put your mulch down until the ground freezes through, because if put down too early, it will keep the plants from “hardening off” to winter’s blast. Come spring, rake this covering aside and use it as a ground cover to keep the strawberry bed moist and weed-free.
We recommend replanting your strawberry beds every two to three years. For June-bearing types, plant this spring, harvest next June. In early August, remove foliage by mowing at 3-4” height and fertilize. In the third spring, start a new bed. Harvest fruit in June on original bed. Destroy plants after the second harvest to prevent disease and since production goes down. For everbearing varieties, start harvesting in mid-summer of the first year. Start a new bed the next spring. Continue to harvest all summer long on the original bed, then destroy it. The finest and best yields are from young vigorous plants that are allowed to crop for a maximum of two seasons.
KIWIS Fuzzless Hardy Kiwi (Actinidia arguta) are great to eat and easy to grow! These no-spray, pest-free vines are excellent for covering walls, fences, trellises or arbors, and they do well in sun or shade. Hardy Kiwi thrive in Zones 5-9. Follow these simple instructions and enjoy them for years.
PLANTING AND fERTILIZING Plant Hardy Kiwi vines 10’ apart in well-drained, fertile soil. They also do well even in the weakest of soils—just don’t plant them where the soil may get waterlogged. At planting time and again at the end of the growing season, fertilize with Stark® Tre-Pep™ Fertilizer*. Use 1 tablespoon to a gallon of water and follow the directions on the package. Beginning in the second year, fertilize twice per year with a gallon of solution per vine. Apply 2 tablespoons per gallon before growth starts, and then 1 tablespoon per gallon after fruit set. Be careful not to overwater.
STRAWBERRIES/KIWIS
hanging planters
strawberry borders
strawberry pyramids
strawberry jarson the patio
strawberry ground cover
STRAWBERRY BED STYLES
30
POLLINATION Male and female flowers that open in late May are produced on separate plants. So both are required for pollination, except in the case of Issai Hardy Kiwi, which is self-pollinating. One male will serve as pollinator for eight females when planted within 100’ of one another. Males do not bear fruit.
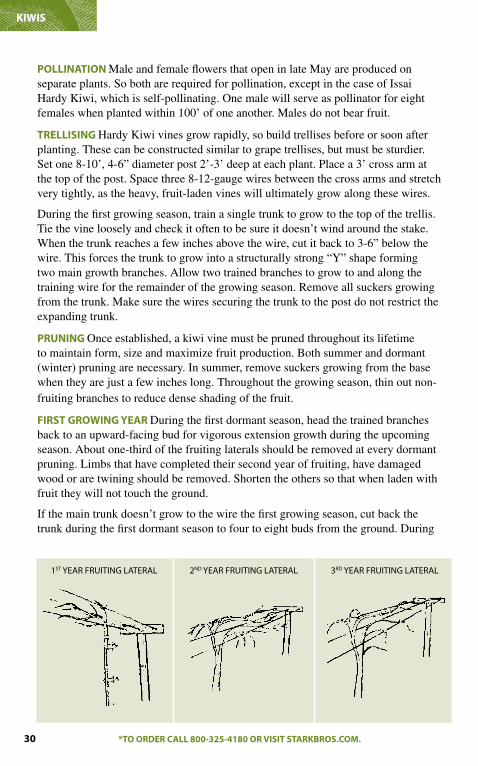
TRELLISING Hardy Kiwi vines grow rapidly, so build trellises before or soon after planting. These can be constructed similar to grape trellises, but must be sturdier. Set one 8-10’, 4-6” diameter post 2’-3’ deep at each plant. Place a 3’ cross arm at the top of the post. Space three 8-12-gauge wires between the cross arms and stretch very tightly, as the heavy, fruit-laden vines will ultimately grow along these wires.
During the first growing season, train a single trunk to grow to the top of the trellis. Tie the vine loosely and check it often to be sure it doesn’t wind around the stake. When the trunk reaches a few inches above the wire, cut it back to 3-6” below the wire. This forces the trunk to grow into a structurally strong “Y” shape forming two main growth branches. Allow two trained branches to grow to and along the training wire for the remainder of the growing season. Remove all suckers growing from the trunk. Make sure the wires securing the trunk to the post do not restrict the expanding trunk.
PRuNING Once established, a kiwi vine must be pruned throughout its lifetime to maintain form, size and maximize fruit production. Both summer and dormant (winter) pruning are necessary. In summer, remove suckers growing from the base when they are just a few inches long. Throughout the growing season, thin out non-fruiting branches to reduce dense shading of the fruit.
fIRST GROWING YEAR During the first dormant season, head the trained branches back to an upward-facing bud for vigorous extension growth during the upcoming season. About one-third of the fruiting laterals should be removed at every dormant pruning. Limbs that have completed their second year of fruiting, have damaged wood or are twining should be removed. Shorten the others so that when laden with fruit they will not touch the ground.
If the main trunk doesn’t grow to the wire the first growing season, cut back the trunk during the first dormant season to four to eight buds from the ground. During
KIWIS
1st Year fruItInG lateral 2nD Year fruItInG lateral 3rD Year fruItInG lateral
*TO ORDER CALL 800-325-4�80 OR VISIT STARKBROS.COM.
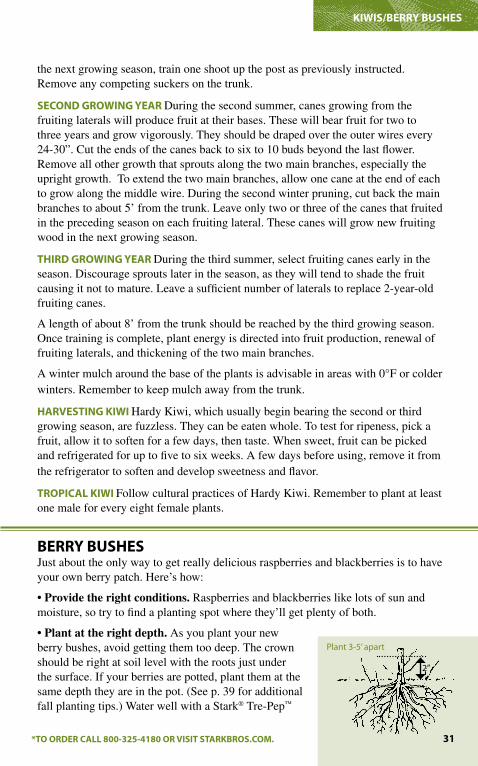
3�
the next growing season, train one shoot up the post as previously instructed. Remove any competing suckers on the trunk.
SECOND GROWING YEAR During the second summer, canes growing from the fruiting laterals will produce fruit at their bases. These will bear fruit for two to three years and grow vigorously. They should be draped over the outer wires every 24-30”. Cut the ends of the canes back to six to 10 buds beyond the last flower. Remove all other growth that sprouts along the two main branches, especially the upright growth. To extend the two main branches, allow one cane at the end of each to grow along the middle wire. During the second winter pruning, cut back the main branches to about 5’ from the trunk. Leave only two or three of the canes that fruited in the preceding season on each fruiting lateral. These canes will grow new fruiting wood in the next growing season.
THIRD GROWING YEAR During the third summer, select fruiting canes early in the season. Discourage sprouts later in the season, as they will tend to shade the fruit causing it not to mature. Leave a sufficient number of laterals to replace 2-year-old fruiting canes.
A length of about 8’ from the trunk should be reached by the third growing season. Once training is complete, plant energy is directed into fruit production, renewal of fruiting laterals, and thickening of the two main branches.
A winter mulch around the base of the plants is advisable in areas with 0°F or colder winters. Remember to keep mulch away from the trunk.
HARVESTING KIWI Hardy Kiwi, which usually begin bearing the second or third growing season, are fuzzless. They can be eaten whole. To test for ripeness, pick a fruit, allow it to soften for a few days, then taste. When sweet, fruit can be picked and refrigerated for up to five to six weeks. A few days before using, remove it from the refrigerator to soften and develop sweetness and flavor.
TROPICAL KIWI Follow cultural practices of Hardy Kiwi. Remember to plant at least one male for every eight female plants.
BERRY BuSHES Just about the only way to get really delicious raspberries and blackberries is to have your own berry patch. Here’s how:
• Provide the right conditions. Raspberries and blackberries like lots of sun and moisture, so try to find a planting spot where they’ll get plenty of both.
• Plant at the right depth. As you plant your new berry bushes, avoid getting them too deep. The crown should be right at soil level with the roots just under the surface. If your berries are potted, plant them at the same depth they are in the pot. (See p. 39 for additional fall planting tips.) Water well with a Stark® Tre-Pep™
KIWIS/BERRY BuSHES
plant 3-5’ apart
2”
3�*TO ORDER CALL 800-325-4�80 OR VISIT STARKBROS.COM.
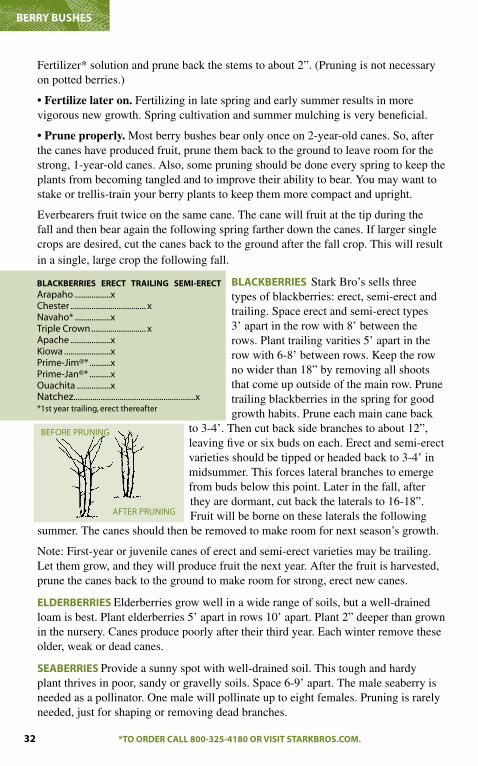
32 *TO ORDER CALL 800-325-4�80 OR VISIT STARKBROS.COM.
Fertilizer* solution and prune back the stems to about 2”. (Pruning is not necessary on potted berries.)
• Fertilize later on. Fertilizing in late spring and early summer results in more vigorous new growth. Spring cultivation and summer mulching is very beneficial.
• Prune properly. Most berry bushes bear only once on 2-year-old canes. So, after the canes have produced fruit, prune them back to the ground to leave room for the strong, 1-year-old canes. Also, some pruning should be done every spring to keep the plants from becoming tangled and to improve their ability to bear. You may want to stake or trellis-train your berry plants to keep them more compact and upright.
Everbearers fruit twice on the same cane. The cane will fruit at the tip during the fall and then bear again the following spring farther down the canes. If larger single crops are desired, cut the canes back to the ground after the fall crop. This will result in a single, large crop the following fall.
BLACKBERRIES Stark Bro’s sells three types of blackberries: erect, semi-erect and trailing. Space erect and semi-erect types 3’ apart in the row with 8’ between the rows. Plant trailing varities 5’ apart in the row with 6-8’ between rows. Keep the row no wider than 18” by removing all shoots that come up outside of the main row. Prune trailing blackberries in the spring for good growth habits. Prune each main cane back
to 3-4’. Then cut back side branches to about 12”, leaving five or six buds on each. Erect and semi-erect varieties should be tipped or headed back to 3-4’ in midsummer. This forces lateral branches to emerge from buds below this point. Later in the fall, after they are dormant, cut back the laterals to 16-18”. Fruit will be borne on these laterals the following
summer. The canes should then be removed to make room for next season’s growth.
Note: First-year or juvenile canes of erect and semi-erect varieties may be trailing. Let them grow, and they will produce fruit the next year. After the fruit is harvested, prune the canes back to the ground to make room for strong, erect new canes.
ELDERBERRIES Elderberries grow well in a wide range of soils, but a well-drained loam is best. Plant elderberries 5’ apart in rows 10’ apart. Plant 2” deeper than grown in the nursery. Canes produce poorly after their third year. Each winter remove these older, weak or dead canes.
SEABERRIES Provide a sunny spot with well-drained soil. This tough and hardy plant thrives in poor, sandy or gravelly soils. Space 6-9’ apart. The male seaberry is needed as a pollinator. One male will pollinate up to eight females. Pruning is rarely needed, just for shaping or removing dead branches.
BERRY BuSHES
after prunInG
Before prunInG
BLACKBERRIES ERECT TRAILING SEMI-ERECTarapaho .................xchester .................................... xnavaho* .................xtriple crown .......................... xapache ...................xKiowa ......................xprime-jim®* ..........xprime-jan®* ..........xouachita ................xnatchez ................................................... .......x*1st year trailing, erect thereafter
*TO ORDER CALL 800-325-4�80 OR VISIT STARKBROS.COM.
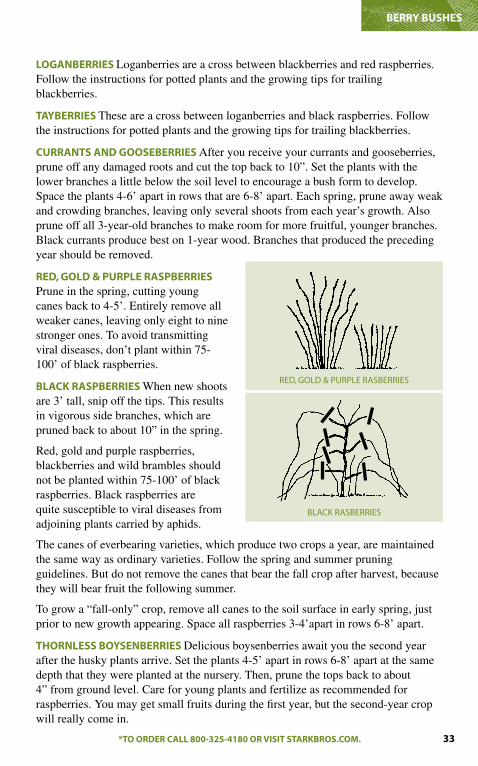
33*TO ORDER CALL 800-325-4�80 OR VISIT STARKBROS.COM.
LOGANBERRIES Loganberries are a cross between blackberries and red raspberries. Follow the instructions for potted plants and the growing tips for trailing blackberries.
TAYBERRIES These are a cross between loganberries and black raspberries. Follow the instructions for potted plants and the growing tips for trailing blackberries.
CuRRANTS AND GOOSEBERRIES After you receive your currants and gooseberries, prune off any damaged roots and cut the top back to 10”. Set the plants with the lower branches a little below the soil level to encourage a bush form to develop. Space the plants 4-6’ apart in rows that are 6-8’ apart. Each spring, prune away weak and crowding branches, leaving only several shoots from each year’s growth. Also prune off all 3-year-old branches to make room for more fruitful, younger branches. Black currants produce best on 1-year wood. Branches that produced the preceding year should be removed.
RED, GOLD & PuRPLE RASPBERRIES Prune in the spring, cutting young canes back to 4-5’. Entirely remove all weaker canes, leaving only eight to nine stronger ones. To avoid transmitting viral diseases, don’t plant within 75-100’ of black raspberries.
BLACK RASPBERRIES When new shoots are 3’ tall, snip off the tips. This results in vigorous side branches, which are pruned back to about 10” in the spring.
Red, gold and purple raspberries, blackberries and wild brambles should not be planted within 75-100’ of black raspberries. Black raspberries are quite susceptible to viral diseases from adjoining plants carried by aphids.
The canes of everbearing varieties, which produce two crops a year, are maintained the same way as ordinary varieties. Follow the spring and summer pruning guidelines. But do not remove the canes that bear the fall crop after harvest, because they will bear fruit the following summer.
To grow a “fall-only” crop, remove all canes to the soil surface in early spring, just prior to new growth appearing. Space all raspberries 3-4’apart in rows 6-8’ apart.
THORNLESS BOYSENBERRIES Delicious boysenberries await you the second year after the husky plants arrive. Set the plants 4-5’ apart in rows 6-8’ apart at the same depth that they were planted at the nursery. Then, prune the tops back to about 4” from ground level. Care for young plants and fertilize as recommended for raspberries. You may get small fruits during the first year, but the second-year crop will really come in.
BERRY BuSHES
reD, GolD & purple rasBerrIes
BlacK rasBerrIes

34 *TO ORDER CALL 800-325-4�80 OR VISIT STARKBROS.COM.
BLuEBERRIES, CRANBERRIES AND LINGONBERRIES If your soil is on the acid side, you’ve already met the major requirement of successful blueberry, cranberry and lingonberry growing. To increase the acidity of your soil (pH of 4.5 - 5.5 is ideal, but 6.5 or below will work), use a soil acidifier, such as our Stark® Soil Acidifier*.
Pick a location where there is full sun. Space your berry plants 4-6’ apart and space rows 6-8’ apart. Amend the soil with organic matter such as dehydrated cow manure, garden compost, peat moss or our Coco-Fiber Potting Medium*. Don’t plant too deep. The crown should be right at the soil level, with the roots just under the surface. Blueberries should not be fertilized until the plants leaf out. Then, soak with a solution of Stark® Tre-Pep™ Fertilizer*.
If your berries are potted, plant them at the same depth as they were in the pot. Blueberries put down a shallow root system, so it is important to water thoroughly during summer, mulch heavily and keep soil acidic. Contact your local Cooperative Extension Service office for information about soil testing in your area, or purchase a pH tester* for quick and accurate results.
Blueberries begin to produce fruit in the third season, so pruning is not required until then. After the plant begins bearing regularly (in mid-June through late July), cut back all but six to eight vigorous canes in early spring. (See illustration below.) Remove any dead or weak branches.
Blueberries, cranberries and lingonberries ripen over several weeks, so plan to pick more than once. Protect your crop from birds with a Garden Net*.
PRuNING BLuEBERRIES, CRANBERRIES AND LINGONBERRIES
BERRY BuSHES
QuESTIONS? call our customer service Department toll-free at 800-325-4180 8 am - 4:30 pm (central time) monday-friday or email us at: [email protected]
visit our website at www.starkbros.com
after purningBefore pruning
*TO ORDER CALL 800-325-4�80 OR VISIT STARKBROS.COM.
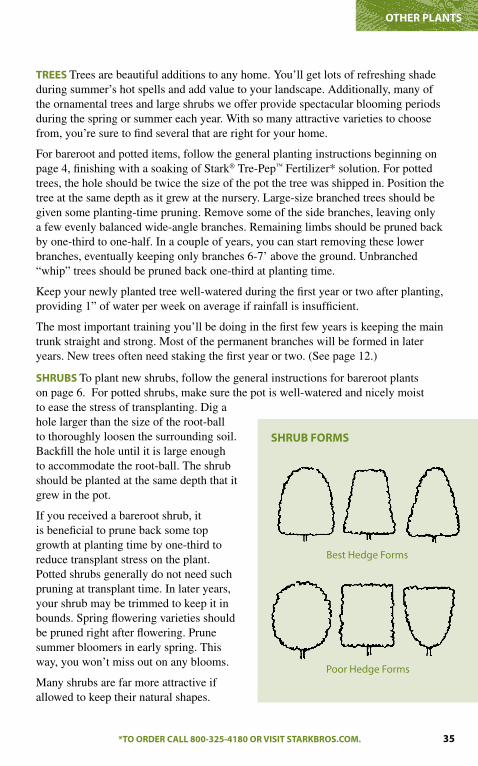
35*TO ORDER CALL 800-325-4�80 OR VISIT STARKBROS.COM.
TREES Trees are beautiful additions to any home. You’ll get lots of refreshing shade during summer’s hot spells and add value to your landscape. Additionally, many of the ornamental trees and large shrubs we offer provide spectacular blooming periods during the spring or summer each year. With so many attractive varieties to choose from, you’re sure to find several that are right for your home.
For bareroot and potted items, follow the general planting instructions beginning on page 4, finishing with a soaking of Stark® Tre-Pep™ Fertilizer* solution. For potted trees, the hole should be twice the size of the pot the tree was shipped in. Position the tree at the same depth as it grew at the nursery. Large-size branched trees should be given some planting-time pruning. Remove some of the side branches, leaving only a few evenly balanced wide-angle branches. Remaining limbs should be pruned back by one-third to one-half. In a couple of years, you can start removing these lower branches, eventually keeping only branches 6-7’ above the ground. Unbranched “whip” trees should be pruned back one-third at planting time.
Keep your newly planted tree well-watered during the first year or two after planting, providing 1” of water per week on average if rainfall is insufficient.
The most important training you’ll be doing in the first few years is keeping the main trunk straight and strong. Most of the permanent branches will be formed in later years. New trees often need staking the first year or two. (See page 12.)
SHRuBS To plant new shrubs, follow the general instructions for bareroot plants on page 6. For potted shrubs, make sure the pot is well-watered and nicely moist to ease the stress of transplanting. Dig a hole larger than the size of the root-ball to thoroughly loosen the surrounding soil. Backfill the hole until it is large enough to accommodate the root-ball. The shrub should be planted at the same depth that it grew in the pot.
If you received a bareroot shrub, it is beneficial to prune back some top growth at planting time by one-third to reduce transplant stress on the plant. Potted shrubs generally do not need such pruning at transplant time. In later years, your shrub may be trimmed to keep it in bounds. Spring flowering varieties should be pruned right after flowering. Prune summer bloomers in early spring. This way, you won’t miss out on any blooms.
Many shrubs are far more attractive if allowed to keep their natural shapes.
OTHER PLANTS
Best hedge forms
poor hedge forms
SHRuB fORMS
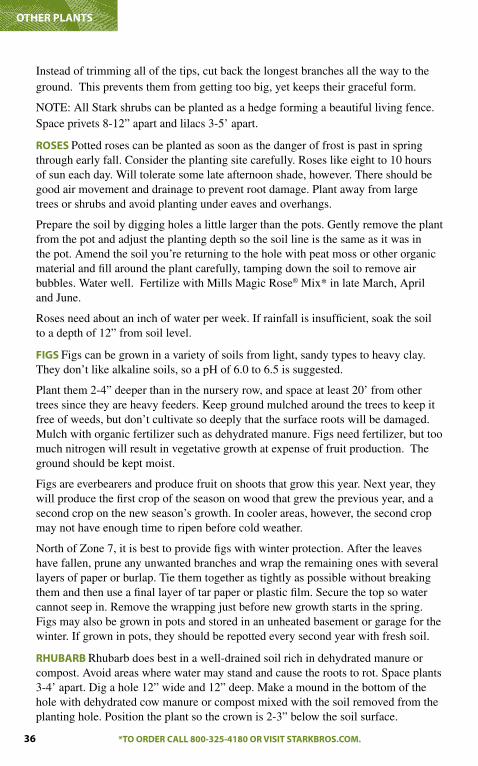
3� *TO ORDER CALL 800-325-4�80 OR VISIT STARKBROS.COM.
Instead of trimming all of the tips, cut back the longest branches all the way to the ground. This prevents them from getting too big, yet keeps their graceful form.
NOTE: All Stark shrubs can be planted as a hedge forming a beautiful living fence. Space privets 8-12” apart and lilacs 3-5’ apart.
ROSES Potted roses can be planted as soon as the danger of frost is past in spring through early fall. Consider the planting site carefully. Roses like eight to 10 hours of sun each day. Will tolerate some late afternoon shade, however. There should be good air movement and drainage to prevent root damage. Plant away from large trees or shrubs and avoid planting under eaves and overhangs.
Prepare the soil by digging holes a little larger than the pots. Gently remove the plant from the pot and adjust the planting depth so the soil line is the same as it was in the pot. Amend the soil you’re returning to the hole with peat moss or other organic material and fill around the plant carefully, tamping down the soil to remove air bubbles. Water well. Fertilize with Mills Magic Rose® Mix* in late March, April and June.
Roses need about an inch of water per week. If rainfall is insufficient, soak the soil to a depth of 12” from soil level.
fIGS Figs can be grown in a variety of soils from light, sandy types to heavy clay. They don’t like alkaline soils, so a pH of 6.0 to 6.5 is suggested.
Plant them 2-4” deeper than in the nursery row, and space at least 20’ from other trees since they are heavy feeders. Keep ground mulched around the trees to keep it free of weeds, but don’t cultivate so deeply that the surface roots will be damaged. Mulch with organic fertilizer such as dehydrated manure. Figs need fertilizer, but too much nitrogen will result in vegetative growth at expense of fruit production. The ground should be kept moist.
Figs are everbearers and produce fruit on shoots that grow this year. Next year, they will produce the first crop of the season on wood that grew the previous year, and a second crop on the new season’s growth. In cooler areas, however, the second crop may not have enough time to ripen before cold weather.
North of Zone 7, it is best to provide figs with winter protection. After the leaves have fallen, prune any unwanted branches and wrap the remaining ones with several layers of paper or burlap. Tie them together as tightly as possible without breaking them and then use a final layer of tar paper or plastic film. Secure the top so water cannot seep in. Remove the wrapping just before new growth starts in the spring. Figs may also be grown in pots and stored in an unheated basement or garage for the winter. If grown in pots, they should be repotted every second year with fresh soil.
RHuBARB Rhubarb does best in a well-drained soil rich in dehydrated manure or compost. Avoid areas where water may stand and cause the roots to rot. Space plants 3-4’ apart. Dig a hole 12” wide and 12” deep. Make a mound in the bottom of the hole with dehydrated cow manure or compost mixed with the soil removed from the planting hole. Position the plant so the crown is 2-3” below the soil surface.
OTHER PLANTS
*TO ORDER CALL 800-325-4�80 OR VISIT STARKBROS.COM.
3�*TO ORDER CALL 800-325-4�80 OR VISIT STARKBROS.COM.
For best results, wait until the second year of growth to lightly harvest stalks. By the third year, your crop should be more abundant. After the third year, harvest stalks after they reach the desired size from mid-April until late June. To rejuve-nate, if stalks become thin, plants can be dug up and divided, then moved in the fall or the spring. Remove any seed heads as they appear because they can reduce stalk growth.
ASPARAGuS Asparagus needs plenty of room. Space plants 12-18” apart. Dig a hole 12” deep. Make a mound in the bottom of the hole with dehydrated cow manure or compost mixed with the soil taken from the hole. Position the plant with the bud facing upward, on top of the mound so the crown (center of the plant) is 3” below the soil surface (see illustration). Cover the crown with soil, and gently firm the soil to remove any air pockets.
The trench method of planting involves digging a hole 12” deep and 12” wide and as long as you want your trench to be. Make a mound along the bottom of the trench with dehydrated cow manure or compost mixed with soil from the hole. Position the plant with the bud pointing upward, on top of the mound. Spread the roots out and cover them with 2” of soil mixture. After the spears emerge, add the rest of the soil. Asparagus spears should be lightly harvested the first two years until the plants are established. By the third year, you should have a nice crop from late April until spears grow thin, usually late June. To harvest spears, cut just below the soil surface or snap off just above the ground.
In late fall, after plants have gone dormant, cut the plants back to the soil surface, and apply mulch to help prevent deep freezing or changes in soil temperature.
PAWPAW This native North American fruit has a delicious custardlike flavor. Plant in full sun to light shade at the depth grown in the nursery pot. The hole should be extra large (at least 12” around and deep) to encourage fast root development. Prepare the soil by adding one-half mixture of peat moss. Follow the general planting guide on page 6. The first year is critical for a pawpaw. Fertilize sparingly with Stark® Tre-Pep™ Fertilizer* at planting time. Water thoroughly every seven to 10 days unless you get at least 1” of rain per week. Avoid letting the soil dry completely and avoid overwatering. Protection from direct sun by shading the first few growing seasons is highly recommended. Use a wooden shingle, evergreen bough, screen with mini fence or similar method to provide shade.
Prune similar to an apple tree (see p. 10) with a central leader with wide-angle crotches for sturdy fruiting limbs. Plant two different varieties to assure proper pollination. Pawpaws normally start bearing fruit in the sixth or seventh year, so have patience and reap the rewards in a few years.
OTHER PLANTS
38 *TO ORDER CALL 800-325-4�80 OR VISIT STARKBROS.COM.
QuINCE This unique and exotic fruit from southern Russia prefers a location in full sun. Well-drained, humus-rich soil will provide the best results. Pruning is necessary only to shape the tree. Fruit ripens in October and needs to be stored by a windowsill until it starts to soften.
CITRuS & BANANAS Upon arrival, these trees may lose all or some of their leaves. This is normal, and new leaves and shoots will appear shortly. Transfer your new plant to a 6-10 inch pot within a few days of arrival. Protect until outdoor temperatures warm and the chance of frost is gone. Move the plant into a protected, sunny location, preferably with a southern exposure.
By your tree’s second summer, you can plant it in a larger container, usually 16-20 inches in diameter. This can be the tree’s permanent home. Just remember that refreshing the soil every one to three years will provide soil nutrients and encourage healthier growth. These pots can be moved around as you wish. Just remember not to make a major change in light exposure all at once, but in stages.
Water consistently. Allowing the top soil to dry out is fine, but the roots like to be moist. However, never let them stand in water. Make sure there is adequate drainage when they are planted. They prefer deep watering to frequent, light watering.
In Zones 4-6, overwinter in a protected area where the temperature does not drop below 60º F. This does not apply to olives, as they need some cold temperatures to produce fruit. However, do not allow them to freeze.
POTTED TREES All of Stark Bro’s fruit, nut and ornamental trees grown and shipped in bottomless pots are part of our continuing quest for producing better and stronger trees for the home grower. By following these simple instructions, you will be assured of getting your young tree off to the best possible start.
When your tree arrives, carefully take it out of the package, making sure not to damage any of the branches. The potted tree has been watered prior to shipment and should arrive moist, but it does need another drink when it arrives at your home. Be sure the container is moist clear through. If you can’t plant your tree immediately upon arrival, keep the pot moist until you can plant it and keep the tree in a sheltered location. DO NOT place your potted tree in a bucket of water. This could cause the roots to rot, and kill your tree.
Your tree is ready for planting as soon as it arrives at your home. Be sure to dig a “ten-dollar hole.” (See p. 6.) Then, simply grasp the sides of the container and carefully slide the tree out. The potting soil should remain intact around the tree’s roots. You will want to keep this soil with the tree and plant it, soil and all, into the prepared hole. Fill the hole with soil, and water thoroughly. (See p. 6.)
Your potted tree may have come with a bamboo stake, which helped straighten the baby tree as it grew in the pot. We recommend that you keep the tree staked when you plant the tree, as we recommend staking for all young trees of any type. You may remove the stake and replace it with a different style if you prefer. See page 12 for more information on staking. The new Tree Stake* and Super T* also is available. Tree Stake*, the perfect strapping system for Stark Bro’s trees, comes
OTHER PLANTS fOR YOuR YARD & GARGENOTHER PLANTS
*TO ORDER CALL 800-325-4�80 OR VISIT STARKBROS.COM.
3�*TO ORDER CALL 800-325-4�80 OR VISIT STARKBROS.COM.
with a sturdy fiberglass rod, and a revolutionary flexible strapping system that allows for movement and growth. The Super T* is the strapping system as described but without the rod, letting you use your own T-post. Both products are available from Stark Bro’s. Call 800-325-4180 for further information or to order.
If you have purchased one of our potted Stark Custom Graft® trees, more information about care instructions will be on the tag attached to your tree.
POTTED PERENNIALS When your plants arrive, plant them in their permanent locations as soon as possible. If planting must be delayed a few days, set the potted perennials in a sunny but protected spot, especially if temperatures are still cool, making sure they’re protected from freezing. Water lightly when the top of the soil dries out.
At planting time, dig a hole just slightly larger than the pot. Amend the soil you’ll be returning to the hole at this point if there’s a need. (Example: adding Stark® Soil Acidifier* or organic material.) Remove the plant from the pot by rolling between your palms while gently squeezing to loosen the planting material from the sides of the pot. Invert the pot while holding your fingers around the stem of the plant.
At this point, if you see that the plant has an excessive amount of roots (rootbound), you will need to loosen the root-ball by pulling or cutting about an inch off the bottom section and cutting vertical lines in all four sides of the root-ball. Even though this cuts some of the roots, it allows the cut ends to grow outward instead of continuing to wrap around themselves.
Place the prepared plant in the center of the hole, making sure the stem(s) are at the same soil level as in the pot. Add the soil to the hole, filling around and under the plant, pressing in all directions to avoid air pockets. Water thoroughly.
During shipping, some foliage may turn yellow or brown and small stems may be bent or snapped. This does not mean the plant will die. Just remove any yellowing foliage or damaged stems, either before or after planting. This allows the plant to use its energy for new growth right away.
fALL PLANTING Some varieties in our catalog can be shipped only in the spring, but most of our bareroot dormant nursery stock is shipped in either fall or spring. Because we cannot dig the stock until it goes dormant in our fields, fall shipping does not usually begin until early November. Fall shipments are scheduled to arrive at the proper time for planting in your zone.
Occasionally, when an Indian summer lingers or Old Man Winter arrives earlier than normal, questions will arise about whether it is safe to plant.
In answer to those questions, we suggest: If temperatures are staying consistently in the 60s or 70s, follow the directions on pages 5-6 of this guide for holding until safer planting time. Should an early snowfall or freezing temperatures set in about the time your order arrives, please don’t panic!
When you first scoop snow away from the plant site, you will find the ground is not frozen yet. This extra snow moisture will be good for the plants. If, however, the
OTHER PLANTS fOR YOuR YARD & GARGENOTHER PLANTS
40 *TO ORDER CALL 800-325-4�80 OR VISIT STARKBROS.COM.
holes cannot be dug, hold the plants in the package for up to two to three weeks until the weather warms enough (to above freezing) for the planting to be done. Be sure to keep any frozen topsoil or snow from falling into the planting hole around the root system. Otherwise, snow is an excellent insulator.
You may plant even if the low temperatures are the in high teens, as long as the daytime highs are near 40ºF. Do not expose the roots to below-freezing temperatures while planting. To hold the nursery stock for a longer period of time, heel them in by digging a trench with a sloping side. Lay the trees in the trench at an angle and cover the roots with the soil. Roots will begin to grow when the soil warms, and inevitably when the trees are moved, some of these young roots will be torn. As soon as the ground can be worked, they should be planted in their permanent locations.
When the stock is planted in its permanent location in the fall, add a solution of Stark® Tre-Pep™ Fertilizer* to the water used in the planting hole (except for pecan, hickory and hican trees). This is the only application of fertilizer recommended until new growth begins in the spring.
In colder areas of the country, be sure to provide winter mulch around the base of all newly transplanted potted shrubs after the soil has frozen. This will prevent the established roots from lifting out of the soil during alternating periods of freezing and thawing temperatures throughout the winter. Frost lifting can be lethal to plants, as the roots become fully exposed to freezing air.
VARIETY INfORMATIONWhat a wonderful selection of fruits available to home growers! With a full range of ripening times, flavors and qualities for every use, you can pick the variety that’s right for your family.
These charts make it easy to select pollination partners. Just match up the pollination needs of a variety in the first column with the pollen type in the third column. For example, if you have a variety with a pollen need of A, B, choose a variety with a pollen type of A or B for effective pollination and maximum production. Many varieties need no pollinator, so the first column indicates “SP” for “self-pollinating.”
For each variety, we’ve listed the expected ripening time here in northern Missouri (Zone 5). As you’d guess, farther south ripening will be somewhat earlier, and north will be later. Weather conditions also affect ripening. Also, we’ve indicated the most enjoyable ways to use each variety. Perhaps this will help you select other varieties to round out your fruit tree plantings.
OTHER PLANTS
QuESTIONS? call our customer service Department toll-free at z800-325-4180 8 am - 4:30 pm (central time) monday-friday or email us at: [email protected]
visit our website at www.starkbros.com
*TO ORDER CALL 800-325-4�80 OR VISIT STARKBROS.COM.
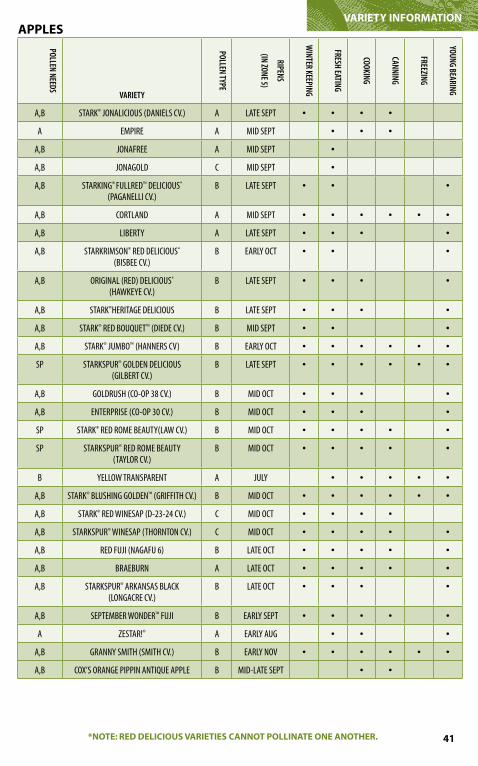
4�*TO ORDER CALL 800-325-4�80 OR VISIT STARKBROS.COM.
VARIETY INfORMATION
Pollen needs
Variety
Pollen tyPe
riPens
(in zone 5)
Winter keePing
fresh eating
cooking
canning
freezing
young bearing
a,b Stark® jonaliciouS (danielS cv.) a late Sept • • • •
a empire a mid Sept • • •
a,b jonafree a mid Sept •
a,b jonagold c mid Sept •
a,b Starking® fullred™ deliciouS* (paganelli cv.)
b late Sept • • •
a,b cortland a mid Sept • • • • • •
a,b liberty a late Sept • • • •
a,b StarkrimSon® red deliciouS* (biSbee cv.)
b early oct • • •
a,b original (red) deliciouS* (hawkeye cv.)
b late Sept • • • •
a,b Stark®heritage deliciouS b late Sept • • • •
a,b Stark® red bouquet™ (diede cv.) b mid Sept • • •
a,b Stark® jumbo™ (hannerS cv) b early oct • • • • • •
Sp StarkSpur® golden deliciouS (gilbert cv.)
b late Sept • • • • • •
a,b goldruSh (co-op 38 cv.) b mid oct • • • •
a,b enterpriSe (co-op 30 cv.) b mid oct • • • •
Sp Stark® red rome beauty(law cv.) b mid oct • • • • •
Sp StarkSpur® red rome beauty (taylor cv.)
b mid oct • • • • •
b yellow tranSparent a july • • • • •
a,b Stark® bluShing golden™ (griffith cv.) b mid oct • • • • • •
a,b Stark® red wineSap (d-23-24 cv.) c mid oct • • • •
a,b StarkSpur® wineSap (thornton cv.) c mid oct • • • • •
a,b red fuji (nagafu 6) b late oct • • • • •
a,b braeburn a late oct • • • • •
a,b StarkSpur® arkanSaS black (longacre cv.)
b late oct • • • •
a,b September wonder™ fuji b early Sept • • • • •
a zeStar!® a early aug • • •
a,b granny Smith (Smith cv.) b early nov • • • • • •
a,b cox’S orange pippin antique apple b mid-late Sept • •
APPLES
*NOTE: RED DELICIOuS VARIETIES CANNOT POLLINATE ONE ANOTHER.
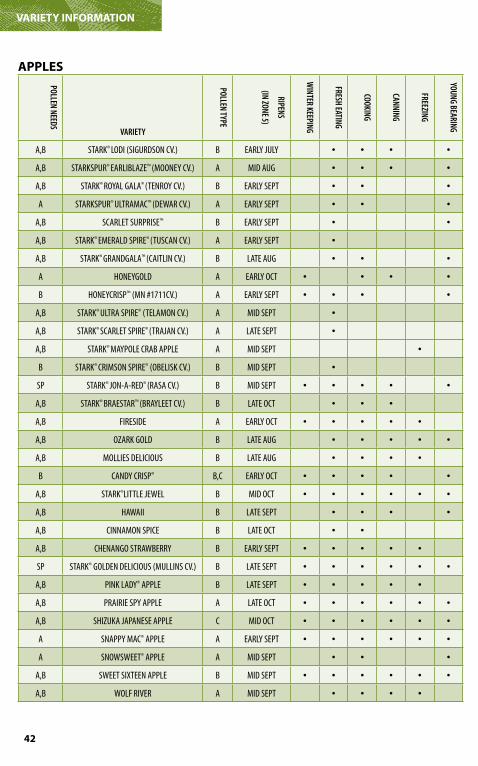
*TO ORDER CALL 800-325-4�80 OR VISIT STARKBROS.COM.
Pollen needs
Variety
Pollen tyPe
riPens
(in zone 5)
Winter keePing
fresh eating
cooking
canning
freezing
young bearing
a,b Stark® lodi (SigurdSon cv.) b early july • • • •
a,b StarkSpur® earliblaze™ (mooney cv.) a mid aug • • • •
a,b Stark® royal gala® (tenroy cv.) b early Sept • • •
a StarkSpur® ultramac™ (dewar cv.) a early Sept • • •
a,b Scarlet SurpriSe™ b early Sept • •
a,b Stark® emerald Spire® (tuScan cv.) a early Sept •
a,b Stark® grandgala™ (caitlin cv.) b late aug • • •
a honeygold a early oct • • • •
b honeycriSp™ (mn #1711cv.) a early Sept • • • •
a,b Stark® ultra Spire® (telamon cv.) a mid Sept •
a,b Stark® Scarlet Spire® (trajan cv.) a late Sept •
a,b Stark® maypole crab apple a mid Sept •
b Stark® crimSon Spire® (obeliSk cv.) b mid Sept •
Sp Stark® jon-a-red® (raSa cv.) b mid Sept • • • • •
a,b Stark® braeStar™ (brayleet cv.) b late oct • • •
a,b fireSide a early oct • • • • •
a,b ozark gold b late aug • • • • •
a,b mollieS deliciouS b late aug • • • •
b candy criSp® b,c early oct • • • • •
a,b Stark®little jewel b mid oct • • • • • •
a,b hawaii b late Sept • • • •
a,b cinnamon Spice b late oct • •
a,b chenango Strawberry b early Sept • • • • •
Sp Stark® golden deliciouS (mullinS cv.) b late Sept • • • • • •
a,b pink lady® apple b late Sept • • • • •
a,b prairie Spy apple a late oct • • • • • •
a,b Shizuka japaneSe apple c mid oct • • • • • •
a Snappy mac® apple a early Sept • • • • • •
a SnowSweet® apple a mid Sept • • •
a,b Sweet Sixteen apple b mid Sept • • • • • •
a,b wolf river a mid Sept • • • •
VARIETY INfORMATION
APPLES
42
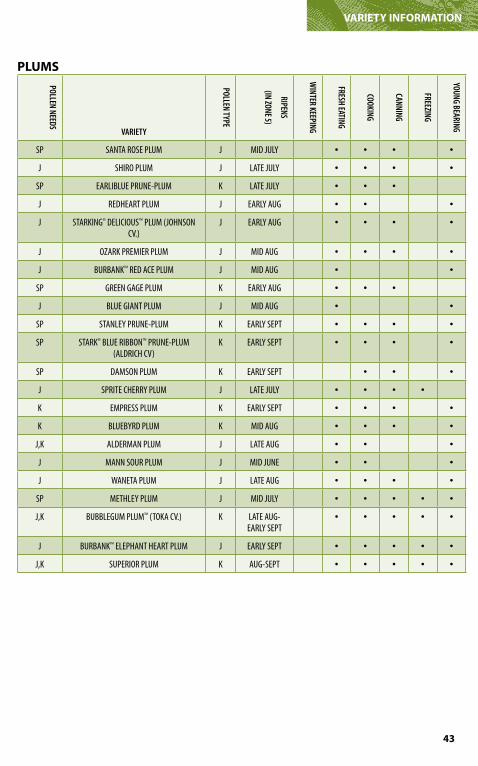
43*TO ORDER CALL 800-325-4�80 OR VISIT STARKBROS.COM.
VARIETY INfORMATION
Pollen needs
Variety
Pollen tyPe
riPens
(in zone 5)
Winter keePing
fresh eating
cooking
canning
freezing
young bearing
Sp Santa roSe plum j mid july • • • •
j Shiro plum j late july • • • •
Sp earliblue prune-plum k late july • • •
j redheart plum j early aug • • •
j Starking® deliciouS™ plum (johnSon cv.)
j early aug • • • •
j ozark premier plum j mid aug • • • •
j burbank™ red ace plum j mid aug • •
Sp green gage plum k early aug • • •
j blue giant plum j mid aug • •
Sp Stanley prune-plum k early Sept • • • •
Sp Stark® blue ribbon™ prune-plum (aldrich cv)
k early Sept • • • •
Sp damSon plum k early Sept • • •
j Sprite cherry plum j late july • • • •
k empreSS plum k early Sept • • • •
k bluebyrd plum k mid aug • • • •
j,k alderman plum j late aug • • •
j mann Sour plum j mid june • • •
j waneta plum j late aug • • • •
Sp methley plum j mid july • • • • •
j,k bubblegum plum™ (toka cv.) k late aug- early Sept
• • • • •
j burbank™ elephant heart plum j early Sept • • • • •
j,k Superior plum k aug-Sept • • • • •
PLuMS
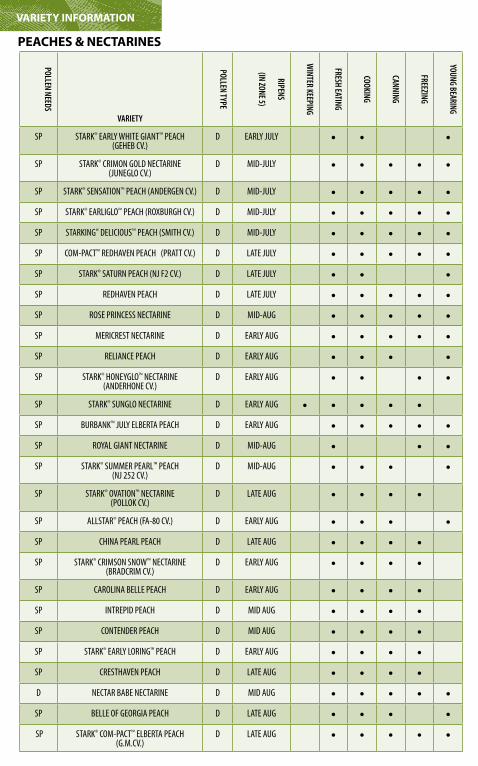
VARIETY INfORMATION
Pollen needs
Variety
Pollen tyPe
riPens
(in zone 5)
Winter keePing
fresh eating
cooking
canning
freezing
young bearing
Sp Stark® early white giant™ peach (geheb cv.)
d early july • • •
Sp Stark® crimon gold nectarine (juneglo cv.)
d mid-july • • • • •
Sp Stark® SenSation™ peach (andergen cv.) d mid-july • • • • •Sp Stark® earliglo™ peach (roxburgh cv.) d mid-july • • • • •Sp Starking® deliciouS™ peach (Smith cv.) d mid-july • • • • •Sp com-pact™ redhaven peach (pratt cv.) d late july • • • • •Sp Stark® Saturn peach (nj f2 cv.) d late july • • •Sp redhaven peach d late july • • • • •Sp roSe princeSS nectarine d mid-aug • • • • •Sp mericreSt nectarine d early aug • • • • •Sp reliance peach d early aug • • • •Sp Stark® honeyglo™ nectarine
(anderhone cv.)d early aug • • • •
Sp Stark® Sunglo nectarine d early aug • • • • •Sp burbank™ july elberta peach d early aug • • • • •Sp royal giant nectarine d mid-aug • • •Sp Stark® Summer pearl™ peach
(nj 252 cv.)d mid-aug • • • •
Sp Stark® ovation™ nectarine (pollok cv.)
d late aug • • • •
Sp allStar® peach (fa-80 cv.) d early aug • • • •Sp china pearl peach d late aug • • • •Sp Stark® crimSon Snow™ nectarine
(bradcrim cv.)d early aug • • • •
Sp carolina belle peach d early aug • • • •Sp intrepid peach d mid aug • • • •Sp contender peach d mid aug • • • •Sp Stark® early loring™ peach d early aug • • • •Sp creSthaven peach d late aug • • • •d nectar babe nectarine d mid aug • • • • •
Sp belle of georgia peach d late aug • • • • Sp Stark® com-pact™ elberta peach
(g.m.cv.)d late aug • • • • •
PEACHES & NECTARINES
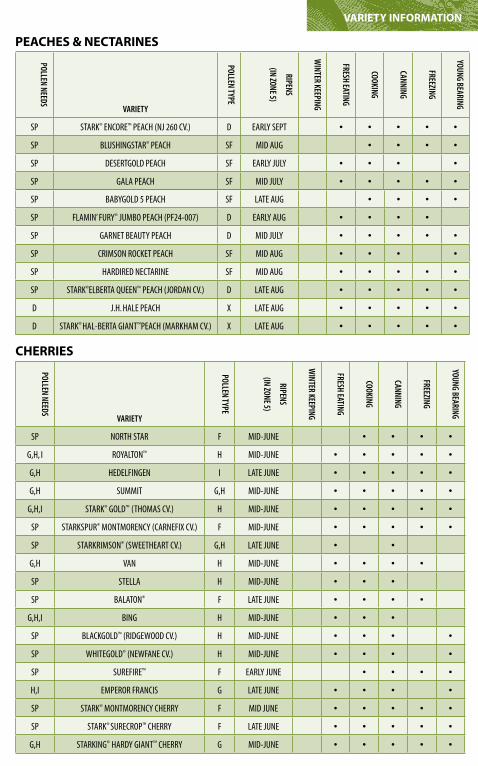
VARIETY INfORMATION
Pollen needs
Variety
Pollen tyPe
riPens
(in zone 5)
Winter keePing
fresh eating
cooking
canning
freezing
young bearing
Sp Stark® encore™ peach (nj 260 cv.) d early Sept • • • • •
Sp bluShingStar® peach Sf mid aug • • • •
Sp deSertgold peach Sf early july • • • •
Sp gala peach Sf mid july • • • • •
Sp babygold 5 peach Sf late aug • • • •
Sp flamin’ fury® jumbo peach (pf24-007) d early aug • • • •
Sp garnet beauty peach d mid july • • • • •
Sp crimSon rocket peach Sf mid aug • • • •
Sp hardired nectarine Sf mid aug • • • • •
Sp Stark®elberta queen™ peach (jordan cv.) d late aug • • • • •
d j.h. hale peach x late aug • • • • •
d Stark® hal-berta giant™peach (markham cv.) x late aug • • • • •
PEACHES & NECTARINES
45
Pollen needs
Variety
Pollen tyPe
riPens
(in zone 5)
Winter keePing
fresh eating
cooking
canning
freezing
young bearing
Sp north Star f mid-june • • • •
g,h, i royalton™ h mid-june • • • • •
g,h hedelfingen i late june • • • • •
g,h Summit g,h mid-june • • • • •
g,h,i Stark® gold™ (thomaS cv.) h mid-june • • • • •
Sp StarkSpur® montmorency (carnefix cv.) f mid-june • • • • •
Sp StarkrimSon® (Sweetheart cv.) g,h late june • •
g,h van h mid-june • • • •
Sp Stella h mid-june • • •
Sp balaton® f late june • • • •
g,h,i bing h mid-june • • •
Sp blackgold™ (ridgewood cv.) h mid-june • • • •
Sp whitegold® (newfane cv.) h mid-june • • • •
Sp Surefire™ f early june • • • •
h,i emperor franciS g late june • • • •
Sp Stark® montmorency cherry f mid june • • • • •
Sp Stark® Surecrop™ cherry f late june • • • • •
g,h Starking® hardy giant™ cherry g mid-june • • • • •
CHERRIES
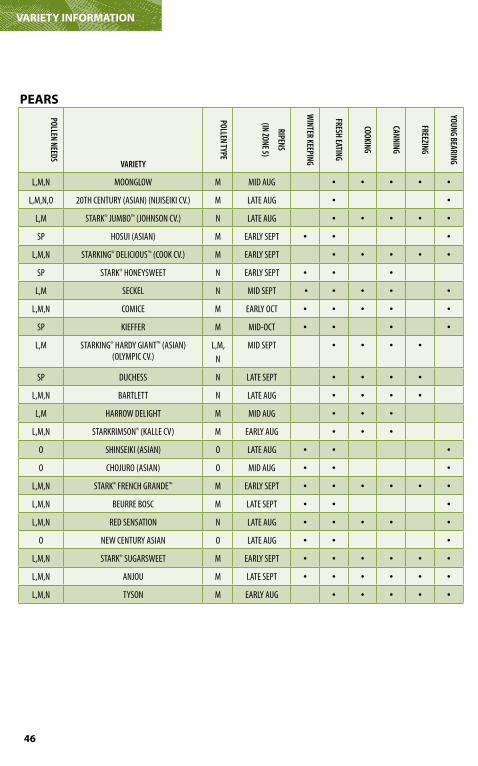
4� *TO ORDER CALL 800-325-4�80 OR VISIT STARKBROS.COM.
VARIETY INfORMATION
Pollen needs
Variety
Pollen tyPe
riPens
(in zone 5)
Winter keePing
fresh eating
cooking
canning
freezing
young bearing
l,m,n moonglow m mid aug • • • • •
l,m,n,o 20th century (aSian) (nijiSeiki cv.) m late aug • •
l,m Stark® jumbo™ (johnSon cv.) n late aug • • • • •
Sp hoSui (aSian) m early Sept • • •
l,m,n Starking® deliciouS™ (cook cv.) m early Sept • • • • •
Sp Stark® honeySweet n early Sept • • •
l,m Seckel n mid Sept • • • • •
l,m,n comice m early oct • • • • •
Sp kieffer m mid-oct • • • •
l,m Starking® hardy giant™ (aSian) (olympic cv.)
l,m,
n
mid Sept • • • •
Sp ducheSS n late Sept • • • •
l,m,n bartlett n late aug • • • •
l,m harrow delight m mid aug • • •
l,m,n StarkrimSon® (kalle cv) m early aug • • •
o ShinSeiki (aSian) o late aug • • •
o chojuro (aSian) o mid aug • • •
l,m,n Stark® french grande™ m early Sept • • • • • •
l,m,n beurre boSc m late Sept • • •
l,m,n red SenSation n late aug • • • • •
o new century aSian o late aug • • •
l,m,n Stark® SugarSweet m early Sept • • • • • •
l,m,n anjou m late Sept • • • • • •
l,m,n tySon m early aug • • • • •
PEARS
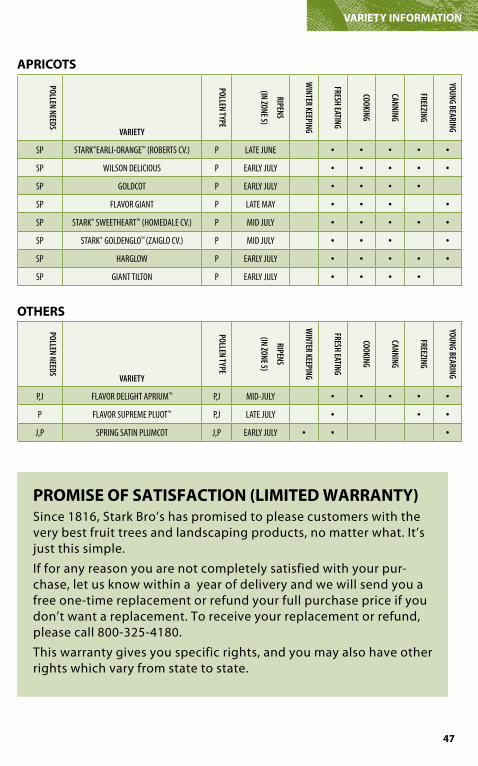
4�*TO ORDER CALL 800-325-4�80 OR VISIT STARKBROS.COM.
VARIETY INfORMATION
Pollen needs
Variety
Pollen tyPe
riPens
(in zone 5)
Winter keePing
fresh eating
cooking
canning
freezing
young bearing
Sp Stark®earli-orange™ (robertS cv.) p late june • • • • •
Sp wilSon deliciouS p early july • • • • •
Sp goldcot p early july • • • •
Sp flavor giant p late may • • • •
Sp Stark® Sweetheart™ (homedale cv.) p mid july • • • • •
Sp Stark® goldenglo™ (zaiglo cv.) p mid july • • • •
Sp harglow p early july • • • • •
Sp giant tilton p early july • • • •
APRICOTS
Pollen needs
Variety
Pollen tyPe
riPens
(in zone 5)
Winter keePing
fresh eating
cooking
canning
freezing
young bearing
p,j flavor delight aprium™ p,j mid-july • • • • •
p flavor Supreme pluot™ p,j late july • • •
j,p Spring Satin plumcot j,p early july • • •
OTHERS
PROMISE Of SATISfACTION (LIMITED WARRANTY)since 1816, stark Bro’s has promised to please customers with the very best fruit trees and landscaping products, no matter what. It’s just this simple.
If for any reason you are not completely satisfied with your pur-chase, let us know within a year of delivery and we will send you a free one-time replacement or refund your full purchase price if you don’t want a replacement. to receive your replacement or refund, please call 800-325-4180.
this warranty gives you specific rights, and you may also have other rights which vary from state to state.
stark Bro’s nurseries & orchards companyp.o. Box 1800 louisiana, missouri 63353-7800
fOR fuRTHER ASSISTANCE help yourself get the most out of your quality stark Bro’s product, simply by taking the time to learn more about it. this booklet can’t possibly cover more than the basic growing information, so here are some suggestions for where you can get additional assistance.
1. Write to stark Bro’s customer service Department if you have any questions, or call, for fast information, 800-325-4180, 8 a.m. to 4:30 p.m. (central time), monday-friday. You can also email us at [email protected]
2. check your local library for books about trees and plants.
3. visit a bookstore for new books about fruit and growing.
4. contact your local extension service office or the college of agriculture at your state university for guides about fruit growing in the home orchard.
shop on-line at: www.starkbros.com notIce: products referenced in this guide may not be available for purchase in all states.
asparagus ................................................................ 37
Branch spreading .................................................. 14
Dealing with Insects & Diseases .................16-17
fall planting ............................................................. 39
figs .............................................................................. 36
for further assistance ......................................... 48
Grapes .................................................................26-27
harvesting fruit ..................................................... 22
help trees thrive ................................................... 12
If trees Don’t Bear ............................................15-16
Kiwi .......................................................................29-30
leave space for future plantings........................5
nut trees .............................................................23-26
other Berries .....................................................31-34
pawpaws ................................................................... 37
perennials ................................................................. 39
plan Before You plant ..............................................4
planting ....................................................................5-7
potted trees ............................................................. 38
pruning .................................................................. 9-11
pruning older trees .......................................... 9-11
rewards of Gardening ........................................2-3
rhubarb .................................................................... 36
rose care .................................................................. 36
shade trees .............................................................. 35
shrubs ........................................................................ 35
spraying ..............................................................19-21
strawberries ............................................................ 28
tropicals .................................................................... 38
variety Information (ripening charts) .....41-47
TOPIC PAGE TOPIC PAGE
INDEX


![INGLES- RICARDO DAVID Vol. 7 Letters 1816-1818 [1816].pdf](https://img.pdfslide.us/doc/110x75/577cdadc1a28ab9e78a6bae4/ingles-ricardo-david-vol-7-letters-1816-1818-1816pdf.jpg)