Embed Size (px)
Citation preview

Google Apps Mail A Few How To’s… This document contains few simple suggestions to help you become familiar with your new Gmail Account. Gmail Basics 10/1/2011
1
Table of Contents GMAIL BASICS ........................................................................................................................................................................... 1 Google Icons ......................................................................................................................................................................................... 1 Logging In ............................................................................................................................................................................................ 2 Your inbox ............................................................................................................................................................................................ 2 About conversations ............................................................................................................................................................................ 2 Compose a message ............................................................................................................................................................................. 3 Send a message ..................................................................................................................................................................................... 4 Reply to a Message .............................................................................................................................................................................. 4 Forward a Message .............................................................................................................................................................................. 5 Print a Message .................................................................................................................................................................................... 5 Create an email signature ...................................................................................................................................................................... 5 Create and apply email labels ................................................................................................................................................................ 6
Calendar Basics ................................................................................................................................................................. 9 Your calendar view ................................................................................................................................................................................ 9 Schedule a meeting .............................................................................................................................................................................. 10 Invite attendees and enter meeting details ........................................................................................................................................... 10 Add a file attachment to a meeting invitation ...................................................................................................................................... 15 Print your calendar .............................................................................................................................................................................. 16 Set up event reminders ........................................................................................................................................................................ 16 Set up invitation replies ....................................................................................................................................................................... 17 Share your calendar ............................................................................................................................................................................. 18 View another user's calendar ............................................................................................................................................................... 18 Create another calendar ....................................................................................................................................................................... 19 Contacts ............................................................................................................................................................................................... 19 Create Contact Groups .......................................................................................................................................... 19 About contact groups ........................................................................................................................................................................... 19 Create a contact group ......................................................................................................................................................................... 19 Use your contact groups as mailing lists ............................................................................................................................................. 21 GOOGLE APPS .......................................................................................................................................................................... 22 What is Google Apps? ......................................................................................................................................................................... 22
GMAIL BASICS Google Icons
2
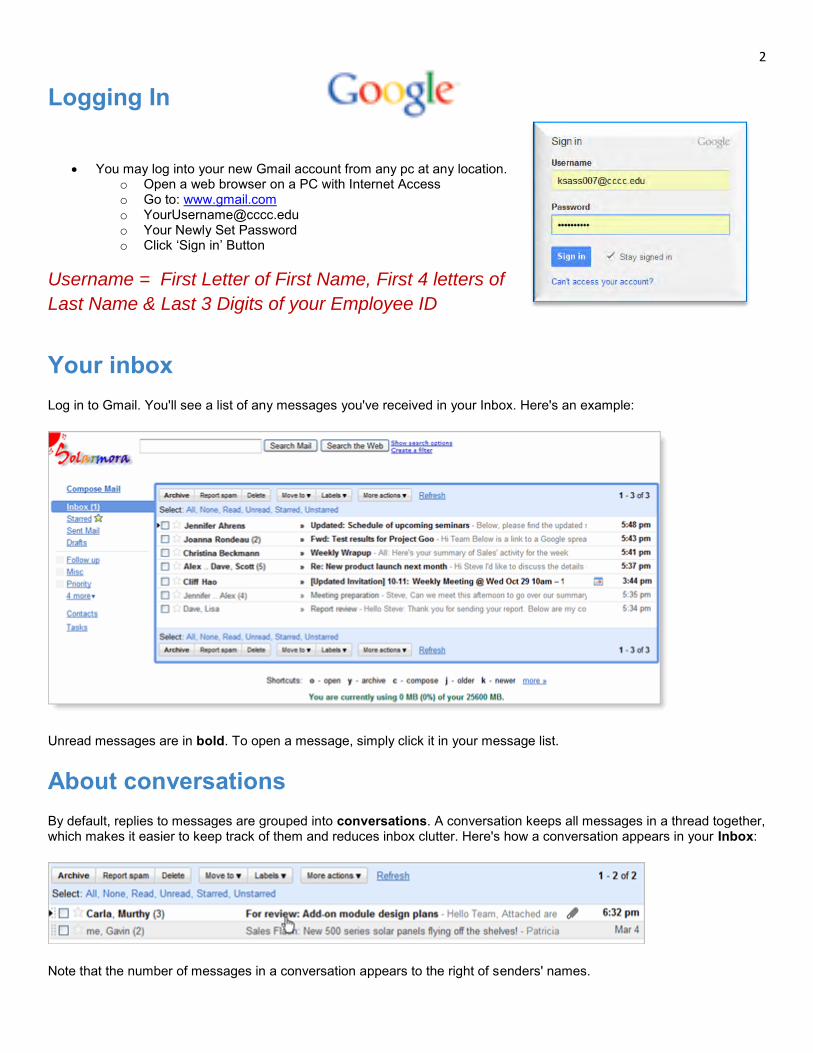
Logging In
You may log into your new Gmail account from any pc at any location. o Open a web browser on a PC with Internet Access o Go to: www.gmail.com o [email protected] o Your Newly Set Password o Click ‘Sign in’ Button
Username = First Letter of First Name, First 4 letters of
Last Name & Last 3 Digits of your Employee ID
Your inbox Log in to Gmail. You'll see a list of any messages you've received in your Inbox. Here's an example:
Unread messages are in bold. To open a message, simply click it in your message list.
About conversations By default, replies to messages are grouped into conversations. A conversation keeps all messages in a thread together, which makes it easier to keep track of them and reduces inbox clutter. Here's how a conversation appears in your Inbox:
Note that the number of messages in a conversation appears to the right of senders' names.
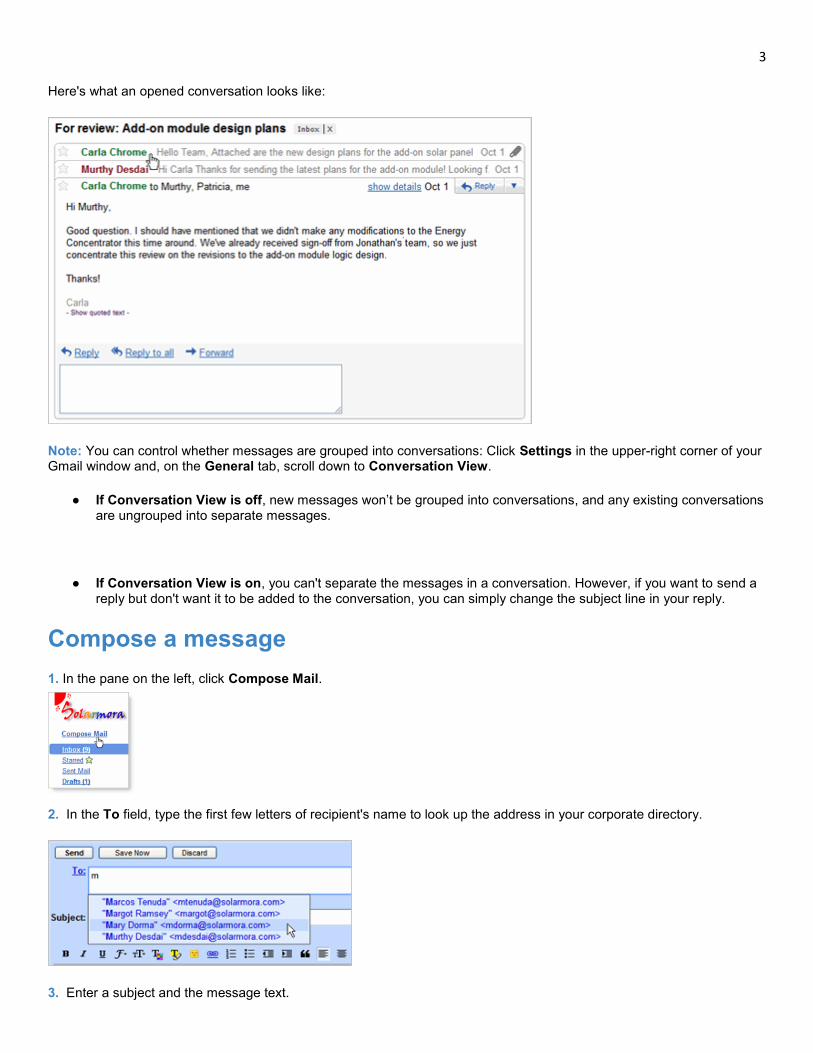
3 Here's what an opened conversation looks like:
Note: You can control whether messages are grouped into conversations: Click Settings in the upper-right corner of your Gmail window and, on the General tab, scroll down to Conversation View.
● If Conversation View is off, new messages won’t be grouped into conversations, and any existing conversations are ungrouped into separate messages.
● If Conversation View is on, you can't separate the messages in a conversation. However, if you want to send a reply but don't want it to be added to the conversation, you can simply change the subject line in your reply.
Compose a message 1. In the pane on the left, click Compose Mail.
2. In the To field, type the first few letters of recipient's name to look up the address in your corporate directory.
3. Enter a subject and the message text.
4
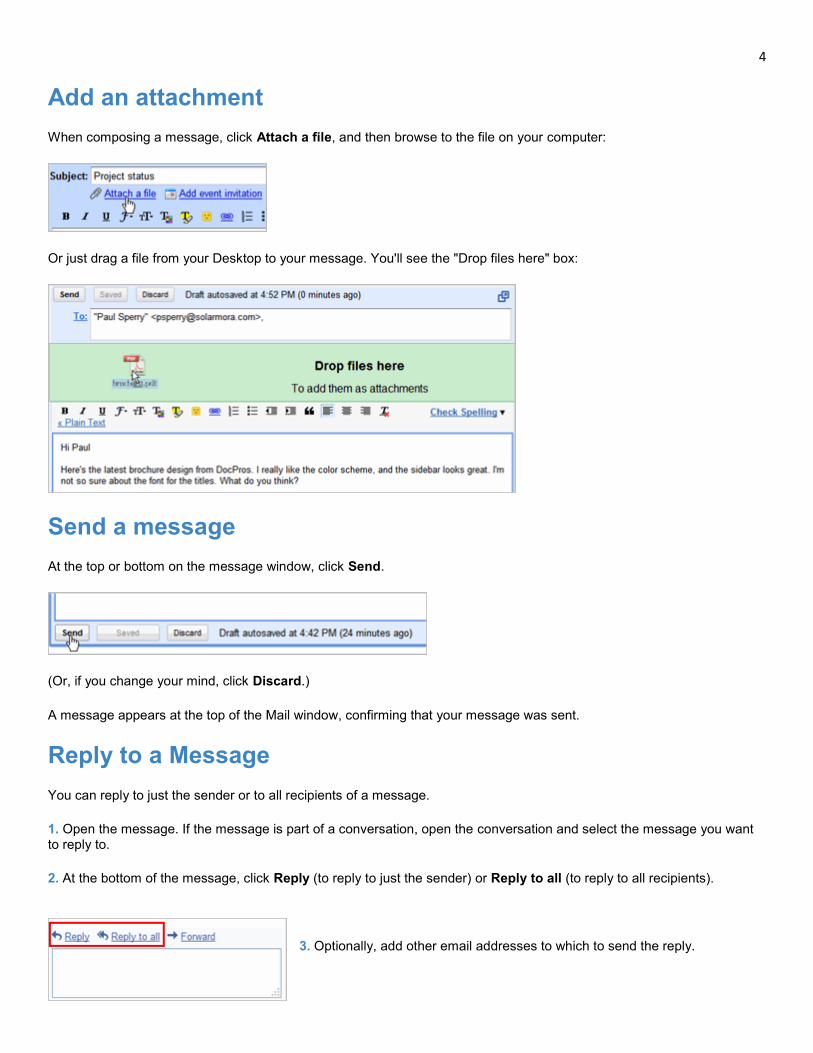
Add an attachment When composing a message, click Attach a file, and then browse to the file on your computer:
Or just drag a file from your Desktop to your message. You'll see the "Drop files here" box:
Send a message At the top or bottom on the message window, click Send.
(Or, if you change your mind, click Discard.)
A message appears at the top of the Mail window, confirming that your message was sent.
Reply to a Message You can reply to just the sender or to all recipients of a message.
1. Open the message. If the message is part of a conversation, open the conversation and select the message you want to reply to.
2. At the bottom of the message, click Reply (to reply to just the sender) or Reply to all (to reply to all recipients).
3. Optionally, add other email addresses to which to send the reply.
5 4. Enter your reply in the message field.
5. At the top or bottom of the message, click Send.
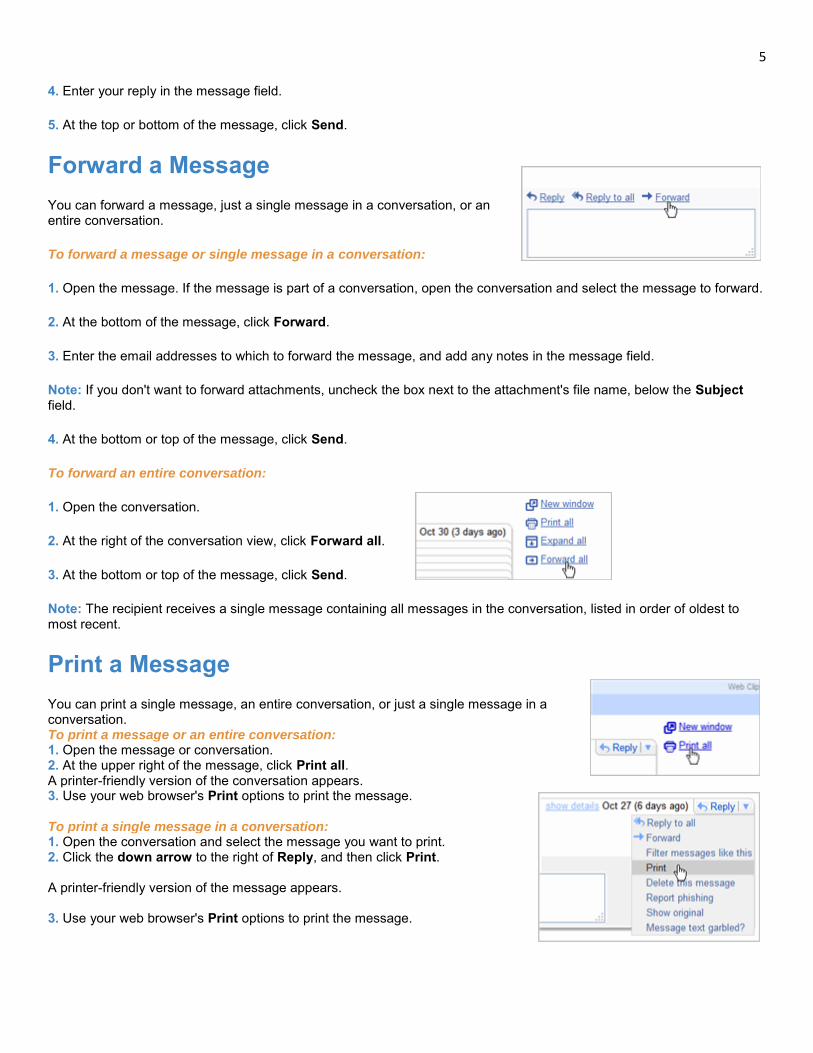
Forward a Message You can forward a message, just a single message in a conversation, or an entire conversation.
To forward a message or single message in a conversation:
1. Open the message. If the message is part of a conversation, open the conversation and select the message to forward.
2. At the bottom of the message, click Forward.
3. Enter the email addresses to which to forward the message, and add any notes in the message field.
Note: If you don't want to forward attachments, uncheck the box next to the attachment's file name, below the Subject field.
4. At the bottom or top of the message, click Send.
To forward an entire conversation:
1. Open the conversation.
2. At the right of the conversation view, click Forward all.
3. At the bottom or top of the message, click Send.
Note: The recipient receives a single message containing all messages in the conversation, listed in order of oldest to most recent.
Print a Message You can print a single message, an entire conversation, or just a single message in a conversation. To print a message or an entire conversation: 1. Open the message or conversation. 2. At the upper right of the message, click Print all. A printer-friendly version of the conversation appears. 3. Use your web browser's Print options to print the message. To print a single message in a conversation: 1. Open the conversation and select the message you want to print. 2. Click the down arrow to the right of Reply, and then click Print. A printer-friendly version of the message appears. 3. Use your web browser's Print options to print the message.
6
Create an email signature 1. Open Gmail.
2. In the upper-right corner of the Mail window, click Settings.
3. On the General page, in the Signature section, enter your signature in the box.
4. Optionally use the options to format the text and add links and images.
5. Click Save at the bottom of the page.
Note: You can set up only one signature.
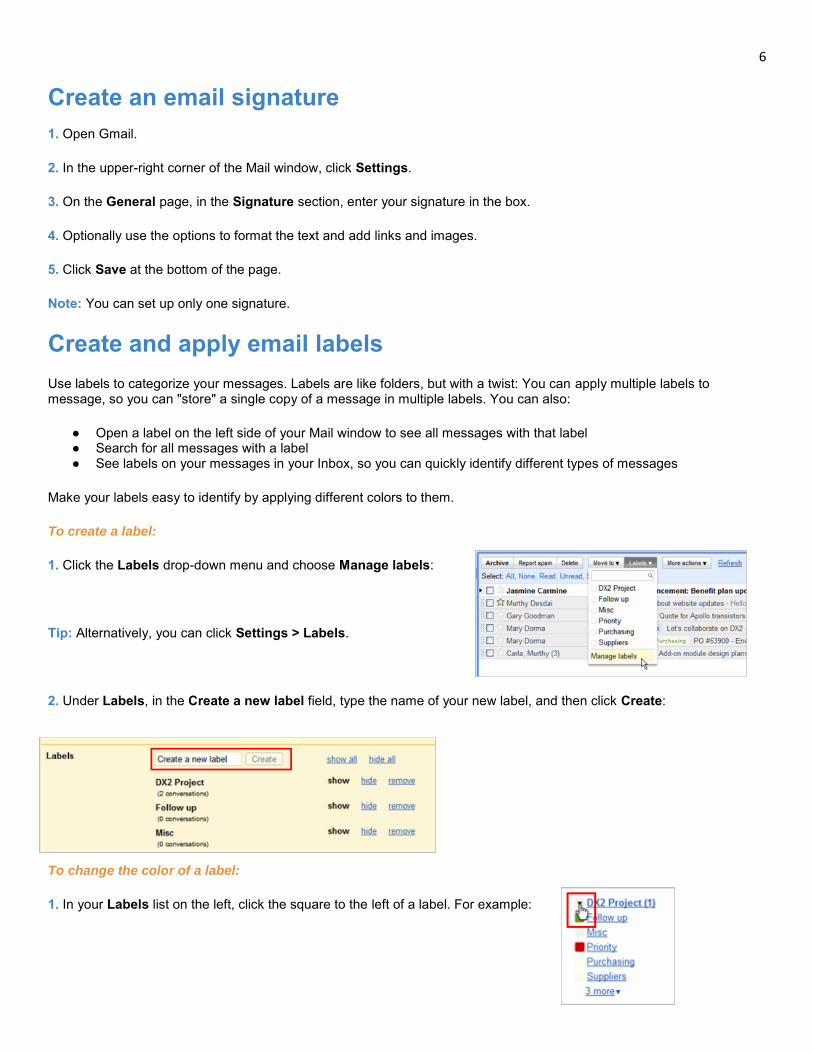
Create and apply email labels Use labels to categorize your messages. Labels are like folders, but with a twist: You can apply multiple labels to message, so you can "store" a single copy of a message in multiple labels. You can also:
● Open a label on the left side of your Mail window to see all messages with that label ● Search for all messages with a label ● See labels on your messages in your Inbox, so you can quickly identify different types of messages
Make your labels easy to identify by applying different colors to them.
To create a label:
1. Click the Labels drop-down menu and choose Manage labels:
Tip: Alternatively, you can click Settings > Labels.
2. Under Labels, in the Create a new label field, type the name of your new label, and then click Create:
To change the color of a label:
1. In your Labels list on the left, click the square to the left of a label. For example:
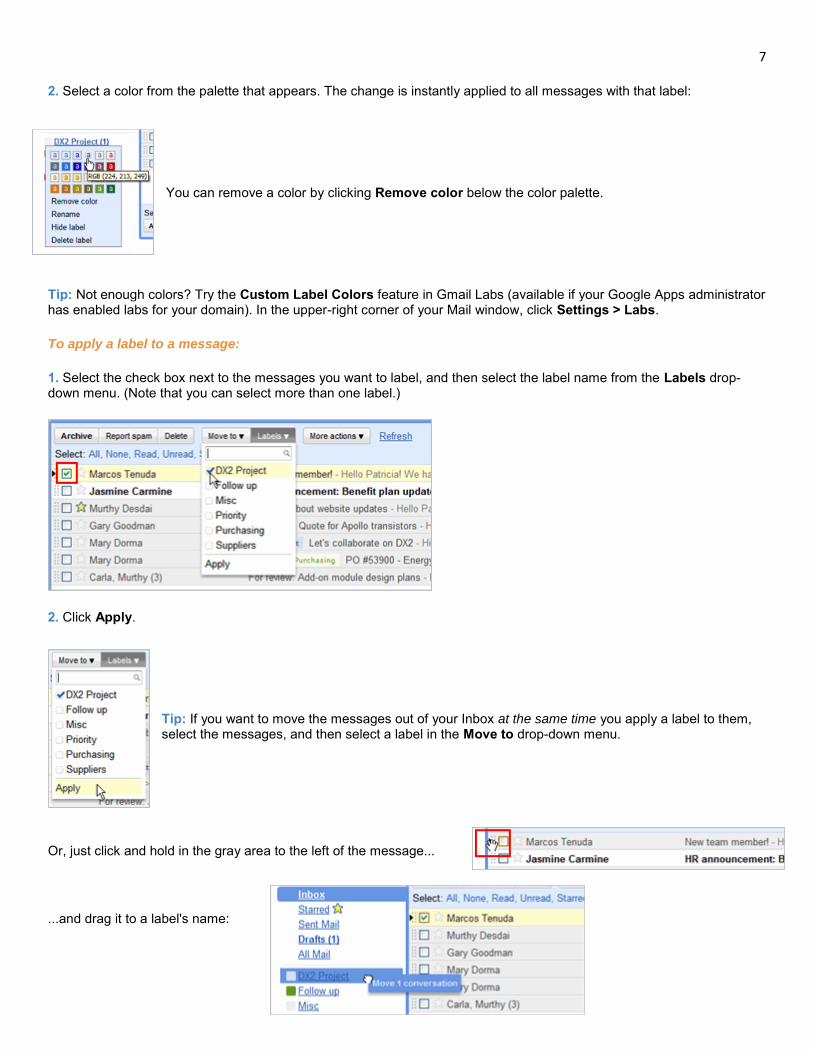
7 2. Select a color from the palette that appears. The change is instantly applied to all messages with that label:
You can remove a color by clicking Remove color below the color palette.
Tip: Not enough colors? Try the Custom Label Colors feature in Gmail Labs (available if your Google Apps administrator has enabled labs for your domain). In the upper-right corner of your Mail window, click Settings > Labs.
To apply a label to a message:
1. Select the check box next to the messages you want to label, and then select the label name from the Labels drop-down menu. (Note that you can select more than one label.)
2. Click Apply.
Tip: If you want to move the messages out of your Inbox at the same time you apply a label to them, select the messages, and then select a label in the Move to drop-down menu.
Or, just click and hold in the gray area to the left of the message...
...and drag it to a label's name:
8 To move labeled messages out of your Inbox:
1. Select one or more labeled messages in your Inbox.
2. Click Archive.
To view a labeled message you archived, just click the label on the left.
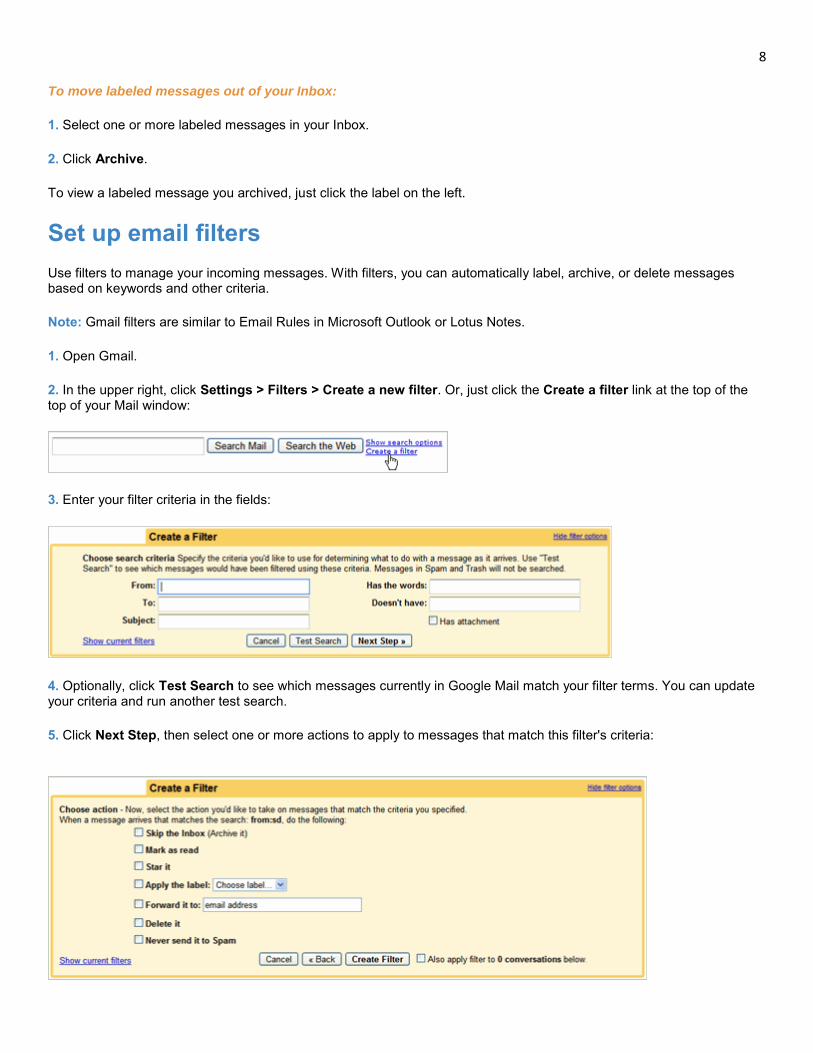
Set up email filters
Use filters to manage your incoming messages. With filters, you can automatically label, archive, or delete messages based on keywords and other criteria.
Note: Gmail filters are similar to Email Rules in Microsoft Outlook or Lotus Notes.
1. Open Gmail.
2. In the upper right, click Settings > Filters > Create a new filter. Or, just click the Create a filter link at the top of the top of your Mail window:
3. Enter your filter criteria in the fields:
4. Optionally, click Test Search to see which messages currently in Google Mail match your filter terms. You can update your criteria and run another test search.
5. Click Next Step, then select one or more actions to apply to messages that match this filter's criteria:
9 Note: These actions are applied in the order in which they are listed. For example, you could choose to forward matching messages to a specific email address, and then delete the messages.
6. To apply the filter to messages you've already received, click Also apply filter to [x] conversations below.
7. Click Create Filter.
Calendar Basics
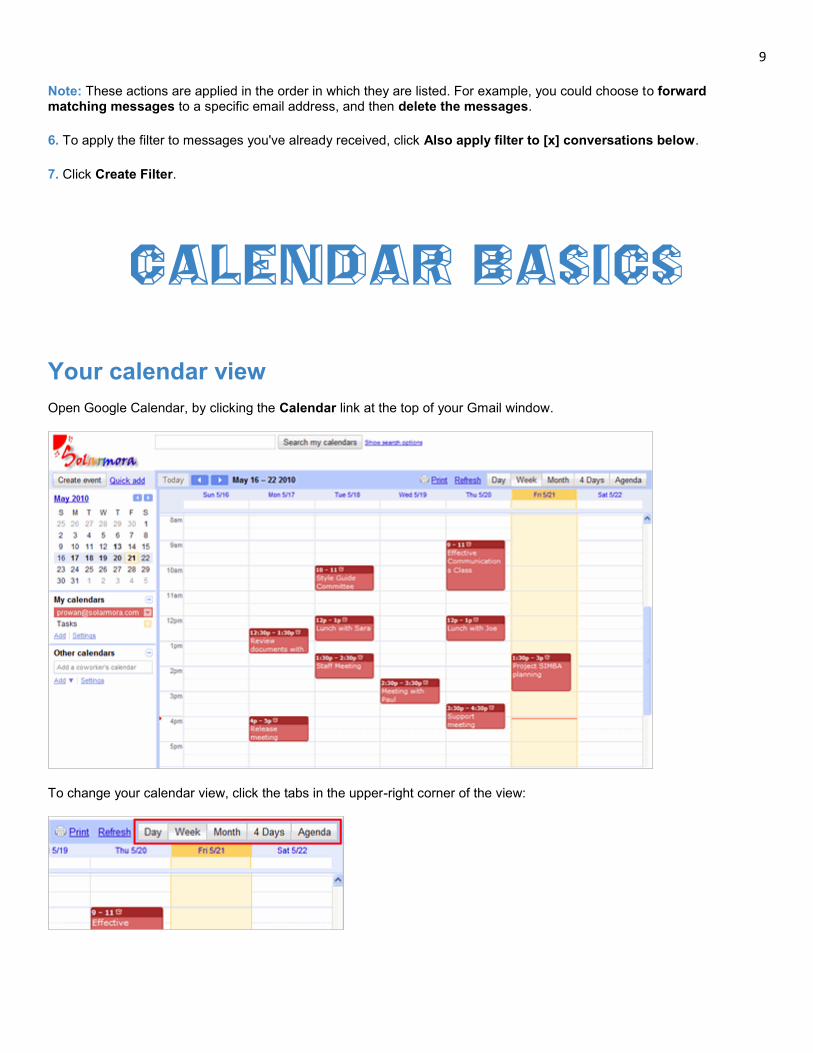
Your calendar view Open Google Calendar, by clicking the Calendar link at the top of your Gmail window.
To change your calendar view, click the tabs in the upper-right corner of the view:
10
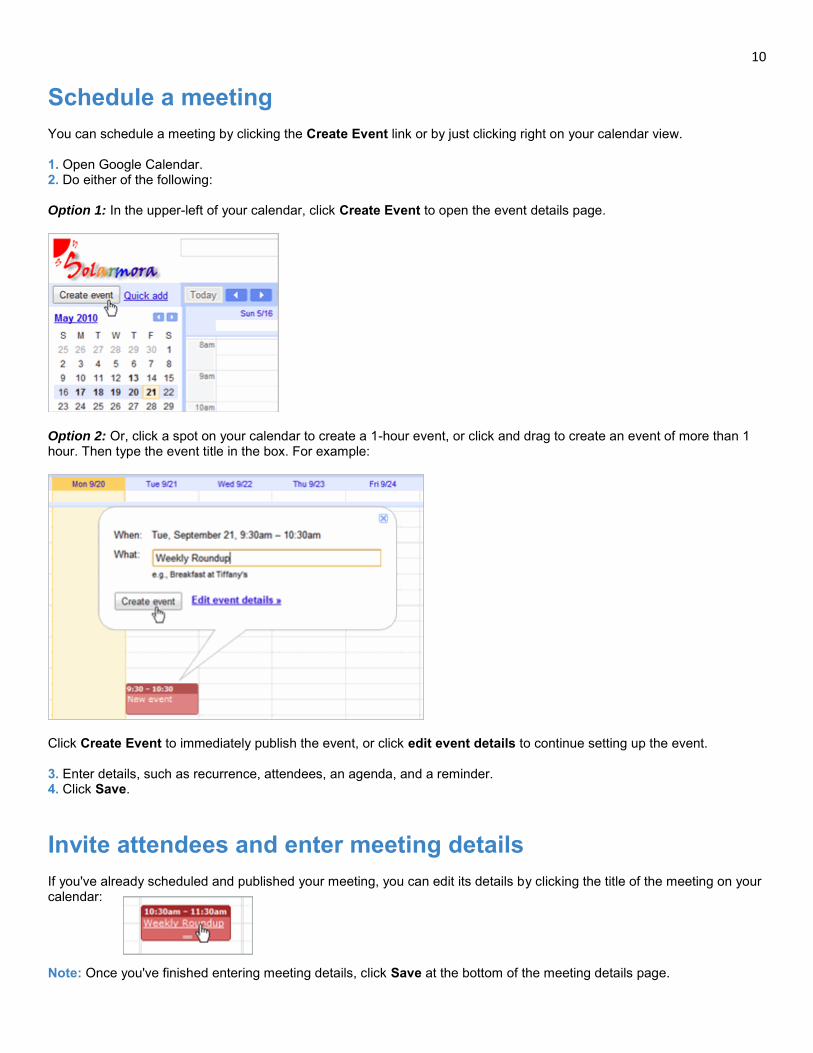
Schedule a meeting You can schedule a meeting by clicking the Create Event link or by just clicking right on your calendar view. 1. Open Google Calendar. 2. Do either of the following: Option 1: In the upper-left of your calendar, click Create Event to open the event details page.
Option 2: Or, click a spot on your calendar to create a 1-hour event, or click and drag to create an event of more than 1 hour. Then type the event title in the box. For example:
Click Create Event to immediately publish the event, or click edit event details to continue setting up the event. 3. Enter details, such as recurrence, attendees, an agenda, and a reminder. 4. Click Save.
Invite attendees and enter meeting details If you've already scheduled and published your meeting, you can edit its details by clicking the title of the meeting on your calendar: Note: Once you've finished entering meeting details, click Save at the bottom of the meeting details page.
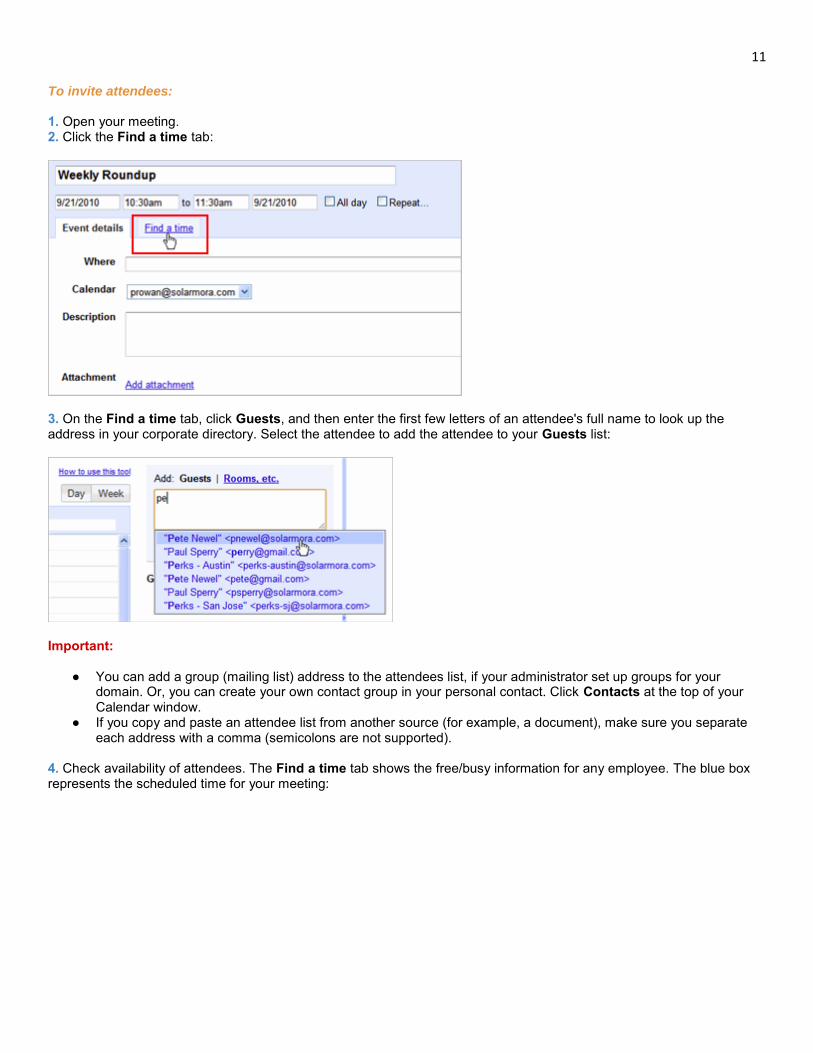
11 To invite attendees: 1. Open your meeting. 2. Click the Find a time tab:
3. On the Find a time tab, click Guests, and then enter the first few letters of an attendee's full name to look up the address in your corporate directory. Select the attendee to add the attendee to your Guests list:
Important:
● You can add a group (mailing list) address to the attendees list, if your administrator set up groups for your domain. Or, you can create your own contact group in your personal contact. Click Contacts at the top of your Calendar window.
● If you copy and paste an attendee list from another source (for example, a document), make sure you separate each address with a comma (semicolons are not supported).
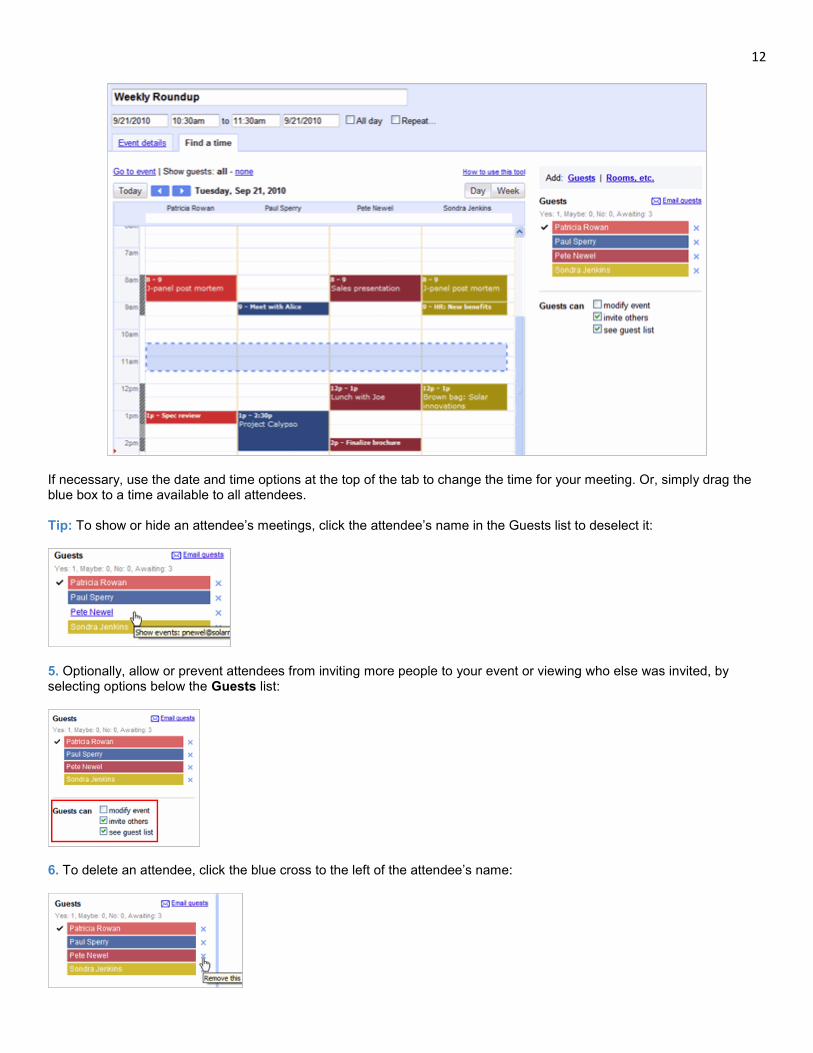
4. Check availability of attendees. The Find a time tab shows the free/busy information for any employee. The blue box represents the scheduled time for your meeting:
12
If necessary, use the date and time options at the top of the tab to change the time for your meeting. Or, simply drag the blue box to a time available to all attendees. Tip: To show or hide an attendee’s meetings, click the attendee’s name in the Guests list to deselect it:
5. Optionally, allow or prevent attendees from inviting more people to your event or viewing who else was invited, by selecting options below the Guests list:
6. To delete an attendee, click the blue cross to the left of the attendee’s name:
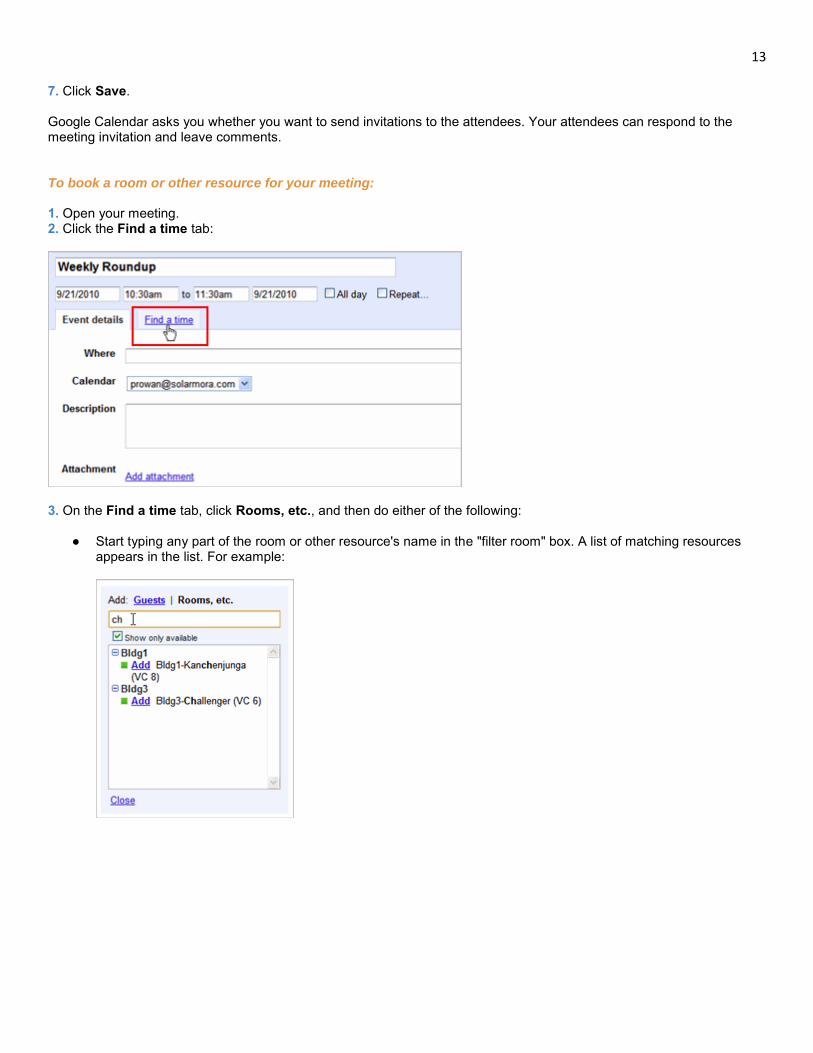
13 7. Click Save. Google Calendar asks you whether you want to send invitations to the attendees. Your attendees can respond to the meeting invitation and leave comments. To book a room or other resource for your meeting: 1. Open your meeting. 2. Click the Find a time tab:
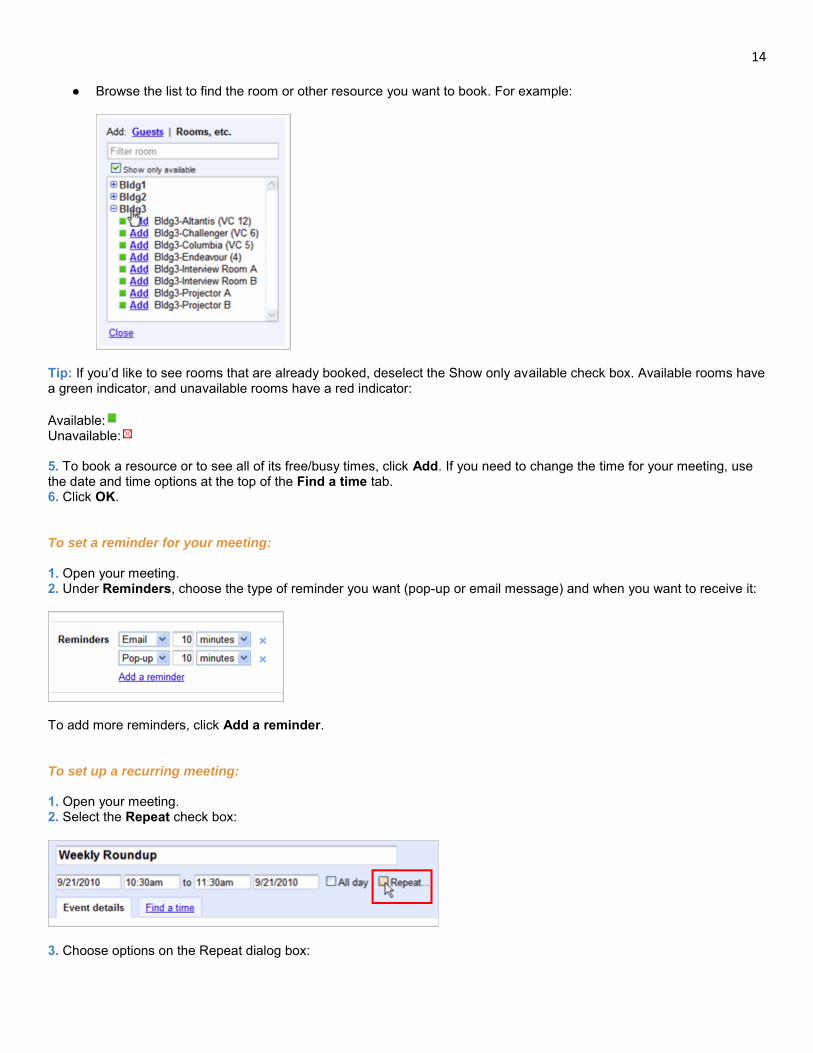
3. On the Find a time tab, click Rooms, etc., and then do either of the following:
● Start typing any part of the room or other resource's name in the "filter room" box. A list of matching resources appears in the list. For example:
14
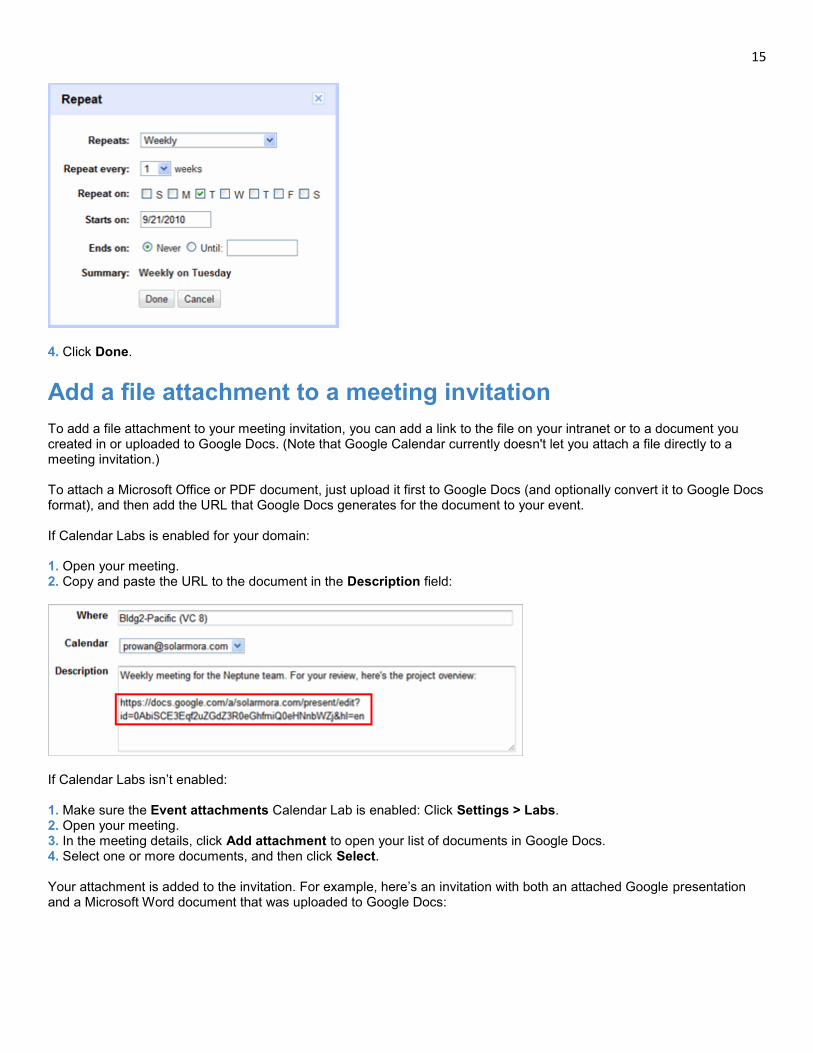
● Browse the list to find the room or other resource you want to book. For example:
Tip: If you’d like to see rooms that are already booked, deselect the Show only available check box. Available rooms have a green indicator, and unavailable rooms have a red indicator: Available: Unavailable: 5. To book a resource or to see all of its free/busy times, click Add. If you need to change the time for your meeting, use the date and time options at the top of the Find a time tab. 6. Click OK. To set a reminder for your meeting: 1. Open your meeting. 2. Under Reminders, choose the type of reminder you want (pop-up or email message) and when you want to receive it:
To add more reminders, click Add a reminder. To set up a recurring meeting: 1. Open your meeting. 2. Select the Repeat check box:
3. Choose options on the Repeat dialog box:
15
4. Click Done.
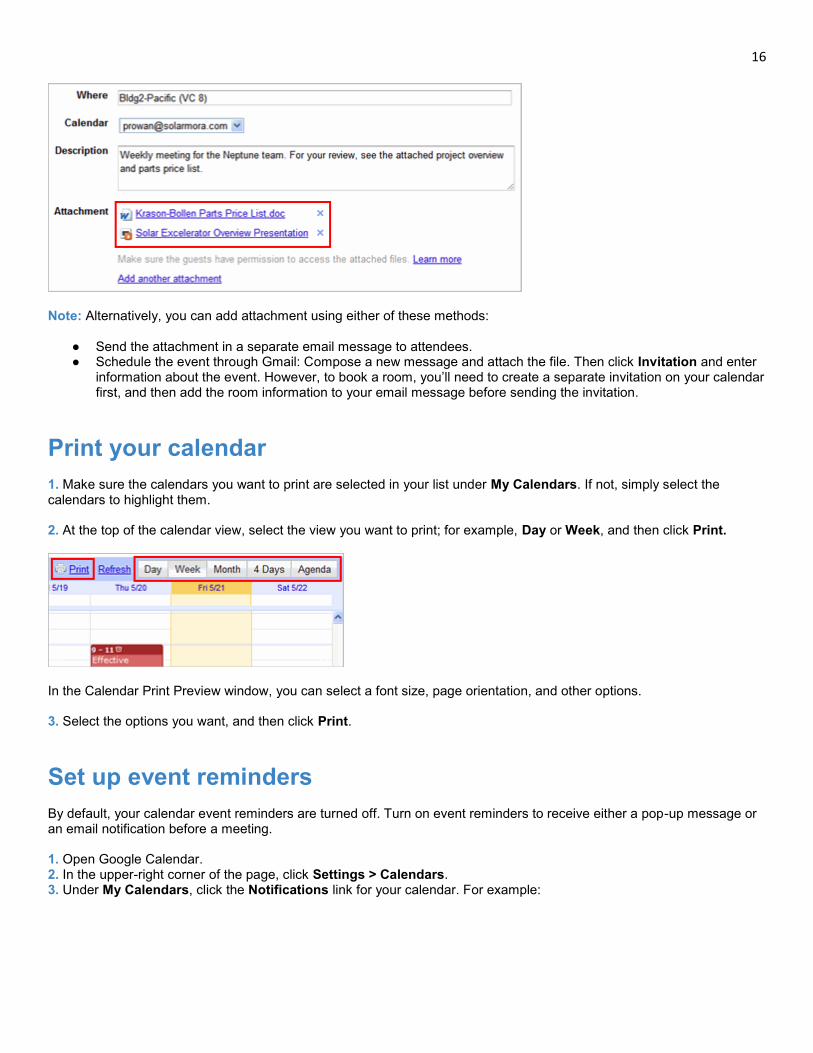
Add a file attachment to a meeting invitation To add a file attachment to your meeting invitation, you can add a link to the file on your intranet or to a document you created in or uploaded to Google Docs. (Note that Google Calendar currently doesn't let you attach a file directly to a meeting invitation.) To attach a Microsoft Office or PDF document, just upload it first to Google Docs (and optionally convert it to Google Docs format), and then add the URL that Google Docs generates for the document to your event. If Calendar Labs is enabled for your domain: 1. Open your meeting. 2. Copy and paste the URL to the document in the Description field:
If Calendar Labs isn’t enabled: 1. Make sure the Event attachments Calendar Lab is enabled: Click Settings > Labs. 2. Open your meeting. 3. In the meeting details, click Add attachment to open your list of documents in Google Docs. 4. Select one or more documents, and then click Select. Your attachment is added to the invitation. For example, here’s an invitation with both an attached Google presentation and a Microsoft Word document that was uploaded to Google Docs:
16
Note: Alternatively, you can add attachment using either of these methods:
● Send the attachment in a separate email message to attendees. ● Schedule the event through Gmail: Compose a new message and attach the file. Then click Invitation and enter
information about the event. However, to book a room, you’ll need to create a separate invitation on your calendar first, and then add the room information to your email message before sending the invitation.
Print your calendar 1. Make sure the calendars you want to print are selected in your list under My Calendars. If not, simply select the calendars to highlight them. 2. At the top of the calendar view, select the view you want to print; for example, Day or Week, and then click Print.
In the Calendar Print Preview window, you can select a font size, page orientation, and other options. 3. Select the options you want, and then click Print.
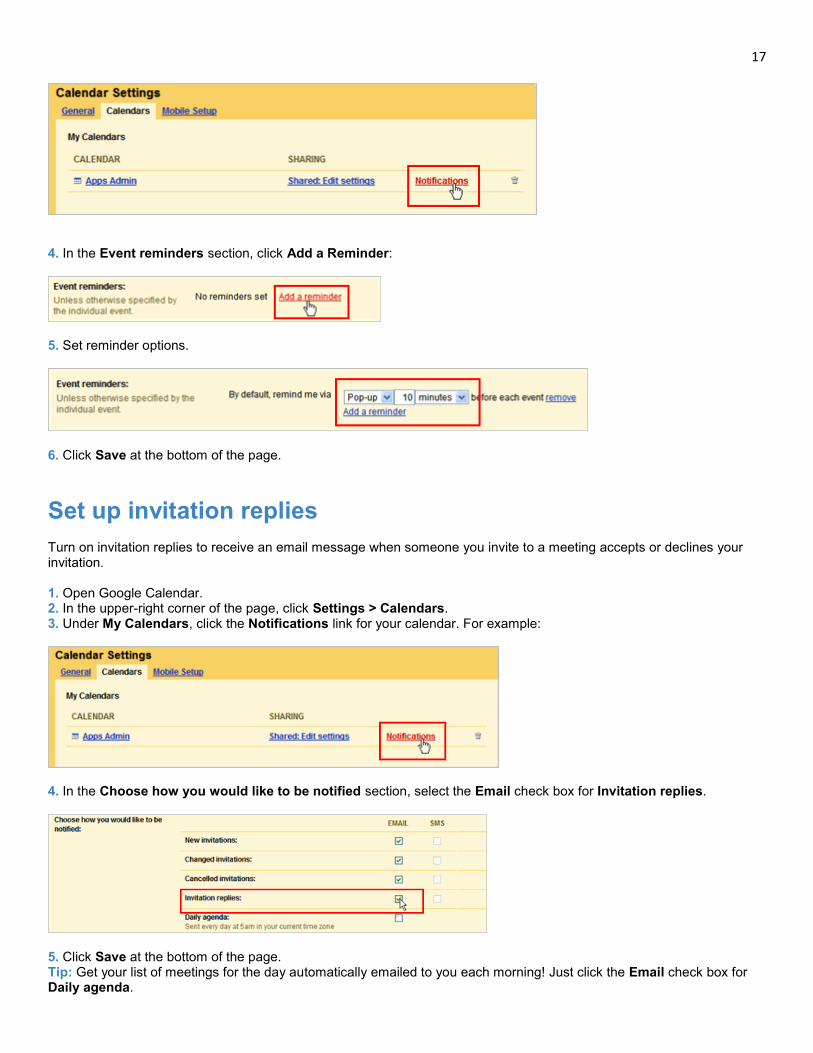
Set up event reminders By default, your calendar event reminders are turned off. Turn on event reminders to receive either a pop-up message or an email notification before a meeting. 1. Open Google Calendar. 2. In the upper-right corner of the page, click Settings > Calendars. 3. Under My Calendars, click the Notifications link for your calendar. For example:
17
4. In the Event reminders section, click Add a Reminder:
5. Set reminder options.
6. Click Save at the bottom of the page.
Set up invitation replies Turn on invitation replies to receive an email message when someone you invite to a meeting accepts or declines your invitation. 1. Open Google Calendar. 2. In the upper-right corner of the page, click Settings > Calendars. 3. Under My Calendars, click the Notifications link for your calendar. For example:
4. In the Choose how you would like to be notified section, select the Email check box for Invitation replies.
5. Click Save at the bottom of the page. Tip: Get your list of meetings for the day automatically emailed to you each morning! Just click the Email check box for Daily agenda.
18
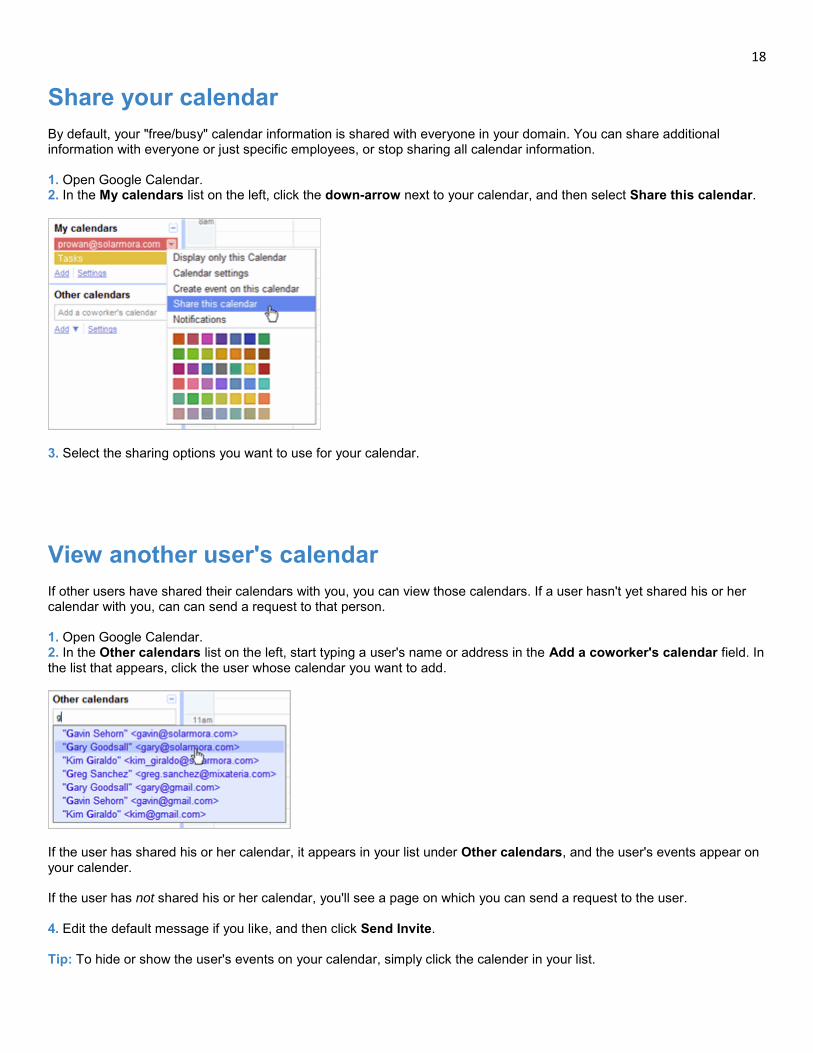
Share your calendar By default, your "free/busy" calendar information is shared with everyone in your domain. You can share additional information with everyone or just specific employees, or stop sharing all calendar information. 1. Open Google Calendar. 2. In the My calendars list on the left, click the down-arrow next to your calendar, and then select Share this calendar.
3. Select the sharing options you want to use for your calendar.
View another user's calendar If other users have shared their calendars with you, you can view those calendars. If a user hasn't yet shared his or her calendar with you, can can send a request to that person. 1. Open Google Calendar. 2. In the Other calendars list on the left, start typing a user's name or address in the Add a coworker's calendar field. In the list that appears, click the user whose calendar you want to add.
If the user has shared his or her calendar, it appears in your list under Other calendars, and the user's events appear on your calender. If the user has not shared his or her calendar, you'll see a page on which you can send a request to the user. 4. Edit the default message if you like, and then click Send Invite. Tip: To hide or show the user's events on your calendar, simply click the calender in your list.
19
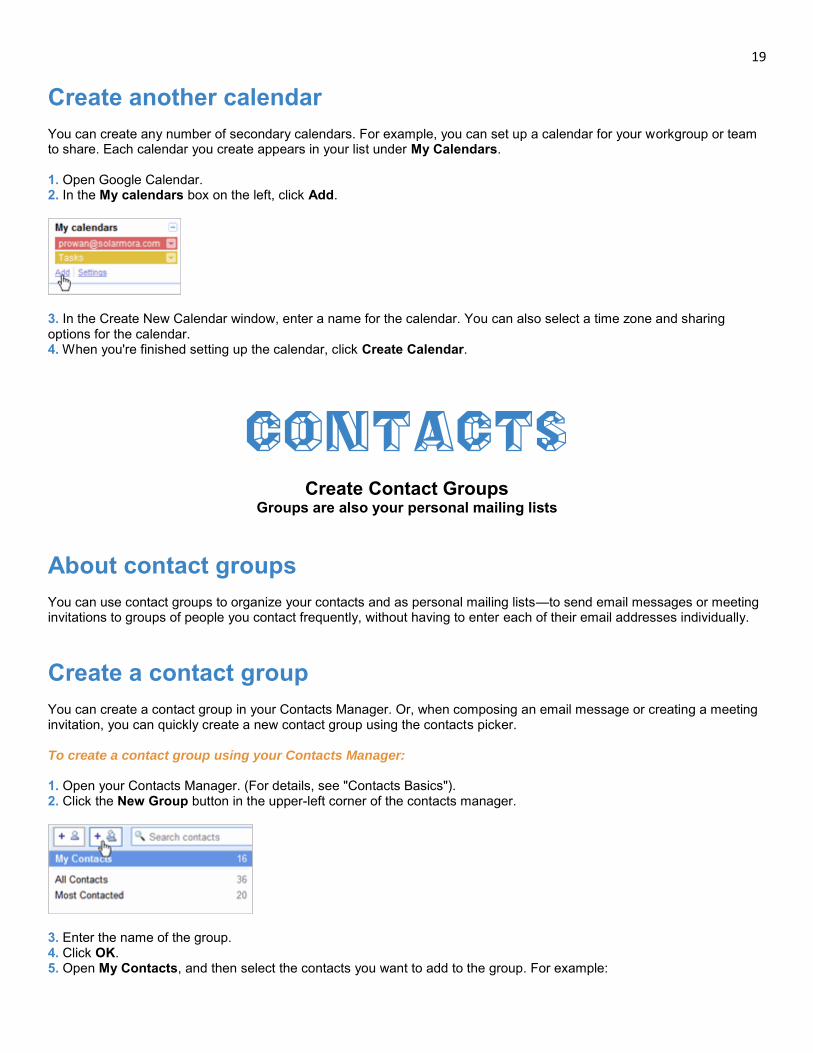
Create another calendar You can create any number of secondary calendars. For example, you can set up a calendar for your workgroup or team to share. Each calendar you create appears in your list under My Calendars. 1. Open Google Calendar. 2. In the My calendars box on the left, click Add.
3. In the Create New Calendar window, enter a name for the calendar. You can also select a time zone and sharing options for the calendar. 4. When you're finished setting up the calendar, click Create Calendar.
Contacts
Create Contact Groups Groups are also your personal mailing lists
About contact groups You can use contact groups to organize your contacts and as personal mailing lists—to send email messages or meeting invitations to groups of people you contact frequently, without having to enter each of their email addresses individually.
Create a contact group You can create a contact group in your Contacts Manager. Or, when composing an email message or creating a meeting invitation, you can quickly create a new contact group using the contacts picker. To create a contact group using your Contacts Manager: 1. Open your Contacts Manager. (For details, see "Contacts Basics"). 2. Click the New Group button in the upper-left corner of the contacts manager.
3. Enter the name of the group. 4. Click OK. 5. Open My Contacts, and then select the contacts you want to add to the group. For example:
20
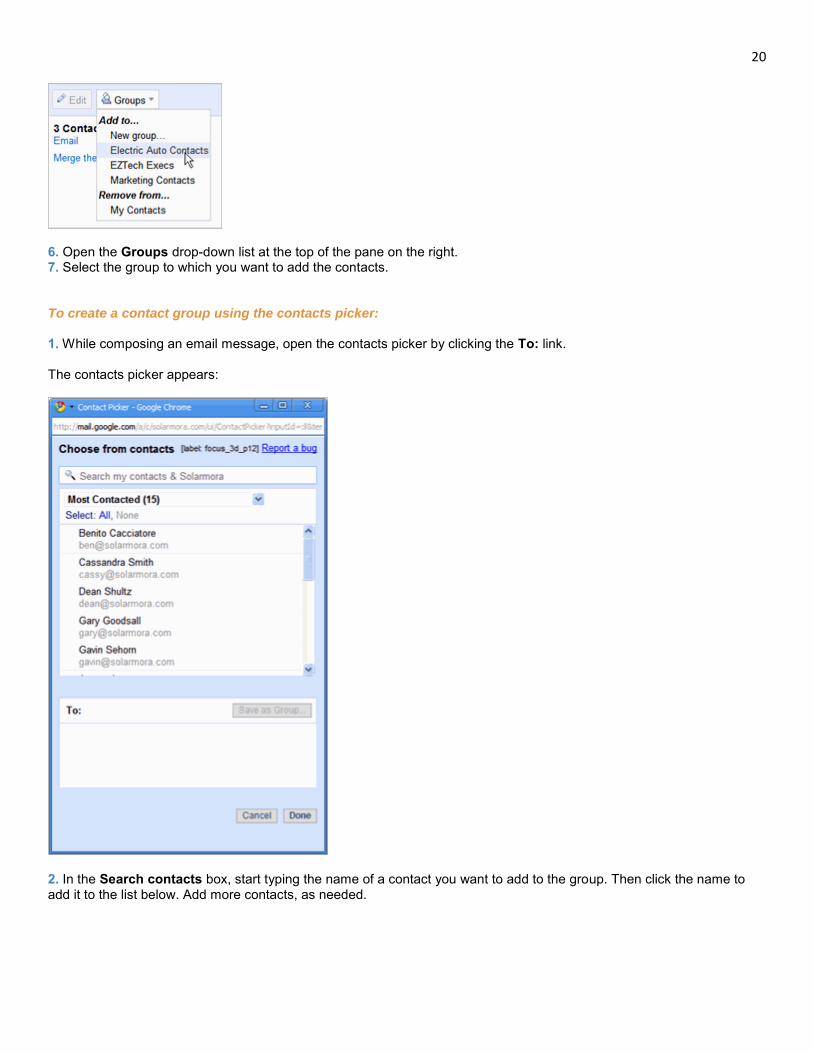
6. Open the Groups drop-down list at the top of the pane on the right. 7. Select the group to which you want to add the contacts. To create a contact group using the contacts picker: 1. While composing an email message, open the contacts picker by clicking the To: link. The contacts picker appears:
2. In the Search contacts box, start typing the name of a contact you want to add to the group. Then click the name to add it to the list below. Add more contacts, as needed.
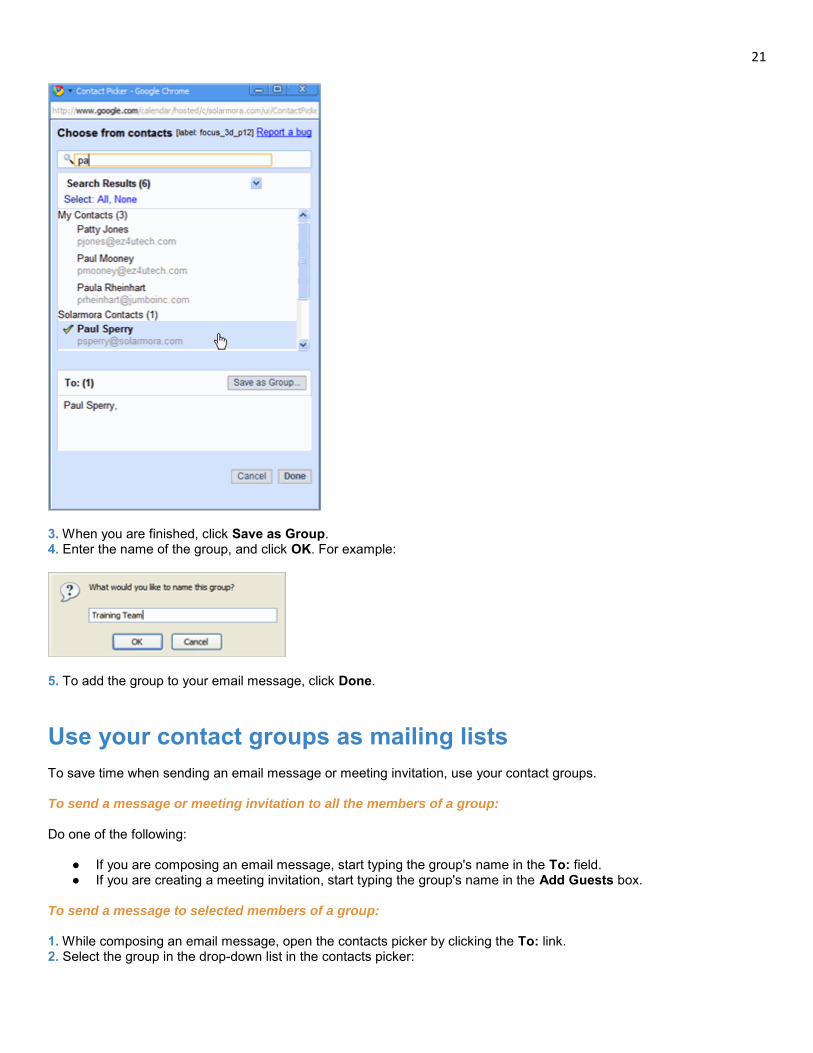
21
3. When you are finished, click Save as Group. 4. Enter the name of the group, and click OK. For example:
5. To add the group to your email message, click Done.
Use your contact groups as mailing lists To save time when sending an email message or meeting invitation, use your contact groups. To send a message or meeting invitation to all the members of a group: Do one of the following:
● If you are composing an email message, start typing the group's name in the To: field. ● If you are creating a meeting invitation, start typing the group's name in the Add Guests box.
To send a message to selected members of a group: 1. While composing an email message, open the contacts picker by clicking the To: link. 2. Select the group in the drop-down list in the contacts picker:

22
3. Select the contacts to whom you want to send the invitation. For example:
Or, to send it to all contacts in the group, click Select all:
GOOGLE APPS What is Google Apps? 3 Minute Video
https://sites.google.com/a/googleapps.com/google-apps-learning-center/your-first-days


![· 2008-03-14 · g cccc y= Êcccc ¥cccc£{ [ ccccc~j cccccp ccccc¨ `= Çccccc cccccl Æccccc ccccc£o ] ... $ c ch =i c¤ Õ g ch i cc h cccc£ cccc¢ `i=gg¥ccccn Êcccc } ccccy](https://img.pdfslide.us/doc/110x75/5e41c484b70c701a1c435917/2008-03-14-g-cccc-y-cccc-cccc-cccccj-cccccp-ccccc-ccccc-cccccl.jpg)