Embed Size (px)
Citation preview
ADVANCED INSTRUMENTATIONNEVI & BARNHART
Lisa Mayo, RDH, BSDH
Clinical Sciences DH102
Concorde Career College

TOPICS FOR TODAY
Root Planing Furcation & Root Planing Techniques Specialized & Modified Instruments Removing Overhangs on Restorations
SELECTION & SEQUENCE OF ADVANCED INSTRUMENTATION
1. Ultrasonic first to remove moderate to heavy deposits
2. Scalers and/or universal curets second
3. Gracey curets third
4. Specialized instruments Mini & Micro-Mini’s Diamond files File scaler Hoe scaler Chisel scaler
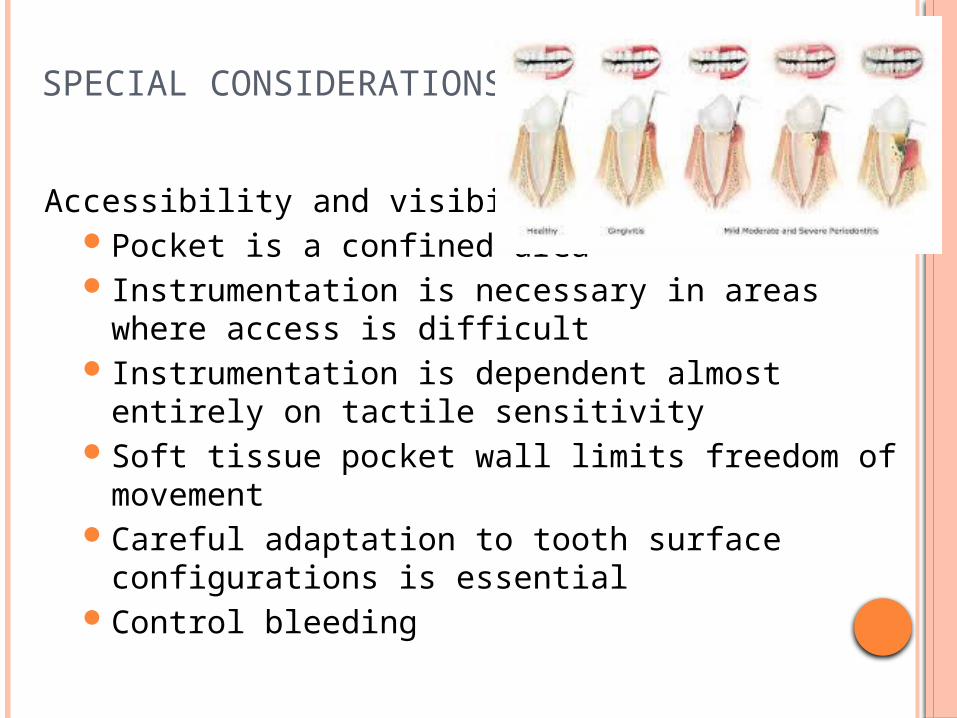
SPECIAL CONSIDERATIONS
Accessibility and visibilityPocket is a confined area Instrumentation is necessary in areas where
access is difficult Instrumentation is dependent almost entirely on
tactile sensitivitySoft tissue pocket wall limits freedom of
movementCareful adaptation to tooth surface configurations
is essential Control bleeding
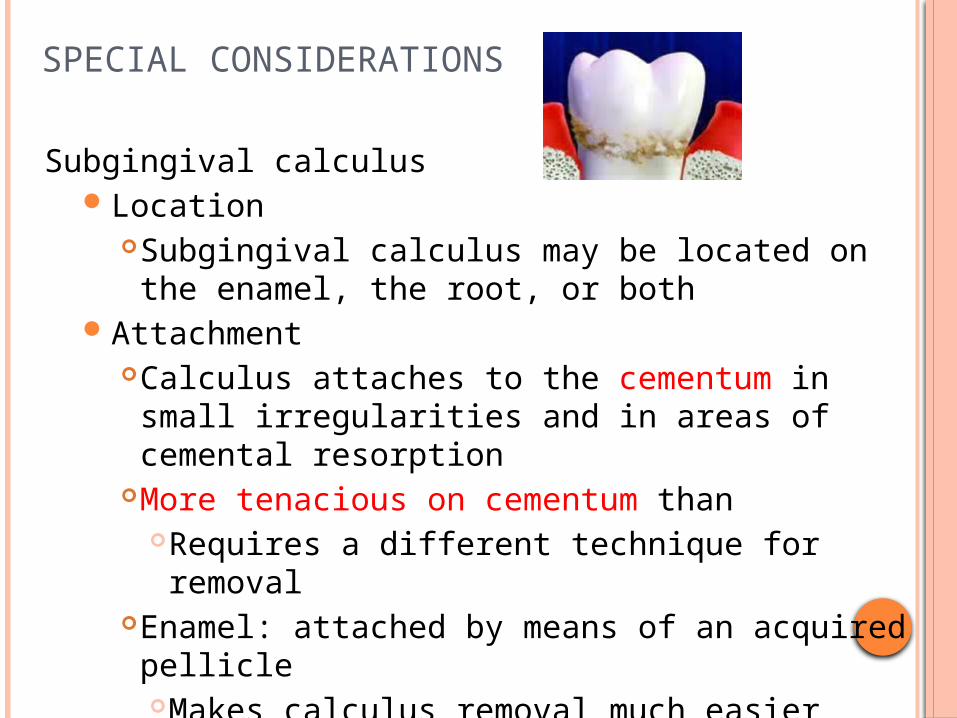
SPECIAL CONSIDERATIONS
Subgingival calculus Location
Subgingival calculus may be located on the enamel, the root, or both
AttachmentCalculus attaches to the cementum in small irregularities and in areas of cemental resorption
More tenacious on cementum than Requires a different technique for removal
Enamel: attached by means of an acquired pellicleMakes calculus removal much easier
SPECIAL CONSIDERATIONS
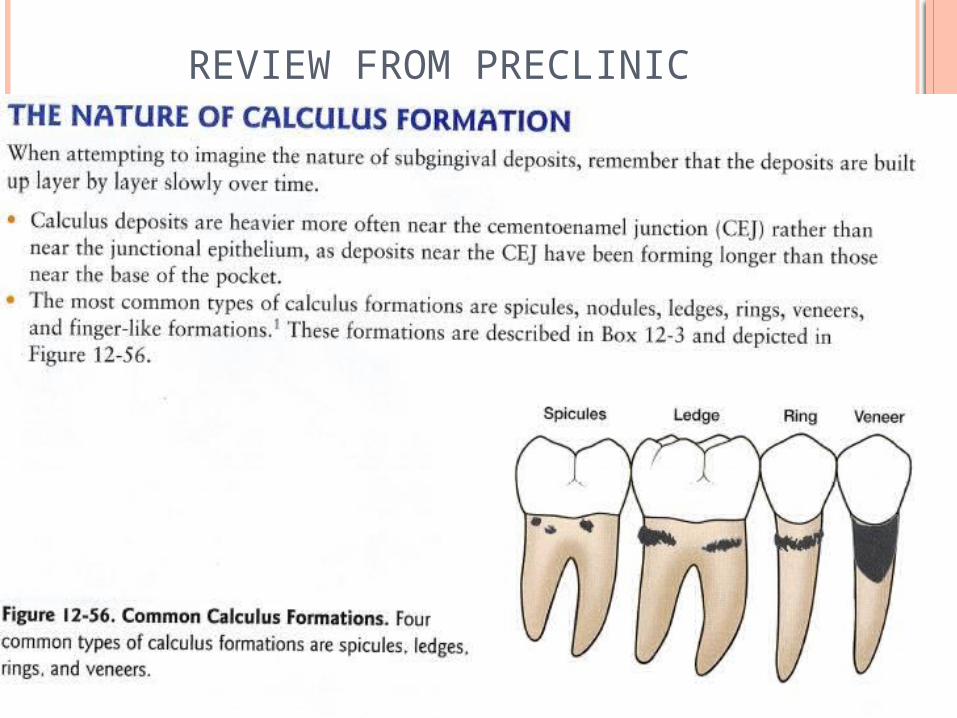
Subgingival calculus Morphology of calculus
Subgingival calculus is irregularly depositedLedge, smooth veneer, spicules, ringPreviously scaled or burnished calculus
Subgingival calculus that has been partially scaled and left after incomplete instrumentation
Smooth, may be hard to detect and removeHorizontal strokes: good for line angles
Useful when other strokes impossible to remove deposits
REVIEW FROM PRECLINIC
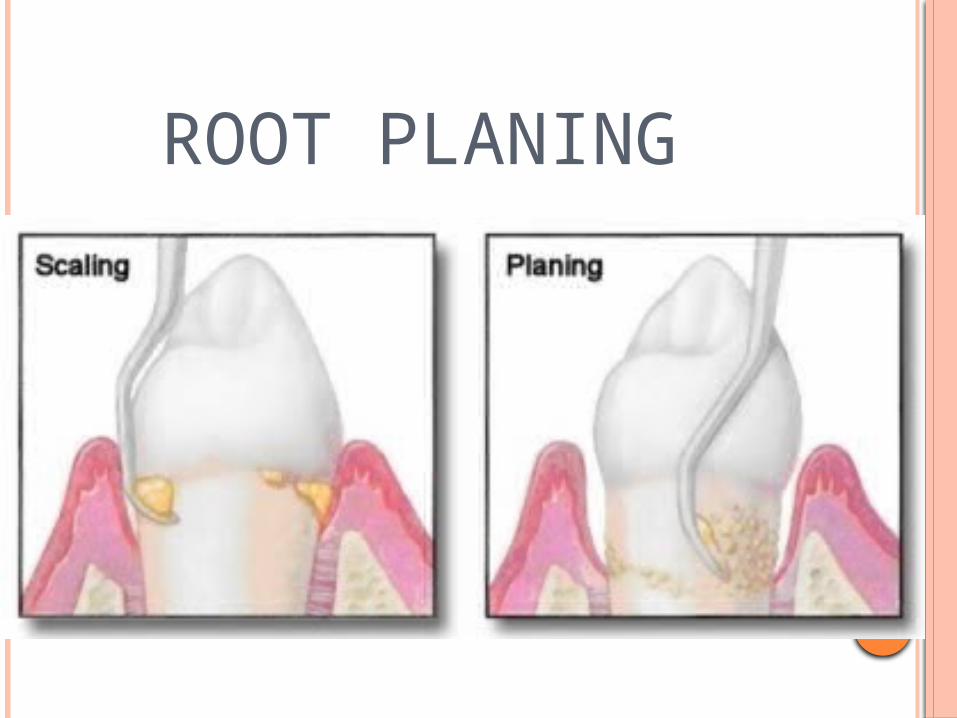
ROOT PLANING
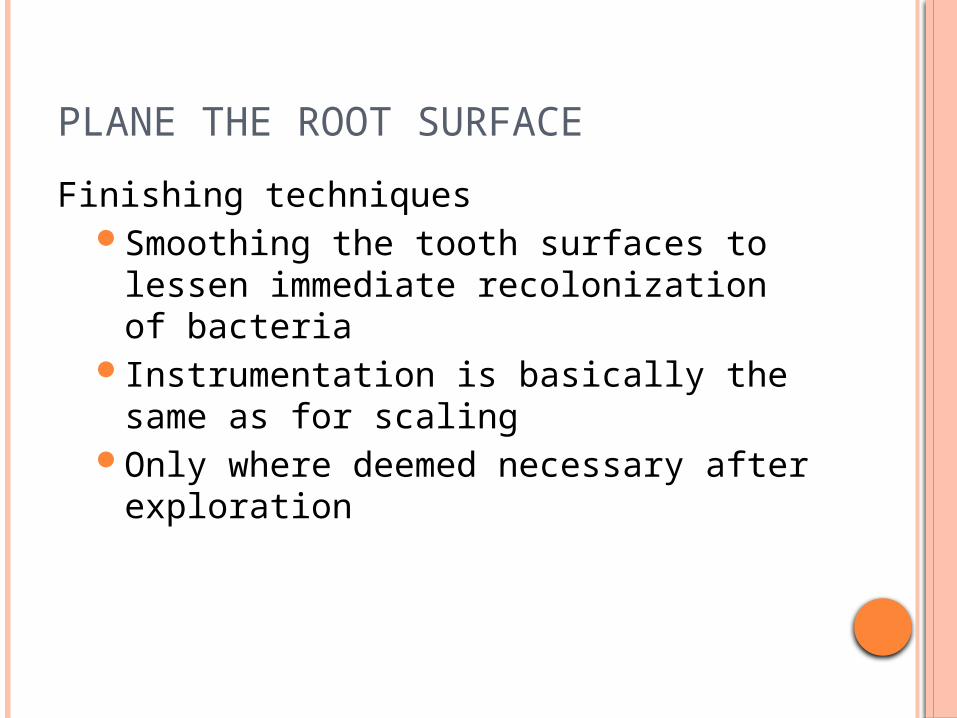
PLANE THE ROOT SURFACE
Finishing techniques Smoothing the tooth surfaces to lessen
immediate recolonization of bacteriaInstrumentation is basically the same
as for scalingOnly where deemed necessary after
exploration
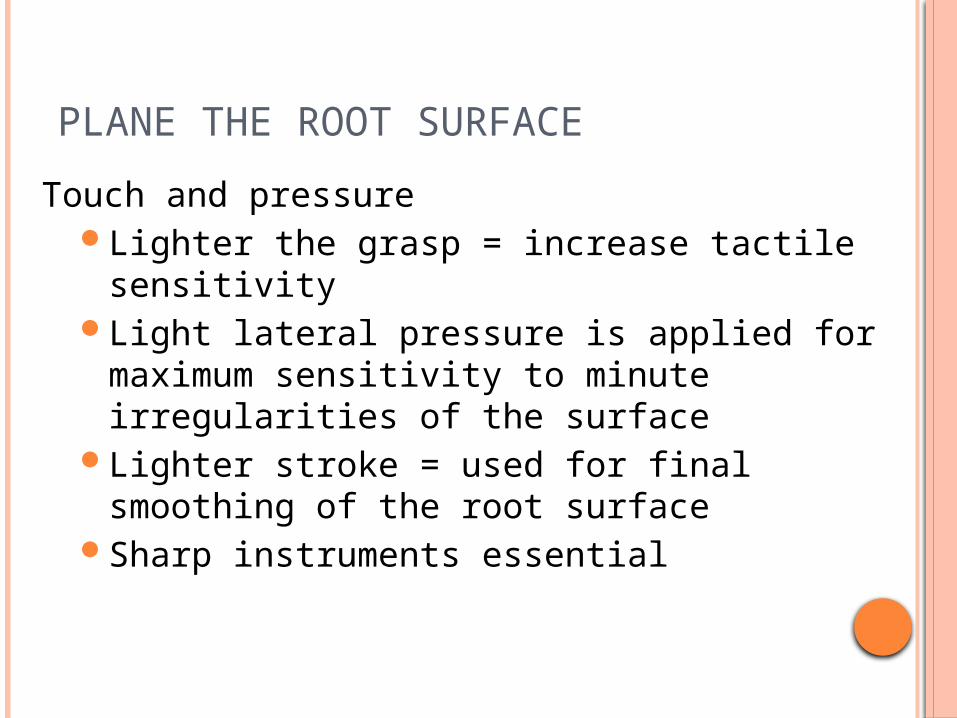
PLANE THE ROOT SURFACE
Touch and pressureLighter the grasp = increase tactile
sensitivityLight lateral pressure is applied for
maximum sensitivity to minute irregularities of the surface
Lighter stroke = used for final smoothing of the root surface
Sharp instruments essential
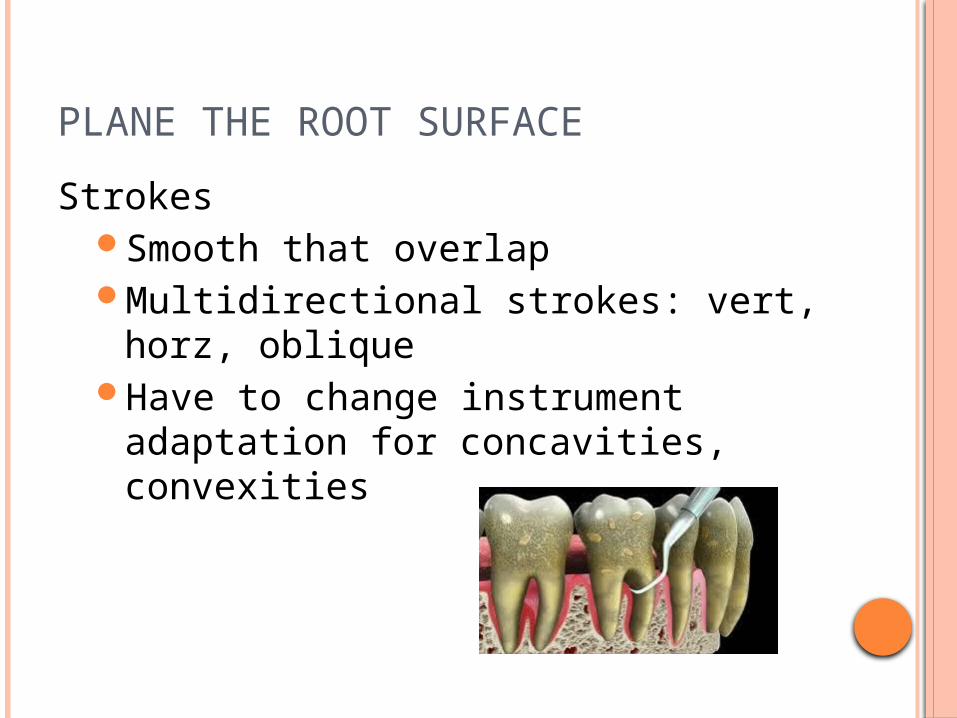
PLANE THE ROOT SURFACE
StrokesSmooth that overlapMultidirectional strokes: vert, horz,
obliqueHave to change instrument
adaptation for concavities, convexities
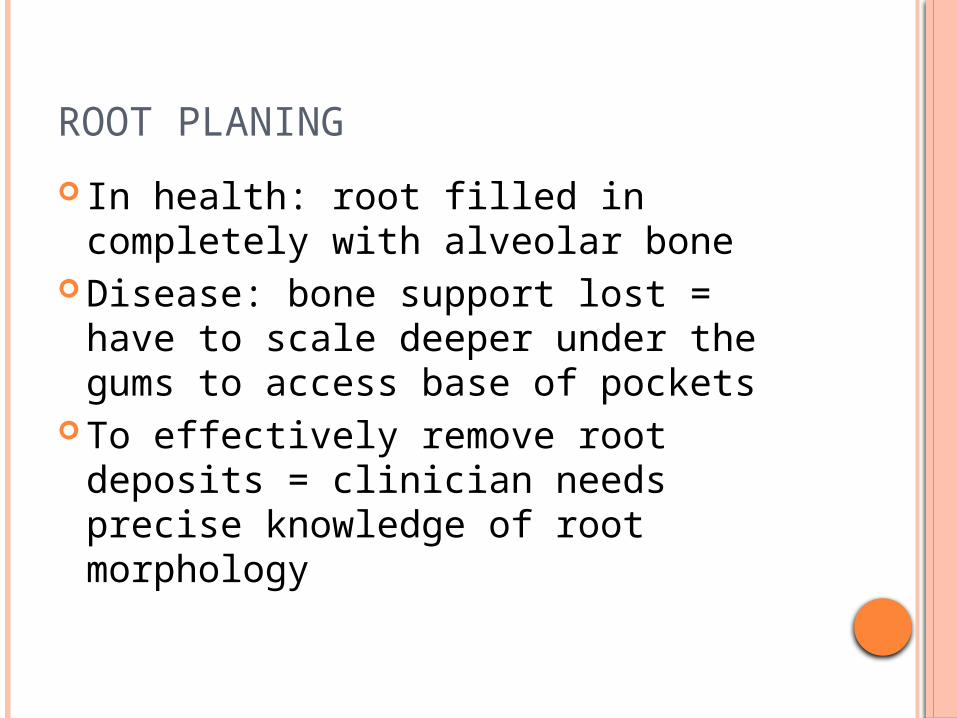
ROOT PLANING
In health: root filled in completely with alveolar bone
Disease: bone support lost = have to scale deeper under the gums to access base of pockets
To effectively remove root deposits = clinician needs precise knowledge of root morphology
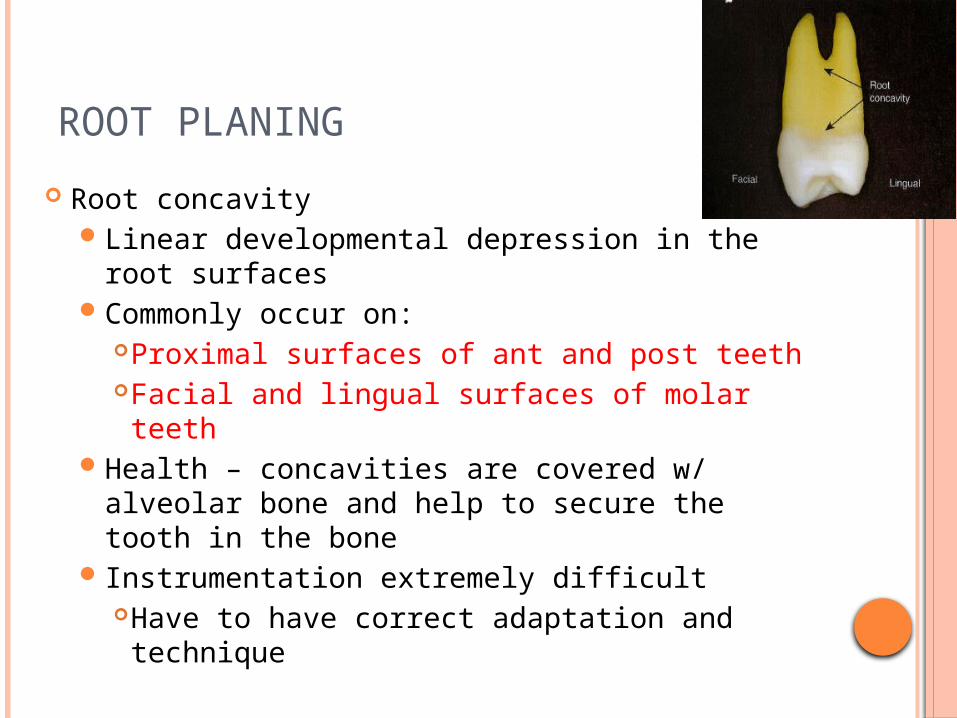
ROOT PLANING
Root concavityLinear developmental depression in the
root surfacesCommonly occur on:
Proximal surfaces of ant and post teethFacial and lingual surfaces of molar teeth
Health – concavities are covered w/ alveolar bone and help to secure the tooth in the bone
Instrumentation extremely difficultHave to have correct adaptation and technique
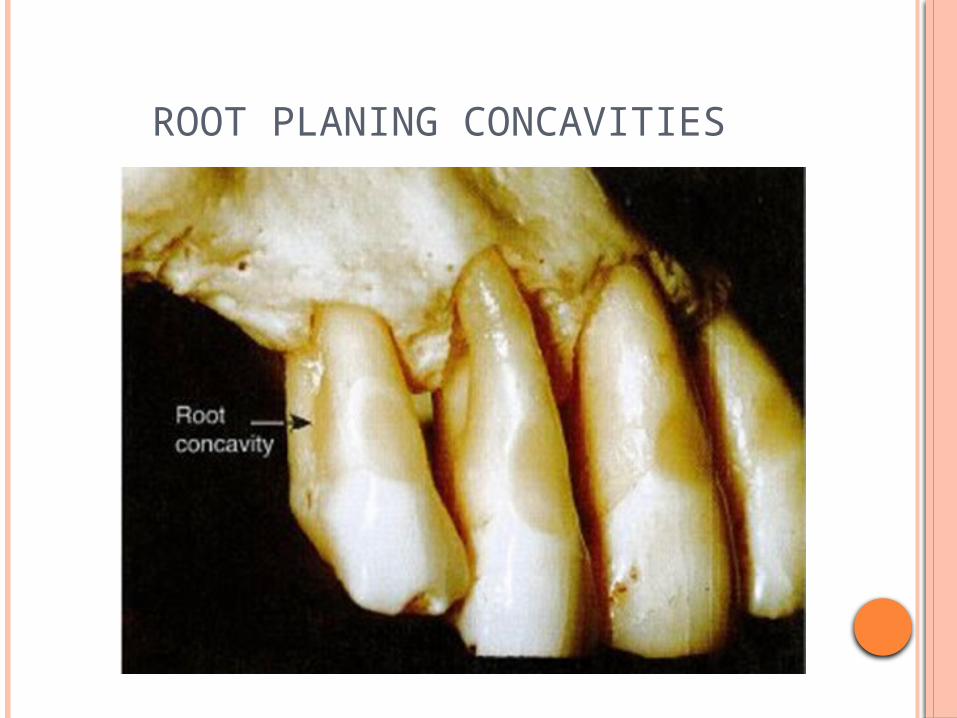
ROOT PLANING CONCAVITIES
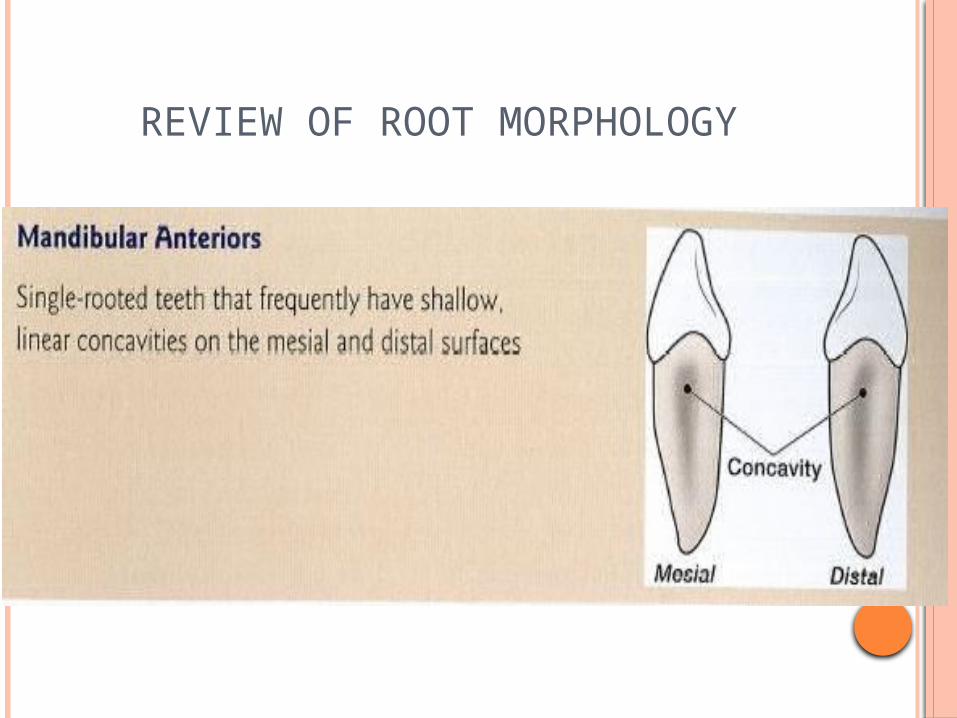
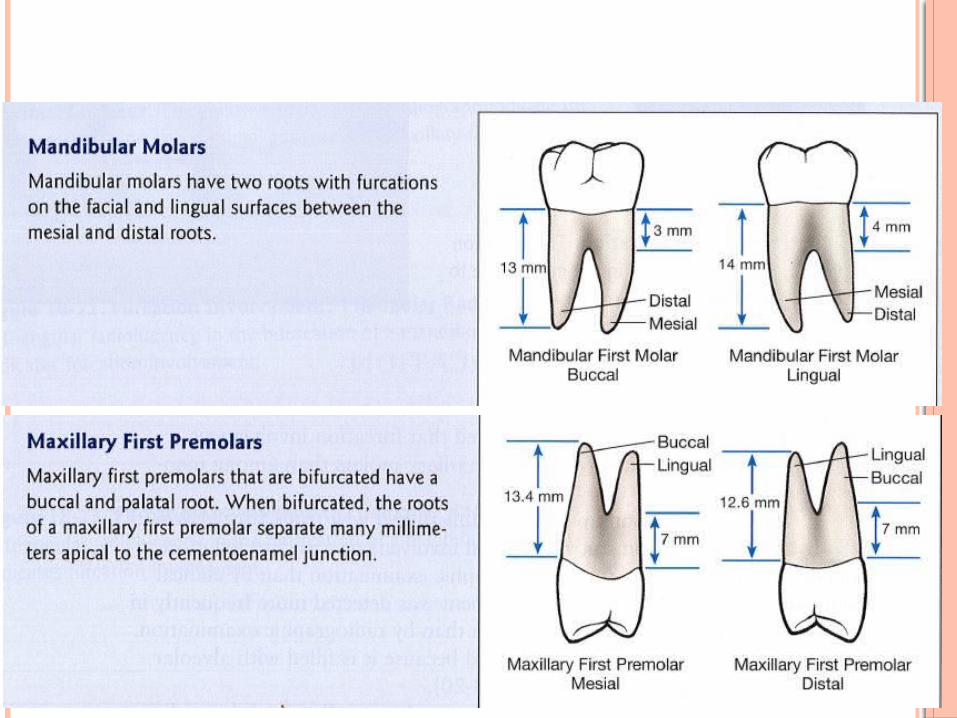
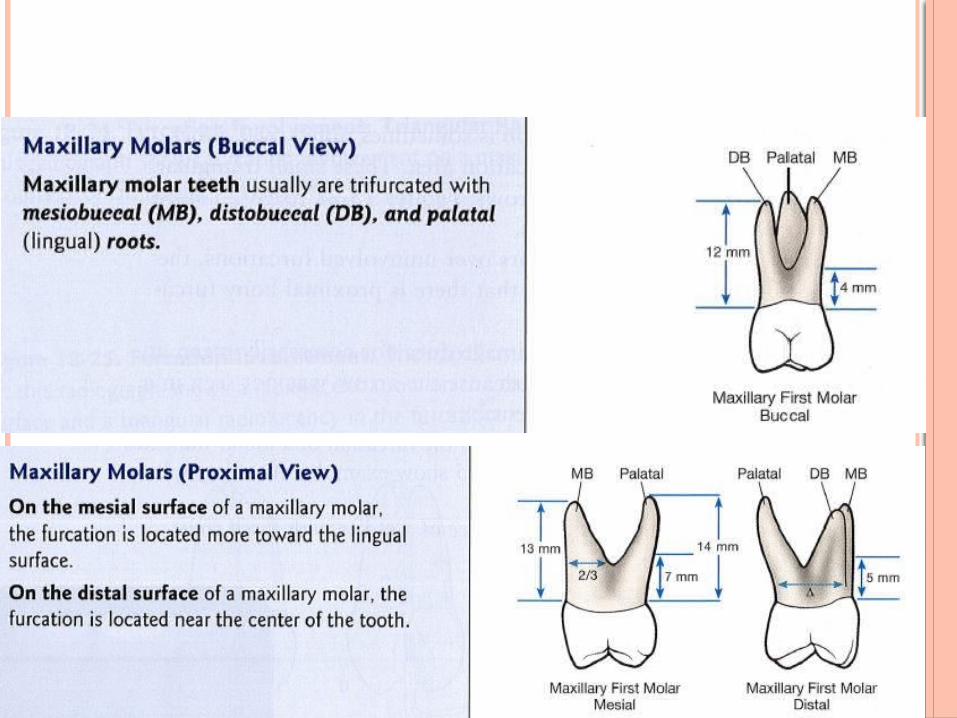
REVIEW OF ROOT MORPHOLOGY
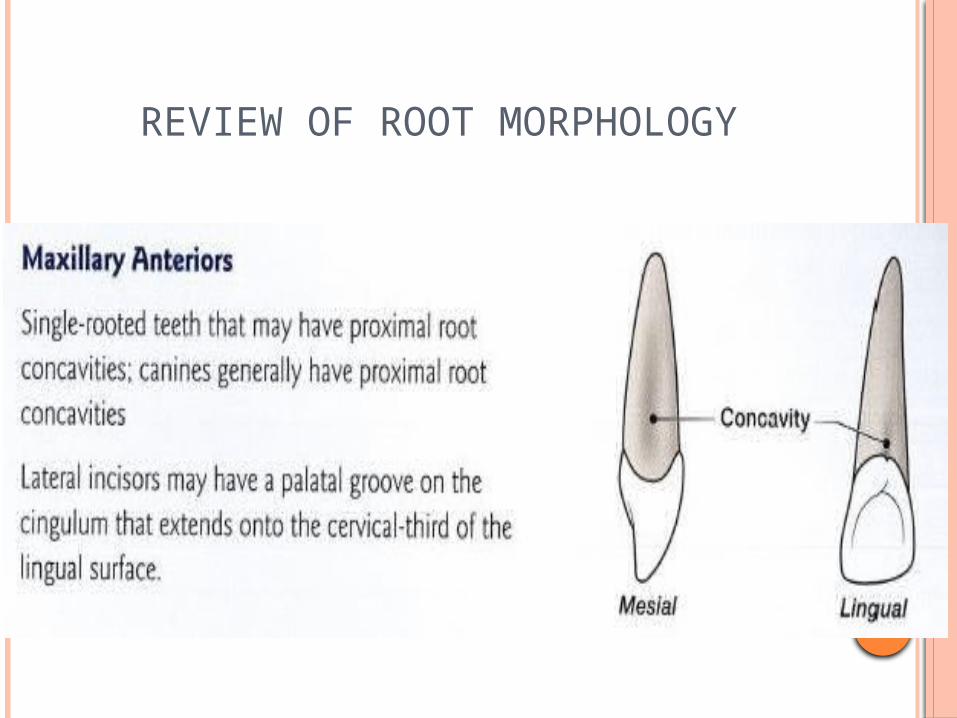
REVIEW OF ROOT MORPHOLOGY
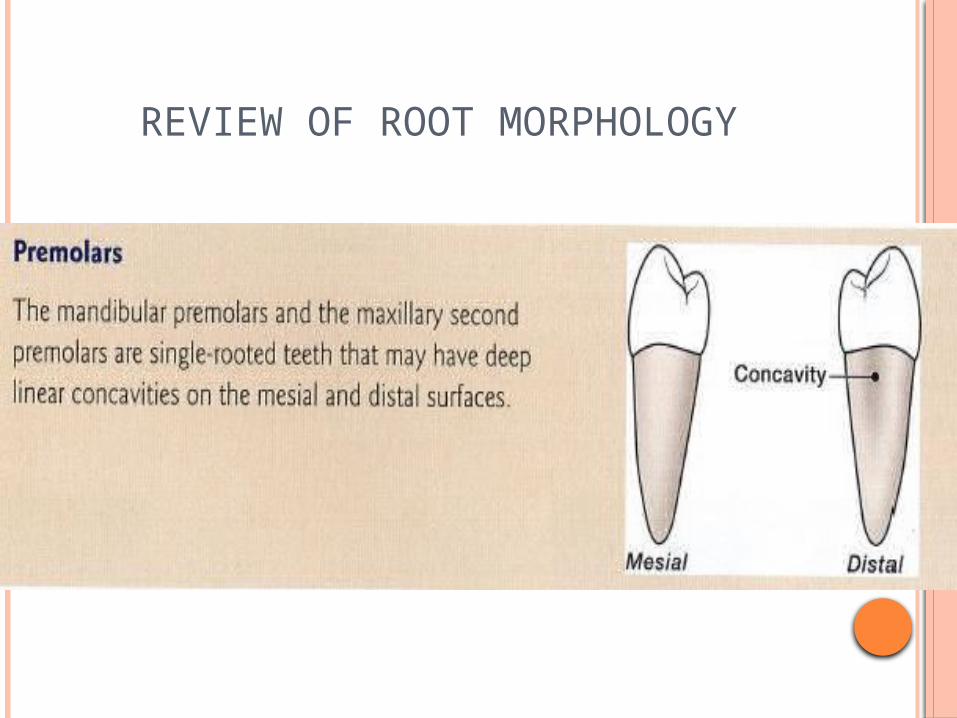
REVIEW OF ROOT MORPHOLOGY
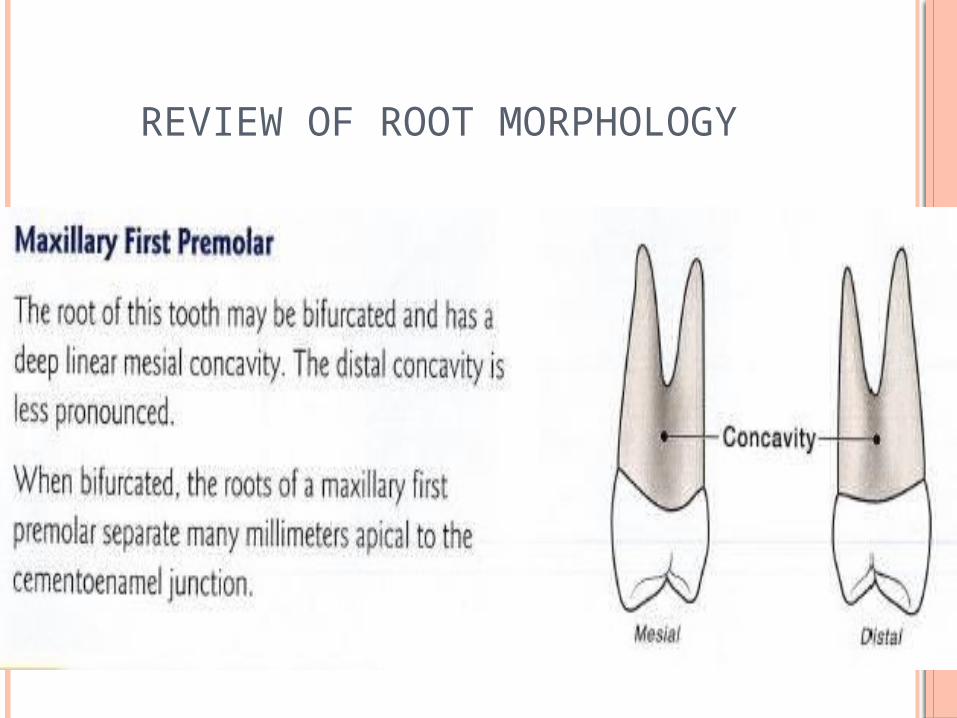
REVIEW OF ROOT MORPHOLOGY
REVIEW OF ROOT MORPHOLOGY
REVIEW OF ROOT MORPHOLOGY
REVIEW OF ROOT MORPHOLOGY
REVIEW OF ROOT MORPHOLOGY
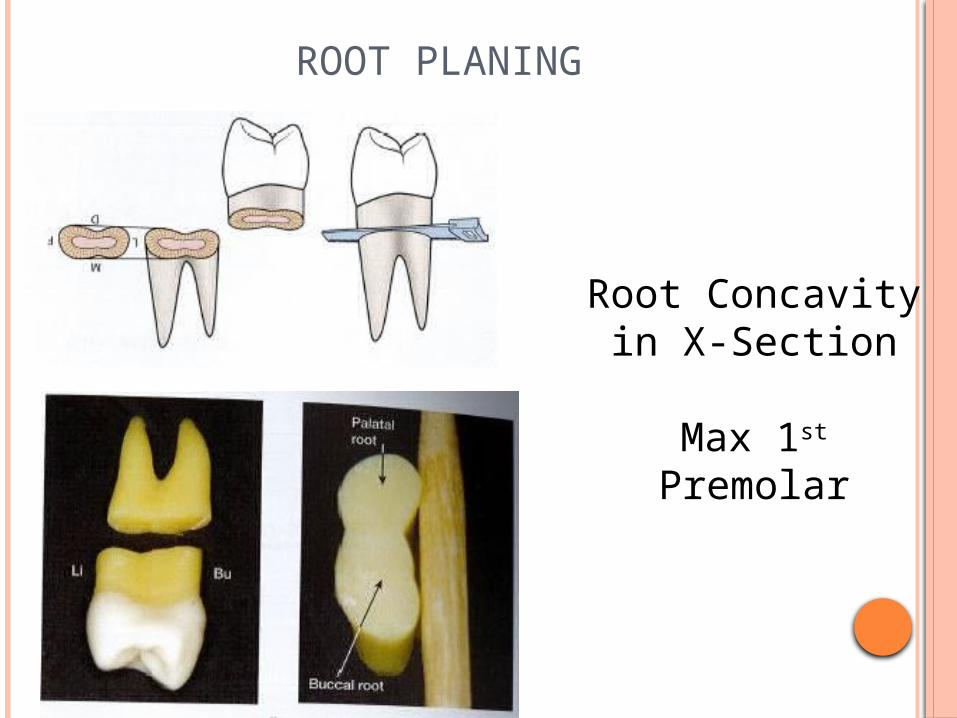
ROOT PLANING
Root Concavity in X-Section
Max 1st Premolar

ROOT PLANING
Incorrect Technique Causes Working End to Glide Over the Root Concavity
ROOT PLANING
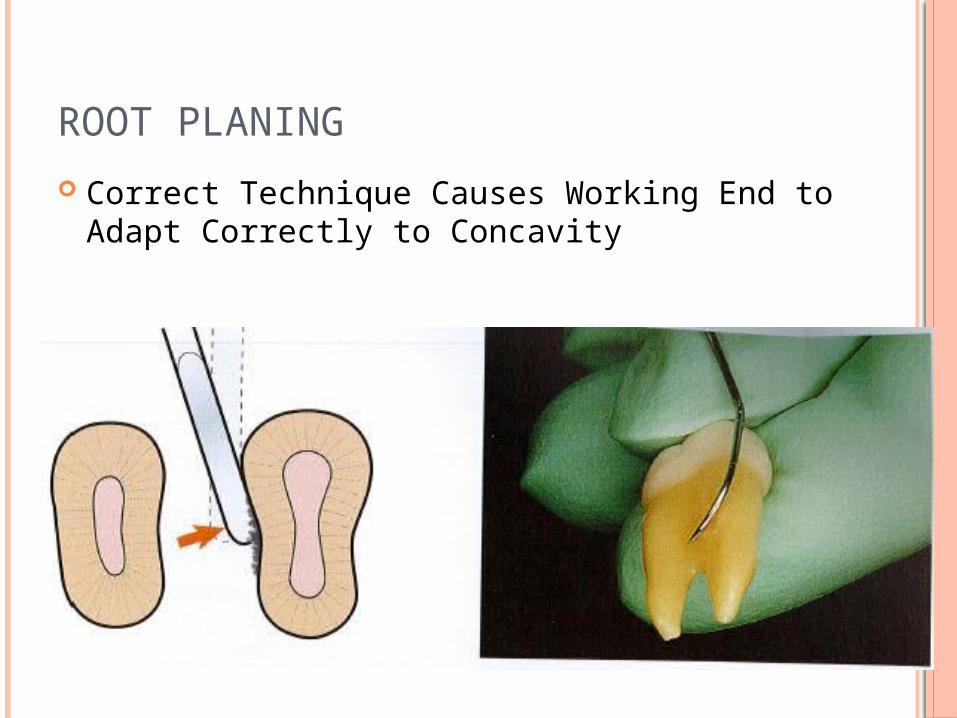
Correct Technique Causes Working End to Adapt Correctly to Concavity
ROOT PLANING
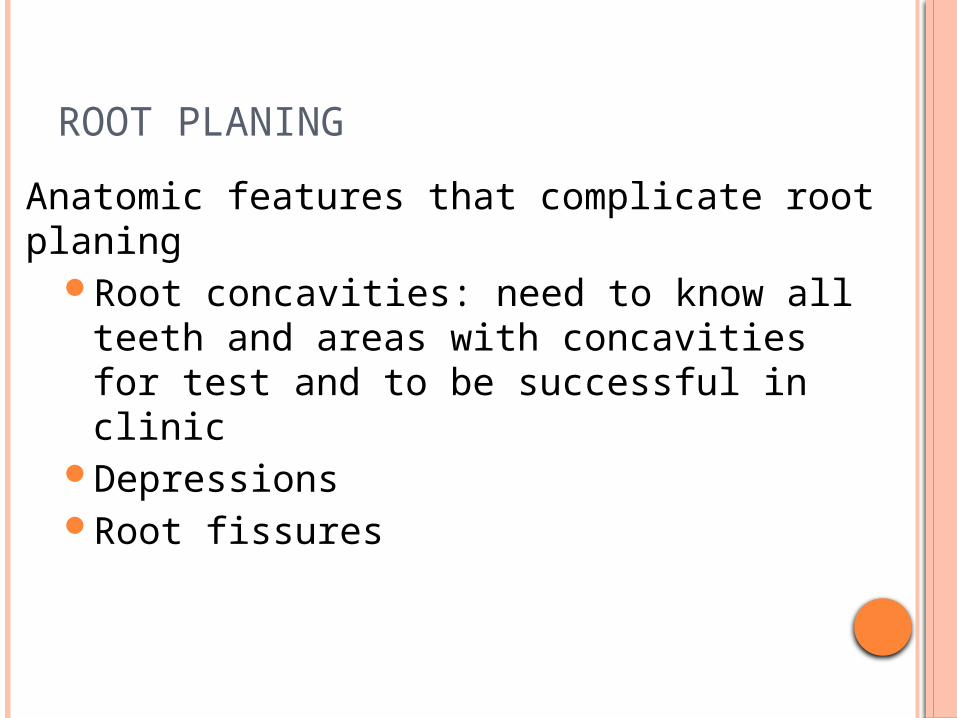
Anatomic features that complicate root planing
Root concavities: need to know all teeth and areas with concavities for test and to be successful in clinic
DepressionsRoot fissures
ROOT PLANING
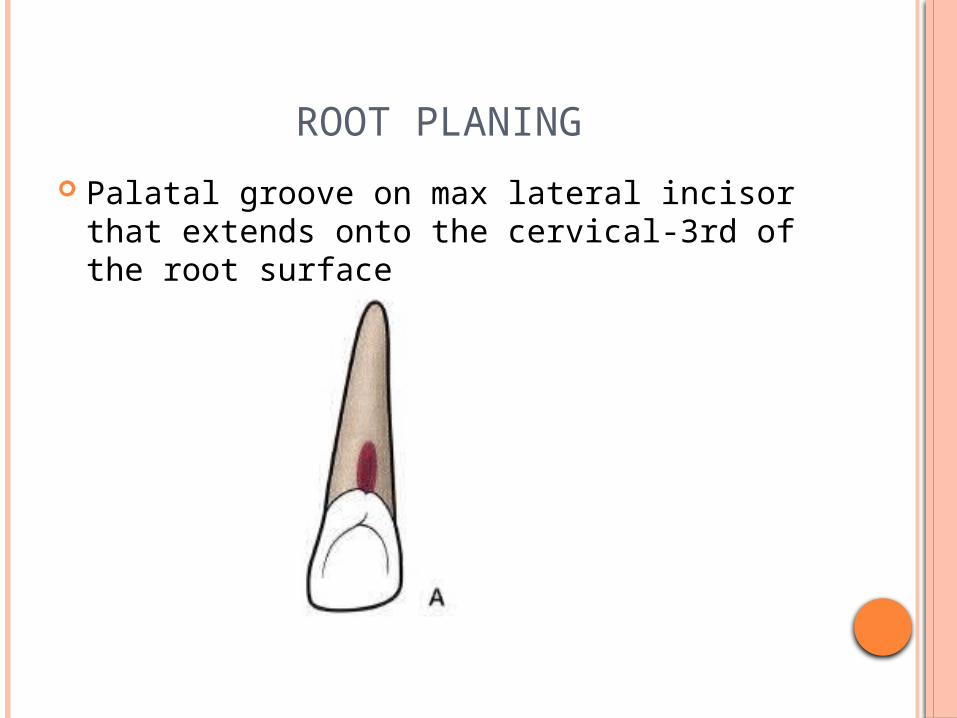
Palatal groove on max lateral incisor that extends onto the cervical-3rd of the root surface

ROOT PLANING
Deep linear root concavities on the proximal surfaces of mand canines
ROOT PLANING
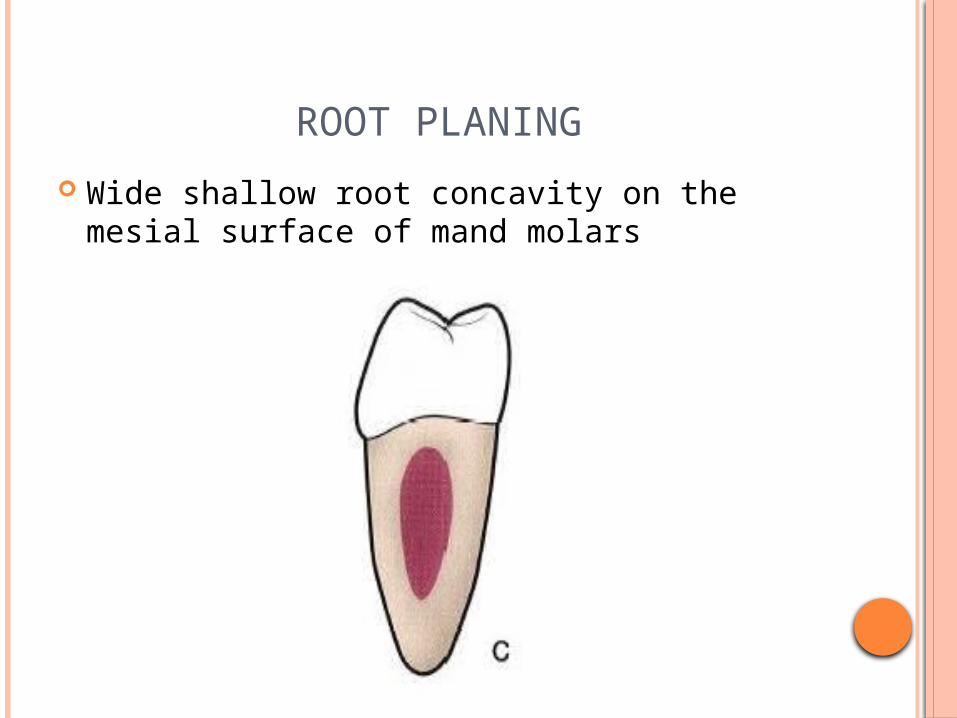
Wide shallow root concavity on the mesial surface of mand molars
ROOT PLANING
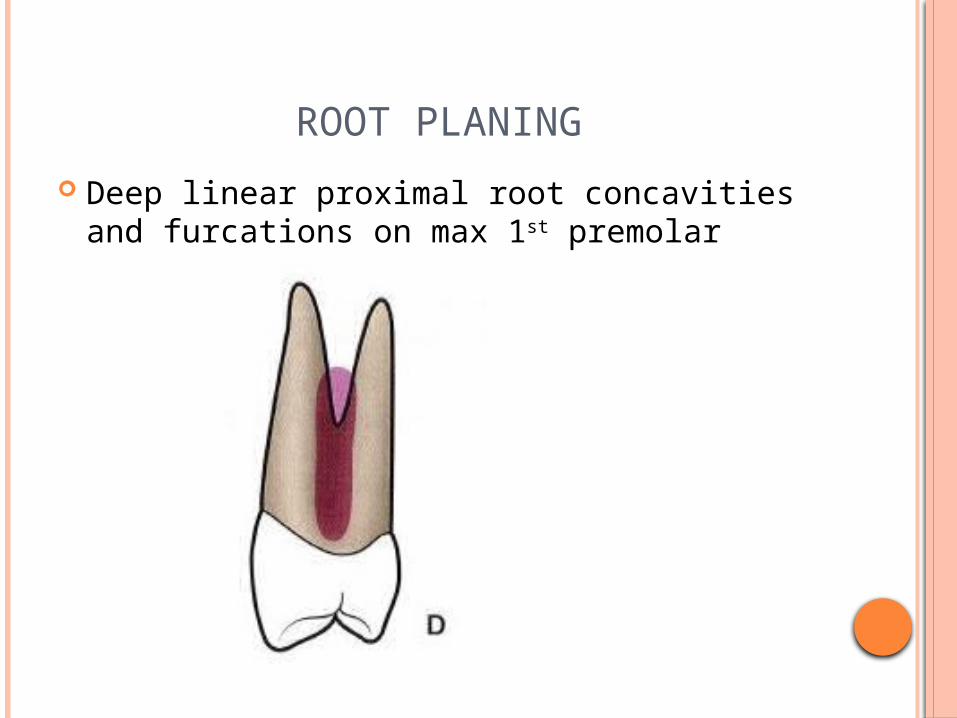
Deep linear proximal root concavities and furcations on max 1st premolar
ROOT PLANING
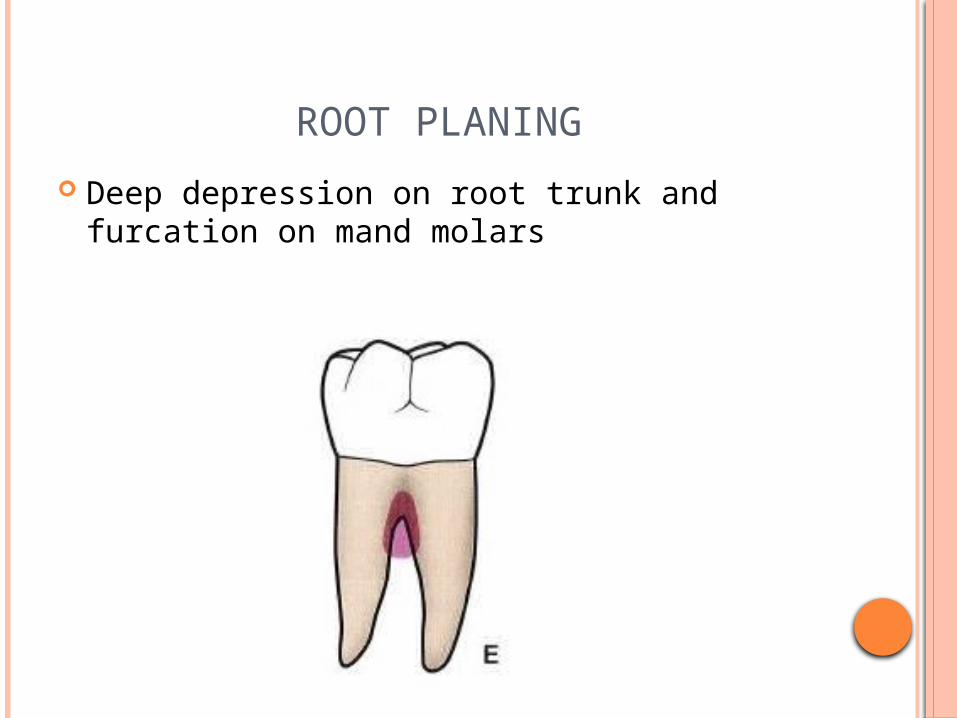
Deep depression on root trunk and furcation on mand molars
ROOT PLANING
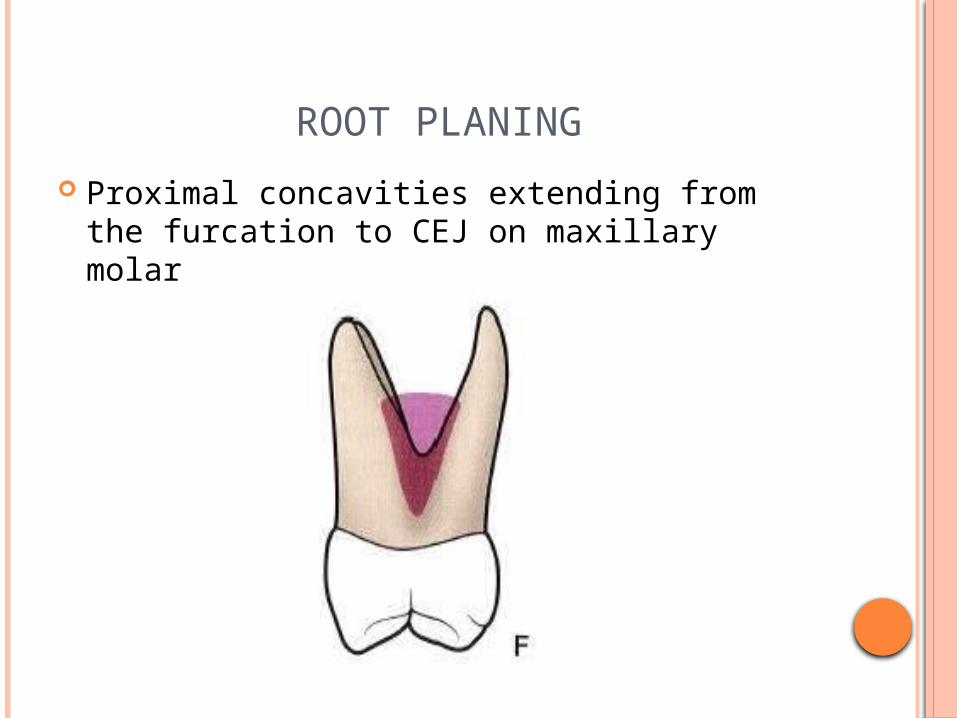
Proximal concavities extending from the furcation to CEJ on maxillary molar
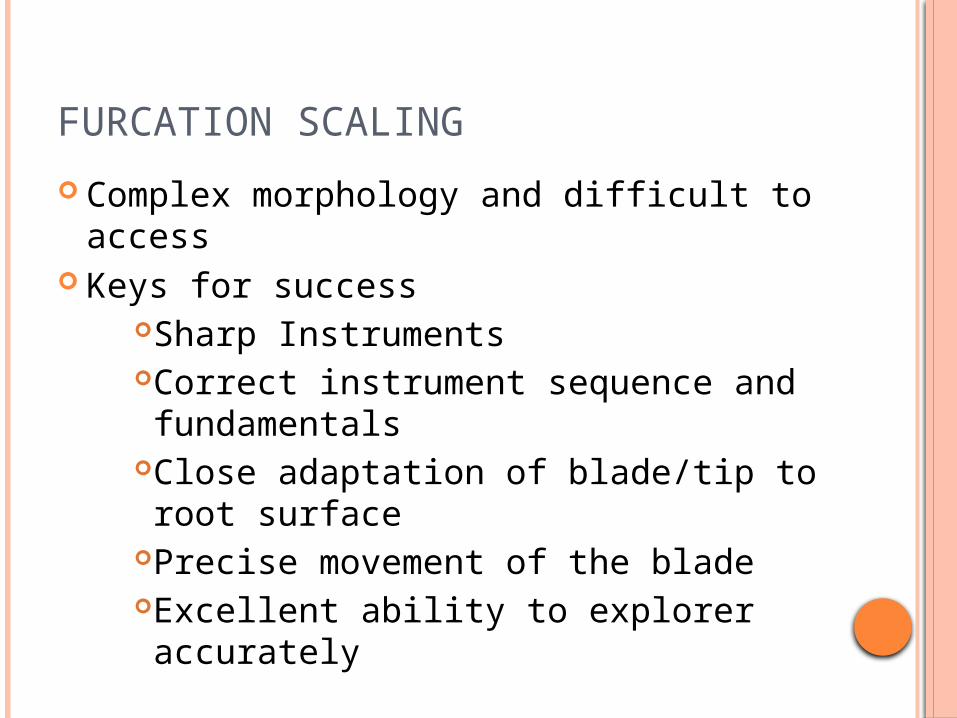
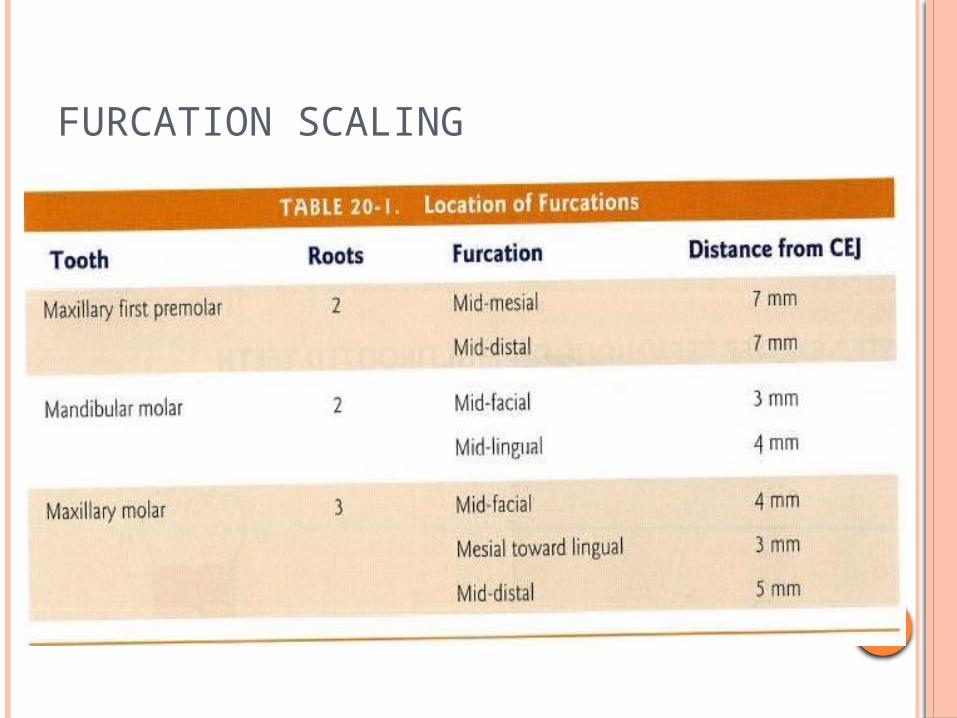
FURCATION SCALING
Complex morphology and difficult to access
Keys for successSharp InstrumentsCorrect instrument sequence and fundamentals
Close adaptation of blade/tip to root surface
Precise movement of the bladeExcellent ability to explorer accurately
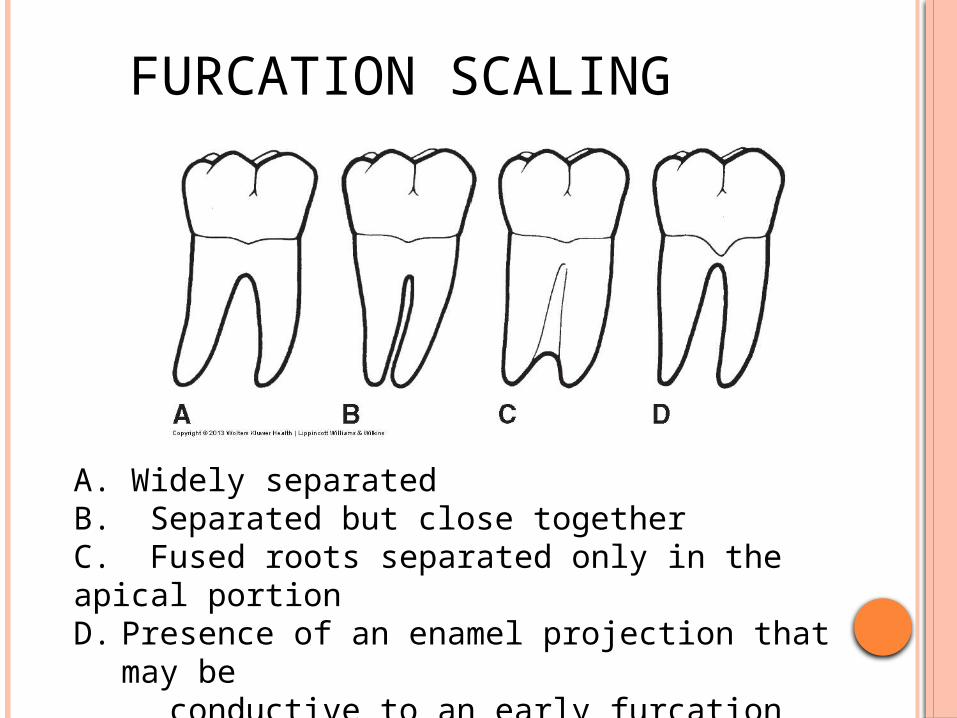
FURCATION SCALING
A. Widely separatedB. Separated but close togetherC. Fused roots separated only in the apical portionD. Presence of an enamel projection that may
be conductive to an early furcation involvement
FURCATION SCALING
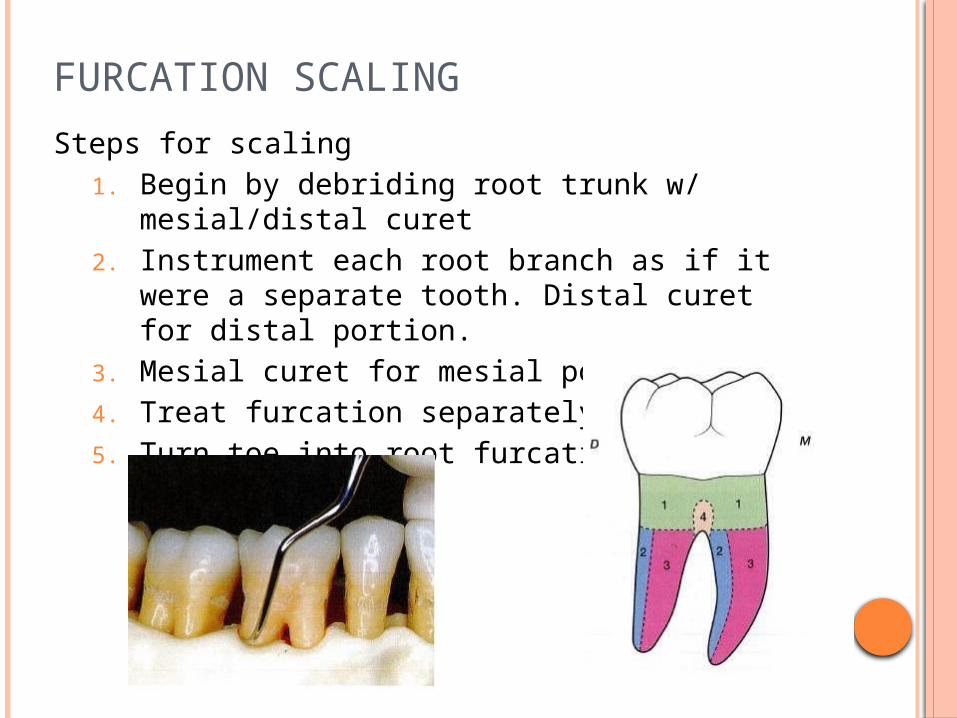
FURCATION SCALING
Steps for scaling1. Begin by debriding root trunk w/ mesial/distal
curet2. Instrument each root branch as if it were a
separate tooth. Distal curet for distal portion.3. Mesial curet for mesial portion4. Treat furcation separately5. Turn toe into root furcation
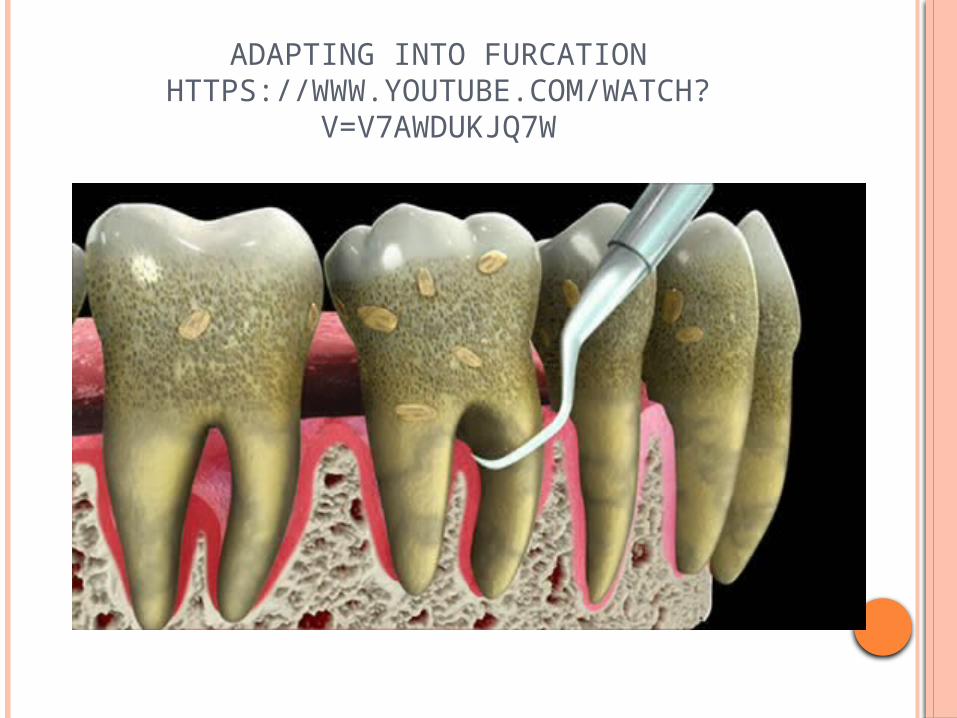
ADAPTING INTO FURCATIONHTTPS://WWW.YOUTUBE.COM/WATCH?
V=V7AWDUKJQ7W
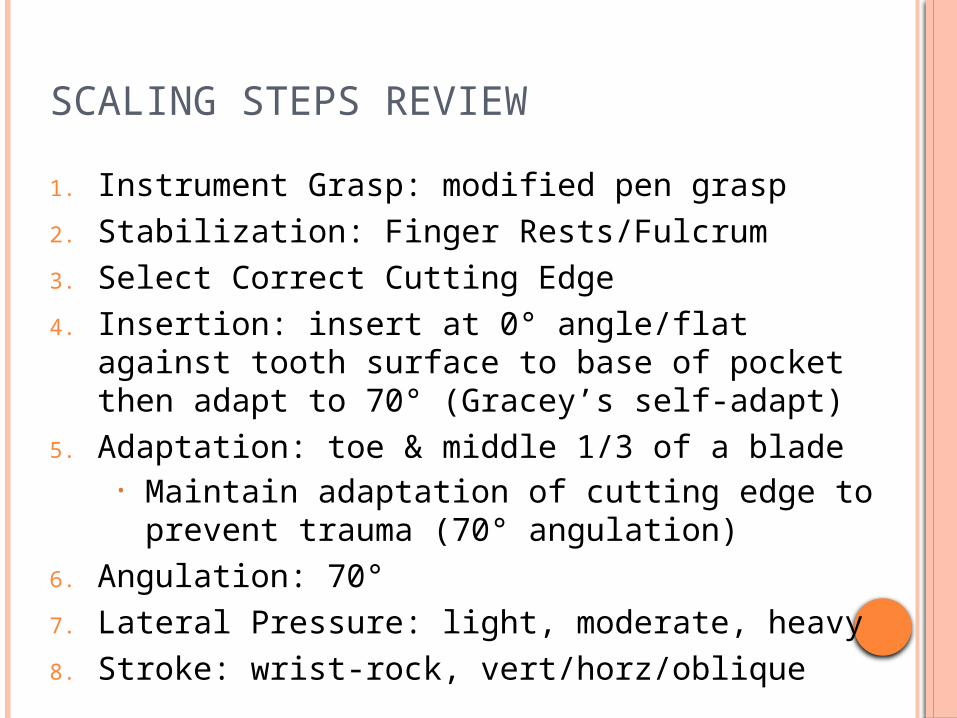
SCALING STEPS REVIEW
1. Instrument Grasp: modified pen grasp2. Stabilization: Finger Rests/Fulcrum3. Select Correct Cutting Edge4. Insertion: insert at 0° angle/flat against tooth
surface to base of pocket then adapt to 70° (Gracey’s self-adapt)
5. Adaptation: toe & middle 1/3 of a blade• Maintain adaptation of cutting edge to
prevent trauma (70° angulation)6. Angulation: 70°7. Lateral Pressure: light, moderate, heavy8. Stroke: wrist-rock, vert/horz/oblique
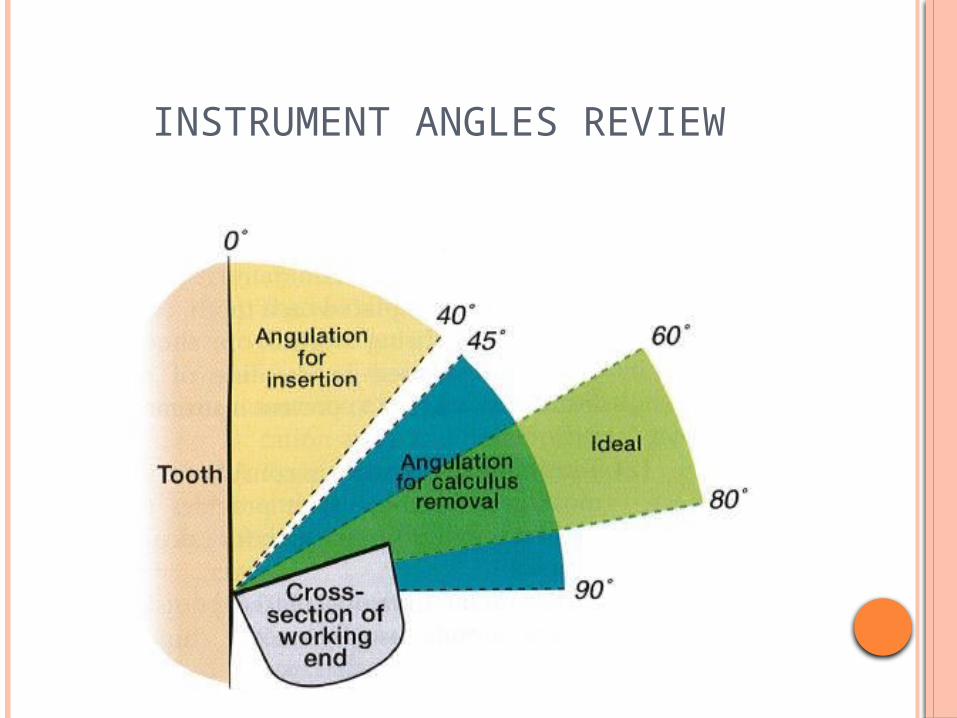
INSTRUMENT ANGLES REVIEW

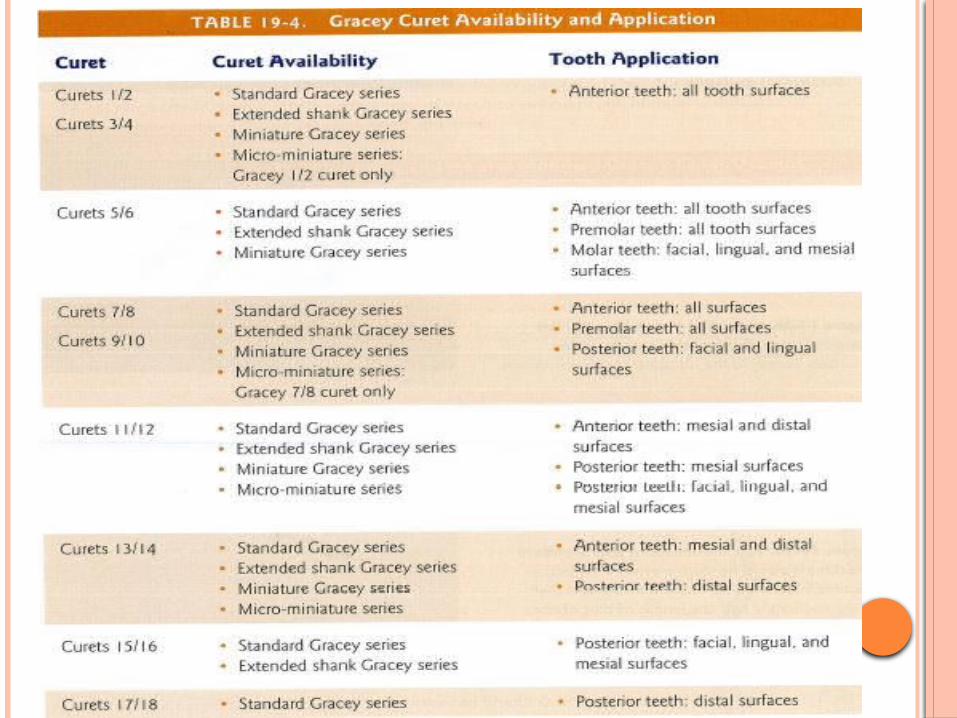
GRACEY’S
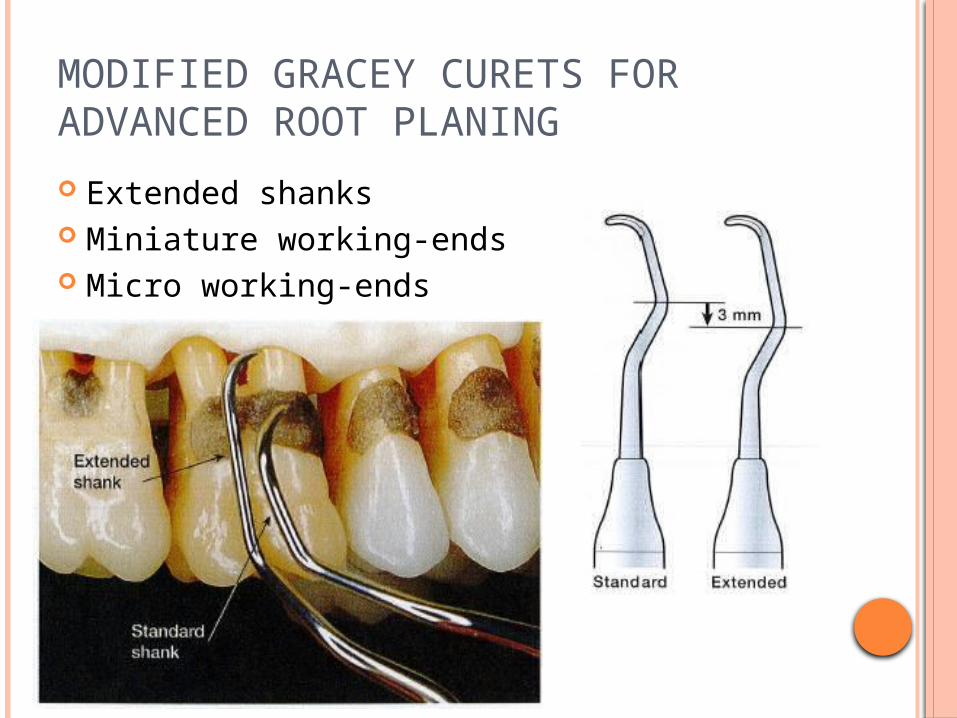
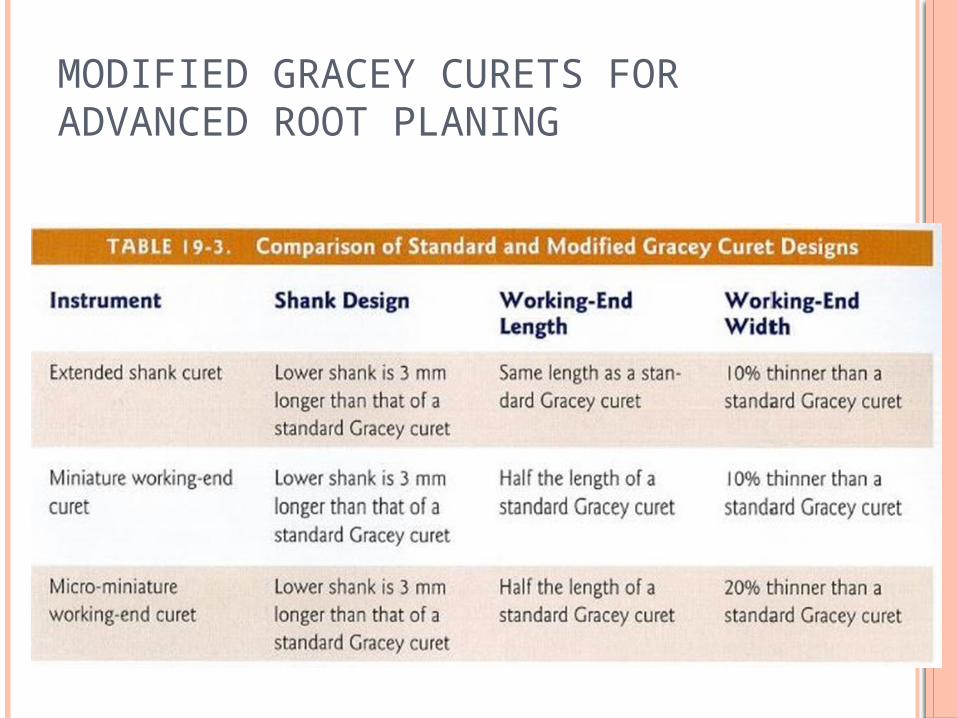
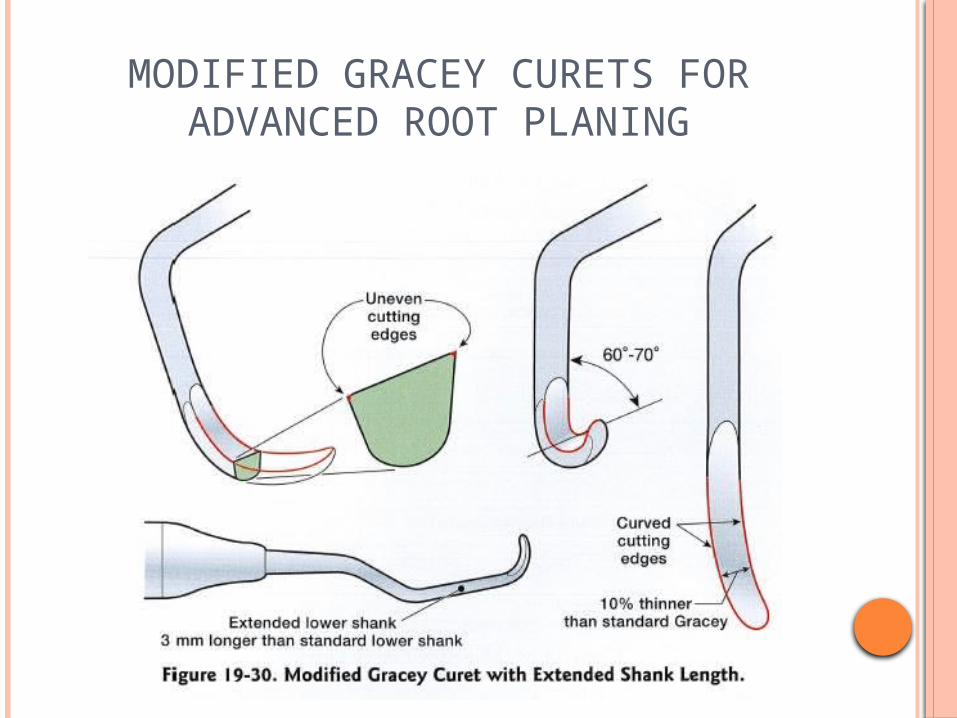
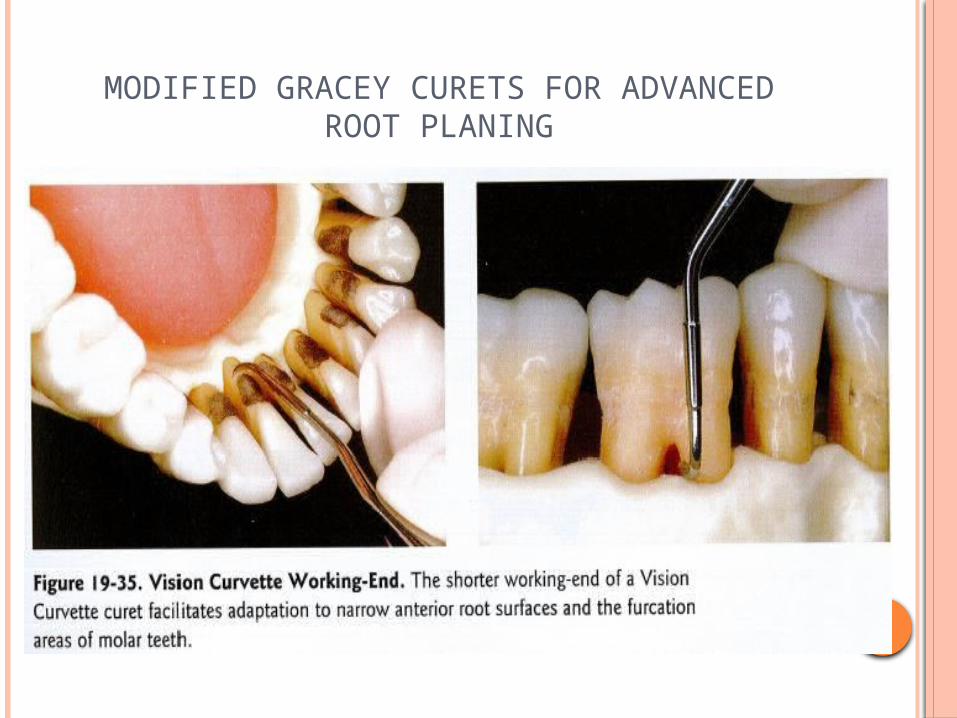
MODIFIED GRACEY CURETS FOR ADVANCED ROOT PLANING
Extended shanks Miniature working-ends Micro working-ends
MODIFIED GRACEY CURETS FOR ADVANCED ROOT PLANING

MODIFIED GRACEY CURETS FOR ADVANCED ROOT PLANING
Extended shanks aids clinicians in accessing furcation areas of molars
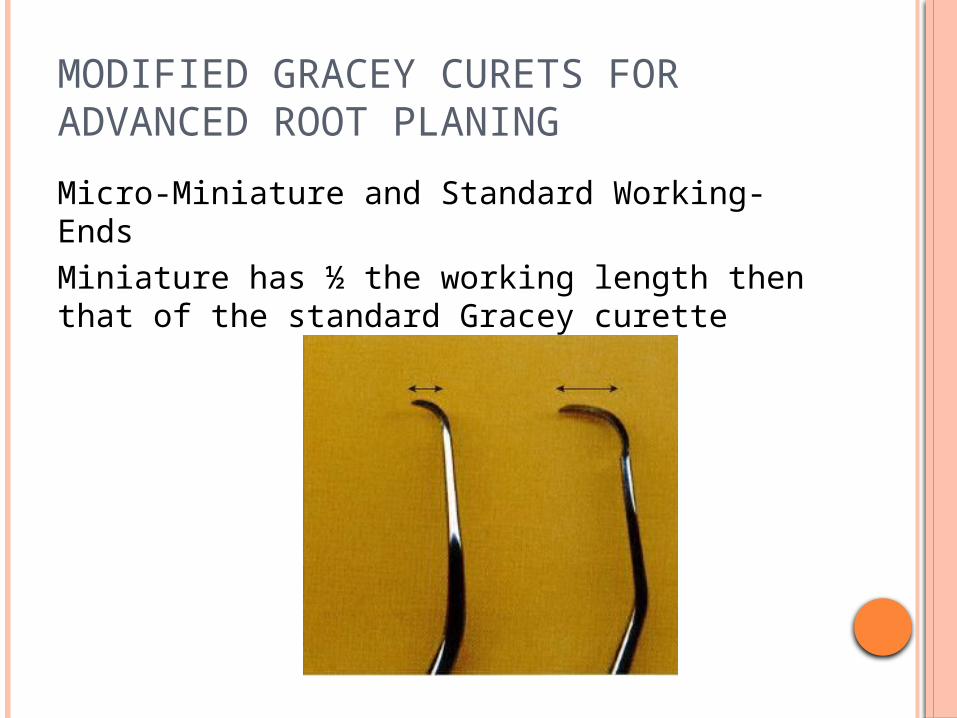
MODIFIED GRACEY CURETS FOR ADVANCED ROOT PLANING
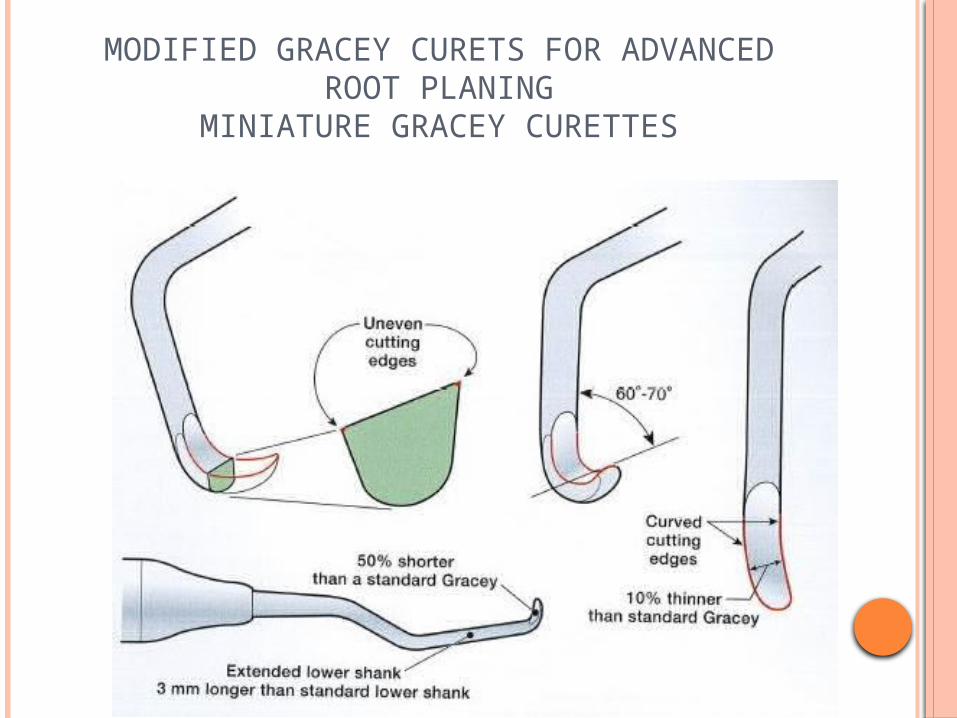
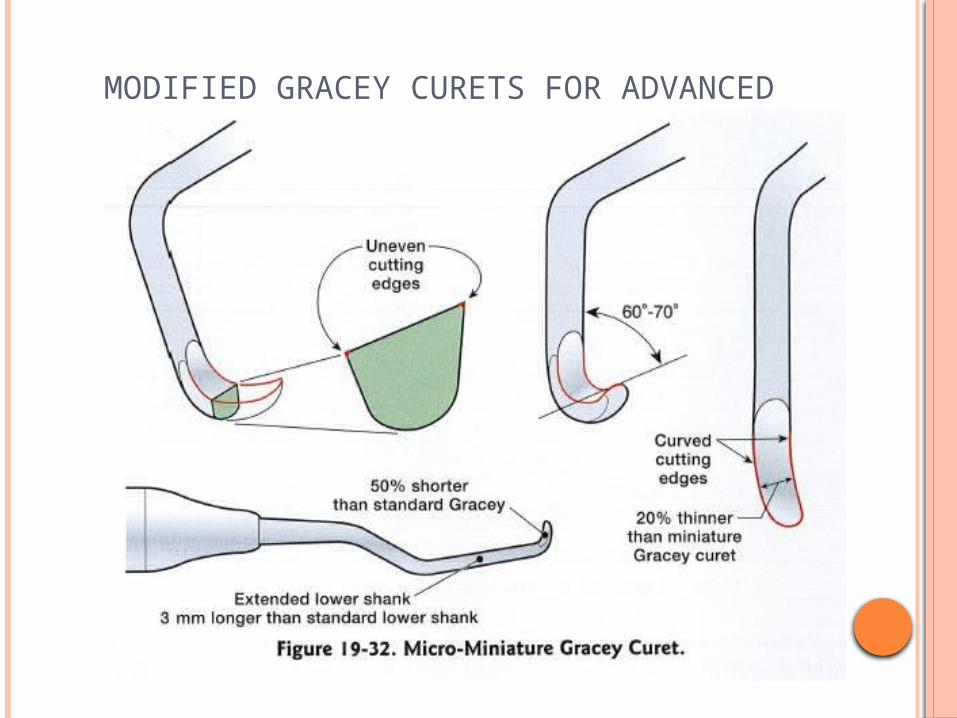
Micro-Miniature and Standard Working-EndsMiniature has ½ the working length then that of the standard Gracey curette
MODIFIED GRACEY CURETS FOR ADVANCED ROOT PLANING
MODIFIED GRACEY CURETS FOR ADVANCED ROOT PLANING
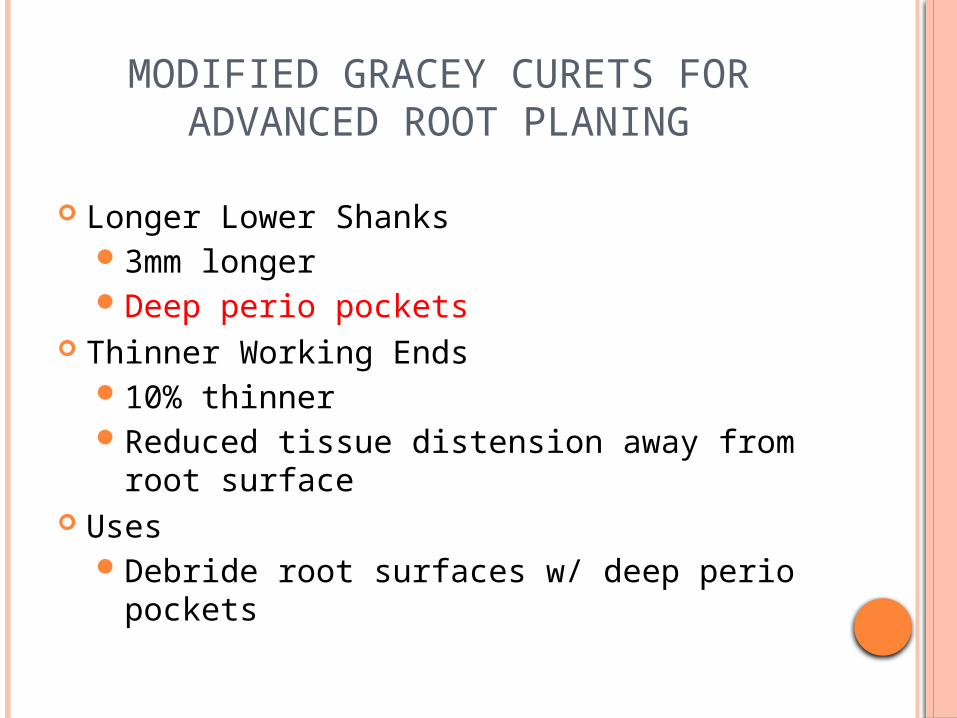
Longer Lower Shanks3mm longerDeep perio pockets
Thinner Working Ends10% thinnerReduced tissue distension away from root
surface Uses
Debride root surfaces w/ deep perio pockets
MODIFIED GRACEY CURETS FOR ADVANCED ROOT PLANING
MINIATURE GRACEY CURETTES
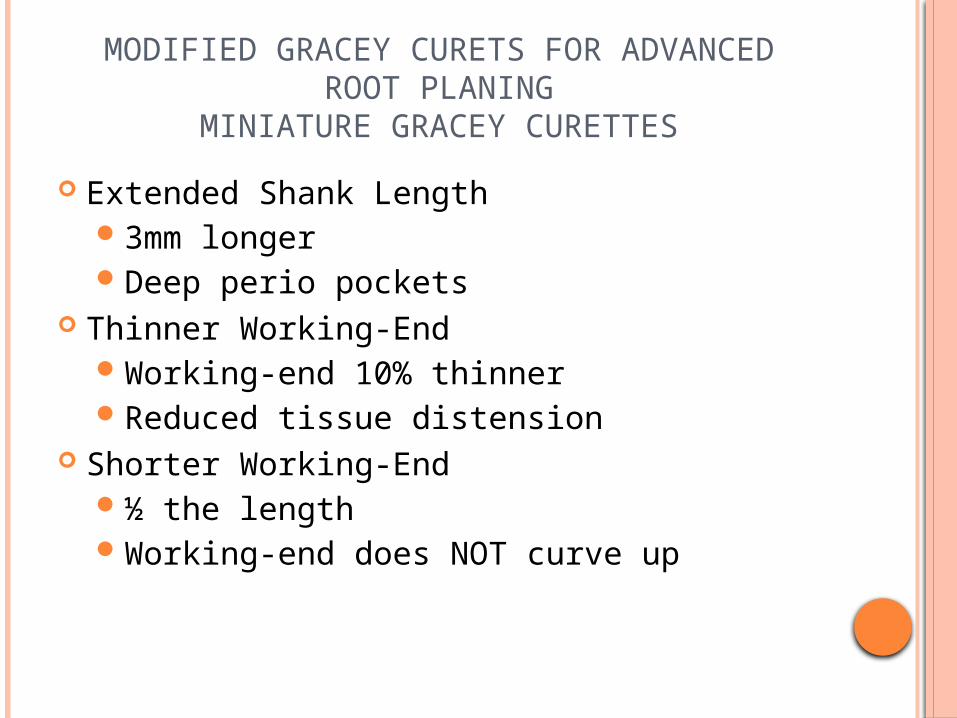
Extended Shank Length3mm longerDeep perio pockets
Thinner Working-EndWorking-end 10% thinnerReduced tissue distension
Shorter Working-End½ the lengthWorking-end does NOT curve up
MODIFIED GRACEY CURETS FOR ADVANCED ROOT PLANING
MINIATURE GRACEY CURETTES

UsesNarrow deep pockets over 4mm in depthDebride root branchesMidline ant rootsRoot concavitiesFurcation areas (#12/5-M, mand molars
F/L, etc…)Narrow facial/lingual surfacesNot intended to replace either the
standard or extended shank Gracey curets for routine instrumentation of all tooth surface
MODIFIED GRACEY CURETS FOR ADVANCED ROOT PLANING
MINIATURE GRACEY CURETTES
MODIFIED GRACEY CURETS FOR ADVANCED ROOT PLANING
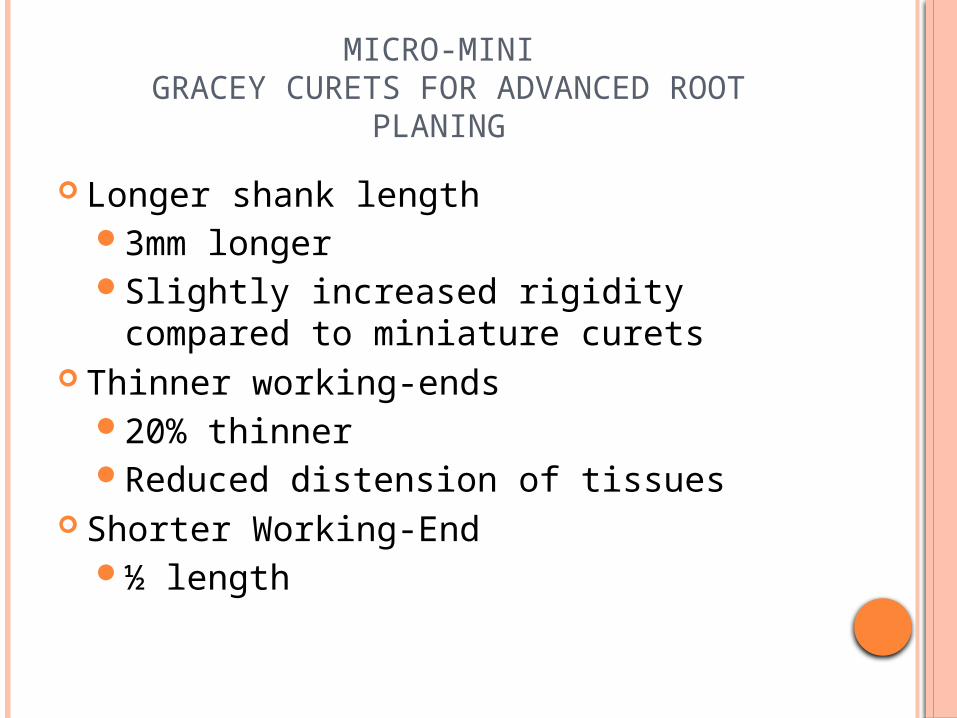
Longer shank length3mm longerSlightly increased rigidity compared to
miniature curets Thinner working-ends
20% thinner Reduced distension of tissues
Shorter Working-End½ length
MICRO-MINI GRACEY CURETS FOR ADVANCED ROOT
PLANING
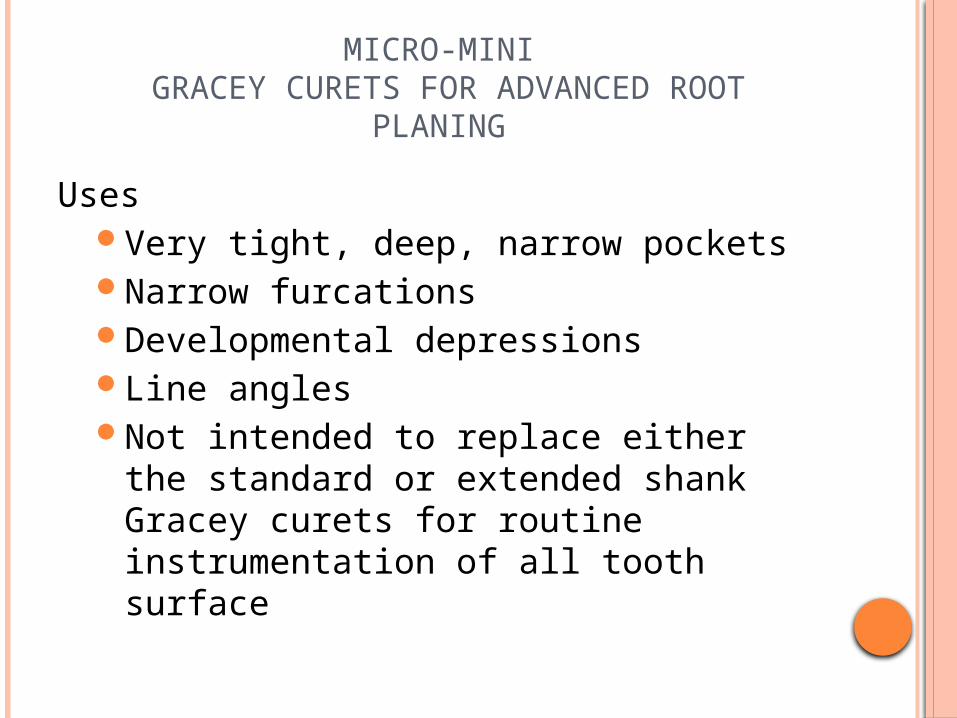
UsesVery tight, deep, narrow pocketsNarrow furcationsDevelopmental depressionsLine anglesNot intended to replace either the
standard or extended shank Gracey curets for routine instrumentation of all tooth surface
MICRO-MINI GRACEY CURETS FOR ADVANCED ROOT
PLANING
MODIFIED GRACEY CURETS FOR ADVANCED ROOT PLANING
MODIFIED GRACEY CURETS FOR ADVANCED ROOT PLANING
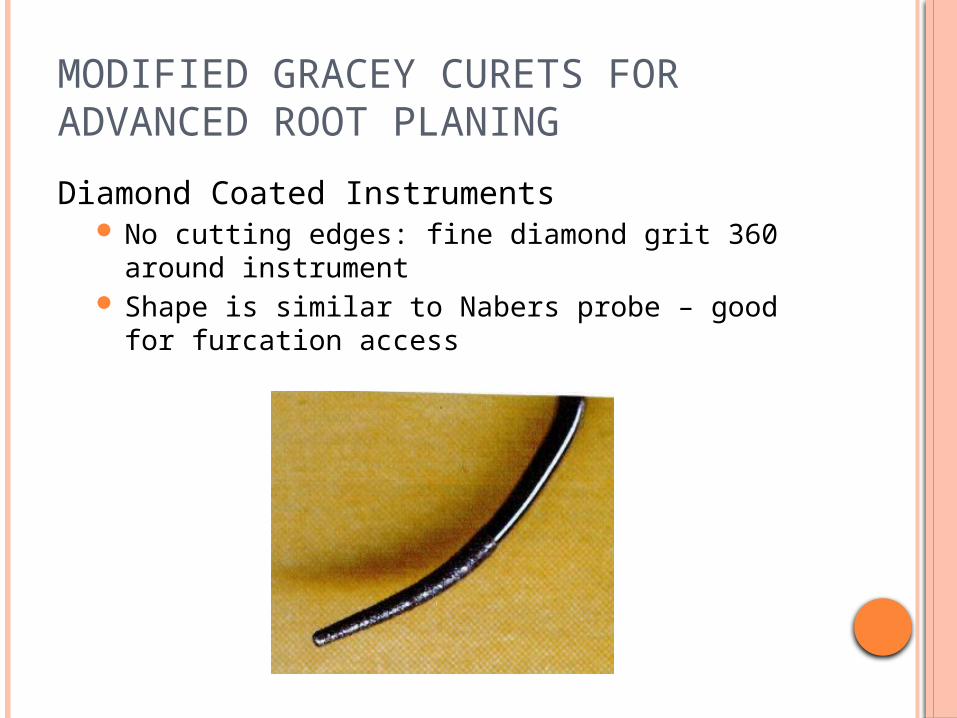
Diamond Coated Instruments No cutting edges: fine diamond grit 360 around
instrument Shape is similar to Nabers probe – good for
furcation access
DIAMOND COATED
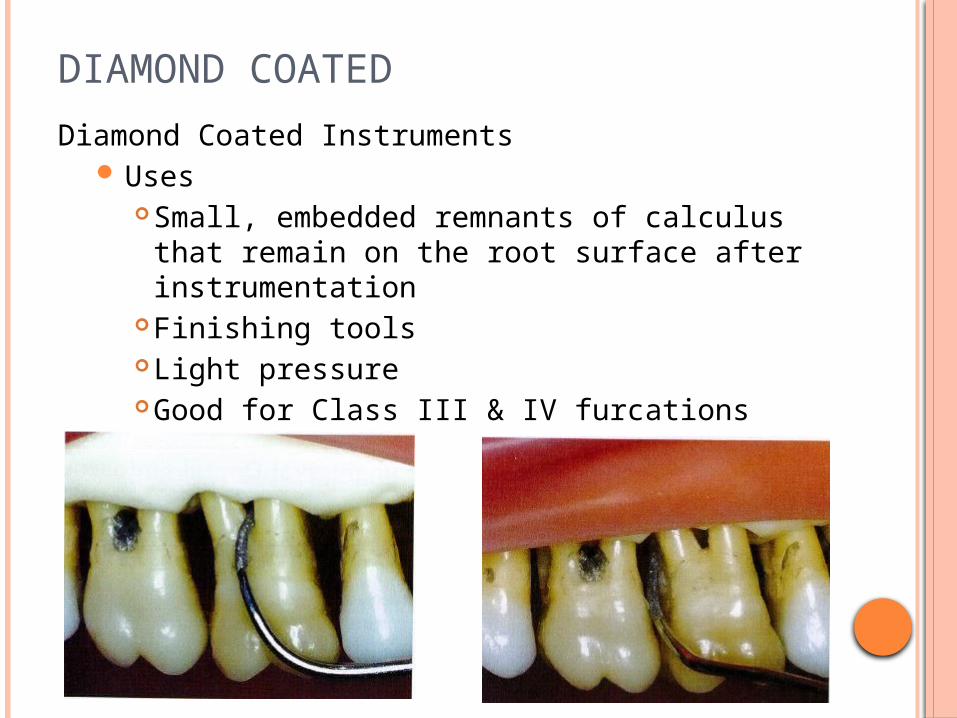
Diamond Coated Instruments Uses
Small, embedded remnants of calculus that remain on the root surface after instrumentation
Finishing toolsLight pressureGood for Class III & IV furcations

C.FILE SCALERD. CHISEL SCALER
E. HOE SCALER
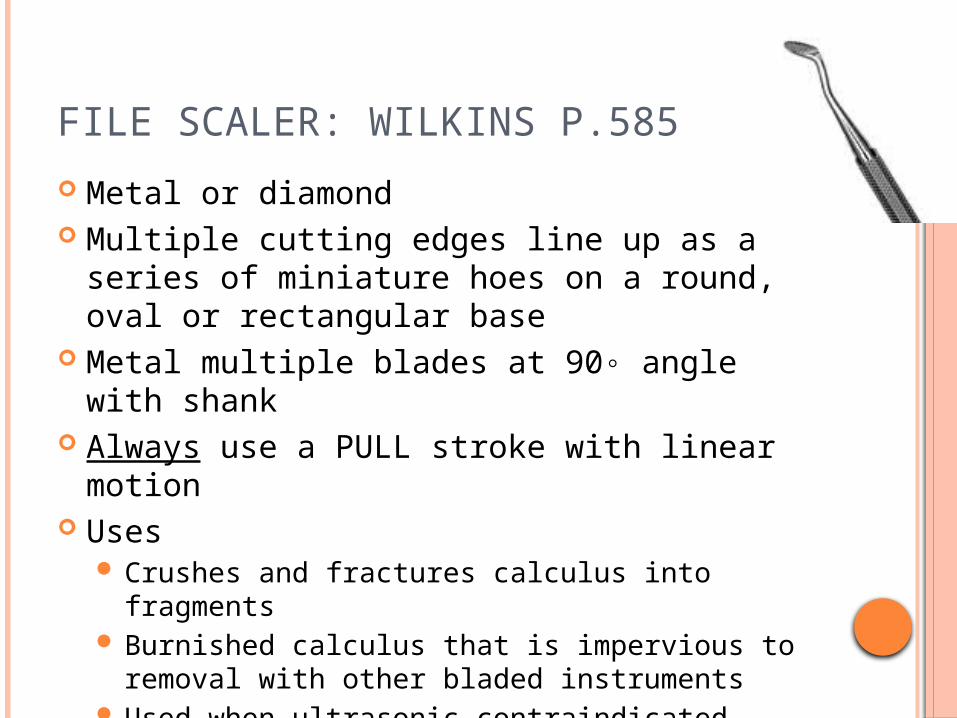
FILE SCALER: WILKINS P.585
Metal or diamond Multiple cutting edges line up as a series of
miniature hoes on a round, oval or rectangular base
Metal multiple blades at 90◦ angle with shank Always use a PULL stroke with linear motion Uses
Crushes and fractures calculus into fragments Burnished calculus that is impervious to removal
with other bladed instruments Used when ultrasonic contraindicated
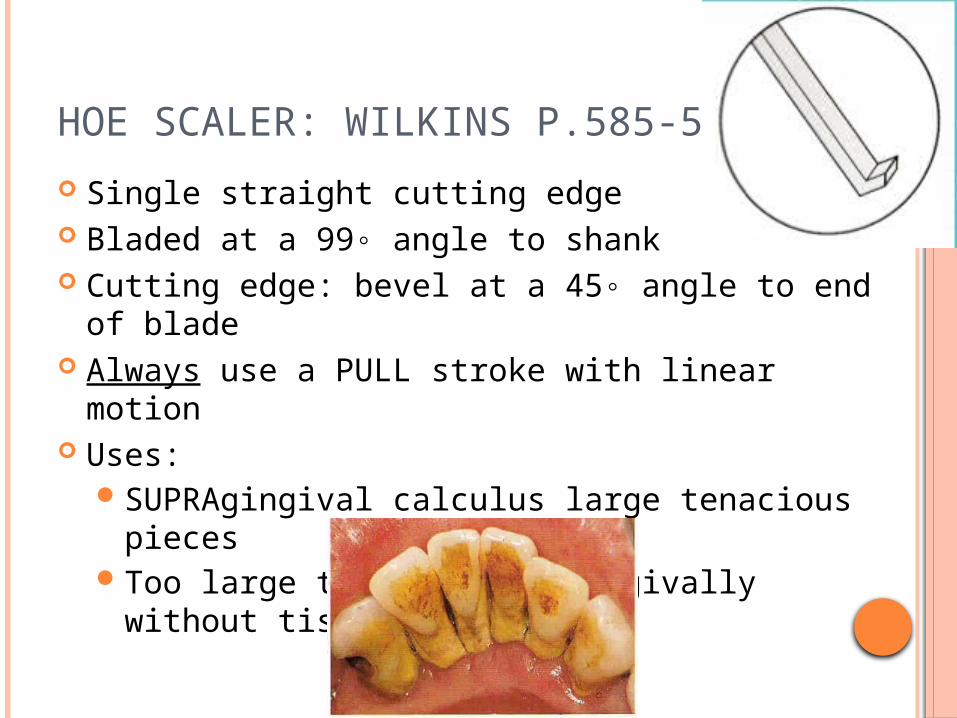
HOE SCALER: WILKINS P.585-586
Single straight cutting edge Bladed at a 99◦ angle to shank Cutting edge: bevel at a 45◦ angle to end of
blade Always use a PULL stroke with linear motion Uses:
SUPRAgingival calculus large tenacious piecesToo large to insert subgingivally without tissue
trauma
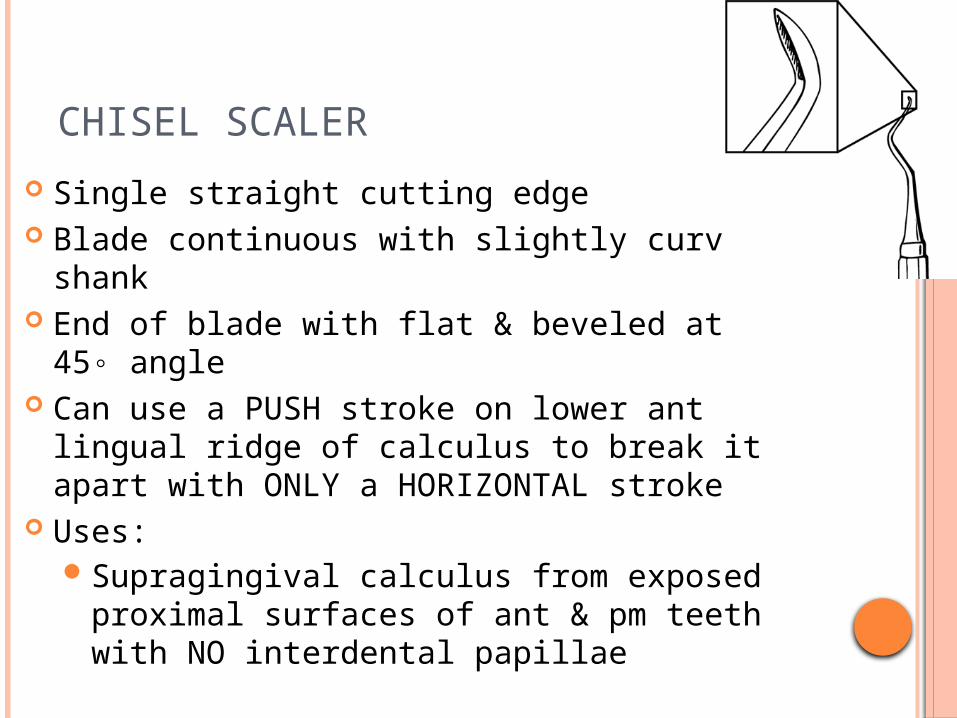
CHISEL SCALER
Single straight cutting edge Blade continuous with slightly curved shank End of blade with flat & beveled at 45◦ angle Can use a PUSH stroke on lower ant lingual
ridge of calculus to break it apart with ONLY a HORIZONTAL stroke
Uses:Supragingival calculus from exposed
proximal surfaces of ant & pm teeth with NO interdental papillae

OVERHANG RESTORATIONS
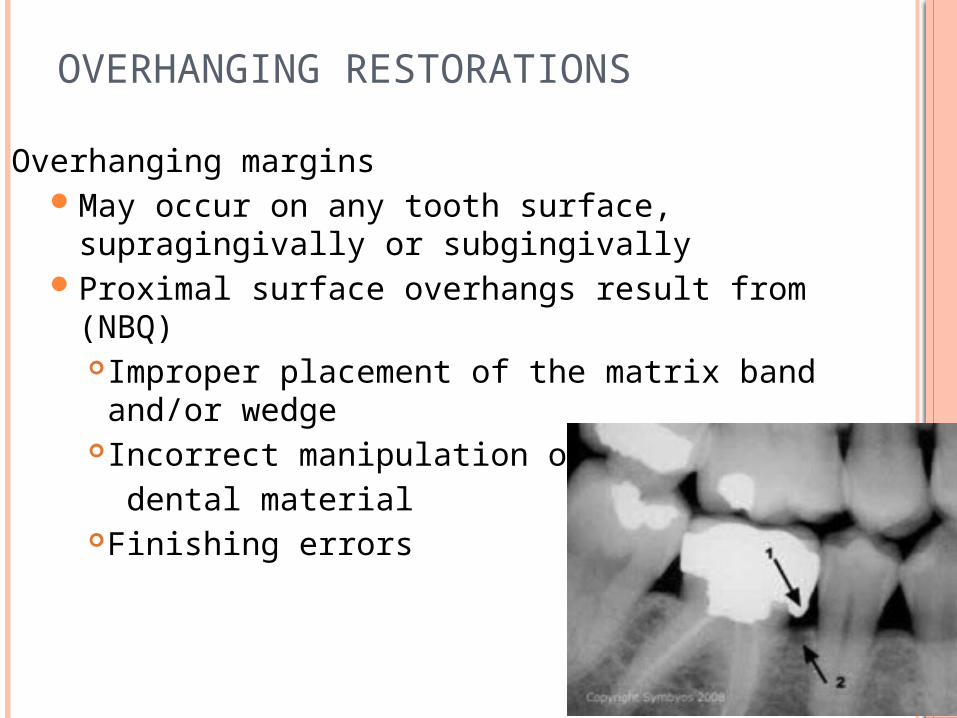
OVERHANGING RESTORATIONS
Overhanging marginsMay occur on any tooth surface,
supragingivally or subgingivallyProximal surface overhangs result from (NBQ)
Improper placement of the matrix band and/or wedge
Incorrect manipulation of the dental materialFinishing errors
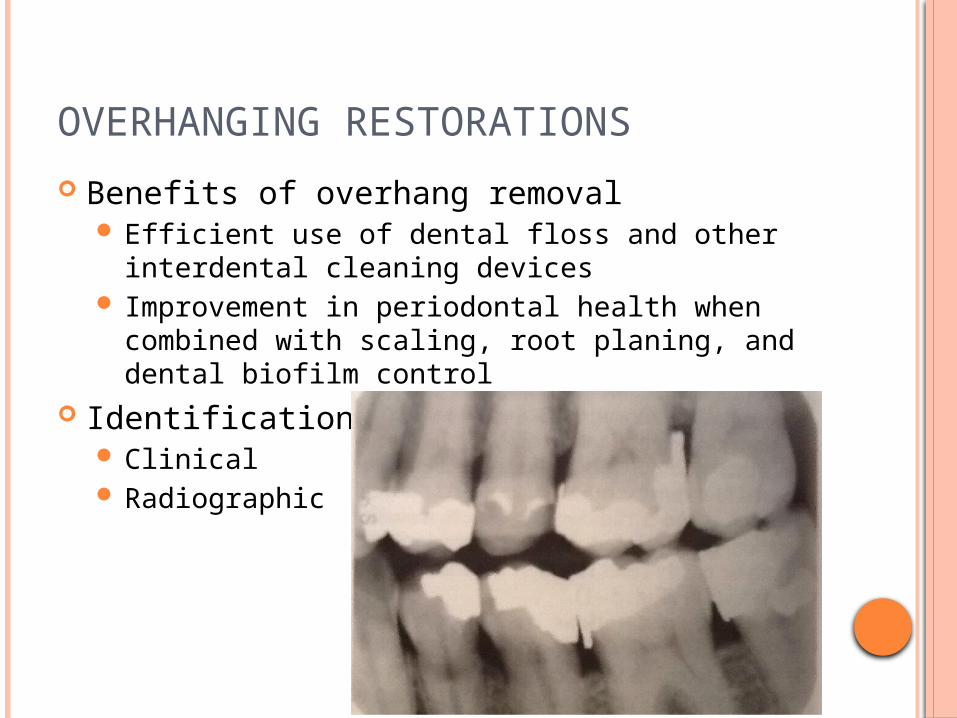
OVERHANGING RESTORATIONS
Benefits of overhang removal Efficient use of dental floss and other interdental
cleaning devices Improvement in periodontal health when
combined with scaling, root planing, and dental biofilm control
Identification Clinical Radiographic
EFFECTS OF OVERHANGING RESTORATIONS
Relationship to periodontal disease and dental cariesNiche where microorganisms that cause periodontal
infections and dental caries can proliferateCatch and tear dental flossRender the area inaccessible to a toothbrush and
other dental biofilm-removing aidsHinder the patient from disease control procedures Increase the severity of existing inflammation Increase the chance of adjacent bone lossRetain debris and microorganisms contributing to
halitosis and a general lack of oral sanitation
OVERHANG REMOVAL
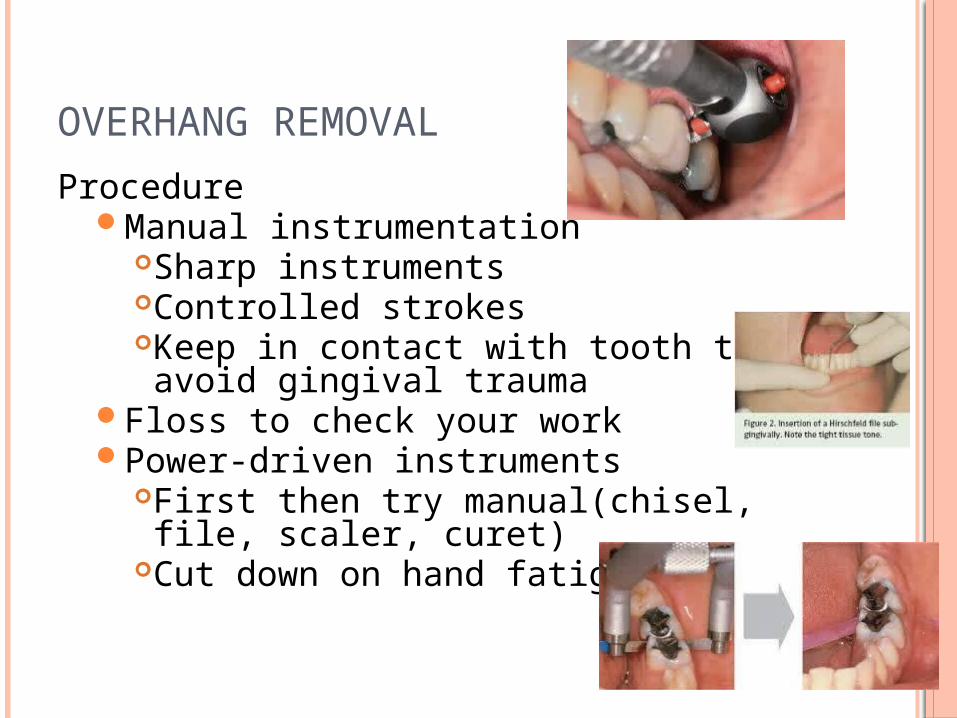
Procedure Manual instrumentation
Sharp instrumentsControlled strokesKeep in contact with tooth to avoid gingival trauma
Floss to check your workPower-driven instruments
First then try manual(chisel, file, scaler, curet)
Cut down on hand fatigue
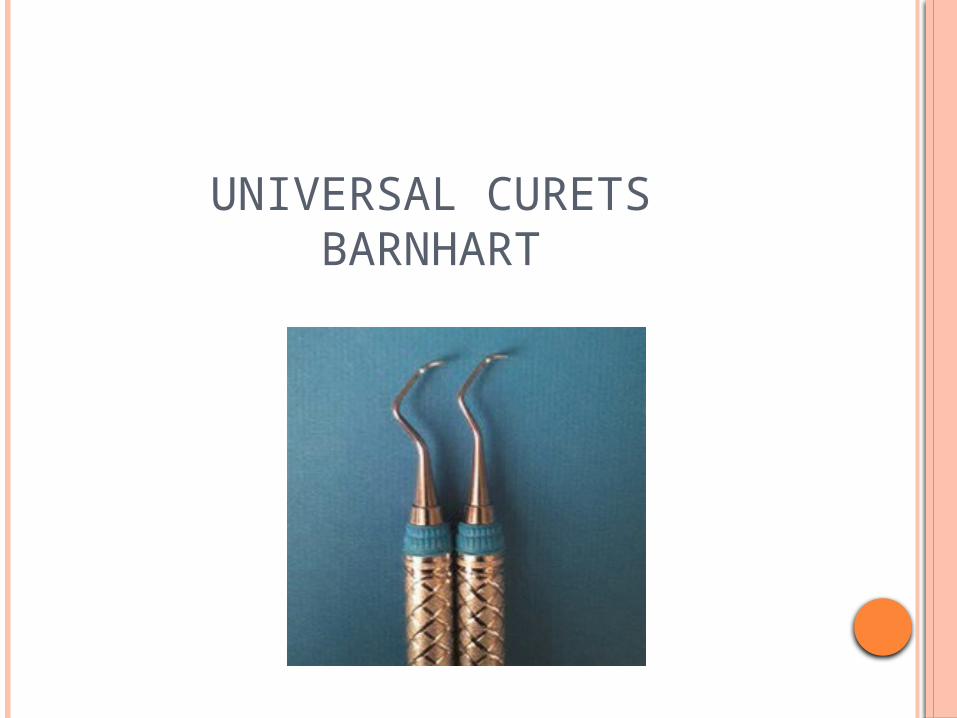
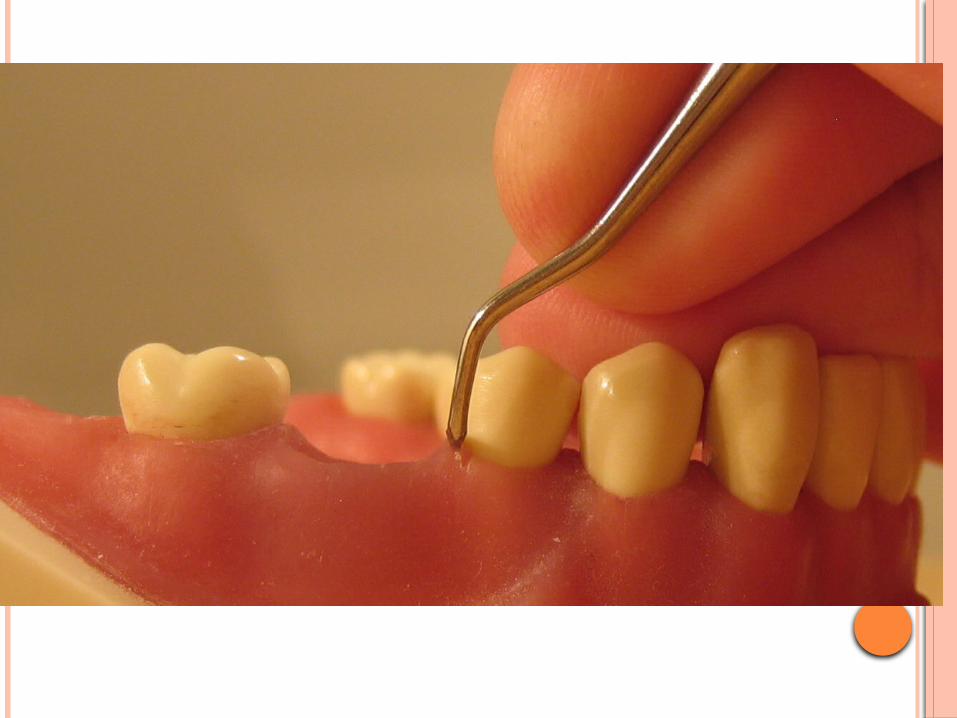
UNIVERSAL CURETSBARNHART
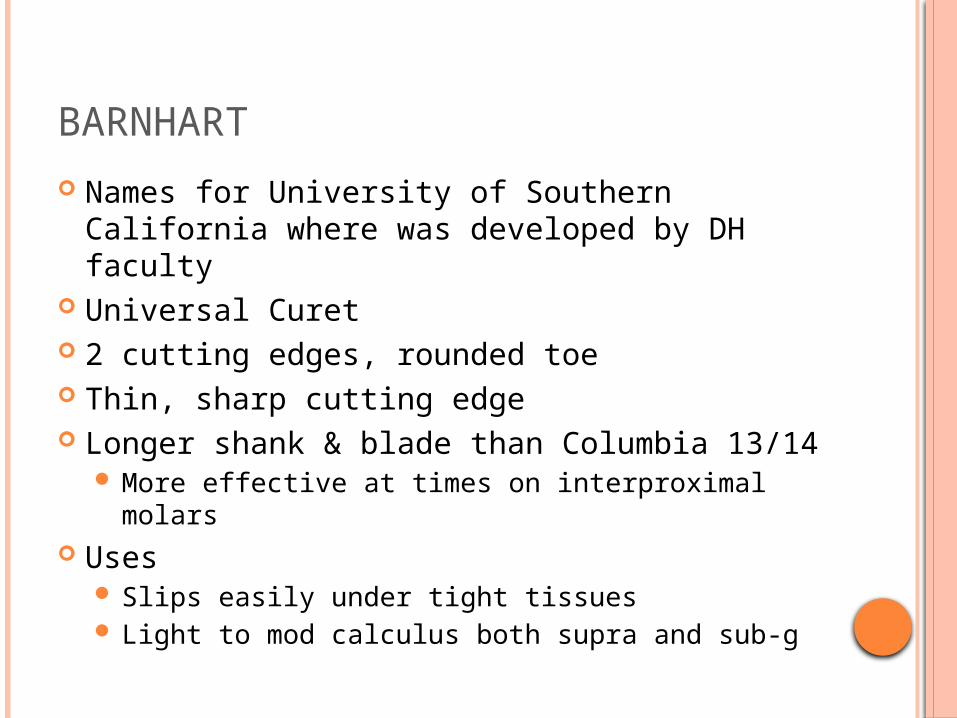
BARNHART
Names for University of Southern California where was developed by DH faculty
Universal Curet 2 cutting edges, rounded toe Thin, sharp cutting edge Longer shank & blade than Columbia 13/14
More effective at times on interproximal molars Uses
Slips easily under tight tissues Light to mod calculus both supra and sub-g
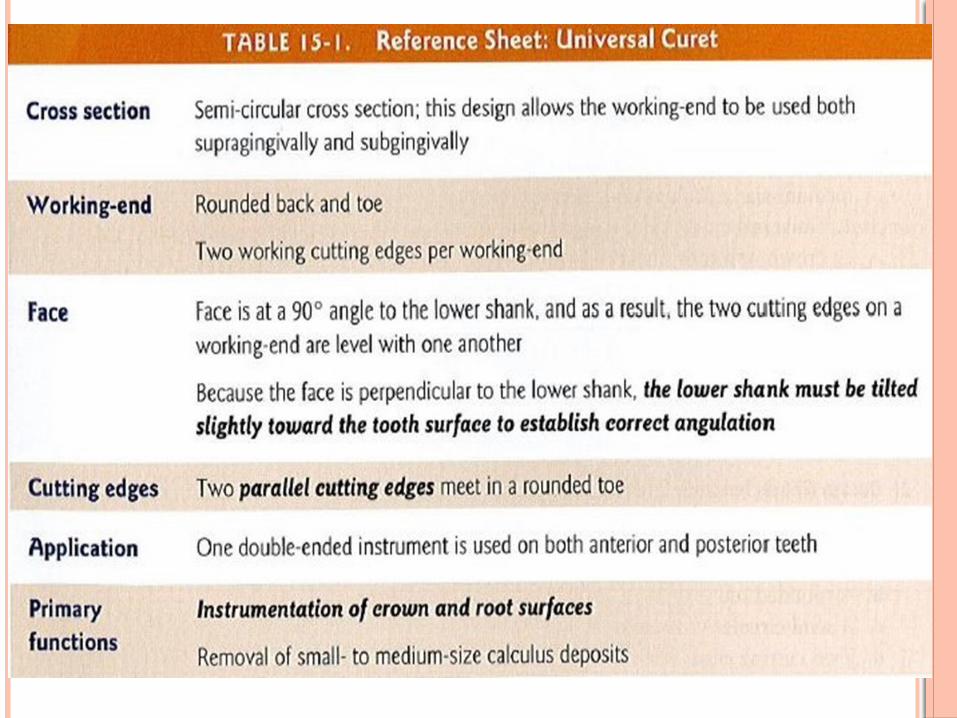
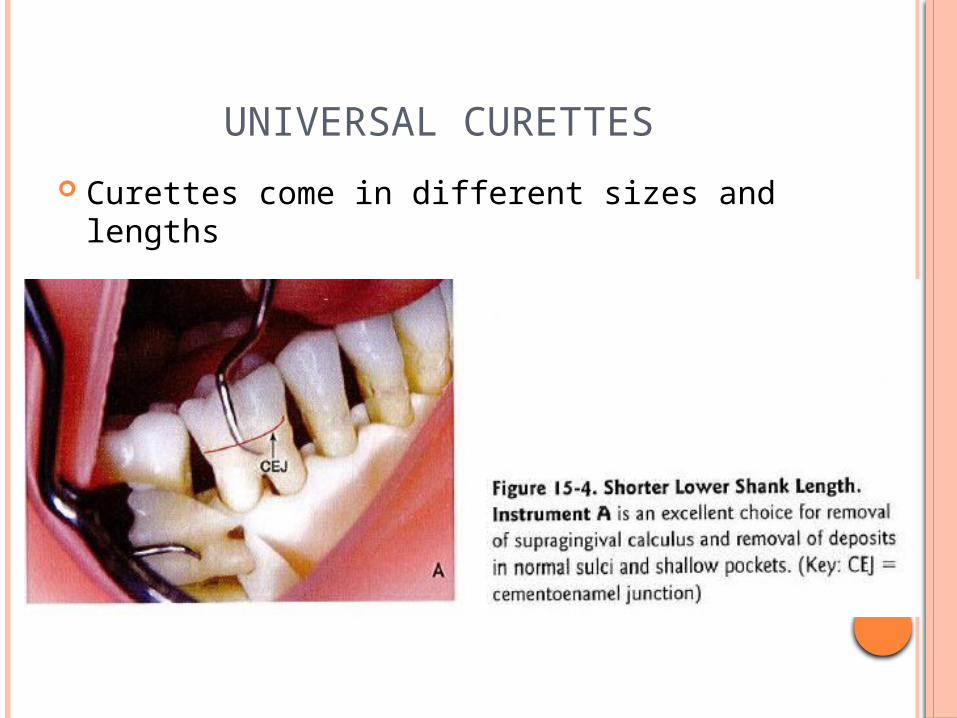
UNIVERSAL CURETTES
Curettes come in different sizes and lengths
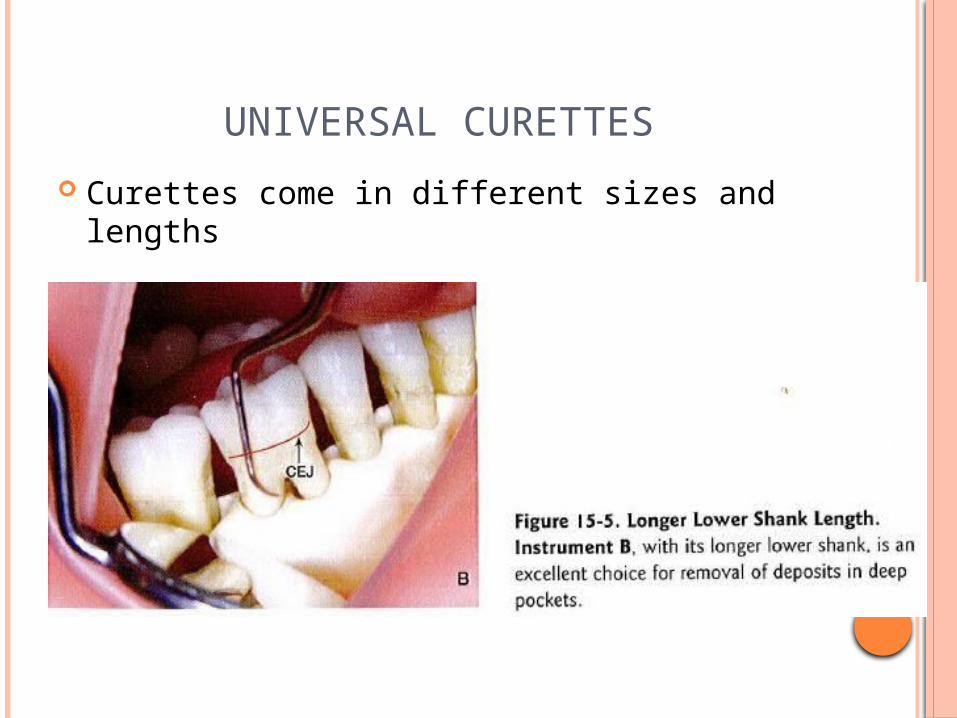
UNIVERSAL CURETTES
Curettes come in different sizes and lengths
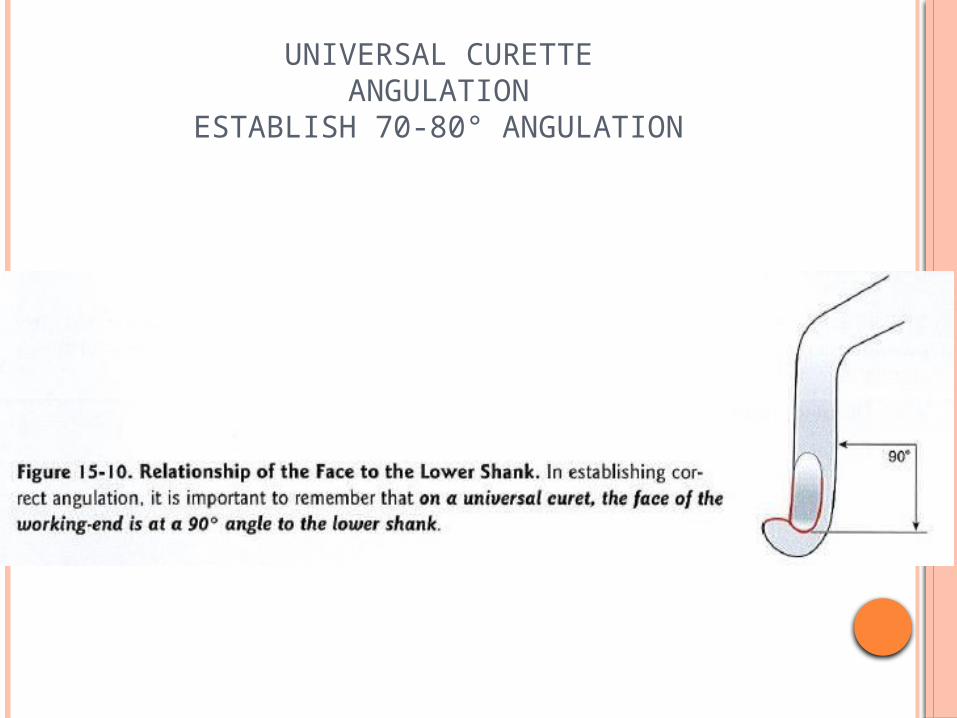
UNIVERSAL CURETTEANGULATION
ESTABLISH 70-80° ANGULATION
SICKLE SCALERS
H6/7 Anterior Teeth 204S Posterior Teeth Nevi Cross between the 2
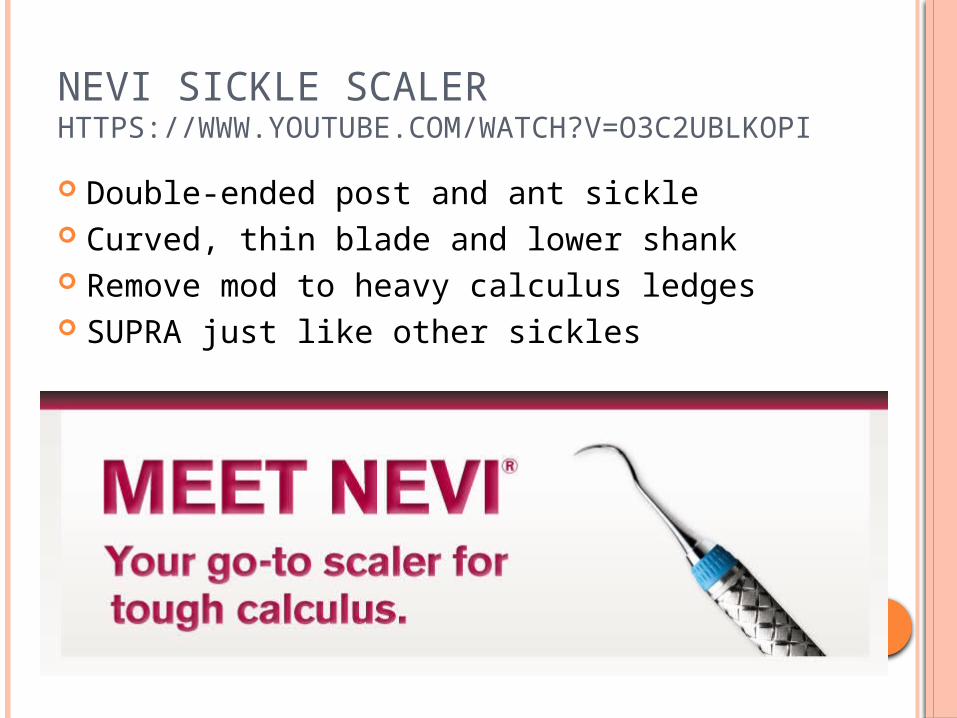
NEVI SICKLE SCALERHTTPS://WWW.YOUTUBE.COM/WATCH?V=O3C2UBLKOPI
Double-ended post and ant sickle Curved, thin blade and lower shank Remove mod to heavy calculus ledges SUPRA just like other sickles