Embed Size (px)
Citation preview
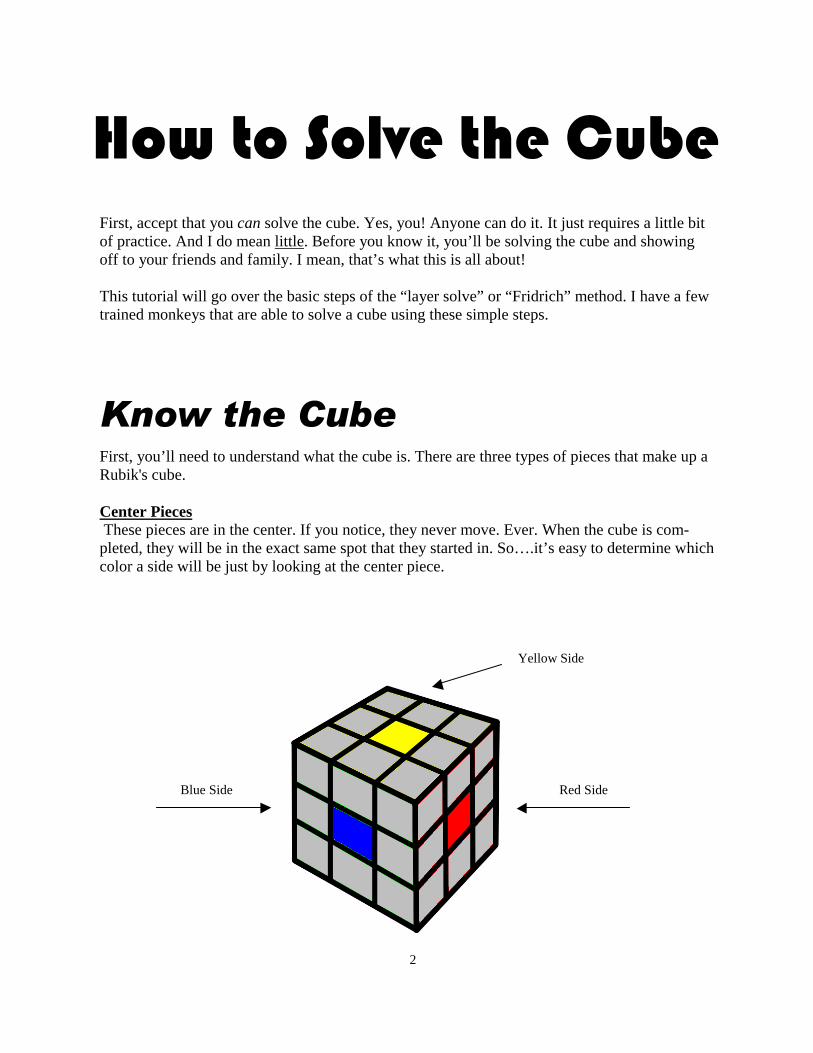
Yellow Side
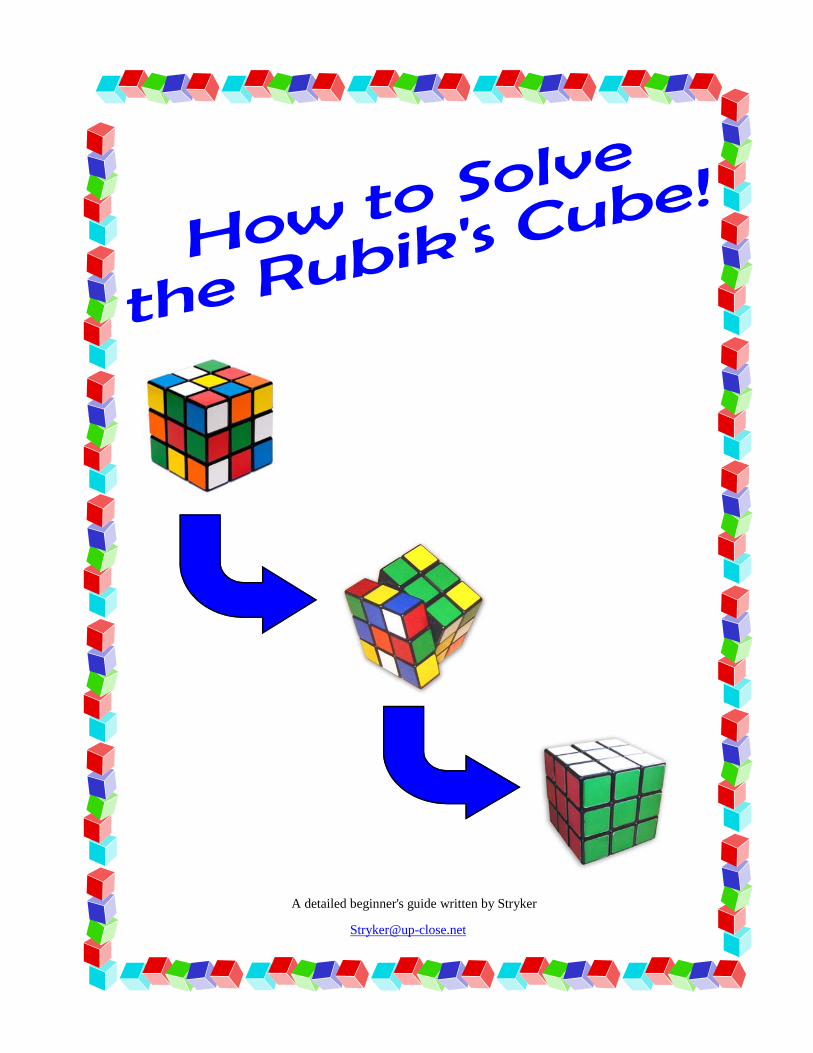
First, accept that you can solve the cube. Yes, you! Anyone can do it. It just requires a little bit of practice. And I do mean little. Before you know it, you’ll be solving the cube and showing off to your friends and family. I mean, that’s what this is all about! This tutorial will go over the basic steps of the “layer solve” or “Fridrich” method. I have a few trained monkeys that are able to solve a cube using these simple steps.
First, you’ll need to understand what the cube is. There are three types of pieces that make up a Rubik's cube. Center Pieces These pieces are in the center. If you notice, they never move. Ever. When the cube is com-pleted, they will be in the exact same spot that they started in. So….it’s easy to determine which color a side will be just by looking at the center piece.
Blue Side Red Side
2
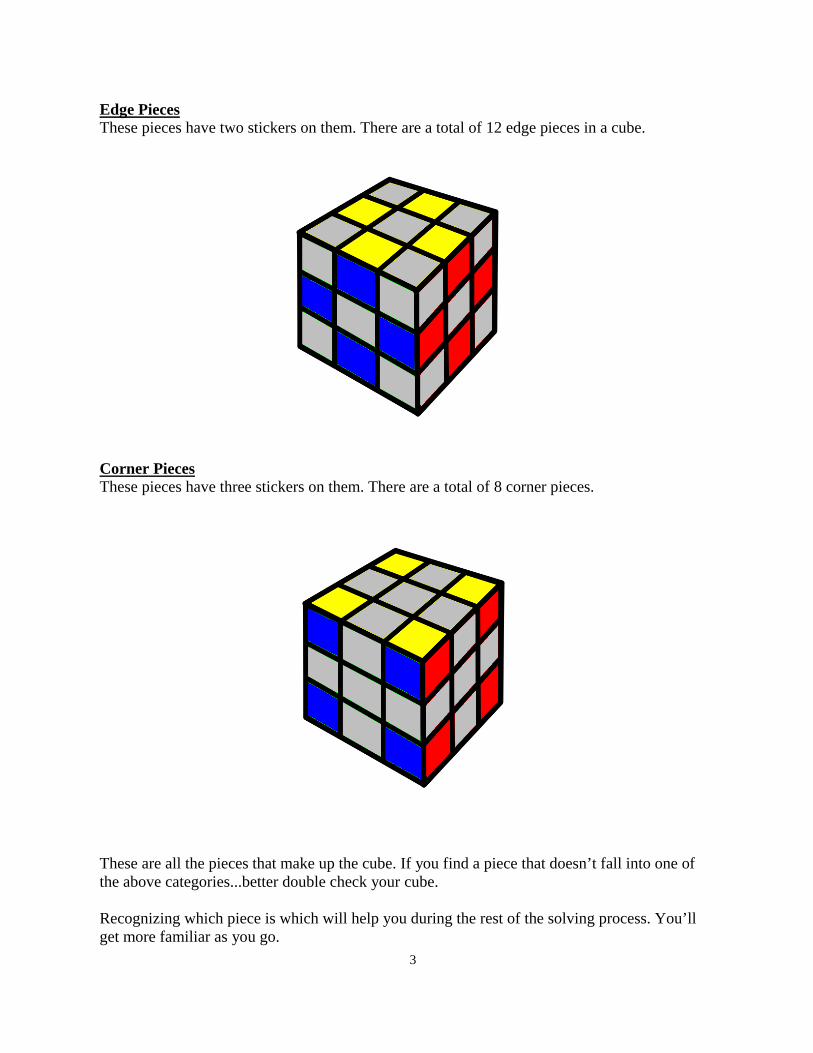
Edge Pieces These pieces have two stickers on them. There are a total of 12 edge pieces in a cube.
Corner Pieces These pieces have three stickers on them. There are a total of 8 corner pieces.
These are all the pieces that make up the cube. If you find a piece that doesn’t fall into one of the above categories...better double check your cube. Recognizing which piece is which will help you during the rest of the solving process. You’ll get more familiar as you go.
3
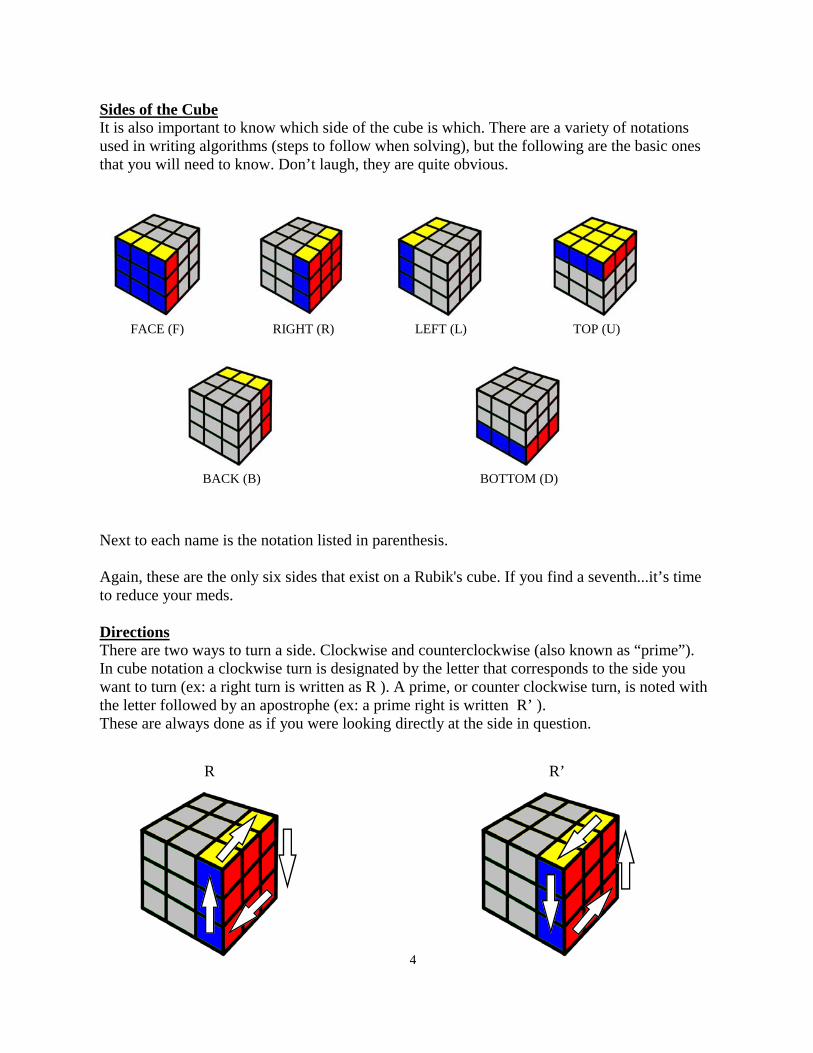
Sides of the Cube It is also important to know which side of the cube is which. There are a variety of notations used in writing algorithms (steps to follow when solving), but the following are the basic ones that you will need to know. Don’t laugh, they are quite obvious.
FACE (F) RIGHT (R) LEFT (L) TOP (U)
BACK (B) BOTTOM (D)
Next to each name is the notation listed in parenthesis. Again, these are the only six sides that exist on a Rubik's cube. If you find a seventh...it’s time to reduce your meds. Directions There are two ways to turn a side. Clockwise and counterclockwise (also known as “prime”). In cube notation a clockwise turn is designated by the letter that corresponds to the side you want to turn (ex: a right turn is written as R ). A prime, or counter clockwise turn, is noted with the letter followed by an apostrophe (ex: a prime right is written R’ ). These are always done as if you were looking directly at the side in question.
R R’
4
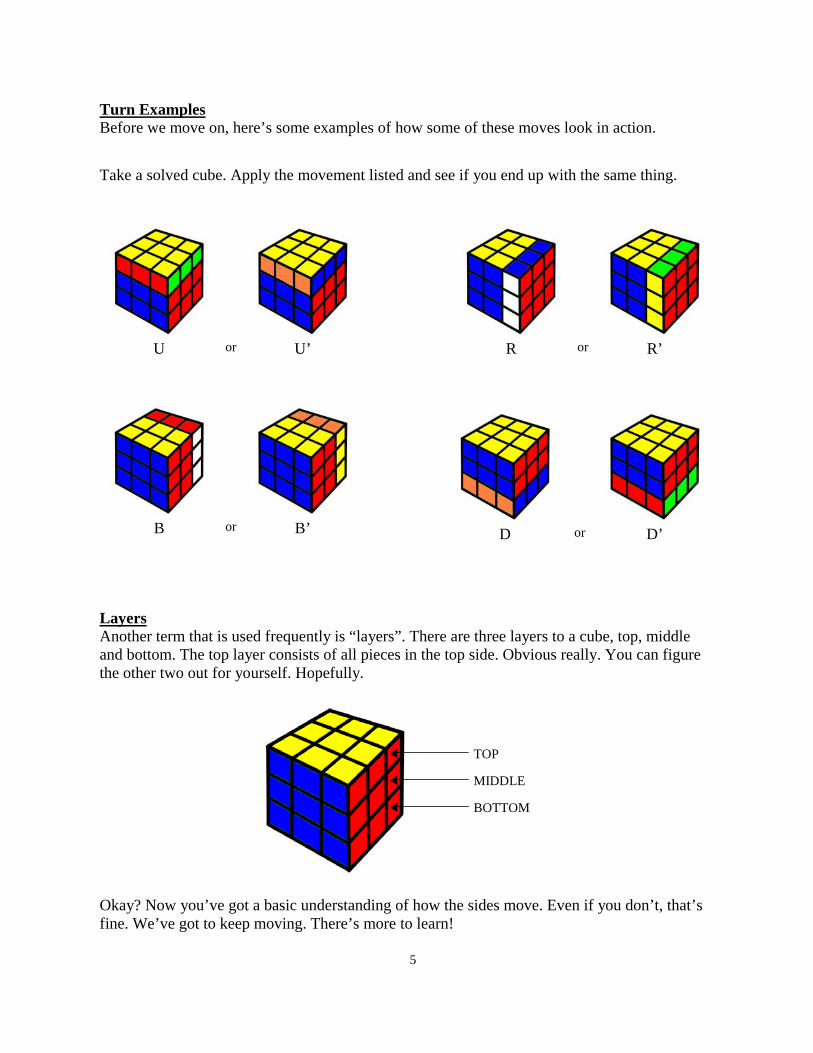
Turn Examples Before we move on, here’s some examples of how some of these moves look in action.
Take a solved cube. Apply the movement listed and see if you end up with the same thing.
B B’ D D’
Okay? Now you’ve got a basic understanding of how the sides move. Even if you don’t, that’s fine. We’ve got to keep moving. There’s more to learn!
U U’ or R R’ or
or or
5
Layers Another term that is used frequently is “layers”. There are three layers to a cube, top, middle and bottom. The top layer consists of all pieces in the top side. Obvious really. You can figure the other two out for yourself. Hopefully.
TOP
MIDDLE
BOTTOM
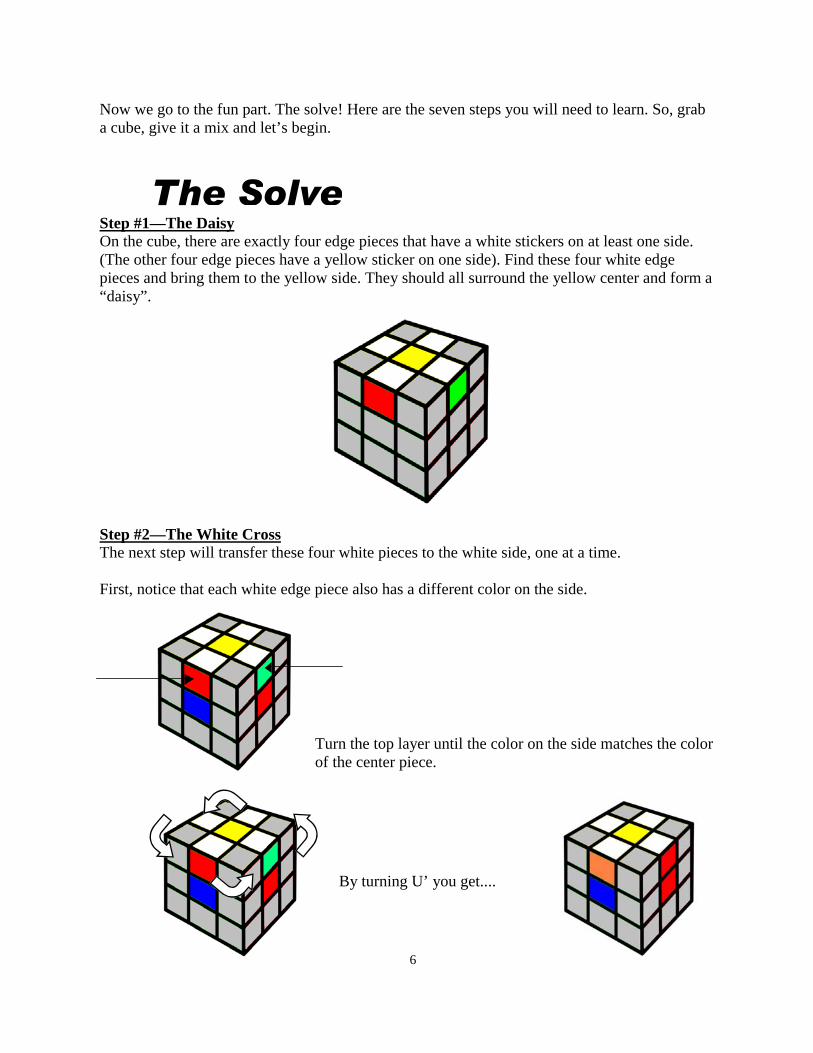
Step #1—The Daisy On the cube, there are exactly four edge pieces that have a white stickers on at least one side. (The other four edge pieces have a yellow sticker on one side). Find these four white edge pieces and bring them to the yellow side. They should all surround the yellow center and form a “daisy”.
Now we go to the fun part. The solve! Here are the seven steps you will need to learn. So, grab a cube, give it a mix and let’s begin.
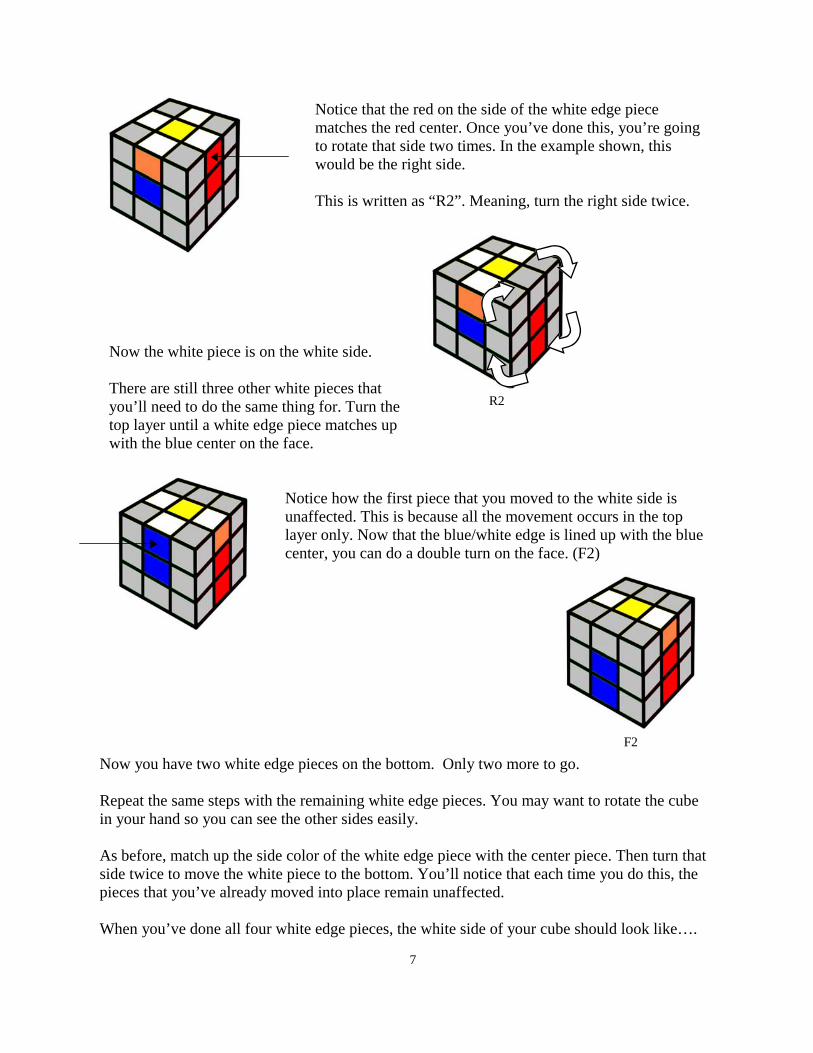
Step #2—The White Cross The next step will transfer these four white pieces to the white side, one at a time. First, notice that each white edge piece also has a different color on the side.
Turn the top layer until the color on the side matches the color of the center piece.
6
By turning U’ you get....
Notice that the red on the side of the white edge piece matches the red center. Once you’ve done this, you’re going to rotate that side two times. In the example shown, this would be the right side. This is written as “R2”. Meaning, turn the right side twice.
R2
Now the white piece is on the white side. There are still three other white pieces that you’ll need to do the same thing for. Turn the top layer until a white edge piece matches up with the blue center on the face.
Notice how the first piece that you moved to the white side is unaffected. This is because all the movement occurs in the top layer only. Now that the blue/white edge is lined up with the blue center, you can do a double turn on the face. (F2)
F2
Now you have two white edge pieces on the bottom. Only two more to go. Repeat the same steps with the remaining white edge pieces. You may want to rotate the cube in your hand so you can see the other sides easily. As before, match up the side color of the white edge piece with the center piece. Then turn that side twice to move the white piece to the bottom. You’ll notice that each time you do this, the pieces that you’ve already moved into place remain unaffected. When you’ve done all four white edge pieces, the white side of your cube should look like….
7
...this! You’ve completed the white cross! Don’t’ get too excited. This is not the whole cube. Yet. You’re ready for the next step...
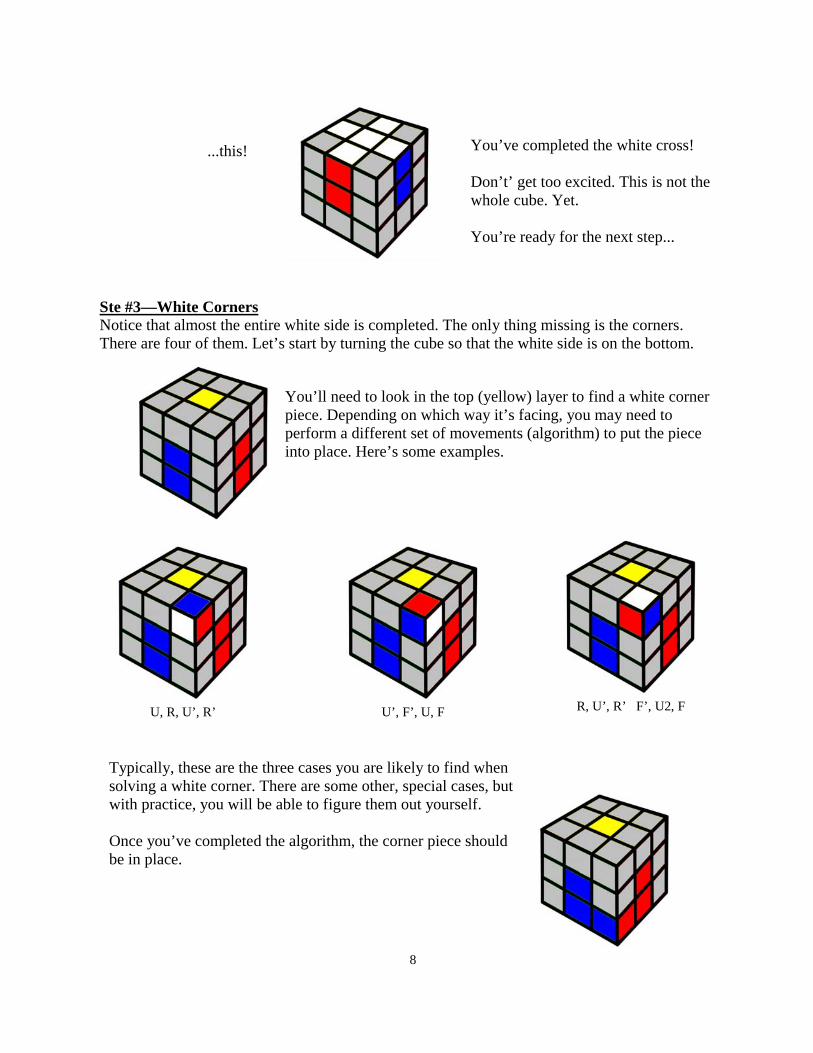
Ste #3—White Corners Notice that almost the entire white side is completed. The only thing missing is the corners. There are four of them. Let’s start by turning the cube so that the white side is on the bottom.
You’ll need to look in the top (yellow) layer to find a white corner piece. Depending on which way it’s facing, you may need to perform a different set of movements (algorithm) to put the piece into place. Here’s some examples.
U, R, U’, R’
8
U’, F’, U, F R, U’, R’ F’, U2, F
Typically, these are the three cases you are likely to find when solving a white corner. There are some other, special cases, but with practice, you will be able to figure them out yourself. Once you’ve completed the algorithm, the corner piece should be in place.
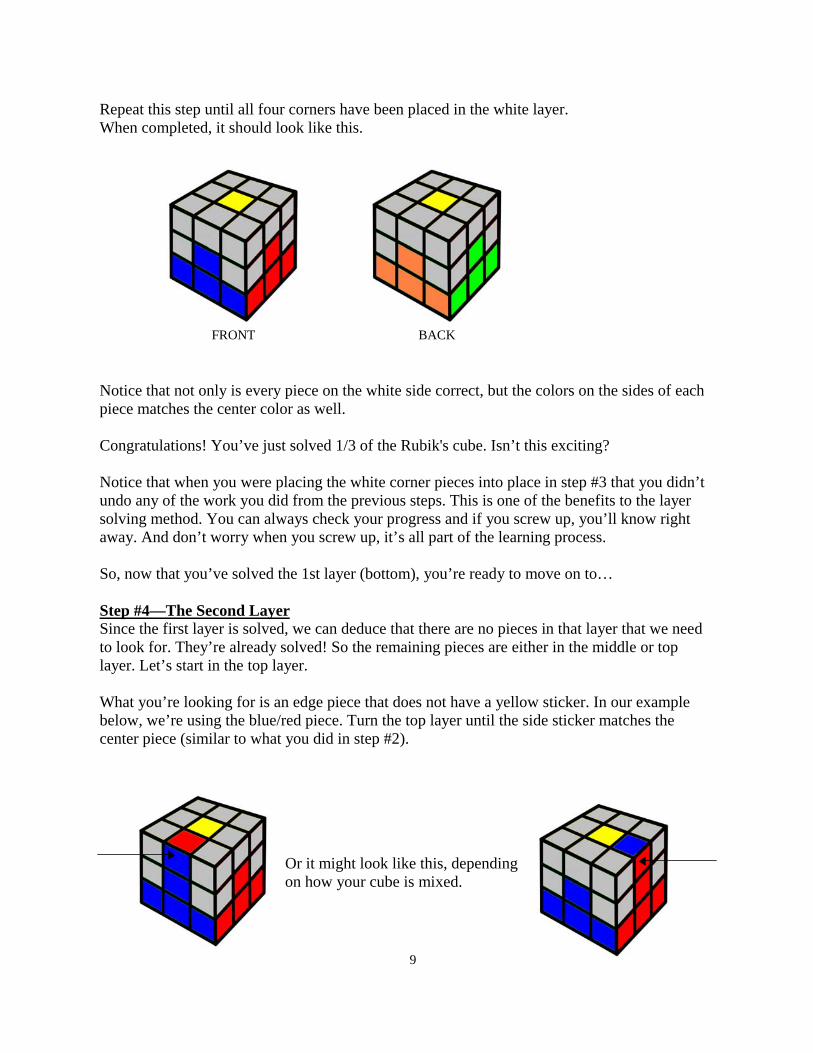
Repeat this step until all four corners have been placed in the white layer. When completed, it should look like this.
FRONT BACK
Notice that not only is every piece on the white side correct, but the colors on the sides of each piece matches the center color as well. Congratulations! You’ve just solved 1/3 of the Rubik's cube. Isn’t this exciting? Notice that when you were placing the white corner pieces into place in step #3 that you didn’t undo any of the work you did from the previous steps. This is one of the benefits to the layer solving method. You can always check your progress and if you screw up, you’ll know right away. And don’t worry when you screw up, it’s all part of the learning process. So, now that you’ve solved the 1st layer (bottom), you’re ready to move on to… Step #4—The Second Layer Since the first layer is solved, we can deduce that there are no pieces in that layer that we need to look for. They’re already solved! So the remaining pieces are either in the middle or top layer. Let’s start in the top layer. What you’re looking for is an edge piece that does not have a yellow sticker. In our example below, we’re using the blue/red piece. Turn the top layer until the side sticker matches the center piece (similar to what you did in step #2).
9
Or it might look like this, depending on how your cube is mixed.
10
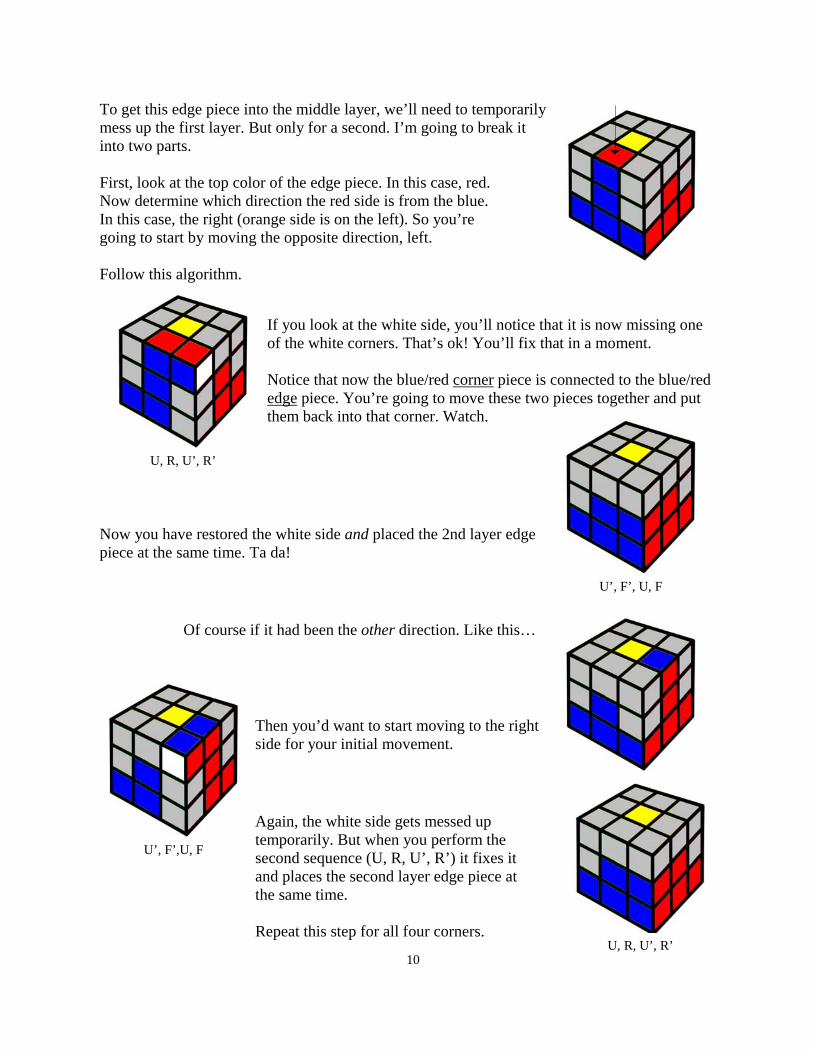
To get this edge piece into the middle layer, we’ll need to temporarily mess up the first layer. But only for a second. I’m going to break it into two parts. First, look at the top color of the edge piece. In this case, red. Now determine which direction the red side is from the blue. In this case, the right (orange side is on the left). So you’re going to start by moving the opposite direction, left. Follow this algorithm.
U, R, U’, R’
If you look at the white side, you’ll notice that it is now missing one of the white corners. That’s ok! You’ll fix that in a moment. Notice that now the blue/red corner piece is connected to the blue/red edge piece. You’re going to move these two pieces together and put them back into that corner. Watch.
U’, F’, U, F
Now you have restored the white side and placed the 2nd layer edge piece at the same time. Ta da!
Of course if it had been the other direction. Like this…
U’, F’,U, F
U, R, U’, R’
Again, the white side gets messed up temporarily. But when you perform the second sequence (U, R, U’, R’) it fixes it and places the second layer edge piece at the same time. Repeat this step for all four corners.
Then you’d want to start moving to the right side for your initial movement.
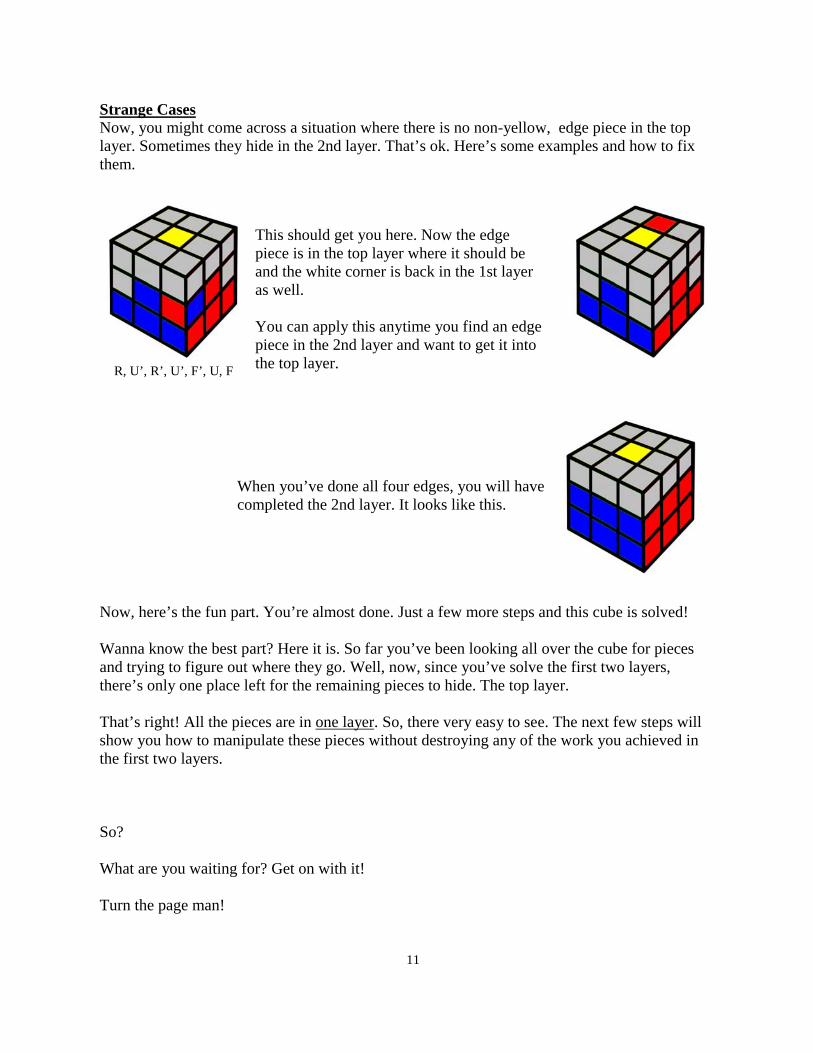
Strange Cases Now, you might come across a situation where there is no non-yellow, edge piece in the top layer. Sometimes they hide in the 2nd layer. That’s ok. Here’s some examples and how to fix them.
R, U’, R’, U’, F’, U, F
This should get you here. Now the edge piece is in the top layer where it should be and the white corner is back in the 1st layer as well. You can apply this anytime you find an edge piece in the 2nd layer and want to get it into the top layer.
When you’ve done all four edges, you will have completed the 2nd layer. It looks like this.
Now, here’s the fun part. You’re almost done. Just a few more steps and this cube is solved! Wanna know the best part? Here it is. So far you’ve been looking all over the cube for pieces and trying to figure out where they go. Well, now, since you’ve solve the first two layers, there’s only one place left for the remaining pieces to hide. The top layer. That’s right! All the pieces are in one layer. So, there very easy to see. The next few steps will show you how to manipulate these pieces without destroying any of the work you achieved in the first two layers. So? What are you waiting for? Get on with it! Turn the page man!
11
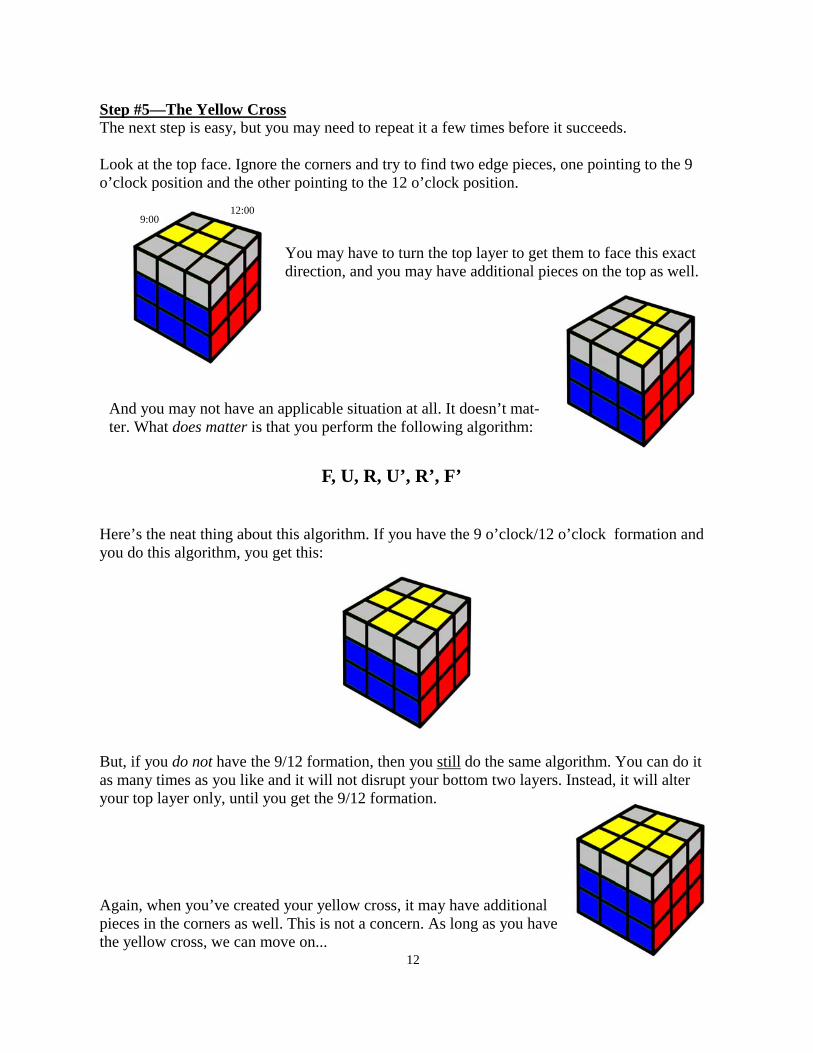
Step #5—The Yellow Cross The next step is easy, but you may need to repeat it a few times before it succeeds. Look at the top face. Ignore the corners and try to find two edge pieces, one pointing to the 9 o’clock position and the other pointing to the 12 o’clock position.
9:00 12:00
You may have to turn the top layer to get them to face this exact direction, and you may have additional pieces on the top as well.
And you may not have an applicable situation at all. It doesn’t mat-ter. What does matter is that you perform the following algorithm:
F, U, R, U’, R’, F’
Here’s the neat thing about this algorithm. If you have the 9 o’clock/12 o’clock formation and you do this algorithm, you get this:
But, if you do not have the 9/12 formation, then you still do the same algorithm. You can do it as many times as you like and it will not disrupt your bottom two layers. Instead, it will alter your top layer only, until you get the 9/12 formation.
Again, when you’ve created your yellow cross, it may have additional pieces in the corners as well. This is not a concern. As long as you have the yellow cross, we can move on...
12
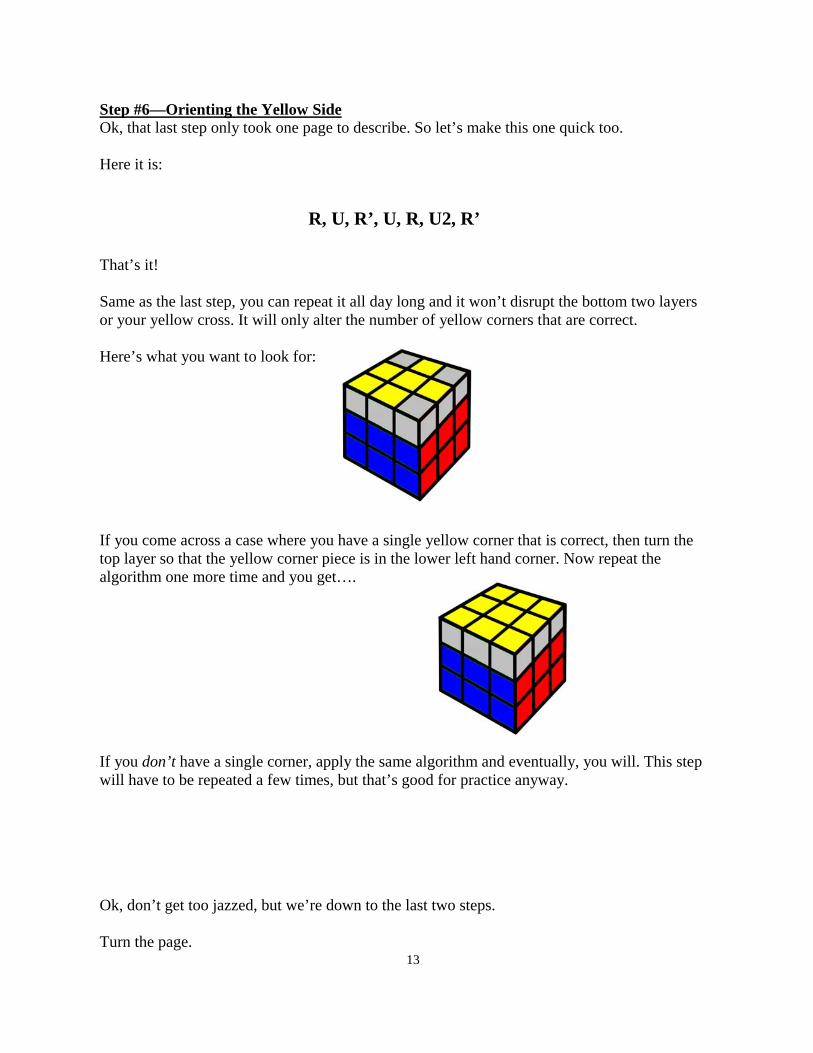
Step #6—Orienting the Yellow Side Ok, that last step only took one page to describe. So let’s make this one quick too. Here it is:
R, U, R’, U, R, U2, R’
That’s it! Same as the last step, you can repeat it all day long and it won’t disrupt the bottom two layers or your yellow cross. It will only alter the number of yellow corners that are correct. Here’s what you want to look for:
If you come across a case where you have a single yellow corner that is correct, then turn the top layer so that the yellow corner piece is in the lower left hand corner. Now repeat the algorithm one more time and you get….
If you don’t have a single corner, apply the same algorithm and eventually, you will. This step will have to be repeated a few times, but that’s good for practice anyway.
Ok, don’t get too jazzed, but we’re down to the last two steps. Turn the page.
13
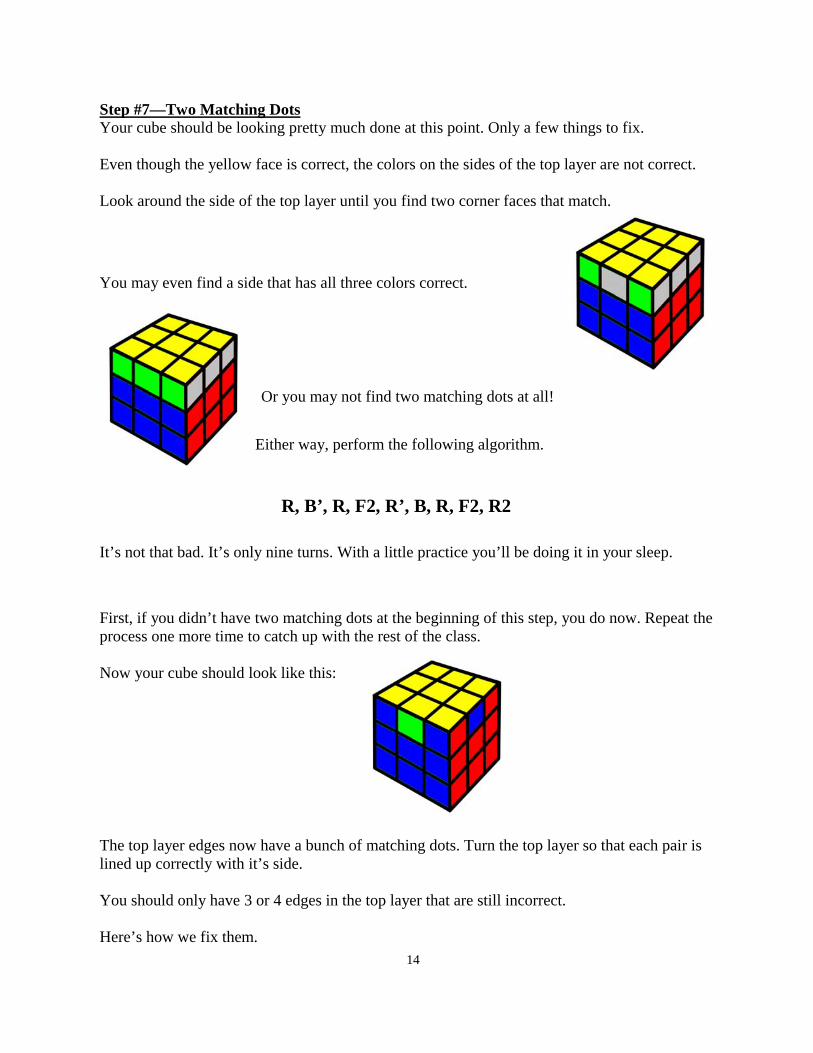
Step #7—Two Matching Dots Your cube should be looking pretty much done at this point. Only a few things to fix. Even though the yellow face is correct, the colors on the sides of the top layer are not correct. Look around the side of the top layer until you find two corner faces that match.
You may even find a side that has all three colors correct.
R, B’, R, F2, R’, B, R, F2, R2
Either way, perform the following algorithm.
It’s not that bad. It’s only nine turns. With a little practice you’ll be doing it in your sleep.
First, if you didn’t have two matching dots at the beginning of this step, you do now. Repeat the process one more time to catch up with the rest of the class. Now your cube should look like this:
Or you may not find two matching dots at all!
The top layer edges now have a bunch of matching dots. Turn the top layer so that each pair is lined up correctly with it’s side. You should only have 3 or 4 edges in the top layer that are still incorrect. Here’s how we fix them.
14
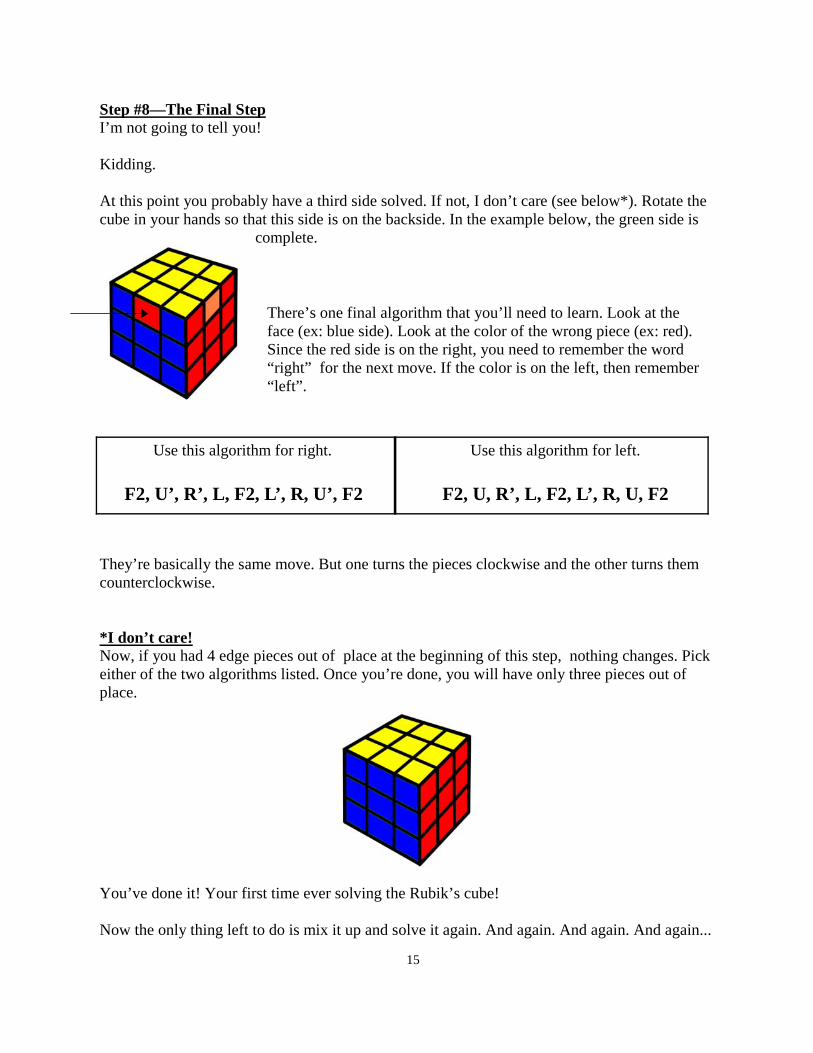
Step #8—The Final Step I’m not going to tell you! Kidding. At this point you probably have a third side solved. If not, I don’t care (see below*). Rotate the cube in your hands so that this side is on the backside. In the example below, the green side is
complete.
There’s one final algorithm that you’ll need to learn. Look at the face (ex: blue side). Look at the color of the wrong piece (ex: red). Since the red side is on the right, you need to remember the word “right” for the next move. If the color is on the left, then remember “left”.
F2, U’, R’, L, F2, L’, R, U’, F2
Use this algorithm for right.
F2, U, R’, L, F2, L’, R, U, F2
Use this algorithm for left.
They’re basically the same move. But one turns the pieces clockwise and the other turns them counterclockwise. *I don’t care! Now, if you had 4 edge pieces out of place at the beginning of this step, nothing changes. Pick either of the two algorithms listed. Once you’re done, you will have only three pieces out of place.
You’ve done it! Your first time ever solving the Rubik’s cube! Now the only thing left to do is mix it up and solve it again. And again. And again. And again...
15

16
Special thanks goes out to John George, for coming up with the idea that we could actually learn to solve the cube in the first place. If you want to buy a killer DVD on how to solve the cube, go to:
www.youcansolvethecube.com Also, many thanks to the numerous people that took the time to help me as I learned. Tyson Mao Chris Dzoan Shelly Chang Adam Zamora Ambie Valdez Leyan Lo Michael Gottlieb Dan Dzoan Lucas Garron and of course, Brenton Ryba.