Embed Size (px)
Citation preview
A complete guide to your EFTPOS Terminal.
EFTPOS Terminal User Guide.
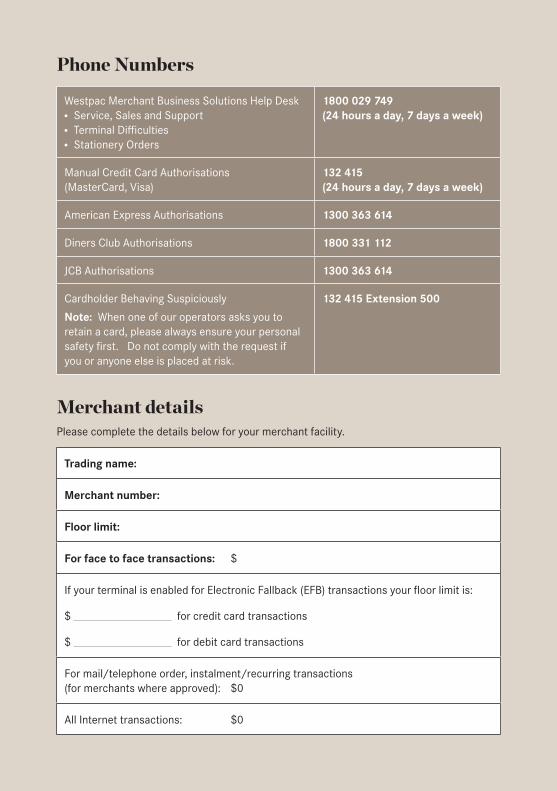
Phone Numbers
Westpac Merchant Business Solutions Help DeskService, Sales and Support ●●
Terminal Difficulties●●
Stationery Orders●●
1800 029 749(24 hours a day, 7 days a week)
Manual Credit Card Authorisations (MasterCard, Visa)
132 415(24 hours a day, 7 days a week)
American Express Authorisations 1300 363 614
Diners Club Authorisations 1800 331 112
JCB Authorisations 1300 363 614
Cardholder Behaving Suspiciously
Note: When one of our operators asks you to retain a card, please always ensure your personal safety first. Do not comply with the request if you or anyone else is placed at risk.
132 415 Extension 500
Merchant detailsPlease complete the details below for your merchant facility.
Trading name:
Merchant number:
Floor limit:
For face to face transactions: $
If your terminal is enabled for Electronic Fallback (EFB) transactions your floor limit is:
$ for credit card transactions
$ for debit card transactions
For mail/telephone order, instalment/recurring transactions (for merchants where approved): $0
All Internet transactions: $0
1EFTPOS EXTRA USER GUIDE
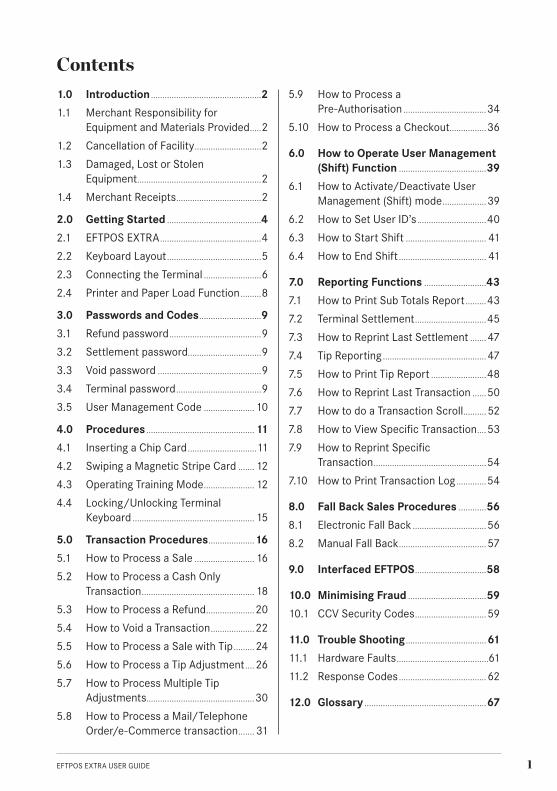
1.0 Introduction ................................................2
1.1 Merchant Responsibility for Equipment and Materials Provided .....2
1.2 Cancellation of Facility .............................2
1.3 Damaged, Lost or Stolen Equipment ......................................................2
1.4 Merchant Receipts .....................................2
2.0 Getting Started .........................................4
2.1 EFTPOS EXTRA ............................................4
2.2 Keyboard Layout .........................................5
2.3 Connecting the Terminal .........................6
2.4 Printer and Paper Load Function .........8
3.0 Passwords and Codes ...........................9
3.1 Refund password ........................................9
3.2 Settlement password................................9
3.3 Void password .............................................9
3.4 Terminal password .....................................9
3.5 User Management Code ......................10
4.0 Procedures ............................................... 11
4.1 Inserting a Chip Card ..............................11
4.2 Swiping a Magnetic Stripe Card ....... 12
4.3 Operating Training Mode ...................... 12
4.4 Locking/Unlocking Terminal Keyboard ..................................................... 15
5.0 Transaction Procedures ....................16
5.1 How to Process a Sale .......................... 16
5.2 How to Process a Cash Only Transaction ................................................. 18
5.3 How to Process a Refund .....................20
5.4 How to Void a Transaction ...................22
5.5 How to Process a Sale with Tip .........24
5.6 How to Process a Tip Adjustment ....26
5.7 How to Process Multiple Tip Adjustments...............................................30
5.8 How to Process a Mail/Telephone Order/e-Commerce transaction ....... 31
5.9 How to Process a Pre-Authorisation ....................................34
5.10 How to Process a Checkout ................36
6.0 How to Operate User Management (Shift) Function ......................................39
6.1 How to Activate/Deactivate User Management (Shift) mode ...................39
6.2 How to Set User ID’s ..............................40
6.3 How to Start Shift ................................... 41
6.4 How to End Shift ...................................... 41
7.0 Reporting Functions ...........................43
7.1 How to Print Sub Totals Report .........43
7.2 Terminal Settlement ...............................45
7.3 How to Reprint Last Settlement .......47
7.4 Tip Reporting .............................................47
7.5 How to Print Tip Report ........................48
7.6 How to Reprint Last Transaction ......50
7.7 How to do a Transaction Scroll ..........52
7.8 How to View Specific Transaction ....53
7.9 How to Reprint Specific Transaction .................................................54
7.10 How to Print Transaction Log .............54
8.0 Fall Back Sales Procedures ............56
8.1 Electronic Fall Back ................................56
8.2 Manual Fall Back ......................................57
9.0 Interfaced EFTPOS ...............................58
10.0 Minimising Fraud ..................................59
10.1 CCV Security Codes ...............................59
11.0 Trouble Shooting ...................................61
11.1 Hardware Faults ........................................61
11.2 Response Codes ......................................62
12.0 Glossary .....................................................67
Contents
2 EFTPOS EXTRA USER GUIDE INTRODUCTION
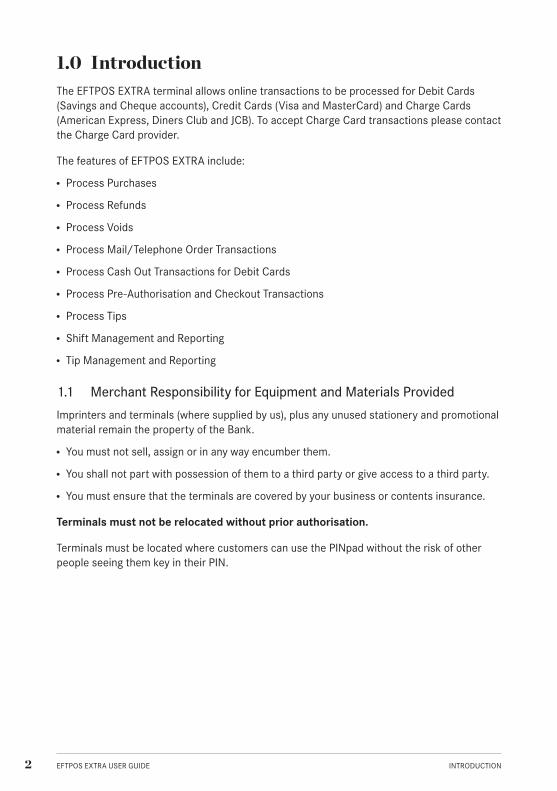
1.0 IntroductionThe EFTPOS EXTRA terminal allows online transactions to be processed for Debit Cards (Savings and Cheque accounts), Credit Cards (Visa and MasterCard) and Charge Cards (American Express, Diners Club and JCB). To accept Charge Card transactions please contact the Charge Card provider.
The features of EFTPOS EXTRA include:
Process Purchases ●●
Process Refunds ●●
Process Voids ●●
Process Mail/Telephone Order Transactions ●●
Process Cash Out Transactions for Debit Cards ●●
Process Pre-Authorisation and Checkout Transactions ●●
Process Tips ●●
Shift Management and Reporting ●●
Tip Management and Reporting ●●
1.1 Merchant Responsibility for Equipment and Materials Provided
Imprinters and terminals (where supplied by us), plus any unused stationery and promotional material remain the property of the Bank.
You must not sell, assign or in any way encumber them. ●●
You shall not part with possession of them to a third party or give access to a third party. ●●
You must ensure that the terminals are covered by your business or contents insurance.●●
Terminals must not be relocated without prior authorisation.
Terminals must be located where customers can use the PINpad without the risk of other people seeing them key in their PIN.
3EFTPOS EXTRA USER GUIDE INTRODUCTION
1.2 Cancellation of Facility
If your merchant facility is cancelled for any reason, this equipment and materials must be returned to us. To make arrangements for return call the Westpac Helpdesk on 1800 029 749. You must ensure that all equipment and materials are available to be returned within five business days of our request.
Fees and charges will continue to be incurred until the equipment is returned to the bank as instructed.
1.3 Damaged, Lost or Stolen Equipment
You are responsible for your equipment. If equipment is damaged, lost or stolen, you will be charged for their replacement.
1.4 Merchant Receipts
You must retain all merchant receipts printed in a secure manner for reconciliation and in case of terminal failure. Refer to Section 14.0 Records in the Merchant Business Solutions Card Acceptance by Business brochure.
You must provide the customer with a receipt unless he or she requests otherwise.
4 EFTPOS EXTRA USER GUIDE GETTING STARTED
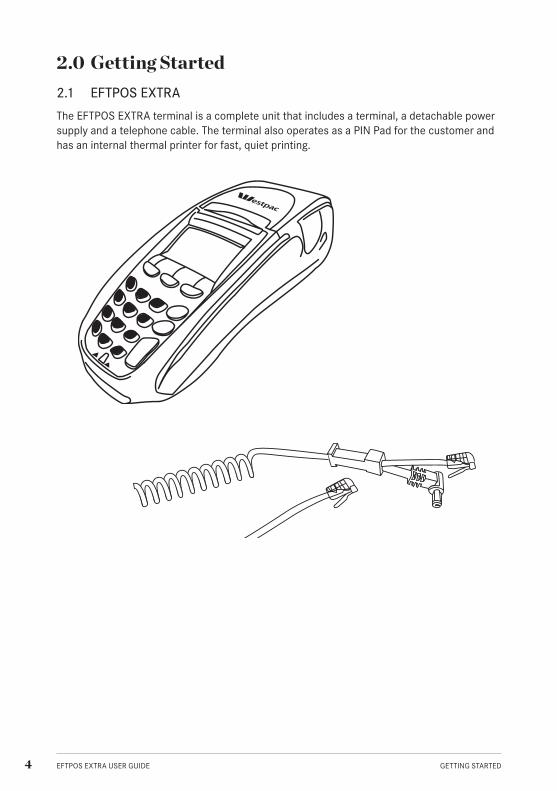
2.0 Getting Started2.1 EFTPOS EXTRA
The EFTPOS EXTRA terminal is a complete unit that includes a terminal, a detachable power supply and a telephone cable. The terminal also operates as a PIN Pad for the customer and has an internal thermal printer for fast, quiet printing.
5EFTPOS EXTRA USER GUIDE GETTING STARTED
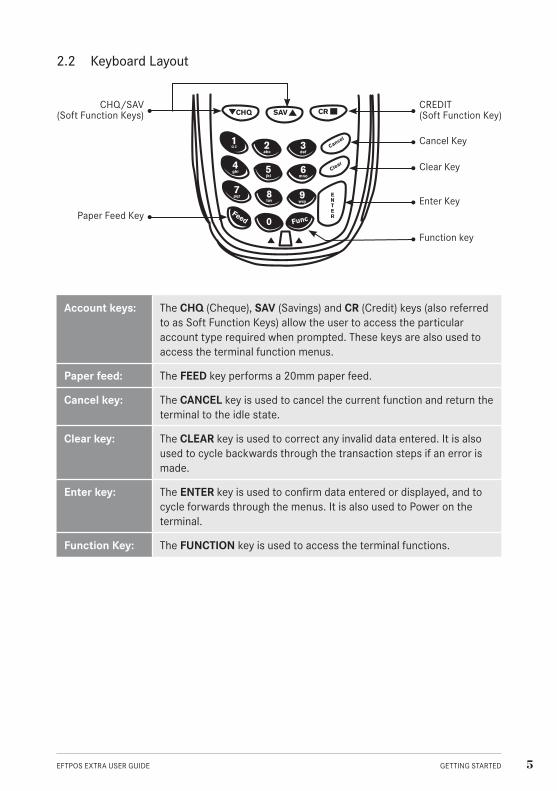
2.2 Keyboard Layout
Account keys: The CHQ (Cheque), SAV (Savings) and CR (Credit) keys (also referred to as Soft Function Keys) allow the user to access the particular account type required when prompted. These keys are also used to access the terminal function menus.
Paper feed: The FEED key performs a 20mm paper feed.
Cancel key: The CANCEL key is used to cancel the current function and return the terminal to the idle state.
Clear key: The CLEAR key is used to correct any invalid data entered. It is also used to cycle backwards through the transaction steps if an error is made.
Enter key: The ENTER key is used to confirm data entered or displayed, and to cycle forwards through the menus. It is also used to Power on the terminal.
Function Key: The FUNCTION key is used to access the terminal functions.
3def
6mno
9wxy
2abc
5jkl
8tuv
1Q Z
4ghi
7pqr
Cancel
Clear
ENTER
0 FuncFeed
CHQ SAV CRCHQ/SAV
(Soft Function Keys)
Function key
Paper Feed Key
CREDIT(Soft Function Key)
Cancel Key
Clear Key
Enter Key
6 EFTPOS EXTRA USER GUIDE GETTING STARTED
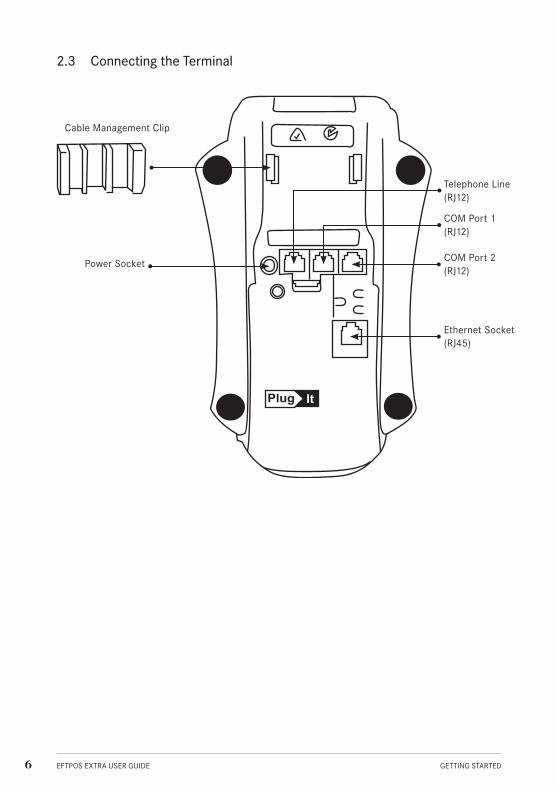
2.3 Connecting the Terminal
Plug It
Power Socket
Telephone Line (RJ12)
COM Port 1 (RJ12)
COM Port 2 (RJ12)
Ethernet Socket (RJ45)
Cable Management Clip
7EFTPOS EXTRA USER GUIDE GETTING STARTED
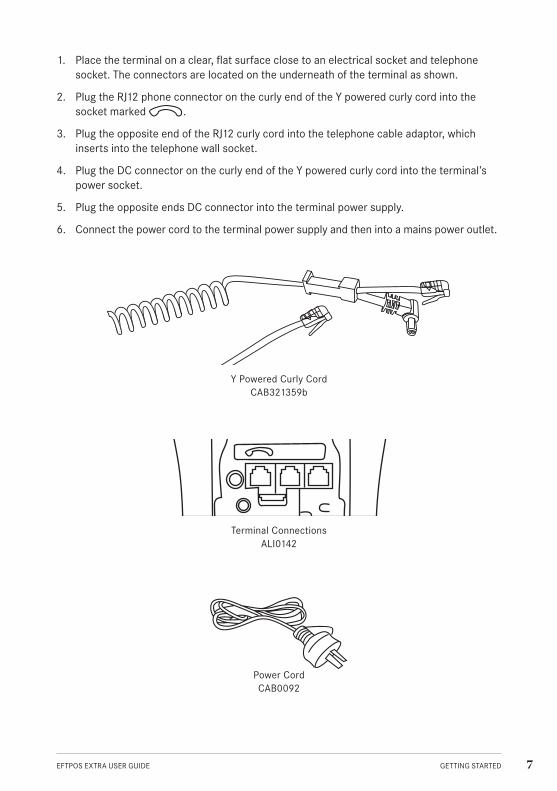
1. Place the terminal on a clear, flat surface close to an electrical socket and telephone socket. The connectors are located on the underneath of the terminal as shown.
2. Plug the RJ12 phone connector on the curly end of the Y powered curly cord into the socket marked .
3. Plug the opposite end of the RJ12 curly cord into the telephone cable adaptor, which inserts into the telephone wall socket.
4. Plug the DC connector on the curly end of the Y powered curly cord into the terminal’s power socket.
5. Plug the opposite ends DC connector into the terminal power supply.
6. Connect the power cord to the terminal power supply and then into a mains power outlet.
Y Powered Curly Cord CAB321359b
Power Cord CAB0092
Terminal Connections ALI0142
Plug It
8
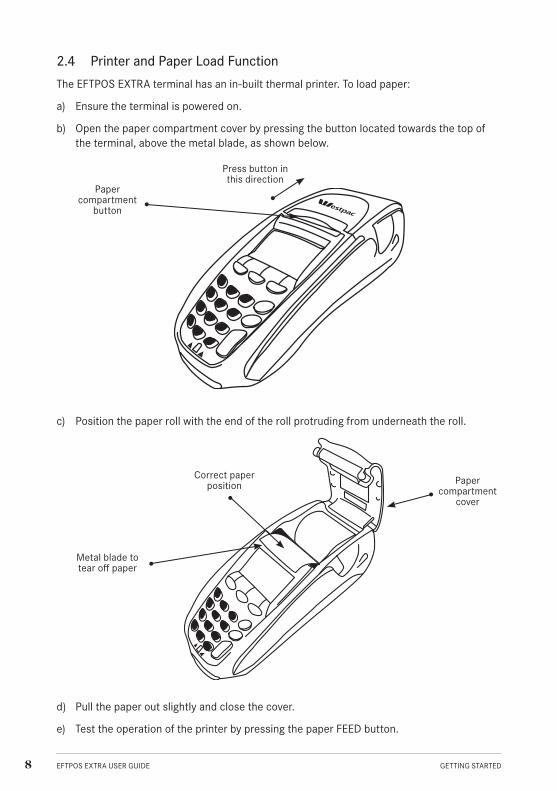
2.4 Printer and Paper Load Function
The EFTPOS EXTRA terminal has an in-built thermal printer. To load paper:
a) Ensure the terminal is powered on.
b) Open the paper compartment cover by pressing the button located towards the top of the terminal, above the metal blade, as shown below.
c) Position the paper roll with the end of the roll protruding from underneath the roll.
d) Pull the paper out slightly and close the cover.
e) Test the operation of the printer by pressing the paper FEED button.
Paper compartment
button
Press button in this direction
Metal blade to tear off paper
Paper compartment
cover
Correct paper position
EFTPOS EXTRA USER GUIDE GETTING STARTED
9EFTPOS EXTRA USER GUIDE PASSWORDS AND CODES
3.0 Passwords and CodesThe following information describes the passwords and codes used in this guide.
3.1 Refund password
This password is a security measure to ensure only those personnel who are authorised by you (as the authorised signatory) can process refunds through your terminal.
You are responsible for protecting this password against unauthorised use. Do not key in your password in a manner that enables customers or unauthorised staff to observe the number.
3.2 Settlement password
This password is a general security password that allows you to restrict access to the SETTLEMENT function. Automatic settlement does not require a password.
Access to the settlement function can be limited at your discretion.
3.3 Void password
This password is a general security password that allows you to restrict access to the VOID function. Access to the void function can be limited at your discretion.
3.4 Terminal password
This password is a general security password that allows you to restrict access to the following functions:
Checkout Function (User Guide section 5.8) ●●
User Management Function ●●
– Activating/Deactivating Shift Function User Guide section 6.1) – Setting User ID’s (User Guide section 6.2) – Starting Shifts (User Guide section 6.3) – Ending shifts (User Guide section 6.4)
Tip Adjustments (User Guide section 5.6) ●●
Activating/Deactivating Tips (User Guide section 7.3.1) ●●
Locking/Unlocking the terminal (User Guide section 4.4) ●●
Training Mode (User Guide section 4.3) ●●
Access to these functions can be limited at your discretion.
Refund, Settlement, Void and Terminal passwords will have a default setting (unless nominated by you at the time of application) when you receive your terminal(s). You (as the authorised signatory) will need to contact the Westpac Helpdesk to change your password with Merchant Business Solutions. The passwords can be changed at any time by contacting Merchant Business Solutions on 1800 029 749.
10
Ensure that your password is changed regularly to prevent unauthorised use.
You are responsible for protecting this password against unauthorised use.
3.5 User Management Code
(See User Guide section 6.0).
The USER MANAGEMENT code is only used when the SHIFT feature is enabled on the terminal. Each “user” must be assigned a “user ID”. The user cannot log in or out of a shift without using the USER MANAGEMENT code. Up to 10 users IDs can be programmed into the terminal.
The User Management code is selected by the user at a time the “user ID” is being established on the terminal (generally at the start of the shift). The code is a four digit number nominated by the user.
EFTPOS EXTRA USER GUIDE PASSWORDS AND CODES
11EFTPOS EXTRA USER GUIDE PROCEDURES
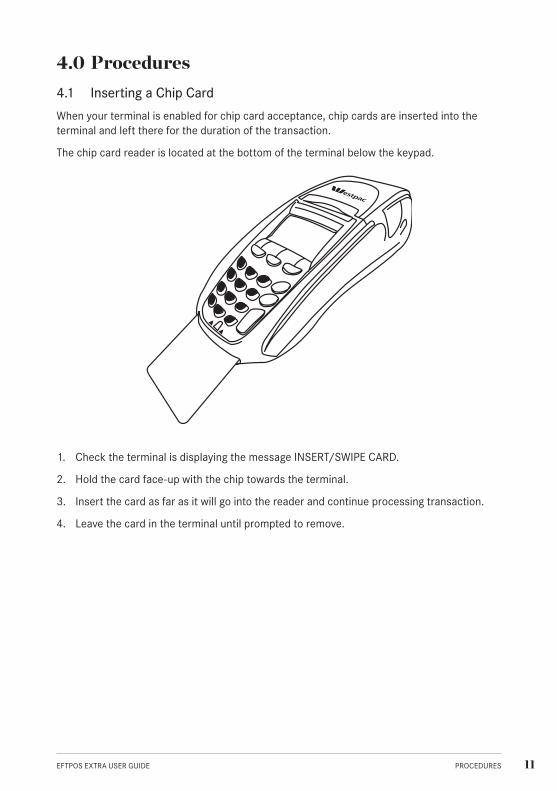
4.0 Procedures4.1 Inserting a Chip Card
When your terminal is enabled for chip card acceptance, chip cards are inserted into the terminal and left there for the duration of the transaction.
The chip card reader is located at the bottom of the terminal below the keypad.
1. Check the terminal is displaying the message INSERT/SWIPE CARD.
2. Hold the card face-up with the chip towards the terminal.
3. Insert the card as far as it will go into the reader and continue processing transaction.
4. Leave the card in the terminal until prompted to remove.
12
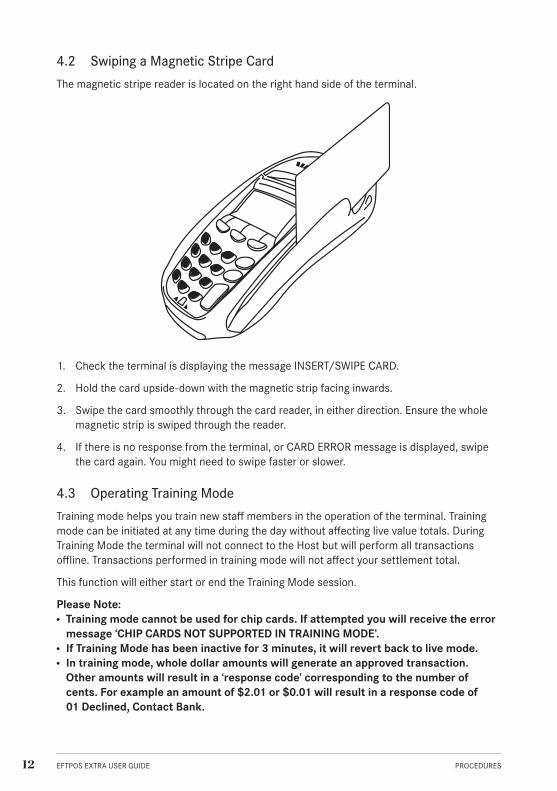
4.2 Swiping a Magnetic Stripe Card
The magnetic stripe reader is located on the right hand side of the terminal.
1. Check the terminal is displaying the message INSERT/SWIPE CARD.
2. Hold the card upside-down with the magnetic strip facing inwards.
3. Swipe the card smoothly through the card reader, in either direction. Ensure the whole magnetic strip is swiped through the reader.
4. If there is no response from the terminal, or CARD ERROR message is displayed, swipe the card again. You might need to swipe faster or slower.
4.3 Operating Training Mode
Training mode helps you train new staff members in the operation of the terminal. Training mode can be initiated at any time during the day without affecting live value totals. During Training Mode the terminal will not connect to the Host but will perform all transactions offline. Transactions performed in training mode will not affect your settlement total.
This function will either start or end the Training Mode session.
Please Note: Training mode cannot be used for chip cards. If attempted you will receive the error ●●
message ‘CHIP CARDS NOT SUPPORTED IN TRAINING MODE’.If Training Mode has been inactive for 3 minutes, it will revert back to live mode. ●●
In training mod●● e, whole dollar amounts will generate an approved transaction. Other amounts will result in a ‘response code’ corresponding to the number of cents. For example an amount of $2.01 or $0.01 will result in a response code of 01 Declined, Contact Bank.
EFTPOS EXTRA USER GUIDE PROCEDURES
13EFTPOS EXTRA USER GUIDE PROCEDURES
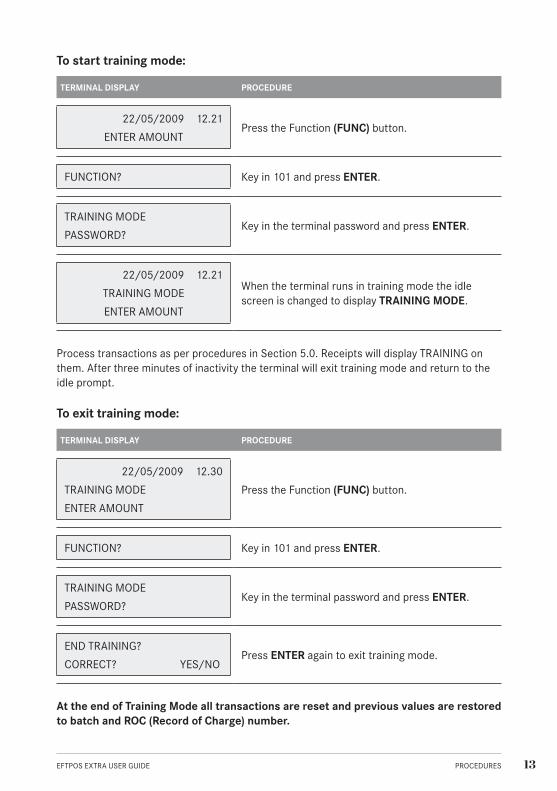
To start training mode:
TERMINAL DISPLAY PROCEDURE
22/05/2009 12.21
ENTER AMOUNTPress the Function (FUNC) button.
FUNCTION? Key in 101 and press ENTER.
TRAINING MODE
PASSWORD?Key in the terminal password and press ENTER.
22/05/2009 12.21
TRAINING MODE
ENTER AMOUNT
When the terminal runs in training mode the idle screen is changed to display TRAINING MODE.
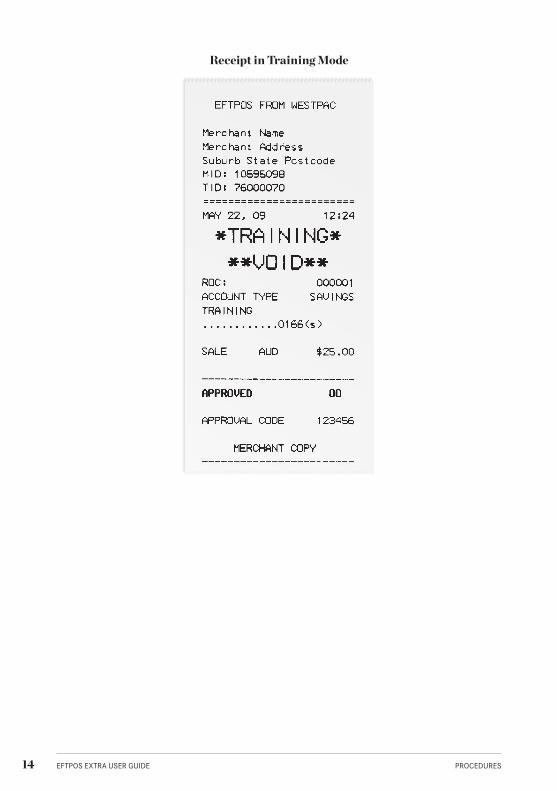
Process transactions as per procedures in Section 5.0. Receipts will display TRAINING on them. After three minutes of inactivity the terminal will exit training mode and return to the idle prompt.
To exit training mode:
TERMINAL DISPLAY PROCEDURE
22/05/2009 12.30
TRAINING MODE
ENTER AMOUNT
Press the Function (FUNC) button.
FUNCTION? Key in 101 and press ENTER.
TRAINING MODE
PASSWORD?Key in the terminal password and press ENTER.
END TRAINING?
CORRECT? YES/NOPress ENTER again to exit training mode.
At the end of Training Mode all transactions are reset and previous values are restored to batch and ROC (Record of Charge) number.
14
Receipt in Training Mode
EFTPOS EXTRA USER GUIDE PROCEDURES
15EFTPOS EXTRA USER GUIDE PROCEDURES
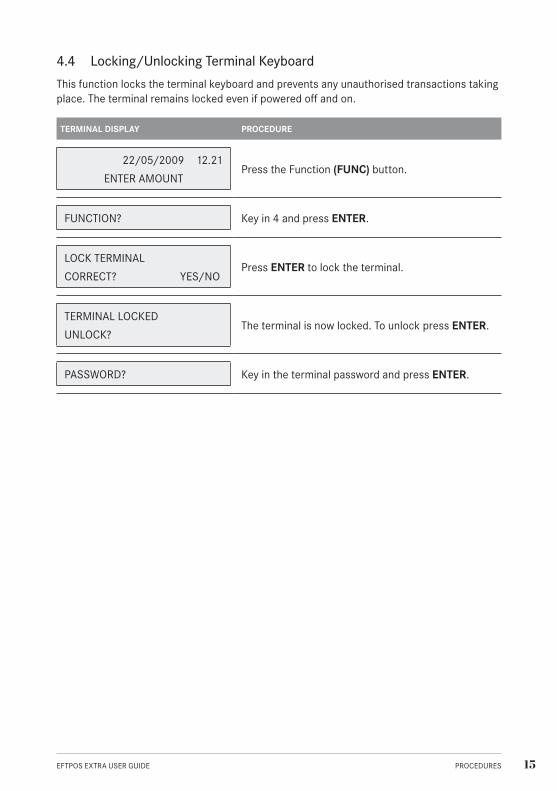
4.4 Locking/Unlocking Terminal Keyboard
This function locks the terminal keyboard and prevents any unauthorised transactions taking place. The terminal remains locked even if powered off and on.
TERMINAL DISPLAY PROCEDURE
22/05/2009 12.21
ENTER AMOUNTPress the Function (FUNC) button.
FUNCTION? Key in 4 and press ENTER.
LOCK TERMINAL
CORRECT? YES/NOPress ENTER to lock the terminal.
TERMINAL LOCKED
UNLOCK?The terminal is now locked. To unlock press ENTER.
PASSWORD? Key in the terminal password and press ENTER.
EFTPOS EXTRA USER GUIDE TRANSACTION PROCEDURES16
5.0 Transaction Procedures
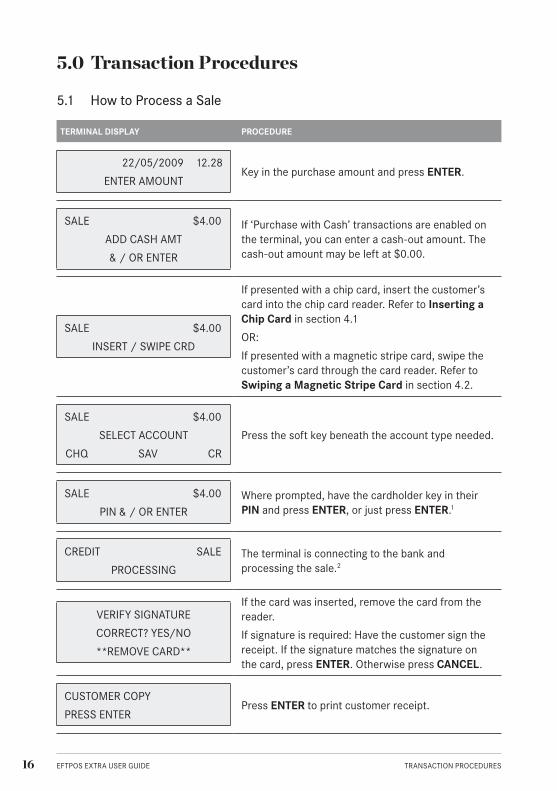
5.1 How to Process a Sale
TERMINAL DISPLAY PROCEDURE
22/05/2009 12.28
ENTER AMOUNTKey in the purchase amount and press ENTER.
SALE $4.00
ADD CASH AMT
& / OR ENTER
If ‘Purchase with Cash’ transactions are enabled on the terminal, you can enter a cash-out amount. The cash-out amount may be left at $0.00.
SALE $4.00
INSERT / SWIPE CRD
If presented with a chip card, insert the customer’s card into the chip card reader. Refer to Inserting a Chip Card in section 4.1
OR:
If presented with a magnetic stripe card, swipe the customer’s card through the card reader. Refer to Swiping a Magnetic Stripe Card in section 4.2.
SALE $4.00
SELECT ACCOUNT
CHQ SAV CR
Press the soft key beneath the account type needed.
SALE $4.00
PIN & / OR ENTERWhere prompted, have the cardholder key in their PIN and press ENTER, or just press ENTER.1
CREDIT SALE
PROCESSINGThe terminal is connecting to the bank and processing the sale.2
VERIFY SIGNATURE
CORRECT? YES/NO
**REMOVE CARD**
If the card was inserted, remove the card from the reader.
If signature is required: Have the customer sign the receipt. If the signature matches the signature on the card, press ENTER. Otherwise press CANCEL.
CUSTOMER COPY
PRESS ENTERPress ENTER to print customer receipt.
EFTPOS EXTRA USER GUIDE TRANSACTION PROCEDURES 17
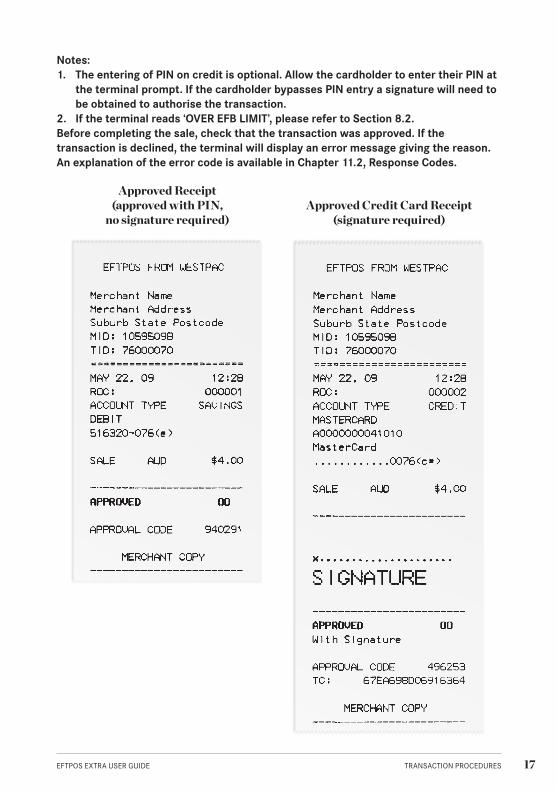
Notes:1. The entering of PIN on credit is optional. Allow the cardholder to enter their PIN at
the terminal prompt. If the cardholder bypasses PIN entry a signature will need to be obtained to authorise the transaction.
2. If the terminal reads ‘OVER EFB LIMIT’, please refer to Section 8.2.Before completing the sale, check that the transaction was approved. If the transaction is declined, the terminal will display an error message giving the reason. An explanation of the error code is available in Chapter 11.2, Response Codes.
Approved Receipt (approved with PIN,
no signature required)Approved Credit Card Receipt
(signature required)
EFTPOS EXTRA USER GUIDE TRANSACTION PROCEDURES18
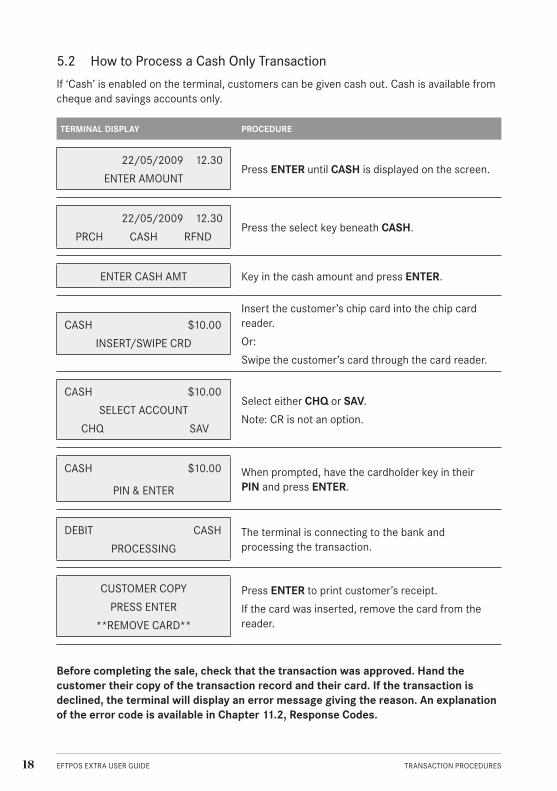
5.2 How to Process a Cash Only Transaction
If ‘Cash’ is enabled on the terminal, customers can be given cash out. Cash is available from cheque and savings accounts only.
TERMINAL DISPLAY PROCEDURE
22/05/2009 12.30
ENTER AMOUNTPress ENTER until CASH is displayed on the screen.
22/05/2009 12.30
PRCH CASH RFNDPress the select key beneath CASH.
ENTER CASH AMT Key in the cash amount and press ENTER.
CASH $10.00
INSERT/SWIPE CRD
Insert the customer’s chip card into the chip card reader.
Or:
Swipe the customer’s card through the card reader.
CASH $10.00
SELECT ACCOUNT
CHQ SAV
Select either CHQ or SAV.
Note: CR is not an option.
CASH $10.00
PIN & ENTER
When prompted, have the cardholder key in their PIN and press ENTER.
DEBIT CASH
PROCESSINGThe terminal is connecting to the bank and processing the transaction.
CUSTOMER COPY
PRESS ENTER
**REMOVE CARD**
Press ENTER to print customer’s receipt.
If the card was inserted, remove the card from the reader.
Before completing the sale, check that the transaction was approved. Hand the customer their copy of the transaction record and their card. If the transaction is declined, the terminal will display an error message giving the reason. An explanation of the error code is available in Chapter 11.2, Response Codes.
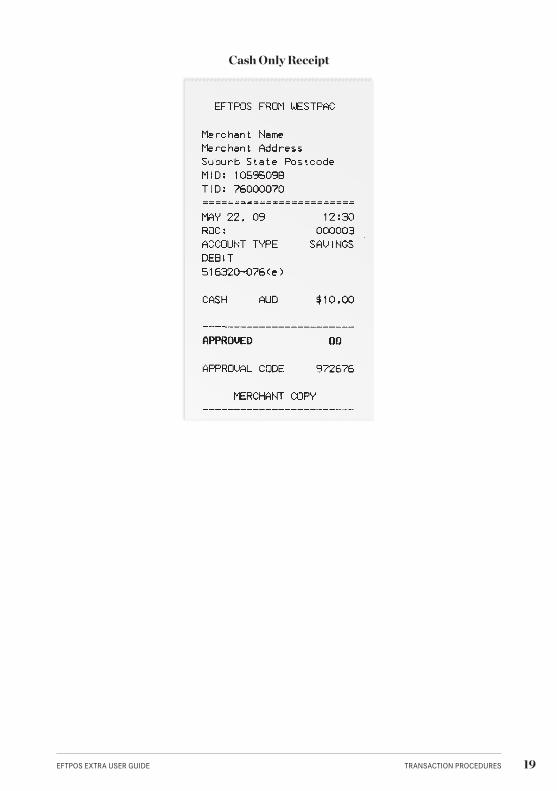
EFTPOS EXTRA USER GUIDE TRANSACTION PROCEDURES 19
Cash Only Receipt
EFTPOS EXTRA USER GUIDE TRANSACTION PROCEDURES20
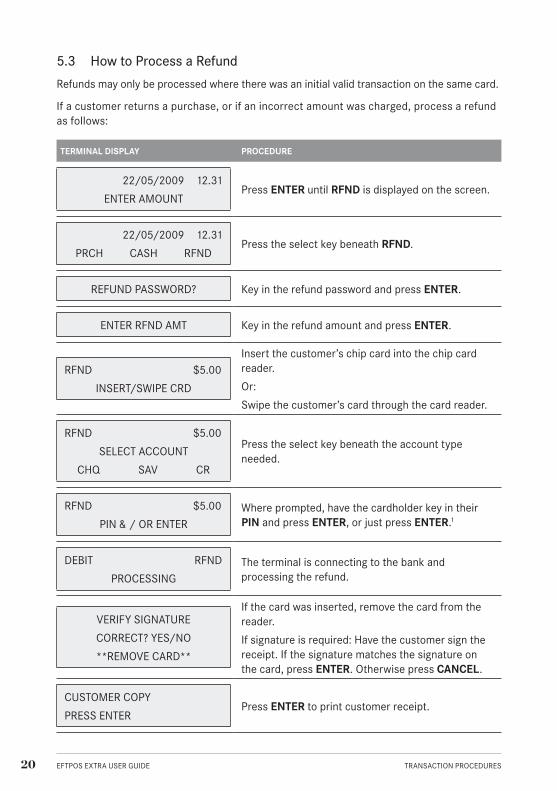
5.3 How to Process a Refund
Refunds may only be processed where there was an initial valid transaction on the same card.
If a customer returns a purchase, or if an incorrect amount was charged, process a refund as follows:
TERMINAL DISPLAY PROCEDURE
22/05/2009 12.31
ENTER AMOUNTPress ENTER until RFND is displayed on the screen.
22/05/2009 12.31
PRCH CASH RFNDPress the select key beneath RFND.
REFUND PASSWORD? Key in the refund password and press ENTER.
ENTER RFND AMT Key in the refund amount and press ENTER.
RFND $5.00
INSERT/SWIPE CRD
Insert the customer’s chip card into the chip card reader.
Or:
Swipe the customer’s card through the card reader.
RFND $5.00
SELECT ACCOUNT
CHQ SAV CR
Press the select key beneath the account type needed.
RFND $5.00
PIN & / OR ENTERWhere prompted, have the cardholder key in their PIN and press ENTER, or just press ENTER.1
DEBIT RFND
PROCESSINGThe terminal is connecting to the bank and processing the refund.
VERIFY SIGNATURE
CORRECT? YES/NO
**REMOVE CARD**
If the card was inserted, remove the card from the reader.
If signature is required: Have the customer sign the receipt. If the signature matches the signature on the card, press ENTER. Otherwise press CANCEL.
CUSTOMER COPY
PRESS ENTERPress ENTER to print customer receipt.
EFTPOS EXTRA USER GUIDE TRANSACTION PROCEDURES 21
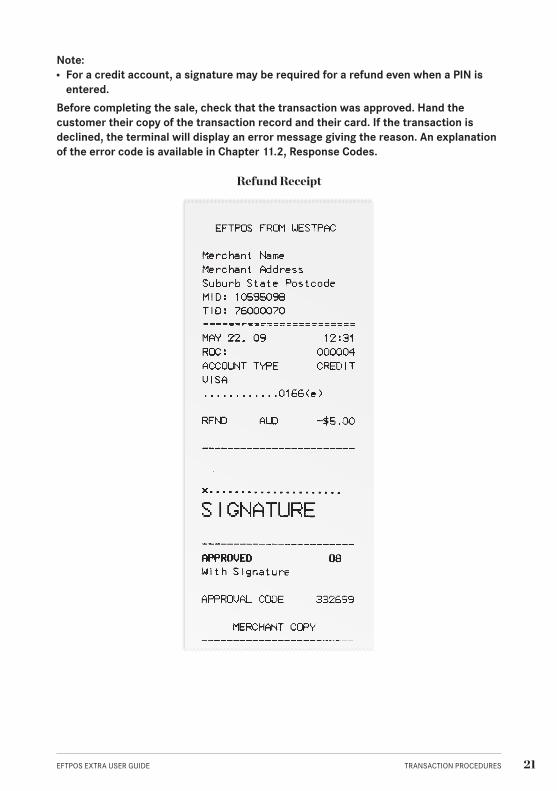
Note:For a credit account, a signature may be required for a refund even when a PIN is ●●
entered.
Before completing the sale, check that the transaction was approved. Hand the customer their copy of the transaction record and their card. If the transaction is declined, the terminal will display an error message giving the reason. An explanation of the error code is available in Chapter 11.2, Response Codes.
Refund Receipt
EFTPOS EXTRA USER GUIDE TRANSACTION PROCEDURES22
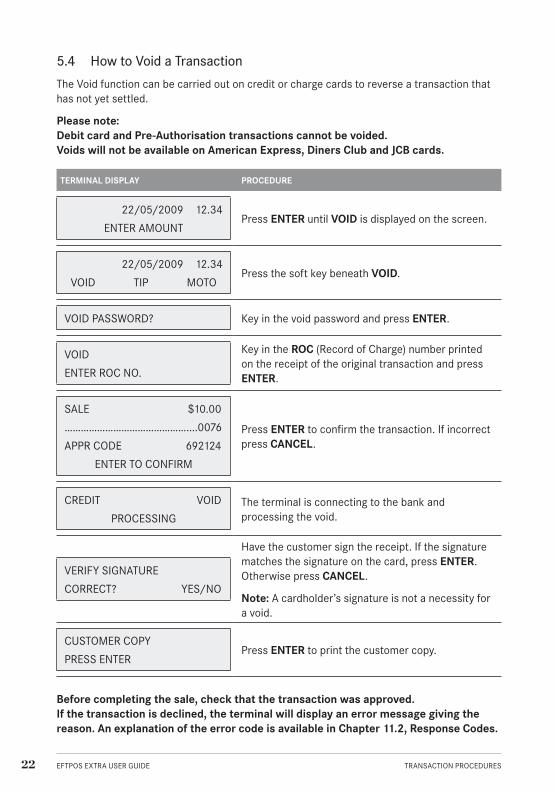
5.4 How to Void a Transaction
The Void function can be carried out on credit or charge cards to reverse a transaction that has not yet settled.
Please note: Debit card and Pre-Authorisation transactions cannot be voided.Voids will not be available on American Express, Diners Club and JCB cards.
TERMINAL DISPLAY PROCEDURE
22/05/2009 12.34
ENTER AMOUNTPress ENTER until VOID is displayed on the screen.
22/05/2009 12.34
VOID TIP MOTOPress the soft key beneath VOID.
VOID PASSWORD? Key in the void password and press ENTER.
VOID
ENTER ROC NO.
Key in the ROC (Record of Charge) number printed on the receipt of the original transaction and press ENTER.
SALE $10.00
………………………………………....0076
APPR CODE 692124
ENTER TO CONFIRM
Press ENTER to confirm the transaction. If incorrect press CANCEL.
CREDIT VOID
PROCESSINGThe terminal is connecting to the bank and processing the void.
VERIFY SIGNATURE
CORRECT? YES/NO
Have the customer sign the receipt. If the signature matches the signature on the card, press ENTER. Otherwise press CANCEL.
Note: A cardholder’s signature is not a necessity for a void.
CUSTOMER COPY
PRESS ENTERPress ENTER to print the customer copy.
Before completing the sale, check that the transaction was approved.If the transaction is declined, the terminal will display an error message giving the reason. An explanation of the error code is available in Chapter 11.2, Response Codes.
EFTPOS EXTRA USER GUIDE TRANSACTION PROCEDURES 23
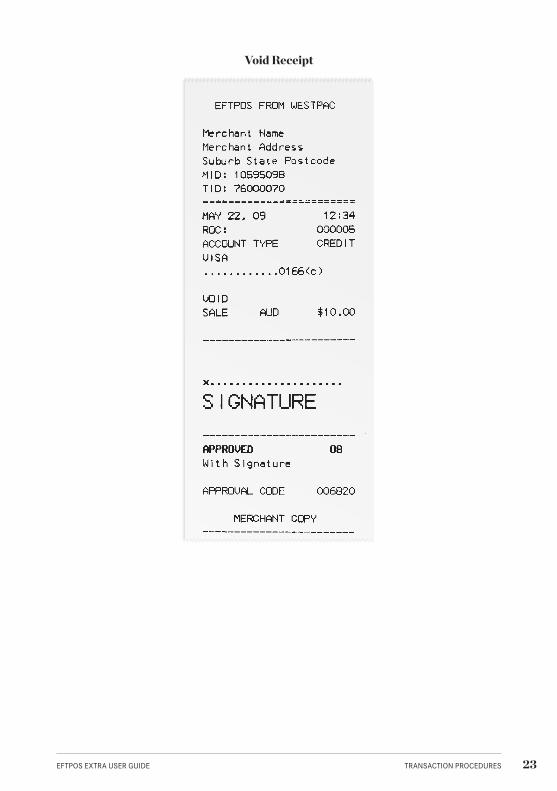
Void Receipt
EFTPOS EXTRA USER GUIDE TRANSACTION PROCEDURES24
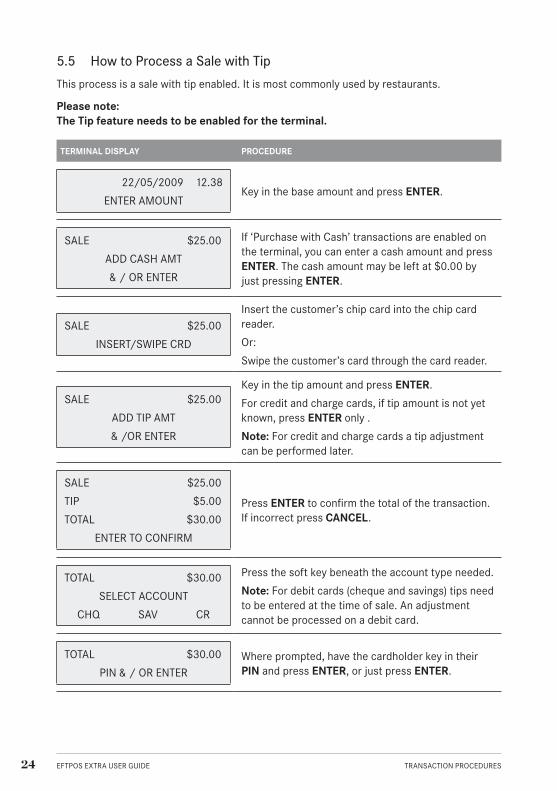
5.5 How to Process a Sale with Tip
This process is a sale with tip enabled. It is most commonly used by restaurants.
Please note: The Tip feature needs to be enabled for the terminal.
TERMINAL DISPLAY PROCEDURE
22/05/2009 12.38
ENTER AMOUNTKey in the base amount and press ENTER.
SALE $25.00
ADD CASH AMT
& / OR ENTER
If ‘Purchase with Cash’ transactions are enabled on the terminal, you can enter a cash amount and press ENTER. The cash amount may be left at $0.00 by just pressing ENTER.
SALE $25.00
INSERT/SWIPE CRD
Insert the customer’s chip card into the chip card reader.
Or:
Swipe the customer’s card through the card reader.
SALE $25.00
ADD TIP AMT
& /OR ENTER
Key in the tip amount and press ENTER.
For credit and charge cards, if tip amount is not yet known, press ENTER only .
Note: For credit and charge cards a tip adjustment can be performed later.
SALE $25.00
TIP $5.00
TOTAL $30.00
ENTER TO CONFIRM
Press ENTER to confirm the total of the transaction. If incorrect press CANCEL.
TOTAL $30.00
SELECT ACCOUNT
CHQ SAV CR
Press the soft key beneath the account type needed.
Note: For debit cards (cheque and savings) tips need to be entered at the time of sale. An adjustment cannot be processed on a debit card.
TOTAL $30.00
PIN & / OR ENTERWhere prompted, have the cardholder key in their PIN and press ENTER, or just press ENTER.
EFTPOS EXTRA USER GUIDE TRANSACTION PROCEDURES 25
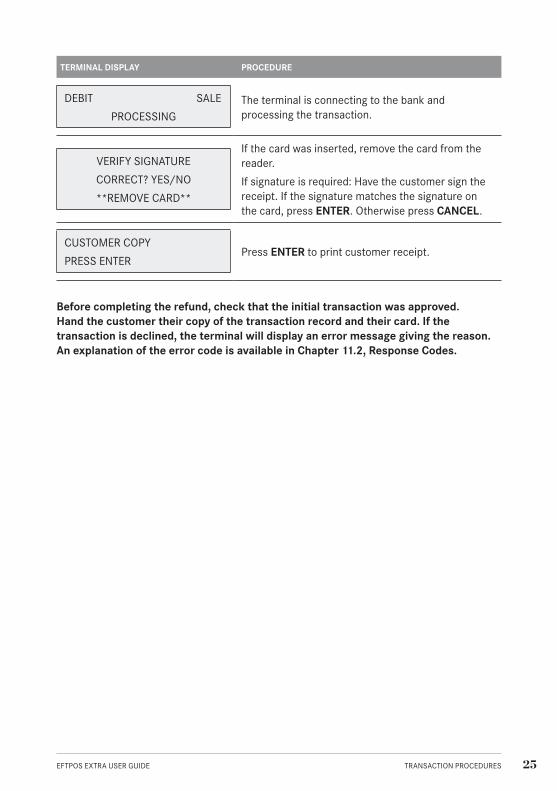
TERMINAL DISPLAY PROCEDURE
DEBIT SALE
PROCESSINGThe terminal is connecting to the bank and processing the transaction.
VERIFY SIGNATURE
CORRECT? YES/NO
**REMOVE CARD**
If the card was inserted, remove the card from the reader.
If signature is required: Have the customer sign the receipt. If the signature matches the signature on the card, press ENTER. Otherwise press CANCEL.
CUSTOMER COPY
PRESS ENTERPress ENTER to print customer receipt.
Before completing the refund, check that the initial transaction was approved.Hand the customer their copy of the transaction record and their card. If the transaction is declined, the terminal will display an error message giving the reason. An explanation of the error code is available in Chapter 11.2, Response Codes.
EFTPOS EXTRA USER GUIDE TRANSACTION PROCEDURES26
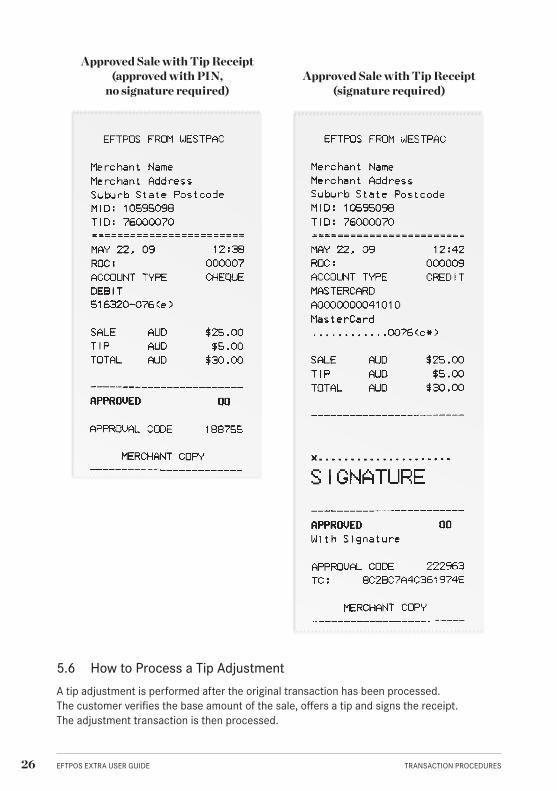
Approved Sale with Tip Receipt (approved with PIN,
no signature required)Approved Sale with Tip Receipt
(signature required)
5.6 How to Process a Tip Adjustment
A tip adjustment is performed after the original transaction has been processed. The customer verifies the base amount of the sale, offers a tip and signs the receipt. The adjustment transaction is then processed.

EFTPOS EXTRA USER GUIDE TRANSACTION PROCEDURES 27
Note:
Tip Addition applies to credit and charge cards only.●●
The original purchase must have been without a tip.●●
The original purchase must not yet have been settled.●●
When tip addition is enabled, a signature must be obtained if the receipt reads ●●
‘Approved with Signature’ or if the cardholder writes a tip addition on the receipt,. This applies even if the original purchase is approved with PIN.
Receipt for tip adjustment to be performed
EFTPOS EXTRA USER GUIDE TRANSACTION PROCEDURES28
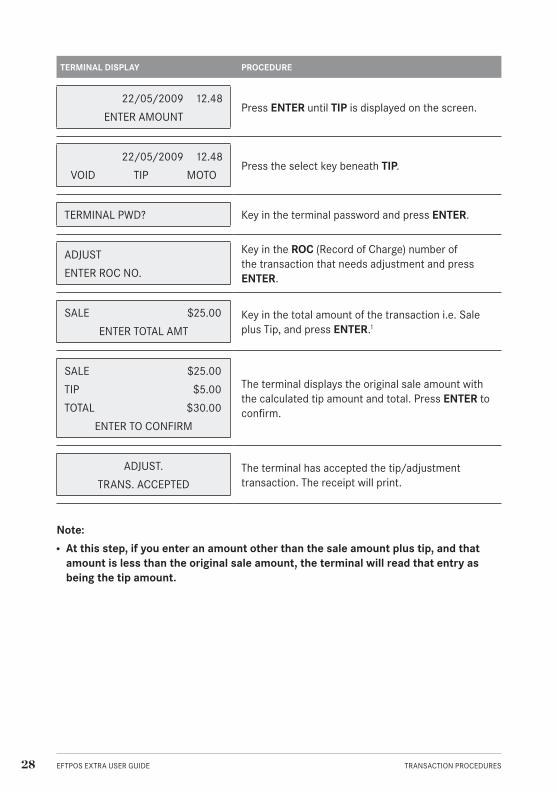
TERMINAL DISPLAY PROCEDURE
22/05/2009 12.48
ENTER AMOUNTPress ENTER until TIP is displayed on the screen.
22/05/2009 12.48
VOID TIP MOTOPress the select key beneath TIP.
TERMINAL PWD? Key in the terminal password and press ENTER.
ADJUST
ENTER ROC NO.
Key in the ROC (Record of Charge) number of the transaction that needs adjustment and press ENTER.
SALE $25.00
ENTER TOTAL AMTKey in the total amount of the transaction i.e. Sale plus Tip, and press ENTER.1
SALE $25.00
TIP $5.00
TOTAL $30.00
ENTER TO CONFIRM
The terminal displays the original sale amount with the calculated tip amount and total. Press ENTER to confirm.
ADJUST.
TRANS. ACCEPTEDThe terminal has accepted the tip/adjustment transaction. The receipt will print.
Note:
At this step, if you enter an amount other than the sale amount plus tip, and that ●●
amount is less than the original sale amount, the terminal will read that entry as being the tip amount.
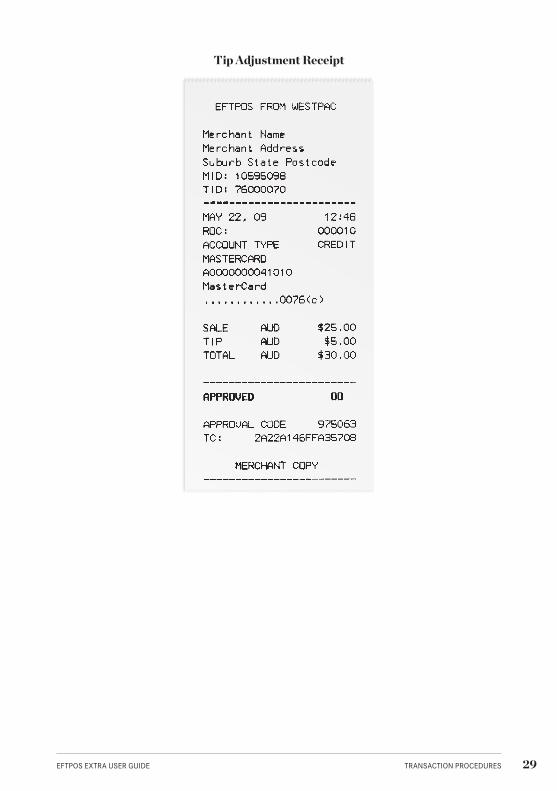
EFTPOS EXTRA USER GUIDE TRANSACTION PROCEDURES 29
Tip Adjustment Receipt
EFTPOS EXTRA USER GUIDE TRANSACTION PROCEDURES30
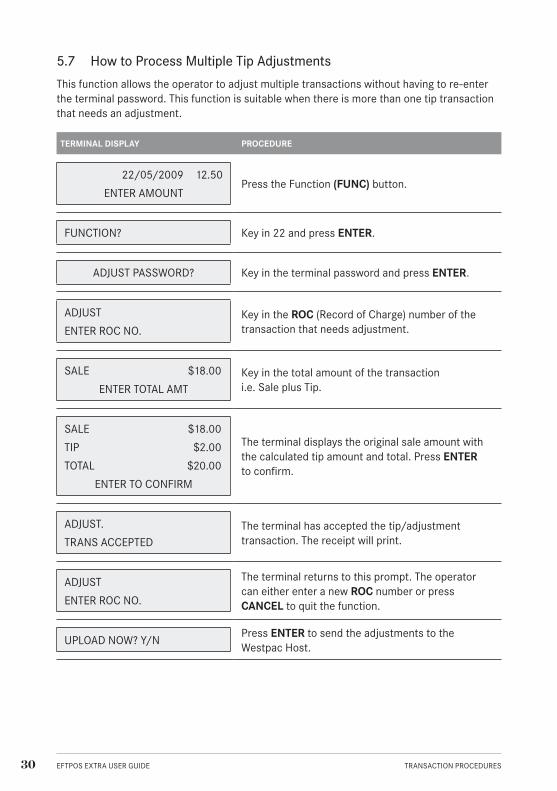
5.7 How to Process Multiple Tip Adjustments
This function allows the operator to adjust multiple transactions without having to re-enter the terminal password. This function is suitable when there is more than one tip transaction that needs an adjustment.
TERMINAL DISPLAY PROCEDURE
22/05/2009 12.50
ENTER AMOUNTPress the Function (FUNC) button.
FUNCTION? Key in 22 and press ENTER.
ADJUST PASSWORD? Key in the terminal password and press ENTER.
ADJUST
ENTER ROC NO.Key in the ROC (Record of Charge) number of the transaction that needs adjustment.
SALE $18.00
ENTER TOTAL AMTKey in the total amount of the transaction i.e. Sale plus Tip.
SALE $18.00
TIP $2.00
TOTAL $20.00
ENTER TO CONFIRM
The terminal displays the original sale amount with the calculated tip amount and total. Press ENTER to confirm.
ADJUST.
TRANS ACCEPTEDThe terminal has accepted the tip/adjustment transaction. The receipt will print.
ADJUST
ENTER ROC NO.
The terminal returns to this prompt. The operator can either enter a new ROC number or press CANCEL to quit the function.
UPLOAD NOW? Y/NPress ENTER to send the adjustments to the Westpac Host.
EFTPOS EXTRA USER GUIDE TRANSACTION PROCEDURES 31
5.8 How to Process a Mail/Telephone Order/e-Commerce transaction
Transactions initiated by mail or telephone are known as MOTO (Mail Order or Telephone Order) transactions. ECOM (Electronic Commerce) transactions are those initiated over the Internet.
MOTO and ECOM transactions can be processed on credit and charge cards only, as the cardholder is not present.
For information on how to register as a MOTO or ECOM merchant, contact Westpac’s Merchant Business Solutions on 1800 029 749.
Note:
Until registered as a MOTO/ECOM merchant you must not process MOTO or ECOM ●●
transactions.
An authorisation of a MOTO or ECOM transaction only establishes that the funds are ●●
available in the cardholder’s account and that the card has not been reported lost or stolen. It does not guarantee that the person whose name appears on the card is making the purchase or that the purchase will not be subject to chargeback.
You will be liable for all chargebacks on MOTO/ECOM transactions.●●
You must retain all merchant receipts for at least twelve months from the transaction date.
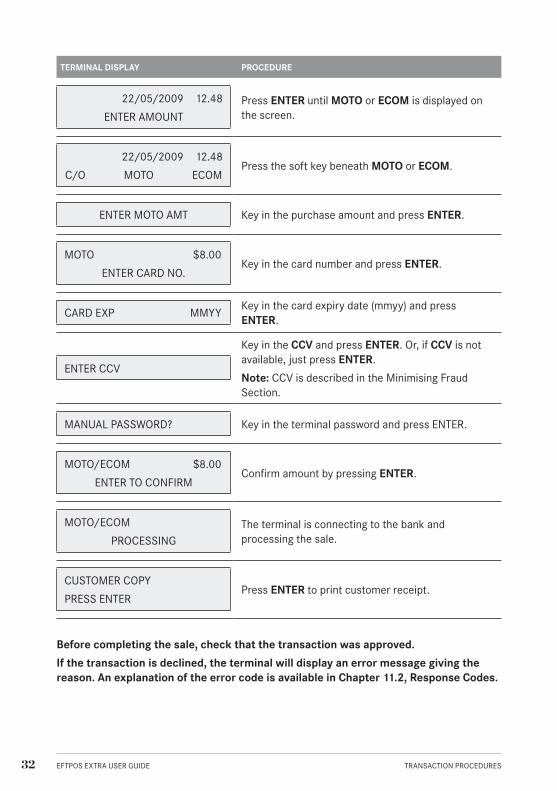
EFTPOS EXTRA USER GUIDE TRANSACTION PROCEDURES32
TERMINAL DISPLAY PROCEDURE
22/05/2009 12.48
ENTER AMOUNTPress ENTER until MOTO or ECOM is displayed on the screen.
22/05/2009 12.48
C/O MOTO ECOMPress the soft key beneath MOTO or ECOM.
ENTER MOTO AMT Key in the purchase amount and press ENTER.
MOTO $8.00
ENTER CARD NO.Key in the card number and press ENTER.
CARD EXP MMYYKey in the card expiry date (mmyy) and press ENTER.
ENTER CCV
Key in the CCV and press ENTER. Or, if CCV is not available, just press ENTER.
Note: CCV is described in the Minimising Fraud Section.
MANUAL PASSWORD? Key in the terminal password and press ENTER.
MOTO/ECOM $8.00
ENTER TO CONFIRMConfirm amount by pressing ENTER.
MOTO/ECOM
PROCESSINGThe terminal is connecting to the bank and processing the sale.
CUSTOMER COPY
PRESS ENTERPress ENTER to print customer receipt.
Before completing the sale, check that the transaction was approved.
If the transaction is declined, the terminal will display an error message giving the reason. An explanation of the error code is available in Chapter 11.2, Response Codes.

EFTPOS EXTRA USER GUIDE TRANSACTION PROCEDURES 33
Approved MOTO Receipt

EFTPOS EXTRA USER GUIDE TRANSACTION PROCEDURES34
5.9 How to Process a Pre-Authorisation
This function is used to reserve funds for a sale to be processed at a later time. Car rentals and hotels/motels most commonly use this function.
Note: Pre-Authorisation transactions can only be performed on credit cards and charge cards and only where you have been authorised to do so. Be sure to retain the receipt as it might be required to process the completion transaction known as a checkout.
TERMINAL DISPLAY PROCEDURE
22/05/2009 12.54
ENTER AMOUNTPress ENTER until AUTH is displayed on the screen.
22/05/2009 12.54
C/O AUTH ECOMPress the soft key beneath AUTH.
ENTER AUTH AMTKey in the pre-authorisation amount and press ENTER.
AUTH $40.00
INSERT/SWIPE CARD
Insert the customer’s chip card into the chip card reader.
Or:
Swipe the customer’s card through the card reader.
Or:
Key in the card number, expiry date and CCV# (if available) for manual entry.
AUTH $40.00
PIN & / OR ENTERWhere prompted, have the cardholder key in their PIN and press ENTER, or just press ENTER.
CREDIT AUTH
PROCESSINGThe terminal is connecting to the bank and processing the pre-authorisation.
VERIFY SIGNATURE
CORRECT? YES/NO
**REMOVE CARD**
If the card was inserted, remove the card from the reader.
If signature is required: Have the customer sign the receipt. If the signature matches the signature on the card, press ENTER. Otherwise press CANCEL.
CUSTOMER COPY
PRESS ENTERPress ENTER to print customer receipt.
EFTPOS EXTRA USER GUIDE TRANSACTION PROCEDURES 35
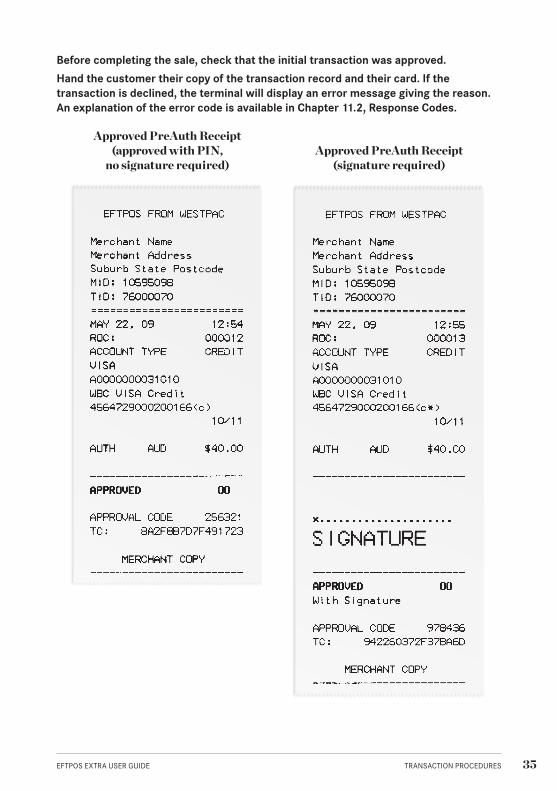
Before completing the sale, check that the initial transaction was approved.
Hand the customer their copy of the transaction record and their card. If the transaction is declined, the terminal will display an error message giving the reason. An explanation of the error code is available in Chapter 11.2, Response Codes.
Approved PreAuth Receipt (approved with PIN,
no signature required)Approved PreAuth Receipt
(signature required)
EFTPOS EXTRA USER GUIDE TRANSACTION PROCEDURES36
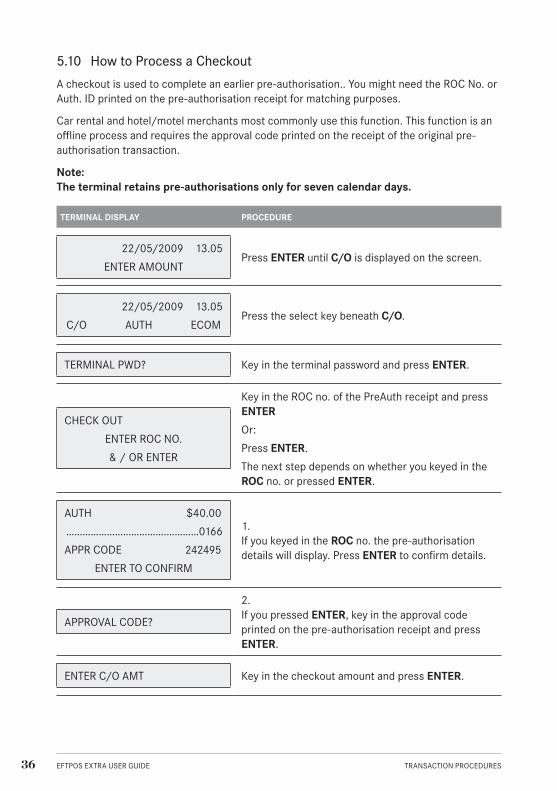
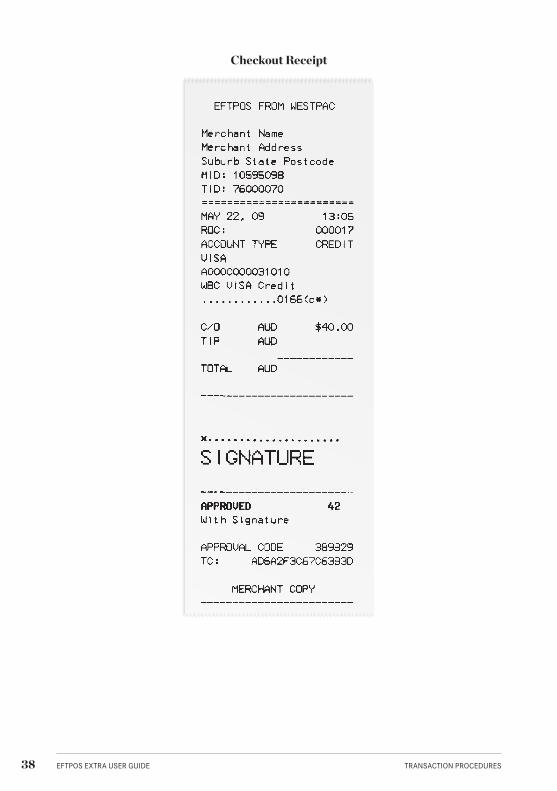
5.10 How to Process a Checkout
A checkout is used to complete an earlier pre-authorisation.. You might need the ROC No. or Auth. ID printed on the pre-authorisation receipt for matching purposes.
Car rental and hotel/motel merchants most commonly use this function. This function is an offline process and requires the approval code printed on the receipt of the original pre-authorisation transaction.
Note: The terminal retains pre-authorisations only for seven calendar days.
TERMINAL DISPLAY PROCEDURE
22/05/2009 13.05
ENTER AMOUNTPress ENTER until C/O is displayed on the screen.
22/05/2009 13.05
C/O AUTH ECOMPress the select key beneath C/O.
TERMINAL PWD? Key in the terminal password and press ENTER.
CHECK OUT
ENTER ROC NO.
& / OR ENTER
Key in the ROC no. of the PreAuth receipt and press ENTER
Or:
Press ENTER.
The next step depends on whether you keyed in the ROC no. or pressed ENTER.
AUTH $40.00
……………………………….…………0166
APPR CODE 242495
ENTER TO CONFIRM
1.If you keyed in the ROC no. the pre-authorisation details will display. Press ENTER to confirm details.
APPROVAL CODE?
2. If you pressed ENTER, key in the approval code printed on the pre-authorisation receipt and press ENTER.
ENTER C/O AMT Key in the checkout amount and press ENTER.

EFTPOS EXTRA USER GUIDE TRANSACTION PROCEDURES 37
TERMINAL DISPLAY PROCEDURE
C/O $40.00
INSERT/SWIPE CARD
If you keyed in the Approval Code this screen will appear.
Insert the customer’s chip card into the chip card reader.
Or:
Swipe the customer’s card through the card reader.
Or:
Key in the card number, expiry date and CCV# (if available) for manual entry.
C/O $40.00
ADD TIP AMT
& / OR ENTER
If your terminal is enabled for tips, this screen may appear. Key in the tip amount and press ENTER or, just press ENTER.
C/O $40.00
ENTER TO CONFIRMPress ENTER to confirm Checkout amount.
VERIFY SIGNATURE
CORRECT? YES/NO
**REMOVE CARD**
If the card was inserted, remove the card from the reader.
Have the customer sign the receipt. If the signature matches the signature on the card, press ENTER. Otherwise press CANCEL.
CUSTOMER COPY
PRESS ENTERPress ENTER to print customer receipt.
Before completing the sale, check that the initial transaction was approved.
Hand the customer their copy of the transaction record and their card. If the transaction is declined, the terminal will display an error message giving the reason. An explanation of the error code is available in Chapter 11.2, Response Codes.
EFTPOS EXTRA USER GUIDE TRANSACTION PROCEDURES38
Checkout Receipt
39EFTPOS EXTRA USER GUIDE HOW TO OPERATE USER MANAGEMENT (SHIFT) FUNCTION
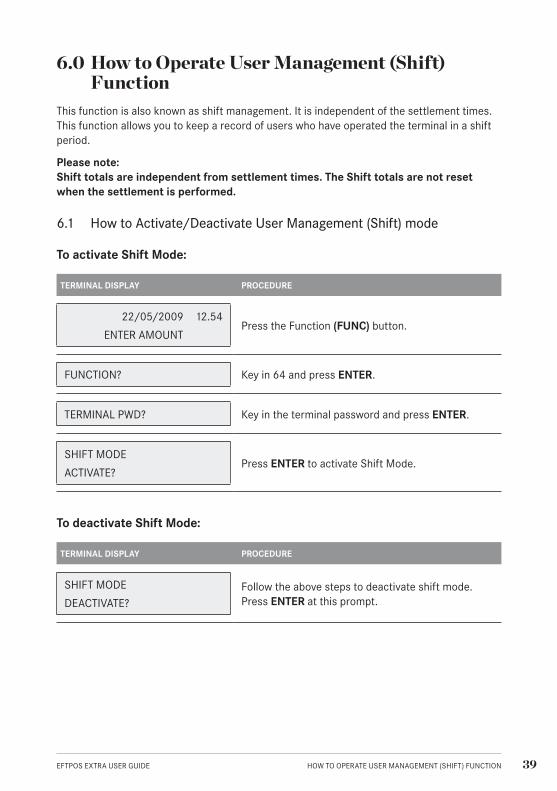
6.0 How to Operate User Management (Shift) Function
This function is also known as shift management. It is independent of the settlement times. This function allows you to keep a record of users who have operated the terminal in a shift period.
Please note: Shift totals are independent from settlement times. The Shift totals are not reset when the settlement is performed.
6.1 How to Activate/Deactivate User Management (Shift) mode
To activate Shift Mode:
TERMINAL DISPLAY PROCEDURE
22/05/2009 12.54
ENTER AMOUNTPress the Function (FUNC) button.
FUNCTION? Key in 64 and press ENTER.
TERMINAL PWD? Key in the terminal password and press ENTER.
SHIFT MODE
ACTIVATE?Press ENTER to activate Shift Mode.
To deactivate Shift Mode:
TERMINAL DISPLAY PROCEDURE
SHIFT MODE
DEACTIVATE?Follow the above steps to deactivate shift mode. Press ENTER at this prompt.
40 EFTPOS EXTRA USER GUIDE HOW TO OPERATE USER MANAGEMENT (SHIFT) FUNCTION
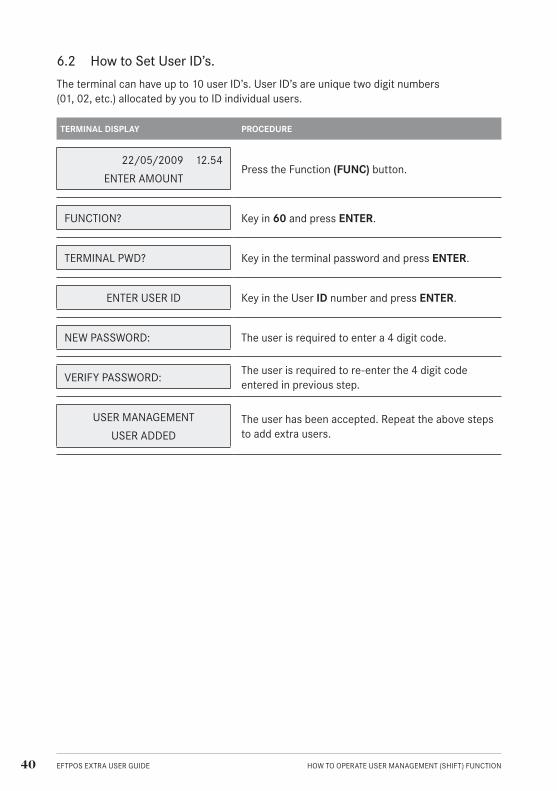
6.2 How to Set User ID’s.
The terminal can have up to 10 user ID’s. User ID’s are unique two digit numbers (01, 02, etc.) allocated by you to ID individual users.
TERMINAL DISPLAY PROCEDURE
22/05/2009 12.54
ENTER AMOUNTPress the Function (FUNC) button.
FUNCTION? Key in 60 and press ENTER.
TERMINAL PWD? Key in the terminal password and press ENTER.
ENTER USER ID Key in the User ID number and press ENTER.
NEW PASSWORD: The user is required to enter a 4 digit code.
VERIFY PASSWORD:The user is required to re-enter the 4 digit code entered in previous step.
USER MANAGEMENT
USER ADDEDThe user has been accepted. Repeat the above steps to add extra users.
41EFTPOS EXTRA USER GUIDE HOW TO OPERATE USER MANAGEMENT (SHIFT) FUNCTION
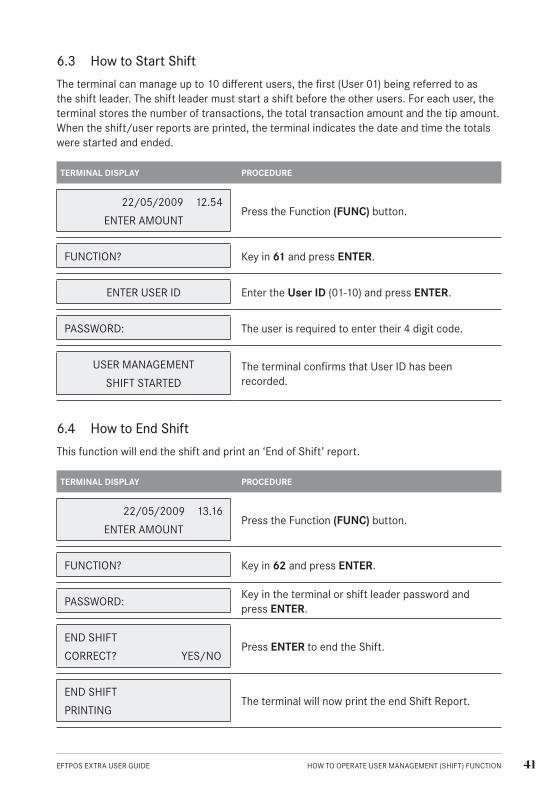
6.3 How to Start Shift
The terminal can manage up to 10 different users, the first (User 01) being referred to as the shift leader. The shift leader must start a shift before the other users. For each user, the terminal stores the number of transactions, the total transaction amount and the tip amount. When the shift/user reports are printed, the terminal indicates the date and time the totals were started and ended.
TERMINAL DISPLAY PROCEDURE
22/05/2009 12.54
ENTER AMOUNTPress the Function (FUNC) button.
FUNCTION? Key in 61 and press ENTER.
ENTER USER ID Enter the User ID (01-10) and press ENTER.
PASSWORD: The user is required to enter their 4 digit code.
USER MANAGEMENT
SHIFT STARTEDThe terminal confirms that User ID has been recorded.
6.4 How to End Shift
This function will end the shift and print an ‘End of Shift’ report.
TERMINAL DISPLAY PROCEDURE
22/05/2009 13.16
ENTER AMOUNTPress the Function (FUNC) button.
FUNCTION? Key in 62 and press ENTER.
PASSWORD:Key in the terminal or shift leader password and press ENTER.
END SHIFT
CORRECT? YES/NOPress ENTER to end the Shift.
END SHIFT
PRINTINGThe terminal will now print the end Shift Report.
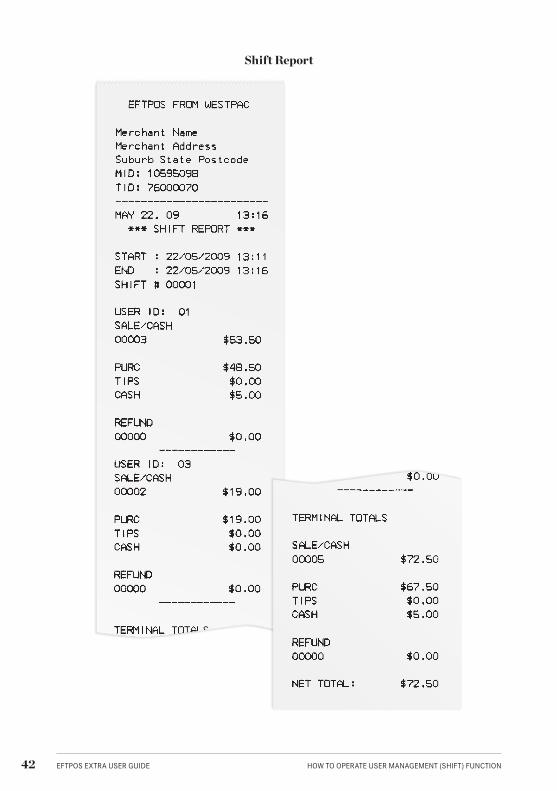
42 EFTPOS EXTRA USER GUIDE HOW TO OPERATE USER MANAGEMENT (SHIFT) FUNCTION
Shift Report
43EFTPOS EXTRA USER GUIDE REPORTING FUNCTIONS
7.0 Reporting Functions7.1 How to Print Sub Totals Report
This function will print a report of all transactions performed since the last settlement, without resetting the totals in the terminal.
TERMINAL DISPLAY PROCEDURE
22/05/2009 13.06
ENTER AMOUNTPress ENTER until SUB is displayed on the screen.
22/05/2009 13.06
INIT SUB SETLPress the select key directly beneath SUB.
SUB TOTALS
PLEASE WAITThe terminal is printing the totals of sales, refunds and cash outs since the last terminal settlement.
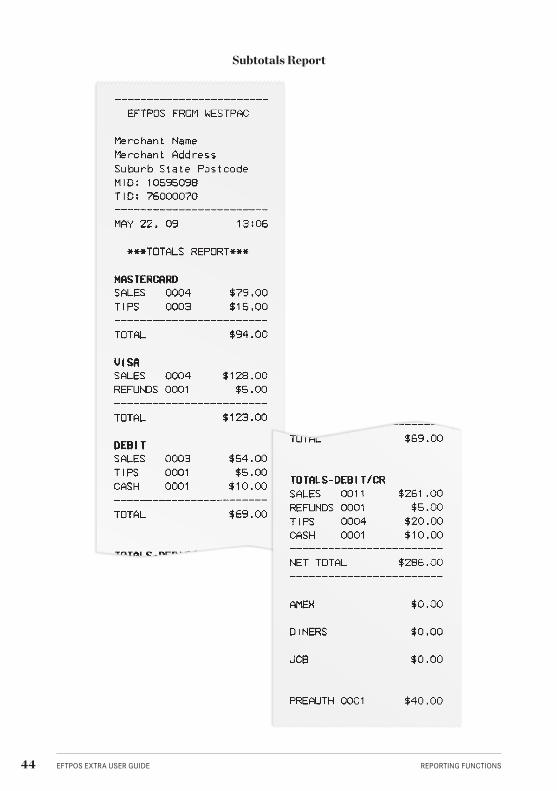
44 EFTPOS EXTRA USER GUIDE REPORTING FUNCTIONS
Subtotals Report
45EFTPOS EXTRA USER GUIDE REPORTING FUNCTIONS
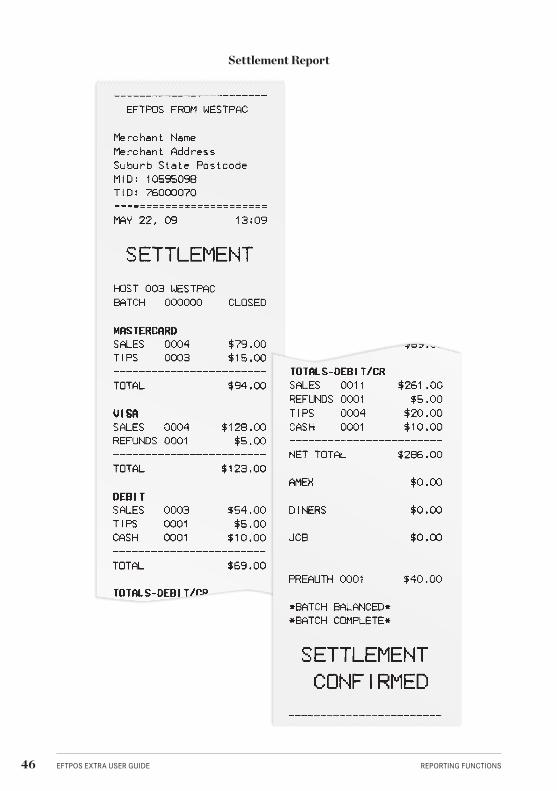
7.2 Terminal Settlement
Settlement for the EFTPOS EXTRA device can occur via a programmed terminal settlement (automatic settlement) or a manual settlement. Failure to perform a settlement may result in split deposits for settlements.
The terminal must be powered on for settlement to occur at the programmed time. Manual settlement will require the operator to enter the terminal settlement password for settlement to occur.
Note: A settlement can only be performed once in a 24-hour period. You cannot settle between 9.30pm and 11.00pm (Sydney time).
To process a manual settlement:
TERMINAL DISPLAY PROCEDURE
22/05/2009 13.09
ENTER AMOUNTPress ENTER until SETL is displayed on the screen.
22/05/2009 13.09
WESTPAC
INIT SUB SETL
Press the select key directly beneath SETL.
SETTLEMENT PWD? Key in the settlement password and press ENTER.
BATCH UPLOAD
PLEASE WAITThe terminal will connect to the host to settle all transactions processed in current batch period.
46 EFTPOS EXTRA USER GUIDE REPORTING FUNCTIONS
Settlement Report
47EFTPOS EXTRA USER GUIDE REPORTING FUNCTIONS
7.3 How to Reprint Last Settlement
This function will reprint the last settlement which has occurred.
TERMINAL DISPLAY PROCEDURE
22/05/2009 13.09
ENTER AMOUNTPress the Function (FUNC) button.
FUNCTION? Key in 70 and press ENTER.
PRINTING
PLEASE WAITThis prompt is displayed as the report is printing.
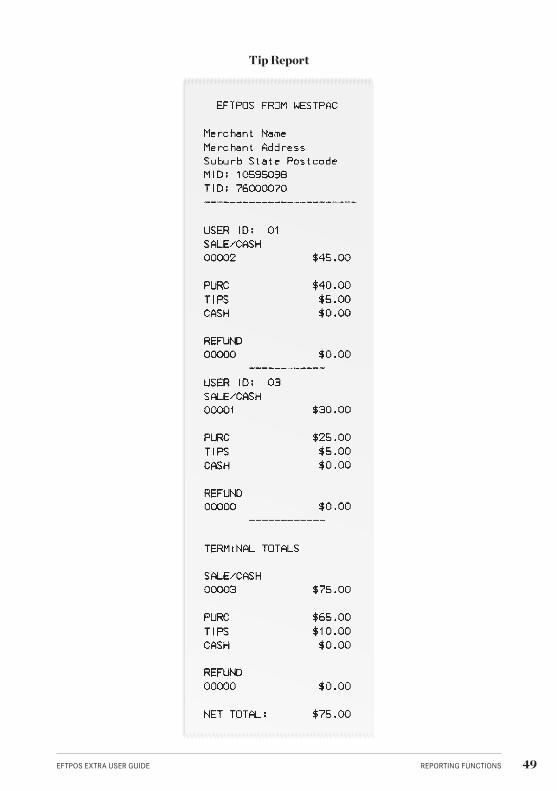
7.4 Tip Reporting
This function is used to print information relating to tips processed in the settlement period. The terminal can be loaded with 10 users, meaning that a user can have a USER ID ranging from 01 to 10. Once tip reporting is enabled it will stay active until it is switched off. The terminal can be settled without having to start the tip reporting function again.
Please note: Tip reporting cannot be activated whilst shift mode is activated. See Section 6.0.
To Activate Tip Reporting Function (This needs to be done before the trading period commences.)
TERMINAL DISPLAY PROCEDURE
22/05/2009 12.24
ENTER AMOUNTPress the Function (FUNC) button.
FUNCTION? Key in 57 and press ENTER.
TERMINAL PWD? Key in the terminal password and press ENTER.
TIP REPORT
ACTIVATE?Press ENTER to activate tip report.
48 EFTPOS EXTRA USER GUIDE REPORTING FUNCTIONS
To Deactivate Tip Report Function
TERMINAL DISPLAY PROCEDURE
TIP REPORT
DEACTIVATE?
To deactivate the tip report, follow the above steps.
Press ENTER to deactivate the tip report.
7.5 How to Print Tip Report
Once the Tip Report function has been activated, the report can be printed many times during the settlement period. Once the terminal settles, the tip report will be reset.
Please note: The tip report can only be printed from current settlement period.
TERMINAL DISPLAY PROCEDURE
22/05/2009 13.06
ENTER AMOUNTPress the Function (FUNC) button.
FUNCTION? Key in 58 and press ENTER.
PRINTING
PLEASE WAITThe terminal is printing the Tip report.
49EFTPOS EXTRA USER GUIDE REPORTING FUNCTIONS
Tip Report
50 EFTPOS EXTRA USER GUIDE REPORTING FUNCTIONS
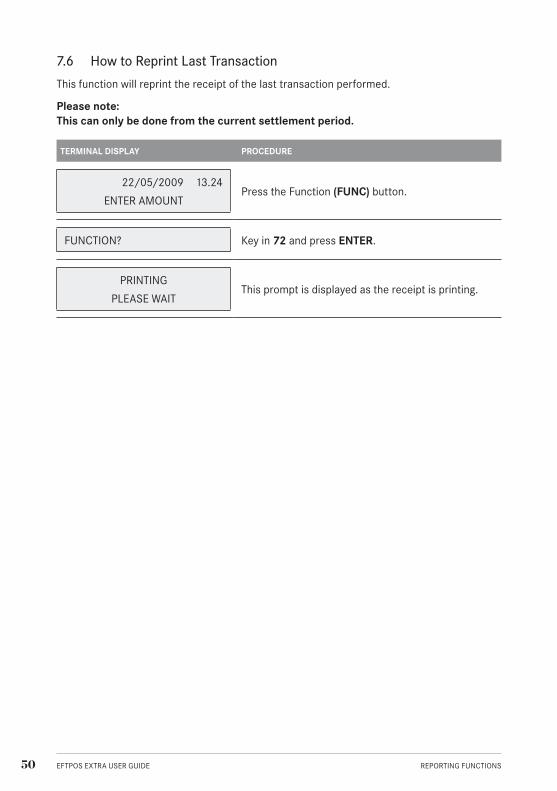
7.6 How to Reprint Last Transaction
This function will reprint the receipt of the last transaction performed.
Please note: This can only be done from the current settlement period.
TERMINAL DISPLAY PROCEDURE
22/05/2009 13.24
ENTER AMOUNTPress the Function (FUNC) button.
FUNCTION? Key in 72 and press ENTER.
PRINTING
PLEASE WAITThis prompt is displayed as the receipt is printing.
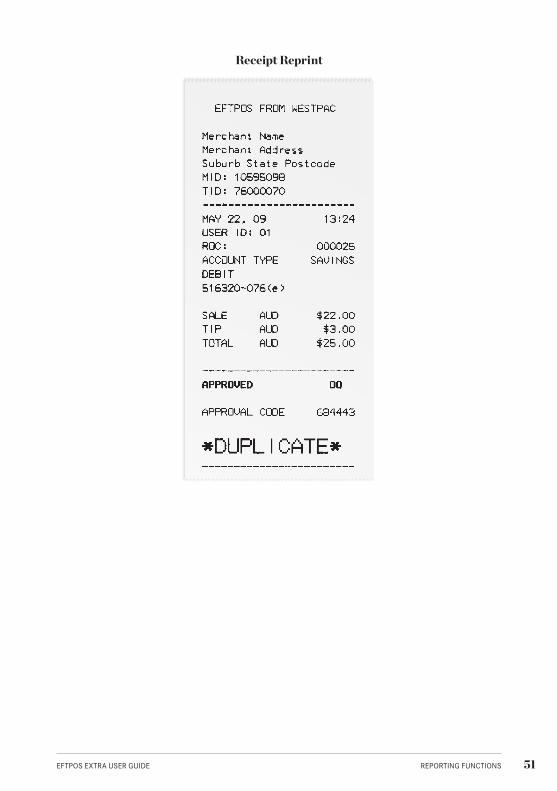
51EFTPOS EXTRA USER GUIDE REPORTING FUNCTIONS
Receipt Reprint
52 EFTPOS EXTRA USER GUIDE REPORTING FUNCTIONS
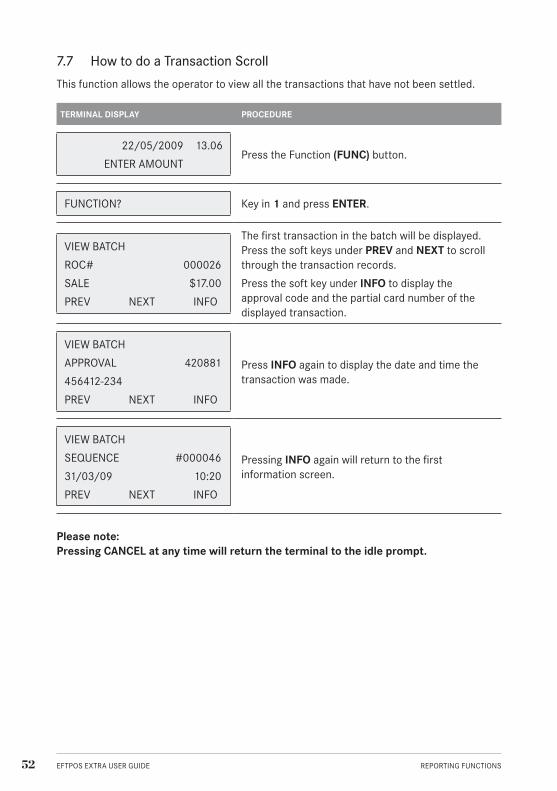
7.7 How to do a Transaction Scroll
This function allows the operator to view all the transactions that have not been settled.
TERMINAL DISPLAY PROCEDURE
22/05/2009 13.06
ENTER AMOUNTPress the Function (FUNC) button.
FUNCTION? Key in 1 and press ENTER.
VIEW BATCH
ROC# 000026
SALE $17.00
PREV NEXT INFO
The first transaction in the batch will be displayed. Press the soft keys under PREV and NEXT to scroll through the transaction records.
Press the soft key under INFO to display the approval code and the partial card number of the displayed transaction.
VIEW BATCH
APPROVAL 420881
456412-234
PREV NEXT INFO
Press INFO again to display the date and time the transaction was made.
VIEW BATCH
SEQUENCE #000046
31/03/09 10:20
PREV NEXT INFO
Pressing INFO again will return to the first information screen.
Please note: Pressing CANCEL at any time will return the terminal to the idle prompt.
53EFTPOS EXTRA USER GUIDE REPORTING FUNCTIONS
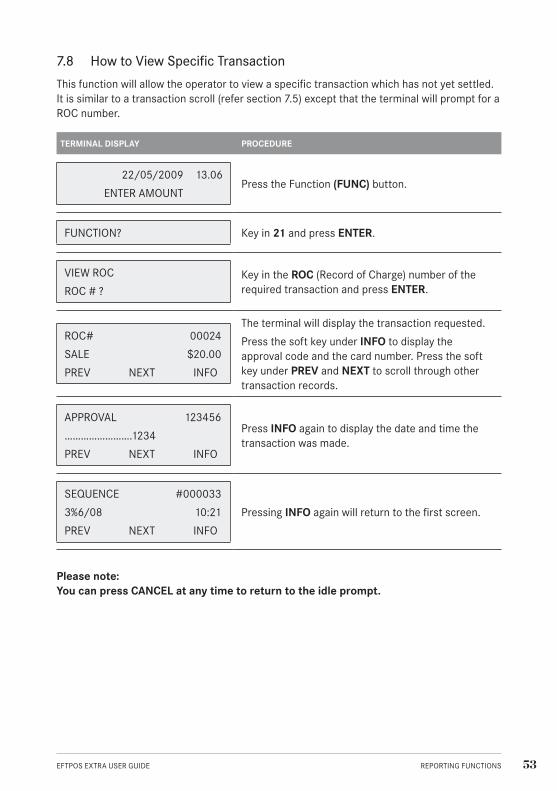
7.8 How to View Specific Transaction
This function will allow the operator to view a specific transaction which has not yet settled. It is similar to a transaction scroll (refer section 7.5) except that the terminal will prompt for a ROC number.
TERMINAL DISPLAY PROCEDURE
22/05/2009 13.06
ENTER AMOUNTPress the Function (FUNC) button.
FUNCTION? Key in 21 and press ENTER.
VIEW ROC
ROC # ?Key in the ROC (Record of Charge) number of the required transaction and press ENTER.
ROC# 00024
SALE $20.00
PREV NEXT INFO
The terminal will display the transaction requested.
Press the soft key under INFO to display the approval code and the card number. Press the soft key under PREV and NEXT to scroll through other transaction records.
APPROVAL 123456
…………………….1234
PREV NEXT INFO
Press INFO again to display the date and time the transaction was made.
SEQUENCE #000033
30/06/08 10:21
PREV NEXT INFO
Pressing INFO again will return to the first screen.
Please note: You can press CANCEL at any time to return to the idle prompt.
54 EFTPOS EXTRA USER GUIDE REPORTING FUNCTIONS
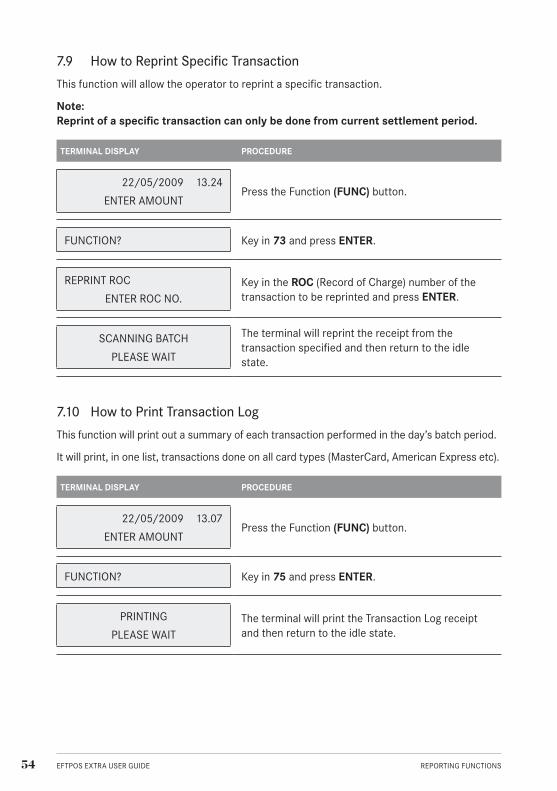
7.9 How to Reprint Specific Transaction
This function will allow the operator to reprint a specific transaction.
Note: Reprint of a specific transaction can only be done from current settlement period.
TERMINAL DISPLAY PROCEDURE
22/05/2009 13.24
ENTER AMOUNTPress the Function (FUNC) button.
FUNCTION? Key in 73 and press ENTER.
REPRINT ROC
ENTER ROC NO.Key in the ROC (Record of Charge) number of the transaction to be reprinted and press ENTER.
SCANNING BATCH
PLEASE WAIT
The terminal will reprint the receipt from the transaction specified and then return to the idle state.
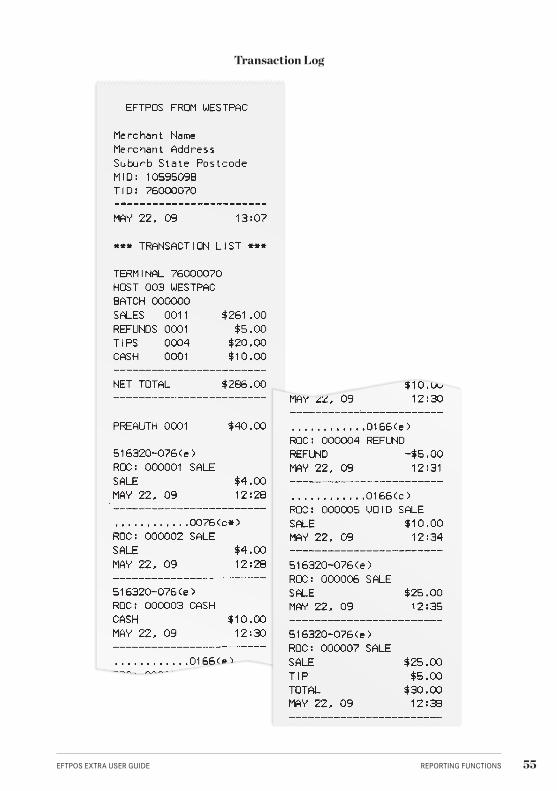
7.10 How to Print Transaction Log
This function will print out a summary of each transaction performed in the day’s batch period.
It will print, in one list, transactions done on all card types (MasterCard, American Express etc).
TERMINAL DISPLAY PROCEDURE
22/05/2009 13.07
ENTER AMOUNTPress the Function (FUNC) button.
FUNCTION? Key in 75 and press ENTER.
PRINTING
PLEASE WAITThe terminal will print the Transaction Log receipt and then return to the idle state.
55EFTPOS EXTRA USER GUIDE REPORTING FUNCTIONS
Transaction Log
56 EFTPOS EXTRA USER GUIDE FALL BACK SALES PROCEDURES
8.0 Fall Back Sales Procedures8.1 Electronic Fall Back
The Electronic Fall Back (EFB) facility is available only when enabled on the terminal, and only for certain card types.
Electronic Fall Back is the ability to continue performing transactions on the terminal, even when communication with the Westpac host system for on-line approval has been lost or the Issuer is unavailable. In EFB mode transactions are stored within the terminal and manual vouchers are not required. After communication has been restored, the terminal forwards the stored transactions to Westpac for processing.
Your Merchant Letter of Offer contains your debit and credit floor limits.
You are reminded that you must not “split” a sale in order to avoid obtaining authorisation.
When processing in EFB Mode some differences apply to normal ‘on-line’ processing:
For credit card transactions that are over your Credit card floor limit, you will be required ●●
to enter an authorisation number which you can obtain by calling 132 415. Alternatively ask your customer for an alternative means of payment.
Signature capture is required on all EFB transactions regardless of the account selection or ●●
whether PIN was entered.. The terminal will process the transaction in accordance with the EFB floor limits and other validation settings.
Cheque/Savings account transactions exceeding your floor debit card floor limit will be ●●
declined. Ask your customer for an alternate means of payment
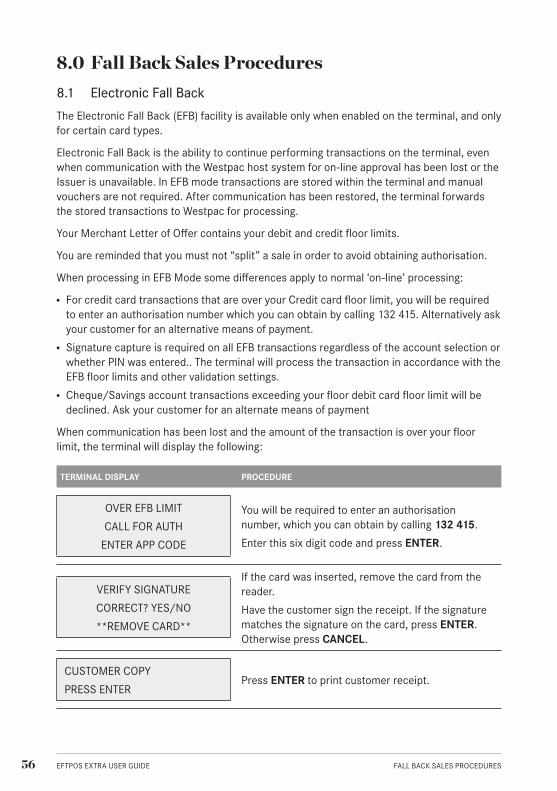
When communication has been lost and the amount of the transaction is over your floor limit, the terminal will display the following:
TERMINAL DISPLAY PROCEDURE
OVER EFB LIMIT
CALL FOR AUTH
ENTER APP CODE
You will be required to enter an authorisation number, which you can obtain by calling 132 415.
Enter this six digit code and press ENTER.
VERIFY SIGNATURE
CORRECT? YES/NO
**REMOVE CARD**
If the card was inserted, remove the card from the reader.
Have the customer sign the receipt. If the signature matches the signature on the card, press ENTER. Otherwise press CANCEL.
CUSTOMER COPY
PRESS ENTERPress ENTER to print customer receipt.
57EFTPOS EXTRA USER GUIDE FALL BACK SALES PROCEDURES
8.2 Manual Fall Back
The EFTPOS EXTRA terminal supplied to you is very reliable and Westpac is committed to ensuring its smooth operation is maintained. Any problems should be promptly reported to our helpdesk.
If your terminal fails to function correctly you may revert to manual fallback.
Before Performing a Downtime Transaction:
For credit cards, if the transaction is over your Floor Limit, call 132 415 for authorisation.
If you are unsure of your Floor Limit for credit cards please refer to your Letter of Offer or check your recent merchant statement.
For debit cards, if the transaction is over your Floor Limit find an alternate means of payment. If you are unsure of your Floor Limit for debit cards please refer to your Letter of Offer or check your recent merchant statement.
Minimum Requirements:
You must complete all sales details on the voucher. The completed voucher must be signed by the customer and the signature compared with that appearing on the reverse of the card. If the signature does not match or you are in any doubt as to the authenticity of the cardholder, another form of payment should be sought. You must check the ‘to’ and ‘from’ dates to ensure the card has not expired. You must ensure the card is presented and imprinted.
Banking:
The completed downtime vouchers, together with an EFTPOS Merchant Summary voucher must be deposited with Westpac in the grey envelope for debit cards and in the blue envelope for credit cards on the first available business day. You must retain copies of all vouchers for 12 months. Vouchers can be charged back for late deposits.
If you require any additional information, please contact Merchant Business Solutions on 1800 029 749.
58
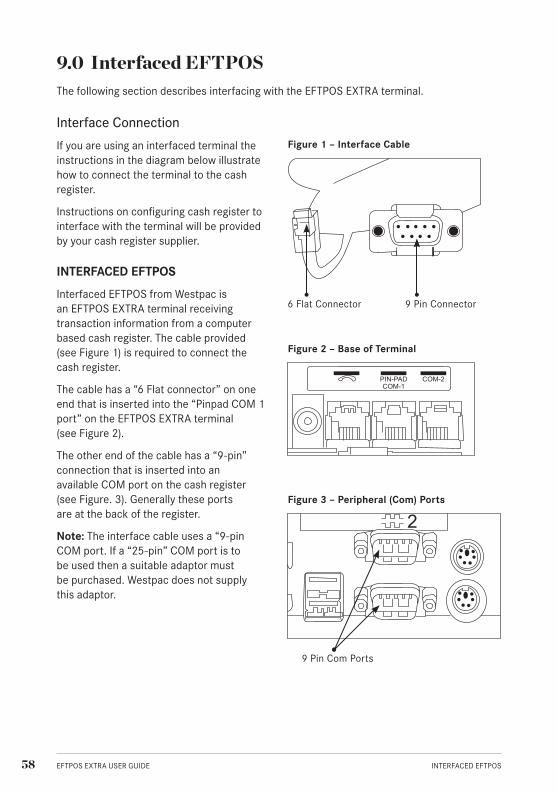
9.0 Interfaced EFTPOSThe following section describes interfacing with the EFTPOS EXTRA terminal.
Interface Connection
If you are using an interfaced terminal the instructions in the diagram below illustrate how to connect the terminal to the cash register.
Instructions on configuring cash register to interface with the terminal will be provided by your cash register supplier.
INTERFACED EFTPOS
Interfaced EFTPOS from Westpac is an EFTPOS EXTRA terminal receiving transaction information from a computer based cash register. The cable provided (see Figure 1) is required to connect the cash register.
The cable has a “6 Flat connector” on one end that is inserted into the “Pinpad COM 1 port” on the EFTPOS EXTRA terminal (see Figure 2).
The other end of the cable has a “9-pin” connection that is inserted into an available COM port on the cash register (see Figure. 3). Generally these ports are at the back of the register.
Note: The interface cable uses a “9-pin COM port. If a “25-pin” COM port is to be used then a suitable adaptor must be purchased. Westpac does not supply this adaptor.
EFTPOS EXTRA USER GUIDE INTERFACED EFTPOS
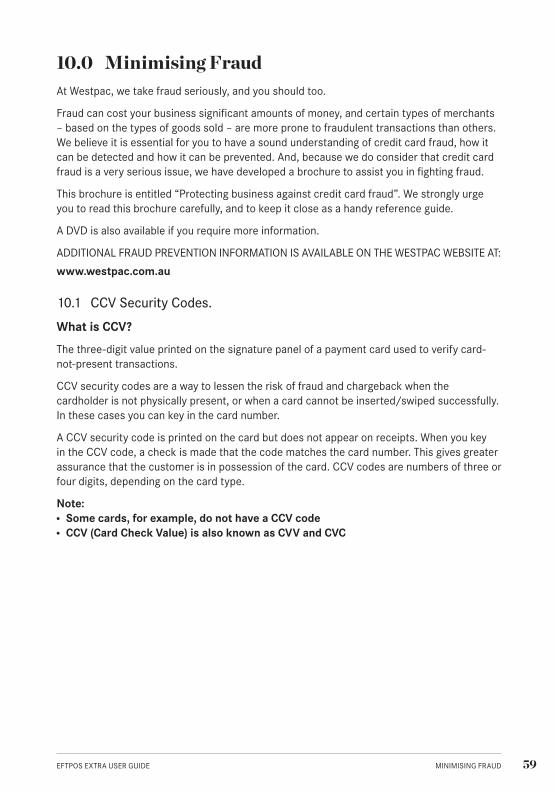
Figure 2 – Base of Terminal
PIN-PADCOM-1
COM-2
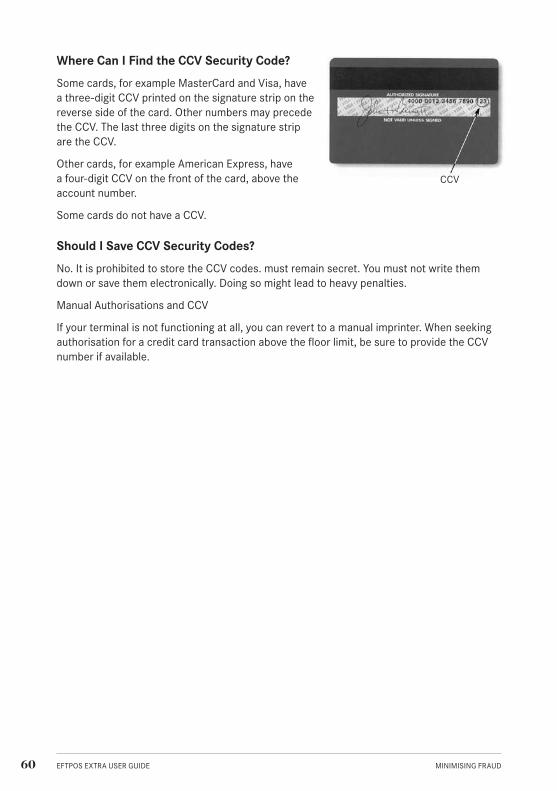
2Figure 3 – Peripheral (Com) Ports
9 Pin Com Ports
PIN-PADCOM-1
COM-2
2
Figure 1 – Interface Cable
6 Flat Connector 9 Pin Connector
PIN-PADCOM-1
COM-2
2
59EFTPOS EXTRA USER GUIDE MINIMISING FRAUD
10.0 Minimising FraudAt Westpac, we take fraud seriously, and you should too.
Fraud can cost your business significant amounts of money, and certain types of merchants – based on the types of goods sold – are more prone to fraudulent transactions than others. We believe it is essential for you to have a sound understanding of credit card fraud, how it can be detected and how it can be prevented. And, because we do consider that credit card fraud is a very serious issue, we have developed a brochure to assist you in fighting fraud.
This brochure is entitled “Protecting business against credit card fraud”. We strongly urge you to read this brochure carefully, and to keep it close as a handy reference guide.
A DVD is also available if you require more information.
ADDITIONAL FRAUD PREVENTION INFORMATION IS AVAILABLE ON THE WESTPAC WEBSITE AT:
www.westpac.com.au
10.1 CCV Security Codes.
What is CCV?
The three-digit value printed on the signature panel of a payment card used to verify card-not-present transactions.
CCV security codes are a way to lessen the risk of fraud and chargeback when the cardholder is not physically present, or when a card cannot be inserted/swiped successfully. In these cases you can key in the card number.
A CCV security code is printed on the card but does not appear on receipts. When you key in the CCV code, a check is made that the code matches the card number. This gives greater assurance that the customer is in possession of the card. CCV codes are numbers of three or four digits, depending on the card type.
Note: Some cards, for example, do not have a CCV code●●
CCV (Card Check Value) is also known as CVV and CVC●●
60 EFTPOS EXTRA USER GUIDE MINIMISING FRAUD
Where Can I Find the CCV Security Code?
Some cards, for example MasterCard and Visa, have a three-digit CCV printed on the signature strip on the reverse side of the card. Other numbers may precede the CCV. The last three digits on the signature strip are the CCV.
Other cards, for example American Express, have a four-digit CCV on the front of the card, above the account number.
Some cards do not have a CCV.
Should I Save CCV Security Codes?
No. It is prohibited to store the CCV codes. must remain secret. You must not write them down or save them electronically. Doing so might lead to heavy penalties.
Manual Authorisations and CCV
If your terminal is not functioning at all, you can revert to a manual imprinter. When seeking authorisation for a credit card transaction above the floor limit, be sure to provide the CCV number if available.
CCV
61EFTPOS EXTRA USER GUIDE TROUBLE SHOOTING
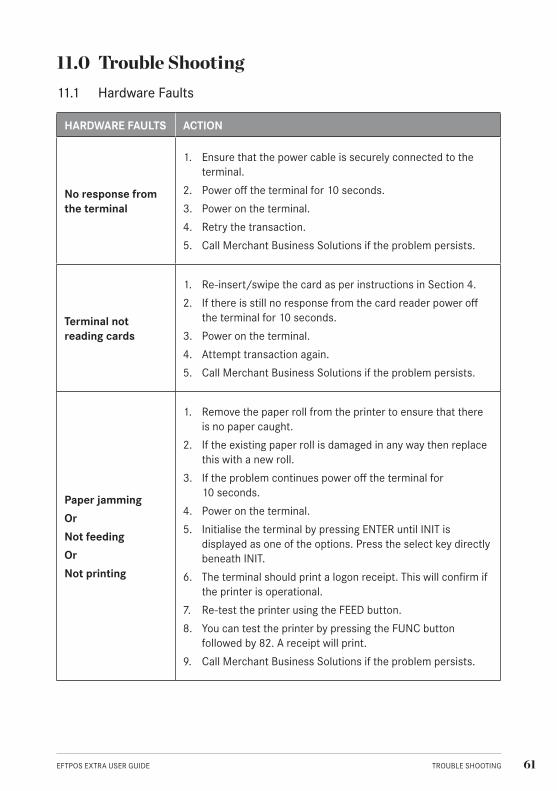
11.0 Trouble Shooting11.1 Hardware Faults
HARDWARE FAULTS ACTION
No response from the terminal
1. Ensure that the power cable is securely connected to the terminal.
2. Power off the terminal for 10 seconds.
3. Power on the terminal.
4. Retry the transaction.
5. Call Merchant Business Solutions if the problem persists.
Terminal not reading cards
1. Re-insert/swipe the card as per instructions in Section 4.
2. If there is still no response from the card reader power off the terminal for 10 seconds.
3. Power on the terminal.
4. Attempt transaction again.
5. Call Merchant Business Solutions if the problem persists.
Paper jamming
Or
Not feeding
Or
Not printing
1. Remove the paper roll from the printer to ensure that there is no paper caught.
2. If the existing paper roll is damaged in any way then replace this with a new roll.
3. If the problem continues power off the terminal for 10 seconds.
4. Power on the terminal.
5. Initialise the terminal by pressing ENTER until INIT is displayed as one of the options. Press the select key directly beneath INIT.
6. The terminal should print a logon receipt. This will confirm if the printer is operational.
7. Re-test the printer using the FEED button.
8. You can test the printer by pressing the FUNC button followed by 82. A receipt will print.
9. Call Merchant Business Solutions if the problem persists.
62 EFTPOS EXTRA USER GUIDE TROUBLE SHOOTING
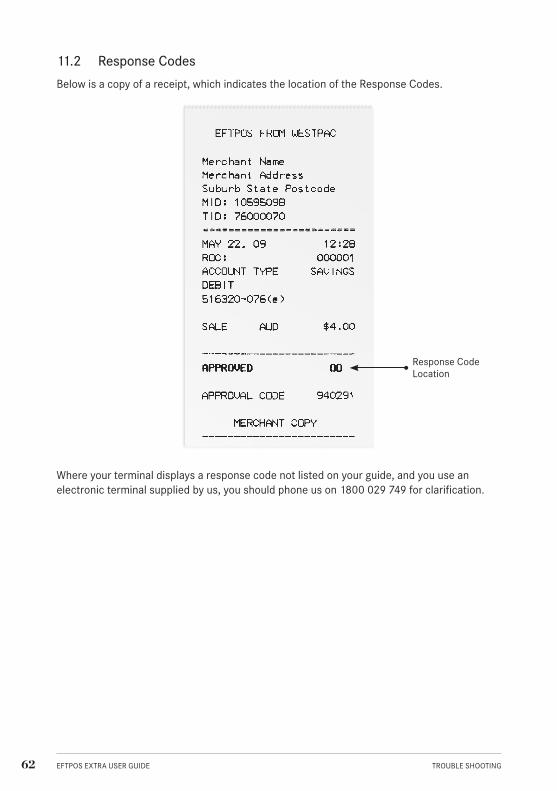
11.2 Response Codes
Below is a copy of a receipt, which indicates the location of the Response Codes.
Where your terminal displays a response code not listed on your guide, and you use an electronic terminal supplied by us, you should phone us on 1800 029 749 for clarification.
Response Code Location
63EFTPOS EXTRA USER GUIDE TROUBLE SHOOTING
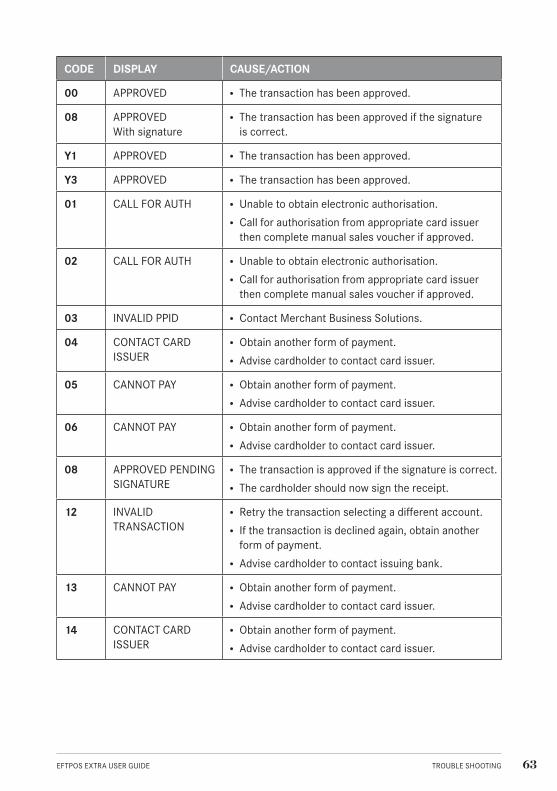
CODE DISPLAY CAUSE/ACTION
00 APPROVED The transaction has been approved.●●
08 APPROVED With signature
The transaction has been approved if the signature ●●
is correct.
Y1 APPROVED The transaction has been approved.●●
Y3 APPROVED The transaction has been approved.●●
01 CALL FOR AUTH Unable to obtain electronic authorisation.●●
Call for authorisation from appropriate card issuer ●●
then complete manual sales voucher if approved.
02 CALL FOR AUTH Unable to obtain electronic authorisation.●●
Call for authorisation from appropriate card issuer ●●
then complete manual sales voucher if approved.
03 INVALID PPID Contact Merchant Business Solutions.●●
04 CONTACT CARD ISSUER
Obtain another form of payment.●●
Advise cardholder to contact card issuer.●●
05 CANNOT PAY Obtain another form of payment.●●
Advise cardholder to contact card issuer.●●
06 CANNOT PAY Obtain another form of payment.●●
Advise cardholder to contact card issuer.●●
08 APPROVED PENDING SIGNATURE
The transaction is approved if the signature is correct.●●
The cardholder should now sign the receipt. ●●
12 INVALID TRANSACTION
Retry the transaction selecting a different account.●●
If the transaction is declined again, obtain another ●●
form of payment.
Advise cardholder to contact issuing bank.●●
13 CANNOT PAY Obtain another form of payment.●●
Advise cardholder to contact card issuer.●●
14 CONTACT CARD ISSUER
Obtain another form of payment.●●
Advise cardholder to contact card issuer.●●

64 EFTPOS EXTRA USER GUIDE TROUBLE SHOOTING
CODE DISPLAY CAUSE/ACTION
30 FORMAT ERR CALL HELPDESK
Power the terminal off and on and retry the ●●
transaction.
Contact Merchant Business Solutions whilst the ●●
cardholder is present to confirm if the transaction has been processed correctly.
39 WRONG ACCOUNT Retry the transaction, selecting a different account.●●
If the transaction is declined again, obtain another ●●
form of payment.
Advise cardholder to contact issuing bank.●●
41 CONTACT CARD ISSUER
Contact manual Credit Card Authorisations.●●
Press the option for extension 500.●●
43 CONTACT CARD ISSUER
Contact manual Credit Card Authorisations.●●
Press the option for extension 500.●●
51 CANNOT PAY Obtain another form of payment.●●
Advise cardholder to contact card issuer.●●
52 WRONG ACCOUNT Retry the transaction, selecting a different account.●●
If the transaction is declined again, obtain another ●●
form of payment.
Advise cardholder to contact issuing bank.●●
53 WRONG ACCOUNT Retry the transaction, selecting a different account.●●
If the transaction is declined again, obtain another ●●
form of payment.
Advise cardholder to contact issuing bank.●●
54 EXPIRED CARD
CANNOT PAY
Check the card expiry date.●●
Obtain another form of payment.●●
Advise cardholder to contact card issuer.●●
55 INVALID PIN The cardholder has entered the wrong PIN.●●
Retry the transaction with the correct PIN.●●
56 CONTACT CARD ISSUER
Obtain another form of payment.●●
Advise cardholder to contact card issuer.●●
58 INVALID TRANSACTION
Obtain another form of payment.●●
Advise cardholder to contact card issuer.●●
65EFTPOS EXTRA USER GUIDE TROUBLE SHOOTING
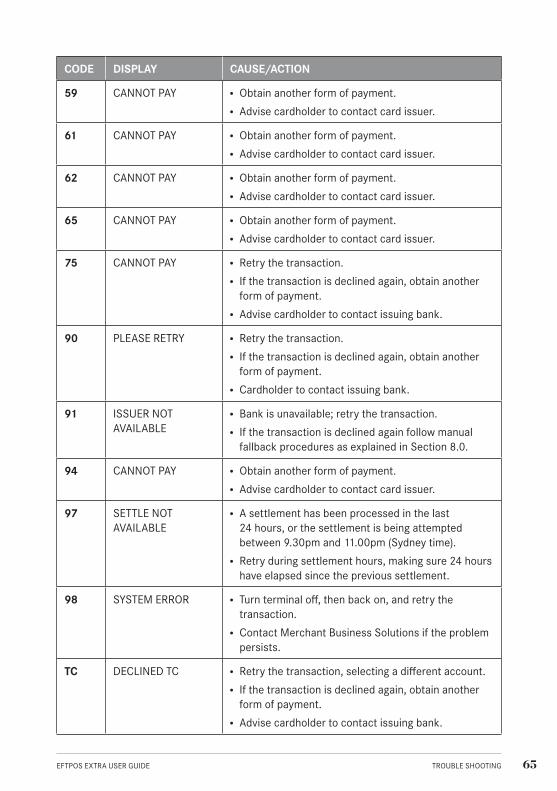
CODE DISPLAY CAUSE/ACTION
59 CANNOT PAY Obtain another form of payment.●●
Advise cardholder to contact card issuer.●●
61 CANNOT PAY Obtain another form of payment.●●
Advise cardholder to contact card issuer.●●
62 CANNOT PAY Obtain another form of payment.●●
Advise cardholder to contact card issuer.●●
65 CANNOT PAY Obtain another form of payment.●●
Advise cardholder to contact card issuer.●●
75 CANNOT PAY Retry the transaction.●●
If the transaction is declined again, obtain another ●●
form of payment.
Advise cardholder to contact issuing bank.●●
90 PLEASE RETRY Retry the transaction.●●
If the transaction is declined again, obtain another ●●
form of payment.
Cardholder to contact issuing bank.●●
91 ISSUER NOT AVAILABLE
Bank is unavailable; retry the transaction.●●
If the transaction is declined again follow manual ●●
fallback procedures as explained in Section 8.0.
94 CANNOT PAY Obtain another form of payment.●●
Advise cardholder to contact card issuer.●●
97 SETTLE NOT AVAILABLE
A settlement has been processed in the last ●●
24 hours, or the settlement is being attempted between 9.30pm and 11.00pm (Sydney time).
Retry during settlement hours, making sure 24 hours ●●
have elapsed since the previous settlement.
98 SYSTEM ERROR Turn terminal off, then back on, and retry the ●●
transaction.
Contact Merchant Business Solutions if the problem ●●
persists.
TC DECLINED TC Retry the transaction, selecting a different account.●●
If the transaction is declined again, obtain another ●●
form of payment.
Advise cardholder to contact issuing bank.●●
66 EFTPOS EXTRA USER GUIDE TROUBLE SHOOTING
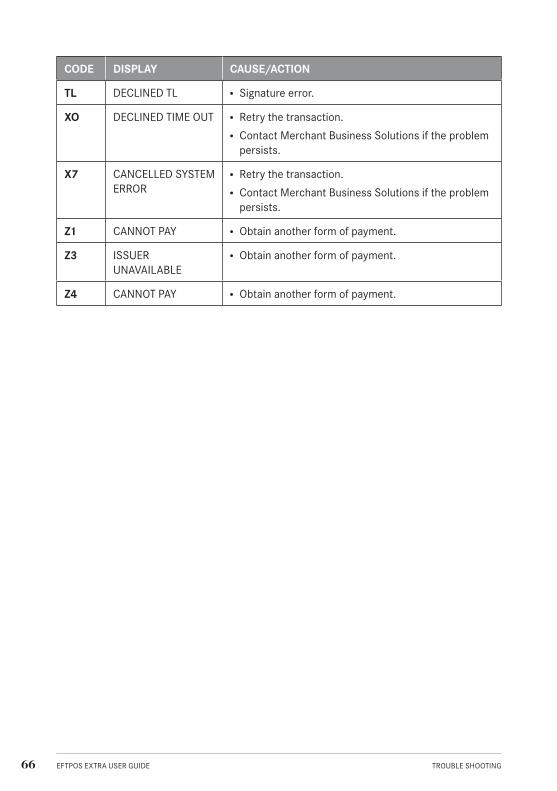
CODE DISPLAY CAUSE/ACTION
TL DECLINED TL Signature error.●●
XO DECLINED TIME OUT Retry the transaction.●●
Contact Merchant Business Solutions if the problem ●●
persists.
X7 CANCELLED SYSTEM ERROR
Retry the transaction.●●
Contact Merchant Business Solutions if the problem ●●
persists.
Z1 CANNOT PAY Obtain another form of payment.●●
Z3 ISSUER UNAVAILABLE
Obtain another form of payment.●●
Z4 CANNOT PAY Obtain another form of payment.●●
67EFTPOS EXTRA USER GUIDE GLOSSARY
12.0 GlossaryCCV Number (Card Check Value)
An additional security feature used in transactions where the card number is entered manually, for example when the cardholder is not present (MOTO or ECI).
Charge Card American Express, Diners Club or JCB card.
Credit Card MasterCard or Visa card.
Debit Card A card that gives the customer access to a cheque account or savings account. The customer must be present when accessing these account types. Details cannot be hand-keyed into an EFTPOS terminal.
Electronic Fall Back (EFB)
The ability to continue performing transactions on the terminal when communication with the Westpac system has been lost.
GSM/GPRS The wireless communications network used to connect the mobile version of the EFTPOS Advantage terminal to the Westpac system.
Manual Fall Back The use of a manual ‘click clack’ imprinter as a back-up, when an electronic terminal is not working.
Merchant ID An eight-digit number used to obtain an authorisation code for credit card transactions. This number is unique to your terminal, and can be found on any of the following:
A receipt printed on your terminal●●
Your merchant statement●●
The metal plate on your manual imprinter●●
Multi Merchant One of a number of merchants who have individual merchant agreements with Westpac and transact business through one shared terminal.
Offline Re-Entry The re-entry, from receipts, of transactions stored in a terminal that has failed, to ensure that the stored transactions are not lost.
ROC Number The ‘Record of Charge’ number found on your terminal receipt. An invoice number.
Terminal ID An eight-digit number that identifies your EFTPOS terminal. The Terminal ID can be found on a transaction report printed on your terminal.

68 EFTPOS EXTRA USER GUIDE
Notes


MBB030 (08/09) 162967
© 2009 Westpac Banking Corporation ABN 33 007 457 141.