Embed Size (px)
Citation preview

9Lesson 9: GUI HTML Editors and Mobile Web Sites Objectives By the end of this lesson, you will be able to:
2.1.10: Identify ways that a Web browser can become an application delivery platform, including strengths and weaknesses of the browser.
2.7.7: Identify the challenges of designing Web sites for mobile devices (e.g., smartphones, tablets, game consoles).
2.11.1: Evaluate a GUI HTML editor according to the W3C Authoring Tool Accessibility Guidelines.
2.11.2: Validate HTML code.
2.11.3: Use font and page appearance options in a GUI HTML editor.
2.11.4: View source code and preview Web pages in a browser.
2.11.5: Create HTML tables using a GUI HTML editor.
2.11.6: Publish (i.e., upload) Web pages and sites to a Web server.
2.11.7 Evaluate various types of HTML editors that can edit files in mobile devices and cloud services.
2.11.8 Distinguish between mobile apps and mobile Web sites.
2.21.5: Identify ways to create pages for traditional and mobile device browsers (e.g., validating code, appropriate resolutions, supported interpreters, extensive user testing).
9-2 Site Development Associate
© 2014 Certification Partners, LLC — All Rights Reserved. Version 2.1
Pre-Assessment Questions 1. Which type of editing application allows Web developers to automate tasks and
integrate other applications into workflow?
a. Page editors b. Text editors c. Site management editors d. WYSIWYG editors
2. Which of the following features of a GUI editor offers the quickest way to create a new Web page?
a. Templates and wizards b. Importing HTML pages c. Icon bars d. Table creation
3. To what extent do GUI editors generally allow developers to modify HTML code manually?
Lesson 9: GUI HTML Editors and Mobile Web Sites 9-3
© 2014 Certification Partners, LLC — All Rights Reserved. Version 2.1
Introduction to GUI HTML Editors You can create Web pages using a graphical user interface (GUI) HTML editor, also called a What You See Is What You Get (WYSIWYG) editor. These editors allow Web authors to create Web pages without typing the requisite HTML code. Many WYSIWYG editors exist, such as Adobe Dreamweaver, Microsoft Expression Web and the open-source KompoZer (www.kompozer.net).
In this lesson, you will use KompoZer as your GUI editor. KompoZer complies with W3C Web standards and creates pages as HTML 4.01 Transitional by default. However, you can create HTML5 templates to ensure the <!DOCTYPE> declaration supports HTML5. KompoZer is better used for Web page creation, not Web site management. This fact greatly simplifies the program because it focuses on the creation of one page at a time, which is similar to the way you approached HTML coding in previous lessons. When the pages are created, you can then join them using hyperlinks. KompoZer offers no comprehensive site management tools, and site management is beyond the scope of this course.
To learn about site management concepts and tools, it is recommended that you pursue the CIW Web Design Specialist course.
This lesson will examine the basic capabilities of a GUI HTML editor, including procedures for creating text styles, icon bars, inline images, hyperlinks and tables.
CIW Online Resources – Movie Clips Visit CIW Online at http://education.Certification-Partners.com/CIW to watch a movie clip about this topic.
Lesson 9: GUI HTML Editors and Mobile Web Sites
Types of GUI Editors As mentioned, there are two types of GUI editors:
• Page editors
• Site management editors
Both are WYSIWYG programs.
Page editors GUI page editors allow you to create a Web page using your mouse and a toolbar. Functionality is usually limited to creating individual Web pages. Software programs that provide only page editor functionality include:
• Virtual Mechanics WebDwarf (www.virtualmechanics.com/products/dwarf).
• Mozilla SeaMonkey (www.seamonkey-project.org).
Site management editors GUI Web site management editors provide both Web page creation and site management functionality. They allow teams of designers and developers to work in an integrated environment to design, build and manage Web site and Internet applications. In addition
What You See Is What You Get (WYSIWYG) (pronounced whiz-ee-wig) A user-friendly editing format in which the file being edited is displayed as it will appear in the browser.
NOTE: Make sure you understand that a WYSIWYG Web page editor offers a click-and-select interface and writes HTML code automatically. WYSIWYG applications are also called GUI Web page editors.
®
9-4 Site Development Associate
© 2014 Certification Partners, LLC — All Rights Reserved. Version 2.1
to creating the Web pages, team members can manage the entire Web site with this type of application, both during and after development. Site management includes task automation and workflow integration with other programs (such as Microsoft Office and Web applications) in a production environment.
Software programs that provide these functions include:
• Adobe Dreamweaver.
• Microsoft Expression Web.
In this lesson, you will use a GUI page editor to create pages similar to those you created using a text editor earlier in this course. First, however, you will learn about some of the features common to all GUI editors, and about accessibility guidelines for GUI editor applications.
GUI HTML Editor Functionality GUI HTML editors allow you to create Web pages. In most cases, you enter and edit text similar to the way you would in a word-processing application. Images, tables, links, bookmarks and so forth can be created easily because the application writes the HTML code automatically.
The following features are offered by most GUI editors:
• Templates and Wizards — allow you to create custom Web pages quickly by selecting from a series of choices.
• Text Style options — allow you to format text in different font styles, alter text size and color, and apply formats such as centering, boldface and italics. Remember that some visitors to your site may not have all the fonts installed on their systems that you want to use on your Web pages. Choose your fonts carefully, or else your page may not render as expected to some visitors.
• Icon bars — offer easily identifiable graphic icons to provide the same functions found in text-based menus.
• Image features — allow you to easily insert graphic images into a Web page.
• Hypertext Links features — allow you to create hypertext links to pages and files within your Web site, and to pages and files on the World Wide Web. Once the link has been created, the editor displays the target page.
• Import HTML Pages features — allow you to open pages from the World Wide Web and, when permissible, save them to a Web site or local file system. The editor can also import all images on a page into a Web site or file system.
• Table Creation features — allow you to add tables to arrange data or organize a page layout.
• Spelling check — Most GUI editors provide an automatic spelling checker, similar to those found in word-processing applications such as Microsoft Word and Apache OpenOffice (www.openoffice.org). However, understand that a mere spelling check cannot ensure that your Web pages project the proper message. Your page content should be edited by a knowledgeable professional who understands your organization's message and the languages your site uses.
• Publish Documents features — allow you to click a button to post pages to a Web server. These features automatically copy files from a local hard drive to a directory on an ISP's server.
NOTE: Adobe Dreamweaver is similar to Microsoft Expression Web, but Dreamweaver offers more advanced features such as layer-to-table conversion of pages.
NOTE: The GUI features listed here are general features. They may not have the same names within each GUI editor. They are listed to provide you with a general idea of the functions offered.
OBJECTIVE 2.11.5: Tables in GUI HTML editor
Lesson 9: GUI HTML Editors and Mobile Web Sites 9-5
© 2014 Certification Partners, LLC — All Rights Reserved. Version 2.1
CIW Online Resources – Online Exercise Visit CIW Online at http://education.Certification-Partners.com/CIW to complete an interactive exercise that will reinforce what you have learned about this topic.
Exercise 9-1: Reviewing the key features of a GUI editor
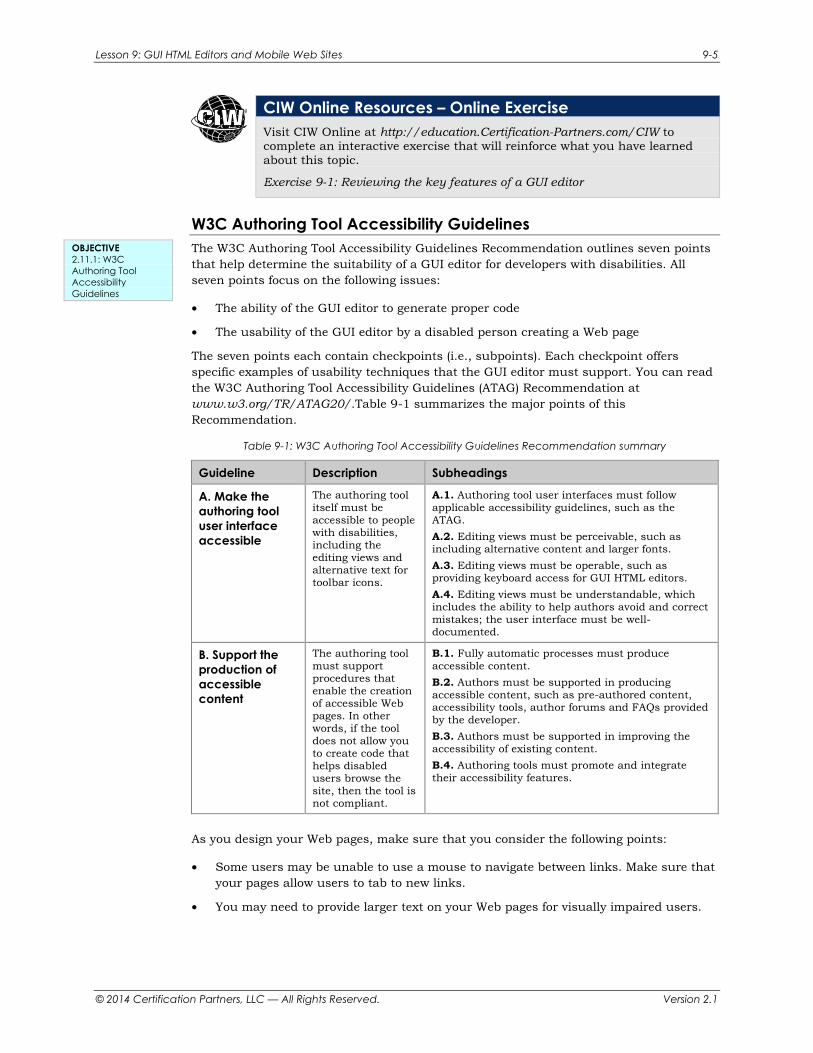
W3C Authoring Tool Accessibility Guidelines The W3C Authoring Tool Accessibility Guidelines Recommendation outlines seven points that help determine the suitability of a GUI editor for developers with disabilities. All seven points focus on the following issues:
• The ability of the GUI editor to generate proper code
• The usability of the GUI editor by a disabled person creating a Web page
The seven points each contain checkpoints (i.e., subpoints). Each checkpoint offers specific examples of usability techniques that the GUI editor must support. You can read the W3C Authoring Tool Accessibility Guidelines (ATAG) Recommendation at www.w3.org/TR/ATAG20/.Table 9-1 summarizes the major points of this Recommendation.
Table 9-1: W3C Authoring Tool Accessibility Guidelines Recommendation summary
Guideline Description Subheadings
A. Make the authoring tool user interface accessible
The authoring tool itself must be accessible to people with disabilities, including the editing views and alternative text for toolbar icons.
A.1. Authoring tool user interfaces must follow applicable accessibility guidelines, such as the ATAG.
A.2. Editing views must be perceivable, such as including alternative content and larger fonts.
A.3. Editing views must be operable, such as providing keyboard access for GUI HTML editors.
A.4. Editing views must be understandable, which includes the ability to help authors avoid and correct mistakes; the user interface must be well-documented.
B. Support the production of accessible content
The authoring tool must support procedures that enable the creation of accessible Web pages. In other words, if the tool does not allow you to create code that helps disabled users browse the site, then the tool is not compliant.
B.1. Fully automatic processes must produce accessible content.
B.2. Authors must be supported in producing accessible content, such as pre-authored content, accessibility tools, author forums and FAQs provided by the developer.
B.3. Authors must be supported in improving the accessibility of existing content.
B.4. Authoring tools must promote and integrate their accessibility features.
As you design your Web pages, make sure that you consider the following points:
• Some users may be unable to use a mouse to navigate between links. Make sure that your pages allow users to tab to new links.
• You may need to provide larger text on your Web pages for visually impaired users.
OBJECTIVE 2.11.1: W3C Authoring Tool Accessibility Guidelines
®
9-6 Site Development Associate
© 2014 Certification Partners, LLC — All Rights Reserved. Version 2.1
Creating Web Pages with a GUI Editor The labs in this lesson will familiarize you with the toolbar, menus and functions of a GUI Web page editor, KompoZer. Most of these features are similar in any GUI editor you use. However, the interface will differ among applications.
In the following series of labs, you will create a Web page with a GUI page editor. Suppose you want to apply for an internship with a technology training company. The company's internship requirements include beginning networking and HTML experience. To prove your skills, you decide to create your résumé in HTML.
Lab 9-1: Creating a Web page with a GUI editor
In this lab, you will create a Web page using the KompoZer GUI page editor with an HTML5 template. Similar to a résumé, this Web page will promote your skills to potential employers.
1. Windows Explorer: Create a folder named Promo on your Desktop.
2. Windows Explorer: Copy the C:\CIW\Site_Dev\Lab Files\Lesson09 folder to your Desktop.
3. Open the Desktop Lesson09\Lab_9-1 folder and extract the KompoZer-0.7.10-win32.zip files to a KompoZer-0.7.10-win32 folder on your Desktop.
4. Open the KompoZer-0.7.10-win32\KompoZer 0.7.10 folder and double-click kompozer.exe to open the application. Close the KompoZer Tips dialog box that appears.
5. KompoZer: You must use an HTML5 template to create an HTML5 <!DOCTYPE> declaration in KompoZer. Otherwise, it will default to an HTML 4.01 version. To perform this task, click the Open button on the toolbar (or select File | Open File). The Open HTML File dialog box will appear.
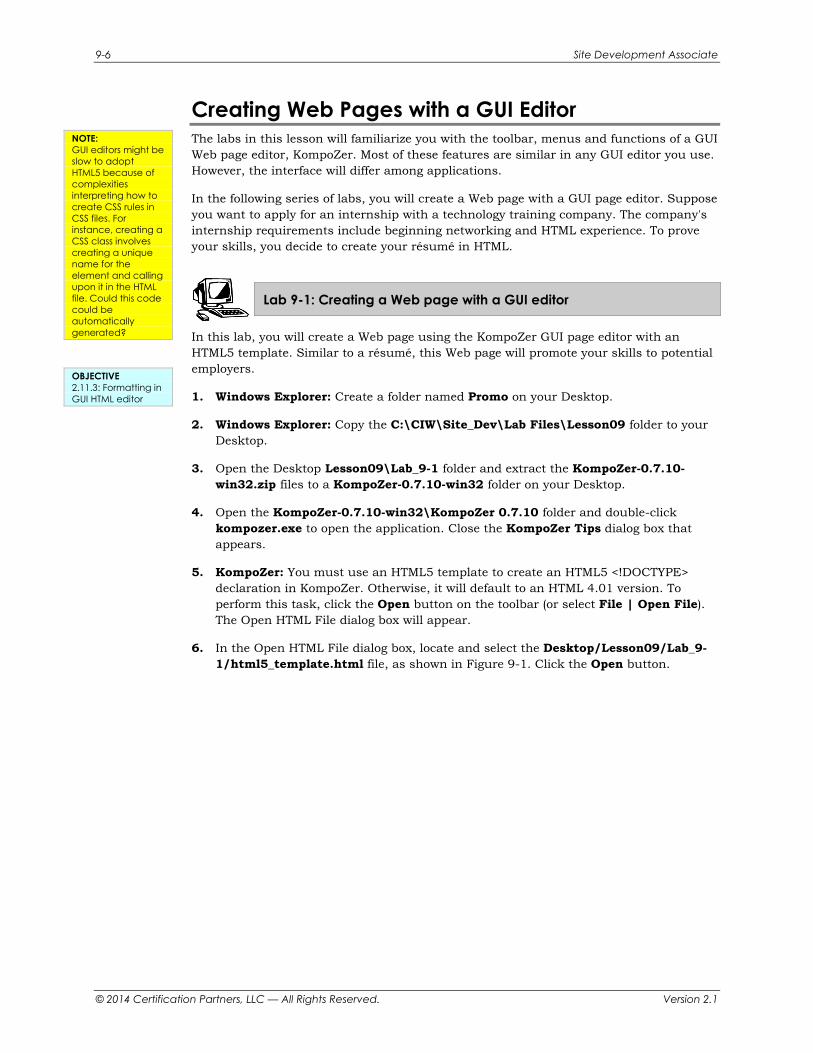
6. In the Open HTML File dialog box, locate and select the Desktop/Lesson09/Lab_9-1/html5_template.html file, as shown in Figure 9-1. Click the Open button.
NOTE: GUI editors might be slow to adopt HTML5 because of complexities interpreting how to create CSS rules in CSS files. For instance, creating a CSS class involves creating a unique name for the element and calling upon it in the HTML file. Could this code could be automatically generated?
OBJECTIVE 2.11.3: Formatting in GUI HTML editor
Lesson 9: GUI HTML Editors and Mobile Web Sites 9-7
© 2014 Certification Partners, LLC — All Rights Reserved. Version 2.1
Figure 9-1: Selecting HTML5 template in KompoZer
7. You will need to save the file under a different name so you do not overwrite the html5_template.html file. Select File | Save As. The Page Title dialog box will appear.
8. In the Page Title dialog box, enter a title for your Web page. For example, enter your name, followed by — Internet Certified. This title will appear in the browser window title bar and the Bookmarks or Favorites folders of Web browsers. Click OK.
9. The Save Page As dialog box will appear. This dialog box allows you to name the HTML file. Name your file default.html, and navigate to the Promo directory you created in Step 1. Click the Save button to save the file to the Promo folder.
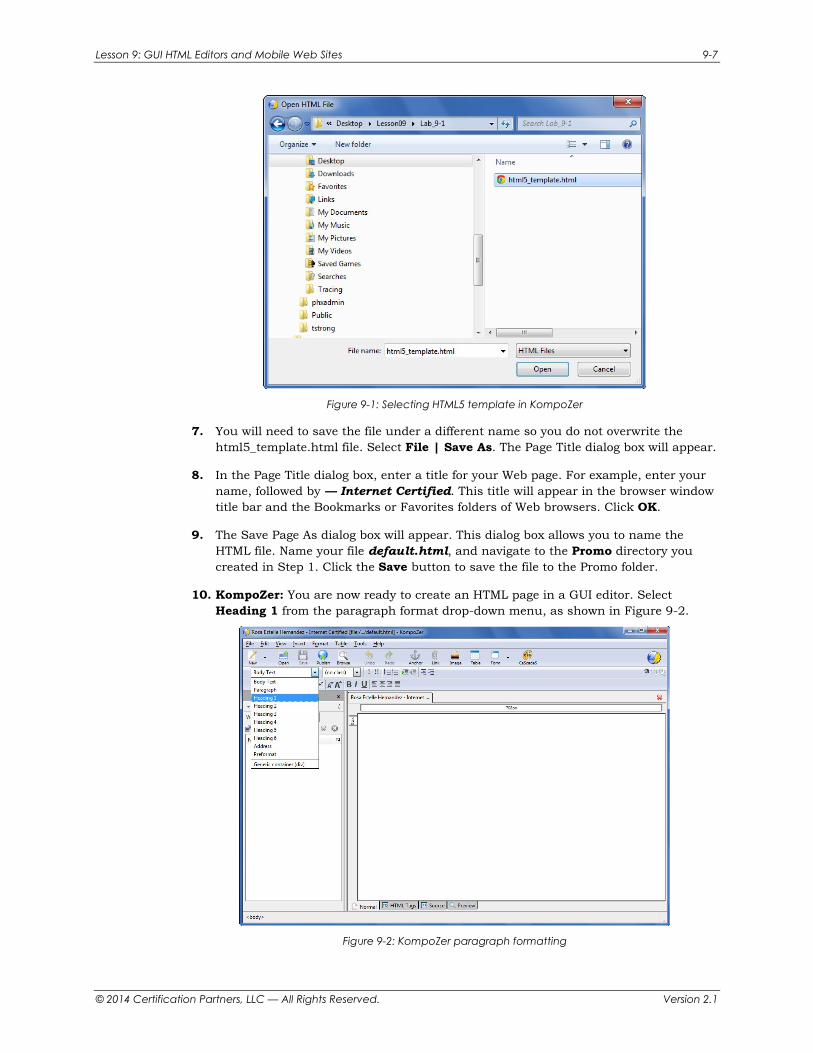
10. KompoZer: You are now ready to create an HTML page in a GUI editor. Select Heading 1 from the paragraph format drop-down menu, as shown in Figure 9-2.
Figure 9-2: KompoZer paragraph formatting
9-8 Site Development Associate
© 2014 Certification Partners, LLC — All Rights Reserved. Version 2.1
11. Type your first, middle and last name. Center it by selecting Format | Align | Center (or by clicking the Align Center button on the toolbar).
Note: If you make a mistake, you can use the CTRL+Z key combination to undo your previous actions. Press CTRL+Y to redo any changes that you have undone and want to reinstate.
12. Move the cursor to the line below your name (similar to a word processor, place the cursor at the end of your name and press the ENTER key). The paragraph format should return to Body Text, as displayed in the drop-down menu. If not, select Body Text from the paragraph format drop-down menu.
13. Enter the text Internet Certified and Ready to Succeed! Select this text and make it boldface by clicking the Bold button on the toolbar (or by pressing CTRL+B). Then, center the text.
Note: To avoid typing, you can copy and paste the Web page text from the GUI_HTML_editor.txt file located in the C:\CIW\Site_Dev\Lab Files\Lesson09 directory.
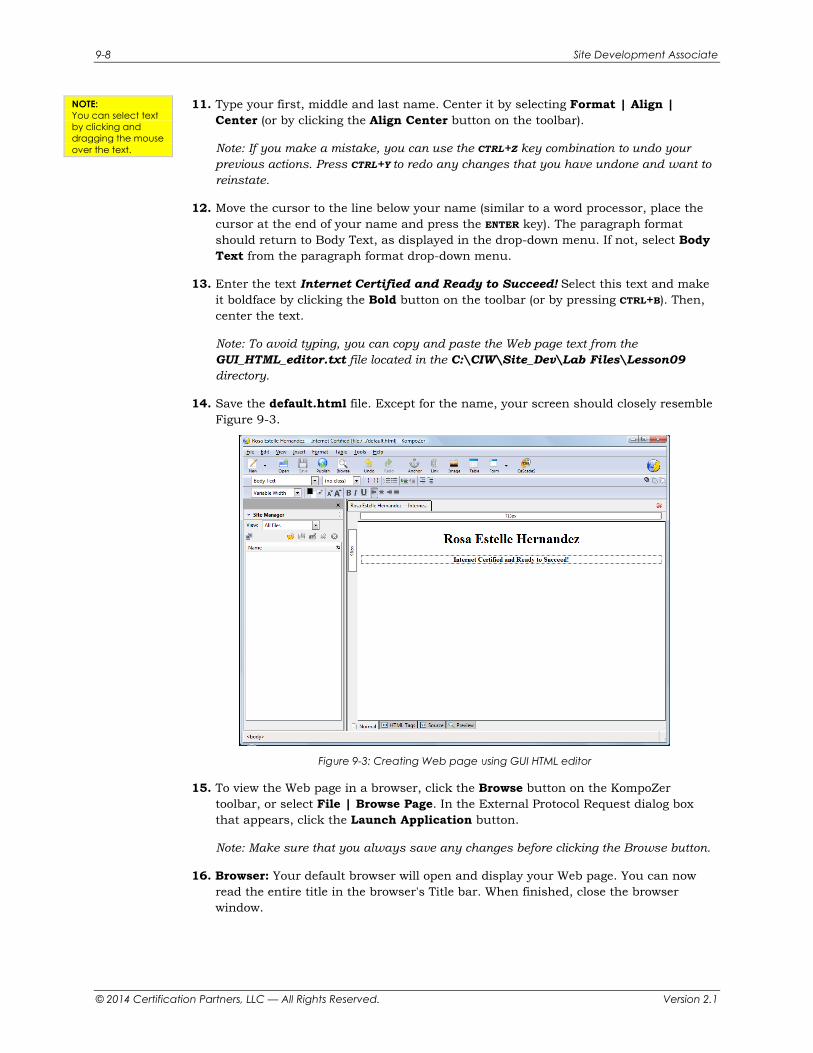
14. Save the default.html file. Except for the name, your screen should closely resemble Figure 9-3.
Figure 9-3: Creating Web page using GUI HTML editor
15. To view the Web page in a browser, click the Browse button on the KompoZer toolbar, or select File | Browse Page. In the External Protocol Request dialog box that appears, click the Launch Application button.
Note: Make sure that you always save any changes before clicking the Browse button.
16. Browser: Your default browser will open and display your Web page. You can now read the entire title in the browser's Title bar. When finished, close the browser window.
NOTE: You can select text by clicking and dragging the mouse over the text.
Lesson 9: GUI HTML Editors and Mobile Web Sites 9-9
© 2014 Certification Partners, LLC — All Rights Reserved. Version 2.1
Note: At the time of this writing, no open-source GUI HTML editors supported HTML5, including KompoZer. That means the built-in Preview browser in KompoZer is not HTML5-compliant. To ensure your Web page renders properly in HTML5, you should always preview your site in your computer's default HTML5-compliant browser, such as Chrome. At the end of these labs, you will update the KompoZer source code to HTML5.
In this lab, you began creating a résumé using a GUI Web page editor.
In the following lab, you will use a GUI page editor to modify font and background colors on a Web page. Suppose that as you are creating your résumé, you want to experiment with various color schemes. You know that color combinations can convey different moods, tones and messages. What color combinations would convey the best message for your résumé? Is a different tone appropriate when applying for an internship, rather than an entry-level position or a contract project? If you were submitting this résumé to five different companies, would you modify the résumé's look for each company?
Lab 9-2: Changing font and background color with a GUI editor
In this lab, you will use the GUI page editor to change your Web page's font and background color. Continue to use the default.html file.
1. KompoZer: Select Format | Page Colors And Background. The Page Colors And Background dialog box will appear.
2. Select the Use Custom Colors radio button. Click the Background button, and select a color from the Block Background Color dialog box that appears.
3. Click OK to return to the Page Colors And Background dialog box.
4. Click the Normal Text button, and select a text color from the Text Color dialog box that appears. When you are satisfied with your choice, click OK twice to return to your page in the KompoZer window.
5. Save the default.html file, and view your changes in the browser.
6. As a class, discuss the following questions: • Thus far, you have used a few interfaces and commands. Are these interfaces
and commands easy to access if you are disabled? Why or why not?
• View the source code you have created by clicking the Source tab at the bottom of the KompoZer window. What type of code is being written? HTML 4.01? XHTML? HTML5? Is this code standard? Which standard?
In this lab, you modified the font and background colors on your résumé. You also learned more about the type of HTML that is generated by this GUI page editor.
OBJECTIVE 2.11.3: Formatting in GUI HTML editor
NOTE: Due to the limited availability of open-source HTML5 GUI editors, this course uses an HTML 4.01 GUI editor and then upgrades the code to HTML5.

9-10 Site Development Associate
© 2014 Certification Partners, LLC — All Rights Reserved. Version 2.1
In the following lab, you will use a GUI page editor to add a horizontal rule to a Web page. Suppose that as you are creating your résumé, you want to experiment with graphical features on the page. You know that graphics should be used sparingly because they can distract from the important information on your page. However, you want to introduce some visual interest to the page and add an organizational element for emphasis. A horizontal rule provides a subtle graphic enhancement that will emphasize your name at the top of your résumé.
Lab 9-3: Adding a horizontal rule to a Web page with a GUI editor
In this lab, you will use a GUI page editor to add a horizontal rule to a Web page. Continue to use the default.html file.
1. KompoZer: Place your cursor after the text Internet Certified and Ready to Succeed!, then press ENTER twice to create a double return (two blank lines).
2. Select Insert | Horizontal Line to insert a horizontal rule. After creating a horizontal line, your screen should resemble Figure 9-4.
Figure 9-4: Adding horizontal rule using GUI HTML editor
3. Save the default.html file, and view your changes in the browser.
In this lab, you added a horizontal line to a Web page using a GUI page editor.
In the following lab, you will use a GUI page editor to create ordered and unordered lists on a Web page. Suppose that as you are creating your résumé, you consider that adding numbered and bulleted lists will help emphasize your achievements, as well as enhance the readability of the page. What types of information work well with numbered lists? What types of information are better as bullet points?
OBJECTIVE 2.11.3: Formatting in GUI HTML editor
Lesson 9: GUI HTML Editors and Mobile Web Sites 9-11
© 2014 Certification Partners, LLC — All Rights Reserved. Version 2.1
Lab 9-4: Creating bulleted and numbered lists with a GUI editor
In this lab, you will use a GUI page editor to create an unordered list and an ordered list on your Web page. Continue to use the default.html file.
1. KompoZer: Place the cursor on the blank line below the horizontal rule.
2. Type the word Certifications, and apply bold and italic formatting.
3. Left-justify the text Certifications by selecting Format | Align | Left (or by clicking the Align Left button on the toolbar).
4. Press ENTER to create a new line beneath the text that reads Certifications. Your cursor should be on the new blank line.
5. Enter the following words below Certifications as body text, and press ENTER after each line of text to create separate lines:
CIW Internet Business Associate
CIW Site Development Associate
CIW Network Technology Associate
CIW Web Foundations Associate
6. Select the four lines of text you just entered, then click the Bulleted List button on the toolbar to automatically insert bullet points. Alternatively, you can select the text, then select Format | List | Bulleted.
7. Create a new line, but make sure the new line is not bulleted. To exit the bulleted list mode, press ENTER and deselect the Bulleted List button, if necessary.
8. Left-justify the new line, if necessary.
9. On the new line, type the words Internet Skills, and apply bold and italic formatting.
Note: To avoid typing in the next step, you can copy and paste Web page text from the GUI_HTML_editor.txt file located in the C:\CIW\Site_Dev\Lab Files\Lesson09 directory.
10. Create another new line beneath Internet Skills. Enter the following text on separate lines as shown:
Web browsers, mobile devices, SMS, e-mail, FTP, social networking, e-commerce
Web page authoring in HTML5, CSS, and simple JavaScript
Basic networking components, protocols and server configuration
Basic security concepts and virus protection
Project management skills for individual and team job tasks
11. Select the five lines of text you just entered, then click the Numbered List button on the toolbar to automatically insert numbering. Each line should now be numbered,
OBJECTIVE 2.11.3: Formatting in GUI HTML editor
NOTE: CIW offers various certifications. If you pass the first three certifications listed, you will earn the CIW Web Foundations Associate certification as well.
9-12 Site Development Associate
© 2014 Certification Partners, LLC — All Rights Reserved. Version 2.1
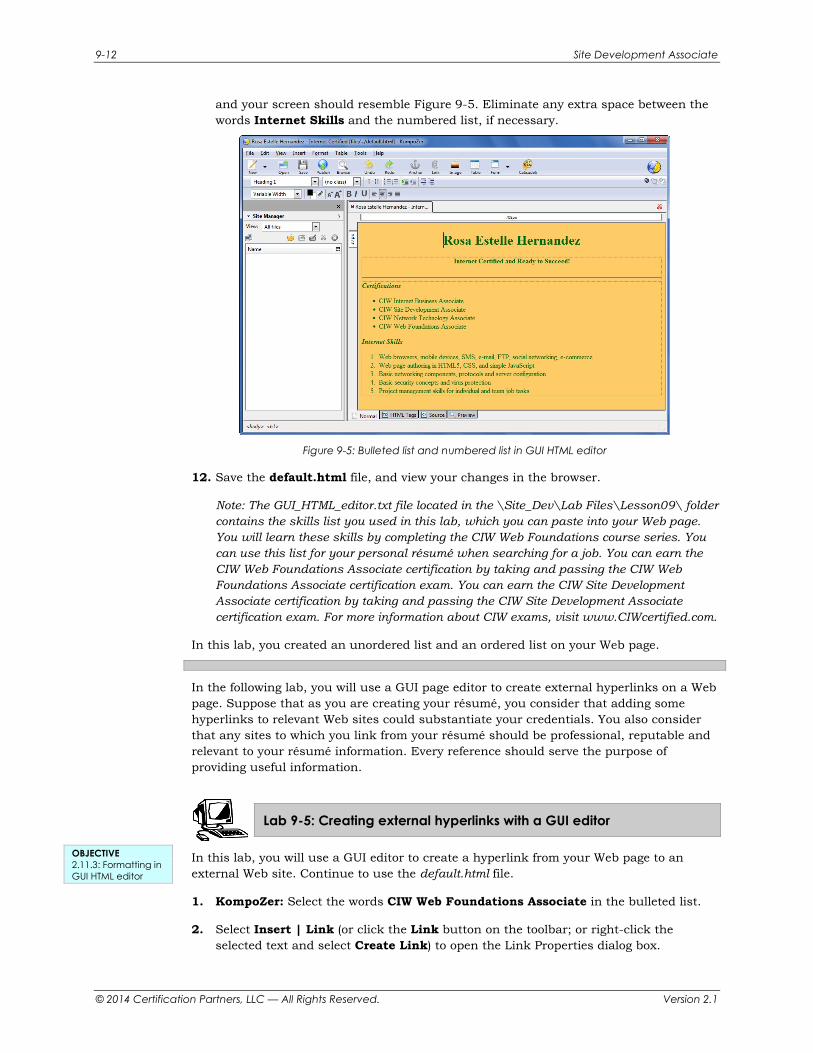
and your screen should resemble Figure 9-5. Eliminate any extra space between the words Internet Skills and the numbered list, if necessary.
Figure 9-5: Bulleted list and numbered list in GUI HTML editor
12. Save the default.html file, and view your changes in the browser.
Note: The GUI_HTML_editor.txt file located in the \Site_Dev\Lab Files\Lesson09\ folder contains the skills list you used in this lab, which you can paste into your Web page. You will learn these skills by completing the CIW Web Foundations course series. You can use this list for your personal résumé when searching for a job. You can earn the CIW Web Foundations Associate certification by taking and passing the CIW Web Foundations Associate certification exam. You can earn the CIW Site Development Associate certification by taking and passing the CIW Site Development Associate certification exam. For more information about CIW exams, visit www.CIWcertified.com.
In this lab, you created an unordered list and an ordered list on your Web page.
In the following lab, you will use a GUI page editor to create external hyperlinks on a Web page. Suppose that as you are creating your résumé, you consider that adding some hyperlinks to relevant Web sites could substantiate your credentials. You also consider that any sites to which you link from your résumé should be professional, reputable and relevant to your résumé information. Every reference should serve the purpose of providing useful information.
Lab 9-5: Creating external hyperlinks with a GUI editor
In this lab, you will use a GUI editor to create a hyperlink from your Web page to an external Web site. Continue to use the default.html file.
1. KompoZer: Select the words CIW Web Foundations Associate in the bulleted list.
2. Select Insert | Link (or click the Link button on the toolbar; or right-click the selected text and select Create Link) to open the Link Properties dialog box.
OBJECTIVE 2.11.3: Formatting in GUI HTML editor
Lesson 9: GUI HTML Editors and Mobile Web Sites 9-13
© 2014 Certification Partners, LLC — All Rights Reserved. Version 2.1
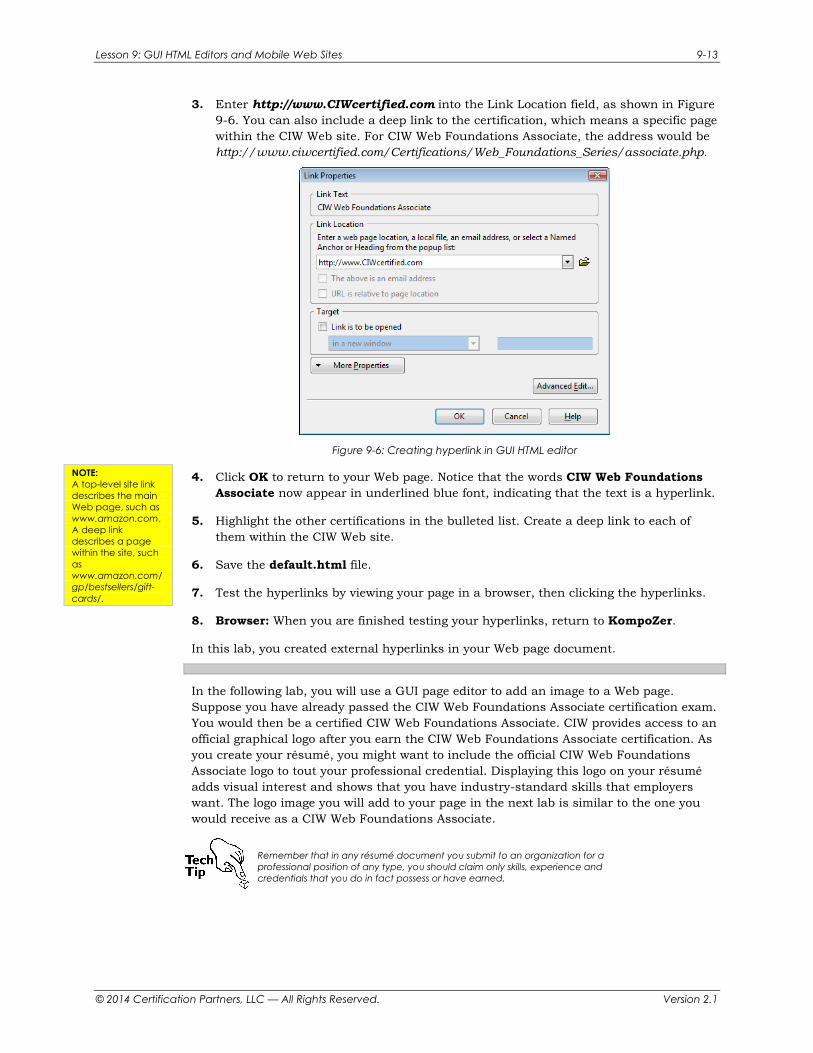
3. Enter http://www.CIWcertified.com into the Link Location field, as shown in Figure 9-6. You can also include a deep link to the certification, which means a specific page within the CIW Web site. For CIW Web Foundations Associate, the address would be http://www.ciwcertified.com/Certifications/Web_Foundations_Series/associate.php.
Figure 9-6: Creating hyperlink in GUI HTML editor
4. Click OK to return to your Web page. Notice that the words CIW Web Foundations Associate now appear in underlined blue font, indicating that the text is a hyperlink.
5. Highlight the other certifications in the bulleted list. Create a deep link to each of them within the CIW Web site.
6. Save the default.html file.
7. Test the hyperlinks by viewing your page in a browser, then clicking the hyperlinks.
8. Browser: When you are finished testing your hyperlinks, return to KompoZer.
In this lab, you created external hyperlinks in your Web page document.
In the following lab, you will use a GUI page editor to add an image to a Web page. Suppose you have already passed the CIW Web Foundations Associate certification exam. You would then be a certified CIW Web Foundations Associate. CIW provides access to an official graphical logo after you earn the CIW Web Foundations Associate certification. As you create your résumé, you might want to include the official CIW Web Foundations Associate logo to tout your professional credential. Displaying this logo on your résumé adds visual interest and shows that you have industry-standard skills that employers want. The logo image you will add to your page in the next lab is similar to the one you would receive as a CIW Web Foundations Associate.
Remember that in any résumé document you submit to an organization for a professional position of any type, you should claim only skills, experience and credentials that you do in fact possess or have earned.
NOTE: A top-level site link describes the main Web page, such as www.amazon.com. A deep link describes a page within the site, such as www.amazon.com/gp/bestsellers/gift-cards/.
9-14 Site Development Associate
© 2014 Certification Partners, LLC — All Rights Reserved. Version 2.1
Lab 9-6: Adding an image to a Web page with a GUI editor
In this lab, you will use a GUI editor to add an image to your Web page. Continue to use the default.html file.
1. KompoZer: Place your cursor on a blank line below the numbered list. Be sure that this new line is not numbered. If necessary, press ENTER to see if a new number appears. If it does, click the Numbered List button to stop the numbering.
Note: Alternatively, you can also click the Source tab and edit the code manually.
2. Add a horizontal rule. If necessary, add a blank line below the rule and place your cursor on it.
3. Windows Explorer: From C:\CIW\Site_Dev\Lab Files\Lesson09, copy the CIWlogo.gif file to the Promo\ folder on your Desktop.
4. KompoZer: Select Insert | Image (or click the Image button on the toolbar) to open the Image Properties dialog box. The Location tab is selected by default.
5. Click the Choose File button (the folder icon to the right of the Image Location text box). The Select Image File dialog box will appear. Navigate to the Promo\ folder, click the CIWlogo.gif file, then click the Open button.
6. The Image Properties dialog box will appear, with the CIWlogo.gif image you selected now entered into the Image Location field. Notice that the Alternate Text radio button is selected. The field associated with this radio button allows you to enter text that describes the image to text-only browsers, such as Lynx. Enter the words CIW Logo into the Alternate Text field, then click OK to insert the image into your document.
7. After inserting the image, center it on the Web page.
8. Save your changes to the default.html file.
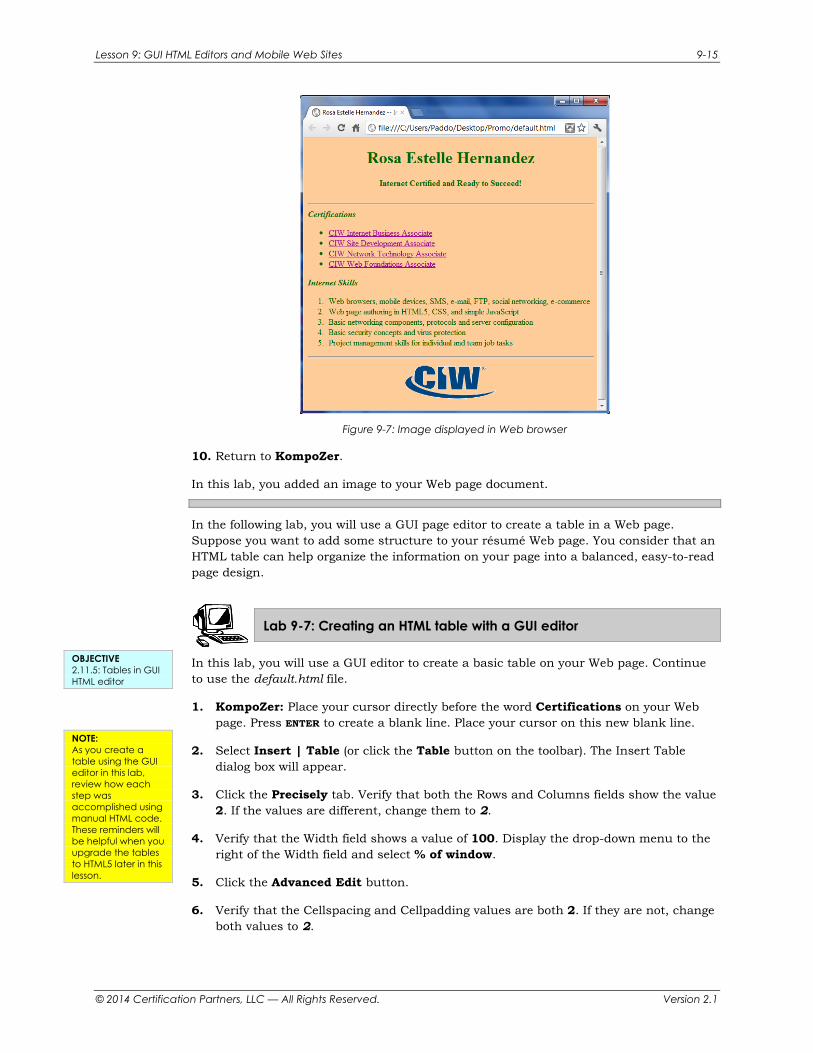
9. View your page in the browser to review your work. Your screen should resemble Figure 9-7.
OBJECTIVE 2.11.3: Formatting in GUI HTML editor
Lesson 9: GUI HTML Editors and Mobile Web Sites 9-15
© 2014 Certification Partners, LLC — All Rights Reserved. Version 2.1
Figure 9-7: Image displayed in Web browser
10. Return to KompoZer.
In this lab, you added an image to your Web page document.
In the following lab, you will use a GUI page editor to create a table in a Web page. Suppose you want to add some structure to your résumé Web page. You consider that an HTML table can help organize the information on your page into a balanced, easy-to-read page design.
Lab 9-7: Creating an HTML table with a GUI editor
In this lab, you will use a GUI editor to create a basic table on your Web page. Continue to use the default.html file.
1. KompoZer: Place your cursor directly before the word Certifications on your Web page. Press ENTER to create a blank line. Place your cursor on this new blank line.
2. Select Insert | Table (or click the Table button on the toolbar). The Insert Table dialog box will appear.
3. Click the Precisely tab. Verify that both the Rows and Columns fields show the value 2. If the values are different, change them to 2.
4. Verify that the Width field shows a value of 100. Display the drop-down menu to the right of the Width field and select % of window.
5. Click the Advanced Edit button.
6. Verify that the Cellspacing and Cellpadding values are both 2. If they are not, change both values to 2.
OBJECTIVE 2.11.5: Tables in GUI HTML editor
NOTE: As you create a table using the GUI editor in this lab, review how each step was accomplished using manual HTML code. These reminders will be helpful when you upgrade the tables to HTML5 later in this lesson.
9-16 Site Development Associate
© 2014 Certification Partners, LLC — All Rights Reserved. Version 2.1
7. Change the Border value to 2 by clicking the word Border, then entering 2 in the Value field at the bottom of the Advanced Property Editor dialog box.
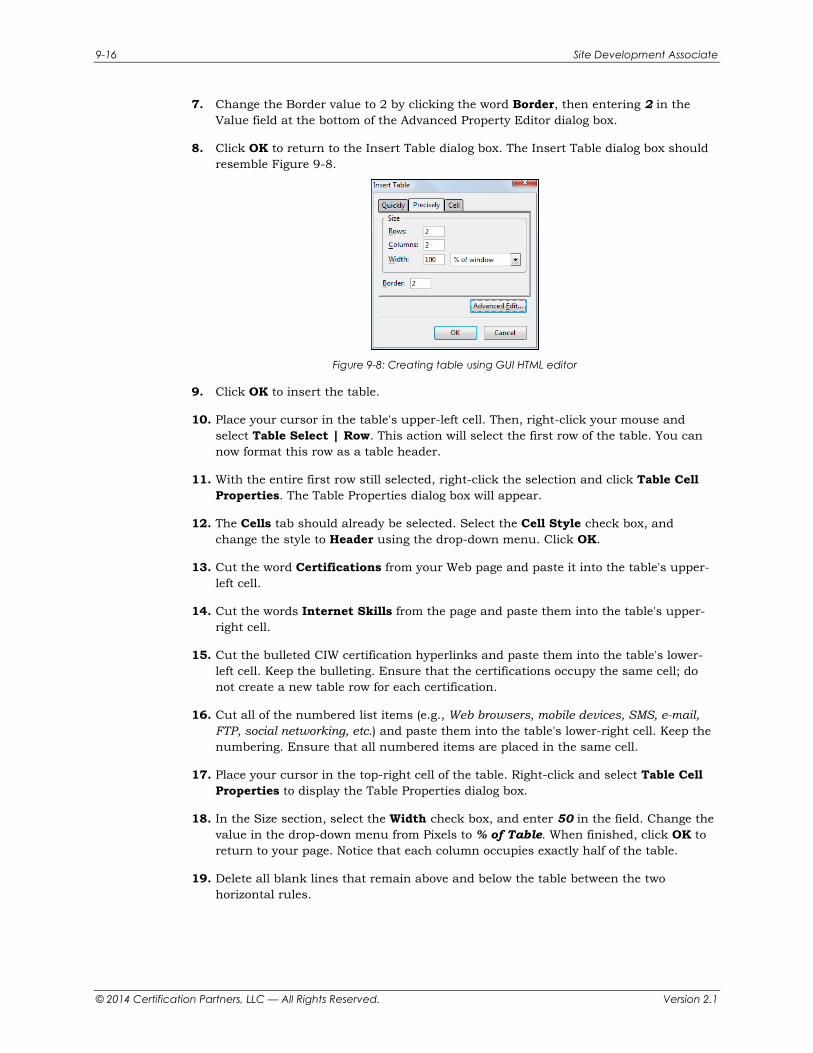
8. Click OK to return to the Insert Table dialog box. The Insert Table dialog box should resemble Figure 9-8.
Figure 9-8: Creating table using GUI HTML editor
9. Click OK to insert the table.
10. Place your cursor in the table's upper-left cell. Then, right-click your mouse and select Table Select | Row. This action will select the first row of the table. You can now format this row as a table header.
11. With the entire first row still selected, right-click the selection and click Table Cell Properties. The Table Properties dialog box will appear.
12. The Cells tab should already be selected. Select the Cell Style check box, and change the style to Header using the drop-down menu. Click OK.
13. Cut the word Certifications from your Web page and paste it into the table's upper-left cell.
14. Cut the words Internet Skills from the page and paste them into the table's upper-right cell.
15. Cut the bulleted CIW certification hyperlinks and paste them into the table's lower-left cell. Keep the bulleting. Ensure that the certifications occupy the same cell; do not create a new table row for each certification.
16. Cut all of the numbered list items (e.g., Web browsers, mobile devices, SMS, e-mail, FTP, social networking, etc.) and paste them into the table's lower-right cell. Keep the numbering. Ensure that all numbered items are placed in the same cell.
17. Place your cursor in the top-right cell of the table. Right-click and select Table Cell Properties to display the Table Properties dialog box.
18. In the Size section, select the Width check box, and enter 50 in the field. Change the value in the drop-down menu from Pixels to % of Table. When finished, click OK to return to your page. Notice that each column occupies exactly half of the table.
19. Delete all blank lines that remain above and below the table between the two horizontal rules.
Lesson 9: GUI HTML Editors and Mobile Web Sites 9-17
© 2014 Certification Partners, LLC — All Rights Reserved. Version 2.1
Note: When deleting extra spaces and characters, try using both the DELETE and BACKSPACE keys. Be careful not to delete the image or the horizontal rules. If you do, press CTRL+Z to undo any changes. Remember that CTRL+Y will redo any changes you undo. If you prefer using the mouse to undo and redo, select Edit | Undo and Edit | Redo.
20. If you want, create additional spaces between the table data and the table borders, either by pressing the ENTER key or by modifying the cell padding values.
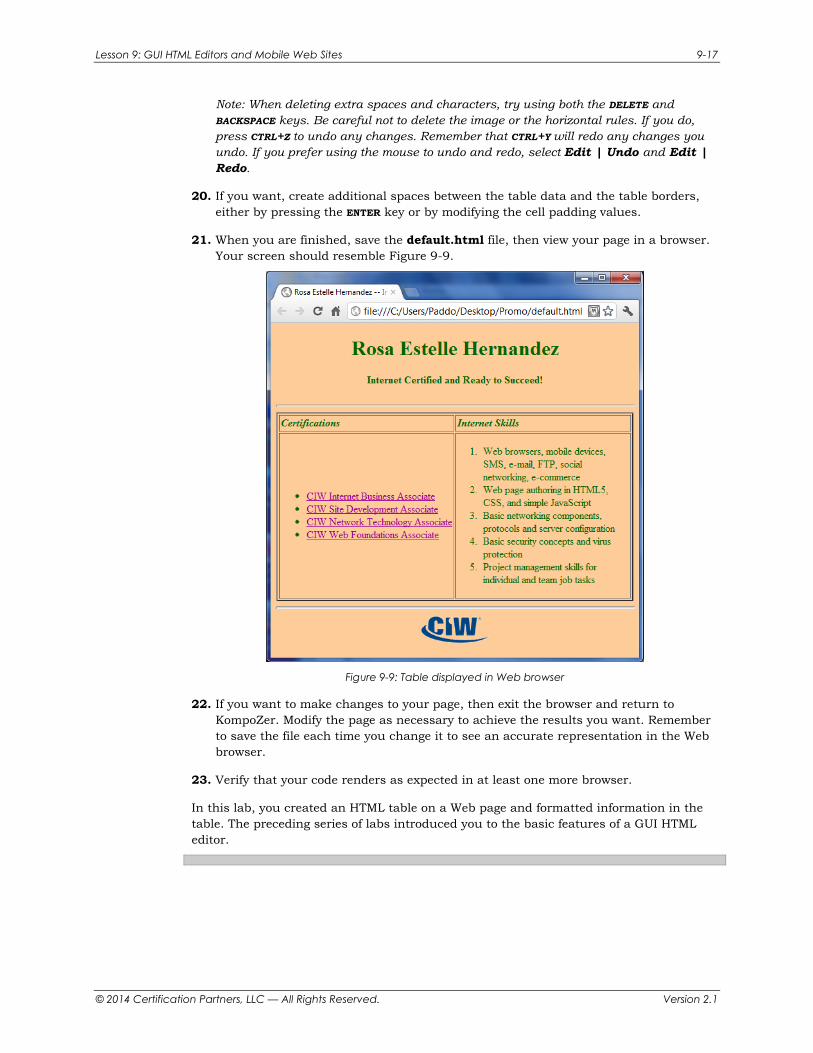
21. When you are finished, save the default.html file, then view your page in a browser. Your screen should resemble Figure 9-9.
Figure 9-9: Table displayed in Web browser
22. If you want to make changes to your page, then exit the browser and return to KompoZer. Modify the page as necessary to achieve the results you want. Remember to save the file each time you change it to see an accurate representation in the Web browser.
23. Verify that your code renders as expected in at least one more browser.
In this lab, you created an HTML table on a Web page and formatted information in the table. The preceding series of labs introduced you to the basic features of a GUI HTML editor.
9-18 Site Development Associate
© 2014 Certification Partners, LLC — All Rights Reserved. Version 2.1
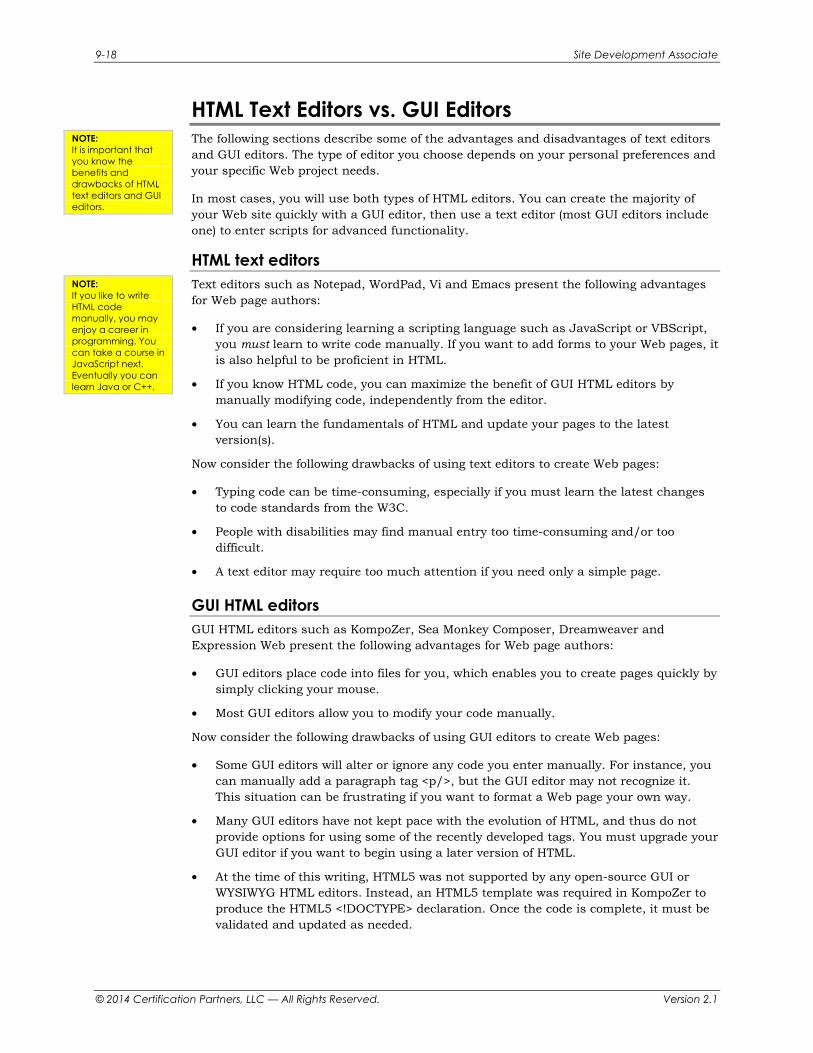
HTML Text Editors vs. GUI Editors The following sections describe some of the advantages and disadvantages of text editors and GUI editors. The type of editor you choose depends on your personal preferences and your specific Web project needs.
In most cases, you will use both types of HTML editors. You can create the majority of your Web site quickly with a GUI editor, then use a text editor (most GUI editors include one) to enter scripts for advanced functionality.
HTML text editors Text editors such as Notepad, WordPad, Vi and Emacs present the following advantages for Web page authors:
• If you are considering learning a scripting language such as JavaScript or VBScript, you must learn to write code manually. If you want to add forms to your Web pages, it is also helpful to be proficient in HTML.
• If you know HTML code, you can maximize the benefit of GUI HTML editors by manually modifying code, independently from the editor.
• You can learn the fundamentals of HTML and update your pages to the latest version(s).
Now consider the following drawbacks of using text editors to create Web pages:
• Typing code can be time-consuming, especially if you must learn the latest changes to code standards from the W3C.
• People with disabilities may find manual entry too time-consuming and/or too difficult.
• A text editor may require too much attention if you need only a simple page.
GUI HTML editors GUI HTML editors such as KompoZer, Sea Monkey Composer, Dreamweaver and Expression Web present the following advantages for Web page authors:
• GUI editors place code into files for you, which enables you to create pages quickly by simply clicking your mouse.
• Most GUI editors allow you to modify your code manually.
Now consider the following drawbacks of using GUI editors to create Web pages:
• Some GUI editors will alter or ignore any code you enter manually. For instance, you can manually add a paragraph tag <p/>, but the GUI editor may not recognize it. This situation can be frustrating if you want to format a Web page your own way.
• Many GUI editors have not kept pace with the evolution of HTML, and thus do not provide options for using some of the recently developed tags. You must upgrade your GUI editor if you want to begin using a later version of HTML.
• At the time of this writing, HTML5 was not supported by any open-source GUI or WYSIWYG HTML editors. Instead, an HTML5 template was required in KompoZer to produce the HTML5 <!DOCTYPE> declaration. Once the code is complete, it must be validated and updated as needed.
NOTE: It is important that you know the benefits and drawbacks of HTML text editors and GUI editors.
NOTE: If you like to write HTML code manually, you may enjoy a career in programming. You can take a course in JavaScript next. Eventually you can learn Java or C++.
Lesson 9: GUI HTML Editors and Mobile Web Sites 9-19
© 2014 Certification Partners, LLC — All Rights Reserved. Version 2.1
GUI editors often simply fail to load and edit code that contains newer tags. Be careful when making changes to your pages. Make backup copies of your pages first, then test each change in the GUI editor to make sure it understands the new code.
CIW Online Resources – Course Mastery Visit CIW Online at http://education.Certification-Partners.com/CIW to take the Course Mastery review of this lesson or lesson segment.
SDA Lesson 9 - Part A
Previewing Pages and Validating Code You have seen in the previous labs that it is necessary to preview your pages when using a GUI editor, despite the WYSIWYG development environment. Most GUI editors make it quite easy to:
• Preview pages in a browser.
• View source code.
• Validate code using built-in validators or a site such as http://validator.w3.org.
Many GUI editors allow you to choose the browser you use for previewing. By not limiting you to any single browser, the GUI editor helps you to test your pages in multiple browsers, or to focus your development on your favorite or company standard browser.
<!DOCTYPE> declaration options Validation engines, such as the one provided by the W3C, first read the <!DOCTYPE> declaration in an HTML page before validating the code. The validation engine examines the code according to the standard specified in the <!DOCTYPE> declaration. As a result, your code may fail validation with one <!DOCTYPE> reference, but pass if you change the standard in your <!DOCTYPE> declaration.
For example, suppose you have written code in a page to the HTML 4.01 Transitional standard, and it has validated. Then one of your team members hears that the site will be updated to HTML5 in the coming months. In an effort to start the update project early, he changes the <!DOCTYPE> declaration on this page to refer to HTML5. Although your page once validated as HTML 4.01 Transitional, it may no longer validate. To get the page to validate now, you can either edit the page code to conform to the HTML5 standard as declared in the <!DOCTYPE>, or you can change the <!DOCTYPE> reference back to HTML 4.01, the standard to which the page code currently conforms.
Validating HTML code When validating code created by a GUI editor, consider the following points:
• Most GUI editors include their own native validation tools or offer menus that provide access to validators. For example, KompoZer provides the Validate HTML option, which you will use in the next lab.
• Some GUI editors have special features that help ensure accessibility in regard to validation.
In the following lab, you will validate Web page code generated by a GUI page editor. Suppose you want to ensure that your résumé page uses proper HTML5 code standards. You can validate your résumé page code using the W3C validator service. You will not use
OBJECTIVE 2.11.4: Source code and page previewing
OBJECTIVE 2.11.2: Validating HTML code
®
9-20 Site Development Associate
© 2014 Certification Partners, LLC — All Rights Reserved. Version 2.1
the built-in GUI editor's validator. Validating your code is an important step, and using clean validated code in your résumé demonstrates your skill and commitment as a Web developer.
Lab 9-8: Validating and updating HTML code generated by a GUI editor
In this lab, you will validate the HTML code created by KompoZer. Then you will edit your Web site to conform to HTML5 by adding a CSS file.
1. KompoZer: Verify that you have saved all changes to your résumé document, default.html.
2. Exit KompoZer.
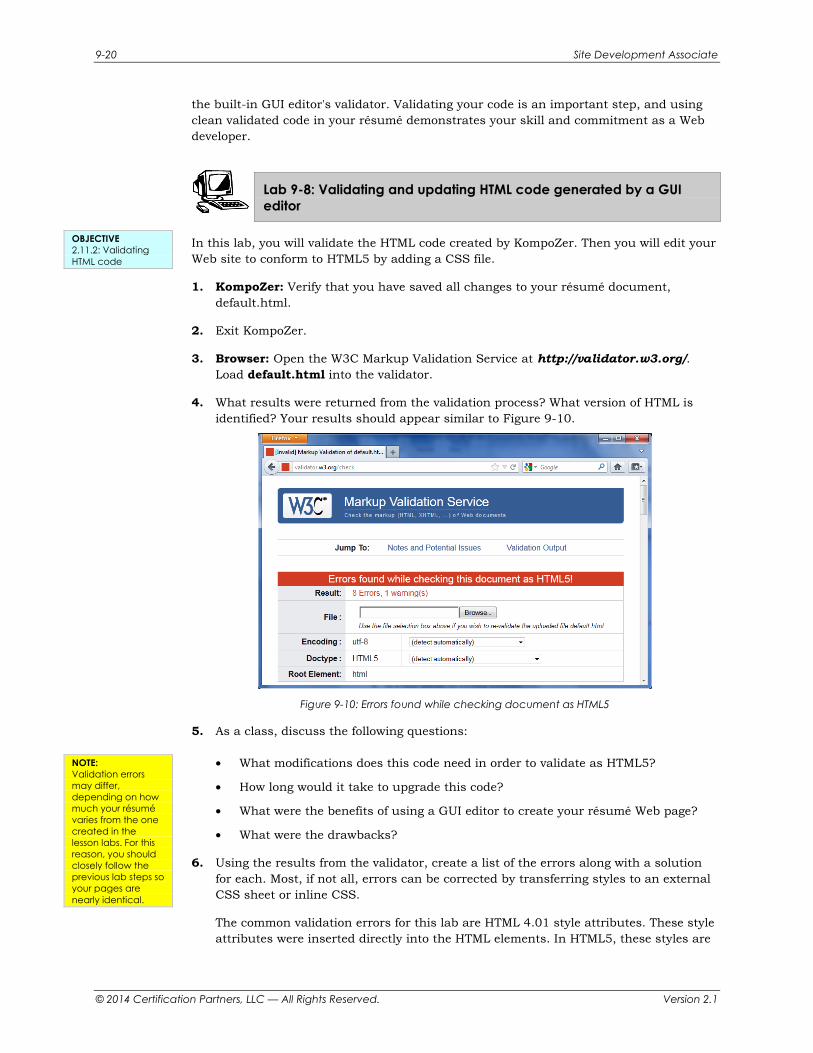
3. Browser: Open the W3C Markup Validation Service at http://validator.w3.org/. Load default.html into the validator.
4. What results were returned from the validation process? What version of HTML is identified? Your results should appear similar to Figure 9-10.
Figure 9-10: Errors found while checking document as HTML5
5. As a class, discuss the following questions: • What modifications does this code need in order to validate as HTML5?
• How long would it take to upgrade this code?
• What were the benefits of using a GUI editor to create your résumé Web page?
• What were the drawbacks?
6. Using the results from the validator, create a list of the errors along with a solution for each. Most, if not all, errors can be corrected by transferring styles to an external CSS sheet or inline CSS.
The common validation errors for this lab are HTML 4.01 style attributes. These style attributes were inserted directly into the HTML elements. In HTML5, these styles are
OBJECTIVE 2.11.2: Validating HTML code
NOTE: Validation errors may differ, depending on how much your résumé varies from the one created in the lesson labs. For this reason, you should closely follow the previous lab steps so your pages are nearly identical.

Lesson 9: GUI HTML Editors and Mobile Web Sites 9-21
© 2014 Certification Partners, LLC — All Rights Reserved. Version 2.1
transferred to CSS. The style attributes that must be updated and transferred will be similar to the following list and the list shown in Figure 9-11: • Hyperlink styles (vlink, alink, link)
• Table styles (cellpadding, cellspacing)
• Text and Image alignment styles (align, valign)
• Thickness value of the table's border attribute
Figure 9-11: Validation errors that need fixing
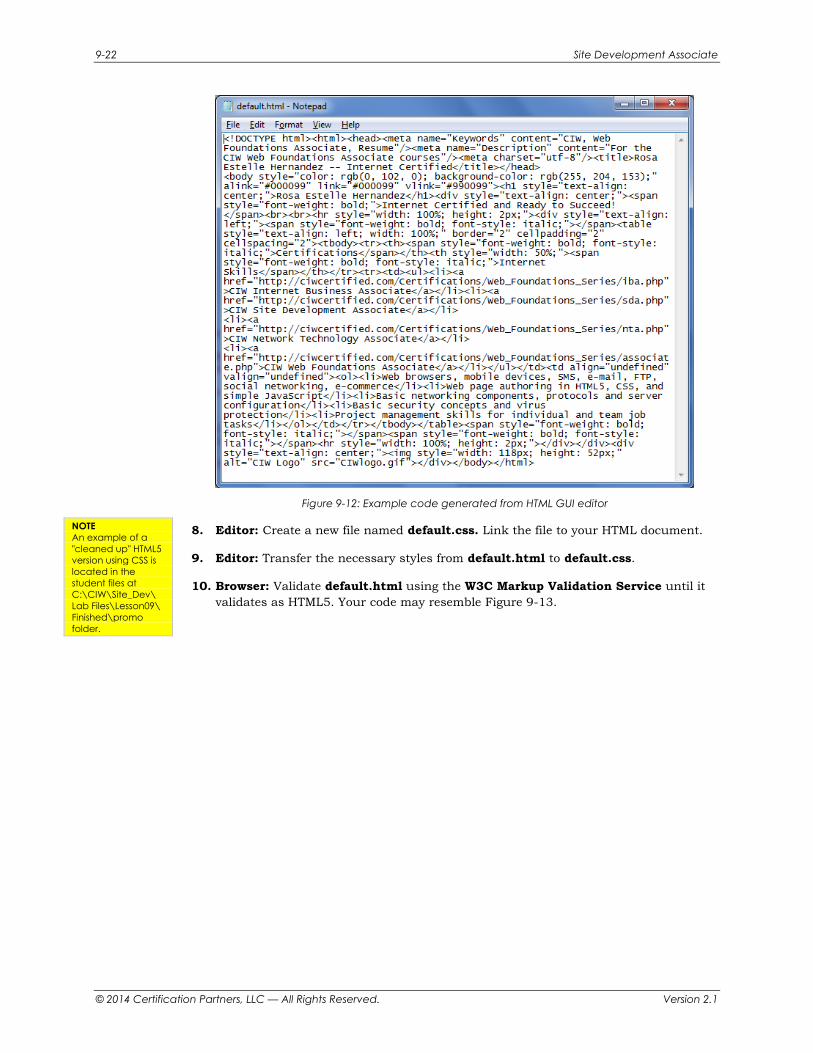
7. Editor: Open default.html in a text editor, such as Notepad. The HTML code created from the HTML GUI editor will resemble the code shown in Figure 9-12.
9-22 Site Development Associate
© 2014 Certification Partners, LLC — All Rights Reserved. Version 2.1
Figure 9-12: Example code generated from HTML GUI editor
8. Editor: Create a new file named default.css. Link the file to your HTML document.
9. Editor: Transfer the necessary styles from default.html to default.css.
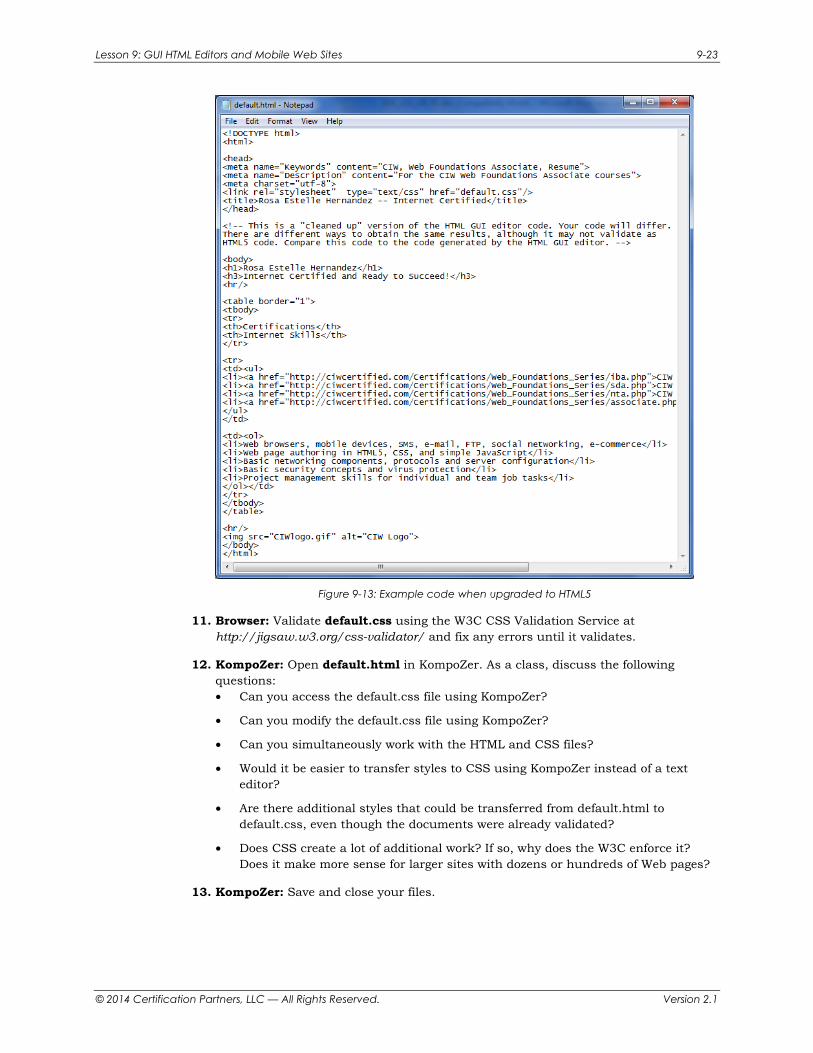
10. Browser: Validate default.html using the W3C Markup Validation Service until it validates as HTML5. Your code may resemble Figure 9-13.
NOTE An example of a "cleaned up" HTML5 version using CSS is located in the student files at C:\CIW\Site_Dev\ Lab Files\Lesson09\ Finished\promo folder.
Lesson 9: GUI HTML Editors and Mobile Web Sites 9-23
© 2014 Certification Partners, LLC — All Rights Reserved. Version 2.1
Figure 9-13: Example code when upgraded to HTML5
11. Browser: Validate default.css using the W3C CSS Validation Service at http://jigsaw.w3.org/css-validator/ and fix any errors until it validates.
12. KompoZer: Open default.html in KompoZer. As a class, discuss the following questions: • Can you access the default.css file using KompoZer?
• Can you modify the default.css file using KompoZer?
• Can you simultaneously work with the HTML and CSS files?
• Would it be easier to transfer styles to CSS using KompoZer instead of a text editor?
• Are there additional styles that could be transferred from default.html to default.css, even though the documents were already validated?
• Does CSS create a lot of additional work? If so, why does the W3C enforce it? Does it make more sense for larger sites with dozens or hundreds of Web pages?
13. KompoZer: Save and close your files.
9-24 Site Development Associate
© 2014 Certification Partners, LLC — All Rights Reserved. Version 2.1
14. Browser: Validate the files, make any necessary changes, and view the site in your browser.
In this lab, you validated and fixed HTML code generated from a GUI editor. You updated the code to HTML5 by transferring styles to CSS.
Web Site Publishing The final step in Web site development is publishing your site to the World Wide Web. You can publish your site in several ways, depending on the tools used to create it. Most GUI HTML editors provide a Publish feature that allows you to easily post your Web page files to your designated Web host. You can also use a File Transfer Protocol (FTP) client, such as FileZilla (http://filezilla-project.org/) or Ipswitch WS_FTP Professional (www.ipswitch.com).
FTP is the protocol most often used to transfer files between two computers, or a server and a computer, depending on the configuration. Transferring files over the Internet requires an FTP client to send the files and a destination FTP server to receive them. FTP can also be used to transfer files to an HTTP server, provided that the HTTP server is also running FTP. However, before you can transfer your Web site files, you must decide where your site will be hosted.
Publishing to a test Web server Professional Web developers post the final version of the Web site files to a test Web server before moving them to the production server for the following reasons:
• To verify that the Web server can process any CGI and database access requests.
• To locate and repair any dead links.
• To allow members of the development team and other stakeholders to preview the site. You will find that many changes are needed before your "final" code is ready for publication.
Test server configuration Your test server must be as nearly identical to the production server as possible. The test server should have:
• The same operating system version — If your production server is a Linux system or a Windows Server, for example, then your production system should be the same model.
• The same type and version of Web server software — Even if your test system uses a software type or version very similar to the production system, this test system is not adequate. For example, if your production Web server uses Apache Server 2.2 and your test server is using Apache Server 2.4, then your testing server will not provide a true test of your site.
• The same CGI interpreter software — If your production server uses PHP 5.4.0, then your test server should use PHP version 5.4.0.
Test servers are often called staging servers.
OBJECTIVE 2.11.6: Publishing Web sites
File Transfer Protocol (FTP) An Internet protocol used to transfer files between computers; allows file transfer without corruption or alteration.
Lesson 9: GUI HTML Editors and Mobile Web Sites 9-25
© 2014 Certification Partners, LLC — All Rights Reserved. Version 2.1
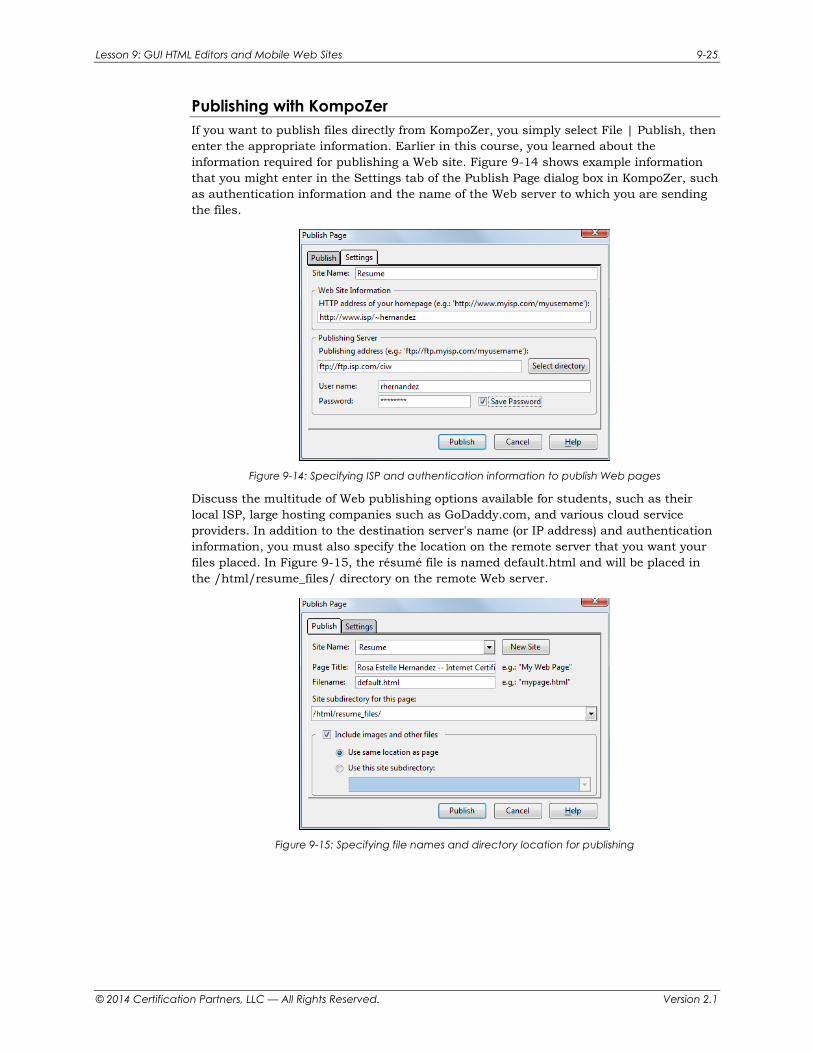
Publishing with KompoZer If you want to publish files directly from KompoZer, you simply select File | Publish, then enter the appropriate information. Earlier in this course, you learned about the information required for publishing a Web site. Figure 9-14 shows example information that you might enter in the Settings tab of the Publish Page dialog box in KompoZer, such as authentication information and the name of the Web server to which you are sending the files.
Figure 9-14: Specifying ISP and authentication information to publish Web pages
Discuss the multitude of Web publishing options available for students, such as their local ISP, large hosting companies such as GoDaddy.com, and various cloud service providers. In addition to the destination server's name (or IP address) and authentication information, you must also specify the location on the remote server that you want your files placed. In Figure 9-15, the résumé file is named default.html and will be placed in the /html/resume_files/ directory on the remote Web server.
Figure 9-15: Specifying file names and directory location for publishing

9-26 Site Development Associate
© 2014 Certification Partners, LLC — All Rights Reserved. Version 2.1
Developing Web Pages for Mobile Devices With the increasingly widespread use of mobile devices, such as smartphones and tablets, it is important that you consider how your Web site (or the mobile version of your Web site) will display on these devices. As of 2012, it was estimated that almost 80 percent of the world's population used mobile phones. Half of all mobile phones sold in the United States were smartphones. These trends will continue until nearly everyone has an Internet connection on a mobile device.
There are several key points you should consider in order to optimize your Web site for viewing on mobile devices:
• Keep your Web pages simple and uncluttered — Mobile devices have smaller screens than desktop or laptop monitors, and Internet connectivity is often slower. It is important that your site visitors have easy access to important information without getting bogged down by unnecessary clutter. Use white space to help give the site an uncluttered look, and keep the use of images to a minimum.
• Prioritize your content — When users are viewing a Web site with a mobile device, they are often looking for very specific information. For example, users who are viewing a store's mobile Web site may be looking for the nearest store to their current location, as opposed to simply browsing the site. Therefore, include only content that is absolutely necessary for the viewer. For this reason, most mobile Web sites should not contain any banner ads or other types of advertisements.
• Optimize your site to a smaller screen size — Although screen sizes vary among mobile devices, the most common size for traditional feature phones is 240x320 pixels. Smartphones typically use 320x480 pixels, with some rendering 480x800. You should tailor your mobile Web site to make sure your site is easily viewable by the majority of mobile device users.
As you develop a Web site designed for mobile devices, keep the following considerations in mind:
• Use clean, valid markup, and use CSS to separate the presentation from the content. Most mobile site visitors want access to content and links and may have CSS disabled.
• Always use the alt attribute in your <img> tags because images may be difficult to see (or will be disabled) on some mobile devices. Besides, it will not validate as HTML5 if you do not add alternative text.
• Ensure that you label form fields so that they are easily identifiable.
• Use heading tags to help build the structure of the page and to style text. Use tags <h1> through <h4> only; smaller heading tags will be too difficult to see.
• Reduce margins and padding to give yourself more usable space in which to display content.
• Provide easy-to-use navigation options and links.
• Ensure that your content is easy to read on a mobile-device screen.
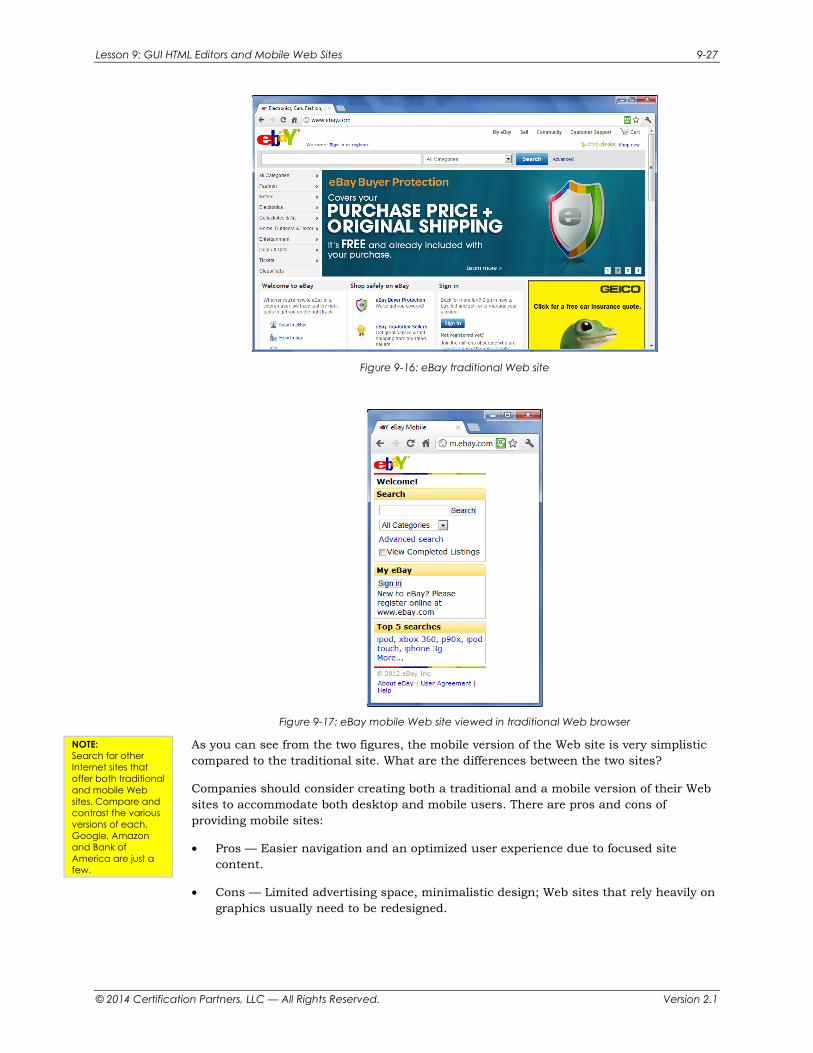
Figures 9-16 and 9-17 show the home page of the traditional Web site and the mobile Web site, respectively, for eBay.
OBJECTIVE 2.21.5: Designing for traditional vs. mobile browsers
OBJECTIVE 2.7.7: Design challenges for mobile devices
OBJECTIVE 2.11.7: Mobile and cloud HTML editors
Lesson 9: GUI HTML Editors and Mobile Web Sites 9-27
© 2014 Certification Partners, LLC — All Rights Reserved. Version 2.1
Figure 9-16: eBay traditional Web site
Figure 9-17: eBay mobile Web site viewed in traditional Web browser
As you can see from the two figures, the mobile version of the Web site is very simplistic compared to the traditional site. What are the differences between the two sites?
Companies should consider creating both a traditional and a mobile version of their Web sites to accommodate both desktop and mobile users. There are pros and cons of providing mobile sites:
• Pros — Easier navigation and an optimized user experience due to focused site content.
• Cons — Limited advertising space, minimalistic design; Web sites that rely heavily on graphics usually need to be redesigned.
NOTE: Search for other Internet sites that offer both traditional and mobile Web sites. Compare and contrast the various versions of each. Google, Amazon and Bank of America are just a few.
9-28 Site Development Associate
© 2014 Certification Partners, LLC — All Rights Reserved. Version 2.1
CIW Online Resources – Movie Clips Visit CIW Online at http://education.Certification-Partners.com/CIW to watch a movie clip about this topic.
Lesson 9: Designing Pages for Mobile Devices
CIW Online Resources – Online Exercise Visit CIW Online at http://education.Certification-Partners.com/CIW to complete an interactive exercise that will reinforce what you have learned about this topic.
Exercise 9-2: Developing Web pages for viewing on mobile devices
Mobile Apps vs. Mobile Web Sites There are many arguments regarding the better approach for mobile devices: mobile apps or mobile Web sites. Mobile apps are stand-alone applications that are downloaded from a vendor's software repository onto a mobile device. Apple iTunes and Google Play are two leading providers of apps for the Apple and Android mobile devices, respectively. As you have learned, mobile Web sites are usually stripped-down versions of traditional Web sites.
For HTML5 developers, the difference is fading between mobile apps and mobile Web sites. Opportunities exist in both arenas because HTML5, CSS and JavaScript are now being used to create both mobile apps and mobile Web sites.
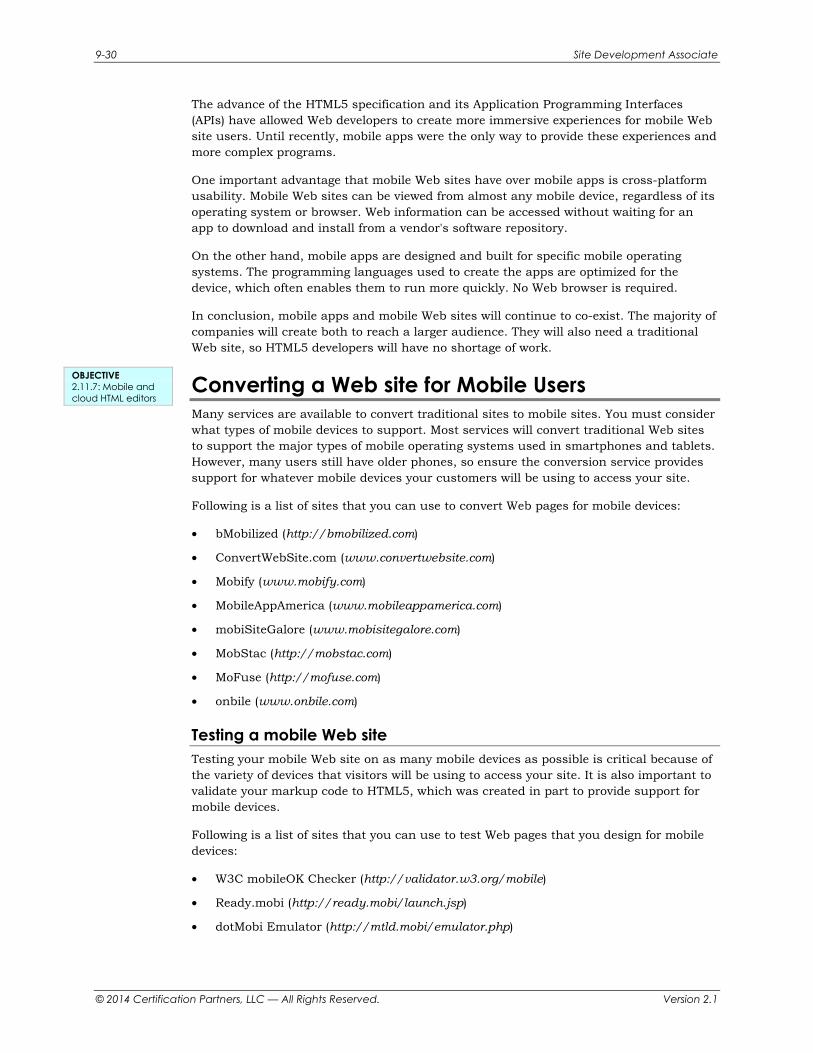
Figure 9-18 shows the Habitat for Humanity Web site (www.habitat.org) in an iPad simulator (http://ipadpeek.com).
Figure 9-18: Habitat site viewed in iPad simulator
OBJECTIVE 2.11.8: Mobile apps vs. mobile sites
®
®

Lesson 9: GUI HTML Editors and Mobile Web Sites 9-29
© 2014 Certification Partners, LLC — All Rights Reserved. Version 2.1
Figure 9-19 shows the Habitat site in an iPhone/iPod Touch simulator (http://iphone4simulator.com/).
Figure 9-19: Habitat site viewed in iPhone/iPod Touch simulator
As you can see, the Habitat site was not available as a mobile Web site at the time of this writing. Only part of the Web site appears in the small screen. Instead, the organization has created a mobile app that is available for download on Apple iTunes (for Apple mobile devices) and Google Play (for Android devices). The Google Play download site for the app is shown in Figure 9-20:
Figure 9-20: Habitat Android app download site from Google Play
Why do you think the Habitat for Humanity organization has not created a mobile Web site at the time of this writing? What are the advantages and disadvantages of mobile Web sites?
NOTE: Visit the iPhone and iPad online simulators. Enter various Web addresses into them and view the results. Do mobile Web sites automatically appear when the traditional Web address is entered, such as Wells Fargo (www.wellsfargo.com)? Or does the mobile address need to be entered (http://wf.com)? How can mobile sites identify a browser and display the proper site to it?
9-30 Site Development Associate
© 2014 Certification Partners, LLC — All Rights Reserved. Version 2.1
The advance of the HTML5 specification and its Application Programming Interfaces (APIs) have allowed Web developers to create more immersive experiences for mobile Web site users. Until recently, mobile apps were the only way to provide these experiences and more complex programs.
One important advantage that mobile Web sites have over mobile apps is cross-platform usability. Mobile Web sites can be viewed from almost any mobile device, regardless of its operating system or browser. Web information can be accessed without waiting for an app to download and install from a vendor's software repository.
On the other hand, mobile apps are designed and built for specific mobile operating systems. The programming languages used to create the apps are optimized for the device, which often enables them to run more quickly. No Web browser is required.
In conclusion, mobile apps and mobile Web sites will continue to co-exist. The majority of companies will create both to reach a larger audience. They will also need a traditional Web site, so HTML5 developers will have no shortage of work.
Converting a Web site for Mobile Users Many services are available to convert traditional sites to mobile sites. You must consider what types of mobile devices to support. Most services will convert traditional Web sites to support the major types of mobile operating systems used in smartphones and tablets. However, many users still have older phones, so ensure the conversion service provides support for whatever mobile devices your customers will be using to access your site.
Following is a list of sites that you can use to convert Web pages for mobile devices:
• bMobilized (http://bmobilized.com)
• ConvertWebSite.com (www.convertwebsite.com)
• Mobify (www.mobify.com)
• MobileAppAmerica (www.mobileappamerica.com)
• mobiSiteGalore (www.mobisitegalore.com)
• MobStac (http://mobstac.com)
• MoFuse (http://mofuse.com)
• onbile (www.onbile.com)
Testing a mobile Web site Testing your mobile Web site on as many mobile devices as possible is critical because of the variety of devices that visitors will be using to access your site. It is also important to validate your markup code to HTML5, which was created in part to provide support for mobile devices.
Following is a list of sites that you can use to test Web pages that you design for mobile devices:
• W3C mobileOK Checker (http://validator.w3.org/mobile)
• Ready.mobi (http://ready.mobi/launch.jsp)
• dotMobi Emulator (http://mtld.mobi/emulator.php)
OBJECTIVE 2.11.7: Mobile and cloud HTML editors
Lesson 9: GUI HTML Editors and Mobile Web Sites 9-31
© 2014 Certification Partners, LLC — All Rights Reserved. Version 2.1
• iPhoney (www.marketcircle.com/iphoney)
• iPadPeek.com (http://ipadpeek.com)
• BlackBerry Simulators (http://us.blackberry.com/developers/resources/simulators.jsp)
Working with Web 2.0 The evolution of Web technologies has given rise to the term "Web 2.0." Web 2.0 is a common term that refers to the changing trends in the use of World Wide Web technology and Web design since the early days of the Web when most Web pages were static, when users simply retrieved information, and when Internet connections were slow. Web use before the "bursting of the dot-com bubble" in 2001 is now referred to as "Web 1.0."
Web 2.0 is a paradigm shift in the way the Internet is used compared with the Web 1.0 day. Web 2.0 involves a more open approach to the Internet that concentrates on developing the information-sharing and collaboration capabilities of the Web. Web 2.0 has enabled users to provide a significant amount of information on the Web, and there are no longer any restrictions on what they produce.
Web 2.0 has also led to the development of Web-based communities and hosted services, such as social networking sites, video-sharing sites, wikis, blogs, RSS feeds, podcasts and so forth. The Web is now a resource through which users have the ability to generate and distribute content, as well as to update and modify it.
Ajax (Asynchronous JavaScript and XML ) is a Web 2.0 programming methodology that enables Web applications to interact with users in much the same way they do with desktop applications. Ajax allows you to create interactive Web applications using XHTML, CSS, the Document Object Model (DOM), JavaScript and XMLHttpRequest.
With the advent of Web 2.0 technologies and Ajax, you can use the Web to perform many tasks including using Web browsers as application delivery platforms, adding third-party applications to your Web page, and accessing and using Web feeds and podcasts.
A more detailed discussion of Web 2.0 is presented in the CIW Internet Business Associate course.
CIW Online Resources – Movie Clips Visit CIW Online at http://education.Certification-Partners.com/CIW to watch a movie clip about this topic.
Lesson 9: Working with Web 2.0
Browsers as application delivery platforms You were introduced to cloud computing and Software as a Service (SaaS) in a previous lesson. Application delivery platform is another term that refers to the way Web browsers are used to access hosted applications and services that enable you to perform computing tasks without the need to download and install any software.
Recall that in cloud computing, software, infrastructure and platform services are hosted by a remote data center and provided to organizations or individuals over the Internet. A Web browser is the only locally installed application necessary to access these applications. Even though only a Web browser is used, the cloud-based applications are
Web 2.0 A concept referring to the changing trends in the use of WWW technology and Web design that have led to the development of information-sharing and collaboration capabilities.
NOTE: A detailed discussion of Web 2.0 is presented in the CIW Internet Business Associate course.
Ajax A programming methodology that uses a number of existing technologies together and enables Web applications to make incremental updates to the user interface without the need to reload the browser page. XMLHttpRequest An Application Programming Interface (API) that is used to transfer XML and other text data between a Web server and browser.
OBJECTIVE 2.17.2: CGI methods
®

9-32 Site Development Associate
© 2014 Certification Partners, LLC — All Rights Reserved. Version 2.1
nevertheless meant to be as robust and as sophisticated as those installed on your local system.
A more detailed discussion of cloud computing is presented in the CIW Internet Business Associate course.
Software as a Service (SaaS) is another term used to describe cloud computing because:
• The software responsible for providing the service cannot be downloaded and owned by the end user. It is available as a solution only on a remote basis.
• The software becomes available as a service either for free or for a fee. Many times, the service is available free for a certain period of time. Two versions of a service are often made available: The first version is usually a free service that is limited in some way or contains advertisements. The second version is an enhanced or "professional" service that contains no advertisements and is often full-featured. In some cases, the full-featured version is available either for a fee or in exchange for user profile information.
Meebo (www.meebo.com) is an example of a Web application delivery platform. Meebo is a free, Ajax-based instant messaging program that combines existing IM services onto one Web interface. Meebo supports AOL Instant Messenger, Yahoo!, MSN, Google Talk, Gmail, MySpace Instant Messenger, Facebook, Chat and others. Meebo enables users to engage in instant messaging without the need to download and install any IM software. The Meebo home page is shown in Figure 9-21.
Figure 9-21: Meebo Messenger
Other Web environments that can serve as application delivery platforms include:
• Aptana (www.aptana.com).
• Bindows (www.bindows.net).
• Laszlo Webtop (www.laszlosystems.com).
• OpenLaszlo (www.openlaszlo.org).
OBJECTIVE 2.1.10: Web browser as application delivery platform
Lesson 9: GUI HTML Editors and Mobile Web Sites 9-33
© 2014 Certification Partners, LLC — All Rights Reserved. Version 2.1
Advantages to using browsers as application delivery platforms Following are some advantages to using browsers as application delivery platforms:
• Flexibility — Using powerful cloud computing software, a single person can run a sophisticated business. Yet a large enterprise can use a very similar product as well.
• Scalability — As an enterprise grows, it can simply rely on its cloud computing partner to increase capability instead of hiring additional employees and obtaining new hardware.
• Cost reduction — Companies that use cloud computing software can hire fewer employees and purchase less hardware.
Disadvantages to using browsers as application delivery platforms Following are some drawbacks to using browsers as application delivery platforms:
• Connectivity — If Internet access is cut off to a particular company or division for some reason, then the cloud-based service will no longer be available. Workers would be entirely dependent upon accessing remote applications. Furthermore, if the company or end user tends to store information only on the remote servers, then this information is no longer available as well.
• Speed — If Internet access somehow becomes impaired, then users will not be able to use or obtain information.
• Lockout — If the cloud-based organization decides to limit access to its services, you may no longer be able to access information stored remotely.
Personalizing a Web page with third-party applications You can personalize your Web pages by adding third-party applications to them. Third-party applications can dramatically increase the functionality and usability of your Web page without the need for you to create the programs yourself. However, be aware that adding such applications may slow page rendering speeds and can easily be overused.
iGoogle Portal (www.igoogleportal.com) is an example of a service that offers many third-party applications that you can add to your Web page. This service allows you to create your own home page on iGoogle Portal.
Google Gadgets are mini-applications created with HTML and JavaScript. Instructions on how to create them can be found at the Gadgets API — Google Developers site (https://developers.google.com/gadgets/). They are a good example of how apps can be created for mobile phones.
In the following lab, you will add third-party applications to a Web page. Suppose your project manager has asked you to customize a browser home page for each member of the project team so that they can track individual projects. You discovered iGoogle Portal and realized that many applications that you would like to add to enhance the pages already exist and can be easily incorporated.
Lab 9-9: Personalizing a Web page with iGoogle Portal
In this lab, you will add third-party applications to a Web page via iGoogle Portal.
1. Open your browser and go to www.igoogleportal.com.
OBJECTIVE 2.1.9: Third-party applications on Web pages
9-34 Site Development Associate
© 2014 Certification Partners, LLC — All Rights Reserved. Version 2.1
2. Click the Login link in the upper-right corner of the screen to create a new account.
3. Click the Create Your Account link to display the Create Your Account dialog box.
4. Enter the e-mail, password and name information you specified when you created your Google account in the previous lesson. Click the Create Account button.
5. A message box will appear prompting you to validate your account. Click on the provided link and the iGoogle Portal login screen will appear. Enter your e-mail address and password, then click the Login button.
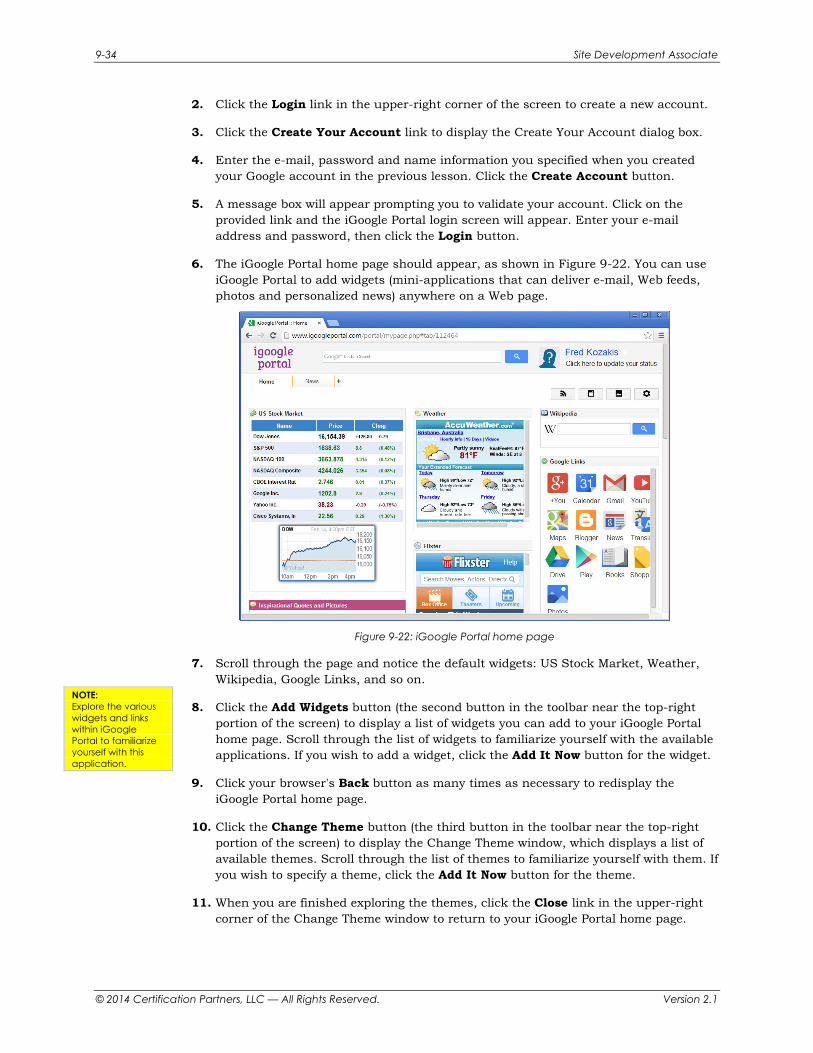
6. The iGoogle Portal home page should appear, as shown in Figure 9-22. You can use iGoogle Portal to add widgets (mini-applications that can deliver e-mail, Web feeds, photos and personalized news) anywhere on a Web page.
Figure 9-22: iGoogle Portal home page
7. Scroll through the page and notice the default widgets: US Stock Market, Weather, Wikipedia, Google Links, and so on.
8. Click the Add Widgets button (the second button in the toolbar near the top-right portion of the screen) to display a list of widgets you can add to your iGoogle Portal home page. Scroll through the list of widgets to familiarize yourself with the available applications. If you wish to add a widget, click the Add It Now button for the widget.
9. Click your browser's Back button as many times as necessary to redisplay the iGoogle Portal home page.
10. Click the Change Theme button (the third button in the toolbar near the top-right portion of the screen) to display the Change Theme window, which displays a list of available themes. Scroll through the list of themes to familiarize yourself with them. If you wish to specify a theme, click the Add It Now button for the theme.
11. When you are finished exploring the themes, click the Close link in the upper-right corner of the Change Theme window to return to your iGoogle Portal home page.
NOTE: Explore the various widgets and links within iGoogle Portal to familiarize yourself with this application.
Lesson 9: GUI HTML Editors and Mobile Web Sites 9-35
© 2014 Certification Partners, LLC — All Rights Reserved. Version 2.1
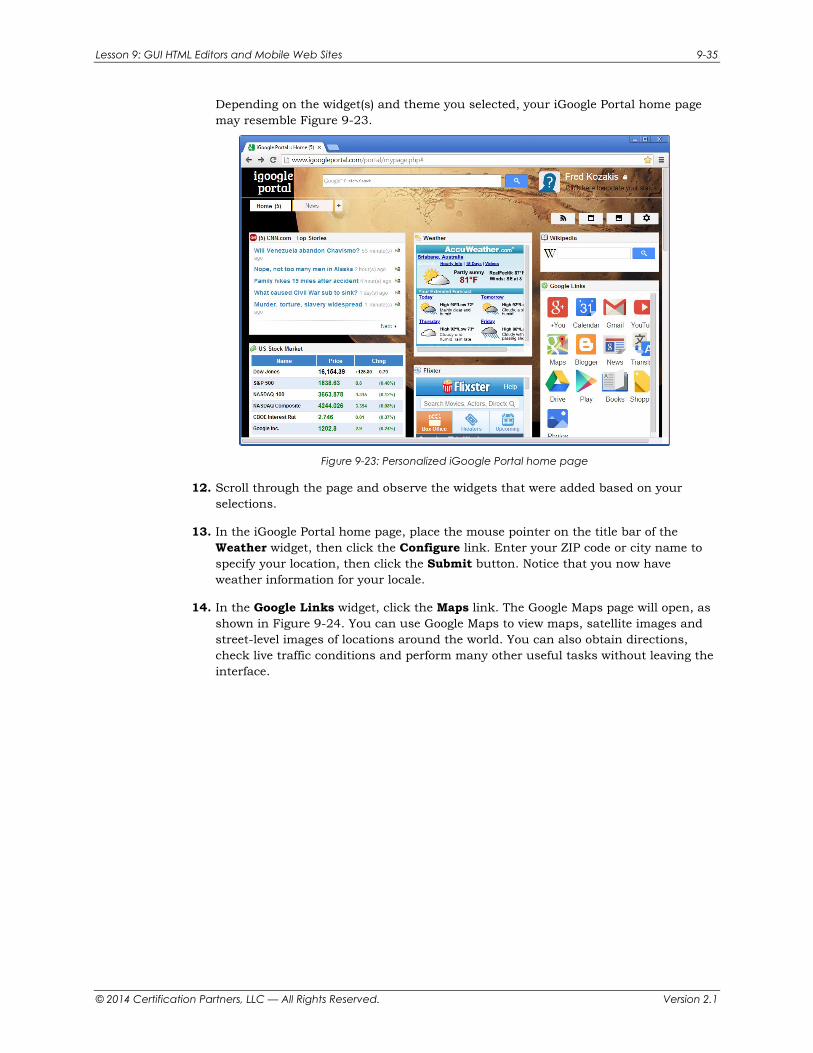
Depending on the widget(s) and theme you selected, your iGoogle Portal home page may resemble Figure 9-23.
Figure 9-23: Personalized iGoogle Portal home page
12. Scroll through the page and observe the widgets that were added based on your selections.
13. In the iGoogle Portal home page, place the mouse pointer on the title bar of the Weather widget, then click the Configure link. Enter your ZIP code or city name to specify your location, then click the Submit button. Notice that you now have weather information for your locale.
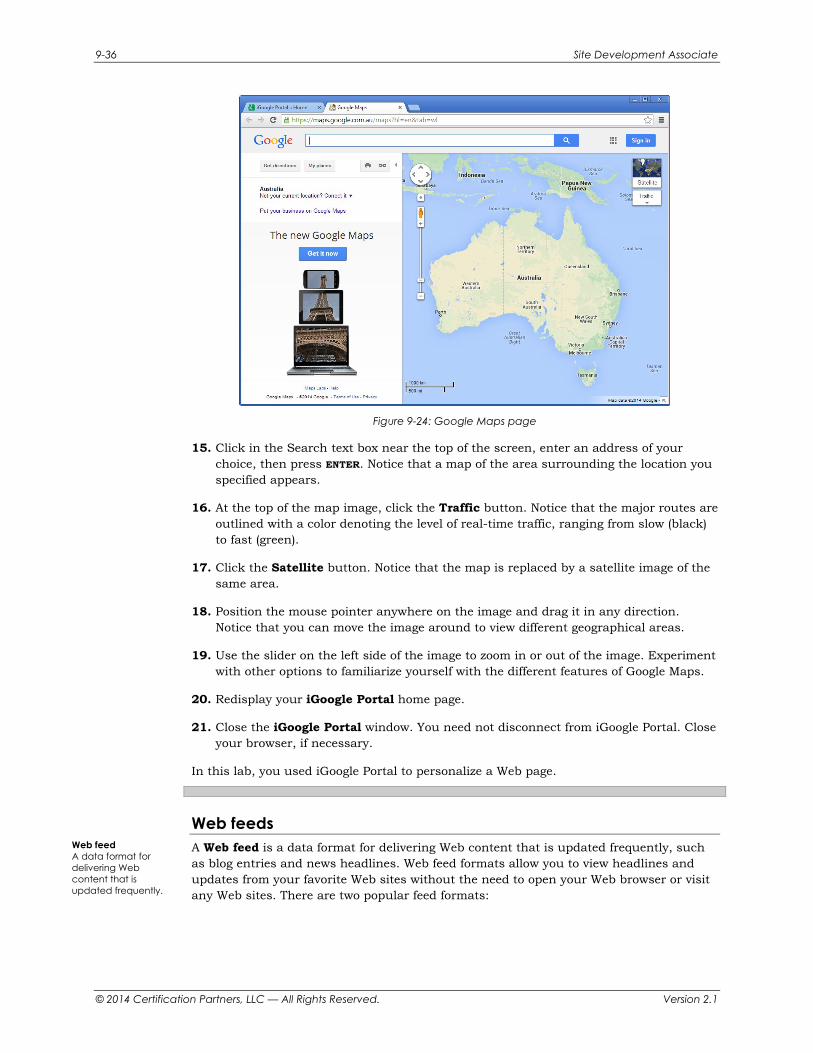
14. In the Google Links widget, click the Maps link. The Google Maps page will open, as shown in Figure 9-24. You can use Google Maps to view maps, satellite images and street-level images of locations around the world. You can also obtain directions, check live traffic conditions and perform many other useful tasks without leaving the interface.
9-36 Site Development Associate
© 2014 Certification Partners, LLC — All Rights Reserved. Version 2.1
Figure 9-24: Google Maps page
15. Click in the Search text box near the top of the screen, enter an address of your choice, then press ENTER. Notice that a map of the area surrounding the location you specified appears.
16. At the top of the map image, click the Traffic button. Notice that the major routes are outlined with a color denoting the level of real-time traffic, ranging from slow (black) to fast (green).
17. Click the Satellite button. Notice that the map is replaced by a satellite image of the same area.
18. Position the mouse pointer anywhere on the image and drag it in any direction. Notice that you can move the image around to view different geographical areas.
19. Use the slider on the left side of the image to zoom in or out of the image. Experiment with other options to familiarize yourself with the different features of Google Maps.
20. Redisplay your iGoogle Portal home page.
21. Close the iGoogle Portal window. You need not disconnect from iGoogle Portal. Close your browser, if necessary.
In this lab, you used iGoogle Portal to personalize a Web page.
Web feeds A Web feed is a data format for delivering Web content that is updated frequently, such as blog entries and news headlines. Web feed formats allow you to view headlines and updates from your favorite Web sites without the need to open your Web browser or visit any Web sites. There are two popular feed formats:
Web feed A data format for delivering Web content that is updated frequently.
Lesson 9: GUI HTML Editors and Mobile Web Sites 9-37
© 2014 Certification Partners, LLC — All Rights Reserved. Version 2.1
• RSS (Really Simple Syndication, RDF Site Summary or Rich Site Summary) — Currently at version 2.0, RSS is the "original" family of Web feeds. RSS 2.0 has the widest acceptance of any feed format.
• Atom — Currently at version 1.0, Atom is a relatively recent development but is much more robust and feature-rich than RSS. Atom is designed solely for the syndication of entire news articles.
Atom vs. RSS Unlike RSS, Atom provides not only the document's content, but also metadata about the document:
• What it is called
• Who created it
• When it was created
• Where it is located
A more detailed discussion of Web feeds is presented in the CIW Internet Business Associate course.
Podcasts A podcast is similar to an RSS feed in that the user can download syndicated audio or video digital-media files to computers or portable media players, such as Apple iPods. To create a podcast, you can produce your own audio files (e.g., MP3, Ogg Vorbis or WAV files) and publish them online. You can then index the files so that an RSS reader can subscribe to them. Podcasts can also consist of rebroadcasts of radio or television content, educational tutorials, and other audio content.
A podcast differs from other digital formats, such as streaming media, in that the podcast files can be syndicated, subscribed to and downloaded automatically as you add new content. Users who want to subscribe to a podcast's syndicated media need to acquire feed aggregator software, such as Apple iTunes player (www.apple.com/itunes). Most users use MP3 players or computers that have media player software installed to listen to podcasts.
CIW Online Resources – Online Exercise Visit CIW Online at http://education.Certification-Partners.com/CIW to complete an interactive exercise that will reinforce what you have learned about this topic.
Exercise 9-3: Advanced Web Technologies
CIW Online Resources – Course Mastery Visit CIW Online at http://education.Certification-Partners.com/CIW to take the Course Mastery review of this lesson or lesson segment.
SDA Lesson 9 - Part B
podcast The use of audio or video digital-media files that are distributed through Web feeds to subscribed users.
®
®
9-38 Site Development Associate
© 2014 Certification Partners, LLC — All Rights Reserved. Version 2.1
Case Study The Best GUI Editor Patrick needs to create a Web site for a small company he is launching. He needs to develop and post the site as quickly as possible, so he decides to use a GUI Web page editor to create the site. When comparing the GUI editor applications he could use, Patrick considers the following issues:
• The type of code that the editor creates — Patrick must decide between HTML 4.01 and HTML5 standards, including W3C compliance. He needs a program to produce code that will validate to standards with as little manual modification as possible.
• Accessibility — Patrick has tendonitis and sometimes experiences difficulty using the computer's mouse. The program must accommodate his physical limitations.
• Ability to insert customized code — Patrick wants to include processes that require JavaScript, PHP and SQL statements, but he does not know those languages.
• Publishing capabilities — Patrick needs a program that can publish his pages to a remote Web server when he has finished creating them.
• Cost — Patrick wants a quality product, but he is running a small business. He does not want to spend much more than U.S. $150.00.
• Validation features — Patrick believes that validating Web page code to standards is important, and he plans to validate his code frequently during development.
• Language support — Patrick's company has an affiliate in Japan.
After considering all these issues, Patrick researches four GUI editor vendors offering various editor products. He visits the vendors' Web sites for specific information about compliance, accessibility and flexibility. He then creates a short list of GUI editors that best meet his needs.
After comparing costs, features, and support, Patrick chooses Microsoft Expression Studio Web Professional (www.microsoft.com/expression/products/ StudioWebPro_Overview.aspx). The product is within his budget; includes accessibility features; and supports multiple languages, including Japanese. It also allows file uploads to a remote Web server. It is not an open-source product, but it does offer validation support. Patrick knows he can also obtain free third-party validation tools that are current and easy to use.
* * *
As a class, consider the issues Patrick reviewed when choosing a GUI editor, and answer the following questions.
• Which do you think are most important features in a GUI editor product?
• Which features would you expect in a GUI editor that requires you to purchase a license, in contrast to the features you would expect from a GUI editor that is available for free? Why?
Lesson 9: GUI HTML Editors and Mobile Web Sites 9-39
© 2014 Certification Partners, LLC — All Rights Reserved. Version 2.1
Lesson Summary
Application project As you learned in this lesson, using a GUI HTML editor to develop Web pages can save you time. How could your company's intranet or Internet site be expanded using a GUI HTML editor? How could the GUI editor help save time and energy on these tasks? Could employees with little or no HTML experience contribute?
View the Web page you created in this lesson's labs with both Mozilla Firefox and Windows Internet Explorer. Does the table appear the same in each browser? How is it different? Using your HTML knowledge, how could you manually modify the table's HTML code to ensure that the table appears the same in each browser?
When time permits, create a complete Web page résumé that details your skills, associations and work experience. After you earn your CIW Web Foundations Associate certification, you can submit your résumé to an Internet job search company, such as Monster.com (www.monster.com) or Yahoo! Careers (http://careers.yahoo.com), or you can post it on your own Web site.
Skills review In this lesson, you were introduced to GUI HTML editors and mobile Web site development. You used a GUI editor to develop a Web page, and you experienced the power and control that a GUI editor provides over a development project. You explored the GUI editor's features, including text style, horizontal rules, inline images, hypertext links, table creation and code validation. You considered the advantages and disadvantages of using such a tool to develop your Web pages and then upgraded the GUI editor's output to HTML5. The upgrade included transferring styles from the HTML document to a newly created CSS file. Finally, you learned about mobile Web site development and Web browsers as application delivery platforms.
Now that you have completed this lesson, you should be able to:
2.1.10: Identify ways that a Web browser can become an application delivery platform, including strengths and weaknesses of the browser.
2.7.7: Identify the challenges of designing Web sites for mobile devices (e.g., smartphones, tablets, game consoles).
2.11.1: Evaluate a GUI HTML editor according to the W3C Authoring Tool Accessibility Guidelines.
2.11.2: Validate HTML code.
2.11.3: Use font and page appearance options in a GUI HTML editor.
2.11.4: View source code and preview Web pages in a browser.
2.11.5: Create HTML tables using a GUI HTML editor.
2.11.6: Publish (i.e., upload) Web pages and sites to a Web server.
2.11.7 Evaluate various types of HTML editors that can edit files in mobile devices and cloud services.

9-40 Site Development Associate
© 2014 Certification Partners, LLC — All Rights Reserved. Version 2.1
2.11.8 Distinguish between mobile apps and mobile Web sites.
2.21.5: Identify ways to create pages for traditional and mobile device browsers (e.g., validating code, appropriate resolutions, supported interpreters, extensive user testing).
CIW Practice Exams Visit CIW Online at http://education.Certification-Partners.com/CIW to take the Practice Exams assessment covering the objectives in this lesson.
SDA Objective 2.01 Review
SDA Objective 2.11 Review
SDA Objective 2.21 Review
Note that some objectives may be only partially covered in this lesson.
®
Lesson 9: GUI HTML Editors and Mobile Web Sites 9-41
© 2014 Certification Partners, LLC — All Rights Reserved. Version 2.1
Lesson 9 Review 1. What is another common term for a graphical user interface (GUI) HTML editor?
2. What two types of HTML GUI editors are available?
3. List several HTML GUI editor applications currently available on the market.
4. What type of application offers an interface similar to an HTML GUI editor?
5. Name a disadvantage of creating Web pages using an HTML text editor that is resolved by using a GUI editor.
6. Name two design techniques you should consider when designing Web pages for mobile devices.
7. Explain the difference between mobile Web sites and mobile apps. Which is better?

9-42 Site Development Associate
© 2014 Certification Partners, LLC — All Rights Reserved. Version 2.1


![JUnit-Testing GUI Components [Autosaved]shsaad/seng426/resources/Lab Slides... · 2011-06-15 · JUnit-Testing GUI Components . Agenda Test GUI Components Simple GUI Application Test](https://img.pdfslide.us/doc/110x75/5e237780175e3d268e70f660/junit-testing-gui-components-autosaved-shsaadseng426resourceslab-slides.jpg)