Embed Size (px)
Citation preview

Protecting the Patient, Product, and Provider
MIC 800N
OWNER’S MANUAL
Containment Technologies Group, Inc. 5460 Victory Dr.
Suite 300
Indianapolis, Indiana 46203 Phone: (317) 713-8200 Fax: (317) 713-8201
Email: [email protected]
www.mic4.com
Protecting the Patient, Product, and Provider
TABLE OF CONTENTS
Section Contents
1 Introduction Features
Safety
Flexibility
Economy
Quality
2 Getting Started Installation
Site Selection
Assembly
Set-up
3 Operation Inspection
Sanitizing
Airlock Usage
Adjustment
4
General Use Guidelines
Maintenance & Troubleshooting
Daily
Weekly
Periodic
Troubleshooting
5 Policies & Procedures 6 Product Specifications 800N 7 Replacement Parts 8 Warranty 9 Ergonomic Considerations

INTRODUCTION
Protecting the Patient, Product, and Provider
Page 1 of 2
Introduction
The 800N is a safe, economical, and portable workstation designed to provide an
International Organization for Standardization (ISO) Class 5 environment for the
preparation of parenteral preparations. The air handling is based on conventional
unidirectional airflow. The 800N provides an environment that is a secure, cost effective,
and flexible alternative to the cleanroom approach. The 800N is available only in
negative pressure configuration. Inlet air is HEPA filtered.
Features
The 800N is fabricated from stainless steel and engineered plastics. The CACI creates a
barrier that requires no procedural setbacks or special work zones that are common with
BSC’s. The 800N is a negative pressure system for the preparation of hazardous IV
admixtures. The 800N utilizes a once through air system. The airlock allows for a
transition of materials without comprising the ISO Class 5 environment. Manipulations
take place through gloves and sleeves, allowing the pharmacist to leave and re-enter the
workstation without compromising the ISO Class 5 environment or containment. The
800N workstation requires an outside exhaust connection, no special wiring, plumbing, or
room-air filtration.
Safety
The ergonomic considerations in the 800N help reduce fatigue and consequently, product
errors. The 800N has an adjustable height feature for comfortable working conditions.
Chemical and shatter resistant plastics provide a clear view of the entire workspace and
airlock, to ensure that materials are visible
Flexibility
The 800N can be wheeled on its heavy-duty casters through most pedestrian doorways.
There is no special room air quality requirement. Gloves come in a wide range of sizes
and can be changed quickly. NOTE USP <797> requires sterile gloves and USP <800>
requires gloves be tested per ASTM D6978.
The 800N workstation requires a standard 110-volt receptacle. USP <800> requires
venting to the outside. The MIC airlocks allow access to the critical area during
compounding.

INTRODUCTION
Protecting the Patient, Product, and Provider
Page 2 of 2
Economy
The 800N is required to be placed into a negative pressure room per USP<800>.
The two-piece glove and sleeve arrangement reduces the cost of consumables compared
to single-piece sleeve/glove replacements.
The 800N increases efficiency by reducing preparation time and procedural requirements.
Quality
The 800N is constructed of 316L stainless steel. Stainless steel seams are ground smooth
and coved corners to eliminate hard to clean areas. The viewing area is comprised of
engineered plastics that provide an unobstructed view of the work area. These surfaces
are smooth and designed to be easy to clean and sanitize. The lighting and air handling
systems are external to the chamber. This not only adds to the ease of sanitizing but also
keeps maintenance out of the critical area. The workstation height adjustment utilizes a
hydraulic lift system.

GETTING STARTED
Protecting the Patient, Product, and Provider
Page 1 of 1
Installation
Instructions in this section are specifically for the initial set-up of the 800N. The steps
will describe site selection, assembly (if needed), set-up, and inspection for the 800N. By
the end of these steps, the 800N will be ready to be placed into operation.
Site Selection The 800N portability eases site selection decisions. Primary considerations for the
installation of the 800N are floor space available, access to an outside exhaust and
electrical receptacle outlet accessibility. Floor space requirements for the 800N are
56 inches wide by 34 inches deep and 78 inches tall.
To operate the 800N, the pharmacist or pharmacy technician will require 36 inches in
front of the workstation for operation. A diagram is provided below:
Some lighting conditions may cause glare in the viewing area of the 800N. Position the
workstation to minimize this affect. The power requirement for the 800N is a grounded
120-volt, 60 hz, 15 amp receptacle. There are no special requirements for air quality in
terms of environmental particulates. The area should be air conditioned for the comfort of
the operator and to ensure that product temperature requirements are met.
Assembly
In most cases, the 800N is delivered as a fully assembled product. However, if it is
required the cabinet can be removed from the base.
Always use a torque wrench when removing any nuts, the proper torque value for nuts on
the 800N is 26 inch pounds.
NOTE: Do not use excessive force. Damage may result.

OPERATION
Protecting the Patient, Product, and Provider
Page 1 of 5
Standard Operating Procedures This section will describe standard operating procedures and general usage of the 800N. These instructions should be followed each time the CACI is used.
Inspection Prior to operating the 800N, an operational check should be performed. Use the following criteria to inspect the 800N:
1. Visually inspect the 800N for loose or damaged components. 2. Inspect for sign of obvious wear. If any items are found worn, replace the defective items. Refer to
Section 4 for replacement procedures of damaged or worn parts. 3. Turn on the light and air system switches to confirm operation. 4. Verify that the 800N is operating within the desired negative pressure on no less than negative .01
to negative 0.3 inches of water column.
5. If the indicator is not within this range, perform the following checks: a. Make sure the doors are closed. b. Make sure the gloves and sleeves are installed correctly and sealed. A torn glove,
loose clamp or missing O-ring can disrupt the air pressure. c. Make sure the sharps container is installed properly and sealed. A loose clamp or
container lid can disrupt the air pressure. d. Check the HEPA filter maintenance log. If the filters have not been serviced
recently, it is possible they need replaced. 6. Call CTG for service if the pressure gauge still does not indicate the desired operating
pressure. 7. Once the inspection is complete, proceed with sanitizing the 800N.
Cleaning Clean the 800N using sterile water for irrigation with a mild detergent mixture followed by a sterile water rinse. Cleaning occurs at least once per shift. Sanitizing always follows cleaning. This process loosens and removes product residue. Document this in the log.

OPERATION
Protecting the Patient, Product, and Provider
Page 2 of 5
Physical Area
The IV compounding room is cleaned following the recommendation contained in USP<797>. All cleaning materials shall be non-shedding (lint free), preferably composed of synthetic fibers and dedicated specifically for the area. Frequency of area cleaning per USP<797> is outlined on Page 28, Table 3 of the Revision Bulletin effective June, 2008.
• Counters and easily cleanable work surfaces to be cleaned daily.
• Floors to be cleaned daily.
• Walls to be cleaned monthly.
• Ceilings to be cleaned monthly.
• Storage shelves to be cleaned monthly.
Sanitizing Two factors determine the sterility assurance level of sterile products prepared in your pharmacy.
• Maintaining an ISO Class 5 environment
• Proper sanitization of the work environment The 800N provides the ISO Class 5 environment. Pharmacy personnel are responsible for the proper sanitizing of the 800N. Proper sanitization requires the misting of all internal surfaces of the CACI with a disinfectant, such as sterile alcohol or hydrogen peroxide. Misting is the preferred method of applying the disinfectant because it provides a uniform coverage. A misting bottle is provided in the start-up kit for this task. A second misting bottle should be used outside the chamber to sanitize the airlock after inserting materials. The inner airlock door must be kept closed while the outside door is open. Details on proper airlock usage follow these sanitizing steps. The air system should be on during sanitization.
Sanitizing is required prior to compounding and immediately after compounding. The general rule is everything entering the critical area should be misted with a disinfecting agent. Follow these steps for sanitizing the workstation:
1. Prior to compounding, place a misting bottle containing a disinfectant inside the 800N, if not already present.
2. Close the inner airlock door. 3. Use the gloves / sleeves to access the
chamber and lightly mist all the interior surfaces of the 800N, including sleeves, gloves, and other items inside the chamber.
OPERATION
Protecting the Patient, Product, and Provider
Page 3 of 5
Note: It is best to sanitize at the
beginning of the work shift. Wait two
minutes before compounding. During
the shift, spray down after completion
of compounding, but there is no need to
wait two minutes.
4. Document this activity in the Sanitizing
Log. 5. Gather materials and organize
baskets. 6. After compounding is complete, mist
gloves, sleeves, and the floor of the chamber with a disinfectant.
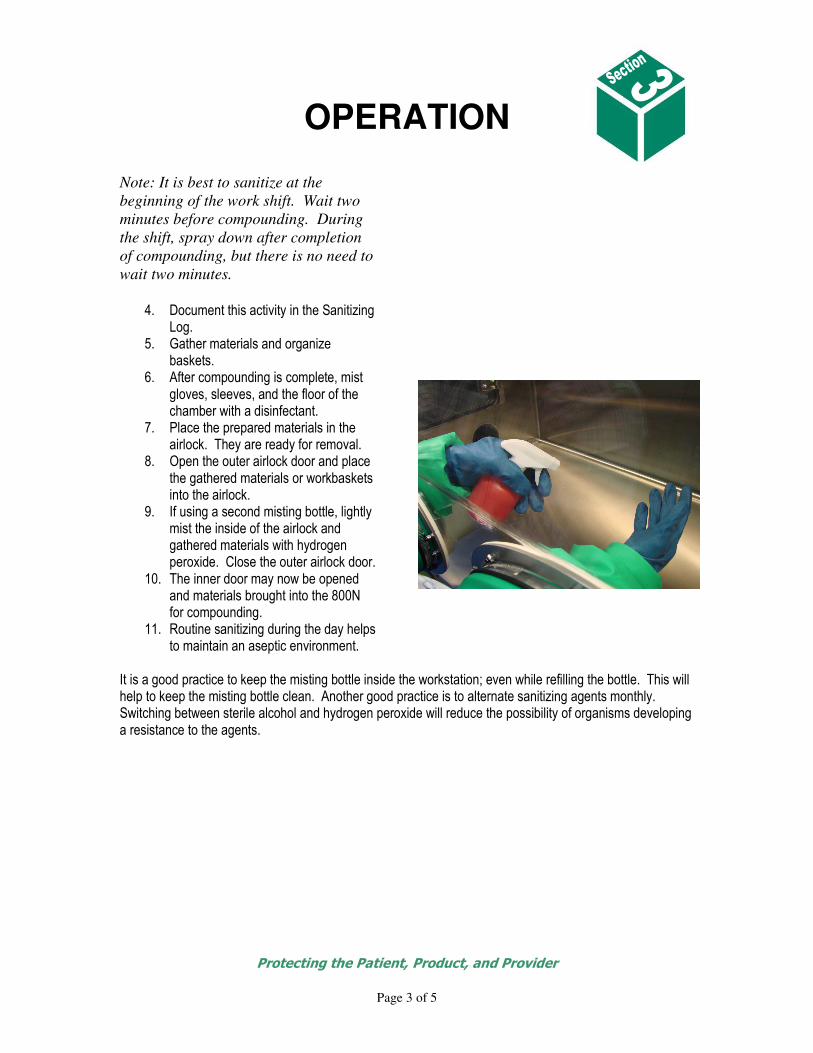
7. Place the prepared materials in the airlock. They are ready for removal.
8. Open the outer airlock door and place the gathered materials or workbaskets into the airlock.
9. If using a second misting bottle, lightly mist the inside of the airlock and gathered materials with hydrogen peroxide. Close the outer airlock door.
10. The inner door may now be opened and materials brought into the 800N for compounding.
11. Routine sanitizing during the day helps to maintain an aseptic environment.
It is a good practice to keep the misting bottle inside the workstation; even while refilling the bottle. This will help to keep the misting bottle clean. Another good practice is to alternate sanitizing agents monthly. Switching between sterile alcohol and hydrogen peroxide will reduce the possibility of organisms developing a resistance to the agents.

OPERATION
Protecting the Patient, Product, and Provider
Page 4 of 5
Height Adjustment The height of the 800N can be adjusted eight inches to accommodate different height personnel and/or allow a comfortable working position whether sitting or standing. Height adjustments can be made at any time by using the hand crank located just below the glove ports. Use the following steps to raise and lower the height adjustment of the MIC:
1. Swing the crank handle into position. 2. Turn clockwise to raise the MIC or counter-
clockwise to lower the MIC. 3. Once the desired height is reach, return
the crank to the folded position. First, pull straight out on the handle, and then swing it out of the way.
4. Operating instructions are on a sticker located near the crank handle.
NOTE: Turning the crank requires only moderate force. The mechanism is equipped with a shear pin to disable the crank if an attempt is made to raise or lower the chamber beyond its limits. Refer to Periodic Maintenance in Section 4 for shear pin replacement
Air Pressure Adjustment The 800N requires no manual adjustments for air pressure. Do not attempt to modify the pressure adjustment. Call CTG for service if the maintenance procedures in Section 4 do not correct any air pressure problems.
OPERATION
Protecting the Patient, Product, and Provider
Page 5 of 5
General use Guidelines Here are a few suggestions to improve productivity, comfort, and safety:
• Develop a sanitizing and airlock usage routine to help reduce mistakes. Although individual materials and supplies can be introduced into the 800N during operation, good planning will help maximize your efforts. Prior to compounding, create a check list of needed supplies and utilize the workbaskets to help organization.
• Place a misting bottle outside the airlock.
• Adjust the height of the workstation so there is approximately a 90° bend at the elbow when your arms enter the glove ports. This adjustment provides a comfortable working position.
• Sleeve and glove liners make working in the 800N sleeves and gloves more comfortable. The liners provide an easier entry and exit and keep the nitrile gloves and sleeves clean longer. Sleeve and glove liners are provided with the start-up kit.
• Wipe up spills right away. This will reduce the possibility of cross-contamination.
• In the event of power loss, the 800N can provide adequate protection if entry and exit is limited.
Range of Environmental Operating Conditions
1. Indoor Use 2. Altitude up to 2000 meters 3. Temperature 5 to 40 degrees centigrade 4. Maximum relative humidity 80% for temperatures up to 31 degrees centigrade decreasing
linearly to 50% relative humidity at 40 degrees centigrade 5. Main supply fluctuations up to 10% of the nominal voltage 6. Transient over voltages typically present on the main supply (over voltage cat II) 7. Pollution degree 1

MAINTENANCE
&
TROUBLESHOOTING
Protecting the Patient, Product, and Provider
Page 1 of 6
This section will provide instructions for daily, weekly and, periodic maintenance, as well as trouble shooting techniques.
Maintenance
Daily Inspect and sanitize the 800N workstation as described in the Inspection and Sanitizing sections of Section 3 (Operation).
Weekly In addition to the Daily Maintenance criteria, an air pressure gauge reading should be taken weekly and recorded in the maintenance log. This data will help monitor filter life and workstation function.
1. The reading may be taken any time while the MIC is in normal use. 2. Make sure the air system has been running for at least three minutes. 3. Read the gauge. The gauge units are in inches of water. 4. Record the reading in the maintenance log to the nearest tenth.
Periodic The sharps container, sleeves, and gloves need periodic inspection and should be replaced as needed. The following paragraphs detail replacement of the items state above.

MAINTENANCE
&
TROUBLESHOOTING
Protecting the Patient, Product, and Provider
Page 2 of 6
Sharps Container Replacement
1. Replace the sharps container as needed or when deemed appropriate by pharmacy personnel.
CAUTION: Disposable gloves should be worn while changing the sharps container if the workstation was last used to prepare hazardous materials such as cytotoxins or other chemotherapy drugs.
2. The sharps container is not intended to be reusable. Make sure a replacement is available for installation.
3. Switch on the 800N air system. 4. Loosen the sharps container connector
clamp, while holding onto container, with a 5/16 nut-driver. A nut-driver was provided with the start -up kit.
5. Lower the container to the floor unscrew the connector from the sharps container.
6. Seal the container with the supplied cap and dispose.
7. Position the connector on the new sharps container and turn counter-clockwise until the threads align. Turn clockwise until the connector is tight.
8. Raise the connector and container assembly to the sharps port and securely tighten the clamp.
9. Sanitize the 800N and verify proper air pressure.

MAINTENANCE
&
TROUBLESHOOTING
Protecting the Patient, Product, and Provider
Page 3 of 6
Glove Replacement - Cytotoxins and Other Hazardous Drugs Gloves used in the preparation of hazardous materials should not be reused, nor should they be removed through the glove ports when replaced. Use the waste chute in the 800N to dispose of the gloves. Replace the gloves as needed or when deemed appropriate by pharmacy personnel. Gloves are to be tested for permeation to ASTM D6978-05. Procedure:
1. Ensure that the 800N air system is running. 2. Reach into the sleeve and glove and pull the
sleeve inside out. 3. Remove the O-ring from the glove retainer but do
NOT loosen the glove. 4. Put the replacement glove on your hand. While
wearing the replacement glove, loosen the old glove from the retainer and push it into the sleeve for later disposal.
5. Place the gloved hand in the appropriate sleeve, in a natural working position. The open end of the glove should protrude from the sleeve by at least one inch.
6. Grasp the glove through the sleeve with the opposite hand and remove your hand from the glove. The glove is aligned and ready to mount on the retainer. To stretch the glove over the retainer, hold the sleeve and retainer in your hands with the glove opening facing away from you.
7. With thumbs under the retainer, grasp the glove opening with your fingers and pull the glove over the retainer. Overlap the retainer completely. The fold should be smooth, with no wrinkles, and no portion of the retainer should be visible. Smaller gloves will be more difficult to stretch, but this technique will ease the task.
8. Install the O-ring over the glove and sleeve and into the retainer groove. This will be the final orientation of the glove.
9. If the glove or sleeve is twisted or uncomfortable, reposition the glove and reinstall the O-ring.
10. Repeat these steps for the other glove(s). 11. Once the replacement gloves are installed, push
the old gloves into the chamber and place in the waste container chute.
12. Verify proper air pressure.
MAINTENANCE
&
TROUBLESHOOTING
Protecting the Patient, Product, and Provider
Page 4 of 6
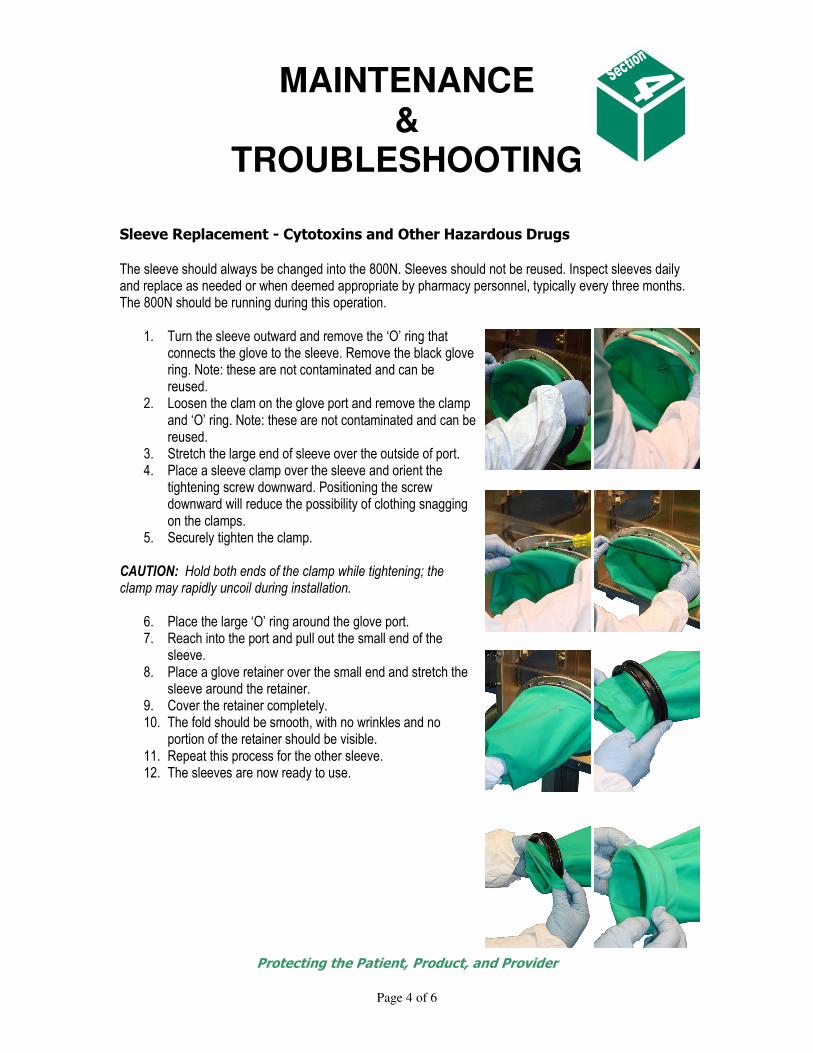
Sleeve Replacement - Cytotoxins and Other Hazardous Drugs
The sleeve should always be changed into the 800N. Sleeves should not be reused. Inspect sleeves daily and replace as needed or when deemed appropriate by pharmacy personnel, typically every three months. The 800N should be running during this operation.
1. Turn the sleeve outward and remove the ‘O’ ring that connects the glove to the sleeve. Remove the black glove ring. Note: these are not contaminated and can be reused.
2. Loosen the clam on the glove port and remove the clamp and ‘O’ ring. Note: these are not contaminated and can be reused.
3. Stretch the large end of sleeve over the outside of port. 4. Place a sleeve clamp over the sleeve and orient the
tightening screw downward. Positioning the screw downward will reduce the possibility of clothing snagging on the clamps.
5. Securely tighten the clamp. CAUTION: Hold both ends of the clamp while tightening; the clamp may rapidly uncoil during installation.
6. Place the large ‘O’ ring around the glove port. 7. Reach into the port and pull out the small end of the
sleeve. 8. Place a glove retainer over the small end and stretch the
sleeve around the retainer. 9. Cover the retainer completely. 10. The fold should be smooth, with no wrinkles and no
portion of the retainer should be visible. 11. Repeat this process for the other sleeve. 12. The sleeves are now ready to use.

MAINTENANCE
&
TROUBLESHOOTING
Protecting the Patient, Product, and Provider
Page 5 of 6
HEPA Filter Inspection and Replacement
The HEPA filters should be tested on a routine basis. The filters should be replaced if:
• The pressure in the 800N becomes too high (reads above 0.0 inches water column)
• The filters fail to meet ISO Class 5 requirements
• When deemed necessary by pharmacy personnel Replacement filters are available from Containment Technologies Group. CTG also provides recommended procedures plus training materials. Have your certifying company contact CTG at 317-713-8200 if they do not have the filters.
Shear Pin Replacement (Hand Crank Repair) The hand crank shear pin is designed to break when too much force is applied to the crank. This prevents the unit from being raised or lowered beyond its limits.
1. Replace the shear pin when the height-adjusting crank becomes disabled. 2. Replacement pins are available from CTG. Call 317-713-8200 3. Remove the hand crank from the shaft. 4. Remove any remaining pieces of the old shear pin from the crank and the crankshaft. 5. Tap a new shear pin into the small hole in the handle. 6. Re-install the handle onto the shaft and align the pin with the hole in the shaft. 7. Tap the pin into the handle and shaft until the pin is flush with the crank.
MAINTENANCE
&
TROUBLESHOOTING
Protecting the Patient, Product, and Provider
Page 6 of 6
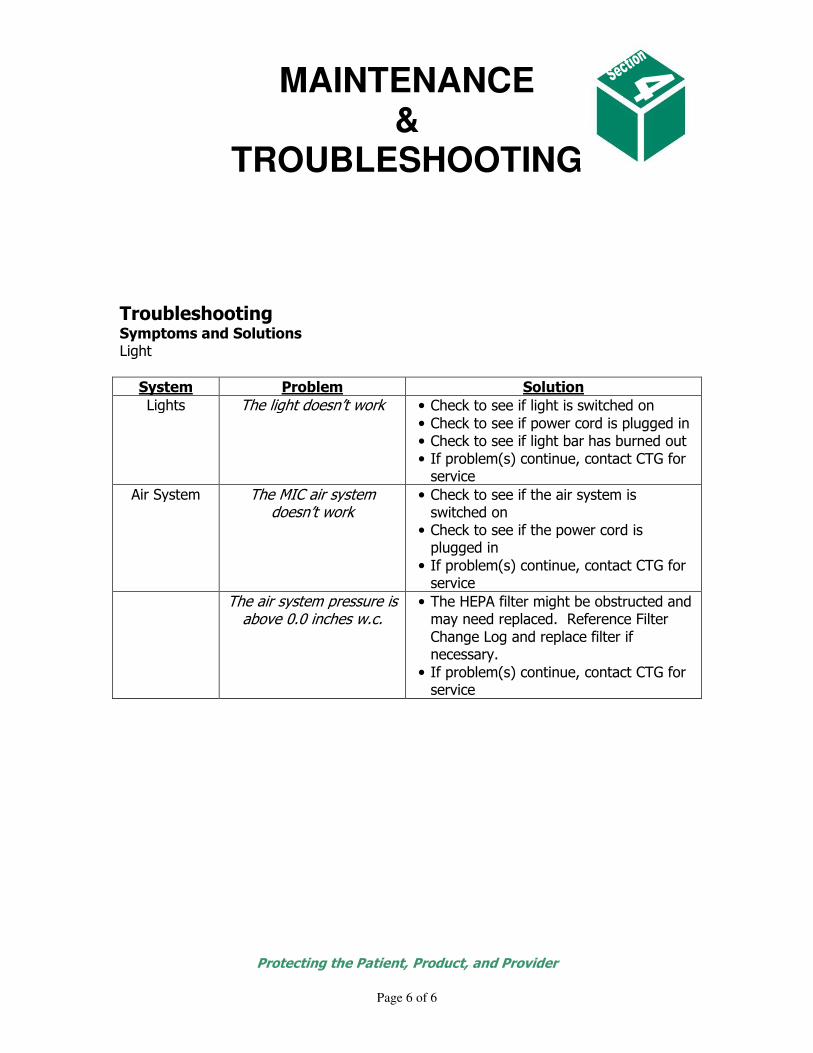
Troubleshooting Symptoms and Solutions Light
System Problem Solution
Lights The light doesn’t work • Check to see if light is switched on • Check to see if power cord is plugged in • Check to see if light bar has burned out • If problem(s) continue, contact CTG for service
Air System The MIC air system doesn’t work
• Check to see if the air system is switched on
• Check to see if the power cord is plugged in
• If problem(s) continue, contact CTG for service
The air system pressure is above 0.0 inches w.c.
• The HEPA filter might be obstructed and may need replaced. Reference Filter Change Log and replace filter if necessary.
• If problem(s) continue, contact CTG for service

800N POLICIES & PROCEDURES
Protecting the Patient, Product, and Provider
Page 1 of 10
I. PURPOSE
To establish standardized procedures and processes for the safe compounding of
hazardous sterile preparations. The goal of the IV admixture program is to ensure that
patients receive parenteral therapies as prescribed, free of microbial and particulate
contamination, and unaltered by incompatibilities and interactions.
II. POLICY
Pharmacy Service will provide IV admixtures and sterile compounded preparations for
all areas within the hospital, except in limited emergency situations in which the
preparation will be used immediately.
III. ACTION
Definitions:
A. 800N:
An ISO Class 5 environment.
Compounding is to take place in the Direct Compounding Area. This area is
where the critical sites are exposed during manipulation of the components used
in compounding.
B. Cleaning:
Cleaning of the 800N is to occur at least once per shift. Cleaning should also
occur anytime there is a spill or a known introduction of contamination. The
purpose of cleaning is to remove any solid materials that may cause cross-
contamination from the surface of the 800N. Sanitizing always follows cleaning.
C. Sanitizing:
Misting the 800N using a sanitizing solution of either 70% sterile isopropyl
alcohol or hydrogen peroxide 3%. The sanitizing process minimizes
environmental microbial bioburden. Materials placed in the airlock should be
sprayed down with a disinfecting agent such as hydrogen peroxide 3% to reduce
bioburden on incoming materials.

800N POLICIES & PROCEDURES
Protecting the Patient, Product, and Provider
Page 2 of 10
FREQUENCY SCHEDULE
1. Inside the 800N – A complete sanitization process should
occur after each cleaning routine (at least once per shift).
2. Allow the disinfecting agent to dry for at least 2 minutes.
Sanitization should occur routinely throughout compounding,
this continuous process is described in detail in section V.E.
3. Daily cleaning and sanitizing – counters, work surfaces and
floors
4. Monthly – walls, ceilings and shelving surfaces
Document this in the cleaning and sanitizing log.
IV. PHYSICAL AREA:
A. The IV compounding room is cleaned by the identified responsible person or
department. All cleaning materials shall be non-shedding (lint free), preferably
composed of synthetic fibers and dedicated specifically for the area.
1. Frequency of area cleaning:
Counters and easily cleanable work surfaces Daily
Floors Daily
Walls Monthly
Ceilings Monthly
Storage Shelves Monthly
B. The IV compounding room is segregated from normal pharmacy operations.
Segregation should be by physical walls and requires a negative pressure. Access
to the IV compounding area is restricted to authorized personnel in an effort to
minimize unnecessary traffic, employee distraction and/or potential microbial
contamination.
C. Trash is removed daily.
D. Paper, cardboard and particulate materials are minimized in the area. Supplies are
unpacked in an external area.
E. No food, chewing gum, or drinks are permitted in the IV compounding area.
F. Trays utilized in the compounding process are sanitized daily and as necessary.
800N POLICIES & PROCEDURES
Protecting the Patient, Product, and Provider
Page 3 of 10
G. Temperature is controlled and monitored in areas where drugs are stored. Storage
temperatures are defined by USP or manufacturers label for the drugs and shall be
monitored at least daily with results documented.
H. The negative pressure 800N is utilized for sterile hazardous preparations.
I. Storage of hazardous drugs is described in USP<800>.
V. 800N :
A. The 800N can be turned off without impacting the integrity of the system if both
airlock doors remain closed.
B. During routine changes of gloves, sleeves, or sharps containers, the
blower on the 800N is left ON.
C. The frequency of changes is as follows and changes are documented on
the monthly log:
1. Gloves (non-powdered, nitrile): Sterile gloves are required and are to be tested
to ASTM D6978-5 for permeability.
(a) Gloves are to be changed at least weekly, when personnel hand sizes
require the change, or at any sign of wear or breach of integrity.
2. Sleeves: Sleeves are to be changed every three months or at any sign of wear
or breach of integrity. (note: sleeves are not required to be sterile)
3. Sharps containers: Change as they become full.
4. Blowers: Blowers should be operated at all times. If the 800N is turned off,
operate for 2 minutes prior to compounding.
D. Interior Cleaning of 800N:
PURPOSE
Cleaning of the 800N is to occur at least once per shift. Cleaning should also
occur anytime there is a spill or a known introduction of contamination. The
purpose of cleaning is to remove any solid materials that may cause cross-
contamination from the surface of the 800N.
800N POLICIES & PROCEDURES
Protecting the Patient, Product, and Provider
Page 4 of 10
Cleaning procedure - Clean the 800N using sterile water and a mild detergent
mixture followed by a surface rinse and sanitizing. Some materials are difficult to
clean and may require a more aggressive cleaning agent than mild detergent. If
areas prove to be difficult a more aggressive agent such as “Barkeepers Friend” a
non-chlorinated cleaner may be used on the difficult areas.
Items Needed
- Spray Bottle with sterile water
- Hydrogen Peroxide or Alcohol Spray Bottle
- Sterile wipes
- Squeegee /Swiffer
- Cleaning solution consisting of a mild detergent in a spray bottle
METHOD
Routine Cleaning 800N:
- Remove all unnecessary items from the chamber.
- Mist all surface areas with sterile water (use a small amount of mild
detergent mixed with sterile water in a spray bottle to clean surfaces).
- Use a squeegee (the webbed side) to scrub surfaces.
- Use the wiper blade side of the squeegee to remove excess liquid.
- Rinse the surfaces with sterile water using the spray bottle.
- Use the squeegee or sterile wipe to remove any liquid.
- Sanitize after allowing to dry.
Storage of the Squeegee Head
- The squeegee head is to be stored in a sealed zip lock bag and replaced
monthly. Before placing the squeegee head in the bag, it is to be sprayed
with a decontaminating agent such as sterile alcohol or hydrogen peroxide.
- The routine cleaning cycle will be documented daily and weekly on a
cleaning/sanitizing log.
E. Sanitizing/ Decontamination of 800N:
1. Sanitizing of the chamber shall be by misting the entire interior surfaces of the
800N with an effective sanitizing agent. Effective sanitizing agents are sterile
70% isopropyl alcohol and non-sterile hydrogen peroxide 3%.
(a.) A light mist of the sanitizing agent should be applied to all interior
surfaces (top, bottom, sides, window, sleeves and gloves) and allowed
to stand for two (2) minutes. Wiping should only occur if there is a
visibility problem or puddles. Using a squeegee, wipe top to bottom,
800N POLICIES & PROCEDURES
Protecting the Patient, Product, and Provider
Page 5 of 10
sides and back to front. This procedure should be done at the
beginning of the work shift.
2. During the work shift as personnel complete preparation of doses; spray down
the critical surfaces, including gloves and sleeves, before exiting the 800N.
3. The airlock should be misted with hydrogen peroxide with each entry.
VI. COMPOUNDING PERRSONEL RESPONSIBILITIES 800N
A. Hand washing:
1. Wash hands and arms to elbow with an antimicrobial soap at the sink.
2. Sanitize hands with alcohol foam/gel prior to entering the IV compounding
area.
B. Proper attire:
1. Authorized personnel who enter the IV compounding area are properly
garbed. Proper garb per USP<800>.
2. Jewelry should not be worn on the hands or wrists since it may introduce
bacteria or particles into the clean work area. If jewelry cannot be removed,
cloth glove liners are worn to reduce the potential of puncturing the gloves.
3. Personnel who regularly or occasionally prepare sterile compounded
preparations may not wear artificial fingernails or extenders.
C. Setup (Preparation of materials for introduction into the airlock of the 800N):
1. Materials entering the airlock are to be sprayed down per with 3 % hydrogen
peroxide.
2. When the final preparation(s) is/are completed, re-sanitize the interior
of the 800N and begin a different medication/dose.
3. Using the IV label(s) header or the IV compounding report as a reference,
assemble all materials (i.e. medications, diluents, IV solutions, syringes,
needles, sterile wipes, security seals) needed to complete the final
preparation. For hazardous substance compounding, add a zip lock
transport bag labeled as ‘chemotherapy’ and/or auxiliary labels.

800N POLICIES & PROCEDURES
Protecting the Patient, Product, and Provider
Page 6 of 10
(a) Before compounding the following steps are recommended:
(1) Visually inspect the products for signs of cloudiness,
particulates, cracks, punctures, manufacturer expiration dates
or other characteristics that may indicate that the product is
defective.
(2) Record the lot number and manufacturer expiration dates of the
additives and diluents on the IV compounding report or the IV
label header. Note any dosage calculations.
(3) The pharmacist will validate the ingredients with the IV labels,
verify the dosage calculations, and sign the report/label prior
to compounding.
(4) Place the assembled non-paper items into a plastic tray (that
has been previously sanitized). Remove the outer wrap of any
IV solutions. Mist or wipe with the designated sanitizing
agent before introduction into the 800N.
(5) Place paper items (syringes, needles, labels with appropriate
post-compounding storage requirements, security seals) into a
separate tray.
(b) Verify the inner airlock door is closed.
(c) Place the trays into the airlock, and mist with hydrogen peroxide.
(d) Close and latch the airlock door.
VII. STERILE COMPOUNDING – 800N
A. Check the pressure setting on the gauge of the 800N (negative).
B. Enter the 800N through the glove/sleeve ports.
C. Verify the outer airlock door is closed.
D. Open the interior air lock door and transfer the tray into the 800N

800N POLICIES & PROCEDURES
Protecting the Patient, Product, and Provider
Page 7 of 10
E. Begin the sterile compounding preparation using proper procedures and
aseptic technique. There are no restrictions for positioning the items.
Aseptic manipulations are to occur in the direct compounding area of the isolation chamber.
1. Spray all entry ports or ampoule necks. Enter medication ports using
proper needle size, inserting needle bevel up and downward pressure.
2. Reconstitute medications, as needed, using appropriate diluents,
volume, and syringe.
3. Check medications, diluents, and volumes to be used for the
preparation with the IV label.
4. Withdraw desired amount of medication using an appropriate size
syringe and needle. Inject into the infusion bag as needed. (Remove
air bubbles from the syringe to obtain an accurate measurement.)
5. Mix/agitate the admixture after each addition and at the end of the
preparation.
6. Visually inspect the final preparation for incompatibility, particulate
matter, and color changes. If the final preparation is ‘defective’,
dispose of the item and prepare an additional dose.
7. Compress IV bag to detect leaks.
8. Place a tamper evident seal over the injection port or syringe tip.
9. Document beyond use date and time on the IV label. Initial the label
as ‘prepared by’. Affix the IV label and any auxiliary labels (filters,
storage requirements) to the final preparation.
10. Verify that the outer airlock door is closed. Place the finished
preparation, the additive(s) and diluent(s) into the tray. Place into the
airlock chamber.
11. Discard syringes, needles and trash into the appropriate containers
attached to the 800N.
12. Sanitize/clean the surfaces of the 800N including gloves and sleeves.

800N POLICIES & PROCEDURES
Protecting the Patient, Product, and Provider
Page 8 of 10
13. Verify the inner airlock door is closed and remove the finished
preparation for checking and delivery.
14. Multi-dose vials are dated and initialed upon opening. After
compounding has occurred; the partial vials are immediately placed
into the proper storage area.
15. Partial single dose vials (no preservative) are immediately discarded
after use.
VIII. STAFF TRAINING and COMPETENCY
A. All pharmacy personnel preparing sterile preparations receive didactic and
experiential training and competency evaluation through demonstration or testing
(written and practical). Aseptic technique is tested utilizing growth media (broth
fill testing).
B. Testing occurs upon hire and annually thereafter.
C. Compounding personnel who fail written tests or who media-fill test shows gross
colonization must be immediately re-instructed and reevaluated. Personnel who
fail media-fill testing may not perform sterile compounding until the media-fill
testing demonstrates competence.
D. Documentation of employee training and process verification is retained for a
period of three years.
X. QUALITY CONTROL:
A. Routine maintenance and certification shall take place based on the following
schedule:
1. The isolation chamber shall be certified by a qualified individual on a
semi-annual basis, in accordance with the rules of the State.
2. Routine checks are outlined in the 800N owner’s manual.
B. Environmental monitoring:
1. Viable airborne shall occur in the 800N every six months using a
volumetric collection method.

800N POLICIES & PROCEDURES
Protecting the Patient, Product, and Provider
Page 9 of 10
2. Surfaces in the interior of the 800N are sampled monthly utilizing
touch plates. Surfaces tested are gloves, sleeves, floor, windows,
and sidewalls. The day of the week and time of day are rotated.
3. Gloved finger tip sampling shall occur as follows:
(a) Before compounding an individual must successfully
complete an initial competency test using a sterile agar
plate and touching it three time with results showing zero
cfu’s.
(b) The finger tip test is required annually for low &
medium risk and semi-annually for high risk.
(c) This testing should be incorporated into the media-
fill test procedure. Results should be recorded per
hand per employee. The cfu action level will be
based on the total cfu’s on both hands.
4. Results of the sampling are documented in a log.
XI. ACTION PLAN WHEN (CFU’s) ARE DETECTED:
A. 1-2 CFU’s: send an e-mail reminder to staff of the results.
B. 2-5 CFU’s: thoroughly clean and sanitize the 800N and inform staff
regarding the results.
C. Greater than 5 CFU’s: send the plate to microbiology or culture. Thoroughly
clean and sanitize the 800N and inform the staff. Based upon the culture
results, determine an appropriate remedy.
XII. HOUSEKEEPING DOCUMENTATION:
A. Housekeeping will document cleaning of the IV compounding room daily on a
log.
B. Housekeeping will document shelf-cleaning quarterly on the monthly log.
C. The monthly log will list the cleaning agent utilized and the routine cleaning
activities performed.
D. A copy of the monthly log will be provided to the Inpatient Pharmacy
Supervisor for inclusion with other records for retention.

800N POLICIES & PROCEDURES
Protecting the Patient, Product, and Provider
Page 10 of 10
XIII. RECORD RETENTION:
A. The following documentation are retained:
1. Refrigerator and freezer temperature logs.
2. IV compounding room and main pharmacy room temperature logs.
3. Cleaning/sanitizing logs
(a) For each 800N.
(b) For the compounding area.
4. Aseptic media-fill logs (low and medium risk annually and as necessary
for high risk semi-annually).
5. Employee didactic skills assessment checklists
(low and medium risk annually and as necessary for high risk semi-
annually).
6. Compounding documents.
7. Engineering control certification of the 800N (every 6 months).
8. Environmental monitoring logs
(a) Viable air sampling results
(1) In the 800N
(2) In the compounding area
(b) Surface sampling results
(1) In the 800N
(2) In the compounding area
(c) Fingertip sampling results

PRODUCT
SPECIFICATIONS
Protecting the Patient, Product, and Provider
Page 1 of 2
MIC 800N
This document describes the physical attributes of an 800N. The 800N is compliant with the current USP<797> in its description of a CACI (Compounding Aseptic Containment Isolator) operated under negative pressure. For preparing your purchasing specification please feel free to utilize the information contained in this document. If you have technical or commercial questions please contain Containment Technologies Group at 317 713-8200 and ask for sales or technical support.
Physical Specifications Dimensions Overall Dimensions: 56 inches long x 31 inches deep x 79 inches high Internal Dimensions: 40 inches long x 27 inches deep x 34 inches high
Airlock Dimensions: Door Opening:
15 inches long x 15 inches deep x 11 inches high 11.5 inches long x 10.5 inches high
Construction of Materials Chamber: 316L stainless steel
Viewing window and airlock(s): Chemical and shatter-resistant engineered plastic Power Requirements 115 Volt, 60 HZ, 15Amps IV Bar Constructed of stainless steel and is removable. Ten IV hooks provided in start-up kit
Height Adjustable Eight inches vertical from a 42 inch center line of the glove port. Glove ports Mounted for maximum reach within the cabinet. Portable Mounted on locking casters for easy installation and facility
cleaning. Pressurization The pressure operating range of -0.01 to -0.30. The pressure is
negative. Electrical Attributes All electrical components UL approved Blower Motor Less than 1.5 AMPS Power Draw Lighting LED Light Bar Power Cord 12 foot w/ hospital grade plug Digital Gauge Digital Pressure Monitoring Particulate Control Unidirectional airflow in the compounding zone per USP <797> HEPA Filtration Chamber Filter Dominations PART 3 85502D301 24” deep by 38” wide and 3” deep 99.99% Efficient @ .3 Micro < 93 Air Changes per Hour

PRODUCT
SPECIFICATIONS
Protecting the Patient, Product, and Provider
Page 2 of 2
The particulate air quality meets and exceeds ISO class 5 per ISO 14644-1:1999(E) as tested per ISO standard 14644-2:2000(E) and ISO 14644-3:2005(E) The HEPA filters scanned per IEST-RP-CC0034 Microbiological Control The static airlock in combination with spray down procedures provides increase sterility assurance of materials being introduced into the main chamber. Validation can be provided. Ergonomic Attributes
1. Stainless steel IV bar with 10 hooks for easy manipulation of IV bags.
2. Owner’s manual with personnel tips for good ergonomic practice for using the MIC.
3. Oval glove ports
4. Ergonomic help section included in owner’s manual
Testing Standards and Certifications Conforms and tested to UL Std 61010-1 CAN/CSA C22.2 NO 610101-1
Cabinet tested and verified to meet ISO 14644-1:199(E) ISO class 5
Cabinet tested and verified to be gas tight per an ammonia leak test
Sound tested and verified to be less than 50 dba.
Customer Support Owner’s Manual including policies and procedures
Installation and on-site training
Options Airlock can be located on either right or left side to facilitate workflow and layout. A second airlock can be added to maximize workflow Slide tray in airlock Start-up kit with all the supplies necessary to begin operation Installation and staff training
Internal electrical power supply, 115 Volt, 60 HZ, 15Amps, either one or two duplex boxes containing two plugs Outside exhaust kit including flex connection to facility exhaust system Custom options available including overall chamber size Complete supplies available for operations Media fill kits for compliance to USP <797> personnel trading requirements ESP Extended Service plan Certification Services

REPLACEMENT
PARTS
Protecting the Patient, Product, and Provider
Page 1 of 2
The 800N is designed to utilize many “off-the-shelf” consumables and replacement parts. These items are available from various vendors, but usually in large quantities. CTG offers these products both in large and small quantities. To place an order, contact CTG using any of the following methods:
• Telephone: (317) 713-8200
• Fax: (317) 713-8201
Taxes, shipping, and handling charges will be added to all orders. Allow 10 days for standard delivery.
Consumables currently available from CTG
B/D Sharps Container (Yellow) Stock # - 305578/Chemo Size – 5 gallon Quantity – 8 per case
½ Finger Glove Liners Stock # - HFL-21 Size – 1 size Quantity – 12 pair per package
Blue Sterile Nitrile Gloves (11mil) Stock # – IR37-510 Sizes – 7, 8, 9, & 10 Quantity – 12 pair per package Gloves individually wrapped
Full Finger Glove Liners Stock # – FFL-22 Size – 1 size Quantity – 12 pair per package
Blue Nitrile Gloves (11mil) Stock # – 37-510 Sizes – 7, 8, 9, & 10 Quantity – 12 pair per package
Tyvek Sleeve Liners Stock # – 1894P Size – 1 Size Quantity – 1 pair per package
Shear Pin Stock # – SP5/32 Size – 1 size Quantity – 1 each
HEPA Filter Stock # – HEPA Size – 1 Size Quantity – 1 each
O-ring (glove retainer) Stock # – 2-343N70 Size – 1 size Quantity – 1 each
Nitrile Sleeves (oval) Stock # – N2710 Sizes – 10 inch port Quantity – 1 pair per package

REPLACEMENT
PARTS
Protecting the Patient, Product, and Provider
Page 2 of 2
Black Glove Retainer Stock # – BLK/GR-01 Size – 1 size Quantity – 1 each
Sleeve Clamp (oval) Stock # – SLC188 Size – 10 inch Quantity – 1 each
Blower Motor Stock # – Blower Motor Size – 1 size Quantity – 1 each
Sharps Clamp Stock # – S/TC080 Size – 5 inch Quantity – 1 each
Squeegee – 15 inch Stock # – WS1524U Size – 15 inch Quantity – 1 each
Bar Keepers Friend Stock # – BKF-4.5 Size – 4 ½ oz Quantity – 1 size
Squeegee – 20 inch Stock # – WS2024U Size – 15 inch Quantity – 1 each
Nut Driver Stock # – 61-807 Size – 5/16 inch Quantity – 1 each
Sharps Adapter Stock # – Sharp Adapter Size – 1 size Quantity – 1 each
Plastic Spray Bottle Stock # – PSB8-OZ Size – 8 oz Quantity – 1 each
Small Plastic Basket Stock # – SMB40-711 Size – Small Quantity – 1 each
Large Plastic Basket Stock # – LGB51-711 Size – Large Quantity – 1 each
Waste Port Covers Stock # – WPC-104 Size – 1 size Quantity – 1 each
Hooks Stock # – 44184ACE Size – 1 size Quantity – 12 per package
WARRANTY
Protecting the Patient, Product, and Provider
Page 1 of 1
LIMITED WARRANTY
For a period of one (1) year from initial installation, Containment Technologies Group, Inc. warrants that the workstation will be free of defects in materials and workmanship. Containment Technologies Group, Inc. will support the correction of defects that may substantially effect the operation of the workstation. If the customer identifies any potential defects, Containment Technologies Group, Inc. is to be informed immediately. This limited warranty does not cover damage caused by improper use or neglect. The proper protocol or standard operating procedure must be followed in operating the workstation and failure to do so negates the warranty. Containment Technologies Group, Inc. does not warrant factors beyond its control. These factors include but are not limited to: operation and maintenance by personnel improperly trained and certified in the use of the workstation, modifications, alterations, normal wear and tear, tampering, improper adjustments, accidents and Acts of Nature. This warranty does not cover equipment already covered under a manufacturer’s warranty. Containment Technologies Group, Inc. shall not be liable under this limited warranty for incidental, special, indirect or consequential damages including without limitation loss of use, loss or delay of anticipated revenue, losses by reason of shut-down, cost of substitute facilities or service or other similar damages. Containment Technologies Group, Inc.’s sole liability, including liability arising out of contract, negligence, and strict liability in tort and warrant, shall not exceed amounts payable to Containment Technologies Group, Inc. for the equipment described herein. The above is a limited warranty and is the only warranty made by Containment Technologies Group, Inc. No other warranty, expressed or implied is given. In consideration for this warranty all liabilities or obligations of Containment Technologies Group, Inc. for damages arising out of or in connection with this equipment or use thereof is absolved.
Model:__________________________
Serial:______________Date:________
Electrical Requirements Volts:___________ Phase:__________
Hertz:___________ Amps:__________
Warning:
Use of this equipment is to be by authorized
personnel only. Proper procedures and protocols
must be strictly followed. Spare or replacement
parts should be obtained from CONTAINMENT
TECHNOLOGIES GROUP, INC. Use of this
equipment beyond the annual certification date is
strictly prohibited. Any deviations may invalidate
your warranty.
5460 Victory Dr. Suite 300
Indianapolis, In 46203
Phone: 317-713-8200
Fax: 317-713-8201
www.mic4.com

ERGONOMIC
CONSIDERATIONS
Page 1 of 9
Introduction
Containment Technologies Group recognizes the importance of proper preparation and
positioning while performing routine activities during compounding. In order to
maximize each participant’s potential, it is important to prevent fatigue and personal
injury. The Center for Disease Control (CDC) has determined that personnel can be at
risk for repetitive injuries during routine laboratory procedures that, in many ways, are
similar to the activities performed in the compounding of sterile products.
Fatigue is a major contributor to errors in compounding and can easily creep into the
routine of workers who do not utilize the appropriate tools to avoid it. Employees may
experience injury by creating stresses on their bodies, both during the performance of
routine activities and by incorrect static positioning during work related duties.
Containment Technologies Group is committed to providing information that will allow
our customers to train their employees in the use of proper body mechanics related to
working with our products. The tools and techniques presented will minimize the
potential for fatigue and personal injury in the work place while compounding sterile
products using the MIC isolator.
Basic Elements of a Sound Ergonomic Program
1. Encourage employees to engage in a stretching routine to warm up before starting
their daily compounding routine.
2. Provide support equipment to reduce the potential for physical stress.
3. Encourage mini breaks throughout the process.
4. Provide training and follow-up on recommended work practices.
Seven Habits for Ergonomics
1. Work at proper heights
2. Reduce pressure points
3. Reduce static load and fatigue
4. Keep items within easy reach
5. Reduce excessive force
6. Minimize awkward and sustained postures
7. Reduce repetitive motion

ERGONOMIC
CONSIDERATIONS
Page 2 of 9
Employee Daily Stretching and Warm-Up Routine
Remember the basics!!
1. Pain is NOT gain. Stretch until you feel a mild tension that relaxes as you
hold the stretch.
2. If a stretch creates discomfort, STOP.
3. Do not bounce.
4. Do not hold your breath. Breathing naturally helps muscles relax.
Example Stretching Exercises:
Wall Sits
• Stand with your back against a wall
with your heels positioned in front of
you knees.
• Slowly lower your hips toward the
floor until your thighs are almost
parallel to the ground. Your legs may
tire easily at first.
• Hold the position for 10 seconds.
• Repeat this strength exercise 3 to 10
times
Calf Stretch
• Lean forward, with your hands against
a wall.
• Bend one leg with a lunge position
(slight bend) in front of you. Keep
your other leg straight behind you with
your heel pressed toward the floor and
your toes pointed straight toward the
wall.
• Hold the stretch for 15 seconds.
• Repeat with the other leg.

ERGONOMIC
CONSIDERATIONS
Page 3 of 9
Quad Stretch
• Hold onto a stable object for support
(e.g. a wall or chair).
• Bend one knee, grab your foot and
gently pull your heel toward your
buttock until a slight stretch is felt.
Keep your knee pointed toward the
floor.
• Hold the stretch for 15 seconds.
• Repeat with your other leg.
Back Stretch
• Stand with your feet about shoulder
width apart. Do not lock your knees.
• Place your hands just above your hips
with your fingers pointing downward.
• Gently push your palms forward,
bending backward at the waist.
• Look straight ahead. Keep your head at
midline with your ears aligned with
your shoulders (do not throw your
head back).
• Hold a comfortable stretch for 10
seconds and then return to the upright
position.
• Repeat 3 times
Overhead Reach
• Lean against a wall with your knees
bent.
• Press your lower back flat into wall as
you lift your arms overhead. Keep
your elbows straight.
• Hold this stretch for 10 seconds.
• Repeat 3 times.

ERGONOMIC
CONSIDERATIONS
Page 4 of 9
Standing Side Bends
• Stand with your feet shoulder width
apart one hand on your hip and one
hand held overhead.
• Bend sideways until you feel a gentle
stretch on the opposite side. Keep your
stomach muscles tight.
• Hold to 5 t o 10 seconds and then
repeat to the opposite side.
• Repeat 3 times on each side.
Shoulder Shrugs
• Stand up straight with your shoulders
relaxed. Look straight ahead.
• Lift your shoulders toward your ears
until you feel a slight tension in your
neck and shoulders.
• Hold for 5 seconds.
• Relax your shoulders into their normal
position.
• Repeat the exercise 5 to 10 times
Neck Rotation
• Stand or sit with your arms hanging
loosely at your sides.
• Gently turn your head as though you
were looking over your shoulder. Try
not to tilt your head sideways. Keep
your upper body still and your
shoulders facing forward.
• Hold 5 to 10 seconds, and then turn
your head the other way.
• Repeat 3 to 5 times in each direction.

ERGONOMIC
CONSIDERATIONS
Page 5 of 9
Midline Cross Stretch
• Bring arms across chest trying to reach
as far around your back as possible.
• Hug yourself until you feel a stretch
across your back and arms.
• Hold 5 to 10 seconds
• Repeat 3 times.
Wrist Stretch
• Bend elbows to 90 degrees at sides
(may rest on arm rest of chair)
• With palms of hands facing down,
bend wrist downward
• Hold 3-5 seconds
• Bend wrist upward
• Hold 3-5 seconds
• Repeat 3-5 times with each wrist
Wrist Circles
• Place elbows at sides
• Circle wrists in opposite directions 3-5
times.
• Reverse directions and circle 3-5 times
• Repeat cycle 2 times.

ERGONOMIC
CONSIDERATIONS
Page 6 of 9
Provide support equipment to reduce the potential for physical stress…
The 800N isolator is equipped with an adjustable height feature that, when standing,
allows the operator to work at an appropriate and comfortable height. On a routine basis,
it is recommended that operators rotate between a standing and a sitting position. An
ergonomic chair is critical to this rotation.
The following criteria should be considered in selection of a chair...
• Does the seat pan feel comfortable and fit your shape? When you sit in the chair, the seat pan should be at least one inch wider than your
hips and thighs on either side. The length of the seat should not impact your ability to
bend your knees. If the seat touches too close to the back of the knee, it will prevent
you from leaning fully back against the lumbar support. Most ergonomic chairs have
a seat pan with a waterfall front that prevents the seat from catching behind the
knees. The seat pan should also be contoured to allow even weight distribution and it
should be comfortable to sit on.
• Is the seat chair height adjustable? For preference, the chair should be pneumatically adjustable so that you can adjust
seat pan height while you are sitting on the chair. Some chairs have a mechanical
height adjustment (spinning mechanism) that is also acceptable.
• Is the range of height adjustment of the chair sufficient to meet the needs of all
users?
You should be able to adjust the height of the seat pan so that the front of your knees
is level or slightly below level (90 degrees) and your feet are firmly on the ground.
In most cases there should be no need for you to use a footrest, however, if your feed
do not touch the floor, a footrest may be necessary. The mechanism to adjust seat
height should be easy to reach and operate when you are seated.
• Does the chair have a comfortable lumbar (lower back) backrest? Many chairs have cushioned lumbar supports that can be adjusted up and down and
forward and backward to best fit your shape. If the chair will be used by multiple
users, then various levels of adjustment may be required. If the chair has a fixed
height lumbar support and it feels comfortable when you sit back against it, and there
will be one primary user of the chair then a fixed lumbar support may be acceptable.

ERGONOMIC
CONSIDERATIONS
Page 7 of 9
• Is the chair backrest large enough to provide good back support? Many chairs have back supports that are large enough to provide mid-back and
upper-back support, in addition to good lumbar support.
• When sitting back against the lumbar support is there ample space for hip
room?
Insufficient hip room can make you sit too far forward on the seat pan so that you
will not have enough thigh support. The seat should be at least 1 inch wider than
your hips and thighs on each side.
• Does the seat pan still feel comfortable after you’ve sat for 60 - 120 minutes? If the seat pan is made from low-density foam then continuous use can cause it to
become permanently deformed resulting in inadequate cushioned support.
Insufficient cushioning and inappropriate contouring can cause discomfort,
imbalance and hip and back fatigue.
• Does the chair backrest recline and support your back in different positions? Movement of the back while you are sitting helps to maintain a healthy spine. Look
for chairs that allow you to easily recline, that provide you with good back support in
different recline postures, and that have a back that tracks where you’re the location
of your back. Locking the chair backrest in one position generally isn’t
recommended or beneficial to users.
• Does the chair have a 5-pedestal base? If chair mobility is important to help you to do your work, then the chair should have
at least a 5 pedestal base with casters that glide freely over the floor surface. You
may also want to choose a chair that swivels easily.
• Do you need armrests on your chair? If so, are the armrests broad, contoured, cushioned and comfortable? While sitting
can you easily adjust the height of the armrests and can you move the armrests closer
together or further apart? Can you easily move the arms out of the way if you need to
do this?
The environment in which the chair will be placed will require routine cleaning and
sanitization. It is important to select a chair that will withstand the material used in these
activities. Consider only evaluating “cleanroom” chair designs.

ERGONOMIC
CONSIDERATIONS
Page 8 of 9
Helpful Suggestions:
• Make sure the 800N is at the correct working height.
• Encourage mini breaks that include change of position (sitting to standing) and brief
exercise (every 30 minutes if working continuously in the 800N).
• Wear under gloves to allow easier removal of hands from the gloves.
• Wear comfortable shoes
• When seated:
o Place feet flat on the floor or footrest
o Utilize a chair that provides adequate lower back support
o The front edge of the chair should not press up against the back of the
knees
o Utilize a footrest if your feet do not reach the floor
o Do not rest your arms or wrists on the glove ports for extended periods
• When standing:
o Stand with your feet separated from front to back
o Do not lock your knees
o Move your foot positions from time to time
o Do not rest your arms or wrists on glove ports for extended periods
ERGONOMIC
CONSIDERATIONS
Page 9 of 9
• When reaching:
o Understand the span of reach inside the 800N. Span is the angle from the
centerline of the glove ports with your arms extended and side-to-side.
o When reaching for the door handle to the airlock, position your arm so that
the your hand opens the handle from the bottom
o The greater the length of your reach the less weight you can comfortably
pick up.
o Position items in your workspace for reaching that will not cause strain. If
the reach is not comfortable reposition the items in the workspace or
request a reach tool.
o Ideal working depth in the 800N is 6 to 15 inches from the front of the
unit.
o Avoid reaches that create stress. Contact your supervisor if you are
experiencing strain or discomfort.
• When lifting:
o Lift with your major muscle group.
o Lift with your wrist as straight as possible (Neutral position)
o Lift as close to the body as possible with arms in a straight position
o Avoid lifts that create stress. Contact your supervisor if you are
experiencing strain or discomfort.
If a compounding activity creates an awkward position in the 800N,
contact Containment Technologies Group to discuss possible
positioning alternatives.