Embed Size (px)
Citation preview
785 Harmony RemoteUser Manual, version 1.2
User Manual Harmony 785
Table of Contents
INTRODUCTION....................................................................................................................................................1 GETTING TO KNOW YOUR HARMONY REMOTE..................................................................................2 BEGINNING THE SETUP PROCESS.......................................................................................................3
USING YOUR HARMONY REMOTE............................................................................................................4RECHARGING THE BATTERY...............................................................................................................4
USING THE TILT SENSOR...................................................................................................................4 SELECTING AN ACTIVITY...................................................................................................................4
USING THE TELETEXT BUTTONS........................................................................................................4 VIEWING THE STATUS AND NAVIGATION BARS...................................................................................5 DISPLAYING HELP ON YOUR HARMONY REMOTE................................................................................5 Types of Help Available.........................................................................................................6 Using the Remote Assistant..................................................................................................6 CONTROLLING INDIVIDUAL DEVICES.................................................................................................6 Device Mode.......................................................................................................................6 USING THE SMART BUTTONS............................................................................................................7 USING SYSTEM OPTIONS..................................................................................................................7
CUSTOMIZING YOUR HARMONY REMOTE......................................................................................................8 CUSTOMIZING THE DISPLAY ON THE HARMONY REMOTE..................................................................8 Adding your Favorite Channel Icons......................................................................................9 Changing the Behavior of Buttons Within an Activity............................................................9
Adding Custom-Labeled Buttons..........................................................................................9 CHANGING THE SETTINGS FOR YOUR HARMONY REMOTE................................................................10 LEARNING INFRARED (IR) COMMANDS.............................................................................................10 Using the Infrared Sensor....................................................................................................10 Naming an Infrared Command............................................................................................11
GETTING ADDITIONAL HELP..............................................................................................................................12 Finding Answers to Your Questions......................................................................................12 Troubleshooting Your Harmony Remote...............................................................................12
Version 1.2 Page i
User Manual Harmony 785
Introduction
Congratulations on the purchase of your Harmony remote! This User Manual will introduce you to the basic online setup process, customizations and main features of your Harmony remote.
If in doubt about how to set up your Harmony remote, follow the information and instructions using the Logitech Harmony Remote Software (also referred to as Harmony Remote Software).
The Harmony remote is an Internet-powered universal remote control. Your Harmony remote can control most devices that understand infrared (IR) signals.
The configuration of your Harmony remote is simple:
• You will be prompted to answer questions about your entertainment devices to create your own personal Harmony remote configuration.
• Your answers will provide us with a description of the entertainment devices you want to control, how they are set up, and your preferences for controlling them.
• If one of your devices is not in the Harmony remote’s database, the Harmony Remote Software will learn about your device and add it to your configuration.
• Once you have told us about your devices, you will then be guided through setting up Activities. Creating Activities is simple: you will be prompted to indicate the devices you use within an Activity and how you want to control specific features, such as the volume, within that Activity.
• An Activity is a set of commands the Harmony remote sends to your entertainment system to turn on the necessary devices.
• Once you have selected an Activity, you are in Activity mode, and the functionality of each button on your Harmony remote is automatically configured for that Activity.
• Additionally, the display buttons will give you access to other commands for that Activity, which cannot be set to the standard buttons.
Example For the Watch Television Activity, the Harmony remote sends commands to your entertainment system to turn on the necessary devices so you can watch television. The remote will auto- matically be configured for the Activity based on the answers you selected during the online setup process for the Activity.
At the end of the setup process, you will have your own configuration loaded in your Harmony remote.Use your Harmony Remote Software to:
• Customize any of your Harmony remote’s features. • Add more entertainment devices. • Add more Activities.
Version 1.2 Page 1

User Manual Harmony 785
Version 1.2 Page 2
Getting to Know Your Harmony Remote
Many of the Harmony remote’s buttons are standard remote buttons. However, there are buttons and other hardware that may not be so familiar to you. The extra buttons and hardware give you access to the special features of the Harmony remote.
A. USB Connector: Connect one end of the USB cable to this connector and the other end to your computer so that you can download your configura-tion using the Harmony Remote Software.
B. Power Button: Turns all devices off with one button press.
C. ACTIVITIES: Press Activities to view a list of Activities you have added. Press the display button next to the Activity you want and the Harmony remote will set up your entertainment system.
D. DEVICES: Lists all your devices on the display, and allows you to select and directly control any device.
E. HELP: Asks you simple questions so that your Harmony remote can fix problems you are having within an Activity.
F. Display: Shows a list of your Activities and devices, help, infrared (IR) commands and any available listings.
G. Display Buttons: Use the buttons at the side of the display to select the corresponding command.
H. Left/Right Arrow: Allows you to view more options on the display.
I. Smart Buttons: While there is a default setting for the buttons in most Activities, you can customize these buttons to send different commands.
J. PREV: Goes to previous television channel.
K. MENU: Gives you access to the menu system on a device, if you have a device with this feature.
L. EXIT: Exits from the Guide feature.
M. GUIDE: Gives you access to view program listings, if you have a device with this feature.
N. INFO: Gives you additional information on program listings, if you have a device with the Guide feature.
O. Infrared Learning Port: The Harmony remote uses this port to learn commands from your original remote.
P. Teletext Buttons: This is a service provided by the television provider. Use the Teletext buttons to access this service; however, your TV set must be equipped with a Teletext decoder. While Teletext is the default setting for these buttons in the Watch TV Activity, you can customize these buttons to send different commands.
User Manual Harmony 785
Version 1.2 Page 3
Beginning the Setup Process
Once you have installed the Logitech Harmony Remote Software, connect your remote and you will be guided through a series of question-and-answer steps to complete each of the five main steps of the online setup process:
Login Information: Create your login information.
Check Connection: Ensures your computer and your Harmony remote are communicating properly.
Set Up Devices: Helps you provide us with information about the devices in your personal home theater system.
Set Up Activities: Helps you provide us with information about the way your devices work together to perform Activities (e.g. Watch Television Activity).
Update Remote: Updates your remote with your personal settings.
Note: When using the Harmony Remote Software, click More Help to view specific help for the step you are on.
User Manual Harmony 785
Version 1.2 Page 4
Using Your Harmony Remote
This section provides you with information that will help you use your remote.
Recharging the BatteryPlace your remote in the base station to charge. While the remote’s battery is charging:
• The display and its backlight, and the keypad backlight remain on.
• The battery level icon in the status bar flashes when the battery is still charging or will display a full battery level when charging is complete.
When the battery is low, the display will flash a message to remind you to charge the battery.
Using the Tilt SensorWhen you pick up the remote slightly tilted, the display will automatically turn on and the keypad light up.
Note: Whenever you pick up the remote from the base station, or replace it in the station, you will hear a beep.
Use the Harmony Remote Software to enable/disable this feature.
Selecting an ActivityView the Activities you have added by pressing the Activities button. The display will then list the Activities you have added. Press the corresponding display button next to the Activity you want to start.
As a default, when you select an Activity, you will see a message on the remote’s display reminding you to keep the remote pointed at your entertainment system while the Activity starts. This helps ensure that all infrared (IR) signals are properly sent.
Use the Harmony Remote Software to turn on/off the “Starting Activity” message.
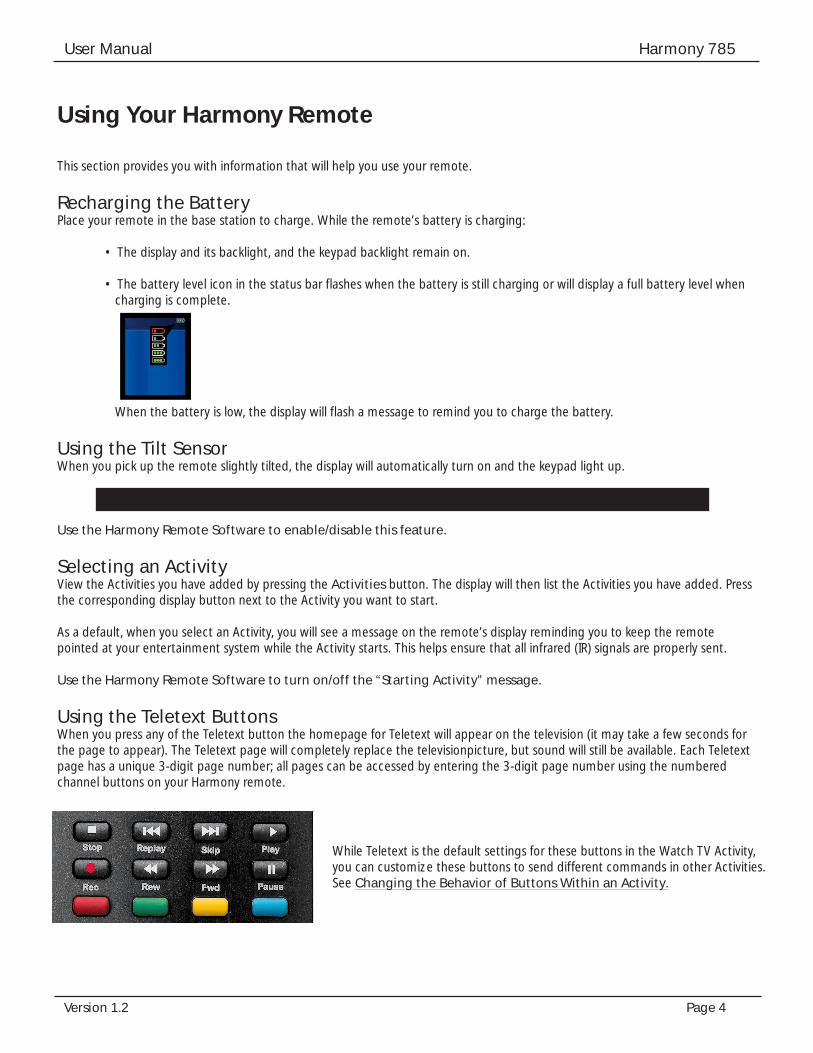
Using the Teletext ButtonsWhen you press any of the Teletext button the homepage for Teletext will appear on the television (it may take a few seconds for the page to appear). The Teletext page will completely replace the televisionpicture, but sound will still be available. Each Teletext page has a unique 3-digit page number; all pages can be accessed by entering the 3-digit page number using the numbered channel buttons on your Harmony remote.
While Teletext is the default settings for these buttons in the Watch TV Activity, you can customize these buttons to send different commands in other Activities. See Changing the Behavior of Buttons Within an Activity.
User Manual Harmony 785
Version 1.2 Page 5
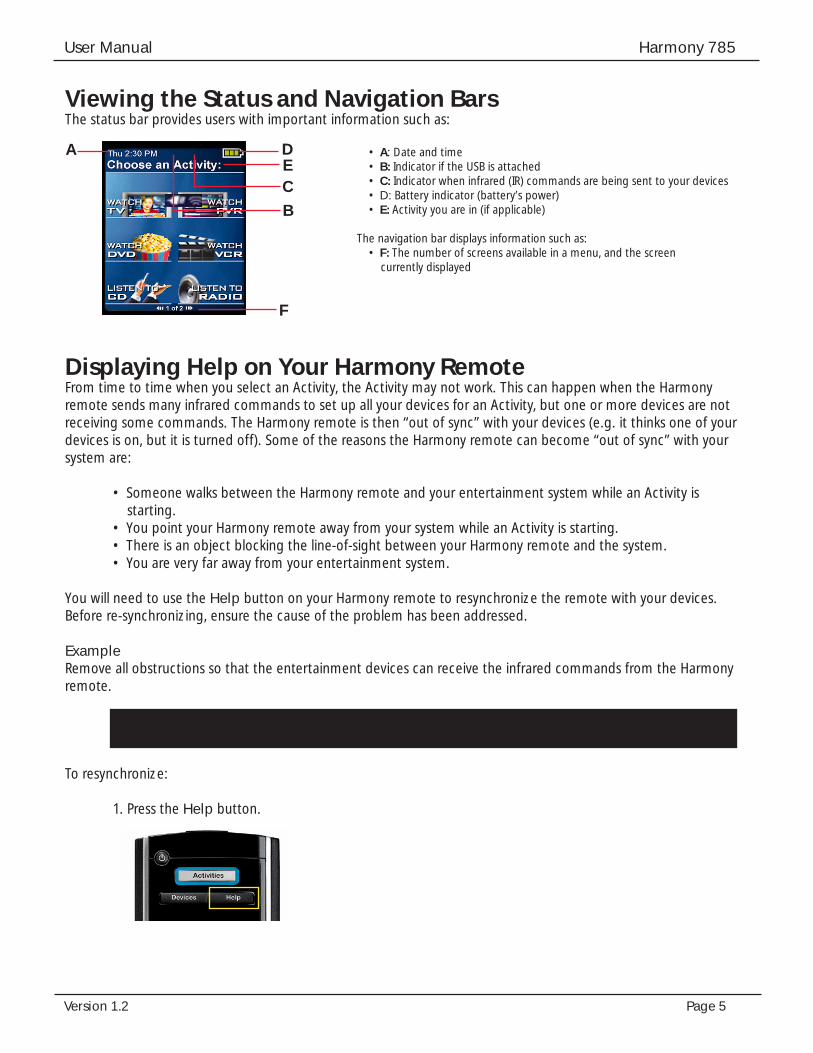
Viewing the Status and Navigation BarsThe status bar provides users with important information such as:
Displaying Help on Your Harmony RemoteFrom time to time when you select an Activity, the Activity may not work. This can happen when the Harmony remote sends many infrared commands to set up all your devices for an Activity, but one or more devices are not receiving some commands. The Harmony remote is then “out of sync” with your devices (e.g. it thinks one of your devices is on, but it is turned off). Some of the reasons the Harmony remote can become “out of sync” with your system are:
• Someone walks between the Harmony remote and your entertainment system while an Activity is starting. • You point your Harmony remote away from your system while an Activity is starting. • There is an object blocking the line-of-sight between your Harmony remote and the system. • You are very far away from your entertainment system.
You will need to use the Help button on your Harmony remote to resynchronize the remote with your devices. Before re-synchronizing, ensure the cause of the problem has been addressed.
ExampleRemove all obstructions so that the entertainment devices can receive the infrared commands from the Harmony remote.
Note: If your devices are no longer responding consistently to your Harmony remote, but were doing so before, you may need to recharge the battery.
To resynchronize:
1. Press the Help button.
• A: Date and time • B: Indicator if the USB is attached • C: Indicator when infrared (IR) commands are being sent to your devices • D: Battery indicator (battery’s power) • E: Activity you are in (if applicable)
The navigation bar displays information such as: • F: The number of screens available in a menu, and the screen currently displayed
A DE
F
C
B
User Manual Harmony 785
Version 1.2 Page 6
2. Answer the questions on the remote’s display by selecting Yes or No. If you answer no to any question, the Harmony remote will resend the necessary command and ask you the same question again.
When you are done, the Harmony remote will be “synchronized” with your devices again.
Types of Help AvailableYou can customize the Help button on your Harmony remote to provide one of the following types of help:
• Smart help Asks questions about the devices that are on during a specific Activity. • Full help Asks questions about all the devices in your system.
Select Full help if you find devices aren’t being controlled the way you want them to and the help on the remote is not asking you questions about these devices.
Use the Harmony Remote Software to select the type of help you want.
Using the Remote Assistant
Extra help is available from your remote by turning on the Remote Assistant.
While the Help button helps you solve device problems within an Activity, the Remote Assistant teaches you how to use your Harmony remote. The following is an example of the type of help the Remote Assistant offers:
Example If any devices are not set up correctly, press “Help” now.
Use the Harmony Remote Software to turn on/off this feature.
Controlling Individual DevicesThis section provides you with an overview of three modes you can use to access specific features of each device.
Device ModePress Devices to enter device mode. Device mode gives you access to all the possible commands for each device included in your Harmony remote configuration. To access device mode you do not need to be in an Activity. However, you should never need to use Device mode during normal use of your Harmony remote. This mode should only be used to send a specific command to a specific device.
You can eliminate the use of device mode by customizing your Activities.
User Manual Harmony 785
Version 1.2 Page 7
Example You can put commands on the display or customize specific buttons for the commands.
See Customizing Your Harmony Remote.
At any time, press Devices to switch into Device mode. Once in this mode, the Harmony remote will display a list of all the devices you have in your configuration. Select a device from the list and the Harmony remote will only control the device features for the device.
Example If you choose Television as the device, the number, volume and channel buttons will all control your television.
Press Devices again to return to exit Device mode.
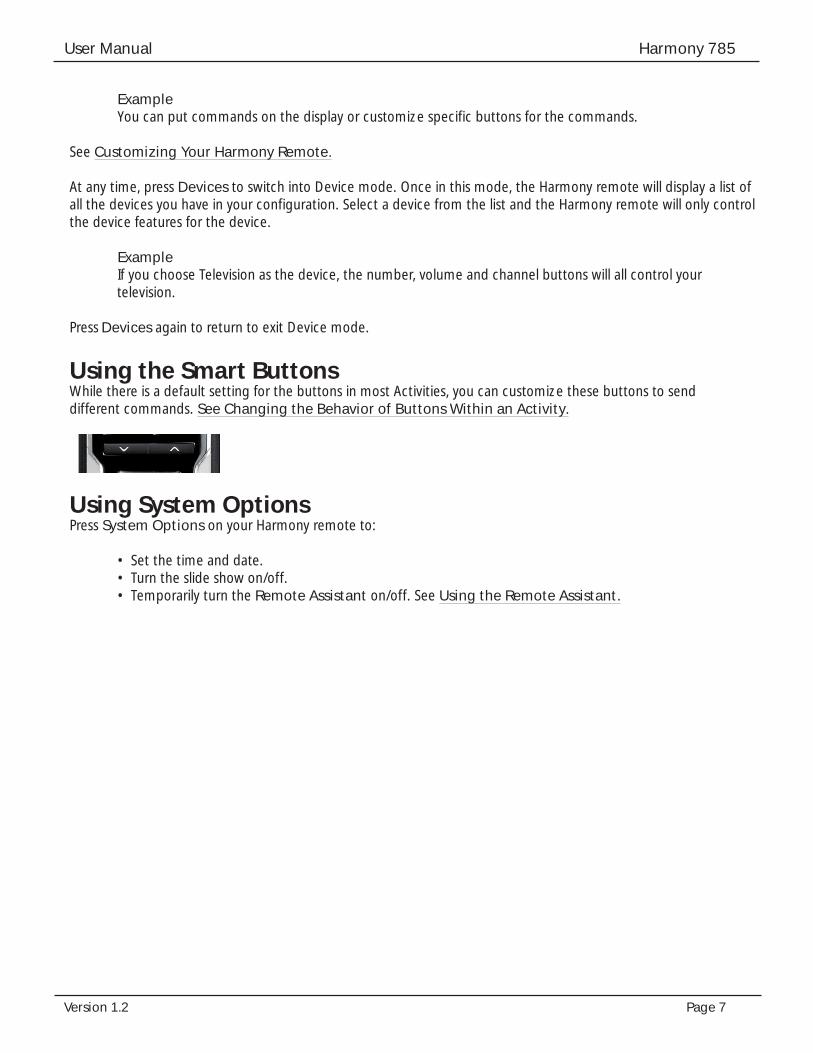
Using the Smart ButtonsWhile there is a default setting for the buttons in most Activities, you can customize these buttons to send different commands. See Changing the Behavior of Buttons Within an Activity.
Using System OptionsPress System Options on your Harmony remote to:
• Set the time and date. • Turn the slide show on/off. • Temporarily turn the Remote Assistant on/off. See Using the Remote Assistant.
Customizing Your Harmony Remote
All customization of your Harmony remote is done from the Harmony Remote Software:
Use the Harmony Remote Software to:
Troubleshoot • Click Troubleshoot when your Harmony remote isn’t controlling your system correctly.
View Activities • Click the Activities tab to add or delete Activities. • Click Settings to change the specific settings (e.g. the name of an Activity) for an Activity.
Example To have more than one Activity of a given type (e.g. If you have both a cable converter and a satellite receiver, you can add a second Watch Television Activity) click Add an Activity. When you’re done, rename the Activities to help you distinguish between them (e.g. For the Watch Television Activity you could rename one from “Watch Television” to “Watch Cable” and the other to “Watch Satellite”.)
View Devices • Click Devices tab to add or delete entertainment devices. • Click Settings to change the specific settings for a device you have already set up.
View Remote Settings • Click Remote Settings to change the remote’s settings.
Update Remote • Click Update Remote after you have made changes your configuration and settings. This will ensure you have the latest configuration and settings on your Harmony remote.
Customizing the Display on the Harmony RemoteThis section provides information that will help you to customize the commands and options listed on the Harmony remote’s display.
The display resolution on the Harmony Remote is 160 x 128 pixels.
The Harmony remote comes with a set of defaults, which you can change to make the display look the way you want it to: • Select or add your own backgrounds for the display. • Add your icons for your favorite channels (you can upload your own icons up to a maximum of 160 KB (file size), and 24-bit .png, .bmp, .jpg, or .gif .)
User Manual Harmony 785
Version 1.2 Page 8
• Select one of the default themes. • A theme consists of a font style, background, layout, and icons (for Activities and Devices)—choose a theme that best suits you. • Layout is the number of selections (3 or 6) displayed on the display
• Add your own slide show to the display. • You can use the default backgrounds or your own background images to create your own slide show. The slide show displays while the remote is in the base station. See Using System Options for more information on turning the slide show on and off.
Use the Harmony Remote Software to make Harmony remote’s display look the way you want it to. You can change the background or the slide show images.
Adding your Favorite Channel IconsYou can customize the display for your Favorite Channels menu by adding your own icons and setting an icon to appear next to one of your Favorite Channels.
Use the Harmony Remote Software to add your favorite channels and icons to the Harmony display.
Changing the Behavior of Buttons Within an ActivityWhen you select an Activity, the Harmony remote will:
• Turn on all the correct entertainment devices • Set the device inputs correctly • Set up the remote’s buttons to control the Activity
Based on our knowledge of how each of your devices is controlled, the Harmony remote will make its best effort to match all the buttons you need to control an Activity.
However, there may be some commands you want to add to buttons or access via the display. Commands can be added to buttons quickly and easily by customizing any Activity to change the behavior of buttons.
Use the Harmony Remote Software to change the behavior of buttons. The change behavior of buttons feature shows you the: • Buttons that have a command associated with them • Device being controlled • Command being sent to the device
Adding Custom-Labeled ButtonsUse the Harmony Remote Software to:
• Add custom-labeled buttons to a device. • Add a custom-labeled button for an Activity. Custom-labeled buttons are displayed on the Harmony remote’s display from left to right, top to bottom.
User Manual Harmony 785
Version 1.2 Page 9

Changing the Settings for your Harmony RemoteFrom within the Harmony software, click Remote Settings, to change the following:
• Turn on/off Help on the remote/Remote Assistant (for additional information, see Displaying Help on Your Harmony Remote.) • Set the backlight timing (for additional information, see Using the Tilt Sensor • Set the time-display format. • Show/Hide the “Starting Activity” message (for additional information, see Selecting an Activity.) • Turn on/off the tilt sensor (for additional information, see Using the Tilt Sensor.)
Learning Infrared (IR) CommandsThe Harmony remote can learn infrared commands from other remote controls, and should only be used in situations where the Harmony remote’s infrared database does not already contain an infrared command you would like to use.Determine the device you would like to send the infrared command to:
1. From within the Harmony software, click the Devices tab. 2. Click Settings for the device you want. 3. Click Learn infrared commands.
Using the Infrared SensorThe Harmony remote has an infrared sensor at the end opposite to the USB connector. The Harmony remote uses this sensor to learn commands from original device remotes.
• A: Your original remote • B: Your Harmony remote • C: Distance between remotes: 5-10 cm (2”-5”) apart
The following steps outline what happens when you press a button on your original remote control:
1. The infrared sensor on the Harmony remote learns the infrared signal. 2. The Harmony remote uploads it via the USB cable (and your computer’s internet connection) to the Harmony remote database. 3. The Harmony Remote Software will try to find a matching pattern for the infrared signal. 4. If no pattern is found, the signal will be stored as-is in its original format. 5. If a pattern is found, the Harmony Remote Software converts the signal into a format for convenient storage.
Either way, the signal is then available for you to assign to a button on your Harmony remote.
A BC
User Manual Harmony 785
Version 1.2 Page 10
Naming an Infrared CommandWhen you teach an infrared command to the Harmony remote, give the command a name. This way you can refer to this command by name in various locations of the online setup process. It is best to use the default names listed on the Learn infrared commands step so that automatic button function assignments can be applied to your Harmony remote.
Example If you teach the volume button infrared commands from your original remote control, name them “Volume Up” and “VolumeDown” (i.e. with no space, and capitalization as shown). The remote software looks for commands with these names to automatically assign them to the volume up and down buttons on the Harmony remote.
Naming ConventionsWhen naming a command for which there is no default name on the Learn infrared commands feature, use the fol-lowing naming conventions to make button assignment and sharing infrared commands easier:
• Do not use spaces or special characters such as /, & or * in the name. • Capitalize the start of words (e.g. NextDisc, ModeDigital). • Start the command name with its main function (e.g. VolumeRearUp, VolumeRearDown, VolumeFrontUp, VolumeFrontDown). This helps group related commands in lists. • For infrared commands that select inputs (e.g. on a stereo receiver), start with the prefix “Input”. Do not name the input based on what you have connected to your device, rather name it based on what it is called on the front of the device, or on the remote control (e.g. InputAux, InputVideo1, InputTape, InputDVD, Input VCR).
User Manual Harmony 785
Version 1.2 Page 11
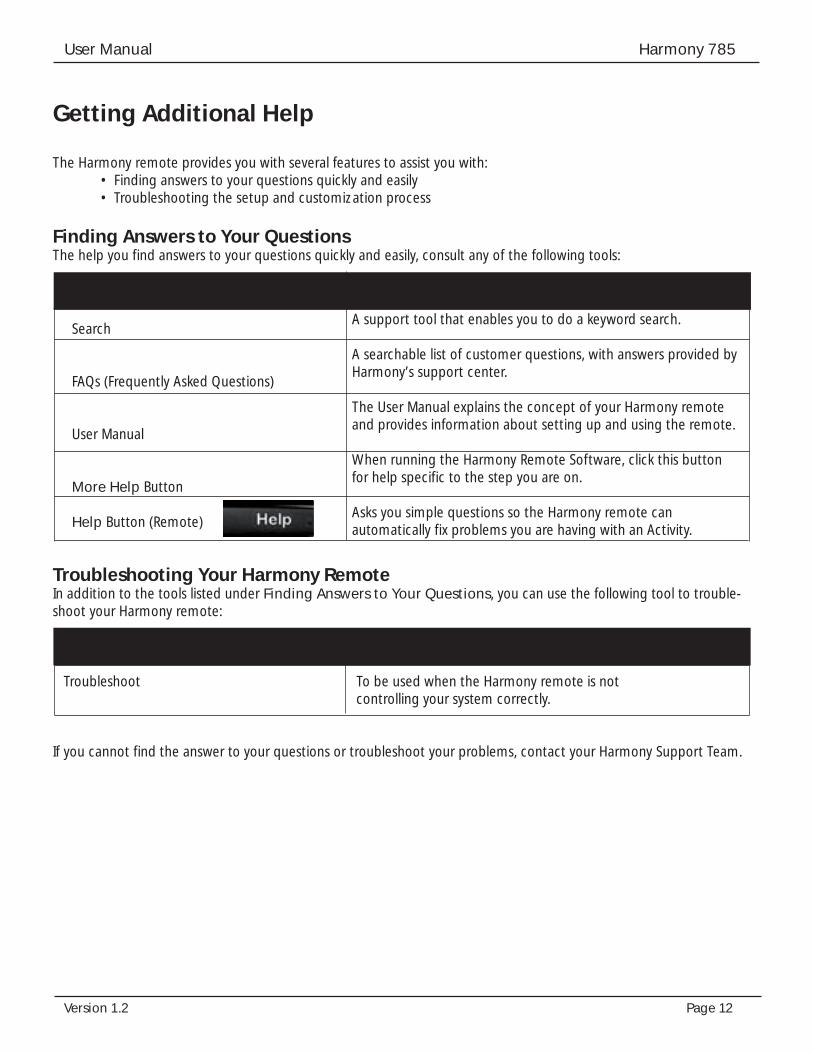
Getting Additional Help
The Harmony remote provides you with several features to assist you with: • Finding answers to your questions quickly and easily • Troubleshooting the setup and customization process
Finding Answers to Your QuestionsThe help you find answers to your questions quickly and easily, consult any of the following tools:
Troubleshooting Your Harmony RemoteIn addition to the tools listed under Finding Answers to Your Questions, you can use the following tool to trouble-shoot your Harmony remote:
Troubleshoot To be used when the Harmony remote is not controlling your system correctly.
If you cannot find the answer to your questions or troubleshoot your problems, contact your Harmony Support Team.
Feature Description
Feature Description
A support tool that enables you to do a keyword search.
A searchable list of customer questions, with answers provided by Harmony’s support center.
The User Manual explains the concept of your Harmony remote and provides information about setting up and using the remote.
When running the Harmony Remote Software, click this button for help specific to the step you are on.
Asks you simple questions so the Harmony remote can automatically fix problems you are having with an Activity.
Search
FAQs (Frequently Asked Questions)
User Manual
More Help Button
Help Button (Remote)
User Manual Harmony 785
Version 1.2 Page 12


![Get 642-785 exam questions & 642-785 practice tests [Infographic]](https://img.pdfslide.us/doc/110x75/5a65c26d7f8b9ab3488b4f9b/get-642-785-exam-questions-642-785-practice-tests-infographic.jpg)