Embed Size (px)
Citation preview
INSTRUCTION SHEET
PRODUCT: 64692QUAD2+2BikeRack•Page1of3
Swagman•300-1880GovernmentSt.•Penticton,B.C.CanadaV2A7J1•Phone(250)490-8883•Fax(250)490-8885•www.swagman.net
REV05/07/16
2
Assembly Instructions for Quad 2 + 21.Removemainassemblyfrombox.2.Foreasierassembly,insertthemaintubeintoyour2”Class3hitch.3.Aligntheratchetinguprightbarassemblyontothecentersectionof themainassembly(Diagram1).Positionitsothatitfoldstotheleft sidewhenviewingfromthebackofthevehicle.Thiswillallowfor easieruseoftheratchethooks.Securewithtwocarriagebolts, washersandnuts.Donottightentheboltscompletelyatthistime.4.Thecrossbarsareintwopieces.Youneedtoinsertthemalesection intothefemalesection.Makesurethatthesmallsetscrewholesat theendsofthebarsarebothfacingdownward.5.Insertthecrossbarthroughtheuprightratchetassembly.Thesquare holeonthebarshouldfaceup(Diagram2).Insertonecarriagebolt throughthecrossbarandthebracket.Installthesecondbolt throughthesideplateoftheratchetarmassembly(Diagram3). Tightenallofthebolts,includingtheonesontheuprightratchetarm.6.Installoneshorthookandonelonghookontotheuprightratchet arm.NOTE:theshorthookgoesonfirst(Diagram4).7.Repeatsteps1to5forthesecondratchetinguprightarmand crossbar.8.Slidethewheeltraysontothecrossbars.Thewheelholdersshould beinstalledsotheupsweepisfacinginward.Theorientationofthe bikeswilldeterminethebestpositionforthe8wheelholders.You wanttomakesurethebucklesideisfacingtowardsyouwhenyou areatthebackofthevehicle.Thiswillallowforeasieruseofthe buckleandstrap.ReviewBike Installationformoredetailson loadingbikes.9.Afterallofthewheeltraysareinstalledyouwillneedtoinstallthe smallscrewsontotheundersideendsofeacharm.Thiswillprevent thewheeltraysfromslidingoffifyouforgettotightenthewheeltray knob(Diagram5).
Removing the 2 Bike add on section1.Removethe10mmAllenboltswiththesuppliedwrench.2.Removethe6mmsetscrew.3.Removetheendsection.4.Puttheextraendcapontheremainingsectionofthebikerack.5.Storetheaddonsectionforfutureuse.
Installing the Quad 2 + 2 on to your Vehicle1.Insertthebikerackintothe2”Class3receiver.Installthe5/8” threadedlockinghitchpinandtightento50ftlbs.(verytight).Put onthelockheaduntilitissecurelyattached.
1
3
4
5
Short Long
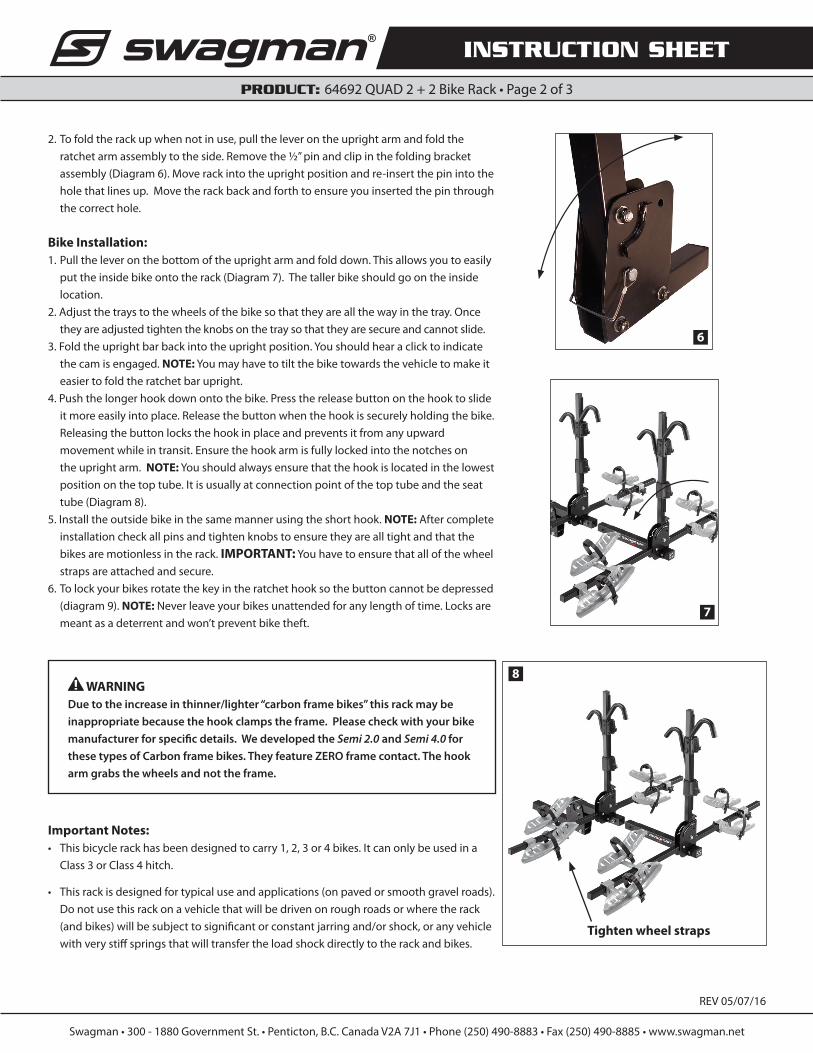
2.Tofoldtherackupwhennotinuse,pulltheleverontheuprightarmandfoldtheratchetarmassemblytotheside.Removethe½”pinandclipinthefoldingbracketassembly(Diagram6).Moverackintotheuprightpositionandre-insertthepinintotheholethatlinesup.Movetherackbackandforthtoensureyouinsertedthepinthroughthecorrecthole.
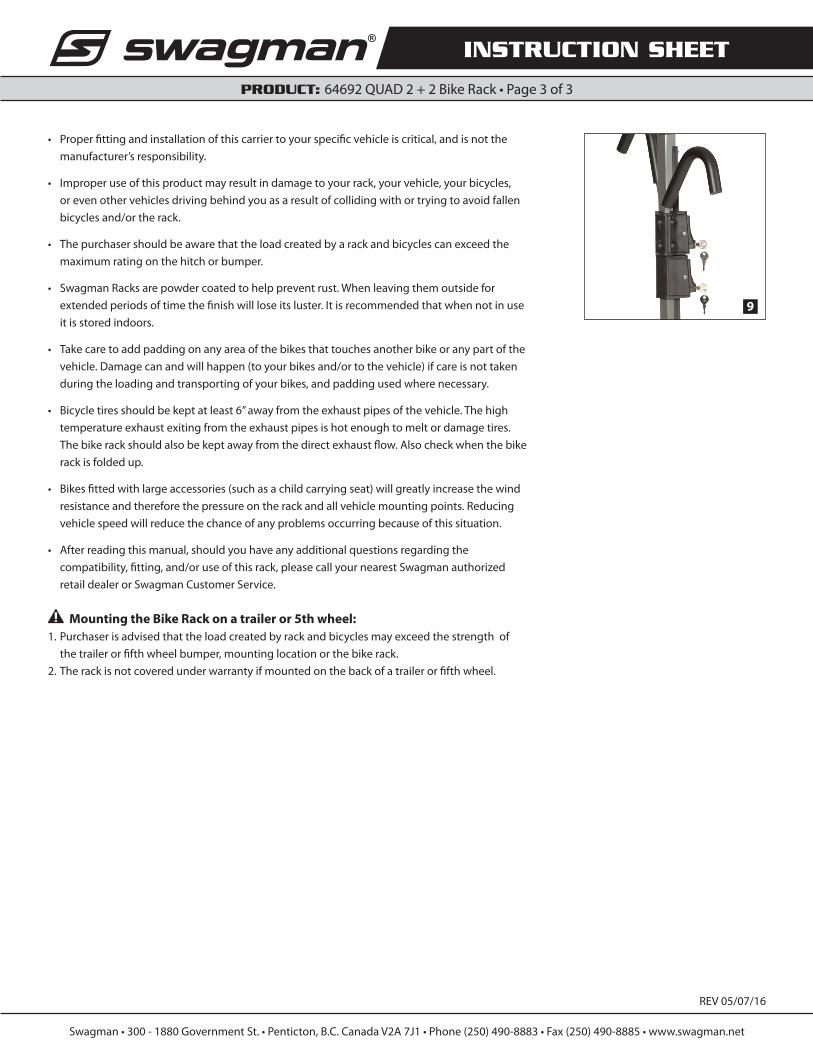
Bike Installation:1.Pulltheleveronthebottomoftheuprightarmandfolddown.Thisallowsyoutoeasilyputtheinsidebikeontotherack(Diagram7).Thetallerbikeshouldgoontheinsidelocation.
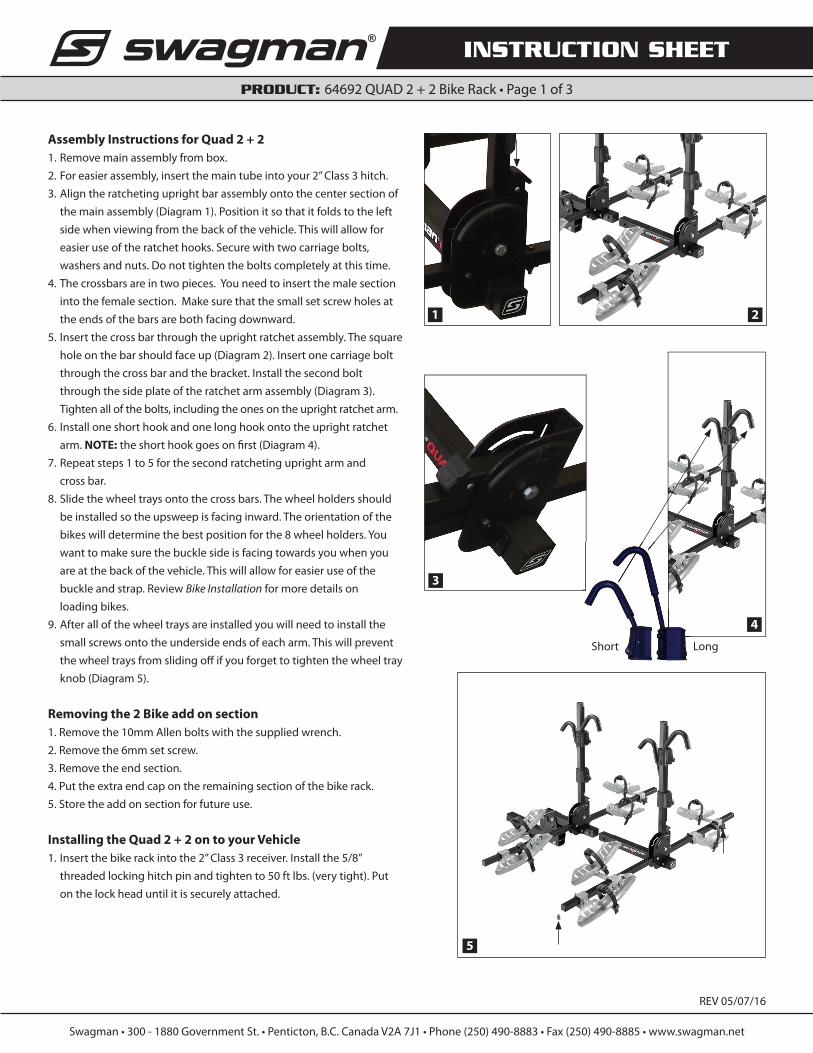
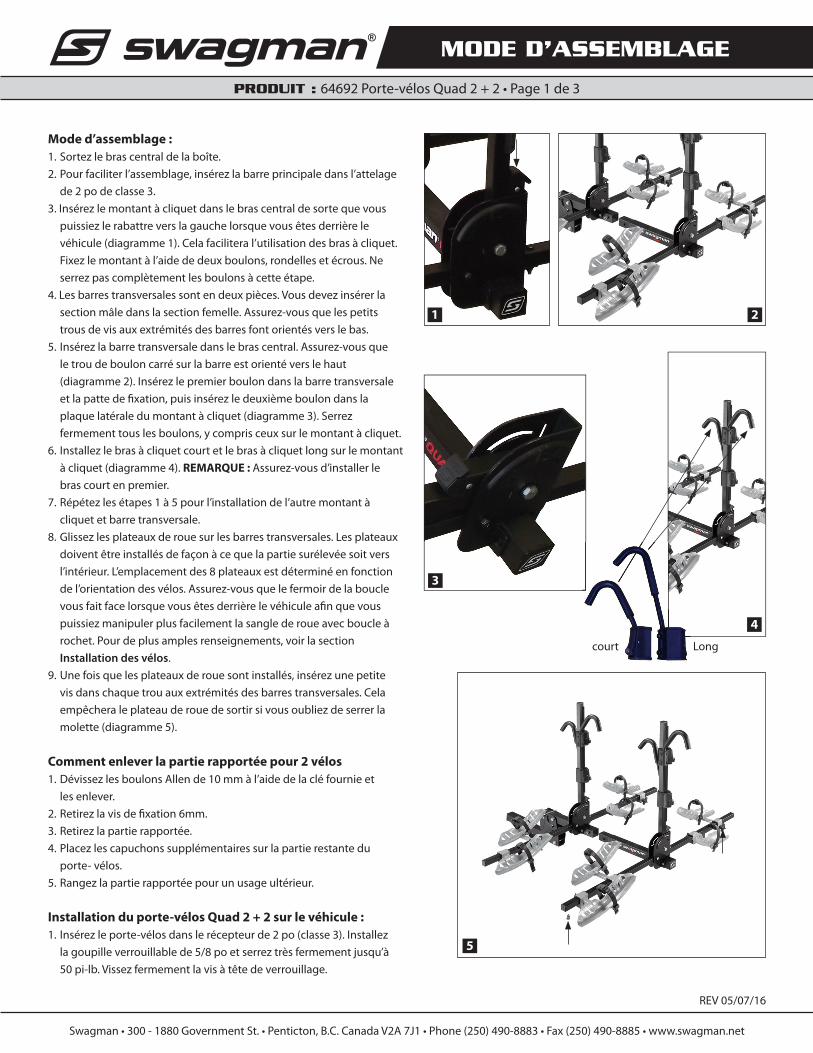
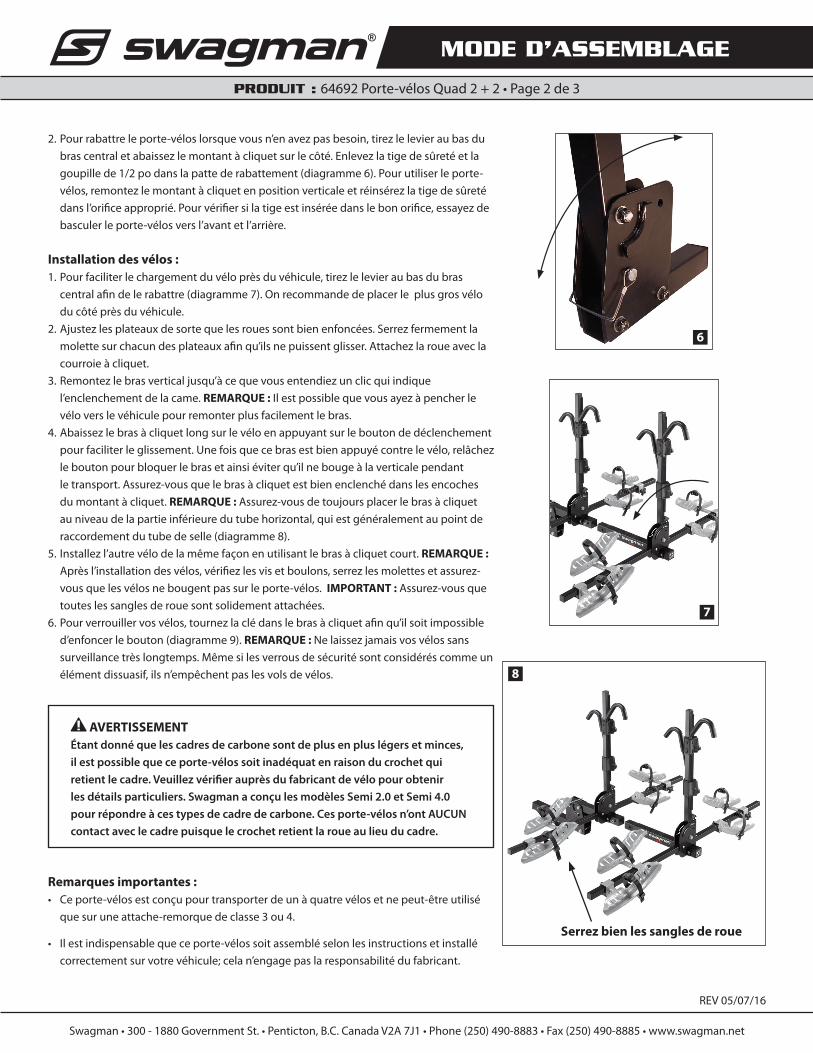
2.Adjustthetraystothewheelsofthebikesothattheyareallthewayinthetray.Once theyareadjustedtightentheknobsonthetraysothattheyaresecureandcannotslide.3.Foldtheuprightbarbackintotheuprightposition.Youshouldhearaclicktoindicate thecamisengaged.NOTE:Youmayhavetotiltthebiketowardsthevehicletomakeit easiertofoldtheratchetbarupright.4.Pushthelongerhookdownontothebike.Pressthereleasebuttononthehooktoslide itmoreeasilyintoplace.Releasethebuttonwhenthehookissecurelyholdingthebike. Releasingthebuttonlocksthehookinplaceandpreventsitfromanyupward movementwhileintransit.Ensurethehookarmisfullylockedintothenotcheson theuprightarm.NOTE:Youshouldalwaysensurethatthehookislocatedinthelowest positiononthetoptube.Itisusuallyatconnectionpointofthetoptubeandtheseat tube(Diagram8).5.Installtheoutsidebikeinthesamemannerusingtheshorthook.NOTE:Aftercomplete installationcheckallpinsandtightenknobstoensuretheyarealltightandthatthe bikesaremotionlessintherack.IMPORTANT:Youhavetoensurethatallofthewheel strapsareattachedandsecure.6.Tolockyourbikesrotatethekeyintheratchethooksothebuttoncannotbedepressed(diagram9).NOTE:Neverleaveyourbikesunattendedforanylengthoftime.Locksaremeantasadeterrentandwon’tpreventbiketheft.
Important Notes:• Thisbicyclerackhasbeendesignedtocarry1,2,3or4bikes.Itcanonlybeusedina Class3orClass4hitch.
• Thisrackisdesignedfortypicaluseandapplications(onpavedorsmoothgravelroads). Donotusethisrackonavehiclethatwillbedrivenonroughroadsorwheretherack (andbikes)willbesubjecttosignificantorconstantjarringand/orshock,oranyvehicle withverystiffspringsthatwilltransfertheloadshockdirectlytotherackandbikes.
INSTRUCTION SHEET
PRODUCT: 64692QUAD2+2BikeRack•Page2of3
Swagman•300-1880GovernmentSt.•Penticton,B.C.CanadaV2A7J1•Phone(250)490-8883•Fax(250)490-8885•www.swagman.net
REV05/07/16
7
6
8
Tighten wheel straps
WARNINGDue to the increase in thinner/lighter “carbon frame bikes” this rack may be inappropriate because the hook clamps the frame. Please check with your bike manufacturer for speci� c details. We developed the Semi 2.0 and Semi 4.0 for these types of Carbon frame bikes. They feature ZERO frame contact. The hook arm grabs the wheels and not the frame.
• Properfittingandinstallationofthiscarriertoyourspecificvehicleiscritical,andisnotthemanufacturer’sresponsibility.
• Improperuseofthisproductmayresultindamagetoyourrack,yourvehicle,yourbicycles,orevenothervehiclesdrivingbehindyouasaresultofcollidingwithortryingtoavoidfallenbicyclesand/ortherack.
• Thepurchasershouldbeawarethattheloadcreatedbyarackandbicyclescanexceedthemaximumratingonthehitchorbumper.
• SwagmanRacksarepowdercoatedtohelppreventrust.Whenleavingthemoutsideforextendedperiodsoftimethefinishwillloseitsluster.Itisrecommendedthatwhennotinuseitisstoredindoors.
• Takecaretoaddpaddingonanyareaofthebikesthattouchesanotherbikeoranypartofthevehicle.Damagecanandwillhappen(toyourbikesand/ortothevehicle)ifcareisnottakenduringtheloadingandtransportingofyourbikes,andpaddingusedwherenecessary.
• Bicycletiresshouldbekeptatleast6”awayfromtheexhaustpipesofthevehicle.Thehightemperatureexhaustexitingfromtheexhaustpipesishotenoughtomeltordamagetires.Thebikerackshouldalsobekeptawayfromthedirectexhaustflow.Alsocheckwhenthebikerackisfoldedup.
• Bikesfittedwithlargeaccessories(suchasachildcarryingseat)willgreatlyincreasethewindresistanceandthereforethepressureontherackandallvehiclemountingpoints.Reducingvehiclespeedwillreducethechanceofanyproblemsoccurringbecauseofthissituation.
• Afterreadingthismanual,shouldyouhaveanyadditionalquestionsregardingthecompatibility,fitting,and/oruseofthisrack,pleasecallyournearestSwagmanauthorizedretaildealerorSwagmanCustomerService.
Mounting the Bike Rack on a trailer or 5th wheel:1.Purchaserisadvisedthattheloadcreatedbyrackandbicyclesmayexceedthestrengthofthetrailerorfifthwheelbumper,mountinglocationorthebikerack.
2.Therackisnotcoveredunderwarrantyifmountedonthebackofatrailerorfifthwheel.
INSTRUCTION SHEET
PRODUCT: 64692QUAD2+2BikeRack•Page3of3
Swagman•300-1880GovernmentSt.•Penticton,B.C.CanadaV2A7J1•Phone(250)490-8883•Fax(250)490-8885•www.swagman.net
REV05/07/16
9
MODE D’ASSEMBLAGE
PRODUIT : 64692Porte-vélosQuad2+2•Page1de3
Swagman•300-1880GovernmentSt.•Penticton,B.C.CanadaV2A7J1•Phone(250)490-8883•Fax(250)490-8885•www.swagman.net
REV05/07/16
Mode d’assemblage : 1.Sortezlebrascentraldelaboîte.2.Pourfaciliterl’assemblage,insérezlabarreprincipaledansl’attelage de2podeclasse3.3.Insérezlemontantàcliquetdanslebrascentraldesortequevous puissiezlerabattreverslagauchelorsquevousêtesderrièrele véhicule(diagramme1).Celafaciliteral’utilisationdesbrasàcliquet. Fixezlemontantàl’aidededeuxboulons,rondellesetécrous.Ne serrezpascomplètementlesboulonsàcetteétape.4.Lesbarrestransversalessontendeuxpièces.Vousdevezinsérerla sectionmâledanslasectionfemelle.Assurez-vousquelespetits trousdevisauxextrémitésdesbarresfontorientésverslebas.5.Insérezlabarretransversaledanslebrascentral.Assurez-vousque letroudebouloncarrésurlabarreestorientéverslehaut (diagramme2).Insérezlepremierboulondanslabarretransversale etlapattedefixation,puisinsérezledeuxièmeboulondansla plaquelatéraledumontantàcliquet(diagramme3).Serrez fermementtouslesboulons,ycomprisceuxsurlemontantàcliquet.6.Installezlebrasàcliquetcourtetlebrasàcliquetlongsurlemontant àcliquet(diagramme4).REMARQUE : Assurez-vousd’installerle brascourtenpremier.7.Répétezlesétapes1à5pourl’installationdel’autremontantà cliquetetbarretransversale.8.Glissezlesplateauxderouesurlesbarrestransversales.Lesplateaux doiventêtreinstallésdefaçonàcequelapartiesurélevéesoitvers l’intérieur.L’emplacementdes8plateauxestdéterminéenfonction del’orientationdesvélos.Assurez-vousquelefermoirdelaboucle vousfaitfacelorsquevousêtesderrièrelevéhiculeafinquevous puissiezmanipulerplusfacilementlasanglederoueavecboucleà rochet.Pourdeplusamplesrenseignements,voirlasection
Installation des vélos.9.Unefoisquelesplateauxderouesontinstallés,insérezunepetite visdanschaquetrouauxextrémitésdesbarrestransversales.Cela empêcheraleplateauderouedesortirsivousoubliezdeserrerla molette(diagramme5).
Comment enlever la partie rapportée pour 2 vélos 1.DévissezlesboulonsAllende10 mmàl’aidedelacléfournieet lesenlever.2.Retirezlavisdefixation6mm.3.Retirezlapartierapportée.4.Placezlescapuchonssupplémentairessurlapartierestantedu porte-vélos.5.Rangezlapartierapportéepourunusageultérieur.
Installation du porte-vélos Quad 2 + 2 sur le véhicule : 1.Insérezleporte-vélosdanslerécepteurde2po(classe3).Installez lagoupilleverrouillablede5/8poetserreztrèsfermementjusqu’à 50pi-lb.Vissezfermementlavisàtêtedeverrouillage.
21
3
4
5
court Long
MODE D’ASSEMBLAGE
PRODUIT : 64692Porte-vélosQuad2+2•Page2de3
Swagman•300-1880GovernmentSt.•Penticton,B.C.CanadaV2A7J1•Phone(250)490-8883•Fax(250)490-8885•www.swagman.net
REV05/07/16
2.Pourrabattreleporte-véloslorsquevousn’enavezpasbesoin,tirezlelevieraubasdubrascentraletabaissezlemontantàcliquetsurlecôté.Enlevezlatigedesûretéetlagoupillede1/2podanslapattederabattement(diagramme6).Pourutiliserleporte-vélos,remontezlemontantàcliquetenpositionverticaleetréinsérezlatigedesûretédansl’orificeapproprié.Pourvérifiersilatigeestinséréedanslebonorifice,essayezdebasculerleporte-vélosversl’avantetl’arrière.
Installation des vélos :1.Pourfaciliterlechargementduvéloprèsduvéhicule,tirezlelevieraubasdubras centralafindelerabattre(diagramme 7).Onrecommandedeplacerleplusgrosvélo ducôtéprèsduvéhicule.2.Ajustezlesplateauxdesortequelesrouessontbienenfoncées.Serrezfermementla molettesurchacundesplateauxafinqu’ilsnepuissentglisser.Attachezlaroueavecla courroieàcliquet.3.Remontezlebrasverticaljusqu’àcequevousentendiezunclicquiindique l’enclenchementdelacame.REMARQUE :Ilestpossiblequevousayezàpencherle véloverslevéhiculepourremonterplusfacilementlebras.4.Abaissezlebrasàcliquetlongsurlevéloenappuyantsurleboutondedéclenchement pourfaciliterleglissement.Unefoisquecebrasestbienappuyécontrelevélo,relâchez leboutonpourbloquerlebrasetainsiéviterqu’ilnebougeàlaverticalependant letransport.Assurez-vousquelebrasàcliquetestbienenclenchédanslesencoches dumontantàcliquet.REMARQUE :Assurez-vousdetoujoursplacerlebrasàcliquet auniveaudelapartieinférieuredutubehorizontal,quiestgénéralementaupointde raccordementdutubedeselle(diagramme8).5.Installezl’autrevélodelamêmefaçonenutilisantlebrasàcliquetcourt.REMARQUE : Aprèsl’installationdesvélos,vérifiezlesvisetboulons,serrezlesmolettesetassurez-
vousquelesvélosnebougentpassurleporte-vélos.IMPORTANT :Assurez-vousque touteslessanglesderouesontsolidementattachées.6.Pourverrouillervosvélos,tournezlaclédanslebrasàcliquetafinqu’ilsoitimpossibled’enfoncerlebouton(diagramme 9).REMARQUE :Nelaissezjamaisvosvélossanssurveillancetrèslongtemps.Mêmesilesverrousdesécuritésontconsidéréscommeunélémentdissuasif,ilsn’empêchentpaslesvolsdevélos.
Remarques importantes : • Ceporte-vélosestconçupourtransporterdeunàquatrevélosetnepeut-êtreutilisé quesuruneattache-remorquedeclasse3ou4.
• Ilestindispensablequeceporte-vélossoitassembléselonlesinstructionsetinstallécorrectementsurvotrevéhicule;celan’engagepaslaresponsabilitédufabricant.
Serrez bien les sangles de roue
AVERTISSEMENTÉtant donné que les cadres de carbone sont de plus en plus légers et minces, il est possible que ce porte-vélos soit inadéquat en raison du crochet qui retient le cadre. Veuillez véri� er auprès du fabricant de vélo pour obtenir les détails particuliers. Swagman a conçu les modèles Semi 2.0 et Semi 4.0 pour répondre à ces types de cadre de carbone. Ces porte-vélos n’ont AUCUN contact avec le cadre puisque le crochet retient la roue au lieu du cadre.
7
6
8

MODE D’ASSEMBLAGE
PRODUIT : 64692Porte-vélosQuad2+2•Page3de3
Swagman•300-1880GovernmentSt.•Penticton,B.C.CanadaV2A7J1•Phone(250)490-8883•Fax(250)490-8885•www.swagman.net
REV05/07/16
• Ilestconçupourunusageréguliersurdesroutesrevêtuesoudesroutesengravierenbonétat.Nel’utilisezpassurdescheminscahoteuxouenmauvaisétatrisquantdesoumettreleporte-vélosàdesmouvementsbrusquesoudeschocsrépétés.Ilestégalementdéconseillédel’utilisersurunvéhiculedotéd’unesuspensiontrèsrigide,carlessecoussesseronttransmisesdirectementauxporte-vélosetauxvélos.
• L’utilisationinadéquateduporte-vélospeutentraînerdesdommagesauporte-vélos,àvotrevéhicule,àvosbicyclettesouauxvéhiculesquivoussuivent(aprèsavoirfrappélesvéloset/ouleporte-vélosouenessayantdeleséviter).
• L’acheteurdoitveilleràcequelachargecrééeparleporte-vélosetlesvélosnedépassepaslachargemaximalepermisepourl’attacheoulepare-chocs.
• Lerevêtementdesporte-vélosSwagmanaétéréaliséparpoudrageafindeprévenirlarouille;cependant,ilperdrasonlustresivouslaissezleporte-vélosàl’extérieurpendantunelonguepériode.Ilestrecommandéderangerleporte-vélosàl’intérieurlorsquevousnevousen servezpas.
• Protégezlestubes,lespiècesetlesaccessoiresdetoutebicyclettequipourraitentrerencontactavecuneautrebicycletteouavecvotrevéhiculeafind’éviterlesdommagesetlesbris.Faitesattentionenchargeantetendéchargeantlesvélos.Vérifiezrégulièrementleporte-bicyclettesetlesvélosaucoursdutransport.
• Veillezàcequelespneusdesvélossoientàaumoins6poucesdestuyauxd’échappementdevotrevéhicule.Latempératureàlasortiedestuyauxestsuffisammentélevéepourfairefondreouendommagerl’extérieurdespneus.Lespneusnedevraientjamaisêtrejusteenfacedestuyauxd’échappement.
• Lesgrosaccessoiressupplémentaires(telsquelessiègesd’enfants)augmententlarésistancecrééeparleventetdonclapressionexercéesurleporte-bicyclettesetsurlespointsd’attache.Réduisezdoncvotrevitesseenfonctiondesconditionsafind’évitertoutrisquededommage.
• Si,aprèsavoirlucesinstructions,voussouhaitiezrecevoirdesrenseignementscomplémentairesquantàl’installationet/oul’utilisationdeceporte-bicyclettes,n’hésitezpasàcontacterleconcessionnaireagrééSwagmanleplusprocheouleserviceàlaclientèleSwagman.
Installation du porte-vélos sur une remorque ou un camion à sellette d’attelage : 1.L’acheteurdoitêtreconscientquelachargeexercéeparleporte-vélosetlesbicyclettespeutdépasserlachargemaximalepermisepouruneremorque,uncamionàselletted’attelageoutoutautreemplacementd’installation.L’installationinadéquateduporte-vélosannulela garantie.
2. Lesporte-vélosrabattablesnesontPAScouvertsparlagaranties’ilssontinstallésàl’arrièred’uncamionàselletted’attelageoud’uneremorque.
9