Embed Size (px)
Citation preview
INSTRUCTION SHEET
PRODUCT: 64684 Dispatch 2 Bike Rack • Page 1 of 3
Swagman • 300 - 1880 Government St. • Penticton, B.C. Canada V2A 7J1 • Phone (250) 490-8883 • Fax (250) 490-8885 • www.swagman.net
REV 24/11/14
2
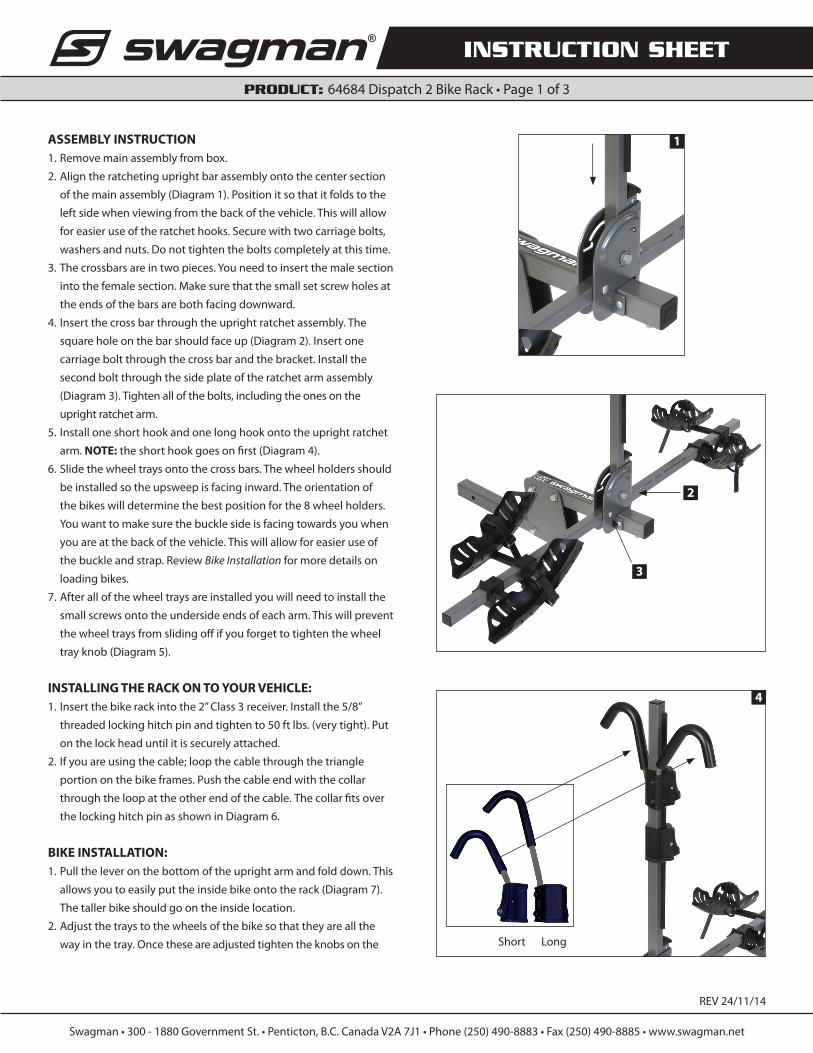
ASSEMBLY INSTRUCTION1. Remove main assembly from box.
2. Align the ratcheting upright bar assembly onto the center section
of the main assembly (Diagram 1). Position it so that it folds to the
left side when viewing from the back of the vehicle. This will allow
for easier use of the ratchet hooks. Secure with two carriage bolts,
washers and nuts. Do not tighten the bolts completely at this time.
3. The crossbars are in two pieces. You need to insert the male section
into the female section. Make sure that the small set screw holes at
the ends of the bars are both facing downward.
4. Insert the cross bar through the upright ratchet assembly. The
square hole on the bar should face up (Diagram 2). Insert one
carriage bolt through the cross bar and the bracket. Install the
second bolt through the side plate of the ratchet arm assembly
(Diagram 3). Tighten all of the bolts, including the ones on the
upright ratchet arm.
5. Install one short hook and one long hook onto the upright ratchet
arm. NOTE: the short hook goes on first (Diagram 4).
6. Slide the wheel trays onto the cross bars. The wheel holders should
be installed so the upsweep is facing inward. The orientation of
the bikes will determine the best position for the 8 wheel holders.
You want to make sure the buckle side is facing towards you when
you are at the back of the vehicle. This will allow for easier use of
the buckle and strap. Review Bike Installation for more details on
loading bikes.
7. After all of the wheel trays are installed you will need to install the
small screws onto the underside ends of each arm. This will prevent
the wheel trays from sliding off if you forget to tighten the wheel
tray knob (Diagram 5).
INSTALLING THE RACK ON TO YOUR VEHICLE:1. Insert the bike rack into the 2” Class 3 receiver. Install the 5/8”
threaded locking hitch pin and tighten to 50 ft lbs. (very tight). Put
on the lock head until it is securely attached.
2. If you are using the cable; loop the cable through the triangle
portion on the bike frames. Push the cable end with the collar
through the loop at the other end of the cable. The collar fits over
the locking hitch pin as shown in Diagram 6.
BIKE INSTALLATION:1. Pull the lever on the bottom of the upright arm and fold down. This
allows you to easily put the inside bike onto the rack (Diagram 7).
The taller bike should go on the inside location.
2. Adjust the trays to the wheels of the bike so that they are all the
way in the tray. Once these are adjusted tighten the knobs on the
1
3
4
Short Long
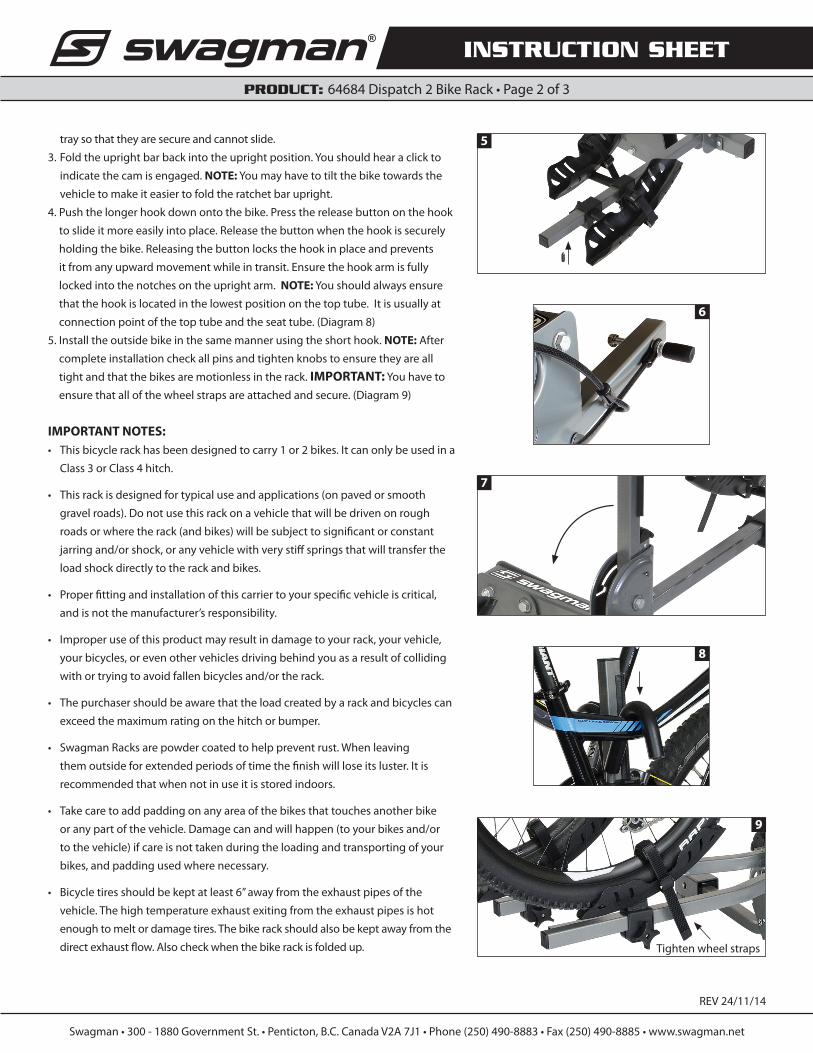
tray so that they are secure and cannot slide.
3. Fold the upright bar back into the upright position. You should hear a click to
indicate the cam is engaged. NOTE: You may have to tilt the bike towards the
vehicle to make it easier to fold the ratchet bar upright.
4. Push the longer hook down onto the bike. Press the release button on the hook
to slide it more easily into place. Release the button when the hook is securely
holding the bike. Releasing the button locks the hook in place and prevents
it from any upward movement while in transit. Ensure the hook arm is fully
locked into the notches on the upright arm. NOTE: You should always ensure
that the hook is located in the lowest position on the top tube. It is usually at
connection point of the top tube and the seat tube. (Diagram 8)
5. Install the outside bike in the same manner using the short hook. NOTE: After
complete installation check all pins and tighten knobs to ensure they are all
tight and that the bikes are motionless in the rack. IMPORTANT: You have to
ensure that all of the wheel straps are attached and secure. (Diagram 9)
IMPORTANT NOTES:• This bicycle rack has been designed to carry 1 or 2 bikes. It can only be used in a
Class 3 or Class 4 hitch.
• This rack is designed for typical use and applications (on paved or smooth
gravel roads). Do not use this rack on a vehicle that will be driven on rough
roads or where the rack (and bikes) will be subject to significant or constant
jarring and/or shock, or any vehicle with very stiff springs that will transfer the
load shock directly to the rack and bikes.
• Proper fitting and installation of this carrier to your specific vehicle is critical,
and is not the manufacturer’s responsibility.
• Improper use of this product may result in damage to your rack, your vehicle,
your bicycles, or even other vehicles driving behind you as a result of colliding
with or trying to avoid fallen bicycles and/or the rack.
• The purchaser should be aware that the load created by a rack and bicycles can
exceed the maximum rating on the hitch or bumper.
• Swagman Racks are powder coated to help prevent rust. When leaving
them outside for extended periods of time the finish will lose its luster. It is
recommended that when not in use it is stored indoors.
• Take care to add padding on any area of the bikes that touches another bike
or any part of the vehicle. Damage can and will happen (to your bikes and/or
to the vehicle) if care is not taken during the loading and transporting of your
bikes, and padding used where necessary.
• Bicycle tires should be kept at least 6” away from the exhaust pipes of the
vehicle. The high temperature exhaust exiting from the exhaust pipes is hot
enough to melt or damage tires. The bike rack should also be kept away from the
direct exhaust flow. Also check when the bike rack is folded up.
INSTRUCTION SHEET
PRODUCT: 64684 Dispatch 2 Bike Rack • Page 2 of 3
Swagman • 300 - 1880 Government St. • Penticton, B.C. Canada V2A 7J1 • Phone (250) 490-8883 • Fax (250) 490-8885 • www.swagman.net
REV 24/11/14
5
6
7
8
9
Tighten wheel straps
• Bikes fitted with large accessories (such as a child carrying seat) will greatly increase the wind resistance and therefore the pressure on the rack
and all vehicle mounting points. Reducing vehicle speed will reduce the chance of any problems occurring because of this situation.
• After reading this manual, should you have any additional questions regarding the compatibility, fitting, and/or use of this rack, please call
your nearest Swagman authorized retail dealer or Swagman Customer Service.
MOUNTING THE BIKE RACK ON A TRAILER OR 5TH WHEEL:1. Purchaser is advised that the load created by rack and bicycles may exceed the strength of trailer or 5th wheel bumper or other mounting
location. Failure through improper mounting will void rack warranty. If mounted on a bumper check with the manufacturer of the trailer to
insure your trailer has a “continuous steel welded bumper
2. The recommended 14” ground clearance is not sufficient on trailers or 5th wheels. Ground clearance must exceed 15” and will vary upon
application. Damage to bicycles or rack due to ground clearance problems on trailers or 5th wheels is not covered by warranty.
INSTRUCTION SHEET
64684 Dispatch 2 Bike Rack • Page 3 of 3
Swagman • 300 - 1880 Government St. • Penticton, B.C. Canada V2A 7J1 • Phone (250) 490-8883 • Fax (250) 490-8885 • www.swagman.net
REV 24/11/14
WARNINGDue to the increase in thinner/lighter “carbon frame bikes” this rack may be inappropriate because the hook clamps the frame. Please check with your bike manufacturer for specific details. We developed the Semi 2.0 and Semi 4.0 for these types of Carbon frame bikes. They feature ZERO frame contact. The hook arm grabs the wheels and not the frame.

MODE D’ASSEMBLAGE
PRODUCT: 64684 Dispatch • Page 1 de 3
Swagman • 300 - 1880 Government St. • Penticton, B.C. Canada V2A 7J1 • Phone (250) 490-8883 • Fax (250) 490-8885 • www.swagman.net
REV 24/11/14
Mode d’assemblage :
1. Sortez le bras central de la boîte.
2. Insérez le montant à cliquet dans le bras central de sorte que vous
puissiez le rabattre vers la gauche lorsque vous êtes derrière le
véhicule (diagramme 1). Cela facilitera l’utilisation des bras à cliquet.
Fixez le montant à l’aide de deux boulons, rondelles et écrous. Ne
serrez pas complètement les boulons à cette étape.
3. Les barres transversales sont en deux pièces. Vous devez insérer la
section mâle dans la section femelle. Assurez-vous que les petits
trous de vis aux extrémités des barres font orientés vers le bas.
4. Insérez la barre transversale dans le bras central. Assurez-vous que le
trou de boulon carré sur la barre est orienté vers le haut (diagramme
2). Insérez le premier boulon dans la barre transversale et la patte de
fixation, puis insérez le deuxième boulon dans la plaque latérale du
montant à cliquet (diagramme 3). Serrez fermement tous les boulons,
y compris ceux sur le montant à cliquet.
5. Installez le bras à cliquet court et le bras à cliquet long sur le montant
à cliquet (diagramme 4). REMARQUE : Assurez-vous d’installer le bras
court en premier.
6. Glissez les plateaux de roue sur les barres transversales. Les plateaux
doivent être installés de façon à ce que la partie surélevée soit vers
l’intérieur. L’emplacement des 8 plateaux est déterminé en fonction
de l’orientation des vélos. Assurez-vous que le fermoir de la boucle
vous fait face lorsque vous êtes derrière le véhicule afin que vous
puissiez manipuler plus facilement la sangle de roue avec boucle
à rochet. Pour de plus amples renseignements, voir la section
Installation des vélos.
7. Une fois que les plateaux de roue sont installés, insérez une petite
vis dans chaque trou aux extrémités des barres transversales. Cela
empêchera le plateau de roue de sortir si vous oubliez de serrer la
molette (diagramme 5).
Installation du porte-vélos Quad 2 + 2 sur le véhicule :
1. Insérez le porte-vélos dans le récepteur de 2 po (classe 3). Installez la
goupille verrouillable de 5/8 po et serrez très fermement jusqu’à 50
pi-lb. Vissez fermement la vis à tête de verrouillage.
2. Si vous utilisez le câble de sécurité, passez-le dans la partie
triangulaire du cadre des vélos. Insérez l’extrémité du câble avec le
collier dans l’attache à l’autre extrémité du câble. Le collier s’insère
dans la goupille verrouillable (diagramme 6).
Installation des vélos :
1. Pour faciliter le chargement du vélo près du véhicule, tirez le
levier au bas du bras central afin de le rabattre (diagramme 7). On
recommande de placer le plus gros vélo du côté près du véhicule.
2
1
3
4
Court Long
MODE D’ASSEMBLAGE
PRODUCT: 64684 Dispatch • Page 2 de 3
Swagman • 300 - 1880 Government St. • Penticton, B.C. Canada V2A 7J1 • Phone (250) 490-8883 • Fax (250) 490-8885 • www.swagman.net
REV 24/11/14
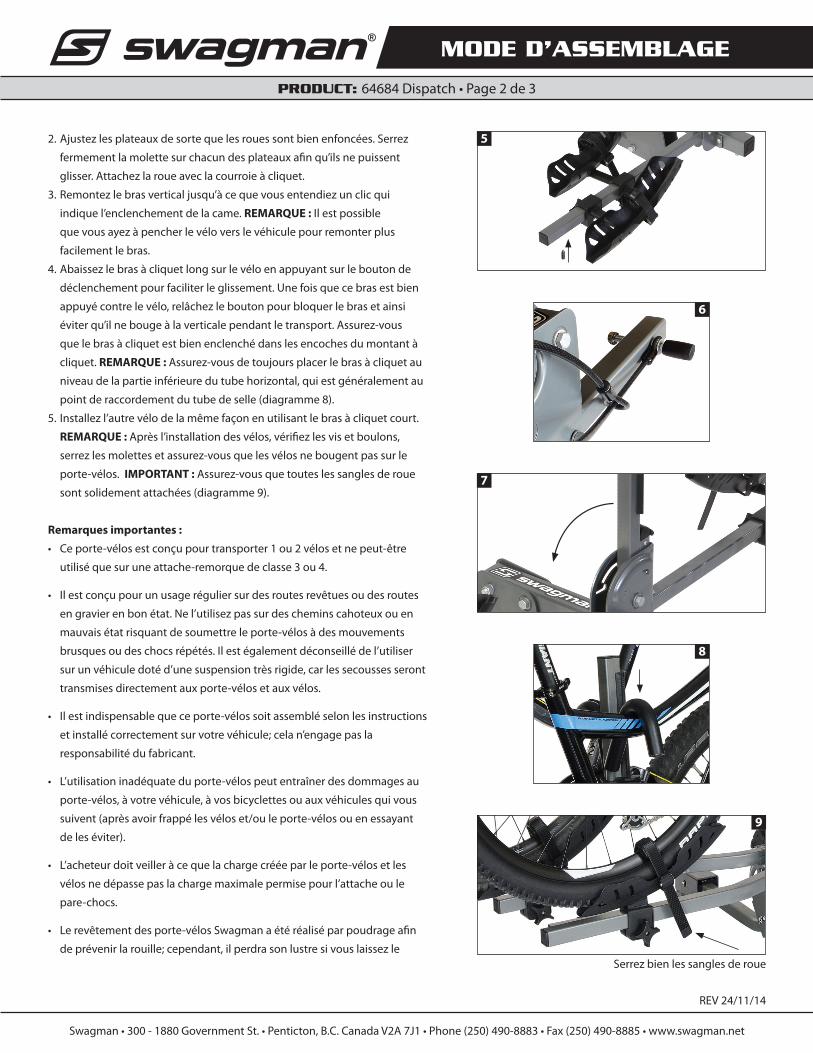
2. Ajustez les plateaux de sorte que les roues sont bien enfoncées. Serrez
fermement la molette sur chacun des plateaux afin qu’ils ne puissent
glisser. Attachez la roue avec la courroie à cliquet.
3. Remontez le bras vertical jusqu’à ce que vous entendiez un clic qui
indique l’enclenchement de la came. REMARQUE : Il est possible
que vous ayez à pencher le vélo vers le véhicule pour remonter plus
facilement le bras.
4. Abaissez le bras à cliquet long sur le vélo en appuyant sur le bouton de
déclenchement pour faciliter le glissement. Une fois que ce bras est bien
appuyé contre le vélo, relâchez le bouton pour bloquer le bras et ainsi
éviter qu’il ne bouge à la verticale pendant le transport. Assurez-vous
que le bras à cliquet est bien enclenché dans les encoches du montant à
cliquet. REMARQUE : Assurez-vous de toujours placer le bras à cliquet au
niveau de la partie inférieure du tube horizontal, qui est généralement au
point de raccordement du tube de selle (diagramme 8).
5. Installez l’autre vélo de la même façon en utilisant le bras à cliquet court.
REMARQUE : Après l’installation des vélos, vérifiez les vis et boulons,
serrez les molettes et assurez-vous que les vélos ne bougent pas sur le
porte-vélos. IMPORTANT : Assurez-vous que toutes les sangles de roue
sont solidement attachées (diagramme 9).
Remarques importantes :
• Ce porte-vélos est conçu pour transporter 1 ou 2 vélos et ne peut-être
utilisé que sur une attache-remorque de classe 3 ou 4.
• Il est conçu pour un usage régulier sur des routes revêtues ou des routes
en gravier en bon état. Ne l’utilisez pas sur des chemins cahoteux ou en
mauvais état risquant de soumettre le porte-vélos à des mouvements
brusques ou des chocs répétés. Il est également déconseillé de l’utiliser
sur un véhicule doté d’une suspension très rigide, car les secousses seront
transmises directement aux porte-vélos et aux vélos.
• Il est indispensable que ce porte-vélos soit assemblé selon les instructions
et installé correctement sur votre véhicule; cela n’engage pas la
responsabilité du fabricant.
• L’utilisation inadéquate du porte-vélos peut entraîner des dommages au
porte-vélos, à votre véhicule, à vos bicyclettes ou aux véhicules qui vous
suivent (après avoir frappé les vélos et/ou le porte-vélos ou en essayant
de les éviter).
• L’acheteur doit veiller à ce que la charge créée par le porte-vélos et les
vélos ne dépasse pas la charge maximale permise pour l’attache ou le
pare-chocs.
• Le revêtement des porte-vélos Swagman a été réalisé par poudrage afin
de prévenir la rouille; cependant, il perdra son lustre si vous laissez le Serrez bien les sangles de roue
5
6
7
8
9
MODE D’ASSEMBLAGE
PRODUCT: 64684 Dispatch • Page 3 de 3
Swagman • 300 - 1880 Government St. • Penticton, B.C. Canada V2A 7J1 • Phone (250) 490-8883 • Fax (250) 490-8885 • www.swagman.net
REV 24/11/14
porte-vélos à l’extérieur pendant une longue période. Il est recommandé de ranger le porte-vélos à l’intérieur lorsque vous ne vous en servez pas.
• Protégez les tubes, les pièces et les accessoires de toute bicyclette qui pourrait entrer en contact avec une autre bicyclette ou avec votre
véhicule afin d’éviter les dommages et les bris. Faites attention en chargeant et en déchargeant les vélos. Vérifiez régulièrement le porte-
bicyclettes et les vélos au cours du transport.
• Veillez à ce que les pneus des vélos soient à au moins 6 pouces des tuyaux d’échappement de votre véhicule. La température à la sortie des
tuyaux est suffisamment élevée pour faire fondre ou endommager l’extérieur des pneus. Les pneus ne devraient jamais être juste en face des
tuyaux d’échappement.
• Les gros accessoires supplémentaires (tels que les sièges d’enfants) augmentent la résistance créée par le vent et donc la pression exercée sur
le porte-bicyclettes et sur les points d’attache. Réduisez donc votre vitesse en fonction des conditions afin d’éviter tout risque de dommage.
• Si, après avoir lu ces instructions, vous souhaitiez recevoir des renseignements complémentaires quant à l’installation et/ou l’utilisation de ce
porte-bicyclettes, n’hésitez pas à contacter le concessionnaire agréé Swagman le plus proche ou le service à la clientèle Swagman.
Installation du porte-vélos sur une remorque ou un camion à sellette d’attelage :
1. L’acheteur doit être conscient que la charge exercée par le porte-vélos et les bicyclettes peut dépasser la charge maximale permise pour une
remorque, un camion à sellette d’attelage ou tout autre emplacement d’installation. L’installation inadéquate du porte-vélos annule la garantie.
2. Les porte-vélos rabattables ne sont PAS couverts par la garantie s’ils sont installés à l’arrière d’un camion à sellette d’attelage ou d’une remorque.
AVERTISSEMENTÉtant donné que les cadres de carbone sont de plus en plus légers et minces, il est possible que ce porte-vélos soit inadéquat en raison du crochet qui retient le cadre. Veuillez vérifier auprès du fabricant de vélo pour obtenir les détails particuliers. Swagman a conçu les modèles Semi 2.0 et Semi 4.0 pour répondre à ces types de cadre de carbone. Ces porte-vélos n’ont AUCUN contact avec le cadre puisque le crochet retient la roue au lieu du cadre.