Embed Size (px)
DESCRIPTION
Sap sd excise invoice User Manual
Citation preview
User Manual-Sales & Distribution (CIN)
INDEX
1.Create Excise invoice
2.Excise Rate Maintenance
3.Update RG23 A/C Issues and RG1 3.1 Update RG23 A/C Issues and RG1
3.2.Extract
3.3.Print Utility Program
4.Returns Process 4.1.Capture / Change / Cancel / Display
4.2.Capture Excise Invoice
4.3.Enter Quantities
4.4.Enter Duty Rates
4.5.Enter Duty Values
4.6.Post CENVAT
4.7.Enter Reference Document Number (Optional)
5. Form Tracking
2
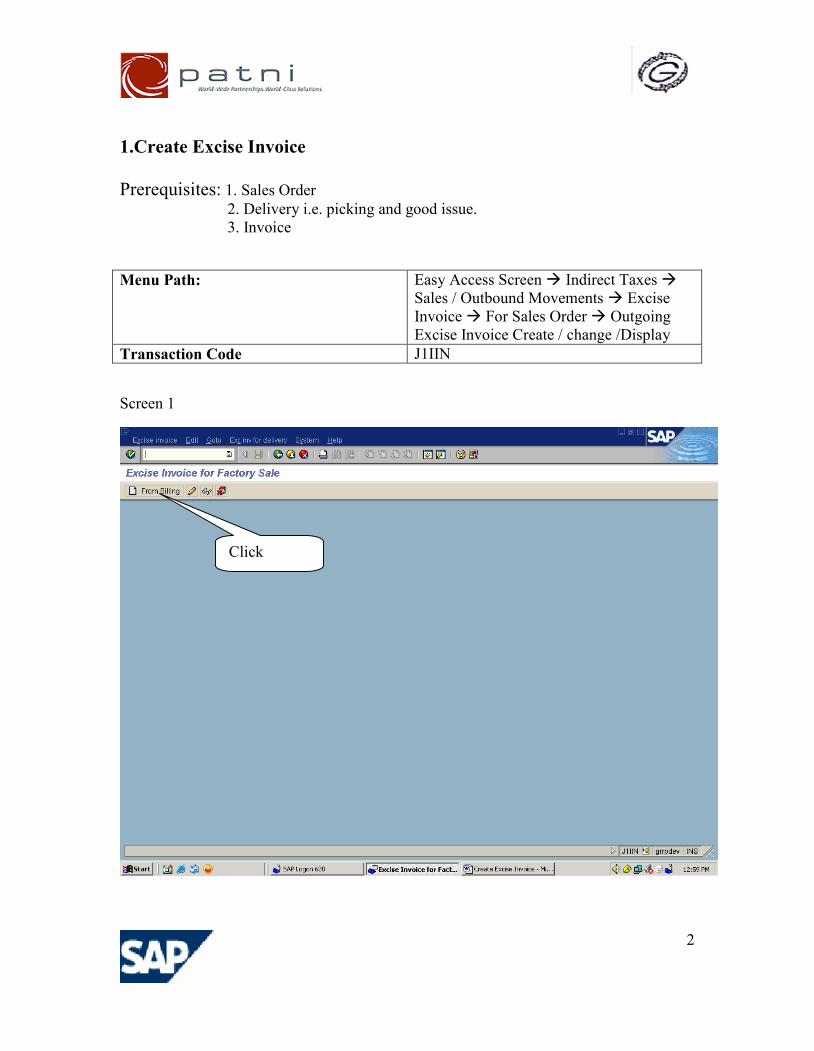
1.Create Excise Invoice
Prerequisites: 1. Sales Order 2. Delivery i.e. picking and good issue. 3. Invoice
Menu Path: Easy Access Screen Indirect Taxes Sales / Outbound Movements ExciseInvoice For Sales Order OutgoingExcise Invoice Create / change /Display
Transaction Code J1IIN
Screen 1
Click
3
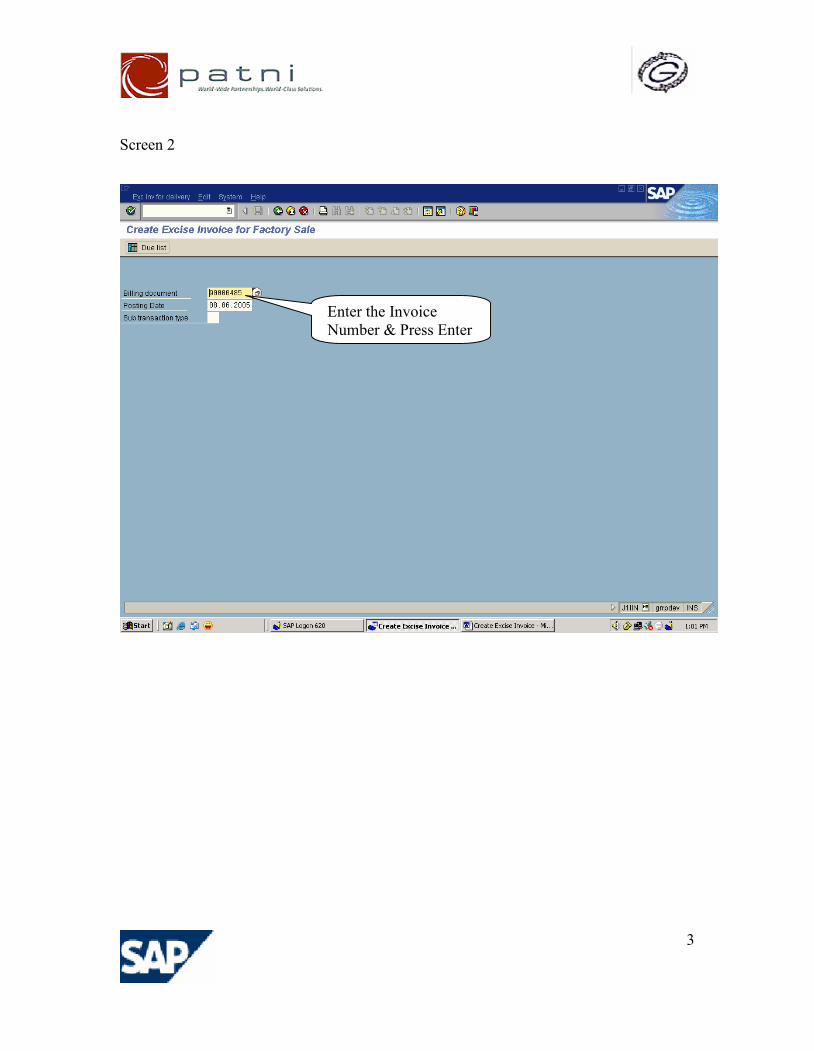
Screen 2
Enter the InvoiceNumber & Press Enter

4
Screen 3
1. Enter Excise Group and Series Group2. Enter the preprinted Excise invoice number.3. Save the document.
Enter Excise group Enter Series Group
EnterPreprintedExciseInvoice No.
5
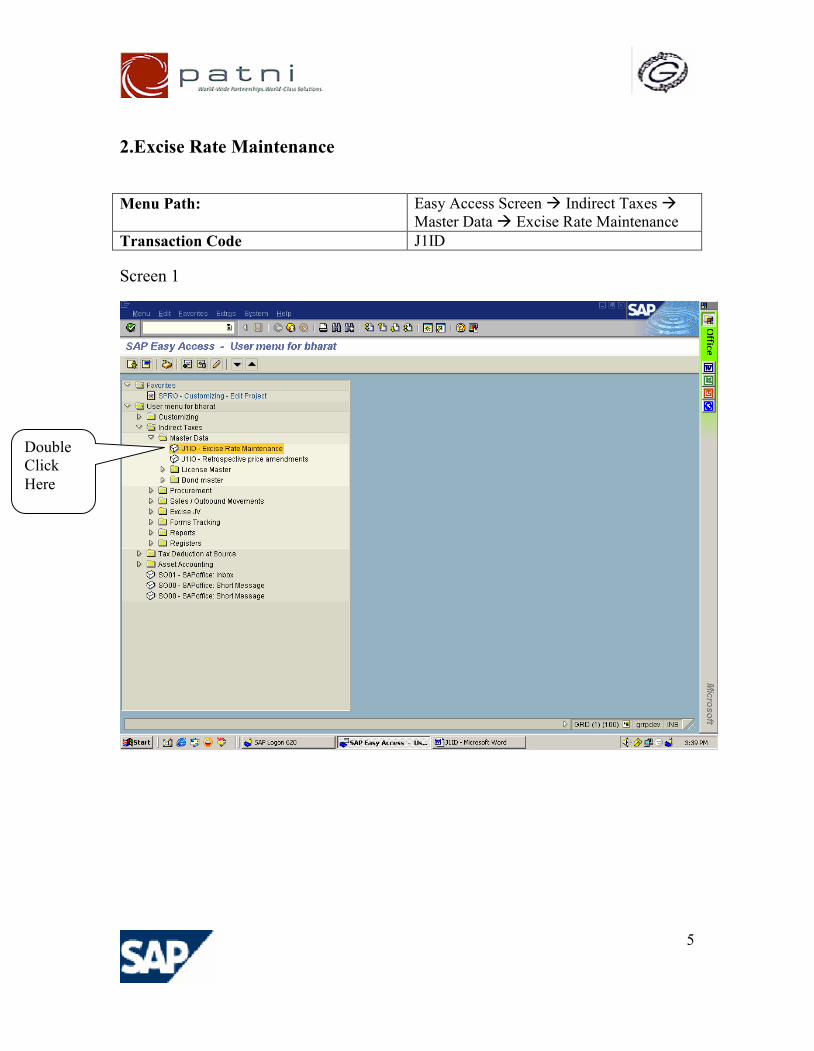
2.Excise Rate Maintenance
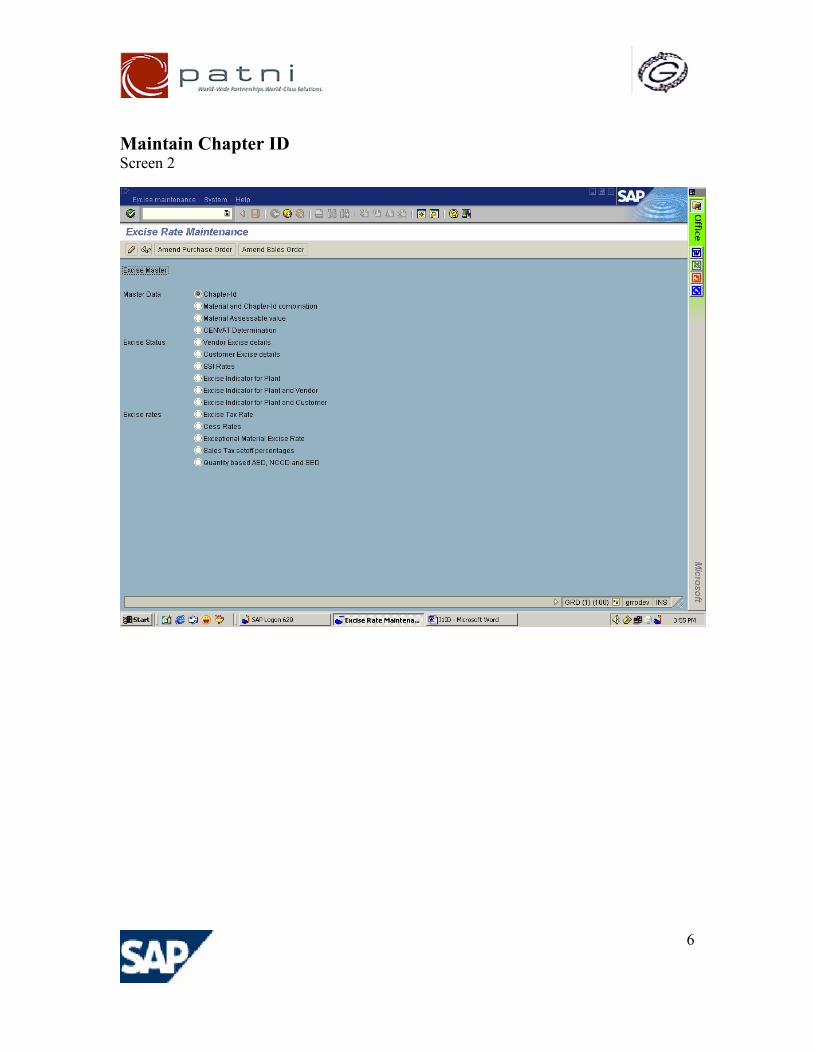
Menu Path: Easy Access Screen Indirect Taxes Master Data Excise Rate Maintenance
Transaction Code J1ID
Screen 1
DoubleClickHere
6
Maintain Chapter IDScreen 2
7
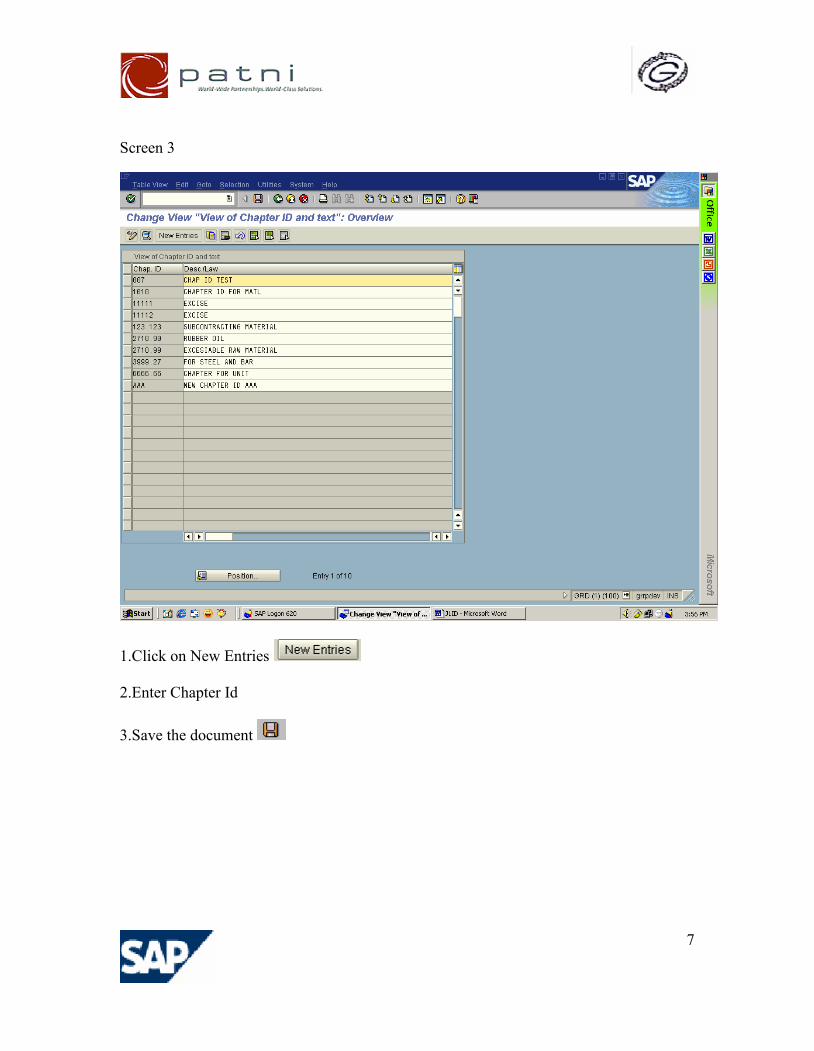
Screen 3
1.Click on New Entries
2.Enter Chapter Id
3.Save the document
8
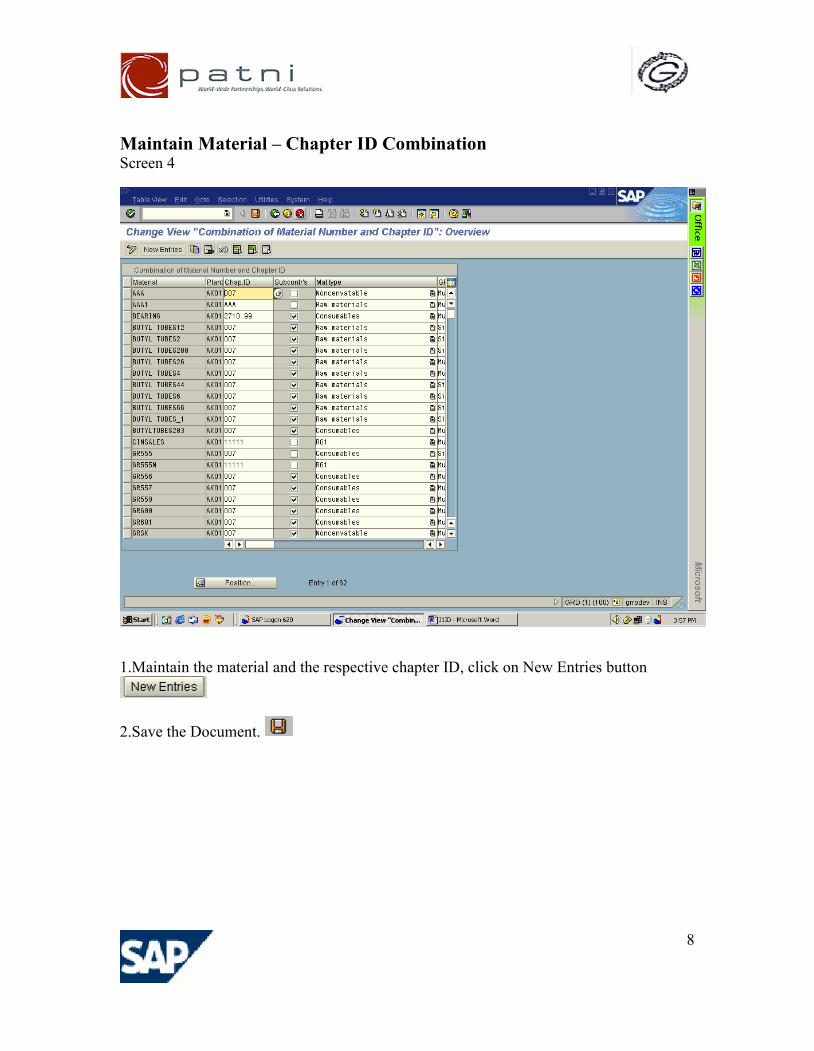
Maintain Material – Chapter ID CombinationScreen 4
1.Maintain the material and the respective chapter ID, click on New Entries button
2.Save the Document.
9
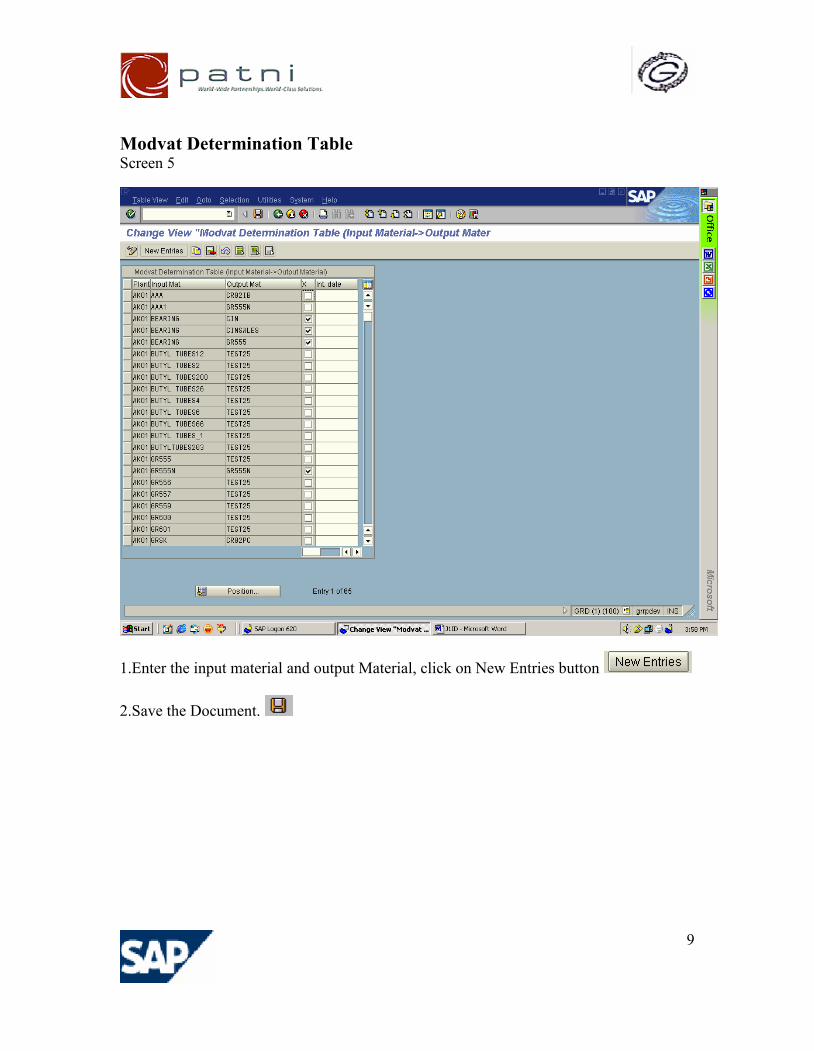
Modvat Determination TableScreen 5
1.Enter the input material and output Material, click on New Entries button
2.Save the Document.

10
Maintain Excise Tax rateScreen 6
1.Maintain chapter ID and the applicable excise rate, click on New Entries button
2.Save the Document.

11
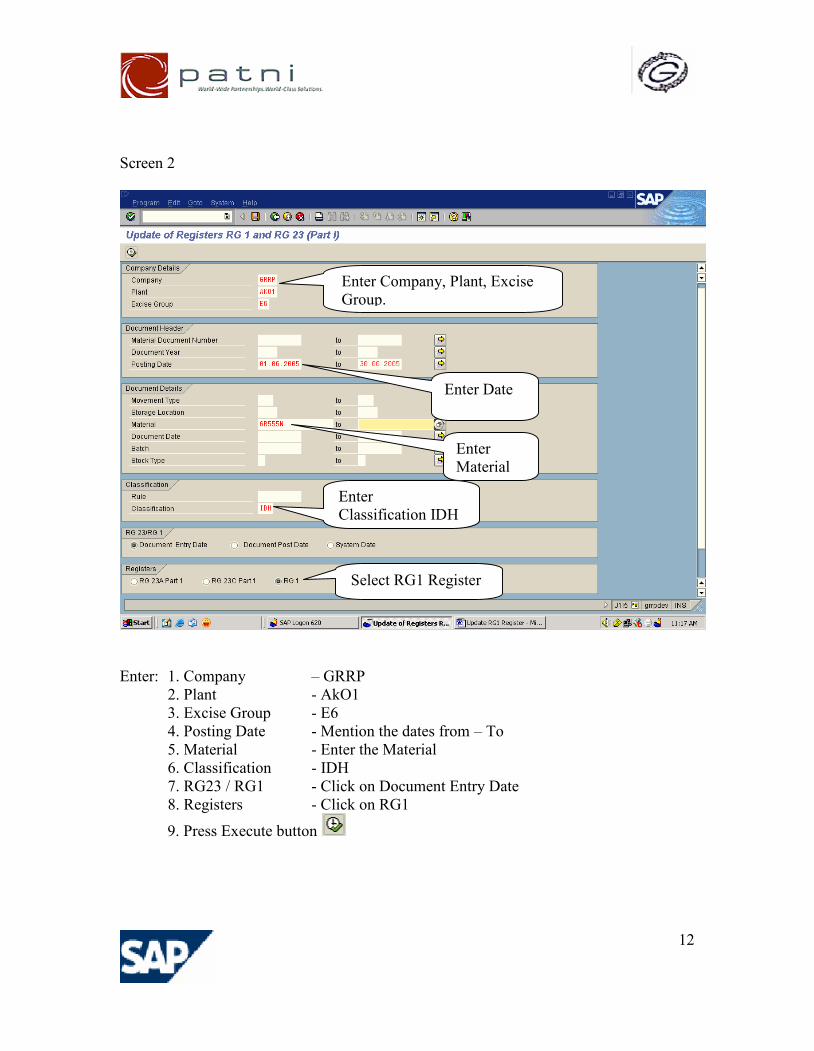
3.1.Update RG23 A/C Issues and RG1
Menu Path: Easy Access Screen Indirect Taxes Registers Excise Tax Update RG23A/C Issues and RG1
Transaction Code J1I5
Screen 1
Doubleclick here
12
Screen 2
Enter: 1. Company – GRRP2. Plant - AkO13. Excise Group - E64. Posting Date - Mention the dates from – To5. Material - Enter the Material6. Classification - IDH7. RG23 / RG1 - Click on Document Entry Date8. Registers - Click on RG1
9. Press Execute button
Enter Company, Plant, ExciseGroup.
Enter Date
EnterMaterial
EnterClassification IDH
Select RG1 Register
13
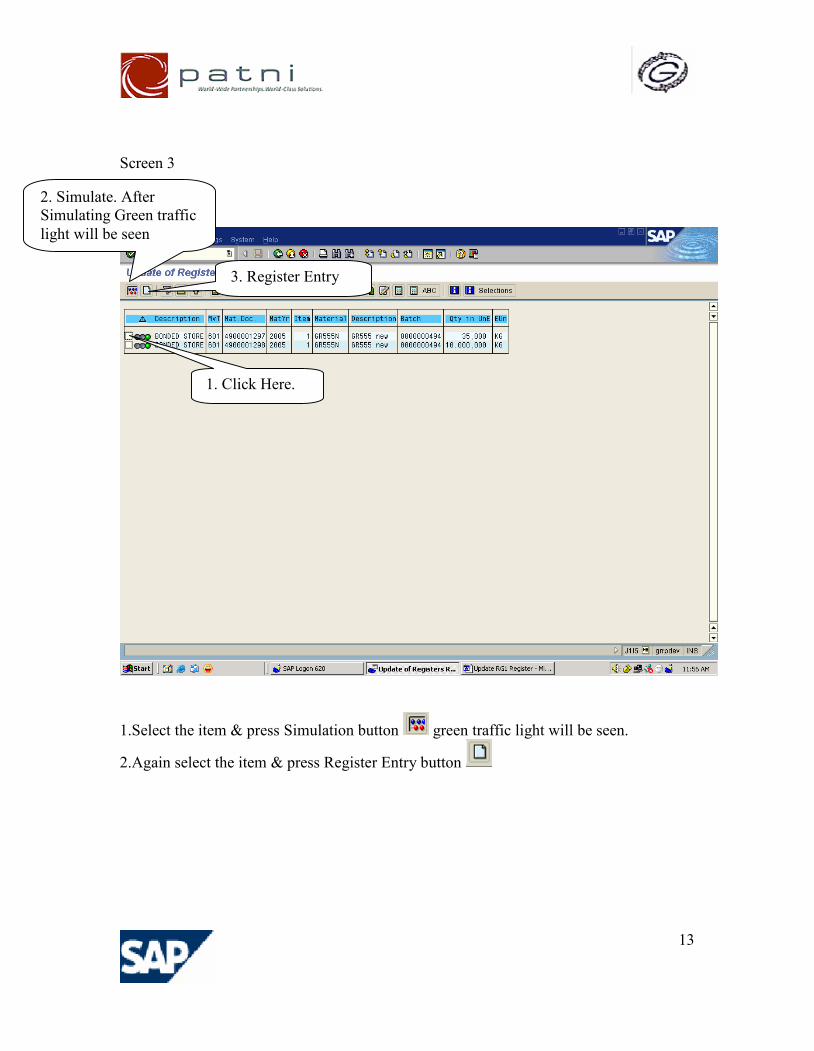
Screen 3
1.Select the item & press Simulation button green traffic light will be seen.
2.Again select the item & press Register Entry button
1. Click Here.
2. Simulate. AfterSimulating Green trafficlight will be seen
3. Register Entry
14
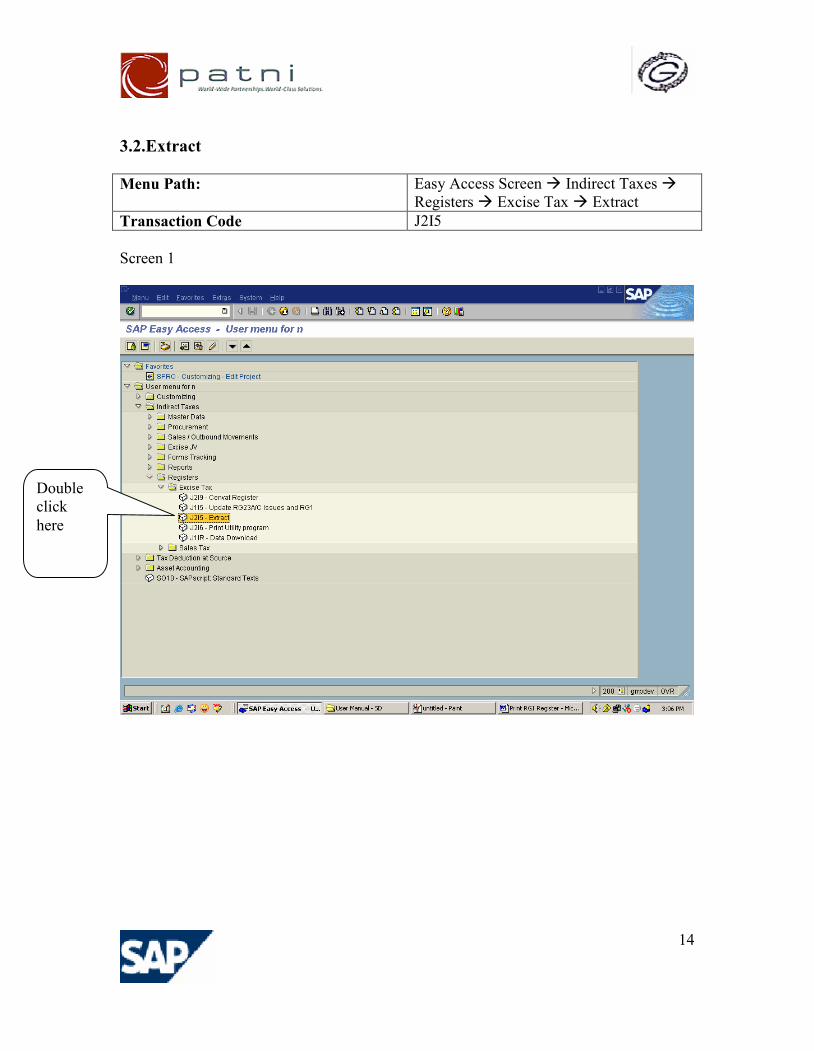
3.2.Extract
Menu Path: Easy Access Screen Indirect Taxes Registers Excise Tax Extract
Transaction Code J2I5
Screen 1
Doubleclickhere
15
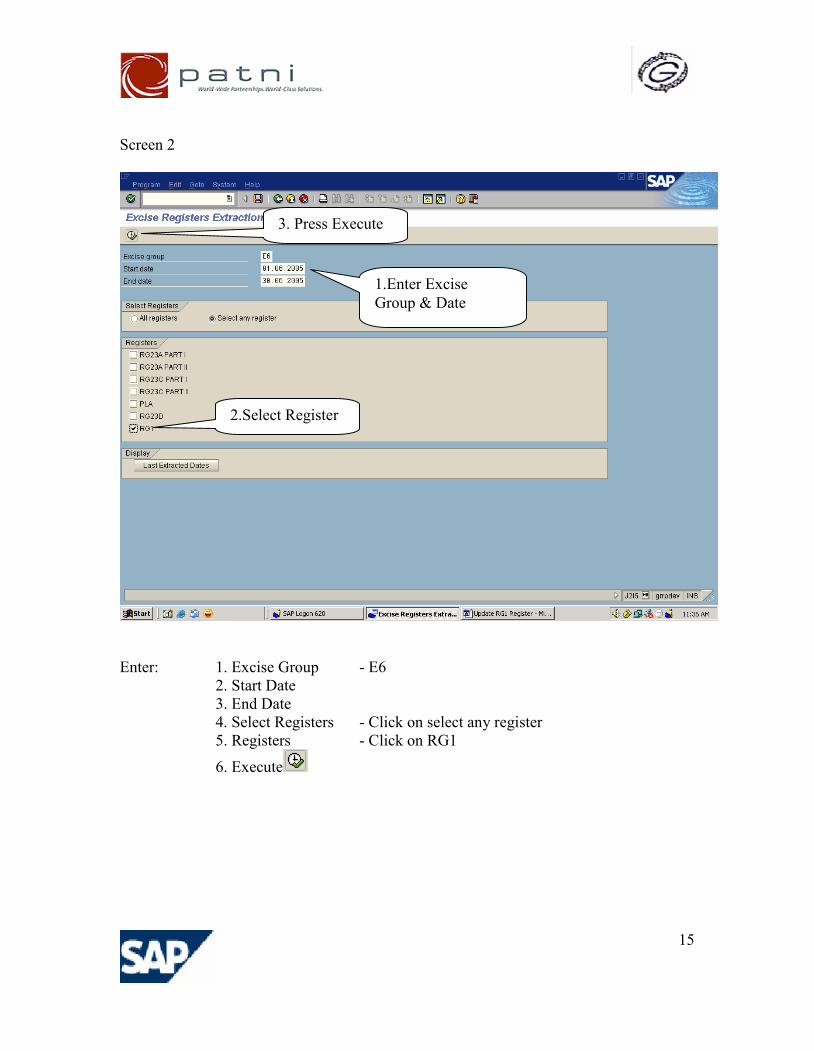
Screen 2
Enter: 1. Excise Group - E62. Start Date3. End Date4. Select Registers - Click on select any register5. Registers - Click on RG1
6. Execute
1.Enter ExciseGroup & Date
2.Select Register
3. Press Execute
16
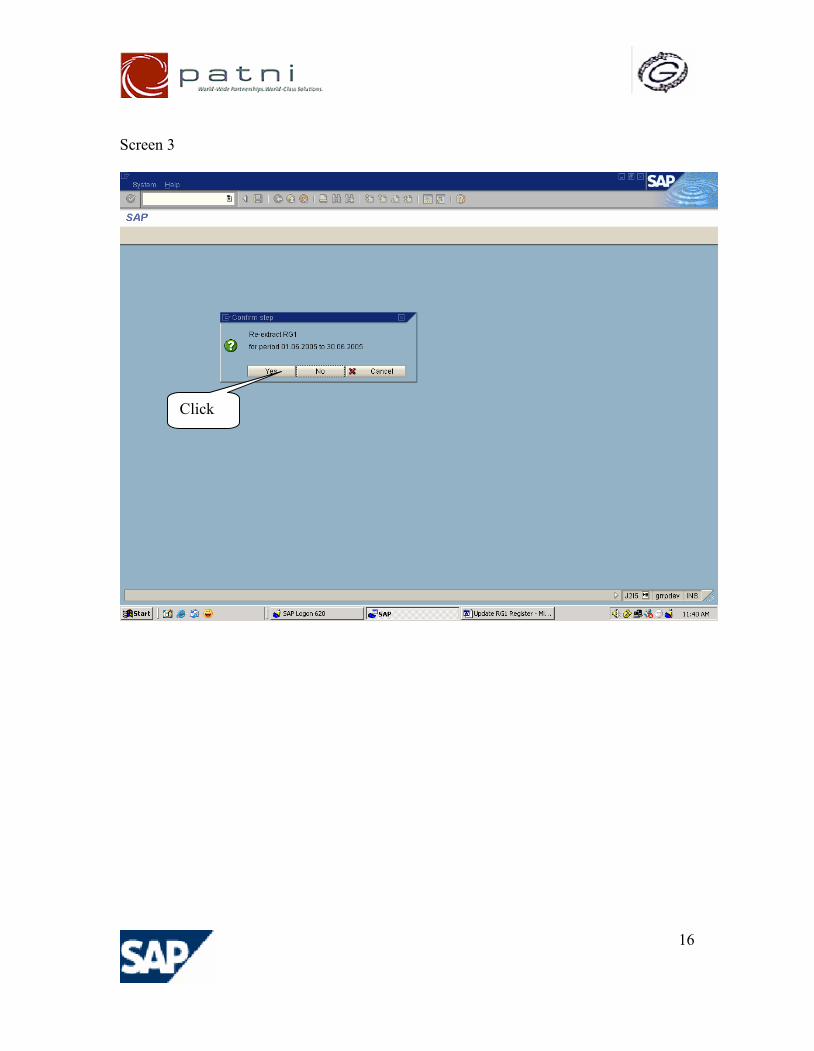
Screen 3
Click
17
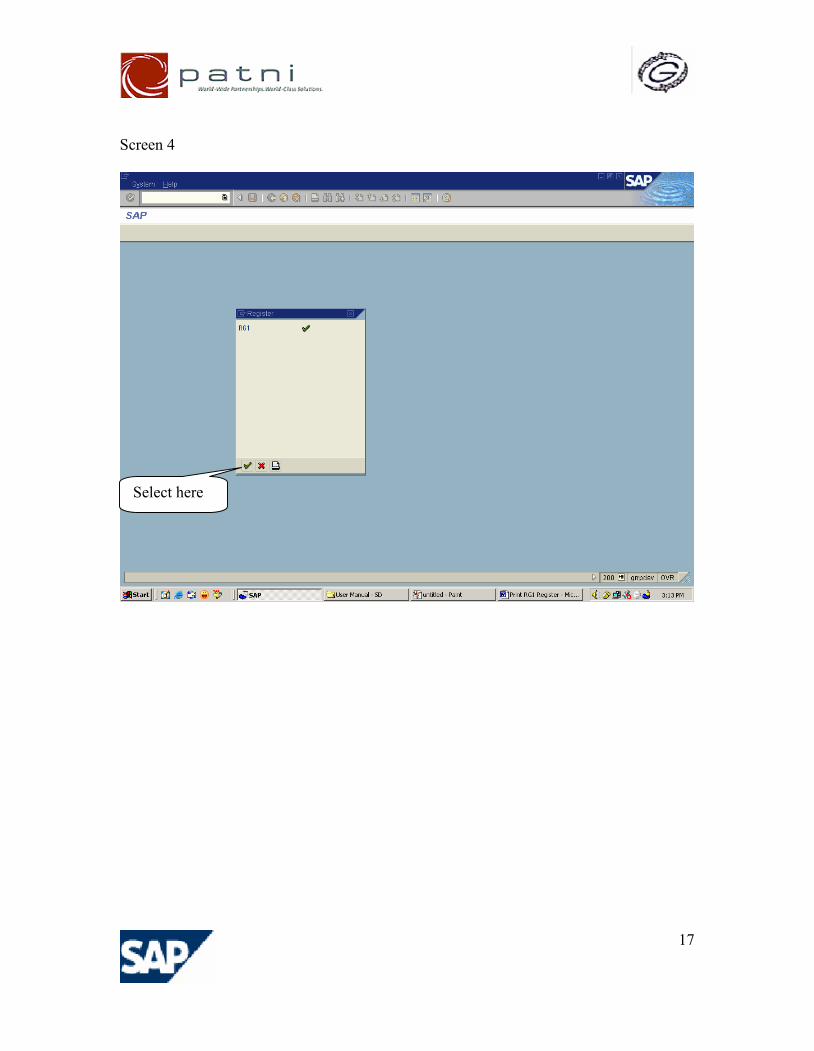
Screen 4
Select here

18
3.3.Print Utility Program
Menu Path: Easy Access Screen Indirect Taxes Registers Excise Tax Print UtilityProgram
Transaction Code J2I6
Printing Excise Registers
Screen 1
Doubleclick here
19
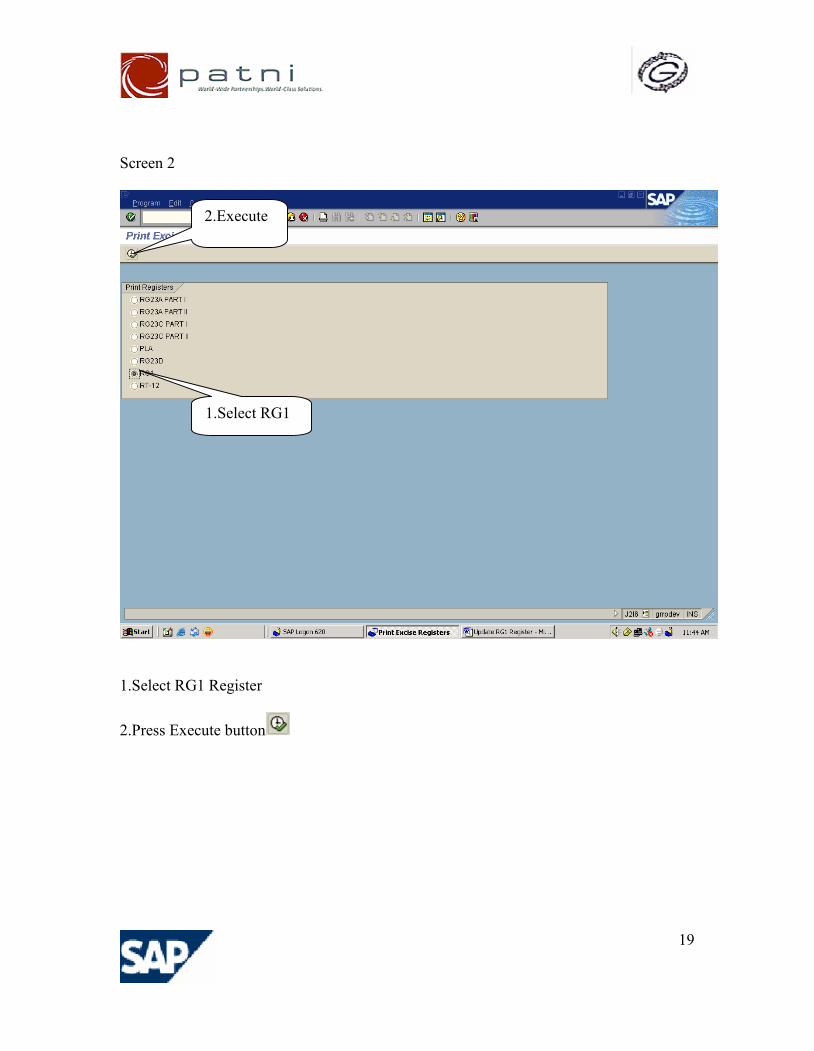
Screen 2
1.Select RG1 Register
2.Press Execute button
1.Select RG1
2.Execute
20
Screen 3
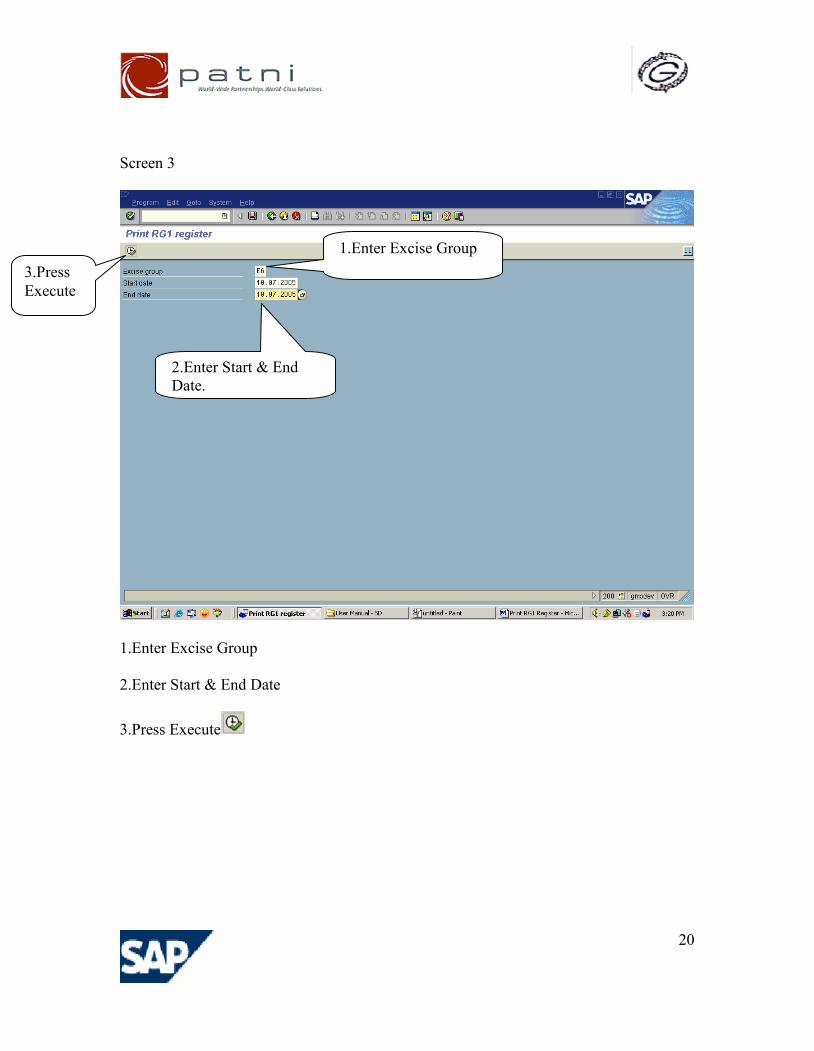
1.Enter Excise Group
2.Enter Start & End Date
3.Press Execute
1.Enter Excise Group
2.Enter Start & EndDate.
3.PressExecute
21
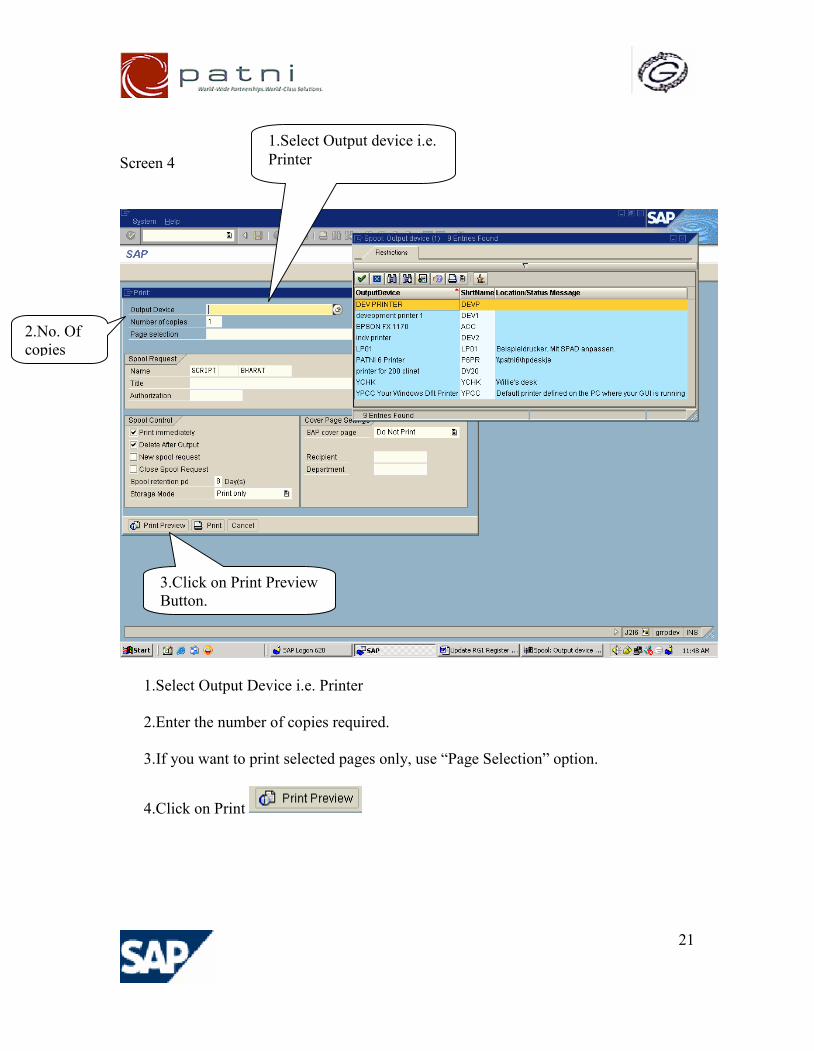
Screen 4
1.Select Output Device i.e. Printer
2.Enter the number of copies required.
3.If you want to print selected pages only, use “Page Selection” option.
4.Click on Print
1.Select Output device i.e.Printer
2.No. Ofcopies
3.Click on Print PreviewButton.
22
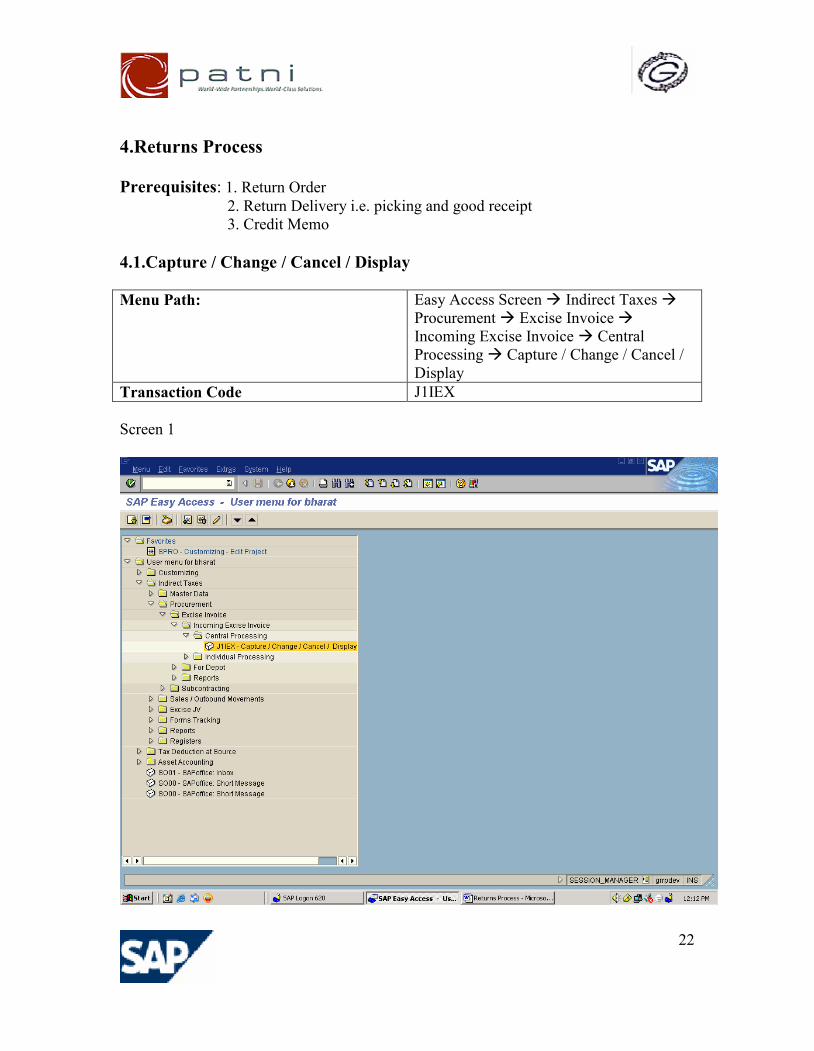
4.Returns Process
Prerequisites: 1. Return Order 2. Return Delivery i.e. picking and good receipt 3. Credit Memo
4.1.Capture / Change / Cancel / Display
Menu Path: Easy Access Screen Indirect Taxes Procurement Excise Invoice Incoming Excise Invoice CentralProcessing Capture / Change / Cancel /Display
Transaction Code J1IEX
Screen 1
23
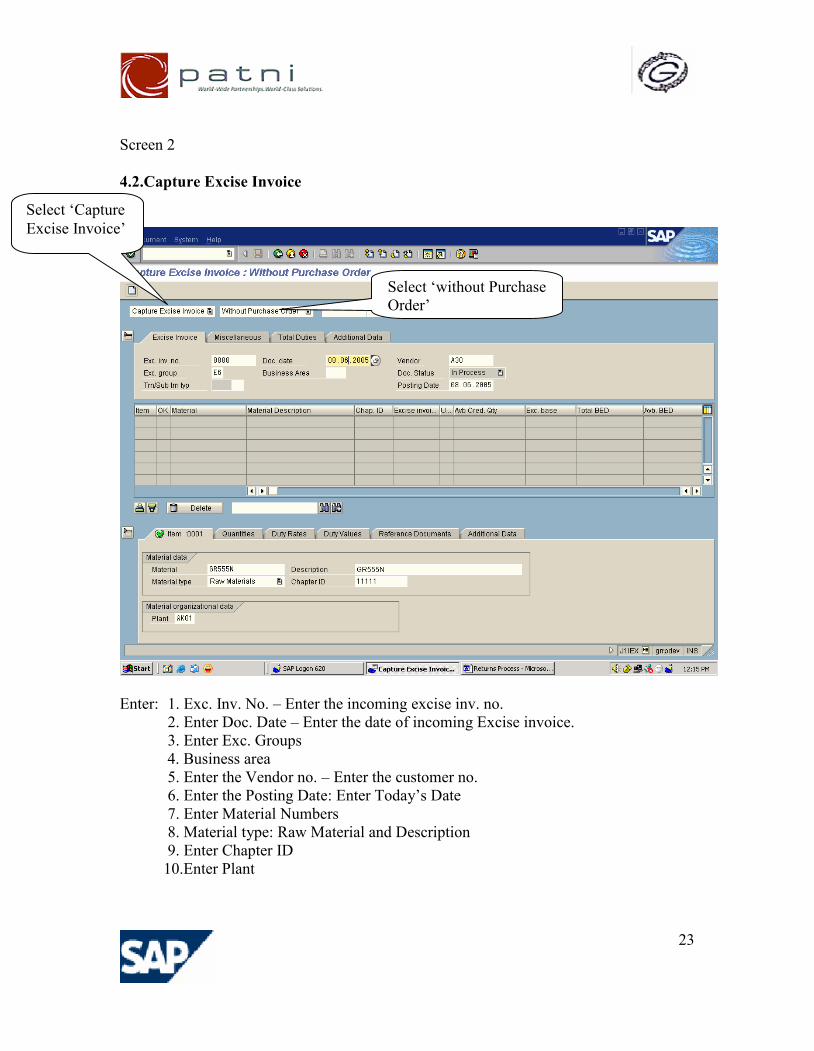
Screen 2
4.2.Capture Excise Invoice
Enter: 1. Exc. Inv. No. – Enter the incoming excise inv. no.2. Enter Doc. Date – Enter the date of incoming Excise invoice.3. Enter Exc. Groups
4. Business area5. Enter the Vendor no. – Enter the customer no.6. Enter the Posting Date: Enter Today’s Date7. Enter Material Numbers8. Material type: Raw Material and Description9. Enter Chapter ID
10.Enter Plant
Select ‘CaptureExcise Invoice’
Select ‘without PurchaseOrder’
24
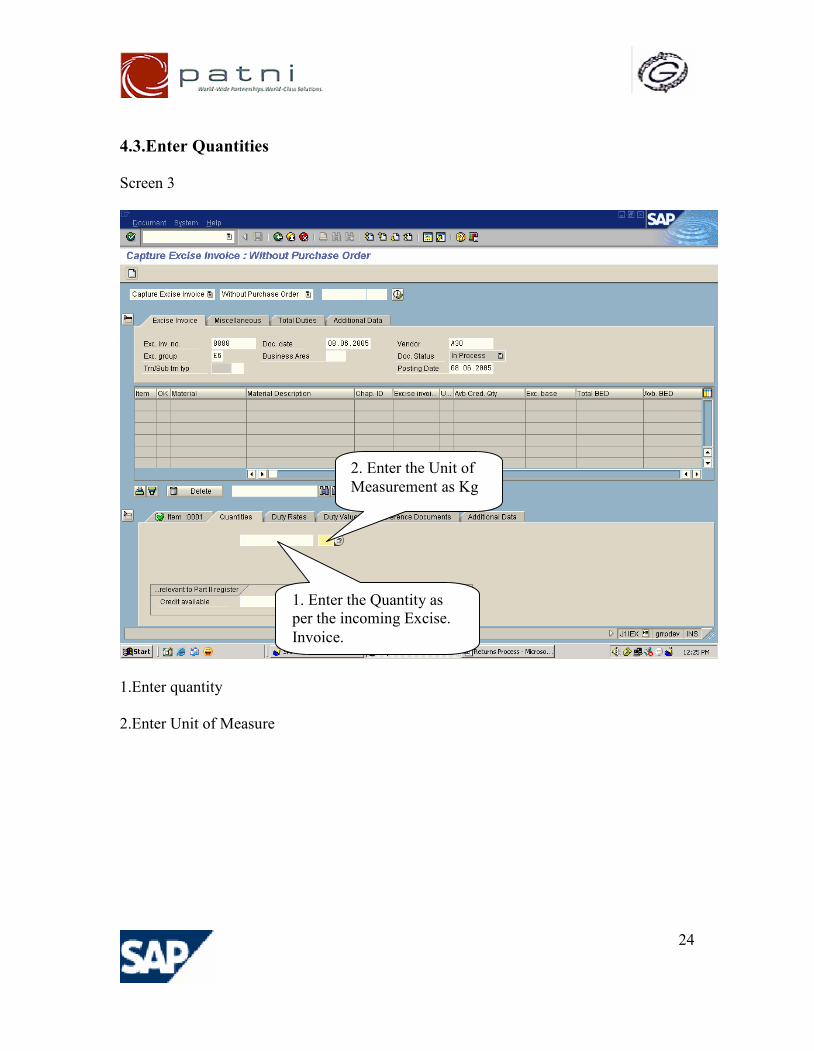
4.3.Enter Quantities
Screen 3
1.Enter quantity
2.Enter Unit of Measure
1. Enter the Quantity asper the incoming Excise.Invoice.
2. Enter the Unit ofMeasurement as Kg
25
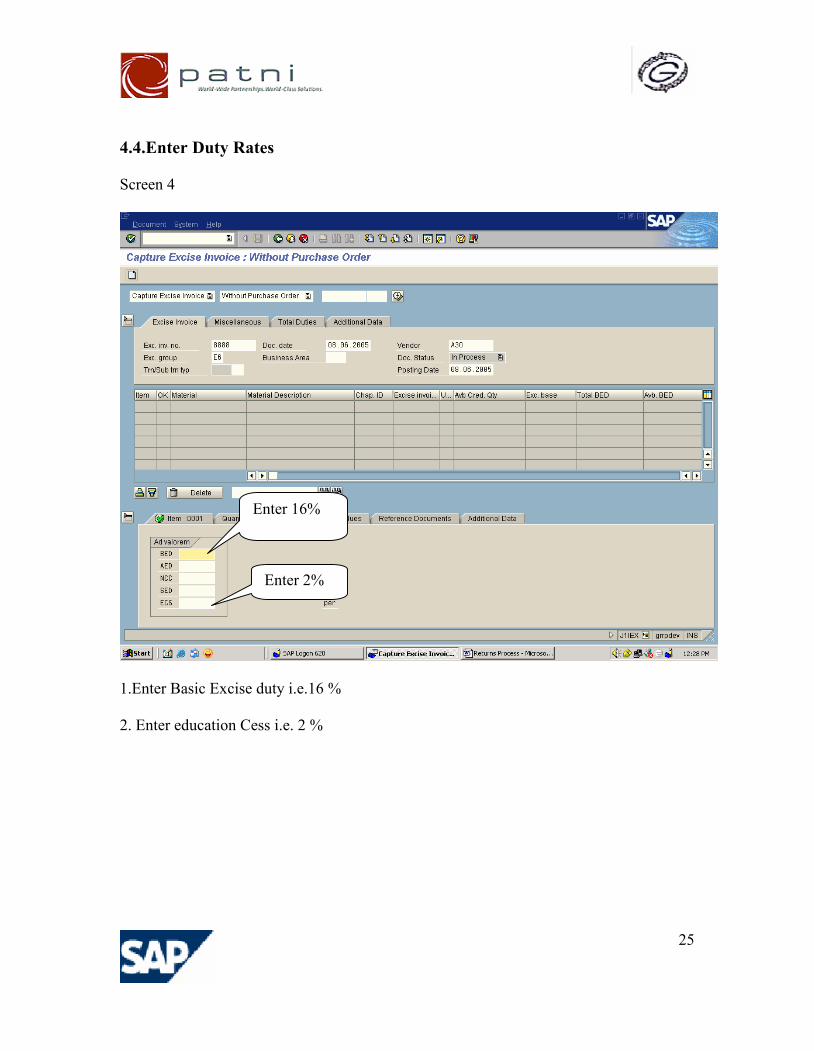
4.4.Enter Duty Rates
Screen 4
1.Enter Basic Excise duty i.e.16 %
2. Enter education Cess i.e. 2 %
Enter 16%
Enter 2%
26
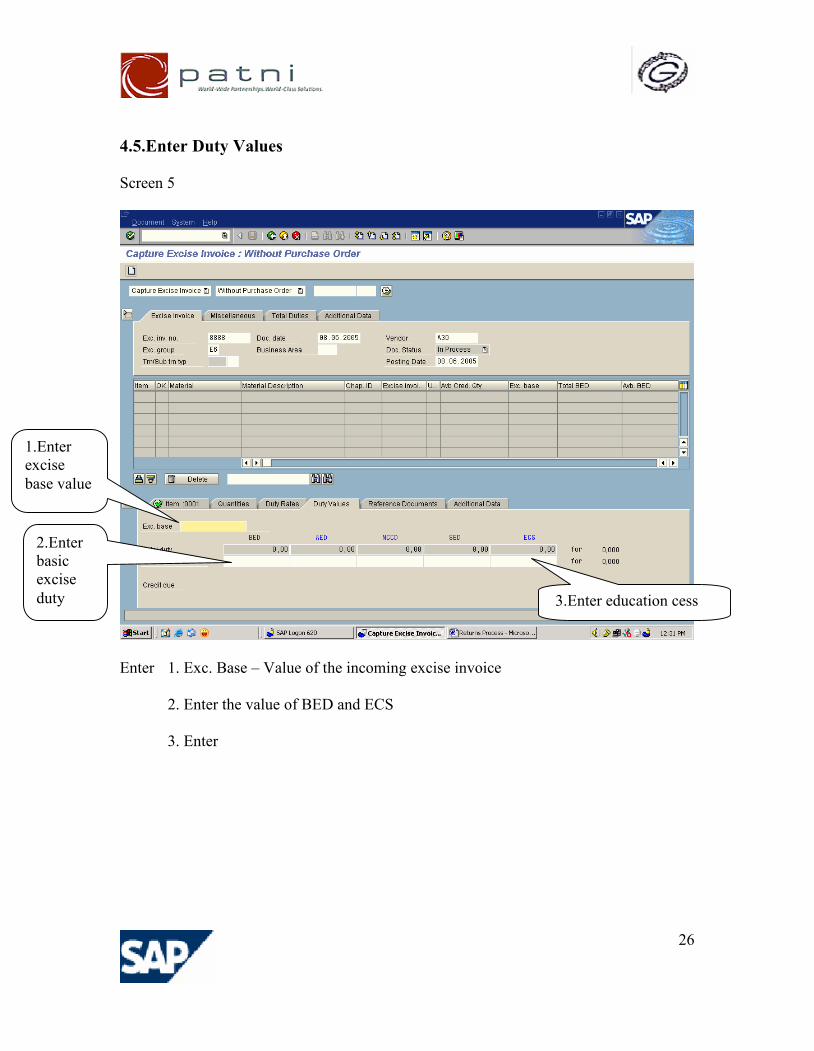
4.5.Enter Duty Values
Screen 5
Enter 1. Exc. Base – Value of the incoming excise invoice
2. Enter the value of BED and ECS
3. Enter
1.Enterexcisebase value
2.Enterbasicexciseduty 3.Enter education cess
27
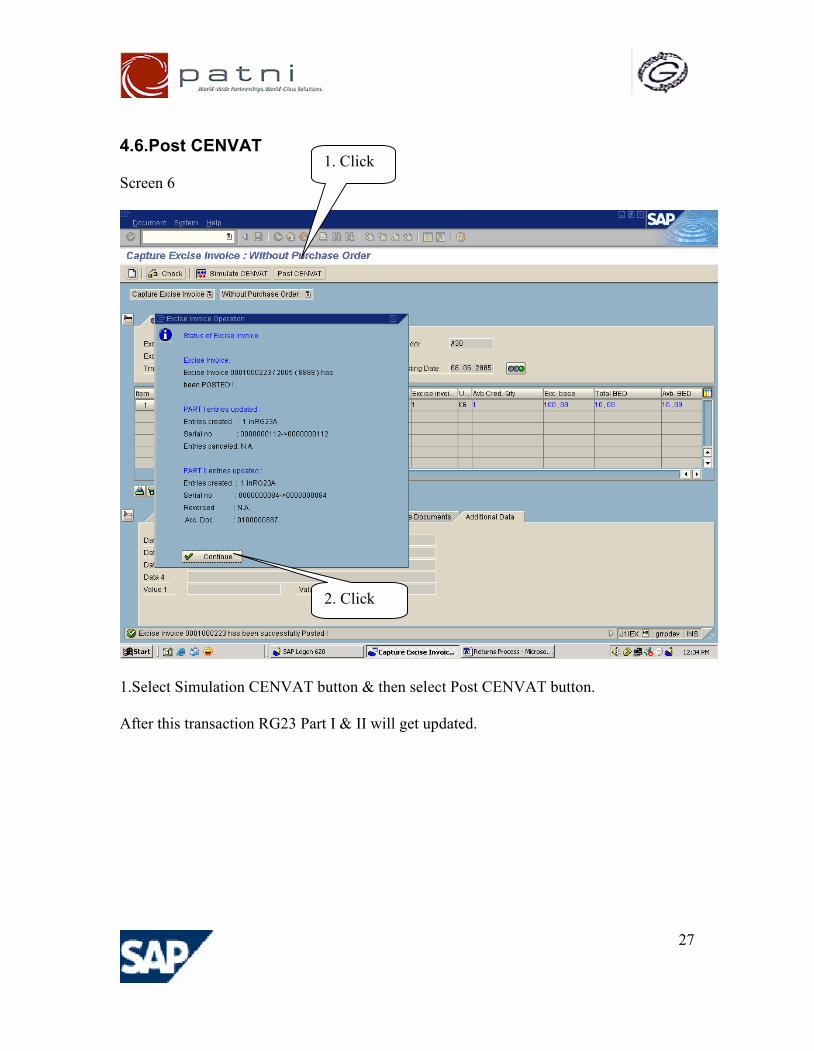
4.6.Post CENVAT
Screen 6
1.Select Simulation CENVAT button & then select Post CENVAT button.
After this transaction RG23 Part I & II will get updated.
1. Click
2. Click
28
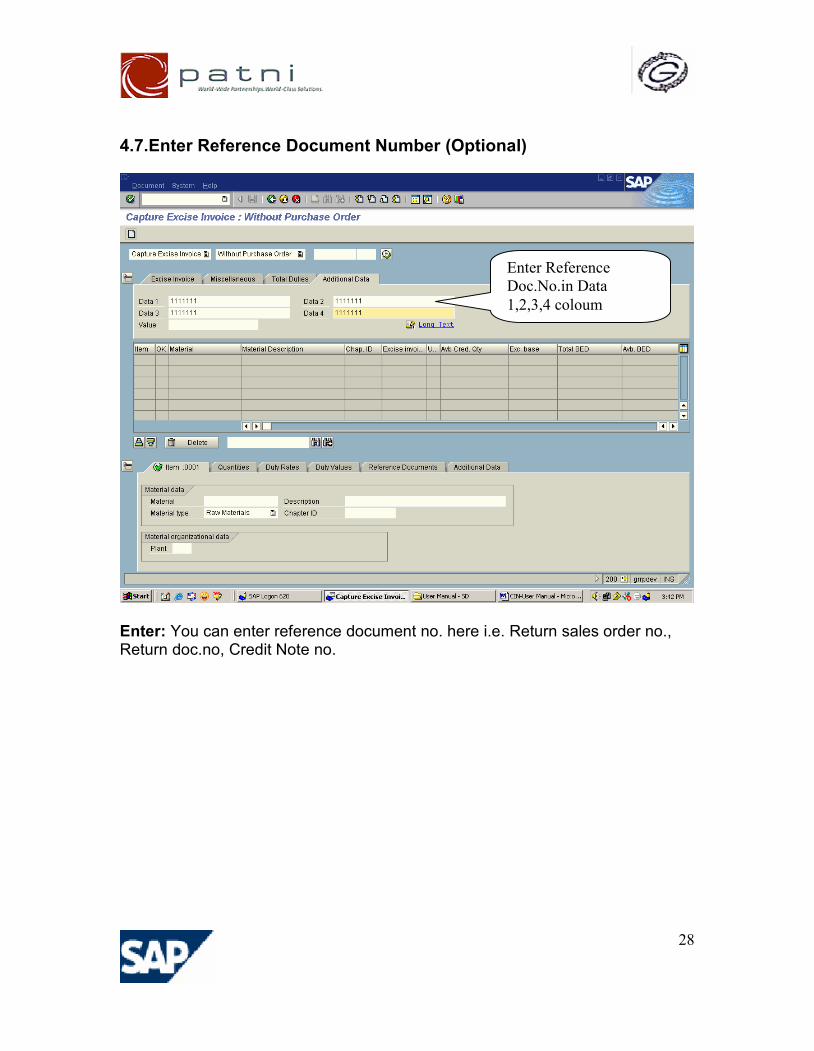
4.7.Enter Reference Document Number (Optional)
Enter: You can enter reference document no. here i.e. Return sales order no.,Return doc.no, Credit Note no.
Enter ReferenceDoc.No.in Data1,2,3,4 coloum

29
5.Form Tracking
Menu Path: Easy Access Screen LogisticsSales andDistributionSalesOrderVA01 - Create
Transaction Code VA01
Create Sales Order
Screen 1
30
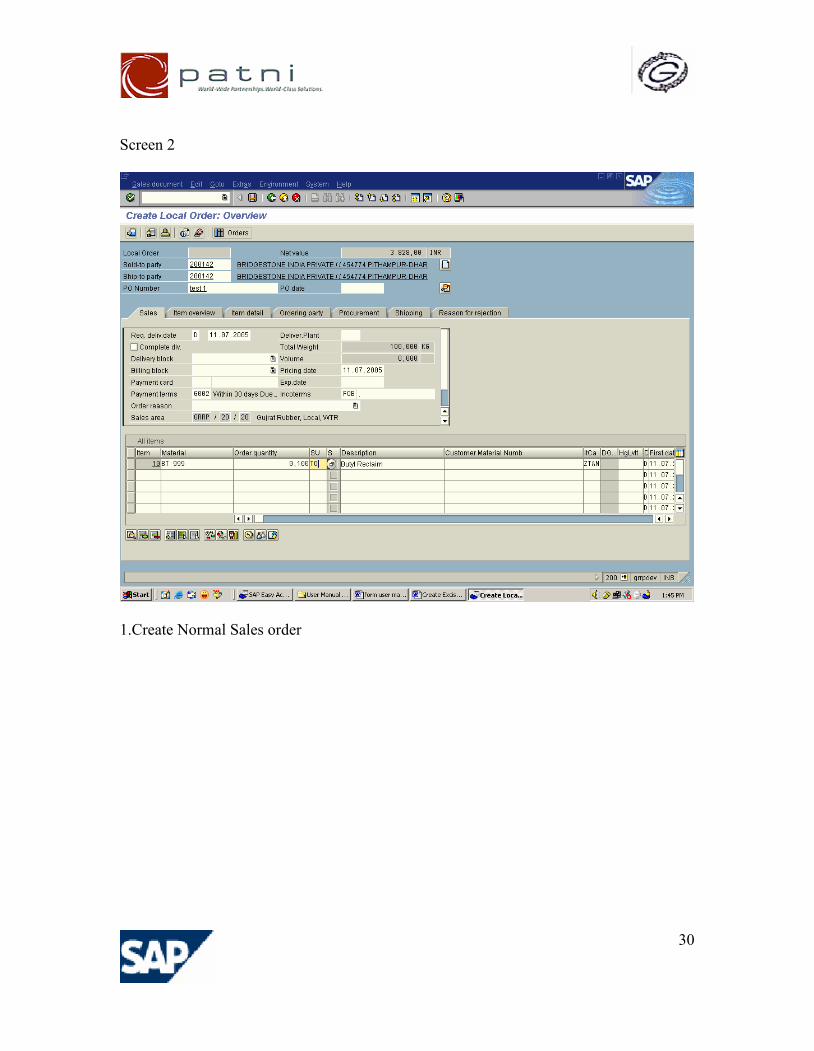
Screen 2
1.Create Normal Sales order
31
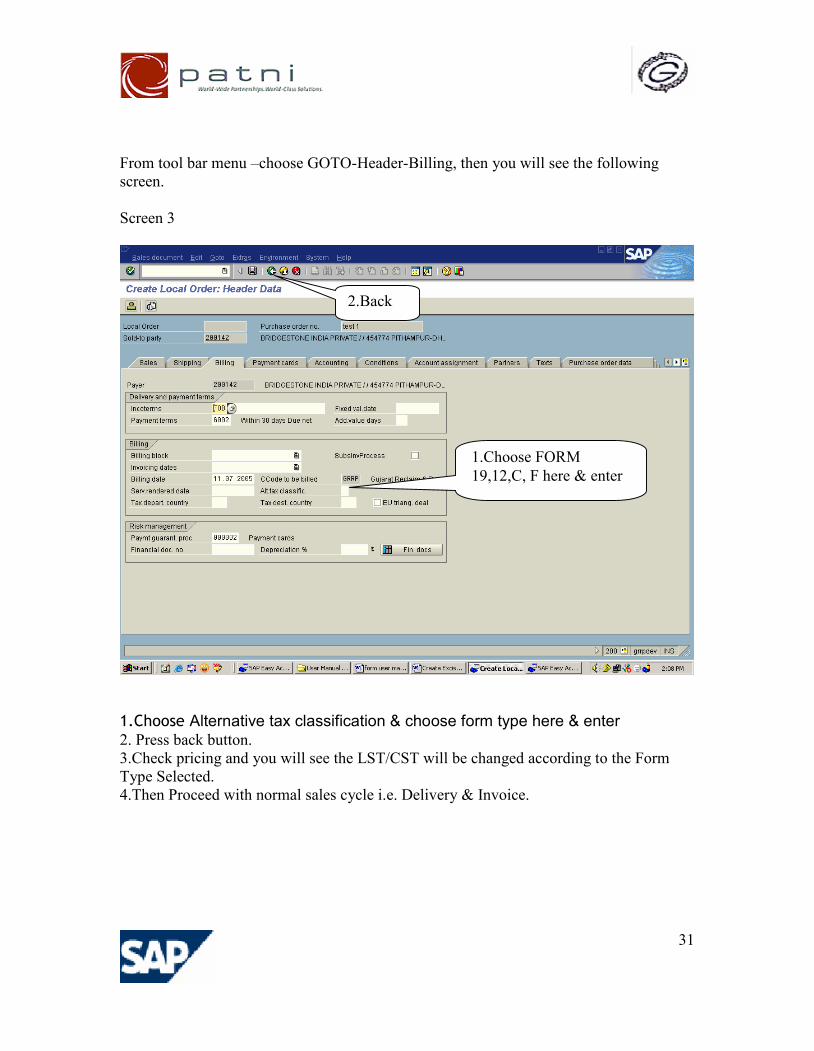
From tool bar menu –choose GOTO-Header-Billing, then you will see the followingscreen.
Screen 3
1.Choose Alternative tax classification & choose form type here & enter2. Press back button.3.Check pricing and you will see the LST/CST will be changed according to the FormType Selected.4.Then Proceed with normal sales cycle i.e. Delivery & Invoice.
1.Choose FORM19,12,C, F here & enter
2.Back