Embed Size (px)
Citation preview
616: Troubleshooting common issues of XenMobile Enterprise deployments
Hands-on Lab Exercise Guide This session is offered as both an instructor led training and a self-paced online lab. Make money selling Field Services Stop by the Education and Consulting booths in the Solutions Expo to find out how! We're here to help.
| 1 |
Contents Contents .................................................................................................................................... 1
Overview .................................................................................................................................... 2
Scenario..................................................................................................................................... 6
Exercise 1 .................................................................................................................................. 7
Unable to Access Windows apps ............................................................................................... 7
Exercise 2 .................................................................................................................................26
Unable to Configure Worx Home for the First Time ...................................................................26
Exercise 3 .................................................................................................................................42
Unable to re-authenticate through Worx Home .........................................................................42
Exercise 4 .................................................................................................................................59
Unable to Access Mail via WorxMail on iOS ..............................................................................59
Exercise 5 .................................................................................................................................78
Unable to Access Mail via WorxMail on Android .......................................................................78
Exercise 6 .................................................................................................................................97
Unable to Integrate XenMobile Device Manager and App Controller .........................................97
Exercise 7 ............................................................................................................................... 134
Test Mobile Device Enrollment and WorxMail/WorxWeb Access ............................................ 134
Exercise 8 (Optional)............................................................................................................... 148
Unable to Launch Windows Apps from Worx Home ................................................................ 148
Exercise 9 (Mandatory) ........................................................................................................... 160
Uninstall Worx Home on iOS / Android ................................................................................... 160
| 2 |
Overview Hands-on Training Module Objective This training will provide hands-on experience on identifying and fixing some of the common issues found in XenMobile Enterprise Edition deployments. Some of the issues that you will troubleshoot are application enumeration, inability to login via Worx Home, unable to access Windows apps and desktops, and inability to access email via WorxMail.
You will learn how to use third-party tools to find key error messages that assist IT Admins and Tech Support engineers to identify misconfiguration steps. At the end, you will be able to fully leverage XenMobile Enterprise by accessing apps from XenMobile and email via WorxMail.
Prerequisites Experience navigating the NetScaler Configuration Utility, StoreFront Administration console, XenMobile App Controller Control Point console and XenMobile Device Manager console.
Students are required to use mobile devices from iOS or Android platform in order to go through most of these labs.
Audience Citrix Partners, Customers, Sales Engineers, Consultants, Technical Support.
| 3 |
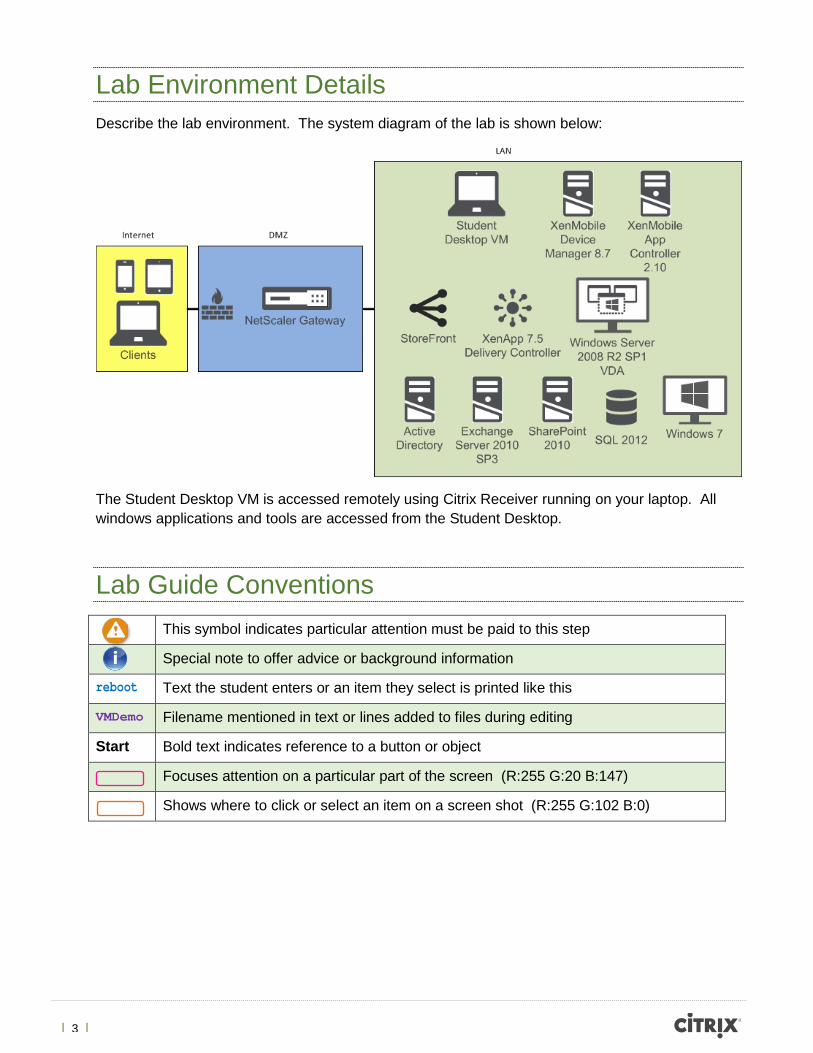
Lab Environment Details Describe the lab environment. The system diagram of the lab is shown below:
The Student Desktop VM is accessed remotely using Citrix Receiver running on your laptop. All windows applications and tools are accessed from the Student Desktop.
Lab Guide Conventions This symbol indicates particular attention must be paid to this step
Special note to offer advice or background information
reboot Text the student enters or an item they select is printed like this
VMDemo Filename mentioned in text or lines added to files during editing
Start Bold text indicates reference to a button or object
Focuses attention on a particular part of the screen (R:255 G:20 B:147)
Shows where to click or select an item on a screen shot (R:255 G:102 B:0)
| 4 |
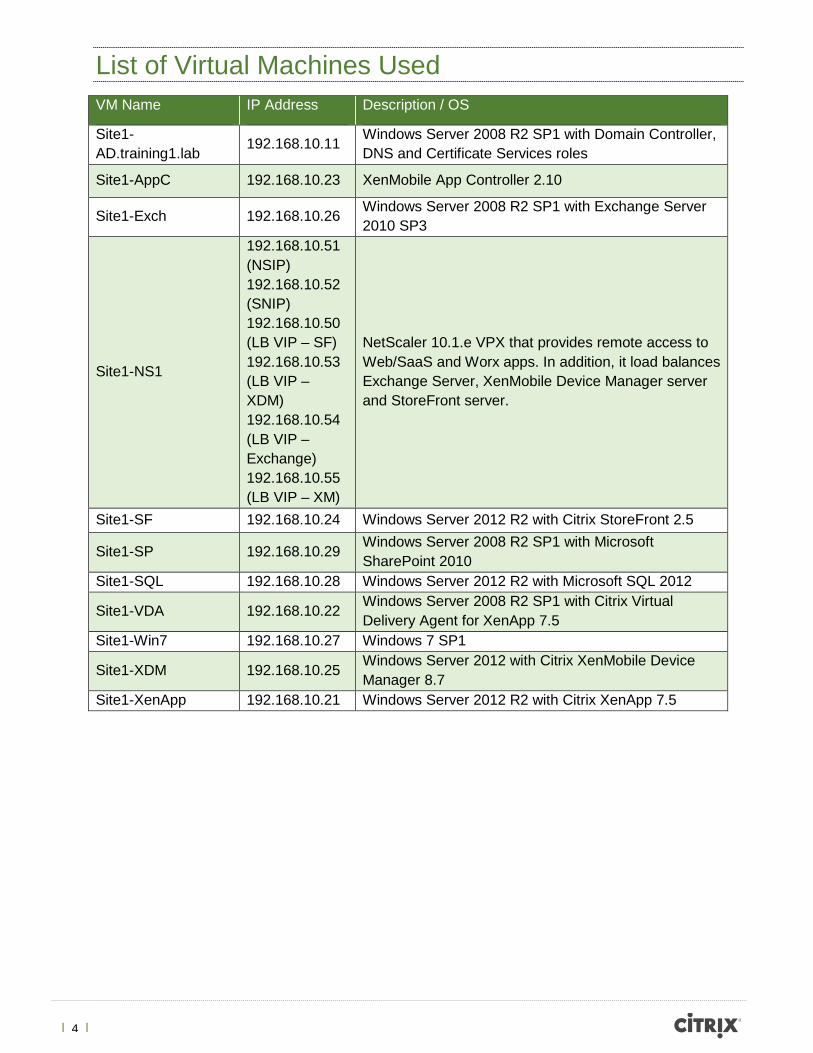
List of Virtual Machines Used VM Name IP Address Description / OS
Site1-AD.training1.lab 192.168.10.11 Windows Server 2008 R2 SP1 with Domain Controller,
DNS and Certificate Services roles
Site1-AppC 192.168.10.23 XenMobile App Controller 2.10
Site1-Exch 192.168.10.26 Windows Server 2008 R2 SP1 with Exchange Server 2010 SP3
Site1-NS1
192.168.10.51 (NSIP) 192.168.10.52 (SNIP) 192.168.10.50 (LB VIP – SF) 192.168.10.53 (LB VIP – XDM) 192.168.10.54 (LB VIP – Exchange) 192.168.10.55 (LB VIP – XM)
NetScaler 10.1.e VPX that provides remote access to Web/SaaS and Worx apps. In addition, it load balances Exchange Server, XenMobile Device Manager server and StoreFront server.
Site1-SF 192.168.10.24 Windows Server 2012 R2 with Citrix StoreFront 2.5
Site1-SP 192.168.10.29 Windows Server 2008 R2 SP1 with Microsoft SharePoint 2010
Site1-SQL 192.168.10.28 Windows Server 2012 R2 with Microsoft SQL 2012
Site1-VDA 192.168.10.22 Windows Server 2008 R2 SP1 with Citrix Virtual Delivery Agent for XenApp 7.5
Site1-Win7 192.168.10.27 Windows 7 SP1
Site1-XDM 192.168.10.25 Windows Server 2012 with Citrix XenMobile Device Manager 8.7
Site1-XenApp 192.168.10.21 Windows Server 2012 R2 with Citrix XenApp 7.5
| 5 |
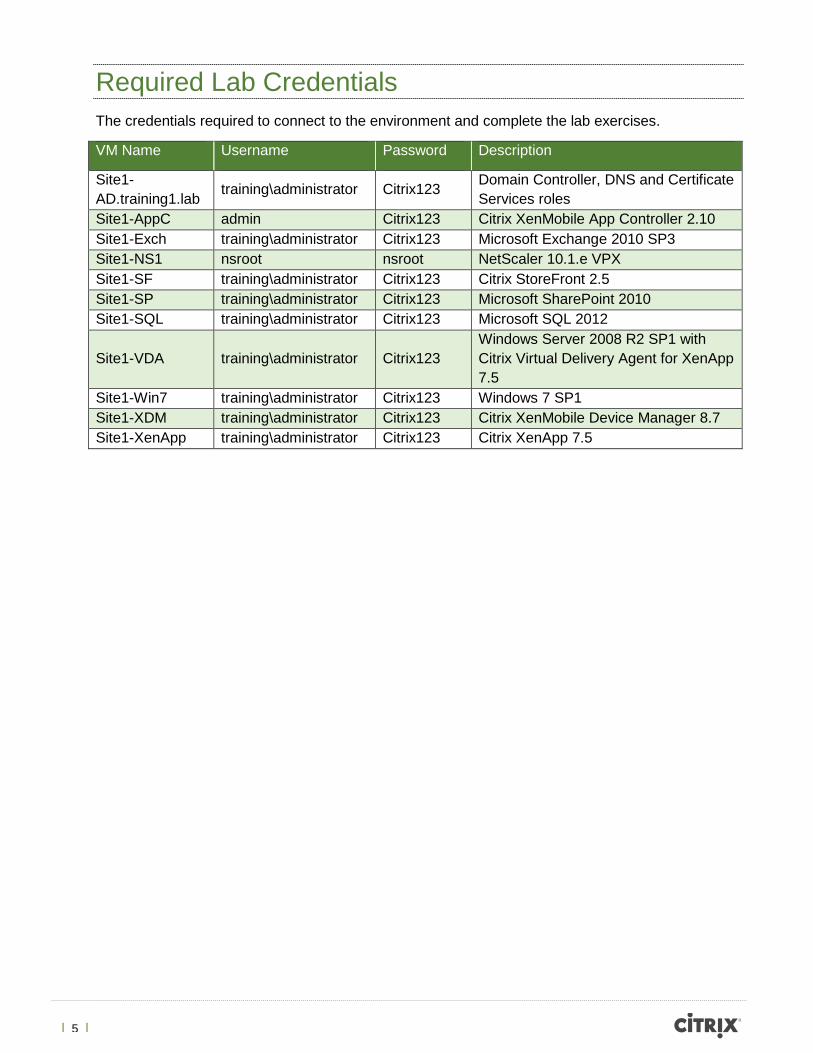
Required Lab Credentials The credentials required to connect to the environment and complete the lab exercises.
VM Name Username Password Description
Site1-AD.training1.lab training\administrator Citrix123 Domain Controller, DNS and Certificate
Services roles Site1-AppC admin Citrix123 Citrix XenMobile App Controller 2.10 Site1-Exch training\administrator Citrix123 Microsoft Exchange 2010 SP3 Site1-NS1 nsroot nsroot NetScaler 10.1.e VPX Site1-SF training\administrator Citrix123 Citrix StoreFront 2.5 Site1-SP training\administrator Citrix123 Microsoft SharePoint 2010 Site1-SQL training\administrator Citrix123 Microsoft SQL 2012
Site1-VDA training\administrator Citrix123 Windows Server 2008 R2 SP1 with Citrix Virtual Delivery Agent for XenApp 7.5
Site1-Win7 training\administrator Citrix123 Windows 7 SP1 Site1-XDM training\administrator Citrix123 Citrix XenMobile Device Manager 8.7 Site1-XenApp training\administrator Citrix123 Citrix XenApp 7.5
| 6 |
Scenario You have been tasked to identify and fix connectivity issues with a fully deployed Citrix XenMobile Enterprise solution. Users are unable to enumerate applications when accessing internally or externally in the environment. In addition, the CIO of the company requires that all users must enroll their mobile devices through XenMobile in order to access any data needed such as Email or SharePoint.
Your task is to use the following guidelines to identify and fix the XenMobile Enterprise solution to allow end-users to become productive anywhere at any time.
Guidelines:
• Users should be able to access Windows apps from internal desktop users.
• Remote mobile users should be able to configure Worx Home the first time.
• Remote mobile users should subsequently be able to log on through Worx Home to access resources.
• WorxMail should be available to all remote mobile users to access mail from the Exchange Server.
• Finally, mobile users must enroll via XenMobile Device Manager in order to access resources.
| 7 |
Exercise 1 Unable to Access Windows apps Overview In this exercise, students will identify and fix why internal desktop users are unable to access Windows apps whenever they access XenMobile App Controller Receiver for Web site.
For this scenario, the IT Admin has already pre-configured App Controller with StoreFront using HTTPS (443) as part of his requirement. Port 80 is not an acceptable solution. Students should assume that DNS resolution is working between App Controller and that port 443 is open between App Controller and StoreFront.
Tools to be used:
Students will leverage App Controller’s network trace tool and Support Bundle to identify the root cause of this issue and find a resolution to the problem.
Step by step guidance Estimated time to complete this lab: 25 minutes.
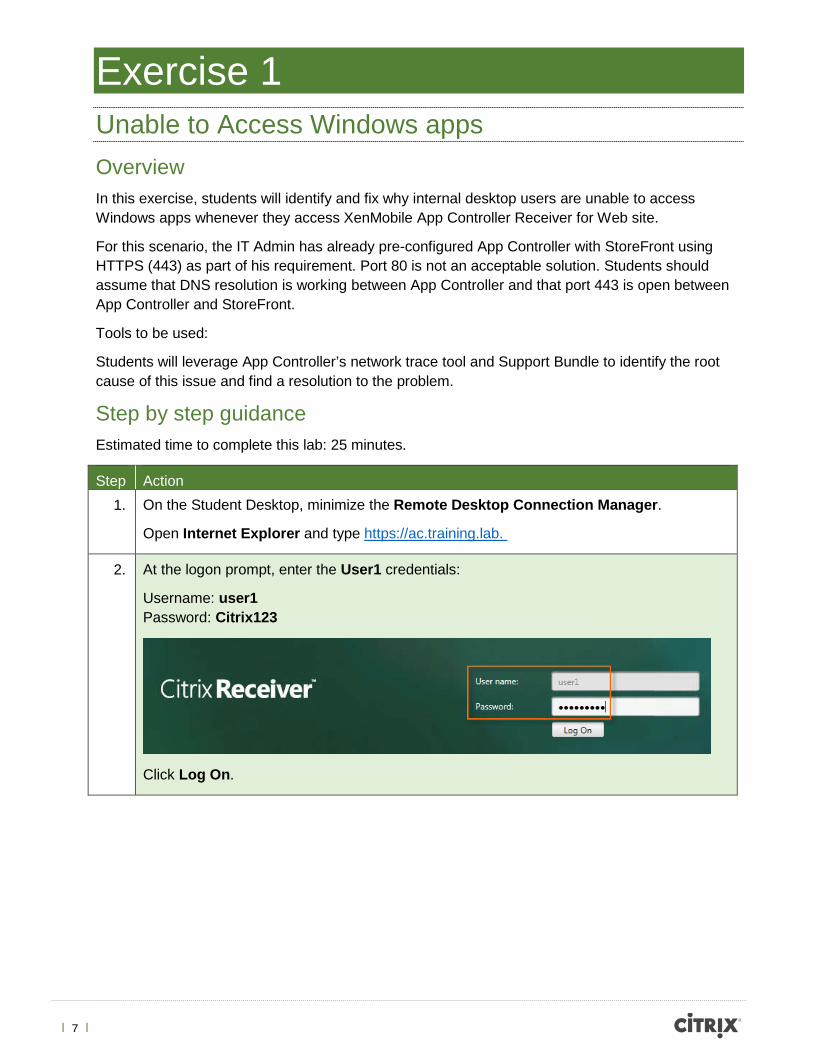
Step Action 1. On the Student Desktop, minimize the Remote Desktop Connection Manager.
Open Internet Explorer and type https://ac.training.lab.
2. At the logon prompt, enter the User1 credentials:
Username: user1 Password: Citrix123
Click Log On.
| 8 |
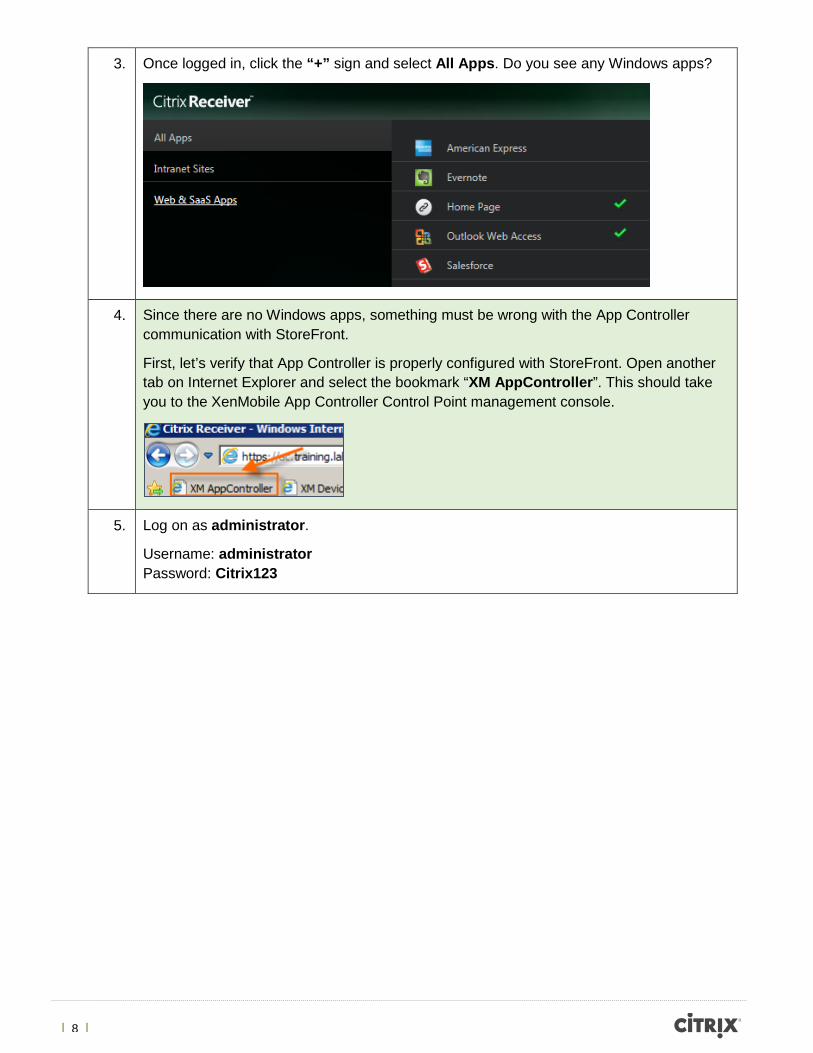
3. Once logged in, click the “+” sign and select All Apps. Do you see any Windows apps?
4. Since there are no Windows apps, something must be wrong with the App Controller communication with StoreFront.
First, let’s verify that App Controller is properly configured with StoreFront. Open another tab on Internet Explorer and select the bookmark “XM AppController”. This should take you to the XenMobile App Controller Control Point management console.
5. Log on as administrator.
Username: administrator Password: Citrix123
| 9 |
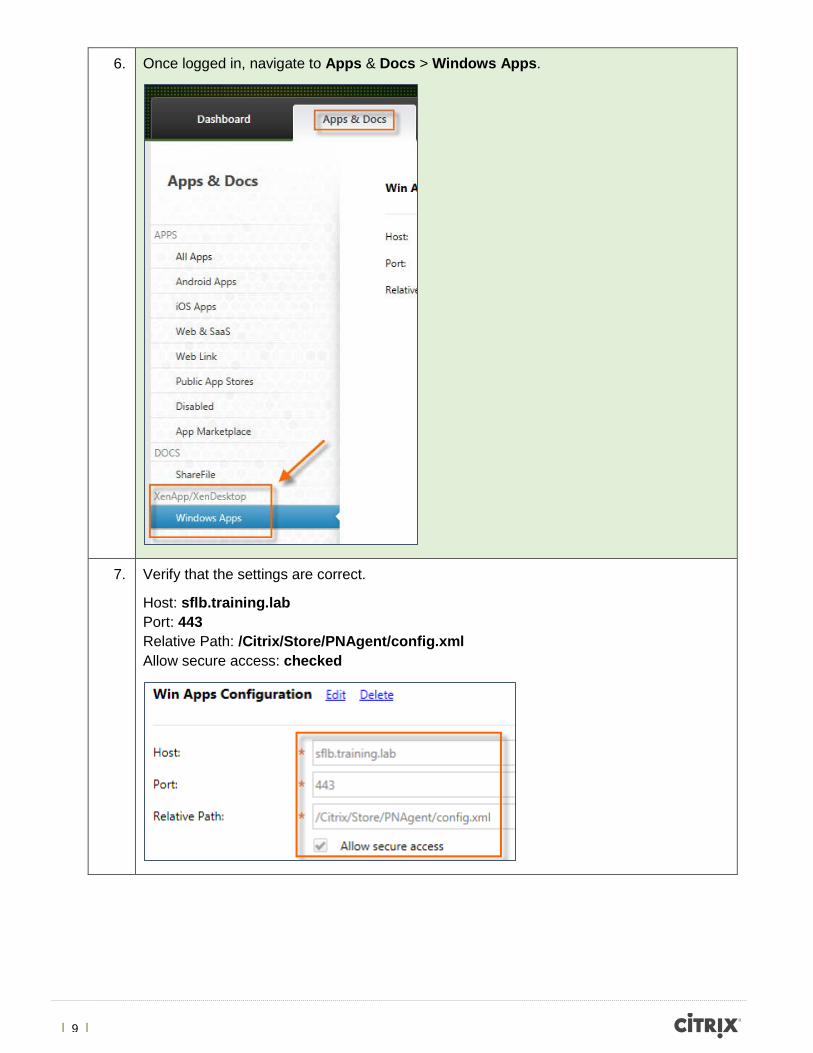
6. Once logged in, navigate to Apps & Docs > Windows Apps.
7. Verify that the settings are correct.
Host: sflb.training.lab Port: 443 Relative Path: /Citrix/Store/PNAgent/config.xml Allow secure access: checked
| 10 |
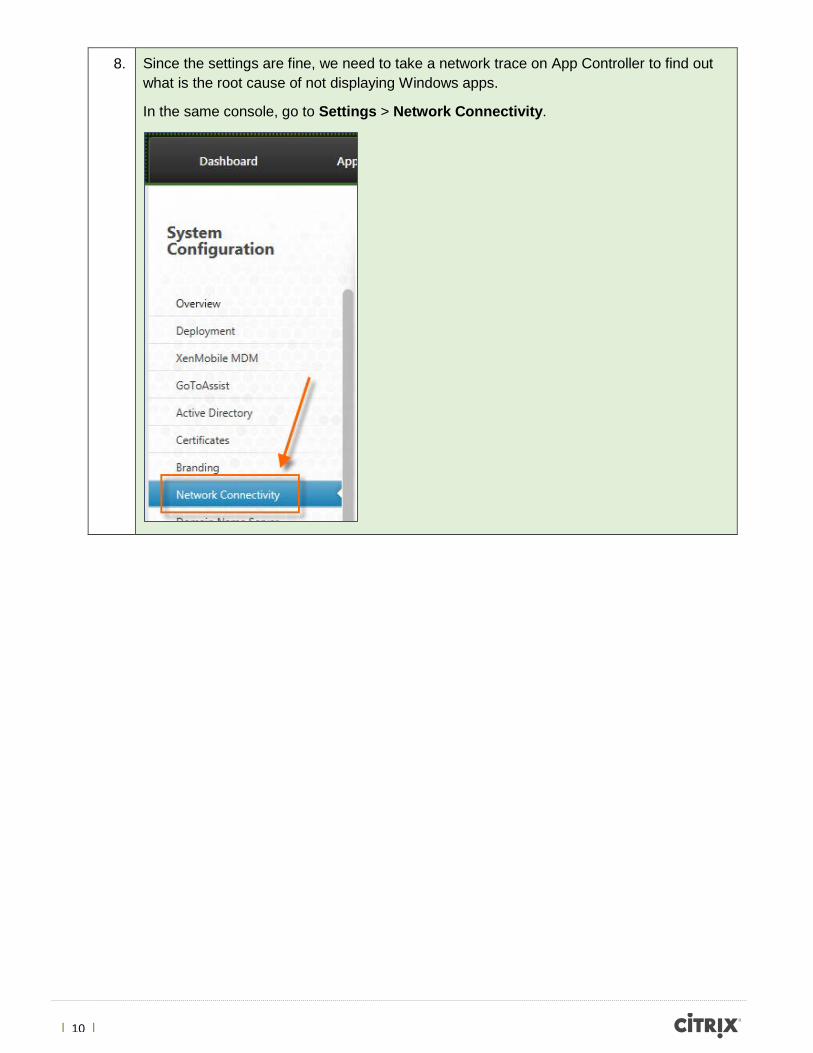
8. Since the settings are fine, we need to take a network trace on App Controller to find out what is the root cause of not displaying Windows apps.
In the same console, go to Settings > Network Connectivity.
| 11 |
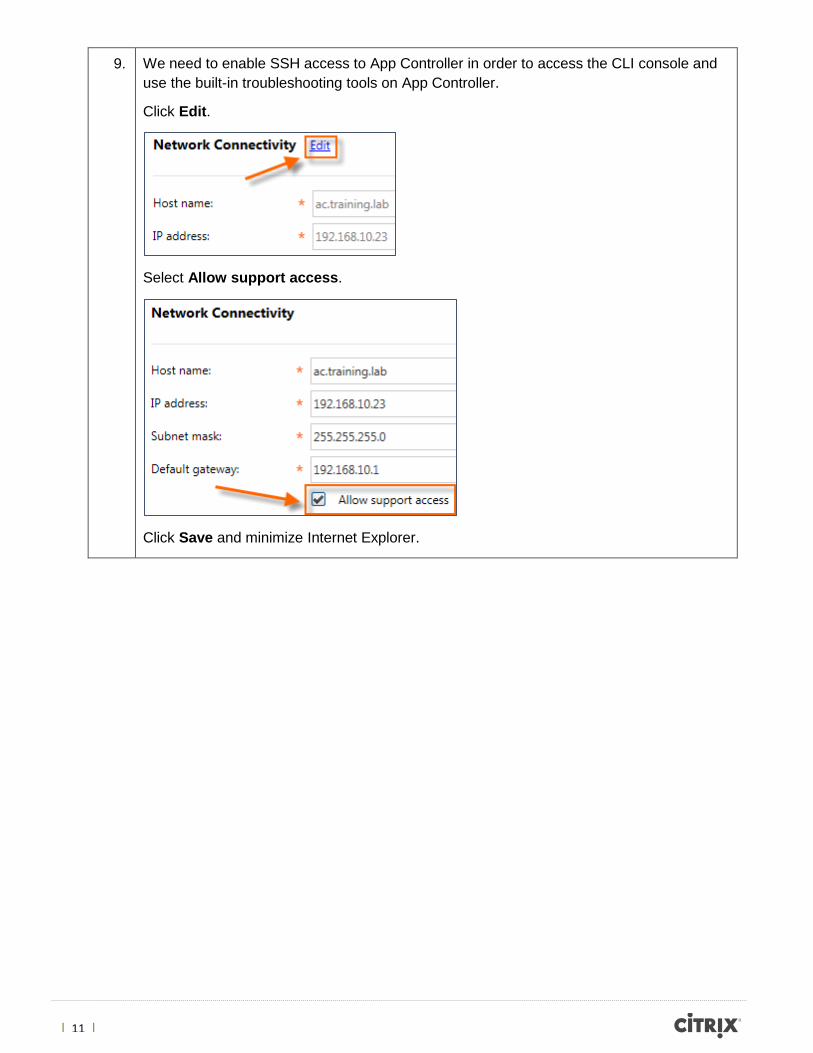
9. We need to enable SSH access to App Controller in order to access the CLI console and use the built-in troubleshooting tools on App Controller.
Click Edit.
Select Allow support access.
Click Save and minimize Internet Explorer.
| 12 |
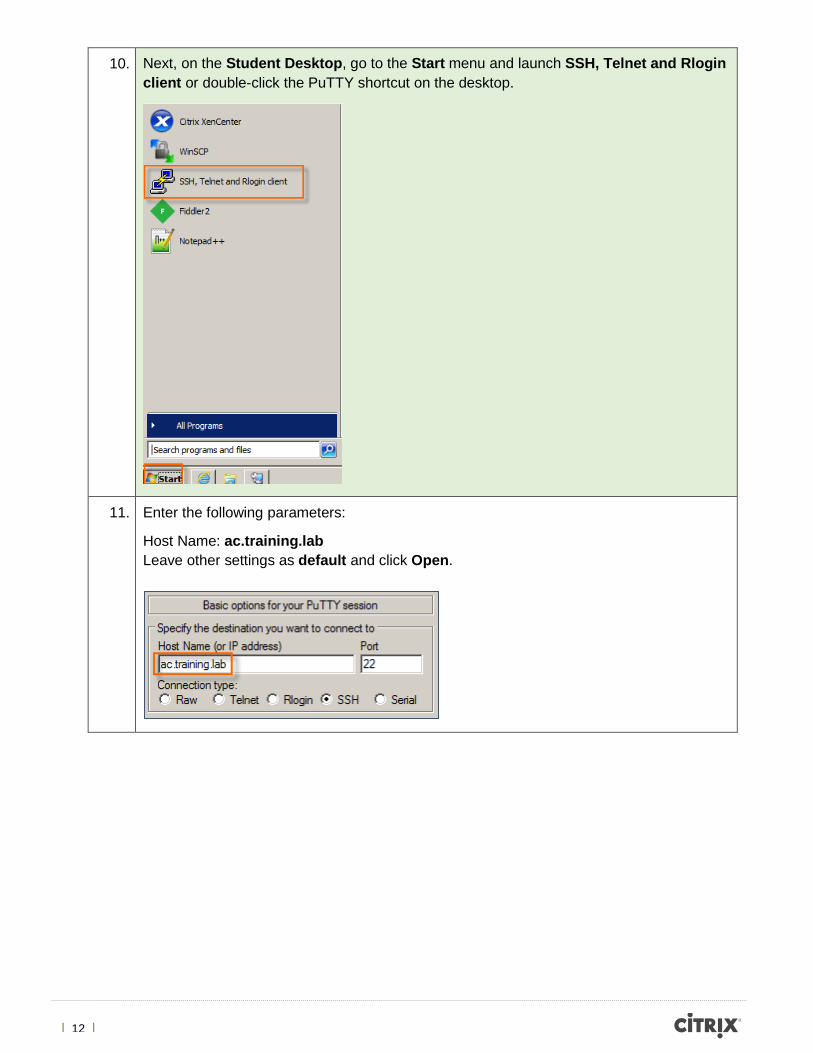
10. Next, on the Student Desktop, go to the Start menu and launch SSH, Telnet and Rlogin client or double-click the PuTTY shortcut on the desktop.
11. Enter the following parameters:
Host Name: ac.training.lab Leave other settings as default and click Open.
| 13 |
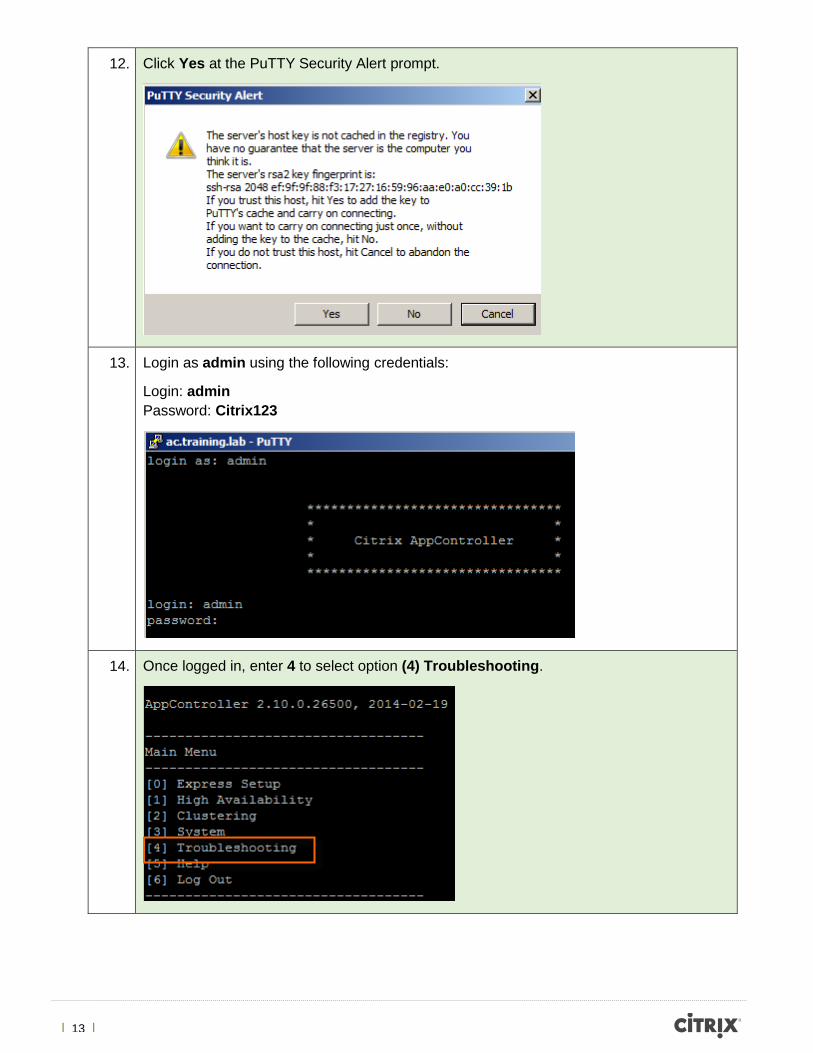
12. Click Yes at the PuTTY Security Alert prompt.
13. Login as admin using the following credentials:
Login: admin Password: Citrix123
14. Once logged in, enter 4 to select option (4) Troubleshooting.
| 14 |
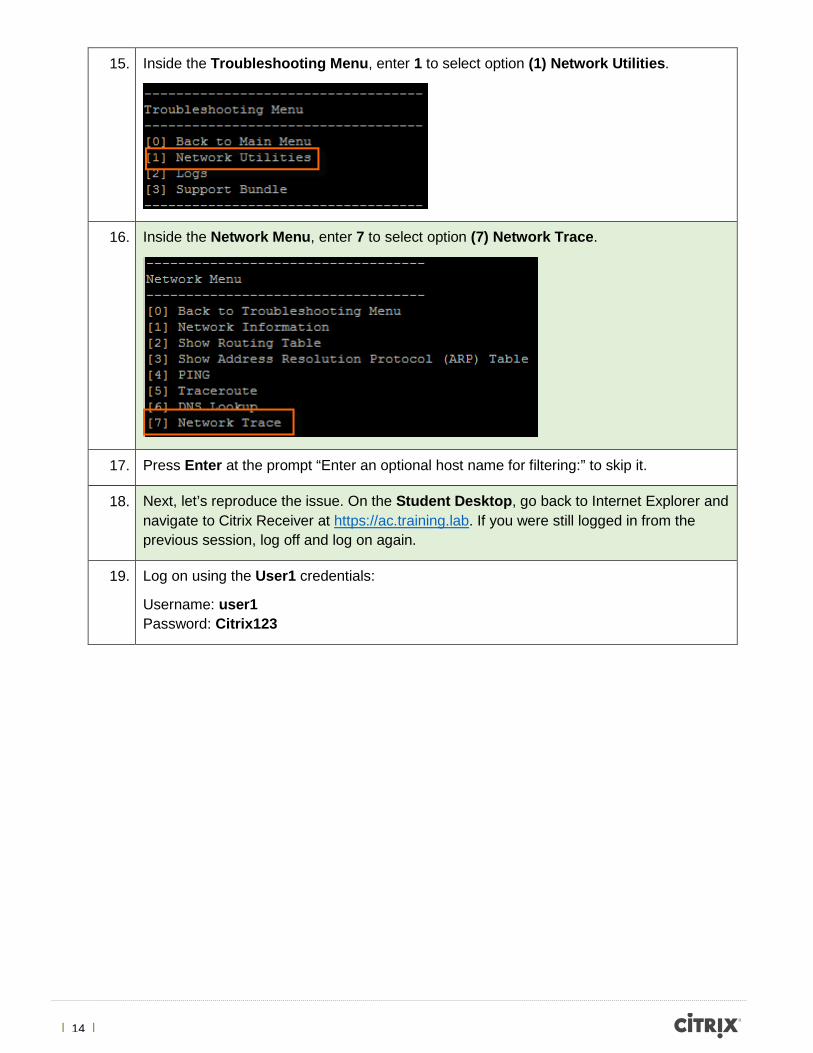
15. Inside the Troubleshooting Menu, enter 1 to select option (1) Network Utilities.
16. Inside the Network Menu, enter 7 to select option (7) Network Trace.
17. Press Enter at the prompt “Enter an optional host name for filtering:” to skip it.
18. Next, let’s reproduce the issue. On the Student Desktop, go back to Internet Explorer and navigate to Citrix Receiver at https://ac.training.lab. If you were still logged in from the previous session, log off and log on again.
19. Log on using the User1 credentials:
Username: user1 Password: Citrix123
| 15 |
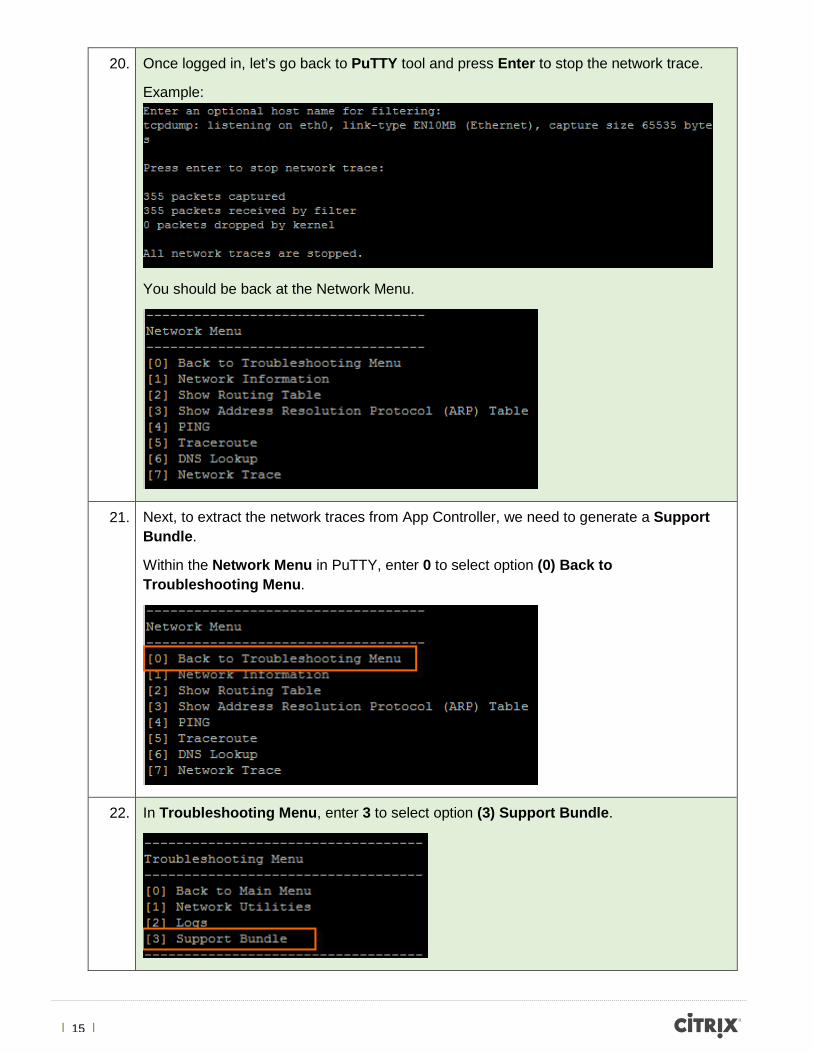
20. Once logged in, let’s go back to PuTTY tool and press Enter to stop the network trace.
Example:
You should be back at the Network Menu.
21. Next, to extract the network traces from App Controller, we need to generate a Support Bundle.
Within the Network Menu in PuTTY, enter 0 to select option (0) Back to Troubleshooting Menu.
22. In Troubleshooting Menu, enter 3 to select option (3) Support Bundle.
| 16 |
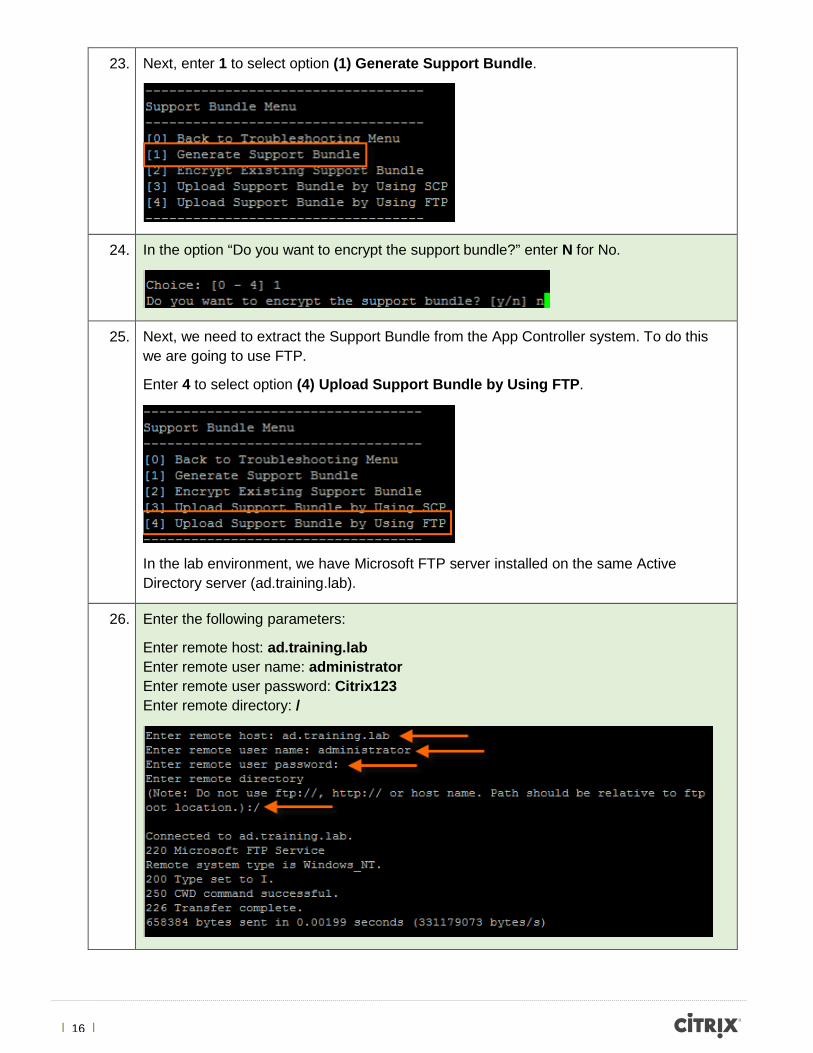
23. Next, enter 1 to select option (1) Generate Support Bundle.
24. In the option “Do you want to encrypt the support bundle?” enter N for No.
25. Next, we need to extract the Support Bundle from the App Controller system. To do this we are going to use FTP.
Enter 4 to select option (4) Upload Support Bundle by Using FTP.
In the lab environment, we have Microsoft FTP server installed on the same Active Directory server (ad.training.lab).
26. Enter the following parameters:
Enter remote host: ad.training.lab Enter remote user name: administrator Enter remote user password: Citrix123 Enter remote directory: /
| 17 |
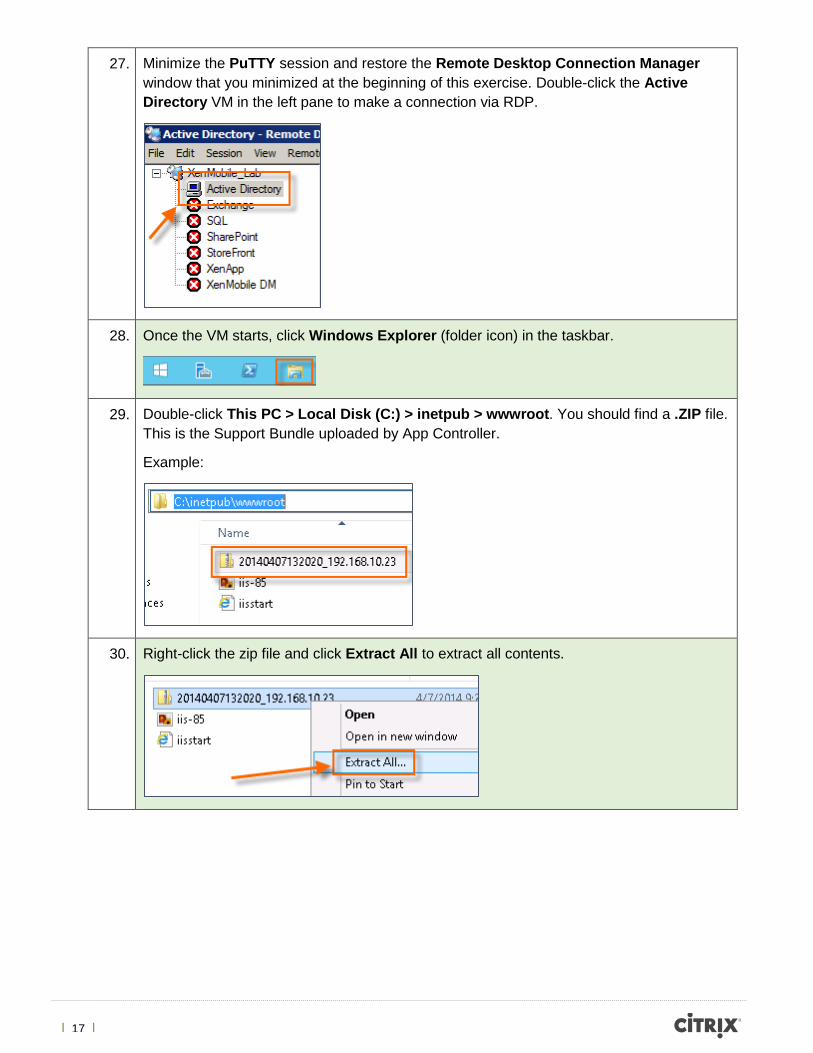
27. Minimize the PuTTY session and restore the Remote Desktop Connection Manager window that you minimized at the beginning of this exercise. Double-click the Active Directory VM in the left pane to make a connection via RDP.
28. Once the VM starts, click Windows Explorer (folder icon) in the taskbar.
29. Double-click This PC > Local Disk (C:) > inetpub > wwwroot. You should find a .ZIP file. This is the Support Bundle uploaded by App Controller.
Example:
30. Right-click the zip file and click Extract All to extract all contents.
| 18 |
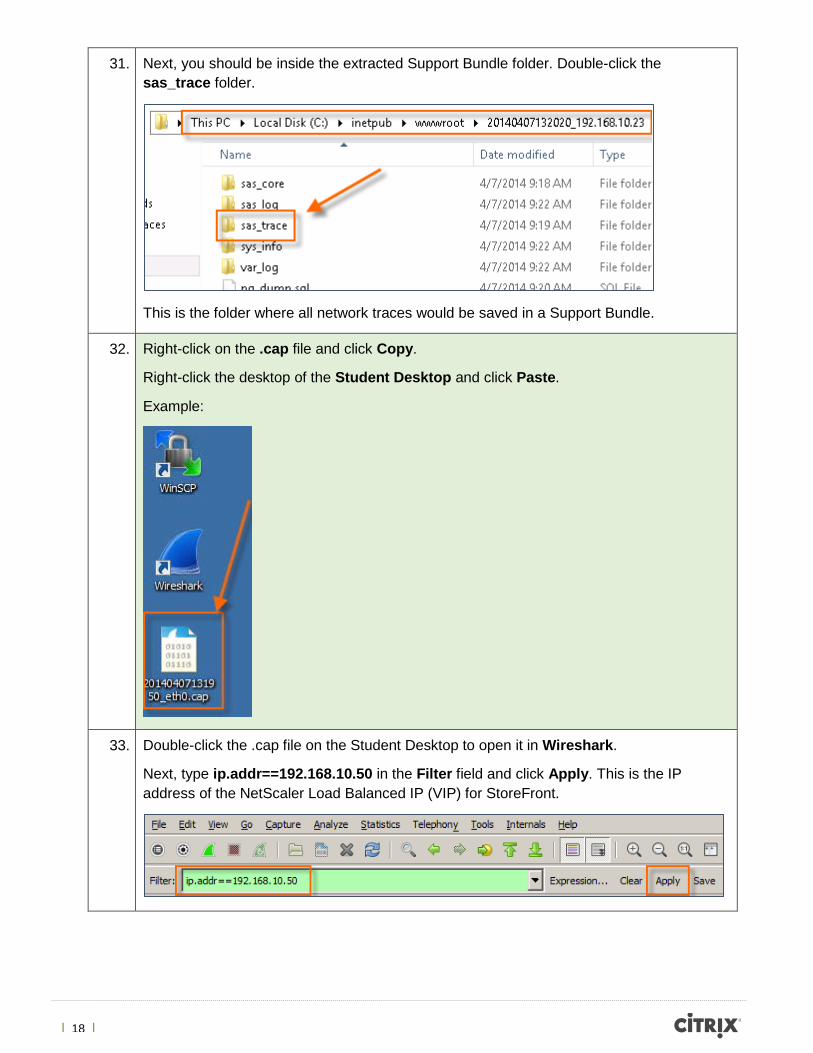
31. Next, you should be inside the extracted Support Bundle folder. Double-click the sas_trace folder.
This is the folder where all network traces would be saved in a Support Bundle.
32. Right-click on the .cap file and click Copy.
Right-click the desktop of the Student Desktop and click Paste.
Example:
33. Double-click the .cap file on the Student Desktop to open it in Wireshark.
Next, type ip.addr==192.168.10.50 in the Filter field and click Apply. This is the IP address of the NetScaler Load Balanced IP (VIP) for StoreFront.
| 19 |
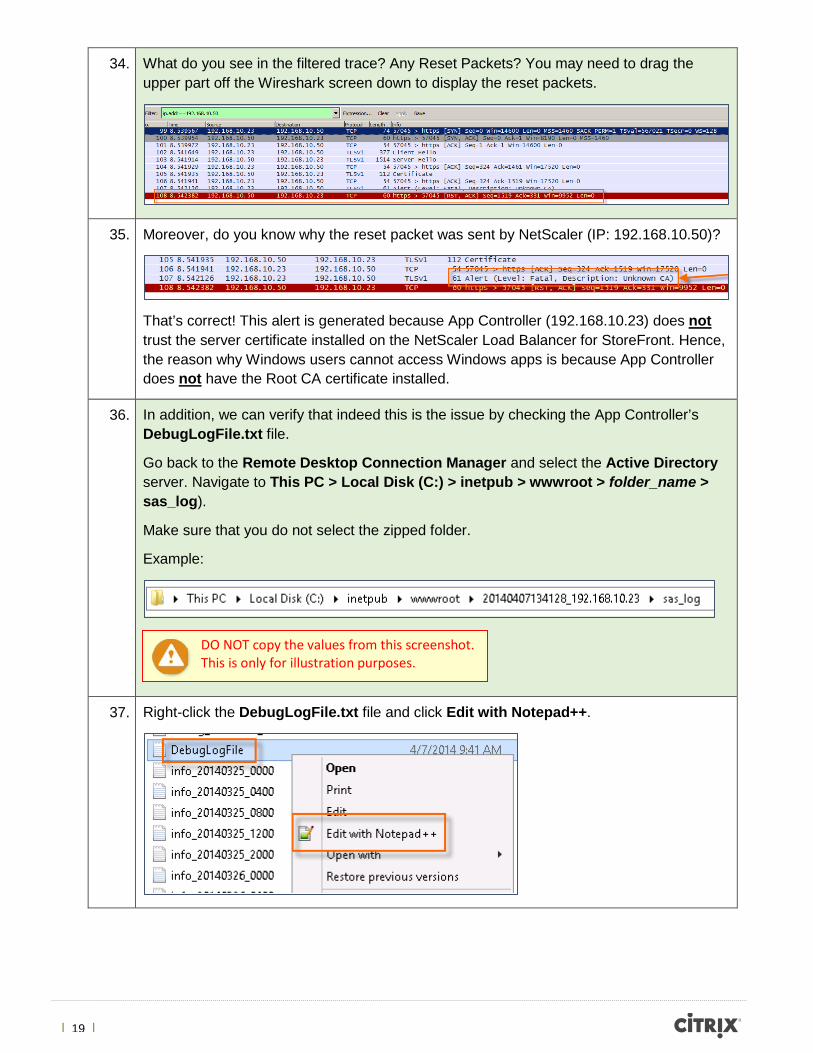
34. What do you see in the filtered trace? Any Reset Packets? You may need to drag the upper part off the Wireshark screen down to display the reset packets.
35. Moreover, do you know why the reset packet was sent by NetScaler (IP: 192.168.10.50)?
That’s correct! This alert is generated because App Controller (192.168.10.23) does not trust the server certificate installed on the NetScaler Load Balancer for StoreFront. Hence, the reason why Windows users cannot access Windows apps is because App Controller does not have the Root CA certificate installed.
36. In addition, we can verify that indeed this is the issue by checking the App Controller’s DebugLogFile.txt file.
Go back to the Remote Desktop Connection Manager and select the Active Directory server. Navigate to This PC > Local Disk (C:) > inetpub > wwwroot > folder_name > sas_log).
Make sure that you do not select the zipped folder.
Example:
37. Right-click the DebugLogFile.txt file and click Edit with Notepad++.
DO NOT copy the values from this screenshot. This is only for illustration purposes.
| 20 |
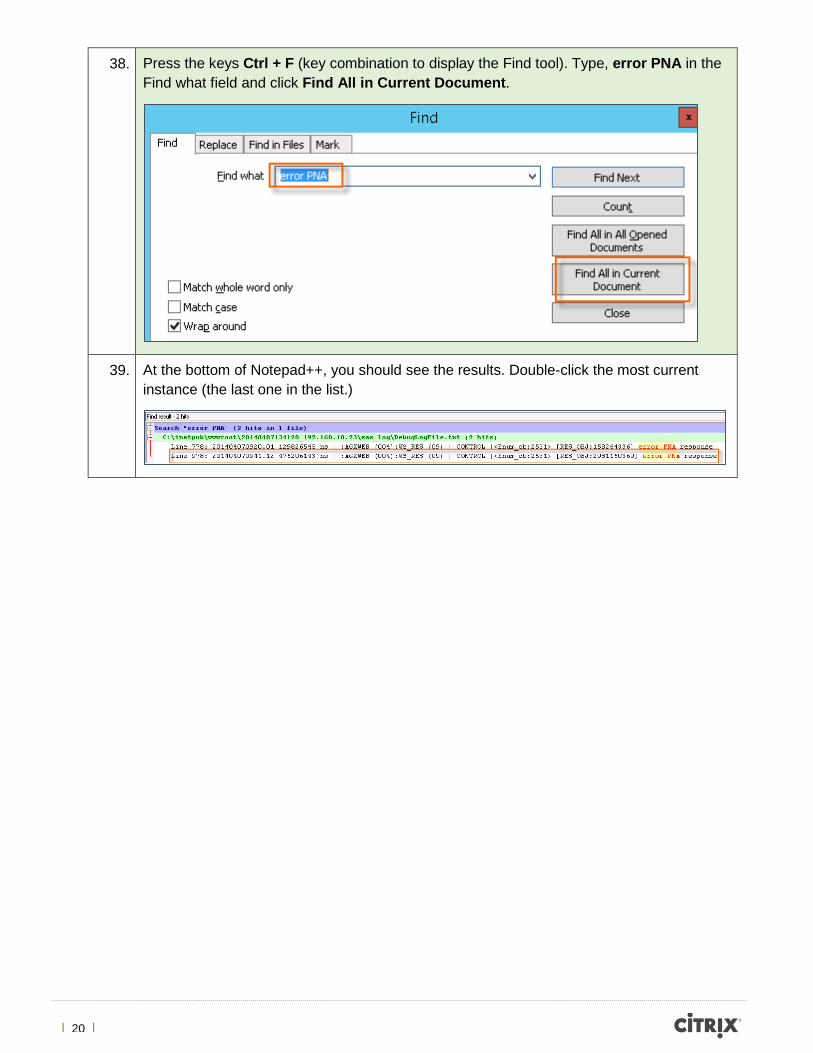
38. Press the keys Ctrl + F (key combination to display the Find tool). Type, error PNA in the Find what field and click Find All in Current Document.
39. At the bottom of Notepad++, you should see the results. Double-click the most current instance (the last one in the list.)
| 21 |
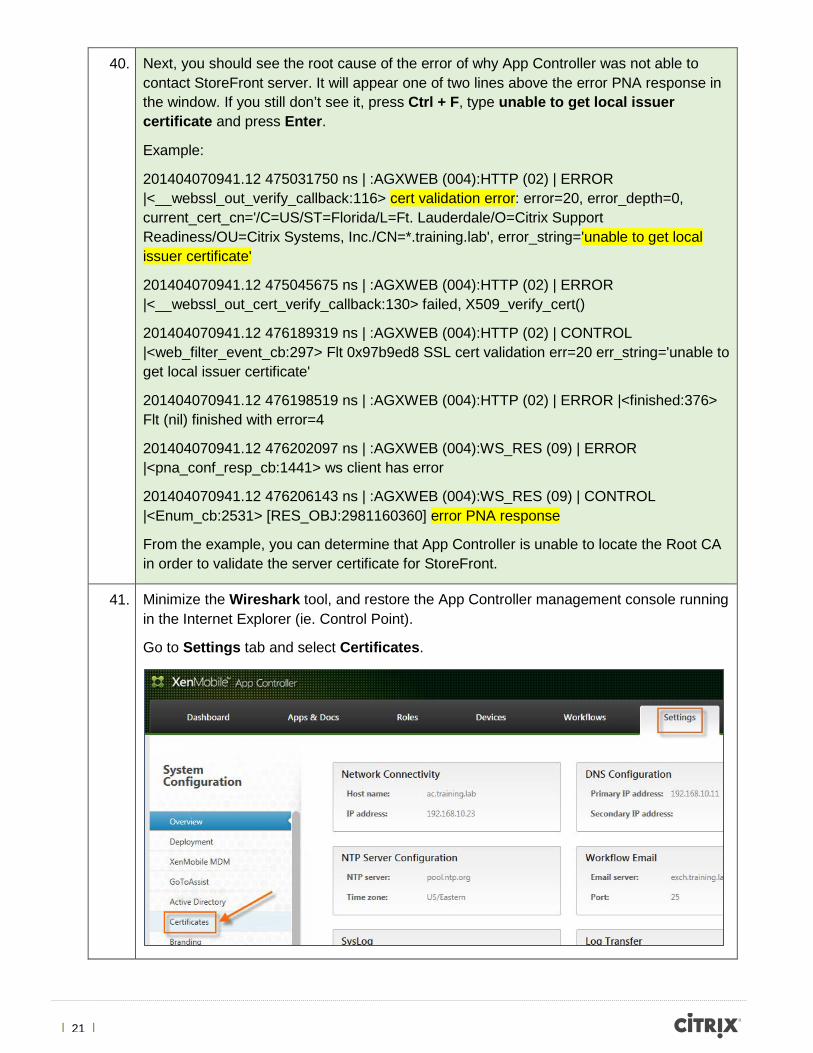
40. Next, you should see the root cause of the error of why App Controller was not able to contact StoreFront server. It will appear one of two lines above the error PNA response in the window. If you still don’t see it, press Ctrl + F, type unable to get local issuer certificate and press Enter.
Example:
201404070941.12 475031750 ns | :AGXWEB (004):HTTP (02) | ERROR |<__webssl_out_verify_callback:116> cert validation error: error=20, error_depth=0, current_cert_cn='/C=US/ST=Florida/L=Ft. Lauderdale/O=Citrix Support Readiness/OU=Citrix Systems, Inc./CN=*.training.lab', error_string='unable to get local issuer certificate'
201404070941.12 475045675 ns | :AGXWEB (004):HTTP (02) | ERROR |<__webssl_out_cert_verify_callback:130> failed, X509_verify_cert()
201404070941.12 476189319 ns | :AGXWEB (004):HTTP (02) | CONTROL |<web_filter_event_cb:297> Flt 0x97b9ed8 SSL cert validation err=20 err_string='unable to get local issuer certificate'
201404070941.12 476198519 ns | :AGXWEB (004):HTTP (02) | ERROR |<finished:376> Flt (nil) finished with error=4
201404070941.12 476202097 ns | :AGXWEB (004):WS_RES (09) | ERROR |<pna_conf_resp_cb:1441> ws client has error
201404070941.12 476206143 ns | :AGXWEB (004):WS_RES (09) | CONTROL |<Enum_cb:2531> [RES_OBJ:2981160360] error PNA response
From the example, you can determine that App Controller is unable to locate the Root CA in order to validate the server certificate for StoreFront.
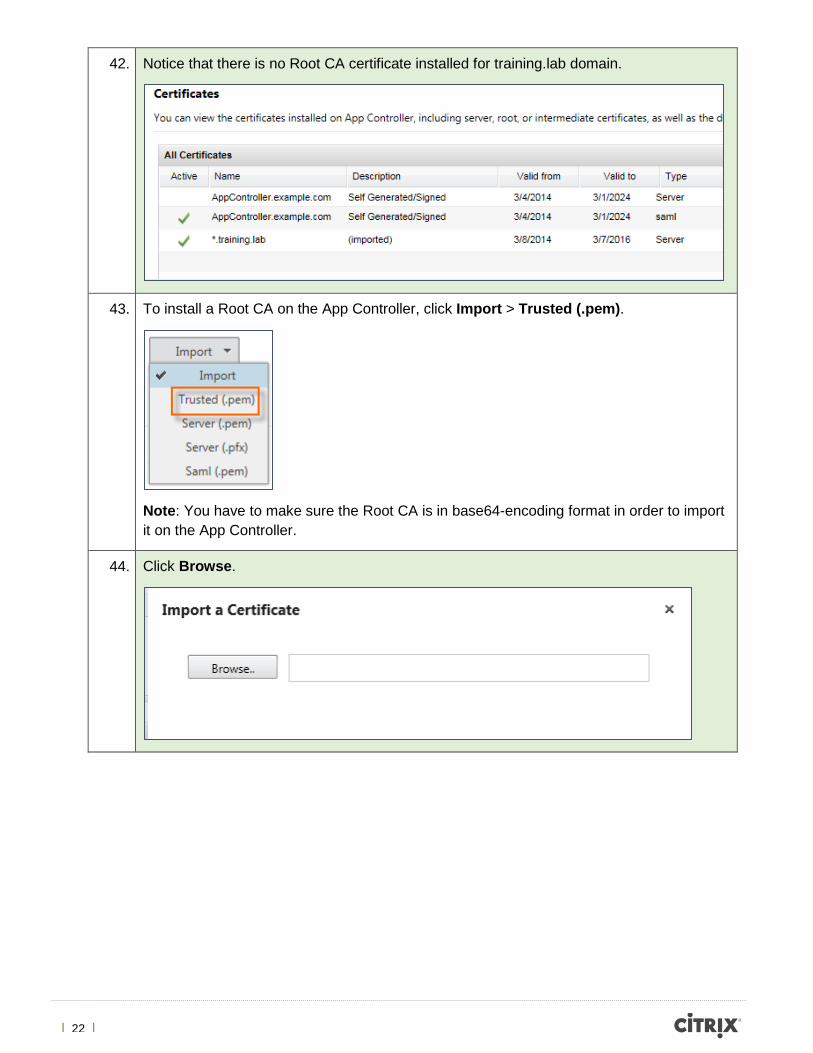
41. Minimize the Wireshark tool, and restore the App Controller management console running in the Internet Explorer (ie. Control Point).
Go to Settings tab and select Certificates.
| 22 |
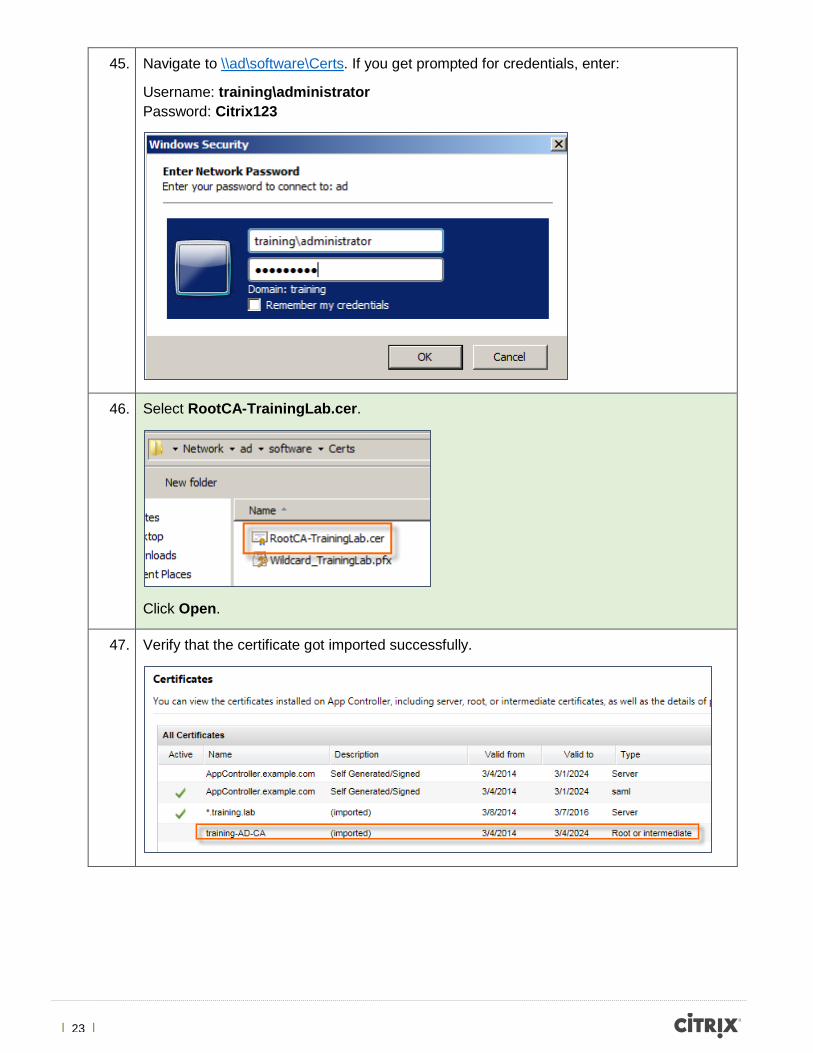
42. Notice that there is no Root CA certificate installed for training.lab domain.
43. To install a Root CA on the App Controller, click Import > Trusted (.pem).
Note: You have to make sure the Root CA is in base64-encoding format in order to import it on the App Controller.
44. Click Browse.
| 23 |
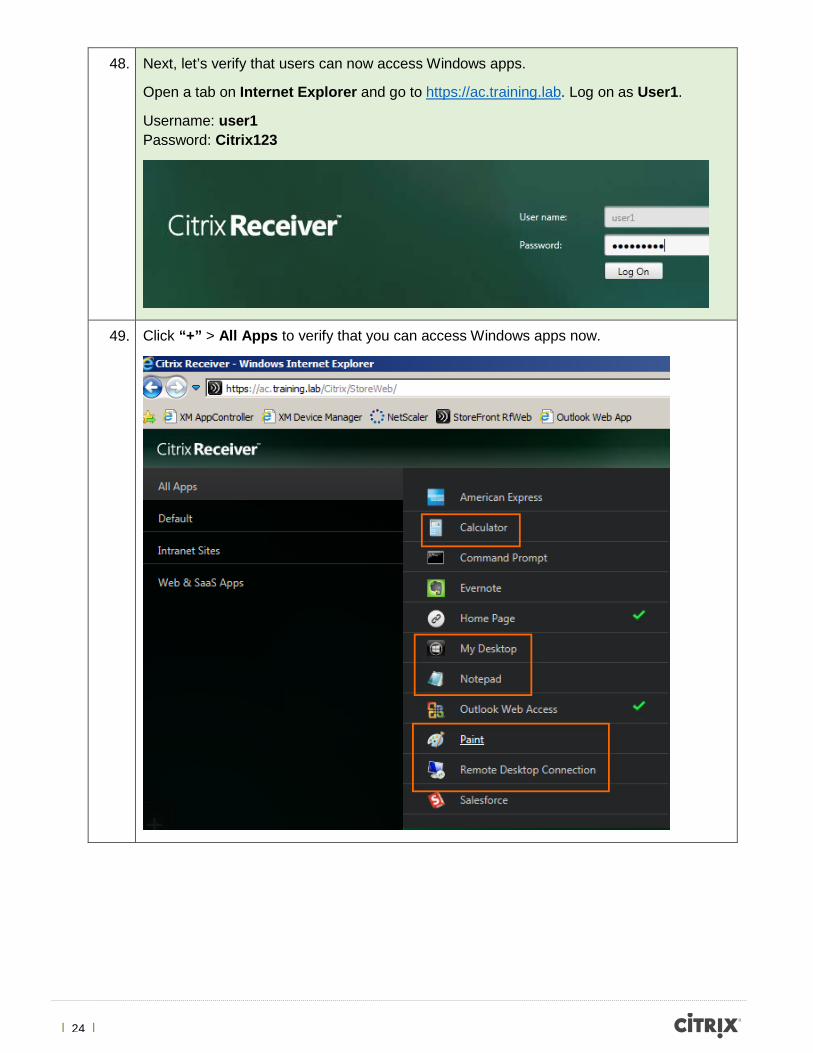
45. Navigate to \\ad\software\Certs. If you get prompted for credentials, enter:
Username: training\administrator Password: Citrix123
46. Select RootCA-TrainingLab.cer.
Click Open.
47. Verify that the certificate got imported successfully.
| 24 |
48. Next, let’s verify that users can now access Windows apps.
Open a tab on Internet Explorer and go to https://ac.training.lab. Log on as User1.
Username: user1 Password: Citrix123
49. Click “+” > All Apps to verify that you can access Windows apps now.
| 25 |
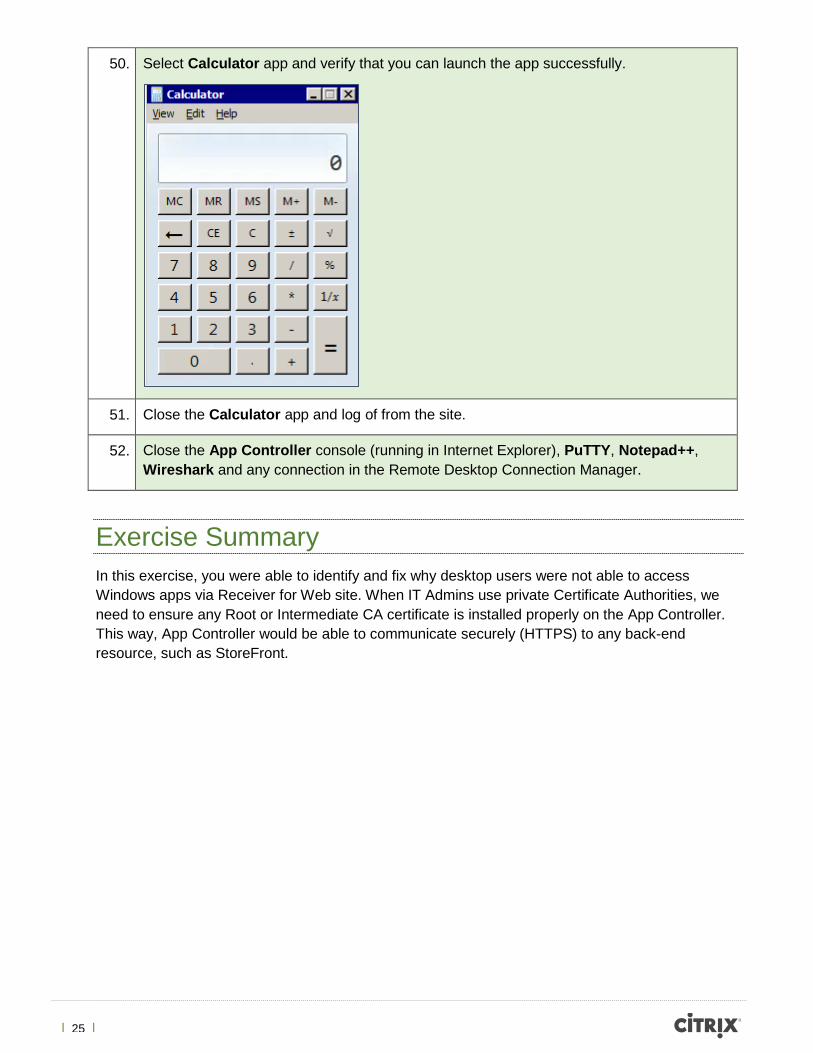
50. Select Calculator app and verify that you can launch the app successfully.
51. Close the Calculator app and log of from the site.
52. Close the App Controller console (running in Internet Explorer), PuTTY, Notepad++, Wireshark and any connection in the Remote Desktop Connection Manager.
Exercise Summary In this exercise, you were able to identify and fix why desktop users were not able to access Windows apps via Receiver for Web site. When IT Admins use private Certificate Authorities, we need to ensure any Root or Intermediate CA certificate is installed properly on the App Controller. This way, App Controller would be able to communicate securely (HTTPS) to any back-end resource, such as StoreFront.
| 26 |
Exercise 2 Unable to Configure Worx Home for the First Time Overview In this exercise, students will identify and fix why remote mobile users (iOS or Android) are unable to authenticate and configure Worx Home for the first time. During this part of the rollout, the IT Admin is testing Worx Home first-time configuration via NetScaler Gateway. The goal is to validate the Session and Client Access policies are properly configured. There is no XenMobile Device Manager involved in this scenario.
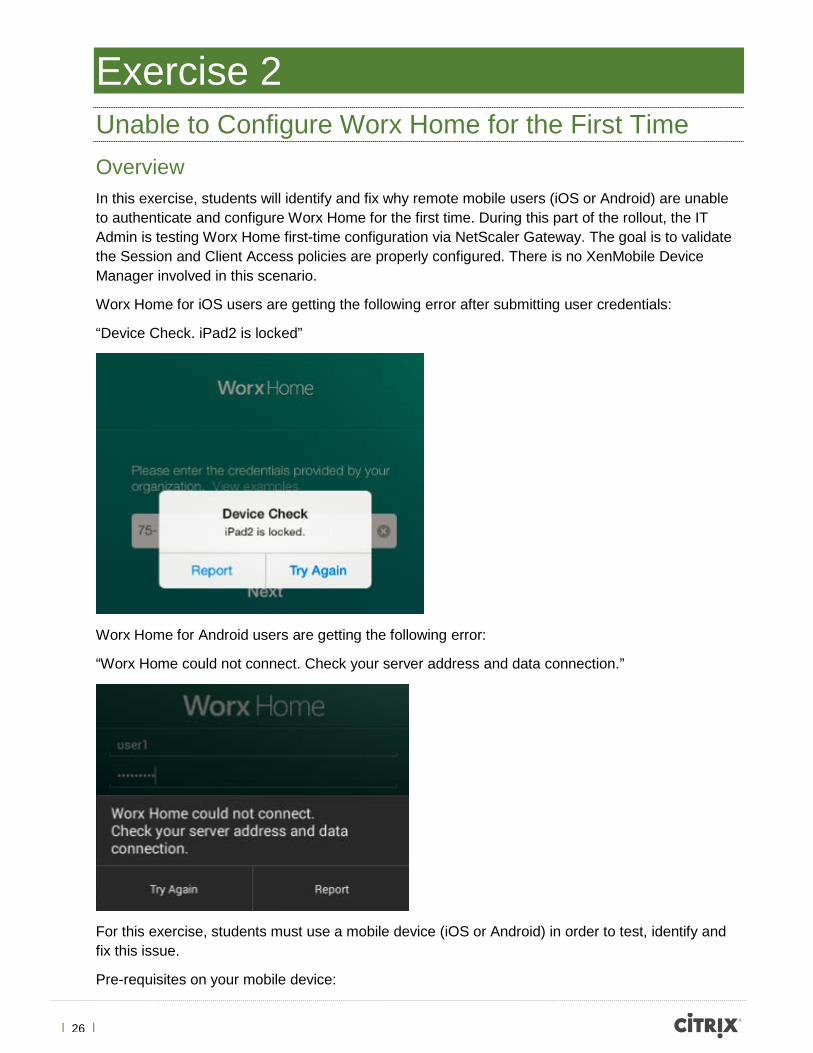
Worx Home for iOS users are getting the following error after submitting user credentials:
“Device Check. iPad2 is locked”
Worx Home for Android users are getting the following error:
“Worx Home could not connect. Check your server address and data connection.”
For this exercise, students must use a mobile device (iOS or Android) in order to test, identify and fix this issue.
Pre-requisites on your mobile device:
| 27 |
- Worx Home installed without any previous configuration.
- Mobile device with native email client registered to a personal or corporate mail account (e.g. Yahoo, Outlook.com, Exchange, etc.) This is needed in order to extract the Worx Home log files via email.
Tools to be used:
Students will leverage NetScaler aaad.debug tool, NetScaler nsconmsg tool, Worx Home logs and Notepad++ to find out what could be root cause of this first time configuration.
Step by step guidance Estimated time to complete this lab: 30 minutes.
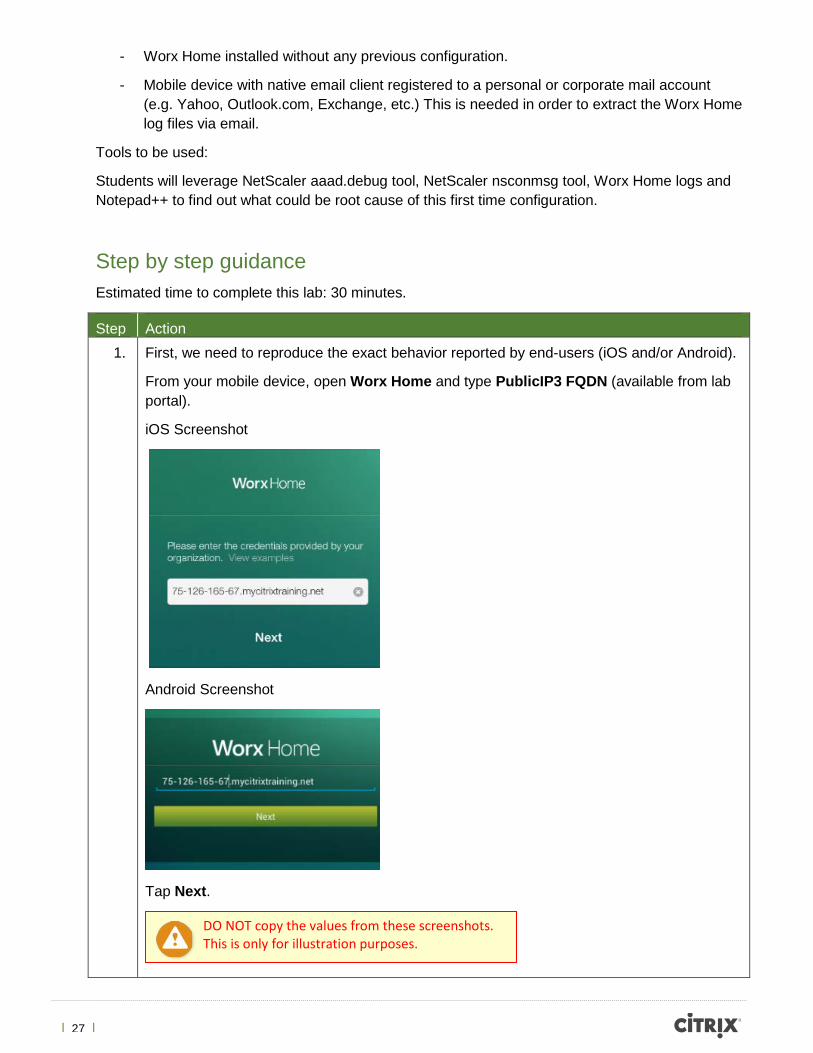
Step Action 1. First, we need to reproduce the exact behavior reported by end-users (iOS and/or Android).
From your mobile device, open Worx Home and type PublicIP3 FQDN (available from lab portal).
iOS Screenshot
Android Screenshot
Tap Next.
DO NOT copy the values from these screenshots. This is only for illustration purposes.
| 28 |
2. Log on with User1 credentials.
Username: user1 Password: Citrix123
Tap Sign on.
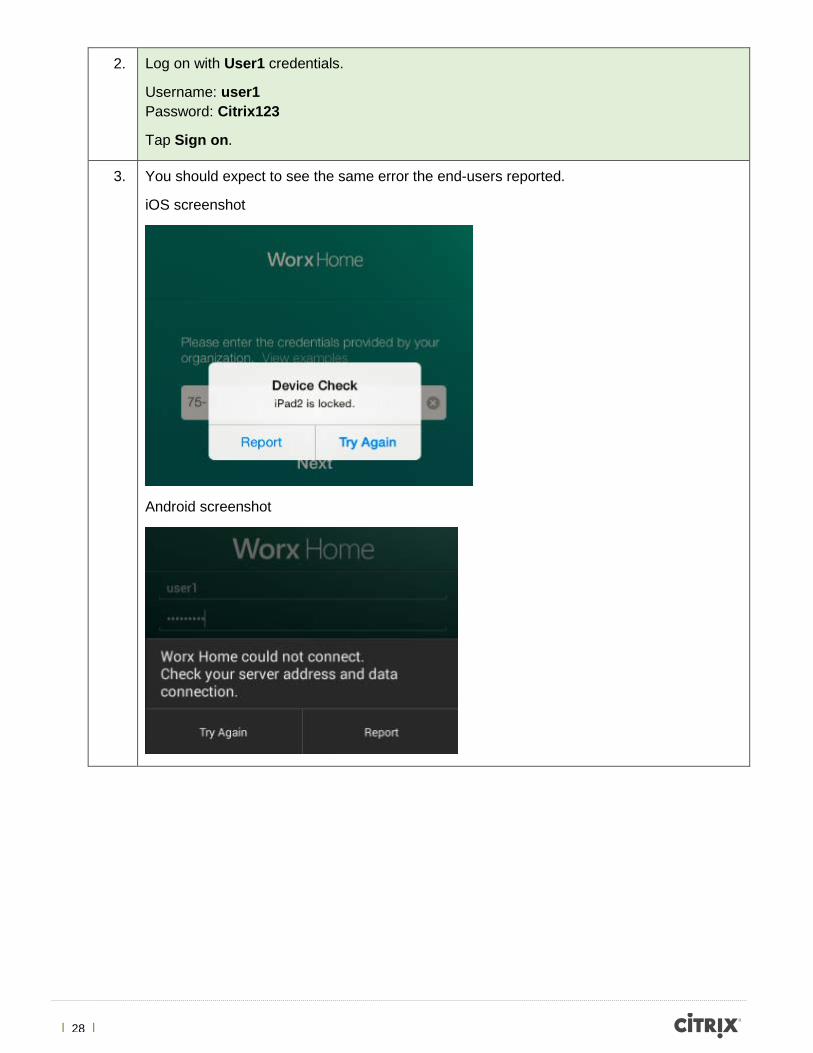
3. You should expect to see the same error the end-users reported.
iOS screenshot
Android screenshot
| 29 |
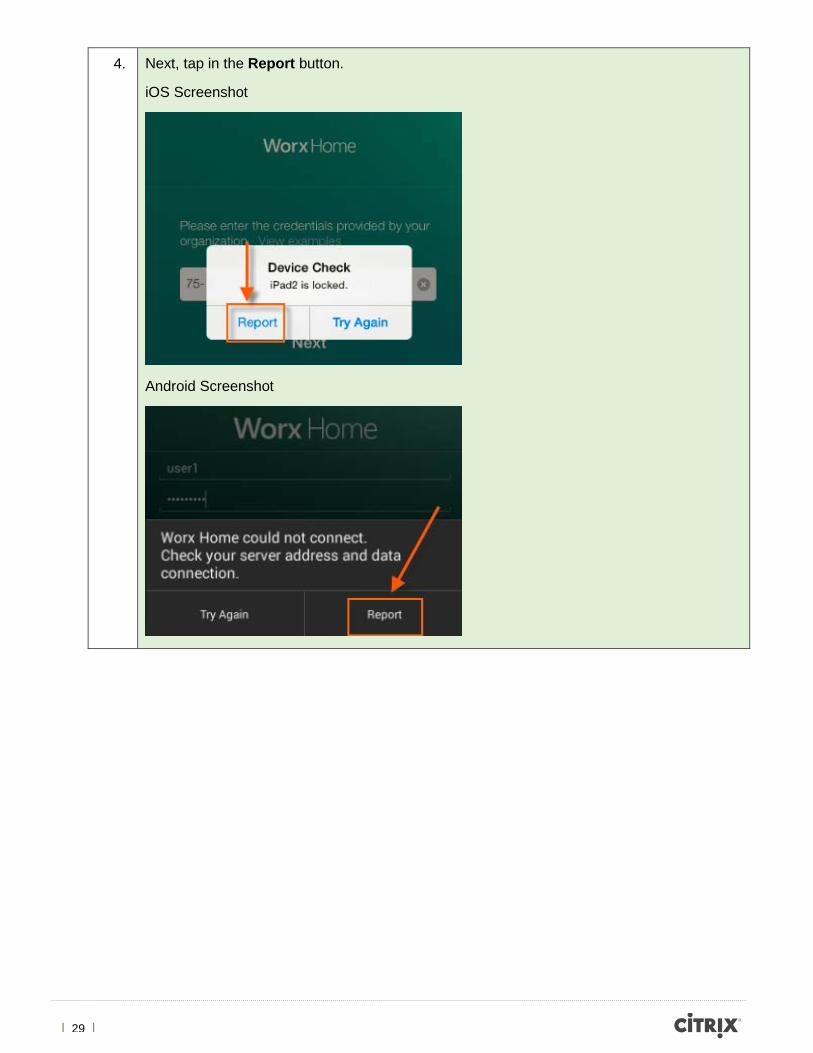
4. Next, tap in the Report button.
iOS Screenshot
Android Screenshot
| 30 |
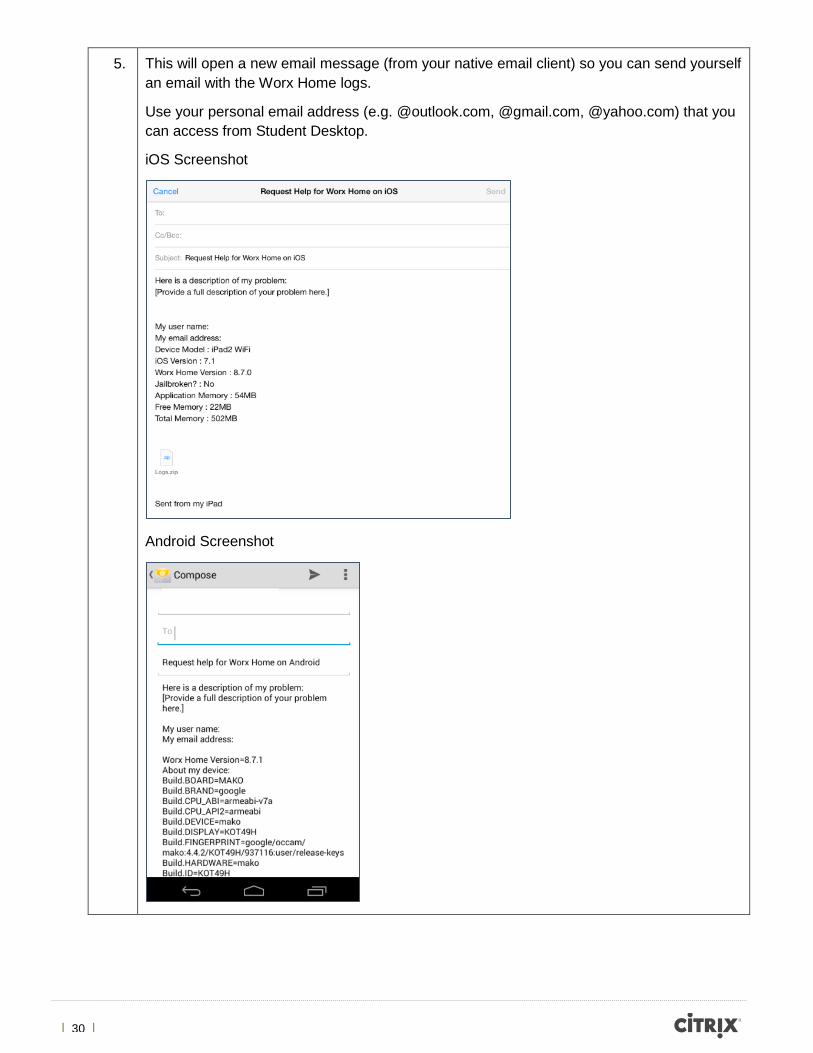
5. This will open a new email message (from your native email client) so you can send yourself an email with the Worx Home logs.
Use your personal email address (e.g. @outlook.com, @gmail.com, @yahoo.com) that you can access from Student Desktop.
iOS Screenshot
Android Screenshot
| 31 |
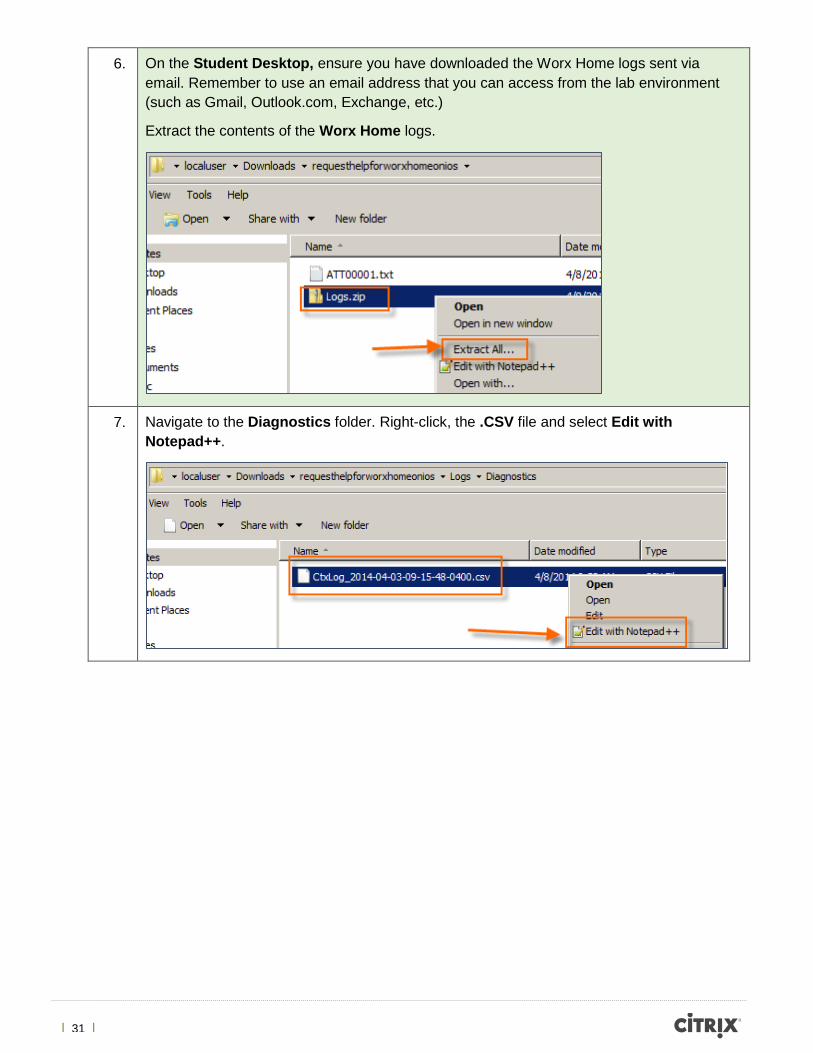
6. On the Student Desktop, ensure you have downloaded the Worx Home logs sent via email. Remember to use an email address that you can access from the lab environment (such as Gmail, Outlook.com, Exchange, etc.)
Extract the contents of the Worx Home logs.
7. Navigate to the Diagnostics folder. Right-click, the .CSV file and select Edit with Notepad++.
| 32 |
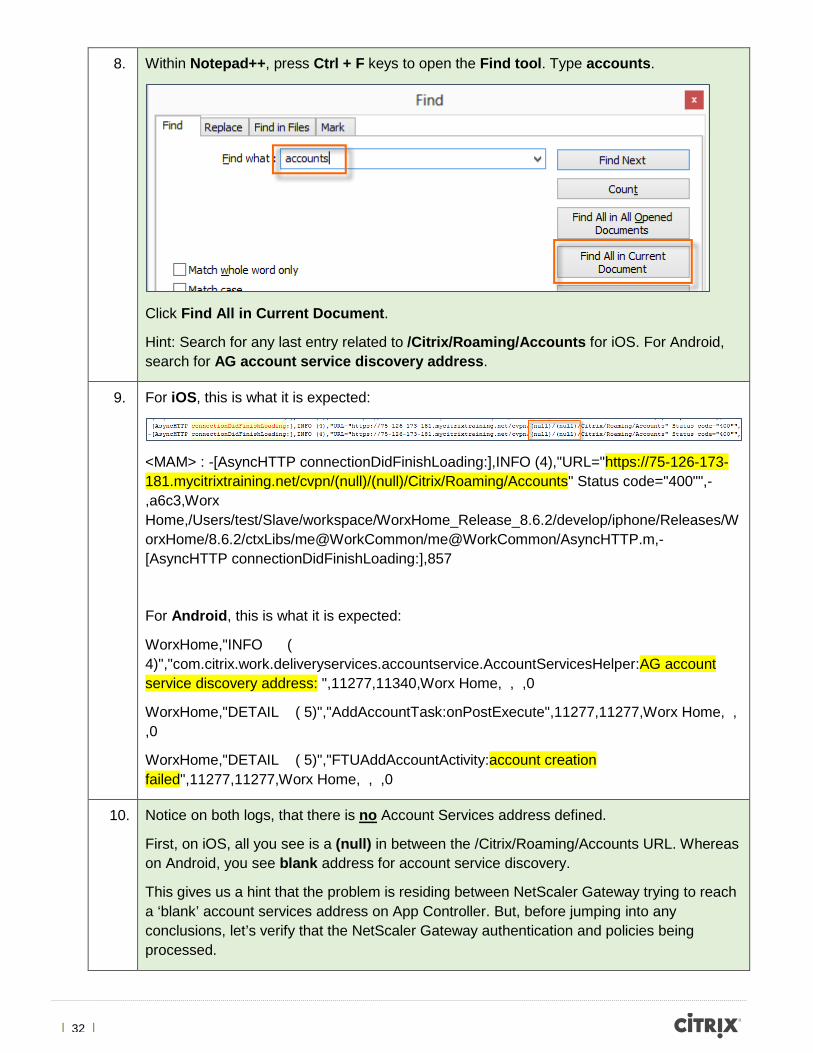
8. Within Notepad++, press Ctrl + F keys to open the Find tool. Type accounts.
Click Find All in Current Document.
Hint: Search for any last entry related to /Citrix/Roaming/Accounts for iOS. For Android, search for AG account service discovery address.
9. For iOS, this is what it is expected:
<MAM> : -[AsyncHTTP connectionDidFinishLoading:],INFO (4),"URL="https://75-126-173-181.mycitrixtraining.net/cvpn/(null)/(null)/Citrix/Roaming/Accounts" Status code="400"",-,a6c3,Worx Home,/Users/test/Slave/workspace/WorxHome_Release_8.6.2/develop/iphone/Releases/WorxHome/8.6.2/ctxLibs/me@WorkCommon/me@WorkCommon/AsyncHTTP.m,-[AsyncHTTP connectionDidFinishLoading:],857
For Android, this is what it is expected:
WorxHome,"INFO ( 4)","com.citrix.work.deliveryservices.accountservice.AccountServicesHelper:AG account service discovery address: ",11277,11340,Worx Home, , ,0
WorxHome,"DETAIL ( 5)","AddAccountTask:onPostExecute",11277,11277,Worx Home, , ,0
WorxHome,"DETAIL ( 5)","FTUAddAccountActivity:account creation failed",11277,11277,Worx Home, , ,0
10. Notice on both logs, that there is no Account Services address defined.
First, on iOS, all you see is a (null) in between the /Citrix/Roaming/Accounts URL. Whereas on Android, you see blank address for account service discovery.
This gives us a hint that the problem is residing between NetScaler Gateway trying to reach a ‘blank’ account services address on App Controller. But, before jumping into any conclusions, let’s verify that the NetScaler Gateway authentication and policies being processed.
| 33 |
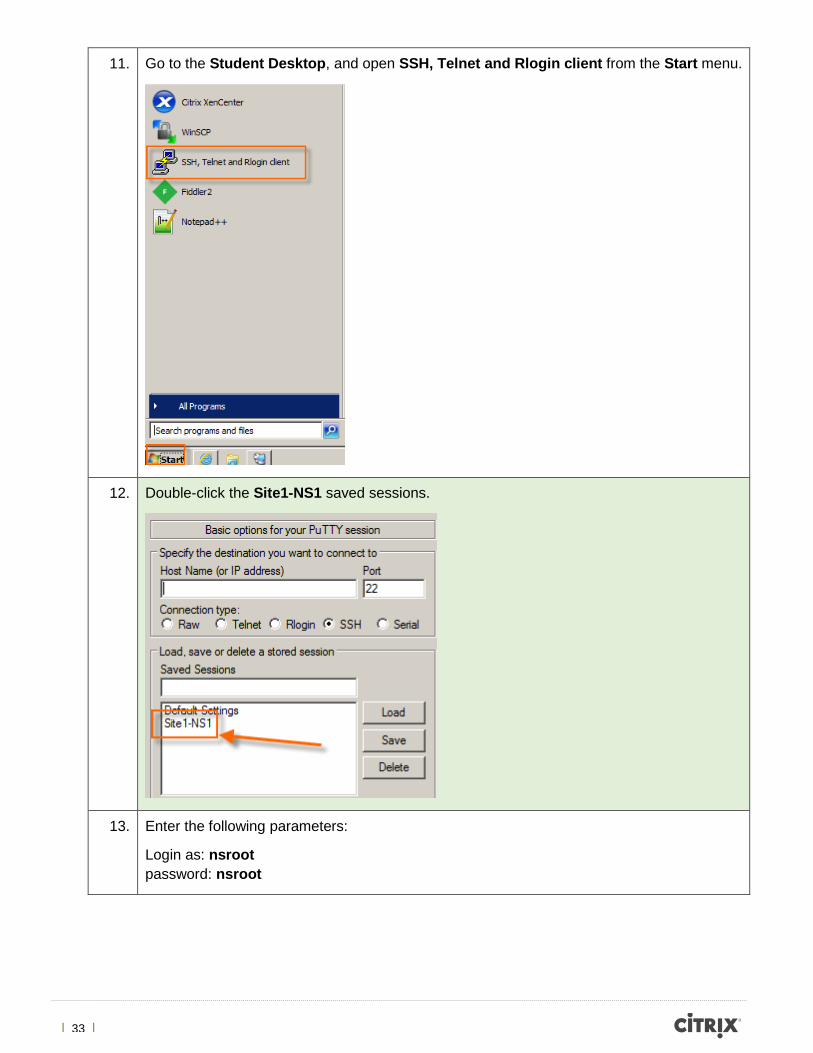
11. Go to the Student Desktop, and open SSH, Telnet and Rlogin client from the Start menu.
12. Double-click the Site1-NS1 saved sessions.
13. Enter the following parameters:
Login as: nsroot password: nsroot
| 34 |
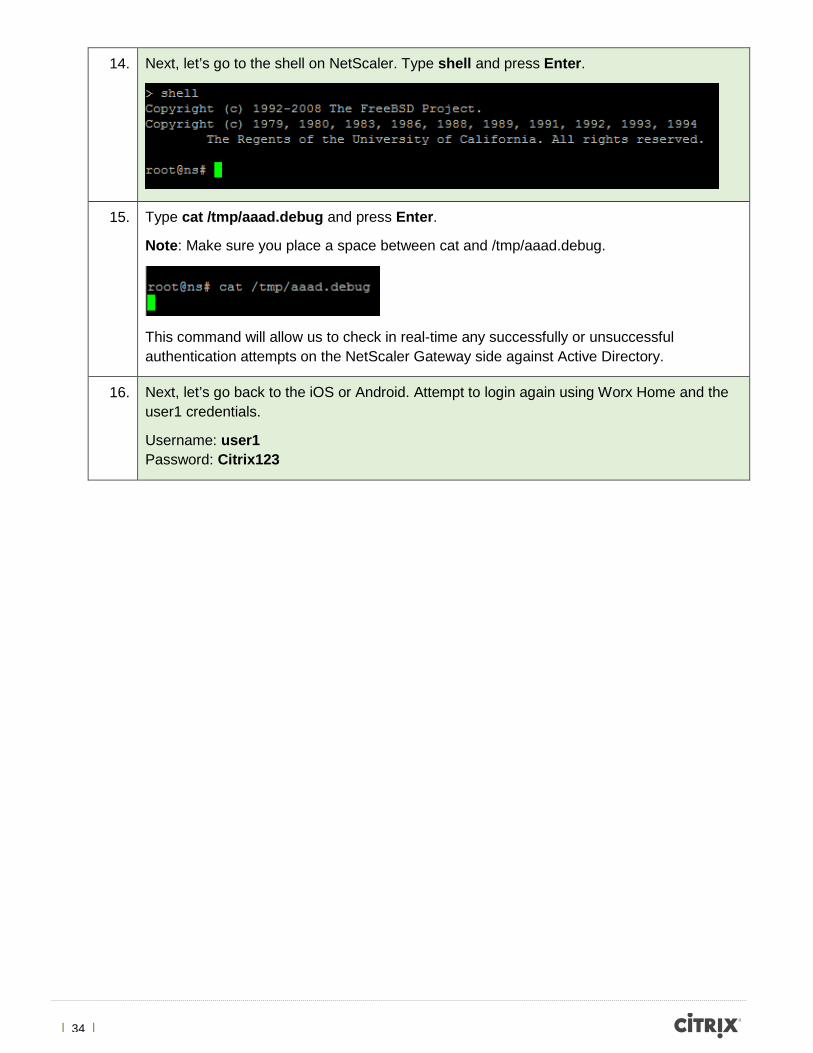
14. Next, let’s go to the shell on NetScaler. Type shell and press Enter.
15. Type cat /tmp/aaad.debug and press Enter.
Note: Make sure you place a space between cat and /tmp/aaad.debug.
This command will allow us to check in real-time any successfully or unsuccessful authentication attempts on the NetScaler Gateway side against Active Directory.
16. Next, let’s go back to the iOS or Android. Attempt to login again using Worx Home and the user1 credentials.
Username: user1 Password: Citrix123
| 35 |
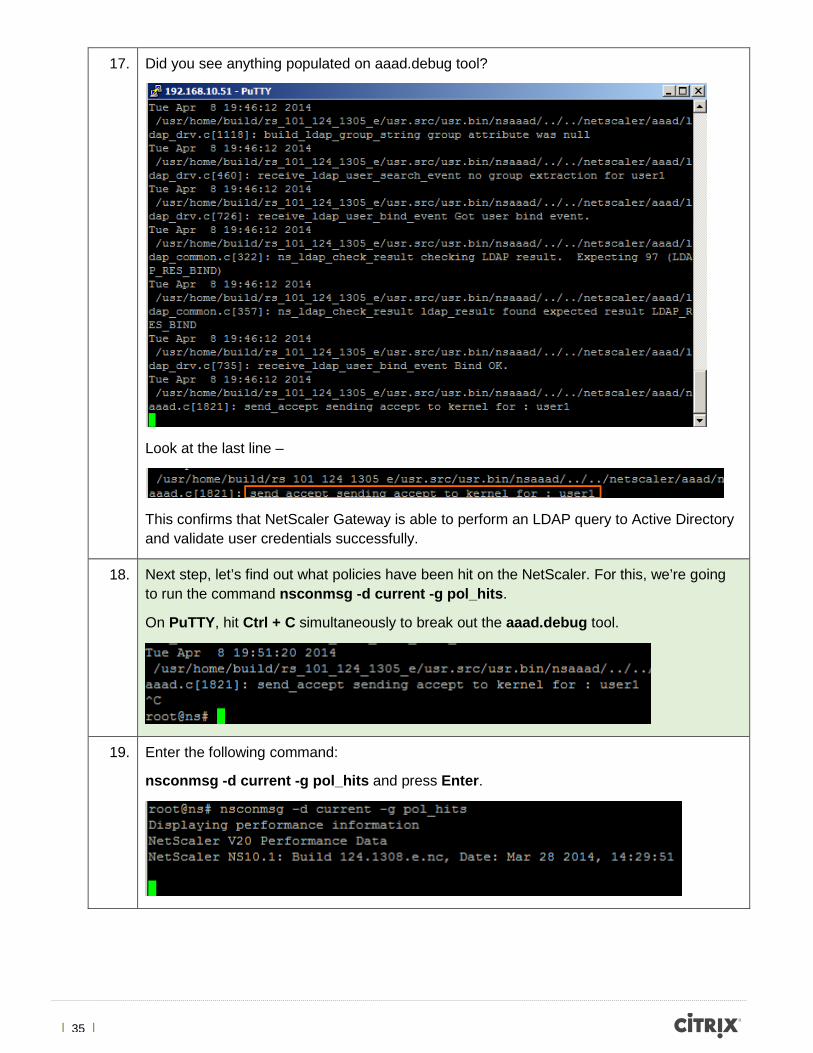
17. Did you see anything populated on aaad.debug tool?
Look at the last line –
This confirms that NetScaler Gateway is able to perform an LDAP query to Active Directory and validate user credentials successfully.
18. Next step, let’s find out what policies have been hit on the NetScaler. For this, we’re going to run the command nsconmsg -d current -g pol_hits.
On PuTTY, hit Ctrl + C simultaneously to break out the aaad.debug tool.
19. Enter the following command:
nsconmsg -d current -g pol_hits and press Enter.
| 36 |
20. Let’s re-test from Worx Home. Try to login one more time with the user1 credentials.
Username: user1 Password: Citrix123
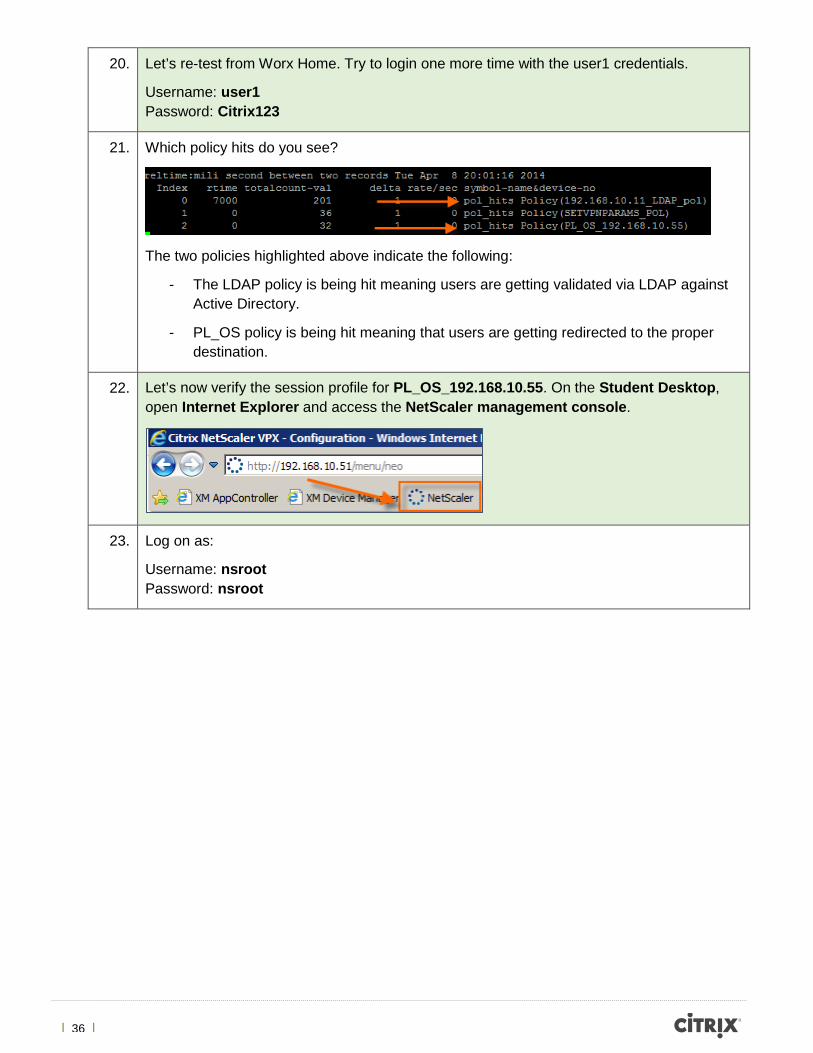
21. Which policy hits do you see?
The two policies highlighted above indicate the following:
- The LDAP policy is being hit meaning users are getting validated via LDAP against Active Directory.
- PL_OS policy is being hit meaning that users are getting redirected to the proper destination.
22. Let’s now verify the session profile for PL_OS_192.168.10.55. On the Student Desktop, open Internet Explorer and access the NetScaler management console.
23. Log on as:
Username: nsroot Password: nsroot
| 37 |
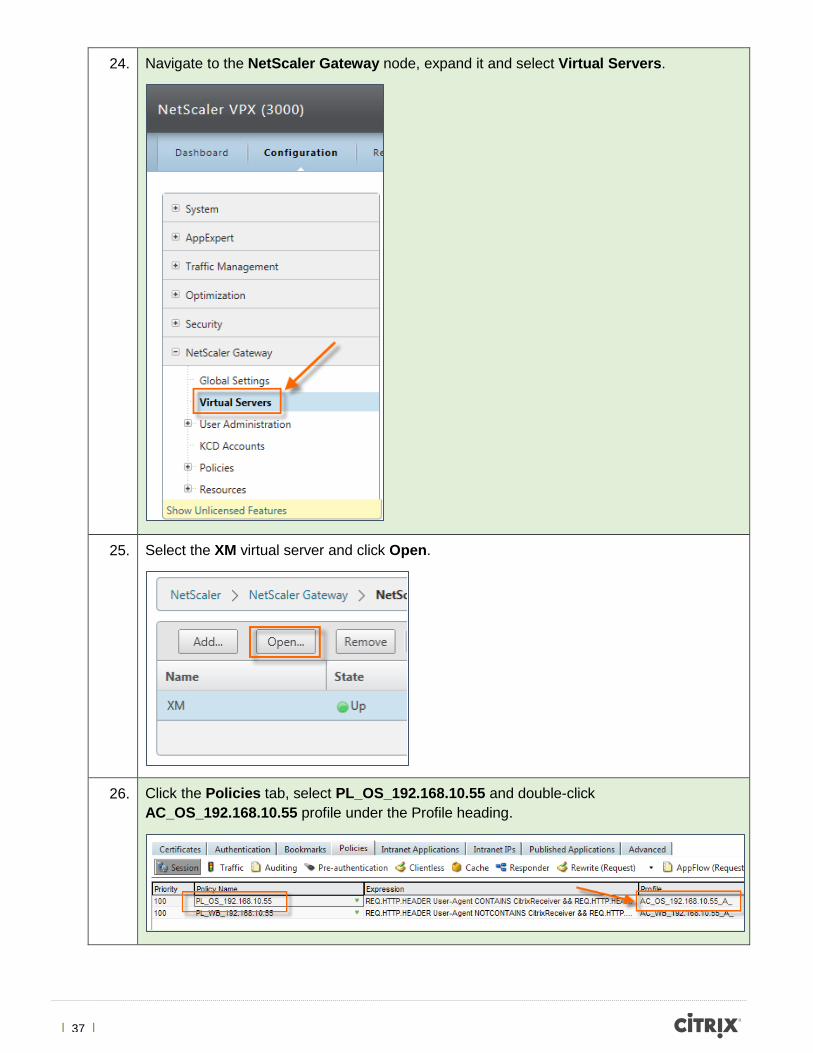
24. Navigate to the NetScaler Gateway node, expand it and select Virtual Servers.
25. Select the XM virtual server and click Open.
26. Click the Policies tab, select PL_OS_192.168.10.55 and double-click AC_OS_192.168.10.55 profile under the Profile heading.
| 38 |
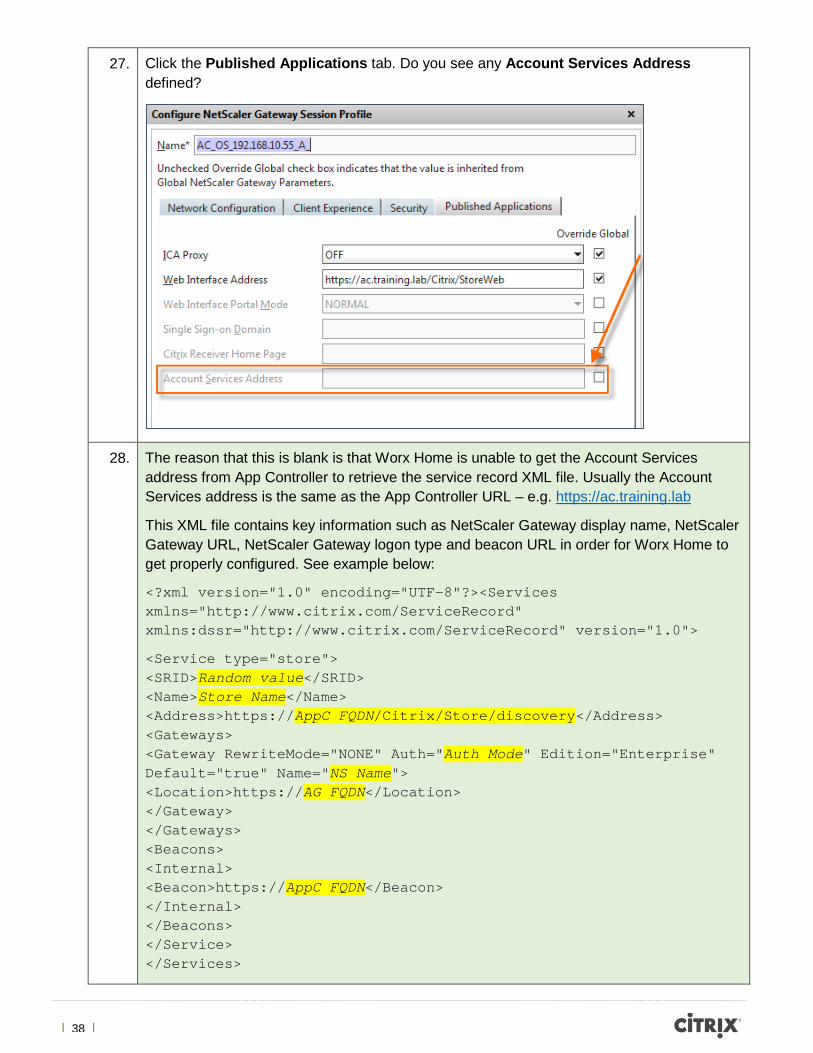
27. Click the Published Applications tab. Do you see any Account Services Address defined?
28. The reason that this is blank is that Worx Home is unable to get the Account Services address from App Controller to retrieve the service record XML file. Usually the Account Services address is the same as the App Controller URL – e.g. https://ac.training.lab
This XML file contains key information such as NetScaler Gateway display name, NetScaler Gateway URL, NetScaler Gateway logon type and beacon URL in order for Worx Home to get properly configured. See example below:
<?xml version="1.0" encoding="UTF-8"?><Services xmlns="http://www.citrix.com/ServiceRecord" xmlns:dssr="http://www.citrix.com/ServiceRecord" version="1.0">
<Service type="store"> <SRID>Random value</SRID> <Name>Store Name</Name> <Address>https://AppC FQDN/Citrix/Store/discovery</Address> <Gateways> <Gateway RewriteMode="NONE" Auth="Auth Mode" Edition="Enterprise" Default="true" Name="NS Name"> <Location>https://AG FQDN</Location> </Gateway> </Gateways> <Beacons> <Internal> <Beacon>https://AppC FQDN</Beacon> </Internal> </Beacons> </Service> </Services>
| 39 |
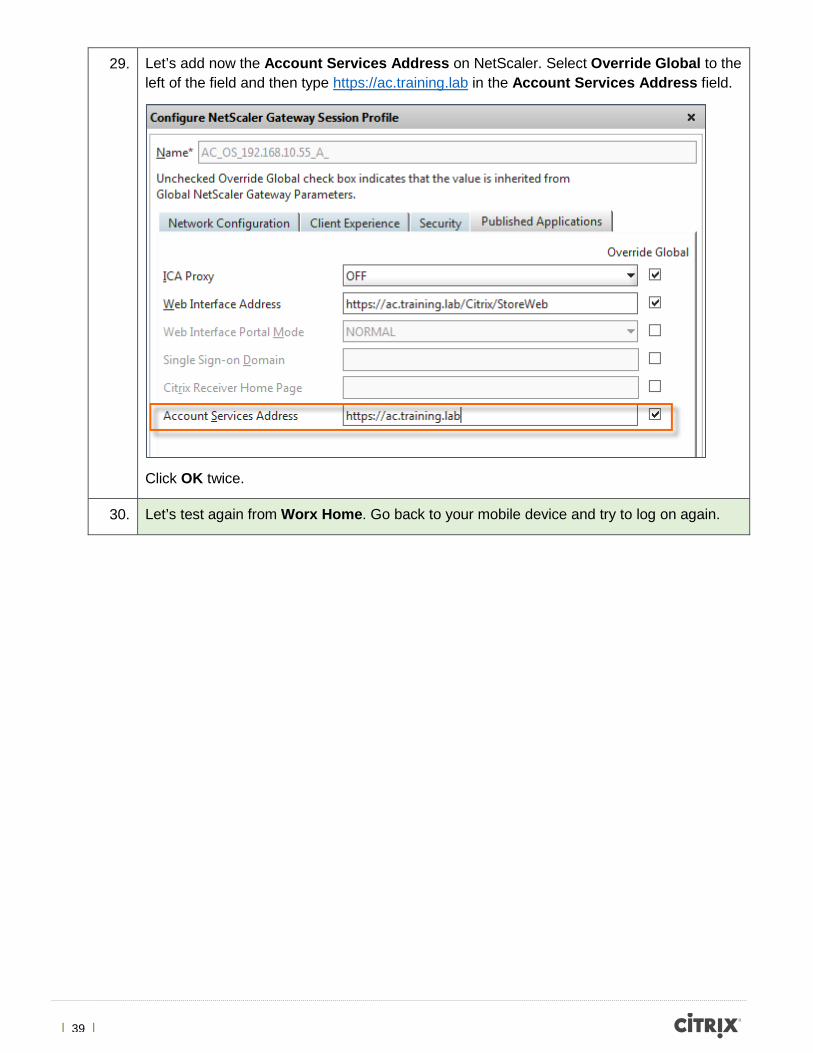
29. Let’s add now the Account Services Address on NetScaler. Select Override Global to the left of the field and then type https://ac.training.lab in the Account Services Address field.
Click OK twice.
30. Let’s test again from Worx Home. Go back to your mobile device and try to log on again.
| 40 |
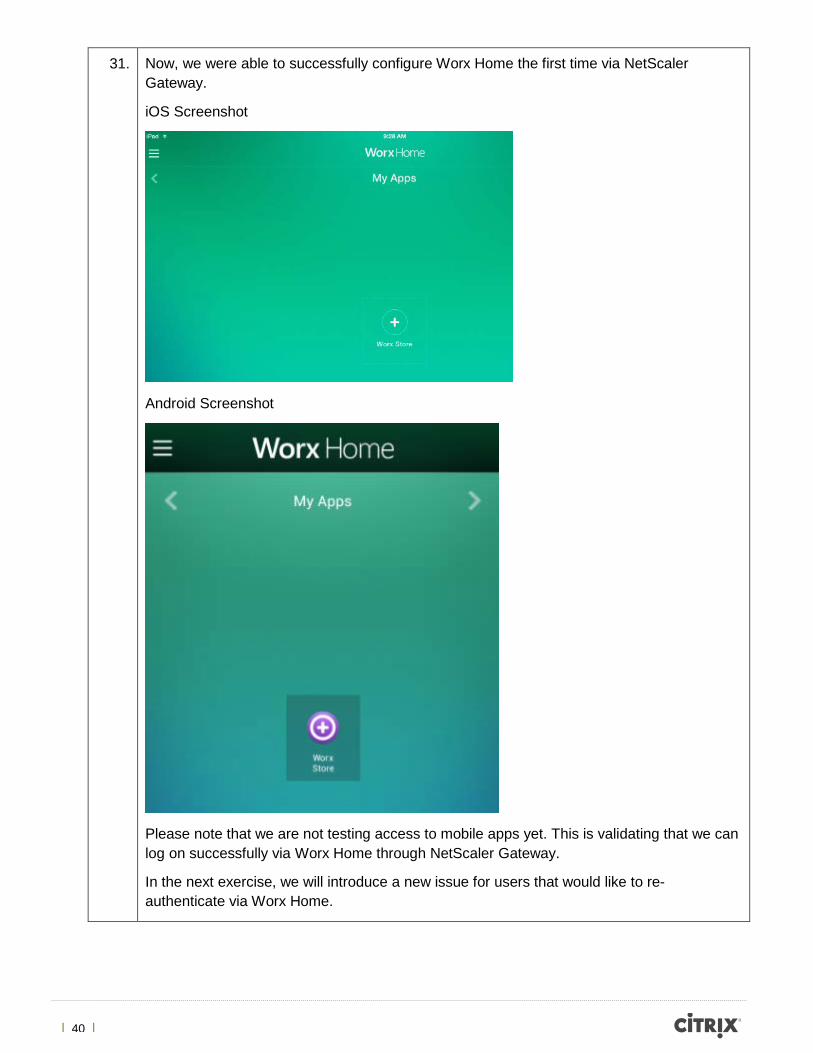
31. Now, we were able to successfully configure Worx Home the first time via NetScaler Gateway.
iOS Screenshot
Android Screenshot
Please note that we are not testing access to mobile apps yet. This is validating that we can log on successfully via Worx Home through NetScaler Gateway.
In the next exercise, we will introduce a new issue for users that would like to re-authenticate via Worx Home.
| 41 |
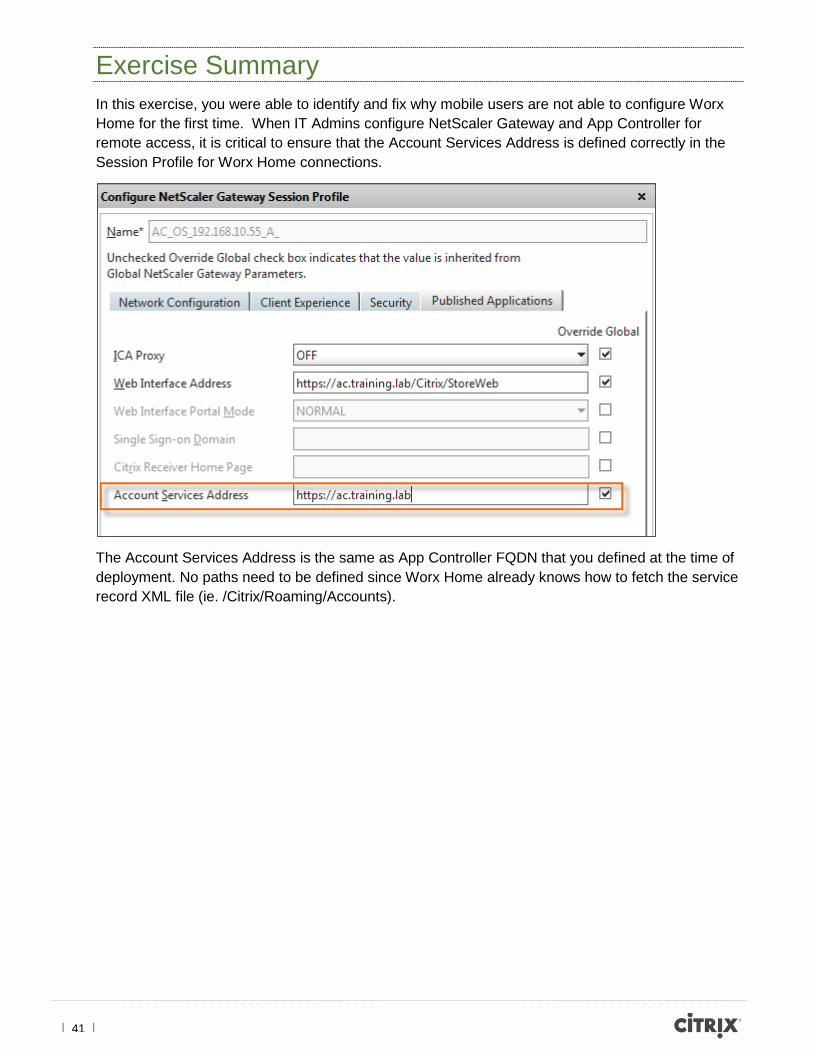
Exercise Summary In this exercise, you were able to identify and fix why mobile users are not able to configure Worx Home for the first time. When IT Admins configure NetScaler Gateway and App Controller for remote access, it is critical to ensure that the Account Services Address is defined correctly in the Session Profile for Worx Home connections.
The Account Services Address is the same as App Controller FQDN that you defined at the time of deployment. No paths need to be defined since Worx Home already knows how to fetch the service record XML file (ie. /Citrix/Roaming/Accounts).
| 42 |
Exercise 3 Unable to re-authenticate through Worx Home Overview In this exercise, students will identify and fix why remote mobile users (iOS or Android) are unable to re-authenticate to Worx Home. During this part of the rollout, the IT Admin is testing NetScaler Gateway connectivity with App Controller. The goal is to allow remote mobile users log in successfully via the NetScaler Gateway. There is no XenMobile Device Manager involved in this scenario.
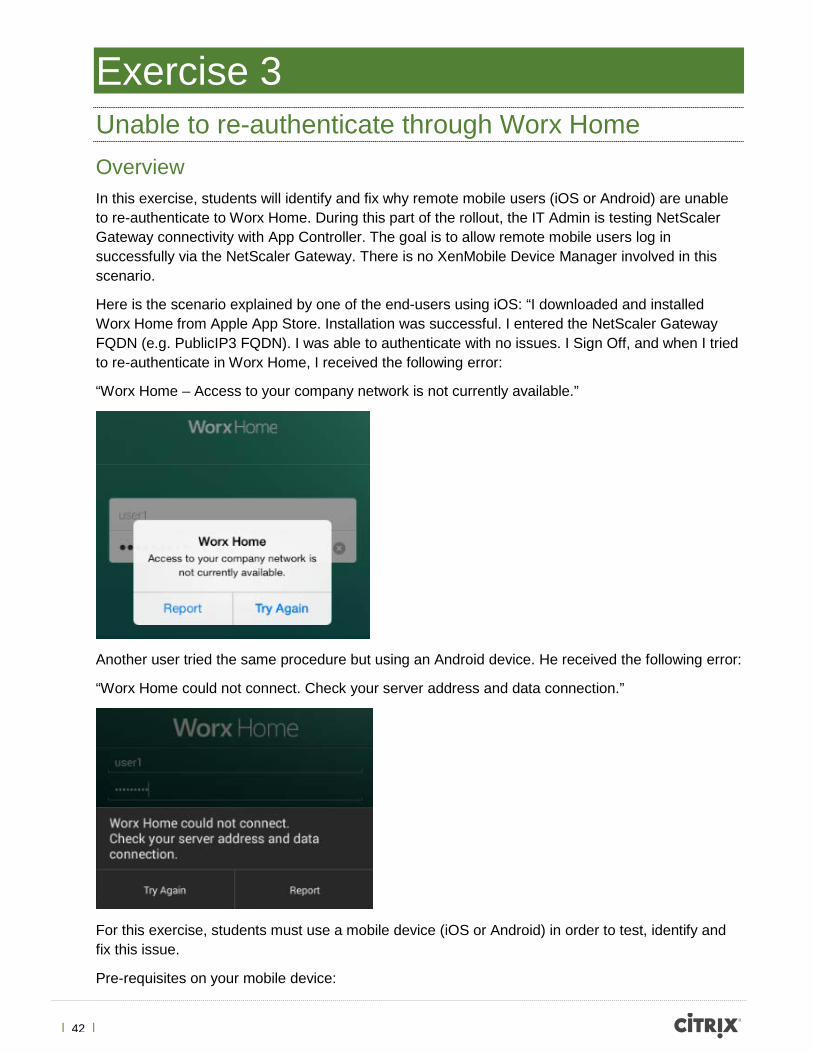
Here is the scenario explained by one of the end-users using iOS: “I downloaded and installed Worx Home from Apple App Store. Installation was successful. I entered the NetScaler Gateway FQDN (e.g. PublicIP3 FQDN). I was able to authenticate with no issues. I Sign Off, and when I tried to re-authenticate in Worx Home, I received the following error:
“Worx Home – Access to your company network is not currently available.”
Another user tried the same procedure but using an Android device. He received the following error:
“Worx Home could not connect. Check your server address and data connection.”
For this exercise, students must use a mobile device (iOS or Android) in order to test, identify and fix this issue.
Pre-requisites on your mobile device:
| 43 |
- Worx Home installed configured as per Exercise #2.
- Mobile device with native email client registered to a personal or corporate mail account (e.g. Yahoo, Outlook.com, Exchange, etc.) This is needed in order to extract the Worx Home log files via email.
Tools to be used:
Students will leverage NetScaler aaad.debug tool, Worx Home logs and Notepad++ to find out what could be root cause of this authentication issue.
Step by step guidance Estimated time to complete this lab: 25 minutes.
Step Action 1. First, we need to reproduce the exact behavior reported by end-users (iOS and/or Android).
Open Worx Home and log on with User1 credentials.
Username: user1 Password: Citrix123
Tap Sign on.
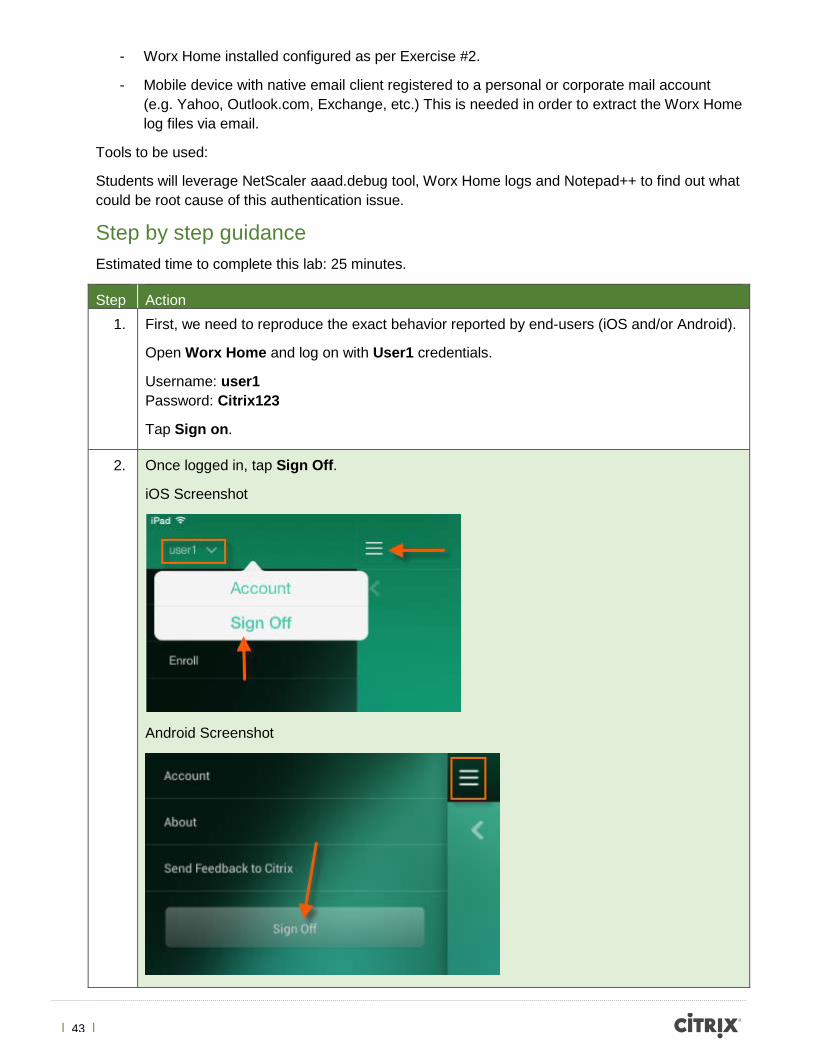
2. Once logged in, tap Sign Off.
iOS Screenshot
Android Screenshot
| 44 |
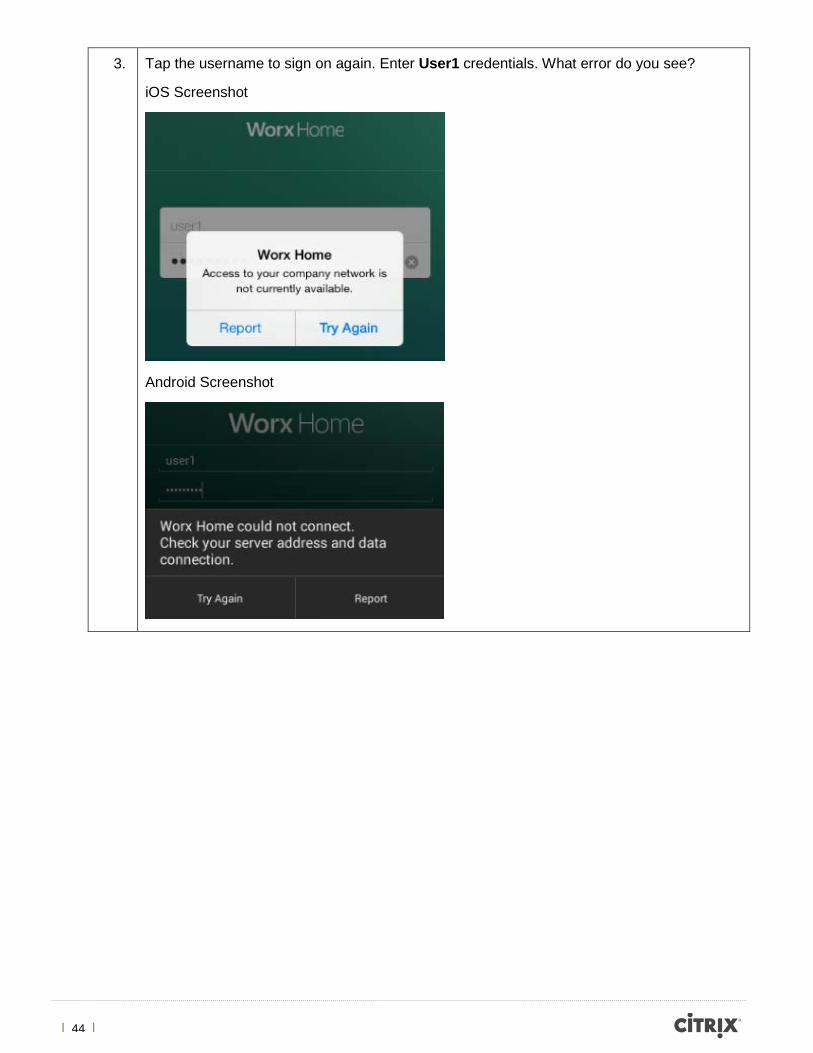
3. Tap the username to sign on again. Enter User1 credentials. What error do you see?
iOS Screenshot
Android Screenshot
| 45 |
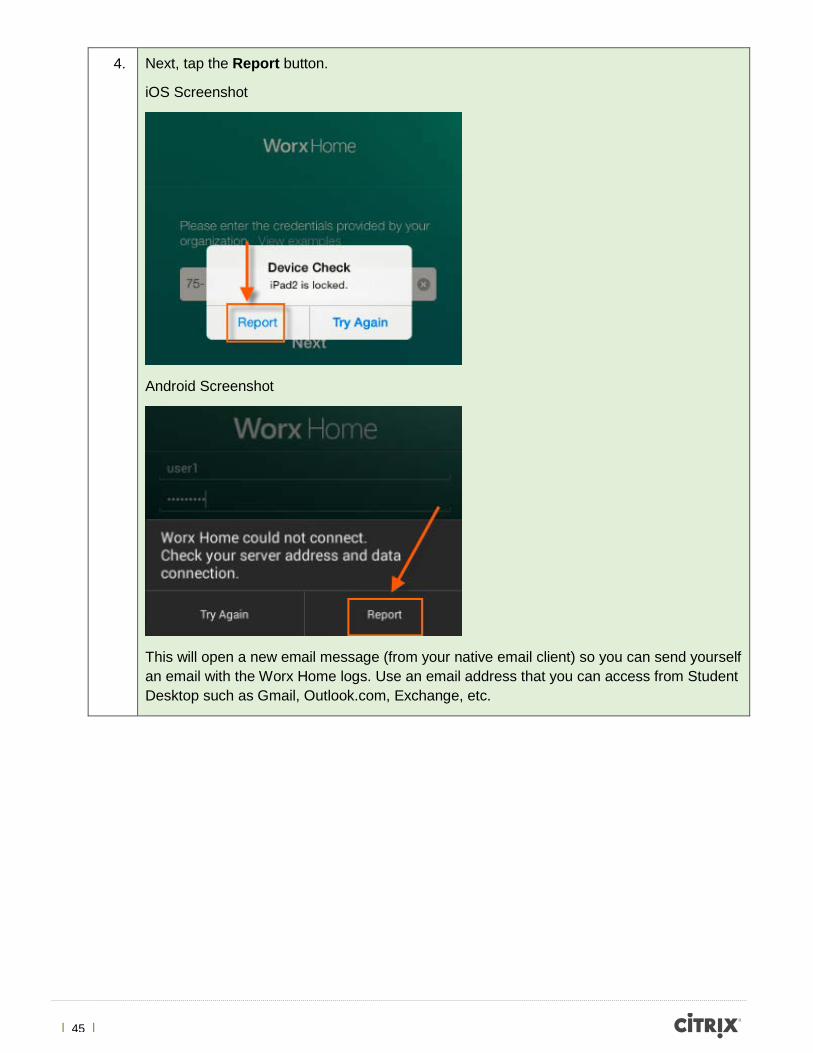
4. Next, tap the Report button.
iOS Screenshot
Android Screenshot
This will open a new email message (from your native email client) so you can send yourself an email with the Worx Home logs. Use an email address that you can access from Student Desktop such as Gmail, Outlook.com, Exchange, etc.

| 46 |
5. Before we start analyzing the Worx Home logs, let’s ensure that NetScaler Gateway is able to authenticate mobile users correctly.
Go to the Student Desktop, and open SSH, Telnet and Rlogin client from the Start menu.
6. Double-click on the Site1-NS1 saved sessions.
7. Enter the following parameters:
Login as: nsroot password: nsroot

| 47 |
8. Next, let’s go to the shell on NetScaler. Type shell and press Enter.
9. Type cat /tmp/aaad.debug and press Enter.
This command will allow us check in real-time any successfully or unsuccessful authentication attempts on the NetScaler Gateway side against Active Directory.
10. Next, let’s go back to the iOS or Android. Attempt to log on again using Worx Home and user1 credentials.
Username: user1 Password: Citrix123
11. Did you see anything populated on aaad.debug tool?
Not really. This is giving us a clue that the issue is not authentication between NetScaler and Active Directory. Perhaps the mobile device is not even attempting to connect to the NetScaler Gateway via HTTPS? Maybe. Let’s analyze the Worx Home log files sent via email.
| 48 |
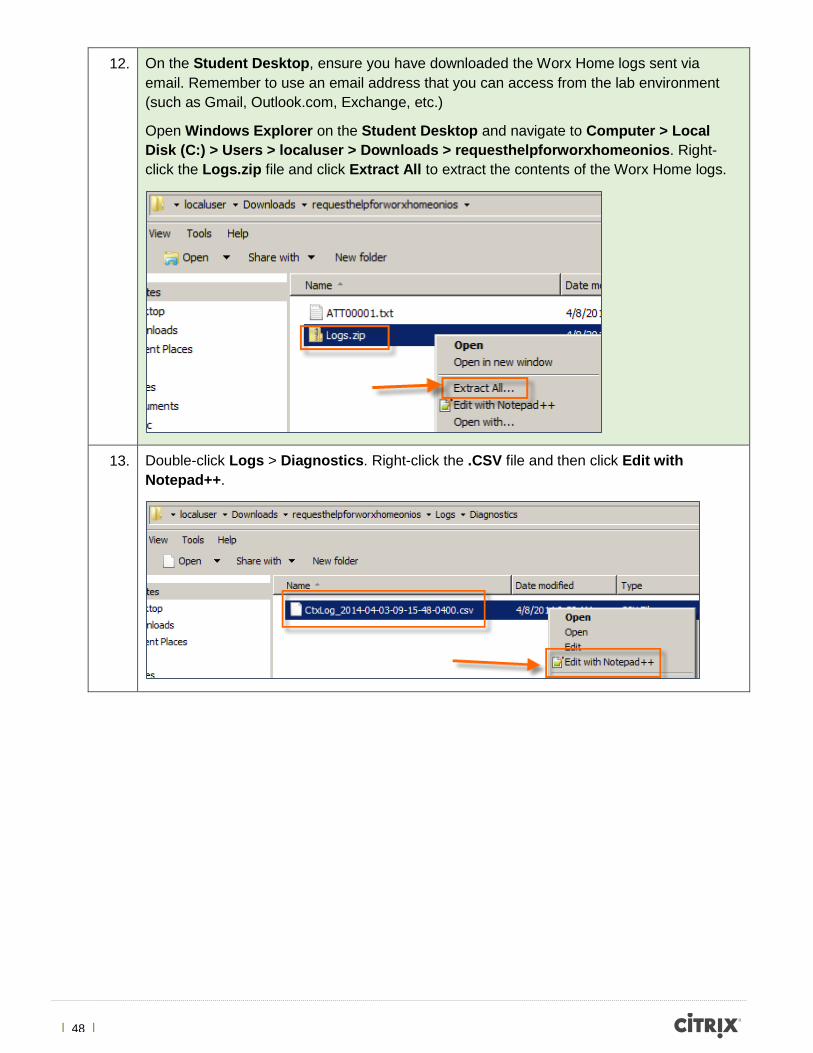
12. On the Student Desktop, ensure you have downloaded the Worx Home logs sent via email. Remember to use an email address that you can access from the lab environment (such as Gmail, Outlook.com, Exchange, etc.)
Open Windows Explorer on the Student Desktop and navigate to Computer > Local Disk (C:) > Users > localuser > Downloads > requesthelpforworxhomeonios. Right-click the Logs.zip file and click Extract All to extract the contents of the Worx Home logs.
13. Double-click Logs > Diagnostics. Right-click the .CSV file and then click Edit with Notepad++.
| 49 |
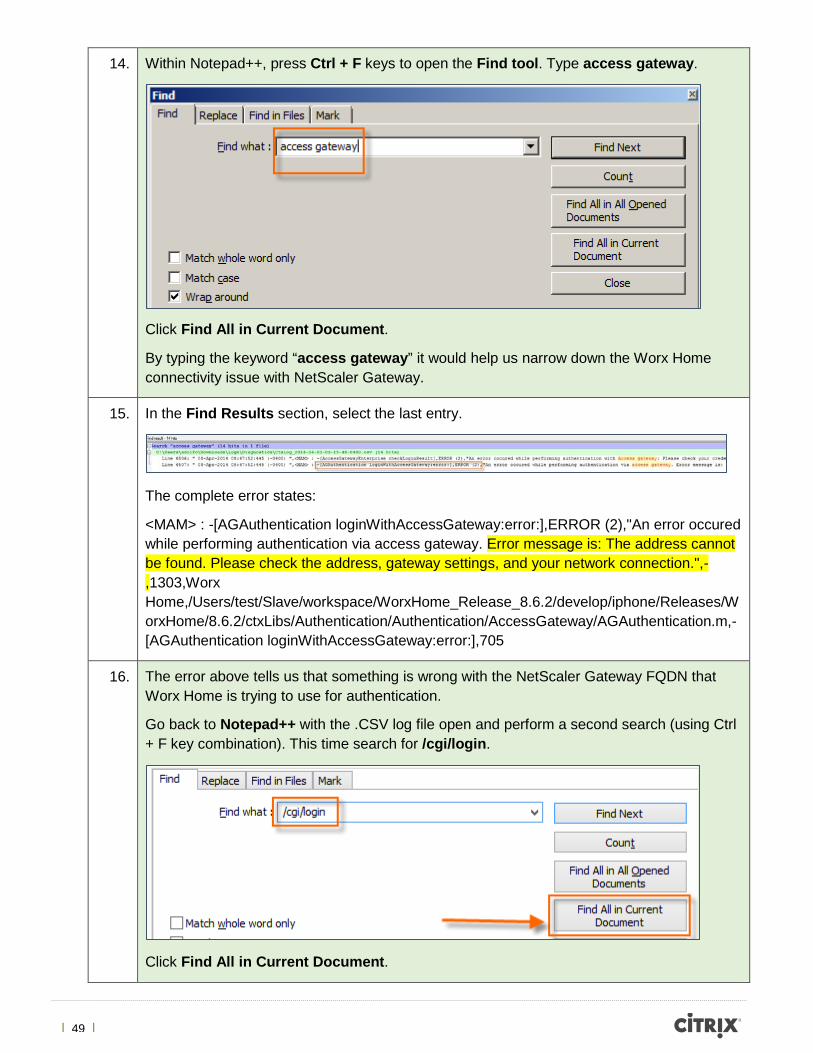
14. Within Notepad++, press Ctrl + F keys to open the Find tool. Type access gateway.
Click Find All in Current Document.
By typing the keyword “access gateway” it would help us narrow down the Worx Home connectivity issue with NetScaler Gateway.
15. In the Find Results section, select the last entry.
The complete error states:
<MAM> : -[AGAuthentication loginWithAccessGateway:error:],ERROR (2),"An error occured while performing authentication via access gateway. Error message is: The address cannot be found. Please check the address, gateway settings, and your network connection.",-,1303,Worx Home,/Users/test/Slave/workspace/WorxHome_Release_8.6.2/develop/iphone/Releases/WorxHome/8.6.2/ctxLibs/Authentication/Authentication/AccessGateway/AGAuthentication.m,-[AGAuthentication loginWithAccessGateway:error:],705
16. The error above tells us that something is wrong with the NetScaler Gateway FQDN that Worx Home is trying to use for authentication.
Go back to Notepad++ with the .CSV log file open and perform a second search (using Ctrl + F key combination). This time search for /cgi/login.
Click Find All in Current Document.
| 50 |
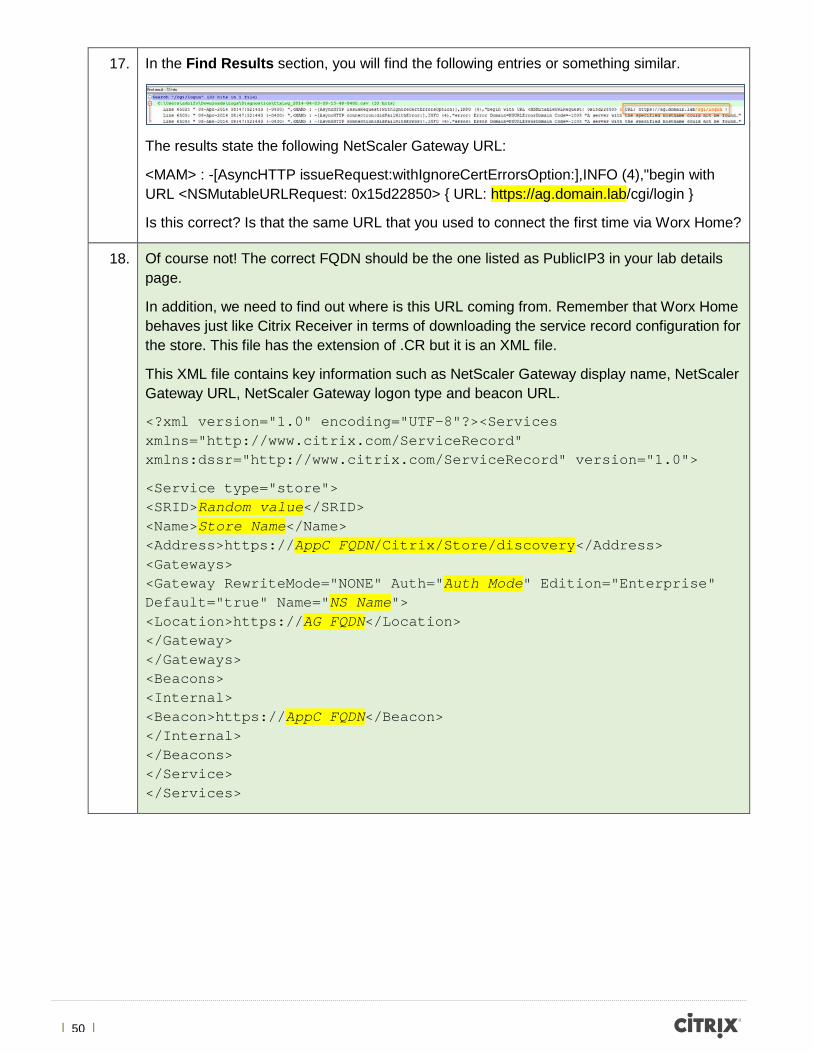
17. In the Find Results section, you will find the following entries or something similar.
The results state the following NetScaler Gateway URL:
<MAM> : -[AsyncHTTP issueRequest:withIgnoreCertErrorsOption:],INFO (4),"begin with URL <NSMutableURLRequest: 0x15d22850> { URL: https://ag.domain.lab/cgi/login }
Is this correct? Is that the same URL that you used to connect the first time via Worx Home?
18. Of course not! The correct FQDN should be the one listed as PublicIP3 in your lab details page.
In addition, we need to find out where is this URL coming from. Remember that Worx Home behaves just like Citrix Receiver in terms of downloading the service record configuration for the store. This file has the extension of .CR but it is an XML file.
This XML file contains key information such as NetScaler Gateway display name, NetScaler Gateway URL, NetScaler Gateway logon type and beacon URL.
<?xml version="1.0" encoding="UTF-8"?><Services xmlns="http://www.citrix.com/ServiceRecord" xmlns:dssr="http://www.citrix.com/ServiceRecord" version="1.0">
<Service type="store"> <SRID>Random value</SRID> <Name>Store Name</Name> <Address>https://AppC FQDN/Citrix/Store/discovery</Address> <Gateways> <Gateway RewriteMode="NONE" Auth="Auth Mode" Edition="Enterprise" Default="true" Name="NS Name"> <Location>https://AG FQDN</Location> </Gateway> </Gateways> <Beacons> <Internal> <Beacon>https://AppC FQDN</Beacon> </Internal> </Beacons> </Service> </Services>
| 51 |
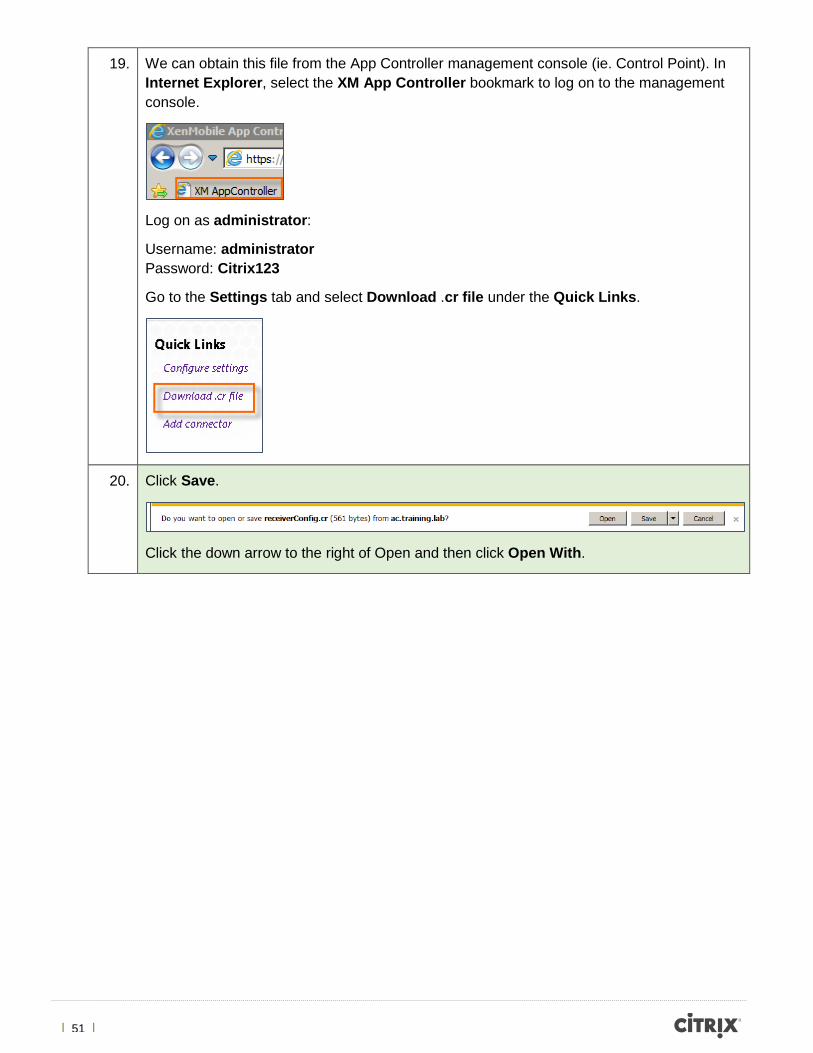
19. We can obtain this file from the App Controller management console (ie. Control Point). In Internet Explorer, select the XM App Controller bookmark to log on to the management console.
Log on as administrator:
Username: administrator Password: Citrix123
Go to the Settings tab and select Download .cr file under the Quick Links.
20. Click Save.
Click the down arrow to the right of Open and then click Open With.
| 52 |
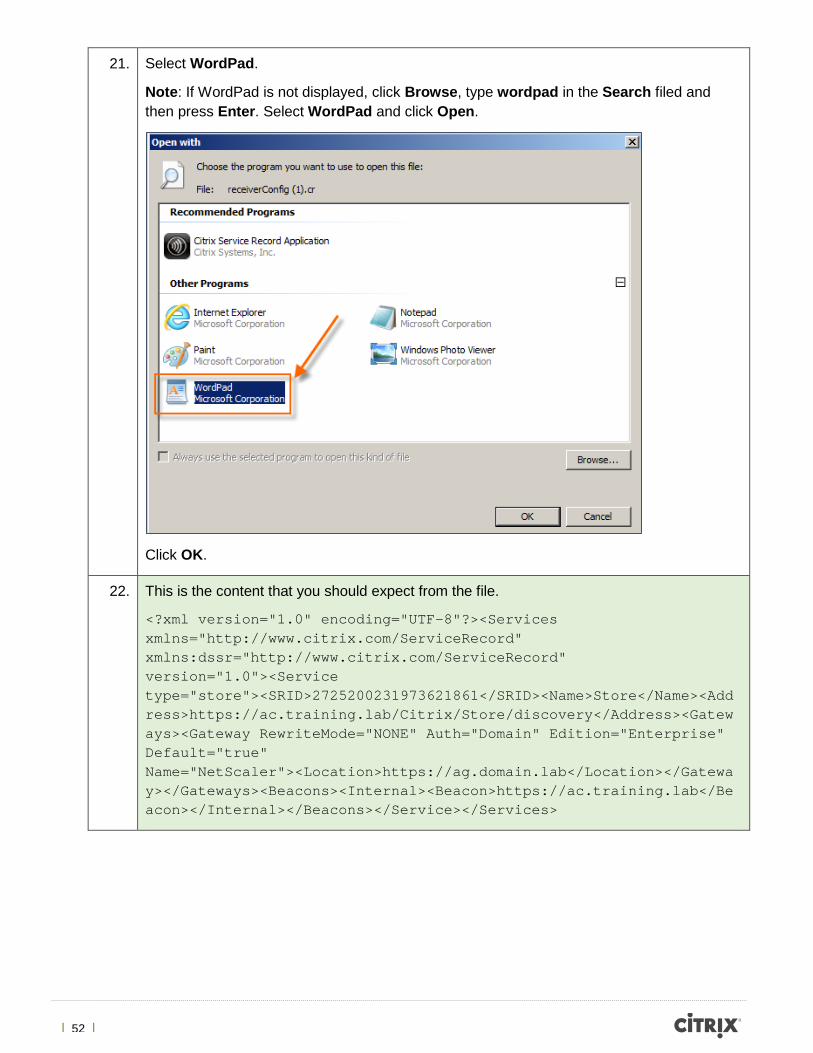
21. Select WordPad.
Note: If WordPad is not displayed, click Browse, type wordpad in the Search filed and then press Enter. Select WordPad and click Open.
Click OK.
22. This is the content that you should expect from the file.
<?xml version="1.0" encoding="UTF-8"?><Services xmlns="http://www.citrix.com/ServiceRecord" xmlns:dssr="http://www.citrix.com/ServiceRecord" version="1.0"><Service type="store"><SRID>2725200231973621861</SRID><Name>Store</Name><Address>https://ac.training.lab/Citrix/Store/discovery</Address><Gateways><Gateway RewriteMode="NONE" Auth="Domain" Edition="Enterprise" Default="true" Name="NetScaler"><Location>https://ag.domain.lab</Location></Gateway></Gateways><Beacons><Internal><Beacon>https://ac.training.lab</Beacon></Internal></Beacons></Service></Services>
| 53 |
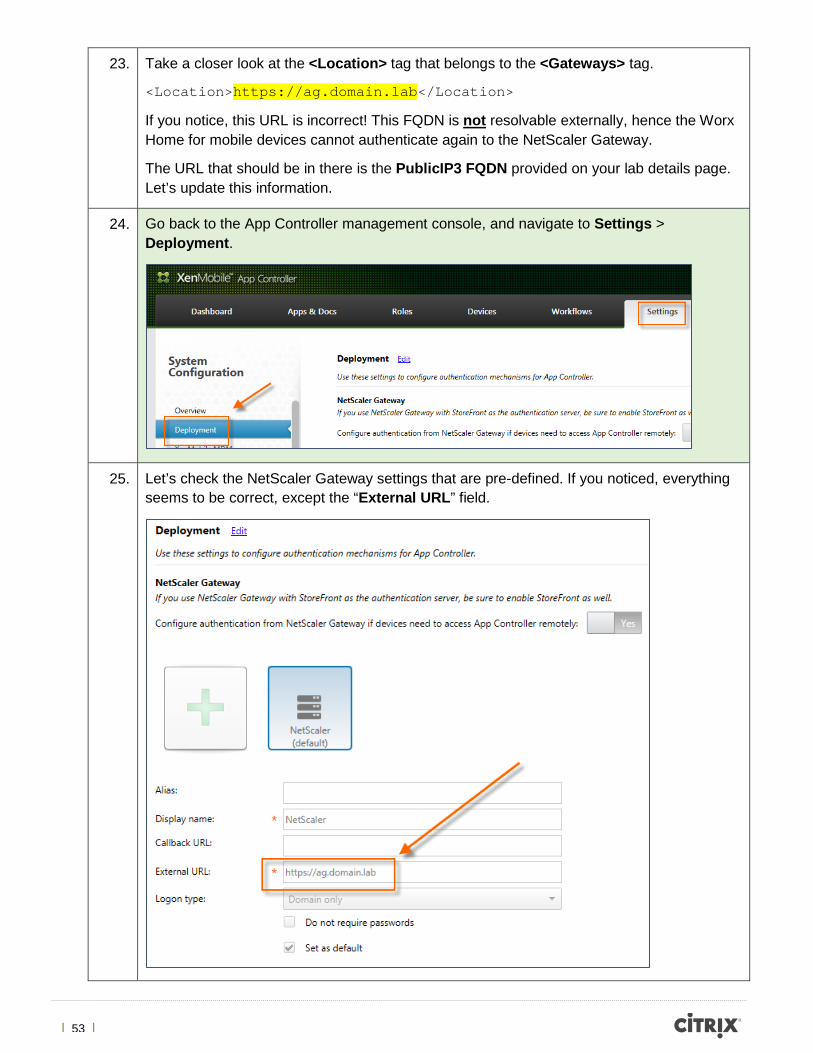
23. Take a closer look at the <Location> tag that belongs to the <Gateways> tag.
<Location>https://ag.domain.lab</Location>
If you notice, this URL is incorrect! This FQDN is not resolvable externally, hence the Worx Home for mobile devices cannot authenticate again to the NetScaler Gateway.
The URL that should be in there is the PublicIP3 FQDN provided on your lab details page. Let’s update this information.
24. Go back to the App Controller management console, and navigate to Settings > Deployment.
25. Let’s check the NetScaler Gateway settings that are pre-defined. If you noticed, everything seems to be correct, except the “External URL” field.
| 54 |
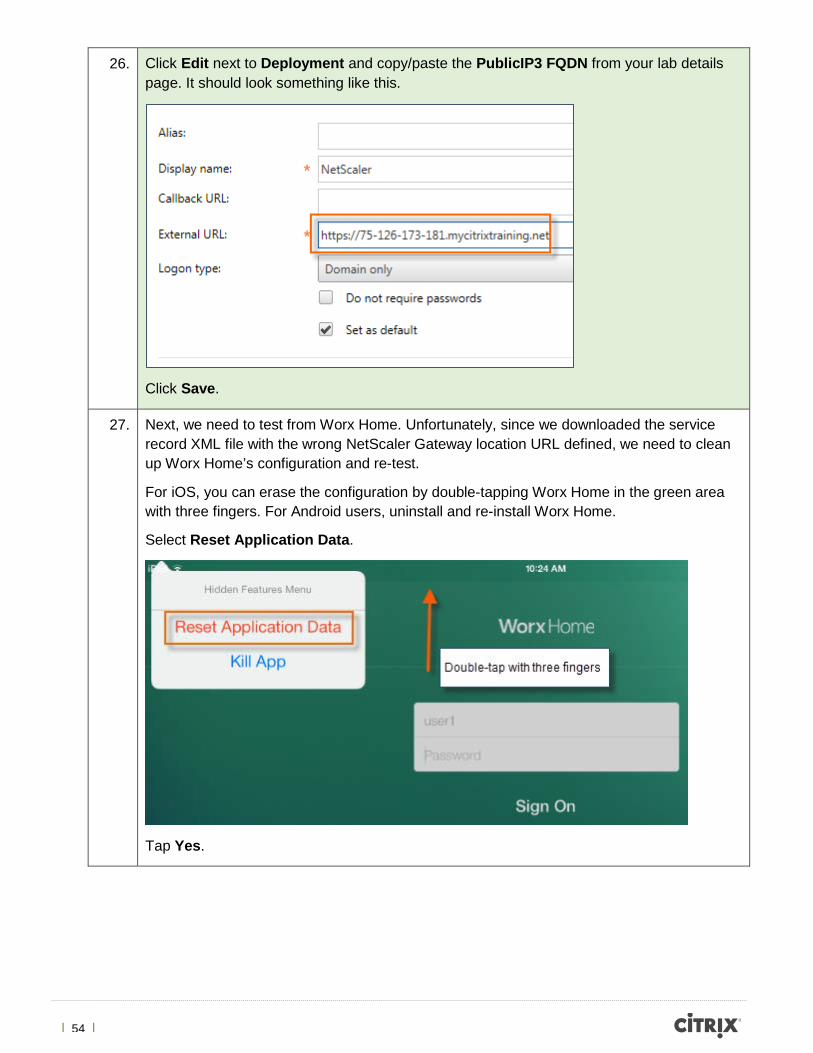
26. Click Edit next to Deployment and copy/paste the PublicIP3 FQDN from your lab details page. It should look something like this.
Click Save.
27. Next, we need to test from Worx Home. Unfortunately, since we downloaded the service record XML file with the wrong NetScaler Gateway location URL defined, we need to clean up Worx Home’s configuration and re-test.
For iOS, you can erase the configuration by double-tapping Worx Home in the green area with three fingers. For Android users, uninstall and re-install Worx Home.
Select Reset Application Data.
Tap Yes.

| 55 |
28. Double-tap on Worx Home with three fingers. Tap Kill App.
Tap Yes.
29. Tap Worx Home again. Now, you should be able to enter the PublicIP3 FQDN again.
Tap Next.
30. Enter User1 credentials.
Username: user1 Password: Citrix123
Tap Sign On.
| 56 |
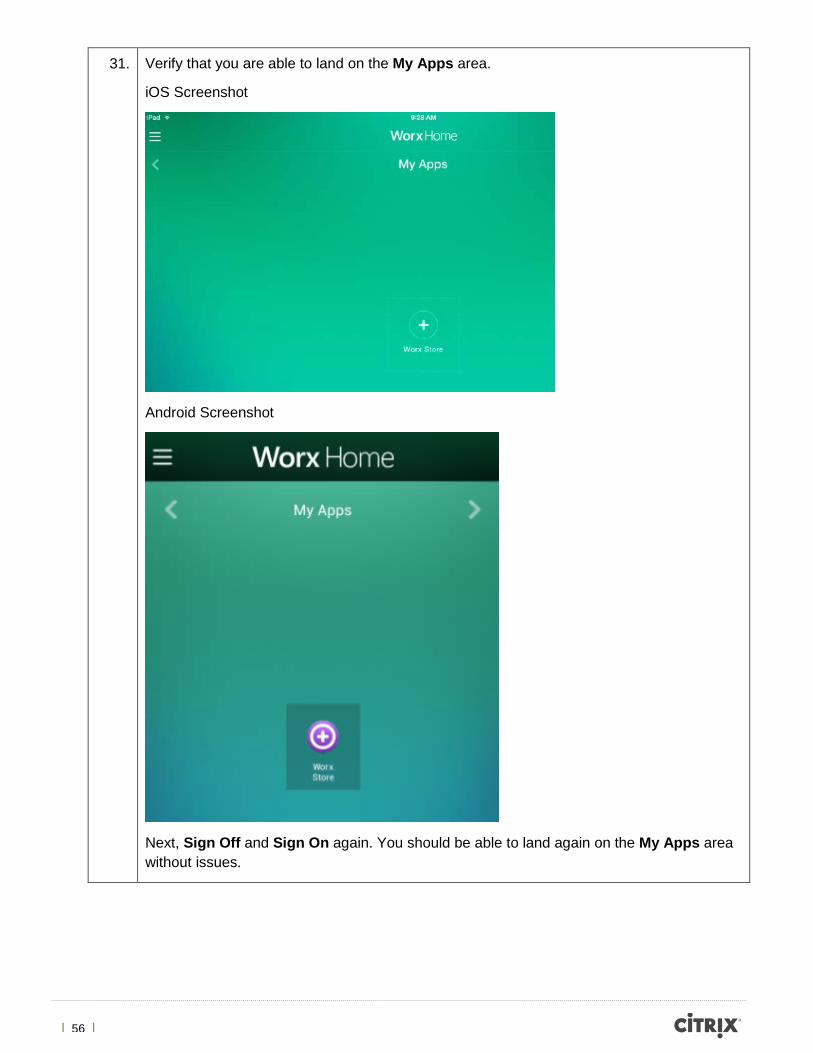
31. Verify that you are able to land on the My Apps area.
iOS Screenshot
Android Screenshot
Next, Sign Off and Sign On again. You should be able to land again on the My Apps area without issues.
| 57 |
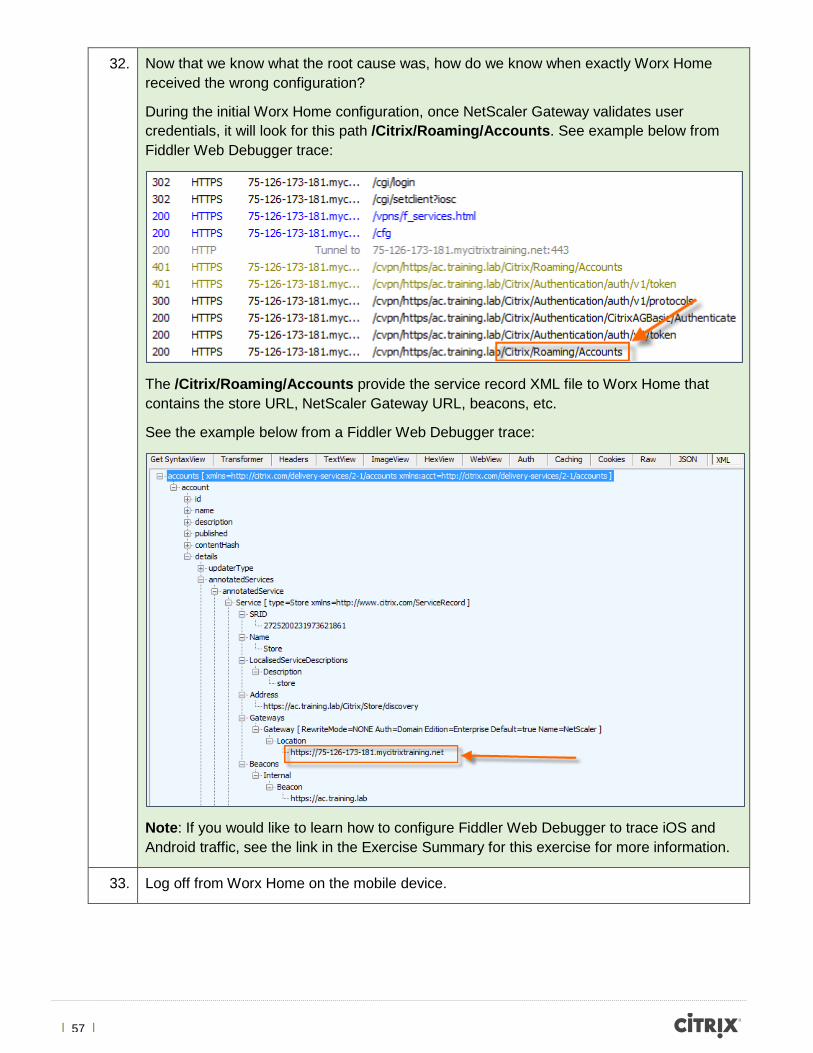
32. Now that we know what the root cause was, how do we know when exactly Worx Home received the wrong configuration?
During the initial Worx Home configuration, once NetScaler Gateway validates user credentials, it will look for this path /Citrix/Roaming/Accounts. See example below from Fiddler Web Debugger trace:
The /Citrix/Roaming/Accounts provide the service record XML file to Worx Home that contains the store URL, NetScaler Gateway URL, beacons, etc.
See the example below from a Fiddler Web Debugger trace:
Note: If you would like to learn how to configure Fiddler Web Debugger to trace iOS and Android traffic, see the link in the Exercise Summary for this exercise for more information.
33. Log off from Worx Home on the mobile device.
| 58 |
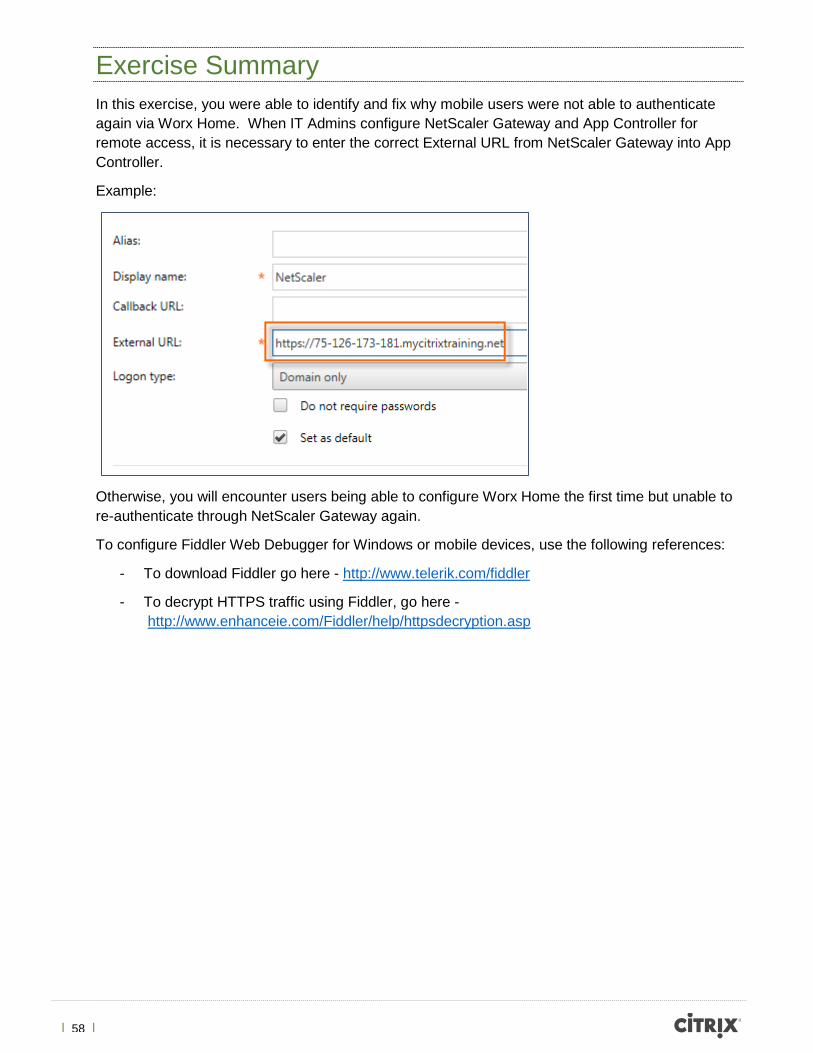
Exercise Summary In this exercise, you were able to identify and fix why mobile users were not able to authenticate again via Worx Home. When IT Admins configure NetScaler Gateway and App Controller for remote access, it is necessary to enter the correct External URL from NetScaler Gateway into App Controller.
Example:
Otherwise, you will encounter users being able to configure Worx Home the first time but unable to re-authenticate through NetScaler Gateway again.
To configure Fiddler Web Debugger for Windows or mobile devices, use the following references:
- To download Fiddler go here - http://www.telerik.com/fiddler
- To decrypt HTTPS traffic using Fiddler, go here - http://www.enhanceie.com/Fiddler/help/httpsdecryption.asp
| 59 |
Exercise 4 Unable to Access Mail via WorxMail on iOS Overview In this exercise, students will identify and fix why they cannot access mail via WorxMail for iOS. Please note if you have an Android device, go to Exercise #5.
During this part of the rollout, the IT Admin configured App Controller and WorxMail to use the Secure Ticket Authority (STA) feature in order to save battery life on mobile devices. The goal is to allow remote mobile users to launch WorxMail and be able to access mail from Exchange. There is no XenMobile Device Manager involved in this scenario.
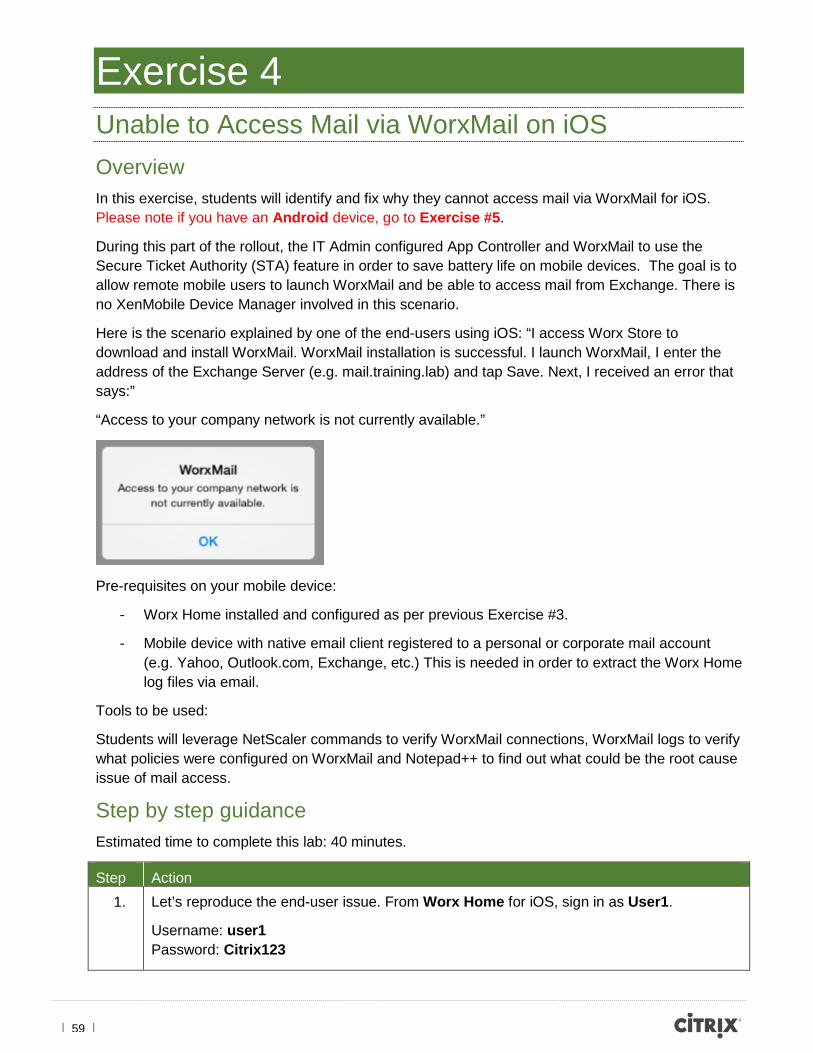
Here is the scenario explained by one of the end-users using iOS: “I access Worx Store to download and install WorxMail. WorxMail installation is successful. I launch WorxMail, I enter the address of the Exchange Server (e.g. mail.training.lab) and tap Save. Next, I received an error that says:”
“Access to your company network is not currently available.”
Pre-requisites on your mobile device:
- Worx Home installed and configured as per previous Exercise #3.
- Mobile device with native email client registered to a personal or corporate mail account (e.g. Yahoo, Outlook.com, Exchange, etc.) This is needed in order to extract the Worx Home log files via email.
Tools to be used:
Students will leverage NetScaler commands to verify WorxMail connections, WorxMail logs to verify what policies were configured on WorxMail and Notepad++ to find out what could be the root cause issue of mail access.
Step by step guidance Estimated time to complete this lab: 40 minutes.
Step Action 1. Let’s reproduce the end-user issue. From Worx Home for iOS, sign in as User1.
Username: user1 Password: Citrix123
| 60 |
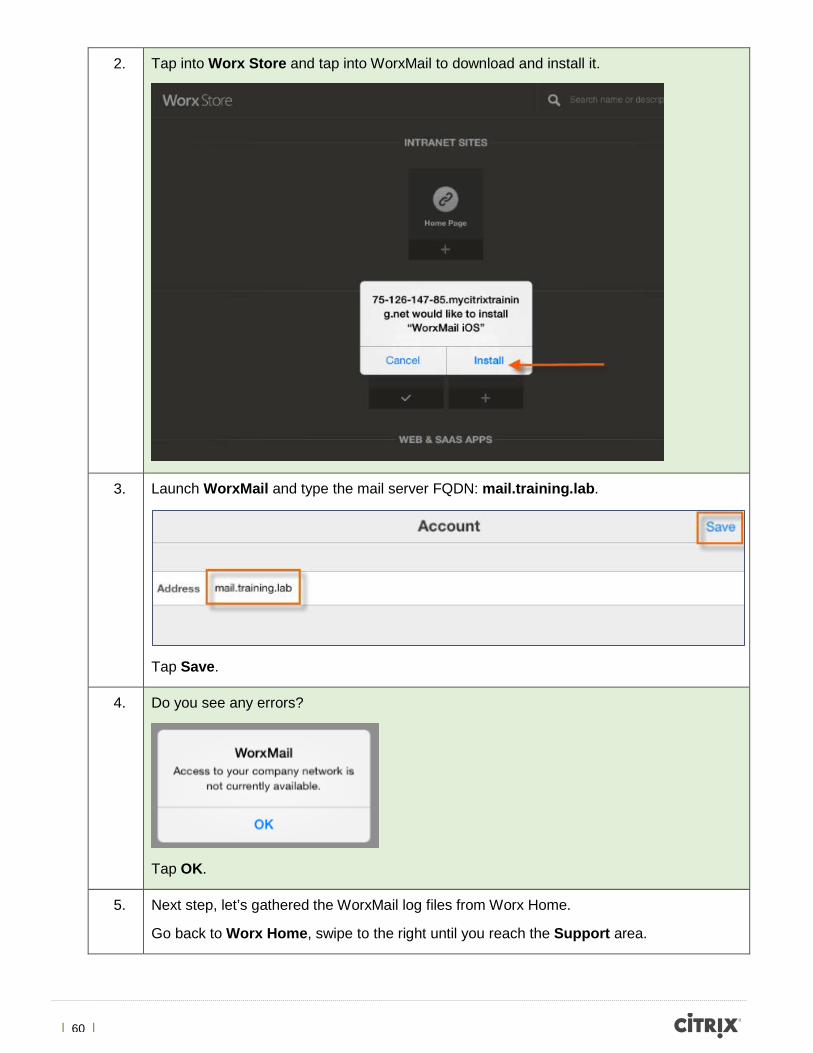
2. Tap into Worx Store and tap into WorxMail to download and install it.
3. Launch WorxMail and type the mail server FQDN: mail.training.lab.
Tap Save.
4. Do you see any errors?
Tap OK.
5. Next step, let’s gathered the WorxMail log files from Worx Home.
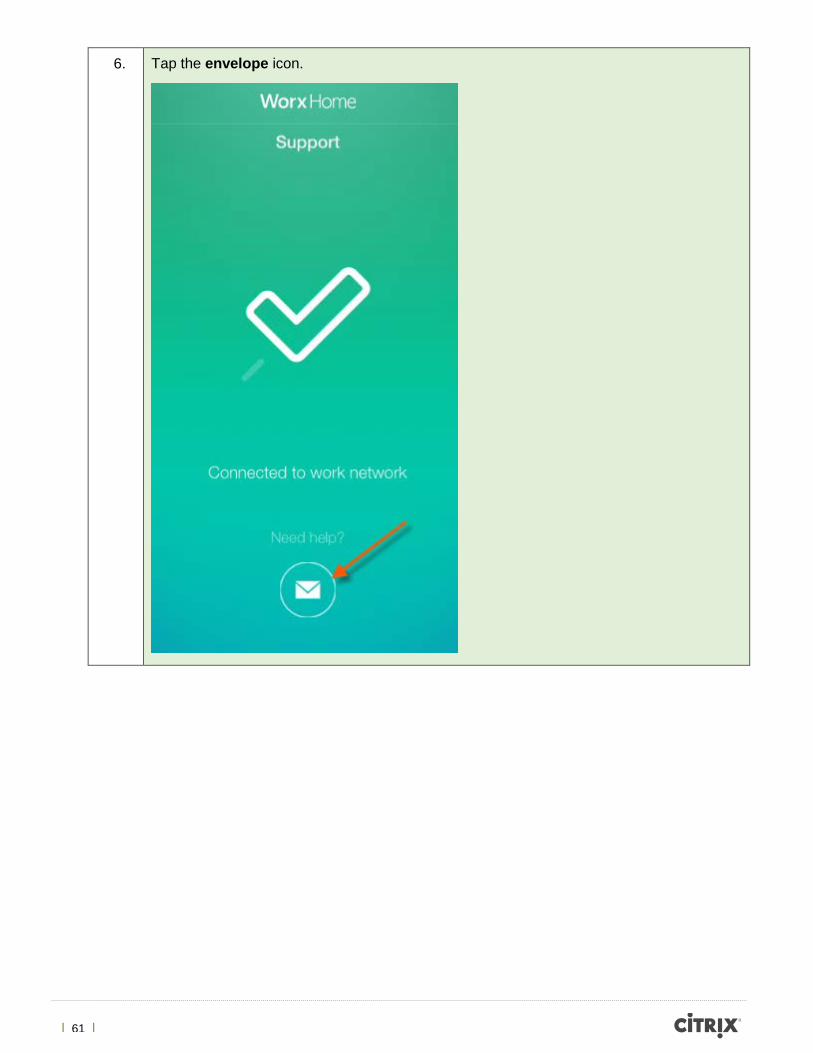
Go back to Worx Home, swipe to the right until you reach the Support area.
| 61 |
6. Tap the envelope icon.
| 62 |
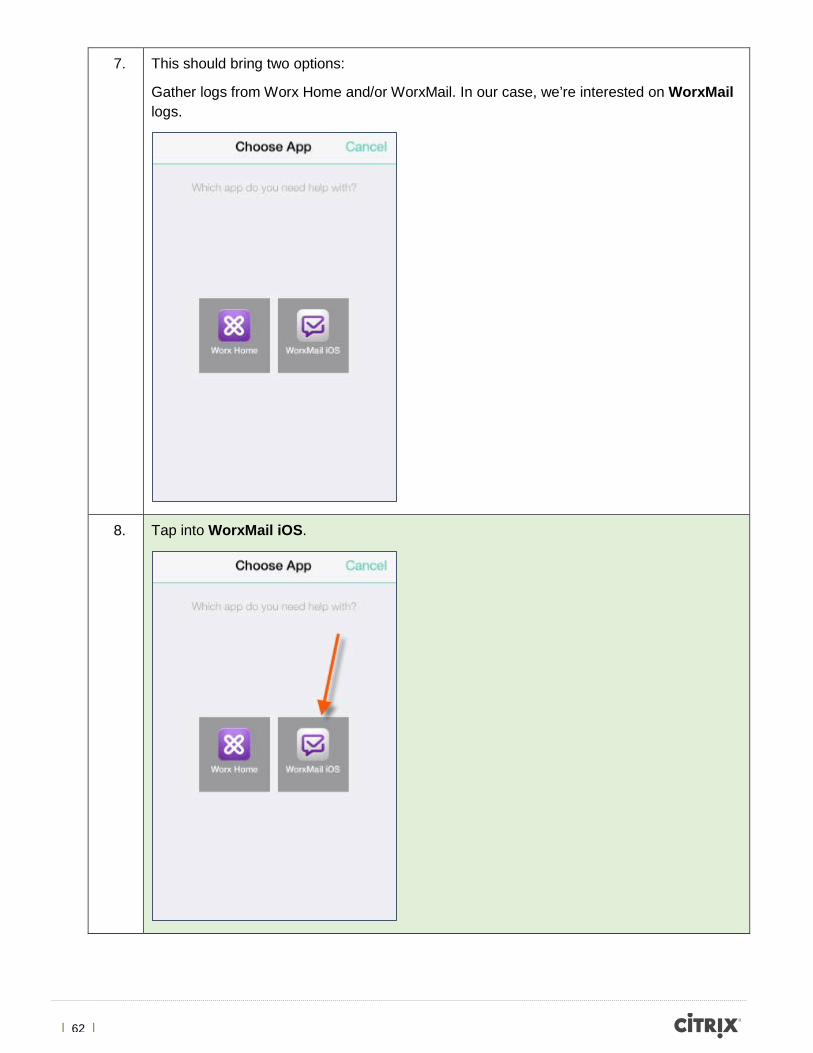
7. This should bring two options:
Gather logs from Worx Home and/or WorxMail. In our case, we’re interested on WorxMail logs.
8. Tap into WorxMail iOS.
| 63 |
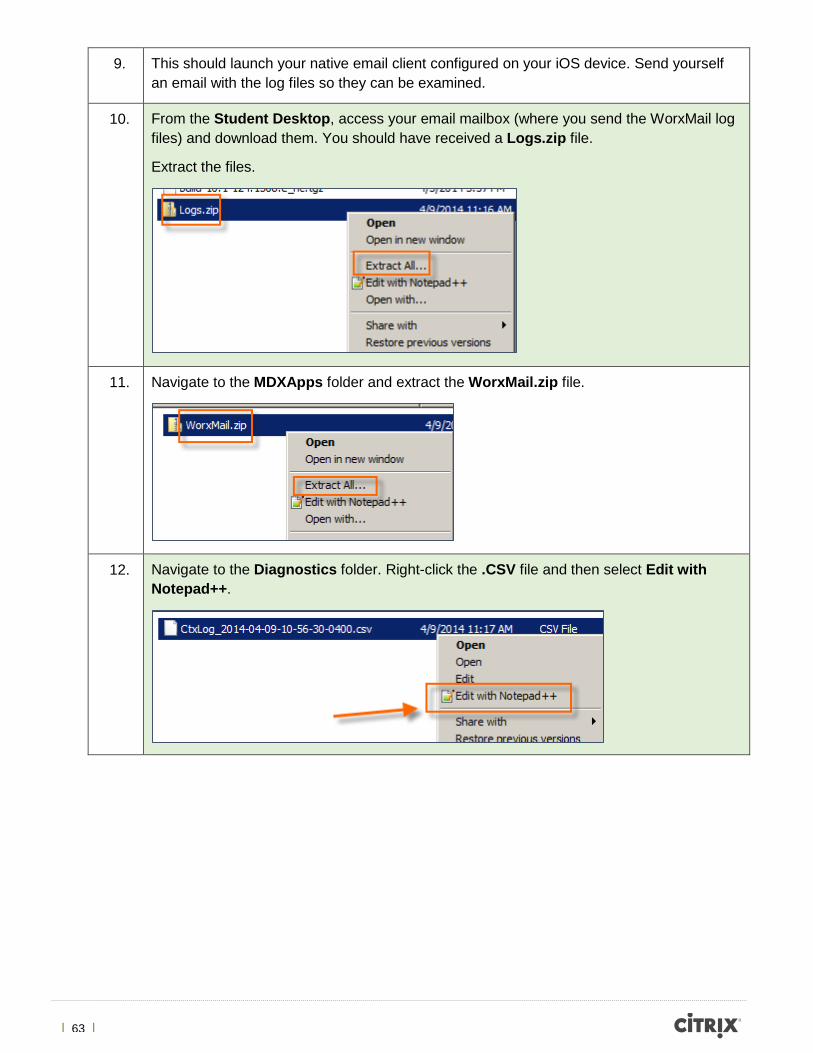
9. This should launch your native email client configured on your iOS device. Send yourself an email with the log files so they can be examined.
10. From the Student Desktop, access your email mailbox (where you send the WorxMail log files) and download them. You should have received a Logs.zip file.
Extract the files.
11. Navigate to the MDXApps folder and extract the WorxMail.zip file.
12. Navigate to the Diagnostics folder. Right-click the .CSV file and then select Edit with Notepad++.
| 64 |
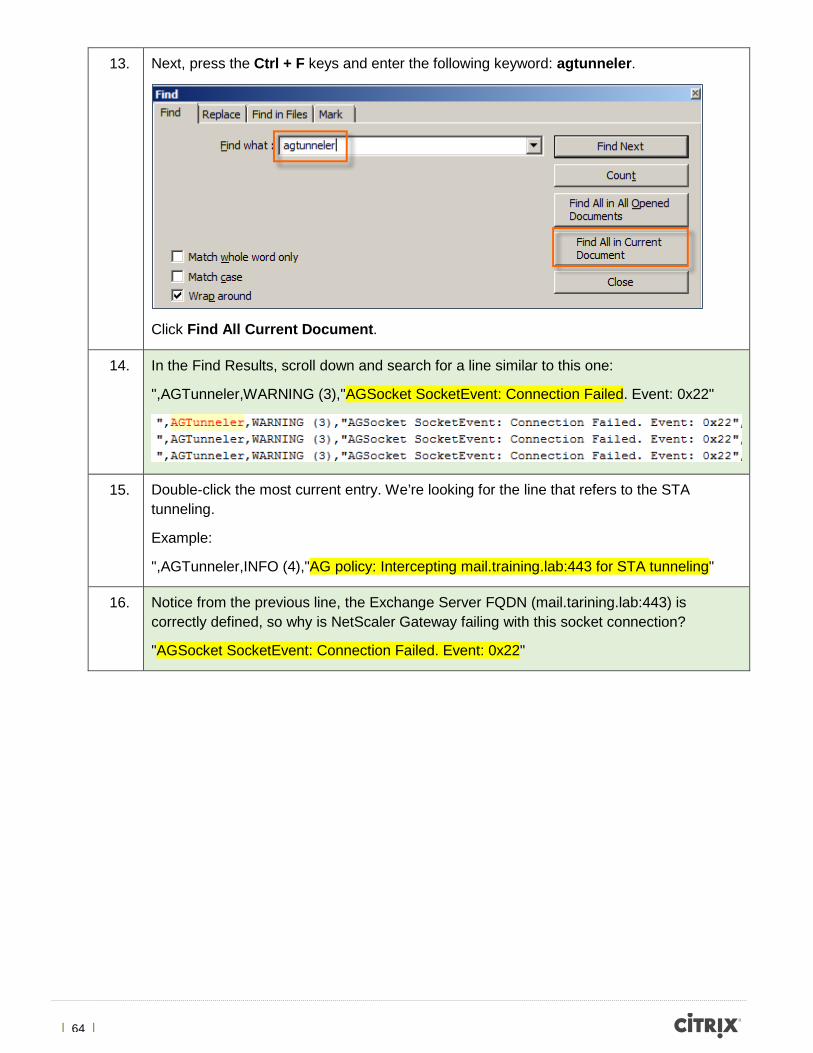
13. Next, press the Ctrl + F keys and enter the following keyword: agtunneler.
Click Find All Current Document.
14. In the Find Results, scroll down and search for a line similar to this one:
",AGTunneler,WARNING (3),"AGSocket SocketEvent: Connection Failed. Event: 0x22"
15. Double-click the most current entry. We’re looking for the line that refers to the STA tunneling.
Example:
",AGTunneler,INFO (4),"AG policy: Intercepting mail.training.lab:443 for STA tunneling"
16. Notice from the previous line, the Exchange Server FQDN (mail.tarining.lab:443) is correctly defined, so why is NetScaler Gateway failing with this socket connection?
"AGSocket SocketEvent: Connection Failed. Event: 0x22"
| 65 |
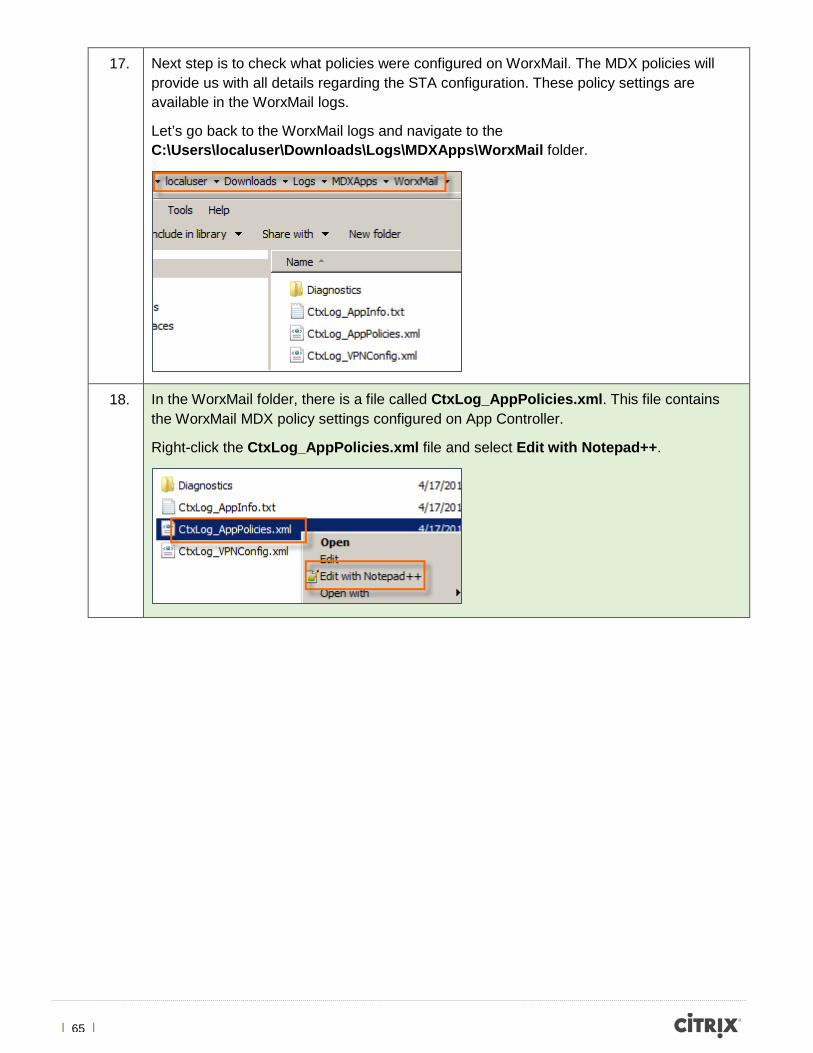
17. Next step is to check what policies were configured on WorxMail. The MDX policies will provide us with all details regarding the STA configuration. These policy settings are available in the WorxMail logs.
Let’s go back to the WorxMail logs and navigate to the C:\Users\localuser\Downloads\Logs\MDXApps\WorxMail folder.
18. In the WorxMail folder, there is a file called CtxLog_AppPolicies.xml. This file contains the WorxMail MDX policy settings configured on App Controller.
Right-click the CtxLog_AppPolicies.xml file and select Edit with Notepad++.
| 66 |
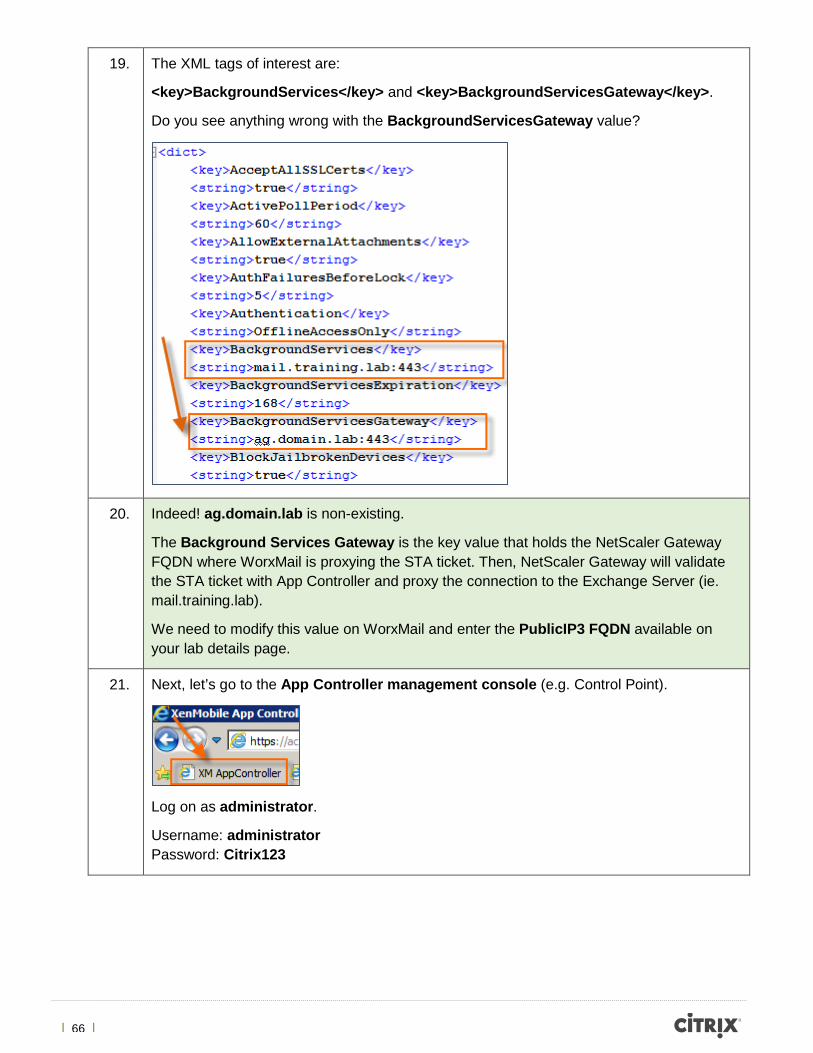
19. The XML tags of interest are:
<key>BackgroundServices</key> and <key>BackgroundServicesGateway</key>.
Do you see anything wrong with the BackgroundServicesGateway value?
20. Indeed! ag.domain.lab is non-existing.
The Background Services Gateway is the key value that holds the NetScaler Gateway FQDN where WorxMail is proxying the STA ticket. Then, NetScaler Gateway will validate the STA ticket with App Controller and proxy the connection to the Exchange Server (ie. mail.training.lab).
We need to modify this value on WorxMail and enter the PublicIP3 FQDN available on your lab details page.
21. Next, let’s go to the App Controller management console (e.g. Control Point).
Log on as administrator.
Username: administrator Password: Citrix123
| 67 |
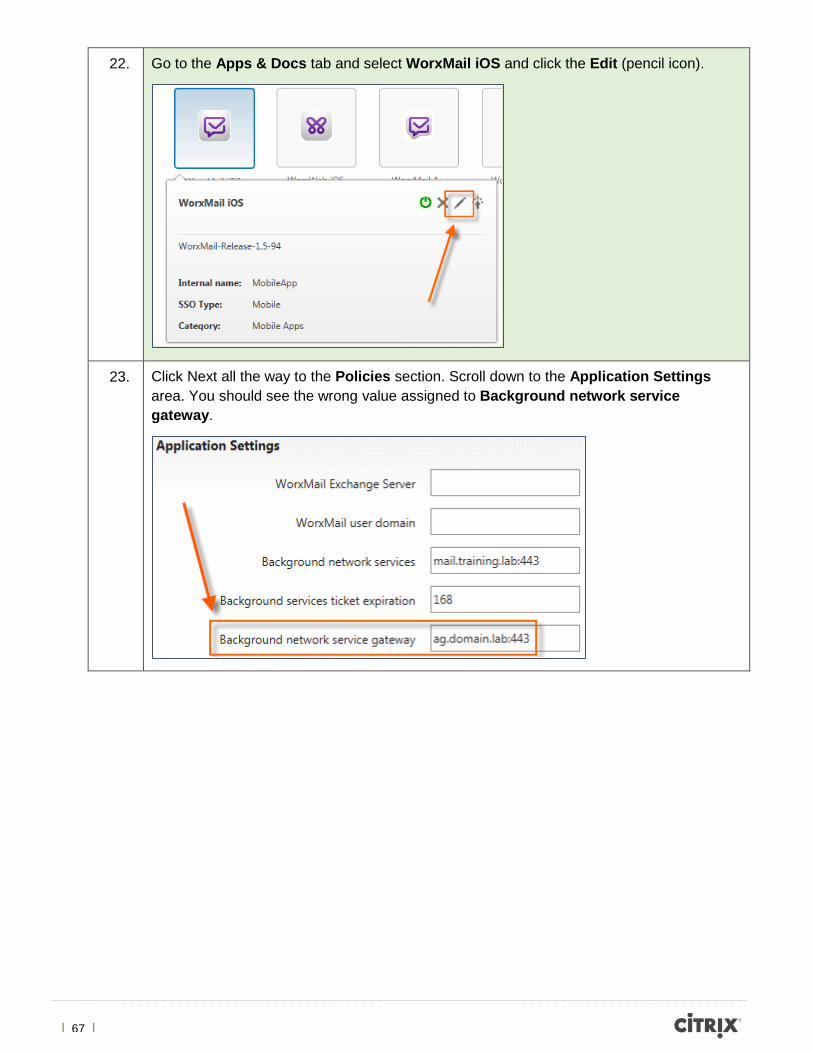
22. Go to the Apps & Docs tab and select WorxMail iOS and click the Edit (pencil icon).
23. Click Next all the way to the Policies section. Scroll down to the Application Settings area. You should see the wrong value assigned to Background network service gateway.
| 68 |
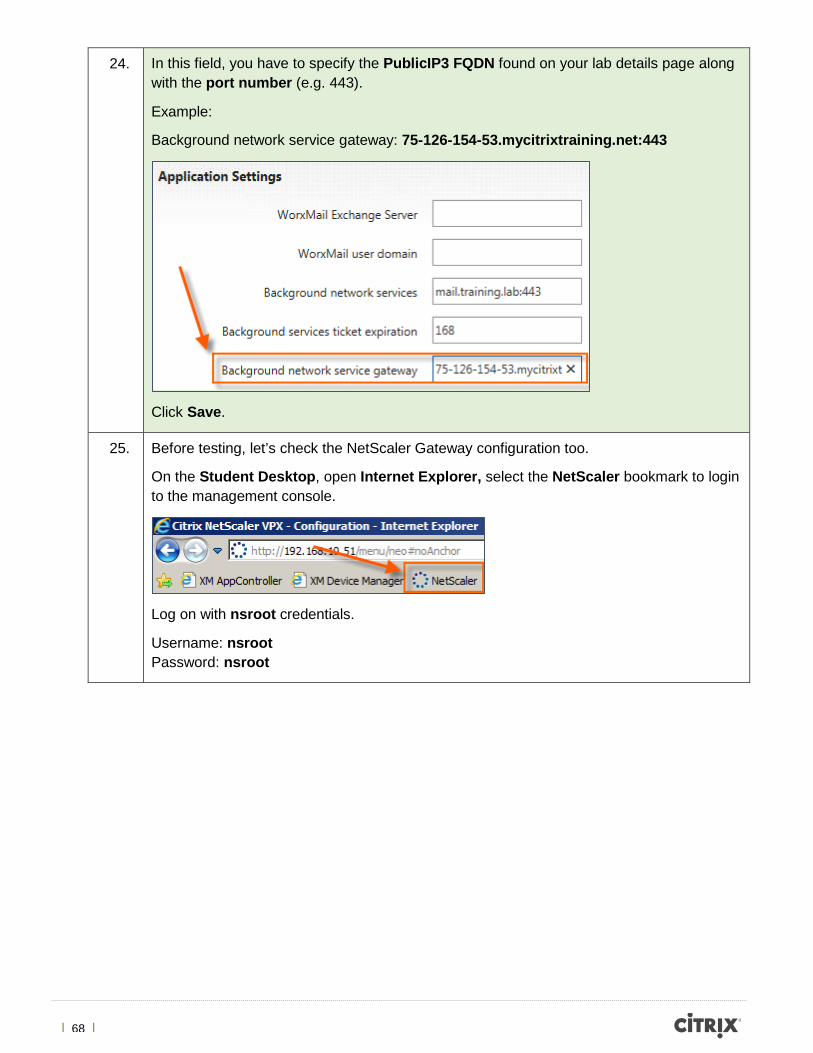
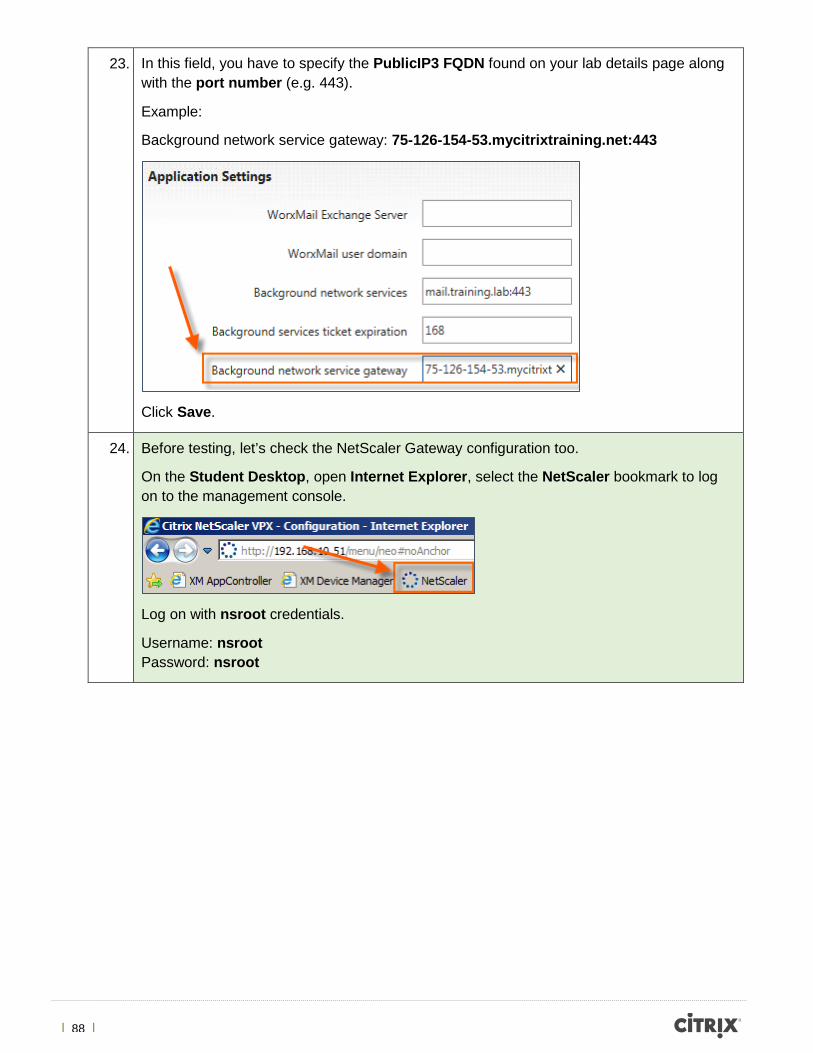
24. In this field, you have to specify the PublicIP3 FQDN found on your lab details page along with the port number (e.g. 443).
Example:
Background network service gateway: 75-126-154-53.mycitrixtraining.net:443
Click Save.
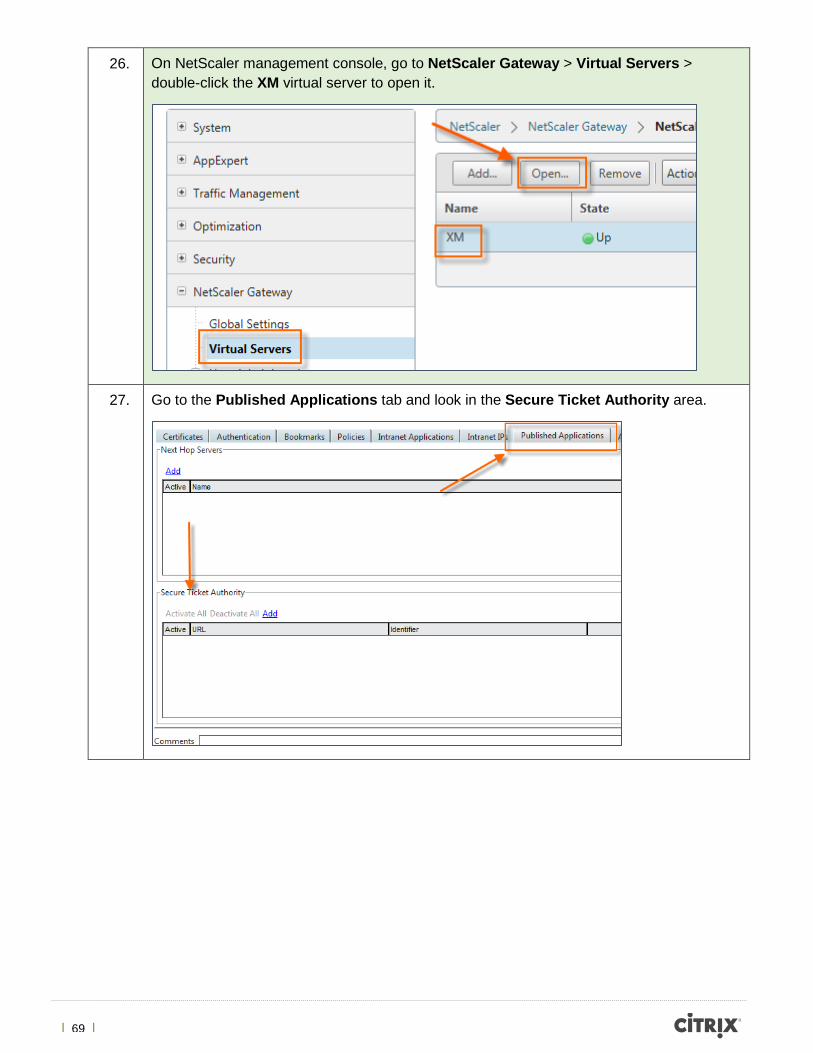
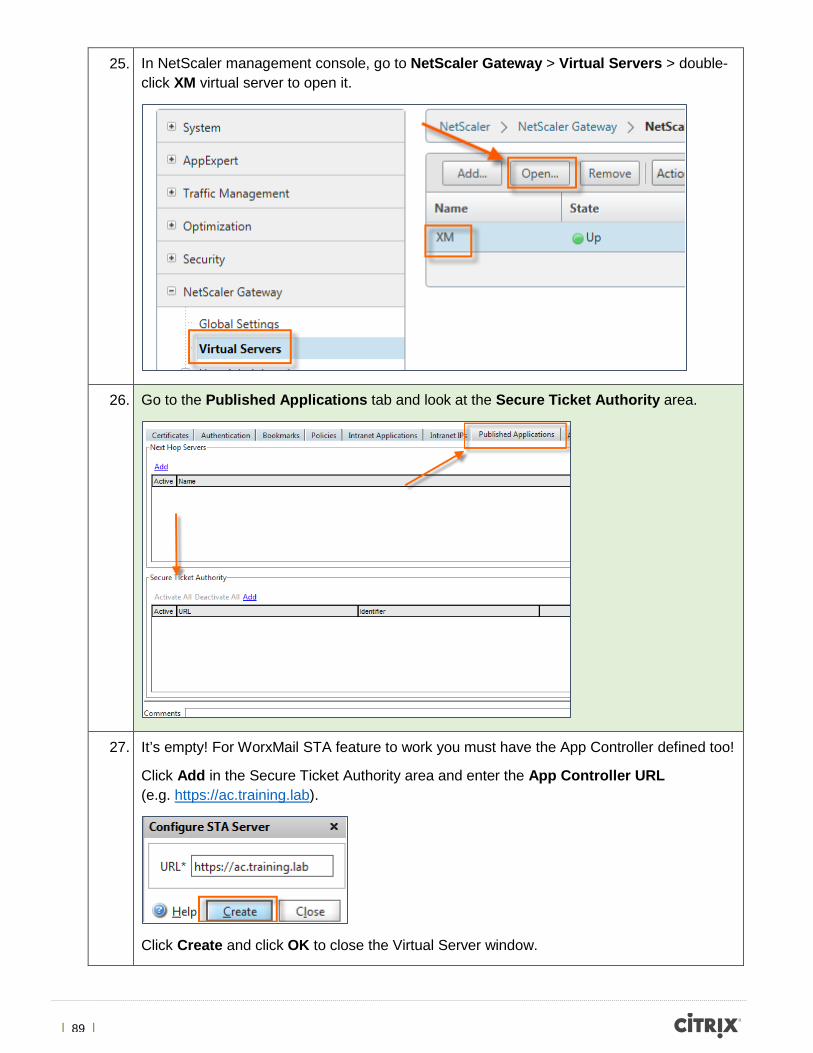
25. Before testing, let’s check the NetScaler Gateway configuration too.
On the Student Desktop, open Internet Explorer, select the NetScaler bookmark to login to the management console.
Log on with nsroot credentials.
Username: nsroot Password: nsroot
| 69 |
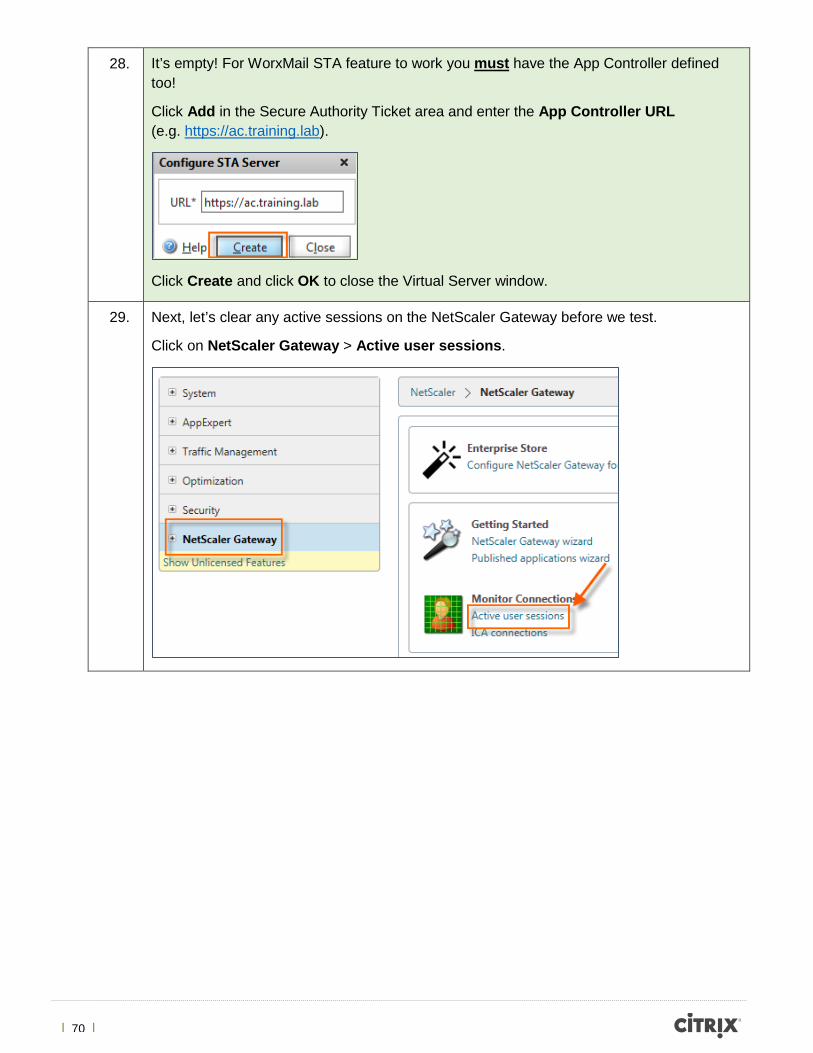
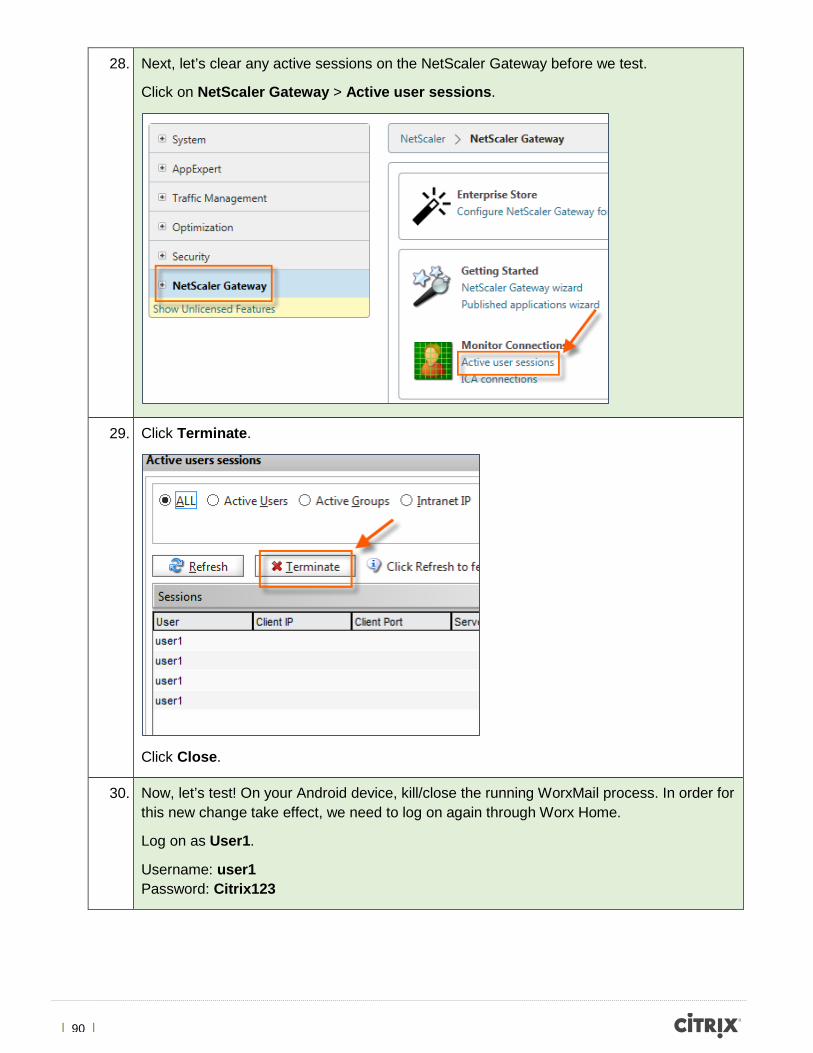
26. On NetScaler management console, go to NetScaler Gateway > Virtual Servers > double-click the XM virtual server to open it.
27. Go to the Published Applications tab and look in the Secure Ticket Authority area.
| 70 |
28. It’s empty! For WorxMail STA feature to work you must have the App Controller defined too!
Click Add in the Secure Authority Ticket area and enter the App Controller URL (e.g. https://ac.training.lab).
Click Create and click OK to close the Virtual Server window.
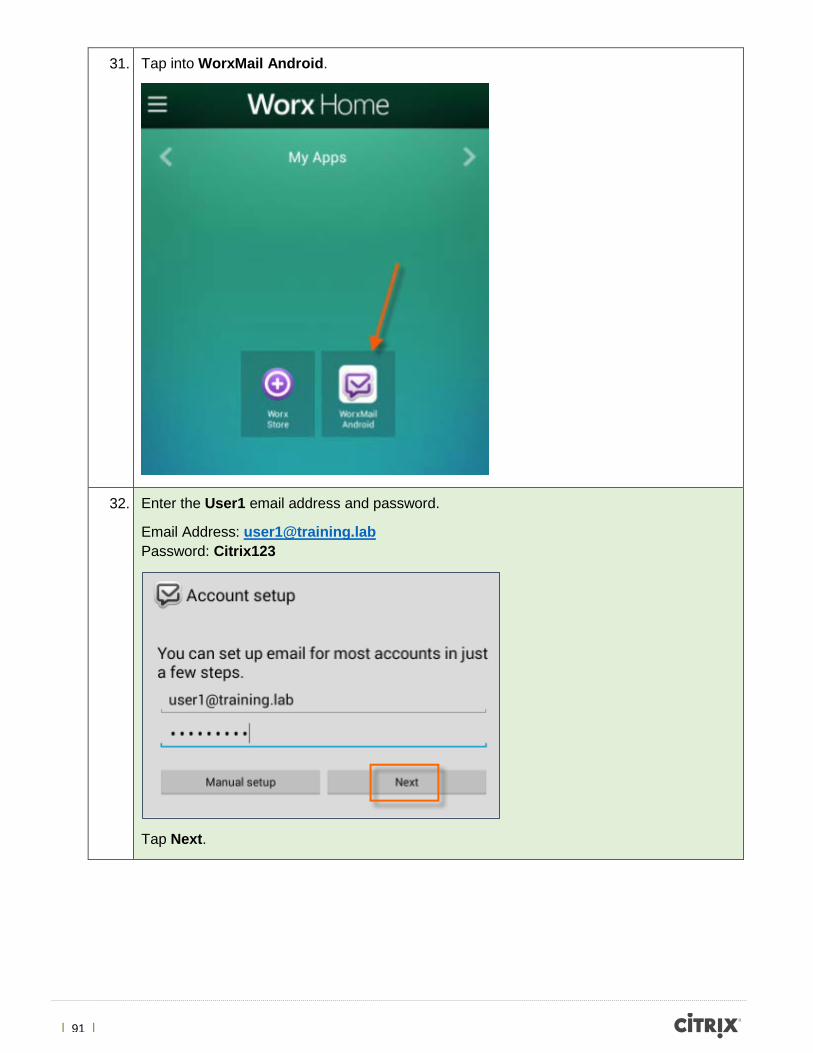
29. Next, let’s clear any active sessions on the NetScaler Gateway before we test.
Click on NetScaler Gateway > Active user sessions.
| 71 |
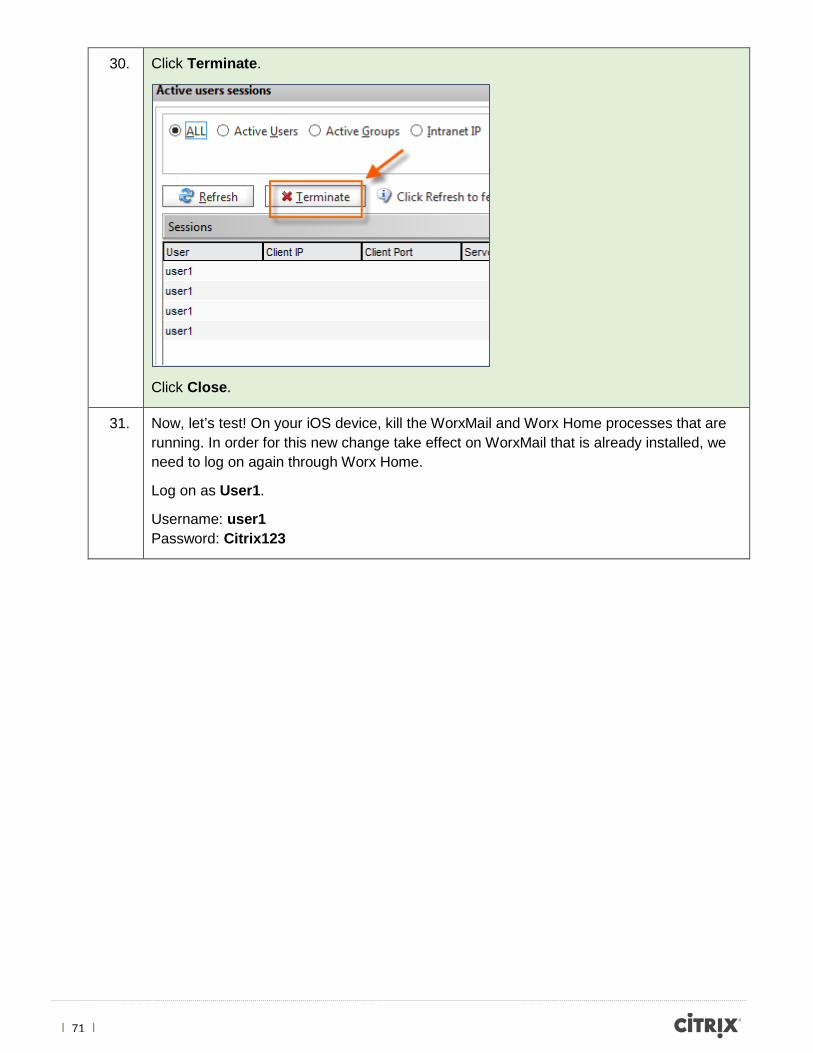
30. Click Terminate.
Click Close.
31. Now, let’s test! On your iOS device, kill the WorxMail and Worx Home processes that are running. In order for this new change take effect on WorxMail that is already installed, we need to log on again through Worx Home.
Log on as User1.
Username: user1 Password: Citrix123
| 72 |
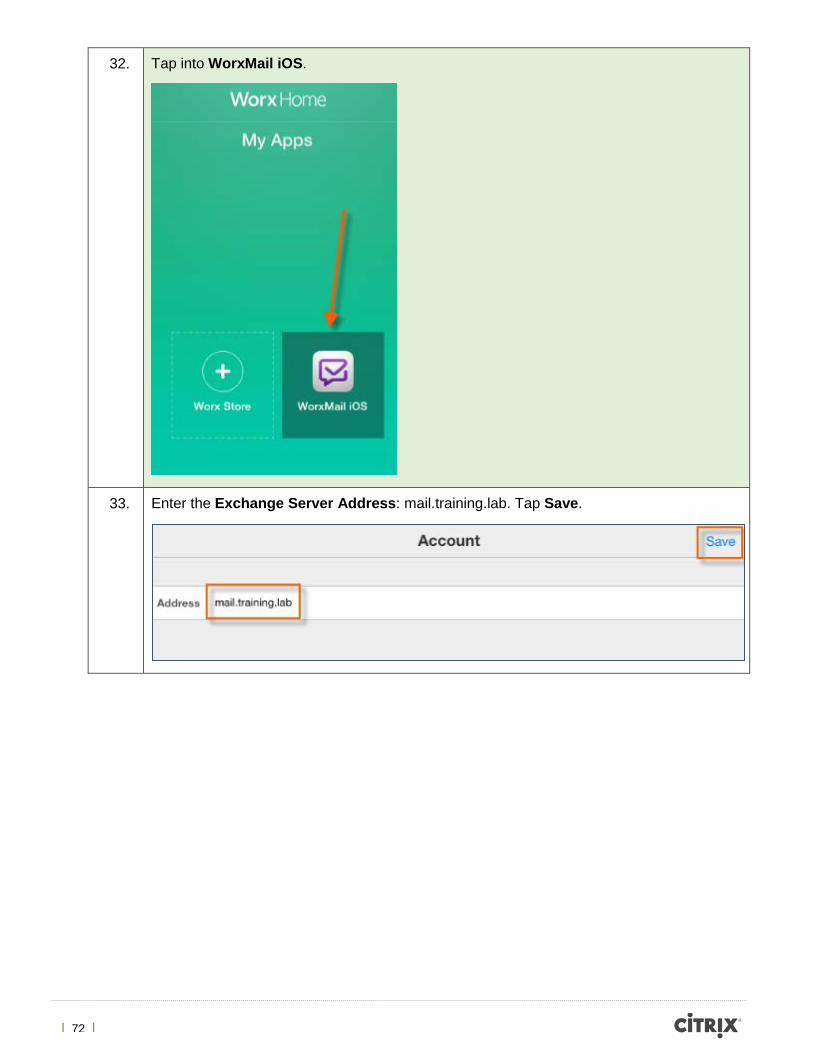
32. Tap into WorxMail iOS.
33. Enter the Exchange Server Address: mail.training.lab. Tap Save.
| 73 |
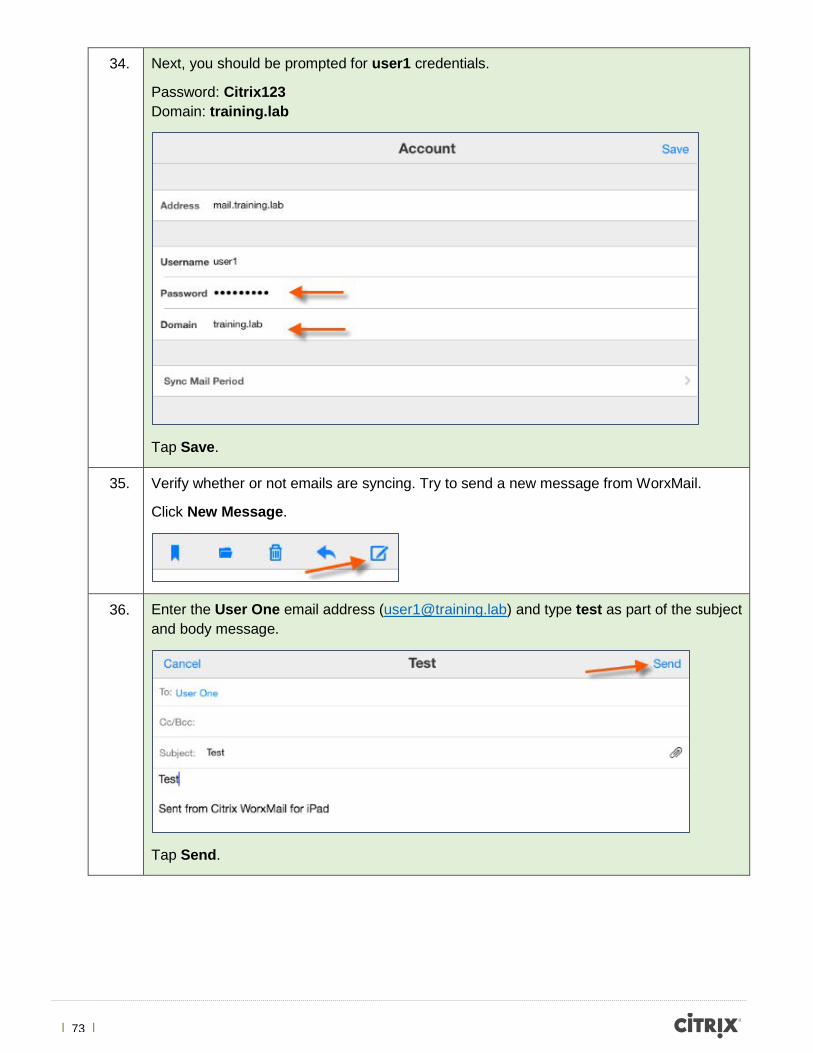
34. Next, you should be prompted for user1 credentials.
Password: Citrix123 Domain: training.lab
Tap Save.
35. Verify whether or not emails are syncing. Try to send a new message from WorxMail.
Click New Message.
36. Enter the User One email address ([email protected]) and type test as part of the subject and body message.
Tap Send.
| 74 |
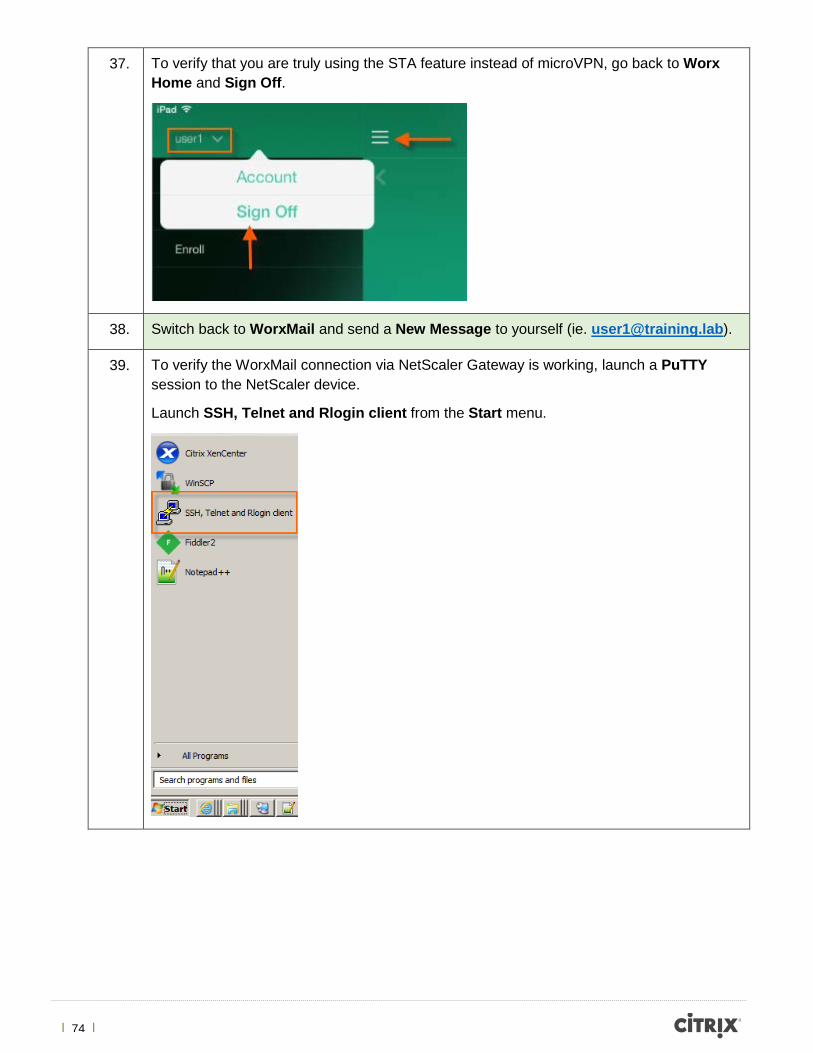
37. To verify that you are truly using the STA feature instead of microVPN, go back to Worx Home and Sign Off.
38. Switch back to WorxMail and send a New Message to yourself (ie. [email protected]).
39. To verify the WorxMail connection via NetScaler Gateway is working, launch a PuTTY session to the NetScaler device.
Launch SSH, Telnet and Rlogin client from the Start menu.
| 75 |
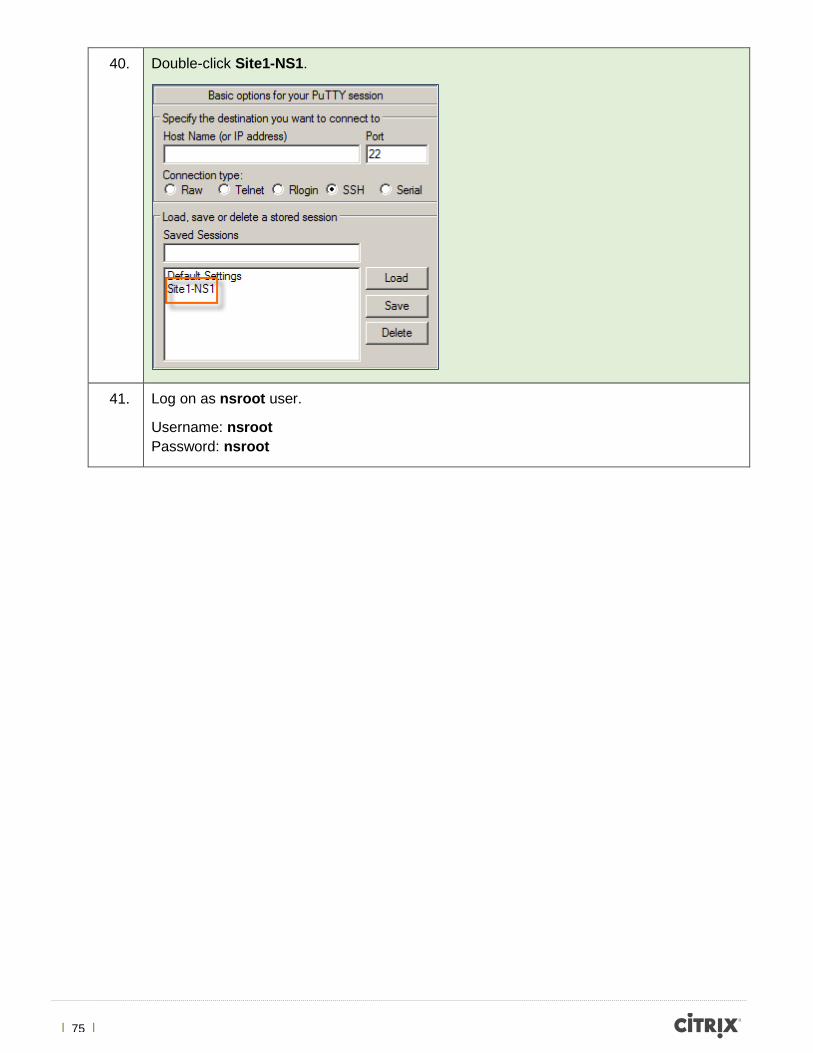
40. Double-click Site1-NS1.
41. Log on as nsroot user.
Username: nsroot Password: nsroot
| 76 |
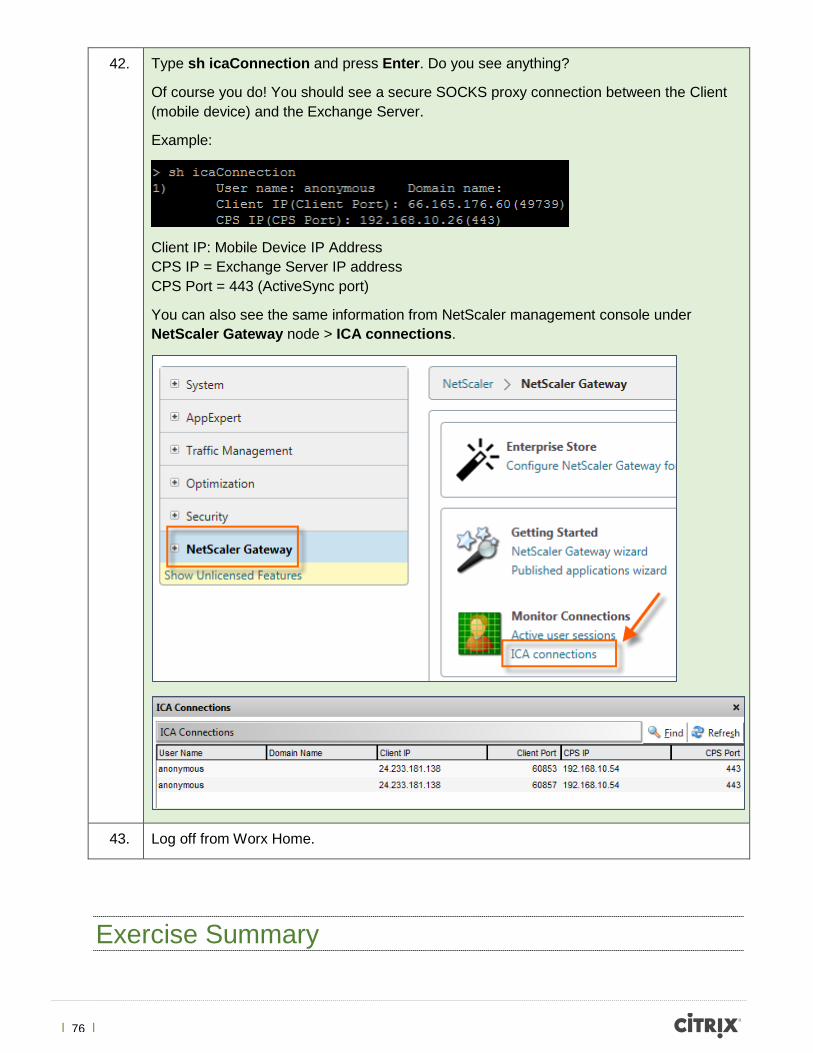
42. Type sh icaConnection and press Enter. Do you see anything?
Of course you do! You should see a secure SOCKS proxy connection between the Client (mobile device) and the Exchange Server.
Example:
Client IP: Mobile Device IP Address CPS IP = Exchange Server IP address CPS Port = 443 (ActiveSync port)
You can also see the same information from NetScaler management console under NetScaler Gateway node > ICA connections.
43. Log off from Worx Home.
Exercise Summary
| 77 |
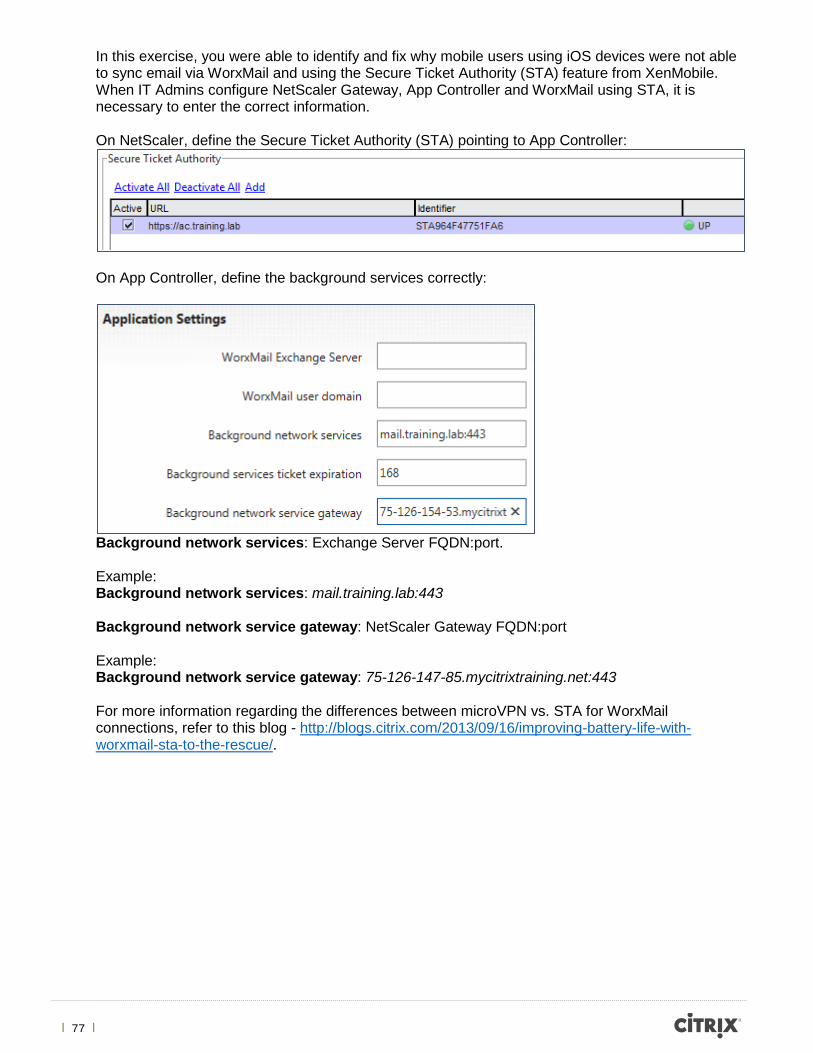
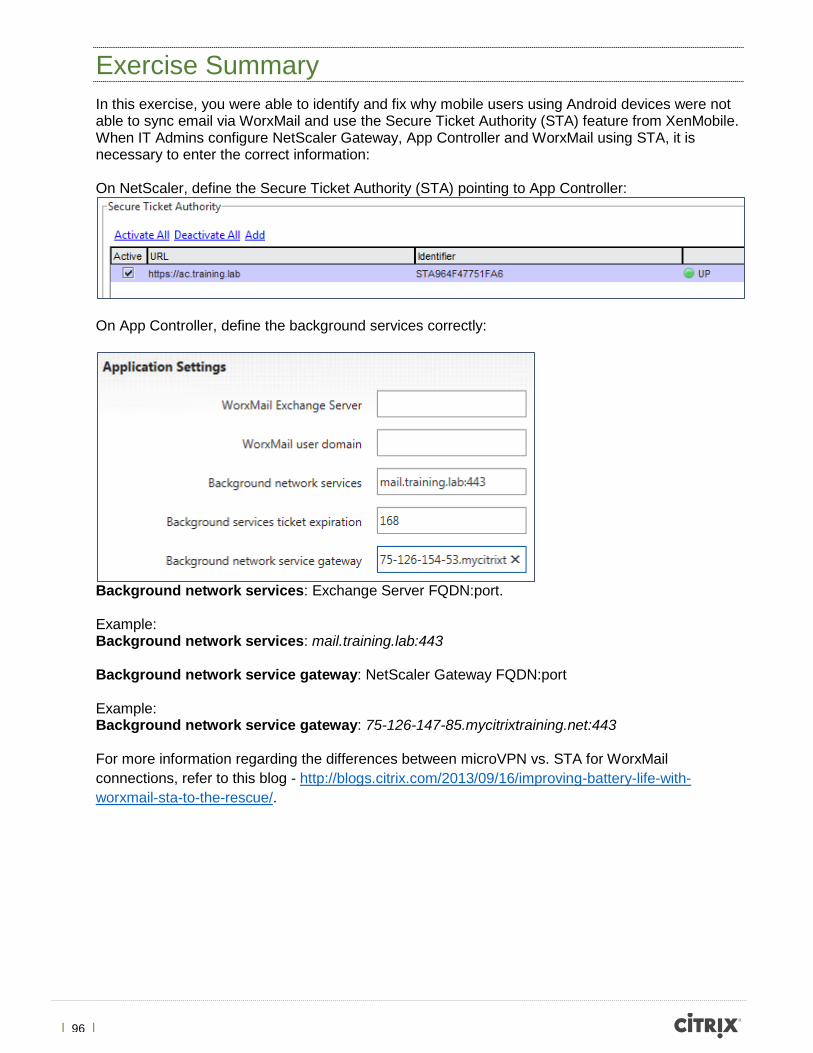
In this exercise, you were able to identify and fix why mobile users using iOS devices were not able to sync email via WorxMail and using the Secure Ticket Authority (STA) feature from XenMobile. When IT Admins configure NetScaler Gateway, App Controller and WorxMail using STA, it is necessary to enter the correct information. On NetScaler, define the Secure Ticket Authority (STA) pointing to App Controller:
On App Controller, define the background services correctly:
Background network services: Exchange Server FQDN:port. Example: Background network services: mail.training.lab:443 Background network service gateway: NetScaler Gateway FQDN:port Example: Background network service gateway: 75-126-147-85.mycitrixtraining.net:443 For more information regarding the differences between microVPN vs. STA for WorxMail connections, refer to this blog - http://blogs.citrix.com/2013/09/16/improving-battery-life-with-worxmail-sta-to-the-rescue/.
| 78 |
Exercise 5 Unable to Access Mail via WorxMail on Android Overview In this exercise students will identify and fix why they cannot access mail via WorxMail for Android.
During this part of the rollout, the IT Admin configured App Controller and WorxMail to use the Secure Ticket Authority (STA) feature in order to save battery life on mobile devices. The goal is to allow remote mobile users to launch WorxMail and be able to access mail from Exchange. There is no XenMobile Device Manager involved in this scenario.
Here is the scenario explained by one of the end-users using Android: “I access Worx Store to download and install WorxMail. WorxMail installation is successful. I launch WorxMail, I enter my email address and password. Tap Save. Next, I received an error that says:”
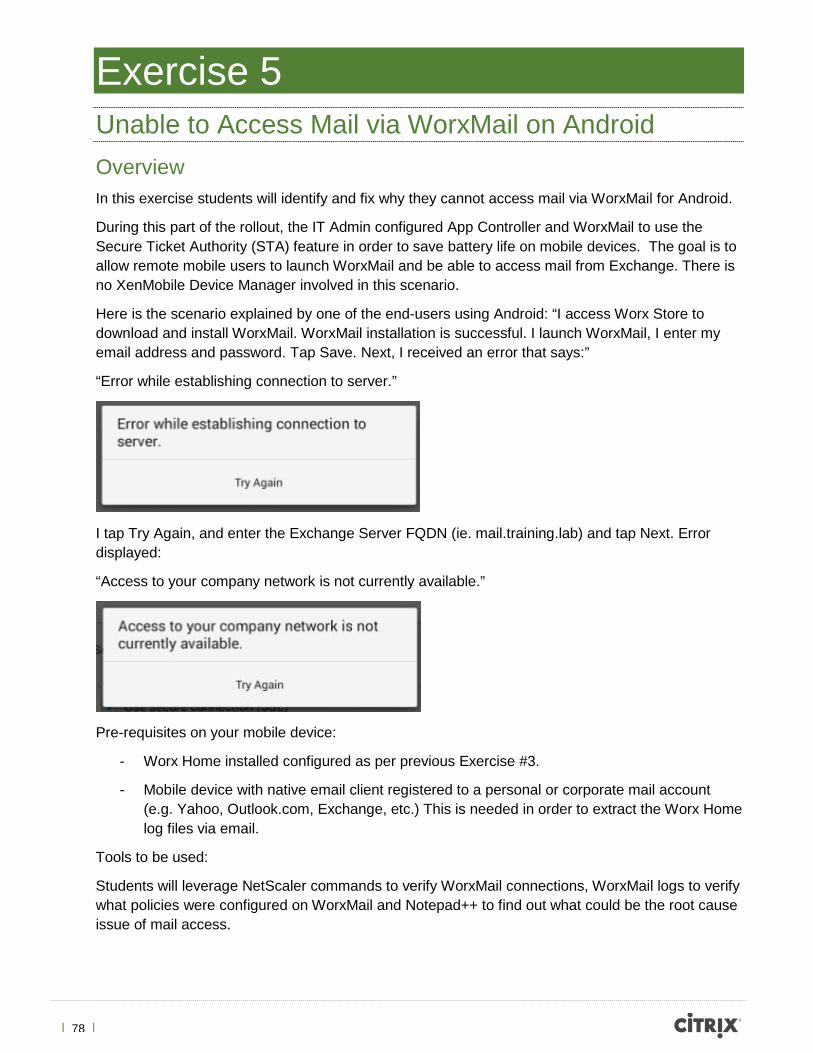
“Error while establishing connection to server.”
I tap Try Again, and enter the Exchange Server FQDN (ie. mail.training.lab) and tap Next. Error displayed:
“Access to your company network is not currently available.”
Pre-requisites on your mobile device:
- Worx Home installed configured as per previous Exercise #3.
- Mobile device with native email client registered to a personal or corporate mail account (e.g. Yahoo, Outlook.com, Exchange, etc.) This is needed in order to extract the Worx Home log files via email.
Tools to be used:
Students will leverage NetScaler commands to verify WorxMail connections, WorxMail logs to verify what policies were configured on WorxMail and Notepad++ to find out what could be the root cause issue of mail access.
| 79 |
Step by step guidance Estimated time to complete this lab: 40 minutes.
Step Action 1. Let’s reproduce the end-user issue. From Worx Home for Android, sign in as User1.
Username: user1 Password: Citrix123
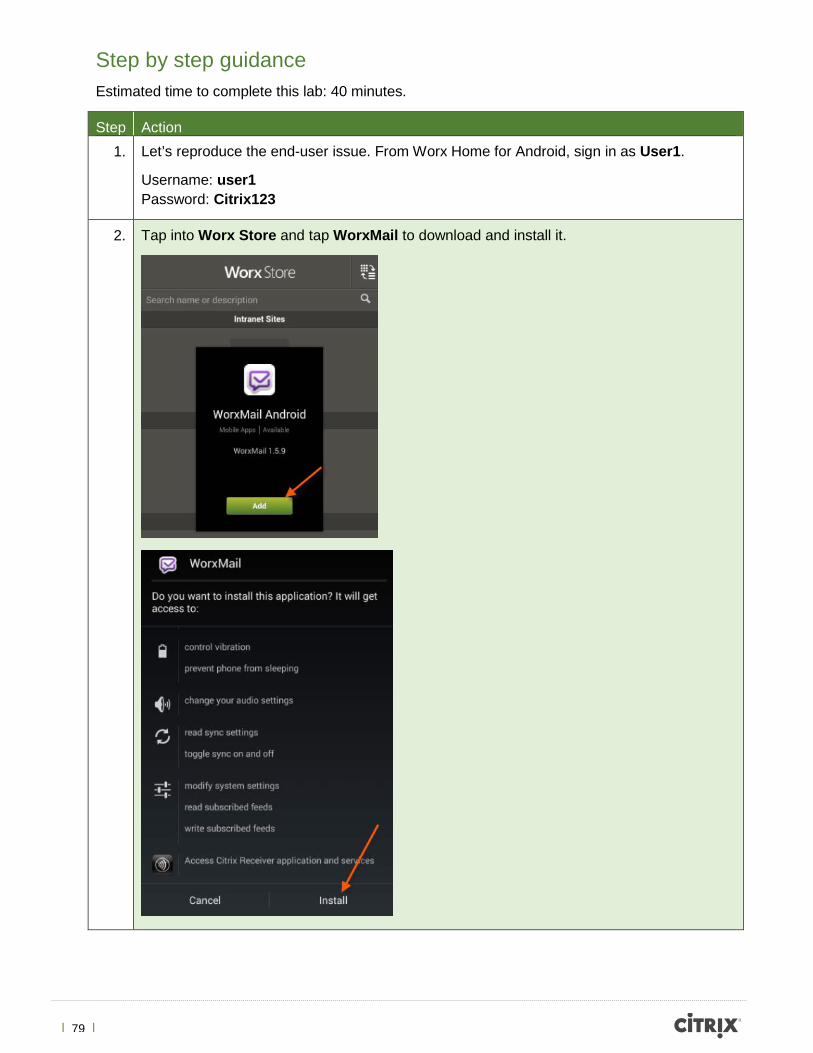
2. Tap into Worx Store and tap WorxMail to download and install it.
| 80 |
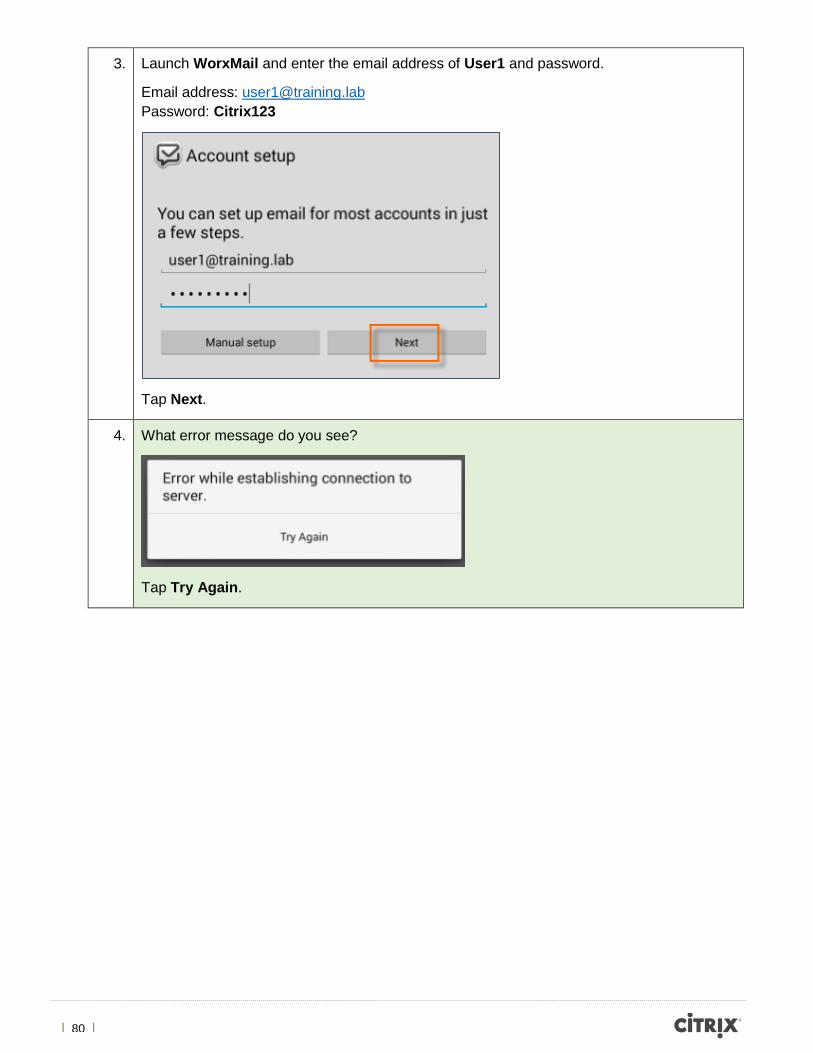
3. Launch WorxMail and enter the email address of User1 and password.
Email address: [email protected] Password: Citrix123
Tap Next.
4. What error message do you see?
Tap Try Again.
| 81 |
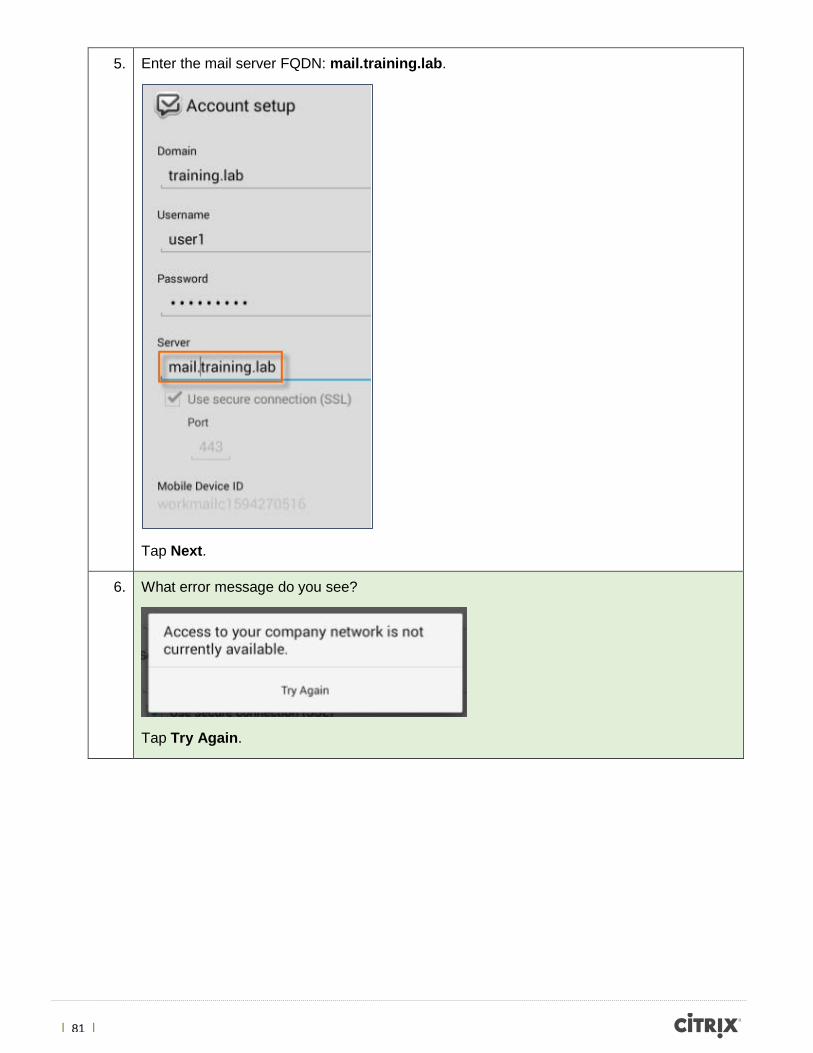
5. Enter the mail server FQDN: mail.training.lab.
Tap Next.
6. What error message do you see?
Tap Try Again.
| 82 |
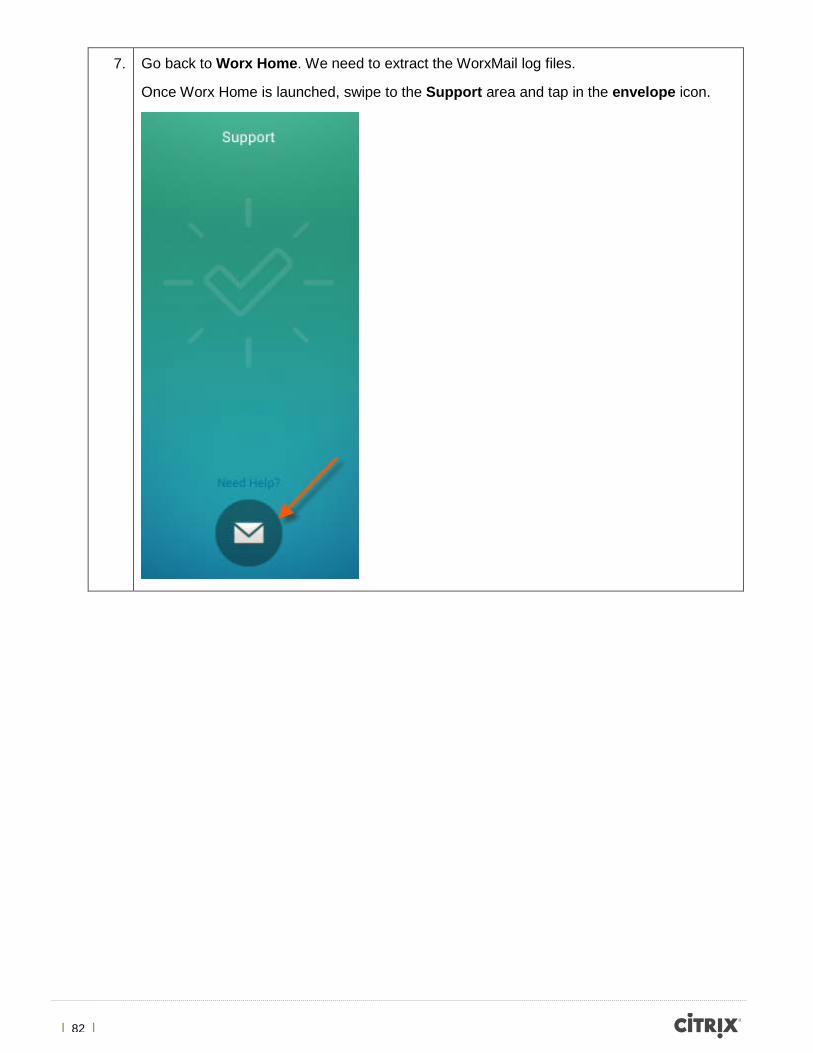
7. Go back to Worx Home. We need to extract the WorxMail log files.
Once Worx Home is launched, swipe to the Support area and tap in the envelope icon.
| 83 |
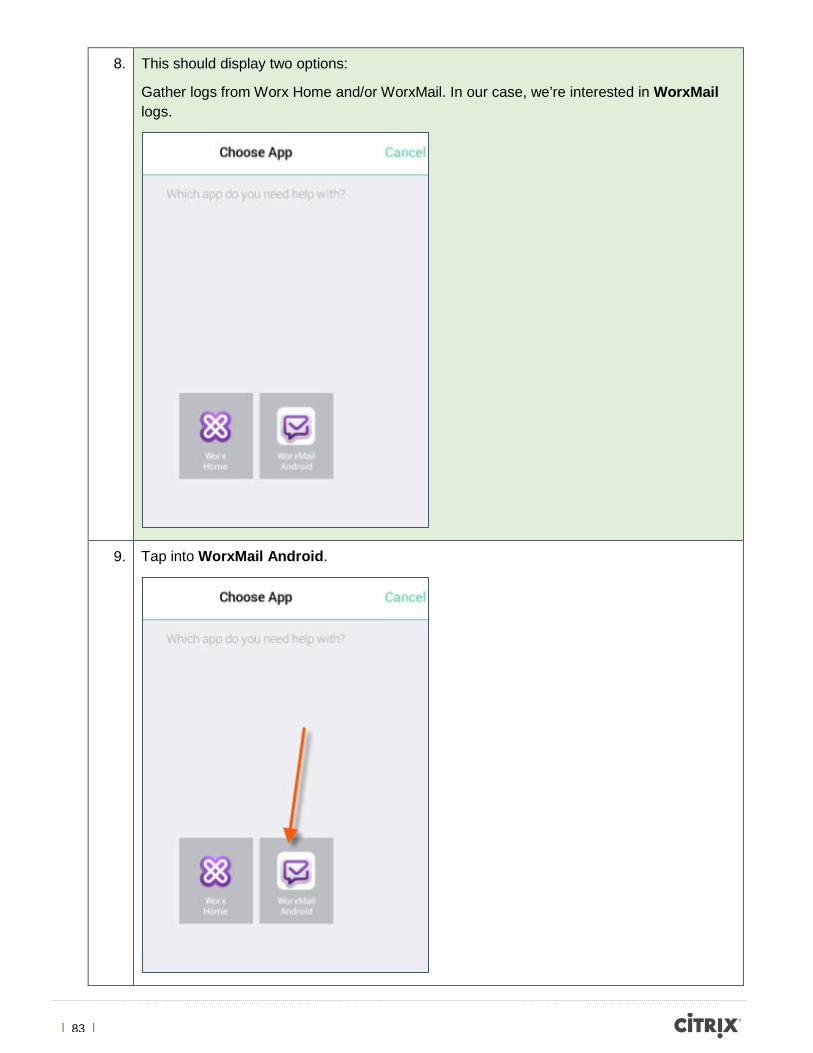
8. This should display two options:
Gather logs from Worx Home and/or WorxMail. In our case, we’re interested in WorxMail logs.
9. Tap into WorxMail Android.
| 84 |
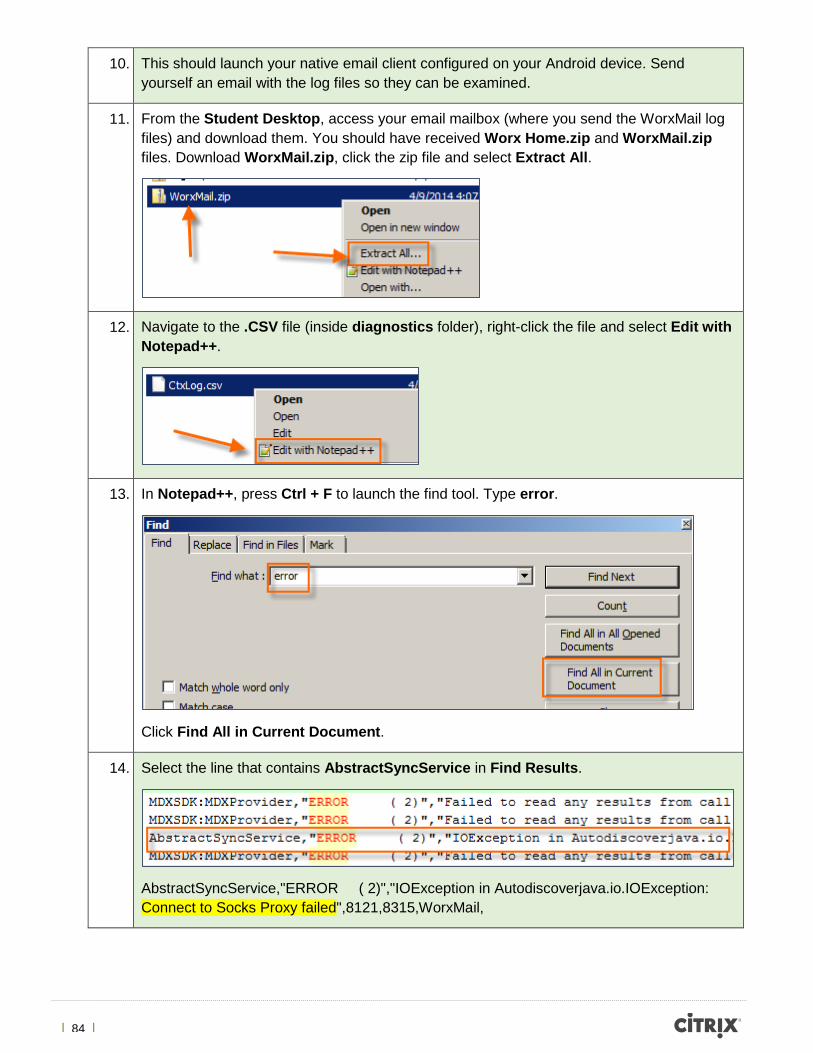
10. This should launch your native email client configured on your Android device. Send yourself an email with the log files so they can be examined.
11. From the Student Desktop, access your email mailbox (where you send the WorxMail log files) and download them. You should have received Worx Home.zip and WorxMail.zip files. Download WorxMail.zip, click the zip file and select Extract All.
12. Navigate to the .CSV file (inside diagnostics folder), right-click the file and select Edit with Notepad++.
13. In Notepad++, press Ctrl + F to launch the find tool. Type error.
Click Find All in Current Document.
14. Select the line that contains AbstractSyncService in Find Results.
AbstractSyncService,"ERROR ( 2)","IOException in Autodiscoverjava.io.IOException: Connect to Socks Proxy failed",8121,8315,WorxMail,
| 85 |
15. This error indicates that WorxMail could not submit the STA ticket successfully to NetScaler Gateway because the SOCKS proxy connection failed.
Let’s check the MDX policy settings for WorxMail. Just like WorxMail for iOS, WorxMail for Android logs provide the XML file with the policy settings configured on App Controller.
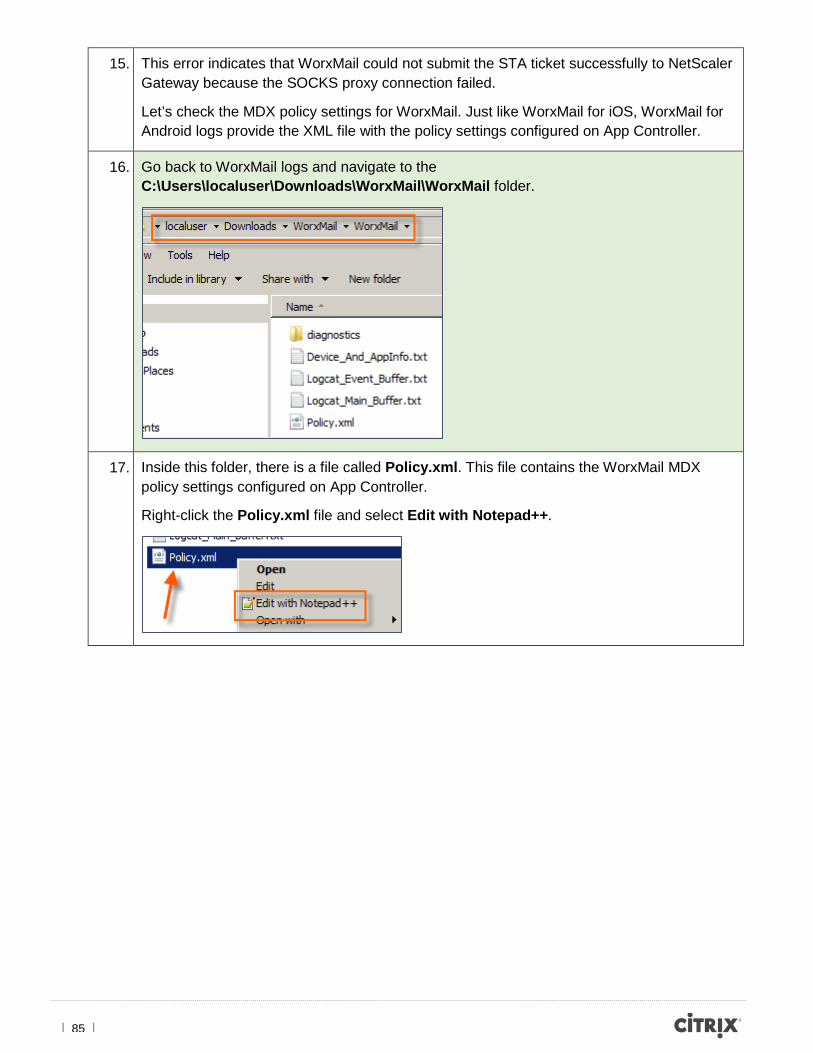
16. Go back to WorxMail logs and navigate to the C:\Users\localuser\Downloads\WorxMail\WorxMail folder.
17. Inside this folder, there is a file called Policy.xml. This file contains the WorxMail MDX policy settings configured on App Controller.
Right-click the Policy.xml file and select Edit with Notepad++.
| 86 |
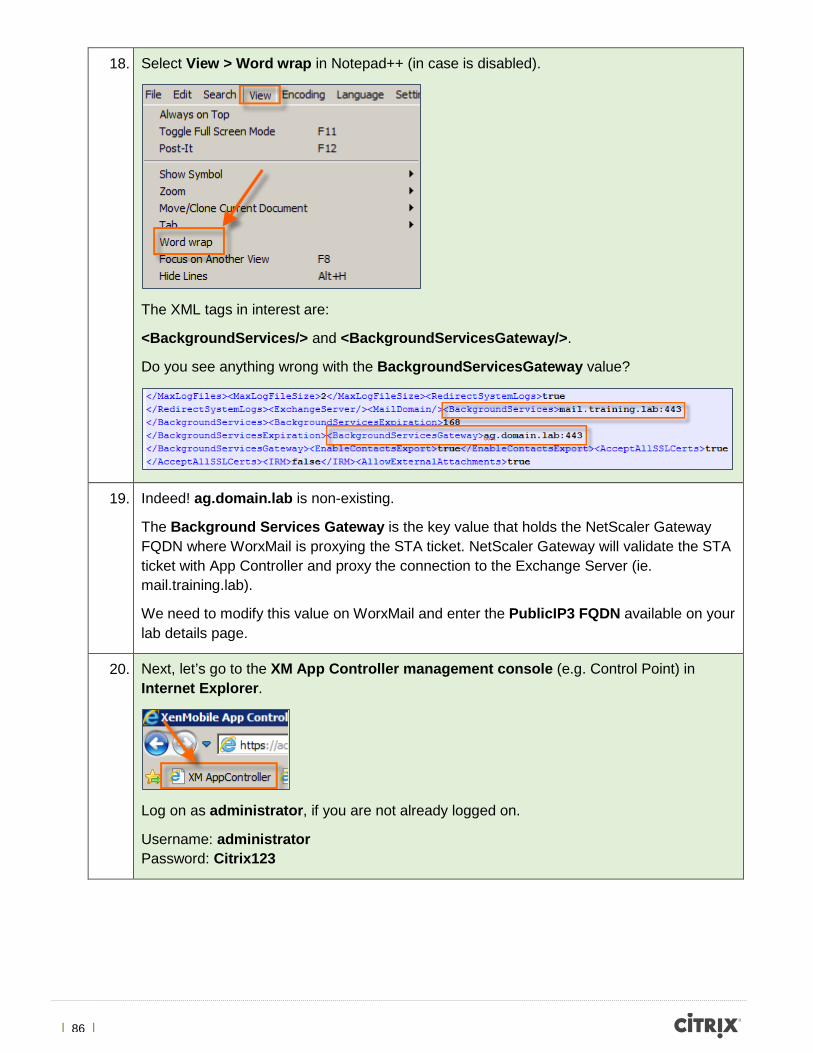
18. Select View > Word wrap in Notepad++ (in case is disabled).
The XML tags in interest are:
<BackgroundServices/> and <BackgroundServicesGateway/>.
Do you see anything wrong with the BackgroundServicesGateway value?
19. Indeed! ag.domain.lab is non-existing.
The Background Services Gateway is the key value that holds the NetScaler Gateway FQDN where WorxMail is proxying the STA ticket. NetScaler Gateway will validate the STA ticket with App Controller and proxy the connection to the Exchange Server (ie. mail.training.lab).
We need to modify this value on WorxMail and enter the PublicIP3 FQDN available on your lab details page.
20. Next, let’s go to the XM App Controller management console (e.g. Control Point) in Internet Explorer.
Log on as administrator, if you are not already logged on.
Username: administrator Password: Citrix123
| 87 |
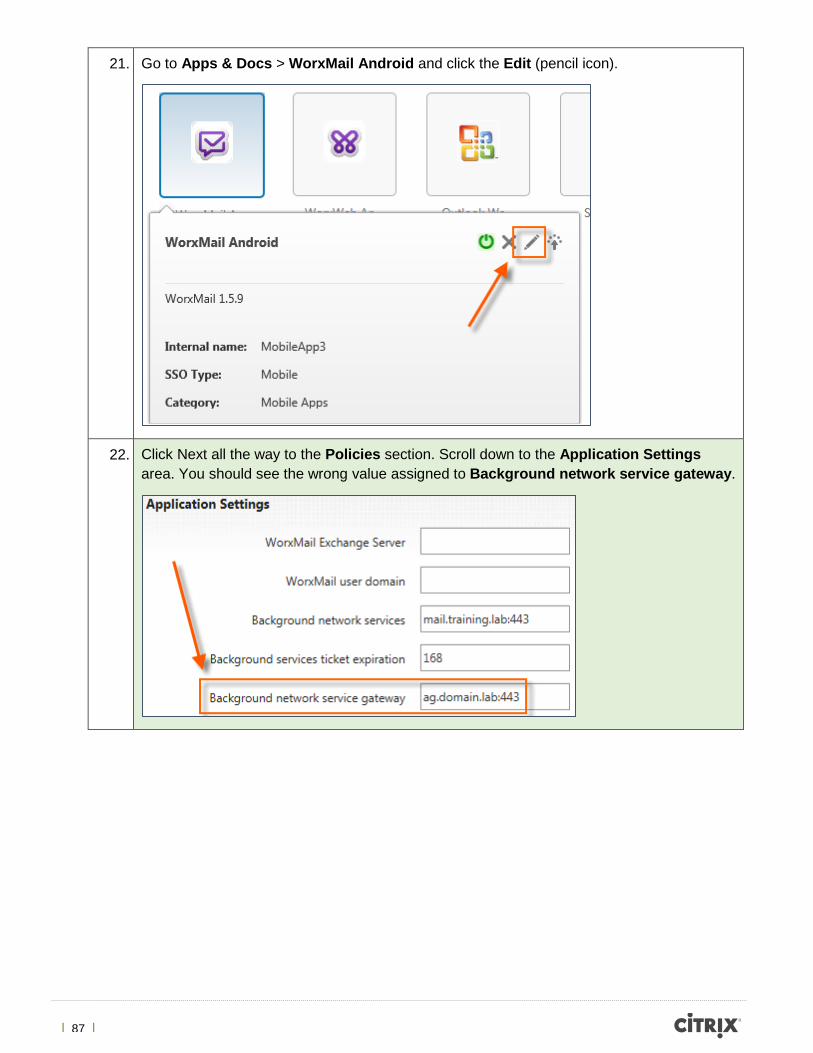
21. Go to Apps & Docs > WorxMail Android and click the Edit (pencil icon).
22. Click Next all the way to the Policies section. Scroll down to the Application Settings area. You should see the wrong value assigned to Background network service gateway.
| 88 |
23. In this field, you have to specify the PublicIP3 FQDN found on your lab details page along with the port number (e.g. 443).
Example:
Background network service gateway: 75-126-154-53.mycitrixtraining.net:443
Click Save.
24. Before testing, let’s check the NetScaler Gateway configuration too.
On the Student Desktop, open Internet Explorer, select the NetScaler bookmark to log on to the management console.
Log on with nsroot credentials.
Username: nsroot Password: nsroot
| 89 |
25. In NetScaler management console, go to NetScaler Gateway > Virtual Servers > double-click XM virtual server to open it.
26. Go to the Published Applications tab and look at the Secure Ticket Authority area.
27. It’s empty! For WorxMail STA feature to work you must have the App Controller defined too!
Click Add in the Secure Ticket Authority area and enter the App Controller URL (e.g. https://ac.training.lab).
Click Create and click OK to close the Virtual Server window.
| 90 |
28. Next, let’s clear any active sessions on the NetScaler Gateway before we test.
Click on NetScaler Gateway > Active user sessions.
29. Click Terminate.
Click Close.
30. Now, let’s test! On your Android device, kill/close the running WorxMail process. In order for this new change take effect, we need to log on again through Worx Home.
Log on as User1.
Username: user1 Password: Citrix123
| 91 |
31. Tap into WorxMail Android.
32. Enter the User1 email address and password.
Email Address: [email protected] Password: Citrix123
Tap Next.
| 92 |
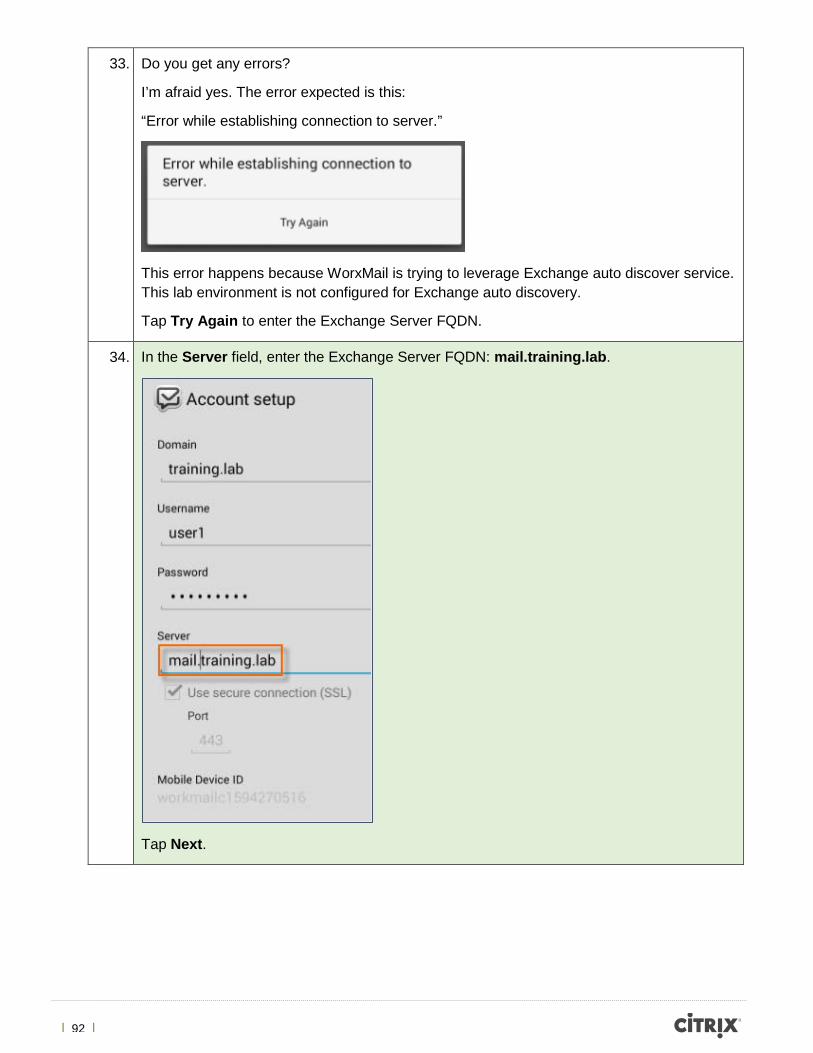
33. Do you get any errors?
I’m afraid yes. The error expected is this:
“Error while establishing connection to server.”
This error happens because WorxMail is trying to leverage Exchange auto discover service. This lab environment is not configured for Exchange auto discovery.
Tap Try Again to enter the Exchange Server FQDN.
34. In the Server field, enter the Exchange Server FQDN: mail.training.lab.
Tap Next.
| 93 |
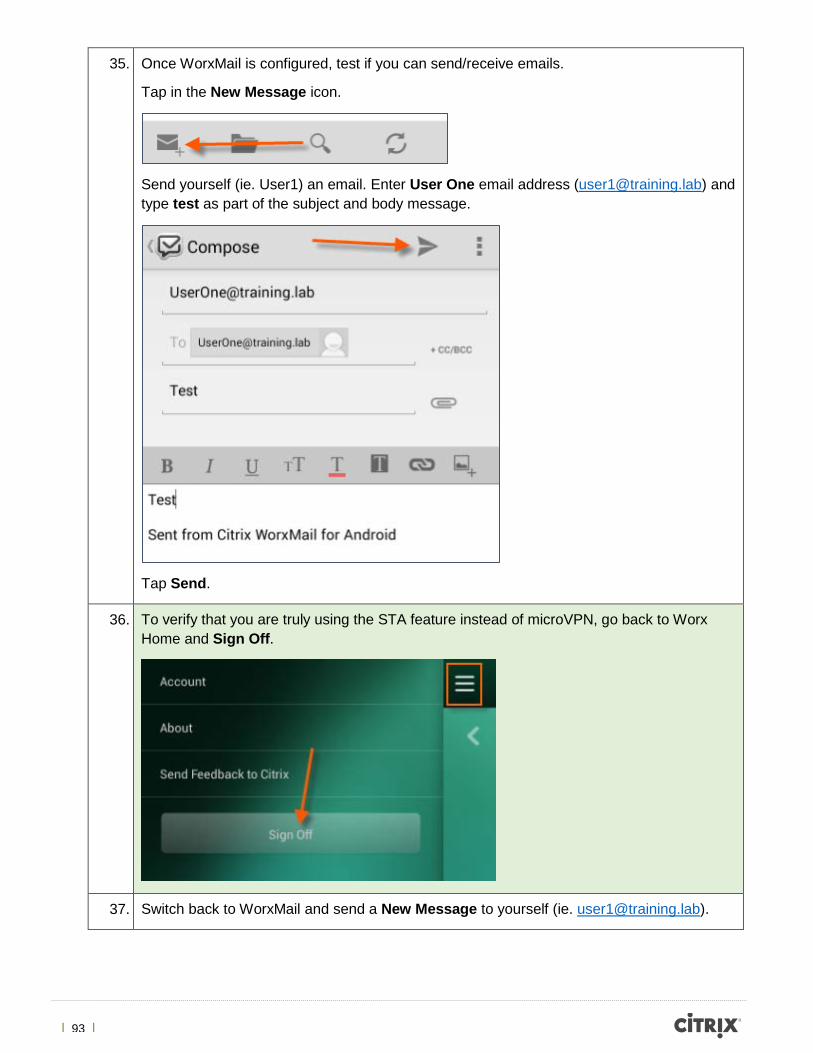
35. Once WorxMail is configured, test if you can send/receive emails.
Tap in the New Message icon.
Send yourself (ie. User1) an email. Enter User One email address ([email protected]) and type test as part of the subject and body message.
Tap Send.
36. To verify that you are truly using the STA feature instead of microVPN, go back to Worx Home and Sign Off.
37. Switch back to WorxMail and send a New Message to yourself (ie. [email protected]).
| 94 |
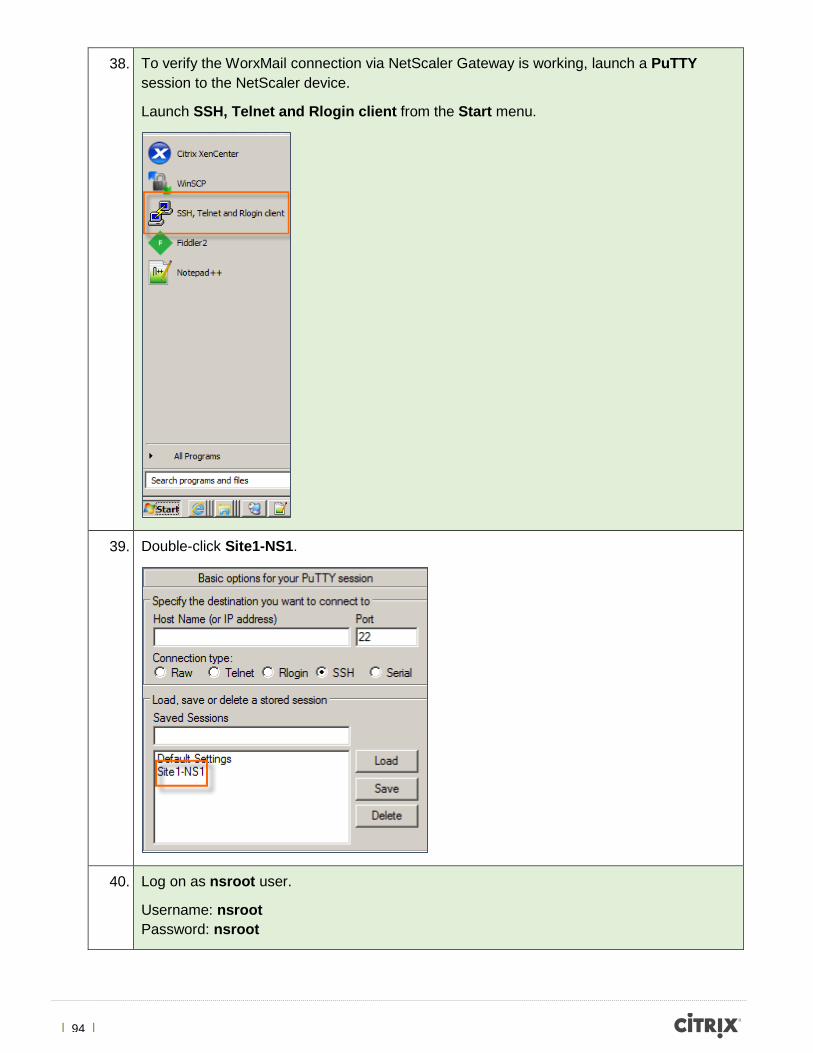
38. To verify the WorxMail connection via NetScaler Gateway is working, launch a PuTTY session to the NetScaler device.
Launch SSH, Telnet and Rlogin client from the Start menu.
39. Double-click Site1-NS1.
40. Log on as nsroot user.
Username: nsroot Password: nsroot
| 95 |
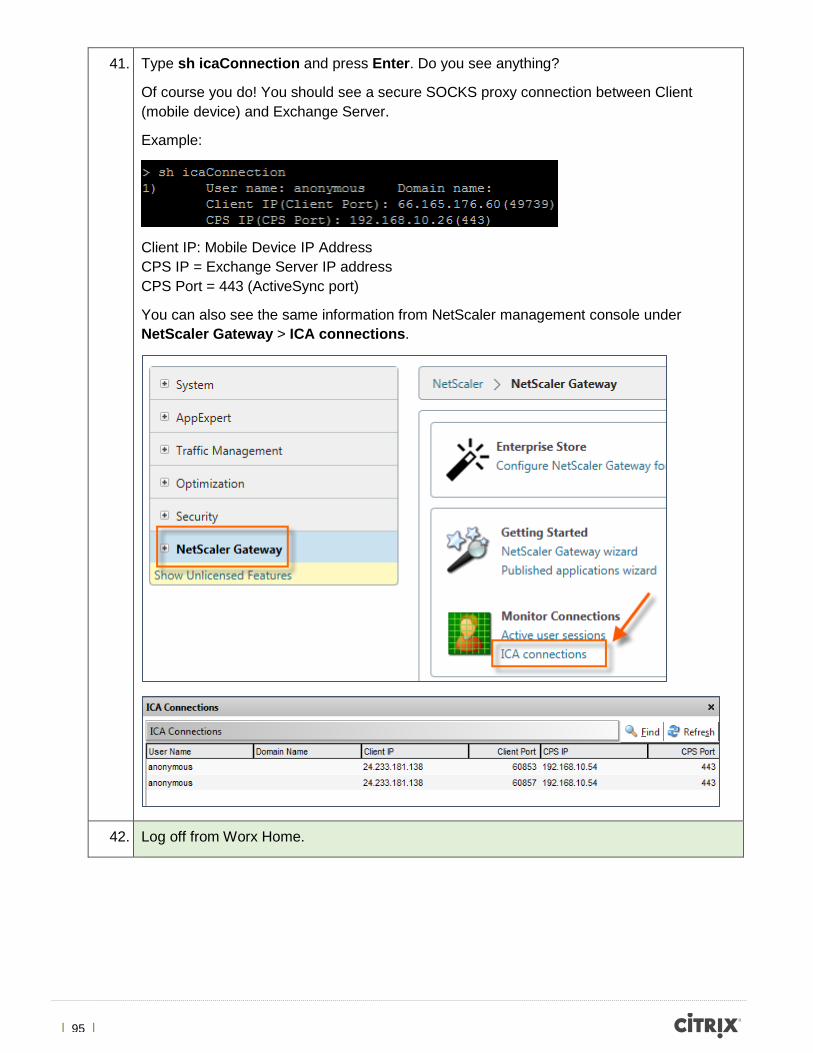
41. Type sh icaConnection and press Enter. Do you see anything?
Of course you do! You should see a secure SOCKS proxy connection between Client (mobile device) and Exchange Server.
Example:
Client IP: Mobile Device IP Address CPS IP = Exchange Server IP address CPS Port = 443 (ActiveSync port)
You can also see the same information from NetScaler management console under NetScaler Gateway > ICA connections.
42. Log off from Worx Home.
| 96 |
Exercise Summary In this exercise, you were able to identify and fix why mobile users using Android devices were not able to sync email via WorxMail and use the Secure Ticket Authority (STA) feature from XenMobile. When IT Admins configure NetScaler Gateway, App Controller and WorxMail using STA, it is necessary to enter the correct information: On NetScaler, define the Secure Ticket Authority (STA) pointing to App Controller:
On App Controller, define the background services correctly:
Background network services: Exchange Server FQDN:port. Example: Background network services: mail.training.lab:443 Background network service gateway: NetScaler Gateway FQDN:port Example: Background network service gateway: 75-126-147-85.mycitrixtraining.net:443 For more information regarding the differences between microVPN vs. STA for WorxMail connections, refer to this blog - http://blogs.citrix.com/2013/09/16/improving-battery-life-with-worxmail-sta-to-the-rescue/.
| 97 |
Exercise 6 Unable to Integrate XenMobile Device Manager and App Controller Overview In this exercise, students will identify and fix why IT Admin cannot integrate both XenMobile Device Manager and App Controller.
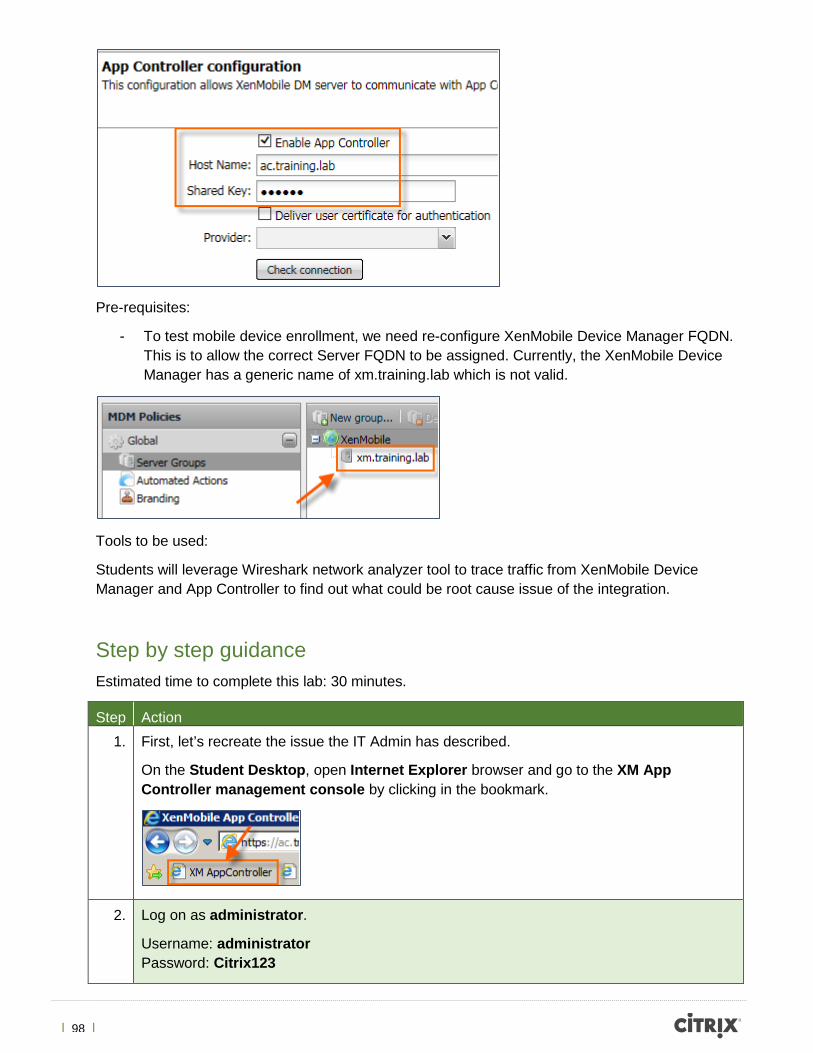
During this part of the rollout, the IT Admin has been tasked to integrate both solutions in order to force enrollment on mobile devices, and deliver WorxMail and WorxWeb as mandatory apps. The IT Admin has already configured the XenMobile Device Manager with the App Controller settings.
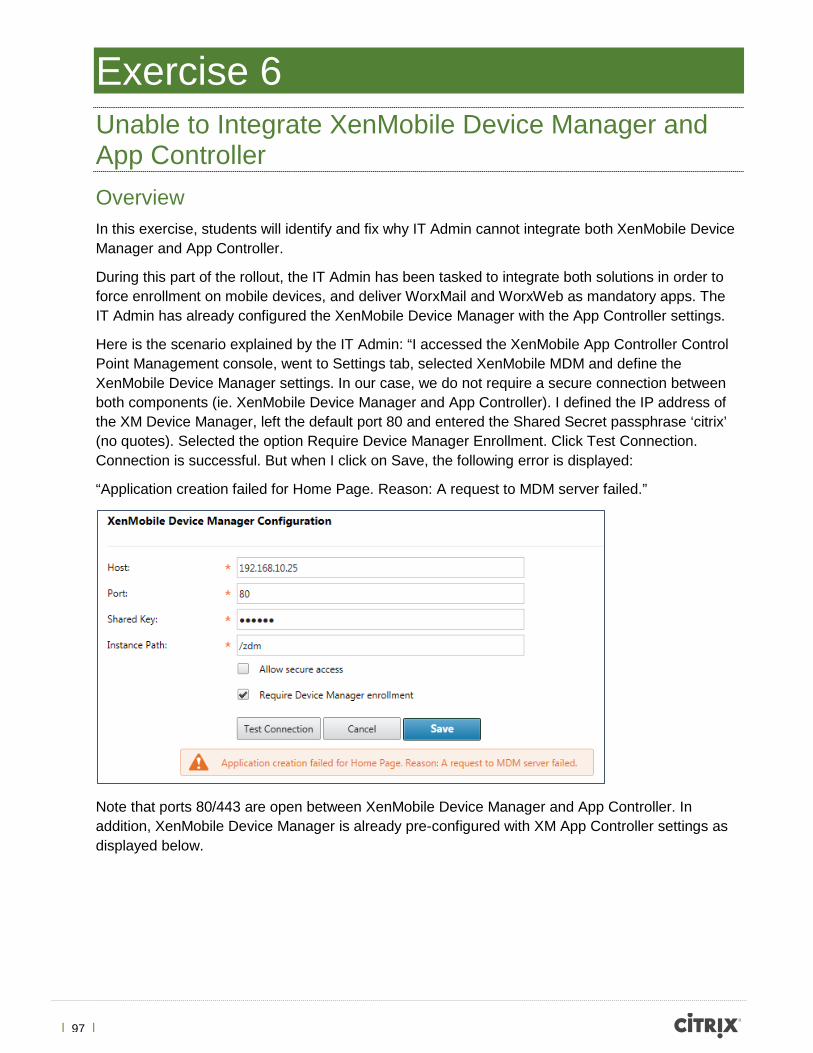
Here is the scenario explained by the IT Admin: “I accessed the XenMobile App Controller Control Point Management console, went to Settings tab, selected XenMobile MDM and define the XenMobile Device Manager settings. In our case, we do not require a secure connection between both components (ie. XenMobile Device Manager and App Controller). I defined the IP address of the XM Device Manager, left the default port 80 and entered the Shared Secret passphrase ‘citrix’ (no quotes). Selected the option Require Device Manager Enrollment. Click Test Connection. Connection is successful. But when I click on Save, the following error is displayed:
“Application creation failed for Home Page. Reason: A request to MDM server failed.”
Note that ports 80/443 are open between XenMobile Device Manager and App Controller. In addition, XenMobile Device Manager is already pre-configured with XM App Controller settings as displayed below.
| 98 |
Pre-requisites:
- To test mobile device enrollment, we need re-configure XenMobile Device Manager FQDN. This is to allow the correct Server FQDN to be assigned. Currently, the XenMobile Device Manager has a generic name of xm.training.lab which is not valid.
Tools to be used:
Students will leverage Wireshark network analyzer tool to trace traffic from XenMobile Device Manager and App Controller to find out what could be root cause issue of the integration.
Step by step guidance Estimated time to complete this lab: 30 minutes.
Step Action 1. First, let’s recreate the issue the IT Admin has described.
On the Student Desktop, open Internet Explorer browser and go to the XM App Controller management console by clicking in the bookmark.
2. Log on as administrator.
Username: administrator Password: Citrix123
| 99 |
3. Once logged in, navigate to the Settings > XenMobile MDM.
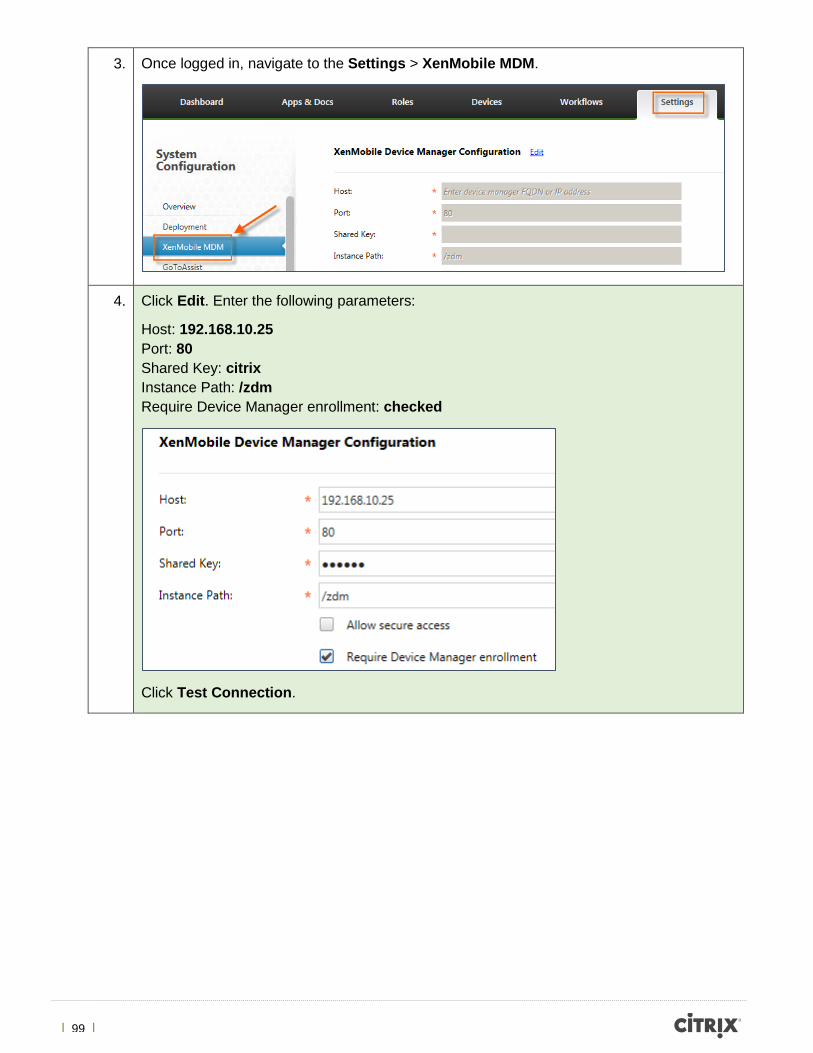
4. Click Edit. Enter the following parameters:
Host: 192.168.10.25 Port: 80 Shared Key: citrix Instance Path: /zdm Require Device Manager enrollment: checked
Click Test Connection.
| 100 |
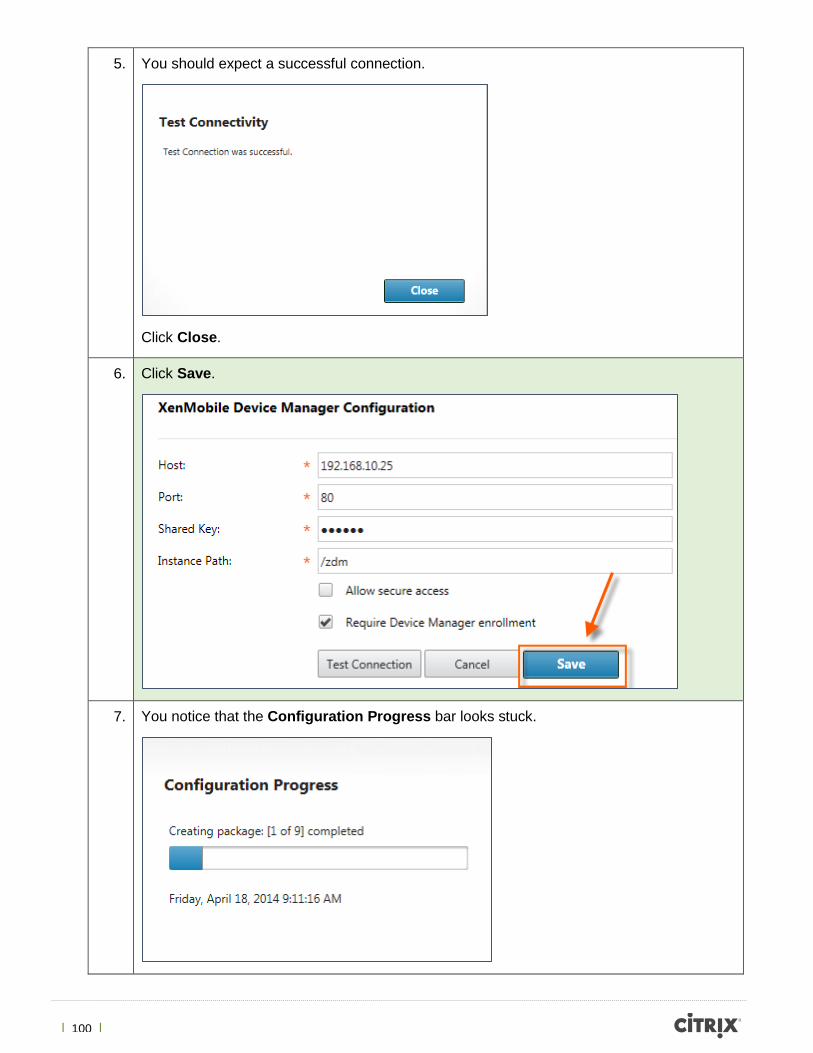
5. You should expect a successful connection.
Click Close.
6. Click Save.
7. You notice that the Configuration Progress bar looks stuck.
| 101 |
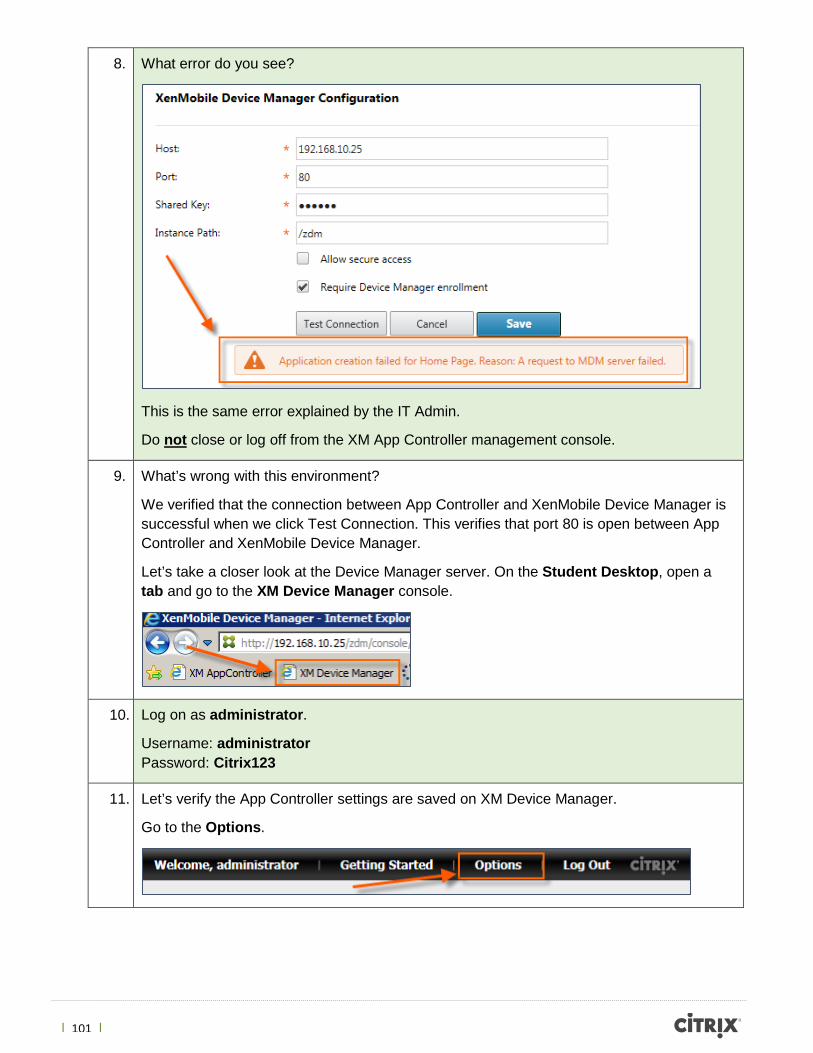
8. What error do you see?
This is the same error explained by the IT Admin.
Do not close or log off from the XM App Controller management console.
9. What’s wrong with this environment?
We verified that the connection between App Controller and XenMobile Device Manager is successful when we click Test Connection. This verifies that port 80 is open between App Controller and XenMobile Device Manager.
Let’s take a closer look at the Device Manager server. On the Student Desktop, open a tab and go to the XM Device Manager console.
10. Log on as administrator.
Username: administrator Password: Citrix123
11. Let’s verify the App Controller settings are saved on XM Device Manager.
Go to the Options.
| 102 |
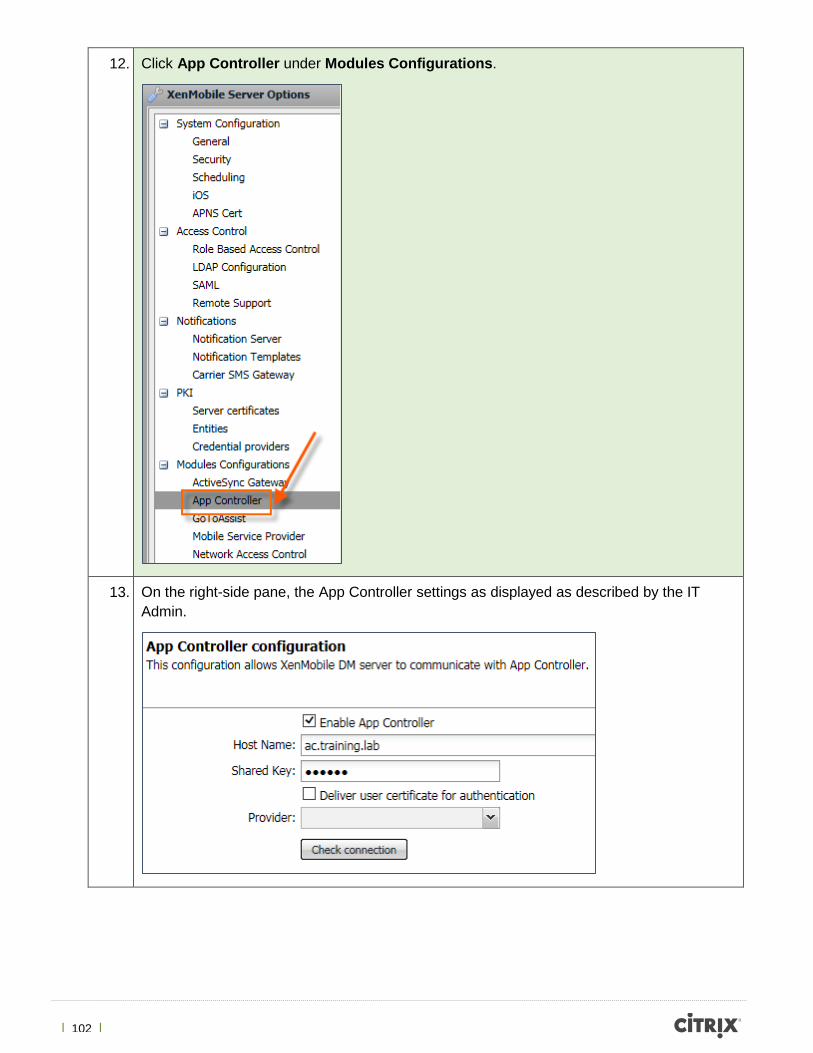
12. Click App Controller under Modules Configurations.
13. On the right-side pane, the App Controller settings as displayed as described by the IT Admin.
| 103 |
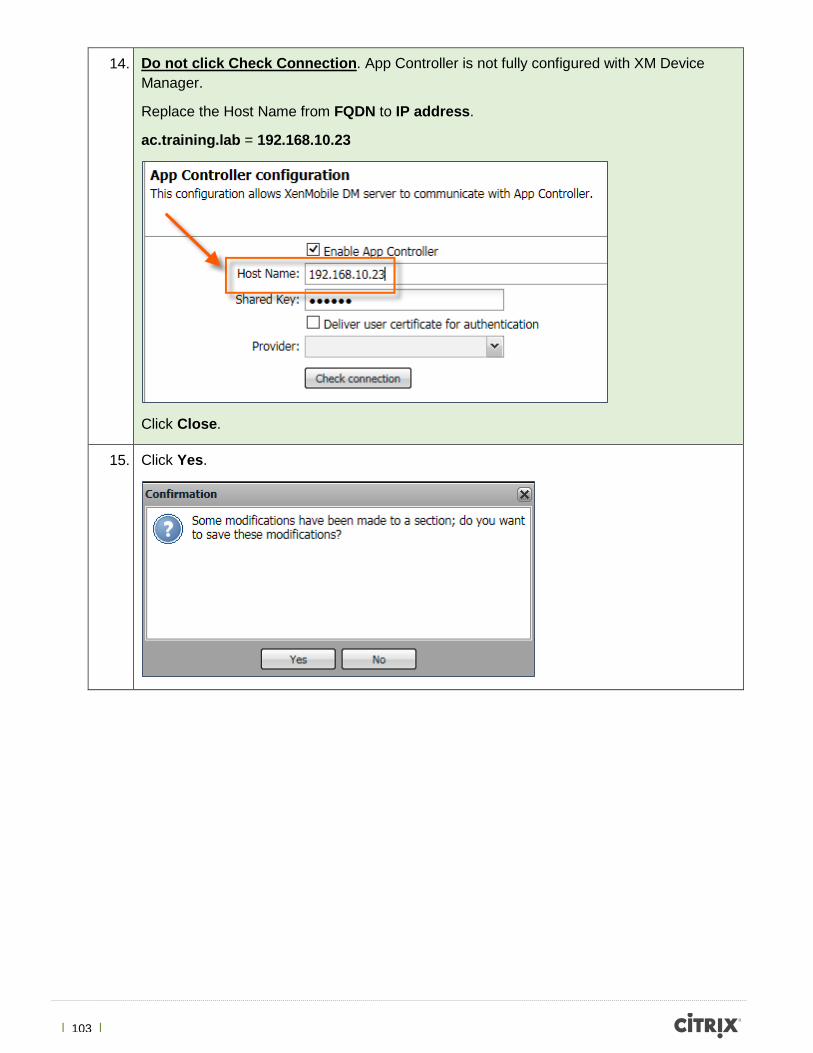
14. Do not click Check Connection. App Controller is not fully configured with XM Device Manager.
Replace the Host Name from FQDN to IP address.
ac.training.lab = 192.168.10.23
Click Close.
15. Click Yes.
| 104 |
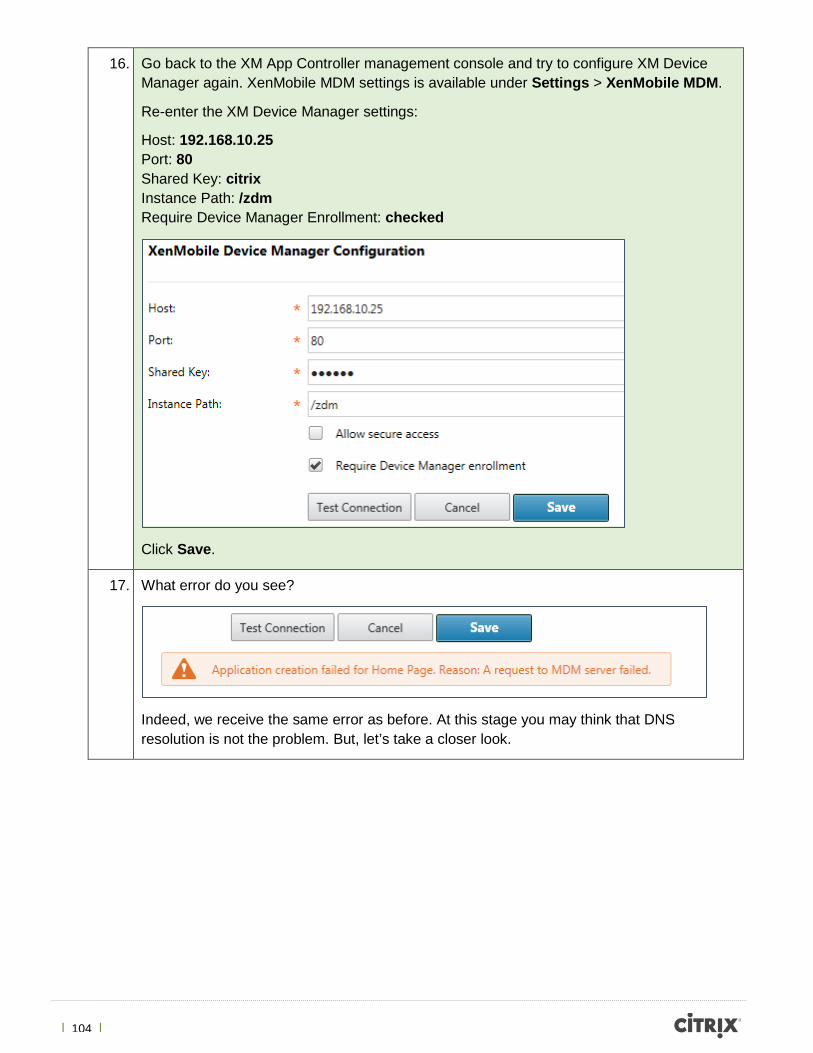
16. Go back to the XM App Controller management console and try to configure XM Device Manager again. XenMobile MDM settings is available under Settings > XenMobile MDM.
Re-enter the XM Device Manager settings:
Host: 192.168.10.25 Port: 80 Shared Key: citrix Instance Path: /zdm Require Device Manager Enrollment: checked
Click Save.
17. What error do you see?
Indeed, we receive the same error as before. At this stage you may think that DNS resolution is not the problem. But, let’s take a closer look.
| 105 |
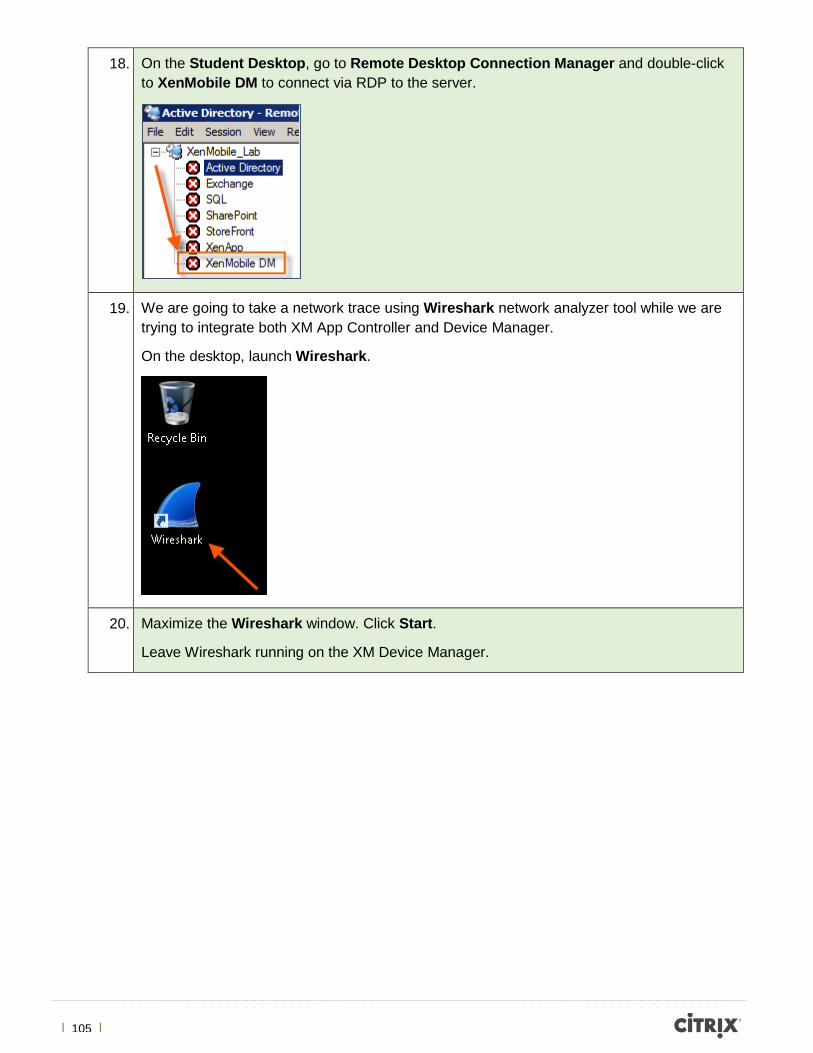
18. On the Student Desktop, go to Remote Desktop Connection Manager and double-click to XenMobile DM to connect via RDP to the server.
19. We are going to take a network trace using Wireshark network analyzer tool while we are trying to integrate both XM App Controller and Device Manager.
On the desktop, launch Wireshark.
20. Maximize the Wireshark window. Click Start.
Leave Wireshark running on the XM Device Manager.
| 106 |
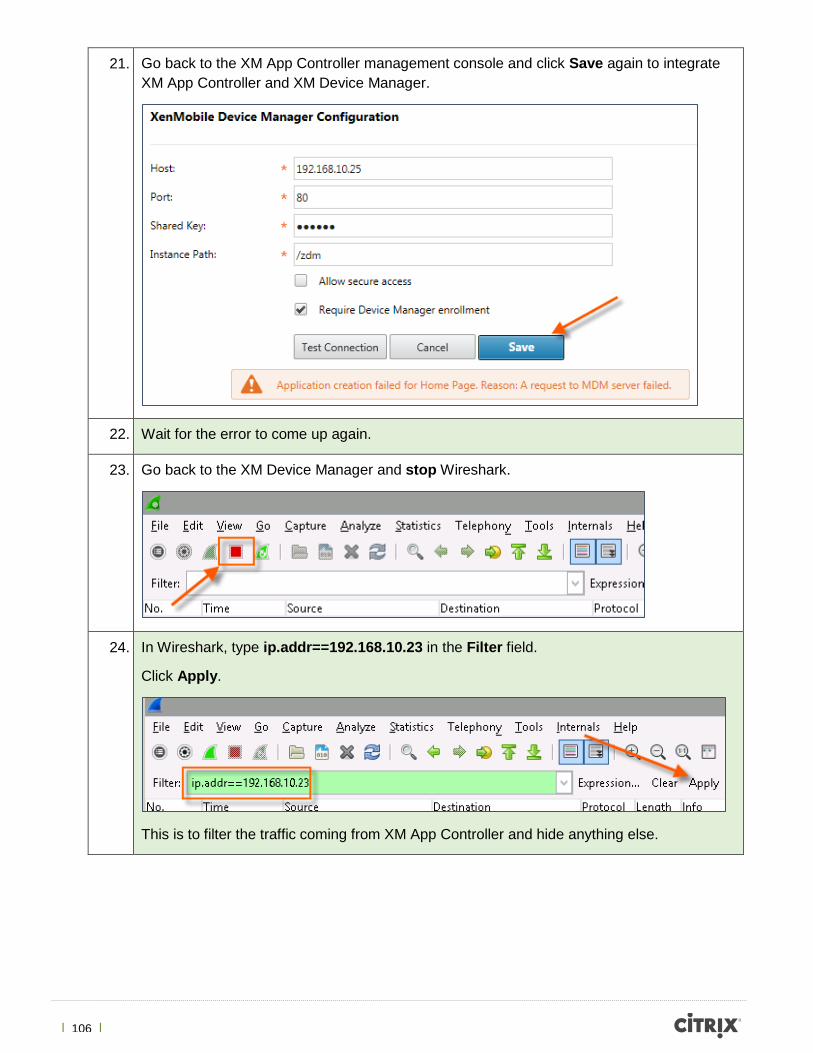
21. Go back to the XM App Controller management console and click Save again to integrate XM App Controller and XM Device Manager.
22. Wait for the error to come up again.
23. Go back to the XM Device Manager and stop Wireshark.
24. In Wireshark, type ip.addr==192.168.10.23 in the Filter field.
Click Apply.
This is to filter the traffic coming from XM App Controller and hide anything else.
| 107 |
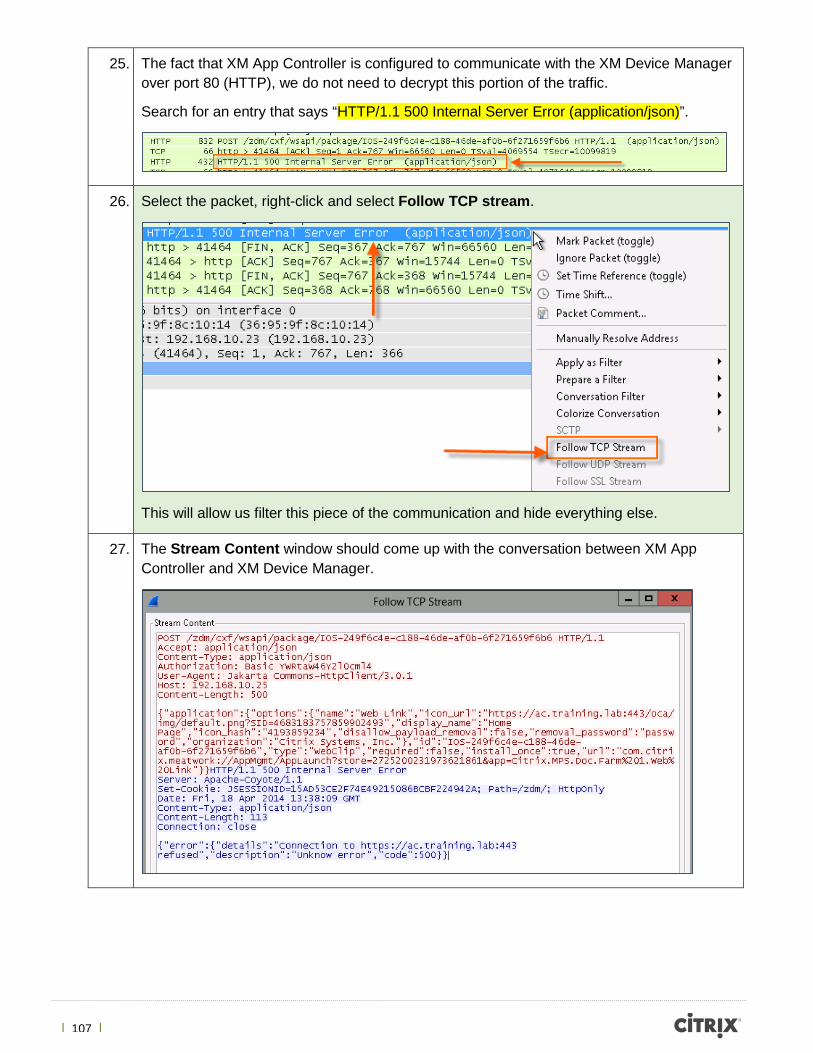
25. The fact that XM App Controller is configured to communicate with the XM Device Manager over port 80 (HTTP), we do not need to decrypt this portion of the traffic.
Search for an entry that says “HTTP/1.1 500 Internal Server Error (application/json)”.
26. Select the packet, right-click and select Follow TCP stream.
This will allow us filter this piece of the communication and hide everything else.
27. The Stream Content window should come up with the conversation between XM App Controller and XM Device Manager.
| 108 |
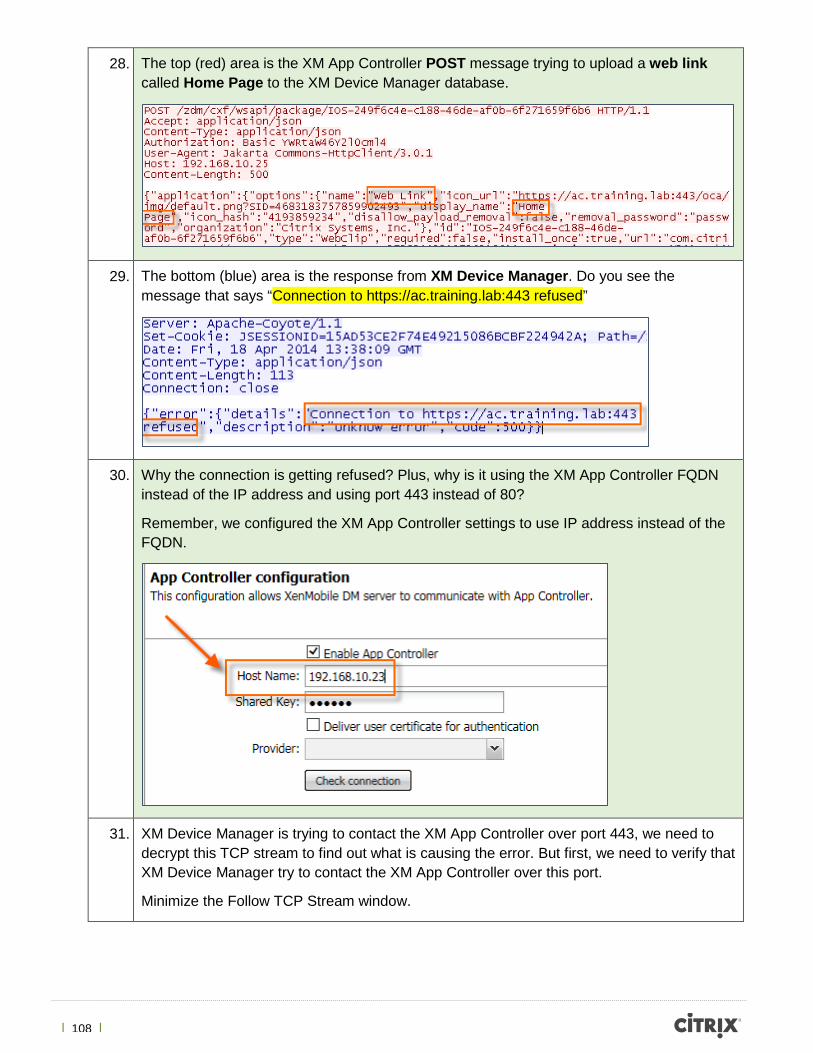
28. The top (red) area is the XM App Controller POST message trying to upload a web link called Home Page to the XM Device Manager database.
29. The bottom (blue) area is the response from XM Device Manager. Do you see the message that says “Connection to https://ac.training.lab:443 refused”
30. Why the connection is getting refused? Plus, why is it using the XM App Controller FQDN instead of the IP address and using port 443 instead of 80?
Remember, we configured the XM App Controller settings to use IP address instead of the FQDN.
31. XM Device Manager is trying to contact the XM App Controller over port 443, we need to decrypt this TCP stream to find out what is causing the error. But first, we need to verify that XM Device Manager try to contact the XM App Controller over this port.
Minimize the Follow TCP Stream window.
| 109 |
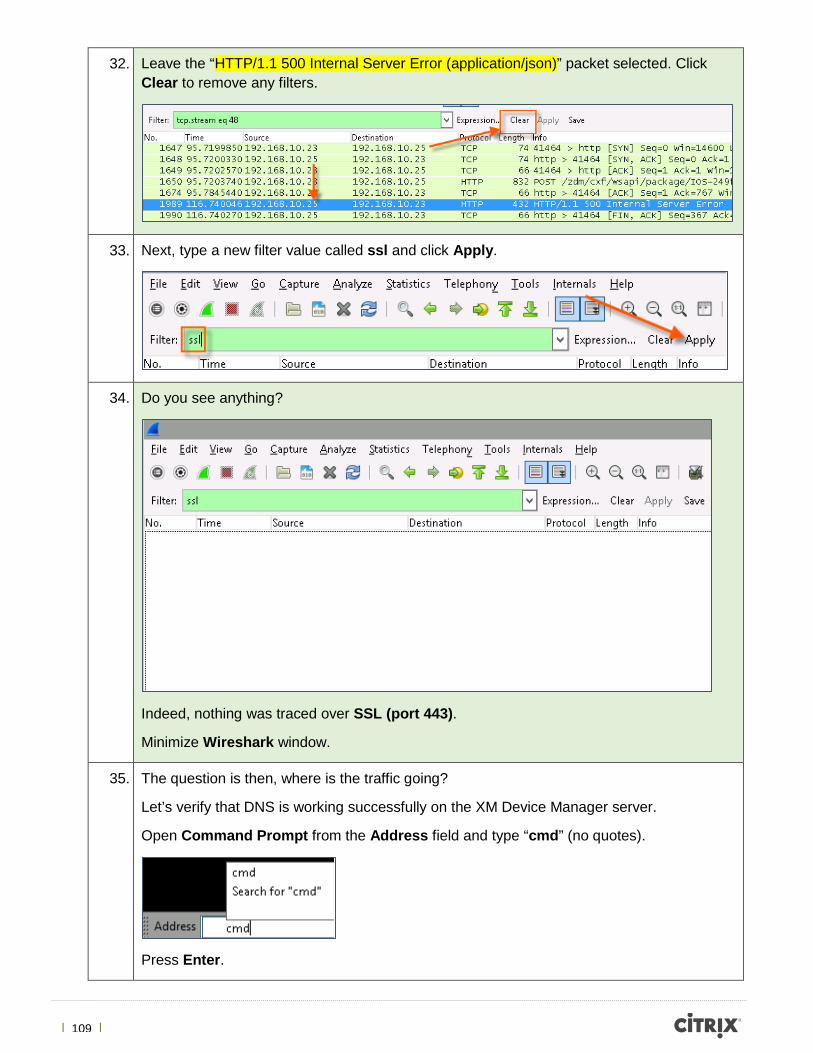
32. Leave the “HTTP/1.1 500 Internal Server Error (application/json)” packet selected. Click Clear to remove any filters.
33. Next, type a new filter value called ssl and click Apply.
34. Do you see anything?
Indeed, nothing was traced over SSL (port 443).
Minimize Wireshark window.
35. The question is then, where is the traffic going?
Let’s verify that DNS is working successfully on the XM Device Manager server.
Open Command Prompt from the Address field and type “cmd” (no quotes).
Press Enter.
| 110 |
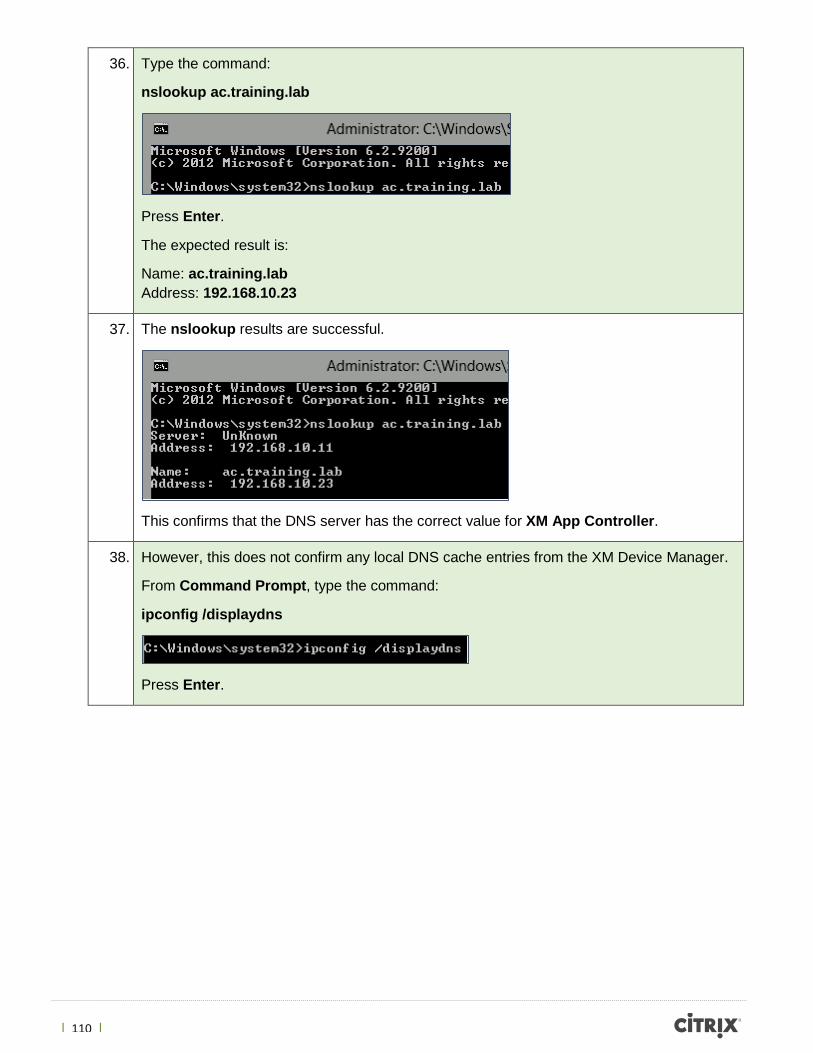
36. Type the command:
nslookup ac.training.lab
Press Enter.
The expected result is:
Name: ac.training.lab Address: 192.168.10.23
37. The nslookup results are successful.
This confirms that the DNS server has the correct value for XM App Controller.
38. However, this does not confirm any local DNS cache entries from the XM Device Manager.
From Command Prompt, type the command:
ipconfig /displaydns
Press Enter.
| 111 |
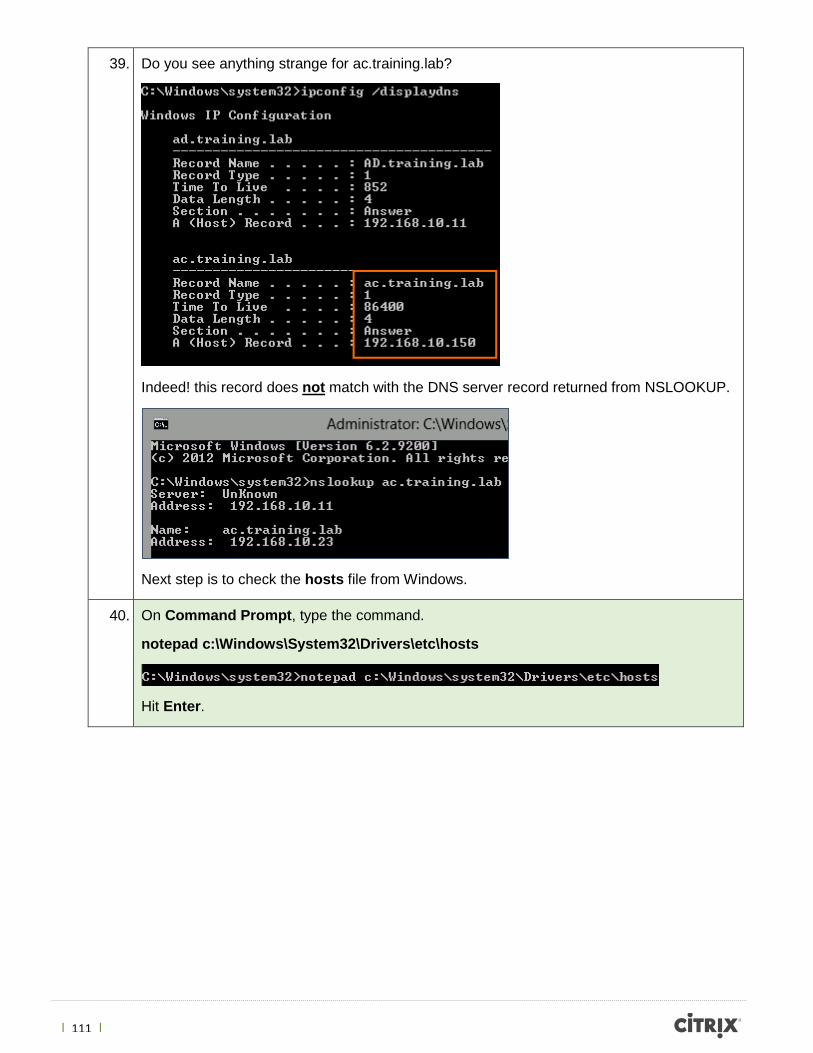
39. Do you see anything strange for ac.training.lab?
Indeed! this record does not match with the DNS server record returned from NSLOOKUP.
Next step is to check the hosts file from Windows.
40. On Command Prompt, type the command.
notepad c:\Windows\System32\Drivers\etc\hosts
Hit Enter.
| 112 |
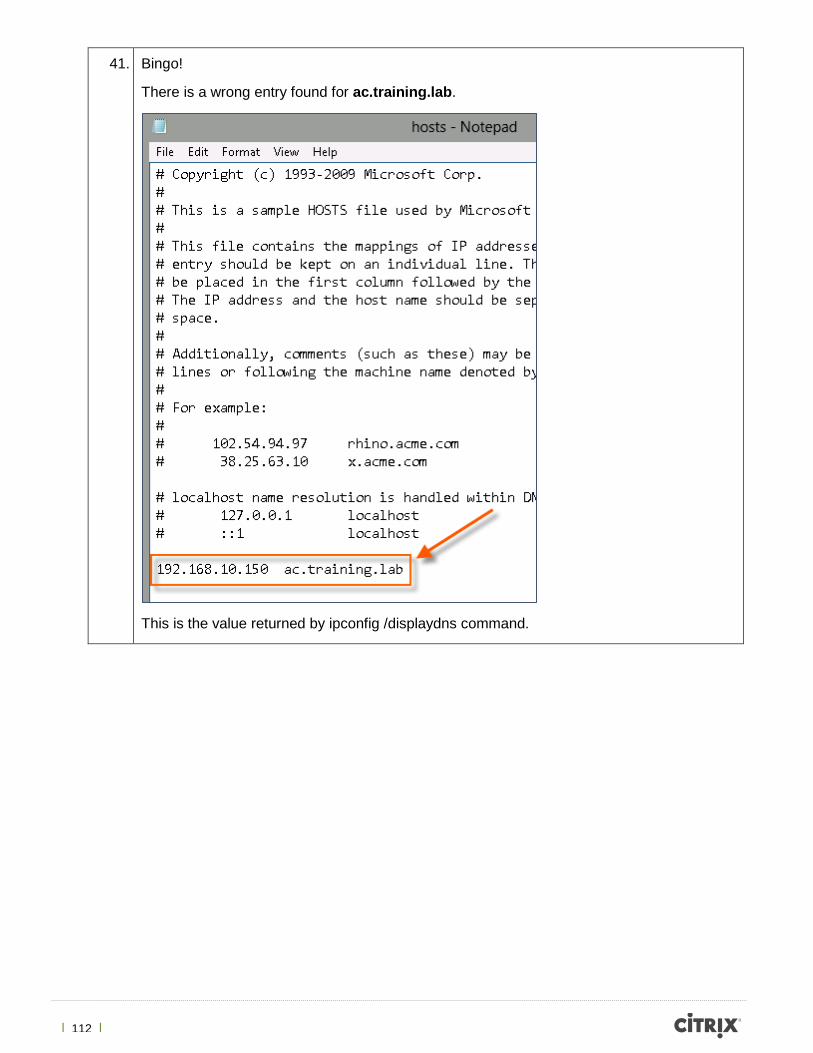
41. Bingo!
There is a wrong entry found for ac.training.lab.
This is the value returned by ipconfig /displaydns command.
| 113 |
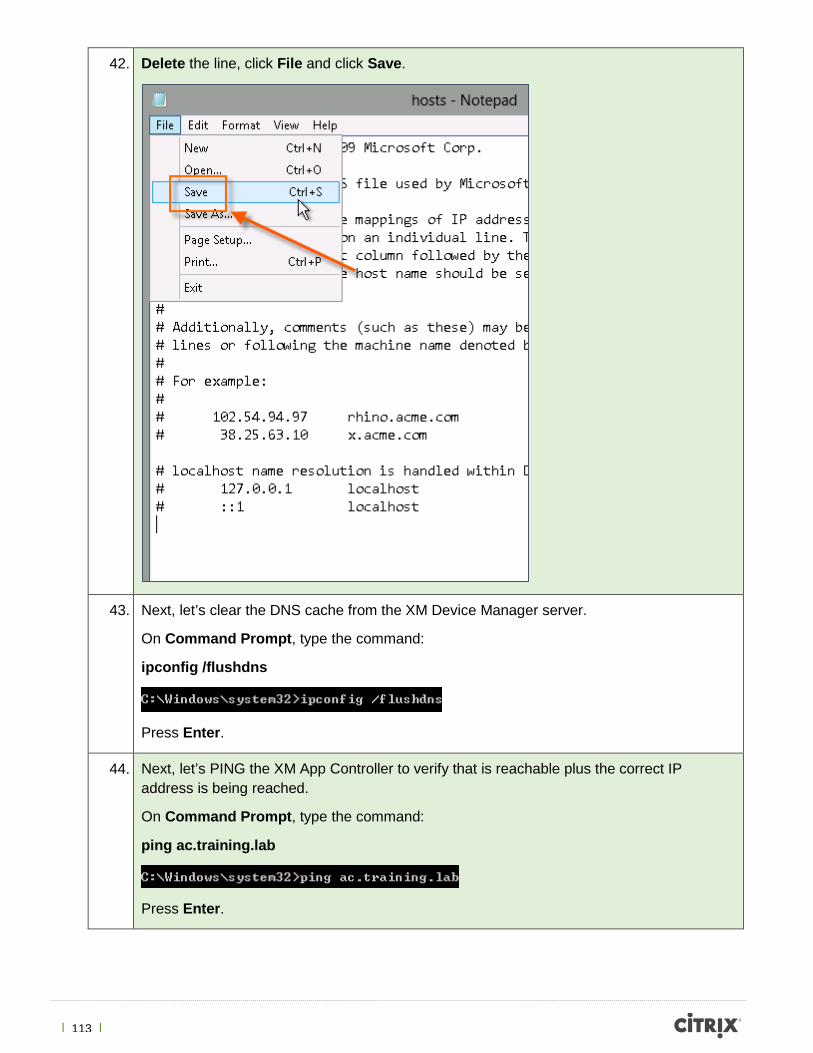
42. Delete the line, click File and click Save.
43. Next, let’s clear the DNS cache from the XM Device Manager server.
On Command Prompt, type the command:
ipconfig /flushdns
Press Enter.
44. Next, let’s PING the XM App Controller to verify that is reachable plus the correct IP address is being reached.
On Command Prompt, type the command:
ping ac.training.lab
Press Enter.
| 114 |
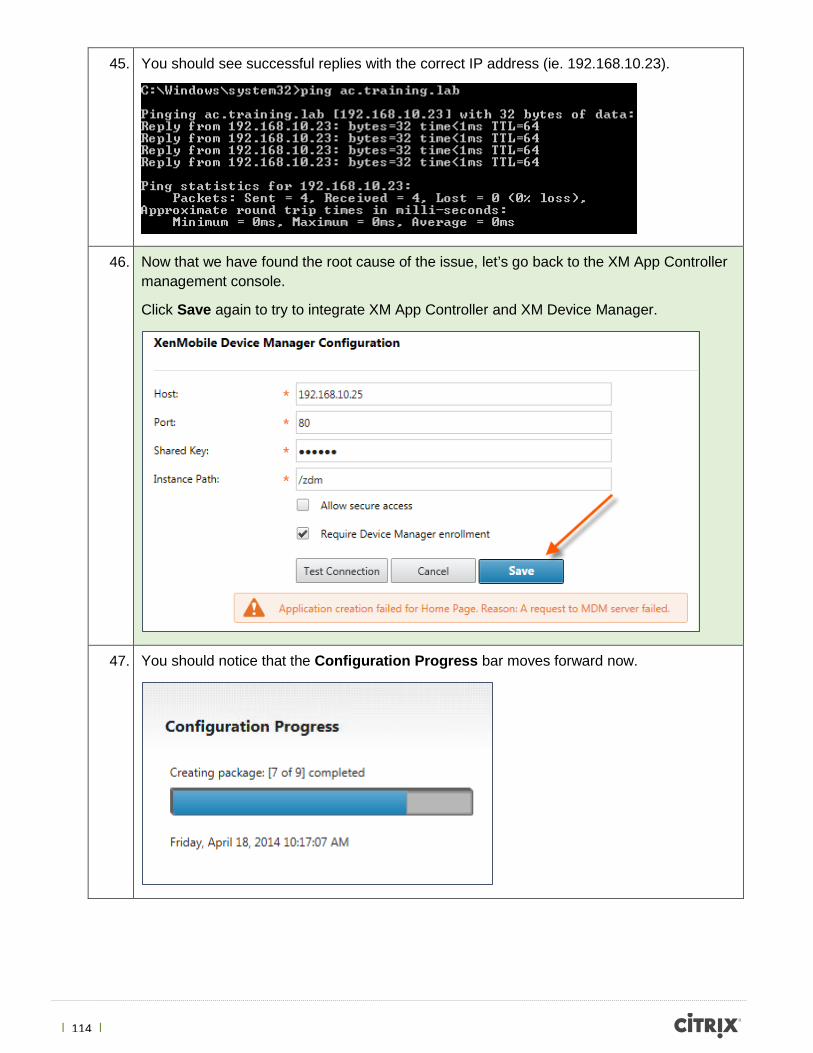
45. You should see successful replies with the correct IP address (ie. 192.168.10.23).
46. Now that we have found the root cause of the issue, let’s go back to the XM App Controller management console.
Click Save again to try to integrate XM App Controller and XM Device Manager.
47. You should notice that the Configuration Progress bar moves forward now.
| 115 |
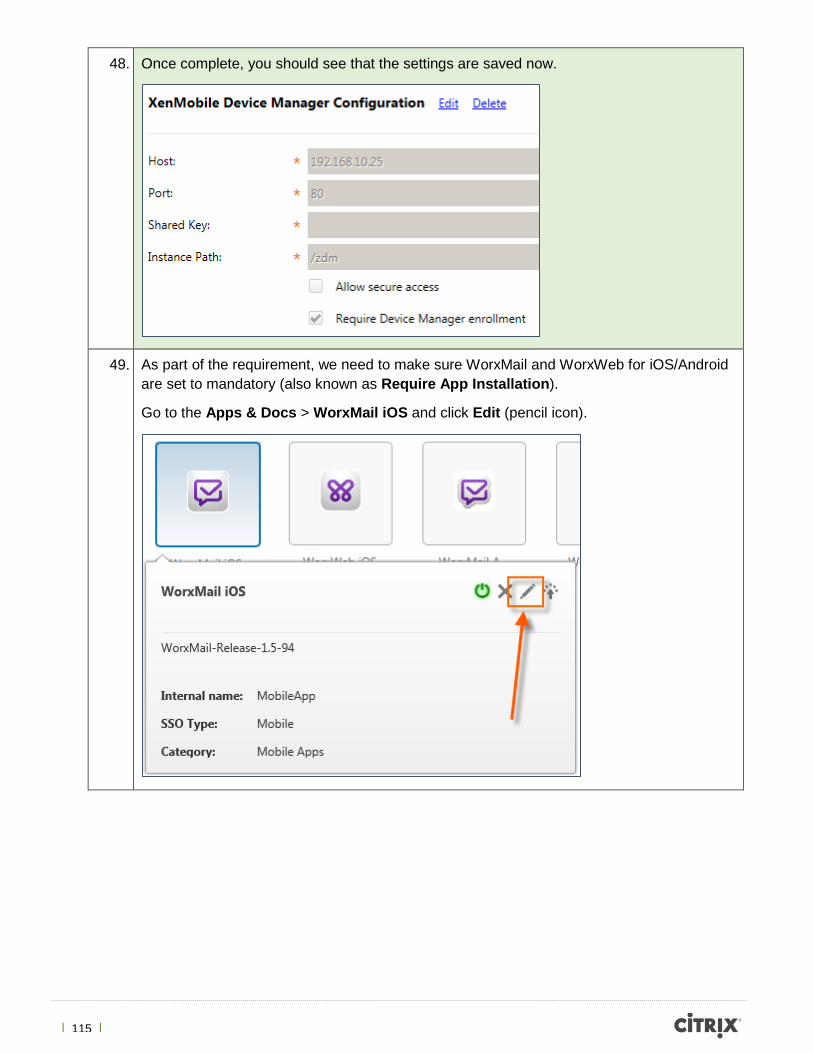
48. Once complete, you should see that the settings are saved now.
49. As part of the requirement, we need to make sure WorxMail and WorxWeb for iOS/Android are set to mandatory (also known as Require App Installation).
Go to the Apps & Docs > WorxMail iOS and click Edit (pencil icon).
| 116 |
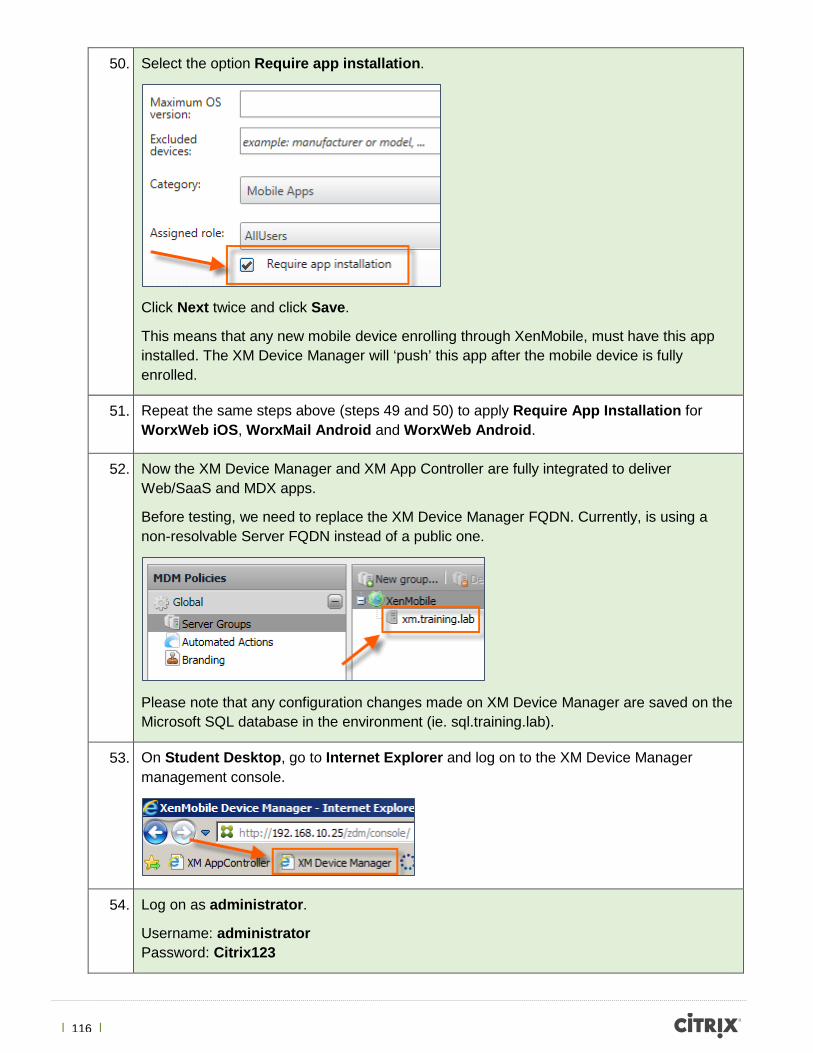
50. Select the option Require app installation.
Click Next twice and click Save.
This means that any new mobile device enrolling through XenMobile, must have this app installed. The XM Device Manager will ‘push’ this app after the mobile device is fully enrolled.
51. Repeat the same steps above (steps 49 and 50) to apply Require App Installation for WorxWeb iOS, WorxMail Android and WorxWeb Android.
52. Now the XM Device Manager and XM App Controller are fully integrated to deliver Web/SaaS and MDX apps.
Before testing, we need to replace the XM Device Manager FQDN. Currently, is using a non-resolvable Server FQDN instead of a public one.
Please note that any configuration changes made on XM Device Manager are saved on the Microsoft SQL database in the environment (ie. sql.training.lab).
53. On Student Desktop, go to Internet Explorer and log on to the XM Device Manager management console.
54. Log on as administrator.
Username: administrator Password: Citrix123
| 117 |
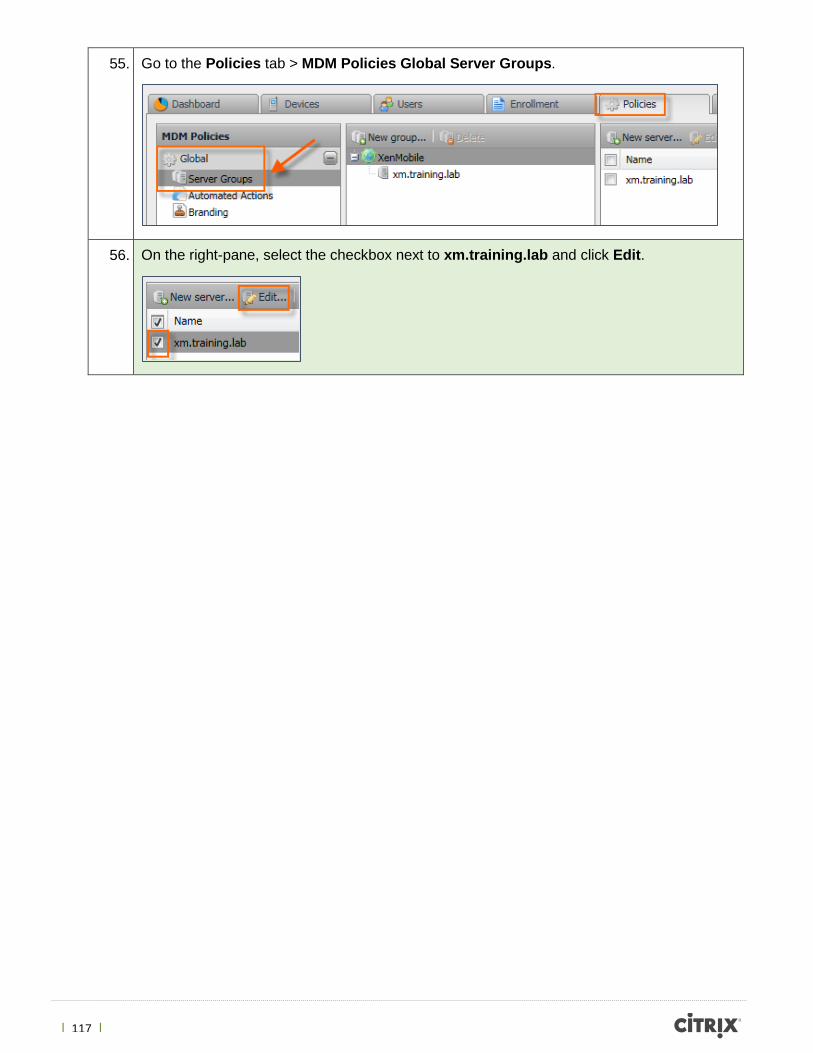
55. Go to the Policies tab > MDM Policies Global Server Groups.
56. On the right-pane, select the checkbox next to xm.training.lab and click Edit.
| 118 |
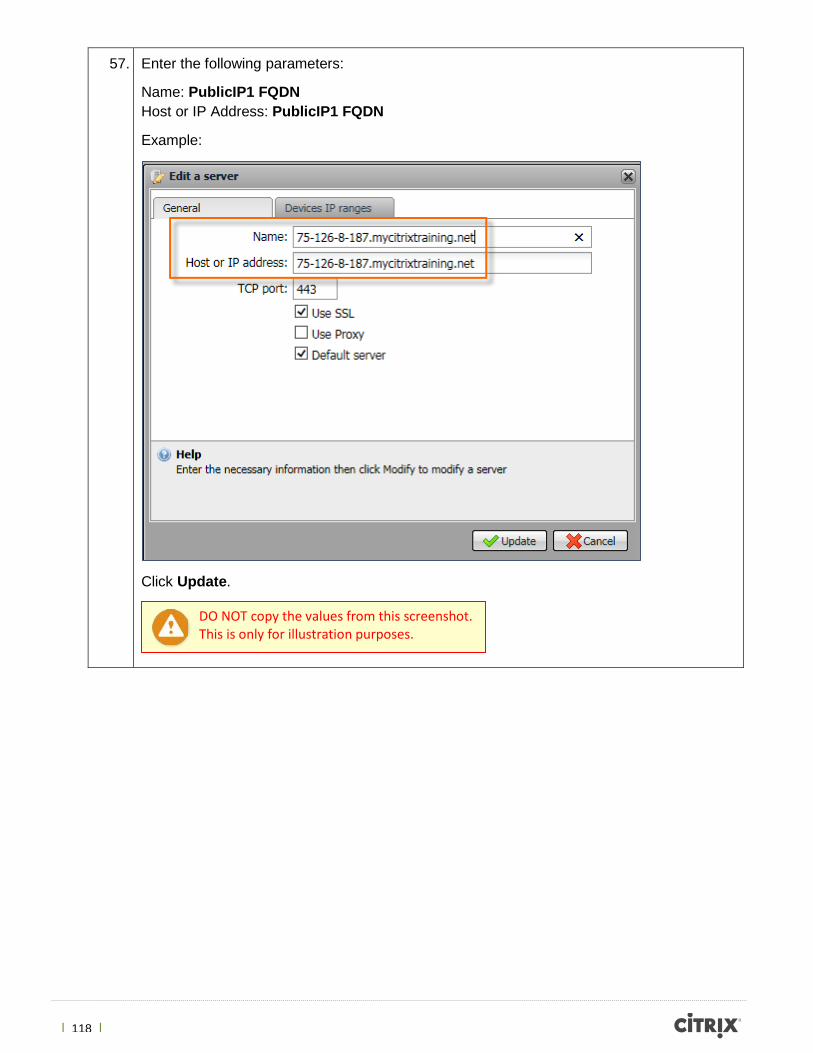
57. Enter the following parameters:
Name: PublicIP1 FQDN Host or IP Address: PublicIP1 FQDN
Example:
Click Update.
DO NOT copy the values from this screenshot. This is only for illustration purposes.
| 119 |
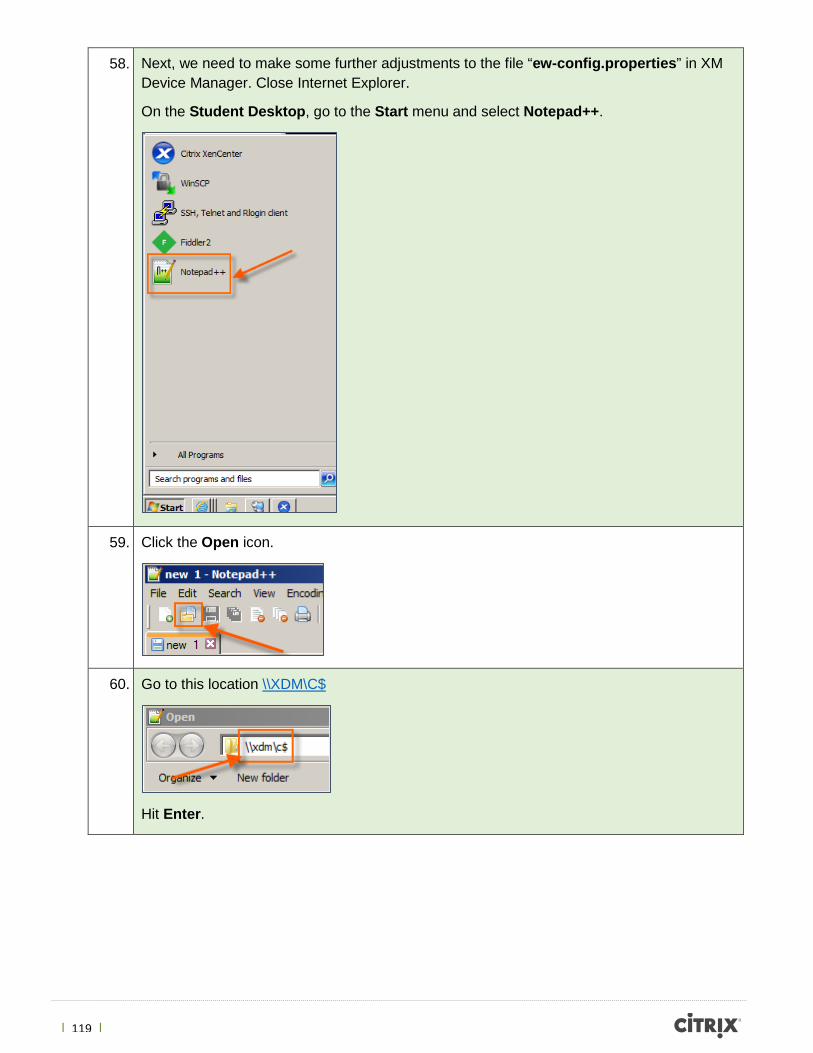
58. Next, we need to make some further adjustments to the file “ew-config.properties” in XM Device Manager. Close Internet Explorer.
On the Student Desktop, go to the Start menu and select Notepad++.
59. Click the Open icon.
60. Go to this location \\XDM\C$
Hit Enter.
| 120 |
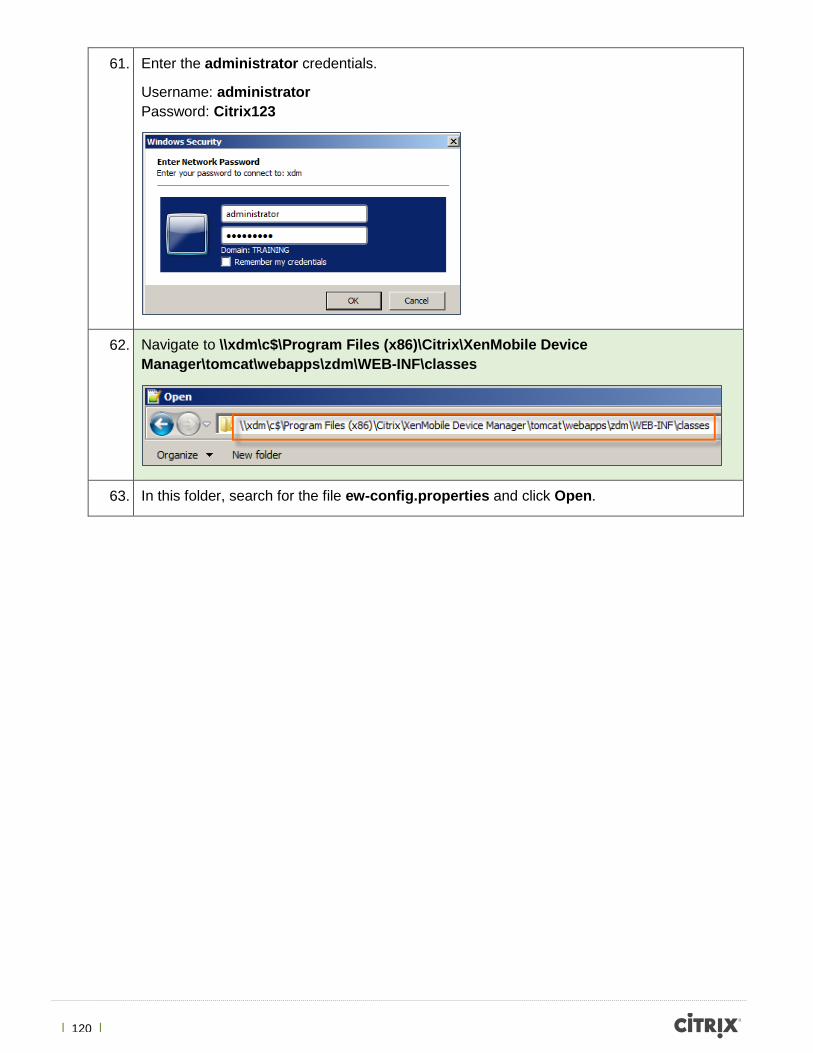
61. Enter the administrator credentials.
Username: administrator Password: Citrix123
62. Navigate to \\xdm\c$\Program Files (x86)\Citrix\XenMobile Device Manager\tomcat\webapps\zdm\WEB-INF\classes
63. In this folder, search for the file ew-config.properties and click Open.
| 121 |
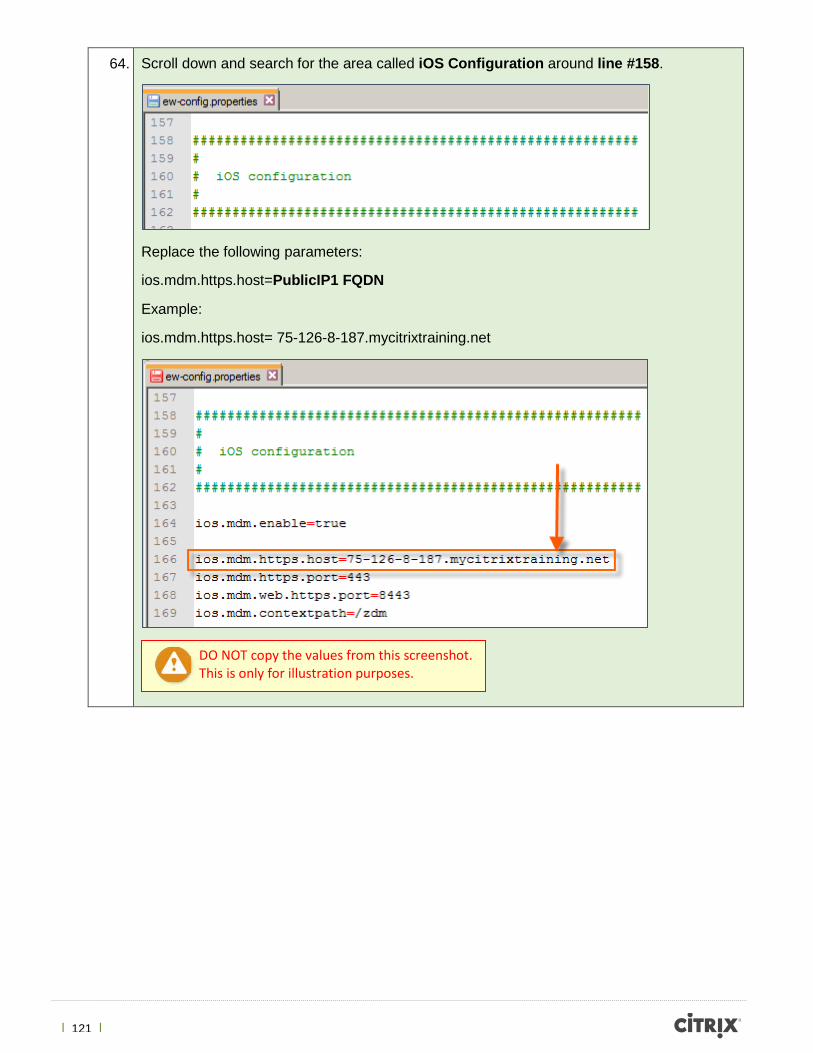
64. Scroll down and search for the area called iOS Configuration around line #158.
Replace the following parameters:
ios.mdm.https.host=PublicIP1 FQDN
Example:
ios.mdm.https.host= 75-126-8-187.mycitrixtraining.net
DO NOT copy the values from this screenshot. This is only for illustration purposes.
| 122 |
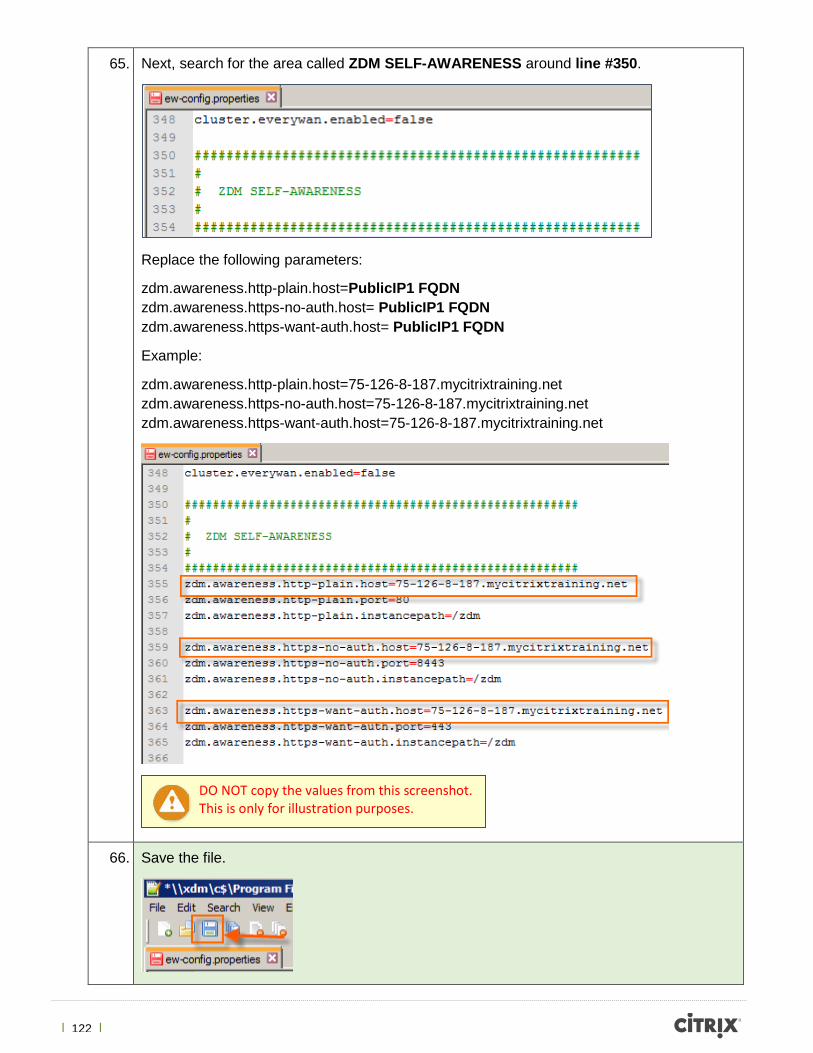
65. Next, search for the area called ZDM SELF-AWARENESS around line #350.
Replace the following parameters:
zdm.awareness.http-plain.host=PublicIP1 FQDN zdm.awareness.https-no-auth.host= PublicIP1 FQDN zdm.awareness.https-want-auth.host= PublicIP1 FQDN
Example:
zdm.awareness.http-plain.host=75-126-8-187.mycitrixtraining.net zdm.awareness.https-no-auth.host=75-126-8-187.mycitrixtraining.net zdm.awareness.https-want-auth.host=75-126-8-187.mycitrixtraining.net
66. Save the file.
DO NOT copy the values from this screenshot. This is only for illustration purposes.
| 123 |
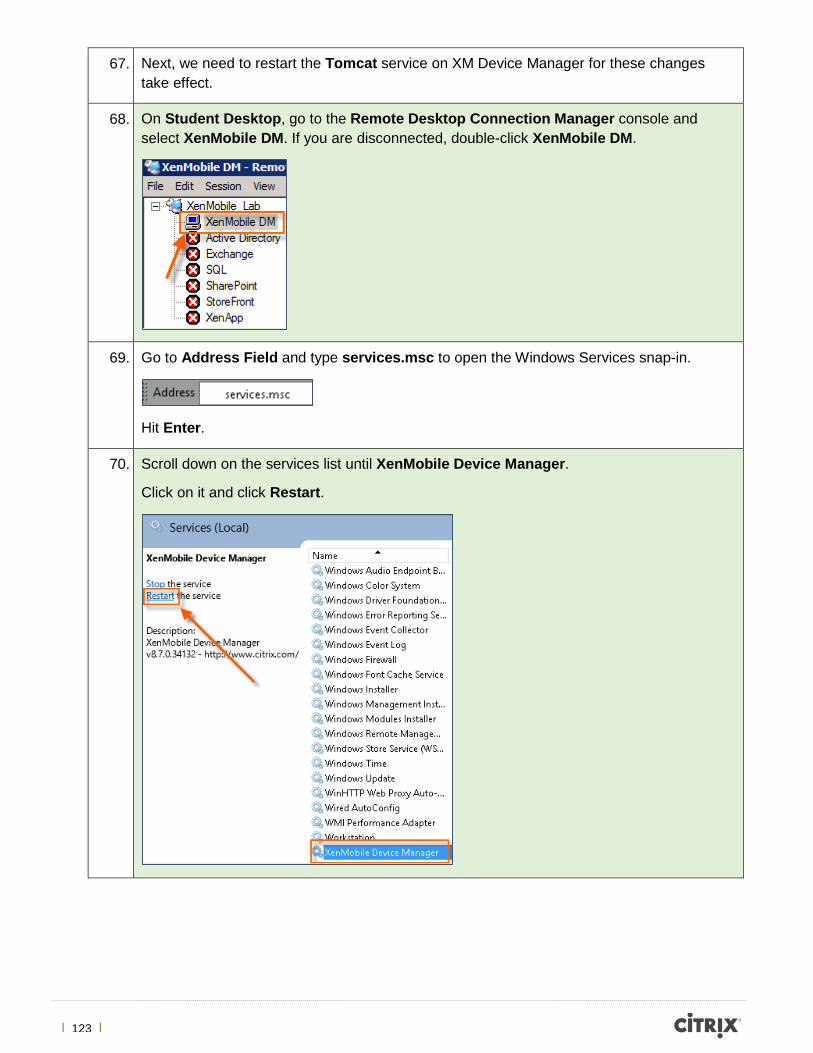
67. Next, we need to restart the Tomcat service on XM Device Manager for these changes take effect.
68. On Student Desktop, go to the Remote Desktop Connection Manager console and select XenMobile DM. If you are disconnected, double-click XenMobile DM.
69. Go to Address Field and type services.msc to open the Windows Services snap-in.
Hit Enter.
70. Scroll down on the services list until XenMobile Device Manager.
Click on it and click Restart.
| 124 |
71. Next, go back to the Student Desktop, open Internet Explorer and go to the XM Device Manager management console
72. Log on as administrator.
Username: administrator Password: Citrix123
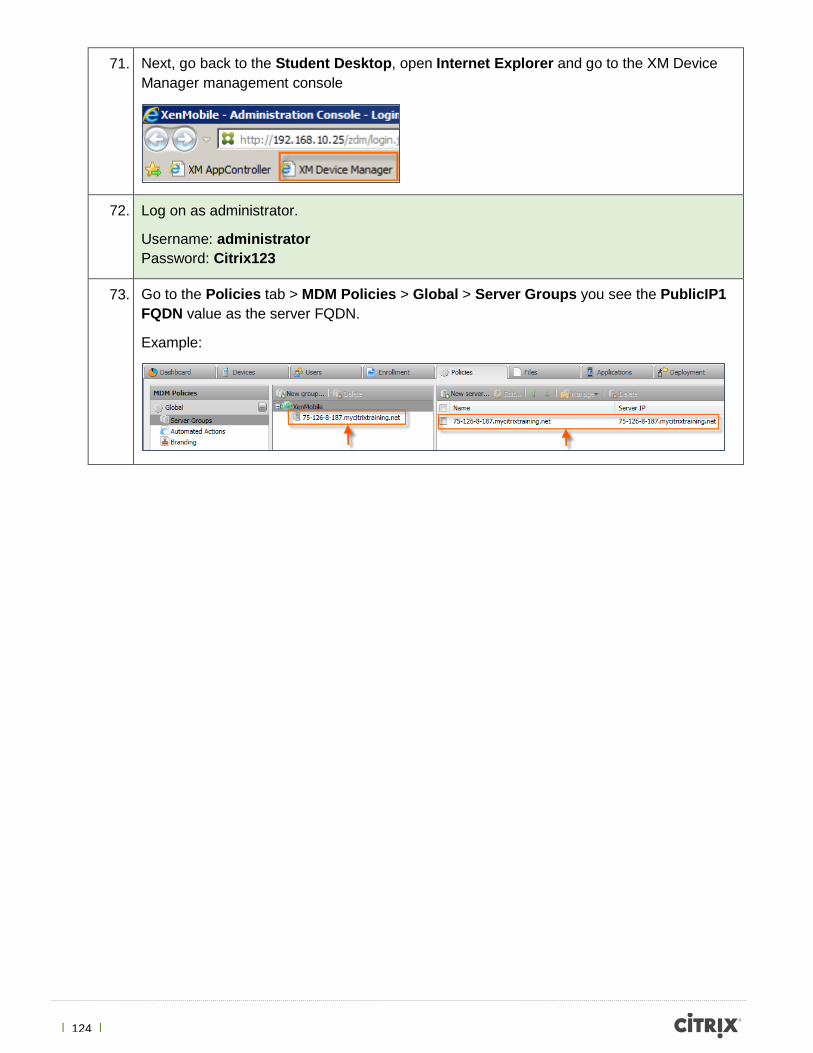
73. Go to the Policies tab > MDM Policies > Global > Server Groups you see the PublicIP1 FQDN value as the server FQDN.
Example:
| 125 |
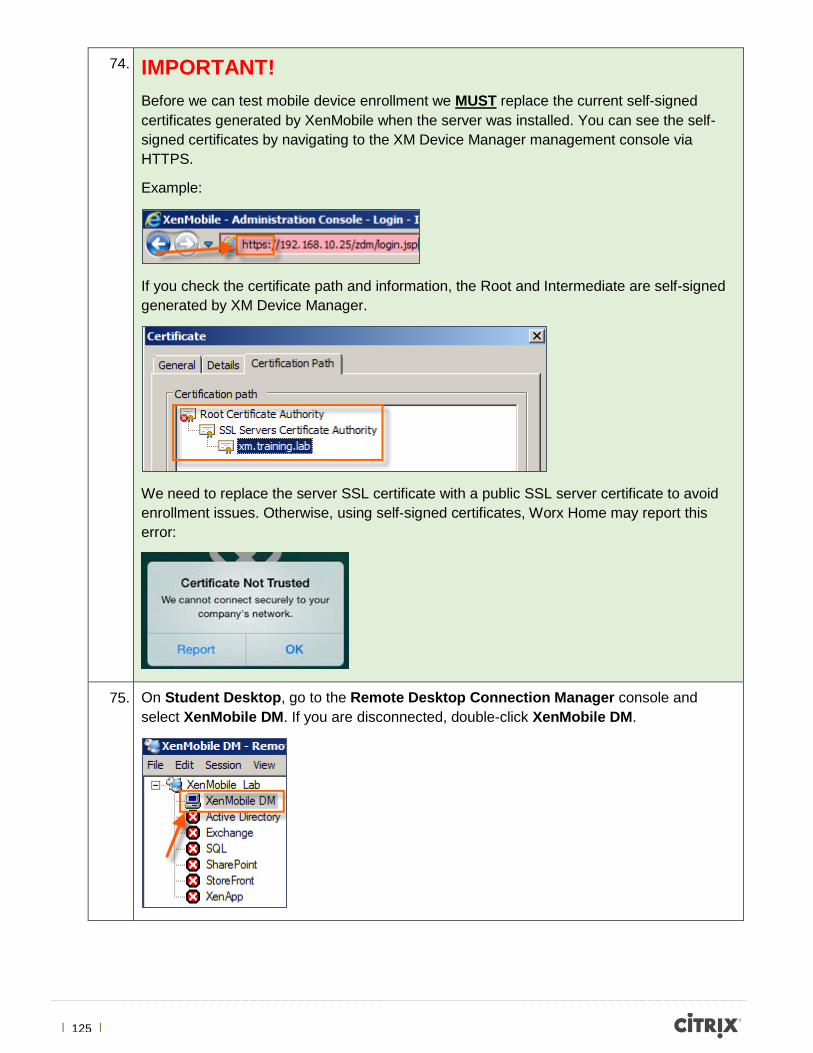
74. IMPORTANT! Before we can test mobile device enrollment we MUST replace the current self-signed certificates generated by XenMobile when the server was installed. You can see the self-signed certificates by navigating to the XM Device Manager management console via HTTPS.
Example:
If you check the certificate path and information, the Root and Intermediate are self-signed generated by XM Device Manager.
We need to replace the server SSL certificate with a public SSL server certificate to avoid enrollment issues. Otherwise, using self-signed certificates, Worx Home may report this error:
75. On Student Desktop, go to the Remote Desktop Connection Manager console and select XenMobile DM. If you are disconnected, double-click XenMobile DM.
| 126 |
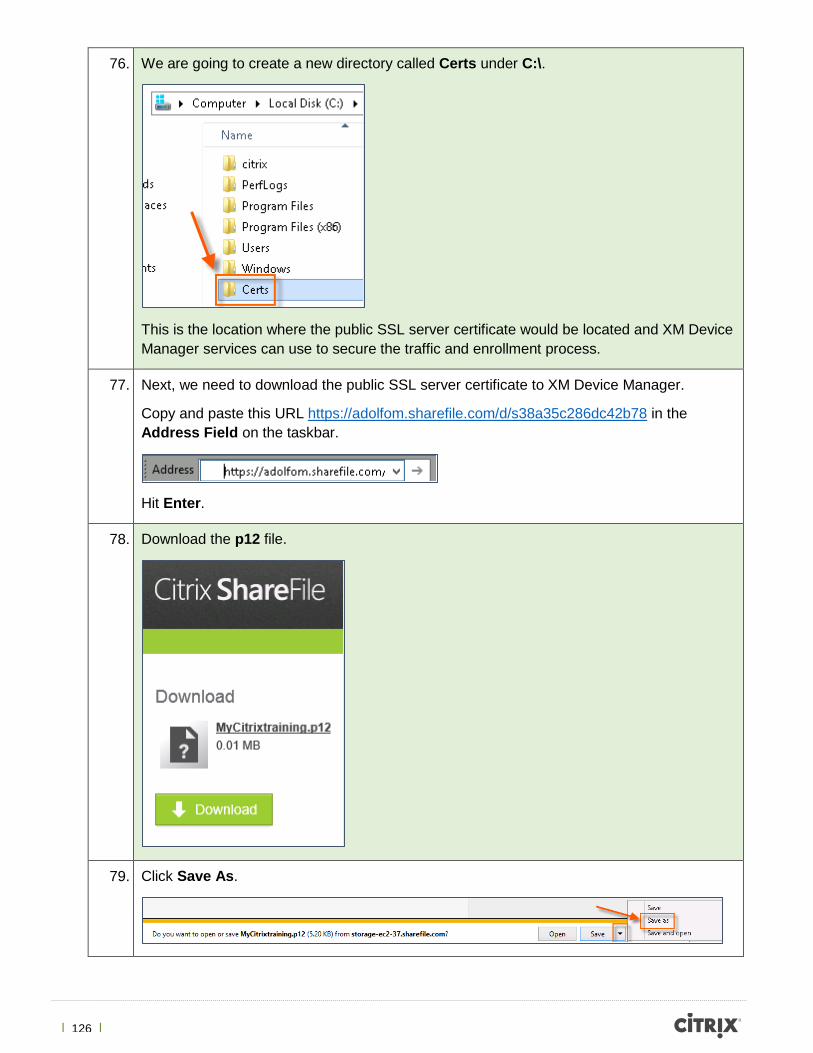
76. We are going to create a new directory called Certs under C:\.
This is the location where the public SSL server certificate would be located and XM Device Manager services can use to secure the traffic and enrollment process.
77. Next, we need to download the public SSL server certificate to XM Device Manager.
Copy and paste this URL https://adolfom.sharefile.com/d/s38a35c286dc42b78 in the Address Field on the taskbar.
Hit Enter.
78. Download the p12 file.
79. Click Save As.

| 127 |
80. Save the file under C:\Certs folder.
Click Save.
81. Verify that the certificate was downloaded successfully in the Certs folder.
82. Next, we need to modify two files (pki.xml and server.xml) on XenMobile Device Manager in order to utilize the new SSL certificate. These changes will done from the Student Desktop.
Note: These changes are also documented on Citrix Support site in http://support.citrix.com/article/CTX136952.
83. On the Student Desktop, go to the Start menu and select Notepad++.
| 128 |
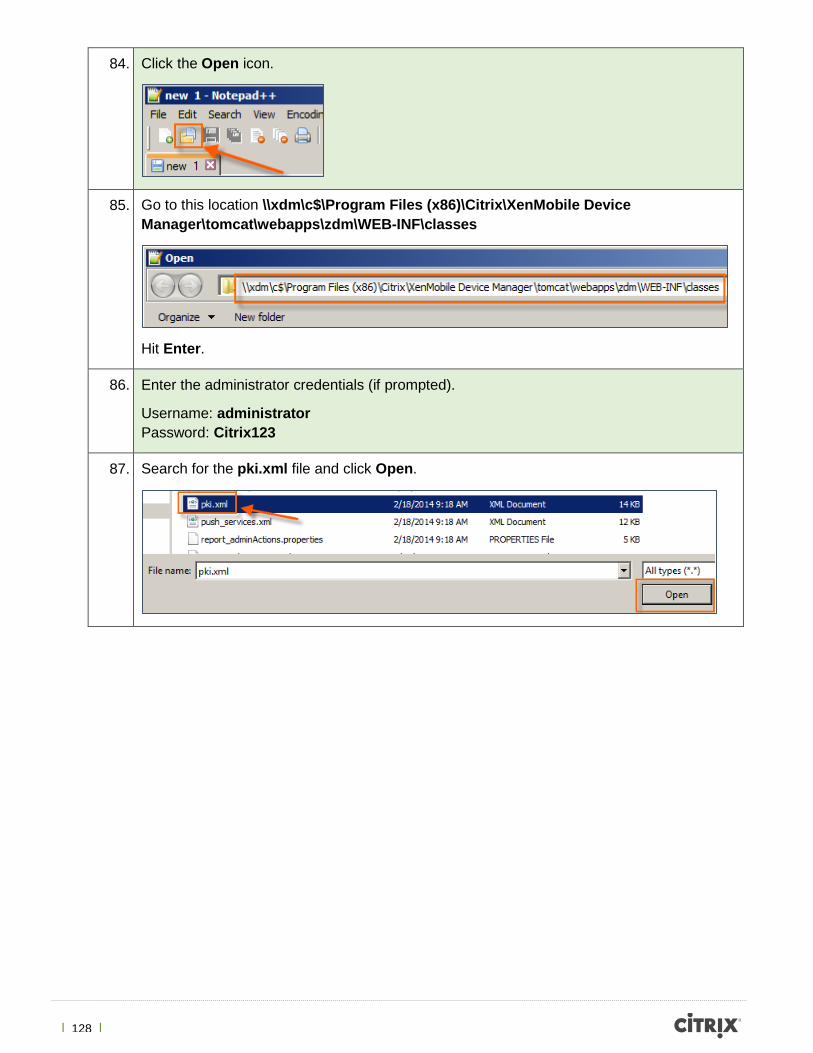
84. Click the Open icon.
85. Go to this location \\xdm\c$\Program Files (x86)\Citrix\XenMobile Device Manager\tomcat\webapps\zdm\WEB-INF\classes
Hit Enter.
86. Enter the administrator credentials (if prompted).
Username: administrator Password: Citrix123
87. Search for the pki.xml file and click Open.
| 129 |
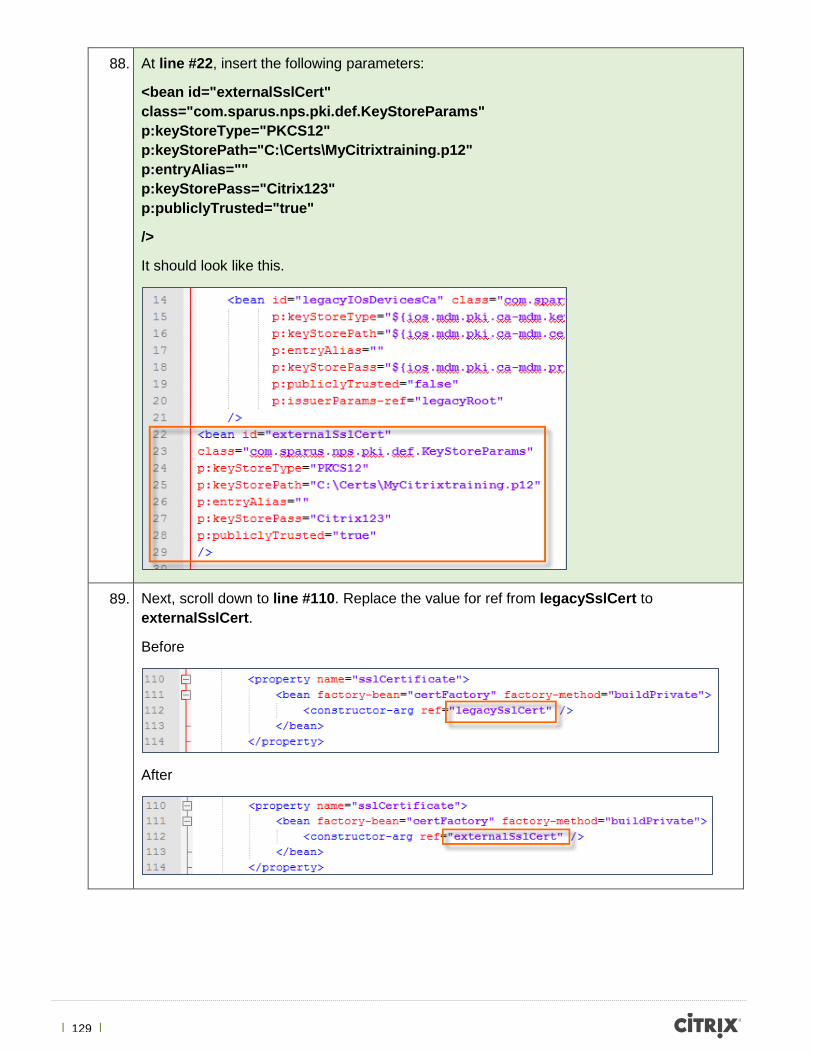
88. At line #22, insert the following parameters:
<bean id="externalSslCert" class="com.sparus.nps.pki.def.KeyStoreParams" p:keyStoreType="PKCS12" p:keyStorePath="C:\Certs\MyCitrixtraining.p12" p:entryAlias="" p:keyStorePass="Citrix123" p:publiclyTrusted="true"
/>
It should look like this.
89. Next, scroll down to line #110. Replace the value for ref from legacySslCert to externalSslCert.
Before
After
| 130 |
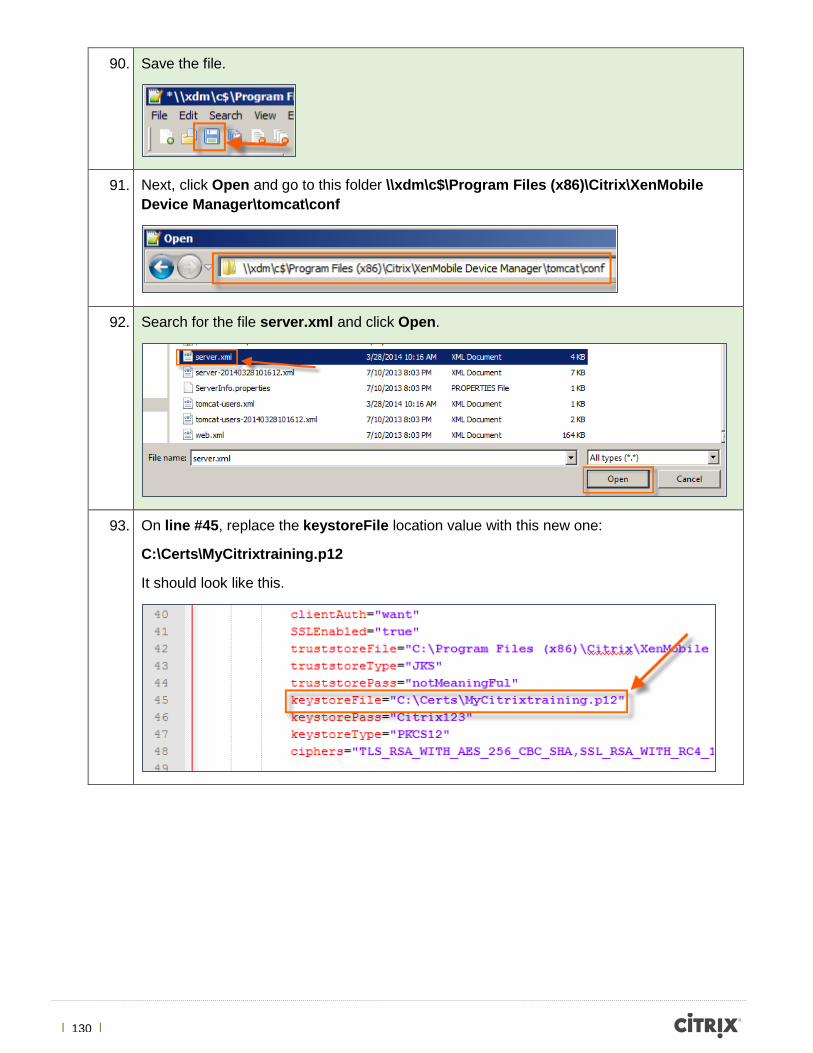
90. Save the file.
91. Next, click Open and go to this folder \\xdm\c$\Program Files (x86)\Citrix\XenMobile Device Manager\tomcat\conf
92. Search for the file server.xml and click Open.
93. On line #45, replace the keystoreFile location value with this new one:
C:\Certs\MyCitrixtraining.p12
It should look like this.
| 131 |
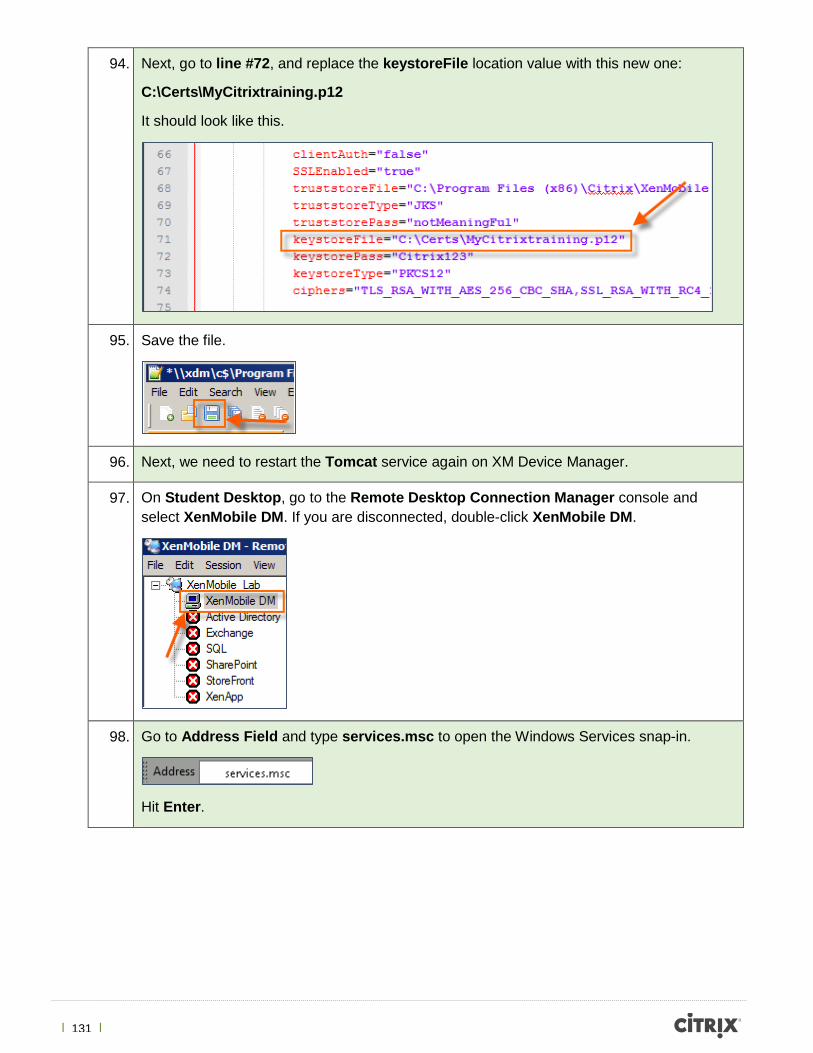
94. Next, go to line #72, and replace the keystoreFile location value with this new one:
C:\Certs\MyCitrixtraining.p12
It should look like this.
95. Save the file.
96. Next, we need to restart the Tomcat service again on XM Device Manager.
97. On Student Desktop, go to the Remote Desktop Connection Manager console and select XenMobile DM. If you are disconnected, double-click XenMobile DM.
98. Go to Address Field and type services.msc to open the Windows Services snap-in.
Hit Enter.
| 132 |
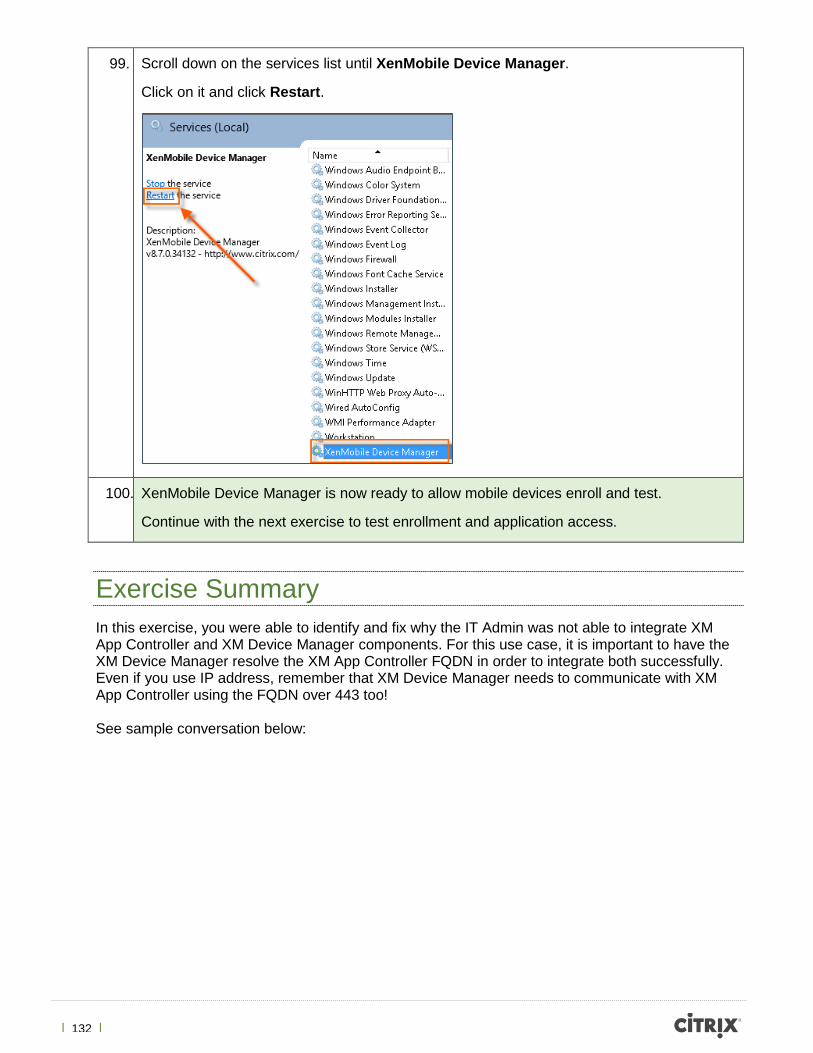
99. Scroll down on the services list until XenMobile Device Manager.
Click on it and click Restart.
100. XenMobile Device Manager is now ready to allow mobile devices enroll and test.
Continue with the next exercise to test enrollment and application access.
Exercise Summary In this exercise, you were able to identify and fix why the IT Admin was not able to integrate XM App Controller and XM Device Manager components. For this use case, it is important to have the XM Device Manager resolve the XM App Controller FQDN in order to integrate both successfully. Even if you use IP address, remember that XM Device Manager needs to communicate with XM App Controller using the FQDN over 443 too! See sample conversation below:

| 133 |
This is the list of common problem types when trying to integrate both components:
- For any new release of MDX Toolkit, it is recommended to re-wrap the iOS/Android apps to ensure compatibility with XenMobile Device Manager.
- Ensure port 443 (HTTPS) is open between XenMobile Device Manager and XenMobile App Controller. (Outbound rule on Firewall)
- Ensure DNS is working between XenMobile Device Manager and XenMobile App Controller. The Device Manager must be able to resolve the App Controller FQDN. If you modify the hosts file Windows, make sure to keep it up-to-date with the correct IP address from App Controller.
- If securing the communication between XM Device Manager and XM App Controller, make sure to install the Root CA certificates from each component on the corresponding certificate store.
| 134 |
Exercise 7 Test Mobile Device Enrollment and WorxMail/WorxWeb Access Overview In this exercise, students will test that mobile device enrollment is working successfully. In addition, they need to ensure WorxMail and WorxWeb are being delivered to the mobile device (ie. iOS or Android).
Pre-requisites on your mobile device:
- Remove WorxMail previously installed.
- Re-install Worx Home (for both iOS and Android).
Step by step guidance Estimated time to complete this lab: 15 minutes.
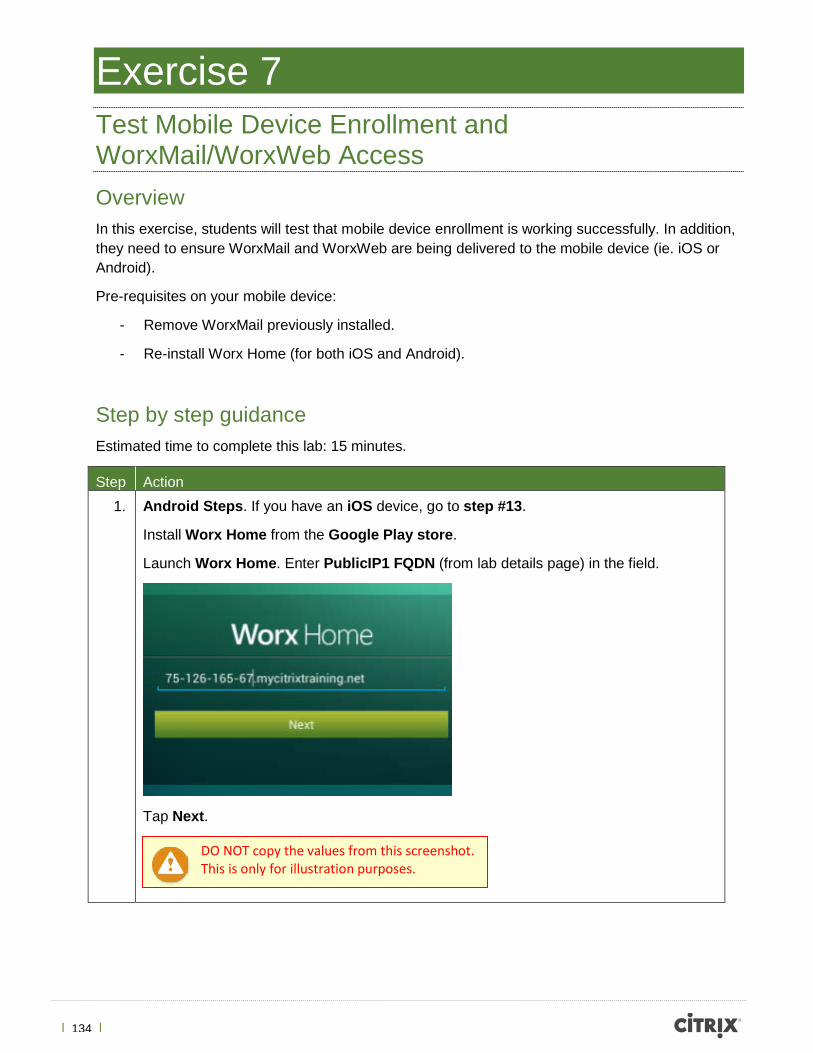
Step Action 1. Android Steps. If you have an iOS device, go to step #13.
Install Worx Home from the Google Play store.
Launch Worx Home. Enter PublicIP1 FQDN (from lab details page) in the field.
Tap Next.
DO NOT copy the values from this screenshot. This is only for illustration purposes.
| 135 |
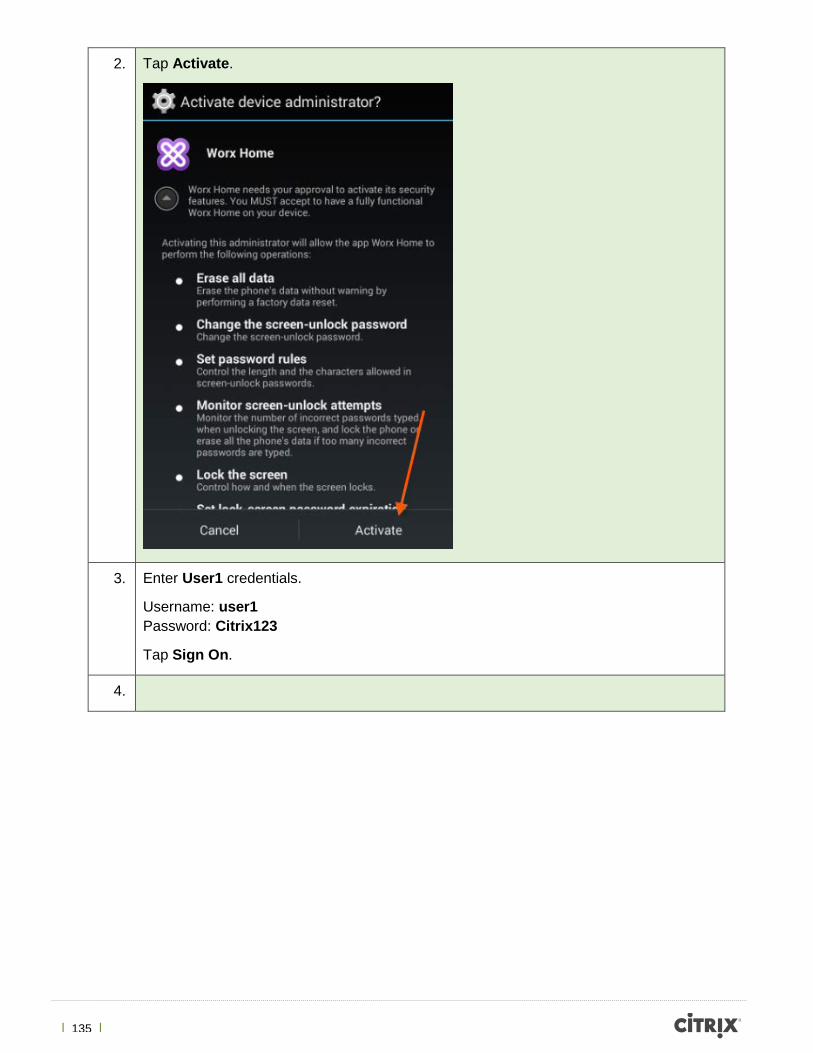
2. Tap Activate.
3. Enter User1 credentials.
Username: user1 Password: Citrix123
Tap Sign On.
4.
| 136 |
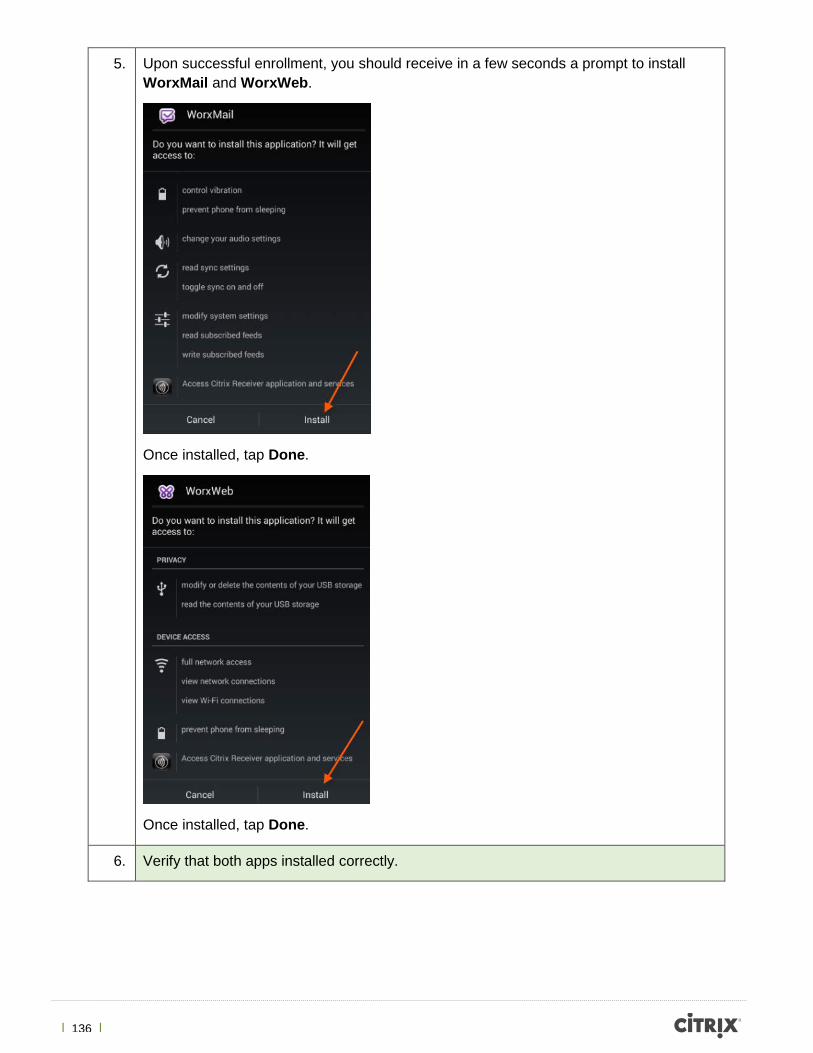
5. Upon successful enrollment, you should receive in a few seconds a prompt to install WorxMail and WorxWeb.
Once installed, tap Done.
Once installed, tap Done.
6. Verify that both apps installed correctly.
| 137 |
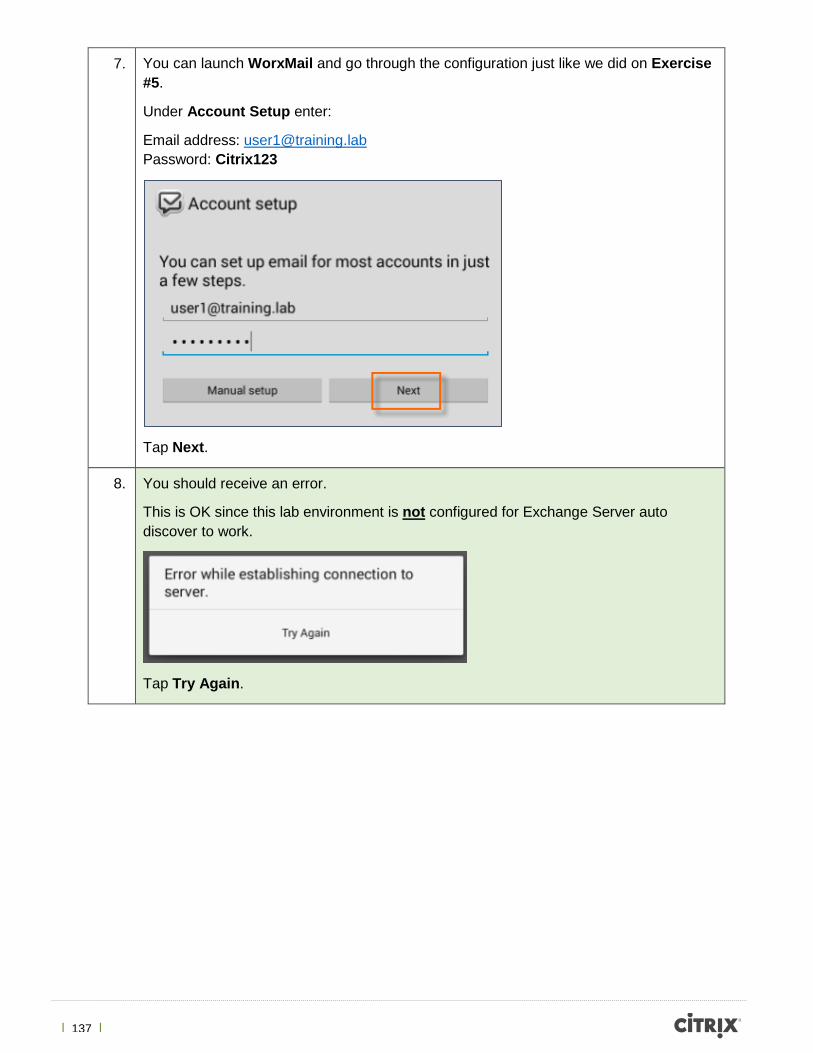
7. You can launch WorxMail and go through the configuration just like we did on Exercise #5.
Under Account Setup enter:
Email address: [email protected] Password: Citrix123
Tap Next.
8. You should receive an error.
This is OK since this lab environment is not configured for Exchange Server auto discover to work.
Tap Try Again.
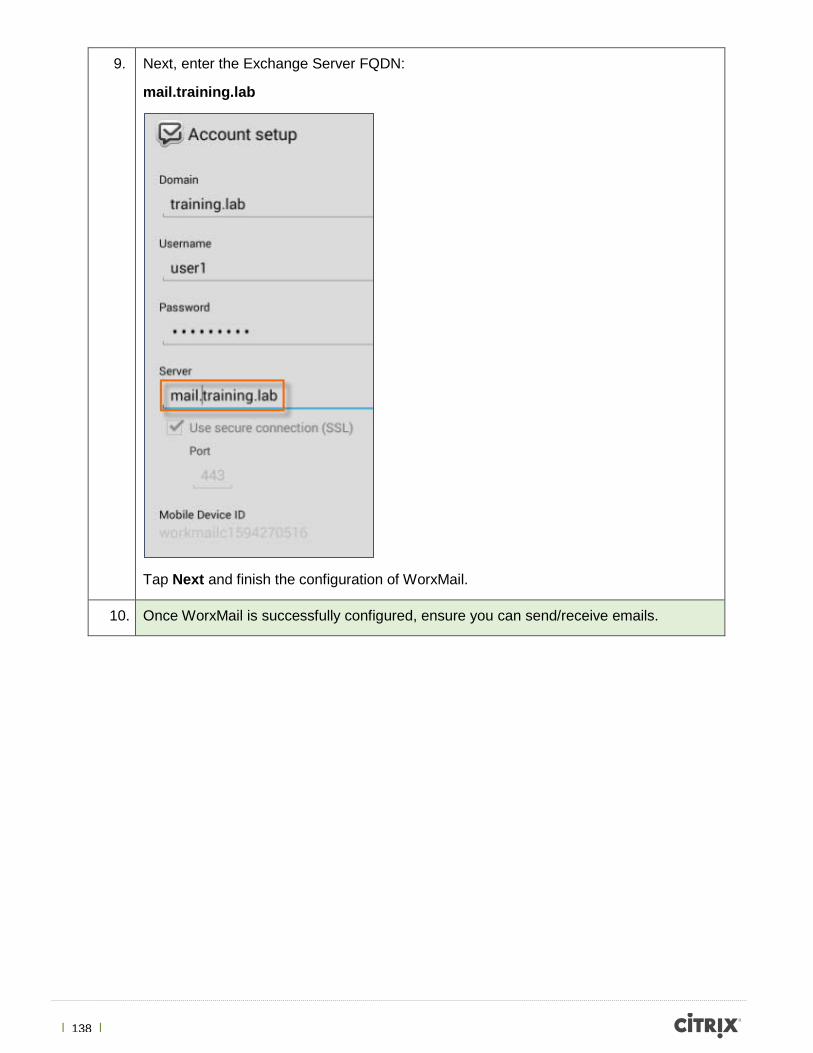
| 138 |
9. Next, enter the Exchange Server FQDN:
mail.training.lab
Tap Next and finish the configuration of WorxMail.
10. Once WorxMail is successfully configured, ensure you can send/receive emails.
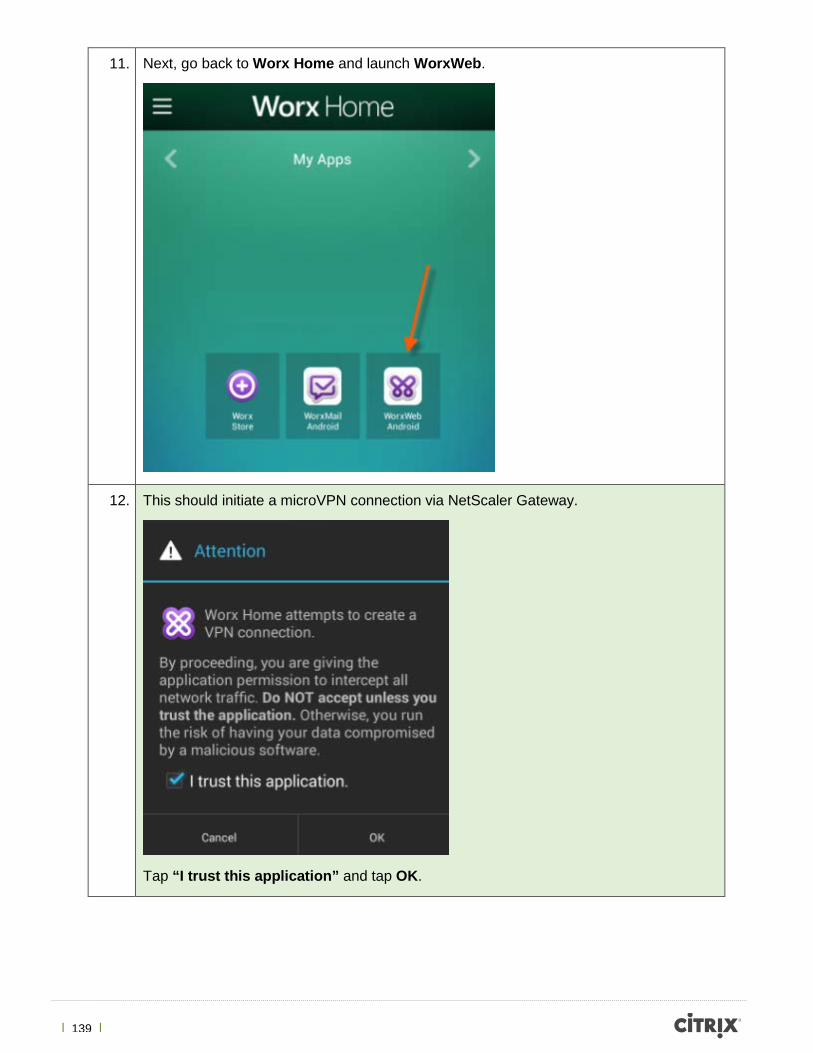
| 139 |
11. Next, go back to Worx Home and launch WorxWeb.
12. This should initiate a microVPN connection via NetScaler Gateway.
Tap “I trust this application” and tap OK.

| 140 |
13. You should be redirected to a SharePoint landing page.
14. iOS Steps.
Install Worx Home from the Apple App Store.
Launch Worx Home. Enter PublicIP1 FQDN (from the lab details page) in the field.
Tap Next.
DO NOT copy the values from this screenshot. This is only for illustration purposes.
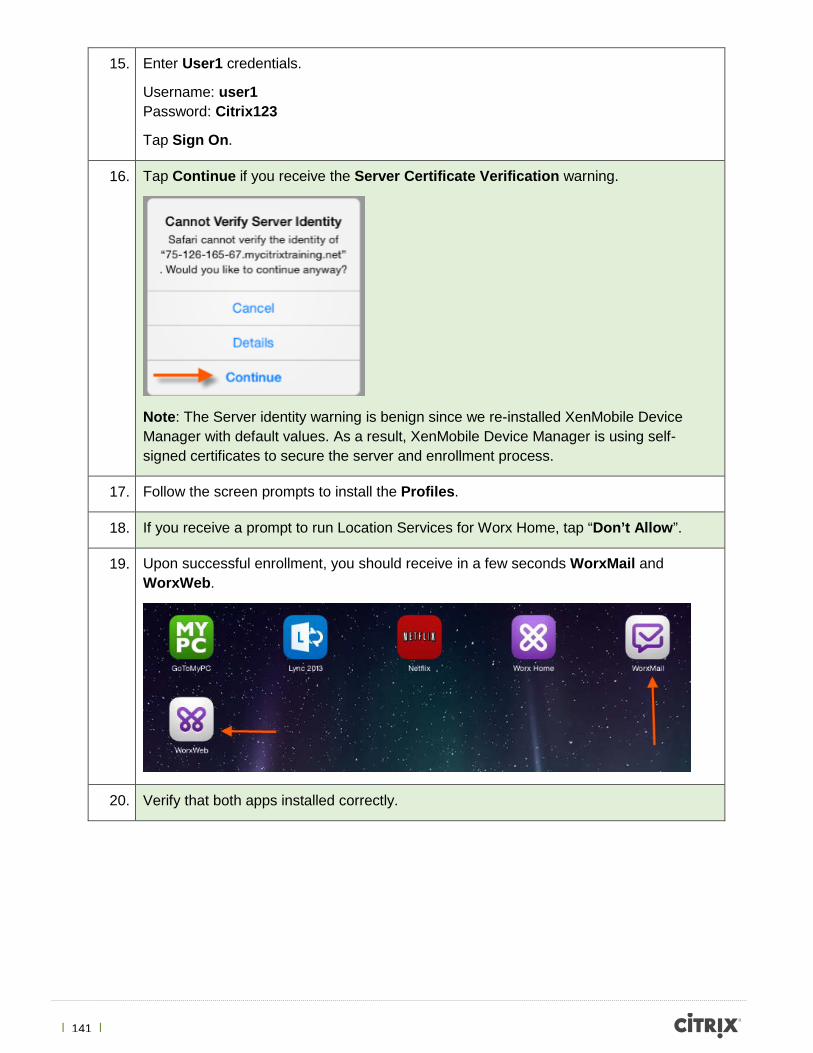
| 141 |
15. Enter User1 credentials.
Username: user1 Password: Citrix123
Tap Sign On.
16. Tap Continue if you receive the Server Certificate Verification warning.
Note: The Server identity warning is benign since we re-installed XenMobile Device Manager with default values. As a result, XenMobile Device Manager is using self-signed certificates to secure the server and enrollment process.
17. Follow the screen prompts to install the Profiles.
18. If you receive a prompt to run Location Services for Worx Home, tap “Don’t Allow”.
19. Upon successful enrollment, you should receive in a few seconds WorxMail and WorxWeb.
20. Verify that both apps installed correctly.
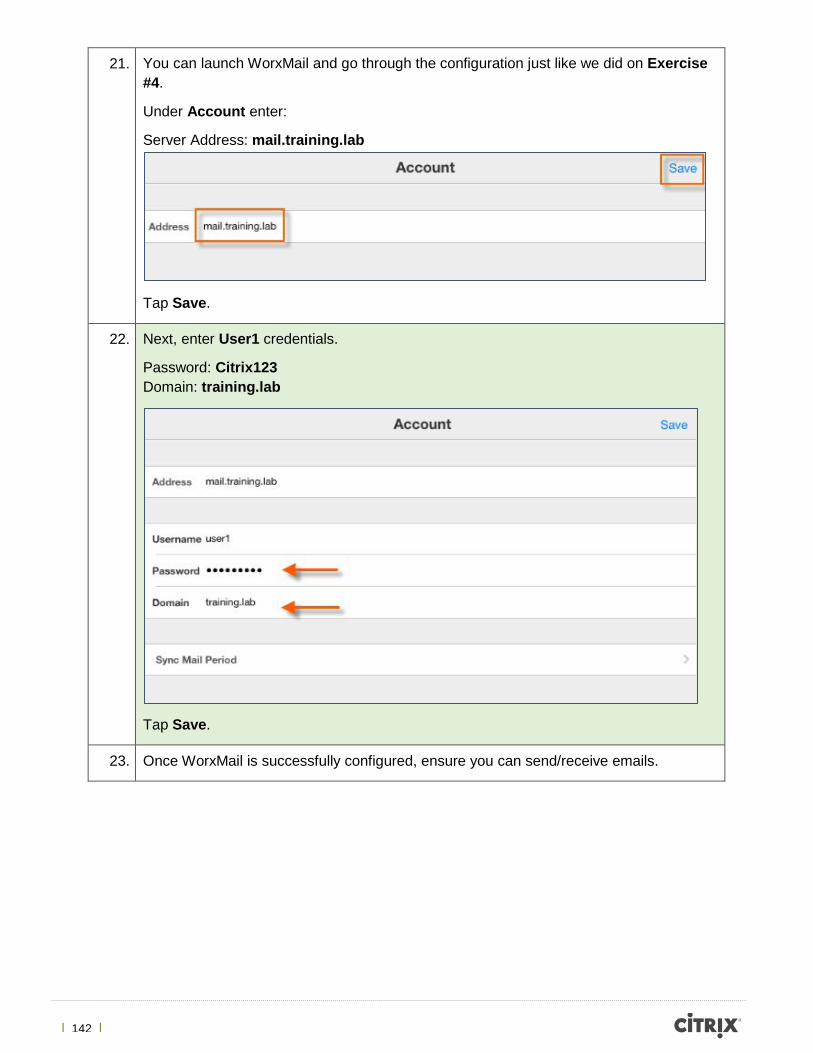
| 142 |
21. You can launch WorxMail and go through the configuration just like we did on Exercise #4.
Under Account enter:
Server Address: mail.training.lab
Tap Save.
22. Next, enter User1 credentials.
Password: Citrix123 Domain: training.lab
Tap Save.
23. Once WorxMail is successfully configured, ensure you can send/receive emails.

| 143 |
24. Next, go back to Worx Home and launch WorxWeb.
25. This should initiate a microVPN connection via NetScaler Gateway. You should be redirected to a SharePoint landing page.
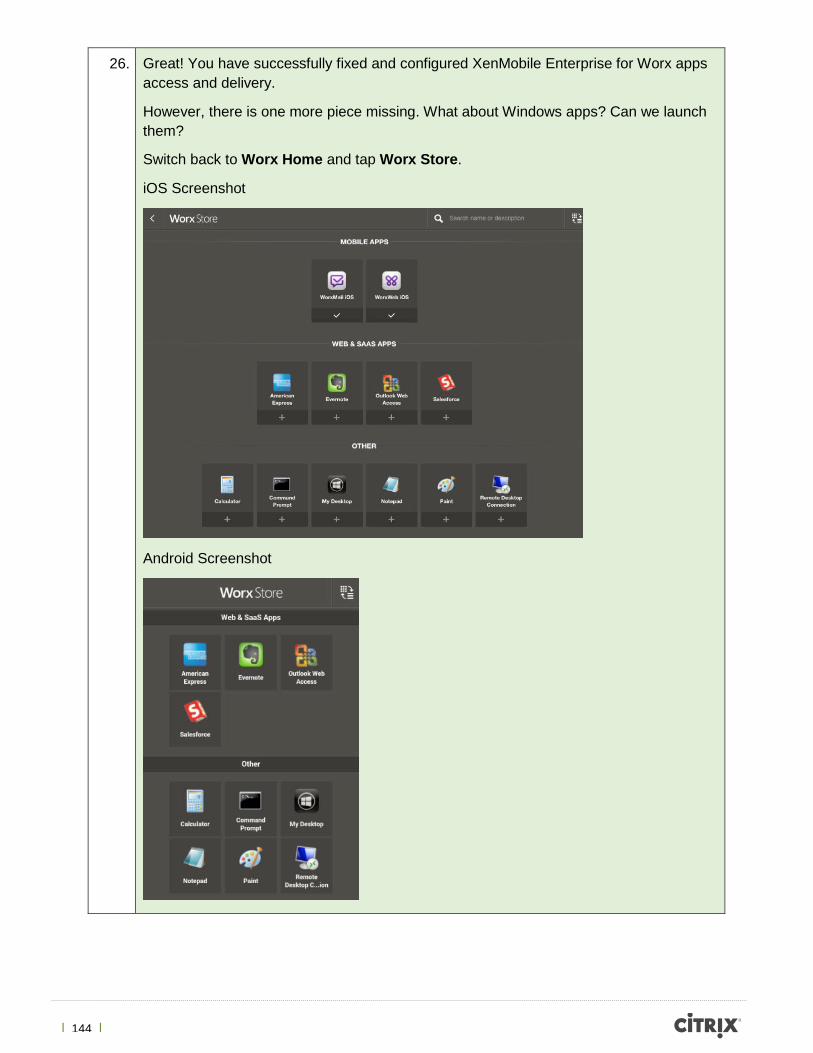
| 144 |
26. Great! You have successfully fixed and configured XenMobile Enterprise for Worx apps access and delivery.
However, there is one more piece missing. What about Windows apps? Can we launch them?
Switch back to Worx Home and tap Worx Store.
iOS Screenshot
Android Screenshot
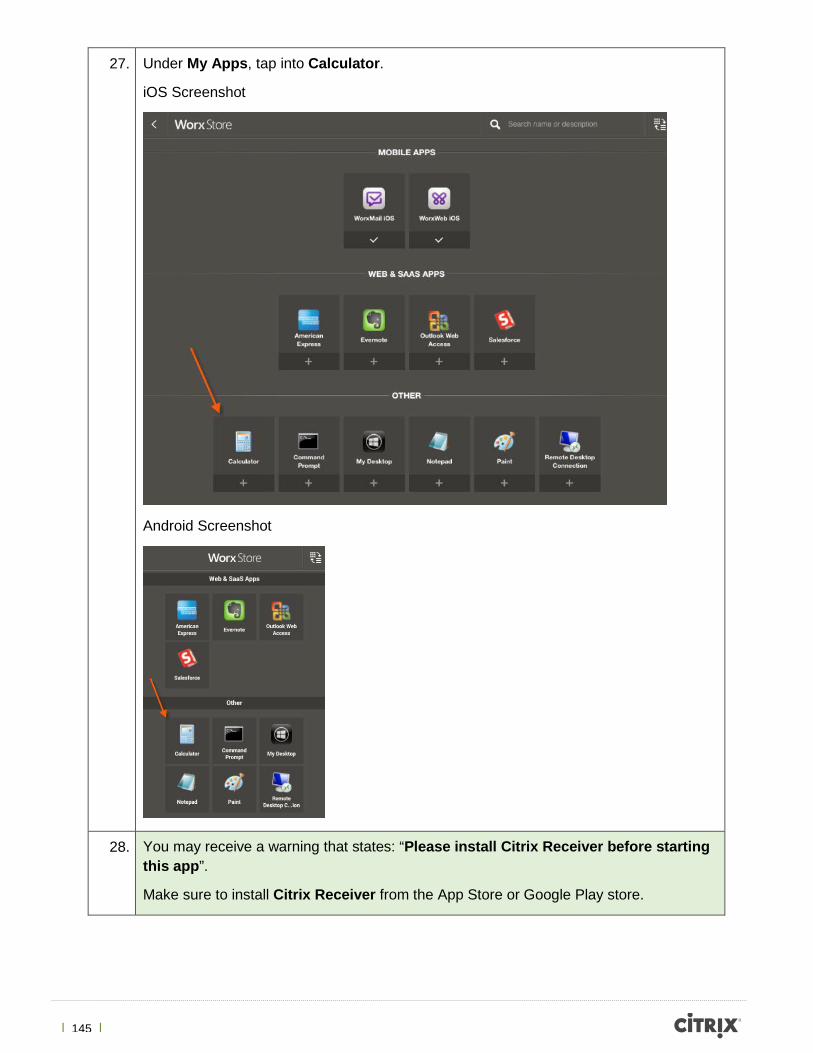
| 145 |
27. Under My Apps, tap into Calculator.
iOS Screenshot
Android Screenshot
28. You may receive a warning that states: “Please install Citrix Receiver before starting this app”.
Make sure to install Citrix Receiver from the App Store or Google Play store.
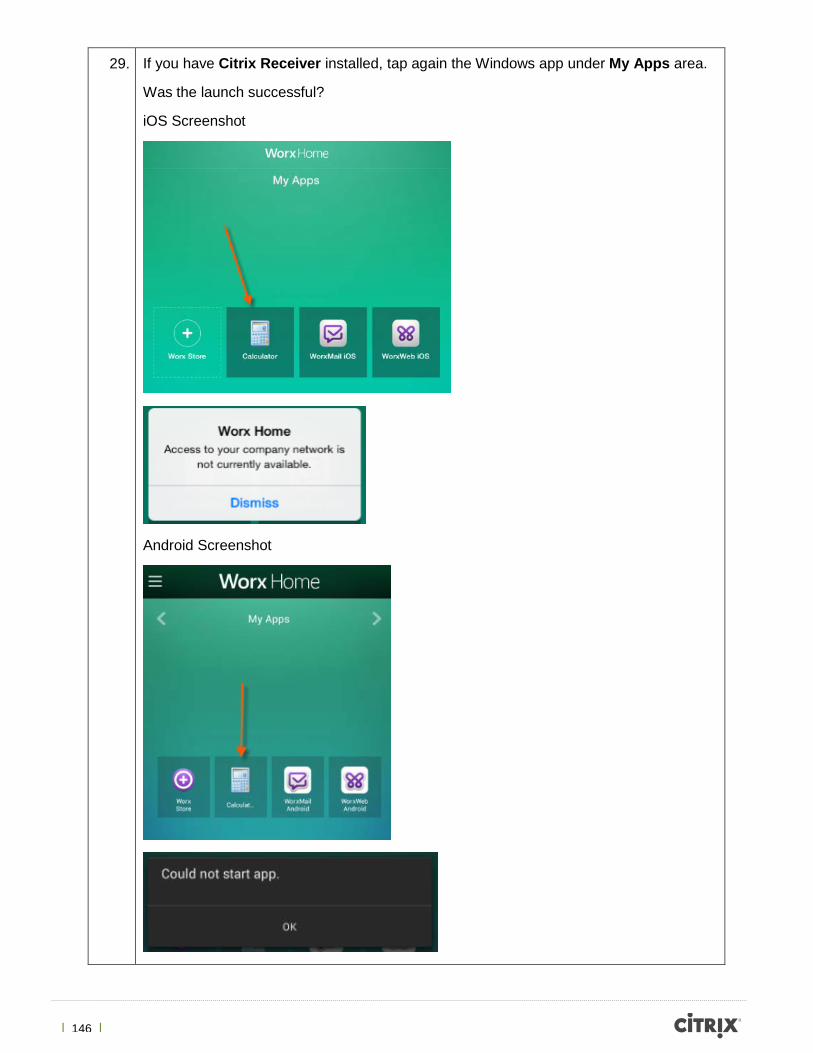
| 146 |
29. If you have Citrix Receiver installed, tap again the Windows app under My Apps area.
Was the launch successful?
iOS Screenshot
Android Screenshot
| 147 |
30. If you are interested on fixing this Windows app launch issue, continue to the next exercise.
Exercise Summary In this exercise, you verified that mobile devices were able to enroll and get Worx apps (ie. WorxMail and WorxWeb) installed and working.
The following exercise is optional but will guide you on how to troubleshoot XenMobile solutions when accessing Windows apps from XenApp or XenDesktop sites.

| 148 |
Exercise 8 (Optional) Unable to Launch Windows Apps from Worx Home Overview In this exercise, students will identify and fix why mobile devices (ie. iOS / Android) are unable to launch Windows apps hosted by XenApp 7.5 and StoreFront 2.5.
Up to this point, the IT Admin and corporate mobile users were able to verify that mobile device enrollment and Worx app access/delivery is fully functional. However, Windows apps are unreachable. iOS users are getting the error:
“Access to your company network is not currently available.”
Android users are getting the error:
“Could not start app.”
Pre-requisites on your mobile device:
- Citrix Receiver must be installed from the App Store or Google Play store.
- Worx Home configured as per Exercise #7.
Tools to be used:
Students will leverage Windows Event Viewer logs to find out why mobile users cannot launch Windows apps.
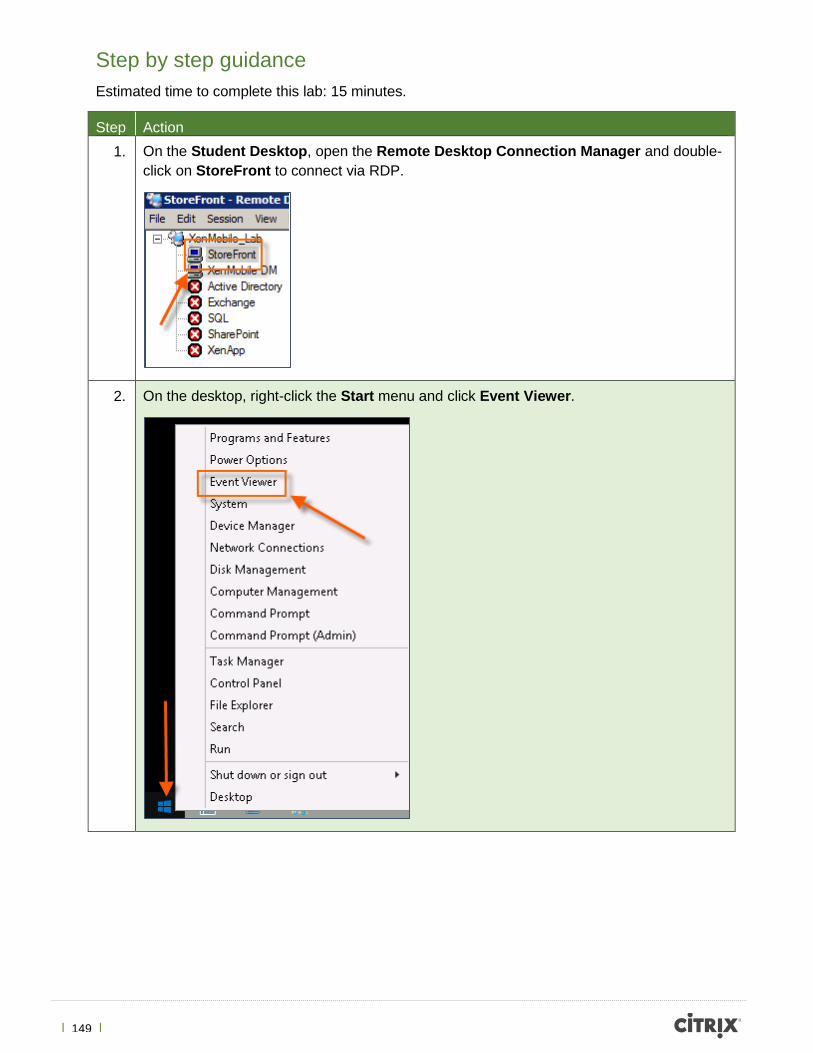
| 149 |
Step by step guidance Estimated time to complete this lab: 15 minutes.
Step Action 1. On the Student Desktop, open the Remote Desktop Connection Manager and double-
click on StoreFront to connect via RDP.
2. On the desktop, right-click the Start menu and click Event Viewer.
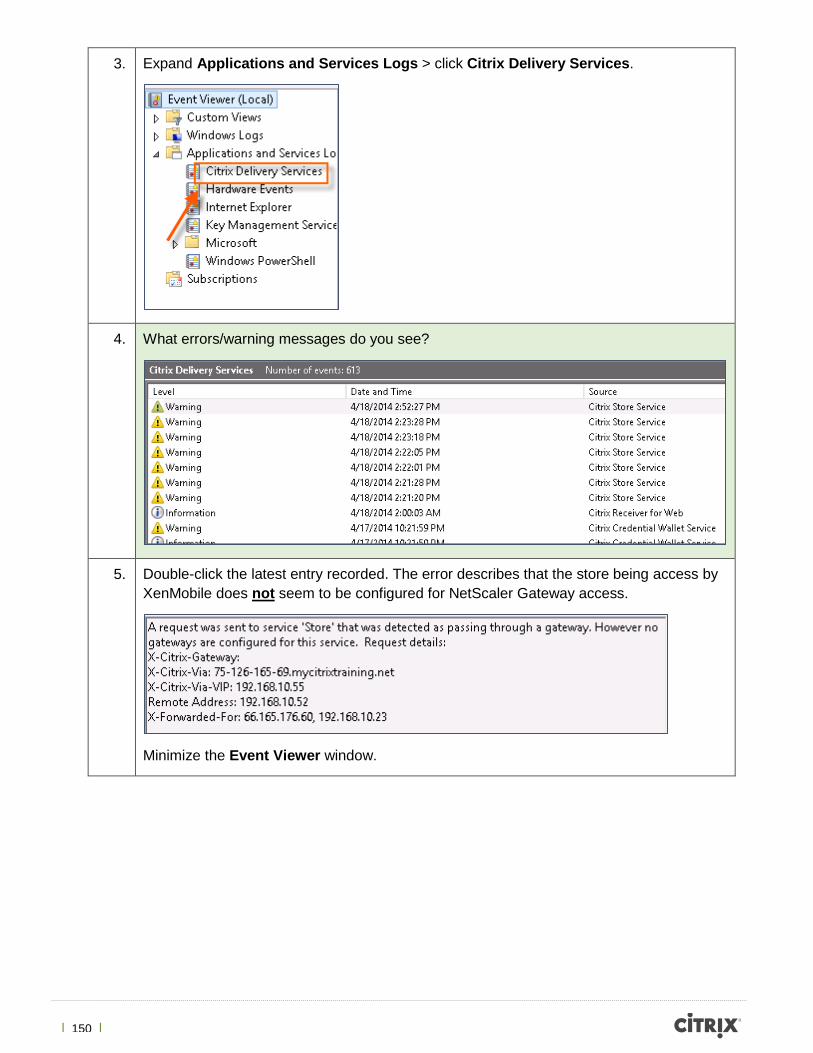
| 150 |
3. Expand Applications and Services Logs > click Citrix Delivery Services.
4. What errors/warning messages do you see?
5. Double-click the latest entry recorded. The error describes that the store being access by XenMobile does not seem to be configured for NetScaler Gateway access.
Minimize the Event Viewer window.
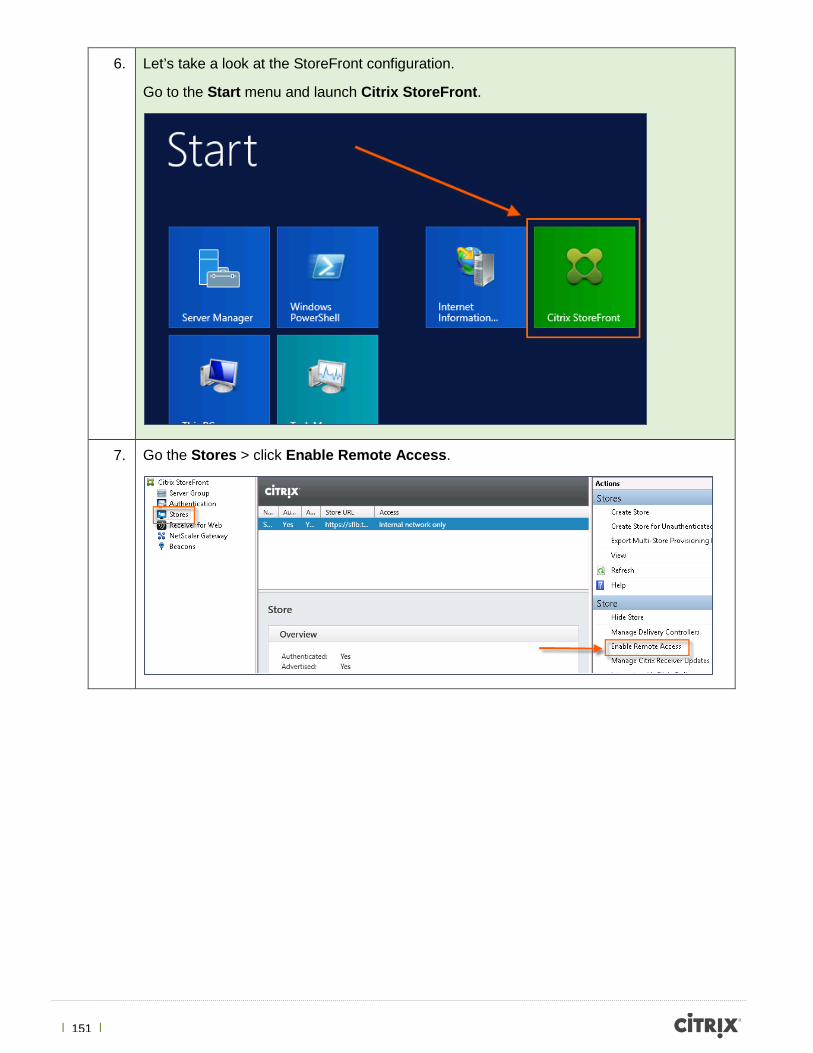
| 151 |
6. Let’s take a look at the StoreFront configuration.
Go to the Start menu and launch Citrix StoreFront.
7. Go the Stores > click Enable Remote Access.
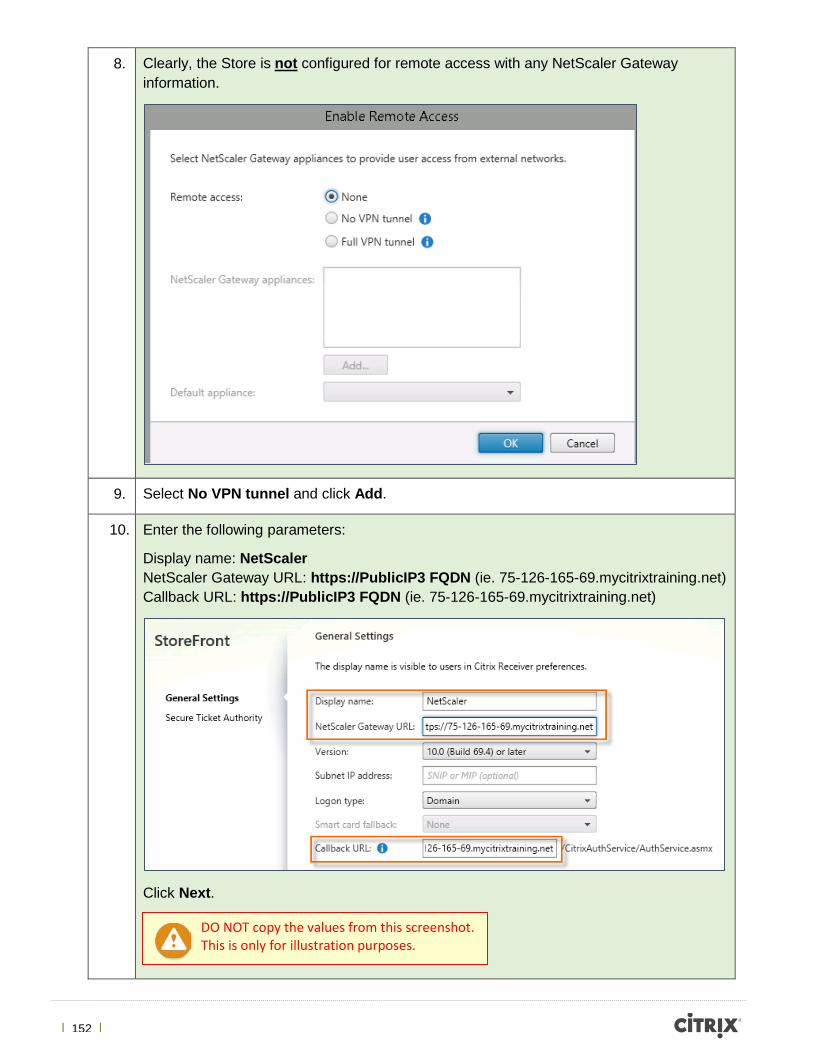
| 152 |
8. Clearly, the Store is not configured for remote access with any NetScaler Gateway information.
9. Select No VPN tunnel and click Add.
10. Enter the following parameters:
Display name: NetScaler NetScaler Gateway URL: https://PublicIP3 FQDN (ie. 75-126-165-69.mycitrixtraining.net) Callback URL: https://PublicIP3 FQDN (ie. 75-126-165-69.mycitrixtraining.net)
Click Next.
DO NOT copy the values from this screenshot. This is only for illustration purposes.
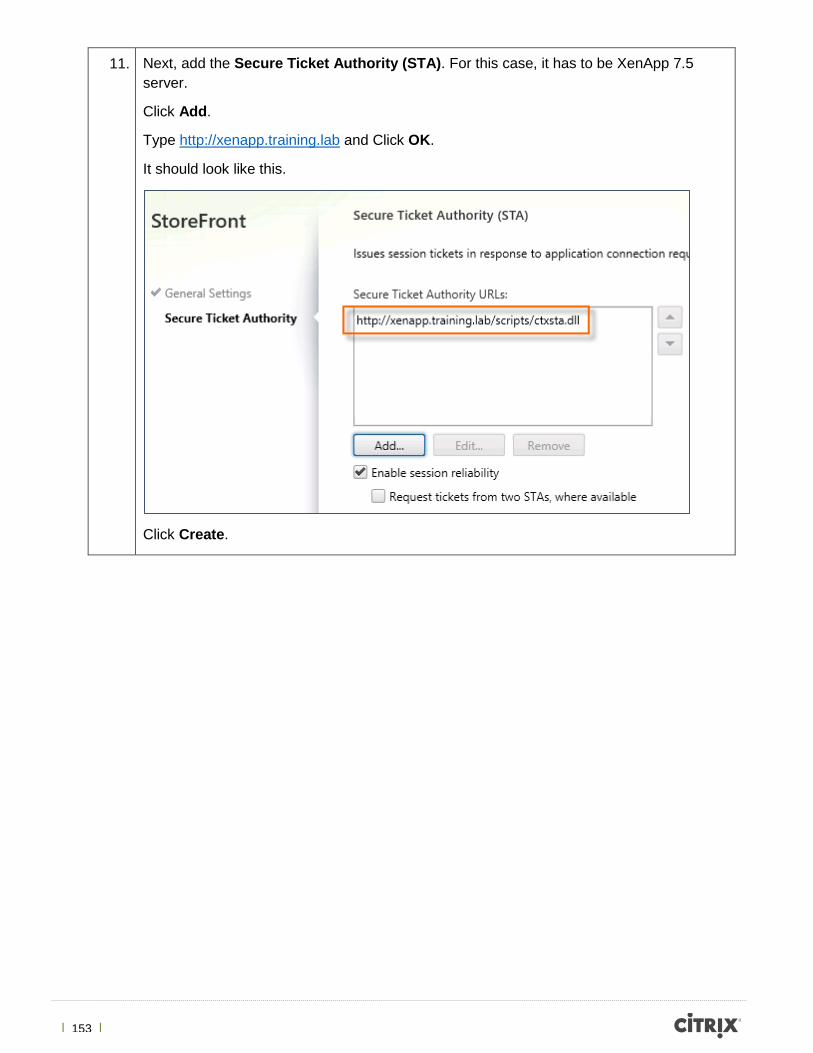
| 153 |
11. Next, add the Secure Ticket Authority (STA). For this case, it has to be XenApp 7.5 server.
Click Add.
Type http://xenapp.training.lab and Click OK.
It should look like this.
Click Create.
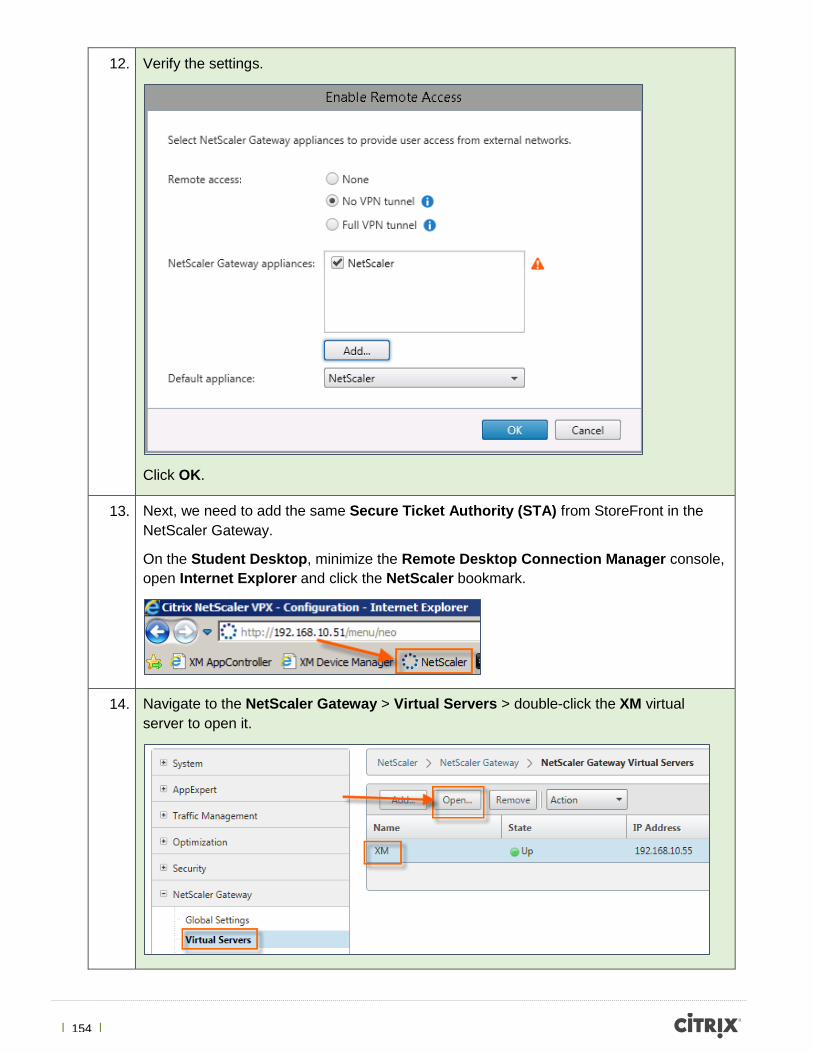
| 154 |
12. Verify the settings.
Click OK.
13. Next, we need to add the same Secure Ticket Authority (STA) from StoreFront in the NetScaler Gateway.
On the Student Desktop, minimize the Remote Desktop Connection Manager console, open Internet Explorer and click the NetScaler bookmark.
14. Navigate to the NetScaler Gateway > Virtual Servers > double-click the XM virtual server to open it.
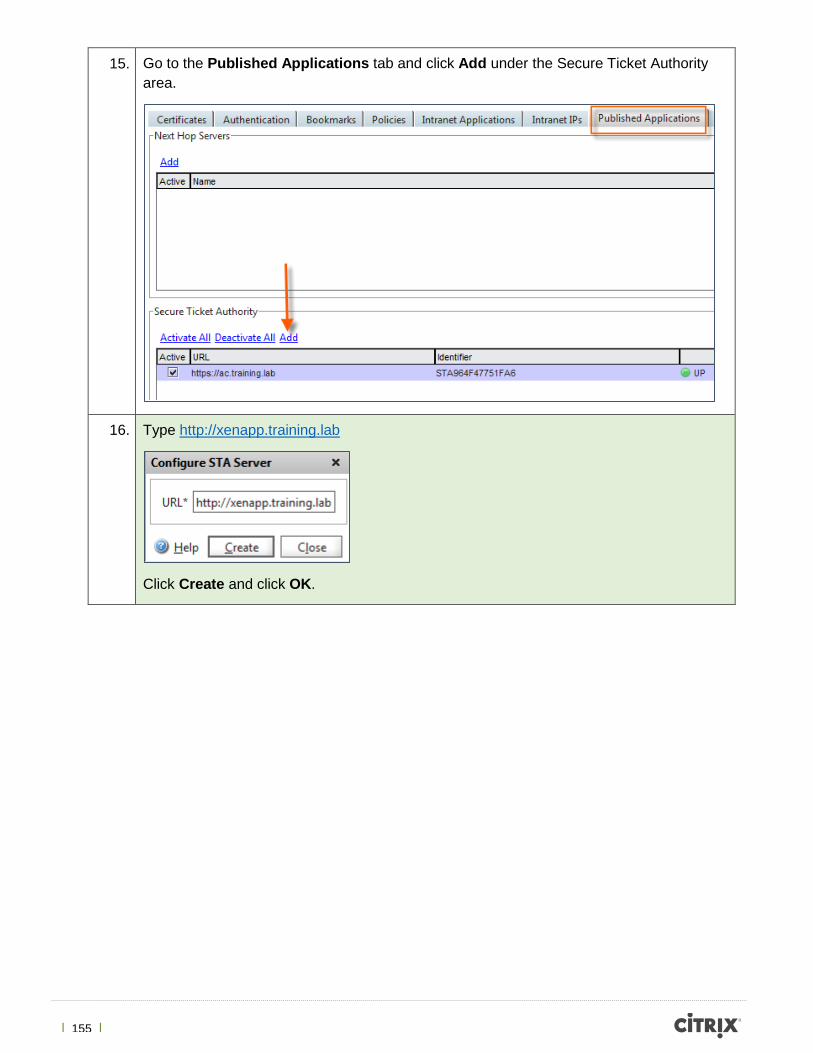
| 155 |
15. Go to the Published Applications tab and click Add under the Secure Ticket Authority area.
16. Type http://xenapp.training.lab
Click Create and click OK.
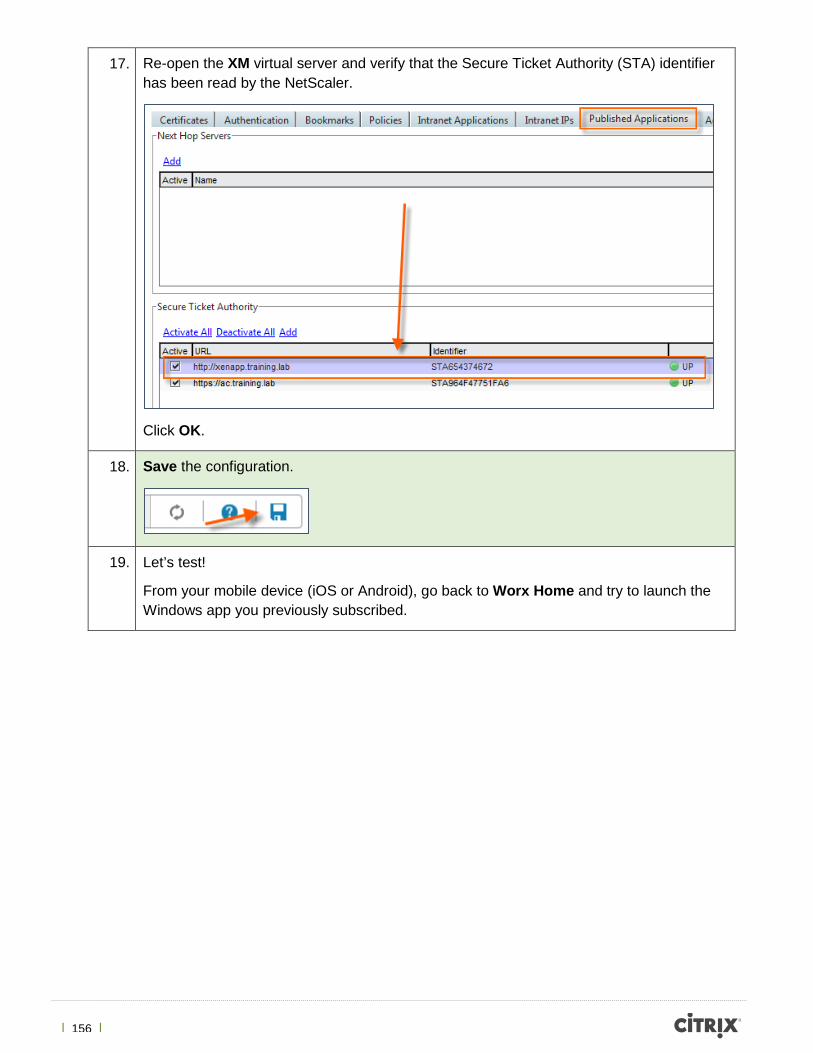
| 156 |
17. Re-open the XM virtual server and verify that the Secure Ticket Authority (STA) identifier has been read by the NetScaler.
Click OK.
18. Save the configuration.
19. Let’s test!
From your mobile device (iOS or Android), go back to Worx Home and try to launch the Windows app you previously subscribed.
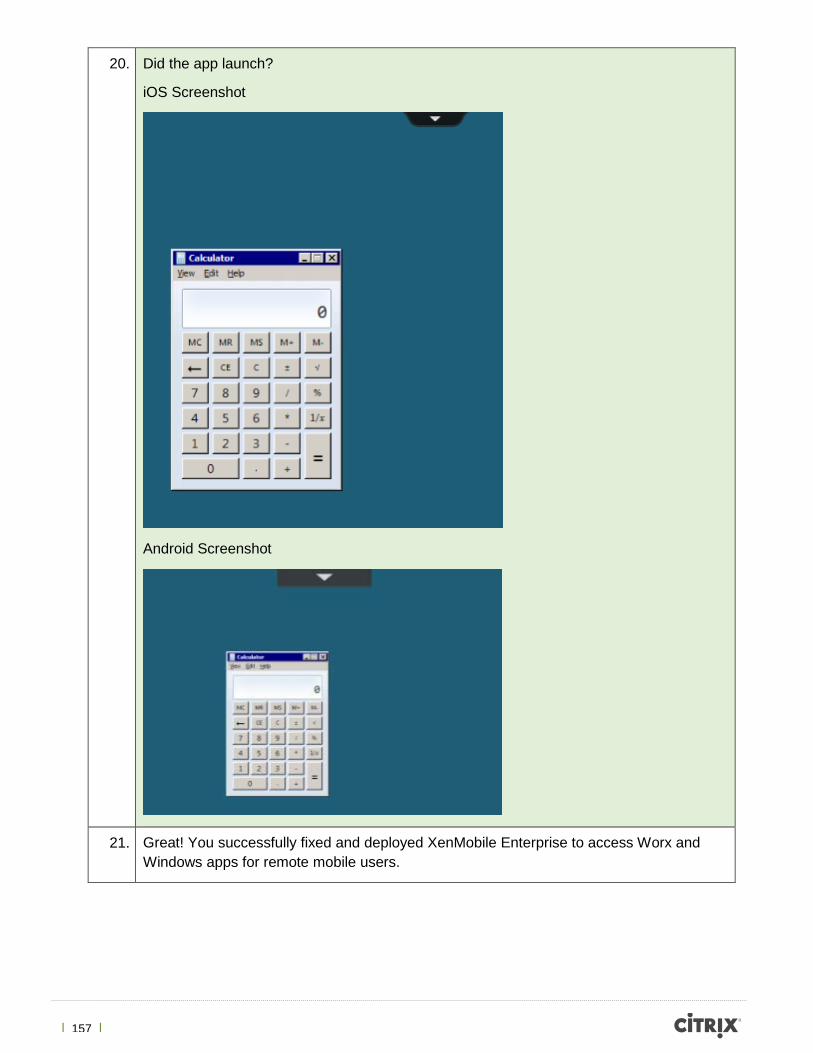
| 157 |
20. Did the app launch?
iOS Screenshot
Android Screenshot
21. Great! You successfully fixed and deployed XenMobile Enterprise to access Worx and Windows apps for remote mobile users.
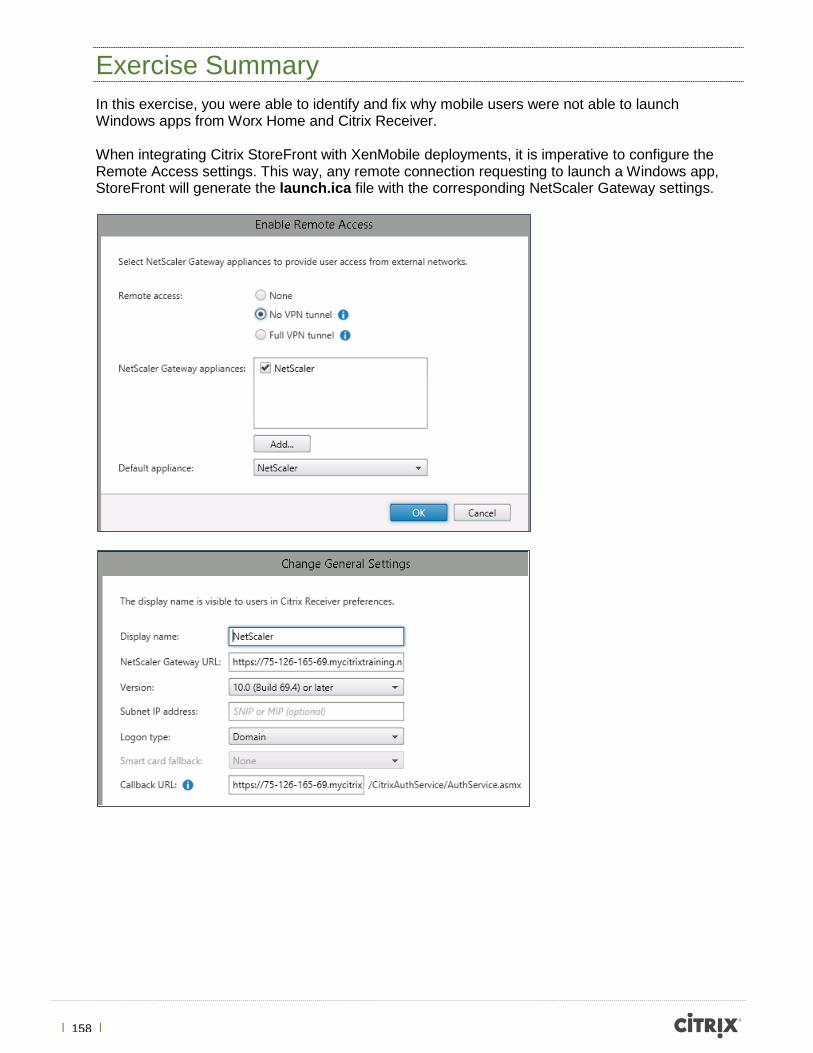
| 158 |
Exercise Summary In this exercise, you were able to identify and fix why mobile users were not able to launch Windows apps from Worx Home and Citrix Receiver. When integrating Citrix StoreFront with XenMobile deployments, it is imperative to configure the Remote Access settings. This way, any remote connection requesting to launch a Windows app, StoreFront will generate the launch.ica file with the corresponding NetScaler Gateway settings.

| 159 |
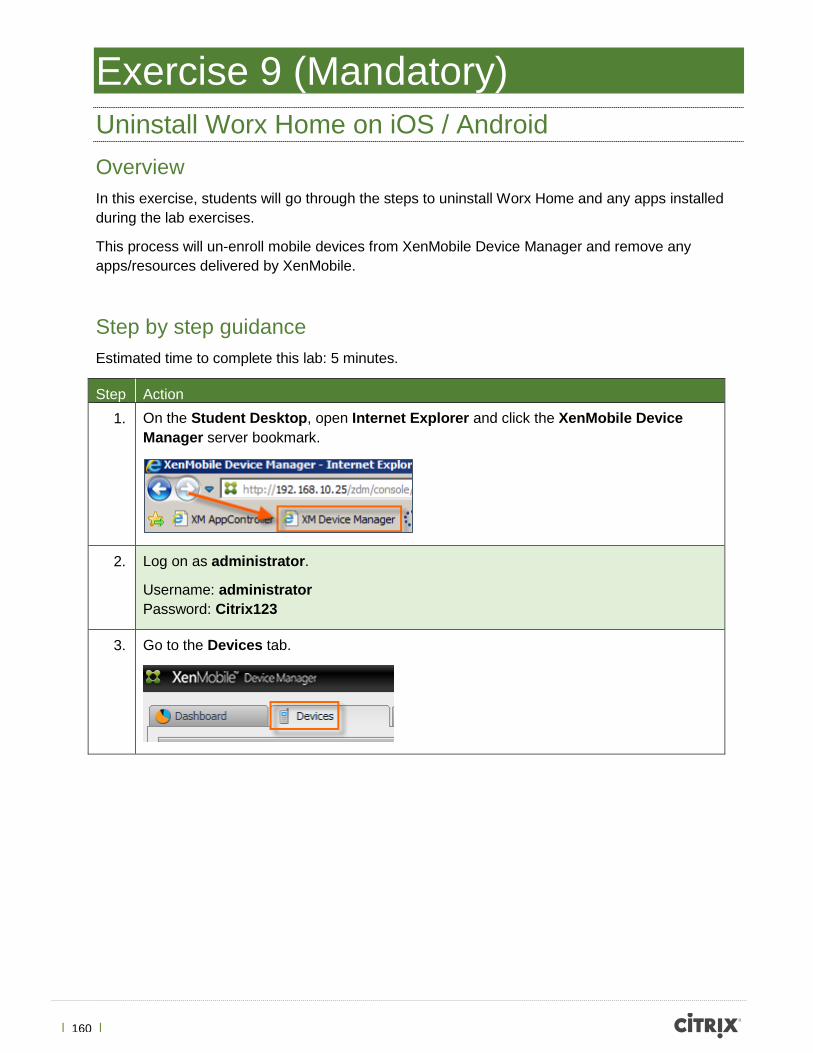
| 160 |
Exercise 9 (Mandatory) Uninstall Worx Home on iOS / Android Overview In this exercise, students will go through the steps to uninstall Worx Home and any apps installed during the lab exercises.
This process will un-enroll mobile devices from XenMobile Device Manager and remove any apps/resources delivered by XenMobile.
Step by step guidance Estimated time to complete this lab: 5 minutes.
Step Action 1. On the Student Desktop, open Internet Explorer and click the XenMobile Device
Manager server bookmark.
2. Log on as administrator.
Username: administrator Password: Citrix123
3. Go to the Devices tab.
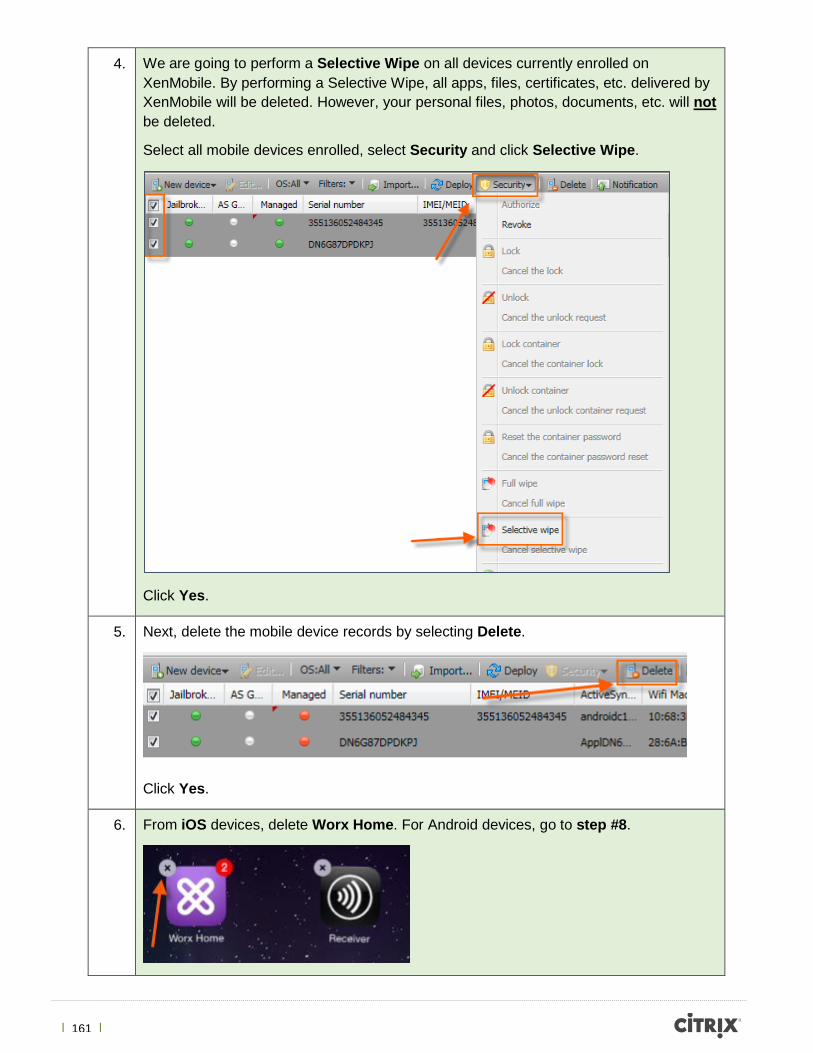
| 161 |
4. We are going to perform a Selective Wipe on all devices currently enrolled on XenMobile. By performing a Selective Wipe, all apps, files, certificates, etc. delivered by XenMobile will be deleted. However, your personal files, photos, documents, etc. will not be deleted.
Select all mobile devices enrolled, select Security and click Selective Wipe.
Click Yes.
5. Next, delete the mobile device records by selecting Delete.
Click Yes.
6. From iOS devices, delete Worx Home. For Android devices, go to step #8.
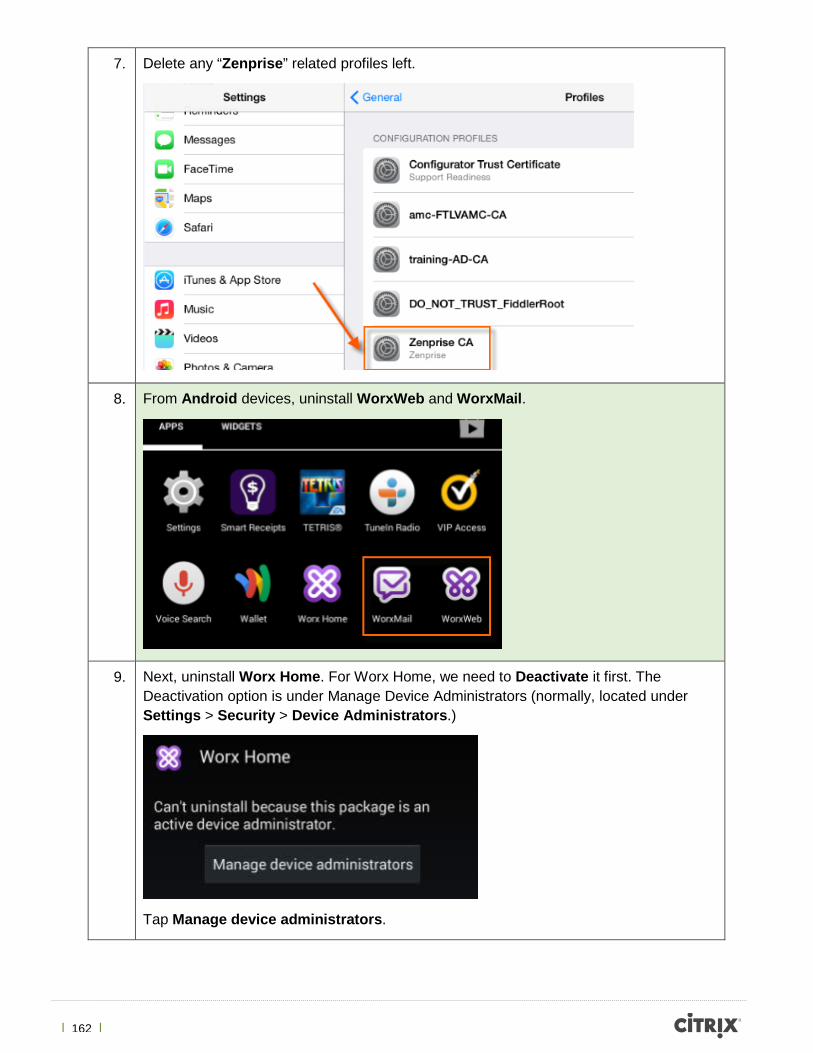
| 162 |
7. Delete any “Zenprise” related profiles left.
8. From Android devices, uninstall WorxWeb and WorxMail.
9. Next, uninstall Worx Home. For Worx Home, we need to Deactivate it first. The Deactivation option is under Manage Device Administrators (normally, located under Settings > Security > Device Administrators.)
Tap Manage device administrators.
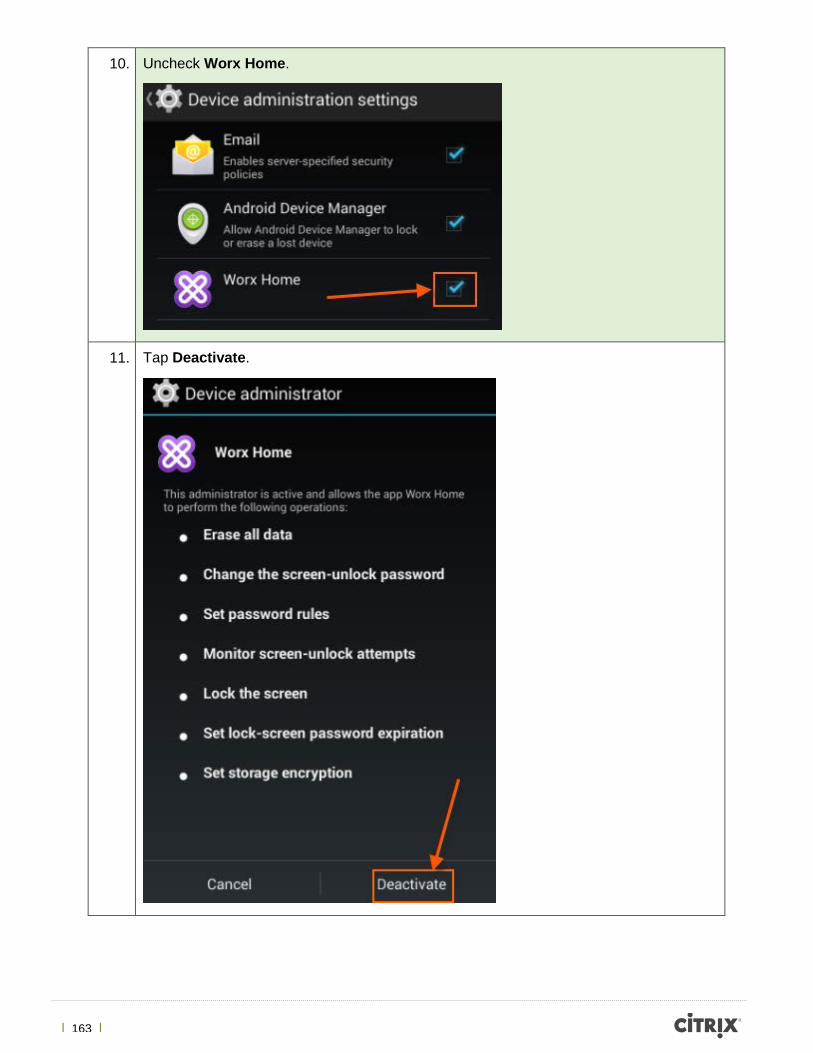
| 163 |
10. Uncheck Worx Home.
11. Tap Deactivate.
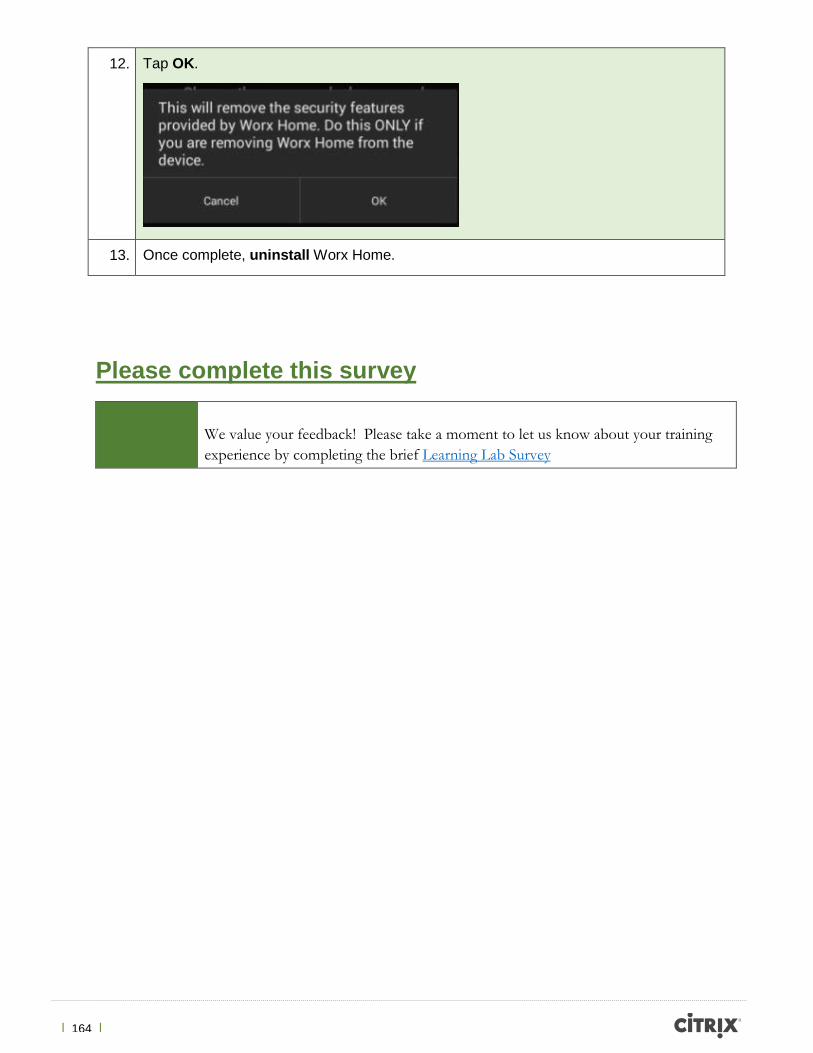
| 164 |
12. Tap OK.
13. Once complete, uninstall Worx Home.
Please complete this survey
We value your feedback! Please take a moment to let us know about your training experience by completing the brief Learning Lab Survey
| 165 |
Revision Change Descriptions Updated By Date
1.0 Original Version Adolfo Montoya May 2014
About Citrix Citrix (NASDAQ:CTXS) is a cloud company that enables mobile workstyles—empowering people to work and collaborate from anywhere, securely accessing apps and data on any of the latest devices, as easily as they would in their own office. Citrix solutions help IT and service providers build clouds, leveraging virtualization and networking technologies to deliver high-performance, elastic and cost-effective cloud services. With market-leading cloud solutions for mobility, desktop virtualization, networking, cloud platforms, collaboration and data sharing, Citrix helps organizations of all sizes achieve the speed and agility necessary to succeed in a mobile and dynamic world. Citrix products are in use at more than 330,000 organizations and by over 100 million users globally. Annual revenue in 2012 was $2.59 billion. Learn more at www.citrix.com.


![VWR HPLC Troubleshooting.ppt - University College Dublin HPLC Troubleshooting.pdf · Microsoft PowerPoint - VWR HPLC Troubleshooting.ppt [Compatibility Mode] Author: john.sloane Created](https://img.pdfslide.us/doc/110x75/5f07d80f7e708231d41f08c2/vwr-hplc-university-college-dublin-hplc-troubleshootingpdf-microsoft-powerpoint.jpg)