Embed Size (px)
Citation preview
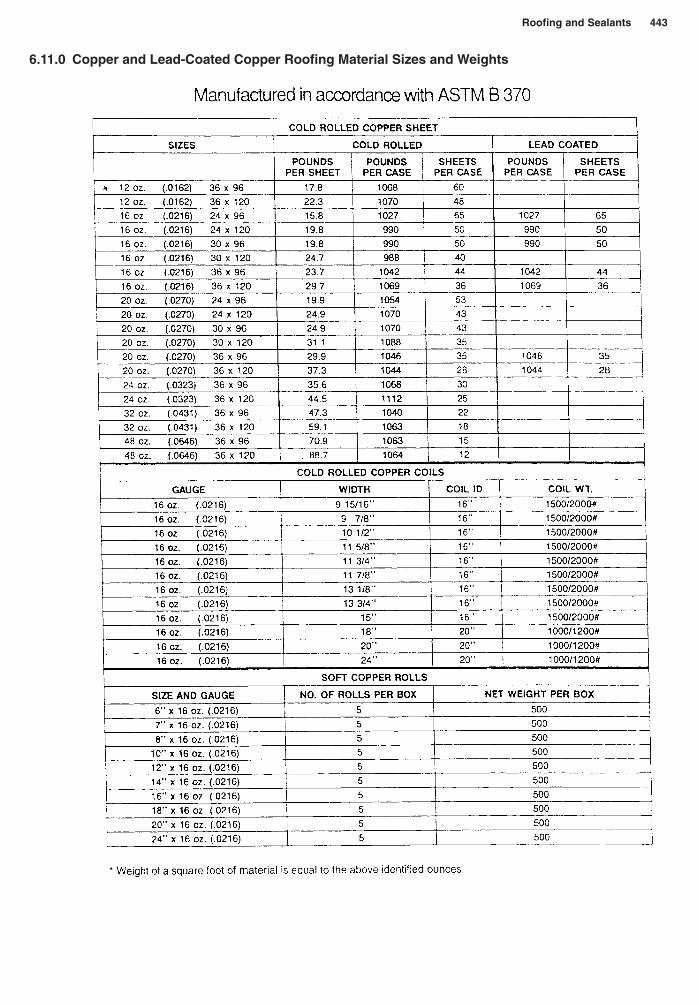
6.11.0 Copper and Lead-Coated Copper Roofing Material Sizes and Weights
Roofing and Sealants 443

6.12.0 Standard Sizes and Exposure to Weather for Slate Roof Tiles
444 Section 6
(By permission from Buckingham Slate, Arvonia, Virginia.)

6.12.1 Slate Roof Installation Procedures
Roofing and Sealants 445
(By permission from Buckingham Slate, Arvonia, Virginia.)

446 Section 6
6.12.2 Slate Roof Installation Procedures
(By permission from Buckingham—Virginia Slate, Arvonia, Virginia.)
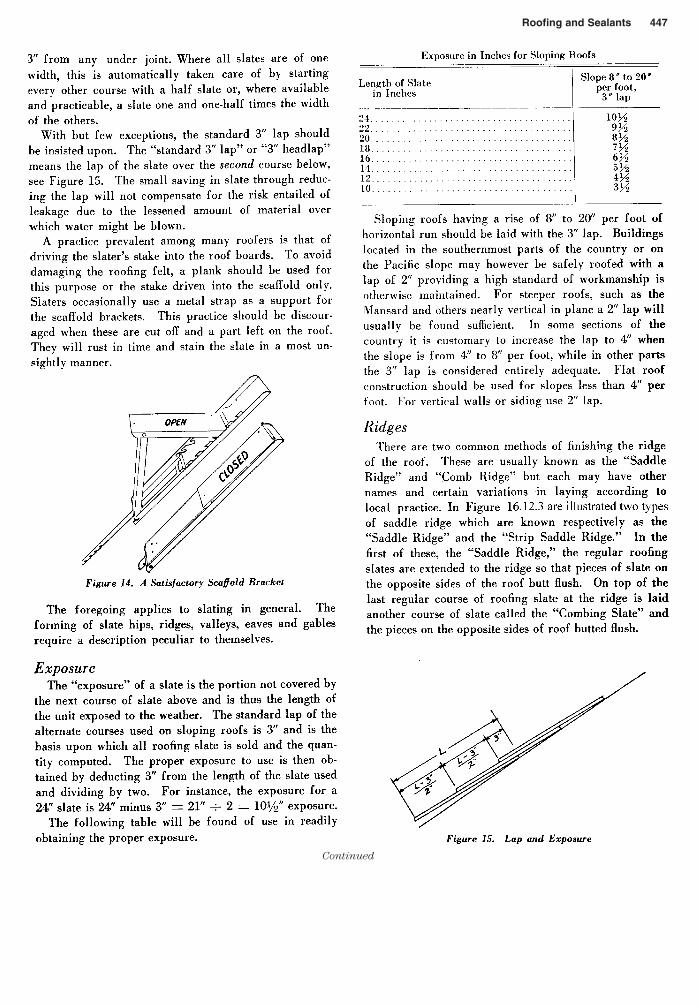
Roofing and Sealants 447
Continued

448 Section 6
Continued

Roofing and Sealants 449
(By permission from Buckingham—Virginia Slate, Arvonia, Virginia.)
6.12.3 Slate Roof—Eave Joining Details

6.13.0 Cedar Shingle/Shake Installation Diagrams
450 Section 6
6.13.1 Cedar Shingle-Grade Label Facsimiles
(By permission of Cedar Shake and Shingle Bureau, Bellevue, Washington.)

6.13.2 Cedar Shingle and Shake Installation and Maintenance Tips
Roofing and Sealants 451
(By permission of Cedar Shake and Shingle Bureau, Bellevue, Washington.)

452 Section 6
(By permission from the Cedar Shake & Shingle Bureau, Sumas, Washington.)
6.3.3 General Application Instructions for Shingles

Roofing and Sealants 453
Continued

454 Section 6
(By permission from the Cedar Shake & Shingle Bureau, Sumas, Washington.)
6.13.4 General Application Instructions for Shakes

Roofing and Sealants 455
Continued

456 Section 6
(By permission from the Cedar Shake & Shingle Bureau, Sumas, Washington.)
6.13.5 Wood Roof Valley Flashing Details
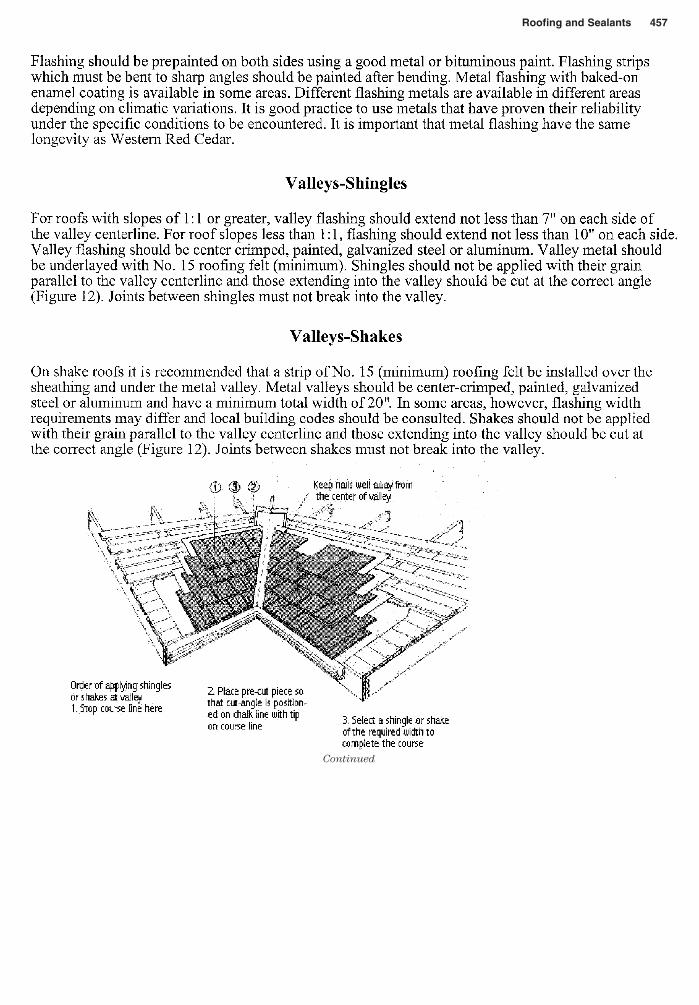
Roofing and Sealants 457
Continued

458 Section 6
(By permission from the Cedar Shake & Shingle Bureau, Sumas, Washington.)
6.13.6 Wood Roof Ventilation Details

6.14.0 A Checklist to Detect or Avoid Roof Leaks for All Types of Roofs
The source of a leak is not necessarily directly above the appearance of water penetration on the in-side of a building. Water has a tendency to travel by the forces of gravity or to be forced into a cer-tain path by high winds. Careful inspection of the roof and all flashings is sometimes necessary to de-tect a leak; planned inspections by the owner might uncover a potential problem so that repairs canbe effected.
1. Most leaks occur at the perimeter of the building because this is where more movement occurs,except at structural expansion joints. This area requires frequent inspection or “first look” if a leakhas been reported.
2. Roof penetrations, those at roof drains or roof curbs or around roof accessories or pipe/conduitflashings, would be the next best place to inspect.
3. Parapet walls, exposed in two sides, might experience greater temperature variations and subse-quent expansion and contraction activity, giving rise to tears in the flashing and leaks.
4. Equipment supports are frequently sources of roof leaks. Roof insulation attached to the outsidesurface of structural steel supports could act as a thermal bridge and increase the potential forcondensation build-up.
5. Tears or splits in the membrane itself, caused by workers working on the roof and abusing the sur-face, is another area of investigation. Servicing of roof-top equipment where oils and lubricantsare used can also result in leaks because of the oils or lubricants being carelessly spilled on theroof membrane and dissolving a portion of the membrane.
6.15.0 Albedo—Measuring Energy Efficiency of Roof Membranes
Resistance to heat flow has been quantified by the use of “R” values—a means of measuring how wella substance or material resists the transmission of heat into a building in hot weather and how wellit keeps heat in a building during cold weather. But when it comes to energy gained or lost througha roof assembly, another form of measurement is often used, and that measure is referred to as“albedo”—solar reflectance. Albedo measures how much of the solar energy striking a roof mem-brane surface is reflected.
Roofing and Sealants 459
Continued

Energy efficient roofing systems exhibit three qualities:
1. Good reflectance—albedo.
2. Sufficient insulation to resist the flow of heat into the structure.
3. Good emissivity—the ability of the roof surface to radiate the absorbed energy away from thestructure rather than retaining it.
The following chart lists albedo and emissivity factors for selected surfaces:
Material Albedo Emissivity
Concrete 0.30 0.94
Red brick 0.30 0.90
Tar paper 0.05 0.93
White plaster 0.93 0.91
Bright galvanized iron 0.35 0.13
Bright aluminum foil 0.85 0.04
White pigment 0.85 0.96
White single-ply roofing 0.78 0.90
460 Section 6

Roofing and Sealants 461
6.16.0 Roof Insulation—Quality Control Checklist

462 Section 6
6.17.0 Flashing and Sheet Metal—Quality Control Checklist

Roofing and Sealants 463
Continued

464 Section 6
6.18.0 Membrane Roofing—Quality Control Checklist

The category “sealants” spans a wide range of construction activities and applications—from pre-venting water and moisture from infiltrating into below-grade structures to maintaining the water-tight integrity of the entire superstructure.
This section deals primarily with caulking and sealant compounds: selection and application, and,secondarily, curtain wall and masonry sealants.
6.19.0 Sealants as Joint-Filling Compounds
These materials generally fall into one of three categories:
• Dynamic joints Joints that exhibit changes due to movement from expansion, contraction, iso-lation and loadings.
• Static joints Joints that exhibit little or no movement, such as masonry mortar joints. However,no joint in a building is truly static because all materials exhibit some movement from temperaturechanges and load factors.
• Butt joints Joints that have opposing faces that contract and expand and place a sealant in com-pression, tension, and can also exhibit shear from extreme loading forces or seismic events.
6.20.0 Proper Application of Sealants
The key to proper application of any sealant begins with proper surface preparation, which can varyconsiderably from one material to another. Most manufacturers go to great lengths to provide de-tailed surface preparation and application procedures, which are often ignored by the applicator, re-sulting in either poor performance or outright failure.
The following general guidelines are to be augmented by the manufacturer’s instructions for thesealant and surface selected:
• Concrete and masonry Concrete can have the most variable surface conditions of any productbecause of variations in curing conditions, moisture content, finishing techniques, additives, hard-eners, curing compounds, and form-release agents. Concrete and masonry surfaces can exhibitweak surface layers because of laitance present in concrete and the potential for spalling in ma-sonry structures. Surfaces contaminated by laitance, hardeners, curing compounds and form-release materials can be sandblasted or wire brushed to remove these contaminants.
Newly placed concrete or masonry must be allowed to cure before applying sealants. If thesesurfaces, once cured, become wet from rain, they should be allowed to dry at least 24 hours in gooddrying weather before sealant or primer application. Because most sealant manufacturers do notrecommend applying their products in temperatures below 40 degrees F, frost is a problem. Underthese conditions, an application of isopropyl alcohol or methyl ethyl ketone will cause surfacemoisture to evaporate and a sealant can be quickly applied before frost forms again.
• Stone These surfaces generally provide good sealant adhesion. However, some material (such asgranite, limestone, and marble) should be primed before a sealant is applied. If the surface area ofthe stone appears to be flaking or dusty, it must be cleaned by either water blasting, sandblasting,or wire brushing before primer and sealant application.
• Glass and porcelain surfaces These surfaces are excellent substrates for sealants once theirsurfaces are cleaned of contaminants and oils. Methyl ethyl ketone or alcohol is an ideal cleaner.
• Painted and lacquered surfaces Depending on where these surfaces are located and their ex-posure to the weather, sealants should not be applied to flaking painted or lacquered surfaces.Sound painted/lacquered surfaces should first be cleaned by wiping with a solvent to remove oiland dust. It is preferable to do a test section to ensure that the solvent does not “lift” the paintedsurface.
• Rigid plastic materials Solvents will clean these surfaces adequately. However, the manufac-turer of the fiberglass, acrylic, or other plastic compound should be consulted to determine whichsolvents will not permanently damage the plastic surface.
• Flexible plastics and elastomers These materials are difficult for sealants to adhere to. Test ap-plications of a solvent, such as VM&P naptha, should be applied to determine if it is harmful to theplastic or elastomer.
Roofing and Sealants 465

• Aluminum with a mill finish A good degreasing solvent, such as trichloroethane or xylene, willclean these surfaces properly. A rub down with fine steel wool or fine emery cloth might permitbetter adhesion.
• Aluminum with an anodized finish This surface generally provides an excellent surface forsealant application. However, it should be wiped down with methyl ethyl ketone or xylene to re-move any surface contaminants.
• Copper Copper can oxidize and this patina must be removed by either sanding or rubbing withsteel wool. Copper is not compatible with many sealants; the sealant manufacturer or distributorshould be contacted for the proper selection.
• Lead Though not used extensively as a new material, lead is often encountered in restorationwork. It is difficult to obtain adhesion to a lead surface—even after cleaning with xylene or methylethyl ketone. Seek the manufacturer’s recommendation.
• Steel Most steel surfaces to be caulked will have been painted, and procedures for anypainted surface will apply. For unpainted steel surfaces, the steel must be free from rust, oil,and other surface contaminants. Abrade the surface by sandblasting or wire brushing down toa sound surface, clean with a solvent, and then apply the caulking.
Stainless steel This is another difficult surface for adhesion purposes. Primers are oftenrecommended along with solvent cleaning of the surface.
Galvanized steel New galvanized surfaces present more difficult surfaces for adhesion thanweathered galvanized surfaces. Once again, consultation with the sealant manufacturer is rec-ommended.
6.21.0 Typical Properties of Noncementitious vs Cementitious Repair Materials
466 Section 6
(Reprinted by permission from the Sealant, Waterproofing, and Restoration Institute, Kansas City, Missouri.)

6.22.0 Advantages/Disadvantages of Various Sealants
Roofing and Sealants 467

6.23.0 Properties of Various Sealant Materials
468 Section 6
(Reprinted by permission from the Sealant, Waterproofing, and Restoration Institute, Kansas City, Missouri.)

6.24.0 Temperatures vs Sealant Performance
Roofing and Sealants 469

6.25.0 Dow Corning Silicone-Sealant Designs, UL Ratings, Estimating Requirements
470 Section 6
(Reprinted by permission from the Sealant, Waterproofing, and Restoration Institute, Kansas City, Missouri.)

6.26.0 Typical Butt Joints and Other Joint Details
Roofing and Sealants 471

6.27.0 Typical Exterior Wall Air-Seal Applications
472 Section 6
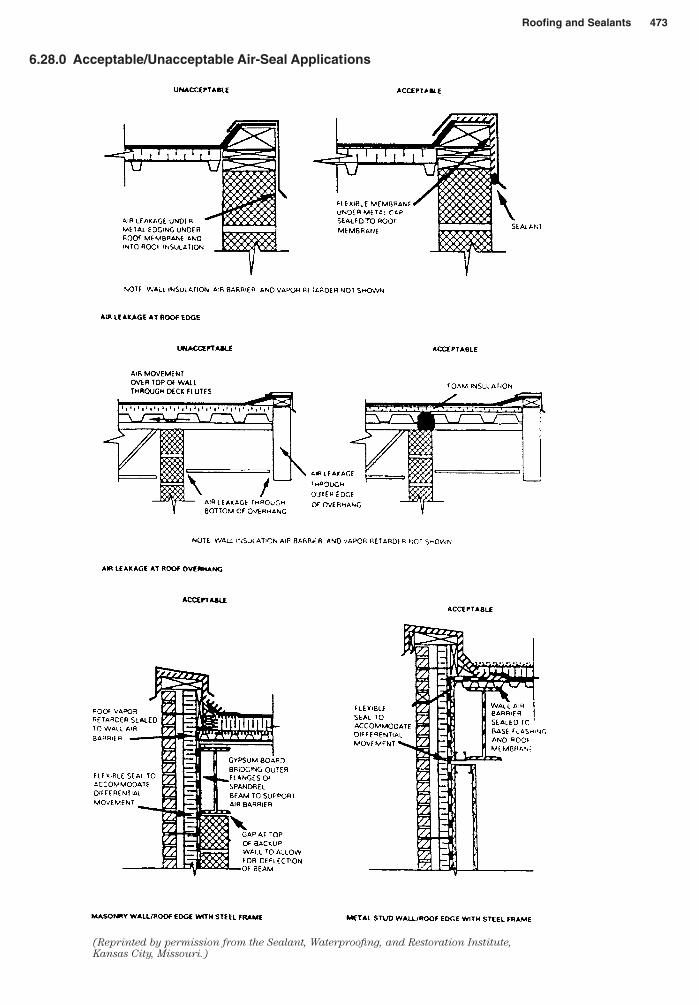
6.28.0 Acceptable/Unacceptable Air-Seal Applications
Roofing and Sealants 473
(Reprinted by permission from the Sealant, Waterproofing, and Restoration Institute,
Kansas City, Missouri.)

6.29.0 Adhesion Test Procedures
474 Section 6
(Reprinted by permission from the Sealant, Waterproofing, and Restoration Institute, Kansas City, Missouri.)

6.30.0 Proper Parapet Wall-Sealants Diagrams
The Best Moisture Escape Routes
1. Ventilate the cavity for walls to breathe.
2. Install weep holes and/or clean existing weep holes that might have become clogged.
3. Correct improperly installed flashing and/or install additional flashing at problem areas.
The Best Barriers to Water Entry
1. Create water infiltration barriers, such as cap flushing.
2. Install adequate expansion and control joints to accommodate expansion due to thermal move-ment, moisture absorption, and freeze-thaw cycles.
3. Replace spalled brick.
4. Repoint deteriorating joints.
A word of caution: When replacing glazed brick, do not use corner brick in any location other thancorners. With its two glazed sides, corner brick will fail to provide a proper bond on one side.
Roofing and Sealants 475

6.31.0 When Is It Time to Repoint? Mortar Joint Details
You know it’s time to repoint when:
• Mortar has eroded to expose the brick behind the glazed face.
• Mortar has crumbled from the joint.
• Hairline cracks have appeared in the mortar.
• The bond between the mortar and the glazed brick is broken.
Strategies for maintaining mortar joints include the following:
1. Remove the old mortar by cutting out to a depth of at least 5⁄8"; remove more if necessary to elim-inate unsound mortar.
2. Clean joints of old mortar, dust, and dirt prior to repointing.
3. Avoiding damaging brick edges when removing old mortar.
4. Use a mix ratio of 1 part Portland cement to 1 to 11⁄2 parts hydrated lime to 6 parts sand for a flex-ible, but durable mortar.
5. Day and evening temperatures should be above 40°F during repointing; the area of work shouldbe protected from the weather when not being worked on.
6. All excess mortar, smears, and droppings should be cleaned up before the mortar sets.
7. Joint configuration must be designed so that the mortar meets the top edge of the glaze and thejoint easily sheds water.
476 Section 6
6.32.0 Inspection of Mortar Joints to Determine Water-Resistant Integrity
• Has the mortar eroded to the point where a large portion of the underside of the brick above andbelow is visible? If so, it is time to repoint.
• Has the mortar begun to crumble from the joint? If so, it is time to repoint.
• Have hairline cracks formed in the mortar? If so, it is time to repoint.
• Is the bond between the mortar and brick broken? If so, it is time to repoint.

6.33.0 Steps Taken to Repoint Properly
1. Cut out old mortar to a depth of at least 5⁄8 inch. Remove more if a sound surface has not beenfound at that depth.
2. Avoid damaging the edges of the bricks while cleaning out the old mortar joint.
3. Clean out dust and dirt from the old joint.
4. Mix up a batch of mortar with the following proportions:1 part Portland cement1 to 11⁄2 parts hydrated lime6 parts sand
5. Repointing should not take place when both day and night temperatures are below 40 degrees F.
6. Clean off excess mortar, drips, etc., before the mortar sets up.
7. The proper selection mortar-joint configuration will help to prevent a recurrence of prematurefailure.
6.34.0 Guidelines for Waterproof Back-Up of Wythes in Masonry Cavity Walls
Roofing and Sealants 477
(Reprinted by permission from the Sealant, Waterproofing, and Restoration Institute,
Kansas City, Missouri.)

6.35.0 Diagram of a Typical Composite Waterproofing System
478 Section 6
(Reprinted by permission from the Sealant, Waterproofing, and Restoration Institute,
Kansas City, Missouri.)

6.36.0 Parking Garage Inspection Checklist
Roofing and Sealants 479

480 Section 6
6.37.0 Sealant/Caulking—Quality Control Checklist