Embed Size (px)
Citation preview
5nine Cloud Security for
Hyper-V
Version 6.0
July 2015
5nine Cloud Security for Hyper-V | Getting Started Guide
© 2009-2015 5nine Software, Inc. All rights reserved.
Security & Management Solutions for Hyper-V and Windows Server 1
© 2015 5nine Software
All rights reserved. All trademarks are the property of their respective owners.
No part of this publication may be reproduced, transmitted, transcribed, stored in a retrieval
system, or translated into any language in any form by any means, without written permission
from 5nine Software Inc. (5nine). The information contained in this document represents the
current view of 5nine on the issue discussed as of the date of publication and is subject to
change without notice. 5nine shall not be liable for technical or editorial errors or omissions
contained herein. 5nine makes no warranties, expressed or implied, in this document. 5nine
may have patents, patent applications, trademark, copyright or other intellectual property
rights covering the subject matter of this document. All other trademarks mentioned herein are
the property of their respective owners. Except as expressly provided in any written license
agreement from 5nine, the furnishing of this document does not give you any license to these
patents, trademarks, copyrights or other intellectual property.
Important! Please read the End User Software License Agreement before using the
accompanying software program(s). Using any part of the software indicates that you accept
the terms of the End User Software License Agreement.

5nine Cloud Security for Hyper-V | Getting Started Guide
© 2009-2015 5nine Software, Inc. All rights reserved.
Security & Management Solutions for Hyper-V and Windows Server 2
Table of Contents
Summary .......................................................................................................................................................................... 4
System requirements................................................................................................................................................... 4
Permissions ................................................................................................................................................................. 5
Installation ....................................................................................................................................................................... 6
Management Service installation ....................................................................................................................... 7
Standalone installation ...................................................................................................................................... 7
Configuration for high availability ............................................................................................................. 13
Host Management Service installation ......................................................................................................... 15
Local installation ............................................................................................................................................... 16
Remote installation .......................................................................................................................................... 20
Management Console installation .................................................................................................................. 28
5nine Cloud Security Network Manager Plugin installation ................................................................. 32
5nine Cloud Security operations .......................................................................................................................... 35
Adding and removing hosts ............................................................................................................................. 37
Users management and tenants ..................................................................................................................... 39
Setting users ....................................................................................................................................................... 39
Setting user permissions ................................................................................................................................ 42
Setting tenants .................................................................................................................................................. 43
User actions audit ............................................................................................................................................. 47
Internal events audit ............................................................................................................................................ 48
Setting virtual firewall rules ............................................................................................................................... 49
User-defined security groups ...................................................................................................................... 50
User-defined rules templates ....................................................................................................................... 53
Adding rules ....................................................................................................................................................... 54
Editing a rule ...................................................................................................................................................... 69
Removing a rule ................................................................................................................................................ 70
Authorization ..................................................................................................................................................... 70
Common scenarios .......................................................................................................................................... 72
Applying a user-defined rules template .................................................................................................. 78
Setting virtual firewall .......................................................................................................................................... 79
View virtual firewall log records ...................................................................................................................... 80
Antivirus .................................................................................................................................................................... 82
Antivirus and active protection settings .................................................................................................. 83
5nine Cloud Security for Hyper-V | Getting Started Guide
© 2009-2015 5nine Software, Inc. All rights reserved.
Security & Management Solutions for Hyper-V and Windows Server 3
Creating antivirus job ...................................................................................................................................... 89
Antivirus status .................................................................................................................................................. 96
Active protection .............................................................................................................................................. 98
Quarantine .......................................................................................................................................................... 99
Reboot action................................................................................................................................................... 100
IDS ............................................................................................................................................................................. 101
Enable IDS ......................................................................................................................................................... 101
View IDS log records ..................................................................................................................................... 102
Block the intrusive IP address .................................................................................................................... 103
Network traffic scanner ..................................................................................................................................... 103
Enable network traffic scanner .................................................................................................................. 104
View network traffic scanner log records .............................................................................................. 104
Connections table ............................................................................................................................................... 105
Network statistics ................................................................................................................................................ 106
Notifications .......................................................................................................................................................... 107
Syslog server integration.................................................................................................................................. 109
Disaster recovery ................................................................................................................................................. 110
Disaster recovery functioning .................................................................................................................... 111
Setting up disaster recovery ....................................................................................................................... 112
Changing VM settings ....................................................................................................................................... 114
Host settings and state ..................................................................................................................................... 119
Refreshing the object tree ............................................................................................................................... 120
5nine Cloud Security information ...................................................................................................................... 120
Licensing ..................................................................................................................................................................... 121
Compatibility with the other 5nine products ................................................................................................ 123
5nine Cloud Security log files ............................................................................................................................. 123
5nine Cloud Security Network Manager Plugin configuration .............................................................. 125
Uninstallation ............................................................................................................................................................ 126

5nine Cloud Security for Hyper-V | Getting Started Guide
© 2009-2015 5nine Software, Inc. All rights reserved.
Security & Management Solutions for Hyper-V and Windows Server 4
Summary
5nine Cloud Security is a fundamentally new virtual monitoring and complex protection tool for
the new generation Hyper-V environment. It presents new effective methods to protect data
center virtual infrastructure while at the same time maintaining its high performance and
saving resources. There are four basic parts of the solution that protect the whole Hyper-V
cloud – Virtual Firewall, Antivirus, Intrusion Detection System (IDS) and Network Traffic Scanner.
5nine Cloud Security supports new cutting-edge technologies such as NVGRE and IP Rewrite
and secures point filtering of virtual machines traffic with its virtual firewall feature. The
Antivirus component of 5nine Cloud Security solution provides unique, agentless protection of
virtual machines that can be arranged either in groups or individually on each separate virtual
machine. The active protection feature that protects virtual machine operating system in real
time is also available. Intrusion Detection System (IDS) feature allows detection of active
attacks, review of the event log and setting the blocking virtual firewall rule on the suspicious
IP address. Network traffic scanner allows monitoring of inbound web – http traffic in real time
to detect malware that might be downloaded to the virtual machine. Email notifications feature
is available to inform administrator about IDS, Antivirus and network traffic scanner events.
5nine Cloud Security also supports multi-user and multi-tenancy that allow delegation of
privileges on virtual machines security control so that each owner is able to control security
policies in his virtual environment.
System requirements
Supported Operating Systems:
Management server1:
Microsoft Windows 7 x64 (with .NET 4.5 additionally installed)
Microsoft Windows Server 2008 R2 SP1 (with .NET 4.5 additionally installed)
Microsoft Windows Server 2012
Microsoft Windows Server 2012 R2
Host:
Microsoft Windows Server 2012
Microsoft Windows Server 2012 R2
1 The host OS minimal requirements apply if management service is set onto managed Hyper-V host!
5nine Cloud Security for Hyper-V | Getting Started Guide
© 2009-2015 5nine Software, Inc. All rights reserved.
Security & Management Solutions for Hyper-V and Windows Server 5
Microsoft Windows 8 Professional with enabled Hyper-V role
Guest VM: any
Prerequisites:
.NET Framework 4.5. or higher
MS SQL Server
MS PowerShell
Hyper-V Module for PowerShell should be installed. It can be installed from GUI with
Add Roles and Features Wizard (can be launched from Server Manager). Component
path:
Features -> Remote Server Administration Tools -> Role Administration Tools ->
Hyper-V Management Tools -> Hyper-V Module for Windows PowerShell
Also it can be installed with following PS command:
Install-WindowsFeature -Name Hyper-V-PowerShell
Snort application v. 2.9.7.3 with snort rules snapshot v. 2.9.7.3 deployed on managed
host (https://www.snort.org/) for IDS function.
Attention! Snort application uses MS-DOS SFN (Short File Names or 8.3) naming convention
(read more at https://msdn.microsoft.com/en-us/library/aa365247.aspx#short_vs._long_names).
This convention is enabled in the latest versions of MS Windows OS by default. If it is disabled,
snort application and, accordingly, IDS feature will not work.
Permissions
For both domain and workgroup configurations:
TCP ports 8533, 8779 and 8788 should be opened on managed host.
TCP ports 8534, 8741, 8789, and 8790 should be opened on management server.
5nine.VirtualFirewall.HostManagementService should be installed on each Hyper-V host
monitored and protected.
For management service and host management service user accounts:
WMI access (http://technet.microsoft.com/en-us/library/cc787533(WS.10).aspx).
SQL database or file access (read/write) – for management service user account
only if Windows authentication is used.
5nine Cloud Security for Hyper-V | Getting Started Guide
© 2009-2015 5nine Software, Inc. All rights reserved.
Security & Management Solutions for Hyper-V and Windows Server 6
Allow to control Hyper-V
(http://blogs.msdn.com/b/virtual_pc_guy/archive/2008/01/17/allowing-non-
administrators-to-control-hyper-v.aspx).
“Logon as a service” privilege.
Host Service user should be local administrator.
If the host is managed remotely from the centralized management console, there
should also be an account with similar permissions used in Server Settings. Best practice
– to use the same account for service on managed host and in Server Settings in the
management console.
For workgroup/mixed domains environment:
The Account for workgroup environment should also have similar permissions for
current managed host.
Managed and management servers should be marked as trusted hosts if workgroup
environment is used on several domains environment.
Installation
There are three separate components that compose the full set of 5nine Cloud Security that is
being installed from a single setup launcher application:
- Management Service. This component should be installed on the host(s) and/or designated
VM(s) that will be set as management servers for the entire Windows Server/Hyper-V
environment. Refer to the ‘Management Service installation’ subsection below. There can
be several management servers for the given Hyper-V environment, which provides
disaster recovery function. Refer to the ‘Disaster recovery’ section below.
- Host Management Service. This component should be installed on each secured/monitored
host. Refer to the ‘Host Management Service installation’ subsection below.
- Management Console. This component should be installed on each host/VM that will be
used by administrators to operate and control the system security/compliance rules
application. Refer to the ‘Management Console installation’ subsection below.
Additionally, the following components are available at single setup launcher application:

5nine Cloud Security for Hyper-V | Getting Started Guide
© 2009-2015 5nine Software, Inc. All rights reserved.
Security & Management Solutions for Hyper-V and Windows Server 7
- Extension for Azure Pack. This component installs 5nine Cloud Security Azure Pack
Extension to operate Cloud Security functions from Azure Pack admin and tenant portals.
Please refer to the 5nine Cloud Security Azure Pack Extension QSG for details.
- SCVMM compliance extension (5nine Cloud Security Network Manager Plugin). This
component is required in certain cases when Microsoft System Center Virtual Machine
Manager is used in the environment and the SCVMM-based logical switches are enabled.
SCVMM compliance plugin helps to get SCVMM logical switches to compliant state. ‘5nine
Cloud Security Network Manager Plugin installation’ subsection below describes SCVMM
compliance extension installation process.
Management Service installation
Standalone installation
Management Service must be installed at least on one server (host or designated VM) prior to
setting up all other 5nine Cloud Security components.
Attention! 5nine Cloud Security management service uses the same interface with the
antivirus management service of the other 5nine product – 5nine Manager for Hyper-V PLUS.
Even if they are used to manage different Hyper-V hosts, they still will run into a conflict and
the antivirus feature will not work in the case they are running on the same server. Therefore
placing of both management services on the same machine is not supported scenario.
To install Management Service, first run the single setup launcher application:

5nine Cloud Security for Hyper-V | Getting Started Guide
© 2009-2015 5nine Software, Inc. All rights reserved.
Security & Management Solutions for Hyper-V and Windows Server 8
Select ‘Management Service’ and click Install. The Management Service Setup wizard will open:
Click Next to start pre-configuration process.
Select the destination folder for the management service installation.
You can change the default destination folder.
Select or create the new folder and click OK. Then click Next.

5nine Cloud Security for Hyper-V | Getting Started Guide
© 2009-2015 5nine Software, Inc. All rights reserved.
Security & Management Solutions for Hyper-V and Windows Server 9
Select the license (.txt) file:
Set the user that will run Management Service:
As a best practice, it is recommended to select the User option and enter either local or domain
user credentials depending on the environment in which the management service is being
installed. The hosts that are added to management console later, will use the user account,
management console or host management service are running under, as default credentials.
Please refer to “Adding and removing hosts” section for more information. If you select ‘Local
5nine Cloud Security for Hyper-V | Getting Started Guide
© 2009-2015 5nine Software, Inc. All rights reserved.
Security & Management Solutions for Hyper-V and Windows Server 10
system’, all the hosts must be added with custom credentials, where the user account is
entered. Click Next.
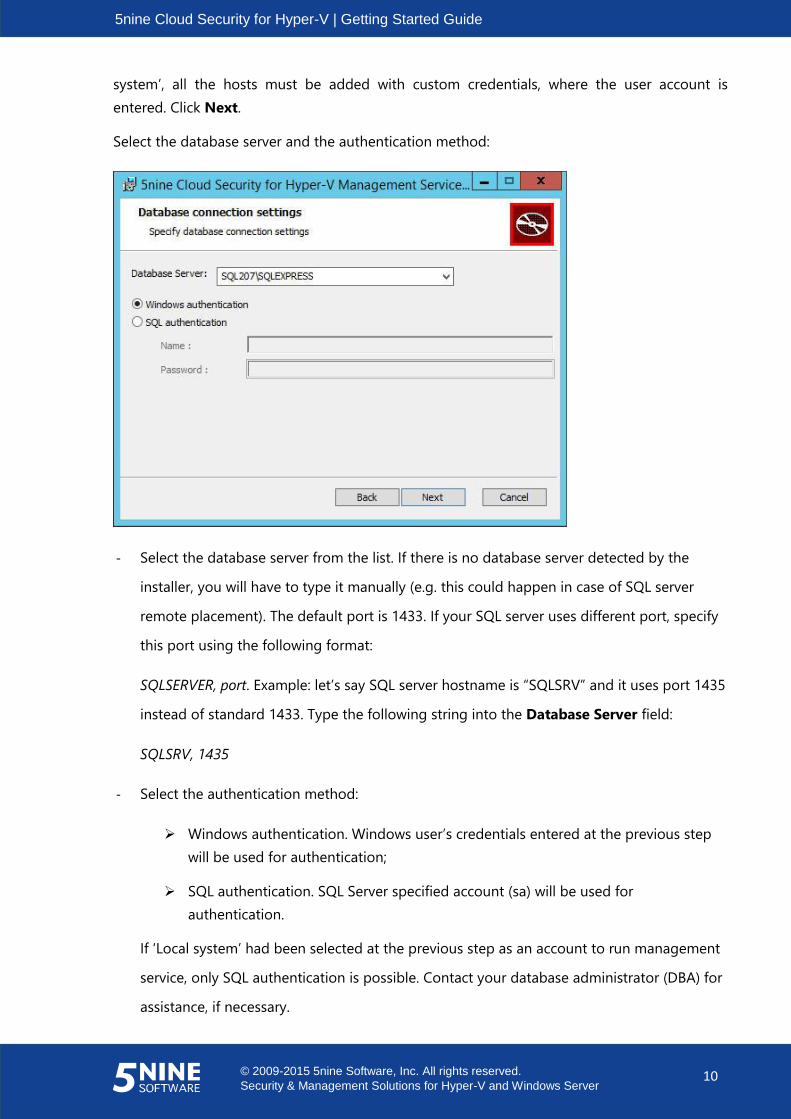
Select the database server and the authentication method:
- Select the database server from the list. If there is no database server detected by the
installer, you will have to type it manually (e.g. this could happen in case of SQL server
remote placement). The default port is 1433. If your SQL server uses different port, specify
this port using the following format:
SQLSERVER, port. Example: let’s say SQL server hostname is “SQLSRV” and it uses port 1435
instead of standard 1433. Type the following string into the Database Server field:
SQLSRV, 1435
- Select the authentication method:
Windows authentication. Windows user’s credentials entered at the previous step
will be used for authentication;
SQL authentication. SQL Server specified account (sa) will be used for
authentication.
If ‘Local system’ had been selected at the previous step as an account to run management
service, only SQL authentication is possible. Contact your database administrator (DBA) for
assistance, if necessary.

5nine Cloud Security for Hyper-V | Getting Started Guide
© 2009-2015 5nine Software, Inc. All rights reserved.
Security & Management Solutions for Hyper-V and Windows Server 11
If you are doing a fresh installation of 5nine Cloud Security for Hyper-V or there is no
previously created security admins exist in your old database vFirewall in your selected data
source, you will be offered to choose whether to create or not security global admin:
If you choose the option Create global administrator, you will be requested to specify the
credentials for the new global admin:
Select the user type:
- Custom user. This option lets you create custom users independently from AD. This type is
used only within 5nine Cloud Security to identify permissions. If you’re working in a mixed
environment you should always select this option. You can set any name and password for
this user type.
- Windows user. This option applies to a single domain environment only. The user must be
registered in the AD.

5nine Cloud Security for Hyper-V | Getting Started Guide
© 2009-2015 5nine Software, Inc. All rights reserved.
Security & Management Solutions for Hyper-V and Windows Server 12
Global admin is a user who has full access over 5nine Cloud Security for Hyper-V. If you create
global admin, you will be able to connect to cloud security management service only under this
user (please refer to the ‘Users management and tenants’ section below for details). Remember
the credentials you have entered to be able to connect to the management service after the
installation.
If you choose the option Do not create admin, the installation will proceed without asking to
specify user’s credentials. In the case you have kept the old database vFirewall from the
previous installation in your selected data source and there was at least one admin registered
in it, the installer will detect this, and this step will be skipped automatically.
Click Next. Then click Install to start the Management Service installation process.
5nine Cloud Security for Hyper-V | Getting Started Guide
© 2009-2015 5nine Software, Inc. All rights reserved.
Security & Management Solutions for Hyper-V and Windows Server 13
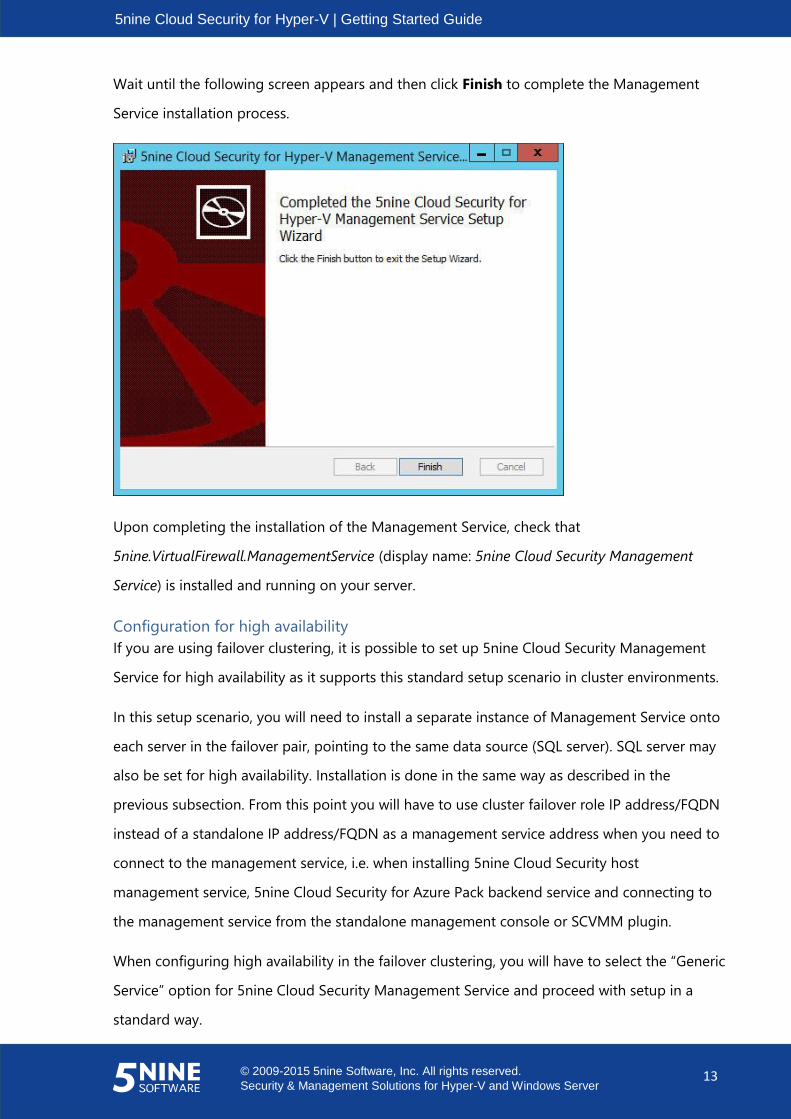
Wait until the following screen appears and then click Finish to complete the Management
Service installation process.
Upon completing the installation of the Management Service, check that
5nine.VirtualFirewall.ManagementService (display name: 5nine Cloud Security Management
Service) is installed and running on your server.
Configuration for high availability
If you are using failover clustering, it is possible to set up 5nine Cloud Security Management
Service for high availability as it supports this standard setup scenario in cluster environments.
In this setup scenario, you will need to install a separate instance of Management Service onto
each server in the failover pair, pointing to the same data source (SQL server). SQL server may
also be set for high availability. Installation is done in the same way as described in the
previous subsection. From this point you will have to use cluster failover role IP address/FQDN
instead of a standalone IP address/FQDN as a management service address when you need to
connect to the management service, i.e. when installing 5nine Cloud Security host
management service, 5nine Cloud Security for Azure Pack backend service and connecting to
the management service from the standalone management console or SCVMM plugin.
When configuring high availability in the failover clustering, you will have to select the “Generic
Service” option for 5nine Cloud Security Management Service and proceed with setup in a
standard way.
5nine Cloud Security for Hyper-V | Getting Started Guide
© 2009-2015 5nine Software, Inc. All rights reserved.
Security & Management Solutions for Hyper-V and Windows Server 14
These are general steps to follow when configuring high availability for 5nine Cloud Security
Management Service:
1. Make sure you have failover pair servers ready and meet requirements for 5nine Cloud
Security Management Service installation. Please refer to the ‘System requirements’
section above.
2. Install 5nine Cloud Security Management Service separately onto each server in the
failover pair, pointing to the same data source (SQL server). Please refer to the
‘Management Service installation’ – ‘Standalone installation’ section above. It is
recommended to stop 5nine.VirtualFirewall.ManagementService on the first server
before proceeding with the installation on the second one.
3. Configure 5nine Cloud Security Management Service high availability in the standard
way using the “Generic Service” option in the failover clustering. Please refer to the
following sources for more information about setting up a service for high availability in
failover cluster environment and using of the “Generic Service” option:
https://technet.microsoft.com/en-us/library/dd197590(v=ws.10).aspx
https://technet.microsoft.com/en-us/library/7fce4e54-3667-48b8-9ff3-266490acd980
Note. Remember that from this moment you will have to use your cluster role IP/FQDN
instead of standalone IP/FQDN whenever you connect to 5nine Cloud Security
Management Service.
5nine Cloud Security for Hyper-V | Getting Started Guide
© 2009-2015 5nine Software, Inc. All rights reserved.
Security & Management Solutions for Hyper-V and Windows Server 15
Host Management Service installation
Before starting Host Management Service setup:
- Confirm that Management Service is already installed on the host or VM that is selected as
a management server in your network.
- Confirm that its service is running (5nine.VirtualFirewall.ManagementService; display name:
5nine Cloud Security Management Service).
Attention! Host Management Service installs 5nine Antivirus Agent that is common to both
5nine Cloud Security for Hyper-V and the other 5nine product – 5nine Manager for Hyper-V
PLUS. 5nine Antivirus Agent communicates either with 5nine Cloud Security for Hyper-V
Management Service or with 5nine Management Service for Hyper-V PLUS. It cannot listen to
both management services in the same time. Therefore using of both products on the same
host is not supported scenario. When you install 5nine Cloud Security for Hyper-V in your
environment it is recommended to use 5nine Manager for Hyper-V version without antivirus
feature instead of 5nine Manager for Hyper-V PLUS version on the hosts that are managed by
5nine Cloud Security for Hyper-V. It will cover antivirus requirements while 5nine Manager for
Hyper-V will perform management functions.
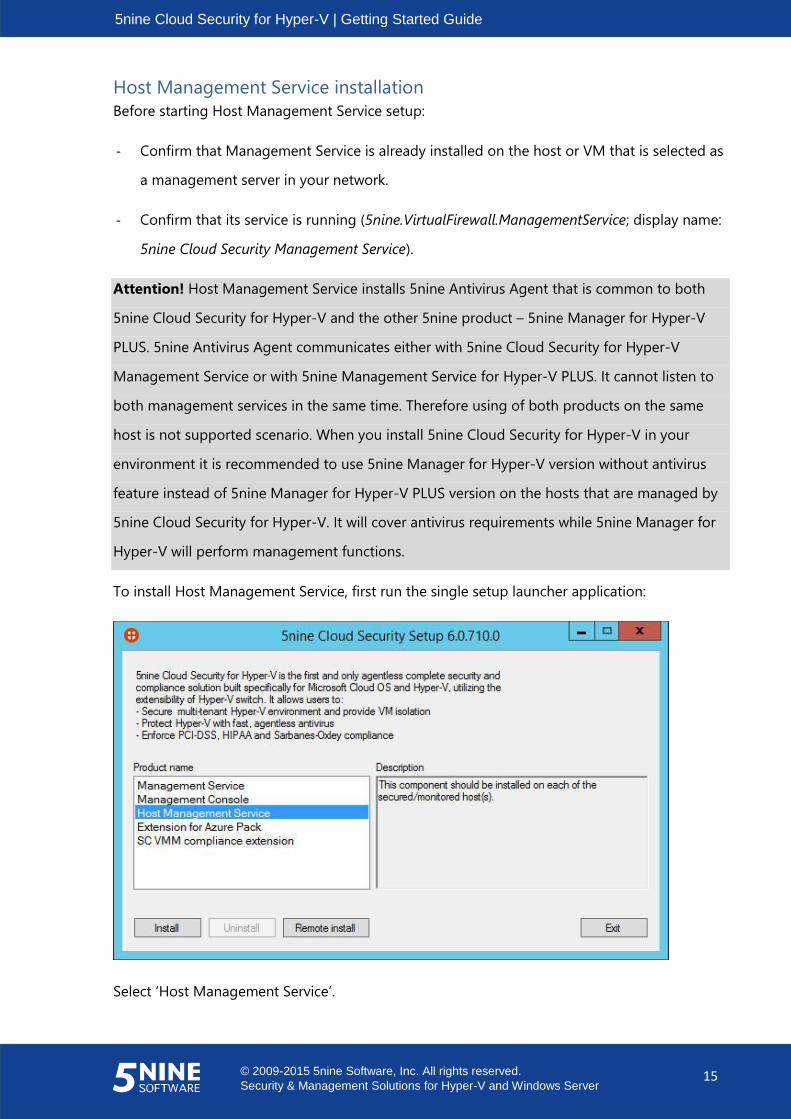
To install Host Management Service, first run the single setup launcher application:
Select ‘Host Management Service’.
5nine Cloud Security for Hyper-V | Getting Started Guide
© 2009-2015 5nine Software, Inc. All rights reserved.
Security & Management Solutions for Hyper-V and Windows Server 16
There are two options available for Host Management Service installation:
- Local installation. With this option Host Management Service will be installed onto the
current local server. ‘Local installation’ subsection below describes local installation
process.
- Remote installation. With this option Host Management Service will be installed onto any
host accessible on the network. ‘Remote installation’ subsection below describes remote
installation process.
Local installation
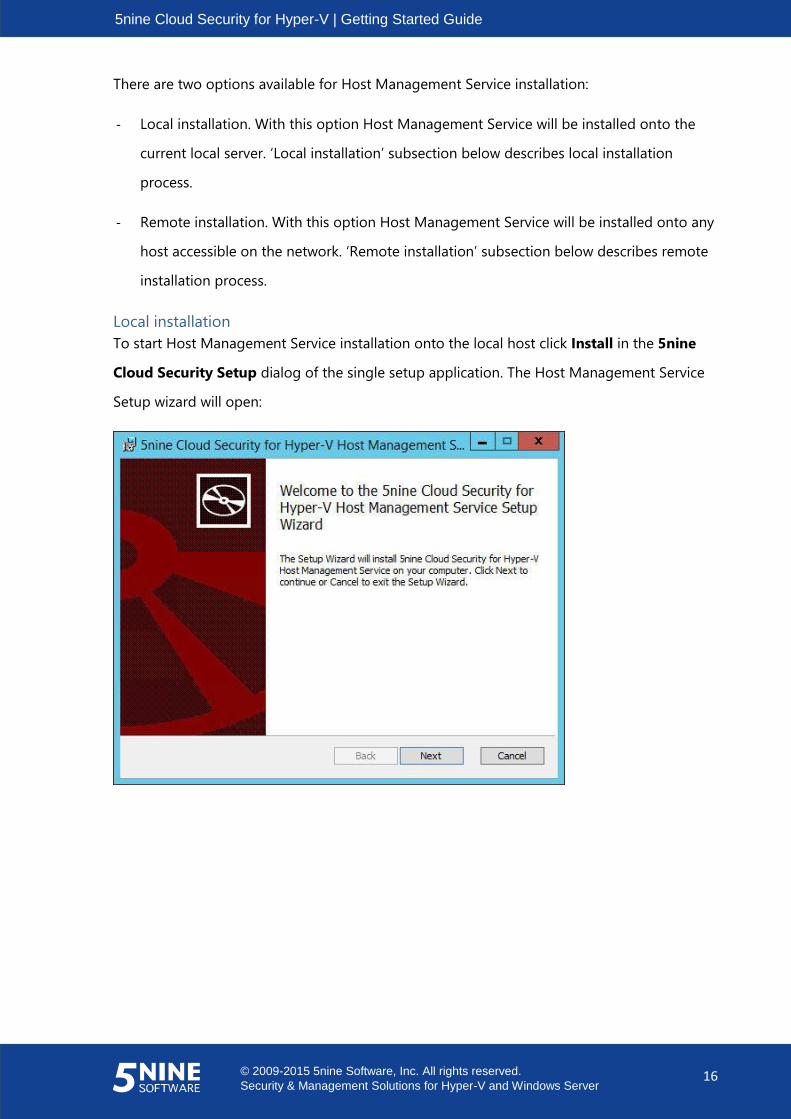
To start Host Management Service installation onto the local host click Install in the 5nine
Cloud Security Setup dialog of the single setup application. The Host Management Service
Setup wizard will open:
5nine Cloud Security for Hyper-V | Getting Started Guide
© 2009-2015 5nine Software, Inc. All rights reserved.
Security & Management Solutions for Hyper-V and Windows Server 17
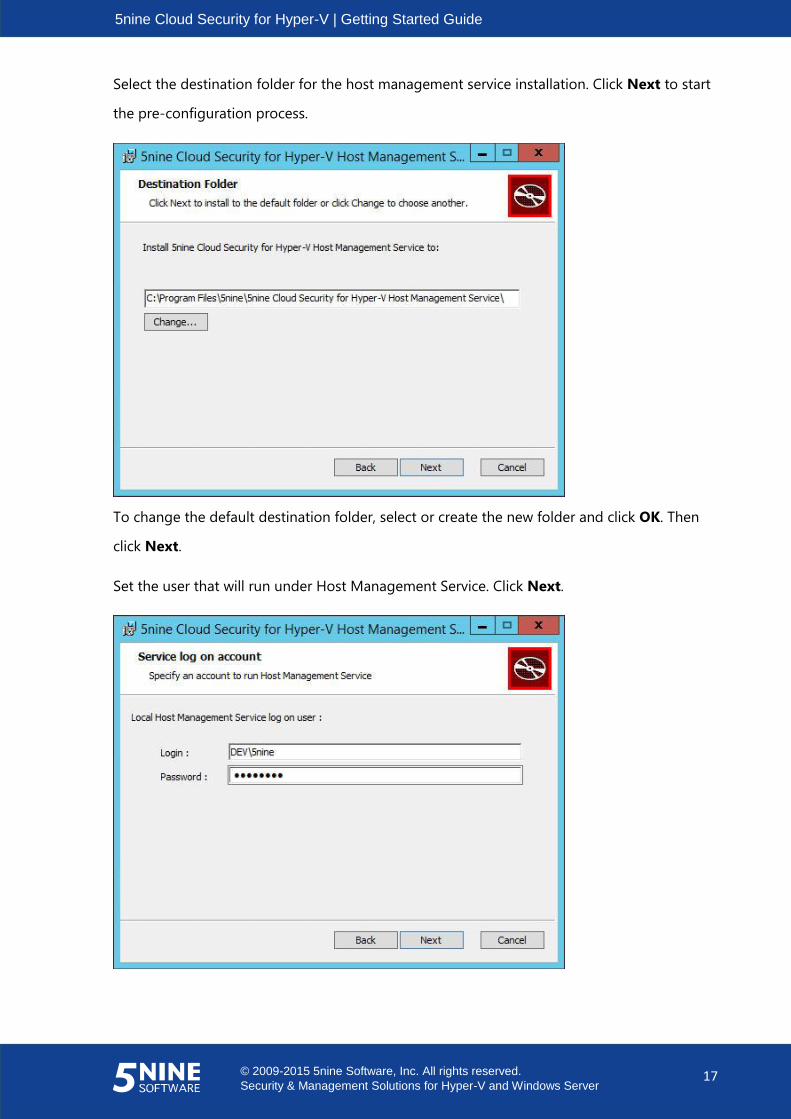
Select the destination folder for the host management service installation. Click Next to start
the pre-configuration process.
To change the default destination folder, select or create the new folder and click OK. Then
click Next.
Set the user that will run under Host Management Service. Click Next.
5nine Cloud Security for Hyper-V | Getting Started Guide
© 2009-2015 5nine Software, Inc. All rights reserved.
Security & Management Solutions for Hyper-V and Windows Server 18
Note. These credentials are entered for the local host on which the host management service is
being installed and may differ from those entered for the remote management server if the
program is used in mixed environments.
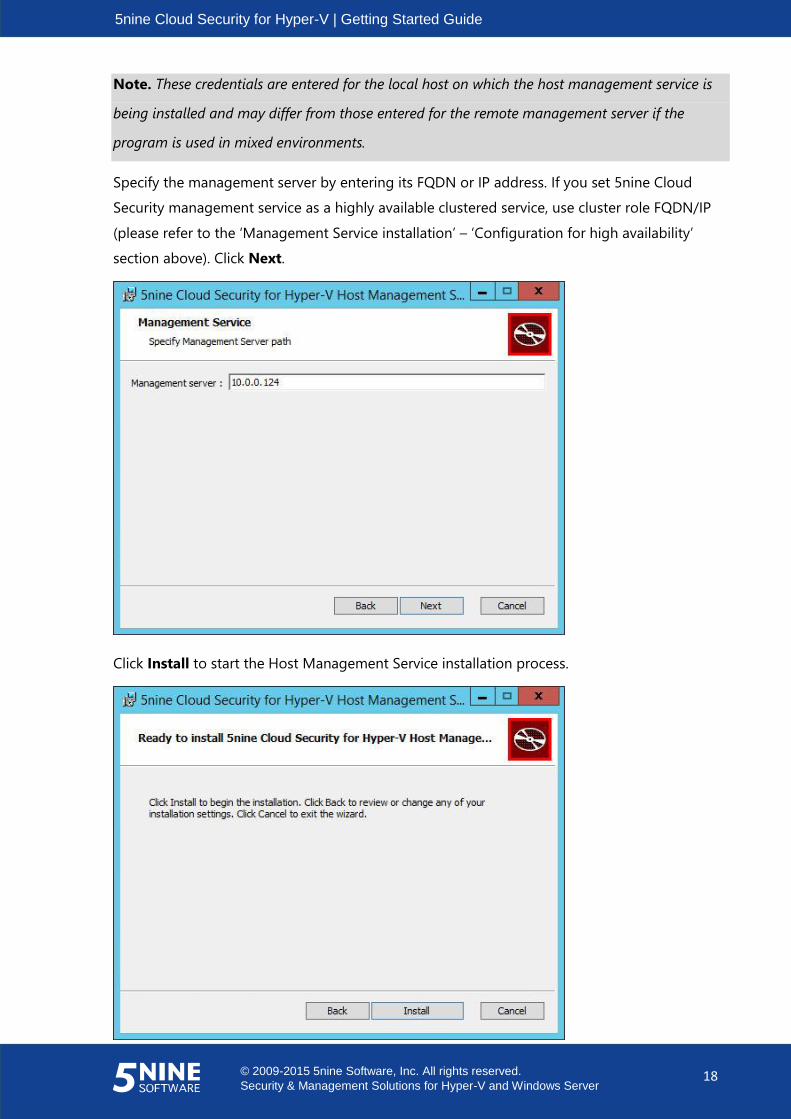
Specify the management server by entering its FQDN or IP address. If you set 5nine Cloud
Security management service as a highly available clustered service, use cluster role FQDN/IP
(please refer to the ‘Management Service installation’ – ‘Configuration for high availability’
section above). Click Next.
Click Install to start the Host Management Service installation process.

5nine Cloud Security for Hyper-V | Getting Started Guide
© 2009-2015 5nine Software, Inc. All rights reserved.
Security & Management Solutions for Hyper-V and Windows Server 19
Wait until the following screen appears and then click Finish to complete the Host
Management Service installation process.
Server reboot is required to complete the host management service setup. Confirm to the
system prompt to perform the server reboot immediately or decline to do it at a later moment.
5nine Cloud Security for Hyper-V | Getting Started Guide
© 2009-2015 5nine Software, Inc. All rights reserved.
Security & Management Solutions for Hyper-V and Windows Server 20
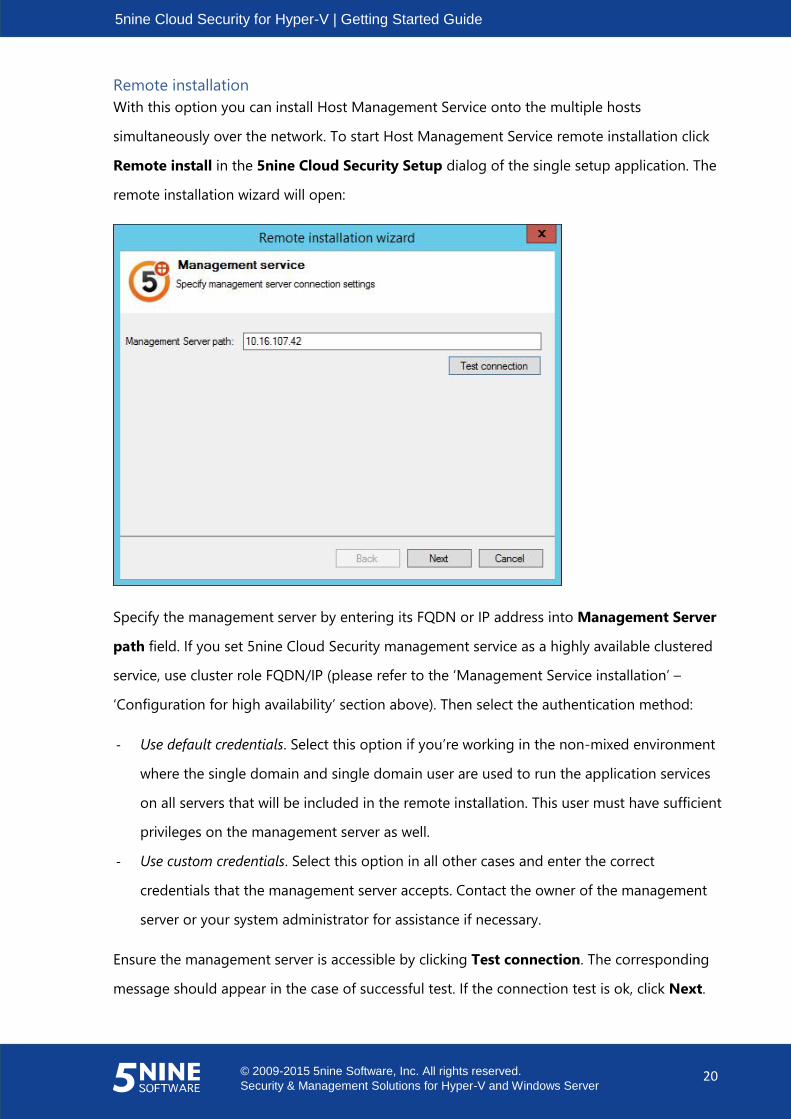
Remote installation
With this option you can install Host Management Service onto the multiple hosts
simultaneously over the network. To start Host Management Service remote installation click
Remote install in the 5nine Cloud Security Setup dialog of the single setup application. The
remote installation wizard will open:
Specify the management server by entering its FQDN or IP address into Management Server
path field. If you set 5nine Cloud Security management service as a highly available clustered
service, use cluster role FQDN/IP (please refer to the ‘Management Service installation’ –
‘Configuration for high availability’ section above). Then select the authentication method:
- Use default credentials. Select this option if you’re working in the non-mixed environment
where the single domain and single domain user are used to run the application services
on all servers that will be included in the remote installation. This user must have sufficient
privileges on the management server as well.
- Use custom credentials. Select this option in all other cases and enter the correct
credentials that the management server accepts. Contact the owner of the management
server or your system administrator for assistance if necessary.
Ensure the management server is accessible by clicking Test connection. The corresponding
message should appear in the case of successful test. If the connection test is ok, click Next.

5nine Cloud Security for Hyper-V | Getting Started Guide
© 2009-2015 5nine Software, Inc. All rights reserved.
Security & Management Solutions for Hyper-V and Windows Server 21
Add the remote hosts:
Click Add to select and the host(s) to the list for remote setup of Host Management Service:
Enter the server(s) by typing their FQDN or IP addresses separated by commas. Then select the
authentication method (contact your system administrator for the assistance if necessary):
- Use default credentials. The current user’s credentials will be used. Use this option if the
single domain is used in the environment and the current user granted all necessary rights
on the remote server(s);
- Use custom credentials. Specify the credentials for remote host. Use this option if different
credentials should be used on remote host. In the case multiple hosts are added, you will
likely need to alter these credentials for each host as applicable in the case you’re working
in mixed environment and/or different credentials are used on the servers.
5nine Cloud Security for Hyper-V | Getting Started Guide
© 2009-2015 5nine Software, Inc. All rights reserved.
Security & Management Solutions for Hyper-V and Windows Server 22
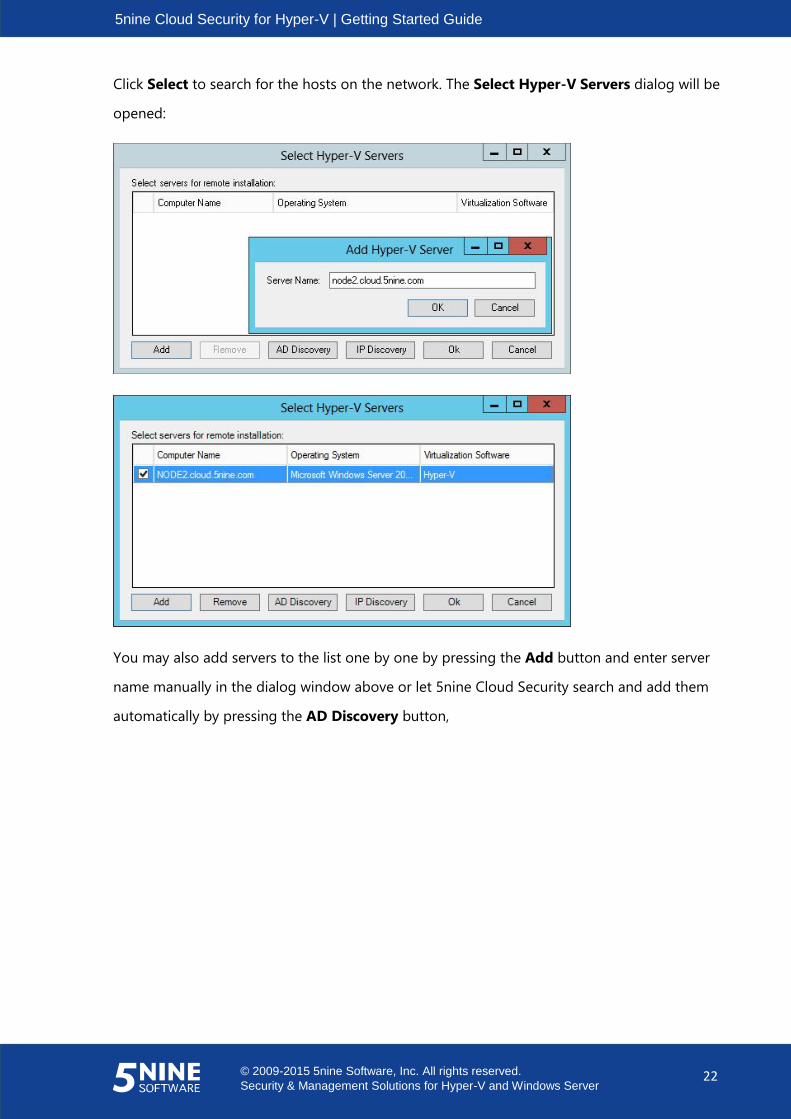
Click Select to search for the hosts on the network. The Select Hyper-V Servers dialog will be
opened:
You may also add servers to the list one by one by pressing the Add button and enter server
name manually in the dialog window above or let 5nine Cloud Security search and add them
automatically by pressing the AD Discovery button,
5nine Cloud Security for Hyper-V | Getting Started Guide
© 2009-2015 5nine Software, Inc. All rights reserved.
Security & Management Solutions for Hyper-V and Windows Server 23
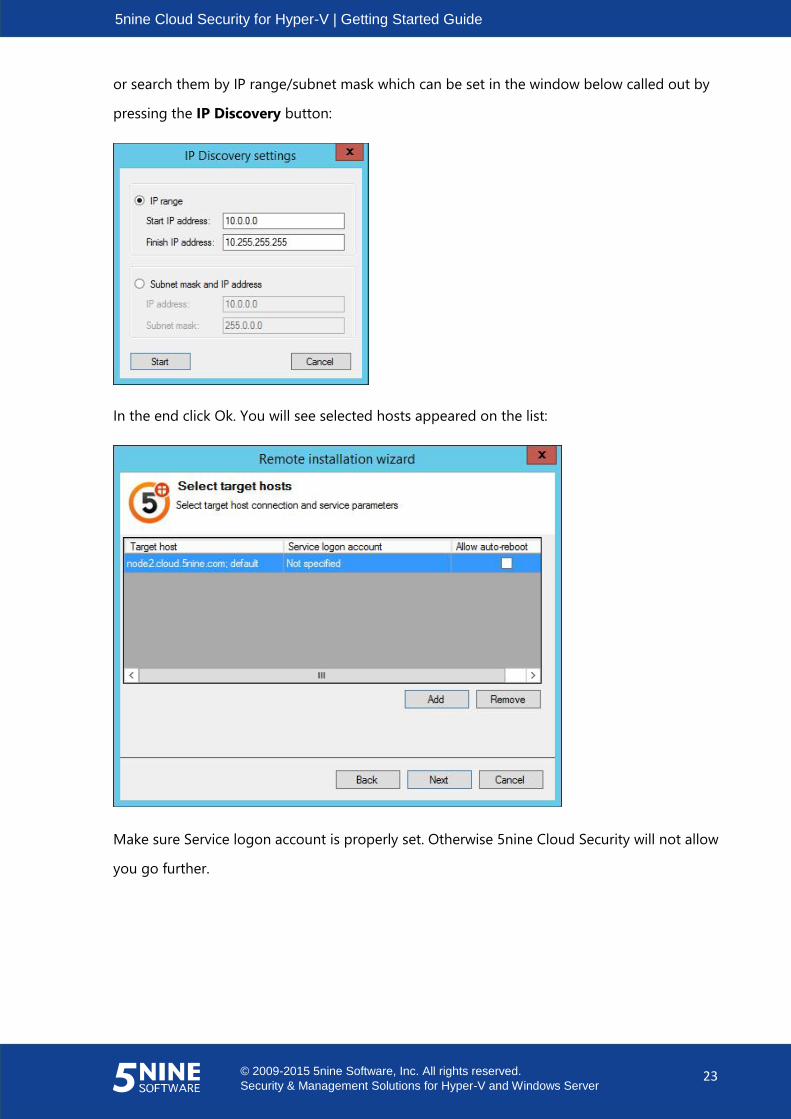
or search them by IP range/subnet mask which can be set in the window below called out by
pressing the IP Discovery button:
In the end click Ok. You will see selected hosts appeared on the list:
Make sure Service logon account is properly set. Otherwise 5nine Cloud Security will not allow
you go further.

5nine Cloud Security for Hyper-V | Getting Started Guide
© 2009-2015 5nine Software, Inc. All rights reserved.
Security & Management Solutions for Hyper-V and Windows Server 24
Right click each host to edit the installation and/or service logon accounts:
- Click Edit install credentials to specify/alter the credentials for the host management
service installation onto the target host:
- Click Edit service credentials to specify/alter the credentials under which
5nine.VirtualFirewall.HostManagementService (display name 5nine Cloud Security Host
Service) will be running on the target host:
Then specify/alter the credentials in the dialog that will open:
5nine Cloud Security for Hyper-V | Getting Started Guide
© 2009-2015 5nine Software, Inc. All rights reserved.
Security & Management Solutions for Hyper-V and Windows Server 25
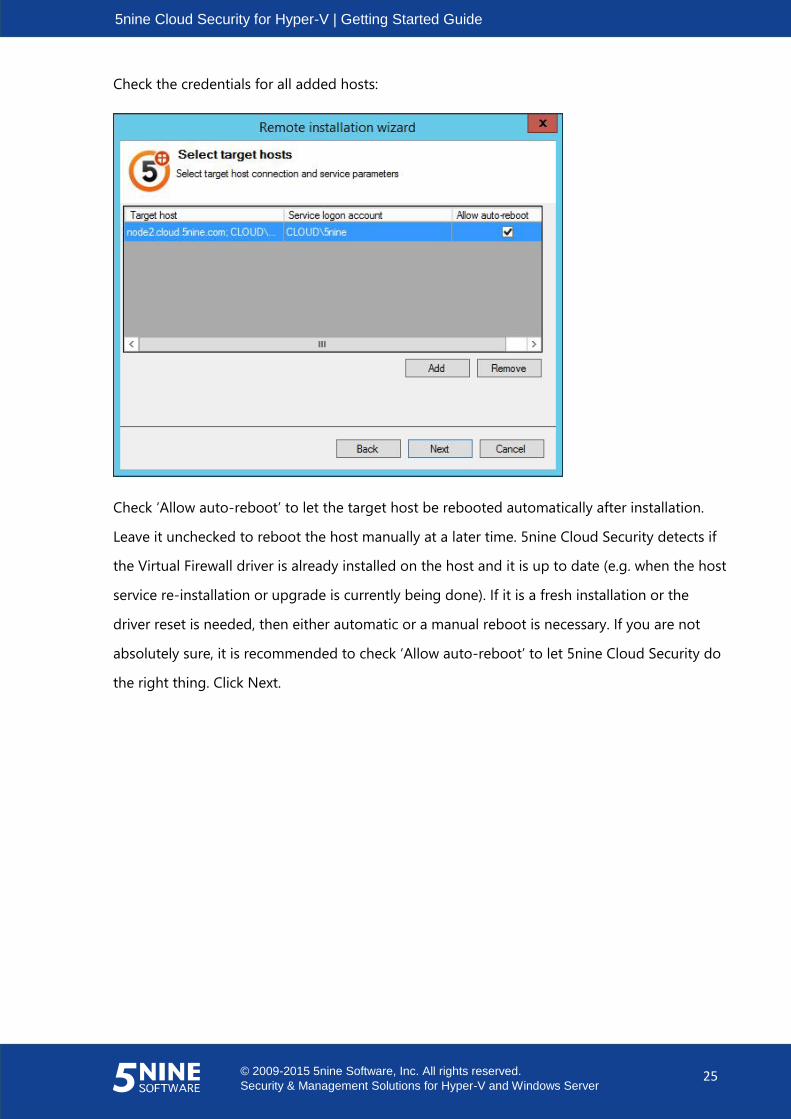
Check the credentials for all added hosts:
Check ‘Allow auto-reboot’ to let the target host be rebooted automatically after installation.
Leave it unchecked to reboot the host manually at a later time. 5nine Cloud Security detects if
the Virtual Firewall driver is already installed on the host and it is up to date (e.g. when the host
service re-installation or upgrade is currently being done). If it is a fresh installation or the
driver reset is needed, then either automatic or a manual reboot is necessary. If you are not
absolutely sure, it is recommended to check ‘Allow auto-reboot’ to let 5nine Cloud Security do
the right thing. Click Next.
5nine Cloud Security for Hyper-V | Getting Started Guide
© 2009-2015 5nine Software, Inc. All rights reserved.
Security & Management Solutions for Hyper-V and Windows Server 26
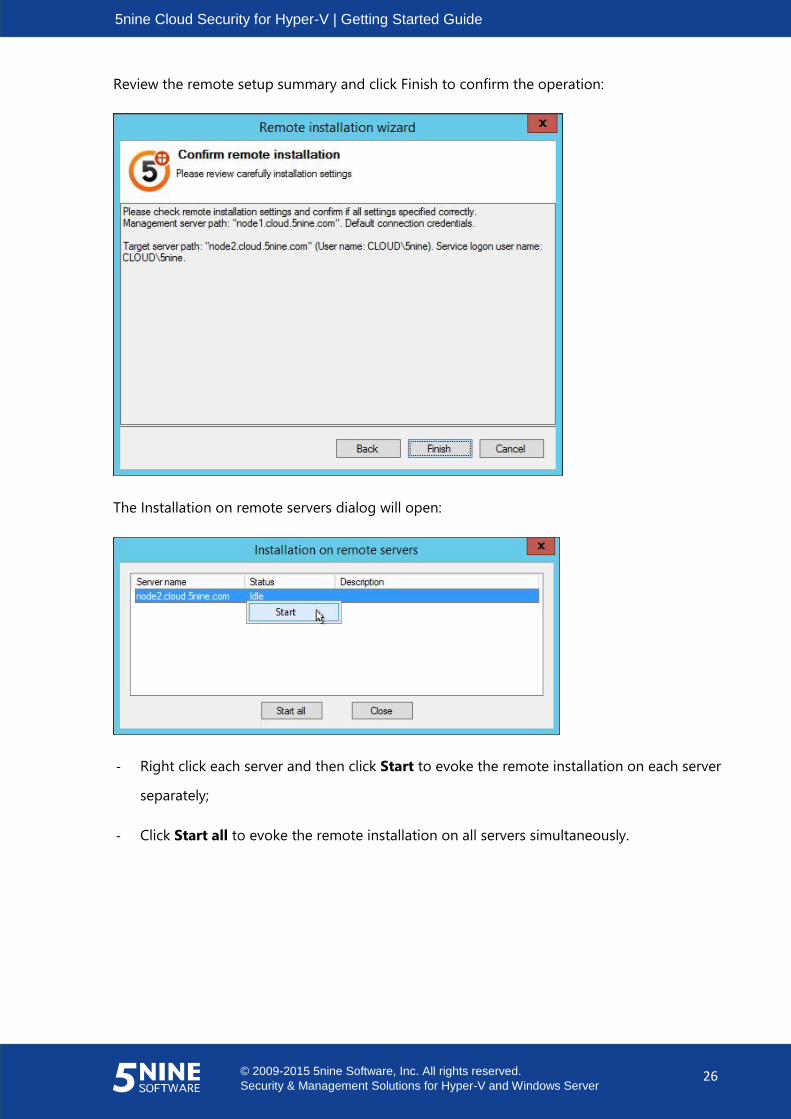
Review the remote setup summary and click Finish to confirm the operation:
The Installation on remote servers dialog will open:
- Right click each server and then click Start to evoke the remote installation on each server
separately;
- Click Start all to evoke the remote installation on all servers simultaneously.
5nine Cloud Security for Hyper-V | Getting Started Guide
© 2009-2015 5nine Software, Inc. All rights reserved.
Security & Management Solutions for Hyper-V and Windows Server 27
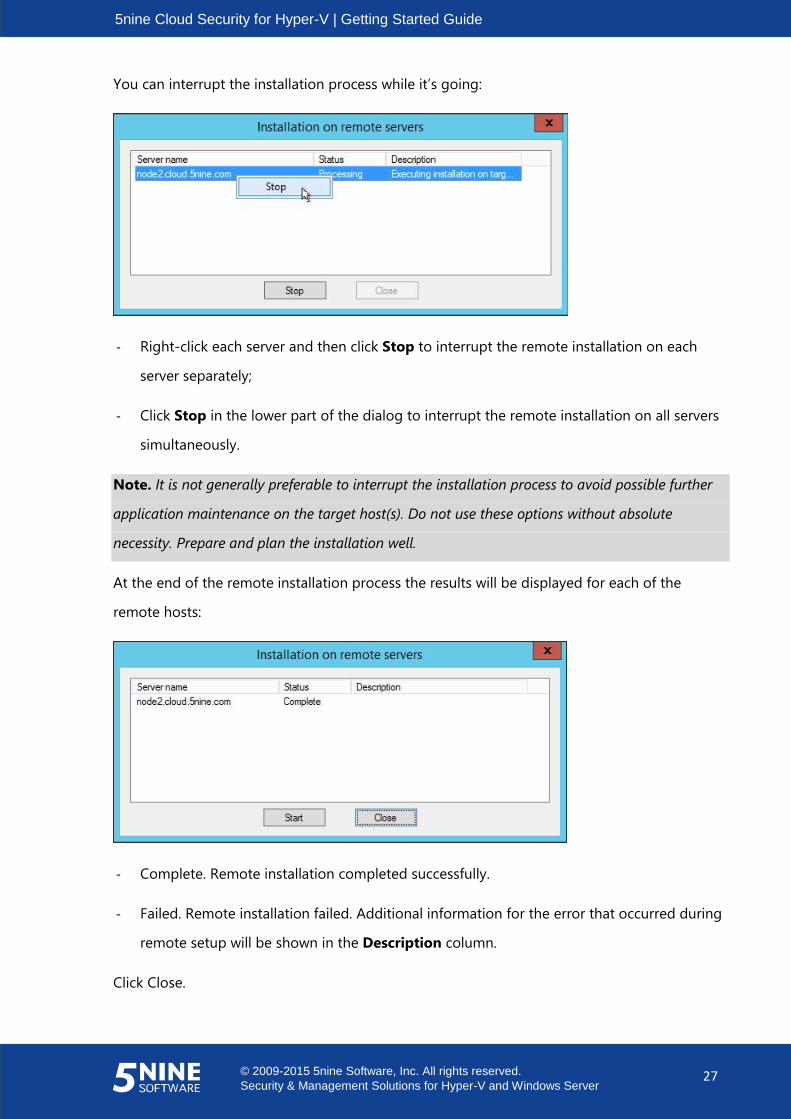
You can interrupt the installation process while it’s going:
- Right-click each server and then click Stop to interrupt the remote installation on each
server separately;
- Click Stop in the lower part of the dialog to interrupt the remote installation on all servers
simultaneously.
Note. It is not generally preferable to interrupt the installation process to avoid possible further
application maintenance on the target host(s). Do not use these options without absolute
necessity. Prepare and plan the installation well.
At the end of the remote installation process the results will be displayed for each of the
remote hosts:
- Complete. Remote installation completed successfully.
- Failed. Remote installation failed. Additional information for the error that occurred during
remote setup will be shown in the Description column.
Click Close.
5nine Cloud Security for Hyper-V | Getting Started Guide
© 2009-2015 5nine Software, Inc. All rights reserved.
Security & Management Solutions for Hyper-V and Windows Server 28
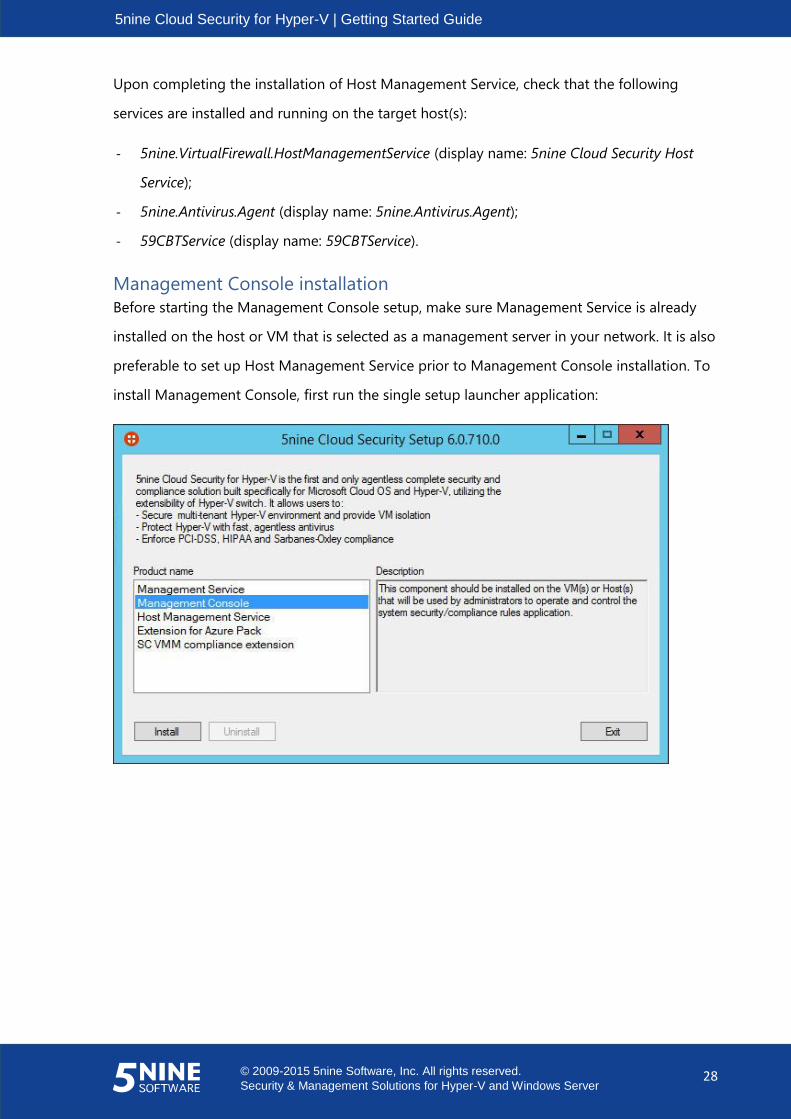
Upon completing the installation of Host Management Service, check that the following
services are installed and running on the target host(s):
- 5nine.VirtualFirewall.HostManagementService (display name: 5nine Cloud Security Host
Service);
- 5nine.Antivirus.Agent (display name: 5nine.Antivirus.Agent);
- 59CBTService (display name: 59CBTService).
Management Console installation
Before starting the Management Console setup, make sure Management Service is already
installed on the host or VM that is selected as a management server in your network. It is also
preferable to set up Host Management Service prior to Management Console installation. To
install Management Console, first run the single setup launcher application:
5nine Cloud Security for Hyper-V | Getting Started Guide
© 2009-2015 5nine Software, Inc. All rights reserved.
Security & Management Solutions for Hyper-V and Windows Server 29
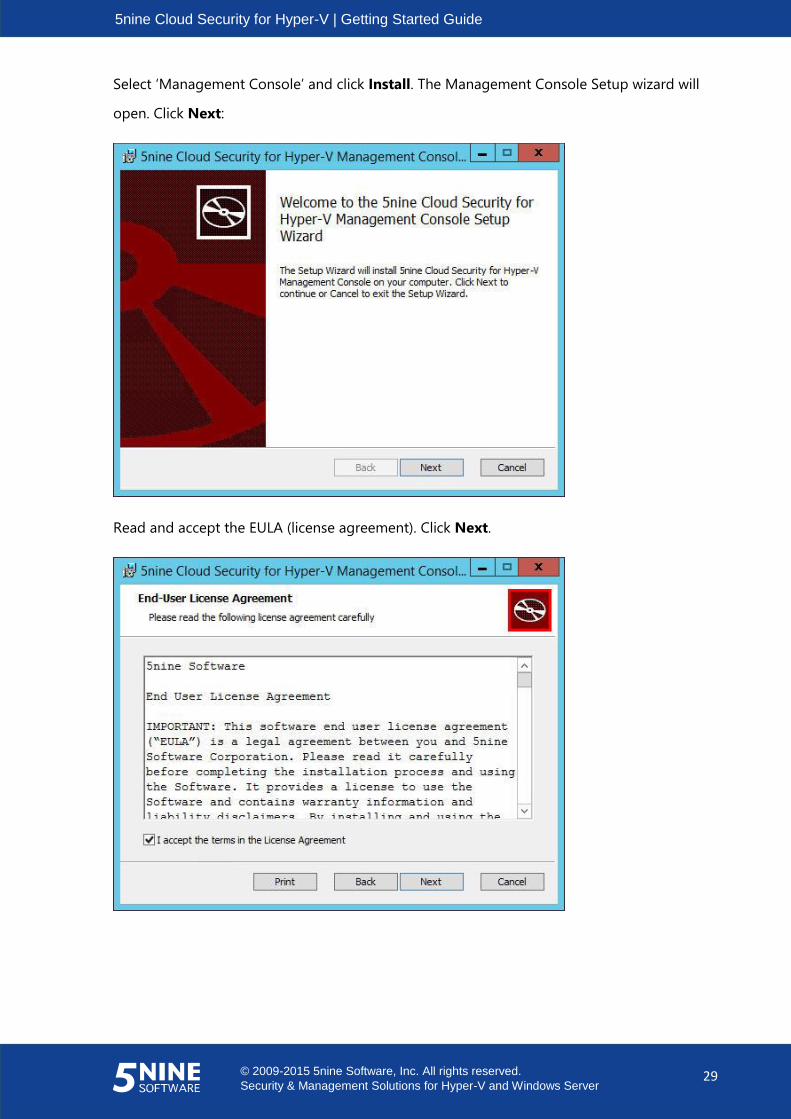
Select ‘Management Console’ and click Install. The Management Console Setup wizard will
open. Click Next:
Read and accept the EULA (license agreement). Click Next.
5nine Cloud Security for Hyper-V | Getting Started Guide
© 2009-2015 5nine Software, Inc. All rights reserved.
Security & Management Solutions for Hyper-V and Windows Server 30
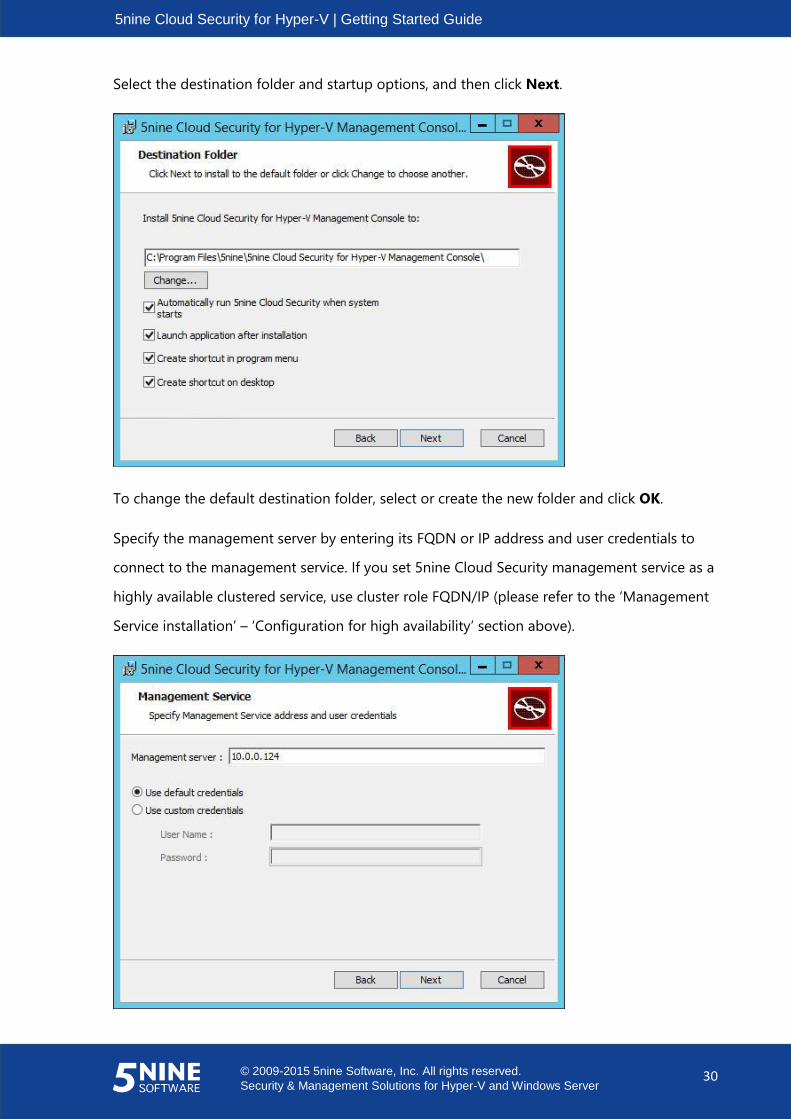
Select the destination folder and startup options, and then click Next.
To change the default destination folder, select or create the new folder and click OK.
Specify the management server by entering its FQDN or IP address and user credentials to
connect to the management service. If you set 5nine Cloud Security management service as a
highly available clustered service, use cluster role FQDN/IP (please refer to the ‘Management
Service installation’ – ‘Configuration for high availability’ section above).
5nine Cloud Security for Hyper-V | Getting Started Guide
© 2009-2015 5nine Software, Inc. All rights reserved.
Security & Management Solutions for Hyper-V and Windows Server 31
Select one of the following options:
- Use default credentials – the current user credentials will be taken to connect to
management service each time the management console is started.
- Use custom credentials – the credentials entered here will always be taken to connect to
management service no matter which user is running the management console.
Note: To install the management console on the server where multiple users with different
privileges work, the best practice is to select the option ‘Use default credentials’ so that each time
the management console is started the necessary privileges are granted on it. The same applies
to tenants’ setup, the user that is currently running the management console instance must
match the user, set to connect to the management service in order to get the right privileges.
Refer to the section of “Users management and tenants”.
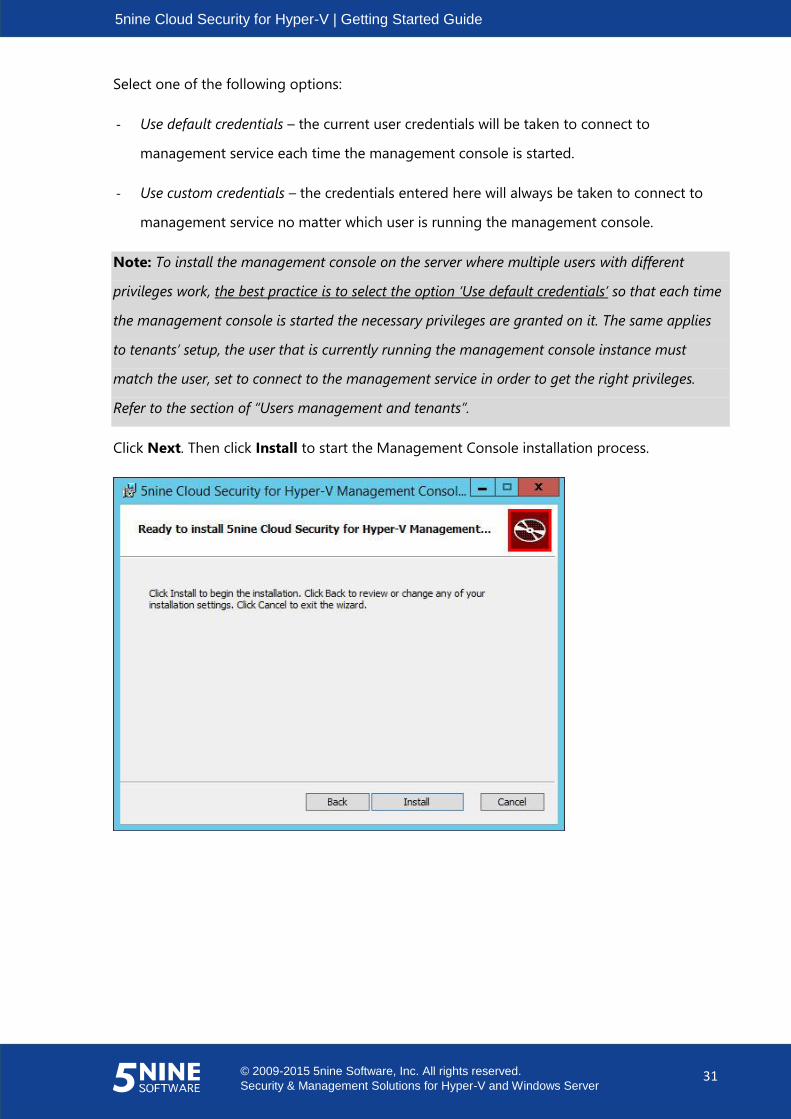
Click Next. Then click Install to start the Management Console installation process.
5nine Cloud Security for Hyper-V | Getting Started Guide
© 2009-2015 5nine Software, Inc. All rights reserved.
Security & Management Solutions for Hyper-V and Windows Server 32
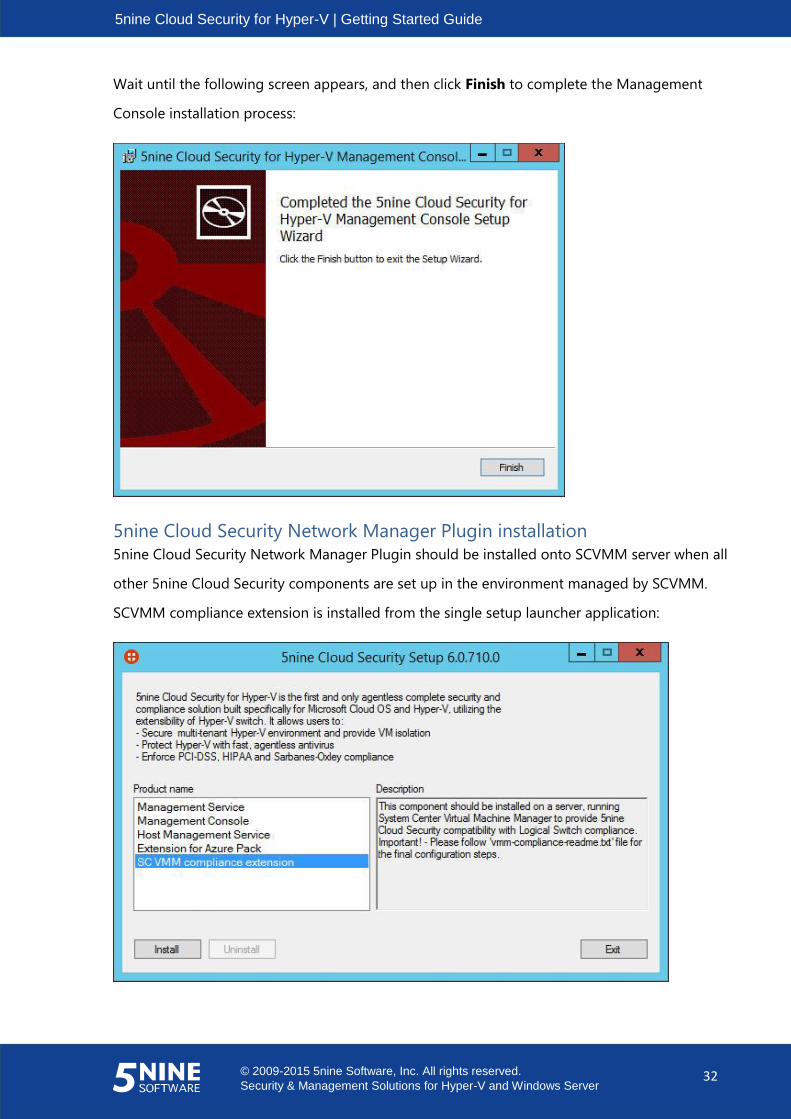
Wait until the following screen appears, and then click Finish to complete the Management
Console installation process:
5nine Cloud Security Network Manager Plugin installation
5nine Cloud Security Network Manager Plugin should be installed onto SCVMM server when all
other 5nine Cloud Security components are set up in the environment managed by SCVMM.
SCVMM compliance extension is installed from the single setup launcher application:

5nine Cloud Security for Hyper-V | Getting Started Guide
© 2009-2015 5nine Software, Inc. All rights reserved.
Security & Management Solutions for Hyper-V and Windows Server 33
Select ‘SC VMM compliance extension’ and click Install. The 5nine Cloud Security for Hyper-V
Network Manager Plugin Setup wizard will open. Click Next.
Select the destination folder or leave the default path and click Next.
Click Install to start the 5nine Cloud Security for Hyper-V Network Manager Plugin installation
process.
5nine Cloud Security for Hyper-V | Getting Started Guide
© 2009-2015 5nine Software, Inc. All rights reserved.
Security & Management Solutions for Hyper-V and Windows Server 34
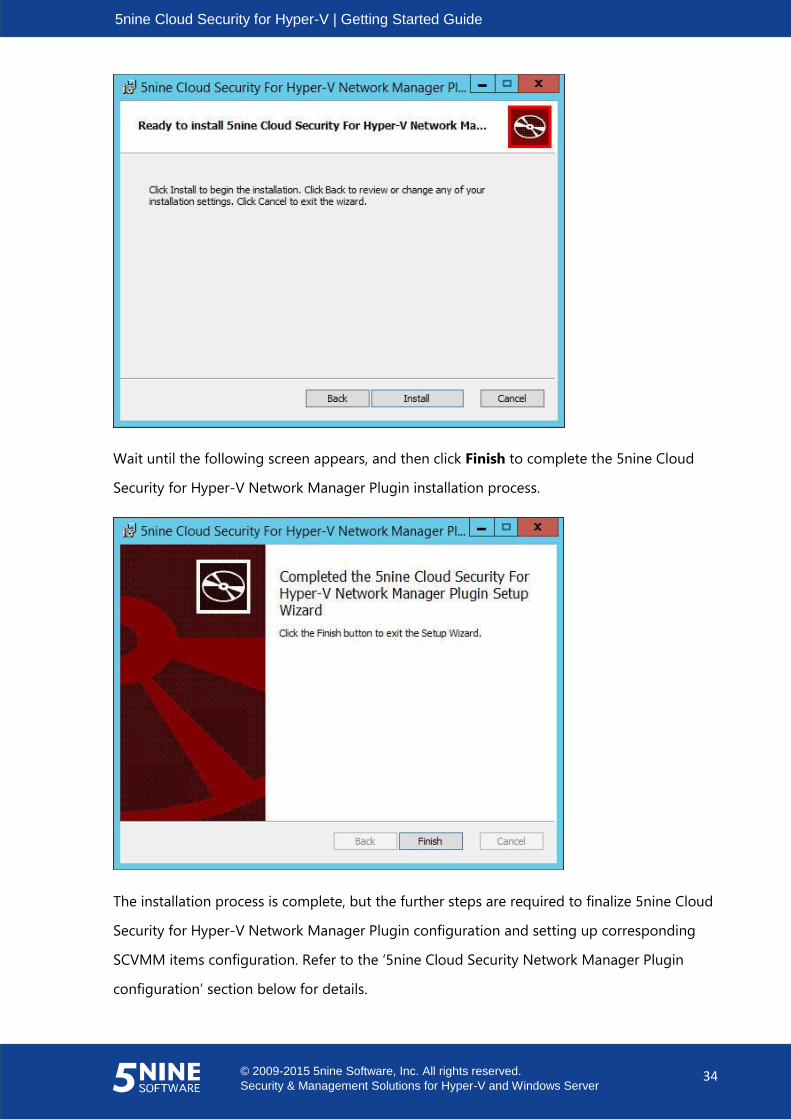
Wait until the following screen appears, and then click Finish to complete the 5nine Cloud
Security for Hyper-V Network Manager Plugin installation process.
The installation process is complete, but the further steps are required to finalize 5nine Cloud
Security for Hyper-V Network Manager Plugin configuration and setting up corresponding
SCVMM items configuration. Refer to the ‘5nine Cloud Security Network Manager Plugin
configuration’ section below for details.
5nine Cloud Security for Hyper-V | Getting Started Guide
© 2009-2015 5nine Software, Inc. All rights reserved.
Security & Management Solutions for Hyper-V and Windows Server 35
5nine Cloud Security operations
To configure 5nine Cloud Security, first open its Management Console using the shortcut to
the following application: C:\Program Files\5nine\5nine Security For Hyper-V Management
Console\5nine.VirtualFirewall. ManagementConsole.exe. This shortcut will be available on your
desktop by default.
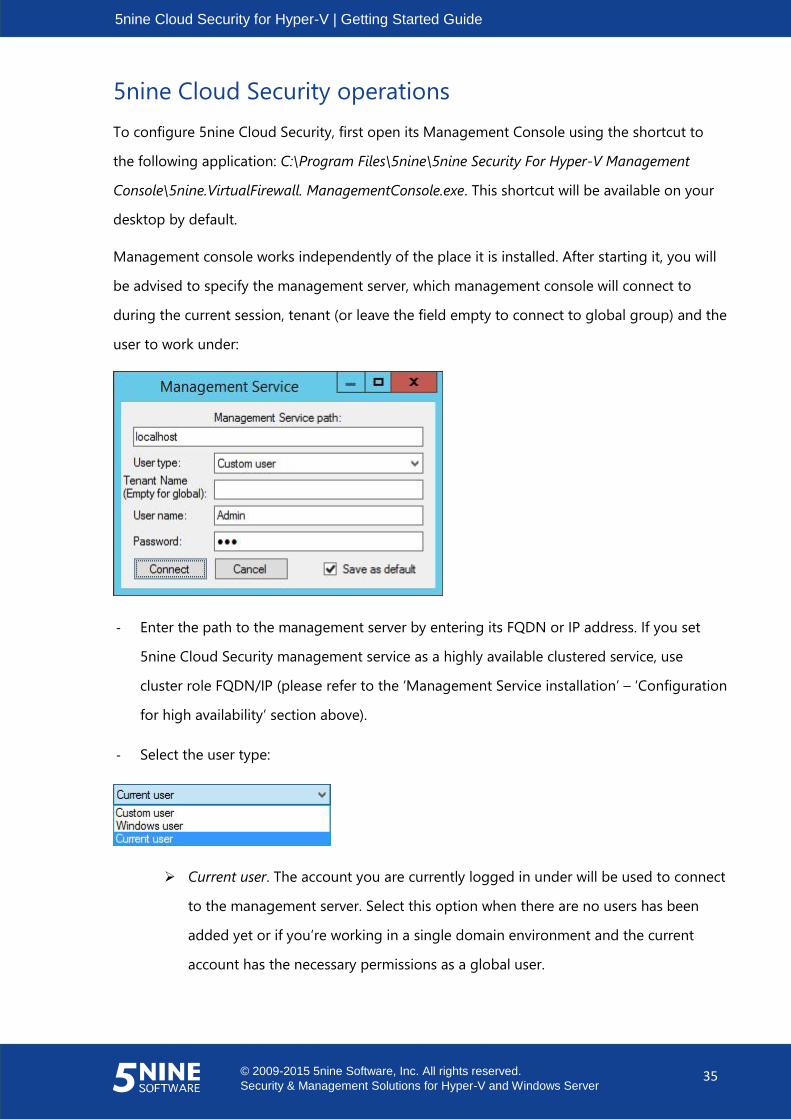
Management console works independently of the place it is installed. After starting it, you will
be advised to specify the management server, which management console will connect to
during the current session, tenant (or leave the field empty to connect to global group) and the
user to work under:
- Enter the path to the management server by entering its FQDN or IP address. If you set
5nine Cloud Security management service as a highly available clustered service, use
cluster role FQDN/IP (please refer to the ‘Management Service installation’ – ‘Configuration
for high availability’ section above).
- Select the user type:
Current user. The account you are currently logged in under will be used to connect
to the management server. Select this option when there are no users has been
added yet or if you’re working in a single domain environment and the current
account has the necessary permissions as a global user.
5nine Cloud Security for Hyper-V | Getting Started Guide
© 2009-2015 5nine Software, Inc. All rights reserved.
Security & Management Solutions for Hyper-V and Windows Server 36
Windows user. The domain account registered in AD will be used to connect to the
management server. This option can be selected in the case you are working in the
non-mixed environment and available for the members of ‘Global Group’ only.
Custom user. The previously created custom user will be used to connect to the
management server. If you are working in the mixed environment you should
always select this option once the users and permissions are set. Please refer to the
‘Setting users’ and ‘Setting user permissions’ paragraphs of the ‘Users management
and tenants’ subsection below for the detailed information.
- Enter the tenant name to connect to a tenant or leave the field empty to connect to global
group.
- For the Custom user and Windows user types enter the name and password in the
appropriate fields.
- If you would like the current login information to be saved for the next sessions as a
default option so that you don’t have to enter it all over again each time you start
management console, check the Save as default box.
Quick search field in the left-lower part of the main window will help you to find the necessary
VM fast. Just enter the key symbols in it and the VM list will be filtered accordingly.
5nine Cloud Security for Hyper-V | Getting Started Guide
© 2009-2015 5nine Software, Inc. All rights reserved.
Security & Management Solutions for Hyper-V and Windows Server 37
Adding and removing hosts
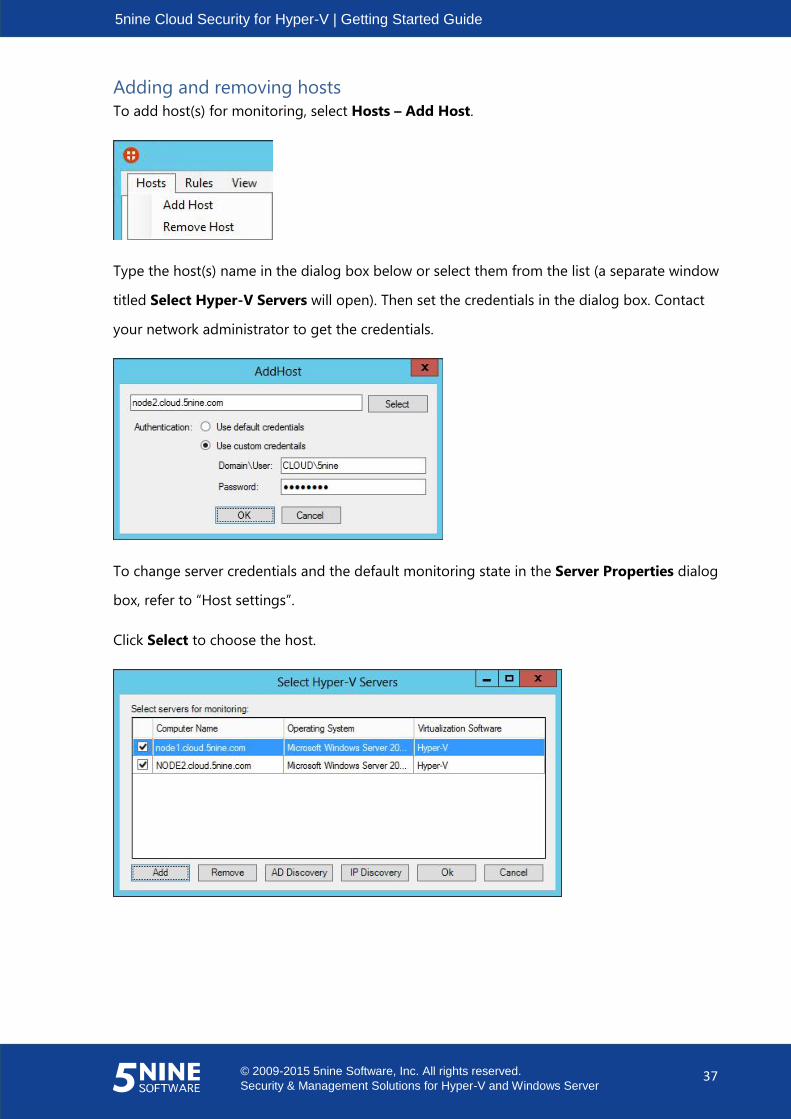
To add host(s) for monitoring, select Hosts – Add Host.
Type the host(s) name in the dialog box below or select them from the list (a separate window
titled Select Hyper-V Servers will open). Then set the credentials in the dialog box. Contact
your network administrator to get the credentials.
To change server credentials and the default monitoring state in the Server Properties dialog
box, refer to “Host settings”.
Click Select to choose the host.
5nine Cloud Security for Hyper-V | Getting Started Guide
© 2009-2015 5nine Software, Inc. All rights reserved.
Security & Management Solutions for Hyper-V and Windows Server 38
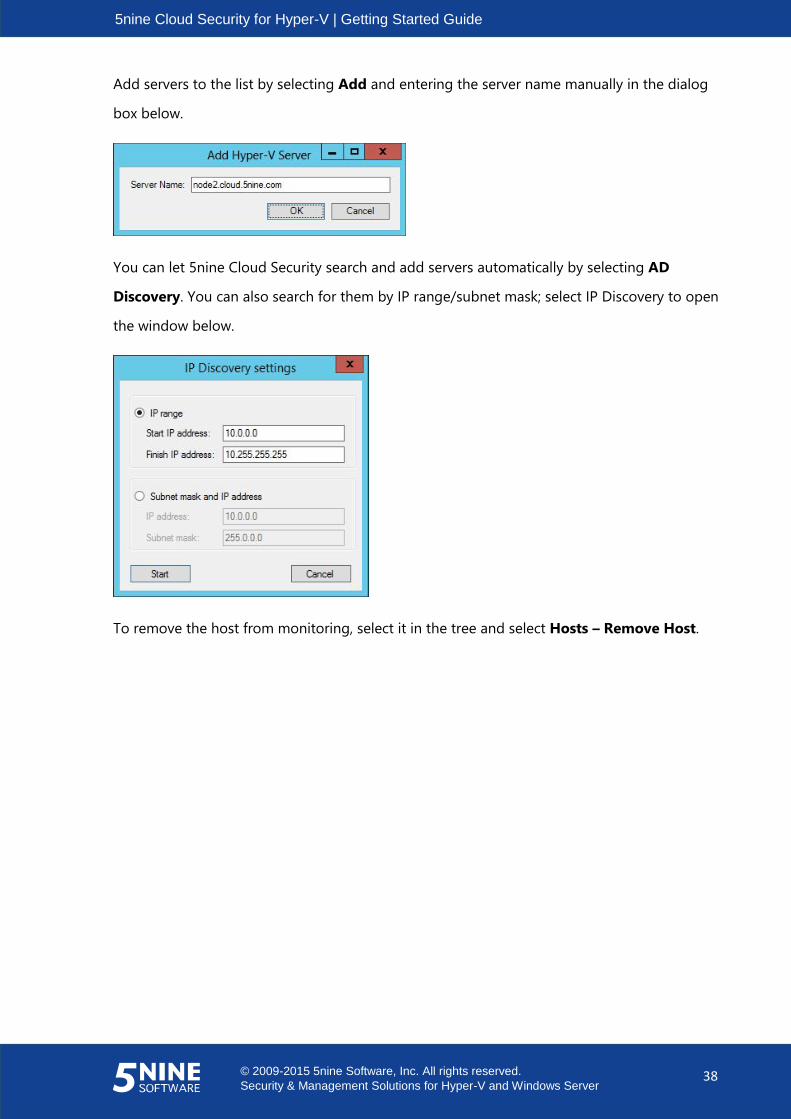
Add servers to the list by selecting Add and entering the server name manually in the dialog
box below.
You can let 5nine Cloud Security search and add servers automatically by selecting AD
Discovery. You can also search for them by IP range/subnet mask; select IP Discovery to open
the window below.
To remove the host from monitoring, select it in the tree and select Hosts – Remove Host.
5nine Cloud Security for Hyper-V | Getting Started Guide
© 2009-2015 5nine Software, Inc. All rights reserved.
Security & Management Solutions for Hyper-V and Windows Server 39
Users management and tenants
The User Management feature is designed to set permissions on 5nine Cloud Security objects
(virtual machines) and operations performed through the management console. It is crucial to
set them in the appropriate way. These permissions are unrelated to users’ permissions that are
set in OS MS Windows; they apply users’ rights solely for 5nine Cloud Security objects and
operations. The most important users that have to be created (added) in User Management are
Global Users, particularly Global Administrator. This user will be able to see all the virtual
machines that are managed by 5nine Cloud Security and to perform all the operations through
the management console: set global rules, create/delete tenants described below, operate the
antivirus feature and set permissions for other users. Before the Global Administrator is
created, there are no permissions set and any user operating management console is
considered as Global Administrator. Once it is set, no other user will be able to do anything
until the Global Administrator grants necessary permissions. It is also possible to add several
Global Administrators; their permissions will be equal. Tenants are the logical groupings of
virtual machines, each with its own user management function. It allows setting permissions for
non-global users to view and manage only designated groups of virtual machines within a
single tenant whereas global users view the whole Hyper-V Cloud picture and all tenants.
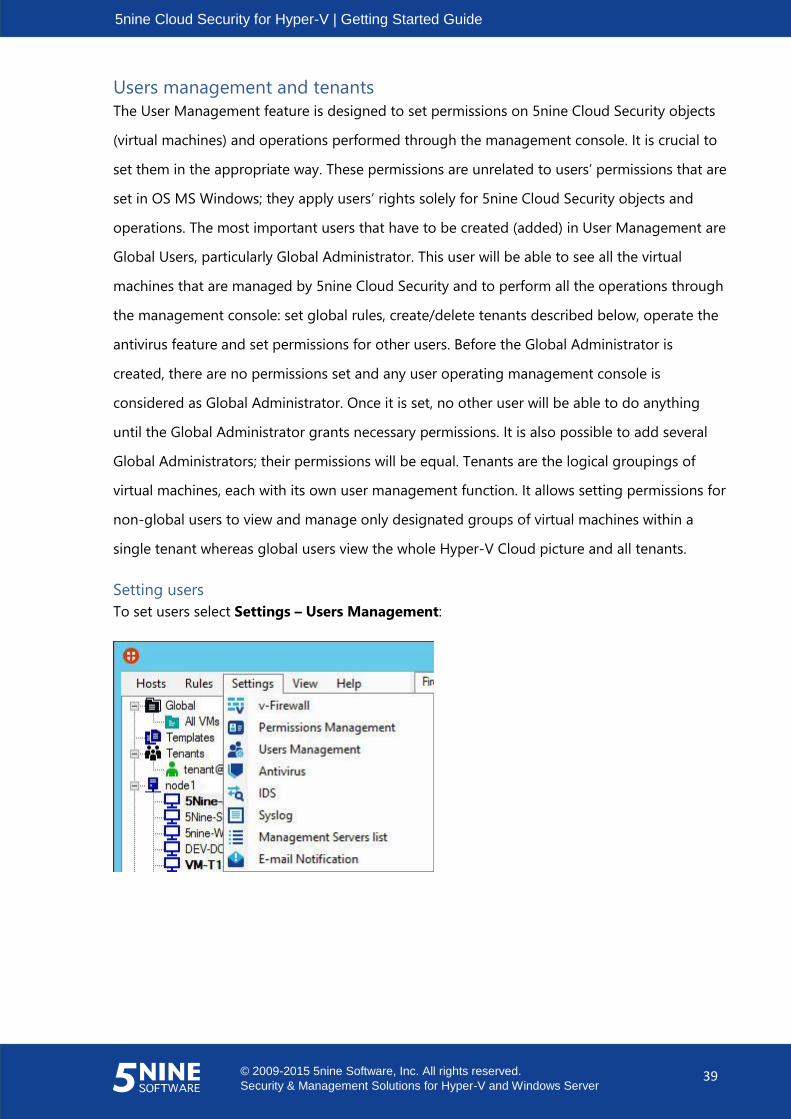
Setting users
To set users select Settings – Users Management:

5nine Cloud Security for Hyper-V | Getting Started Guide
© 2009-2015 5nine Software, Inc. All rights reserved.
Security & Management Solutions for Hyper-V and Windows Server 40
All users are managed in the Select User dialog box:
To add a user, click Add, and then enter the user parameters in the following dialog box:
- Select the user type:
Custom user. This option lets you create custom users independently from AD. This
type is used only within 5nine Cloud Security to identify permissions. If you’re
working in a mixed environment you should always select this option. You can set
any name and password for this user type.
Windows user. This option applies to a single domain environment only and
available only for Global Group membership. The user must be registered in the
AD.
5nine Cloud Security for Hyper-V | Getting Started Guide
© 2009-2015 5nine Software, Inc. All rights reserved.
Security & Management Solutions for Hyper-V and Windows Server 41
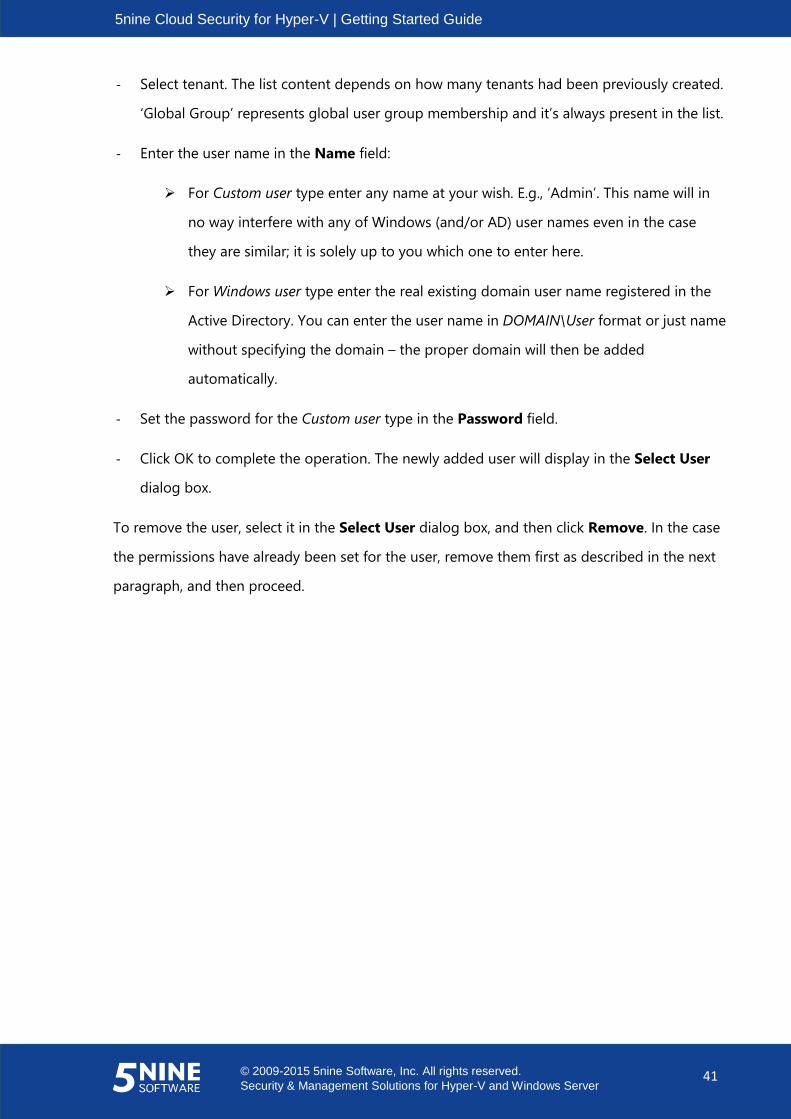
- Select tenant. The list content depends on how many tenants had been previously created.
‘Global Group’ represents global user group membership and it’s always present in the list.
- Enter the user name in the Name field:
For Custom user type enter any name at your wish. E.g., ‘Admin’. This name will in
no way interfere with any of Windows (and/or AD) user names even in the case
they are similar; it is solely up to you which one to enter here.
For Windows user type enter the real existing domain user name registered in the
Active Directory. You can enter the user name in DOMAIN\User format or just name
without specifying the domain – the proper domain will then be added
automatically.
- Set the password for the Custom user type in the Password field.
- Click OK to complete the operation. The newly added user will display in the Select User
dialog box.
To remove the user, select it in the Select User dialog box, and then click Remove. In the case
the permissions have already been set for the user, remove them first as described in the next
paragraph, and then proceed.
5nine Cloud Security for Hyper-V | Getting Started Guide
© 2009-2015 5nine Software, Inc. All rights reserved.
Security & Management Solutions for Hyper-V and Windows Server 42
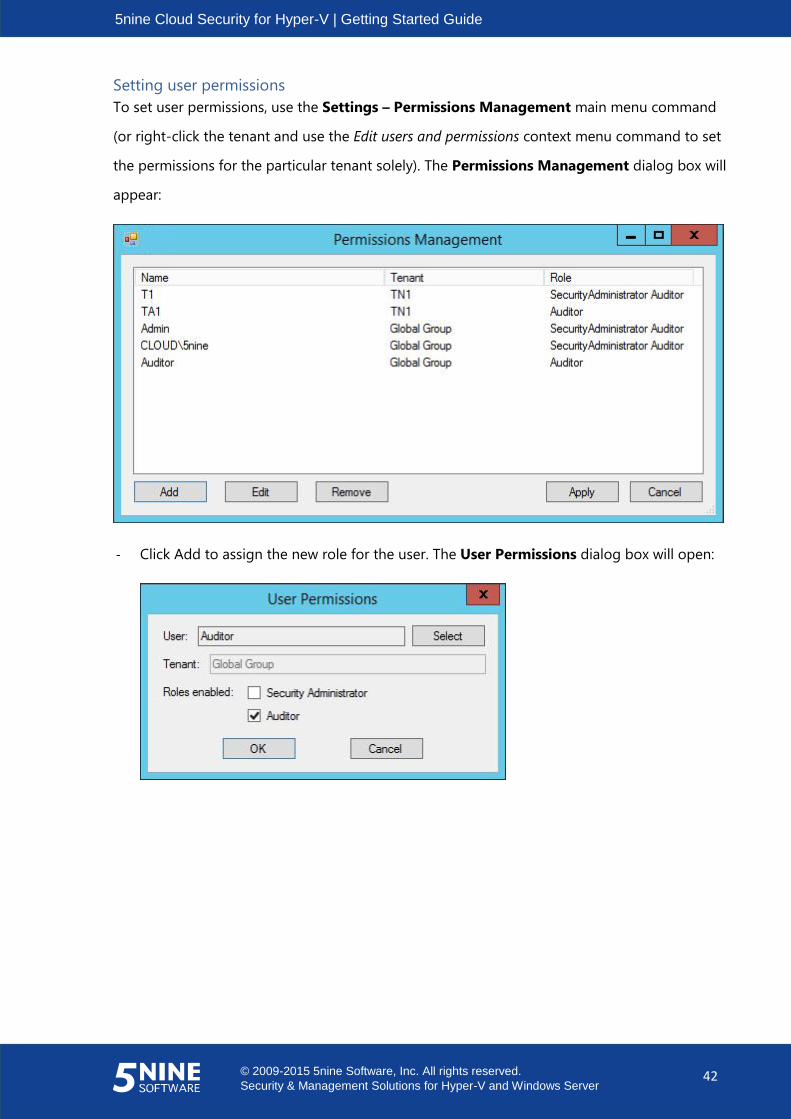
Setting user permissions
To set user permissions, use the Settings – Permissions Management main menu command
(or right-click the tenant and use the Edit users and permissions context menu command to set
the permissions for the particular tenant solely). The Permissions Management dialog box will
appear:
- Click Add to assign the new role for the user. The User Permissions dialog box will open:

5nine Cloud Security for Hyper-V | Getting Started Guide
© 2009-2015 5nine Software, Inc. All rights reserved.
Security & Management Solutions for Hyper-V and Windows Server 43
Click the Select button to select the user:
Select the user and click OK. You can add new users here in the way it’s described
above in the ‘Setting users’ paragraph.
Enable the roles for the user:
Security Administrator. This role grants the full permissions on the Hyper-V
Cloud for the user. The user assigned to this role will act as a global
administrator or a tenant administrator, depending on which group it is
assigned to.
Auditor. The user will be able to view the whole Hyper-V Cloud or a tenant
depending on which user is selected. In this role, the user can review virtual
firewall and IDS logs but cannot apply any changes.
Click OK. Then click Apply in the Permissions Management dialog to complete the operation.
To edit the user, select it in the Permissions Management dialog, then click the Edit button
and repeat the actions described above.
To remove the user, select it in the Permissions Management dialog, then click the Remove
button. This operation must be done prior to removing the user itself.
Setting tenants
To set tenants, navigate to the Tenants entity in 5nine Cloud Security object tree and use the
appropriate context menu commands.
5nine Cloud Security for Hyper-V | Getting Started Guide
© 2009-2015 5nine Software, Inc. All rights reserved.
Security & Management Solutions for Hyper-V and Windows Server 44
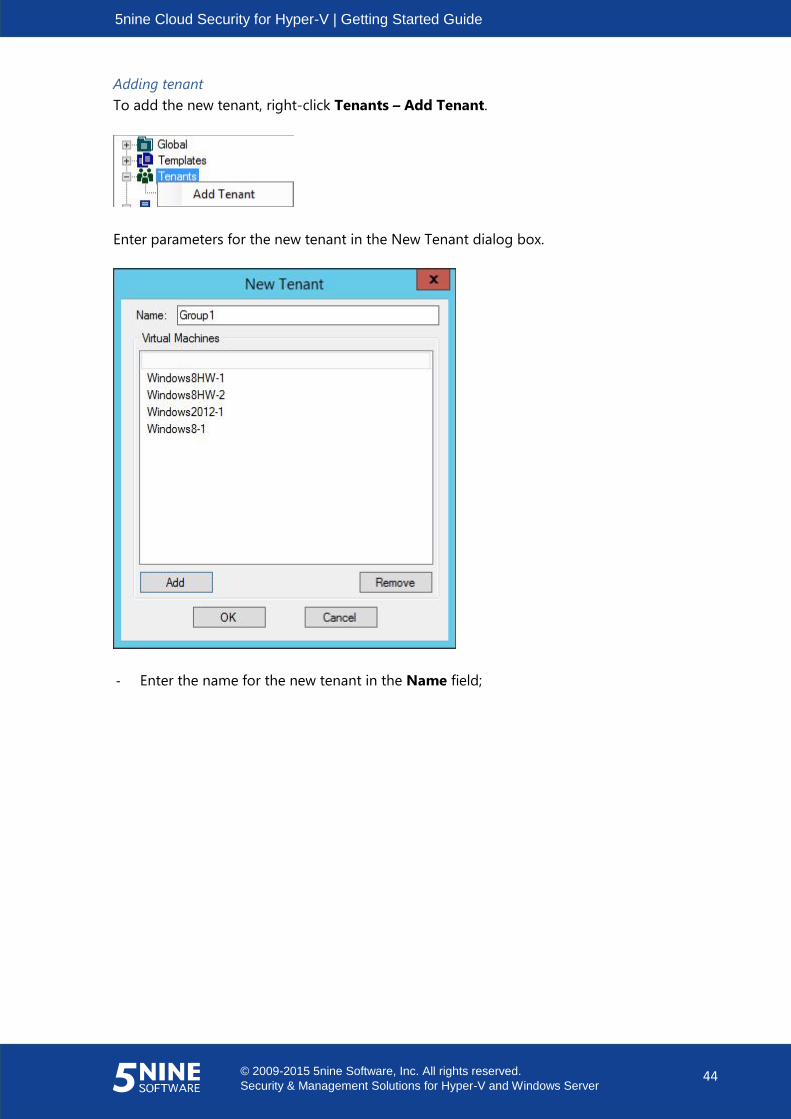
Adding tenant
To add the new tenant, right-click Tenants – Add Tenant.
Enter parameters for the new tenant in the New Tenant dialog box.
- Enter the name for the new tenant in the Name field;
5nine Cloud Security for Hyper-V | Getting Started Guide
© 2009-2015 5nine Software, Inc. All rights reserved.
Security & Management Solutions for Hyper-V and Windows Server 45
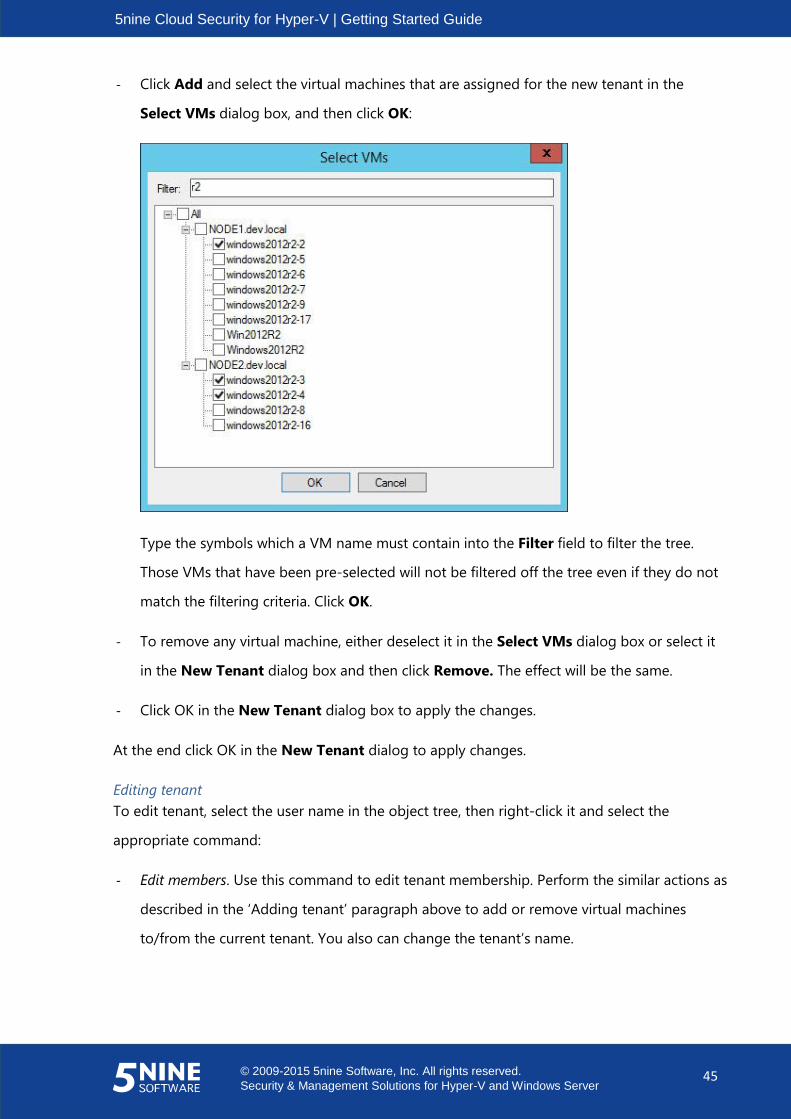
- Click Add and select the virtual machines that are assigned for the new tenant in the
Select VMs dialog box, and then click OK:
Type the symbols which a VM name must contain into the Filter field to filter the tree.
Those VMs that have been pre-selected will not be filtered off the tree even if they do not
match the filtering criteria. Click OK.
- To remove any virtual machine, either deselect it in the Select VMs dialog box or select it
in the New Tenant dialog box and then click Remove. The effect will be the same.
- Click OK in the New Tenant dialog box to apply the changes.
At the end click OK in the New Tenant dialog to apply changes.
Editing tenant
To edit tenant, select the user name in the object tree, then right-click it and select the
appropriate command:
- Edit members. Use this command to edit tenant membership. Perform the similar actions as
described in the ‘Adding tenant’ paragraph above to add or remove virtual machines
to/from the current tenant. You also can change the tenant’s name.

5nine Cloud Security for Hyper-V | Getting Started Guide
© 2009-2015 5nine Software, Inc. All rights reserved.
Security & Management Solutions for Hyper-V and Windows Server 46
Another way to edit tenant membership is to do it directly on the Members tab:
To edit tenant membership, select the target tenant in the object tree on the left, and then
click the Edit Members button on the Members tab. In the Edit members list window
select the necessary virtual machines to assign them to the tenant or deselect them to
remove from it:
Type the symbols which a VM name must contain into the Filter field to filter the tree.
Those VMs that have been pre-selected will not be filtered off the tree even if they do not
match the filtering criteria. Click OK.
5nine Cloud Security for Hyper-V | Getting Started Guide
© 2009-2015 5nine Software, Inc. All rights reserved.
Security & Management Solutions for Hyper-V and Windows Server 47
- Edit users and permissions. Use this command to edit users and permissions for the current
tenant. The way of setting the users and permissions on the tenant level is similar to that
performed on the global level and described in the ‘Setting user permissions’ paragraph
above.
Note. The users assigned for the tenant will be able to see and operate virtual machines
assigned to this tenant only. It is purposefully implemented in 5nine Cloud Security to allow
delineation of users’ permissions for virtual machines.
- Remove. Use this command to remove the selected tenant. You will be asked to confirm
the operation.
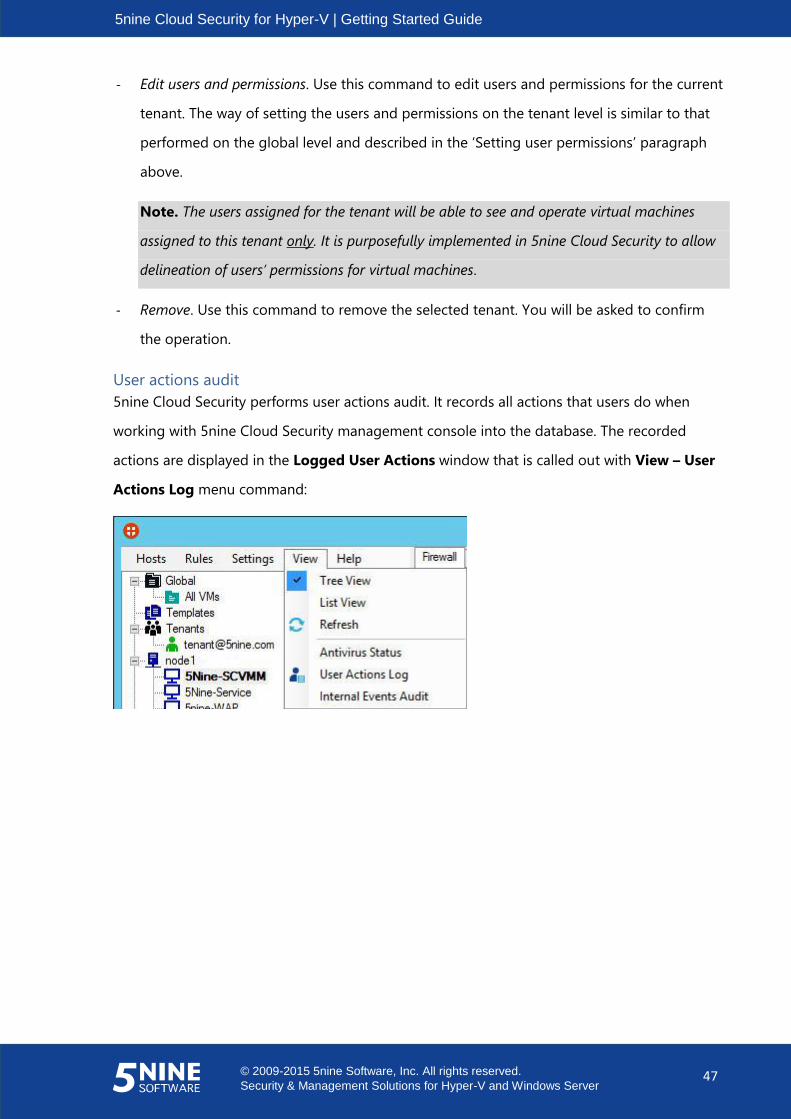
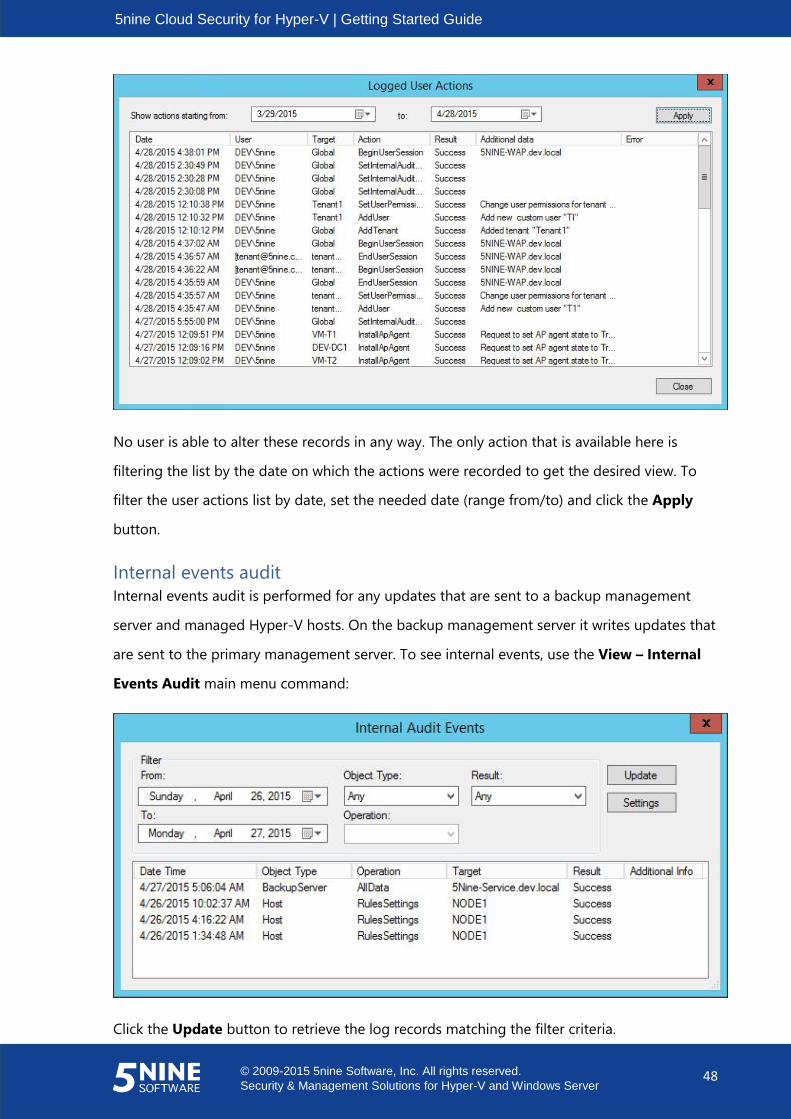
User actions audit
5nine Cloud Security performs user actions audit. It records all actions that users do when
working with 5nine Cloud Security management console into the database. The recorded
actions are displayed in the Logged User Actions window that is called out with View – User
Actions Log menu command:
5nine Cloud Security for Hyper-V | Getting Started Guide
© 2009-2015 5nine Software, Inc. All rights reserved.
Security & Management Solutions for Hyper-V and Windows Server 48
No user is able to alter these records in any way. The only action that is available here is
filtering the list by the date on which the actions were recorded to get the desired view. To
filter the user actions list by date, set the needed date (range from/to) and click the Apply
button.
Internal events audit
Internal events audit is performed for any updates that are sent to a backup management
server and managed Hyper-V hosts. On the backup management server it writes updates that
are sent to the primary management server. To see internal events, use the View – Internal
Events Audit main menu command:
Click the Update button to retrieve the log records matching the filter criteria.

5nine Cloud Security for Hyper-V | Getting Started Guide
© 2009-2015 5nine Software, Inc. All rights reserved.
Security & Management Solutions for Hyper-V and Windows Server 49
The following filter settings are available:
- Dates range for the report – From/To.
- Object Type – Any, Host, Backup Server.
- Result – Any, Success, Failed.
- Operation – Any, VM Settings, Rules, Rules Settings, AV Update Settings, Management
Servers List, VM Groups.
Click the Settings button to set the events categories that should be saved into the log and
log records retention parameters:
- Set the object type – Host, Backup Server.
- Set the retention days and maximal events count.
Click Apply to save settings.
Setting virtual firewall rules
There are three basic types of virtual firewall rules in 5nine Cloud Security:
- Global rules of default ‘All VMs’ group. These rules automatically apply to all virtual
machines in the Hyper-V Cloud.
- Rules of user-defined security groups. These rules apply only to those virtual machines to
which the group is assigned in the virtual machine settings. Each virtual machine can be a
member of several security groups. Please refer to the “Changing VM settings” section for
more information. The “User-defined security groups” section below describes how to set
up user-defined security groups.
5nine Cloud Security for Hyper-V | Getting Started Guide
© 2009-2015 5nine Software, Inc. All rights reserved.
Security & Management Solutions for Hyper-V and Windows Server 50
- Local rules. These rules apply only to a particular virtual machine in which list they were
created.
All rules take effect when the virtual firewall protection is enabled. Please refer to the
“Setting virtual firewall” section.
All the rules are created in a similar manner using 5nine Cloud Security menu commands. The
type of rule described above is determined depending on what object was selected in the
5nine Cloud Security object tree prior to creating the new rule. All this is described in the
“Adding rules” subsection below.
Virtual firewall rules priorities
Attention! 5nine Cloud Security for Hyper-V uses the following approach to applying virtual
firewall rules that has been implemented in the 5.X product line:
- All traffic is blocked by default if no rule is added to the protected virtual machine.
- Any allowing rule opens the channel(s) it is set for and lets the corresponding traffic flow.
- Any blocking rule has priority over any allowing rule in the case they cross each other and the
traffic that matches rule’s criteria will be blocked.
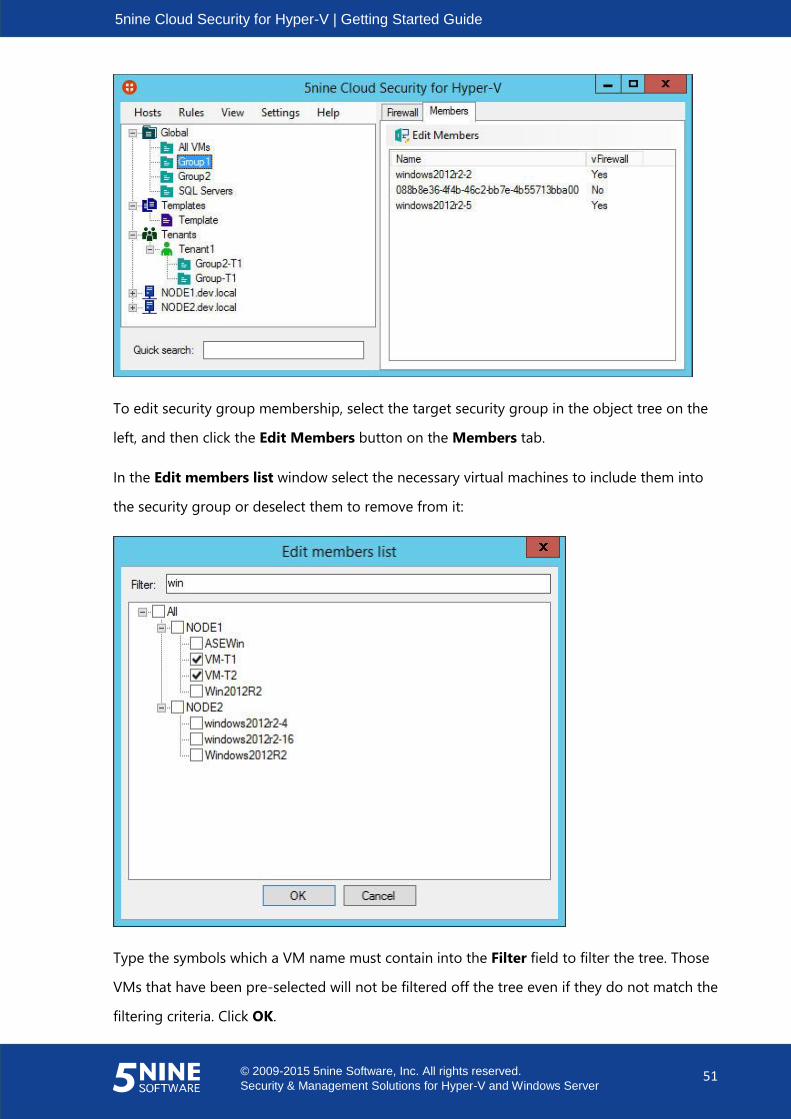
User-defined security groups
5nine Cloud Security allows creation of multiple security groups in addition to default built-in
‘All VMs’ group. The ‘All VMs’ default group rules apply to all virtual machines with enabled
virtual firewall. Rules in other security groups apply to member virtual machines only. Each
virtual machine can be a member of several security groups. Setting up security group
membership can be done either in the virtual machine settings (Please refer to the “Changing
VM settings” section for more information) or directly on the Members tab.
5nine Cloud Security for Hyper-V | Getting Started Guide
© 2009-2015 5nine Software, Inc. All rights reserved.
Security & Management Solutions for Hyper-V and Windows Server 51
To edit security group membership, select the target security group in the object tree on the
left, and then click the Edit Members button on the Members tab.
In the Edit members list window select the necessary virtual machines to include them into
the security group or deselect them to remove from it:
Type the symbols which a VM name must contain into the Filter field to filter the tree. Those
VMs that have been pre-selected will not be filtered off the tree even if they do not match the
filtering criteria. Click OK.

5nine Cloud Security for Hyper-V | Getting Started Guide
© 2009-2015 5nine Software, Inc. All rights reserved.
Security & Management Solutions for Hyper-V and Windows Server 52
Note. Use this method to edit security group membership for deleted VMs to remove them from
the security group. They will be displayed under “Unknown” branch in the object tree like it’s
shown on the picture above.
Security groups are also available for tenant users who can create their own groups that will
apply within a tenant and are available to be altered for this tenant and global administrators
only.
To create a new security group, select Rules – Add Global Rules Group main menu command
or right click on the Global entity and then click Add Group.
Then enter the name for the new group in the following dialog box (‘New VM Group’ is the
default value) and the description (optional). Click OK.
The new group is created and appears in the object tree.
To edit the global rules group, select it in the object tree. Then select Rules – Edit Global
Rules Group main menu command or Edit Group main panel button, or right click on the
group and then click Edit:
Enter the new name and/or description in the same dialog
box, and then click OK.
5nine Cloud Security for Hyper-V | Getting Started Guide
© 2009-2015 5nine Software, Inc. All rights reserved.
Security & Management Solutions for Hyper-V and Windows Server 53
To delete global rules group, select global rules group in the object tree. Then select Rules –
Delete Global Rules Group or right click on the group and then click Delete. Confirm the
operation.
User-defined rules templates
You can create sets of rules as user-defined templates. These templates will then be available
when adding rules to a group and/or VMs for convenience and to save time required for
setting up (altering) the security plan. User-defined rules templates are tenant-specific – they
work for each tenant and on the global level independently and are available only on the level
(and in tenant) they were created. Templates are just some kind of storage for the rules, the
rules added to a template will not take effect until this template is applied to a group or a VM.
Altering template content – adding, changing and/or removing rules – will not affect those
objects (groups and/or VMs) to which the template had been previously applied. Re-applying
the template to the object will add the whole set of its rules over again, even if some of them
(or all) are already present in the VM’s/Group’s rules list – that way the same rule may be
doubled, which generally will not cause any difference in their functioning.
To create a new template, right click the Templates entity and then click Add Template:
Then enter the name for the new template in the following dialog box (‘New Template’ is the
default value) and the description (optional). Click OK.
The new template is created and appears in the object tree.
5nine Cloud Security for Hyper-V | Getting Started Guide
© 2009-2015 5nine Software, Inc. All rights reserved.
Security & Management Solutions for Hyper-V and Windows Server 54
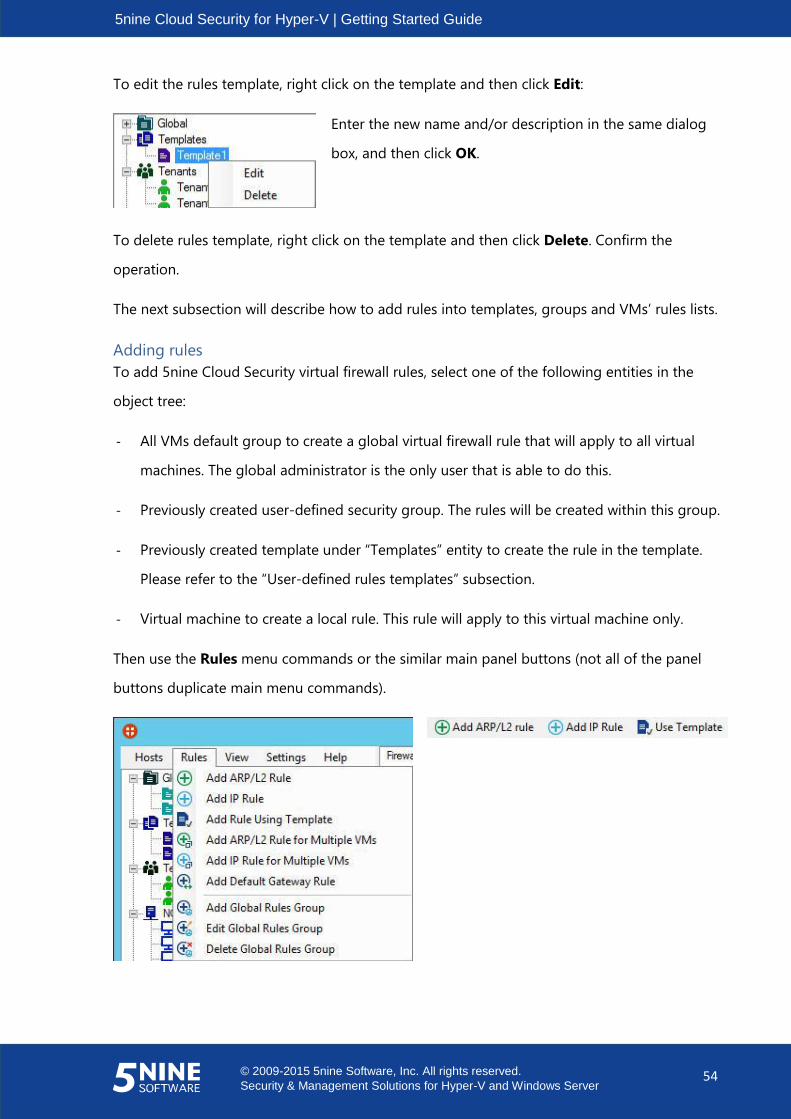
To edit the rules template, right click on the template and then click Edit:
Enter the new name and/or description in the same dialog
box, and then click OK.
To delete rules template, right click on the template and then click Delete. Confirm the
operation.
The next subsection will describe how to add rules into templates, groups and VMs’ rules lists.
Adding rules
To add 5nine Cloud Security virtual firewall rules, select one of the following entities in the
object tree:
- All VMs default group to create a global virtual firewall rule that will apply to all virtual
machines. The global administrator is the only user that is able to do this.
- Previously created user-defined security group. The rules will be created within this group.
- Previously created template under “Templates” entity to create the rule in the template.
Please refer to the “User-defined rules templates” subsection.
- Virtual machine to create a local rule. This rule will apply to this virtual machine only.
Then use the Rules menu commands or the similar main panel buttons (not all of the panel
buttons duplicate main menu commands).
5nine Cloud Security for Hyper-V | Getting Started Guide
© 2009-2015 5nine Software, Inc. All rights reserved.
Security & Management Solutions for Hyper-V and Windows Server 55
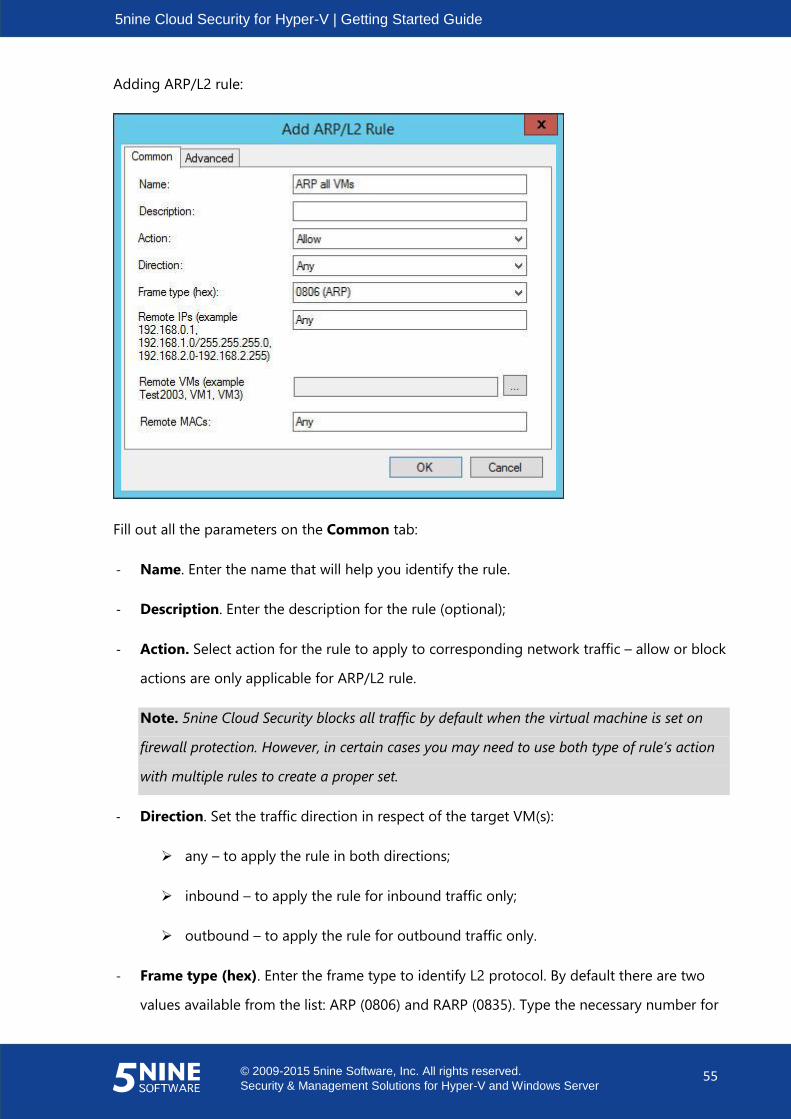
Adding ARP/L2 rule:
Fill out all the parameters on the Common tab:
- Name. Enter the name that will help you identify the rule.
- Description. Enter the description for the rule (optional);
- Action. Select action for the rule to apply to corresponding network traffic – allow or block
actions are only applicable for ARP/L2 rule.
Note. 5nine Cloud Security blocks all traffic by default when the virtual machine is set on
firewall protection. However, in certain cases you may need to use both type of rule’s action
with multiple rules to create a proper set.
- Direction. Set the traffic direction in respect of the target VM(s):
any – to apply the rule in both directions;
inbound – to apply the rule for inbound traffic only;
outbound – to apply the rule for outbound traffic only.
- Frame type (hex). Enter the frame type to identify L2 protocol. By default there are two
values available from the list: ARP (0806) and RARP (0835). Type the necessary number for
5nine Cloud Security for Hyper-V | Getting Started Guide
© 2009-2015 5nine Software, Inc. All rights reserved.
Security & Management Solutions for Hyper-V and Windows Server 56
the L2 protocol. ARP protocol will let you additionally specify remote IP addresses to limit
rule action to.
- Remote IPs. Enter remote IP addresses to/from which the ARP traffic is sent/received,
using spaces and comma as delimiters. Empty field assumes any address. This option
basically applies to ARP traffic. For the majority of the other L2 protocols, e.g. for PPPoE
protocol, this option is not applicable and will be disabled.
- Remote VMs. Select remote virtual machines to/from which the traffic is sent/received.
Empty field assumes any remote VM. This option basically applies to ARP traffic. For the
majority of L2 protocols, e.g. for PPPoE protocol, this option is not applicable and will be
disabled.
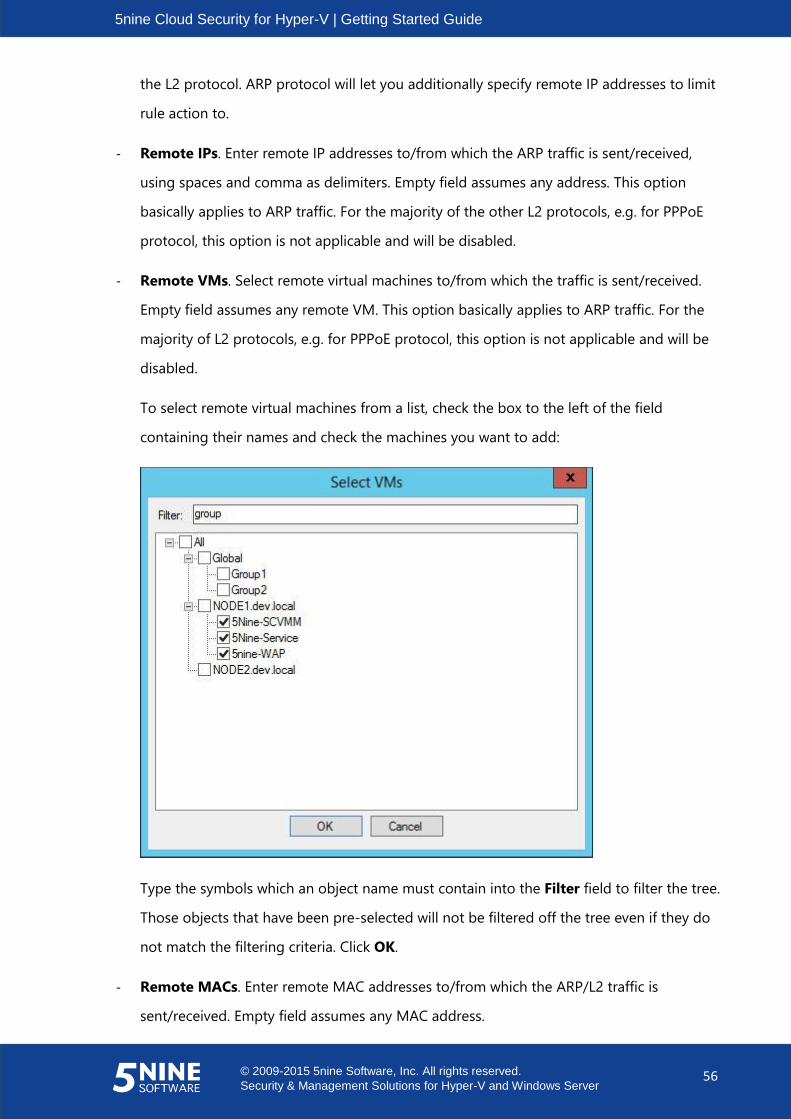
To select remote virtual machines from a list, check the box to the left of the field
containing their names and check the machines you want to add:
Type the symbols which an object name must contain into the Filter field to filter the tree.
Those objects that have been pre-selected will not be filtered off the tree even if they do
not match the filtering criteria. Click OK.
- Remote MACs. Enter remote MAC addresses to/from which the ARP/L2 traffic is
sent/received. Empty field assumes any MAC address.
5nine Cloud Security for Hyper-V | Getting Started Guide
© 2009-2015 5nine Software, Inc. All rights reserved.
Security & Management Solutions for Hyper-V and Windows Server 57
Note. Parameters Remote IPs, Remote VMs and Remote MACs work independently from
each other and do not interfere with each other. I.e. if you select the remote virtual machine
into the remote VMs list and enter IP address from another server into remote IPs field as
well, the rule will apply to both remote systems.
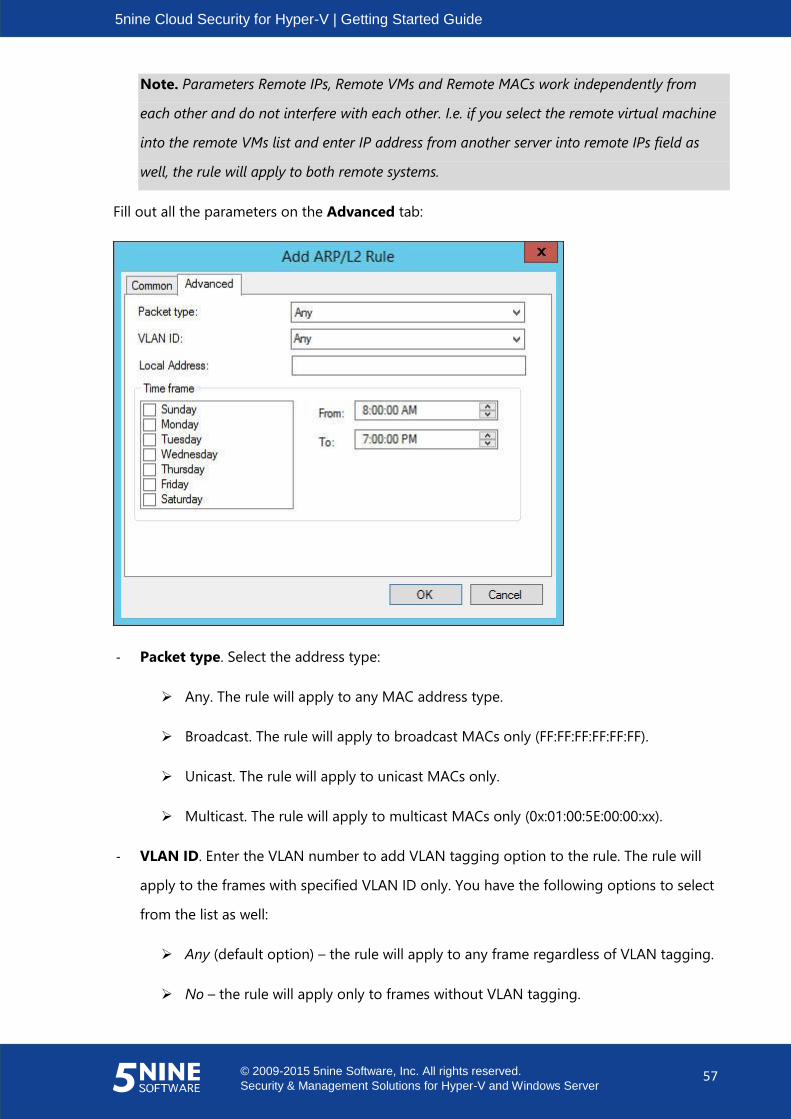
Fill out all the parameters on the Advanced tab:
- Packet type. Select the address type:
Any. The rule will apply to any MAC address type.
Broadcast. The rule will apply to broadcast MACs only (FF:FF:FF:FF:FF:FF).
Unicast. The rule will apply to unicast MACs only.
Multicast. The rule will apply to multicast MACs only (0x:01:00:5E:00:00:xx).
- VLAN ID. Enter the VLAN number to add VLAN tagging option to the rule. The rule will
apply to the frames with specified VLAN ID only. You have the following options to select
from the list as well:
Any (default option) – the rule will apply to any frame regardless of VLAN tagging.
No – the rule will apply only to frames without VLAN tagging.
5nine Cloud Security for Hyper-V | Getting Started Guide
© 2009-2015 5nine Software, Inc. All rights reserved.
Security & Management Solutions for Hyper-V and Windows Server 58
- Local Address. Enter the IP address or a subnet address using this notation: x.x.x.x/y.y.y.y,
where x.x.x.x – network address in the decimal format; y.y.y.y – subnet mask in the decimal
format, e.g., 192.168.0.0/255.255.255.0. When this address is specified, local VM address
that the rule is applied will be checked to match it. If local VM address does not match the
entered value, the traffic will be blocked. Since ARP/L2 rule usually applies to multiple
virtual machines or a group, it is important to have all these virtual machines in the same
subnet to be able to use this parameter properly. In this case you may enter a subnet
address instead of a single IP address – the rule will apply to VMs which local address is in
this subnet. If VMs are in different networks/subnets, the rule will only apply to the VM(s),
which local address matches the IP address or subnet specified in the rule. It is not
currently possible to enter IP ranges or multiple IP addresses here. Therefore either omit
using it for multiple virtual machines/groups from different networks, or use it in the rules
that apply for each VM or a subnet (group) individually.
- Specify the time frame and the days in a week on which only the rule should be in action.
Time period will only apply if at least one day of a week is marked. Leave all days
unmarked to let the rule always be in action.
At the end click OK. The rule will be created and added to the selected VM or a group and will
be displayed in the main window.
5nine Cloud Security for Hyper-V | Getting Started Guide
© 2009-2015 5nine Software, Inc. All rights reserved.
Security & Management Solutions for Hyper-V and Windows Server 59
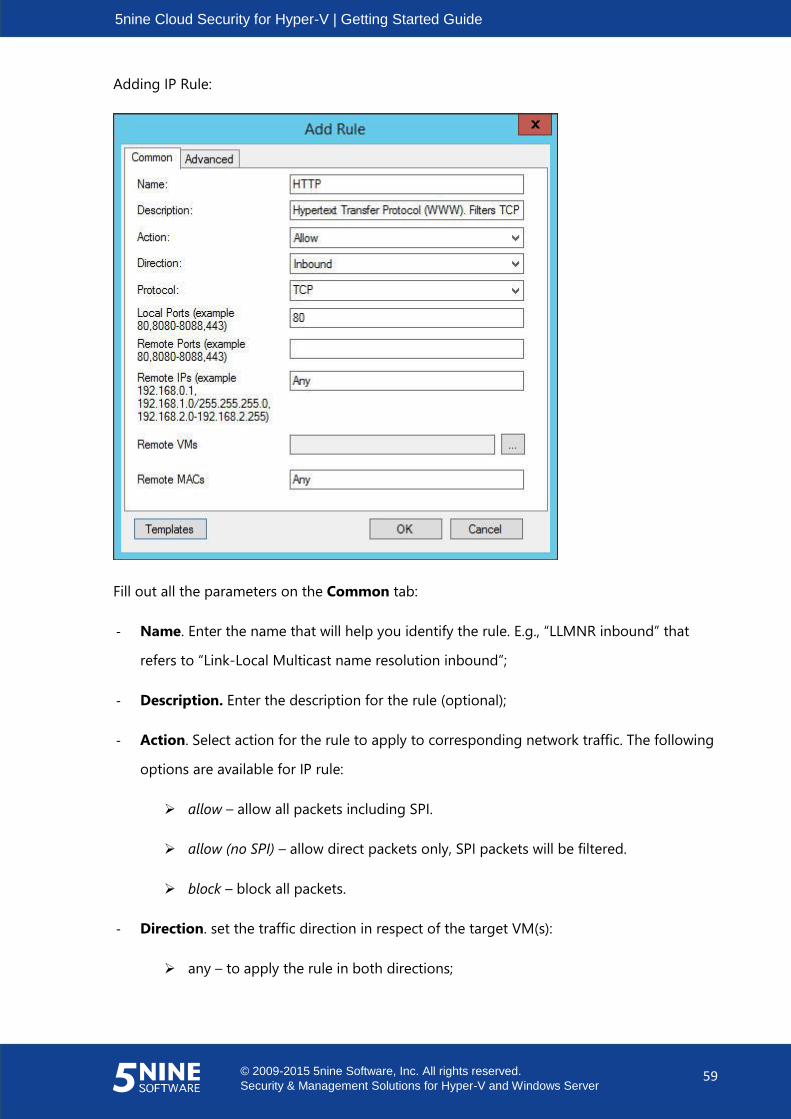
Adding IP Rule:
Fill out all the parameters on the Common tab:
- Name. Enter the name that will help you identify the rule. E.g., “LLMNR inbound” that
refers to “Link-Local Multicast name resolution inbound”;
- Description. Enter the description for the rule (optional);
- Action. Select action for the rule to apply to corresponding network traffic. The following
options are available for IP rule:
allow – allow all packets including SPI.
allow (no SPI) – allow direct packets only, SPI packets will be filtered.
block – block all packets.
- Direction. set the traffic direction in respect of the target VM(s):
any – to apply the rule in both directions;
5nine Cloud Security for Hyper-V | Getting Started Guide
© 2009-2015 5nine Software, Inc. All rights reserved.
Security & Management Solutions for Hyper-V and Windows Server 60
inbound – to apply the rule for inbound traffic only (SPI packets will be excluded if
allow action is set);
outbound – to apply the rule for outbound traffic only (SPI packets will be excluded
if allow action is set).
SPI packets are normally allowed through 5nine Cloud Security virtual firewall when
the certain traffic is set to be passed through it. E.g., the RDP inbound allowing rule
on TCP port 3389 will let corresponding outbound SPI packets from TCP port 3389
to the remote private TCP port on the remote host that initiate RDP session in the
case allow action is set. It will be considered as TCP established connection and will
be displayed in connections table for the target VM. In certain situations such
connections will be dropped by timeout, which results in losing the current session.
Using allow (no SPI) action you can set two separate rules for inbound and
outbound traffic to avoid such issues.
In the given example it will look like:
allow (no SPI), inbound, TCP local ports 3389, remote ports empty (any);
allow (no SPI), outbound, TCP local ports 3389, remote ports empty (any);
Such sessions are not recognized by 5nine Cloud Security virtual firewall as
established TCP connections and will not be displayed in the connections table for
the target virtual machine, while the sessions themselves will be allowed and will
not be dropped by time out unlike SPI-based TCP connections.
- Protocol. Select the protocol that is used to send the certain traffic type. You have the
following options:
Any – any IP protocol.
TCP – TCP protocol.
UDP – UDP protocol.
GRE – GRE protocol.

5nine Cloud Security for Hyper-V | Getting Started Guide
© 2009-2015 5nine Software, Inc. All rights reserved.
Security & Management Solutions for Hyper-V and Windows Server 61
ICMP or ICMPv6 – ICMP (ICMPv6) protocol. The following additional options are
available for this protocols:
MESSAGE TYPES: Echo Reply – 0, Destination Unreachable – 3, Source Quench – 4,
Redirect (change route) – 5, Echo Request – 8, Time Exceeded – 11, Parameter
Problem – 12, Timestamp Reply – 14, Information Request – 15, Information Reply –
16, Address Mask Request – 17, Address Mask Reply – 18.
Enter the required number(s) divided by commas (spaces will be added
automatically). Leave the field empty to allow all types of ICMP messages.
5nine Cloud Security for Hyper-V | Getting Started Guide
© 2009-2015 5nine Software, Inc. All rights reserved.
Security & Management Solutions for Hyper-V and Windows Server 62
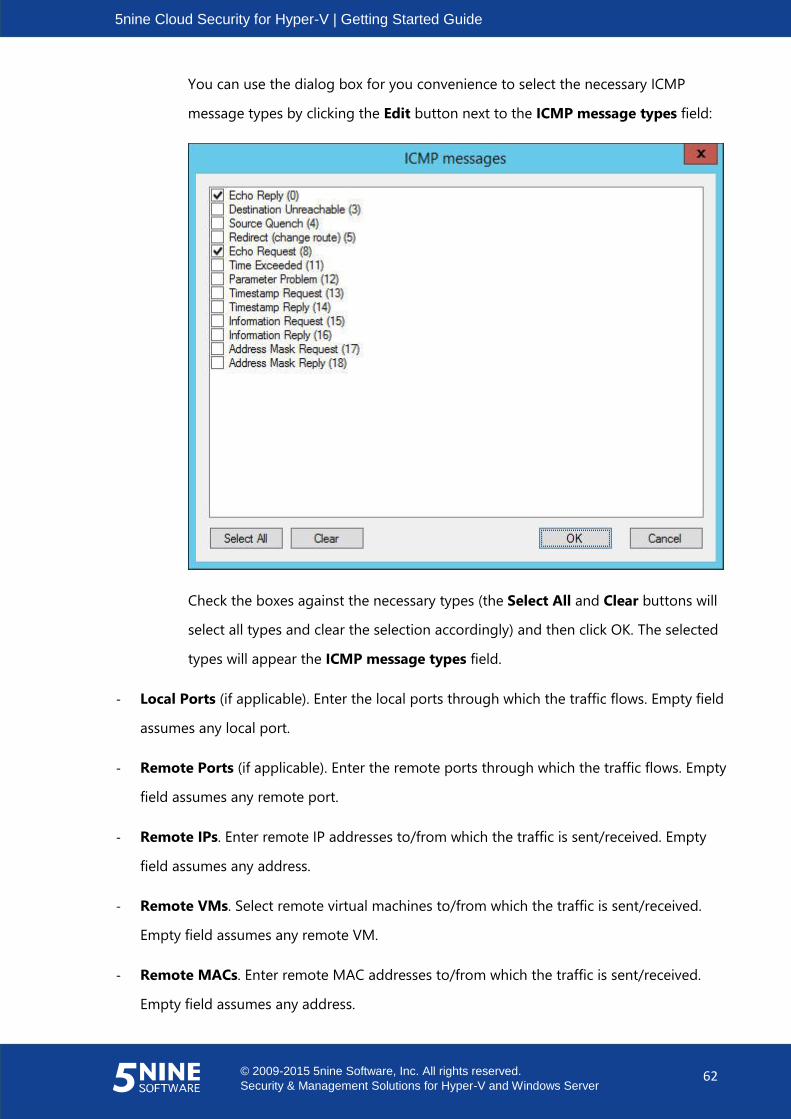
You can use the dialog box for you convenience to select the necessary ICMP
message types by clicking the Edit button next to the ICMP message types field:
Check the boxes against the necessary types (the Select All and Clear buttons will
select all types and clear the selection accordingly) and then click OK. The selected
types will appear the ICMP message types field.
- Local Ports (if applicable). Enter the local ports through which the traffic flows. Empty field
assumes any local port.
- Remote Ports (if applicable). Enter the remote ports through which the traffic flows. Empty
field assumes any remote port.
- Remote IPs. Enter remote IP addresses to/from which the traffic is sent/received. Empty
field assumes any address.
- Remote VMs. Select remote virtual machines to/from which the traffic is sent/received.
Empty field assumes any remote VM.
- Remote MACs. Enter remote MAC addresses to/from which the traffic is sent/received.
Empty field assumes any address.
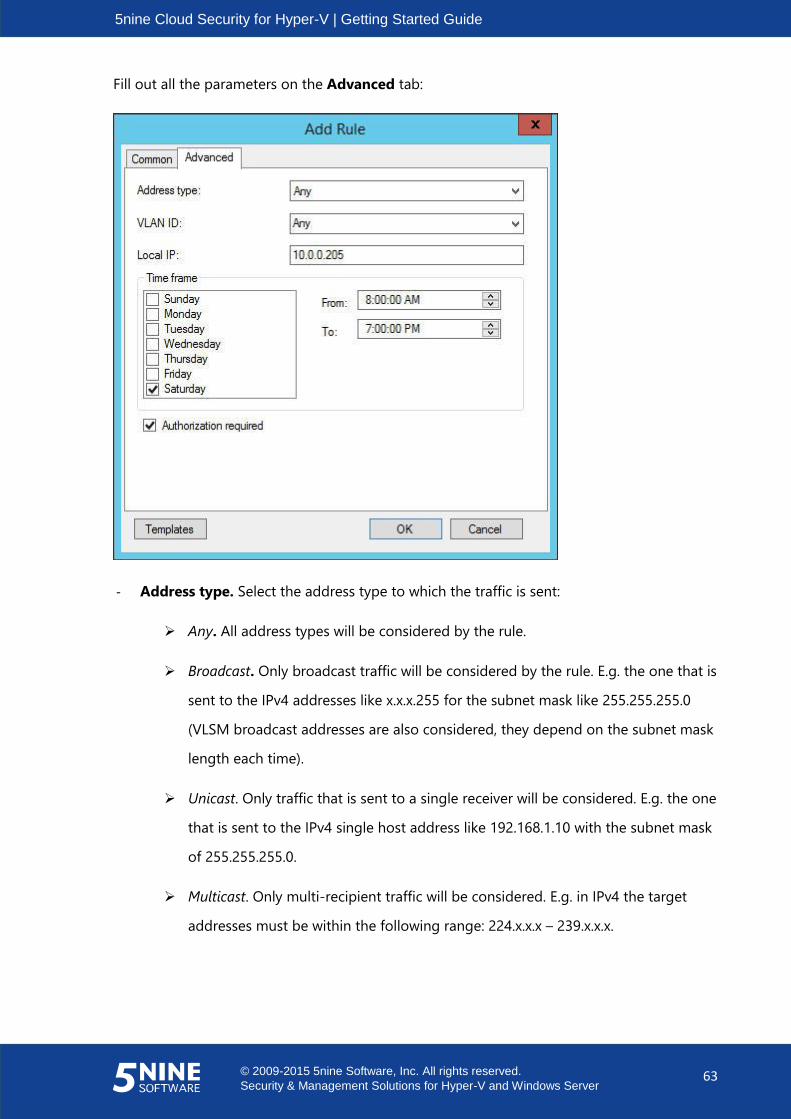
5nine Cloud Security for Hyper-V | Getting Started Guide
© 2009-2015 5nine Software, Inc. All rights reserved.
Security & Management Solutions for Hyper-V and Windows Server 63
Fill out all the parameters on the Advanced tab:
- Address type. Select the address type to which the traffic is sent:
Any. All address types will be considered by the rule.
Broadcast. Only broadcast traffic will be considered by the rule. E.g. the one that is
sent to the IPv4 addresses like x.x.x.255 for the subnet mask like 255.255.255.0
(VLSM broadcast addresses are also considered, they depend on the subnet mask
length each time).
Unicast. Only traffic that is sent to a single receiver will be considered. E.g. the one
that is sent to the IPv4 single host address like 192.168.1.10 with the subnet mask
of 255.255.255.0.
Multicast. Only multi-recipient traffic will be considered. E.g. in IPv4 the target
addresses must be within the following range: 224.x.x.x – 239.x.x.x.
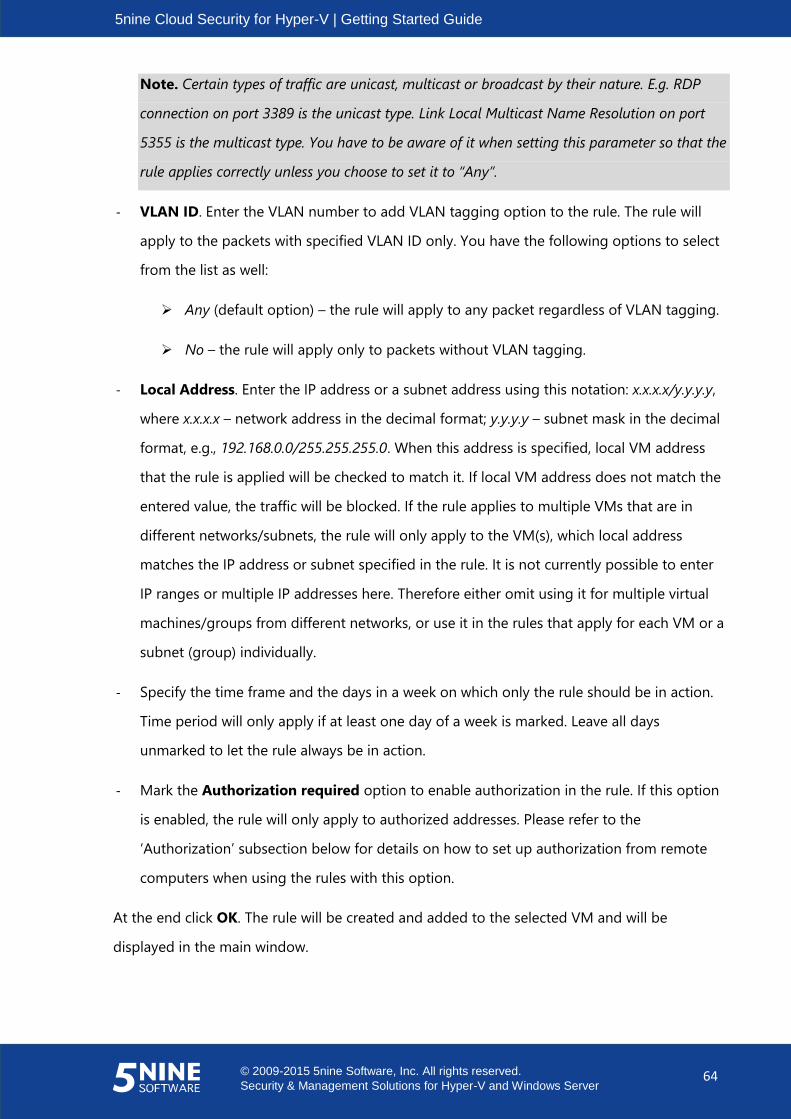
5nine Cloud Security for Hyper-V | Getting Started Guide
© 2009-2015 5nine Software, Inc. All rights reserved.
Security & Management Solutions for Hyper-V and Windows Server 64
Note. Certain types of traffic are unicast, multicast or broadcast by their nature. E.g. RDP
connection on port 3389 is the unicast type. Link Local Multicast Name Resolution on port
5355 is the multicast type. You have to be aware of it when setting this parameter so that the
rule applies correctly unless you choose to set it to “Any”.
- VLAN ID. Enter the VLAN number to add VLAN tagging option to the rule. The rule will
apply to the packets with specified VLAN ID only. You have the following options to select
from the list as well:
Any (default option) – the rule will apply to any packet regardless of VLAN tagging.
No – the rule will apply only to packets without VLAN tagging.
- Local Address. Enter the IP address or a subnet address using this notation: x.x.x.x/y.y.y.y,
where x.x.x.x – network address in the decimal format; y.y.y.y – subnet mask in the decimal
format, e.g., 192.168.0.0/255.255.255.0. When this address is specified, local VM address
that the rule is applied will be checked to match it. If local VM address does not match the
entered value, the traffic will be blocked. If the rule applies to multiple VMs that are in
different networks/subnets, the rule will only apply to the VM(s), which local address
matches the IP address or subnet specified in the rule. It is not currently possible to enter
IP ranges or multiple IP addresses here. Therefore either omit using it for multiple virtual
machines/groups from different networks, or use it in the rules that apply for each VM or a
subnet (group) individually.
- Specify the time frame and the days in a week on which only the rule should be in action.
Time period will only apply if at least one day of a week is marked. Leave all days
unmarked to let the rule always be in action.
- Mark the Authorization required option to enable authorization in the rule. If this option
is enabled, the rule will only apply to authorized addresses. Please refer to the
‘Authorization’ subsection below for details on how to set up authorization from remote
computers when using the rules with this option.
At the end click OK. The rule will be created and added to the selected VM and will be
displayed in the main window.
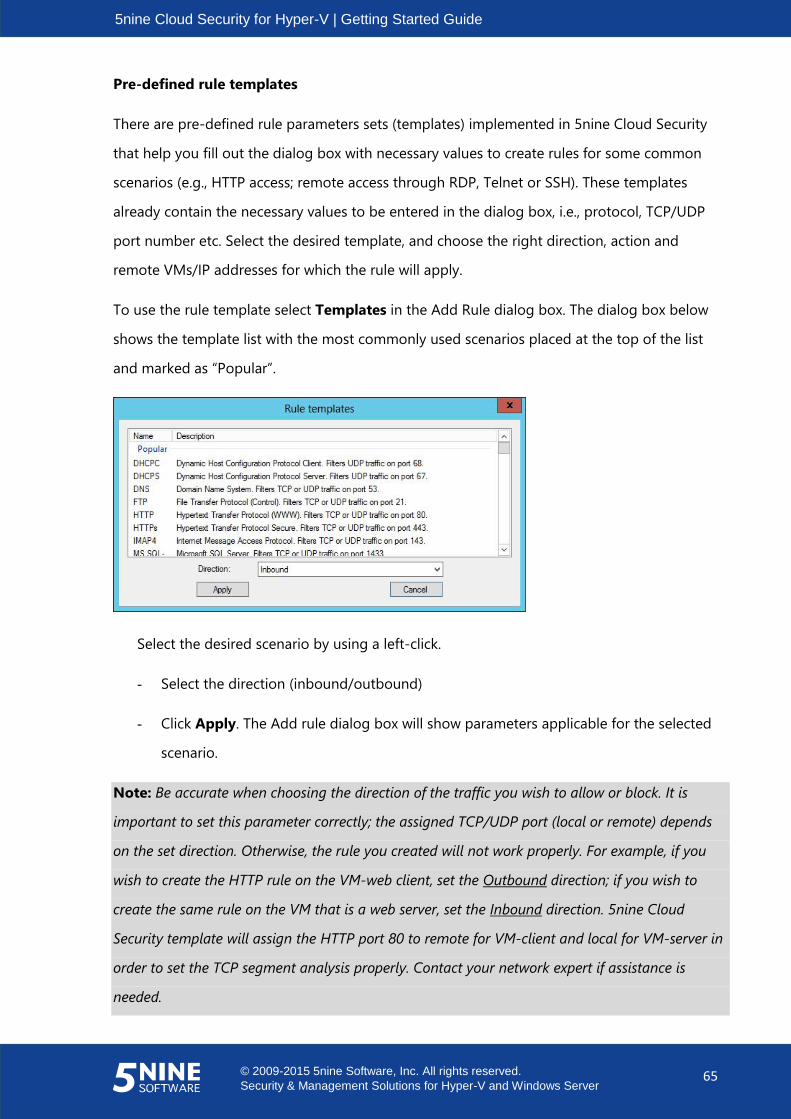
5nine Cloud Security for Hyper-V | Getting Started Guide
© 2009-2015 5nine Software, Inc. All rights reserved.
Security & Management Solutions for Hyper-V and Windows Server 65
Pre-defined rule templates
There are pre-defined rule parameters sets (templates) implemented in 5nine Cloud Security
that help you fill out the dialog box with necessary values to create rules for some common
scenarios (e.g., HTTP access; remote access through RDP, Telnet or SSH). These templates
already contain the necessary values to be entered in the dialog box, i.e., protocol, TCP/UDP
port number etc. Select the desired template, and choose the right direction, action and
remote VMs/IP addresses for which the rule will apply.
To use the rule template select Templates in the Add Rule dialog box. The dialog box below
shows the template list with the most commonly used scenarios placed at the top of the list
and marked as “Popular”.
Select the desired scenario by using a left-click.
- Select the direction (inbound/outbound)
- Click Apply. The Add rule dialog box will show parameters applicable for the selected
scenario.
Note: Be accurate when choosing the direction of the traffic you wish to allow or block. It is
important to set this parameter correctly; the assigned TCP/UDP port (local or remote) depends
on the set direction. Otherwise, the rule you created will not work properly. For example, if you
wish to create the HTTP rule on the VM-web client, set the Outbound direction; if you wish to
create the same rule on the VM that is a web server, set the Inbound direction. 5nine Cloud
Security template will assign the HTTP port 80 to remote for VM-client and local for VM-server in
order to set the TCP segment analysis properly. Contact your network expert if assistance is
needed.
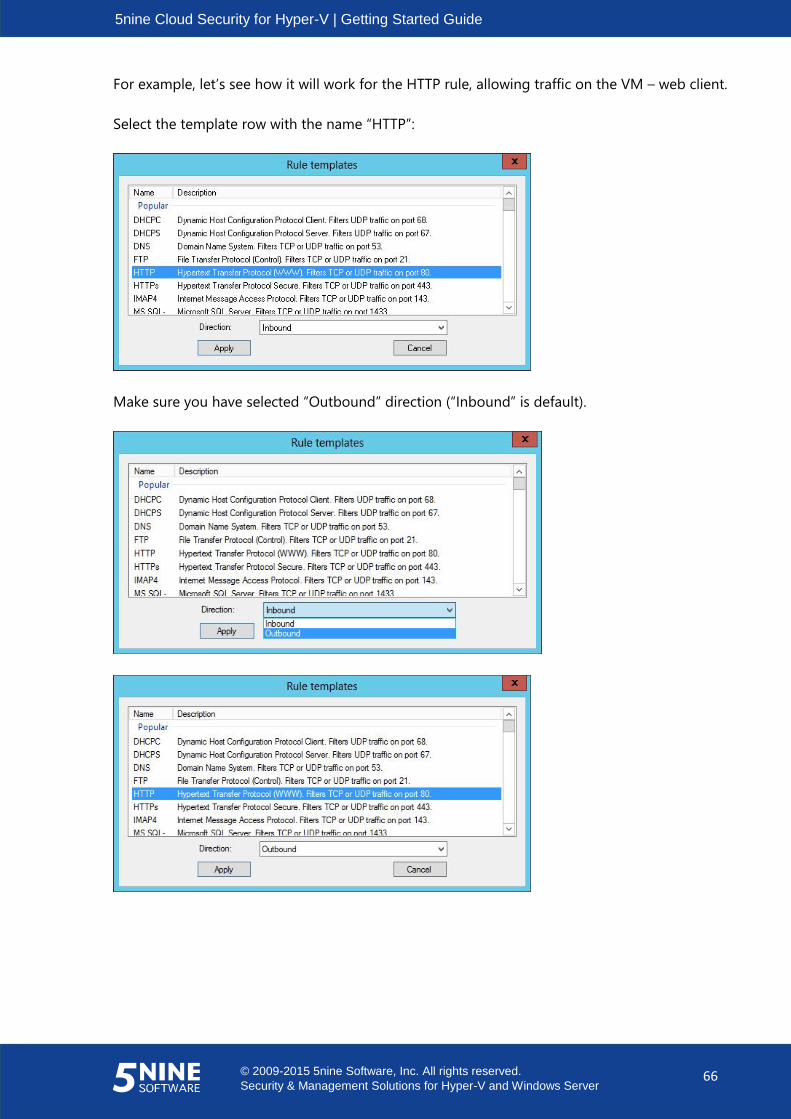
5nine Cloud Security for Hyper-V | Getting Started Guide
© 2009-2015 5nine Software, Inc. All rights reserved.
Security & Management Solutions for Hyper-V and Windows Server 66
For example, let’s see how it will work for the HTTP rule, allowing traffic on the VM – web client.
Select the template row with the name “HTTP”:
Make sure you have selected “Outbound” direction (“Inbound” is default).
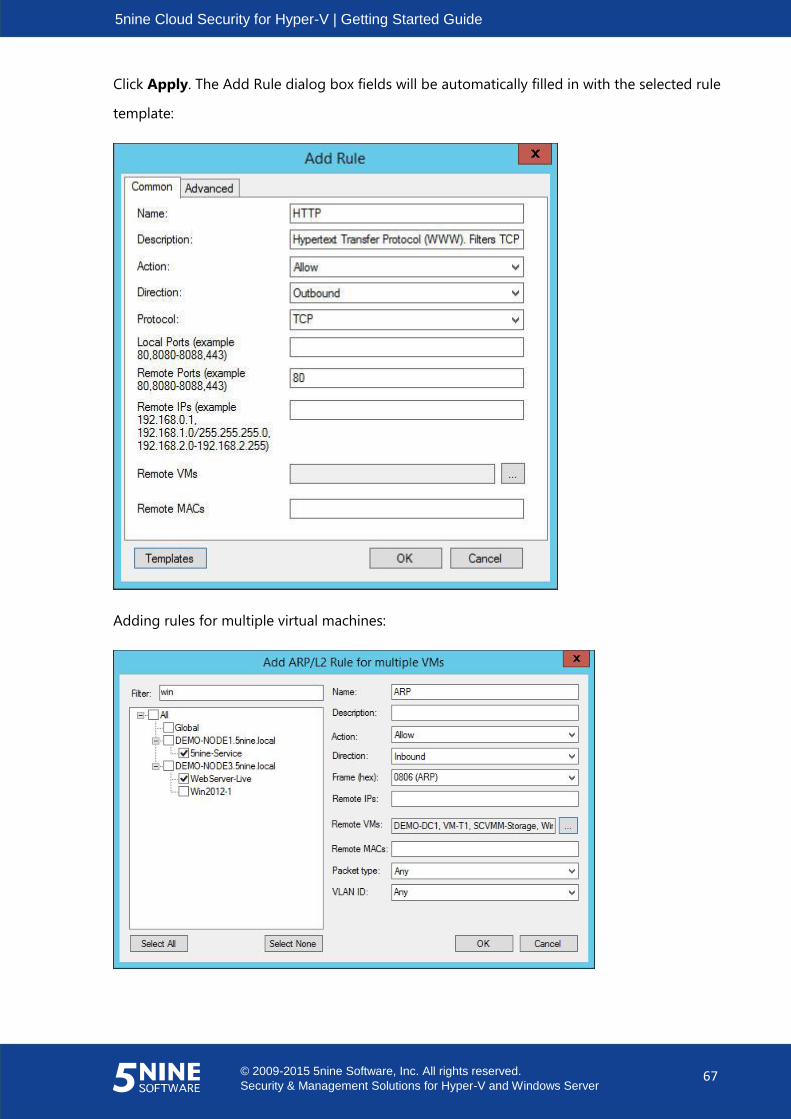
5nine Cloud Security for Hyper-V | Getting Started Guide
© 2009-2015 5nine Software, Inc. All rights reserved.
Security & Management Solutions for Hyper-V and Windows Server 67
Click Apply. The Add Rule dialog box fields will be automatically filled in with the selected rule
template:
Adding rules for multiple virtual machines:
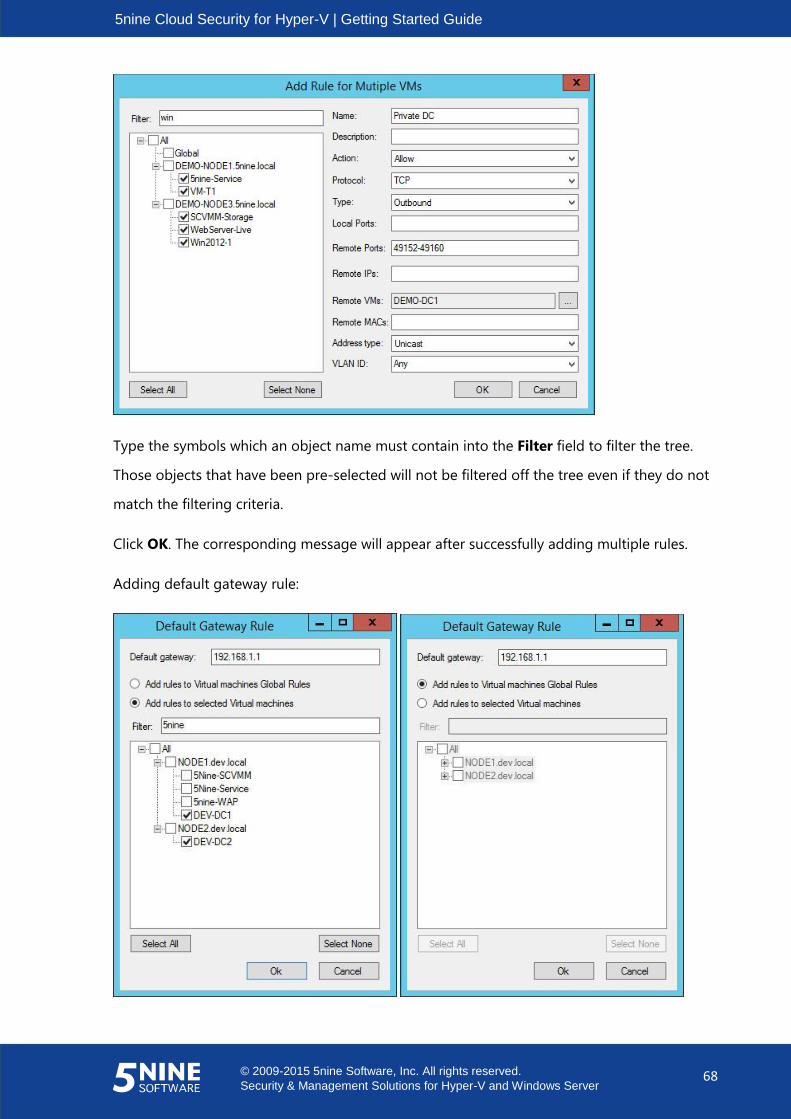
5nine Cloud Security for Hyper-V | Getting Started Guide
© 2009-2015 5nine Software, Inc. All rights reserved.
Security & Management Solutions for Hyper-V and Windows Server 68
Type the symbols which an object name must contain into the Filter field to filter the tree.
Those objects that have been pre-selected will not be filtered off the tree even if they do not
match the filtering criteria.
Click OK. The corresponding message will appear after successfully adding multiple rules.
Adding default gateway rule:

5nine Cloud Security for Hyper-V | Getting Started Guide
© 2009-2015 5nine Software, Inc. All rights reserved.
Security & Management Solutions for Hyper-V and Windows Server 69
You have two options:
- Add rules to Virtual machines Global Rules – the rule being created will be added to
Global-VM Rules list and will apply to all VMs set on virtual firewall.
- Add rules to selected Virtual machines – the rule being created will be added to the
rules lists only for those VMs that were chosen. Type the symbols which a VM name
must contain into the Filter field to filter the tree. Those VMs that have been pre-
selected will not be filtered off the tree even if they do not match the filtering criteria.
Click OK. The following rules with the characteristics shown below will be automatically created
and then added to the necessary places as described above:
1. Default gateway IP Rule
Name: “Default gateway IP Rule”
TypeOfRule: “IP, Any”
Type: “Any”
Action: “Allow”
Protocol: “Any”
Remote IPs: “10.16.101.198” (as it’s entered in the example given here)
2. Default gateway ARP Rule
Name: “Default gateway ARP Rule”
TypeOfRule: “ARP”
Type: “Any”
Action: “Allow”
Protocol: 0806
Remote IPs: any
Editing a rule
To edit a rule, select it in the list, then click Edit Rule on the top menu panel. Then change the
rule settings in the appropriate dialog box just as when adding a rule.

5nine Cloud Security for Hyper-V | Getting Started Guide
© 2009-2015 5nine Software, Inc. All rights reserved.
Security & Management Solutions for Hyper-V and Windows Server 70
Removing a rule
To remove a rule, select it in the list, then click Remove Rule on the top menu panel. The rule
will disappear from the list.
Authorization
When “Authorization required” option is enabled in the IP rule’s parameters, this rule will only
apply to authorized addresses. Any remote address that the rule is intended to be active for
should be authorized using special application that arrives with 5nine Cloud Security for Hyper-
V installation package. It is also necessary to have custom users created in 5nine Cloud Security
for Hyper-V users list, which will be required during authorization.
To setup authorization follow the steps below:
1. Ensure you have appropriate custom users created in 5nine Cloud Security for Hyper-V
(please refer to the ‘Users management and tenants’ – ‘Setting users’ section for
details). Currently it is not required to grant those users permissions, it is enough just to
have them in the users list. If the target virtual machine is in the global group, then the
custom user should be created in the global group. If the target virtual machine is
assigned to a tenant, then the custom user should be created in that tenant. In the case
your rule is created in the security group and/or applies for multiple VMs, which may be
assigned to different tenants and some just be in the global group, then you should
have custom users in each tenant and/or global group accordingly.
2. On the remote computer that the rule should be active towards, run the 5ninecli.exe
application that arrived with 5nine Cloud Security for Hyper-V installation package:
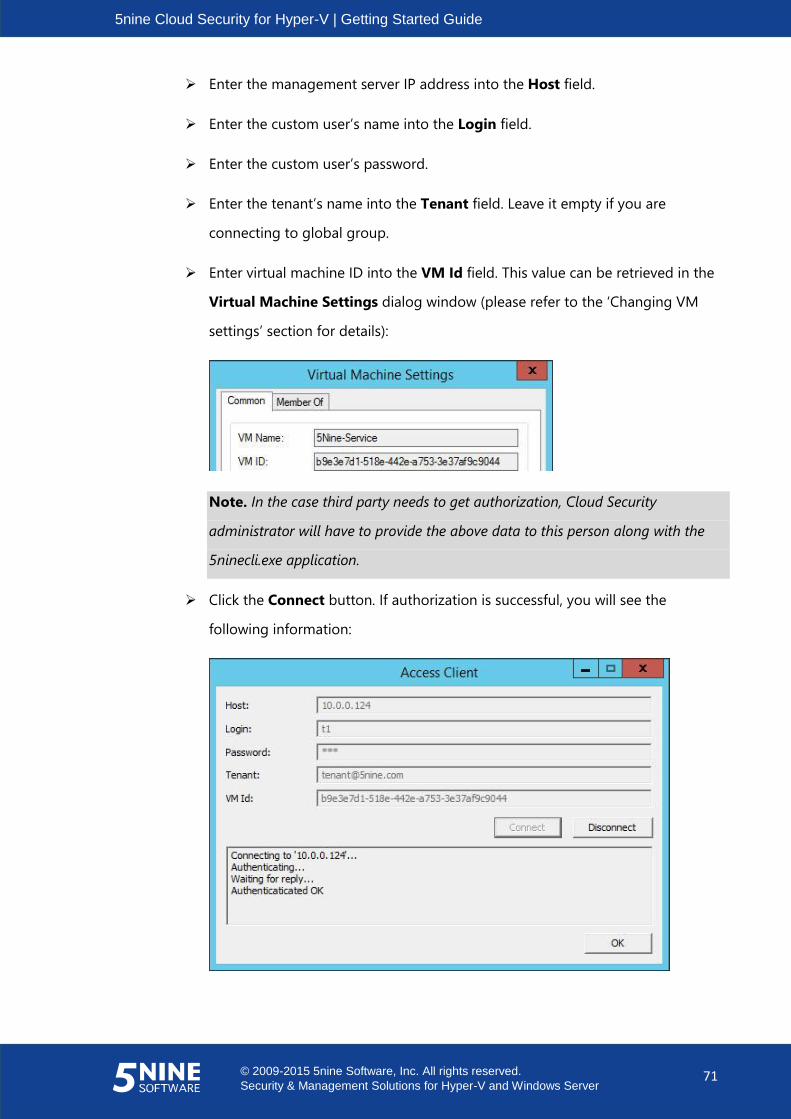
5nine Cloud Security for Hyper-V | Getting Started Guide
© 2009-2015 5nine Software, Inc. All rights reserved.
Security & Management Solutions for Hyper-V and Windows Server 71
Enter the management server IP address into the Host field.
Enter the custom user’s name into the Login field.
Enter the custom user’s password.
Enter the tenant’s name into the Tenant field. Leave it empty if you are
connecting to global group.
Enter virtual machine ID into the VM Id field. This value can be retrieved in the
Virtual Machine Settings dialog window (please refer to the ‘Changing VM
settings’ section for details):
Note. In the case third party needs to get authorization, Cloud Security
administrator will have to provide the above data to this person along with the
5ninecli.exe application.
Click the Connect button. If authorization is successful, you will see the
following information:
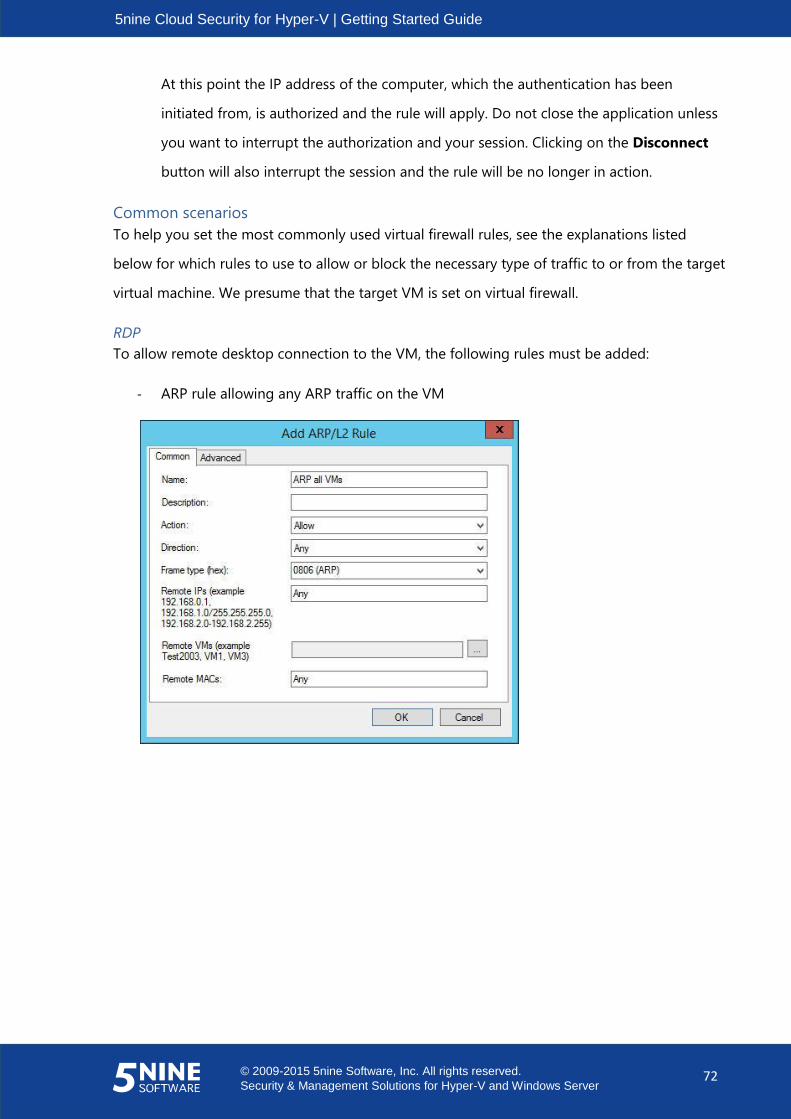
5nine Cloud Security for Hyper-V | Getting Started Guide
© 2009-2015 5nine Software, Inc. All rights reserved.
Security & Management Solutions for Hyper-V and Windows Server 72
At this point the IP address of the computer, which the authentication has been
initiated from, is authorized and the rule will apply. Do not close the application unless
you want to interrupt the authorization and your session. Clicking on the Disconnect
button will also interrupt the session and the rule will be no longer in action.
Common scenarios
To help you set the most commonly used virtual firewall rules, see the explanations listed
below for which rules to use to allow or block the necessary type of traffic to or from the target
virtual machine. We presume that the target VM is set on virtual firewall.
RDP
To allow remote desktop connection to the VM, the following rules must be added:
- ARP rule allowing any ARP traffic on the VM

5nine Cloud Security for Hyper-V | Getting Started Guide
© 2009-2015 5nine Software, Inc. All rights reserved.
Security & Management Solutions for Hyper-V and Windows Server 73
- IP rule allowing inbound TCP traffic on the local port 3389
Ping traffic
To allow ping commands to/from VM, the following rules must be added:
- ARP rule allowing any ARP traffic on the VM
- IP rule allowing ICMP traffic on the VM
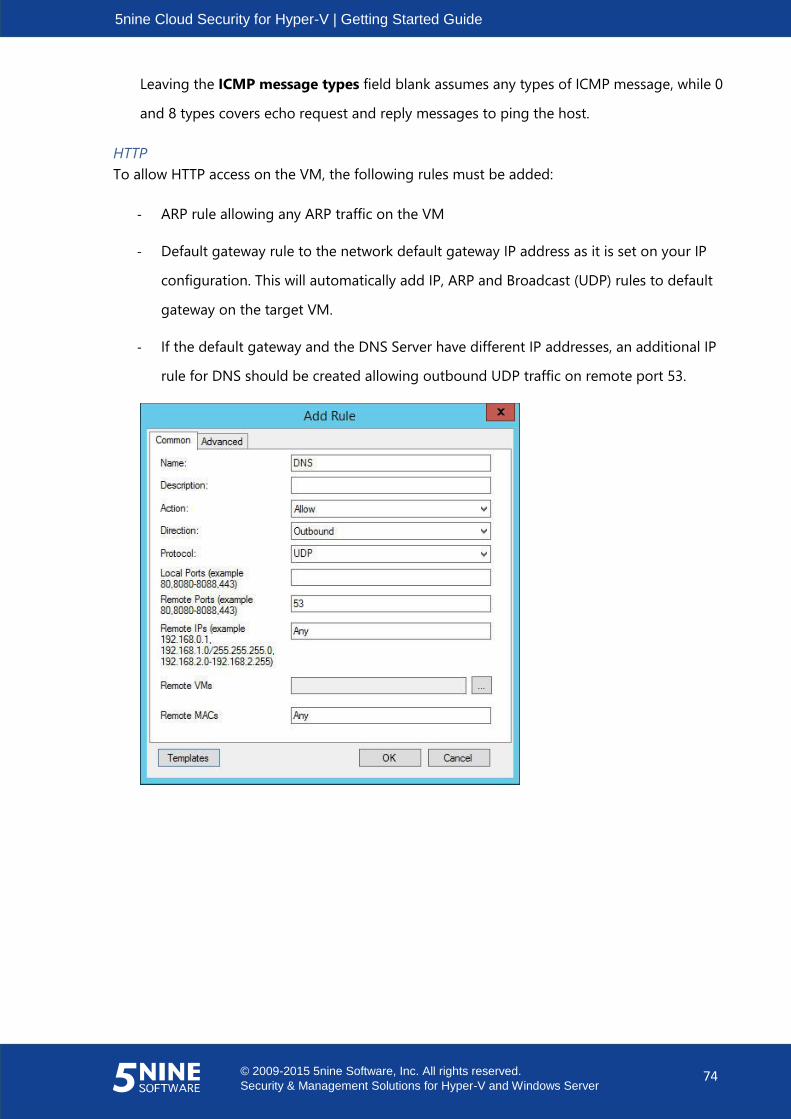
5nine Cloud Security for Hyper-V | Getting Started Guide
© 2009-2015 5nine Software, Inc. All rights reserved.
Security & Management Solutions for Hyper-V and Windows Server 74
Leaving the ICMP message types field blank assumes any types of ICMP message, while 0
and 8 types covers echo request and reply messages to ping the host.
HTTP
To allow HTTP access on the VM, the following rules must be added:
- ARP rule allowing any ARP traffic on the VM
- Default gateway rule to the network default gateway IP address as it is set on your IP
configuration. This will automatically add IP, ARP and Broadcast (UDP) rules to default
gateway on the target VM.
- If the default gateway and the DNS Server have different IP addresses, an additional IP
rule for DNS should be created allowing outbound UDP traffic on remote port 53.
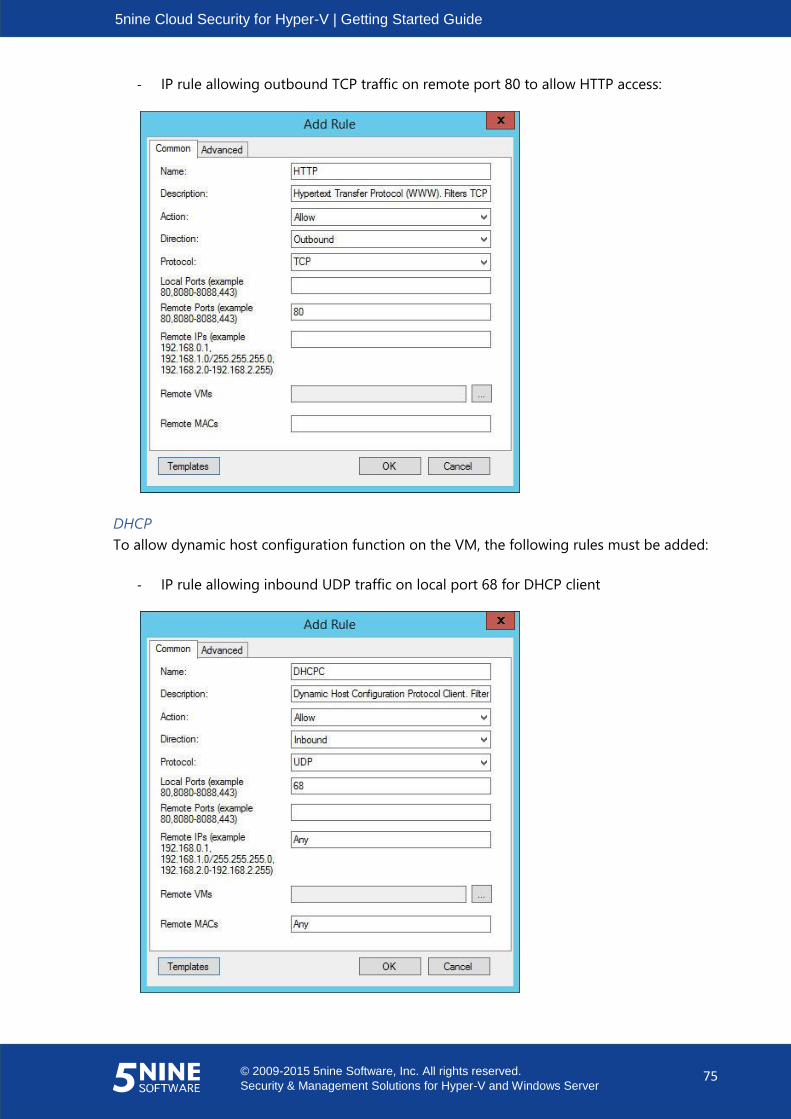
5nine Cloud Security for Hyper-V | Getting Started Guide
© 2009-2015 5nine Software, Inc. All rights reserved.
Security & Management Solutions for Hyper-V and Windows Server 75
- IP rule allowing outbound TCP traffic on remote port 80 to allow HTTP access:
DHCP
To allow dynamic host configuration function on the VM, the following rules must be added:
- IP rule allowing inbound UDP traffic on local port 68 for DHCP client
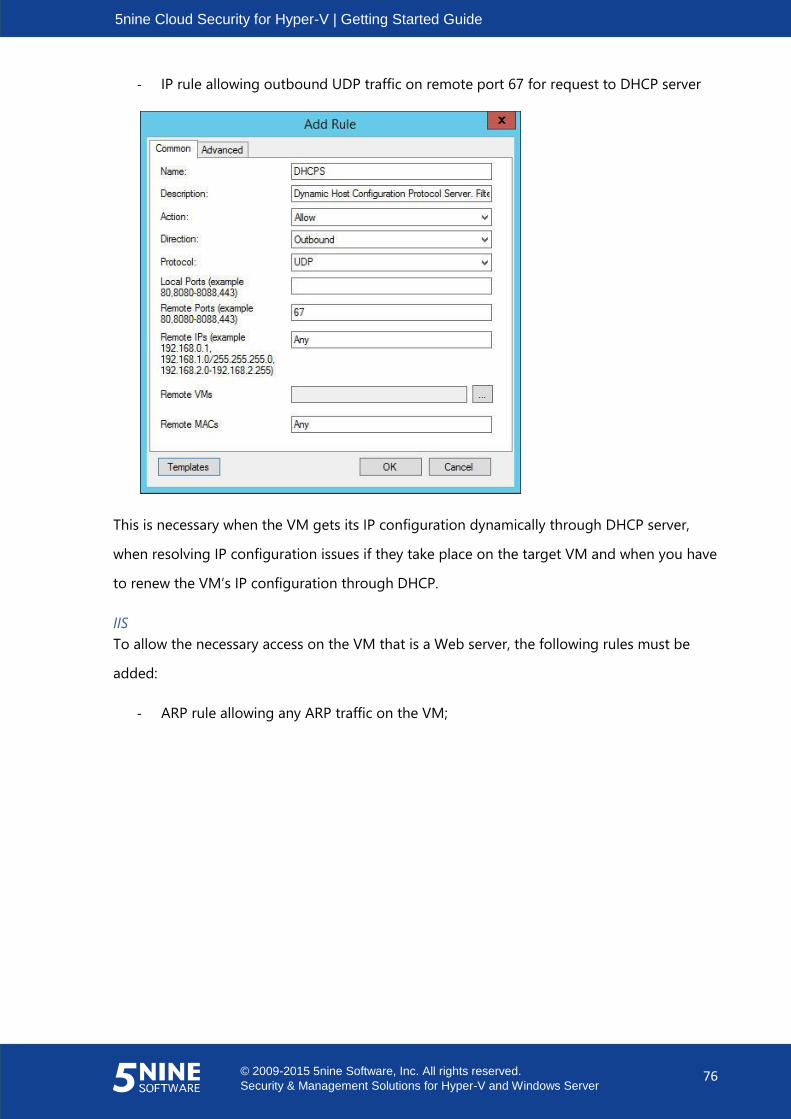
5nine Cloud Security for Hyper-V | Getting Started Guide
© 2009-2015 5nine Software, Inc. All rights reserved.
Security & Management Solutions for Hyper-V and Windows Server 76
- IP rule allowing outbound UDP traffic on remote port 67 for request to DHCP server
This is necessary when the VM gets its IP configuration dynamically through DHCP server,
when resolving IP configuration issues if they take place on the target VM and when you have
to renew the VM’s IP configuration through DHCP.
IIS
To allow the necessary access on the VM that is a Web server, the following rules must be
added:
- ARP rule allowing any ARP traffic on the VM;

5nine Cloud Security for Hyper-V | Getting Started Guide
© 2009-2015 5nine Software, Inc. All rights reserved.
Security & Management Solutions for Hyper-V and Windows Server 77
- IP rule allowing TCP traffic on local port 80 to allow HTTP access to the web server:
MS SQL Server
To allow the necessary access on the VM that is a Web server, the following rules must be
added:
- ARP rule allowing any ARP traffic on the VM;
- IP rule allowing TCP traffic on local port 1433:
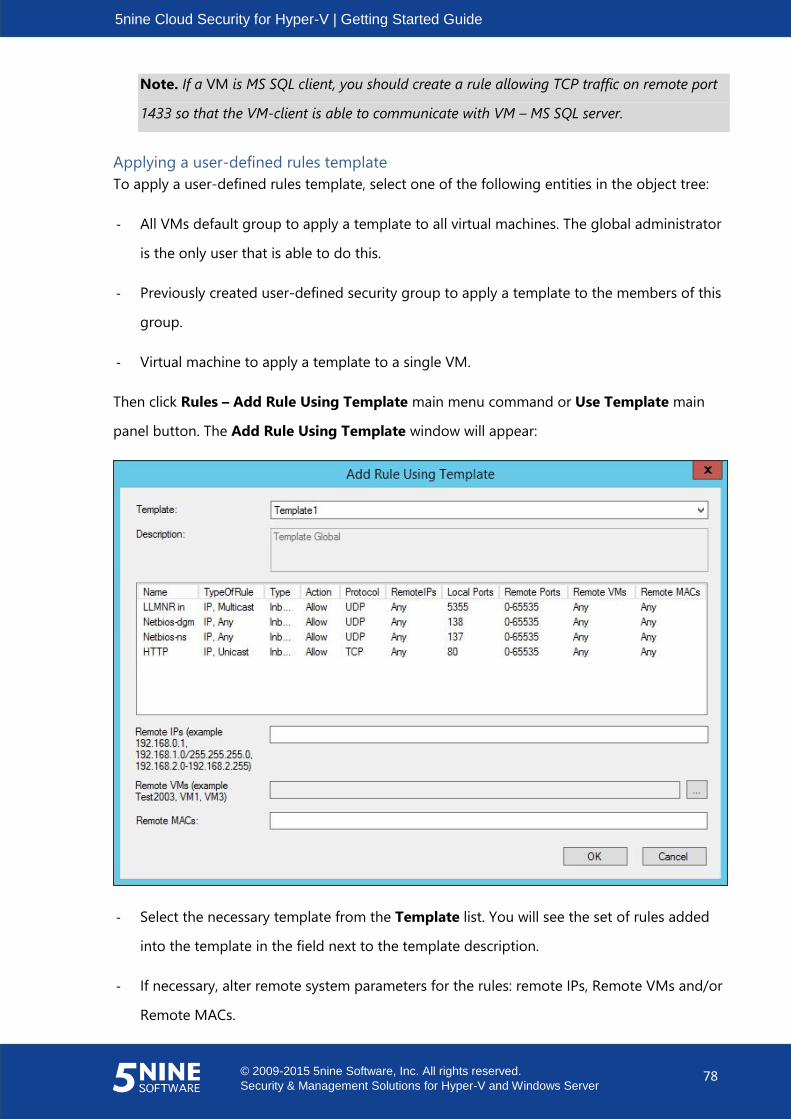
5nine Cloud Security for Hyper-V | Getting Started Guide
© 2009-2015 5nine Software, Inc. All rights reserved.
Security & Management Solutions for Hyper-V and Windows Server 78
Note. If a VM is MS SQL client, you should create a rule allowing TCP traffic on remote port
1433 so that the VM-client is able to communicate with VM – MS SQL server.
Applying a user-defined rules template
To apply a user-defined rules template, select one of the following entities in the object tree:
- All VMs default group to apply a template to all virtual machines. The global administrator
is the only user that is able to do this.
- Previously created user-defined security group to apply a template to the members of this
group.
- Virtual machine to apply a template to a single VM.
Then click Rules – Add Rule Using Template main menu command or Use Template main
panel button. The Add Rule Using Template window will appear:
- Select the necessary template from the Template list. You will see the set of rules added
into the template in the field next to the template description.
- If necessary, alter remote system parameters for the rules: remote IPs, Remote VMs and/or
Remote MACs.
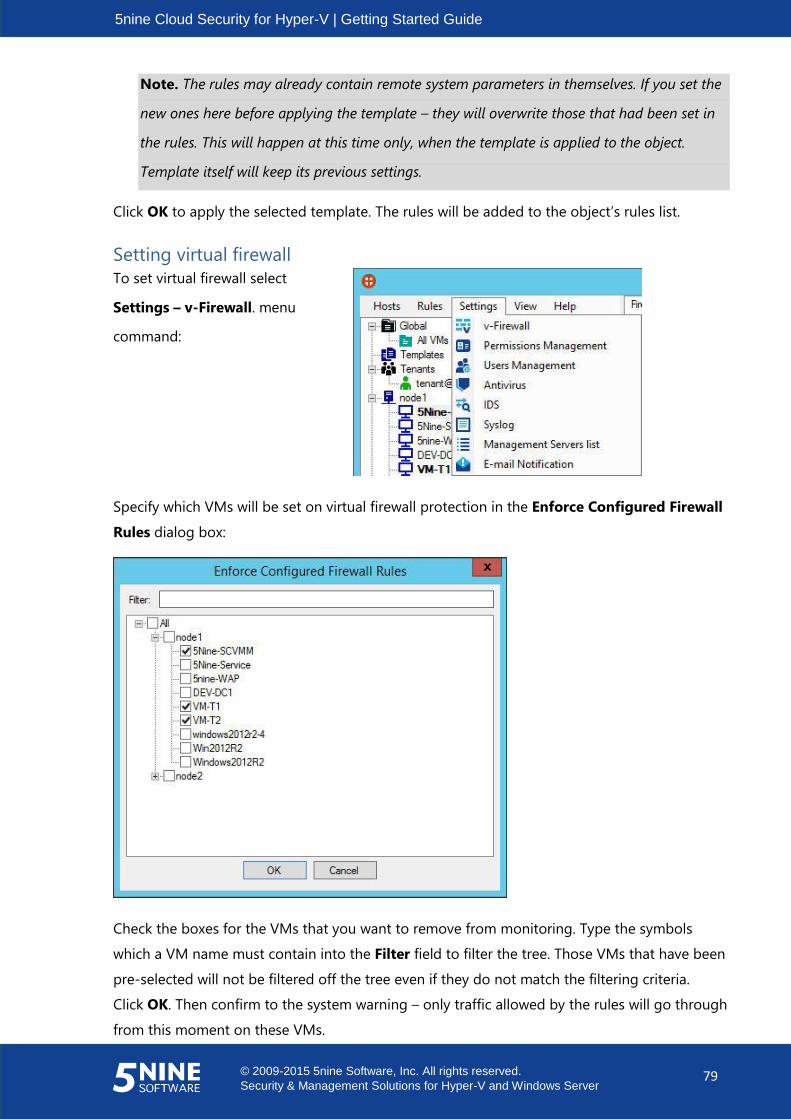
5nine Cloud Security for Hyper-V | Getting Started Guide
© 2009-2015 5nine Software, Inc. All rights reserved.
Security & Management Solutions for Hyper-V and Windows Server 79
Note. The rules may already contain remote system parameters in themselves. If you set the
new ones here before applying the template – they will overwrite those that had been set in
the rules. This will happen at this time only, when the template is applied to the object.
Template itself will keep its previous settings.
Click OK to apply the selected template. The rules will be added to the object’s rules list.
Setting virtual firewall
To set virtual firewall select
Settings – v-Firewall. menu
command:
Specify which VMs will be set on virtual firewall protection in the Enforce Configured Firewall
Rules dialog box:
Check the boxes for the VMs that you want to remove from monitoring. Type the symbols
which a VM name must contain into the Filter field to filter the tree. Those VMs that have been
pre-selected will not be filtered off the tree even if they do not match the filtering criteria.
Click OK. Then confirm to the system warning – only traffic allowed by the rules will go through
from this moment on these VMs.
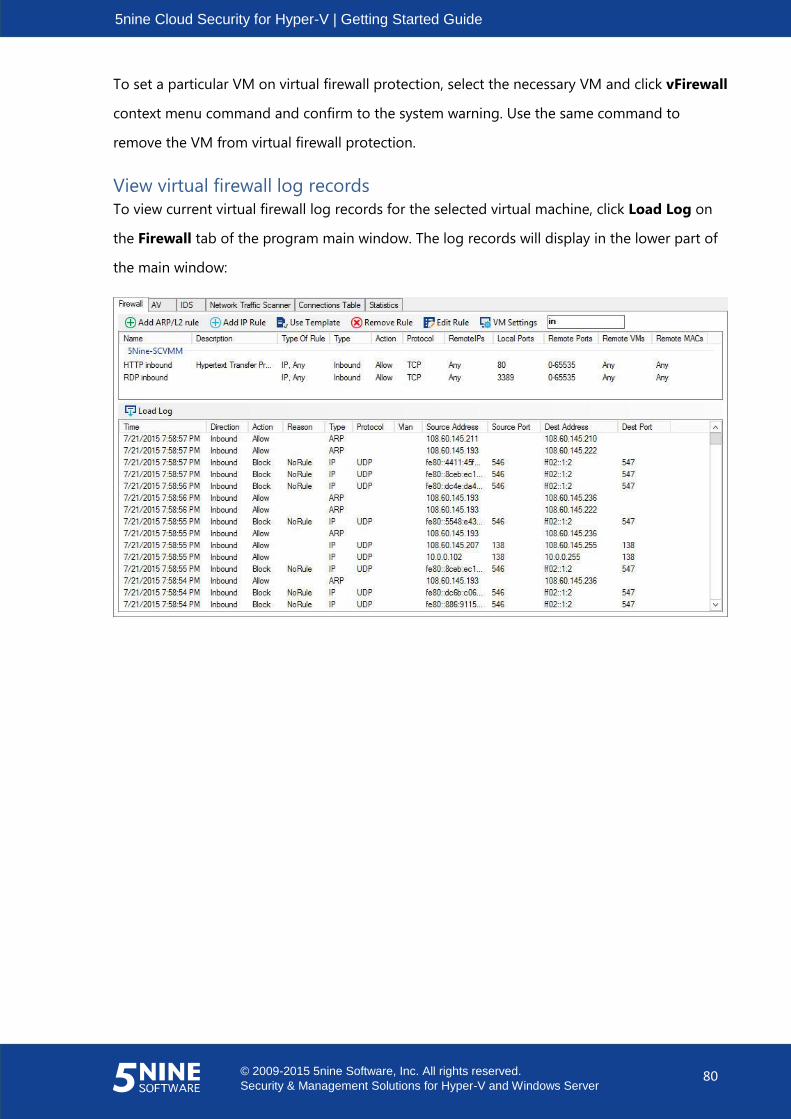
5nine Cloud Security for Hyper-V | Getting Started Guide
© 2009-2015 5nine Software, Inc. All rights reserved.
Security & Management Solutions for Hyper-V and Windows Server 80
To set a particular VM on virtual firewall protection, select the necessary VM and click vFirewall
context menu command and confirm to the system warning. Use the same command to
remove the VM from virtual firewall protection.
View virtual firewall log records
To view current virtual firewall log records for the selected virtual machine, click Load Log on
the Firewall tab of the program main window. The log records will display in the lower part of
the main window:
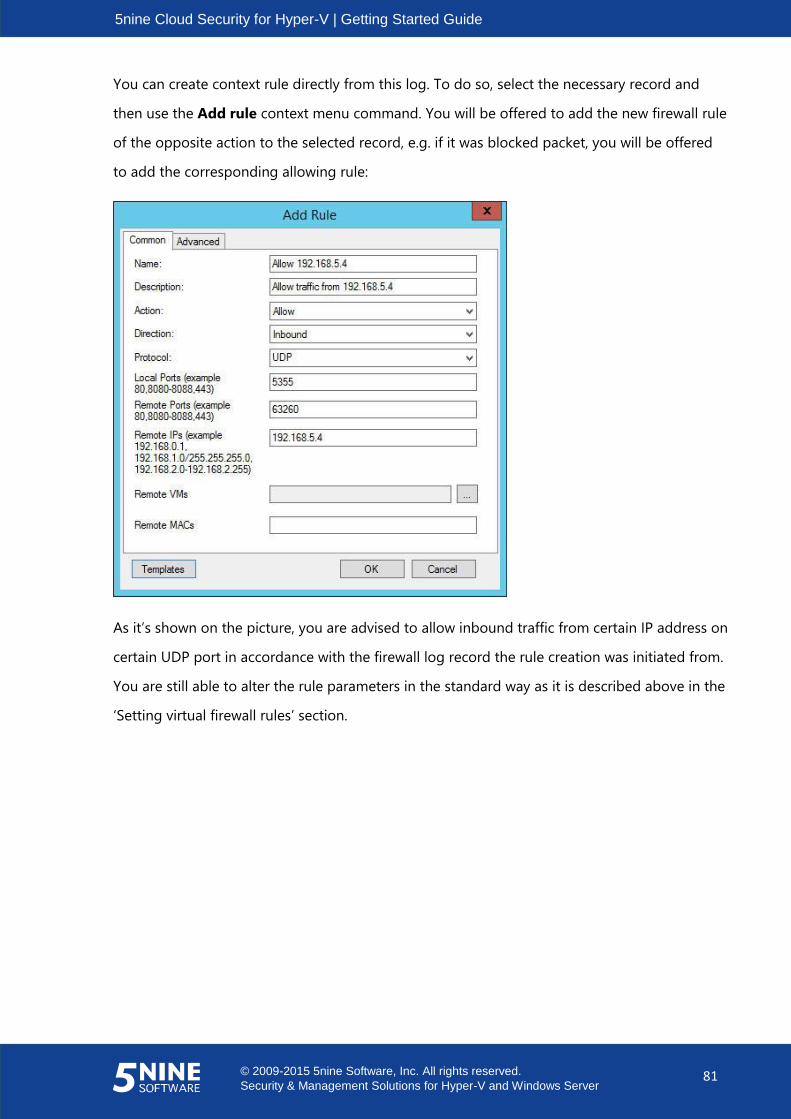
5nine Cloud Security for Hyper-V | Getting Started Guide
© 2009-2015 5nine Software, Inc. All rights reserved.
Security & Management Solutions for Hyper-V and Windows Server 81
You can create context rule directly from this log. To do so, select the necessary record and
then use the Add rule context menu command. You will be offered to add the new firewall rule
of the opposite action to the selected record, e.g. if it was blocked packet, you will be offered
to add the corresponding allowing rule:
As it’s shown on the picture, you are advised to allow inbound traffic from certain IP address on
certain UDP port in accordance with the firewall log record the rule creation was initiated from.
You are still able to alter the rule parameters in the standard way as it is described above in the
‘Setting virtual firewall rules’ section.
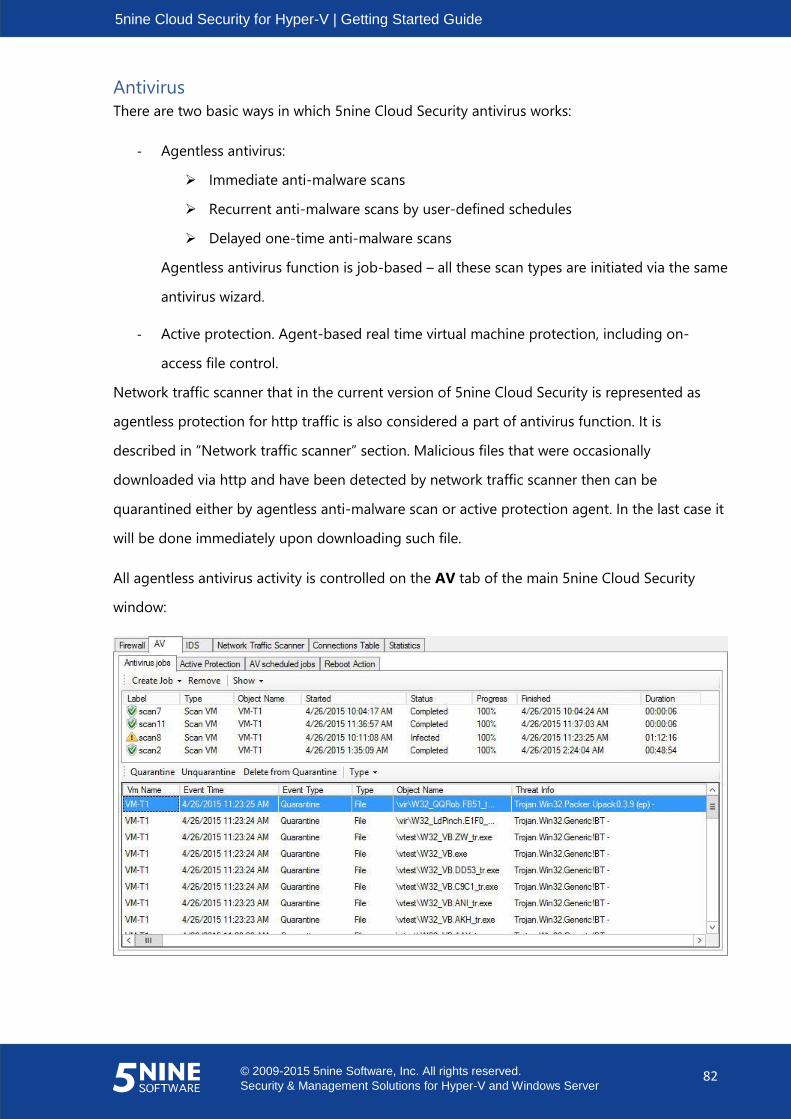
5nine Cloud Security for Hyper-V | Getting Started Guide
© 2009-2015 5nine Software, Inc. All rights reserved.
Security & Management Solutions for Hyper-V and Windows Server 82
Antivirus
There are two basic ways in which 5nine Cloud Security antivirus works:
- Agentless antivirus:
Immediate anti-malware scans
Recurrent anti-malware scans by user-defined schedules
Delayed one-time anti-malware scans
Agentless antivirus function is job-based – all these scan types are initiated via the same
antivirus wizard.
- Active protection. Agent-based real time virtual machine protection, including on-
access file control.
Network traffic scanner that in the current version of 5nine Cloud Security is represented as
agentless protection for http traffic is also considered a part of antivirus function. It is
described in “Network traffic scanner” section. Malicious files that were occasionally
downloaded via http and have been detected by network traffic scanner then can be
quarantined either by agentless anti-malware scan or active protection agent. In the last case it
will be done immediately upon downloading such file.
All agentless antivirus activity is controlled on the AV tab of the main 5nine Cloud Security
window:
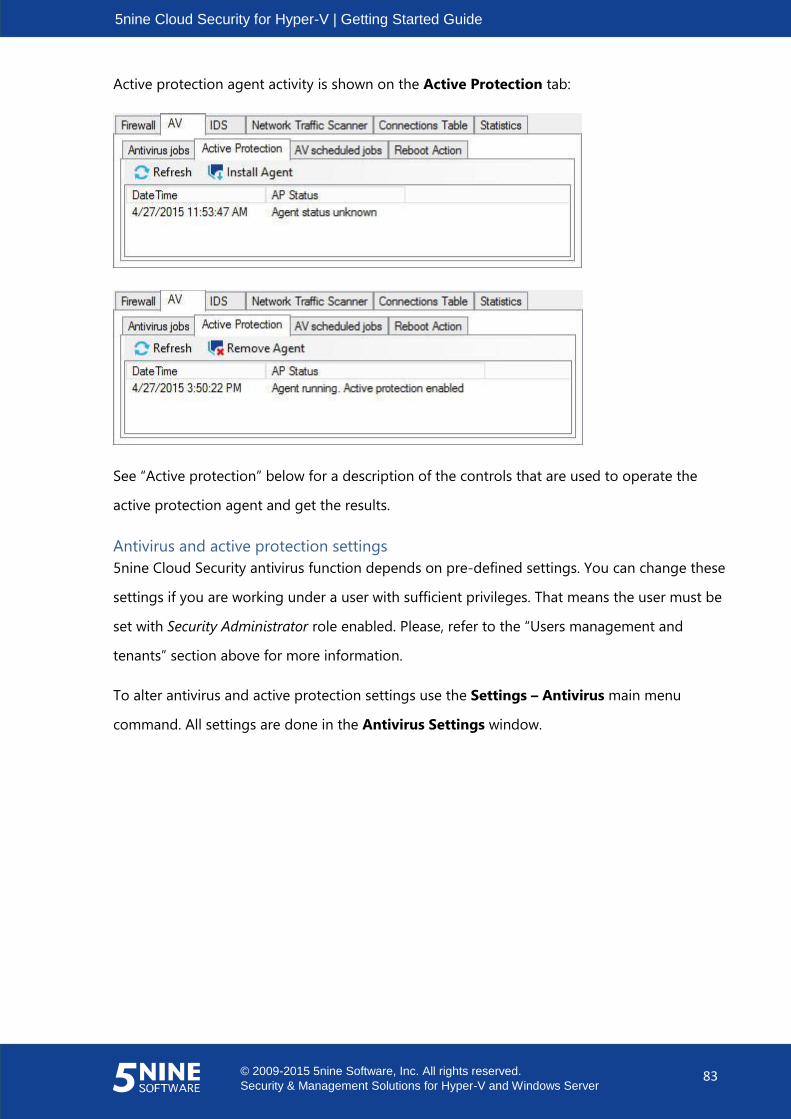
5nine Cloud Security for Hyper-V | Getting Started Guide
© 2009-2015 5nine Software, Inc. All rights reserved.
Security & Management Solutions for Hyper-V and Windows Server 83
Active protection agent activity is shown on the Active Protection tab:
See “Active protection” below for a description of the controls that are used to operate the
active protection agent and get the results.
Antivirus and active protection settings
5nine Cloud Security antivirus function depends on pre-defined settings. You can change these
settings if you are working under a user with sufficient privileges. That means the user must be
set with Security Administrator role enabled. Please, refer to the “Users management and
tenants” section above for more information.
To alter antivirus and active protection settings use the Settings – Antivirus main menu
command. All settings are done in the Antivirus Settings window.
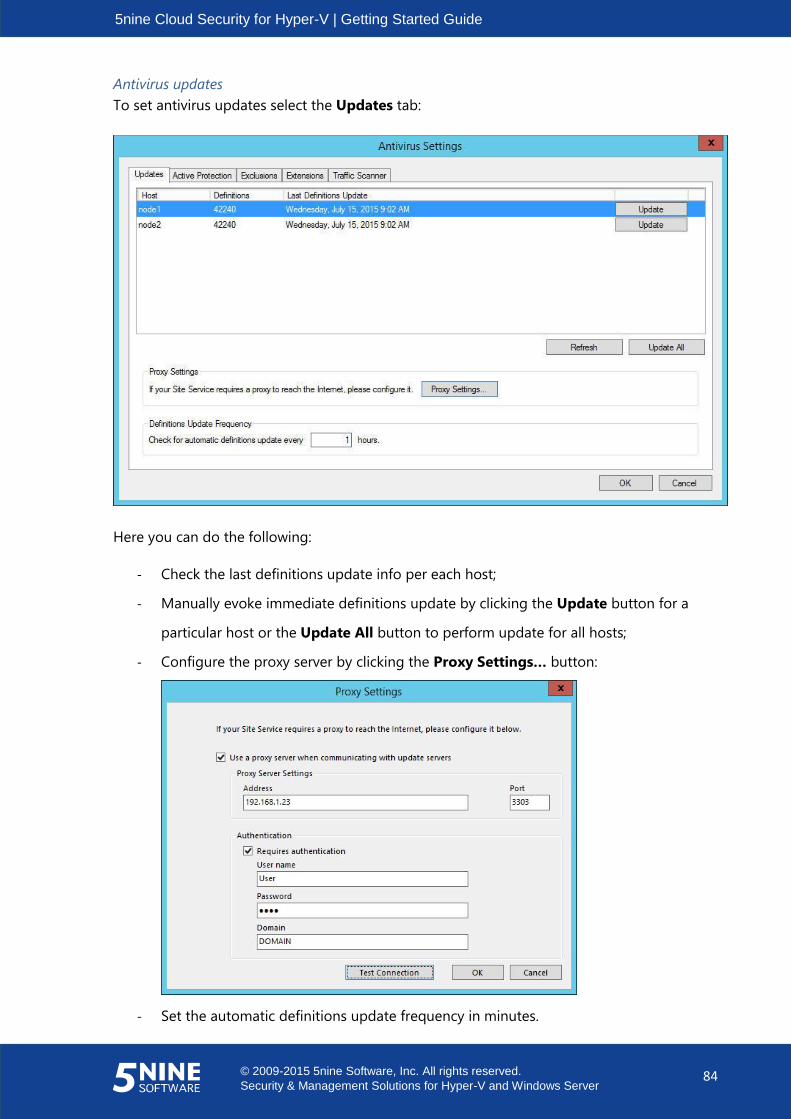
5nine Cloud Security for Hyper-V | Getting Started Guide
© 2009-2015 5nine Software, Inc. All rights reserved.
Security & Management Solutions for Hyper-V and Windows Server 84
Antivirus updates
To set antivirus updates select the Updates tab:
Here you can do the following:
- Check the last definitions update info per each host;
- Manually evoke immediate definitions update by clicking the Update button for a
particular host or the Update All button to perform update for all hosts;
- Configure the proxy server by clicking the Proxy Settings… button:
- Set the automatic definitions update frequency in minutes.

5nine Cloud Security for Hyper-V | Getting Started Guide
© 2009-2015 5nine Software, Inc. All rights reserved.
Security & Management Solutions for Hyper-V and Windows Server 85
Active protection settings
To set parameters for the virtual machines real time anti-malware protection and active
protection agent behavior options, select the Active Protection tab:
- Check Enabled under Settings to enable active protection on virtual machines; this is
the default setting. Active protection will be immediately activated on those virtual
machines where active protection agent is installed. Refer to the “Active protection”
section for more information. If you need to disable active protection, deselect this box
and active protection agent will immediately stop working.
- Move the On Access slider to one of the three positions:
Execution Only– the least resource consuming, but also the least secure. Active
Protection agent will scan files when they attempt to execute. Malware could
already be copied to the virtual machine and will not be caught by active
protection until the malware attempts to execute if protection is enabled as
described above.
High Risk Extensions Only– active protection will scan files with the known
extensions (shown to the right) whenever these files are touched. Active
protection will also scan any file that attempts to execute if protection is
enabled as described above.

5nine Cloud Security for Hyper-V | Getting Started Guide
© 2009-2015 5nine Software, Inc. All rights reserved.
Security & Management Solutions for Hyper-V and Windows Server 86
All Touched Files– active protection will scan any file each time it is touched.
Active protection will also scan any file that attempts to execute if protection is
enabled as described above. This mode is the most resource consuming, but
also the most secure.
- Review the known extensions in AP Known/Admin Known lists. Check the boxes of each
extension to enable or disable active protection. The same operations are made under
the Extensions tab as described below. The Modify button will take you there.
Exclusions
The Exclusions tab allows you to specify the files and folders (with destinations if needed) on
the host that will be excluded from anti-malware protection and allowed on your system:
Note: The files, destinations and folders can be added to the exclusions list either from the host
file system or the VM internal file system, as it works for both VM and host. If you add entries
from the VM internal file system, you can only type them directly into the dialog boxes as
described below. If you add them from the host file system, you can either type them in directly or
browse for them as described below.

5nine Cloud Security for Hyper-V | Getting Started Guide
© 2009-2015 5nine Software, Inc. All rights reserved.
Security & Management Solutions for Hyper-V and Windows Server 87
To add a file, destination or folder to the exclusions list, click Add and use the appropriate
command:
- Add File – select and add a single file to the exclusions list. Enter the file name directly
or select Browse to search for the file.
- Add File with Path – select and add a single file with its destination to the exclusions list.
Enter the full path to the file directly or select Browse to search for the file.
- Add Folder – select and add a folder to the exclusions list. Enter the path to the folder
directly or select Browse to search for the file.
To remove a file, destination or a folder from the exclusions list, select it and then click
Remove.
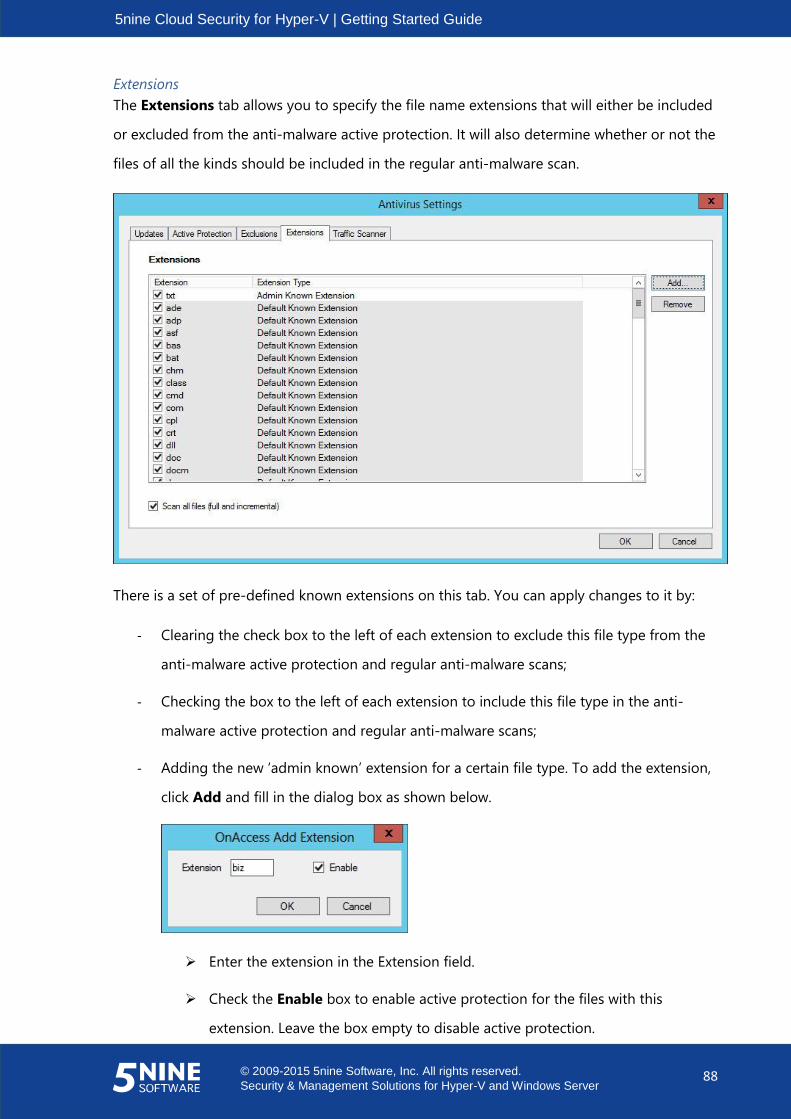
5nine Cloud Security for Hyper-V | Getting Started Guide
© 2009-2015 5nine Software, Inc. All rights reserved.
Security & Management Solutions for Hyper-V and Windows Server 88
Extensions
The Extensions tab allows you to specify the file name extensions that will either be included
or excluded from the anti-malware active protection. It will also determine whether or not the
files of all the kinds should be included in the regular anti-malware scan.
There is a set of pre-defined known extensions on this tab. You can apply changes to it by:
- Clearing the check box to the left of each extension to exclude this file type from the
anti-malware active protection and regular anti-malware scans;
- Checking the box to the left of each extension to include this file type in the anti-
malware active protection and regular anti-malware scans;
- Adding the new ‘admin known’ extension for a certain file type. To add the extension,
click Add and fill in the dialog box as shown below.
Enter the extension in the Extension field.
Check the Enable box to enable active protection for the files with this
extension. Leave the box empty to disable active protection.
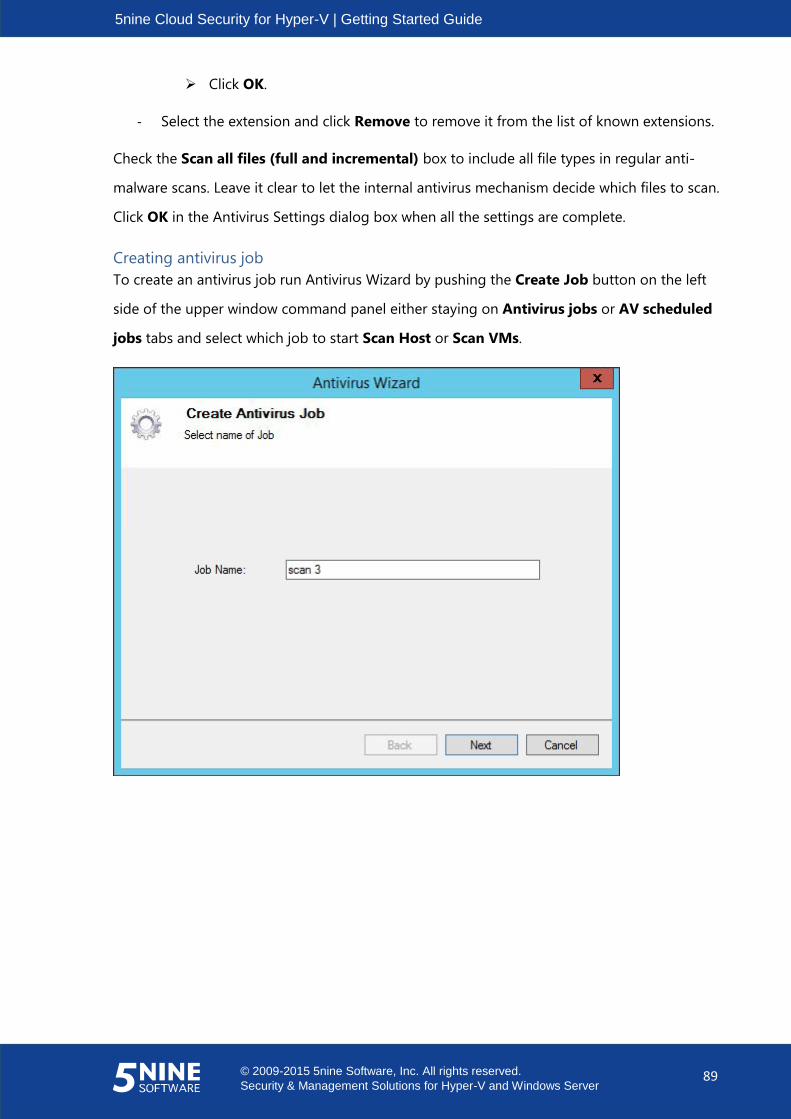
5nine Cloud Security for Hyper-V | Getting Started Guide
© 2009-2015 5nine Software, Inc. All rights reserved.
Security & Management Solutions for Hyper-V and Windows Server 89
Click OK.
- Select the extension and click Remove to remove it from the list of known extensions.
Check the Scan all files (full and incremental) box to include all file types in regular anti-
malware scans. Leave it clear to let the internal antivirus mechanism decide which files to scan.
Click OK in the Antivirus Settings dialog box when all the settings are complete.
Creating antivirus job
To create an antivirus job run Antivirus Wizard by pushing the Create Job button on the left
side of the upper window command panel either staying on Antivirus jobs or AV scheduled
jobs tabs and select which job to start Scan Host or Scan VMs.

5nine Cloud Security for Hyper-V | Getting Started Guide
© 2009-2015 5nine Software, Inc. All rights reserved.
Security & Management Solutions for Hyper-V and Windows Server 90
Name the job and click Next. Then select the entities to be scanned:
Mark objects to include in the job. Use filter for convenience. Click Next.
Select file types for the scan:
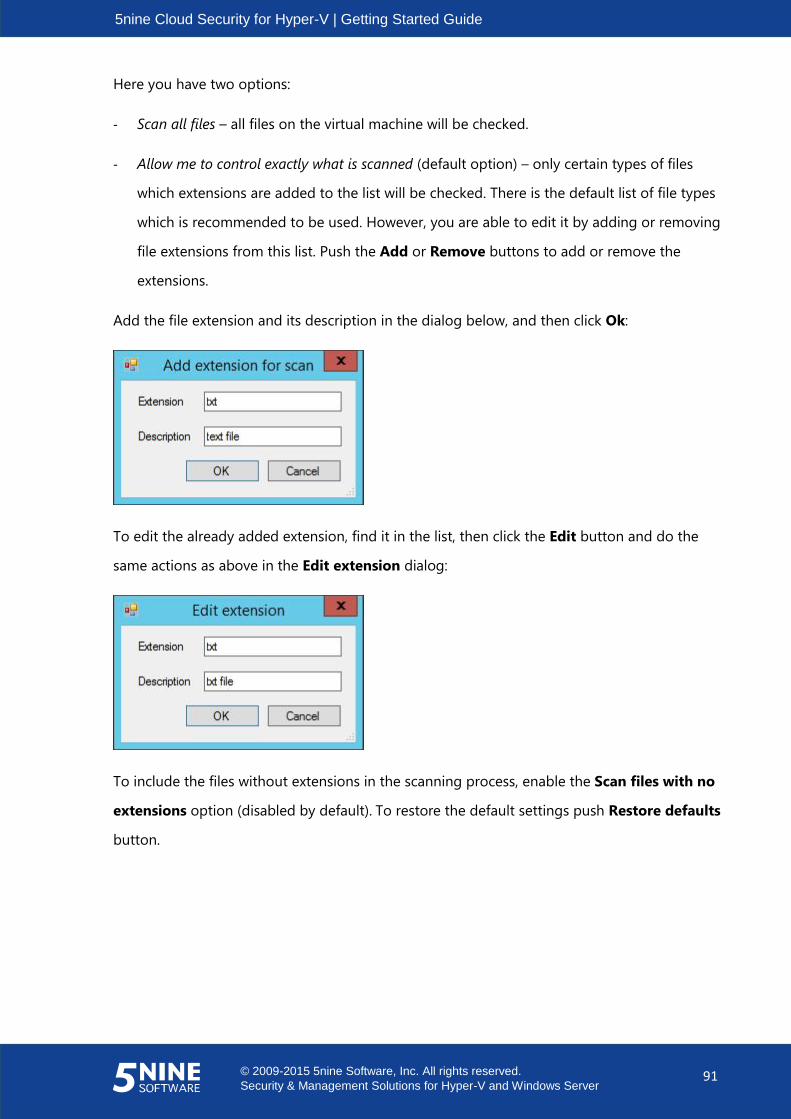
5nine Cloud Security for Hyper-V | Getting Started Guide
© 2009-2015 5nine Software, Inc. All rights reserved.
Security & Management Solutions for Hyper-V and Windows Server 91
Here you have two options:
- Scan all files – all files on the virtual machine will be checked.
- Allow me to control exactly what is scanned (default option) – only certain types of files
which extensions are added to the list will be checked. There is the default list of file types
which is recommended to be used. However, you are able to edit it by adding or removing
file extensions from this list. Push the Add or Remove buttons to add or remove the
extensions.
Add the file extension and its description in the dialog below, and then click Ok:
To edit the already added extension, find it in the list, then click the Edit button and do the
same actions as above in the Edit extension dialog:
To include the files without extensions in the scanning process, enable the Scan files with no
extensions option (disabled by default). To restore the default settings push Restore defaults
button.
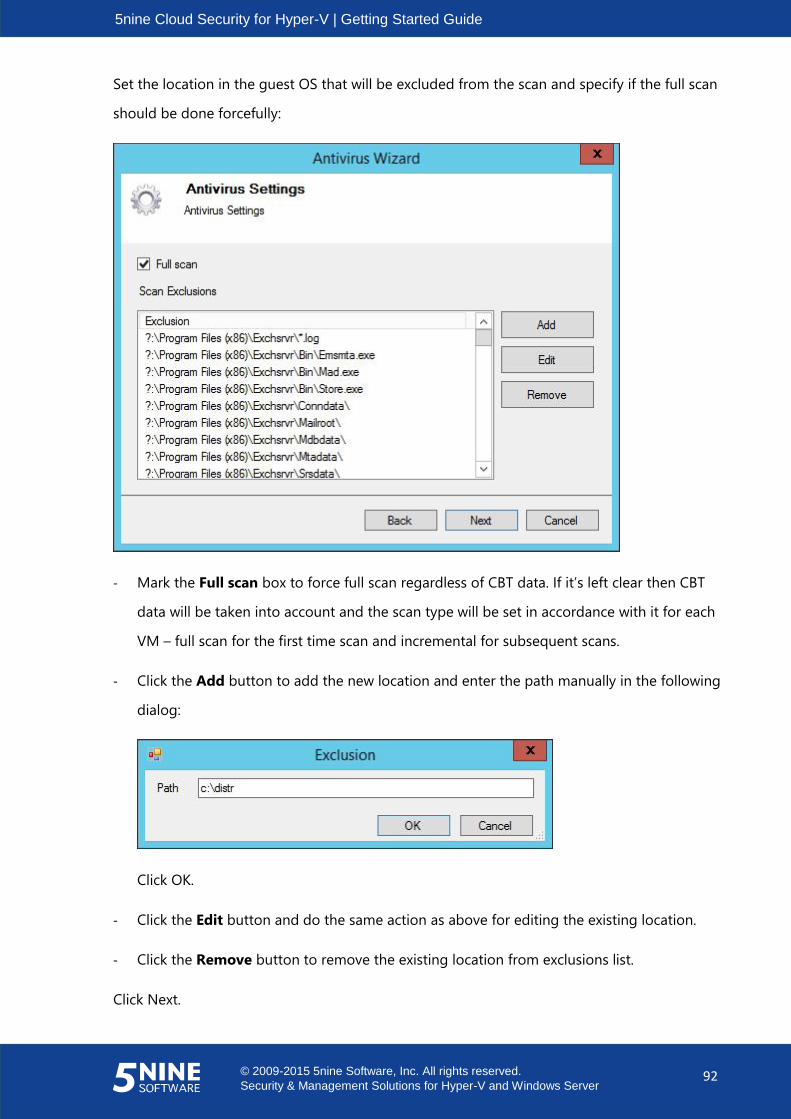
5nine Cloud Security for Hyper-V | Getting Started Guide
© 2009-2015 5nine Software, Inc. All rights reserved.
Security & Management Solutions for Hyper-V and Windows Server 92
Set the location in the guest OS that will be excluded from the scan and specify if the full scan
should be done forcefully:
- Mark the Full scan box to force full scan regardless of CBT data. If it’s left clear then CBT
data will be taken into account and the scan type will be set in accordance with it for each
VM – full scan for the first time scan and incremental for subsequent scans.
- Click the Add button to add the new location and enter the path manually in the following
dialog:
Click OK.
- Click the Edit button and do the same action as above for editing the existing location.
- Click the Remove button to remove the existing location from exclusions list.
Click Next.

5nine Cloud Security for Hyper-V | Getting Started Guide
© 2009-2015 5nine Software, Inc. All rights reserved.
Security & Management Solutions for Hyper-V and Windows Server 93
Set the job schedule:
Review all settings and submit the new job:
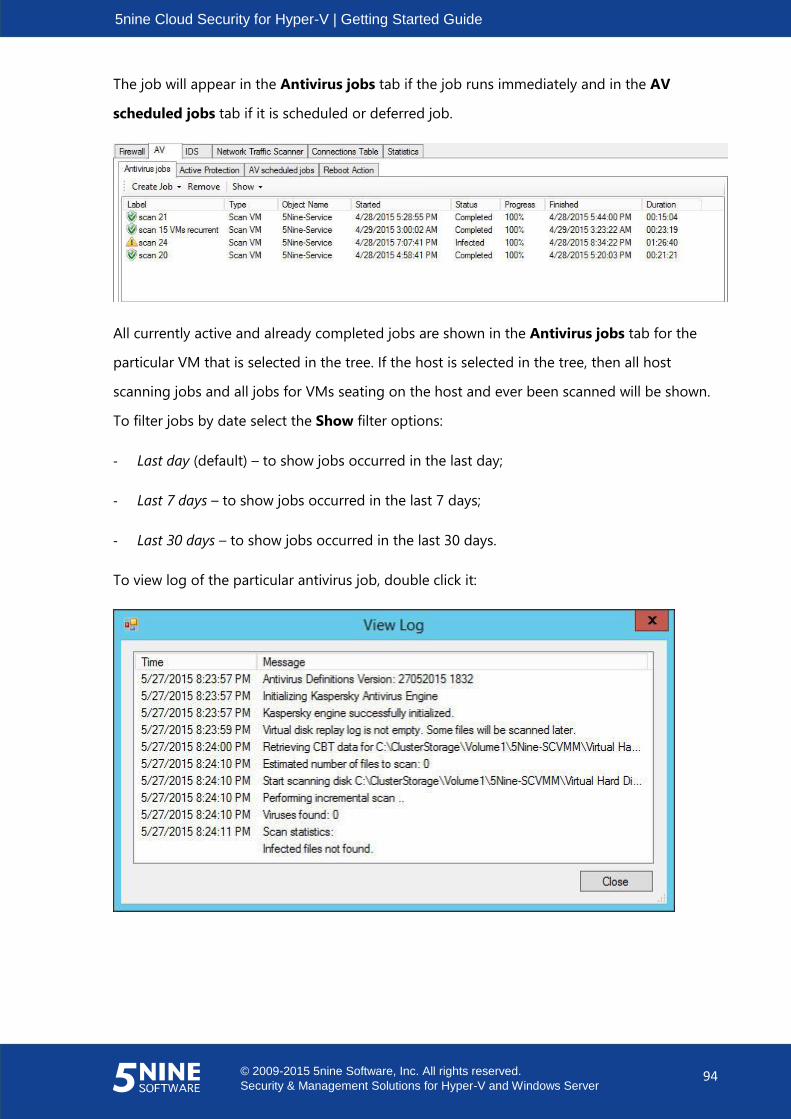
5nine Cloud Security for Hyper-V | Getting Started Guide
© 2009-2015 5nine Software, Inc. All rights reserved.
Security & Management Solutions for Hyper-V and Windows Server 94
The job will appear in the Antivirus jobs tab if the job runs immediately and in the AV
scheduled jobs tab if it is scheduled or deferred job.
All currently active and already completed jobs are shown in the Antivirus jobs tab for the
particular VM that is selected in the tree. If the host is selected in the tree, then all host
scanning jobs and all jobs for VMs seating on the host and ever been scanned will be shown.
To filter jobs by date select the Show filter options:
- Last day (default) – to show jobs occurred in the last day;
- Last 7 days – to show jobs occurred in the last 7 days;
- Last 30 days – to show jobs occurred in the last 30 days.
To view log of the particular antivirus job, double click it:
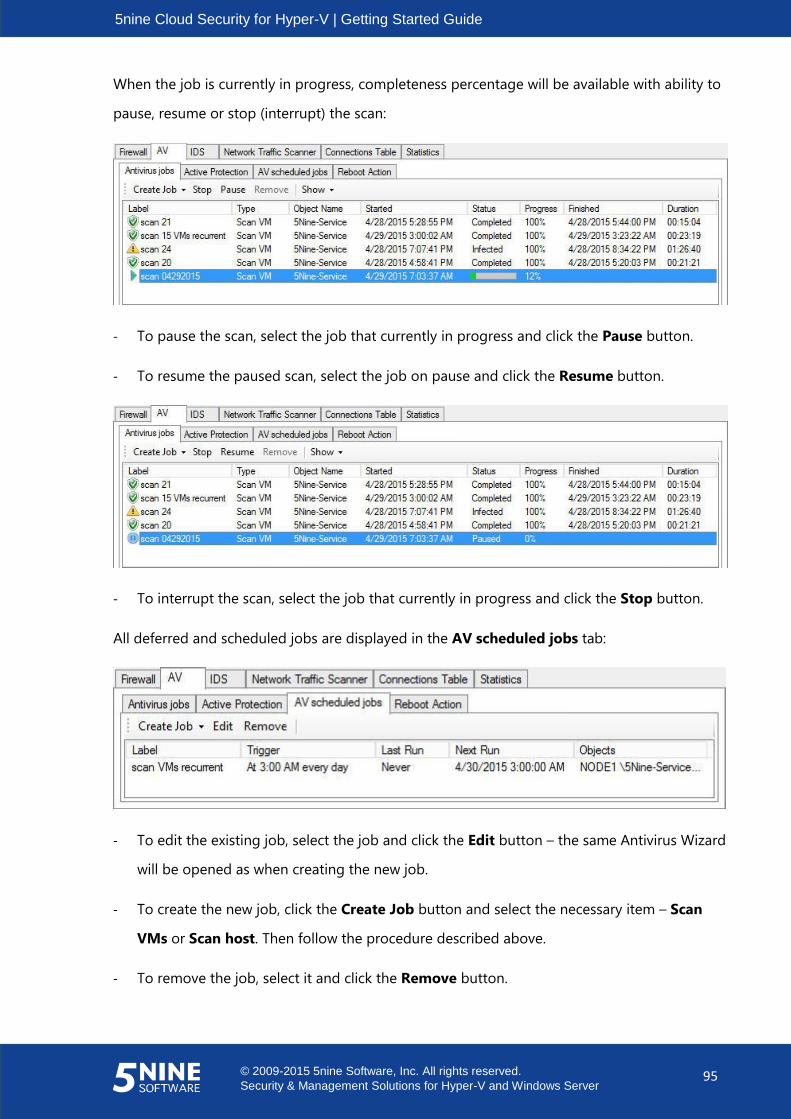
5nine Cloud Security for Hyper-V | Getting Started Guide
© 2009-2015 5nine Software, Inc. All rights reserved.
Security & Management Solutions for Hyper-V and Windows Server 95
When the job is currently in progress, completeness percentage will be available with ability to
pause, resume or stop (interrupt) the scan:
- To pause the scan, select the job that currently in progress and click the Pause button.
- To resume the paused scan, select the job on pause and click the Resume button.
- To interrupt the scan, select the job that currently in progress and click the Stop button.
All deferred and scheduled jobs are displayed in the AV scheduled jobs tab:
- To edit the existing job, select the job and click the Edit button – the same Antivirus Wizard
will be opened as when creating the new job.
- To create the new job, click the Create Job button and select the necessary item – Scan
VMs or Scan host. Then follow the procedure described above.
- To remove the job, select it and click the Remove button.
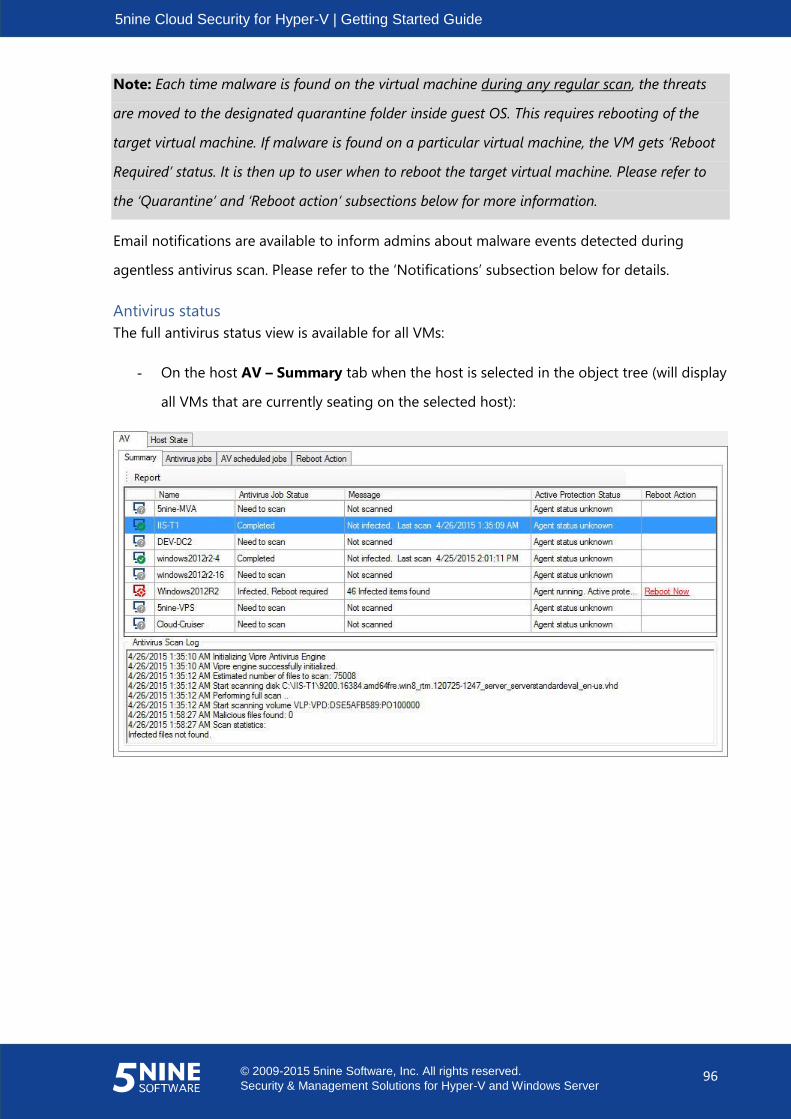
5nine Cloud Security for Hyper-V | Getting Started Guide
© 2009-2015 5nine Software, Inc. All rights reserved.
Security & Management Solutions for Hyper-V and Windows Server 96
Note: Each time malware is found on the virtual machine during any regular scan, the threats
are moved to the designated quarantine folder inside guest OS. This requires rebooting of the
target virtual machine. If malware is found on a particular virtual machine, the VM gets ‘Reboot
Required’ status. It is then up to user when to reboot the target virtual machine. Please refer to
the ‘Quarantine’ and ‘Reboot action’ subsections below for more information.
Email notifications are available to inform admins about malware events detected during
agentless antivirus scan. Please refer to the ‘Notifications’ subsection below for details.
Antivirus status
The full antivirus status view is available for all VMs:
- On the host AV – Summary tab when the host is selected in the object tree (will display
all VMs that are currently seating on the selected host):

5nine Cloud Security for Hyper-V | Getting Started Guide
© 2009-2015 5nine Software, Inc. All rights reserved.
Security & Management Solutions for Hyper-V and Windows Server 97
- In the Virtual Machine Status window. Use the View – Antivirus Status main menu
command to open this window (will display all VMs that are currently seating on the
selected host):
Here you can get the following information:
Last scan date and time.
VM name.
Antivirus job status.
Active protection status.
Message – last scan brief result (if it has ever occurred).
Signature.
From this window, using standard controls in the top menu, you can change page layout
settings, print the report, or export data to MS Word, MS Excel or PDF file formats.
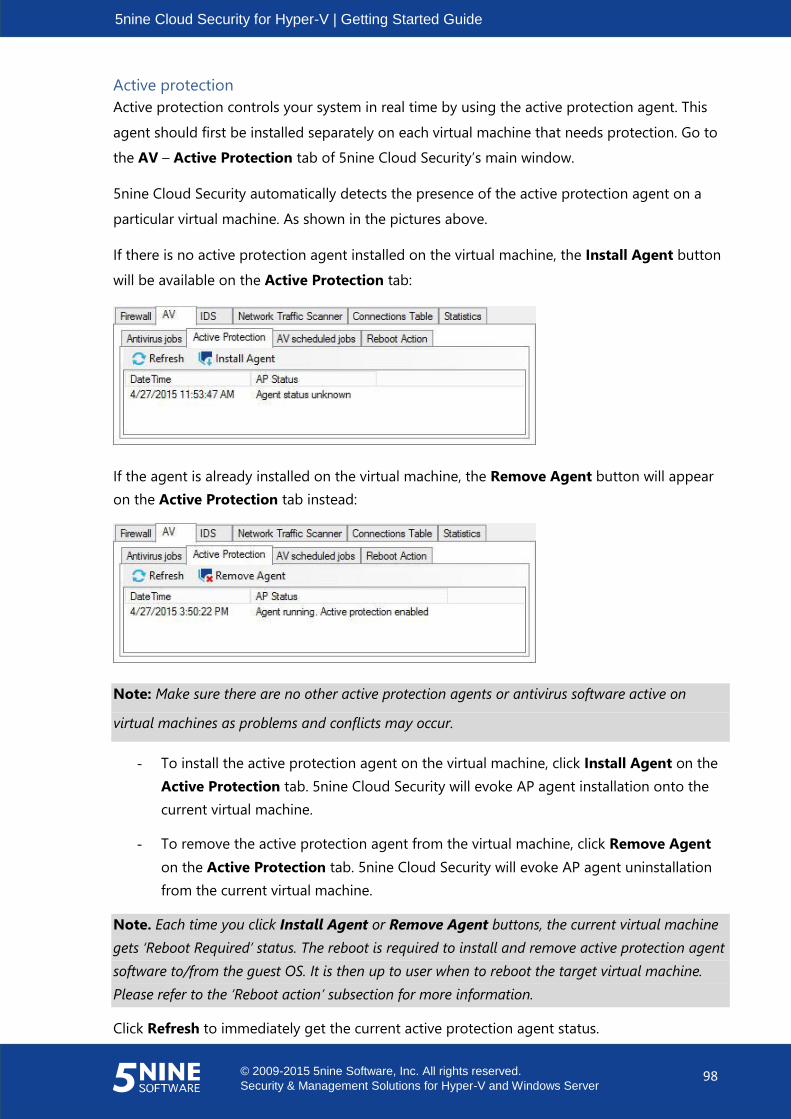
5nine Cloud Security for Hyper-V | Getting Started Guide
© 2009-2015 5nine Software, Inc. All rights reserved.
Security & Management Solutions for Hyper-V and Windows Server 98
Active protection
Active protection controls your system in real time by using the active protection agent. This
agent should first be installed separately on each virtual machine that needs protection. Go to
the AV – Active Protection tab of 5nine Cloud Security’s main window.
5nine Cloud Security automatically detects the presence of the active protection agent on a
particular virtual machine. As shown in the pictures above.
If there is no active protection agent installed on the virtual machine, the Install Agent button
will be available on the Active Protection tab:
If the agent is already installed on the virtual machine, the Remove Agent button will appear
on the Active Protection tab instead:
Note: Make sure there are no other active protection agents or antivirus software active on
virtual machines as problems and conflicts may occur.
- To install the active protection agent on the virtual machine, click Install Agent on the
Active Protection tab. 5nine Cloud Security will evoke AP agent installation onto the
current virtual machine.
- To remove the active protection agent from the virtual machine, click Remove Agent
on the Active Protection tab. 5nine Cloud Security will evoke AP agent uninstallation
from the current virtual machine.
Note. Each time you click Install Agent or Remove Agent buttons, the current virtual machine
gets ‘Reboot Required’ status. The reboot is required to install and remove active protection agent
software to/from the guest OS. It is then up to user when to reboot the target virtual machine.
Please refer to the ‘Reboot action’ subsection for more information.
Click Refresh to immediately get the current active protection agent status.
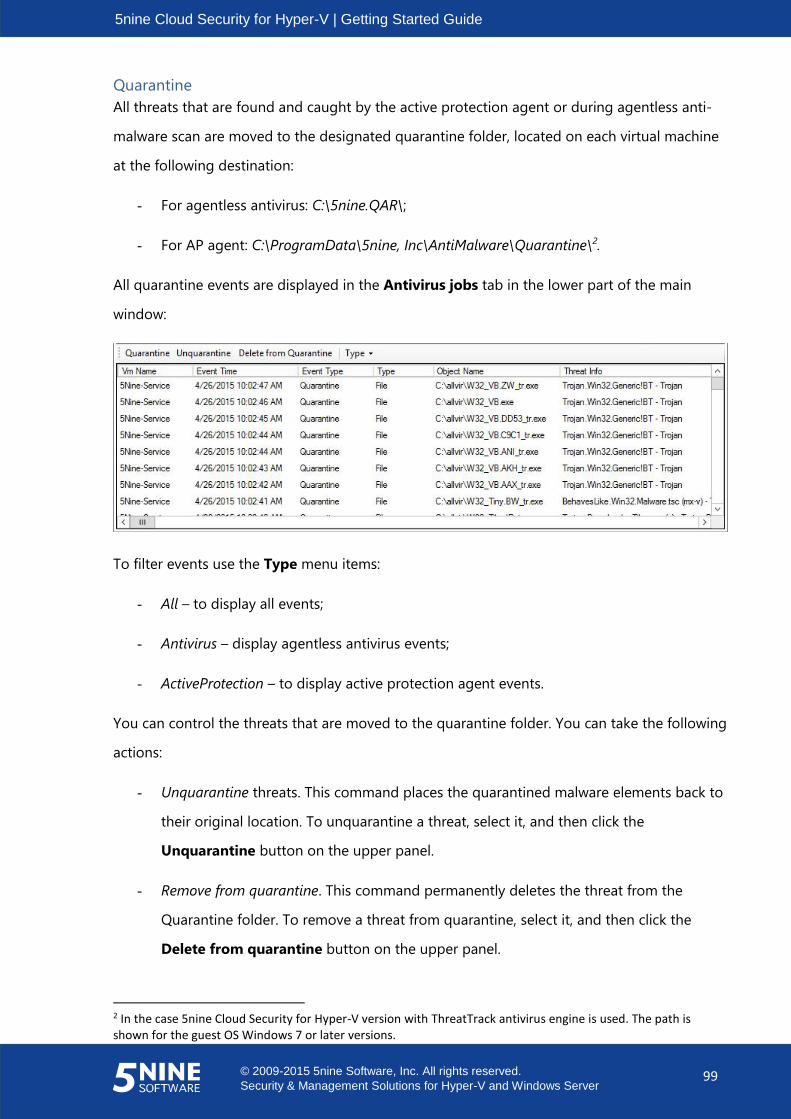
5nine Cloud Security for Hyper-V | Getting Started Guide
© 2009-2015 5nine Software, Inc. All rights reserved.
Security & Management Solutions for Hyper-V and Windows Server 99
Quarantine
All threats that are found and caught by the active protection agent or during agentless anti-
malware scan are moved to the designated quarantine folder, located on each virtual machine
at the following destination:
- For agentless antivirus: C:\5nine.QAR\;
- For AP agent: C:\ProgramData\5nine, Inc\AntiMalware\Quarantine\2.
All quarantine events are displayed in the Antivirus jobs tab in the lower part of the main
window:
To filter events use the Type menu items:
- All – to display all events;
- Antivirus – display agentless antivirus events;
- ActiveProtection – to display active protection agent events.
You can control the threats that are moved to the quarantine folder. You can take the following
actions:
- Unquarantine threats. This command places the quarantined malware elements back to
their original location. To unquarantine a threat, select it, and then click the
Unquarantine button on the upper panel.
- Remove from quarantine. This command permanently deletes the threat from the
Quarantine folder. To remove a threat from quarantine, select it, and then click the
Delete from quarantine button on the upper panel.
2 In the case 5nine Cloud Security for Hyper-V version with ThreatTrack antivirus engine is used. The path is shown for the guest OS Windows 7 or later versions.
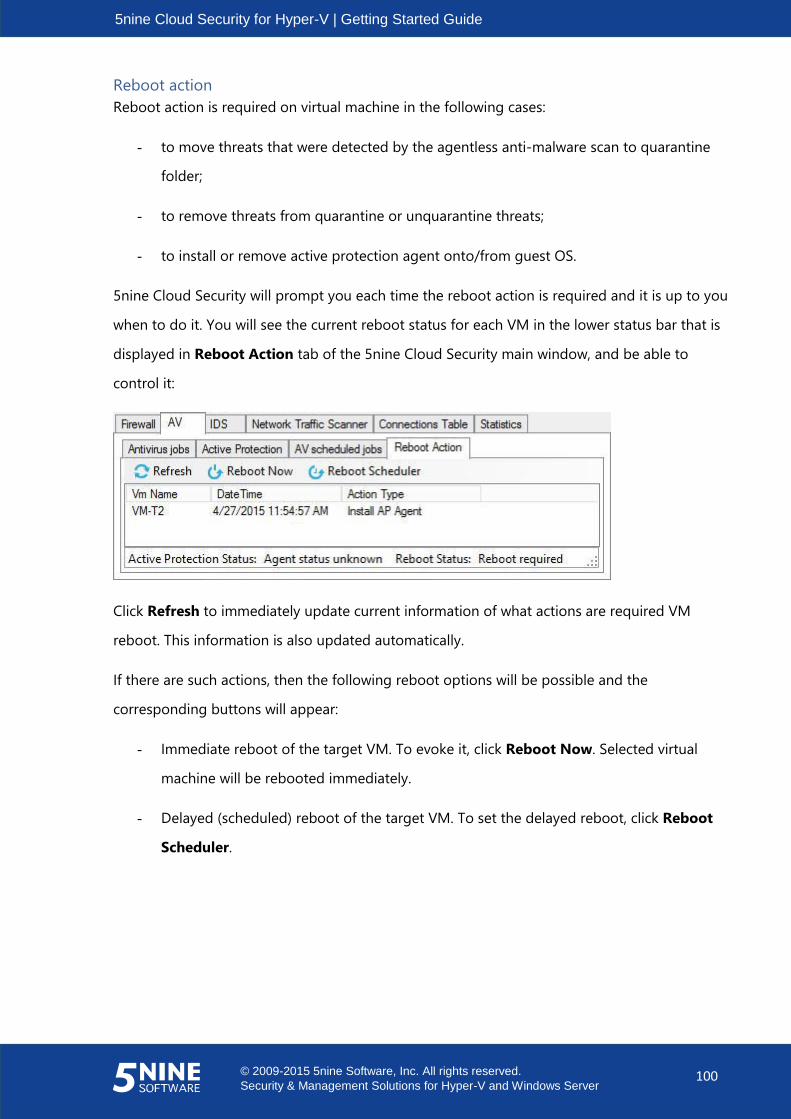
5nine Cloud Security for Hyper-V | Getting Started Guide
© 2009-2015 5nine Software, Inc. All rights reserved.
Security & Management Solutions for Hyper-V and Windows Server 100
Reboot action
Reboot action is required on virtual machine in the following cases:
- to move threats that were detected by the agentless anti-malware scan to quarantine
folder;
- to remove threats from quarantine or unquarantine threats;
- to install or remove active protection agent onto/from guest OS.
5nine Cloud Security will prompt you each time the reboot action is required and it is up to you
when to do it. You will see the current reboot status for each VM in the lower status bar that is
displayed in Reboot Action tab of the 5nine Cloud Security main window, and be able to
control it:
Click Refresh to immediately update current information of what actions are required VM
reboot. This information is also updated automatically.
If there are such actions, then the following reboot options will be possible and the
corresponding buttons will appear:
- Immediate reboot of the target VM. To evoke it, click Reboot Now. Selected virtual
machine will be rebooted immediately.
- Delayed (scheduled) reboot of the target VM. To set the delayed reboot, click Reboot
Scheduler.

5nine Cloud Security for Hyper-V | Getting Started Guide
© 2009-2015 5nine Software, Inc. All rights reserved.
Security & Management Solutions for Hyper-V and Windows Server 101
Then set the date and time when you would like the target VM to be rebooted and click
OK in the Reboot Scheduler dialog:
The selected virtual machine will be rebooted automatically at this time.
IDS
The Intrusion Detection System (IDS) allows detection3 of intrusion attacks, review of the event
log and setting the blocking virtual firewall rule on the suspicious IP address.
Enable IDS
IDS feature is disabled on all virtual machines by default. To enable IDS on the virtual machines,
open the IDS Settings dialog window using the Settings – IDS main menu command:
On the Enable IDS tab check the boxes against the VMs on which IDS should be enabled. Type
the symbols which a VM name must contain into the Filter field to filter the tree. Those VMs
3 Detection of intrusion attacks is done through free IDS – Snort ® – third-party freely distributed application that is able to determine whether certain inbound traffic is considered as an intrusion.
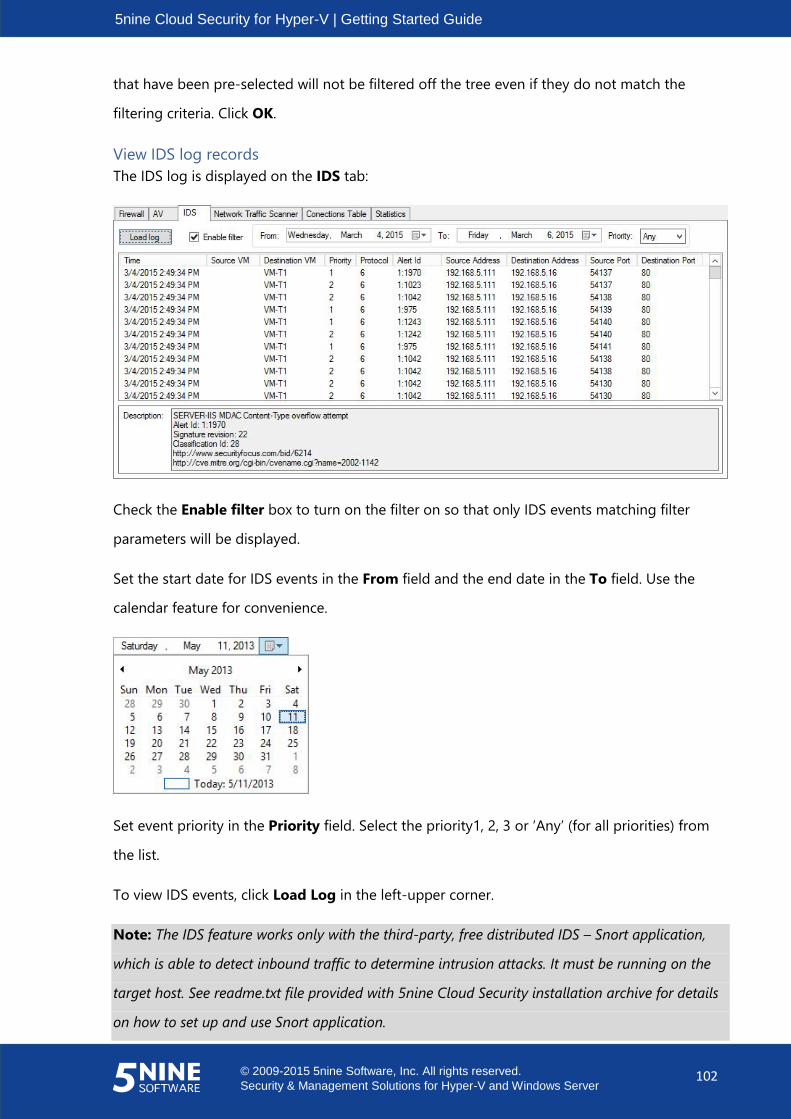
5nine Cloud Security for Hyper-V | Getting Started Guide
© 2009-2015 5nine Software, Inc. All rights reserved.
Security & Management Solutions for Hyper-V and Windows Server 102
that have been pre-selected will not be filtered off the tree even if they do not match the
filtering criteria. Click OK.
View IDS log records
The IDS log is displayed on the IDS tab:
Check the Enable filter box to turn on the filter on so that only IDS events matching filter
parameters will be displayed.
Set the start date for IDS events in the From field and the end date in the To field. Use the
calendar feature for convenience.
Set event priority in the Priority field. Select the priority1, 2, 3 or ‘Any’ (for all priorities) from
the list.
To view IDS events, click Load Log in the left-upper corner.
Note: The IDS feature works only with the third-party, free distributed IDS – Snort application,
which is able to detect inbound traffic to determine intrusion attacks. It must be running on the
target host. See readme.txt file provided with 5nine Cloud Security installation archive for details
on how to set up and use Snort application.
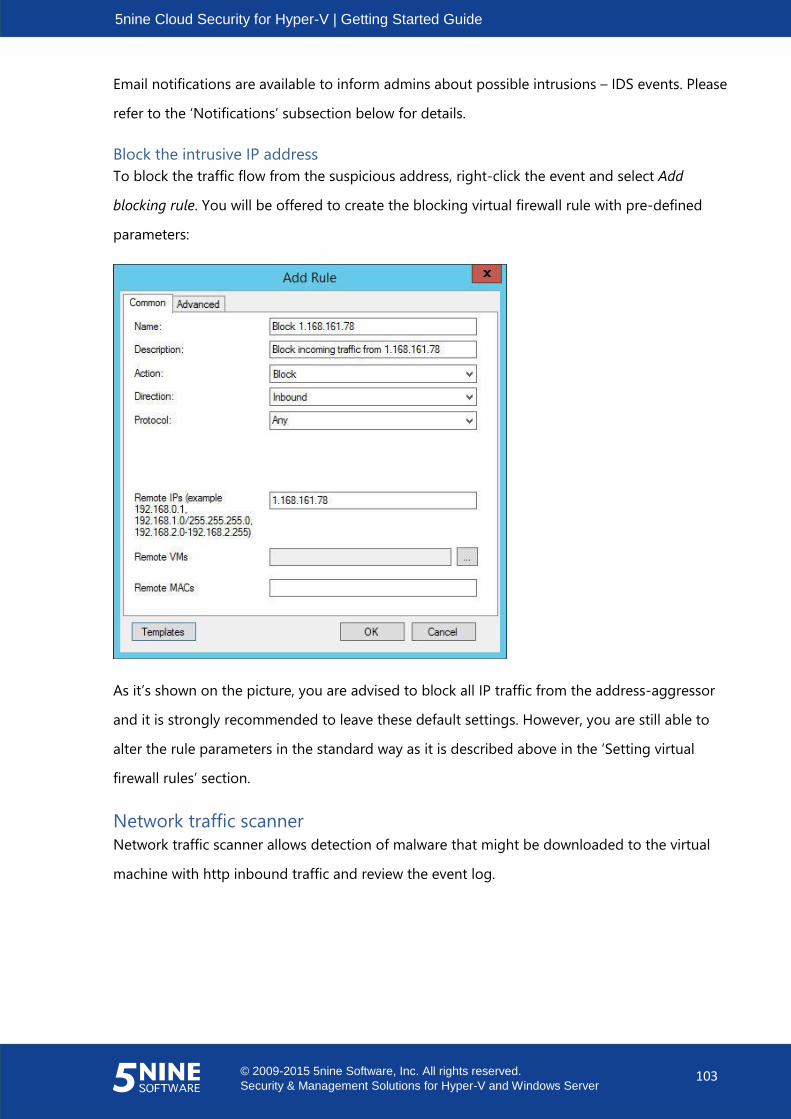
5nine Cloud Security for Hyper-V | Getting Started Guide
© 2009-2015 5nine Software, Inc. All rights reserved.
Security & Management Solutions for Hyper-V and Windows Server 103
Email notifications are available to inform admins about possible intrusions – IDS events. Please
refer to the ‘Notifications’ subsection below for details.
Block the intrusive IP address
To block the traffic flow from the suspicious address, right-click the event and select Add
blocking rule. You will be offered to create the blocking virtual firewall rule with pre-defined
parameters:
As it’s shown on the picture, you are advised to block all IP traffic from the address-aggressor
and it is strongly recommended to leave these default settings. However, you are still able to
alter the rule parameters in the standard way as it is described above in the ‘Setting virtual
firewall rules’ section.
Network traffic scanner
Network traffic scanner allows detection of malware that might be downloaded to the virtual
machine with http inbound traffic and review the event log.
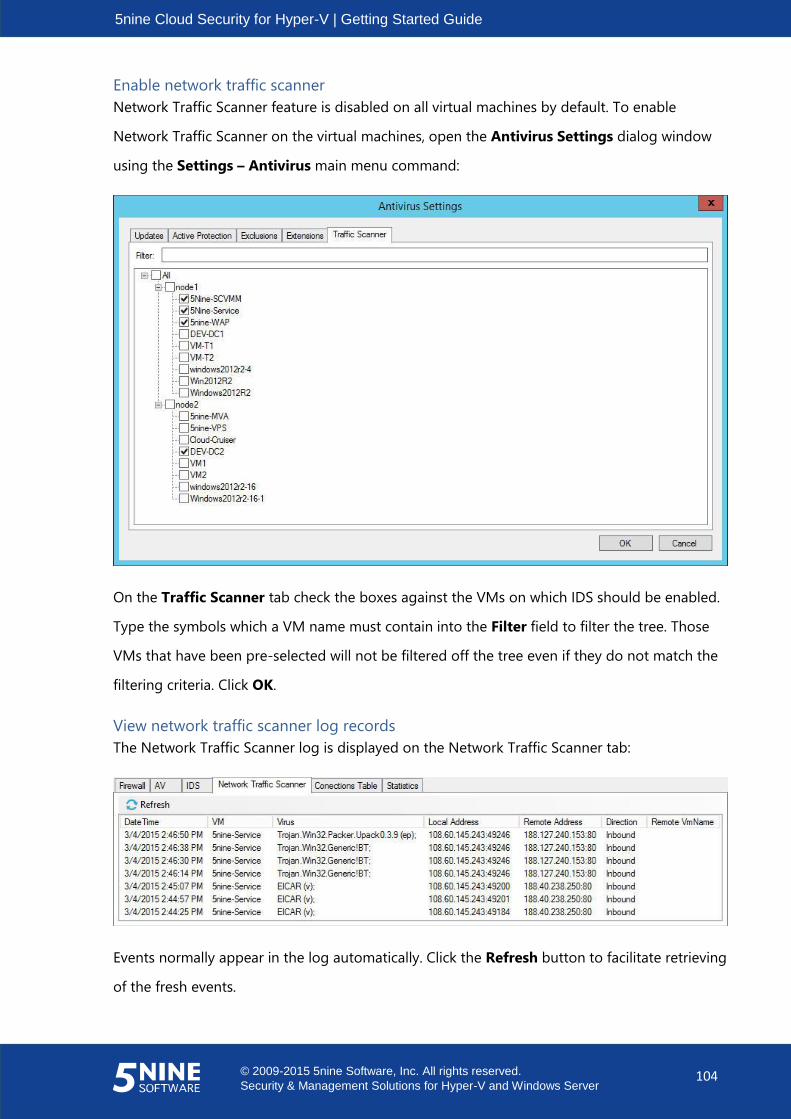
5nine Cloud Security for Hyper-V | Getting Started Guide
© 2009-2015 5nine Software, Inc. All rights reserved.
Security & Management Solutions for Hyper-V and Windows Server 104
Enable network traffic scanner
Network Traffic Scanner feature is disabled on all virtual machines by default. To enable
Network Traffic Scanner on the virtual machines, open the Antivirus Settings dialog window
using the Settings – Antivirus main menu command:
On the Traffic Scanner tab check the boxes against the VMs on which IDS should be enabled.
Type the symbols which a VM name must contain into the Filter field to filter the tree. Those
VMs that have been pre-selected will not be filtered off the tree even if they do not match the
filtering criteria. Click OK.
View network traffic scanner log records
The Network Traffic Scanner log is displayed on the Network Traffic Scanner tab:
Events normally appear in the log automatically. Click the Refresh button to facilitate retrieving
of the fresh events.

5nine Cloud Security for Hyper-V | Getting Started Guide
© 2009-2015 5nine Software, Inc. All rights reserved.
Security & Management Solutions for Hyper-V and Windows Server 105
Email notifications are available to inform admins about http malware events. Please refer to
the ‘Notifications’ subsection below for details.
Connections table
The list of current connections is displayed for each virtual machine (the virtual firewall must be
turned on):
Click the Update button to get the current connections list for the selected virtual machine.
You can set certain connection parameters to filter the list in the way you want it to be
displayed, e.g. to find the exact TCP session in the connections table. Set the connection
parameters you need to see and click the Update button:
The connections table will be filtered.
Note. In the current version of 5nine Cloud Security for Hyper-V the connections table feature
can be used in observation mode only.
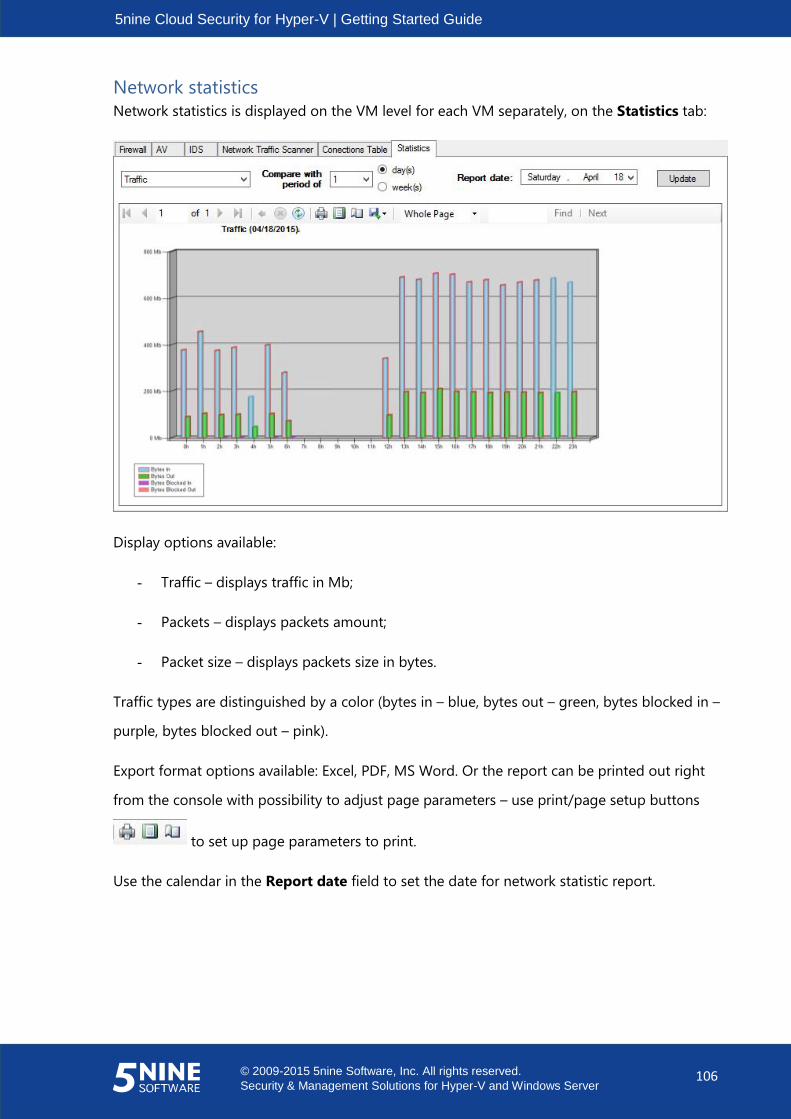
5nine Cloud Security for Hyper-V | Getting Started Guide
© 2009-2015 5nine Software, Inc. All rights reserved.
Security & Management Solutions for Hyper-V and Windows Server 106
Network statistics
Network statistics is displayed on the VM level for each VM separately, on the Statistics tab:
Display options available:
- Traffic – displays traffic in Mb;
- Packets – displays packets amount;
- Packet size – displays packets size in bytes.
Traffic types are distinguished by a color (bytes in – blue, bytes out – green, bytes blocked in –
purple, bytes blocked out – pink).
Export format options available: Excel, PDF, MS Word. Or the report can be printed out right
from the console with possibility to adjust page parameters – use print/page setup buttons
to set up page parameters to print.
Use the calendar in the Report date field to set the date for network statistic report.
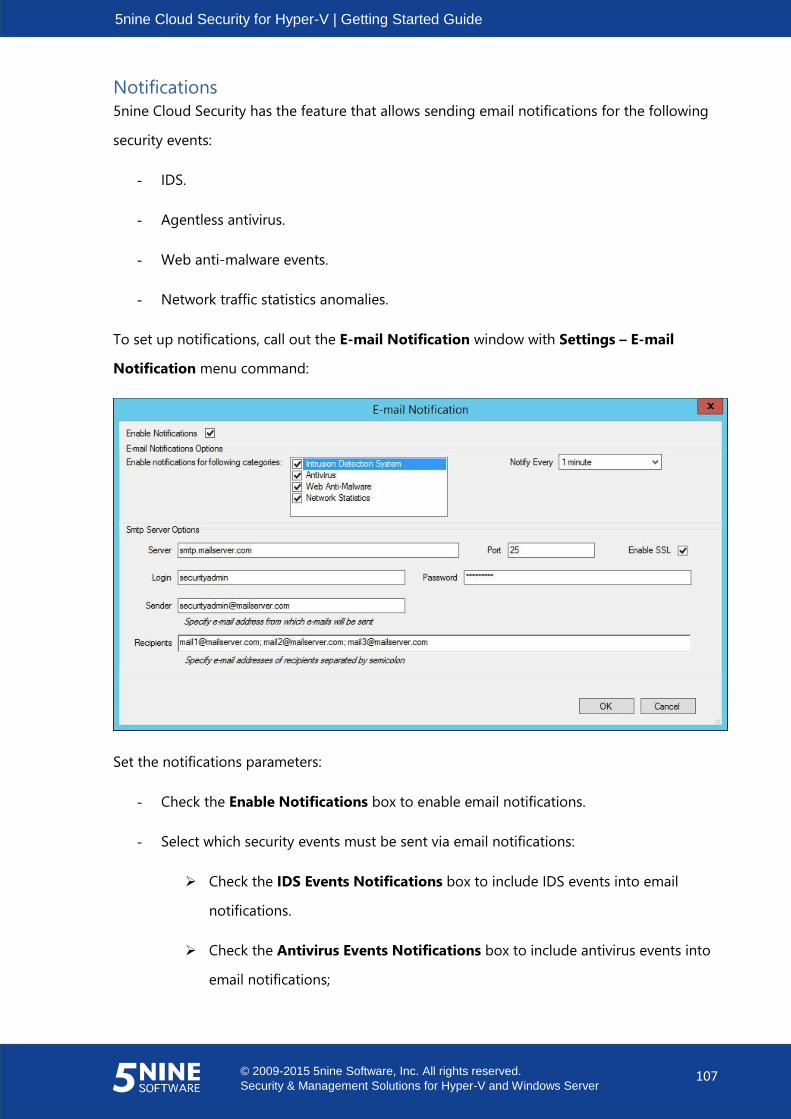
5nine Cloud Security for Hyper-V | Getting Started Guide
© 2009-2015 5nine Software, Inc. All rights reserved.
Security & Management Solutions for Hyper-V and Windows Server 107
Notifications
5nine Cloud Security has the feature that allows sending email notifications for the following
security events:
- IDS.
- Agentless antivirus.
- Web anti-malware events.
- Network traffic statistics anomalies.
To set up notifications, call out the E-mail Notification window with Settings – E-mail
Notification menu command:
Set the notifications parameters:
- Check the Enable Notifications box to enable email notifications.
- Select which security events must be sent via email notifications:
Check the IDS Events Notifications box to include IDS events into email
notifications.
Check the Antivirus Events Notifications box to include antivirus events into
email notifications;
5nine Cloud Security for Hyper-V | Getting Started Guide
© 2009-2015 5nine Software, Inc. All rights reserved.
Security & Management Solutions for Hyper-V and Windows Server 108
Check the Web Anti-Malware Events box to include inbound http traffic events
into email notifications;
Check the Network Statistics box to include network statistics anomalies into
email notifications. 5nine Cloud Security automatically analyzes network
statistics on monitored VMs for the period of last week, then splits the data for
the last day by hours and sends notifications if the traffic skew factor is equal to
or greater than 1.4. The following parameters are measured: the amount of
traffic, packet size, the number of packets. Notification shows virtual machine
with detected traffic anomaly and the hour of the day during which this anomaly
had been detected.
- Set the notification period (select value between 1min – 24 hours from the list). The
default value is 1 minute.
- Specify the SMTP server address and port.
- Check the Enable SSL box in the case SSL authentication is required to access the SMTP
server. Then set the login and password for the user (SMTP administrator).
- Specify the sender’s email address.
- Specify the recipients’ email addresses separated by semicolon.
Click OK to save the settings and close the E-Mail Notification window.

5nine Cloud Security for Hyper-V | Getting Started Guide
© 2009-2015 5nine Software, Inc. All rights reserved.
Security & Management Solutions for Hyper-V and Windows Server 109
Syslog server integration
5nine Cloud Security supports integration with external Syslog server. To let virtual firewall, IDS,
agentless antivirus and active protection events be sent to an external Syslog server, call out
the Syslog Server Settings dialog box with Settings – Syslog menu command, enable syslog
server logging and set the IP address where it’s running:
- Enable syslog server logging to turn this option on.
- Enable RFC5424 header if necessary4.
- Type the syslog server IP address.
4 Some external syslog servers require RFC5424 standard header support (e.g., Splunk ® syslog server), whereas the others do not (e.g., SolarWinds ® syslog server) and won’t function if this option is enabled. Contact your system administrator to determine if your external syslog server requires RFC5424 header support!
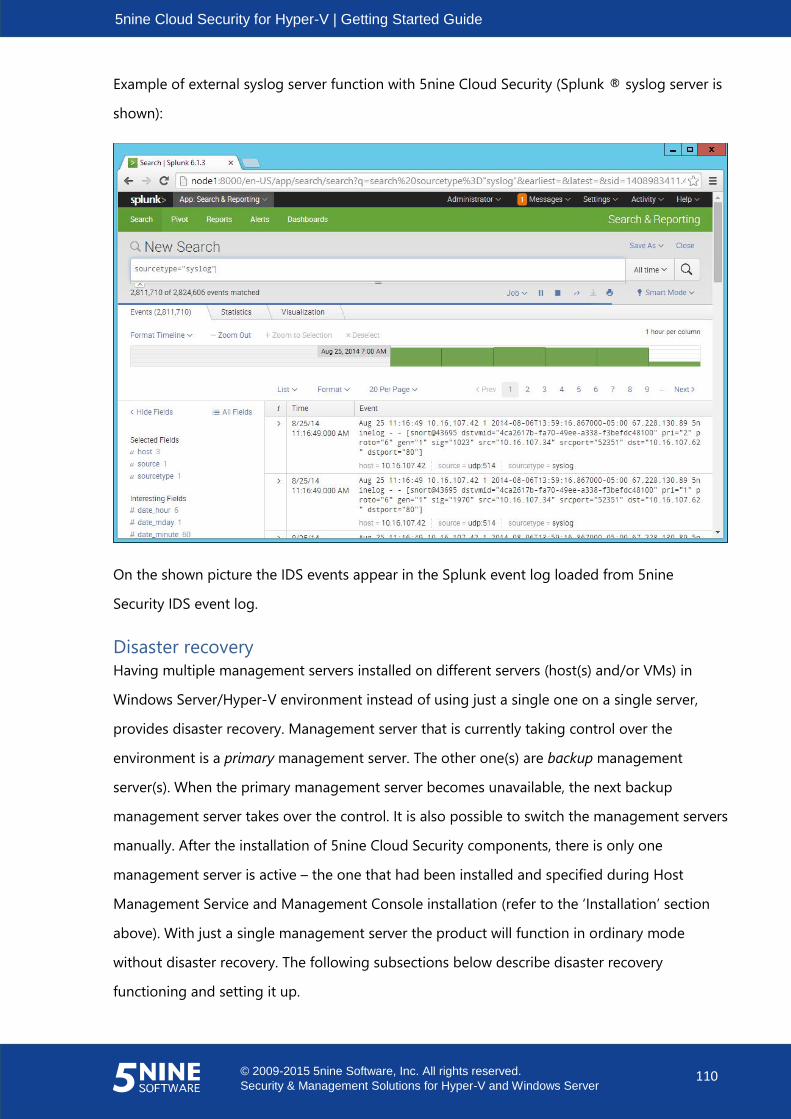
5nine Cloud Security for Hyper-V | Getting Started Guide
© 2009-2015 5nine Software, Inc. All rights reserved.
Security & Management Solutions for Hyper-V and Windows Server 110
Example of external syslog server function with 5nine Cloud Security (Splunk ® syslog server is
shown):
On the shown picture the IDS events appear in the Splunk event log loaded from 5nine
Security IDS event log.
Disaster recovery
Having multiple management servers installed on different servers (host(s) and/or VMs) in
Windows Server/Hyper-V environment instead of using just a single one on a single server,
provides disaster recovery. Management server that is currently taking control over the
environment is a primary management server. The other one(s) are backup management
server(s). When the primary management server becomes unavailable, the next backup
management server takes over the control. It is also possible to switch the management servers
manually. After the installation of 5nine Cloud Security components, there is only one
management server is active – the one that had been installed and specified during Host
Management Service and Management Console installation (refer to the ‘Installation’ section
above). With just a single management server the product will function in ordinary mode
without disaster recovery. The following subsections below describe disaster recovery
functioning and setting it up.
5nine Cloud Security for Hyper-V | Getting Started Guide
© 2009-2015 5nine Software, Inc. All rights reserved.
Security & Management Solutions for Hyper-V and Windows Server 111
Disaster recovery functioning
Multiple management servers running management service instances are connected to own
separate data source each, having separate database vFirewall.
Management servers exchange and replicate the following data:
- Managed Hyper-V hosts list and settings.
- Virtual firewall rules and VMs’ monitoring statuses.
- Antivirus and active protection settings and VMs’ antivirus statuses (for scheduled
scans).
- Global security groups and tenants.
- Syslog server integration settings.
- Notifications settings.
- VM connections table (the feature is not replicated but works independently from
management server and VM connections are displayed similarly no matter which
management server is currently taking control).
- Management servers list itself.
These data are replicated in the real time from any of the management servers, to which
management console is connected when applying the changes, no matter whether it is a
primary or a backup one.
Management servers do not exchange the following data:
- Virtual Firewall and IDS log records.
- Antivirus and Active protection (including quarantine) log records.
- User’s actions.
These data remain at the management server at which they had been recorded. The next one
simply takes the log recording over from the moment it becomes the primary management
server and stops recording when the other one takes the control next.
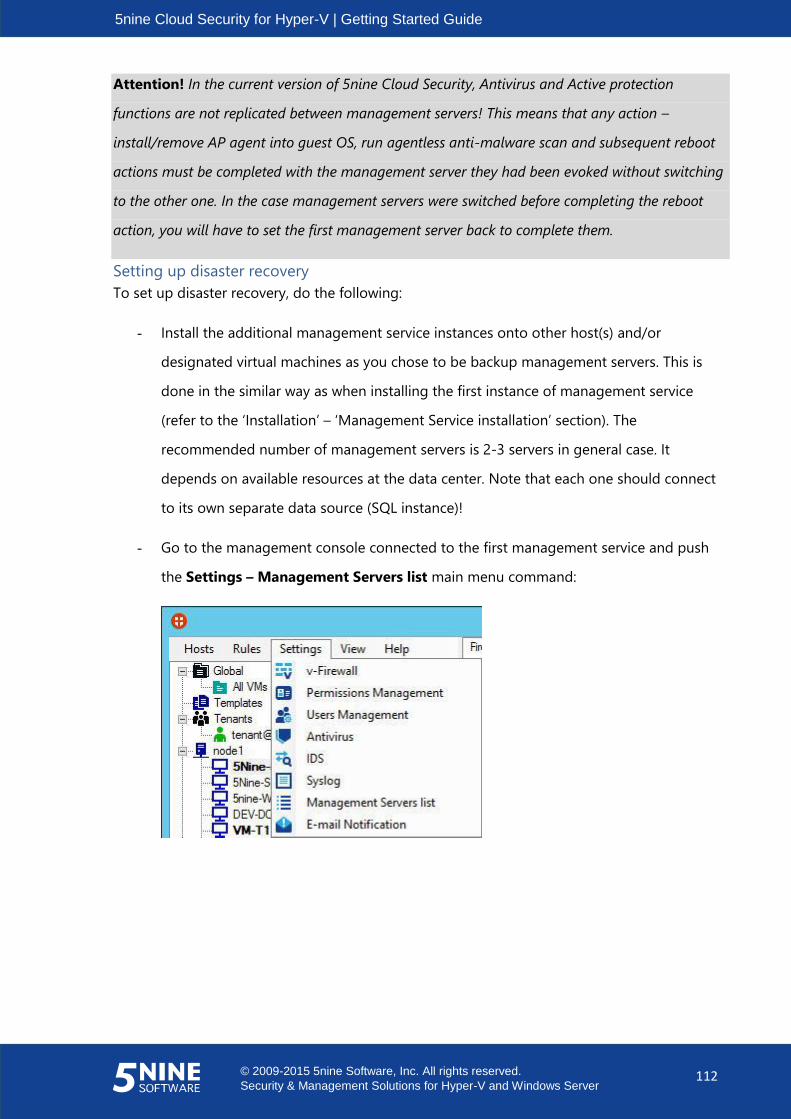
5nine Cloud Security for Hyper-V | Getting Started Guide
© 2009-2015 5nine Software, Inc. All rights reserved.
Security & Management Solutions for Hyper-V and Windows Server 112
Attention! In the current version of 5nine Cloud Security, Antivirus and Active protection
functions are not replicated between management servers! This means that any action –
install/remove AP agent into guest OS, run agentless anti-malware scan and subsequent reboot
actions must be completed with the management server they had been evoked without switching
to the other one. In the case management servers were switched before completing the reboot
action, you will have to set the first management server back to complete them.
Setting up disaster recovery
To set up disaster recovery, do the following:
- Install the additional management service instances onto other host(s) and/or
designated virtual machines as you chose to be backup management servers. This is
done in the similar way as when installing the first instance of management service
(refer to the ‘Installation’ – ‘Management Service installation’ section). The
recommended number of management servers is 2-3 servers in general case. It
depends on available resources at the data center. Note that each one should connect
to its own separate data source (SQL instance)!
- Go to the management console connected to the first management service and push
the Settings – Management Servers list main menu command:

5nine Cloud Security for Hyper-V | Getting Started Guide
© 2009-2015 5nine Software, Inc. All rights reserved.
Security & Management Solutions for Hyper-V and Windows Server 113
- In the Management Servers list dialog box edit the management servers list:
Click the Add button to add another management server to the list:
Type the hostname, FQDN or IP address of the management server and click
OK.
Select the management server and click the Move Up button to bring the target
server to the one position up. The top one will become the primary
management server and will immediately take over the control. The second one
will take over the control if the top one becomes unavailable, etc.
Select the management server and click the Move Down button to bring the
target server to the one position down.
Select the management server and click the Remove button to remove it from
the list
Click OK in the Management Servers list dialog box to complete the disaster recovery
setup operation.
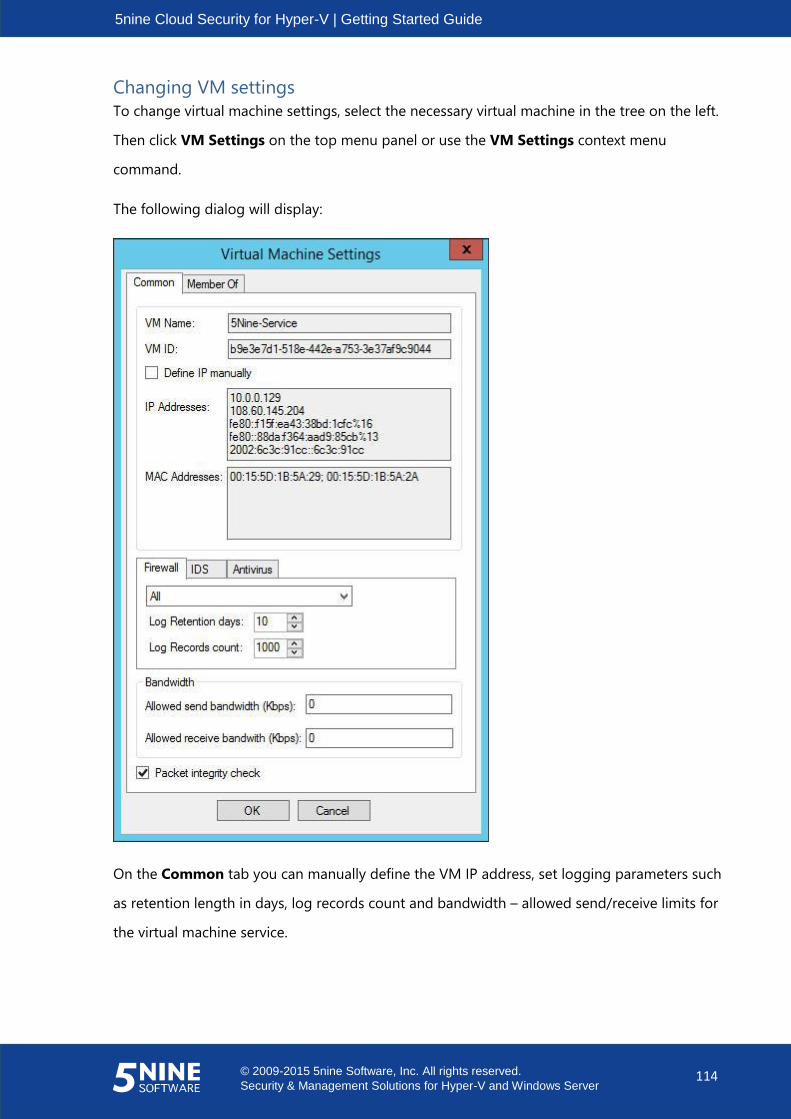
5nine Cloud Security for Hyper-V | Getting Started Guide
© 2009-2015 5nine Software, Inc. All rights reserved.
Security & Management Solutions for Hyper-V and Windows Server 114
Changing VM settings
To change virtual machine settings, select the necessary virtual machine in the tree on the left.
Then click VM Settings on the top menu panel or use the VM Settings context menu
command.
The following dialog will display:
On the Common tab you can manually define the VM IP address, set logging parameters such
as retention length in days, log records count and bandwidth – allowed send/receive limits for
the virtual machine service.
5nine Cloud Security for Hyper-V | Getting Started Guide
© 2009-2015 5nine Software, Inc. All rights reserved.
Security & Management Solutions for Hyper-V and Windows Server 115
The VM Name field displays the virtual machine name. The VM ID field displays the virtual
machine ID – this parameter will be needed for authorization in the case virtual firewall rules
with authorization are used (please refer to the ‘5nine Cloud Security operations’ – ‘Setting
virtual firewall rules’ – ‘Authorization’ section for detailed information).
Check Define IP manual box to detect the VM IP address for 5nine Cloud Security manually. In
most cases you don’t have to do this, because normally the IP address is detected
automatically by 5nine Cloud Security. However, there are certain situations when this option is
needed, such as with non-Windows OS based VMs, when 5nine Cloud Security is unable to
automatically detect VM IP configuration. In the cases like this it is necessary to manually
determine IP address so that Virtual Firewall rules work for this kind of virtual machines.
Enter a single IP v4 or IP v6 IP address (as applicable), which are assigned to the VM, in the
IP Addresses field – only single value is accepted. If 5nine Cloud Security gets the IP addresses
from the VM IP network settings automatically, you will see them in this field when this dialog
box opens – there is no need to define them manually in this case.
Note: The IP address that is set here manually does not affect actual IP settings on a virtual
machine. It is only used by 5nine Cloud Security to analyze the virtual machine traffic and
properly apply virtual firewall rules in the case it is unable to automatically detect it.
Set virtual firewall logging parameters on the Firewall tab:
- Select the logging level from the list.
Filtered – only filtered VM events will be recorded to the log.
Allowed – only allowed VM events will be recorded to the log.
All (default) – all VM events except SPI packets will be recorded to the log.
No Logging – neither of the VM events will be recorded to the log.
Allowed and SPI – allowed VM events and allowed SPI packets will be recorded
to the log.
All and SPI – all VM events including SPI packets will be recorded to the log. It is
the maximal logging level.
- Enter the number of days to keep the log records in the Log Retention days field.

5nine Cloud Security for Hyper-V | Getting Started Guide
© 2009-2015 5nine Software, Inc. All rights reserved.
Security & Management Solutions for Hyper-V and Windows Server 116
- Enter the maximum number of records that will be added to the log in the Log Records
count field.
Set the log size and retention for the IDS logs on the IDS tab in the same way.
Set the log size and retention for the antivirus logs on the Antivirus tab:
Set bandwidths allowed send/receive limits:
- Enter the maximum (in Kbps) allowed send bandwidth limit in the Allowed send
bandwidth (Kbps) field.
- Enter the maximum (in Kbps) allowed receive bandwidth limit in the Allowed receive
bandwidth (Kbps) field.
Tick the Packet integrity check box to enable CRC check in the packets towards the VM. If this
option is enabled, any traffic allowed by any rule for this virtual machine will be put to CRC
check. If the sum is incorrect or corrupted the packet will be dropped. Some network devices
might not be compatible with this option and therefore normal traffic will be blocked if CRC
check is enabled. In such cases it is recommended to leave this option disabled.
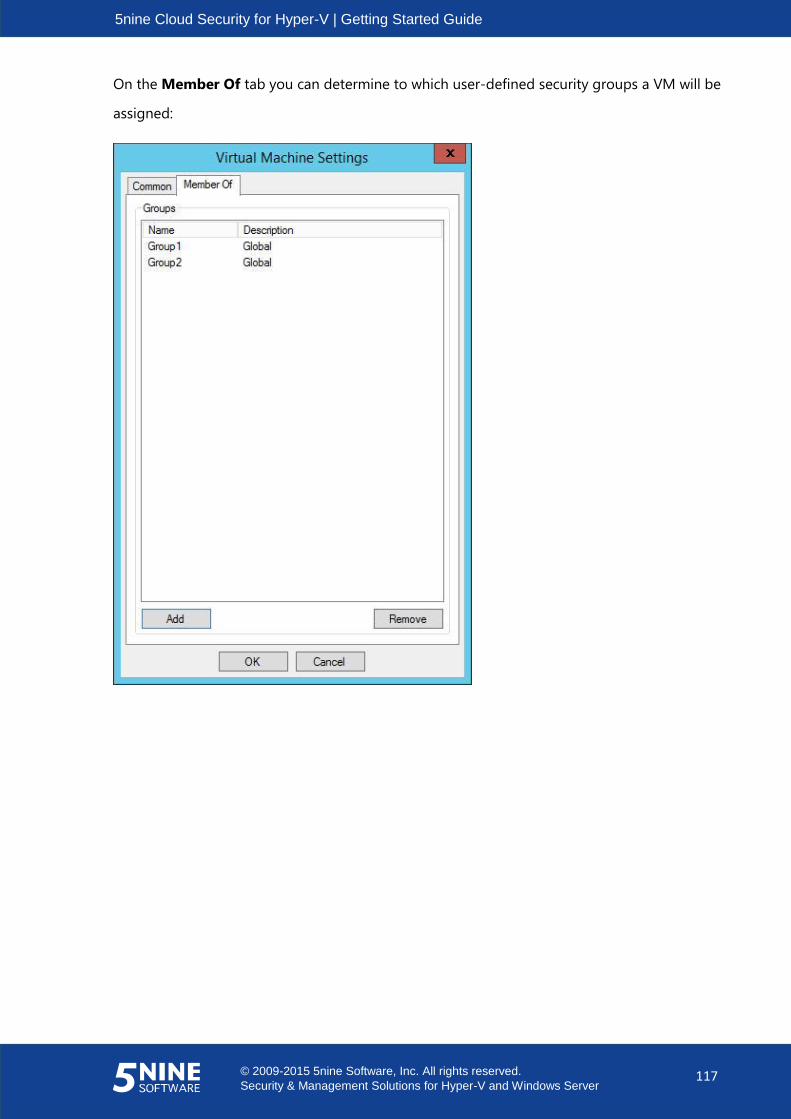
5nine Cloud Security for Hyper-V | Getting Started Guide
© 2009-2015 5nine Software, Inc. All rights reserved.
Security & Management Solutions for Hyper-V and Windows Server 117
On the Member Of tab you can determine to which user-defined security groups a VM will be
assigned:
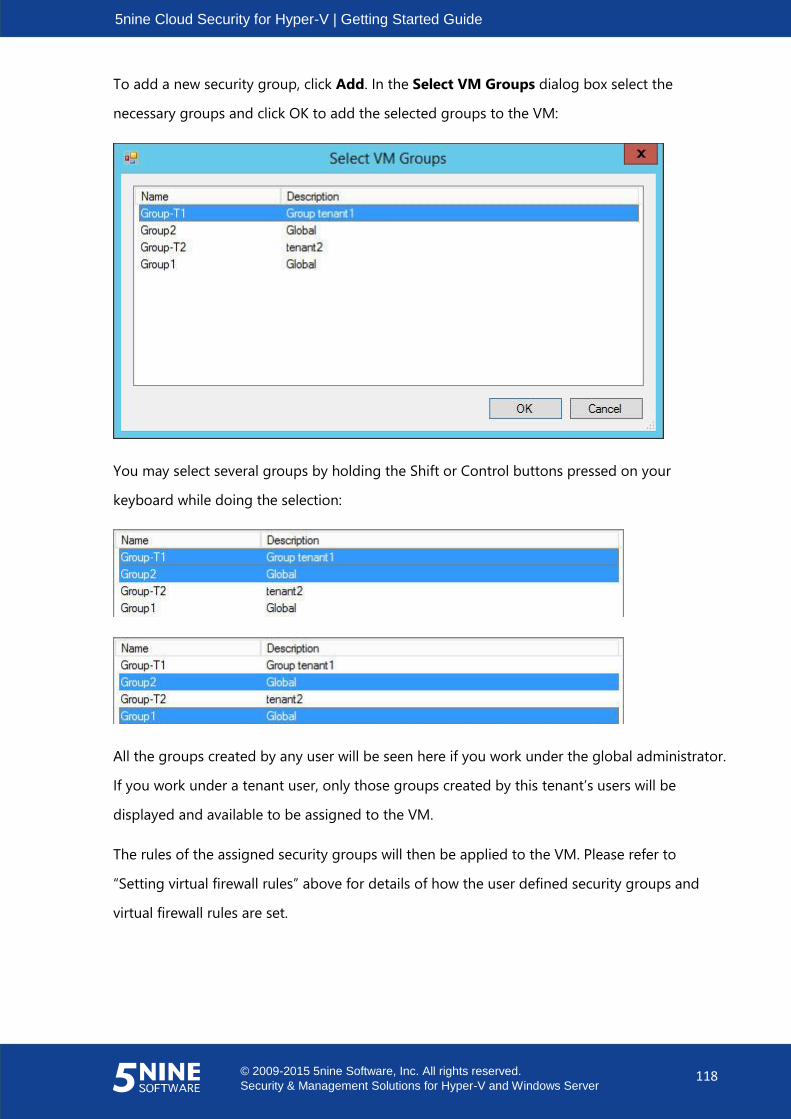
5nine Cloud Security for Hyper-V | Getting Started Guide
© 2009-2015 5nine Software, Inc. All rights reserved.
Security & Management Solutions for Hyper-V and Windows Server 118
To add a new security group, click Add. In the Select VM Groups dialog box select the
necessary groups and click OK to add the selected groups to the VM:
You may select several groups by holding the Shift or Control buttons pressed on your
keyboard while doing the selection:
All the groups created by any user will be seen here if you work under the global administrator.
If you work under a tenant user, only those groups created by this tenant’s users will be
displayed and available to be assigned to the VM.
The rules of the assigned security groups will then be applied to the VM. Please refer to
“Setting virtual firewall rules” above for details of how the user defined security groups and
virtual firewall rules are set.
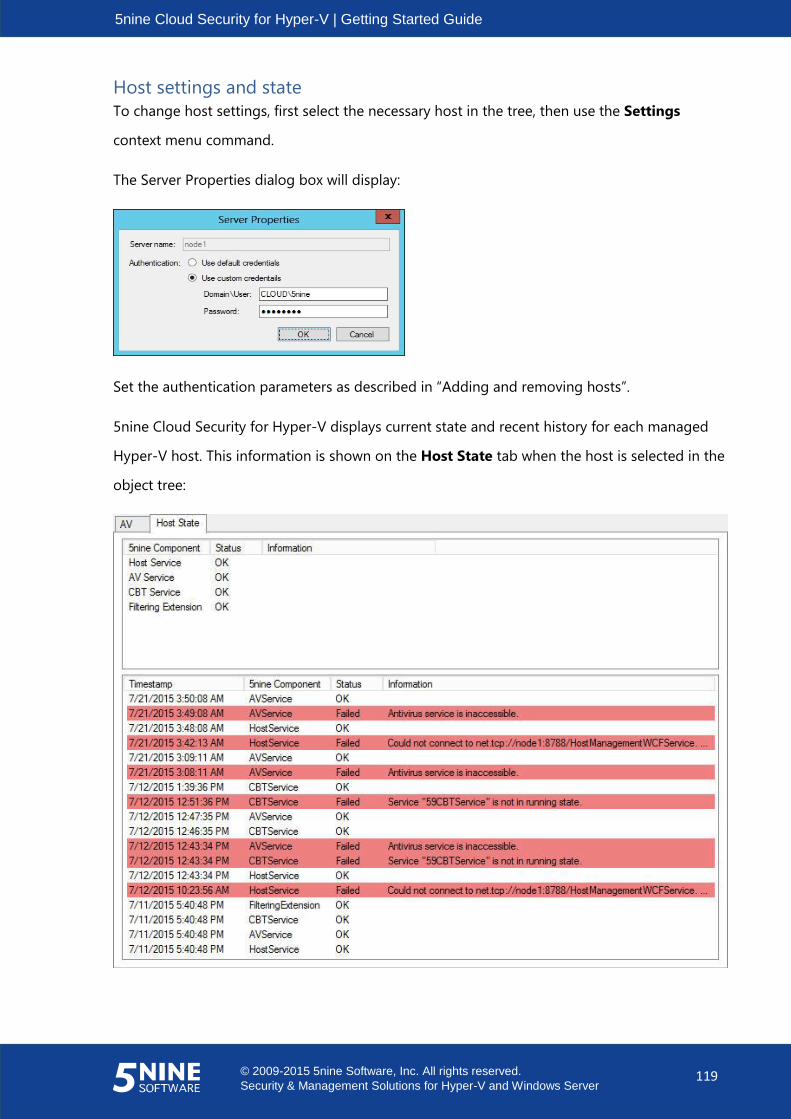
5nine Cloud Security for Hyper-V | Getting Started Guide
© 2009-2015 5nine Software, Inc. All rights reserved.
Security & Management Solutions for Hyper-V and Windows Server 119
Host settings and state
To change host settings, first select the necessary host in the tree, then use the Settings
context menu command.
The Server Properties dialog box will display:
Set the authentication parameters as described in “Adding and removing hosts”.
5nine Cloud Security for Hyper-V displays current state and recent history for each managed
Hyper-V host. This information is shown on the Host State tab when the host is selected in the
object tree:
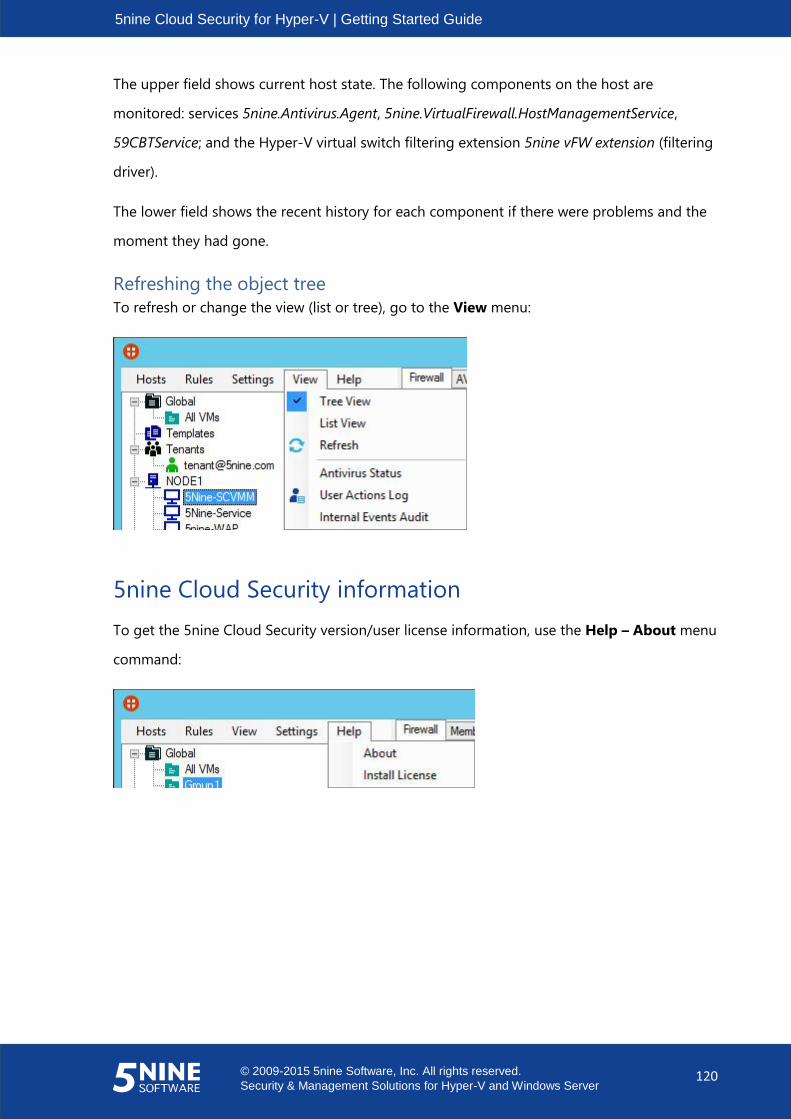
5nine Cloud Security for Hyper-V | Getting Started Guide
© 2009-2015 5nine Software, Inc. All rights reserved.
Security & Management Solutions for Hyper-V and Windows Server 120
The upper field shows current host state. The following components on the host are
monitored: services 5nine.Antivirus.Agent, 5nine.VirtualFirewall.HostManagementService,
59CBTService; and the Hyper-V virtual switch filtering extension 5nine vFW extension (filtering
driver).
The lower field shows the recent history for each component if there were problems and the
moment they had gone.
Refreshing the object tree
To refresh or change the view (list or tree), go to the View menu:
5nine Cloud Security information
To get the 5nine Cloud Security version/user license information, use the Help – About menu
command:

5nine Cloud Security for Hyper-V | Getting Started Guide
© 2009-2015 5nine Software, Inc. All rights reserved.
Security & Management Solutions for Hyper-V and Windows Server 121
The About 5nine Cloud Security for Hyper-V – Data Center window will show the 5nine
Cloud Security version info and the licensing information (also refer to ‘Licensing’ section
below):
Licensing
5nine Cloud Security has its licensing policy, which allows you to use it for the certain number
of virtual machines. If you need the greater number of virtual machines to be monitored and
protected by 5nine Cloud Security, you are always able to purchase additional licenses for the
required additional number of virtual machines. 5nine Cloud Security allows exceeding the
limited number of VMs by 20% (but not less than one VM) and prompts you when you exceed
the current license.
The license also has its expiration period. When it’s expired, Virtual Firewall will be turned off
automatically and scheduled antivirus will be disabled on those VMs that have been set on
Virtual Firewall and/or scheduled antivirus.
You can get information about currently and previously installed licenses’ installation and
expiration dates, total VMs amount allowed by the license and number of VMs currently in use
in the About 5nine Cloud Security for Hyper-V – Data Center window as described in ‘5nine
Cloud Security information’ section above.

5nine Cloud Security for Hyper-V | Getting Started Guide
© 2009-2015 5nine Software, Inc. All rights reserved.
Security & Management Solutions for Hyper-V and Windows Server 122
Call out the Licensing dialog with Help – Install License menu command to install the new
license:
Then, browse to the license .txt file or copy-paste/manually type the path to it and click OK.
Note. When updating the license in the environment with disaster recovery set, you will have to
install the new license onto each of management servers separately.
5nine Cloud Security for Hyper-V | Getting Started Guide
© 2009-2015 5nine Software, Inc. All rights reserved.
Security & Management Solutions for Hyper-V and Windows Server 123
Compatibility with the other 5nine products
5nine Cloud Security for Hyper-V is compatible with 5nine Manager for Hyper-V (version
without antivirus feature) and incompatible with 5nine Manager for Hyper-V PLUS (version with
antivirus feature). 5nine Cloud Security for Hyper-V uses the same services for antivirus feature
on managed hosts as 5nine Manager for Hyper-V PLUS – 5nine.Antivirus.Agent and
59CBTService. Services run into a conflict if they are managed by both products on the same
host. 5nine Cloud Security for Hyper-V Management Service and 5nine Manager for Hyper-V
PLUS Antivirus Management Service use the same program interface and also cannot be
placed on the same machine as they will run into a conflict resulting in a failure of the antivirus
feature. Therefore it is recommended to use 5nine Manager for Hyper-V without antivirus in
the environments that are protected by 5nine Cloud Security for Hyper-V, which will cover anti-
malware demands instead of 5nine Manager for Hyper-V PLUS. In the case there are separate
hosts in the data center that are not supposed to be managed by 5nine Cloud Security for
Hyper-V, it is possible to use 5nine Manager for Hyper-V PLUS on such hosts, but in this case
its antivirus management service shall not be placed on the same machine with 5nine Cloud
Security for Hyper-V management service.
5nine Cloud Security log files
5nine Cloud Security writes the following log files that are used to troubleshoot the product
and contains information of its activity:
Log file name Location Description
Management server file system
YYYY-MM-DD
ManagementServiceLog.txt
C:\ProgramData\5nine\5nine
Cloud Security for Hyper-
V\Logs\Management Service\
Contains information related to
central management service
activity
Starter.log
C:\Program Files\5nine\5nine
Cloud Security for Hyper-V
Management Service\Logs\
Contains information related to
recurrent agentless anti-
malware scans
Host/VM(s) file system where Management Console is installed
YYYY-MM-DD
ManagementConsoleLog.txt
C:\ProgramData\5nine\5nine
Cloud Security for Hyper-
V\Logs\Management Console\
Contains information related to
activity on management
console
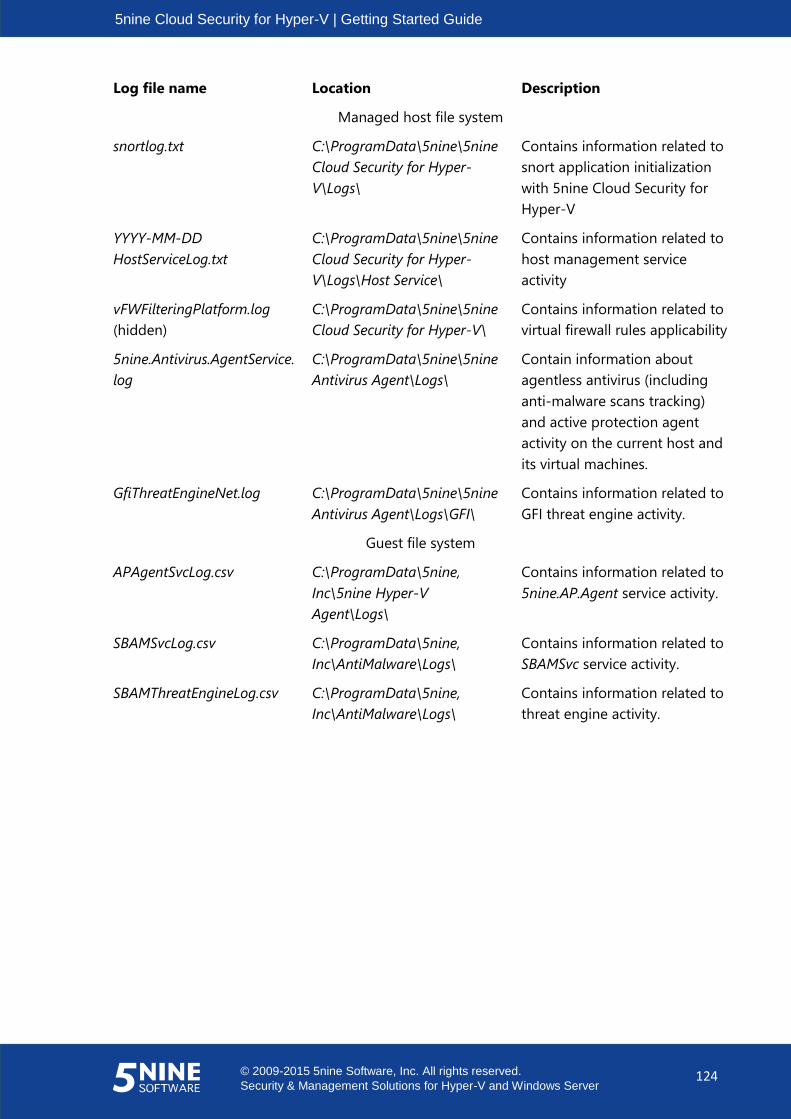
5nine Cloud Security for Hyper-V | Getting Started Guide
© 2009-2015 5nine Software, Inc. All rights reserved.
Security & Management Solutions for Hyper-V and Windows Server 124
Log file name Location Description
Managed host file system
snortlog.txt C:\ProgramData\5nine\5nine
Cloud Security for Hyper-
V\Logs\
Contains information related to
snort application initialization
with 5nine Cloud Security for
Hyper-V
YYYY-MM-DD
HostServiceLog.txt
C:\ProgramData\5nine\5nine
Cloud Security for Hyper-
V\Logs\Host Service\
Contains information related to
host management service
activity
vFWFilteringPlatform.log
(hidden)
C:\ProgramData\5nine\5nine
Cloud Security for Hyper-V\
Contains information related to
virtual firewall rules applicability
5nine.Antivirus.AgentService.
log
C:\ProgramData\5nine\5nine
Antivirus Agent\Logs\
Contain information about
agentless antivirus (including
anti-malware scans tracking)
and active protection agent
activity on the current host and
its virtual machines.
GfiThreatEngineNet.log C:\ProgramData\5nine\5nine
Antivirus Agent\Logs\GFI\
Contains information related to
GFI threat engine activity.
Guest file system
APAgentSvcLog.csv C:\ProgramData\5nine,
Inc\5nine Hyper-V
Agent\Logs\
Contains information related to
5nine.AP.Agent service activity.
SBAMSvcLog.csv C:\ProgramData\5nine,
Inc\AntiMalware\Logs\
Contains information related to
SBAMSvc service activity.
SBAMThreatEngineLog.csv C:\ProgramData\5nine,
Inc\AntiMalware\Logs\
Contains information related to
threat engine activity.
5nine Cloud Security for Hyper-V | Getting Started Guide
© 2009-2015 5nine Software, Inc. All rights reserved.
Security & Management Solutions for Hyper-V and Windows Server 125
5nine Cloud Security Network Manager Plugin
configuration
This section is only applicable to those environments that are running under Microsoft System
Center Virtual Machine Manager with enabled SCVMM-based logical switches where it is
necessary to get those switches to compliant state with 5nine Cloud Security for Hyper-V
filtering extension.
Upon installation of 5nine Cloud Security Network Manager Plugin, do the following actions on
your SCVMM server to complete 5nine Cloud Security for Hyper-V Network Manager Plugin
configuration:
1. Restart SCVMM service. Re-open SCVMM management console, make sure you do it
with administrative privileges (“Run as Administrator”).
2. Go to Settings – Configuration Providers. Check that "5nine Cloud Security Network
Management Provider" is present in configuration providers list.
3. Create Network Service in SCVMM:
Go to Fabric – Networking – Network Service – (right click) Add Network Service;
Name the network service (e.g. “Cloud Security Filtering Service”);
Select “5nine Software, Inc – CloudSecurity Manager”;
Enter credentials. The best way is to add current domain user account that has
all necessary permissions;
Connection string: localhost;
Host group: check “All Hosts”
4. Go to Fabric – Networking – Logical Switches:
Right-click on the logical switch – Properties;
Select Extensions;
Check the box against the new “5nine Cloud Security Filtering extension”.
Click OK.
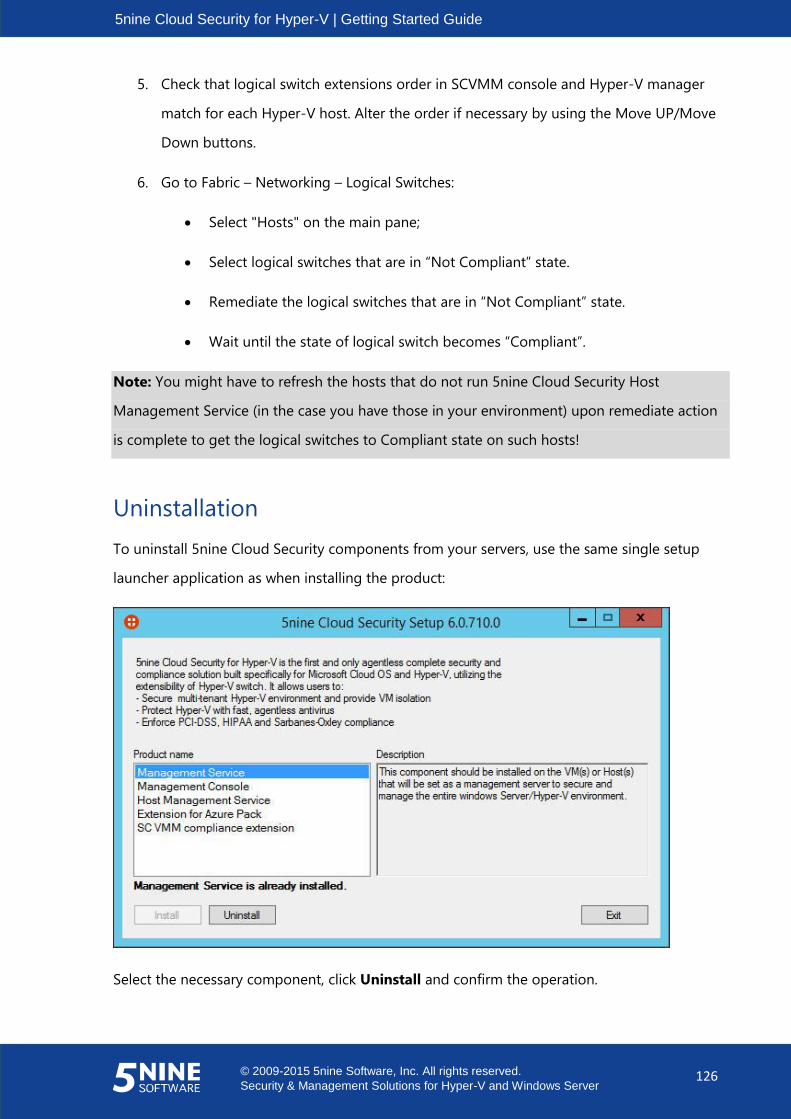
5nine Cloud Security for Hyper-V | Getting Started Guide
© 2009-2015 5nine Software, Inc. All rights reserved.
Security & Management Solutions for Hyper-V and Windows Server 126
5. Check that logical switch extensions order in SCVMM console and Hyper-V manager
match for each Hyper-V host. Alter the order if necessary by using the Move UP/Move
Down buttons.
6. Go to Fabric – Networking – Logical Switches:
Select "Hosts" on the main pane;
Select logical switches that are in “Not Compliant” state.
Remediate the logical switches that are in “Not Compliant” state.
Wait until the state of logical switch becomes “Compliant”.
Note: You might have to refresh the hosts that do not run 5nine Cloud Security Host
Management Service (in the case you have those in your environment) upon remediate action
is complete to get the logical switches to Compliant state on such hosts!
Uninstallation
To uninstall 5nine Cloud Security components from your servers, use the same single setup
launcher application as when installing the product:
Select the necessary component, click Uninstall and confirm the operation.