Embed Size (px)
Citation preview

500 Series User Guide
Revision 1.1 March, 2007
Disclaimer: The specifications in this document are subject to change without notice.
All trademarks mentioned in this document are the property of their respective owners, and are used herein for informational purposes only.
© 2007 Quantum Scientific Imaging
Phone 888-QSI-4CCD • www.QSImaging.com

ii
Table of Contents
1 . G E T T I N G S T A R T E D
What’s In the Box? 2 Get to Know Your Camera 3 Install Software and Drivers 4 Confirm Installation and Camera Operation 4 Launch MaxIm LE 4 Connect the camera 5 Take an image 7 View the image 8
2 . C A M E R A F E A T U R E S A N D O P E R A T I O N
Camera Attachment Options 9 Using SLR Lenses 10 Attach the camera to your telescope 10 Electrical Connections 11 DC Power Connector 11 USB Connector 12 Guider Control Port 12 Cooling the Camera 14 Standard Air Cooling 14 Liquid-Assisted Cooling 14 How Much Cooling Is Enough 15 Controlling the Cooler 16 Internal Color Filter Wheel 18 Advanced Setup Options 19
Camera Selection 20 Status Indicators 21 Imaging Options 21 Status and Notification 23 Camera Status Indication 23 Camera Error Indication 23 Audible Beeper 25 Imaging Application Messages 25
3 . C C D I M A G I N G O V E R V I E W
How CCDs work 26 Types of CCDs 26 Full-Frame CCDs 26 Interline transfer CCDs 27 Anti-Blooming CCDs 27 Microlenses 28 Single-shot color CCDs 28 Signal versus noise 29 Reducing noise in CCD images 30 Dark Frames 30 Flat Fields 32 Bias Frames 34 Stacking Images 35 Color images 36

4 . T A K I N G I M A G E S
Launch MaxIm LE 37 Camera Control Window 38 Cool the CCD 40 Focusing with MaxIm LE 41
Take a series of images 43
Image Calibration 45 ark Frames 46
Bias Frames 46 46 47
4
47
49
on in MaxIm LE 50
axIm LE 54
s in MaxIm LE 55
58
Using the internal Color Filter Wheel 61 62
Cont 62
5 . G U I D I N G
Autoguider support in MaxIm LE 63 Using an AutoGuider 64 Using a QSI Camera as an AutoGuider 67
6 . A C C E S S O R I E S
T-mount adapter 69 2” nosepiece 69 1 ¼” nosepiece 69 C-mount adapter 69
LR lens adapter 70 iquid heat exchanger 70
70
70
ox 70
E N A N C E
71
oving color filters 71
72
Cleaning the CCD cover glass 72
echnical support 73
E S
Series Specifications 74
77
Take a single image 42 View the image in MaxIm LE 43
D
Flat Fields
Flat Darks Manual Image Calibration 7 Subtract Dark Frames Scale by Flat Fields Automatic Calibrati Calibrate Images in M Combine Frame Binning
Shutting down your camera
rolling with other software
S
L
Recirculating pump Color filter wheel Guider Breakout B
7 . C A R E & M A I N T
Cleaning the exterior Installing or rem Cleaning the color filters
Recharging the desiccant 72 T
A P P E N D I C
Appendix A – 500 Appendix B – Warranty

Q S I 5 0 0 S E R I E S U S E R G U I D E
1
Getting t Star edThank you for your purchase of a QSI 500 Series Camera.
The QSI 500 Series family of t ermoel meras is designed produce scientific-grade imag with wid ent linearity and l noise. Your QSI 500 Series camera w ll provi properly treated and
o get the most fr your mend that you read this ser ghly and follow the included
in a hurry to try out your new camera and are familiar with the general operation of ed” section provides the basi
take yo r first i nd the ed with MaxI LE fo .
hes
ectrically cooled CCD ca toe dynamic range, excell ow
i de years of service if maintained. T om camera, we recom UGuide thorou precautions.
If you’reCCD cameras, this “Getting Startsetup your camera and u
c information you will need to mage. Please refer to the full User Guide a
online help provid m r complete instructions
The QSI 500 Series Camera Family Showing Different Body Styles
Section
1

Q S I 5 0 0 S E R I E S U S E R G U I D E
2
What’s In the Box? Your QSI 500 Series camera was shipped in a water-tight Pelican case foam to provide the ultimate in protection. Please take a few minutes tocamera to make sure that it has arrived in good condition, and that the citems listed below. Note that additional items purchased at the time of oincluded as well.
Camera body
epending on configuration
-Mount depending on configuration
Body cap T-Mount or C-Mount depending on configuration
(100-240VAC, 50-60Hz) with detachable, region-specific AC power cord
ing:
py of MaxIm LE
with custom-cut examine your ase contains the rder may be
Nosepiece 2” or 1 ¼” d
Mounting Adapter T-Mount or C
AC Power Adapter Universal AC power supply
USB Cable 10 ft. USB 2.0 cable
Guider Cable 14 ft. guider cable with modular connectors on each end
Tools Tool kit for camera maintenance
Documentation envelope containing the follow
Quick Start Guide CD-ROM containing the Installation program, MaxIm LE, the USB and
camera drivers, and the Installation Guide and this User Guide in PDF format. A document with the serial number for licensing your co
Open Pelican case showing QSI 500 Series camera and standard accessories

Q S I 5 0 0 S E R I E S U S E R G U I D E
3
Get to Know Your Camera
and features of your camera.
Take a few minutes to familiarize yourself with the external connections
The image above shows the major external features of a typical QSI 500 Series camera. The depth of the Camera Cover on your camera may differ depending on the internal options installed.

Q S I 5 0 0 S E R I E S U S E R G U I D E
4
Install Software and Drivers The USB drivers and associated software included on the installation CD-ROM must be installed before connecting your QSI camera to your computer.
Note: cted to do so during
Refer to the QSI 500 Series Camera Installation Guide for complete software and tallation instructions.
m Installation and Camera Operation cessful installation of the camera and the associated software is complete, you
n quickly test your camera with MaxIm LE if you choose. Leave the camera USB cable and power supply connected, and follow the steps below.
Launch MaxIm LE After installing the camera drivers and MaxIm LE from the Installation CD-ROM, launch MaxIm LE by double-clicking the MaxIm LE icon on your desktop or by selecting “Programs > MaxIm LE > MaxIm LE” from the Windows Start menu.
The first time you run MaxIm LE you will be asked to enter your temporary User Registration information. Enter the Name, Email, Expiry dates and Serial number information exactly as printed on the MaxIm LE License Information sheet included in the documentation envelope with your camera.
Do not connect your camera to your computer until instru the camera installation process.
hardware ins
ConfirAfter the succa
Caution: Do not enter your real name and email address. Enter the information exactly as printed on the included MaxIm LE License Information sheet.
This license will work for 30 days.from the time it is installed. You must register direcwith Diffraction L
tly imited to receive your permanent license. Select Register Online
from the Help Menu in MaxIm LE and follow the given directions to receive your permanent license.
Q S I 5 0 0 S E R I E S U S E R G U I D E
5
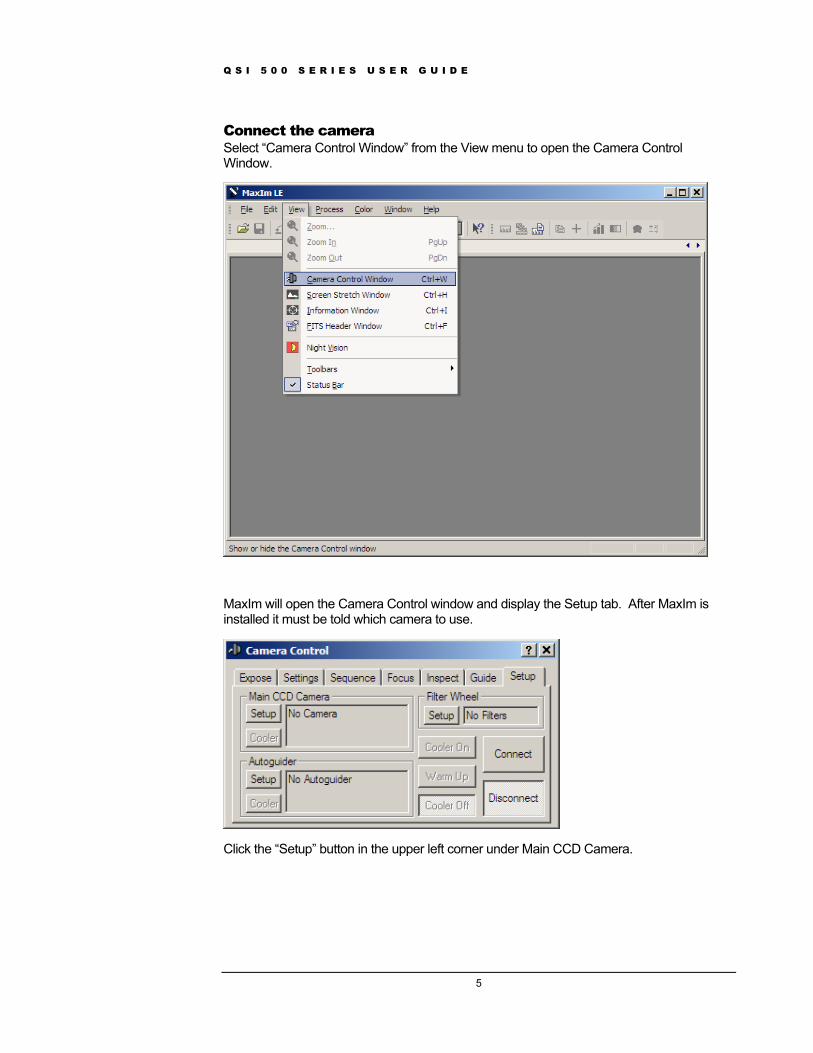
Connect the camera Select “Camera Control Window” from the View menu to open the Camera Control Window.
MaxIm will open the Camera Control window and display the Setup tab. After MaxIm is installed it must be told which camera to use.
Click the “Setup” button in the upper left corner under Main CCD Camera.

Q S I 5 0 0 S E R I E S U S E R G U I D E
6
Select “QSI Universal” from the Camera Model list box. Click OK.
That will take you back to the Camera Control Window. If you have a QSI camera with an internal color filter wheel you’ll also need to tell MaxIm about that by clicking “Setup” under “Filter Wheel” toward the upper right of the Setup tab.
Select “QSI Universal” as the filter wheel model. Click OK.
Q S I 5 0 0 S E R I E S U S E R G U I D E
7
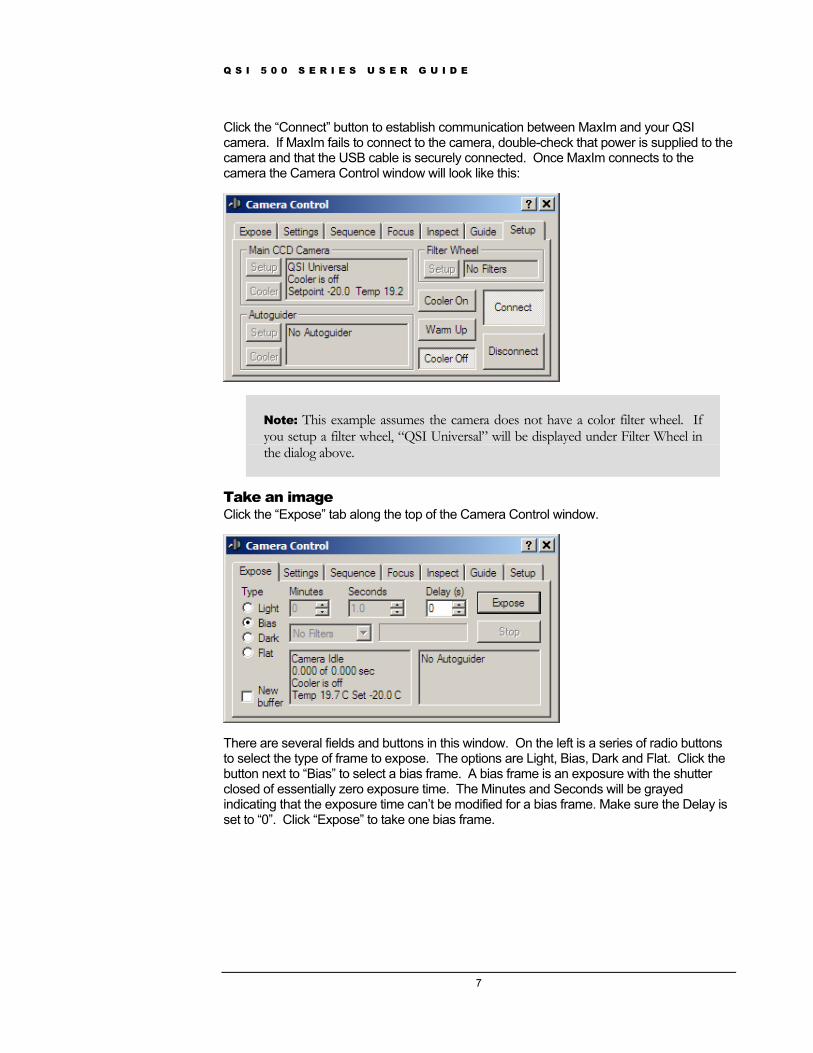
Click the “Connect” button to establish communication between MaxIm and your QSI camera. If MaxIm fails to connect to the camera, double-check that power is supplied to the camera and that the USB cable is securely connected. Once MaxIm connects to the camera the Camera Control window will look like this:
Note: This example assumes the camera does not have a color filter wheel. If you setup a filter wheel, “QSI Universal” will be displayed under Filter Wheel in the dialog above.
Take an image Click the “Expose” tab along the top of the Camera Control window.
There are several fields and buttons in this window. On the left is a series of radio buttons to select the type of frame to expose. The options are Light, Bias, Dark and Flat. Click the button next to “Bias” to select a bias frame. A bias frame is an exposure with the shutter closed of essentially zero exposure time. The Minutes and Seconds will be grayed indicating that the exposure time can’t be modified for a bias frame. Make sure the Delay is set to “0”. Click “Expose” to take one bias frame.

Q S I 5 0 0 S E R I E S U S E R G U I D E
8
View the image MaxIm will instruct the camera to acquire a bias frame and then automatically download and display the resulting image. Your screen should look something like this.
Your display may vary somewhat from the screen shot above and the image displayed may be larger or smaller than that shown depending on your camera model. While a room temperature Bias image isn't very exciting, this does provide confirmation that your software and camera are installed and working properly.
Congratulations, you have just connected your new QSI 500 Series camera and acquired your first image. If you’re familiar with MaxIm LE or MaxIm DL, or are using some other camera control software such as CCDSoft from Software Bisque, you are now ready to begin taking additional images.
For all users, but especially if you’re new to CCD imaging with MaxIm LE, we suggest you read the entire QSI 500 Series Camera User Guide to familiarize yourself with all of the features and capabilities of your new QSI camera.

Q S I 5 0 0 S E R I E S U S E R G U I D E
9
Camera Features and Operation
Camera Attachment Options
The camera can be attached to your telescope or lens in a variety of ways. The image bove shows the industry standard T-Adapter with an attached 2" nosepiece. An optional
nosepiece is also available. The T-Adapter is compatible with a wide variety of standard accessories.
An opti r and is com ent such a
a1.25"
onal C-Adapter adapter is also available. The C-Adapter replaces the T-Adaptepatible with many standard lenses, lens mounting accessories and other equipms microscopes.
Note: The T-Adapter has industry standard 42mm diameter x 0.75mm pitch threads. The C-Adapter has industry standard 1" x 32TPI threads. Always make certain that any device you attempt to thread into either adapter has proper matching threads. Some optical components have threads that look like they might work, but have slightly different dimensions. Never force-thread anything into the adapters.
Section
2

Q S I 5 0 0 S E R I E S U S E R G U I D E
10
Using SLR Lenses
The C-Adapter can be used to attach many standard SLR lens attached to your camera. The image at the right shows an Olympus OM series SLR lens attached to a QSI Model 520i camera. Optional SLR lens adapters are available to fit a variety of popular SLR camera lenses. See Section 6 in this Guide for a
list of available adapters and compatibility requirements.
Note: Custom mounting adapters can be employed to satisfy many unique or non-standard mounting requirements. Contact QSI for the dimensions and requirements for custom mounting adapters.
Attach the camera to your telescope The picture below shows a QSI 500 Series camera with 2" nosepiece being fitted to the 2" focusing tube of a refracting telescope. Always use the largest nosepiece that your telescope will allow to minimize any vignetting of your image.
e correct diameter nosepiece firmly screwed in to the front of the camera, carefuhe nosepiece into the eyepiece adapter on your telescope. Tighten any retainingor screws to ensure the camera i
With th lly guide t screw s stable and will not slip or move when the orientation of the telescope changes.

Q S I 5 0 0 S E R I E S U S E R G U I D E
11
Electrical Connections
camera body to rotect the connectors when no
cables are attached.
DC PoThe camera is ordinarily powered by the included AC power adapter which plugs into the
le connector on the bottom of the camera. The AC power adapter accepts any input voltage from 90v to 240v and 50-60 Hz. It is supplied with a region-specific AC power cord.
cator on the back of the camera will
nected via the USB cable. The Camera Status Indicator will glow solid green once the camera is connected to the computer via the USB cable. See the Status and Notification discussion later in this Section for additional detail.
The image at the left is a close-up of the bottom of the camera body. All electrical connections to the camera are made through the three connectors located on this connector panel. The panel is recessed into the p
wer Connector
midd
Shortly after power is applied to the camera, the Camera Status Indicamera will start glowing yellow indicating that the camera is starting up. The make a small “chirp” sound and then a few seconds later will make a “chirp chirp” sound indicating that the camera successfully completed its initialization steps. The Camera Status Indicator will begin flashing green if the camera is not con
Note: Power-up initialization can take up to 6 seconds. It is not possible to connect to the camera from the imaging application (MaxIm LE, CCDSoft, etc.) during this time. Any attempt to do so will cause an error message to be displayed by your imaging application.
Note: The camera is designed to operate on stable, clean 12v DC power and consumes less than 2 amps at full power. Voltage below 11v and above 15v can increase power dissipation or lower cooling efficiency. If the voltage is outside of this range the camera will 'notify' the user every 4 seconds until the voltage is back within range. See Status and Notification below.
The camera power connecter uses a standard 2.1mm coaxial connector with center positive.

Q S I 5 0 0 S E R I E S U S E R G U I D E
12
Caution: Because of the wide range of potential power sources (especially with field operations that can also employ batteries, generators, DC inverters, etc.) there is the real possibility of damaging your camera and other electrical equipment by creating unexpected ground loops and different ground reference potentials between your equipment.
It is highly recommended that the included AC adapter be used to power the camera at all times. If a power source other than the included AC adapter is used, it is your responsibly to insure that it is suitable. Avoid sharing the camera DC power source with other devices that can produce excessive noise (old technology dew heaters, etc.) and possible ground loops that could interfere with the reliable operation, or even damage your imaging equipment.
If you choose to use a power source other than the included AC adapter and are uncertain about meeting these requirements, please contact QSI for assistance.
USB Connector The camera's USB interface is compatible with USB 2.0 and 1.1. The included USB 2.0 cable plugs into the USB port on the left side of the camera connector panel. The other side connects to any standard USB port on your computer. All camera control commands and resulting images are passed over the USB cable.
Note: Do not connect your camera to your computer unless you have successfullyinstalled the camera software and drivers.
After the camera power-up initialization is complete, and the camera's USB cable is connected to your computer,
the computer will make a Plug-N-Play sound indicating that a ce was connected to the computer. This means that your camera is ready and is
listening for commands to be sent over the USB connection.
devi
Note: QSI 500 Series cameras do not draw power from the USB bus. Powered hubs are not necessary for operation.
Guider Control Port All QSI with MaxImduratio ed as the 'Gu
The Gui eme is comconduc pe cable is required for connecting the camera to the mount's guider input. This type of cable is commonly available at retailers such as Radio Shack. A 14 ft.
n of this cable is supplied with 500 Series cameras.
500 Series cameras have a Guider Control Port that can be used in conjunction LE (or other CCD imaging software) to 'guide' your telescope mount for long-n astro-imaging. Ordinarily, the Port is only operational if the camera is being usider' camera.
der Port employs an RJ-25, 6-conductor modular connector. The interface schpatible with most modern telescope mounts. Typically, a 6P6C (6 position, 6 tor) telephone-ty
versio

Q S I 5 0 0 S E R I E S U S E R G U I D E
13
The image below summarizes how the Guider Port and compatible cable are wired:
Note: The Guider Port outputs employ optically isolated solid-state switches that mimic the traditional behavior of older technology mechanical relays. The optical isolation prevents potentially interfering or damaging ground loops between the camera and mount.
This newer approach is compatible with most modern telescope mounts (Meade, Losmandy, Software Bisque, etc.) that employ logic inputs pulled to VCC with a suitable load resistor.
QSI also offers a Guider Break-Out Box with mechanical relays that can be employed to adapt to virtually any older or non-standard mount configuration.
Caution: Do not apply more than 50v or 50ma to the guider port pins. The 'Common' input must be at ground, or zero volt potential relative to the control inputs of your mount. Contact QSI if you are uncertain about your mount's electrical characteristics.

Q S I 5 0 0 S E R I E S U S E R G U I D E
14
Cooling the Camera oling the CCD is essential for successful astro-imaging. Cooling dramatically reduces the
thermal noise in an image and makes long exposures practical. See the discussion in the 'CCD Imaging Overview' Section on dark current and noise.
QSI 500 Series cameras use a very efficient thermo-electric cooler (TEC) which relies on the 'Peltier Effect' to cool the CCD. When power is applied to a TEC, one side of the device gets cold and other side gets hot, essentially pumping heat from the cold side to the hot side. All QSI 500 Series cameras employ a two-stage TEC to increase the differential cooling effect.
The more power applied to the TEC, the greacan get. The heat pumped from the CCD, as well as the power dissipated by the C, es a significant amount of excess heat that must be removed from the camera. QSI
500 Se
StandThe badirectly automatically controlled cooling fans force air through these fins. The m ved from th
Keep in temperature that the CCD can be cooled is limited by the ambien res is easyeven ne ble to cool the CCD to the desired temperature. See the specifications for your camera to
rmine the maximum cooling differential you can expect under typical conditions.
LiquidForcedneededHowev rticularly demanding situations, additional cooling can be achieved with the optional Liquid Heat Exchanger, or LHX. The LHX utilizes recirculating water for more efficient removal of heat from the camera. All things being equal, the LHX can provide an additional 7ºC to 10ºC of CCD cooling. It attaches to the rear of the camera body as illustrated in the image to the right. The water flows through the two hoses, colored blue in this picture. Self-sealing quick-disconnect couplings are used to attach the hoses to the LHX so that the hoses can be removed easily without leakage of the recirculating water.
There are numerous ways of supplying recirculating water for the camera. One of the simpler and more common methods for astro-photography is to place a small submersible pump into a 5 gallon plastic pail full of cool water. The temperature of this amount of water
Co
ter the differential cooling and the colder the CCD creat
TE
ries cameras employ two different methods for removing this heat.
ard Air Cooling ck of a QSI 500 Series camera acts as a large heatsink with cooling fins machined into the body. Two ovement of air through the cooling fins greatly increases the amount of heat remoe camera.
mind that the lowest t air temperature and the speed of the cooling fans. Achieving very low temperatu when imaging outdoors during cooler weather. If it is particularly cold you may not ed to turn the fans on. It the weather is quite warm and humid you might not be a
dete
-Assisted Cooling air cooling is usually all that is to reach normal levels of cooling. er, in warm weather or pa

Q S I 5 0 0 S E R I E S U S E R G U I D E
15
will only rise by a few degrees after a full Liquid Heat Exchanger, see the Acce
night of imaging. For additional details on the ssories section below.
Note: The Fans can usually be turned off when using the LHX. In fact, the fans may actually decrease the cooling ability if the air is warmer than the liquid.
Caution: It is generally advised that only water be used in the LHX. Coolants such as ethylene glycol and some solvents may damage the seals and gaskets.
How Much Cooling Is Enough Good results can be obtained with the CCD cooled to -10ºC when taking modest length exposures. This is easy to achieve with forced air cooling when the ambient air is at 25ºC
lts in nearly a 50-fold decrease in CCD dark current. For more
d by the intrinsic read noise of the CCD itself. The camera will actively prevent the CCD from being cooled below -40ºC.
(77ºF). Cooling to -10ºC resudemanding imaging and longer exposures, lower temperatures are desirable. Cooling the CCD to -20ºC and -30ºC lowers the dark current by a factor of 130 and 400 respectively. Cooling below -30ºC results in a diminishing improvement as the noise from the dark current is outweighe
Fahrenheit -40F -20F 0F 20F 32F 40F 60F 80FCelsius -40C -29C -18C -7C 0C 4C 16C 27C
Note: Refer to the specification sheets at the end of this Guide for the exact cooling specifications for your particular camera model. Keep in mind that ambient temperature changes, air movement, and even relative humidity can affect the temperature that the camera can reach and maintain.
Note: The cooler is not designed to raise the temperature of the CCD above the temperature of the camera body, i.e. it can not heat the CCD. If the ambient temperature is -10ºC, the cooler can not bring the CCD temperature up to 0ºC.
When using forced-air cooling the body of can be up to 12ºC warmer than the
the camera and the window of the CCD chamber surrounding ambient air temperature. By definition, the
camera will be above the dew point (or frost point) and condensation will not form. When D using the LHX there is the opportunity to drive the enclosure of the camera and the CC
chamber window significantly below ambient temperature if the recirculating water is colder

Q S I 5 0 0 S E R I E S U S E R G U I D E
16
that the surrounding environment. If the relative humidity is high enough, this action coudrop the camera below the dew/frost point and condensation will fo
ld rm.
Caution: Do not allow excessive dew or frost to collect in or on the camera. Exercise the normal precautions that you would with any precision optical or electronic device. Never use the LHX to drive the camera temperature so low that liquid water forms on or in the camera. Under certain conditions excessive moisture can impair or damage the optical coatings and the internal electronics.
the Cooler om your CCD imaging application (MaxIm,
e.
t ºC,
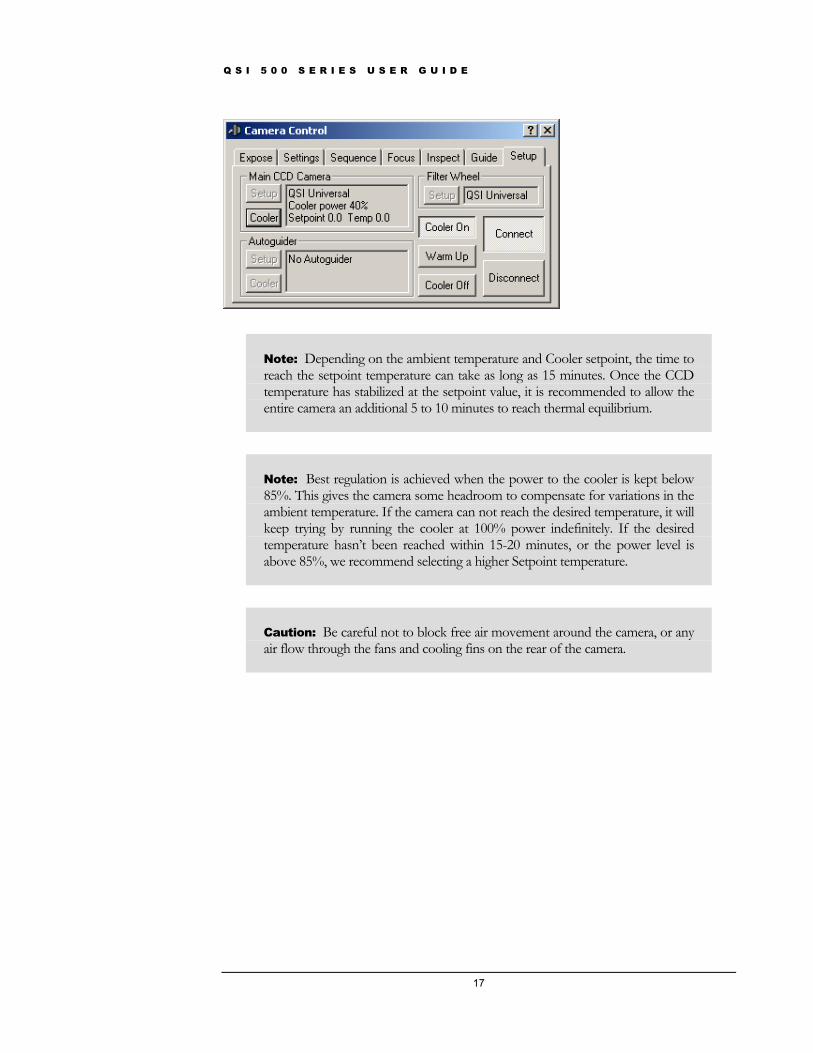
ControllingThe operation of the cooler is managed frCCDSoft, etc.) When power is first applied to your camera the cooler is in an inactive statIt must be actively turned on. The following explores the technical details of camera cooling utilizing MaxIm as the imaging application. For step-by-step operating instructions and changing the CCD setpoint temperature, see Section 4.
Below is a snapshot of the Setup tab in the Camera Control window, just after the Connecand then Cooler On button was clicked. Notice that the current CCD temperature is 23the default Setpoint is 0ºC, and that the cooler power is 100%
en the Cooler On button is clicked, the camera immediately starts cooling the CCD at full cooler will stay at full power until it has cooled the CCD to within a few degrees
of the scooler y slightly coupleachieved, the camera will keep the CCD temperature within 0.1ºC of the setpoint.
he following is an image of the same Camera Control window 5 minutes after clicking the
Whpower. The
etpoint temperature. The camera will then start adjusting the power applied to the as it approaches the setpoint temperature. The displayed CCD temperature ma over-shoot the setpoint temperature as the regulation servo locks. It can take a more minutes for the temperature servo to achieve a solid lock. After lock is
TCooler On button. Notice that the CCD temperature is now being regulated at 0ºC and that the power level has settled down to a modest 40%.
Q S I 5 0 0 S E R I E S U S E R G U I D E
17
Note: Depending on the ambient temperature and Cooler setpoint, the time to reach the setpoint temperature can take as long as 15 minutes. Once the CCD temperature has stabilized at the setpoint value, it is recommended to allow the entire camera an additional 5 to 10 minutes to reach thermal equilibrium.
Note: Best regulation is achieved when the power to the cooler is kept below 85%. This gives the camera some headroom to compensate for variations in the ambient temperature. If the camera can not reach the desired temperature, it will keep trying by running the cooler at 100% power indefinitely. If the desired temperature hasn’t been reached within 15-20 minutes, or the power level is above 85%, we recommend selecting a higher Setpoint temperature.
Caution: Be careful not to block free air movement around the camera, or any air flow through the fans and cooling fins on the rear of the camera.

Q S I 5 0 0 S E R I E S U S E R G U I D E
18
Internal Color Filter Wheel A five position filter wheel is available for some models of QSI 500 Series cameras. The filter wheel is designed to hold five standard 1.25" filters. Ordinarily, the filter wheel is supplied with an LRGB filter set as illustrated in the following image. The filter wheel can be supplied without filters if desired.
Note the reflection of the complementary colors
with this set of astro-imaging LRGB filers.
Note: QSI offers LRGB filter sets from a number of respected manufacturers, as well as other specialized filters for astro-imaging. Alternatives can be specified at the time of order.
The filter wheel is designed to be removed and replaced easily. After detaching the camera cover, the filter wheel can be removed by loosening a single shoulder screw. This allows the user to have additional filter wheels populated with different combinations of filters and interchange them quickly while operating in the field. See the Care and Maintenance section for details.
Q S I 5 0 0 S E R I E S U S E R G U I D E
19
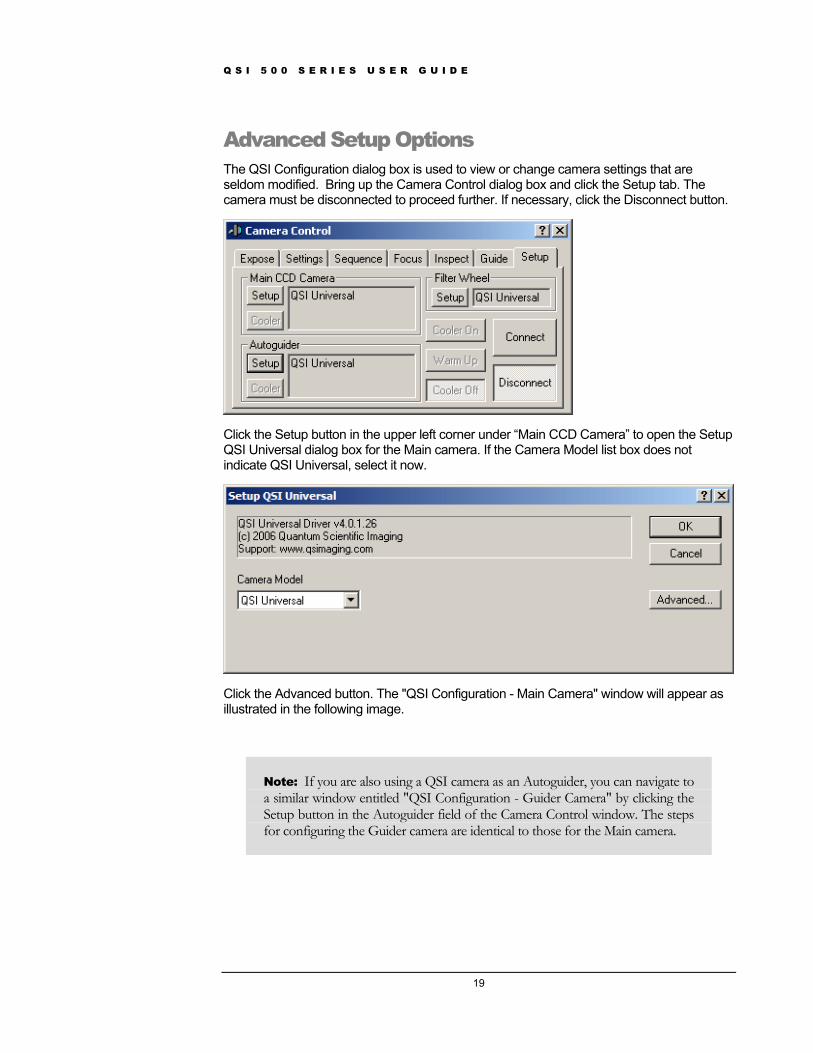
Advanced Setup Options The QSI Configuration dialog box is used to view or change camera settings that are seldom modified. Bring up the Camera Control dialog box and click the Setup tab. The camera must be disconnected to proceed further. If necessary, click the Disconnect button.
Click the Setup button in the upper left corner under “Main CCD Camera” to open the Setup QSI Universal dialog box for the Main camera. If the Camera Model list box does not indicate QSI Universal, select it now.
Click the Advanced button. The "QSI Configuration - Main Camera" window will appear as illustrated in the following image.
Note: If you are also using a QSI camera as an Autoguider, you can navigate to a similar window entitled "QSI Configuration - Guider Camera" by clicking the Setup button in the Autoguider field of the Camera Control window. The steps for configuring the Guider camera are identical to those for the Main camera.

Q S I 5 0 0 S E R I E S U S E R G U I D E
20
Note: The very first time a QSI camera is connected to the computer it will set the relevant options shown above to default values based on the configuration of the specific camera. From that point forward, the settings are maintained in the Windows Registry. All subsequent changes are made to these Registry settings. This allows the computer to always know your last selections for each camera and restore them the next time you begin imaging. Also, a camera's settings are remembered uniquely when being used as a Main camera and when being used as a Guider camera.
Only those settings that are relevant to a particular camera model are enabled. Options that
Camera Selection USB Interface Select the specific QSI camera that you wish to control from
those listed in the USB Interface list box. Cameras are
assigned as the Main camera, it will not appear as an option in the Guider selection list box.
Ethernet Interface Disabled on QSI 500 Series cameras
don't apply are grayed-out.
tracked by their serial number. That is the number located inparenthesis, and will match the number engraved on the camera nameplate / desiccant cover.
If a camera has previously been assigned to another role, it will not appear in the list. For example, if a camera is currently

Q S I 5 0 0 S E R I E S U S E R G U I D E
21
Note: If only one camera is connected to the computer, the computer will always select that camera by default. You do not need to make the selection here. If two or more cameras are available and they match the serial numbers of the last camera(s) used for the Main and/or Guider camera, the computer will automatically reconnect to them in the same roles.
The only time you need to actively make a selection is when you have two or more cameras available and you want to:
1) Change the camera roles or
2) Select a new camera that has never been connected to this computer before.
Status Indicators
LED Indicator On Uncheck to disable the Status Indicator LED on the back of the camera. Only normal status indications are disabled. Visual indication of errors can not be disabled.
Sound On Uncheck to disable the Audible Beeper. Sounds associated with camera initialization and error notification can not be disabled.
Fa
begins to exceeds a predefined safe level. At
that point the fans are turned on and run at full speed until the camera temperature is reduced to a safe level.
Shutter Mode
nti- ooming
n Mode Can be set to Off, Quiet or Full-Speed. Full Speed is the default setting and allows the greatest cooling.
When in Quiet mode the camera runs the fans at reduced speed for quieter operation. If more cooling is required to maintain the setpoint temperature, the fan speed is graduallyincreased.
If Off is selected the fans are disabled unless the camera temperature
Imaging Options
Bits per Pixel Always set to 16 bits per pixel for QSI 500 Series cameras
Settings are “Mechanical” or “Electronic”. This setting can only be changed on cameras with interline transfer CCDs such as the QSI 520i.
A Bl Default setting is “Off”. This can only be set to On with cameras that have CCDs with anti-blooming protection that can be controlled or adjusted electronically.

Q S I 5 0 0 S E R I E S U S E R G U I D E
22
Flush Cycles This number determines how many times the pixels in the . r
Sh ng progress while an image is
d time.
Op is disabled on QSI 500 Series cameras. 500
he current camera status is shown in the text field to the left of the OK and Cancel buttons.
ve your changes or the Cancel button to abort them. This will rn you to the Setup QSI Universal window. Click OK again and you'll be returned to the
Setu a
CCD are flushed between exposures. The default value is 2It can be lowered to decrease the time between exposures oincreased if you want to ensure that the CCD retains less stray charge between exposures.
ow D/L Progress Check this box to enable reportibeing downloaded from the camera. The default setting is “Off”. If Show D/L Progress is enabled it will modestly increase the downloa
timization This settingSeries cameras always optimize for image quality.
T
Click the OK button to saretu
p tab in the Camer Control window.

Q S I 5 0 0 S E R I E S U S E R G U I D E
23
Sta NoQSI 500 Series camera u s operation, status and othe er provide notifialso to the user.
Camera Status IndiThe -state L panel. The LED indicates the cu nderway.
LED can display green, yellow or red and flash at various rates.
tus and tification tilizes a variety of methods to inform the operator of the camera'r events. A built-in LED Status Indicator and audible Beepcameracation at the . In the event of a serious internal error, the camera will
pass a descriptive error code back to the controlling application which then reports it
cation re is a small tri ED indicator on the camera back just above the connector
rrent status of the camera and any operation that is uThe
Camera Operational State Indication
Green solid In Idle state, not Busy. Ready to accept commands.
Green flashing USB cable not connected. Not ready to accept commands. This only indicates that the USB cable is not physically connected between the camera and computer or hub.
Yellow solid Busy with internal operation. Not ready to accept commands. This state is seen while the camera is performing power-up initialization, moving the filter wheel or shutter, or when uploading an image to the computer
Yellow flashing Upgrading firmware. The indicator will flash rapidly while downloading the camera firmware and then more slowly as it is validated.
Red slow flashing Exposing an image. Flashes once every 4 seconds. The camera can still respond to commands (such as abort image or read CCD temperature) while in this state.
Note: The Status Indicator can be disabled for the normal camera states described above. This may be desirable during long exposures where the light from the Status Indicator may be reflected into the telescope. See the Advanced Setup dialog box.
Camera Error Indication Camera error conditions are indicated by a more elaborate sequence of Red and Yellow flashes of the Status Indicator. Errors are classified as Soft errors or Hard errors. Soft errors are those that the camera can mitigate, but typically need operator action to resolve. Soft errors always begin with one Red flash followed by a number of Yellow flashes.

Q S I 5 0 0 S E R I E S U S E R G U I D E
24
Camera Soft Error State Indication
Flash Red: 1
Flash Yellow: 1 The camera is over-temperature. Camera has exceeded the40°C maximum recommended operating temperature for the internal electronics and enclosure. This sequence will repeat
every four seconds as long as the camera remains “over-re”.
rature. This sequence will repeat every four seconds as long as the CCD
”.
Flash Red: 1
: 3 inimum
e
1
Flash Yellow: 4
oltage is lowered below this threshold.
Flash Yellow: 5 l has encountered a problem and is no longer operational. The camera will still function, but will no longer
e in
Flash Red: 1
Flash Yellow: 6 The shutter has encountered a problem and is no longer r y o
Hard errors occur when the USB communication channel to the computer malfunctions or the era has an unrecoverable internal error. The power to the camera must be turned
ra and USB connection to the computer. This class of error h the USB connection between the camera and
temperatu
Flash Red: 1
Flash Yellow: 2 The CCD is under-temperature. The CCD has exceeded the -40°C minimum recommended operating tempe
remains “under-temperature
Flash Yellow The camera DC supply voltage is below the 11V mrecommended operating level. This sequence will repeatevery four seconds until the supply voltage is raised abovthis threshold.
Flash Red:
The camera DC supply voltage is above the 15V maximum recommended operating level. This sequence will repeat every four seconds until the supply v
Flash Red: 1
The filter whee
attempt to move the filter wheel. The filter wheel may bany position. Power to the camera must be turned off and onto reinitialize the filter wheel.
operational. The camera will still function, but will no longeattempt to operate the shutter. The shutter may be in anstate. Power to the camera must be turned off and on treinitialize the shutter.
camoff and on to reinitialize the cameis generally caused by problems witcomputer or software and firmware version incompatibility. Hard errors always begin with two Red flashes followed by a number of Yellow flashes.

Q S I 5 0 0 S E R I E S U S E R G U I D E
25
Camera Hard Error State Indication
Flash Red: 2
Flash Yellow: N The number of yellow flashes of the Status Indicator specifies the nature of the camera Hard Error. This code indicates the technical nature of the problem.
Note: Neither class of error indications can be disabled with the Advanced Dialog box. I you encounter any of these errors, make a record of the code fflashed by the Status Indicator. This information will be useful if you need to contact QSI Customer Service.
Au There is a small beeper lovarious events. Shortly af “chirp” sound indicating th entering the Initialization mode. Once the camera is fu eeper will make a “chirp-chirp” sound. At this point the camera is ready to er the USB
The Beeper is also soundoccurs. A long beep is so ort beep when displaying yell e alert is intended to alert the operator in case the Sta no ced or not visible.
dible Beepercated inside the camera that is used to provide notification of ter power is applied to the camera, the Beeper will make a shortat the camera is
lly operational the Bcommunicate ov connection to the computer.
ed in sequence with the Status Indicator when any sort of error unded whenever the Status Indicator is displaying Red and a show. This audibl
tus Indicator is t noti
Note: The Beeper disable function in the Advanced Dialog box does not apply to power-on initialization or error notifications. These events are always accompanied by th sounds. e corresponding audible beeper
Imaging ApplicatioThe imaging applications activities performed with t
scriptions of the event. Ot clude only a numeric code. If you get a
n Messages (MaxIm LE, CCDSoft, etc.) can display messages in response tohe camera. Many of these messages have straightforward text
hers messages may indemessage indicating an error, record the text message or numeric code in the event that youneed to contact QSI Customer Support.

Q S I 5 0 0 S E R I E S U S E R G U I D E
26
CCD Ima
section is only intended to be a brief overview of CCDs and CCD Imaging. If you are there are a number of excellent books that you can use to gain a
we
ging Overview
Thisnew to CCD imaging deeper understanding of the issues and techniques. Two very well regarded books thatrecommend are:
The New CCD Astronomy by Ron Wodaski
The Handbook of Astronomical Image Processing by R. Berry and J. Burnell
How CCDs work Charge Coupled Devices (CCD) work by converting photons into electrons which are then stored in individual pixels. A CCD is organized in a 2 dimensional array of pixels. The
used in the QSI 500 Series cameras range from roughly 400,000 pixels (768H x 512W) to 3.2 million pixels (2184H x 1472W).
Each pSeries c model trike individual pixels and are converted to electrons and stored in each pixel well. The effectiveness of this process
referred to as Quantum Efficiency (QE). The number of electrons stored in each pixel ” is proportional to the number of photons that struck that pixel. This linear response is
ptionally well suited to astronomical imaging. A
s
ypes of CCDs CDs are available in a variety of designs and technologies. QSI 500 Series cameras mploy two different types of CCDs, Full Frame and Interline Transfer, with numerous ptional features.
Full-Frame CCDs Full-Frame CCDs generally provide the highest sensitivity and the widest linear response range of these two types of CCDs. These characteristics make full-frame CCDs ideally
CCDs
ixel can hold some maximum number of electrons. CCDs used in the QSI 500 can hold from 45,000 to as many as 100,000 electrons depending on the specifiof CCD. While integrating (exposing) an image, photons s
is“wellone of the key traits that make CCDs excesubject that is twice as bright will build up twice as many electrons in the CCD. After an exposure is complete, the electrons in each pixel are shifted out of the CCD and converted to a number, indicating how dark or light each particular pixel was. Those brightness valuefor each pixel are then stored in the image file, typically a FITS file for astronomical imaging.
TCeo
Section
3

Q S I 5 0 0 S E R I E S U S E R G U I D E
27
suited to astronomical imaging. Full-frame CCDs must employ a mechaprevent light from falling on the CCD surface while the image is being shCCD.
Interline transfer CCDs Interline transfer CCDs work somewhat differently. In an interline transfevery column of pixels is a specialized storage column that is covered blight from hitting the storage 'pixels' underneath. When an exposure is c
e column. The pixels which are shifted out of the CCD in Ds give up some sensitivity
because a sizable portion of the potential light gathering surface of the CCD is occupied by storage columns. The key benefit of interline transfer CCDs is that the shifting
f the image into the masked storage column acts like a very precise electronic shutter allowing short, accurate exposures.
nical shutter to ifted out of the
er CCD, next to y a mask to prevent omplete, the entire
image is shifted in a single operation into this masked storagare now under the mask stop building additional charge andthe same fashion as a full-frame CCD. Interline transfer CC
the masked o
Anti-Blooming CCDs CCDs are subject to an electronic artifact called “blooming” that results in bright vertical streaks leading from bright objects.
The 60-second image above shows a portion of M42, the great nebula in Orion. The stars that make up the center of the nebula are much brighter than the surrounding nebula. Taking an exposure long enough to show detail in the nebula causes the bright stars to bloom. Note that some of the other brighter stars around the image also show
s full
ght ead all the way to the bottom of the image. Data under a “bloom” is lost
riety of processing techniques that can be used to hide pixel blooms
varying amounts of blooming.
Blooming occurs when taking images of bright objects because when a pixel reaches itwell capacity, say 100,000 electrons, the electrons literally overflow into adjoining pixelseventually causing them to fill and overflow as well. In a severely bloomed image, the briblooming trail can lalthough there are a vain a final processed image.
Q S I 5 0 0 S E R I E S U S E R G U I D E
28
Anti-blooming is a feature available on many full-frame and most interline transfer CCDsAnti-blooming technology limits the number of electrons that can accumulate in a pixel bdrainin
. y
g off excess electrons before they exceed the capacity of the pixel. This can increase the dynamic rage of the CCD by as much as 300 times or more. This increase in dynamic
lty of imaging bright objects.
-
re
rface of the CCD is covered with the electronic circuits that make a CCD work. Light striking a part of the CCD covered by a circuit will not get recorded by the CCD.
microlenses which focus more of the light otosensitive area away from the circuits.
n circuits is one factor in determining the quantum e of how efficiently the CCD converts photons
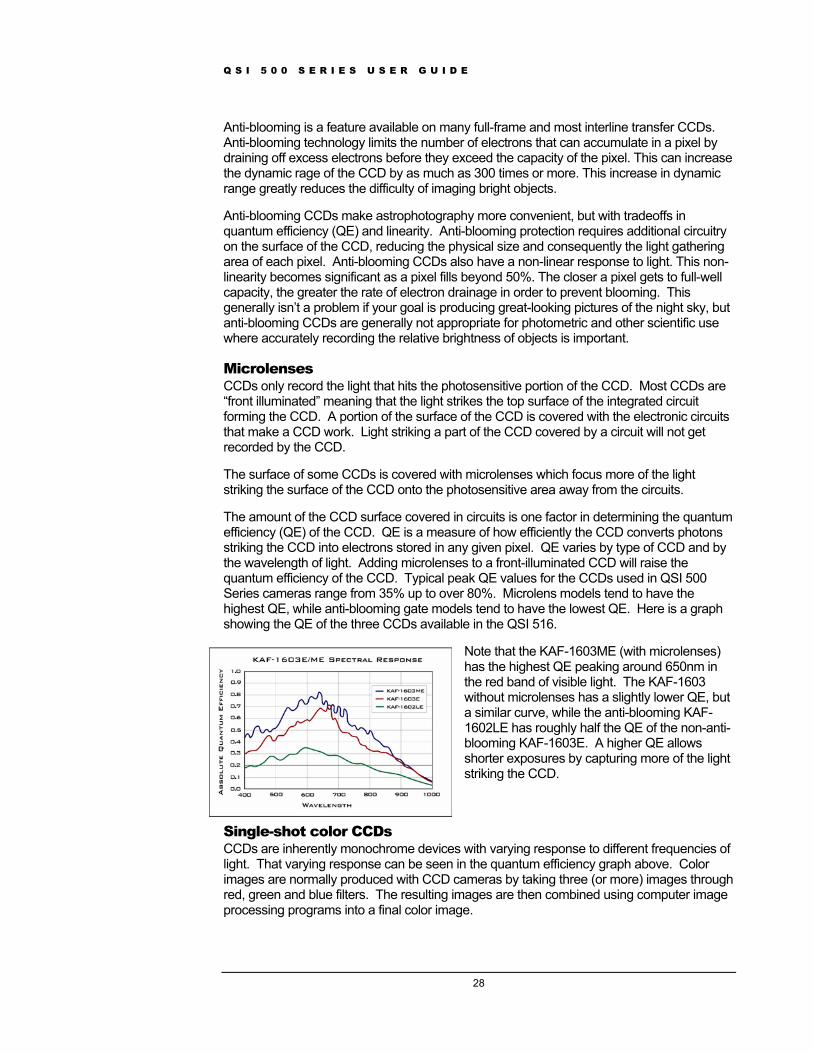
any given pixel. QE varies by type of CCD and by s to a front-illuminated CCD will raise the ak QE values for the CCDs used in QSI 500 r 80%. Microlens models tend to have the els tend to have the lowest QE. Here is a graph e in the QSI 516.
Note that the KAF-1603ME (with microlenses) has the highest QE peaking around 650nm in the red band of visible light. The KAF-1603 without microlenses has a slightly lower QE, but a similar curve, while the anti-blooming KAF-1602LE has roughly half the QE of the non-anti-
processing programs into a final color image.
range greatly reduces the difficu
Anti-blooming CCDs make astrophotography more convenient, but with tradeoffs in quantum efficiency (QE) and linearity. Anti-blooming protection requires additional circuitry on the surface of the CCD, reducing the physical size and consequently the light gathering area of each pixel. Anti-blooming CCDs also have a non-linear response to light. This nonlinearity becomes significant as a pixel fills beyond 50%. The closer a pixel gets to full-wellcapacity, the greater the rate of electron drainage in order to prevent blooming. This generally isn’t a problem if your goal is producing great-looking pictures of the night sky, but anti-blooming CCDs are generally not appropriate for photometric and other scientific use where accurately recording the relative brightness of objects is important.
Microlenses CCDs only record the light that hits the photosensitive portion of the CCD. Most CCDs a“front illuminated” meaning that the light strikes the top surface of the integrated circuit forming the CCD. A portion of the su
The surface of some CCDs is covered withstriking the surface of the CCD onto the ph
The amount of the CCD surface covered iefficiency (QE) of the CCD. QE is a measurstriking the CCD into electrons stored in the wavelength of light. Adding microlensequantum efficiency of the CCD. Typical peSeries cameras range from 35% up to ovehighest QE, while anti-blooming gate modshowing the QE of the three CCDs availabl
blooming KAF-1603E. A higher QE allows shorter exposures by capturing more of the light striking the CCD.
Single-shot color CCDs CCDs are inherently monochrome devices with varying response to different frequencies of light. That varying response can be seen in the quantum efficiency graph above. Color images are normally produced with CCD cameras by taking three (or more) images through red, green and blue filters. The resulting images are then combined using computer image
Q S I 5 0 0 S E R I E S U S E R G U I D E
29
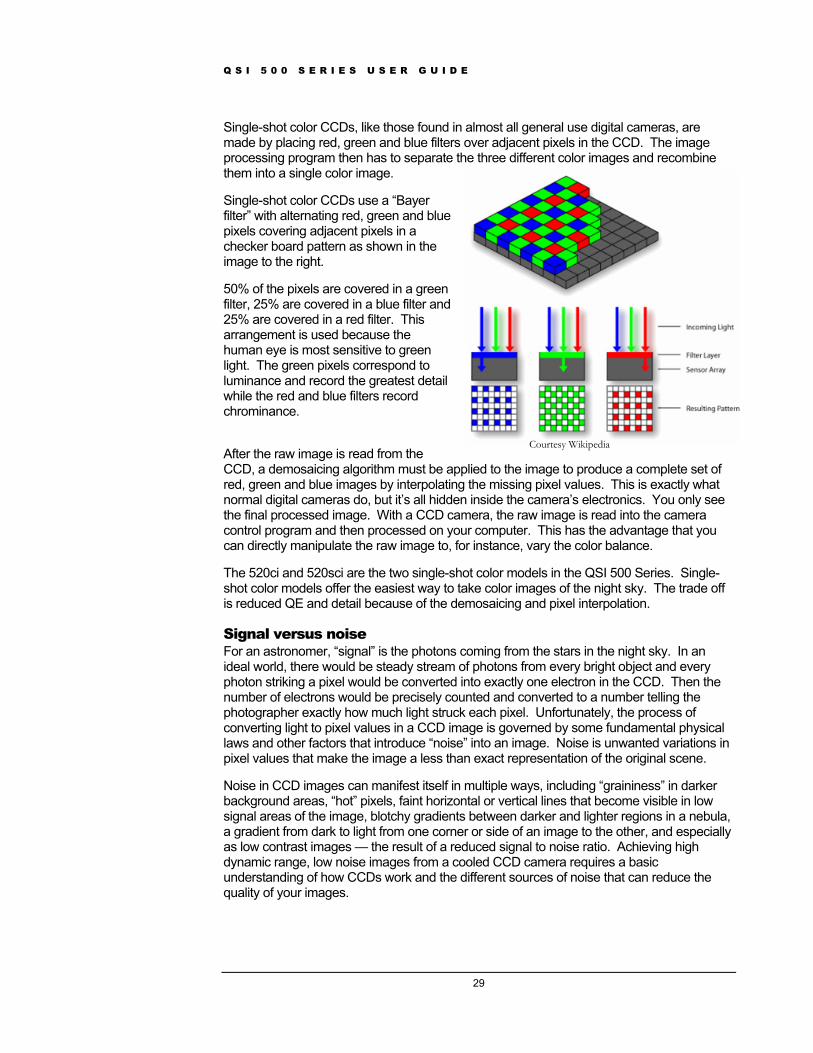
Single-shot color CCDs, like those found in almost all general use digital cameras, are made by placing red, green and blue filters over adjacent pixels in the CCD. The image processing program then has to separate the three different color images and recombine them into a single color image.
Single-shot color CCDs use a “Bayer filter” with alternating red, green and blue pixels covering adjacent pixels in a checker board pattern as shown in the image to the right.
50% of the pixels are covered in a green filter, 25% are covered in a blue filter and 25% are covered in a red filter. This arrangement is used because the human eye is most sensitive to green
ixels correspond to
ead from the t of at
ly see
off
For an astronomer, “signal” is the photons cideal world, there would be steady stream ophoton striking a pixel would be converted i e number of electrons would be precisely couphotographer exactly how much light struckconverting light to pixel values in a CCD imlaws and other factors that introduce “noise s in pixel values that make the image a less tha
Noise in CCD images can manifest itself in mu ng “graininess” in darker background areas, “hot” pixels, faint horizontal or vertical lines that become visible in low signal areas of the image, blotchy gradients between darker and lighter regions in a nebula,
one corner or side of an image to the other, and especially
light. The green pluminance and record the greatest detail while the red and blue filters record chrominance.
After the raw image is rCCD, a demosaicing algorithm must be applied to the image to produce a complete sered, green and blue images by interpolating the missing pixel values. This is exactly whnormal digital cameras do, but it’s all hidden inside the camera’s electronics. You onthe final processed image. With a CCD camera, the raw image is read into the camera control program and then processed on your computer. This has the advantage that you can directly manipulate the raw image to, for instance, vary the color balance.
The 520ci and 520sci are the two single-shot color models in the QSI 500 Series. Single-shot color models offer the easiest way to take color images of the night sky. The trade is reduced QE and detail because of the demosaicing and pixel interpolation.
Signal versus noise oming from the stars in the night sky. In an f photons from every bright object and every nto exactly one electron in the CCD. Then thnted and converted to a number telling the each pixel. Unfortunately, the process of age is governed by some fundamental physical ” into an image. Noise is unwanted variationn exact representation of the original scene.
ltiple ways, includi
a gradient from dark to light fromas low contrast images — the result of a reduced signal to noise ratio. Achieving high dynamic range, low noise images from a cooled CCD camera requires a basic understanding of how CCDs work and the different sources of noise that can reduce the quality of your images.
Courtesy Wikipedia

Q S I 5 0 0 S E R I E S U S E R G U I D E
30
Reducing noise in CCD images CCD imagers have developed a standard set of calibration techniques to reduce or eliminate different types of noise from CCD images. Calibrating CCD images requires taking some special kinds of exposures that are then applied to the “light frames” taken of
re called Dark Frames, Flat Fields and Bias Frames. software help gather these extra frames. After u to calibrate your images either automatically or
ames should be collected during each imaging session with the CCD at mes. This will ensure the best possible imagers plan their night of observing to begin oaches. That way, you don’t waste precious
the night sky. The calibration frames aMaxIm LE and other CCD camera control the frames are gathered, MaxIm allows yomanually.
All the calibration frthe same temperature used for the light fracalibration of the final images. Many CCDtaking the calibration frames as dawn apprdark time.
The image above is a single raw 6-minute image of the diffuse nebula M78 in Orion. Some bright stars are clearly visible along with some nebulosity but there are also scattered bright spots around the image caused by “hot” pixels.
ild
easy e image.
Dark Frames Dark frames are used to subtract the build up of dark current from a CCD image. Dark current is caused by heat. Similar to how CCDs convert the energy from a photon into a stored electron, CCDs also convert the energy from heat into stored electrons. CCDs buup “dark current” whether the CCD is being exposed to light or not. The rate that dark current builds up is dependent on the temperature of the CCD and can be dramatically reduced by cooling the CCD. Dark current builds up more slowly as the temperature of the CCD is reduced.
Most pixels on a CCD build up dark current at a fairly consistent rate but that rate will vary slightly from pixel to pixel. A subset of the pixels in a CCD will build up dark current at a dramatically different rate from the average. These pixels are called “hot pixels” or “dark pixels”. Hot pixels and dark pixels are both the result of slight imperfections introduced into the silicon substrate of the CCD during the manufacturing process. Hot pixels are veryto see in a raw CCD image as a series of bright dots placed randomly around th

Q S I 5 0 0 S E R I E S U S E R G U I D E
31
6-minute Dark Frame
Above is a 6-minute dark frame taken during the same imaging session with the above image of M78. Notice the brighter pixels scattered randomly around the image.
Note: The pixel values in this image have been stretched significantly to show the variations in the dark frame. In reality this image is almost completely black with perhaps a few hundred “hot” pixels. This is completely normal and a natural consequence of how CCDs are manufactured.
MaxIm LE automatically scales the visible range of pixels to match the underlying data. In the dark frame shown above the average pixel value is just 203 out of a ossible 16-bit dynamic range of 0-65,535. Seeing an automatically scaled dark frame r bias frame can
subtracted from a light frame to remove the dark current from the image. l
t a
r of dark frames you collect by using a set of bias frames but, in general,
po
be a bit disconcerting for a new imager. Fear not, this “noise” will be almost completely eliminated by subtracting a dark frame from your images.
Dark frames are This subtraction removes the slight differences in dark current build-up from pixel to pixealong with the larger variations caused by hot or dark pixels.
In general you’ll want to take at least 5 dark frames at each exposure used for your light frames. If all your light frames were taken with 5-minute exposures, you’ll need to collecset of 5-minute dark frames. If you took both 5-minute and 10-minute light frames, you’ll need a set of 5-minute dark frames and a set of 10 minute dark frames. There is a way to reduce the numbeyou’ll achieve the best results taking dark frames with the same exposure as your light frames.

Q S I 5 0 0 S E R I E S U S E R G U I D E
32
Original image
Original image minus dark frame
Look at the two images above. The top image is the original image as it came out of the te
otes, and to adjust for any pixel non-uniformity inherent in the CCD. Pixels in a spond slightly differently to light, typically within 1% to 2% across a CCD.
All optical systems have a “signature” which gets recorded on the CCD. This unique signature is caused by how light travels through the telescope illuminating the CCD and how each pixel responds to that illumination.
camera. The bottom image has had the average of 5 dark frames subtracted from it. Nothat the number and intensity of bright pixels have been dramatically reduced leaving a smoother black sky background.
Flat Fields Flat fields are used to correct for any irregularities in your optical system, such as vignettingor dust mCCD all re

Q S I 5 0 0 S E R I E S U S E R G U I D E
33
The image above has been manipulated to highlight the effect of dust motes on a filter or CCD cover glass. Note the 3 darker circles. Because dust will tend to stay in one place over a night of imaging, the variation in pixel values caused by the dust can be easily eliminated by properly applying a Flat Field.
A flat field is created by taking an image of an evenly illuminated subject. There are four common ways to create flat fields.
Lightbox flats – Using a lightbox is usually the easiest way to create good flat fields. There are a few commercial lightbox solutions, but many astronomers make their own. You can find plans in The New CCD Astronomy and The Handbook of Astronomical Image Processing as well as online. Search for “Telescope light box”.
Twilight flats – There is a brief time after the sun sets or just before it rises when the sky is appropriate for creating flat frames. Too early and the sky is too bright. Too late and stars will begin to show up in the image.
Dome flats – If your telescope is in an observatory, you can take dome flats. A dome flat is created by aiming your telescope at a white card placed somewhere on the inside of the dome.
Sky flats – Taking sky flats requires taking dozens or hundreds of images with
ction on Sky Flats in the Handbook of Astronomical
the telescope pointed at the sky with tracking turned off. All the images are combined into a master flat to remove the effect of any stars moving through the field. Sky flats require more time than the other three options so few amateurs take sky flats. We recommend reading the seImage Processing for additional details on taking sky flats.
e
noise and then take a series of dark frames (called flat-darks) using the same exposure you used for your flat fields. Just as with light frames, the flat-darks are subtracted from the flat fields to remove any contribution from dark current. Taking 16 flat fields and 16 flat-darks will yield excellent results. Luckily
Good flat fields require an exposure time such that the pixel wells are filled to approximately half their full capacity. With a QSI 500 Series camera you should strive to achieve averagpixel values between 20,000 and 30,000 out of a total of roughly 65,000. You shouldexperiment with exposure times to yield that result. Pixel values are commonly called“ADUs”, short for Analog to Digital Units.
You’ll need to take enough flat fields to average out the
Q S I 5 0 0 S E R I E S U S E R G U I D E
34
because flat fields tend to use fairly short exposures, you can often take a full series of flat fields and flat-darks in just a few minutes.
The resulting master Flat Field is used to scale the pixel values in the light frame, eliminating the effects of pixel non-uniformity, optical vignetting and dust on the optical surfaces.
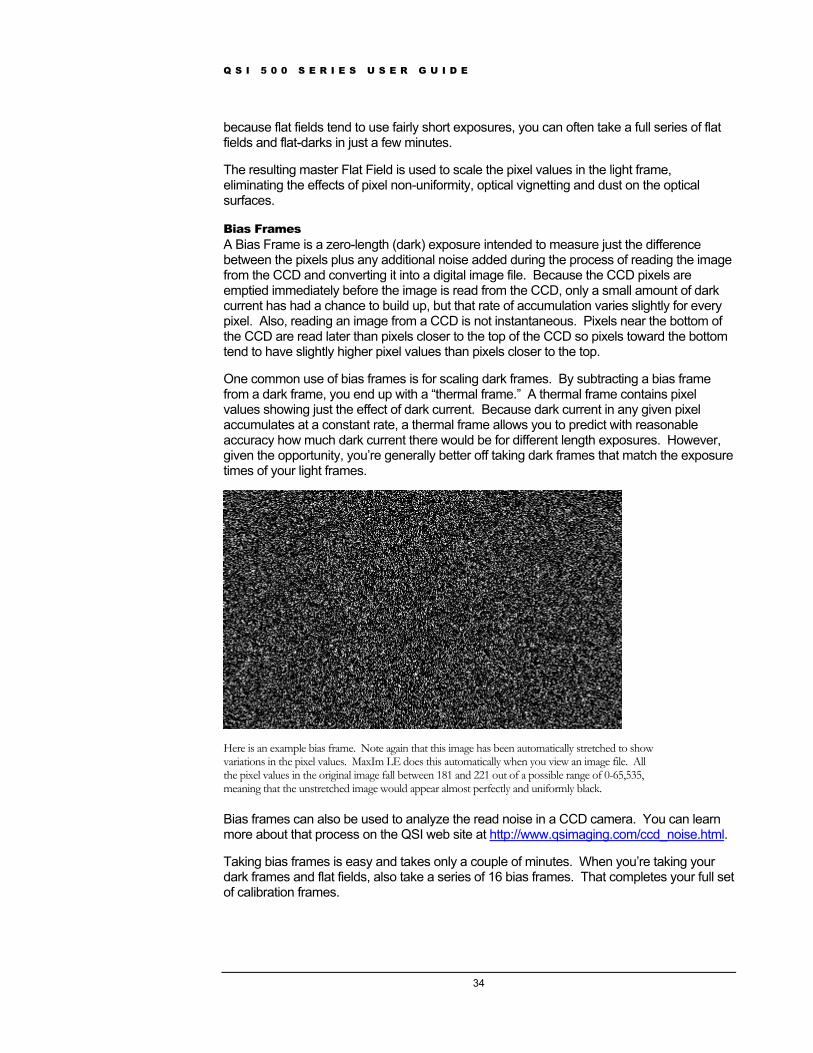
Bias Frames A Bias Frame is a zero-length (dark) exposure intended to measure just the difference between the pixels plus any additional noise added during the process of reading the image from the CCD and converting it into a digital image file. Because the CCD pixels are emptied immediately before the image is read from the CCD, only a small amount of dark current has had a chance to build up, but that rate of accumulation varies slightly for every pixel. Also, reading an image from a CCD is not instantaneous. Pixels near the bottom of the CCD are read later than pixels closer to the top of the CCD so pixels toward the bottom tend to have slightly higher pixel values than pixels closer to the top.
e dark current in any given pixel
, lly better off taking dark frames that match the exposure
time
One common use of bias frames is for scaling dark frames. By subtracting a bias frame from a dark frame, you end up with a “thermal frame.” A thermal frame contains pixel values showing just the effect of dark current. Becausaccumulates at a constant rate, a thermal frame allows you to predict with reasonable accuracy how much dark current there would be for different length exposures. Howevergiven the opportunity, you’re genera
s of your light frames.
ame. Note again that this image has been automatically stretched to show es. MaxIm LE does this automatically when you view an image file. All
Here is an example bias frvariations in the pixel valu
arn tml
the pixel values in the original image fall between 181 and 221 out of a possible range of 0-65,535, meaning that the unstretched image would appear almost perfectly and uniformly black.
Bias frames can also be used to analyze the read noise in a CCD camera. You can lemore about that process on the QSI web site at http://www.qsimaging.com/ccd_noise.h .
Taking bias frames is easy and takes only a couple of minutes. When you’re taking your dark frames and flat fields, also take a series of 16 bias frames. That completes your full set of calibration frames.

Q S I 5 0 0 S E R I E S U S E R G U I D E
35
Stacking Images After calibrating each of your raw images with dark frames, flat fields and bias frames,
noise in
e riations in pixel values tend to cancel each other out when multiple images are
lting in a smooth background, while non-random pixels, the bright objects in
combining or “stacking” multiple sub-exposures can be used to further reduce the your images. Stacking multiple images with a pixel-by-pixel average or median combine tends to increase the signal to noise ratio (SNR) of the combined image. This is becausrandom vacombined, resuthe night sky you’re trying to take a picture of, reinforce each other getting you closer to a true representation of the patch of sky you’re imaging.
The benefits of stacking images can be clearly seen by comparing an individual frame to apixel-by-pixel average of multiple frames.
Individual dark-subtracted image of M78
Average combine of 9 dark-subtracted images of M78
Averaging 9 separate images increases the signal to noise ratio of the final image, allowing the faint nebulosity in M78 to become visible and smoothing the black sky background. Adding more frames would further improve the results although you do end up in a situation

Q S I 5 0 0 S E R I E S U S E R G U I D E
36
of diminishing returns. Combining 18 frames will not yield a final image twice as good as
through different colored filters and then electronically combining the separate color channels. The most common method used by amateur astronomers for color imaging is called LRGB, where separate color images are taken through red, green and blue filters and combined with a set of “luminance” images taken through a luminance filter. The luminance filter is required because CCDs are generally responsive to frequencies of light that can’t be seen by the human eye. The luminance filter blocks the infrared (IR) and ultraviolet (UV) frequencies that fall outside the range of human vision.
The luminance filter passes most of the visible light coming from the object. Because the individual frames taken through the red, green and blue filters block roughly ⅔ of the total light, the luminance image will often reveal subtle details not apparent in the color images. This actually works out quite well since the human eye is much more sensitive to changes in brightness than it is to changes in color. Adding a combined RGB image using the same exposure times as the luminance image will yield a combined LRBG image that the human eye would perceive as being very close to the true colors of the object.
MaxIm LE can be used with your QSI 500 Series camera to collect and atalog the various create LRGB images. As with any images, you’ll want to ch filter and then calibrate and combine them in order to
reduce the major sources of noise. After calibration, you’ll have a master luminance image plus master red, green and blue images. Those master color frames are combined into your final image. In addition to the color image tools in MaxIm you can do further processing of your images in Adobe Photoshop or similar photo manipulation programs to yield impressive final results.
combining 9 frames.
Also note that in some cases, doing a “median combine” rather than an “average combine”may yield better results. A median combine is recommended if several of the individual frames have unique anomalies such as bright pixels caused by cosmic rays, satellites, airplanes, etc. With at least 5 images, a median combine completely eliminates extreme pixel values that occur in individual frames.
Color images Unless you’re using a single-shot color camera such as the QSI 520ci, producing color images requires taking separate exposures
cfiltered images that you’ll need tocollect multiple frames through ea

Q S I 5 0 0 S E R I E S U S E R G U I D E
37
Taking Images with your QSI 500 Series Camera
Launch MaxIm LE If you haven’t already launched MaxIm LE (or other camera control software), do so now. Double-click the MaxIm LE icon on your desktop or select “Programs > MaxIm LE > MaxIm LE” from the Windows Start menu. The MaxIm LE window should open looking similar to this:
Your window may look slightly different. If the Screen Stretch and Information windows aren’t open, open them by selecting “Screen Stretch Window” from the View menu, then selecting “Information window” from the View menu. You can move those windows around your screen to position them where they are most convenient.
Section
4

Q S I 5 0 0 S E R I E S U S E R G U I D E
38
Camera Control Window Select “Camera Control Window” from the View menu to open the CamWindow.
era Control
MaxIm should open the window and display the Setup tab. If another tab is displayed, click the Setup tab. MaxIm may recognize your QSI camera and automatically show it as the default camera in the Main CCD Camera field. If so, the Camera Control Window will look like this:

Q S I 5 0 0 S E R I E S U S E R G U I D E
39
If you don’t see “QSI Universal” listed in the Mbutton in the upper left corner under Main CCD
ain CCD Camera field, click the “Setup” Camera. The window below will open.
Select “QSI Universal” from the pop-up menu. Click OK.
That will take you back to the Camera Control Window. Click the “Connect” button to establish communication between MaxIm and your QSI camera. If MaxIm connects properly the Camera Control window will look like this:
Note that the current temperature of the CCD is displayed in the “Main CCD Camera” field toward the upper left of the Camera Control window. The “Setpoint” is the temperature that camera will cool the CCD to, and may be different than shown above.

Q S I 5 0 0 S E R I E S U S E R G U I D E
40
Cool the CCD To set the CCD cooling temperature you must first turn Cooling on by clicking the “CooleOn” button just to the left of the Connect button. After turn
r ing cooling on, the Camera
Control window will look like this:
The camera will immediately begin cooling the CCD to achieve the current setpoint temperature. To select a different setpoint temperature, click the “Cooler” button at the bottom left of the Main CCD Camera field. That will open the “Set Camera Cooler” window on top of the Camera Control window.
Enter a new temperature in the Setpoint field and click OK.
The camera will automatically select the right amount of power to apply to the coolers to drive the CCD to the correct temperature. The Main CCD Camera field will show the CCD temperature setpoint, the current CCD temperature and the amount of power being applied to the CCD. The camera should reach the setpoint temperature and stabilize within 5 to 10 minutes depending on conditions and the amount of cooling required.

Q S I 5 0 0 S E R I E S U S E R G U I D E
41
Note: Please refer to the Cooling the Camera discussion in Section 2 Camera Features and Controls for in-depth information on cooling your 500 Series camera and the available cooling options.
Focusing with MaxIm LE Achieving precise focus is critical for producing high quality astronomical photos. This seemingly simple task is surprisingly difficult when using the long focal lengths typical of astronomical telescopes. Fast telescopes with small focal ratios are great for astrophotography, but they make focusing even more of a challenge. The smaller the focal ratio, the shorter the critical focus zone. With some optical systems, the size of the critical focus zone can be less than 100 microns (0.1 millimeters), or roughly 0.003 inches.
MaxIm LE includes a Focus tab to assist with achieving critical focus. In the Camera Control Window, click the Focus Tab.
The Focus tab allows you to take a continuous series of short exposures while adjusting the focus of your telescope or other lens. As stars come into focus they produce a smaller disk of light with more of the total light from the star being focused into a smaller area. The Focus tab window should be set as shown above. You may need to adjust the exposure

Q S I 5 0 0 S E R I E S U S E R G U I D E
42
time in the “Seconds” field to the time necessary to see a few bright stars. Setting the exposure time as short as necessary to see a few bright stars allows you take more focus images in a shorter period of time, generally allowing you to achieve reasonably sharp focus fairly quickly. When you are satisfied with the focus, click “Stop”.
Note: The Inspect tab next to the Focus tab can help you achieve critical focus by analyzing the area around the brightest point light source in an image. Review the MaxIm LE online help on focusing for additional details.
Take a single image connecting to the camera, letting the camera stabilize at the desired temperature, and
achieving critical focus, you’re finally ready to begin taking “light frames”.
Click o not visible, The window
After
n the Camera Control window to make it active. If the Camera Control window isselect “Camera Control Window” from the View menu. Click the “Expose” tab. will look similar to this:
Click “Light” under the “Type” to select a “light frame.” If you have a camera with a color filter wheel, select the filter that want to use for this exposure. On a QSI 500 Series “ws” model with internal color filter wheel, Filter 4 by default contains the “L” or luminance filter. Set the exposure length in the Minutes and Seconds field.
Tip: The Seconds field can accept values between 0.03 seconds and 32767 seconds so you won’t need to use the Minutes field unless that’s more natural for you.
When the settings in the Expose tab are set properly, click the Expose button to begin the exposure. While the camera is exposing the image, the Status LED on the back of the camera will flash red. When the exposure is complete and the im e is being downloaded, agit will flash yellow.

Q S I 5 0 0 S E R I E S U S E R G U I D E
43
View the image in MaxIm LE When an exposure has completed, MaxIm will automatically download and display the image in a new window.
After downloading the image, examine it to see if the target is properly framed and the exposure time is appropriate. The best astronomical images are achieved when the full dynamic range of the CCD is utilized.
If you like the image, save it by selecting “Save” from the File menu. If you need to adjust the framing, focus or exposure, make the necessary changes then click the “Expose” button again. When you’re happy with the image, save it with an appro ate name so you remember what the target, temperature and exposure setting were. After a long night of
pri
imaging, it is difficult to remember what settings were used with which image files.
Tip: The FITS file format used as the default file format by MaxIm LE and most astronomical image processing programs stores a number of settings about the image inside the file. MaxIm LE automatically stores the exposure time, filter settings, and CCD temperature among other values associated with each image. MaxIm will also store your name, telescope specifications and location into the FITS headers if you first enter it in the FITS Header tab of the File > Settings… window. To see the information stored in the FITS header of an image file, select “FITS Header Window” from the View menu.
Take a series of images Achieving the best astronomical images generally requires gathering a lot of light. Taking multiple sub-exposures of, say, 5 minutes, is generally easier than trying to take a single 60

Q S I 5 0 0 S E R I E S U S E R G U I D E
44
minute image. Tracking errors, improper polar alignmrays all conspire to make it difficult to be successful wi
ent, airplanes, satellites, and cosmic th very long exposures. Plus it’s a lot
-
MaxIm makes taking multiple sub-exposures easy. It’s even possible to set up an entire night of images and then go to sleep. To set up a sequence of images, bring the Camera Control Window to the front and click on the “Sequence” tab.
less frustrating to throw away one 5-minute exposure out of a total of 12 than a single 60minute exposure.
Establish a base file name for the sequence of images by entering a text string in the “Autosave Filename” field. All the images taken in the sequence will begin with that base filename. Set “Start at” to 1. This determines the starting sequence number a ied to each series of images.
ab . Select “Setup Sequence…” from the Options
menu. This will open the “Setup Sequence” window.
ppl
Click the black arrowhead to the right of “Options” along the right edge of the Sequence twindow. The Options menu will popup

Q S I 5 0 0 S E R I E S U S E R G U I D E
45
The Setup Sequence window allows you to setup up 16 different groups of images to take during a single automated sequence. In the window above, we show 6 different steps in thesequence. MaxIm LE will take five 360 second light frames each with the red, green and then blue filters, ten
360 second light frames with the luminance filter, 12 360 second dark frames and 16 bias frames. The total duration of the sequence is shown along the bottom
The default behavior of MaxIm LE is to take one image in each grouping (e.g., one “R” image followed by 1 “G” image, etc.) cycling through all the active groups. If you prefer to take all the “R” images followed by all the “G” images, etc., click the black arrowhead next to Options along the bottom of the Setup Sequence window and select “Group by Slot”.
under “Duration.” This sequence of images will take 13,502 seconds, or roughly 3 hours and 45 minutes.
Note: The “Suffix” field will be appended to each image filename along with a sequence number. So the full filename of the first light frame taken through the red filter would be “M78 QSI 0C-001-R360.fit”. This name identifies the target (M78) the camera model (QSI), the CCD temperature (0C), the sequence number (001) and the filter and exposure length (R360). You can of course choose your own naming scheme.
When you’ve setup the sequence of image you would like to take, click OK to return to the Camera Control window. Click the “Start” button to begin the sequence. All the imagethe sequence will be run automatically, including moving the filter wheel to the appropriate filter, until the sequence is complete. You are free to perform other tasks, or even take anap, until the sequence
s in
completes. Review the MaxIm LE online help regarding
Image calibration is the process of removing or reducing predictable types of noise and variations in pixel brightness not caused by light from your subject striking the CCD. The calibration frames should include:
1. 5 or more Dark frames You’ll want at least 5 dark frames taken at each exposure length used for your light frames. If all your light frames were taken with a 5-minute exposure you’ll only need one set of dark frames. If you took 2-minute, 5-minute and 10-minute exposures you’ll need a set of dark frames for each exposure length.
2. 16 Bias frames (for scaling dark frames if necessary)
Plus optionally…
3. 5 Flat field frames
Sequences for additional details.
Image Calibration
Note: If you took images through different filters, for the best results you’ll want separate flat fields with each filter to record the unique optical signature produced through each filter.
4. 16 flat-darks

Q S I 5 0 0 S E R I E S U S E R G U I D E
46
The above numbers represent the minimum of each type of frame you should use. Taking more of each type of frame will further reduce the noise present in each calibration master image and improve your final results.
Why you take different types of image calibration frames was discussed in some depth in the CCD Imaging Overview section. This section covers how to take the required calibration frames.
In the previous section, we showed how to use the Sequence tab to automatically take a sequence of images. Adding the required dark frames to an automated sequence is often conven many dark fra r. Taking environ ight frames
An exc me during the night is reserved for taking light frames. Dark frames can be taken after the sun starts to light up the sky as long as no stray
g , take at
exposure. Taking more dark frames reduces the r, producing higher quality images.
e
n general you should plan on always taking at least one set of bia aging session.
To take Sequen ring the imag r light and dar
Fla iFlat eld rities in your optical system, such as vignetting or dust motes, and t sensitivity of each pixel on the CCD. Some astroimagers con onal. While calibrating images with flat fields does not have as dramatic an effect on CCD images as applying dark frames, flat fields are nevertheless importa
Most a tely dark or oaches. If you’re taking twilight flats the timing of those images is critical as you have only a few minutes when the sky is appropriate for taking twili rames and bias frames it is important that flat field frames are
Dark Frames Dark frames are used to subtract the build-up of dark current from raw CCD images. Subtracting dark current is generally considered the most important image calibration step.
ient because taking dark frames consumes a lot of time. You need at least as mes as you take for each type of light frame, twice as many darks is even bette
the dark frames in the same sequence as the light frames also ensures that themental conditions are as close as possible to the conditions when you took the l. This ensures the closest match when subtracting dark frames from light frames.
eption to this rule is if all the dark ti
light reaches the CCD and the camera can maintain the same CCD temperature as the morning air starts to heat up.
To take a series of dark frames, either add them as an additional group in the Setup Sequence window or setup a new sequence of just dark frames at a convenient time durinthe imaging session. If you’re taking 5 exposures each with the R, G and B filtersleast 10 dark frames using the samenoise in the combined dark maste
Bias Frames Bias Frames record just the subtle variations in the zero level of each pixel plus any noisintroduced when reading the image from the CCD. Taking a complete set of bias frames takes only a couple of minutes so i
s frames during each im
a series of bias frames, either add them as an additional group in the Setup ce window, or setup a new sequence of just bias frames at a convenient time duing session. Take at least 16 bias frames at the same temperature as you
k frames.
t F elds fi s record any irregula the slightly different lighsider flat fields to be opti
nt for producing the best images with the highest possible signal to noise ratio.
stronomers take their flat fields either in the evening before the sky gets comple in the morning as dawn appr
ght flats. As with dark f

Q S I 5 0 0 S E R I E S U S E R G U I D E
47
taken with the CCD at the same temperature as your light frames. If you’re taking LRBG or other filtered images, ideally you should take a set of flat fields through each filter.
Setup your telescope and possibly your light box to take your preferred style of flats. Adjust I
with ould take at least as many flat frames as the light frames you took
through each filter. Taking additional flat fields will produce a master flat with less noise, lity images. Do not change your focus. To get correct flat fields, it is
Flat Darks
t-
n in MaxIm LE. For complete instructions on calibrating
images, please see the online help in MaxIm LE.
e. tructions on
images.
the exposure so the average pixel is filled to approximately half its full well depth. With QS500 Series cameras you should strive for pixel values of roughly 30,000 ADUs. Asdark frames, you sh
yielding higher quaimportant that the focus be identical to the focus used for the light frames.
As with any exposure using a CCD camera, dark current builds up while taking a flat field image therefore the dark current must be subtracted with a dark frame taken at the same exposure as the flat field. Taking flat-darks is easier and less time consuming than regular dark frames because the exposure time of flat field images is typically much shorter than your light frames. If you take flat field images, it is critical that you also take a series of fladarks. They’re easy to take with the shorter exposure, so take at least 15 flat-darks.
Manual Image Calibration MaxIm LE supports both automatic and manual image calibration. This section describesbasic manual image calibratio
Subtract Dark Frames Begin by creating a master Dark Frame for each exposure length. A master dark frame is created by combining all the individual dark frames using an average or median combinSee the section below Combine Frames in MaxIm LE for detailed inscombining multiple
Tip: In general, an average combine of multiple images will yield a combined image with slightly less noise than a median combine, but this requires that none of the frames being combined have any anomalous groups of light or dark pixels caused by, for instance, cosmic rays.
Other programs, such as MaxIm DL, include additional combine methods that attempt to provide the low noise of an average combine with the anomalous pixel rejection of a median combine. You will need to experiment to achieve the best results.

Q S I 5 0 0 S E R I E S U S E R G U I D E
48
Dark frame showing two cosmic ray hits in lower right hand quadrant
Inspect your dark frames for cosmic ray strikes or other anomalous pixel groupings. The c ray hits in the lower right quadrant of the image.
icles originating from somewhere in space. They can come
set each have cosmic ray hits, doing a median combine of all the images may yield a better combined image than averaging just the clean frames. Experim
After y each othe Pro
dark frame above shows two cosmiCosmic rays are energetic partfrom any direction and depending on the angle that they strike the CCD can be very long if they are nearly parallel with the CCD or just a bright circle if they strike perpendicular to the CCD.
If multiple dark frames in your
ent to get the best results.
ou’ve created your master dark frame for a given exposure length, subtract it fromf the light frames with that same exposure. Do this by selecting “Pixel Math…” from cess menu.

Q S I 5 0 0 S E R I E S U S E R G U I D E
49
Screenshot showing Pixel Math command ready to subtract a master dark frame.
Select your light frame for Image A at the top and your master dark for Image B. Select
me. If you took multiple images through different filters you will need to create a master light frame for each color.
Scale by Flat Fields Scaling dark subtracted images by flat fields follows a similar process to subtracting dark frames.
“Subtract” for the operation. Click OK. You should see many of the bright pixels scattered around the light frame, disappear or get visibly darker. Do this with each of your light frames. After dark subtracting the individual light frames, the light frames can be combined into a master light fra
Note: Taking proper flat fields can be tricky. If the flat fields aren’t exposed and processed properly, scaling an image by an improper flat field can produce worse results than not calibrating with flat fields at all. Experiment and practice for the best results.

Q S I 5 0 0 S E R I E S U S E R G U I D E
50
1. Produce a master dark flat following the steps above for creating a master dark frame.
2. Subtract the master dark flat from each of the flat fields.
3. Produce a master flat field by averaging the dark-subtracted flat field images.
4. Finally, divide the master flat field image into each of the dark-subtracted light frames.
Save the resulting images with names that identify the frames as dark subtracted and scaled by a flat field.
ration in MaxIm LE
using automatic image calibration in MaxIm. Many astrophotographers prefer to do all their image calibration manually in order to maintain the greatest control over the calibratamountimages
Begin b ur calibration frames into the same directory as your light frames. This makes it easier for MaxIm to automatically find and characterize each of the calibration frames.
See the section below Combine Frames in MaxIm LE for how to combine the now calibrated individual frames into a master light frame. If you took multiple images through different filters, you’ll need to create a master light frame for each filter (e.g., red, green, blue, luminance for LRGB images).
Automatic CalibThe section above described manual image calibration in MaxIm LE. This section describes
ion process, but used properly, automatic image calibration can save significant s of time and yield excellent results. For complete instructions on calibrating , please see the online help provided with MaxIm LE.
y gathering all of yo

Q S I 5 0 0 S E R I E S U S E R G U I D E
51
Launch MaxIm LE. Choose “Set Calibration” from the Process menu. That will open the Set Calibration window.
By default, MaxIm expects to calibrate images with bias frames, dFor this example we’re only going to show calibrating with bias fram
ark frames and flat fields. es and dark frames.
Note: MaxIm also has a Calibration Wizard that steps you through the process of setting up your image calibration. For details on the Calibration Wizard please consult the online help in MaxIm LE.
If you’re not calibrating with flats, as in this example, uncheck the three “Flat” checkboxealong the top of the Set Calibration window.
s
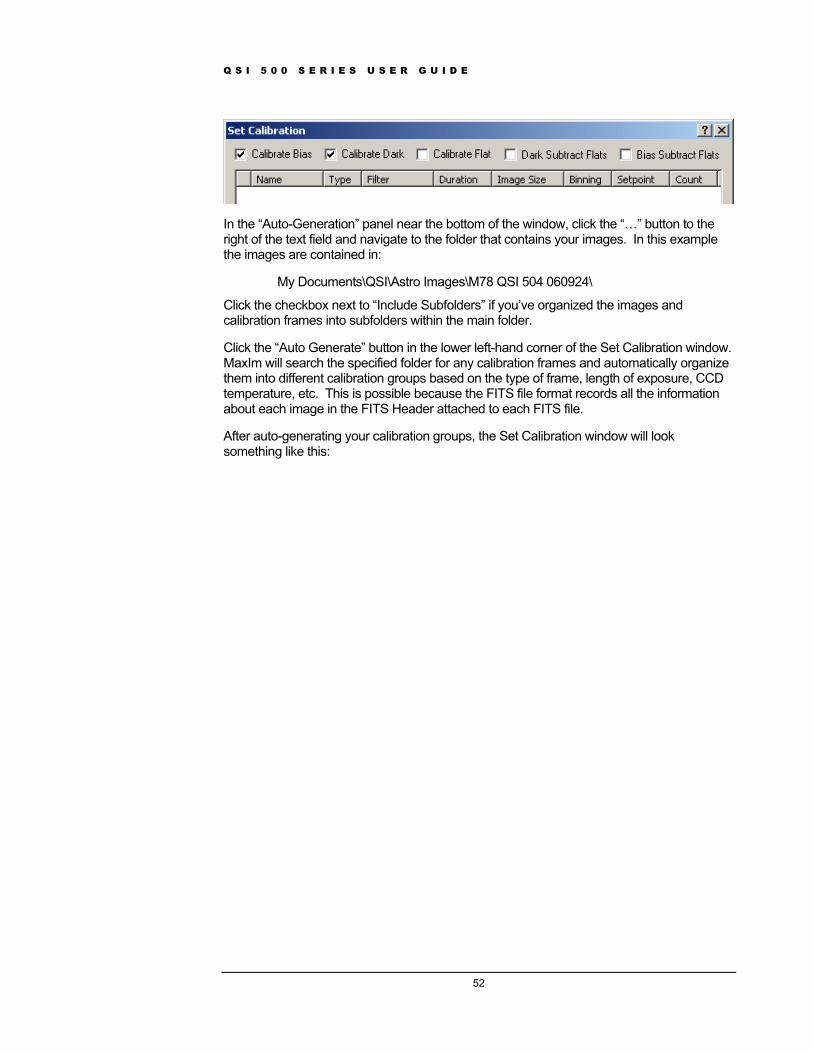
Q S I 5 0 0 S E R I E S U S E R G U I D E
52
In the “Auto-Generation” panel near the bottom of the window, click the “…” button to the right of the text field and navigate to the folder that contains your images. In this example the images are contained in:
My Documents\QSI\Astro Images\M78 QSI 504 060924\
Click the checkbox next to “Include Subfolders” if you’ve organized the images and calibration frames into subfolders within the main folder.
Click the “Auto Generate” button in the lower left-hand corner of the Set Calibration window. MaxIm will search the specified folder for any calibration frames and automatically organize them into different calibration groups based on the type of frame, length of exposure, CCD temperature, etc. This is possible because the FITS file format records all the information about each image in the FITS Header attached to each FITS file.
After auto-generating your calibration groups, the Set Calibration window will look something like this:

Q S I 5 0 0 S E R I E S U S E R G U I D E
53
The upper panel lists the groups of calibration frames that MaxIm identified. The first calibration group should be selected. The lower “Group Properties” panel lists the files in the selected calibration group. Click on the group labeled “Dark1” in the upper panel to see the files in that group.
For each calibration group, you can select whether the master image for the group should be created by averaging each pixel in the individual frames or using the median value of each pixel. Setting the “Combine Type” to average will generally yield the lowest noise master frame but any irregularities in any of the images, such as from a cosmic ray hit, will show up in the master image. Setting the combine type to Median eliminates any excessively dark or light pixels in an individual image from affecting the master but produces a master image with slightly more noise than an average combine of clean individual calibration frames.
If MaxIm correctly identified all the calibration groups you created, you can click OK to close the Set Calibration window. Optionally you can click the “Replace w/Masters” button next to the Auto-Generate button. When Replace w/Masters is pressed, MaxIm will combine all the

Q S I 5 0 0 S E R I E S U S E R G U I D E
54
images in each calibration group and save the combined master image in the same directory as the individual frames. It will then modify the calibration groups to use each master frame. Using “Replace w/Masters” saves a little time while calibrating images because MaxIm only has to load and process one master file as opposed to all the individual frames.
After clicking “Replace w/Masters” the Set Calibration window will look like this:
Note: MaxIm assigns a name to the master calibration frames that shows all the unique characteristics about the calibration group used to create it.
Click “OK” to close the Set Calibration window.
Calibrate Images in MaxIm LE r
Now that you’ve told MaxIm about all your calibration frames you’re ready to calibrate youlight frames. We’re going to show an example of calibrating the “luminance” or “L” images. If you’re taking LRGB images, the same techniques will be applied to processing the images taken through the red, green and blue filters.
Open all the luminance images in MaxIm LE. In this example 9 luminance images were taken with an exposure of 360 seconds each. All the luminance images were given a filename suffix of “L” when the image sequence was setup using the Sequence tab in theCamera Control window. Select multiple files from within a folder and drag them all at once into MaxIm or select “Open…” from the File menu and open individual or multiple files in a single operation.
With the files open in MaxIm, select “Calibrate All” from the Process menu.
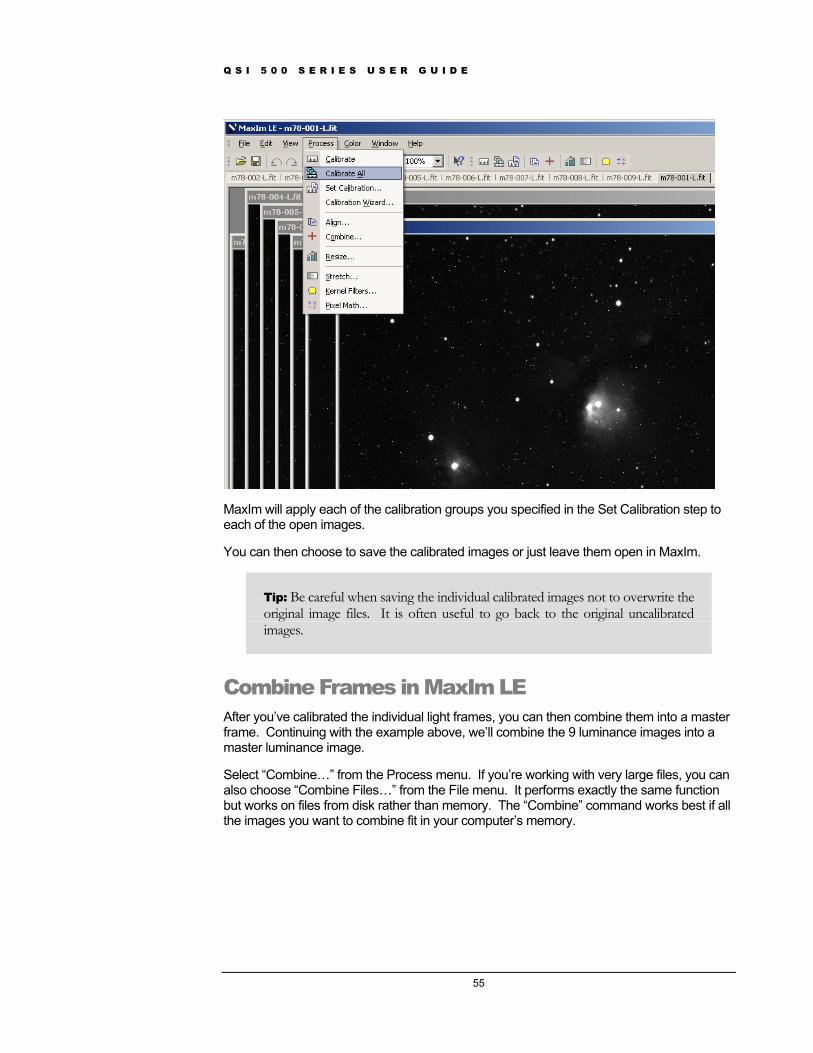
Q S I 5 0 0 S E R I E S U S E R G U I D E
55
MaxIm will apply each of the calibration groups you specified in the Set Calibration step to each of the open images.
You can then choose to save the calibrated images or just leave them open in MaxIm.
Tip: Be careful when saving the individual calibrated images not to overwrite the original image files. It is often useful to go back to the original uncalibrated images.
Combine Frames in MaxIm LE After you’ve calibrated the individual light frames, you can then combine them into a master frame. Continuing with the example above, we’ll combine the 9 luminance images into a
n
ant to combine fit in your computer’s memory.
master luminance image.
Select “Combine…” from the Process menu. If you’re working with very large files, you caalso choose “Combine Files…” from the File menu. It performs exactly the same function but works on files from disk rather than memory. The “Combine” command works best if all the images you w

Q S I 5 0 0 S E R I E S U S E R G U I D E
56
The dialog box above will open showing a list of all currently open files on the left. Select individual image files and then click the “>>” button to add them to the list of Selected Images or click the “Add All” button to add all the images. Click OK.
This brings up the Combine Images dialog, which performs two related functions. It aligns and then combines the individual images. Alignment is important because unless you have absolutely perfect polar alignment and tracking, the position of individual stars will shift
of manual alignment. Other programs, including MaxIm DL
rotate individual frames to line up the stars in the images.
MaxIm the checkbcalculat nter of mass of a point object like a star allowing sub-pixel alignment. With Auto Next set, each time you click on an image to pick the alignment star, MaxIm will automatically proceed to the next image. Select a star fairly near the edge of the first image
e alignment process. If “Auto Next” e same star in each image.
slightly between images.
MaxIm LE provides 3 typesprovide additional types of alignment including fully automatic alignment. For this example we’re going to use the Align Mode, “Manual 2 stars.” This 2 star alignment will shift and
makes manually aligning the images painless. If you’re aligning on stars, click oxes next to “Use Centroid” and “Auto Next”. With “Use Centroid” MaxIm will e the ce
and click on it. That sets the position of the first star in this set, MaxIm will display the next image file. Click on th
In the dialog box below we are already half way through the alignment process. Note that the “Center Point” is set to “23, 57” and the “Star 2” button is depressed.
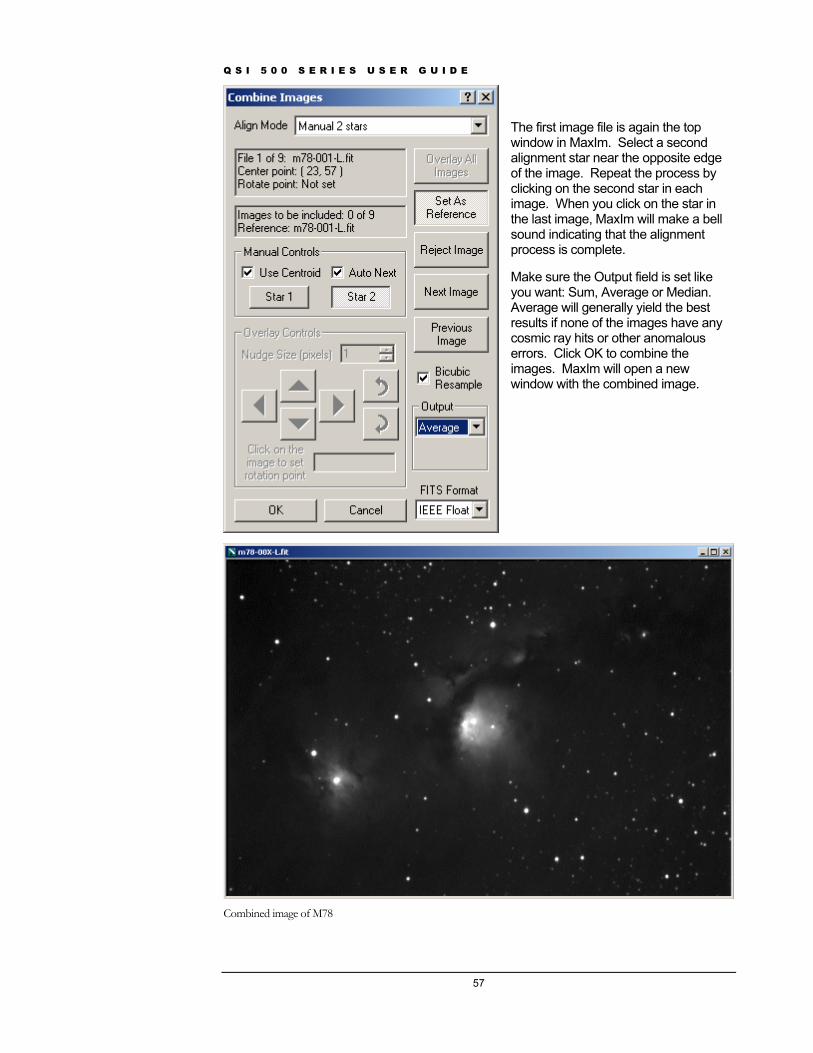
Q S I 5 0 0 S E R I E S U S E R G U I D E
57
The first image file is again the top window in MaxIm. Select a second alignment star near the opposite edge of the image. Repeat the process by clicking on the second star in each image. When you click on the star in the last image, MaxIm will make a bell sound indicating that the alignment process is complete.
Make sure the Output field is set like you want: Sum, Average or Median. Average will generally yield the best results if none of the images have any cosmic ray hits or other anomalous errors. Click OK to combine the images. MaxIm will open a new window with the combined image.
Combined image of M78

Q S I 5 0 0 S E R I E S U S E R G U I D E
58
If everything was done correctly the calibrated and c onal detail with less noise and greater contrast than the i e of displayed brightness levels in Screen Stretch windifferent parts of the raw image file. Save the image y this image as a combined master image.
MaxIm provides additional tools for manipulating im Image Processing in MaxIm for additional details. AMaxIm, many astronomers prefer to move the indivi e Photoshop or other dedicated image processing pro ssing.
Binning Binning allows you to combine multiple pixels into wthree times as big as an individual pixel. The stand t each logical pixel is equal to one physical pixel. The 2 and 3x3 binning. Larger binning modes like these provirange at the expense of resolution.
The following image illustrates how rows and colum s of pixels are combined when binning an image. Notice how the effective dimensions of the CCD changes with the degree of binning.
ombined image should show additindividual frames. Changing the rangdow will show additional detail in with a name that allows you to identif
ages. Please refer to the online help onfter performing image calibration in dual or combined image files into Adobgram for further proce
hat are effectively larger pixels twice or ard binning mode is 1x1 meaning tha QSI 500 Series also supports 2x
de increased sensitivity and dynamic
n
1x1 Binning 2x2 Binning 3x3 Binning 768x512 384x256 256x170 QSI 504 image size
Binning other than 1x1 is typically used in two different situations. First, the human eye is much more sensitive to subtle changes in image brightness than it is to small changes in color. This can be taken advantage when producing color images by taking luminance images through the “L” filter binned 1x1 and red, green and blue images binned 2x2. When combined with the luminance image the 2x2 binned color image is almost indistinguishable from using 1x1 binning for the color frames.
The second situation where 2x2 or higher binning is used is when seeing conditions don’t support high resolution imaging. If each pixel on your CCD “sees” 2 arc seconds of the sky through your telescope and the local seeing conditions are only 4 arc seconds, you won’t benefit from the increased resolution offered by 1x1 binning. In this case, binning 2x2 will yield optimal results.
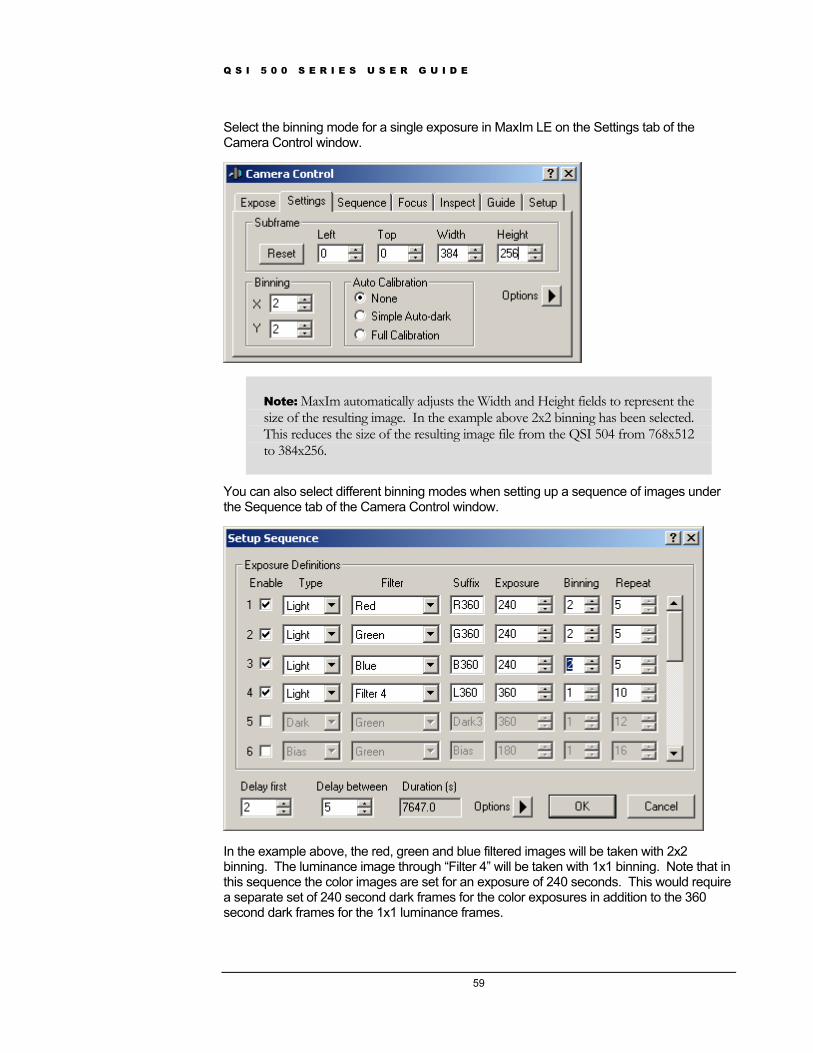
Q S I 5 0 0 S E R I E S U S E R G U I D E
59
Select the binning mode for a single exposure in MaxIm LE on the Settings tab of the Camera Control window.
Note: MaxIm automatically adjusts the Width and Height fields to represent the size of the resulting image. In the example above 2x2 binning has been selected. This reduces the size of the resulting image file from the QSI 504 from 768x512 to 384x256.
You can also select different binning modes when setting up a sequence of images under the Sequence tab of the Camera Control window.
In the example above, the red, green and blue filtered images will be taken with 2x2 binning. The luminance image through “Filter 4” will be taken with 1x1 binning. Note that in this sequence the color images are set for an exposure of 240 seconds. This would require a separate set of 240 second dark frames for the color exposures in addition to the 360 second dark frames for the 1x1 luminance frames.

Q S I 5 0 0 S E R I E S U S E R G U I D E
60
Note: When using binning other than 1x1, the pixels are combined inside the CCD before reading and converting the combined pixel charge to a numeric value. This results in lower overall noise than reading each pixel separately and combining them numerically in your computer.. With 2x2 binning for instance, only one pixel value (representing a square of 4 physical pixels) is fed through the CCD output amplifier resulting in ¼ the noise as reading each of the 1x1 pixels separately.

Q S I 5 0 0 S E R I E S U S E R G U I D E
61
UsinSome lor filter wh From the faccome w
1. Red
2. Green
3. Blue
4. Luminance
5. Empty
In the picture above with the front cover removed from the camera, filter position 5 is shown empty over the shutter opening. Note that the dichroic filters supplied with 500 Series cameras reflect the light not passed by the narrow band filter (e.g. the red filter reflects cyan). Specify which filter to use for a single exposure in MaxIm LE in the Camera Control Expose window by selecting the filter in the pop-up menu
g the internal Color Filter Wheel QSI 500 Series cameras include an internal 5-position color filter wheel. The coeel is controlled automatically by MaxIm LE or other camera control software.
tory, the 5 positions of the filter wheel ith the following filters:
In a sequence of images, you can specify a different filter for each sequence group. Refer to the Setup Sequence window in the previous section. That sequence shows four sequence groups, one each through the Red, Green, Blue and Luminance filters (shown as Filter 4). Before each image is exposed the correct filter will be rotated into position.
For information on removing the front cover of the camera to add, remove or clean the color filters, refer to the Care & Maintenance section.

Q S I 5 0 0 S E R I E S U S E R G U I D E
62
Shutting down your camera QSI cameras can safely be turned off by removing the power cable at any time, however itis best to let the temperature of the CCD rise close to the air temperature before removing power.
Click on the Setup Tab in the Camera Control window. Click the Cooler Off button to turn off the CCD cooler. The fans will continue to run dissipating heat from the thermoelectric coolers. When the temperature of the CCD begins to stabilize near the air temperature, click Disconnect to disconnect from the camera.
Unplug the power plug from the camera.
Controlling your camera with other software QSI camera drivers are included on the installation CD for MaxIm DL from Diffraction Limited and CCDSoft from Software Bisque. Follow the instructions in the installer if you want to control your QSI 500 Series camera with either of these applications.
Your camera can also be controlled with our ASCOM-compatible ActiveX API. For complete details on the ActiveX API please visit the Software and Drivers page on the QSI web site, http://www.qsimaging.com/software.html.

Q S I 5 0 0 S E R I E S U S E R G U I D E
63
Guiding maging camera or as an autoguider. rs. Other camera control software,
a QSI camera.
Video DirectShow
rt sends ble from
rn
AutoGuider port on a Losmandy Gemini System. Please refer to your camera and mount specifications to confirm your mount is compatible with the signals from the QSI 500 Series camera. QSI offers an optional Guider Break-Out Box (GBOB) for connecting to older or non-standard mounts. Please see the QSI web site for complete details.
The QSI 500 Series camera can be used as you main iMaxIm LE supports the following cameras as autoguidesuch as MaxIm DL support additional autoguiders with
Autoguider support in MaxIm LE Any QSI camera
Any recent SBIG camera
Meade DSI (including DSI Pro, DSI Pro II)
Orion StarShoot
Lumenera
QSI 500 Series cameras have a Guider port on the bottom of the camera. This poguider correcting signals to your telescope mount. Connect the included guider cathe camera Guider port to the AutoGuider port on your telescope mount. The guider correction signals output by the QSI 500 and the included cable will work with most modetelescope mounts.
The photo to the left shows the guider cable connected to the
Section
5
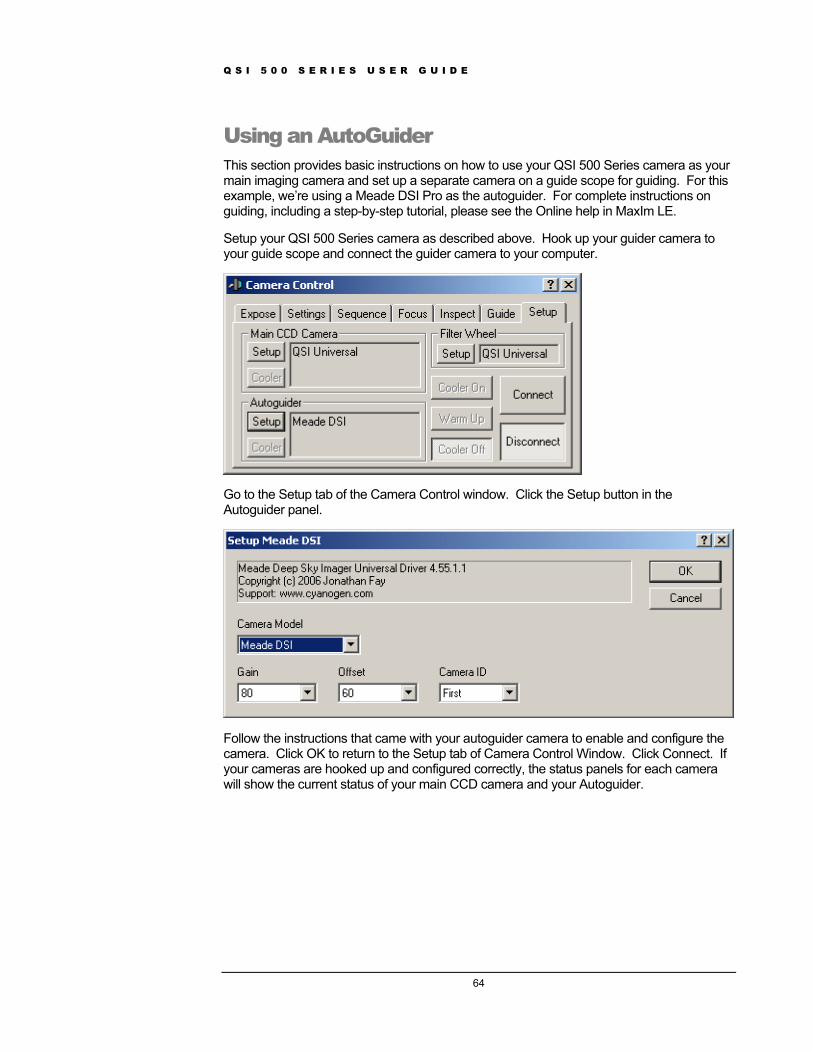
Q S I 5 0 0 S E R I E S U S E R G U I D E
64
Using an AutoGuider This section provides basic instructions on how to use your QSI 500 Semain imaging camera and set up a separate camera on a guide scope fexample, we’re using a Meade DSI Pro as the autoguider. For completguiding, including a step-by-step tutorial, please see the Online help in M
Setup your QSI 500 Series camera as described above. Hook up your nect the guider camera to your computer.
ries camera as your or guiding. For this e instructions on axIm LE.
guider camera to your guide scope and con
Go to the Setup tab of the Camera Control window. Click the Setup button in the Autoguider panel.
Follow the instructions that came with your autoguider c the camera. Click OK to return to the Setup tab of Camera f your cameras are hooked up and configured correctly, th will show the current status of your main CCD camera a
amera to enable and configureControl Window. Click Connect. Ie status panels for each camera
nd your Autoguider.
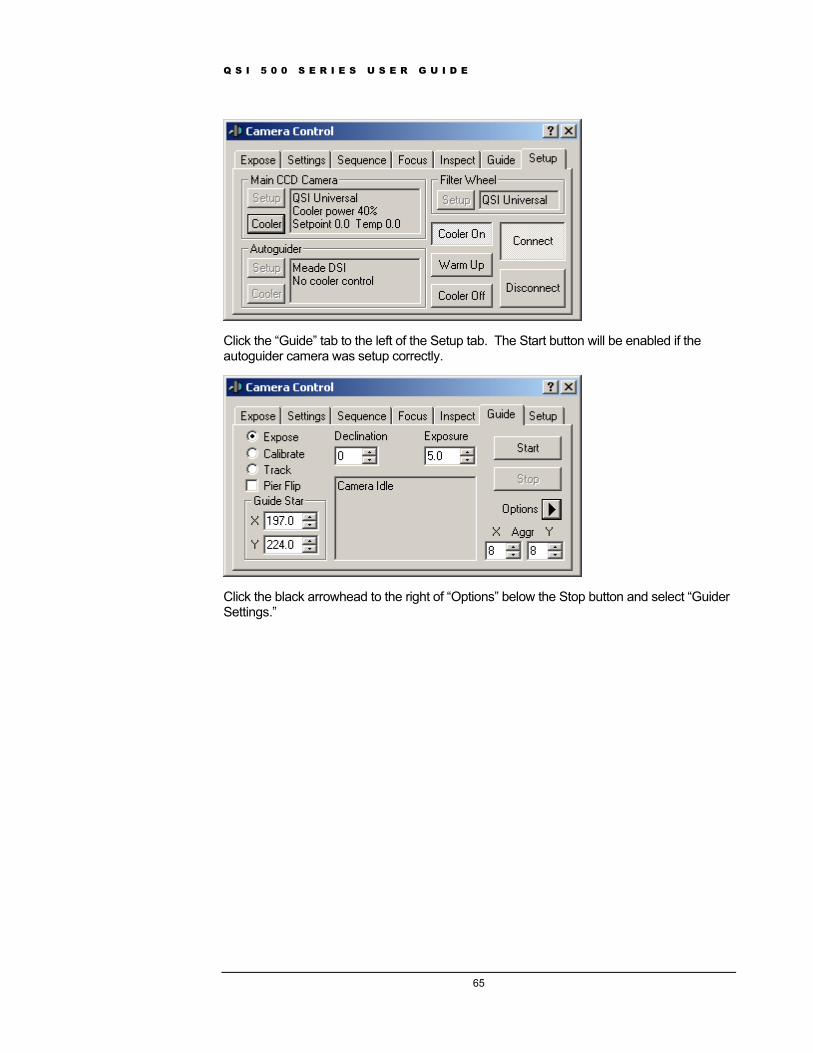
Q S I 5 0 0 S E R I E S U S E R G U I D E
65
Click the “Guide” tab to the left of the Setup tab. The Start button will be enabled if the autoguider camera was setup correctly.
Click the black arrowhead to the right of “Options” below the Stop button and select “Guider Settings.”

Q S I 5 0 0 S E R I E S U S E R G U I D E
66
In the guider settings window, make sure that “Main Relays” is selected in the “Control Via” pop-up list under Autoguider Output. This instructs MaxIm to send the autoguider control signals through the Guider port on the QSI 500 Series camera. If your autoguider camera also has a guider port, you can select “Guider Relays” to send the signals through the autoguider camera. MaxIm supports additional methods of generating the correct control signals. See the online help in MaxIm LE for complete details. Click OK to close the Guider
eed to focus your guide scope. You can take an image with your autoguider by pressing the Start button. Set the exposure only as long as necessary to still yield well-defined stars. Shorter exposures allow quicker cycles between guiding exposures and smoother guiding.
The first time you press Start with a new exposure length, MaxIm LE will automatically take a dark frame. Follow the instructions on screen. Press Start as necessary to take additional images while focusing your guide scope. Stop when you are satisfied with the focus and exposure length.
Settings window and return to the Guide tab of the Camera Control Window.
You may n

Q S I 5 0 0 S E R I E S U S E R G U I D E
67
MaxIm LE automatically selects the brightest star as the guide star.
You are now set up for guiding. Continue with instructions in the online help in MaxIm LE to calibrate your autoguider and begin tracking the selected guide star.
For complete instructions on autoguiding in MaxIm LE please refer to the “Autoguiding” section of the online help in MaxIm.
Using a QSI 500 Series Camera as an AutoGuider ain
n of MaxIm DL and CCDSoft supports additional options.
Your QSI 500 Series can be used as an autoguider with another camera as your mimaging camera. If using MaxIm LE, the main CCD camera must be set as a QSI cameraor “No Camera.” The full versio
Note: This section provides basic instructions on how to use your QSI 500 Series camera as an autoguider. For this example, there is no main CCD camera. For complete instructions on guiding, including a step-by-step tutorial, please see the online help in MaxIm LE.
Click the Setup tab of the Camera Control window. Click the Setup button below Main CCD Camera and select “No Camera” under Camera Model and click OK to return to the Camera Control Window. Click the Setup button below Autoguider and select “QSI

Q S I 5 0 0 S E R I E S U S E R G U I D E
68
Universal” under Camera Model and click OK to return to the Camera Control Window. Click Connect.
Click the Guide tab and again click the black arrowhead to the right of “Options” below the Stop button and select “Guider Settings.” Select “Guider Relays” in the “Control Via” pop-up list under Autoguider Output. This instructs MaxIm to send the autoguider control signals through the Guider port on the QSI 500 Series camera now being used as the autoguider. Click OK to close the Guider Settings window and return to the Guide tab of the Camera Control Window.
Everything else in the section above Using an Autoguider applies when using the QSI 500 Series camera as the autoguider. Continue with Using an Autoguider above for additional details.
Note: For complete instructions on guiding, including a step-by-step tutorial, please see the Online help in MaxIm LE.

Q S I 5 0 0 S E R I E S U S E R G U I D E
69
Accessories
T-mount adapter
.
The 2” nosepiece screws into the T-mount adapter plate. The 2” nosepiece allows the camera to be mounted in any 2” eyepiece
1 ¼” nosepiece The 1 ¼” nosepiece is optional and screws into the T-mount adapter plate. The 1 ¼” nosepiece allows the camera to be mounted in any 1 ¼” eyepiece adapter.
pter The C-mount adapter replaces the standard T-mount adapter on the camera faceplate. It is threaded to accept standard C-mount adapters, such as SLR lens adapters. There are two different versions of the C-mount adapter plate for the slim and mid-sized QSI 500 Series cameras. You must use the correct version of the C-mount adapter plate for your body style in order to achieve focus at infinity. The full-size body with the internal color filter wheel is not compatible with C-mount lenses. A C-mount adapter will mount to the full-sized body but lenses will not achieve focus at infinity.
The T-mount adapter plate attaches to the front of the camera bodyIt comes standard on all QSI 500 Series cameras. The T-mount adapter is threaded with standard T-mount threads, 42mm diameter by 0.75mm pitch.
2” nosepiece
adapter.
C-mount ada
Section
6

Q S I 5 0 0 S E R I E S U S E R G U I D E
70
SLR lens adapter SLR lens adapters are available for the following lens mounts:
Canon EF (EOS)
Minolta AF (Maxxum)
Nikon F
o the standard T-mount adapter plate.
nger
termine the temperature differential that can pically be maintained when using the LHX.
gThe recirculating pump
Color filter w eel
eel ls can
filters, and easily replace
the entire filter wheel. See the Care & Maintenance section below r instructions on removing and installing the color filter wheel.
x The Guider Breakout B non-standard mounts. low the standard used by S
Olympus OM
The SLR lens adapter screws int
Liquid heat excha The liquid heat exchanger (LHX) provides additional cooling of the CCD beyond what can be achieved using the standard air cooling. The liquid heat exchanger attaches to the back of the QSI 500 Series camera using four screws. Refer to the camera specifications to dety
Recirculatin pump is used to pump water through the liquid heat exchanger.
h Cameras with an internal color filter wheel include one filter whand a standard set of LRGB filters. Additional color filter wheebe ordered. With additional color filter wheels you can load asecond set of filters, such as narrowband
fo
Guider Breakout Boox (GBOB) can be used to adapt the autoguider signals to older orThe autoguider signals output by the QSI 500 Series camera folBIG cameras and most modern mounts.

Q S I 5 0 0 S E R I E S U S E R G U I D E
71
Care & Maintenance
Cleaning the exterior The QSI 500 Series camdurable anodized finishremove dirt or spots fro
Installing or rTo change filters or replace the color filter wheel the front cover of the camera must be removed. Place the ca ra face up on a stable surface. Using the included 3/32” Allen wrench, carefully unscrew the 8 screws holding the camera faceplate to the camera back.
e the color filter wheel.
The filters in the color filter wheel are standard 1 ¼” mounted color filters. Any standard filter can be screwed into any of the 5 available
To replace the color filter wheel a slight pressure must be applied with the outside O-ring against the capstan motor that drives the color filter wheel. Carefully line up the
er tighten.
eras are machined from military grade 6061 aluminum with a very that resists most scratches and fingerprints. Use a soft cloth to m the exterior surface of the camera.
emoving color filters
me
Lift the faceplate straight up to expos
positions.
To remove the entire filter wheel unscrew the screw in the center of the filter wheel. Carefully lift out the color filter wheel.
center screw and press the filter wheel O-ring gently against the capstan motor. When the screw is lined up correctly it will screw in easily. Screw in the center screw until snug. No not ov
Section
7

Q S I 5 0 0 S E R I E S U S E R G U I D E
72
Cleaning the color filters As with any precision optical surface, the optical coatings or glass of colpermanently damaged by improper cleaning procedures. For best resulcleaning instructions that came with your filters.
For the standard LRGB filters shipped with your QSI 500 Series camerathe filters infrequently and use the least intrusive of the methods below t
pressed air.
2. Gently wipe off any remaining dust with a lens brush or microfiber cloth.
ith gentle soap and water and then dry it gently
ass of CCD cover glass can are often better off not
1. First try blowing off any dust off the filter with compressed air.
2. If that doesn’t work gently wipe off any remaimicrofiber cloth.
The CCD cover glass cannot be removed.
Recharging the desiccant The environmental chamber enclosing the CCD is filled wmanufacturing to increase cooling capability and prevent cover glass. This ultra dry and clean noble gas will gene ironmental chamber for about 3 years.
After 3 years, you can restore many of the benefits of the g the microsieve desiccant in the desiccant chamber. The present in the environmental chamber and stores it behinmembrane. Over time the desiccant will lose its ability to you may begin to see frost or dew forming on the CCD c
To recharge the desiccant, unplug the camera and allow sufficient time for the CCD to reach room temperature. Place the camera, with the desiccant chamber cover upright, on a stable surface. Loosen the four screws holding the desiccant cover and lift it from the camera.
or filters can be ts follow the
, it is best to clean o remove any dust
or fingerprints.
1. Blow any dust off the filter with clean, dry com
3. Remove the filter and clean it wusing a 100% cotton cloth.
Cleaning the CCD cover glass As with any precision optical surface, the optical coatings or glbe permanently damaged by improper cleaning procedures. Youtrying to clean the CCD cover glass. The effects of small amounts of dust can be removed from your images with proper calibration techniques.
If you must clean the CCD cover glass.
ning dust with a lens brush or
ith UHP argon during the formation of frost on the CCDrally remain in the env
original UHP argon by rechargindesiccant removes the moisture d a submicron gas permeable remove additional moisture and
over glass when operating the CCD at low temperatures or in high humidity environments.

Q S I 5 0 0 S E R I E S U S E R G U I D E
73
Lift the brass desiccant canister from the camera. Preheat an oven to 500 degrees. Place the desiccant canister in the 500 degree oven for 4 to 5 hours. This will drive out the accumulated water molecules, recharging the desiccant.
Remove the desiccant canister from the oven and let it cool. As soon as the begin abmineffecani rcamera early room temperature. Place it
back in the desiccant chamber with
argon gas. Argon has better thermal s the best results but the camera will work
air in the chamber and an active desiccant plug.
Te24 hours a day using the support
com/support.html
canister leaves the oven it will sorbing moisture. To
imize the impact on the ctiveness of the desiccant, the ste should be returned to the
as soon as it has cooled to n
the fine grid face down toward the inside of the camera. Screw the nameplate back down to the camera making sure that the O-ring surrounding the nameplate is carefully seated against inside of the environmental chamber.
You can also return your camera to QSI to have the desiccant recharged and to have the environmental chamber purged and refilled with UHP insulating properties than air and provideextremely well in most conditions with just
chnical support Most technical support questions can be answered section of our web site at http://www.qsimaging. . There you will find online help and instruction manuals, technical articles and a searchable knowledge base with
the answer to your question on our web n below. Email is preferred.
answers to common questions. If you can’t find site please contact QSI technical support at show
Internet http://www.qsimaging.com/support.html
Email [email protected]
Phone 888-774-4223

74
Appendix A – 500 Se
General
ries Specifications
Camera Specifications Feature QSI 500i Models QSI 500s Models QSI 500ws Models
Electronic Shutter (520i models) 100µsec to 240 minutes 100µsec to 240 minutes 100µsec to 240 minutes
Mechanical Shutter - 0.03 seconds to 240 minutes 0.03 seconds to 240 minutes
Internal Color Filter Wheel No No Yes - 5 Position, 1.25" std filters
Camera Body Configuration EnSlim closure
Medium Enclosure
Full Enclosure
Dimensions W4.45” x H4.D1.68” (add 0.23"
45” x
for T-Mount)
W4.45” x H4.45” x D2.00” (add 0.23" for T-Mount)
W4.45” x H4.45” x D2.50” (add 0.23" for T-Mount)
Weight, without Nosepiece 26 oz. / 740g 34 oz. / 950g 40 oz. / 1120g
Optical Back Focus (without Filters in path)
0.68" with C mounting adapter 0.39" w/o mounting adapter
0.68" with C mounting adapter 0.68" w/o mounting adapter
1.18" with C mounting adapter 1.18" w/o mounting adapter
0.61" with T mounting adapter
0.90" with T mounting adapter 1.40" wi
adapter th T mounting
Thermoelectric CCD Cooling Temperature regulation +/- 0.1°C, @ 0°C to -40°C CCD temperature
*In free air, Fans @ Full Speed Typically 38°C below ambient air with 85% cooling power
*With Opt Liquid Cooling - Fans Off
Typically 45°C below circulating liquid with 85% cooling power (adds 0.75" todepth)
camera
Cooling Fan Control Intelligent, user configurable
Status and Notification User configurable multi-color LED status indicator and multifunctioOver-temperature and high/low voltage alarms.
n audible beeper.
Power Consump er moving (25 AC watts max with included 90-240V AC power supply) tion 12v, 1.5A (18 watts) at max cooling, max fans and filt
Operating Enviro idity: 10% to 90% non-condensing nment Temperature: -20°C to 30°C, Hum
Computer Conn tible) ectivity USB 2.0 (USB 1.1 compa
Other Ports l control port for telescope guiding or other application specific control Optically isolated 4 channe
T Mounting Adapter Standard adapter - T-Thread, 42mm x .75mm
C Mounting Adapter (1" x 32TPI)
Optional, C-Mount lens focus compatible (17.5mm backfocus)
Optional, C-Mount lens focus compatible (17.5mm backfocus)
Optional, for non-lens adapters and accessories (standard C-Mount lens does not reach focus)
Nosepiece Standard, T-Adapter to 2" nosepiece Optional, T-Adapter to 1.25" nosepiece

75
Model 504 CCD Specifications Feature Standard Optional Optional
Model 532 CCD Options Ko Kodak KAF-0401LE dak KAF-0402ME Kodak KAF-0402E
CCD Architecture Full Frame Full Frame Full Frame
Blue Enha Yes Yes Nonced
Microlens Yes No No
Anti-blooming No No Yes, 300x suppression
Imager Size: (WxH) 6.91mm x 4.6mm 6.91mm x 4.6mm 6.91mm x 4.6mm
Pixel Array (WxH): 784x520 tal pixels, 768x512 active (visible)
784x total pixels, 768x512 active (visible)
520 total pixels, 768x512 active (visible)
to 520 784x
Pixel Size: 9µm x 9µm 9µm x 9µm 9µm x 9µm
Typ ical Values
Pixel Full Well Depth 100,000 electrons 100,000 electrons 50,000 electrons
Absolute Quantum Efficiency
Peak:400n
P4
83% m: 44%
eak: 73% 00nm: 30%
Peak: 35% 400nm: 20%
Pixel Dark Current <1.0 el ond at 0°C per secondectron per sec ; <0.1 electron at -25°C
Dark Current Doubling 6.3° 6 6.3° C C .3° C
Intrinsic Read Noise 15 el MS 1 ns RMS ectrons R 5 electro 15 electrons RMS
Dynamic Range 76db 76db 70db
Charge Transfer Efficiency >0.99 >999 0.99999 >0.99999
M
odel 516 CCD Specifications Feature Standard Optional Optional
Model 516 CCD Options Kod ak KAF-1603E Kodak KAF-1602LE ak KAF-1603ME Kod
CCD Architecture Full Frame Full Frame Full Frame
Blue Enhanced Yes Yes No
Microlens Yes No No
Anti-blooming No suppression No Yes, 300x
Imager Size: (WxH) 13.8 m mm x 9.2mm 13.8mm x 9.2mm 13.8mm x 9.2m
Pixel Array (WxH): 155153
1032 total pixels, 1024 active (visible)
1552x1032 total pixels, 1536x1024 active (visible)
2x1032 total pixels, 6x1024 active (visible)
1552x1536x
Pixel Size: 9µm x 9µm 9µm x 9µm 9µm x 9µm
Typical Values
Pixel Full Well Depth 100,0 50,000 electrons 00 electrons 100,000 electrons
Absolute Quantum Efficiency Peak: 77% 400
Peak: 65% 40
Pnm: 45% 0nm: 30%
eak: 35% 400nm: 20%
Pixel Dark Current <1.0 at 0° seco electron per second C ; <0.1 electron per nd at -25°C
Dark Current Doubling 6.3° 6. C 3° C 6.3° C
Intrinsic Read Noise 15 e s RMS 15 electrons RMS lectrons RMS 15 electron
Dynamic Range 76d 70db b 76db
Charge Transfer Efficiency >0.99999 >0.99999 >0.99999

76
Model 532 CCD Specifications Feature Standard Optional Optional
Model 516 CCD Options Kodak KAF-1603ME K Koodak KAF-1603E dak KAF-1602LE
CCD Architecture Full Frame F Fuull Frame ll Frame
Blue Enhanced Yes Y Noes
Microlens Yes N Noo
Anti-blooming No N Yeo s, 300x suppression
Imager Size: (WxH) 13.8mm x 9.2mm 1 13.3.8mm x 9.2mm 8mm x 9.2mm
Pixel Array (WxH): 1552x1032 total pixe1536x1024 active (visibl
ls, e)
1 1
1515
552x1032 total pixels,536x1024 active (visible)
52x1032 total pixels, 36x1024 active (visible)
Pixel Size: 9µm x 9µm 9 9µµm x 9µm m x 9µm
Typical Values
Pixel Full Well Depth 100,000 electrons 1 5000,000 electrons ,000 electrons
Absolute Quantum Efficiency
P4
Pe40
Peak: 77%400nm: 45%
eak: 65% 00nm: 30%
ak: 35% 0nm: 20%
Pixel Dark Current <1.0 electron per second at 0°C ; <0.1 electron per second at -25°C
Dark Current Doubling 6.3° C 6 6..3° C 3° C
Intrinsic Read Noise 15 electrons RMS 1 155 electrons RMS electrons RMS
Dynamic Range 76db 7 706db db
Charge Transfer Efficiency >0.99999 > >00.99999 .99999
Model 520 CCD Specifications
Feature 520 520c
CCD Manufacturer & Mode k Kl Kodak KAI-2020CM Koda AI-2020M
CCD Architecture Transfer Interline
Microlens Yes
Anti-blooming Yes - 100x suppression
Color Filters No Yes - Internal RGB on CCD; Bayer color filter mask
Imager Size: (WxH) 13.38mm x 9.52mm
Pixel Array (WxH): 0x1214 total p x1200 active 164 ixels, 1600 (visible)
Pixel Size: 7.4µm x 7.4µm
Typical Values
Pixel Full Well Depth 45,000 electrons
Absolute Quantum Efficiency Blue Peak: 42%, Green Peak: 36%, Red Peak: 31%
Pixel Dark Current <0.1 electron per second at 0°C
Intrinsic Read Noise ns RMS<8 electro
Dynamic Range 74db
Charge Transfer Efficiency .99999 >0

77
Appendix B – WQSI Warranty Policy
set is provided um Scientific Inc. for QSI ras when purchased directly from QSI or an authorize SI dealer. This
owing accesso es if they were inclu with your ase: carryi se, AC power ad r, AC cable, and U cable.
Came gainst erials o p for a rom th nal purchase. QSI will, at its or
era that t
warranty covers all defects encoun rmal use of t ientific amera, and does not apply in the following cases:
age t tific Ca se, mi roper ent, electrica uctuations, f llow
operating, maintenance ental instru cribed in Q uide or ed by s era
ithou ng the foregoing r damage, sand on damage, era, sc ns or d ody, in rcuit ging se esumed from r
ate the QS ntific Camera as rth in the operati ctions.
(b) Use of parts or supplies (other than those ld by QSI) that cause damage to the QSI Scientific Camera or cause abnormally frequent service calls or service problems.
(c) If the camera body has been opened and a y parts inside have been altered or damaged, except for thos r modification or maintenance as described i Scientific Cameras h al parts that should not be touched or modified if you
ctu sensitive m ectronic O ELEC WE
MEND T OT OPEN YOUR QSI SCIENTIFIC DY. QSI IS NOT PONSIBLE FOR DAMAGE CAUSED BY MISUSE,
QSI SCIENTIFIC CAMERA AS SET FORTH IN G INSTRUCT
cientific Camer had its serial number or d
anties
separate wa e in device specifica of one year from date of shipment to the
stomer. This warranty does not cover failure due to t chanical and r receipt of the d custo from mechanical ge), electr r misuse of the device (electrical, storage
he ns.
a lifetime un ir cases.
arranty
The limited warranty forth below by Quant Imaging,Scientific Camelimited warranty also cove
d Qded rs the foll ri
original purch ng ca apte SB
Your QSI Scientific period of one (1) year f
ra is warranted ae date of origi
defects in mat r workmanshioption, repair
replace any cam is proven to be defec ive during the warranty period.
This limited tered in no he QSI ScC
(a) Loss of or dam o the QSI Scien mera due to abu shandling, imppackaging by you, alteration, accid
or environml current flctions pres
ailure to foSI's User G
services perform omeone other than QSI, or an authorized QSI Scientific CamService Provider. W t limiti , wate /corrosidropping the camboards, or the ima
ratches, abrasionsor will be pr
amage to the b to have resulted
ternal parts or ci misuse, abuse o
failure to oper I Scie set fo ng instru
so
ne parts that are expressly intended for use
n the QSI Scientific Camera User Manual. QSI ave intern are
inexperienced in the manufacomponents. IF YOU ARE N
re, assembly and use of T EXPERIENCED WITH
echanical and elTRONIC EQUIPMENT,
STRONGLY RECOM HAT YOU DO NCAMERA BOABUSE OR FAILURE TO OPER
RESATE THE
THE OPERATIN IONS.
(d) If the QSI S a has ating altered or removed.
Manufacturer Warr
Kodak provides a rranty that their CCDs will perform in normal usaccordance to tions for a period cu he following me
mer: Damageelectrical causes afte(scratches or breaka
evice by the ical (ESD), or othe
temperature, etc.) beyond t stated maximum ratings in the device specificatio
Pelican® provides conditional warranty on all the

78
Shipping Costs
The customer is responwhen returning a prod
sible for all costs in shipping to QSI. QSI will pay shipping costs uct to the customer. All replacement/repaired products are shipped
TO THE
Y M
SCIENTIFIC IMAGING SHALL
,
N
TER IN AMOUNT THAN THE PURCHASE PRICE OF THE QSI SCIENTIFIC CAMERA SOLD
Y FOR S AND
OF LLOW
via UPS Ground unless a rush is requested. The cost of such a shipping upgrade is to be paid by the customer prior to shipment.
NO IMPLIED WARRANTY, INCLUDING ANY IMPLIED WARRANTY OF MERCHANTABILITY OR FITNESS FOR A PARTICULAR PURPOSE, APPLIESQSI SCIENTIFIC CAMERA AFTER THE APPLICABLE PERIOD OF THE EXPRESS LIMITED WARRANTY STATED ABOVE, AND NO OTHER EXPRESS WARRANTY OR GUARANTY, EXCEPT AS MENTIONED ABOVE, GIVEN BY ANY PERSON OR ENTITWITH RESPECT TO THE QSI SCIENTIFIC CAMERA SHALL BIND QUANTUSCIENTIFIC IMAGING, INC. (SOME STATES AND PROVINCES DO NOT ALLOW LIMITATIONS ON HOW LONG AN IMPLIED WARRANTY LASTS, SO THE ABOVE LIMITATION MAY NOT APPLY TO YOU.) QUANTUM NOT BE LIABLE FOR LOSS OF REVENUES OR PROFITS, INCONVENIENCE, EXPENSE FOR SUBSTITUTE EQUIPMENT OR SERVICE, STORAGE CHARGESLOSS OR CORRUPTION OF DATA, OR ANY OTHER SPECIAL, INCIDENTAL OR CONSEQUENTIAL DAMAGES CAUSED BY THE USE OR MISUSE OF, OR INABILITYTO USE, THE QSI SCIENTIFIC CAMERA, REGARDLESS OF THE LEGAL THEORY OWHICH THE CLAIM IS BASED, AND EVEN IF QUANTUM SCIENTIFIC IMAGING HAS BEEN ADVISED OF THE POSSIBILITY OF SUCH DAMAGES. IN NO EVENT SHALL RECOVERY OF ANY KIND AGAINST QUANTUM SCIENTIFIC IMAGING BE GREA
BY QUANTUM SCIENTIFIC IMAGING AND CAUSING THE ALLEGED DAMAGE. WITHOUT LIMITING THE FOREGOING, YOU ASSUME ALL RISK AND LIABILITLOSS, DAMAGE OR INJURY TO YOU AND YOUR PROPERTY AND TO OTHERTHEIR PROPERTY ARISING OUT OF USE OR MISUSE OF, OR INABILITY TO USE, THE QSI SCIENTIFIC CAMERA NOT CAUSED DIRECTLY BY THE NEGLIGENCEQUANTUM SCIENTIFIC IMAGING. (SOME STATES AND PROVINCES DO NOT ATHE EXCLUSION OR LIMITATION OF INCIDENTAL OR CONSEQUENTIAL DAMAGES, SO THE ABOVE EXCLUSION OR LIMITATION MAY NOT APPLY TO YOU.) THIS LIMITED WARRANTY SHALL NOT EXTEND TO ANYONE OTHER THAN THE ORIGINAL PURCHASER OF THE QSI SCIENTIFIC CAMERA, OR THE PERSON FORWHOM IT WAS PURCHASED AS A GIFT, AND STATES YOUR EXCLUSIVE REMEDY.