Embed Size (px)
Citation preview
5-Using Pedon PC.ppt Page 1 of 23
5-Using Pedon PC.ppt
Document created on: 10/18/2007 Title: 5-Using Pedon PC
Type: x Skill x Knowledge Performance Objective: Trainee will be able to use Pedon PC to input pedon descriptions and site data.
Trainer Preparation: Make sure the participants have machines that they have write permission to the C drive and access to the internet.
Special Requirements: • CCE configuration to ensure that Microsoft Access is compatible with Pedon PC. • A version of Pedon PC must be installed on the computer for this module. • (Downloading data from the DataMart and importing data into a SSURGO
template is optional.) Prerequisite Modules:
• Pedon PC Setup • Pedon PC Customizing Choice Lists
Procedure:
• Trainer will use as a job aid to help prepare for this task. • Trainer can then use this job aid as a training module to accomplish the task.
Notes/Purpose: The purpose is for the trainee to learn how to input pedon descriptions into an ACCESS database using Pedon PC.
Authors: Henry Ferguson, NGDC Alan Stahnke, TX
Approved by: Marc Crouch, NSSC
5-Using Pedon PC.ppt Page 2 of 23
Slid
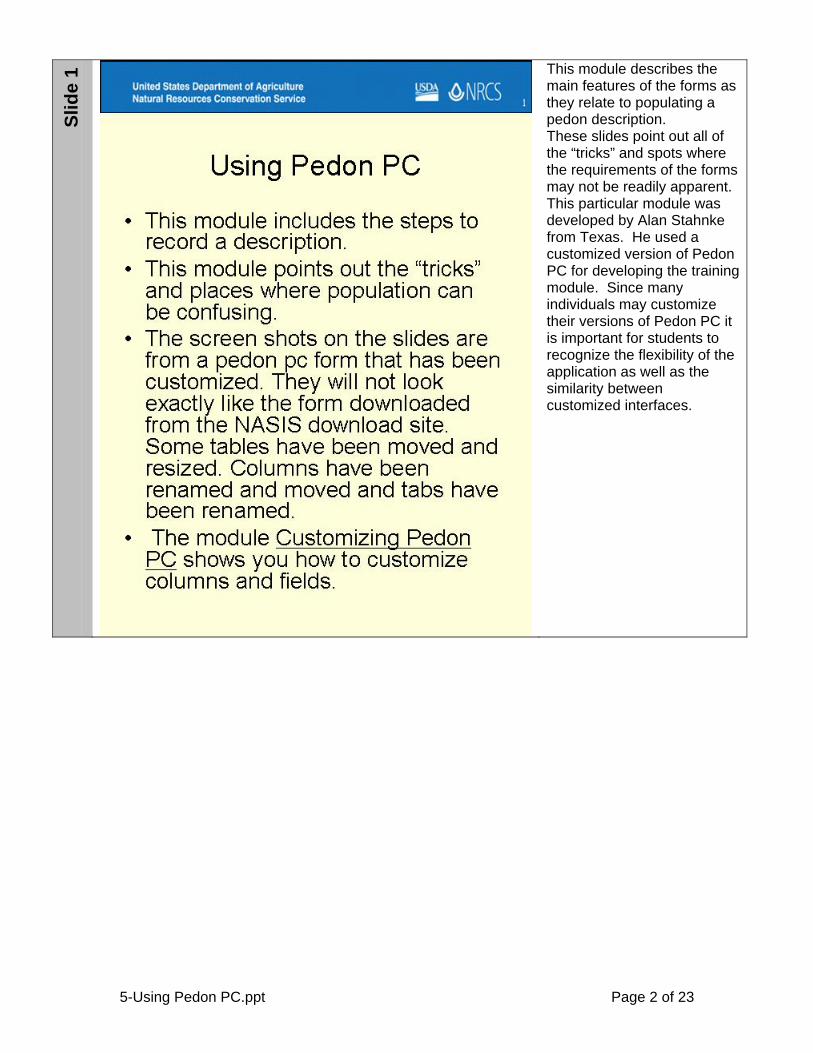
e 1 This module describes the
main features of the forms as they relate to populating a pedon description. These slides point out all of the “tricks” and spots where the requirements of the forms may not be readily apparent. This particular module was developed by Alan Stahnke from Texas. He used a customized version of Pedon PC for developing the training module. Since many individuals may customize their versions of Pedon PC it is important for students to recognize the flexibility of the application as well as the similarity between customized interfaces.
5-Using Pedon PC.ppt Page 3 of 23
Slid
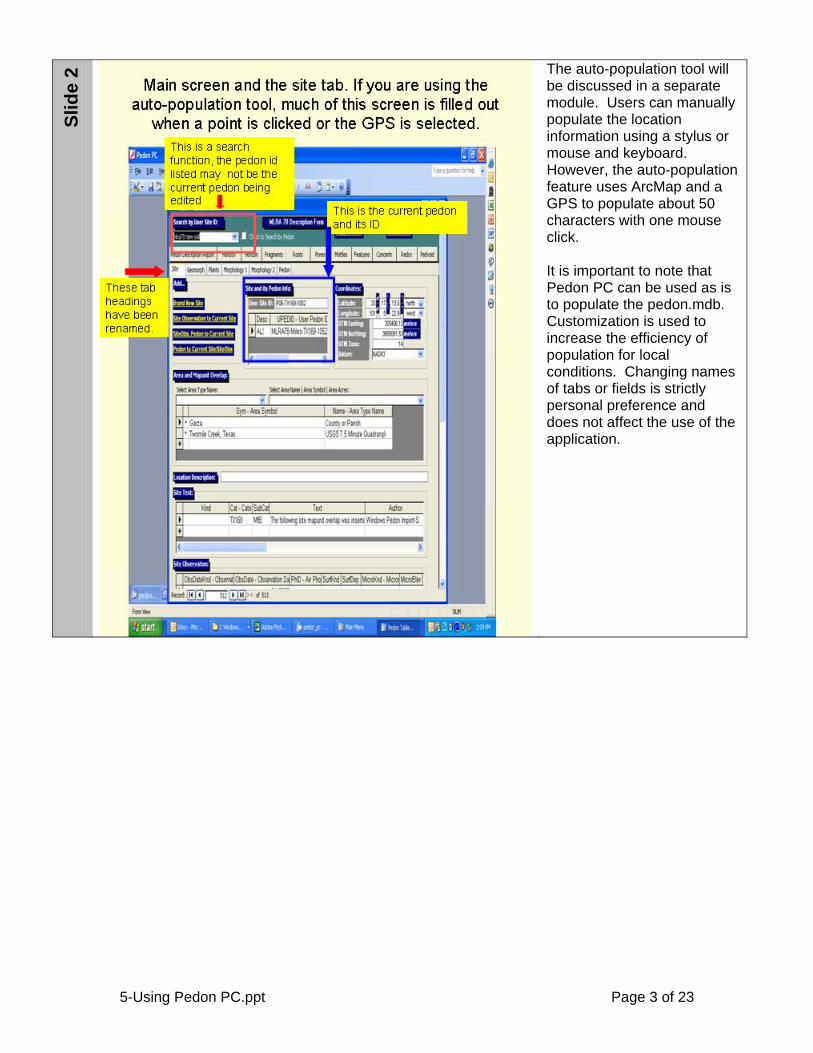
e 2 The auto-population tool will
be discussed in a separate module. Users can manually populate the location information using a stylus or mouse and keyboard. However, the auto-population feature uses ArcMap and a GPS to populate about 50 characters with one mouse click. It is important to note that Pedon PC can be used as is to populate the pedon.mdb. Customization is used to increase the efficiency of population for local conditions. Changing names of tabs or fields is strictly personal preference and does not affect the use of the application.
5-Using Pedon PC.ppt Page 4 of 23
Slid
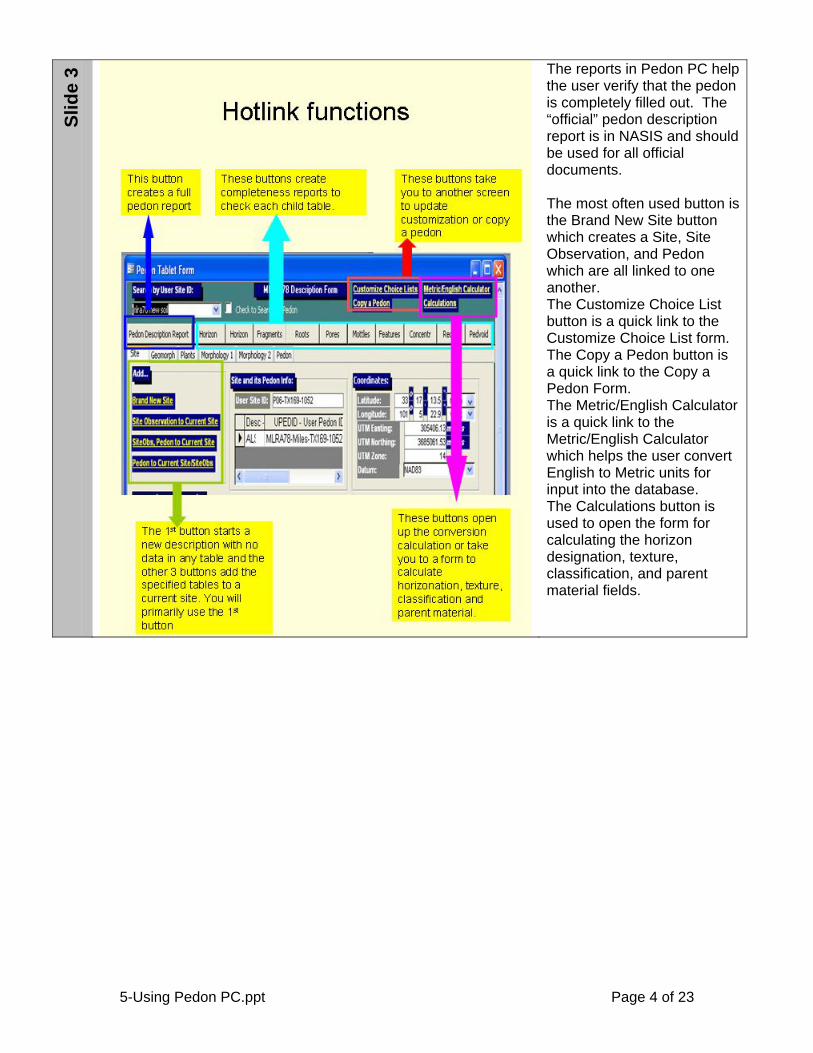
e 3 The reports in Pedon PC help
the user verify that the pedon is completely filled out. The “official” pedon description report is in NASIS and should be used for all official documents. The most often used button is the Brand New Site button which creates a Site, Site Observation, and Pedon which are all linked to one another. The Customize Choice List button is a quick link to the Customize Choice List form. The Copy a Pedon button is a quick link to the Copy a Pedon Form. The Metric/English Calculator is a quick link to the Metric/English Calculator which helps the user convert English to Metric units for input into the database. The Calculations button is used to open the form for calculating the horizon designation, texture, classification, and parent material fields.
5-Using Pedon PC.ppt Page 5 of 23
Slid
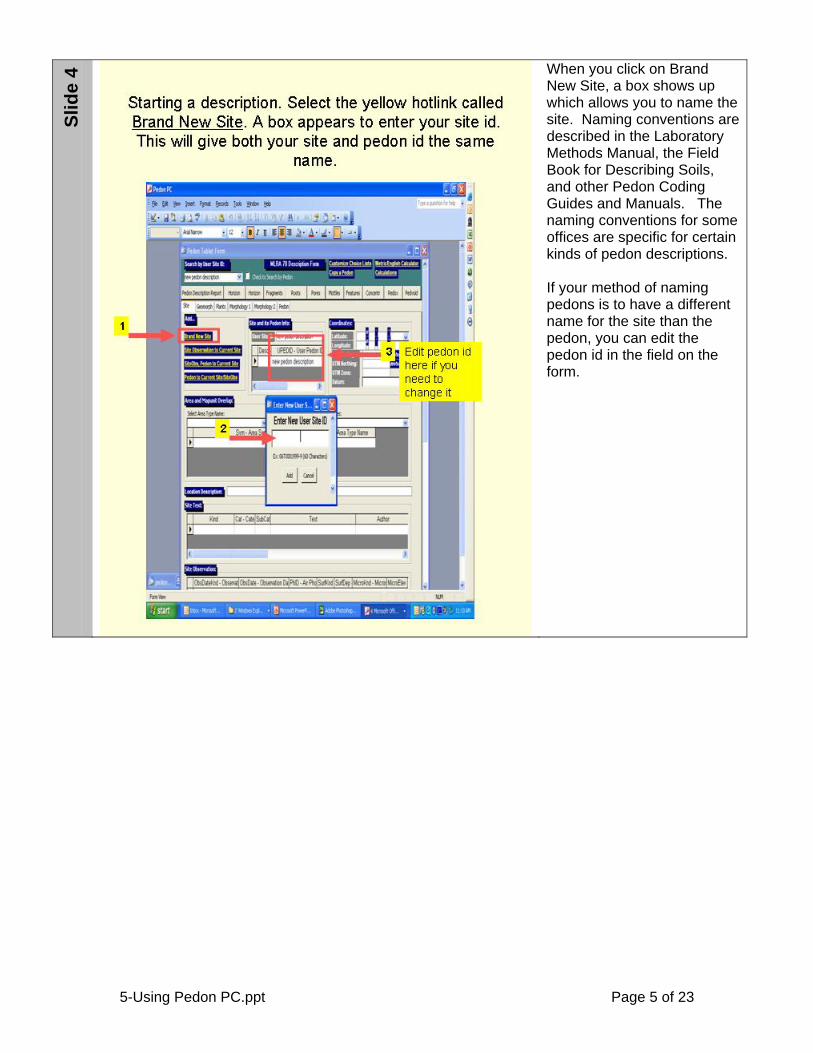
e 4 When you click on Brand
New Site, a box shows up which allows you to name the site. Naming conventions are described in the Laboratory Methods Manual, the Field Book for Describing Soils, and other Pedon Coding Guides and Manuals. The naming conventions for some offices are specific for certain kinds of pedon descriptions. If your method of naming pedons is to have a different name for the site than the pedon, you can edit the pedon id in the field on the form.

5-Using Pedon PC.ppt Page 6 of 23
Slid
e 5
5-Using Pedon PC.ppt Page 7 of 23
Slid
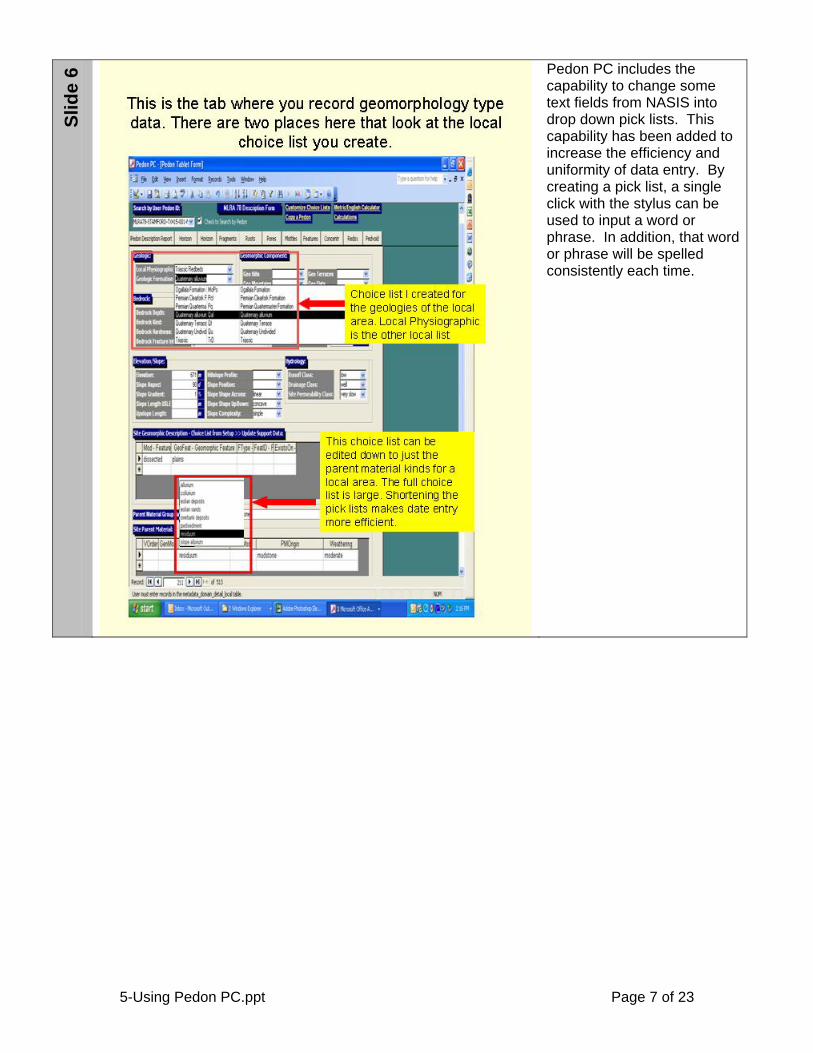
e 6 Pedon PC includes the
capability to change some text fields from NASIS into drop down pick lists. This capability has been added to increase the efficiency and uniformity of data entry. By creating a pick list, a single click with the stylus can be used to input a word or phrase. In addition, that word or phrase will be spelled consistently each time.
5-Using Pedon PC.ppt Page 8 of 23
Slid
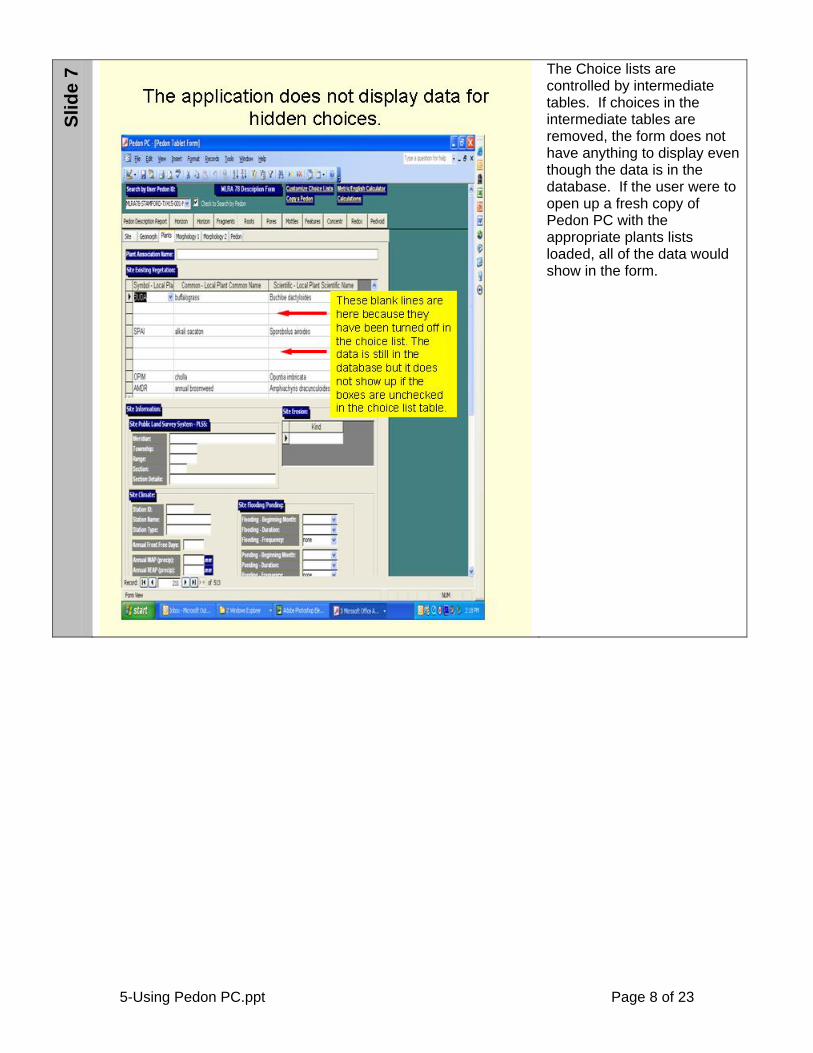
e 7 The Choice lists are
controlled by intermediate tables. If choices in the intermediate tables are removed, the form does not have anything to display even though the data is in the database. If the user were to open up a fresh copy of Pedon PC with the appropriate plants lists loaded, all of the data would show in the form.
5-Using Pedon PC.ppt Page 9 of 23
Slid
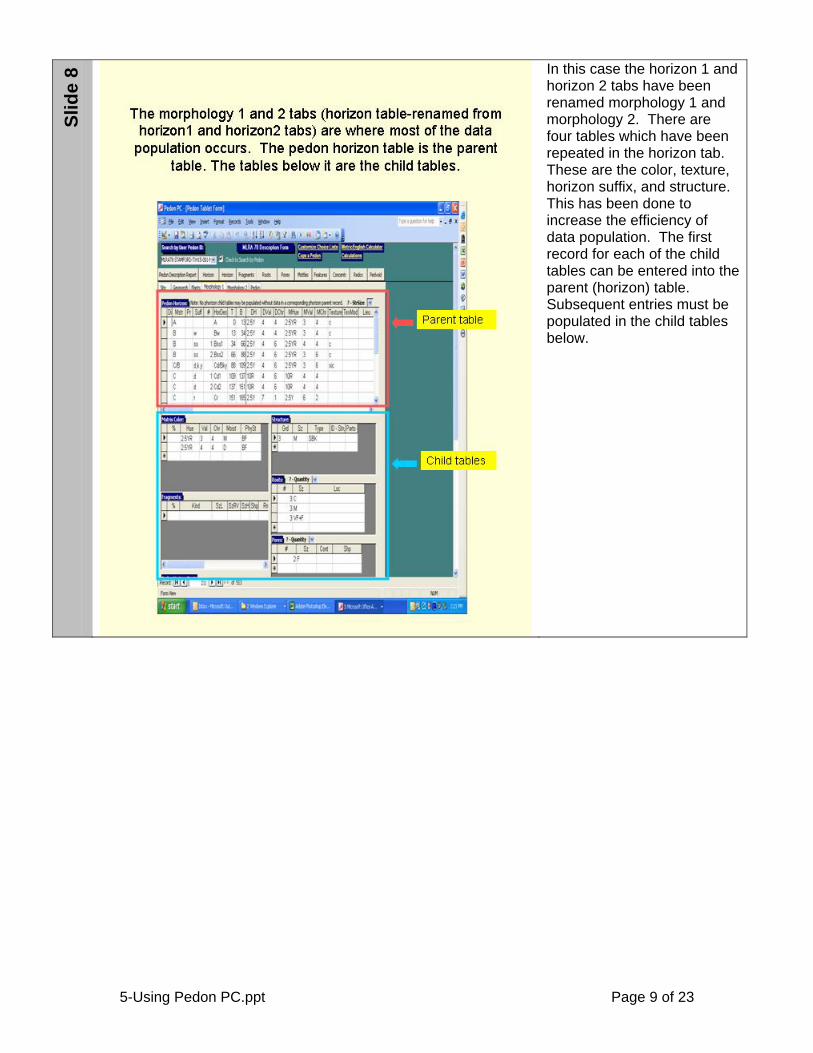
e 8 In this case the horizon 1 and
horizon 2 tabs have been renamed morphology 1 and morphology 2. There are four tables which have been repeated in the horizon tab. These are the color, texture, horizon suffix, and structure. This has been done to increase the efficiency of data population. The first record for each of the child tables can be entered into the parent (horizon) table. Subsequent entries must be populated in the child tables below.
5-Using Pedon PC.ppt Page 10 of 23
Slid
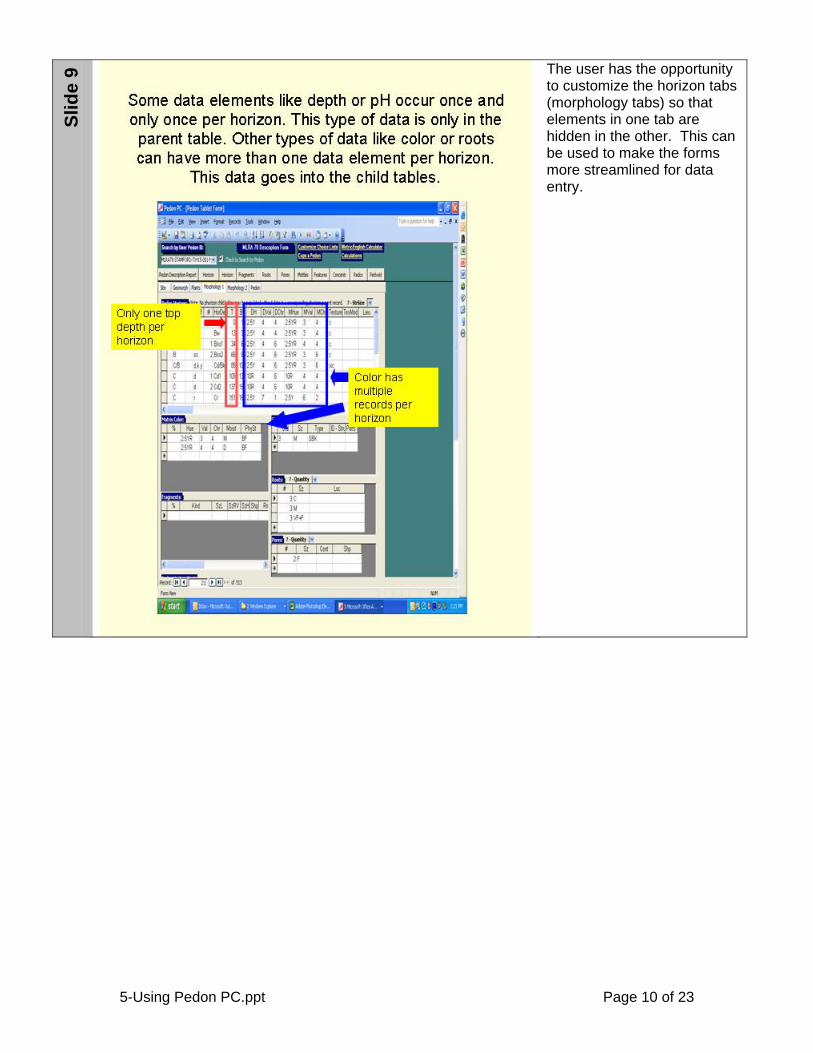
e 9 The user has the opportunity
to customize the horizon tabs (morphology tabs) so that elements in one tab are hidden in the other. This can be used to make the forms more streamlined for data entry.
5-Using Pedon PC.ppt Page 11 of 23
Slid
e 10
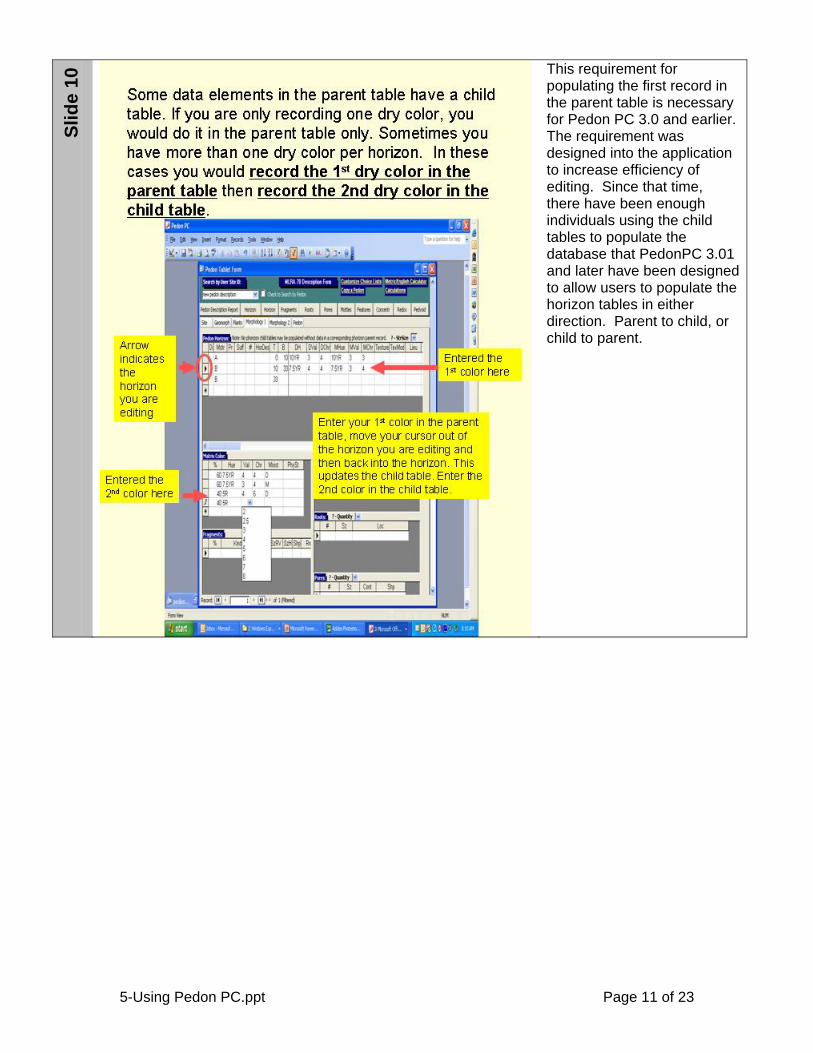
This requirement for populating the first record in the parent table is necessary for Pedon PC 3.0 and earlier. The requirement was designed into the application to increase efficiency of editing. Since that time, there have been enough individuals using the child tables to populate the database that PedonPC 3.01 and later have been designed to allow users to populate the horizon tables in either direction. Parent to child, or child to parent.
5-Using Pedon PC.ppt Page 12 of 23
Slid
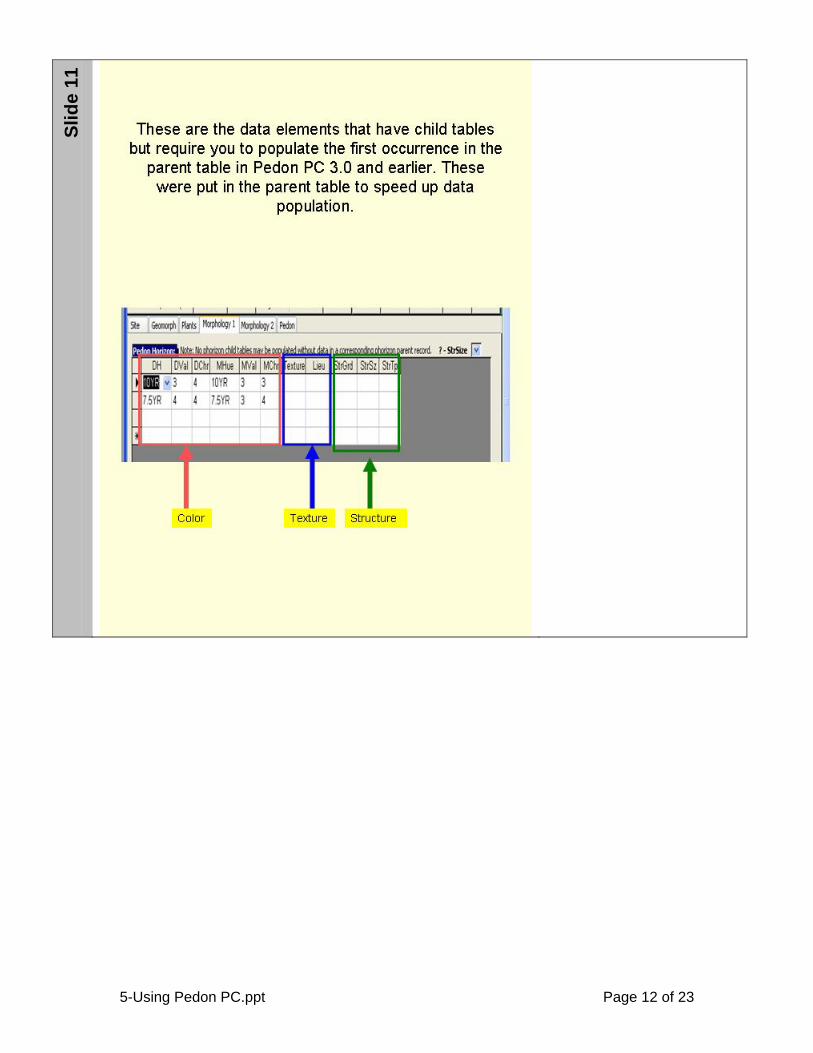
e 11
5-Using Pedon PC.ppt Page 13 of 23
Slid
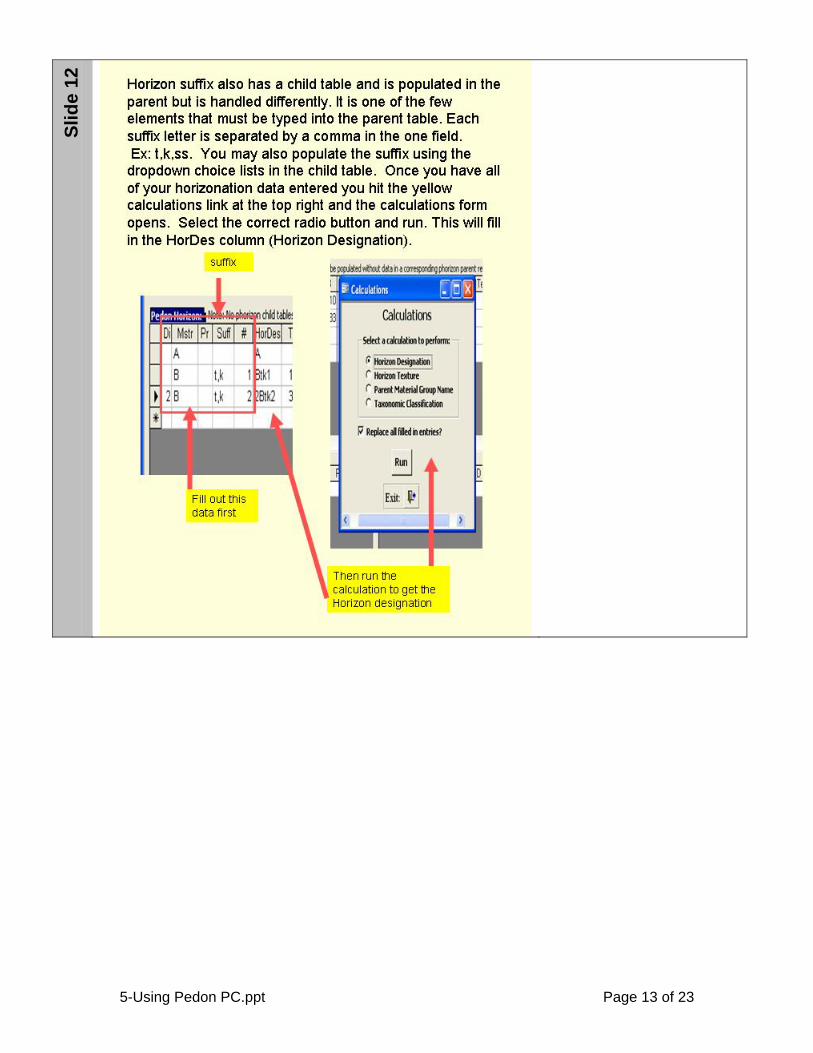
e 12
5-Using Pedon PC.ppt Page 14 of 23
Slid
e 13
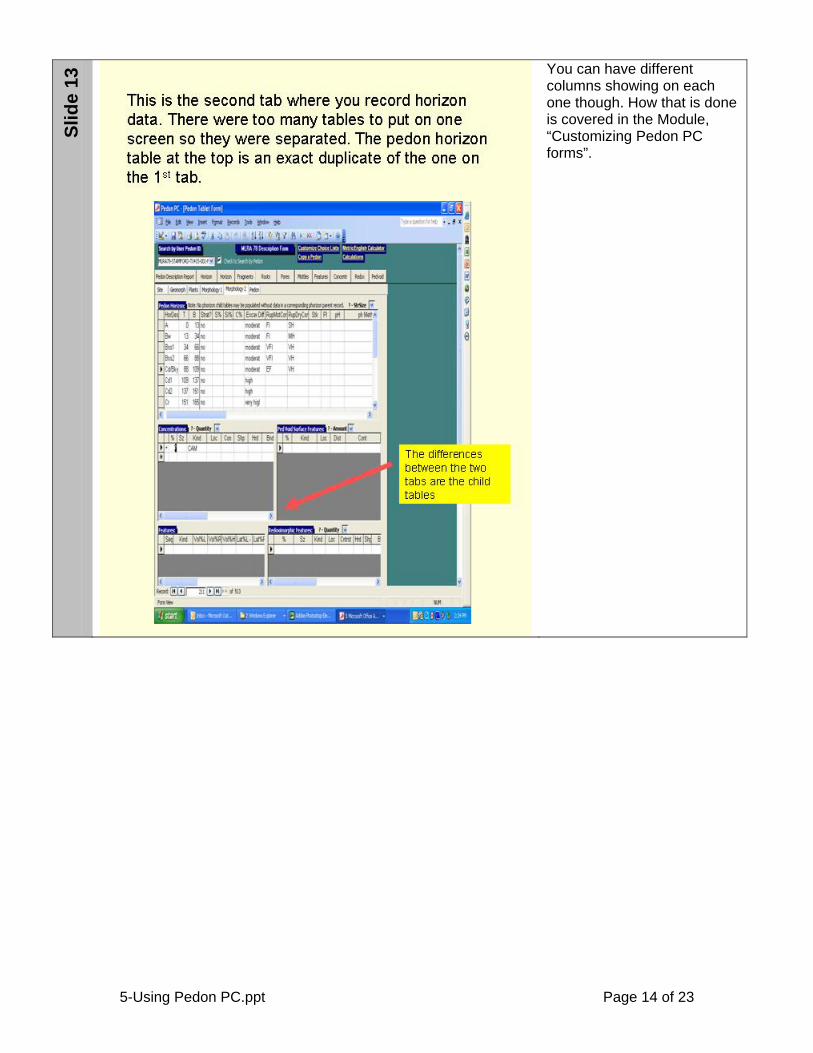
You can have different columns showing on each one though. How that is done is covered in the Module, “Customizing Pedon PC forms”.
5-Using Pedon PC.ppt Page 15 of 23
Slid
e 14
5-Using Pedon PC.ppt Page 16 of 23
Slid
e 15
5-Using Pedon PC.ppt Page 17 of 23
Slid
e 16
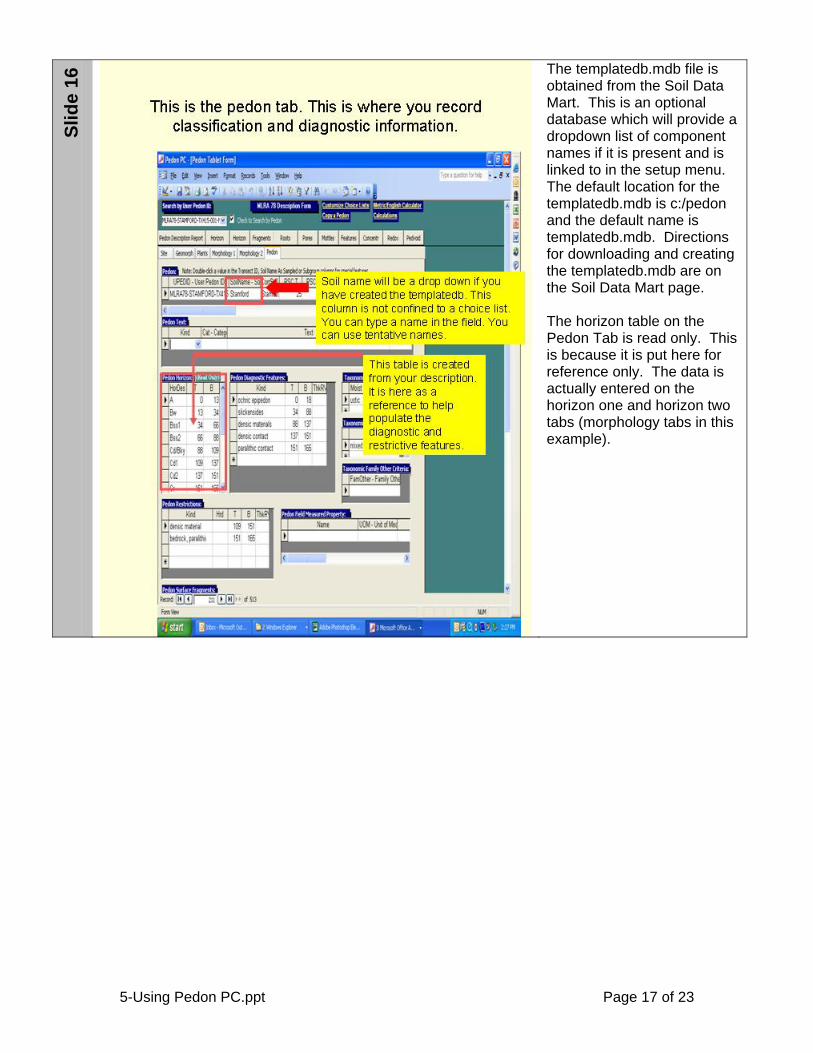
The templatedb.mdb file is obtained from the Soil Data Mart. This is an optional database which will provide a dropdown list of component names if it is present and is linked to in the setup menu. The default location for the templatedb.mdb is c:/pedon and the default name is templatedb.mdb. Directions for downloading and creating the templatedb.mdb are on the Soil Data Mart page. The horizon table on the Pedon Tab is read only. This is because it is put here for reference only. The data is actually entered on the horizon one and horizon two tabs (morphology tabs in this example).
5-Using Pedon PC.ppt Page 18 of 23
Slid
e 17
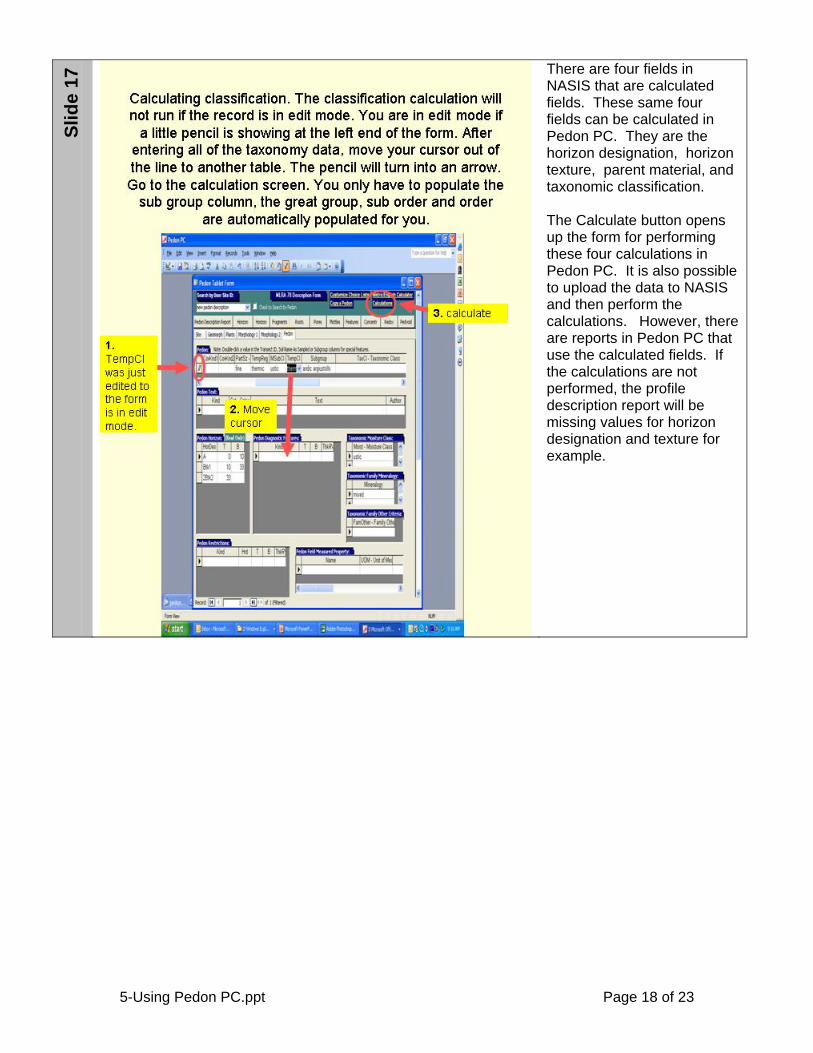
There are four fields in NASIS that are calculated fields. These same four fields can be calculated in Pedon PC. They are the horizon designation, horizon texture, parent material, and taxonomic classification. The Calculate button opens up the form for performing these four calculations in Pedon PC. It is also possible to upload the data to NASIS and then perform the calculations. However, there are reports in Pedon PC that use the calculated fields. If the calculations are not performed, the profile description report will be missing values for horizon designation and texture for example.

5-Using Pedon PC.ppt Page 19 of 23
Slid
e 18
The official pedon description report is in NASIS. A pedon description report is provided in Pedon PC for users to evaluate the data input and ensure that they have not missed any fields.
5-Using Pedon PC.ppt Page 20 of 23
Slid
e 19
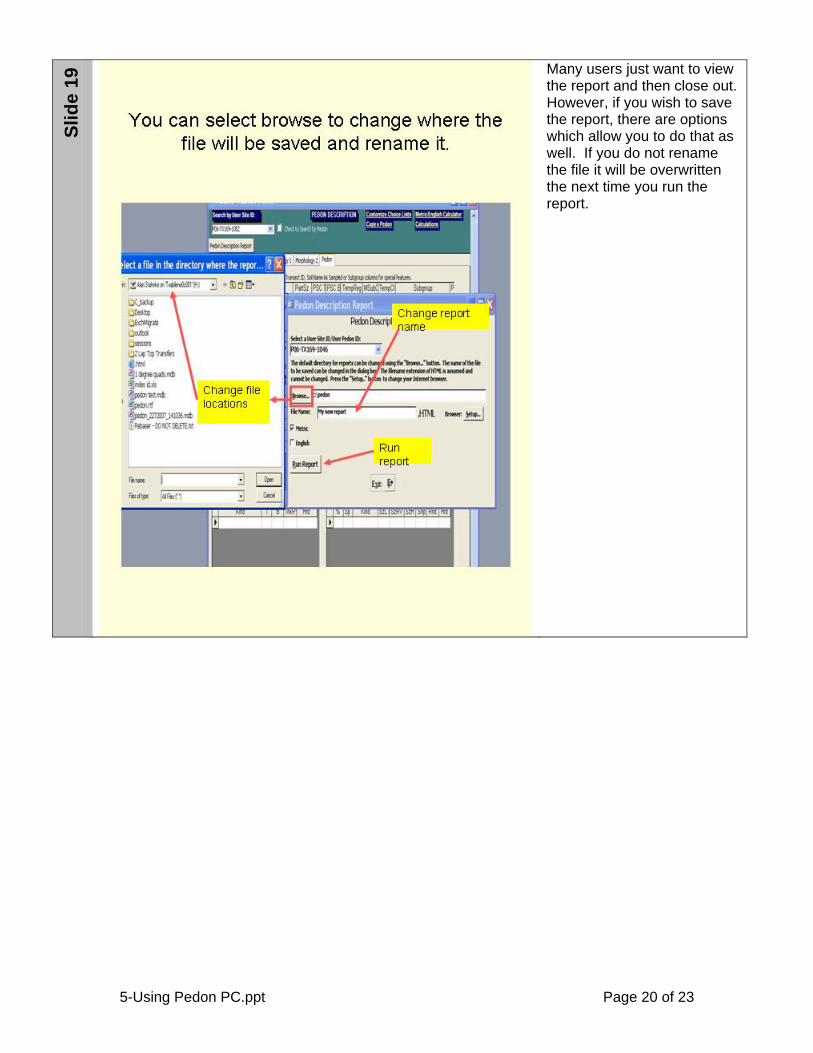
Many users just want to view the report and then close out. However, if you wish to save the report, there are options which allow you to do that as well. If you do not rename the file it will be overwritten the next time you run the report.

5-Using Pedon PC.ppt Page 21 of 23
Slid
e 20
5-Using Pedon PC.ppt Page 22 of 23
Slid
e 21
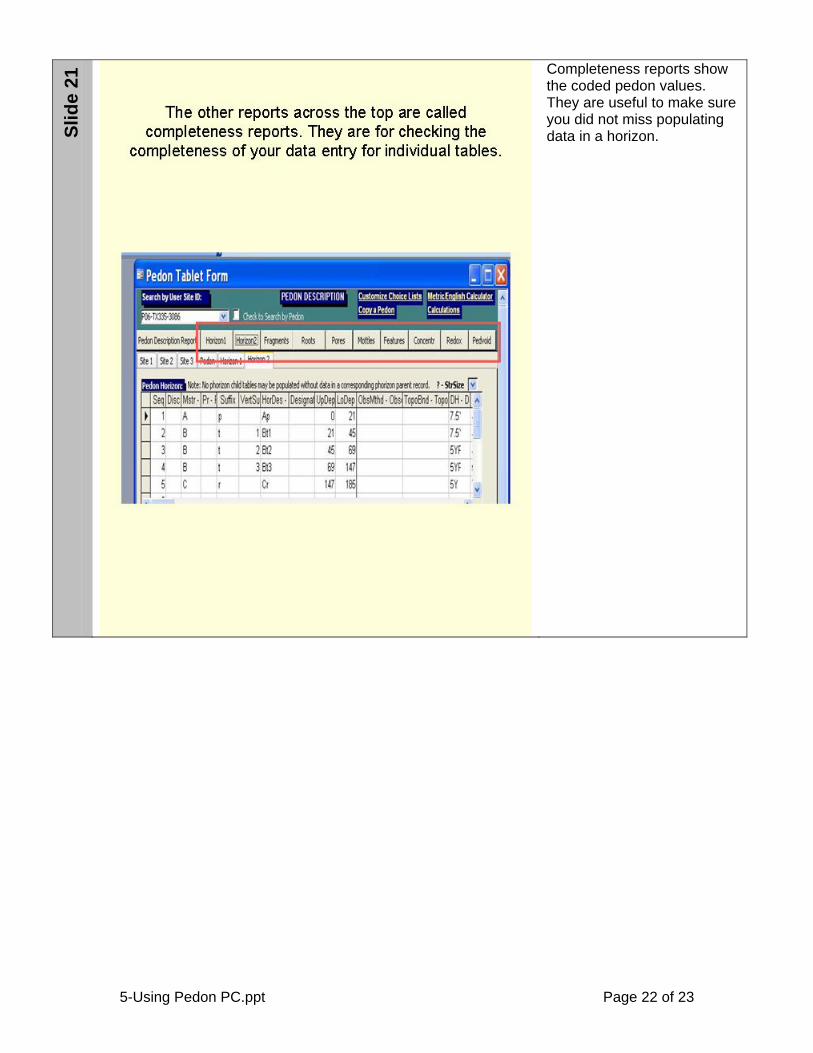
Completeness reports show the coded pedon values. They are useful to make sure you did not miss populating data in a horizon.

5-Using Pedon PC.ppt Page 23 of 23
Slid
e 22
In the structure columns it just gives the pedon codes for structure but by looking at the report it is possible to see that the structure size for one of the horizons was not populated.


![[XLS] · Web view005B PC Memory - 4MB 005C PC Memory - 6MB 005D PC Memory - 8MB 005E PC Memory - 10MB 005F PC Memory - 12MB 005G PC Memory - 14MB 005H PC Memory - 16MB 005I PC Memory](https://img.pdfslide.us/doc/110x75/5ab13df97f8b9ac66c8c4031/xls-view005b-pc-memory-4mb-005c-pc-memory-6mb-005d-pc-memory-8mb-005e-pc.jpg)