Embed Size (px)
Citation preview
V . Emails Table of Contents
Content Page #A. Upload and Download Files for CheetahMail V:2 – V:5B. Activate or Deactivate SalesForce Emails V:6 – V:8C. Check Usage of SalesForce Emails V: 9 – V:11
Learn more about:
CheetahMail : Emails launched through CM are sent via an outside vendor (the from field is “Staples Advantage”) and deployed directly to a customer’s inbox.
SalesForce : Emails are posted to SF.com and deployed directly from a Sales Rep (ie [email protected]) to a customer’s inbox. Emails can be personalized.
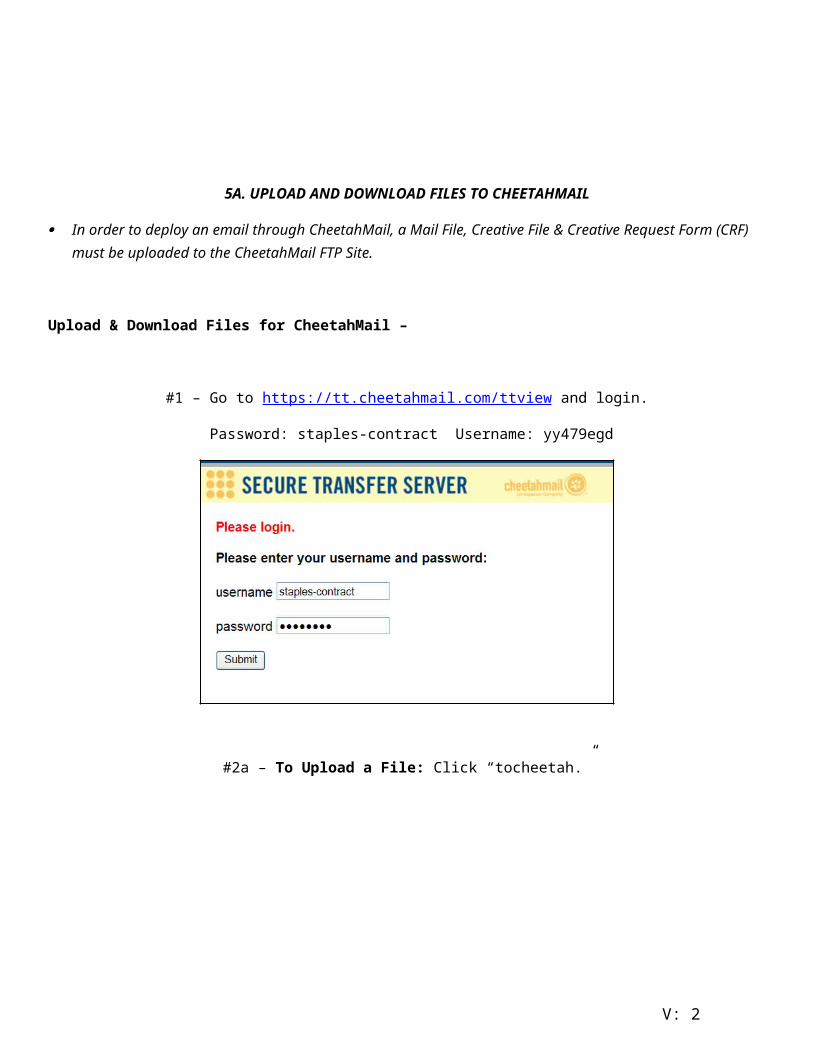
5A. UPLOAD AND DOWNLOAD FILES TO CHEETAHMAIL
In order to deploy an email through CheetahMail, a Mail File, Creative File & Creative Request Form (CRF) must be uploaded to the CheetahMail FTP Site.
Upload & Download Files for CheetahMail –
#1 – Go to https://tt.cheetahmail.com/ttview and login.
Password: staples-contract Username: yy479egd
#2a – To Upload a File: Click “tocheetah.”
V: 2
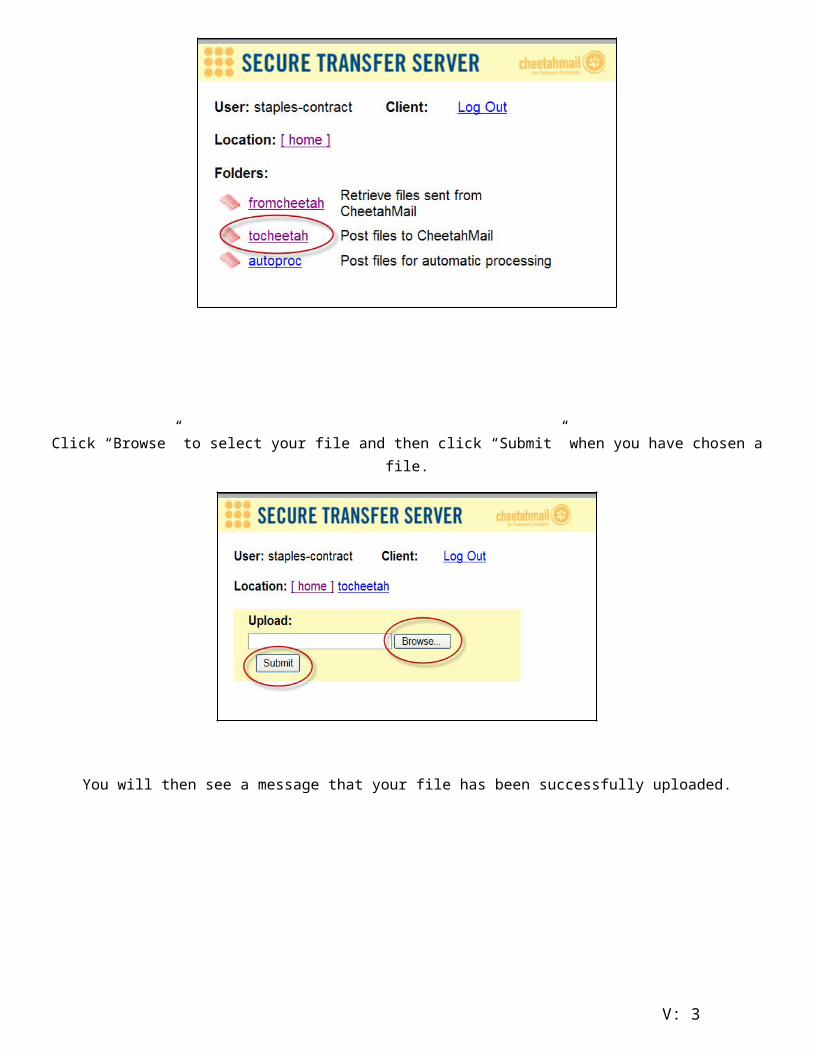
Click “Browse” to select your file and then click “Submit” when you have chosen a file.
You will then see a message that your file has been successfully uploaded.
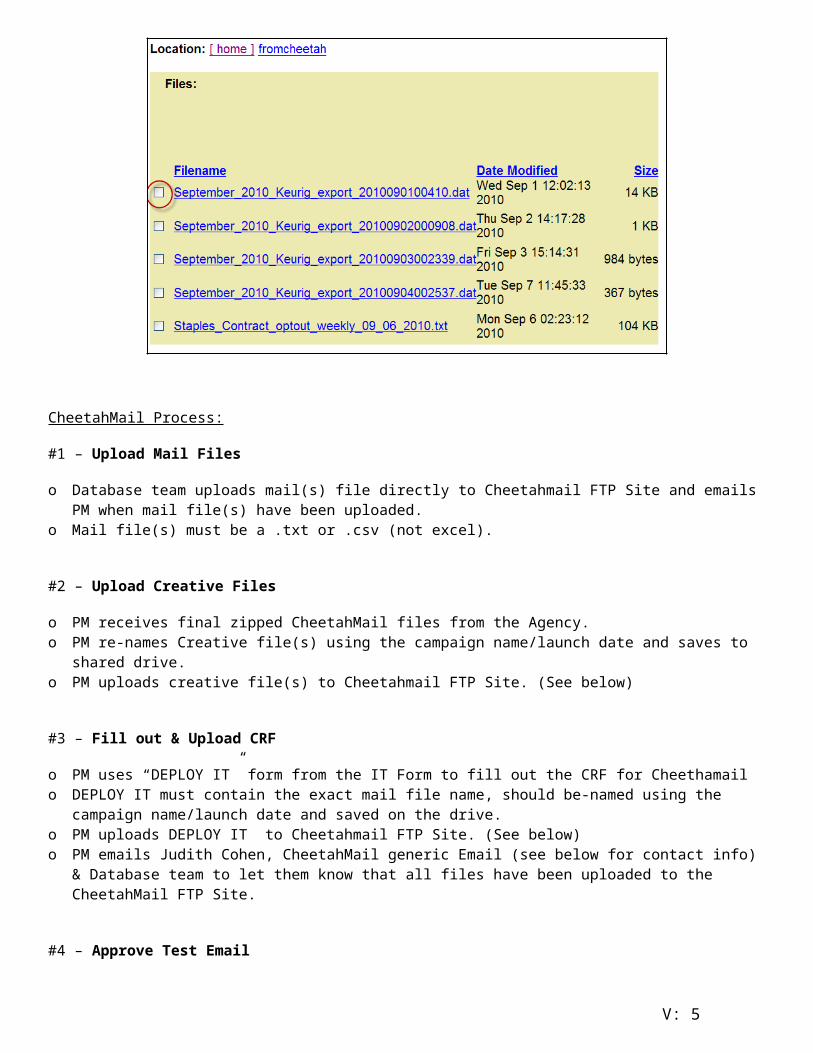
#2b – To Download a File: Click “fromcheetah.”
V: 3
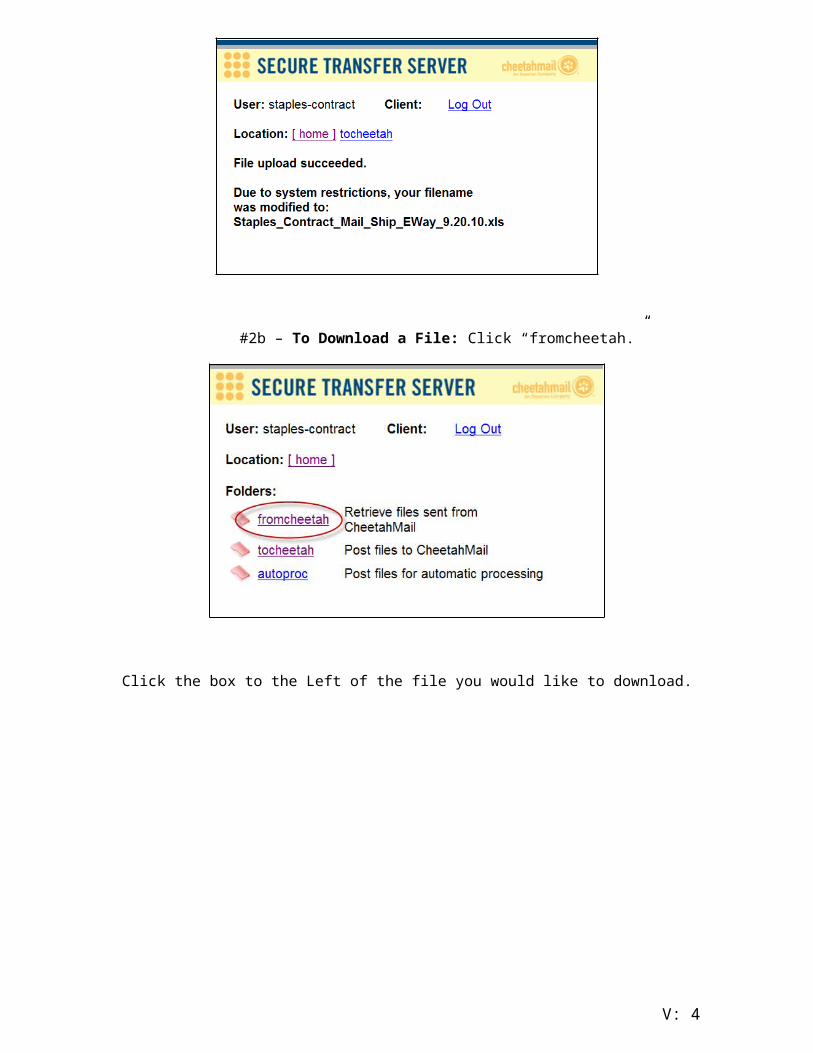
Click the box to the Left of the file you would like to download.
CheetahMail Process:
#1 – Upload Mail Files
o Database team uploads mail(s) file directly to Cheetahmail FTP Site and emails PM when mail file(s) have been uploaded.
o Mail file(s) must be a .txt or .csv (not excel).
#2 – Upload Creative Files
o PM receives final zipped CheetahMail files from the Agency.o PM re-names Creative file(s) using the campaign name/launch date and saves to shared drive.o PM uploads creative file(s) to Cheetahmail FTP Site. (See below)
#3 – Fill out & Upload CRF
o PM uses “DEPLOY IT” form from the IT Form to fill out the CRF for Cheethamailo DEPLOY IT must contain the exact mail file name, should be-named using the campaign name/launch date and saved
on the drive. o PM uploads DEPLOY IT to Cheetahmail FTP Site. (See below)o PM emails Judith Cohen, CheetahMail generic Email (see below for contact info) & Database team to let them know
that all files have been uploaded to the CheetahMail FTP Site.
#4 – Approve Test Email
o CheetahMail team will send “test” email of email 1-3 days prior to deployment for PM to approve.o PM reviews test email, sends to any other approvers and checks that all links work.
V: 4
o If email is not approved, PM emails CheetahMail team & cc Database team to make them aware of any issues. PM should request new test emails.
o If email is approved, PM emails CheetahMail team & Database team to approve email for launch.
Notes -
o Any email updates/date changes should be emailed directly to Database team.o All email campaign files are due to Cheetahmail 7 business days prior to deployment date.o When uploading files, please be sure to indicate StaplesLink or EWay.o If Campaign has multiple versions, please indicate in DEPLOY IT. Please fill out a different DEPLOY IT for EWay & Link
versions of an email.
o CheetahMail Contact Information:o Contacts: Generic Email - [email protected] Judith Cohen - [email protected] Chaz Tinch- [email protected]
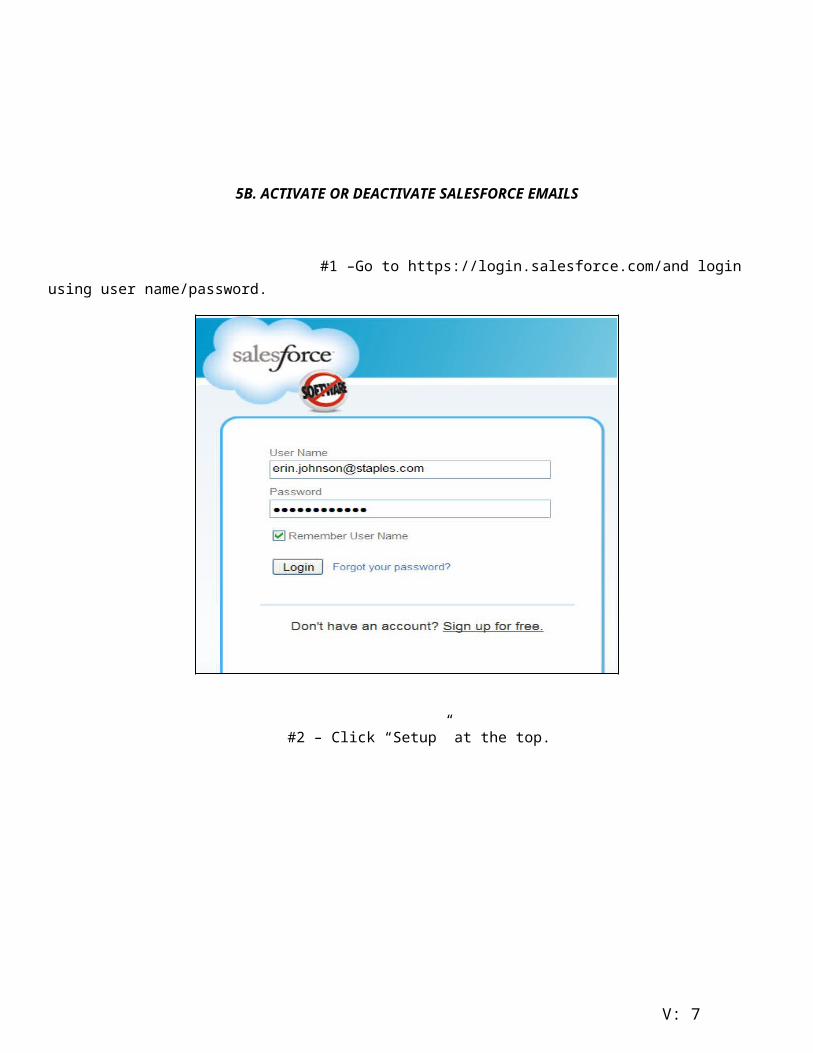
5B. ACTIVATE OR DEACTIVATE SALESFORCE EMAILS
V: 5
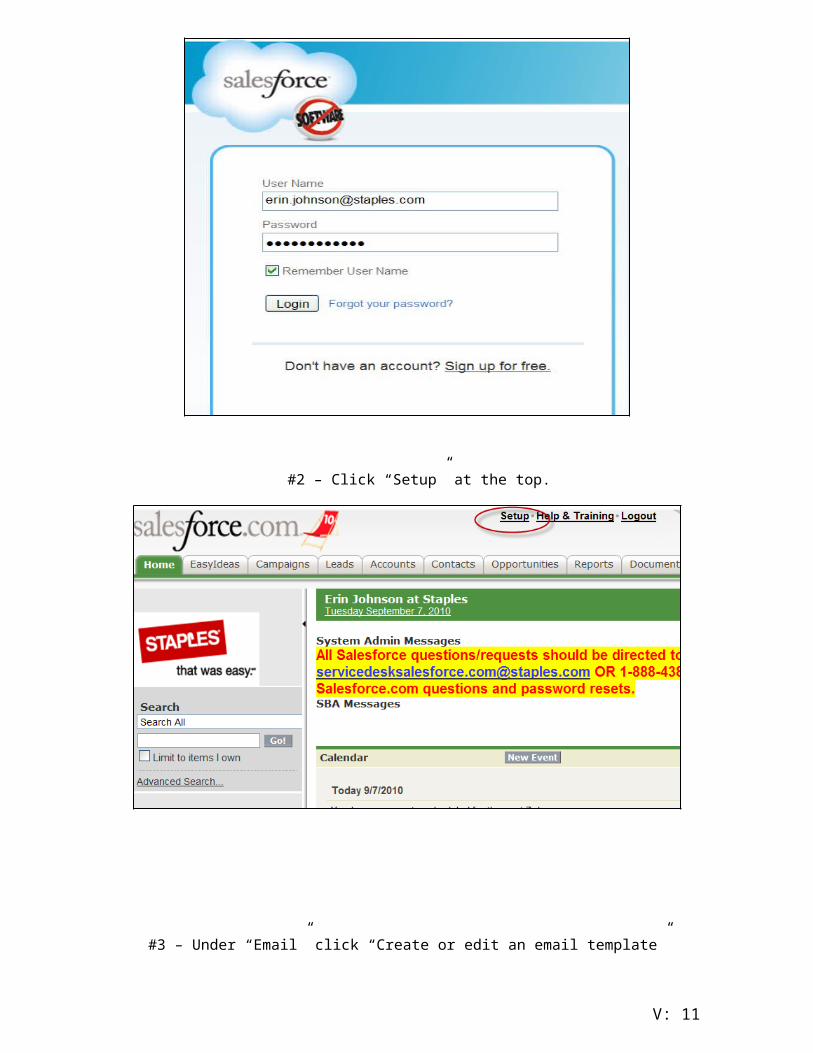
#1 –Go to https://login.salesforce.com/and login using user name/password.
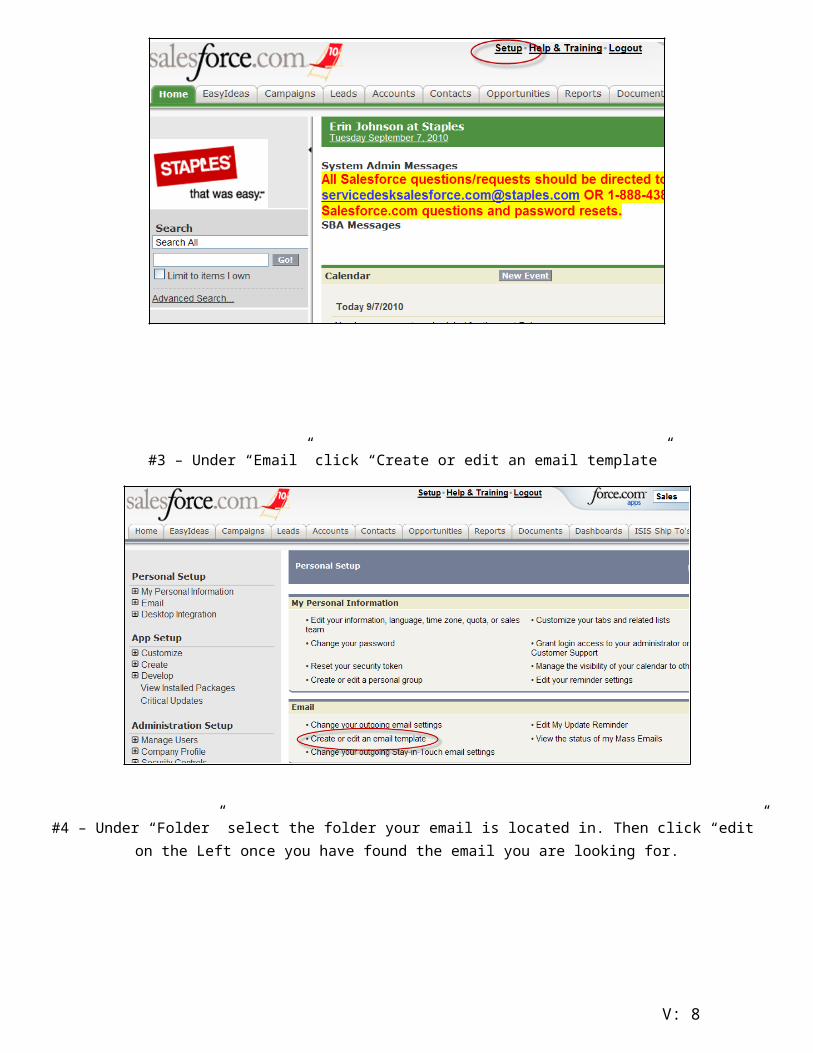
#2 – Click “Setup” at the top.
#3 – Under “Email” click “Create or edit an email template”
V: 6
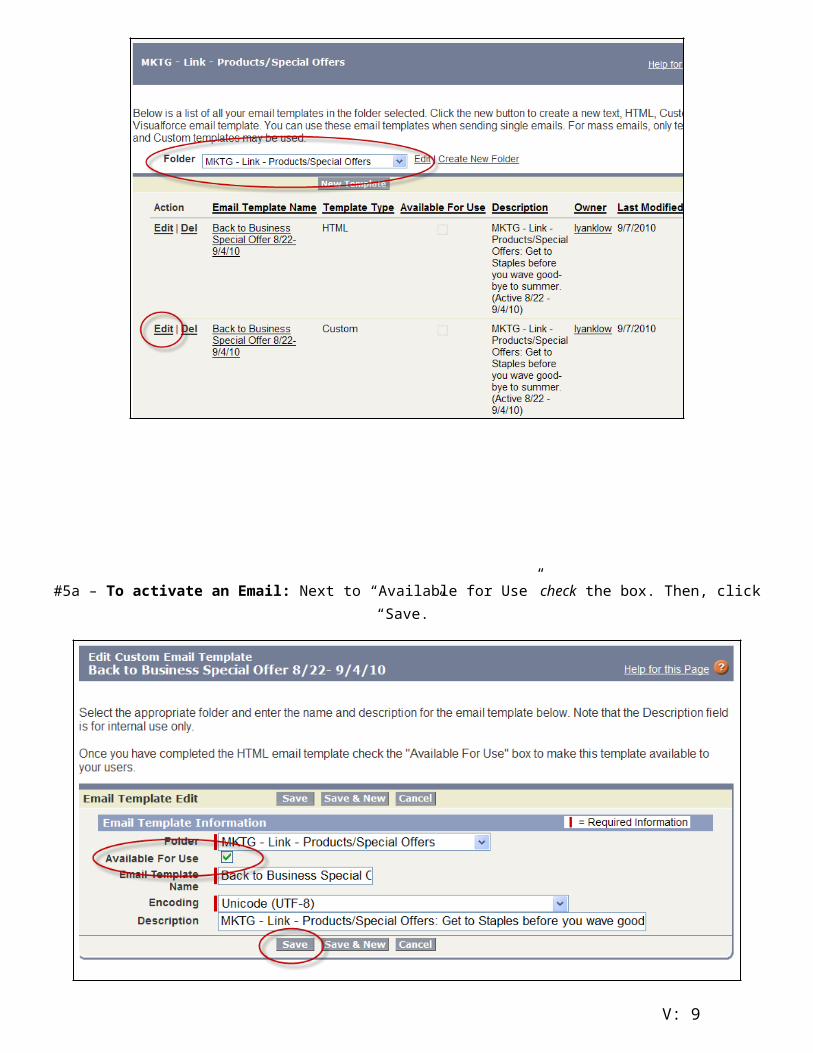
#4 – Under “Folder” select the folder your email is located in. Then click “edit” on the Left once you have found the email you are looking for.
#5a – To activate an Email: Next to “Available for Use” check the box. Then, click “Save.”
V: 7
#5b – To deactivate an Email: Next to “Available for Use” uncheck the box. Then, click “Save.”
5C. CHECK USAGES OF SALESFORCE.COM EMAILS
V: 8
#1 –Go to https://login.salesforce.com/and login using user name/password.
#2 – Click “Setup” at the top.
#3 – Under “Email” click “Create or edit an email template”
V: 9

#4 – Under “Folder” select the folder your email is located in. Then click on the title of email once you have found the one you are looking for.
#5 – Next to “Times Used” you will see the # of times your email has been sent.
V: 10
V: 11


![[Doc 303-5] 7-3-2013 Warrant to Search Additional Emails](https://img.pdfslide.us/doc/110x75/56d6bf611a28ab30169602f6/doc-303-5-7-3-2013-warrant-to-search-additional-emails.jpg)