Embed Size (px)
Citation preview
ptg7971238
144
5 DRAWING WITH THE PEN AND PENCIL TOOLS
Lesson overviewIn this lesson, you’ll learn how to do the following:
• Draw curved lines.
• Draw straight lines.
• Use template layers.
• End path segments and split lines.
• Select and adjust curve segments.
• Create dashed lines and add arrowheads.
• Draw and edit with the Pencil tool.
This lesson takes approximately an hour and a half to complete. If needed, remove the previous lesson folder from your hard disk and copy the Lesson05 folder onto it.
ptg7971238
145
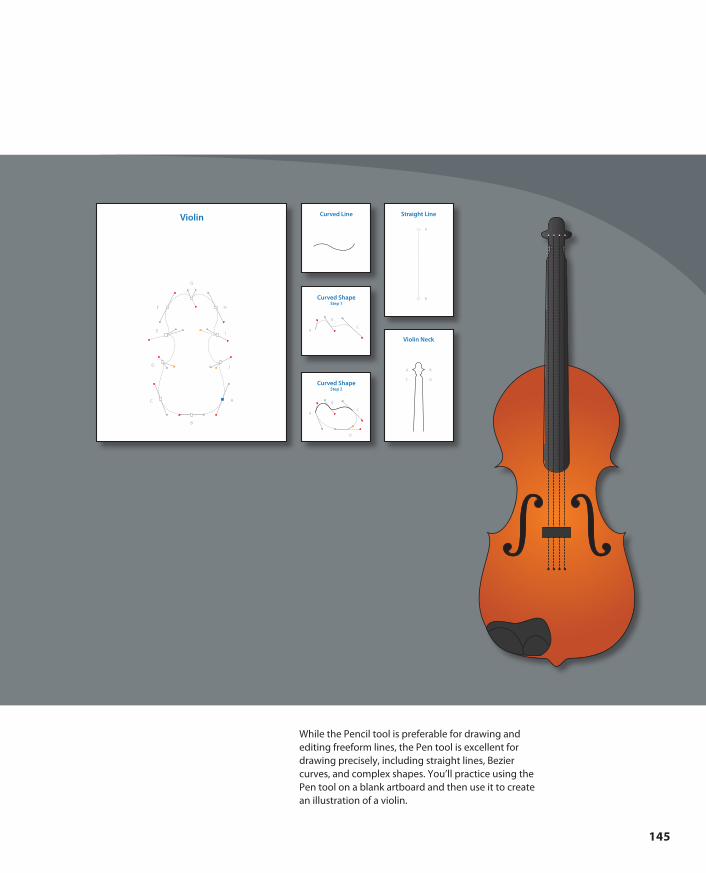
While the Pencil tool is preferable for drawing and editing freeform lines, the Pen tool is excellent for drawing precisely, including straight lines, Bezier curves, and complex shapes. You’ll practice using the Pen tool on a blank artboard and then use it to create an illustration of a violin.

ptg7971238
146 LESSON 5 Drawing with the Pen and Pencil Tools
Getting startedIn the first part of this lesson, you learn how to manipulate the Pen tool on a blank artboard.
1 To ensure that the tools and panels function exactly as described in this lesson, delete or deactivate (by renaming) the Adobe Illustrator CS6 preferences file. See “Restoring default preferences” on page 3.
2 Start Adobe Illustrator CS6.
� Note: If you have not already done so, copy the Lesson05 folder from the Lessons folder on the Adobe Illustrator CS6 Classroom in a Book CD onto your hard disk. See “Copying the Classroom in a Book files” on page 2.
3 Open the L5start_1.ai file in the Lesson05 folder, located in the Lessons folder on your hard disk.
The top artboard shows the path that you will create. Use the bottom artboard for this exercise.
4 Choose File > Save As. In the Save As dialog box, navigate to the Lesson05 folder and open it. Rename the file to path1.ai. Choose Adobe Illustrator (*.AI) from the Save As Type menu (Windows), or choose Adobe Illustrator (ai) from the Format menu (Mac OS). Click Save and, in the Illustrator Options dialog box, leave the default settings, and then click OK.
Starting with the Pen tool1 Press Alt+Ctrl+0 (zero) (Windows) or Option+Command+0 (zero) (Mac OS) to
fit both artboards in the window. Then, hold down the Shift key and press the Tab key once to close all the panels except for the Tools panel. You don’t need the panels for the first part of this lesson.
2 Choose View > Smart Guides to deselect the Smart Guides.
3 In the Control panel, click the Fill color and choose the None swatch ( ). Then, click the Stroke color and make sure that the black swatch is selected.
4 Make sure the Stroke weight is 1 pt in the Control panel.
When you draw with the Pen tool, it is best to have no fill on the path you create. You can add a fill later, if necessary.
5 Select the Pen tool ( ) in the Tools panel. Notice the asterisk next to the Pen icon ( ), indicating that you are starting a path. Click toward the top of the bottom artboard to set the first point, and then move the pointer to the right of the original anchor point. The asterisk disappears.
� Note: In Mac OS, when opening lesson files, you may need to click the round, green button in the upper-left corner of the Document window to maximize the window’s size.
�Note: If you see a cross hair instead of the Pen icon, the Caps Lock key is active. Caps Lock turns tool icons into cross hairs for increased precision.
ptg7971238
ADOBE ILLUSTRATOR CS6 CLASSROOM IN A BOOK 147
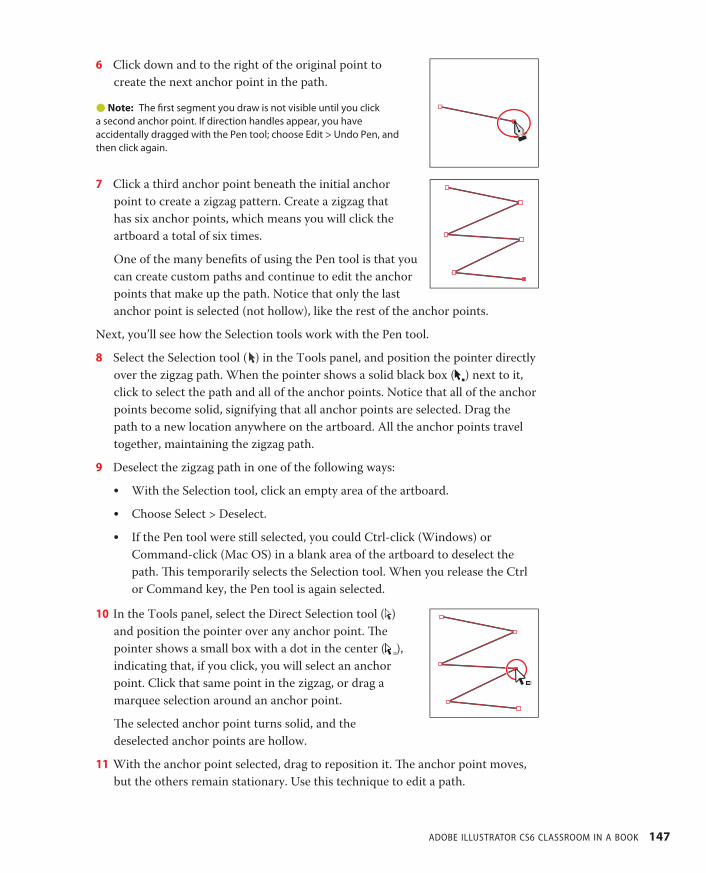
6 Click down and to the right of the original point to create the next anchor point in the path.
�Note: The first segment you draw is not visible until you click a second anchor point. If direction handles appear, you have accidentally dragged with the Pen tool; choose Edit > Undo Pen, and then click again.
7 Click a third anchor point beneath the initial anchor point to create a zigzag pattern. Create a zigzag that has six anchor points, which means you will click the artboard a total of six times.
One of the many benefits of using the Pen tool is that you can create custom paths and continue to edit the anchor points that make up the path. Notice that only the last anchor point is selected (not hollow), like the rest of the anchor points.
Next, you’ll see how the Selection tools work with the Pen tool.
8 Select the Selection tool ( ) in the Tools panel, and position the pointer directly over the zigzag path. When the pointer shows a solid black box ( ) next to it, click to select the path and all of the anchor points. Notice that all of the anchor points become solid, signifying that all anchor points are selected. Drag the path to a new location anywhere on the artboard. All the anchor points travel together, maintaining the zigzag path.
9 Deselect the zigzag path in one of the following ways:
• With the Selection tool, click an empty area of the artboard.
• Choose Select > Deselect.
• If the Pen tool were still selected, you could Ctrl-click (Windows) or Command-click (Mac OS) in a blank area of the artboard to deselect the path. This temporarily selects the Selection tool. When you release the Ctrl or Command key, the Pen tool is again selected.
10 In the Tools panel, select the Direct Selection tool ( ) and position the pointer over any anchor point. The pointer shows a small box with a dot in the center ( ), indicating that, if you click, you will select an anchor point. Click that same point in the zigzag, or drag a marquee selection around an anchor point.
The selected anchor point turns solid, and the deselected anchor points are hollow.
11With the anchor point selected, drag to reposition it. The anchor point moves, but the others remain stationary. Use this technique to edit a path.
ptg7971238
148 LESSON 5 Drawing with the Pen and Pencil Tools
12Choose Select > Deselect.
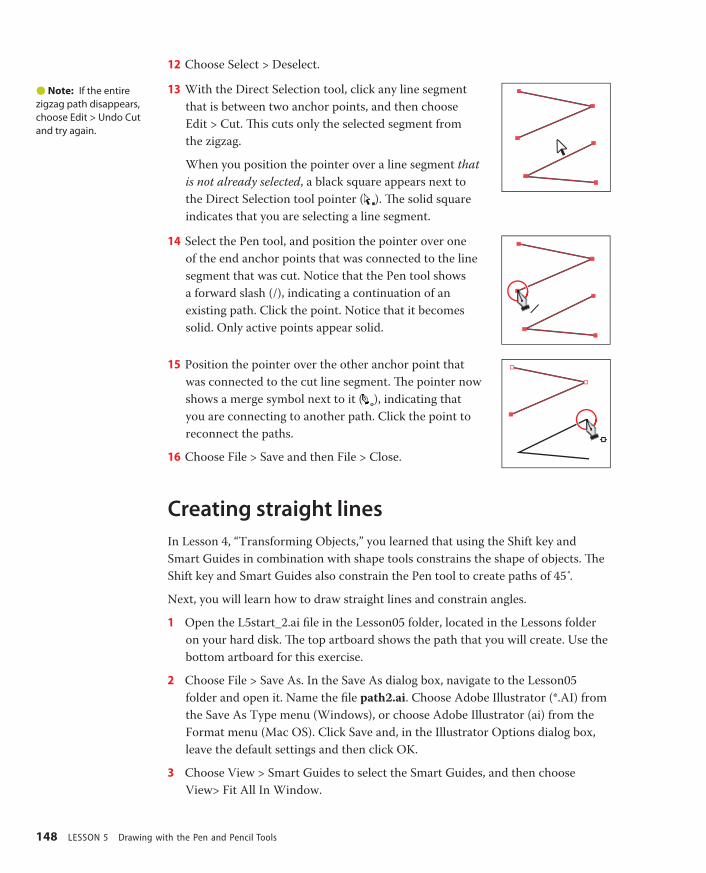
13With the Direct Selection tool, click any line segment that is between two anchor points, and then choose Edit > Cut. This cuts only the selected segment from the zigzag.
When you position the pointer over a line segment that is not already selected, a black square appears next to the Direct Selection tool pointer ( ). The solid square indicates that you are selecting a line segment.
14Select the Pen tool, and position the pointer over one of the end anchor points that was connected to the line segment that was cut. Notice that the Pen tool shows a forward slash (/), indicating a continuation of an existing path. Click the point. Notice that it becomes solid. Only active points appear solid.
15Position the pointer over the other anchor point that was connected to the cut line segment. The pointer now shows a merge symbol next to it ( ), indicating that you are connecting to another path. Click the point to reconnect the paths.
16Choose File > Save and then File > Close.
Creating straight linesIn Lesson 4, “Transforming Objects,” you learned that using the Shift key and Smart Guides in combination with shape tools constrains the shape of objects. The Shift key and Smart Guides also constrain the Pen tool to create paths of 45 .̊
Next, you will learn how to draw straight lines and constrain angles.
1 Open the L5start_2.ai file in the Lesson05 folder, located in the Lessons folder on your hard disk. The top artboard shows the path that you will create. Use the bottom artboard for this exercise.
2 Choose File > Save As. In the Save As dialog box, navigate to the Lesson05 folder and open it. Name the file path2.ai. Choose Adobe Illustrator (*.AI) from the Save As Type menu (Windows), or choose Adobe Illustrator (ai) from the Format menu (Mac OS). Click Save and, in the Illustrator Options dialog box, leave the default settings and then click OK.
3 Choose View > Smart Guides to select the Smart Guides, and then choose View> Fit All In Window.
�Note: If the entire zigzag path disappears, choose Edit > Undo Cut and try again.
ptg7971238
ADOBE ILLUSTRATOR CS6 CLASSROOM IN A BOOK 149
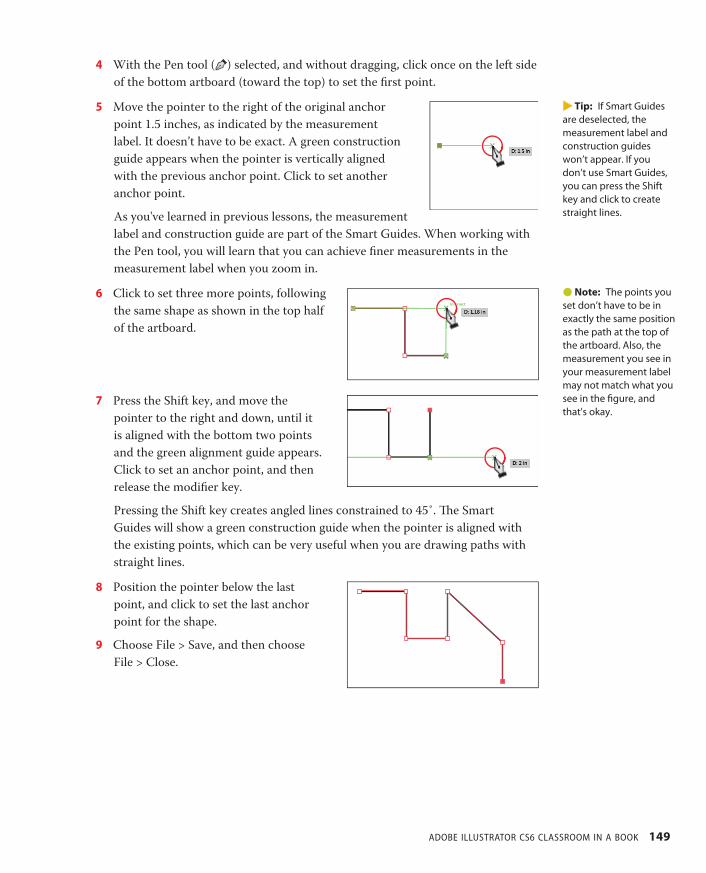
4 With the Pen tool ( ) selected, and without dragging, click once on the left side of the bottom artboard (toward the top) to set the first point.,
5 Move the pointer to the right of the original anchor point 1.5 inches, as indicated by the measurement label. It doesn’t have to be exact. A green construction guide appears when the pointer is vertically aligned with the previous anchor point. Click to set another anchor point.
As you've learned in previous lessons, the measurement label and construction guide are part of the Smart Guides. When working with the Pen tool, you will learn that you can achieve finer measurements in the measurement label when you zoom in.
6 Click to set three more points, following the same shape as shown in the top half of the artboard.
7 Press the Shift key, and move the pointer to the right and down, until it is aligned with the bottom two points and the green alignment guide appears. Click to set an anchor point, and then release the modifier key.
Pressing the Shift key creates angled lines constrained to 45˚. The Smart Guides will show a green construction guide when the pointer is aligned with the existing points, which can be very useful when you are drawing paths with straight lines.
8 Position the pointer below the last point, and click to set the last anchor point for the shape.
9 Choose File > Save, and then choose File > Close.
�Tip: If Smart Guides are deselected, the measurement label and construction guides won’t appear. If you don’t use Smart Guides, you can press the Shift key and click to create straight lines.
intersect
�Note: The points you set don’t have to be in exactly the same position as the path at the top of the artboard. Also, the measurement you see in your measurement label may not match what you see in the figure, and that's okay.

ptg7971238
150 LESSON 5 Drawing with the Pen and Pencil Tools
Creating curved pathsIn this part of the lesson, you’ll learn how to draw smooth, curved lines with the Pen tool. In vector drawing applications, such as Illustrator, you draw a curve, called a Bezier curve, with control points. By setting anchor points and dragging direction handles, you can define the shape of the curve. Although drawing curves this way can take some time to learn, it gives you the greatest control and flexibility in creating paths.
1 Open the L5start_3.ai file in the Lesson05 folder. Choose View > Fit All In Window.
This file contains a template layer that you can trace to practice using the Pen tool ( ). You will draw in the bottom artboard for this exercise.
2 Choose File > Save As. In the Save As dialog box, navigate to the Lesson05 folder. Change the name to path3.ai. Choose Adobe Illustrator (*.AI) from the Save As Type menu (Windows), or choose Adobe Illustrator (ai) from the Format menu (Mac OS). Click Save and, in the Illustrator Options dialog box, leave the default settings and then click OK.
3 In the Control panel, click the Fill color ( ) and choose the None swatch ( ). Then, click the Stroke color ( ) and make sure that the black swatch is selected.
4 Make sure the Stroke weight is 1 pt in the Control panel.
5 With the Pen tool ( ), click on the left side of the bottom artboard to create the initial anchor point. Click another location, and drag away from the point to create a curved path.
Continue clicking and dragging at different locations on the page. The goal for this exercise is not to create anything specific but to get accustomed to the feel of the Bezier curve.
Notice that as you drag, direction handles appear. Direction handles consist of direction lines that end in round direction points. The angle and length of the direction handles determine the shape and size of the curve. Direction handles do not print and are not visible when the anchor is inactive.
6 Choose Select > Deselect.
7 Select the Direct Selection tool ( ) in the Tools panel, and click the line between two points (called a line segment) to display the direction handles. Click and drag the end of a direction handle as you see in the figure. Moving the direction handles reshapes the curve.
8 Leave the file open for the next section.
� Note: See Lesson 8, “Working with Layers,” for information about creating layers.
ptg7971238
ADOBE ILLUSTRATOR CS6 CLASSROOM IN A BOOK 151
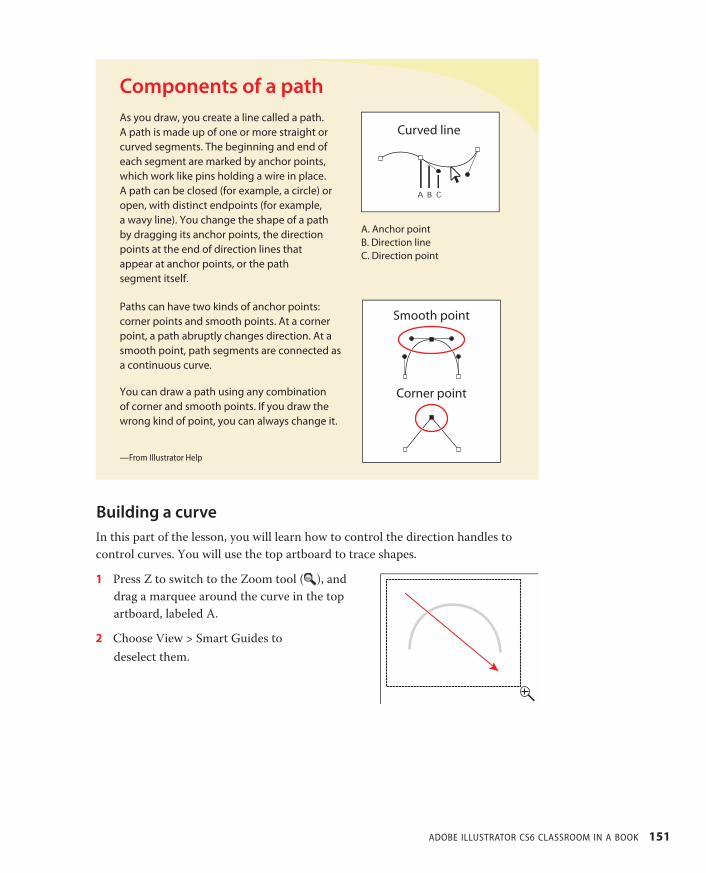
Components of a pathAs you draw, you create a line called a path. A path is made up of one or more straight or curved segments. The beginning and end of each segment are marked by anchor points, which work like pins holding a wire in place. A path can be closed (for example, a circle) or open, with distinct endpoints (for example, a wavy line). You change the shape of a path by dragging its anchor points, the direction points at the end of direction lines that appear at anchor points, or the path segment itself.
Paths can have two kinds of anchor points: corner points and smooth points. At a corner point, a path abruptly changes direction. At a smooth point, path segments are connected as a continuous curve.
You can draw a path using any combination of corner and smooth points. If you draw the wrong kind of point, you can always change it.
—From Illustrator Help
A. Anchor pointB. Direction lineC. Direction point
Building a curveIn this part of the lesson, you will learn how to control the direction handles to control curves. You will use the top artboard to trace shapes.
1 Press Z to switch to the Zoom tool ( ), and drag a marquee around the curve in the top artboard, labeled A.
2 Choose View > Smart Guides to deselect them.

ptg7971238
152 LESSON 5 Drawing with the Pen and Pencil Tools
3 Select the Pen tool ( ) in the Tools panel. Click at the base of the left side of the arch, and drag up to create a direction line going the same direction as the arch. Remember to always follow the direction of the curve. Release the mouse button when the direction line is above the gray arch.
�Tip: If you make a mistake while drawing with the Pen tool, choose Edit > Undo Pen to undo the points you have set.
4 Click the lower-right base of the gray arch path, and drag down. Release the mouse button when the path you are creating looks like the arch.
�Note: Pulling the direction handle longer makes a steeper slope; when the direction handle is shorter, the slope is flatter.
5 If the path you created is not aligned exactly with the template, use the Direct Selection tool ( ) to select the anchor points one at a time. Then, adjust the direction handles until your path follows the template more accurately.
6 Select the Selection tool ( ), and click the artboard in an area with no objects, or choose Select > Deselect. Deselecting the first path allows you to create a new path. If you click somewhere on the artboard with the Pen tool while path A is still selected, the path connects to the next point you draw.
�Tip: To deselect objects, you can also press the Ctrl (Windows) or Command (Mac OS) key to temporarily switch to the Selection or Direct Selection tool, whichever was last used. Then, click the artboard where there are no objects.
7 Choose File > Save.
8 Zoom out to see path B.
9 Select the Pen tool, and drag up from the left base of path B in the direction of the arch. Click and drag down on the next square point to the right, adjusting the arch with the direction handle before you release the mouse button. This creates the same type of arch shape you created for path A.
� Note: Don’t worry if the path you draw is not exact. You can correct the line with the Direct Selection tool when the path is complete.
�Note: The artboard may scroll as you drag. If you lose visibility of the curve, choose View > Zoom Out until you see the curve and anchor point. Pressing the spacebar allows you to use the Hand tool to reposition the artwork.
ptg7971238
ADOBE ILLUSTRATOR CS6 CLASSROOM IN A BOOK 153
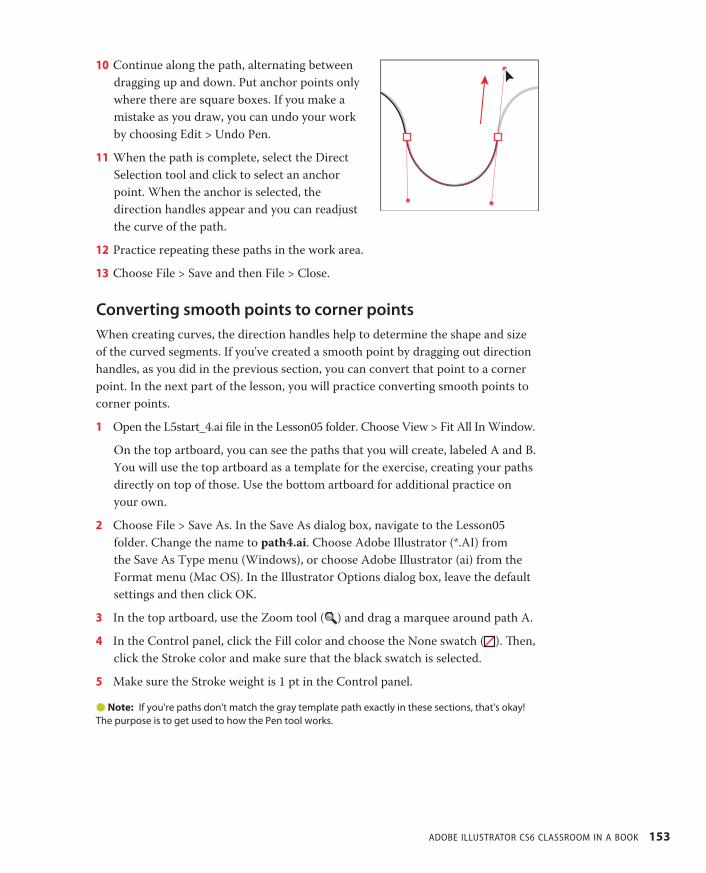
10Continue along the path, alternating between dragging up and down. Put anchor points only where there are square boxes. If you make a mistake as you draw, you can undo your work by choosing Edit > Undo Pen.
11When the path is complete, select the Direct Selection tool and click to select an anchor point. When the anchor is selected, the direction handles appear and you can readjust the curve of the path.
12Practice repeating these paths in the work area.
13Choose File > Save and then File > Close.
Converting smooth points to corner pointsWhen creating curves, the direction handles help to determine the shape and size of the curved segments. If you've created a smooth point by dragging out direction handles, as you did in the previous section, you can convert that point to a corner point. In the next part of the lesson, you will practice converting smooth points to corner points.
1 Open the L5start_4.ai file in the Lesson05 folder. Choose View > Fit All In Window.
On the top artboard, you can see the paths that you will create, labeled A and B. You will use the top artboard as a template for the exercise, creating your paths directly on top of those. Use the bottom artboard for additional practice on your own.
2 Choose File > Save As. In the Save As dialog box, navigate to the Lesson05 folder. Change the name to path4.ai. Choose Adobe Illustrator (*.AI) from the Save As Type menu (Windows), or choose Adobe Illustrator (ai) from the Format menu (Mac OS). In the Illustrator Options dialog box, leave the default settings and then click OK.
3 In the top artboard, use the Zoom tool ( ) and drag a marquee around path A.
4 In the Control panel, click the Fill color and choose the None swatch ( ). Then, click the Stroke color and make sure that the black swatch is selected.
5 Make sure the Stroke weight is 1 pt in the Control panel.
� Note: If you're paths don't match the gray template path exactly in these sections, that's okay! The purpose is to get used to how the Pen tool works.
ptg7971238
154 LESSON 5 Drawing with the Pen and Pencil Tools
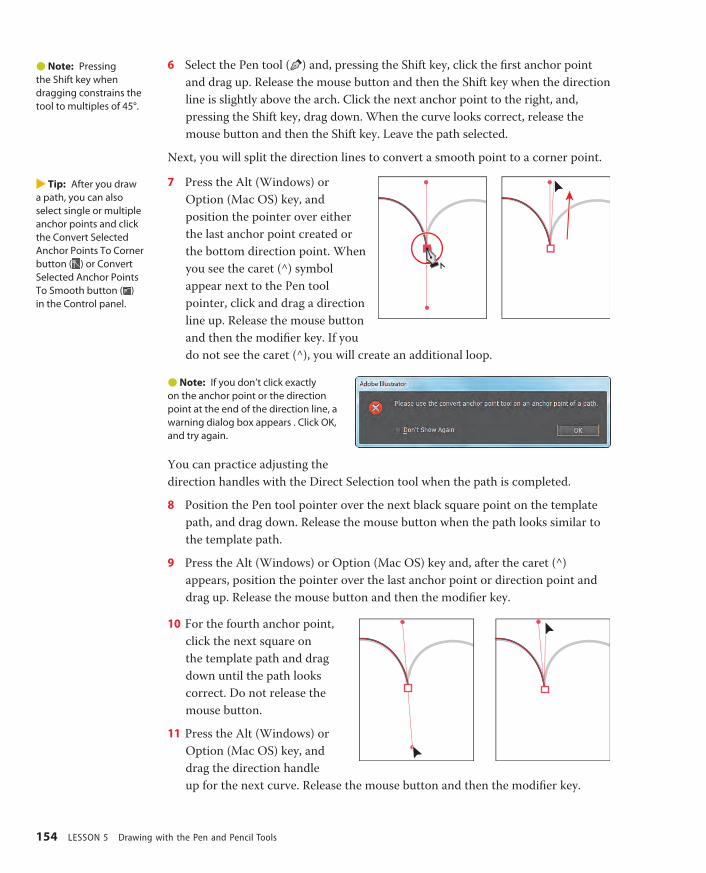
6 Select the Pen tool ( ) and, pressing the Shift key, click the first anchor point and drag up. Release the mouse button and then the Shift key when the direction line is slightly above the arch. Click the next anchor point to the right, and, pressing the Shift key, drag down. When the curve looks correct, release the mouse button and then the Shift key. Leave the path selected.
Next, you will split the direction lines to convert a smooth point to a corner point.
7 Press the Alt (Windows) or Option (Mac OS) key, and position the pointer over either the last anchor point created or the bottom direction point. When you see the caret (^) symbol appear next to the Pen tool pointer, click and drag a direction line up. Release the mouse button and then the modifier key. If you do not see the caret (^), you will create an additional loop.
� Note: If you don’t click exactly on the anchor point or the direction point at the end of the direction line, a warning dialog box appears . Click OK, and try again.
You can practice adjusting the direction handles with the Direct Selection tool when the path is completed.
8 Position the Pen tool pointer over the next black square point on the template path, and drag down. Release the mouse button when the path looks similar to the template path.
9 Press the Alt (Windows) or Option (Mac OS) key and, after the caret (^) appears, position the pointer over the last anchor point or direction point and drag up. Release the mouse button and then the modifier key.
10For the fourth anchor point, click the next square on the template path and drag down until the path looks correct. Do not release the mouse button.
11Press the Alt (Windows) or Option (Mac OS) key, and drag the direction handle up for the next curve. Release the mouse button and then the modifier key.
�Note: Pressing the Shift key when dragging constrains the tool to multiples of 45°.
�Tip: After you draw a path, you can also select single or multiple anchor points and click the Convert Selected Anchor Points To Corner button ( ) or Convert Selected Anchor Points To Smooth button ( ) in the Control panel.
ptg7971238
ADOBE ILLUSTRATOR CS6 CLASSROOM IN A BOOK 155
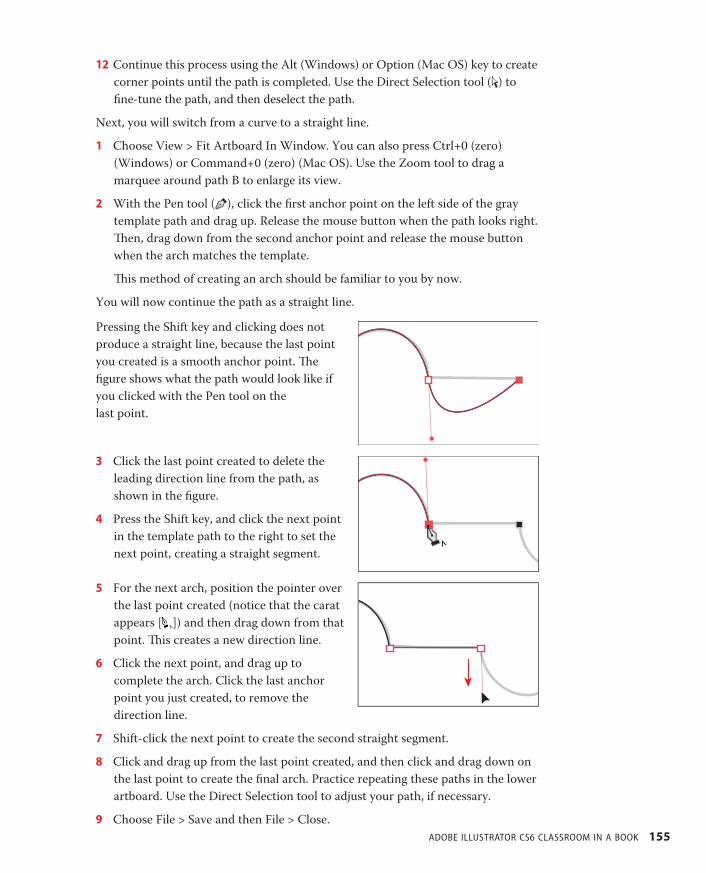
12Continue this process using the Alt (Windows) or Option (Mac OS) key to create corner points until the path is completed. Use the Direct Selection tool ( ) to fine-tune the path, and then deselect the path.
Next, you will switch from a curve to a straight line.
1 Choose View > Fit Artboard In Window. You can also press Ctrl+0 (zero) (Windows) or Command+0 (zero) (Mac OS). Use the Zoom tool to drag a marquee around path B to enlarge its view.
2 With the Pen tool ( ), click the first anchor point on the left side of the gray template path and drag up. Release the mouse button when the path looks right. Then, drag down from the second anchor point and release the mouse button when the arch matches the template.
This method of creating an arch should be familiar to you by now.
You will now continue the path as a straight line.
Pressing the Shift key and clicking does not produce a straight line, because the last point you created is a smooth anchor point. The figure shows what the path would look like if you clicked with the Pen tool on the last point.
3 Click the last point created to delete the leading direction line from the path, as shown in the figure.
4 Press the Shift key, and click the next point in the template path to the right to set the next point, creating a straight segment.
5 For the next arch, position the pointer over the last point created (notice that the carat appears [ ]) and then drag down from that point. This creates a new direction line.
6 Click the next point, and drag up to complete the arch. Click the last anchor point you just created, to remove the direction line.
7 Shift-click the next point to create the second straight segment.
8 Click and drag up from the last point created, and then click and drag down on the last point to create the final arch. Practice repeating these paths in the lower artboard. Use the Direct Selection tool to adjust your path, if necessary.
9 Choose File > Save and then File > Close.
ptg7971238
156 LESSON 5 Drawing with the Pen and Pencil Tools
Creating the violin illustrationIn this next part of the lesson, you’ll create an illustration of a violin. You’ll use the new skills you learned in the previous exercises, and you'll also learn some additional Pen tool techniques.
1 Choose File > Open, and open the L5end_5.ai file in the Lesson05 folder, located in the Lessons folder.
2 Choose View > Fit All In Window to see the finished artwork. (Use the Hand tool [ ] to move the artwork to where you want it.) If you don’t want to leave the artwork open, choose File > Close.
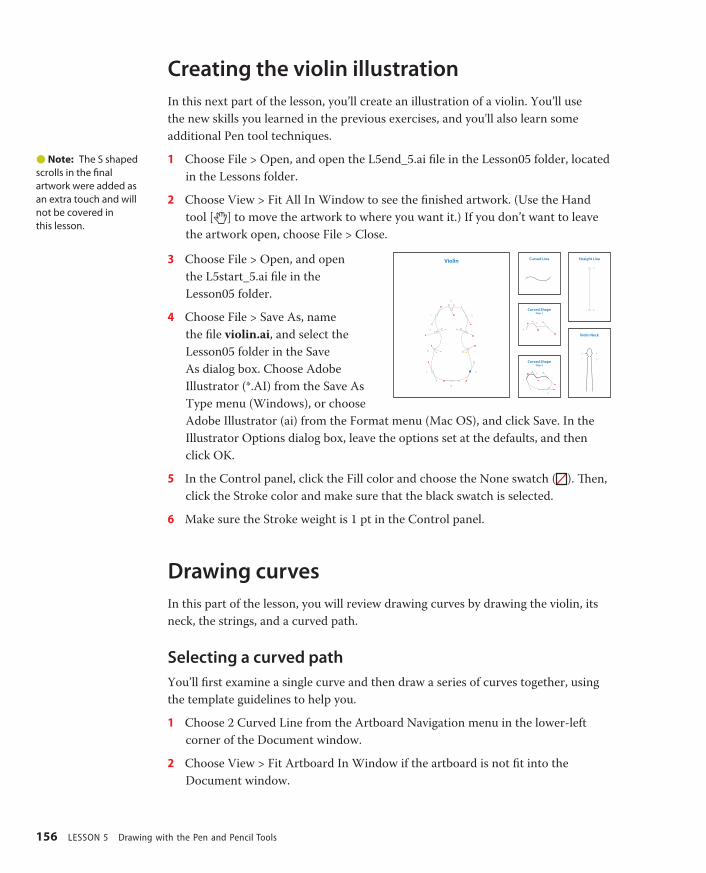
3 Choose File > Open, and open the L5start_5.ai file in the Lesson05 folder.
4 Choose File > Save As, name the file violin.ai, and select the Lesson05 folder in the Save As dialog box. Choose Adobe Illustrator (*.AI) from the Save As Type menu (Windows), or choose Adobe Illustrator (ai) from the Format menu (Mac OS), and click Save. In the Illustrator Options dialog box, leave the options set at the defaults, and then click OK.
5 In the Control panel, click the Fill color and choose the None swatch ( ). Then, click the Stroke color and make sure that the black swatch is selected.
6 Make sure the Stroke weight is 1 pt in the Control panel.
Drawing curvesIn this part of the lesson, you will review drawing curves by drawing the violin, its neck, the strings, and a curved path.
Selecting a curved pathYou’ll first examine a single curve and then draw a series of curves together, using the template guidelines to help you.
1 Choose 2 Curved Line from the Artboard Navigation menu in the lower-left corner of the Document window.
2 Choose View > Fit Artboard In Window if the artboard is not fit into the Document window.
� Note: The S shaped scrolls in the final artwork were added as an extra touch and will not be covered in this lesson.

ptg7971238
ADOBE ILLUSTRATOR CS6 CLASSROOM IN A BOOK 157
3 Select the Direct Selection tool ( ), and click one of the segments of the curved line to view its anchor points and direction handles, which extend from the points. The Direct Selection tool lets you select and edit individual segments in the curved line.
With a curve selected, you can also select the stroke and fill of the curve. When you do this, the next line you draw will have the same attributes. For more information about these attributes, see Lesson 6, “Color and Painting.”
Drawing a curved pathNext, you’ll draw the first curve of the curved shape.
1 Choose 3 Curved Shape step 1 from the Artboard Navigation menu in the lower-left corner of the Document window.
Instead of clicking with the Pen tool ( ) to start a path, you will drag with it to set the starting point and the direction of the path's curve.
2 Select the Pen tool ( ), and position it over point A on the template. Drag from point A to the red dot above it.
Next, you’ll create the second anchor point with direction lines.
3 Drag with the Pen tool from point B to the next red dot.
The two anchor points are connected with a line segment which has a curve that is controlled by the direction handles you created. Notice that, if you vary the angle of dragging, you change the shape of the curve.
4 To complete the curved line, position the pointer over point C and drag from point C to the last red dot.
5 Control-click (Windows) or Command-click (Mac OS) away from the path to stop drawing that path.
�Tip: You can also end a path by clicking the Pen tool, pressing P for the Pen tool shortcut, or choosing Select > Deselect.
ptg7971238
158 LESSON 5 Drawing with the Pen and Pencil Tools
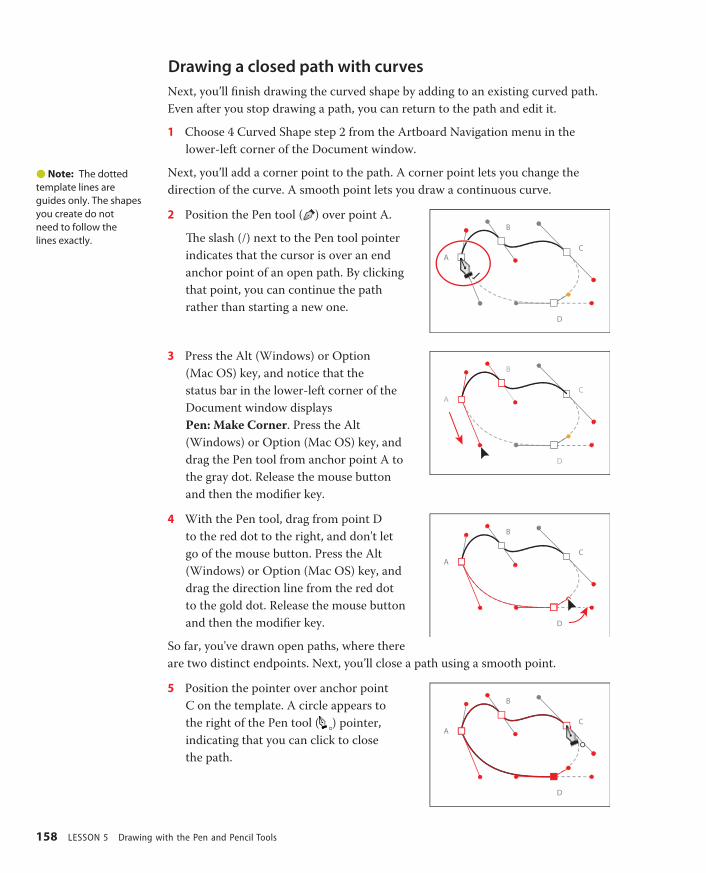
Drawing a closed path with curvesNext, you’ll finish drawing the curved shape by adding to an existing curved path. Even after you stop drawing a path, you can return to the path and edit it.
1 Choose 4 Curved Shape step 2 from the Artboard Navigation menu in the lower-left corner of the Document window.
Next, you’ll add a corner point to the path. A corner point lets you change the direction of the curve. A smooth point lets you draw a continuous curve.
2 Position the Pen tool ( ) over point A.
The slash (/) next to the Pen tool pointer indicates that the cursor is over an end anchor point of an open path. By clicking that point, you can continue the path rather than starting a new one.
3 Press the Alt (Windows) or Option (Mac OS) key, and notice that the status bar in the lower-left corner of the Document window displays Pen: Make Corner. Press the Alt (Windows) or Option (Mac OS) key, and drag the Pen tool from anchor point A to the gray dot. Release the mouse button and then the modifier key.
4 With the Pen tool, drag from point D to the red dot to the right, and don't let go of the mouse button. Press the Alt (Windows) or Option (Mac OS) key, and drag the direction line from the red dot to the gold dot. Release the mouse button and then the modifier key.
So far, you've drawn open paths, where there are two distinct endpoints. Next, you’ll close a path using a smooth point.
5 Position the pointer over anchor point C on the template. A circle appears to the right of the Pen tool ( ) pointer, indicating that you can click to close the path.
� Note: The dotted template lines are guides only. The shapes you create do not need to follow the lines exactly.
ptg7971238
ADOBE ILLUSTRATOR CS6 CLASSROOM IN A BOOK 159
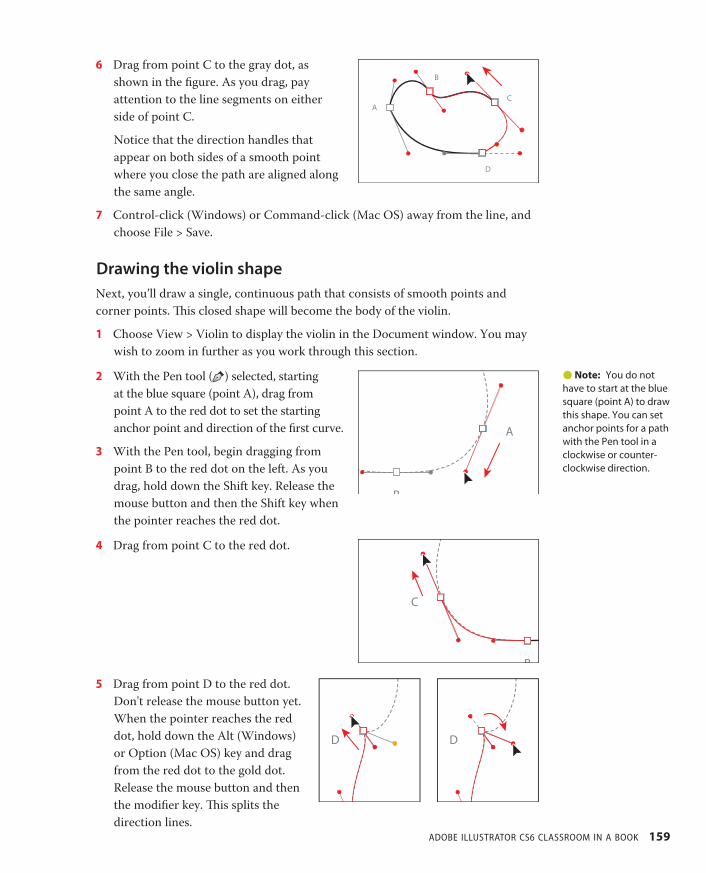
6 Drag from point C to the gray dot, as shown in the figure. As you drag, pay attention to the line segments on either side of point C.
Notice that the direction handles that appear on both sides of a smooth point where you close the path are aligned along the same angle.
7 Control-click (Windows) or Command-click (Mac OS) away from the line, and choose File > Save.
Drawing the violin shapeNext, you’ll draw a single, continuous path that consists of smooth points and corner points. This closed shape will become the body of the violin.
1 Choose View > Violin to display the violin in the Document window. You may wish to zoom in further as you work through this section.
2 With the Pen tool ( ) selected, starting at the blue square (point A), drag from point A to the red dot to set the starting anchor point and direction of the first curve.
3 With the Pen tool, begin dragging from point B to the red dot on the left. As you drag, hold down the Shift key. Release the mouse button and then the Shift key when the pointer reaches the red dot.
4 Drag from point C to the red dot.
5 Drag from point D to the red dot. Don't release the mouse button yet. When the pointer reaches the red dot, hold down the Alt (Windows) or Option (Mac OS) key and drag from the red dot to the gold dot. Release the mouse button and then the modifier key. This splits the direction lines.
A
B
�Note: You do not have to start at the blue square (point A) to draw this shape. You can set anchor points for a path with the Pen tool in a clockwise or counter-clockwise direction.
DD
ptg7971238
160 LESSON 5 Drawing with the Pen and Pencil Tools
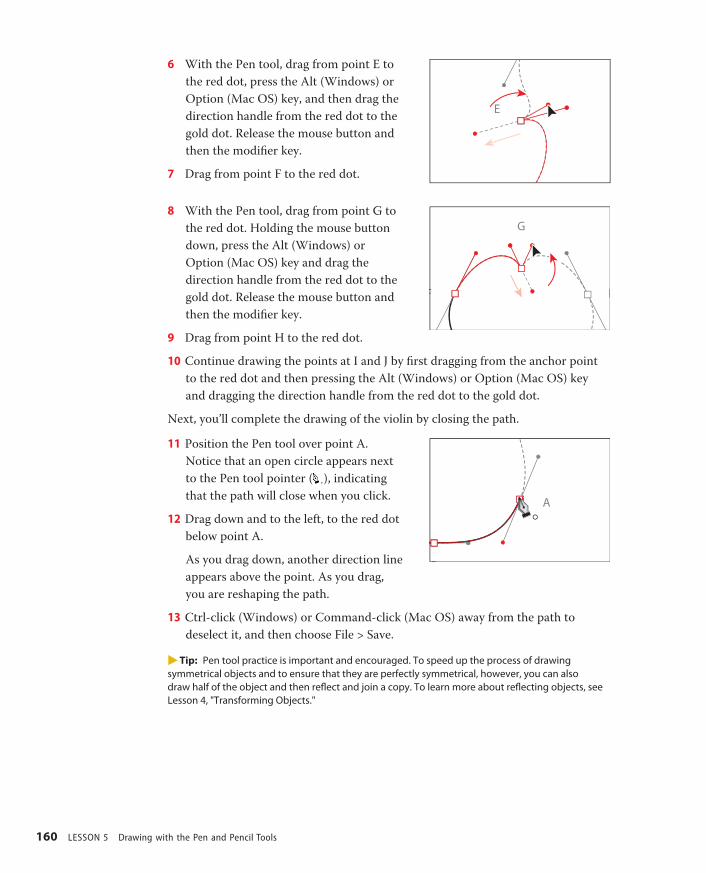
6 With the Pen tool, drag from point E to the red dot, press the Alt (Windows) or Option (Mac OS) key, and then drag the direction handle from the red dot to the gold dot. Release the mouse button and then the modifier key.
7 Drag from point F to the red dot.
8 With the Pen tool, drag from point G to the red dot. Holding the mouse button down, press the Alt (Windows) or Option (Mac OS) key and drag the direction handle from the red dot to the gold dot. Release the mouse button and then the modifier key.
9 Drag from point H to the red dot.
10Continue drawing the points at I and J by first dragging from the anchor point to the red dot and then pressing the Alt (Windows) or Option (Mac OS) key and dragging the direction handle from the red dot to the gold dot.
Next, you’ll complete the drawing of the violin by closing the path.
11Position the Pen tool over point A. Notice that an open circle appears next to the Pen tool pointer ( ), indicating that the path will close when you click.
12Drag down and to the left, to the red dot below point A.
As you drag down, another direction line appears above the point. As you drag, you are reshaping the path.
13Ctrl-click (Windows) or Command-click (Mac OS) away from the path to deselect it, and then choose File > Save.
�Tip: Pen tool practice is important and encouraged. To speed up the process of drawing symmetrical objects and to ensure that they are perfectly symmetrical, however, you can also draw half of the object and then reflect and join a copy. To learn more about reflecting objects, see Lesson 4, "Transforming Objects."
ptg7971238
ADOBE ILLUSTRATOR CS6 CLASSROOM IN A BOOK 161
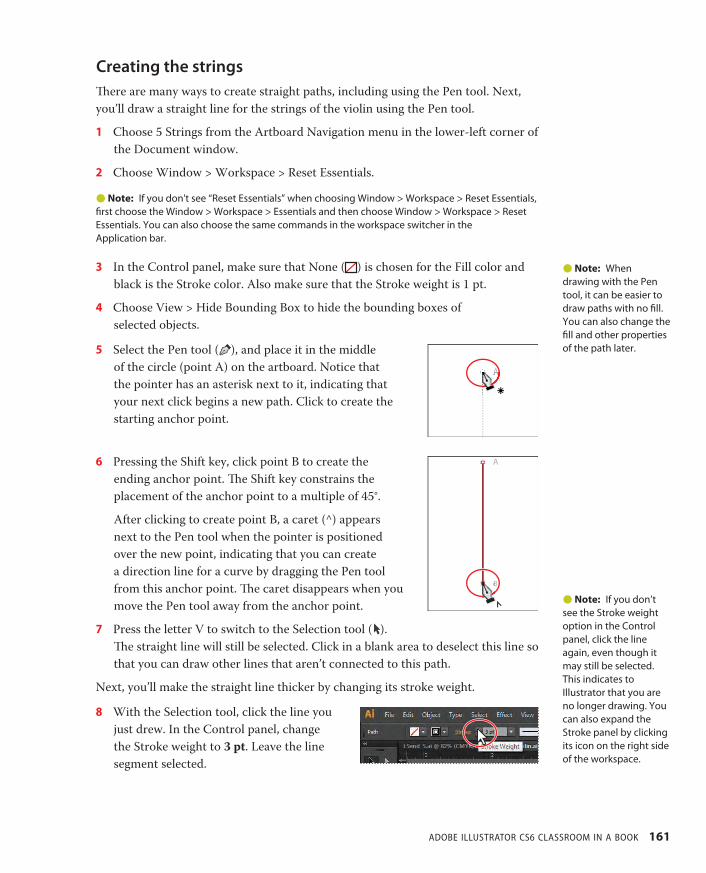
Creating the stringsThere are many ways to create straight paths, including using the Pen tool. Next, you’ll draw a straight line for the strings of the violin using the Pen tool.
1 Choose 5 Strings from the Artboard Navigation menu in the lower-left corner of the Document window.
2 Choose Window > Workspace > Reset Essentials.
� Note: If you don't see “Reset Essentials” when choosing Window > Workspace > Reset Essentials, first choose the Window > Workspace > Essentials and then choose Window > Workspace > Reset Essentials. You can also choose the same commands in the workspace switcher in the Application bar.
3 In the Control panel, make sure that None ( ) is chosen for the Fill color and black is the Stroke color. Also make sure that the Stroke weight is 1 pt.
4 Choose View > Hide Bounding Box to hide the bounding boxes of selected objects.
5 Select the Pen tool ( ), and place it in the middle of the circle (point A) on the artboard. Notice that the pointer has an asterisk next to it, indicating that your next click begins a new path. Click to create the starting anchor point.
6 Pressing the Shift key, click point B to create the ending anchor point. The Shift key constrains the placement of the anchor point to a multiple of 45°.
After clicking to create point B, a caret (^) appears next to the Pen tool when the pointer is positioned over the new point, indicating that you can create a direction line for a curve by dragging the Pen tool from this anchor point. The caret disappears when you move the Pen tool away from the anchor point.
7 Press the letter V to switch to the Selection tool ( ). The straight line will still be selected. Click in a blank area to deselect this line so that you can draw other lines that aren’t connected to this path.
Next, you’ll make the straight line thicker by changing its stroke weight.
8 With the Selection tool, click the line you just drew. In the Control panel, change the Stroke weight to 3 pt. Leave the line segment selected.
�Note: When drawing with the Pen tool, it can be easier to draw paths with no fill. You can also change the fill and other properties of the path later.
� Note: If you don’t see the Stroke weight option in the Control panel, click the line again, even though it may still be selected. This indicates to Illustrator that you are no longer drawing. You can also expand the Stroke panel by clicking its icon on the right side of the workspace.
ptg7971238
162 LESSON 5 Drawing with the Pen and Pencil Tools
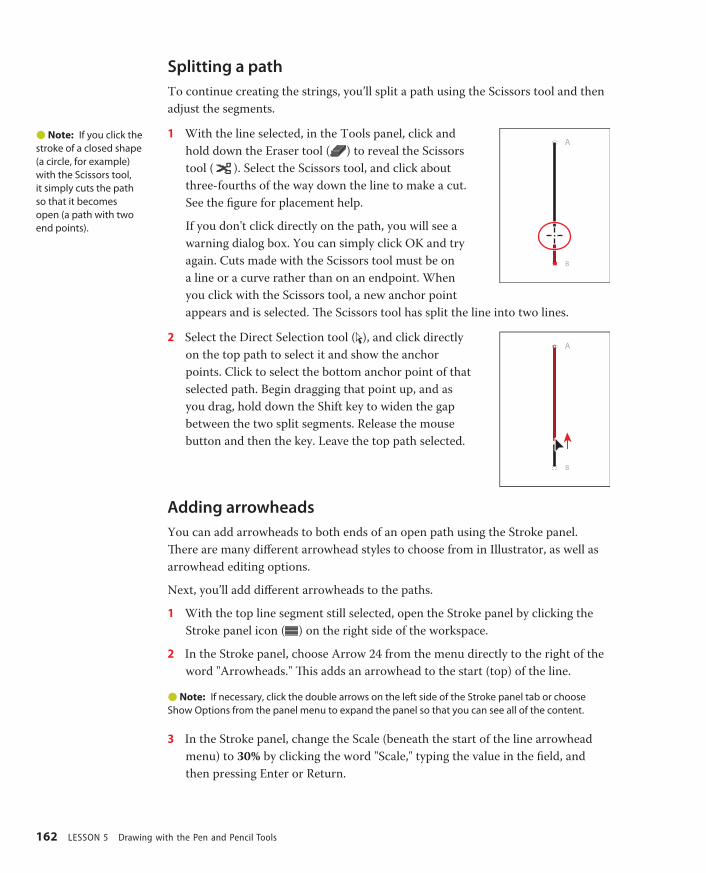
Splitting a pathTo continue creating the strings, you’ll split a path using the Scissors tool and then adjust the segments.
1 With the line selected, in the Tools panel, click and hold down the Eraser tool ( ) to reveal the Scissors tool ( ). Select the Scissors tool, and click about three-fourths of the way down the line to make a cut. See the figure for placement help.
If you don't click directly on the path, you will see a warning dialog box. You can simply click OK and try again. Cuts made with the Scissors tool must be on a line or a curve rather than on an endpoint. When you click with the Scissors tool, a new anchor point appears and is selected. The Scissors tool has split the line into two lines.
2 Select the Direct Selection tool ( ), and click directly on the top path to select it and show the anchor points. Click to select the bottom anchor point of that selected path. Begin dragging that point up, and as you drag, hold down the Shift key to widen the gap between the two split segments. Release the mouse button and then the key. Leave the top path selected.
Adding arrowheadsYou can add arrowheads to both ends of an open path using the Stroke panel. There are many different arrowhead styles to choose from in Illustrator, as well as arrowhead editing options.
Next, you’ll add different arrowheads to the paths.
1 With the top line segment still selected, open the Stroke panel by clicking the Stroke panel icon ( ) on the right side of the workspace.
2 In the Stroke panel, choose Arrow 24 from the menu directly to the right of the word "Arrowheads." This adds an arrowhead to the start (top) of the line.
�Note: If necessary, click the double arrows on the left side of the Stroke panel tab or choose Show Options from the panel menu to expand the panel so that you can see all of the content.
3 In the Stroke panel, change the Scale (beneath the start of the line arrowhead menu) to 30% by clicking the word "Scale," typing the value in the field, and then pressing Enter or Return.
�Note: If you click the stroke of a closed shape (a circle, for example) with the Scissors tool, it simply cuts the path so that it becomes open (a path with two end points).
ptg7971238
ADOBE ILLUSTRATOR CS6 CLASSROOM IN A BOOK 163
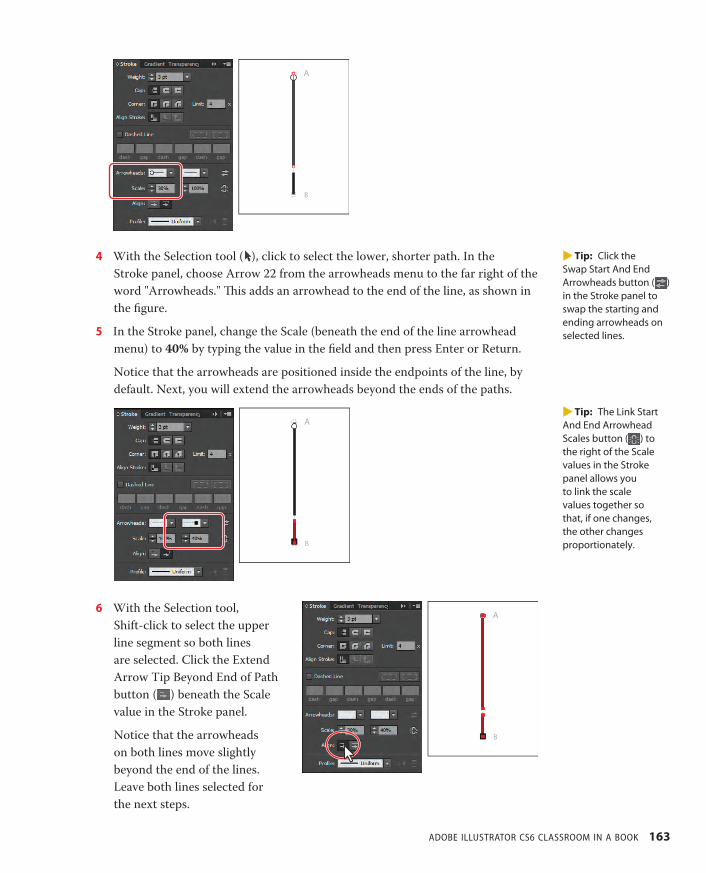
4 With the Selection tool ( ), click to select the lower, shorter path. In the Stroke panel, choose Arrow 22 from the arrowheads menu to the far right of the word "Arrowheads." This adds an arrowhead to the end of the line, as shown in the figure.
5 In the Stroke panel, change the Scale (beneath the end of the line arrowhead menu) to 40% by typing the value in the field and then press Enter or Return.
Notice that the arrowheads are positioned inside the endpoints of the line, by default. Next, you will extend the arrowheads beyond the ends of the paths.
6 With the Selection tool, Shift-click to select the upper line segment so both lines are selected. Click the Extend Arrow Tip Beyond End of Path button ( ) beneath the Scale value in the Stroke panel.
Notice that the arrowheads on both lines move slightly beyond the end of the lines. Leave both lines selected for the next steps.
�Tip: Click the Swap Start And End Arrowheads button ( ) in the Stroke panel to swap the starting and ending arrowheads on selected lines.
�Tip: The Link Start And End Arrowhead Scales button ( ) to the right of the Scale values in the Stroke panel allows you to link the scale values together so that, if one changes, the other changes proportionately.
ptg7971238
164 LESSON 5 Drawing with the Pen and Pencil Tools
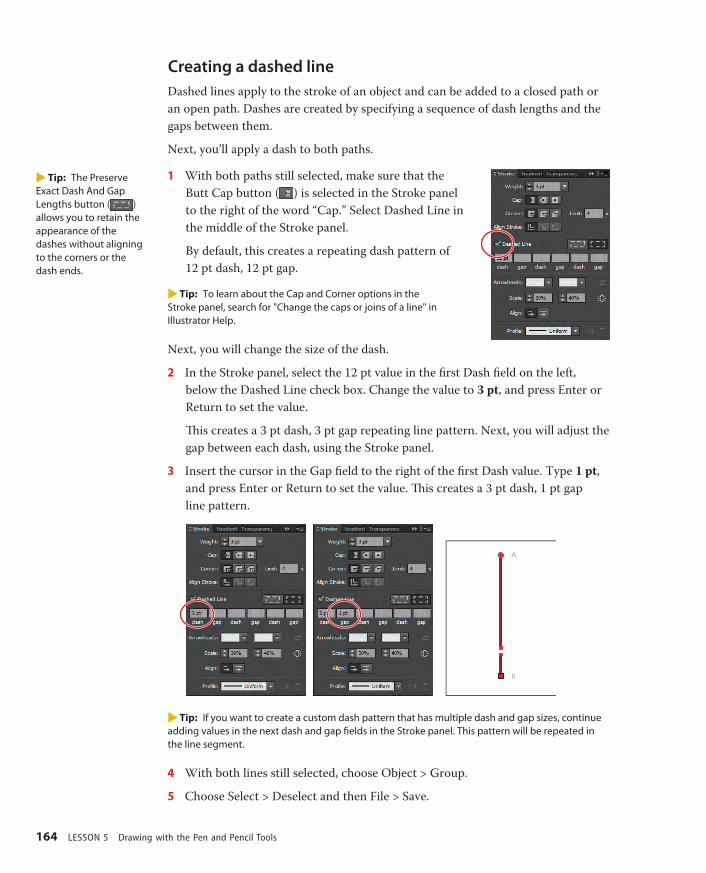
Creating a dashed lineDashed lines apply to the stroke of an object and can be added to a closed path or an open path. Dashes are created by specifying a sequence of dash lengths and the gaps between them.
Next, you’ll apply a dash to both paths.
1 With both paths still selected, make sure that the Butt Cap button ( ) is selected in the Stroke panel to the right of the word “Cap.” Select Dashed Line in the middle of the Stroke panel.
By default, this creates a repeating dash pattern of 12 pt dash, 12 pt gap.
�Tip: To learn about the Cap and Corner options in the Stroke panel, search for "Change the caps or joins of a line" in Illustrator Help.
Next, you will change the size of the dash.
2 In the Stroke panel, select the 12 pt value in the first Dash field on the left, below the Dashed Line check box. Change the value to 3 pt, and press Enter or Return to set the value.
This creates a 3 pt dash, 3 pt gap repeating line pattern. Next, you will adjust the gap between each dash, using the Stroke panel.
3 Insert the cursor in the Gap field to the right of the first Dash value. Type 1 pt, and press Enter or Return to set the value. This creates a 3 pt dash, 1 pt gap line pattern.
�Tip: If you want to create a custom dash pattern that has multiple dash and gap sizes, continue adding values in the next dash and gap fields in the Stroke panel. This pattern will be repeated in the line segment.
4 With both lines still selected, choose Object > Group.
5 Choose Select > Deselect and then File > Save.
�Tip: The Preserve Exact Dash And Gap Lengths button ( ) allows you to retain the appearance of the dashes without aligning to the corners or the dash ends.
ptg7971238
ADOBE ILLUSTRATOR CS6 CLASSROOM IN A BOOK 165
Editing curvesIn this part of the lesson, you’ll adjust the curves you’ve drawn by dragging either the curve’s anchor points or direction handles. You can also edit a curve by moving the line. You will hide the template layer to make editing the path easier.
1 Choose 4 Curved Shape step 2 from the Artboard Navigation menu in the lower-left corner of the Document window.
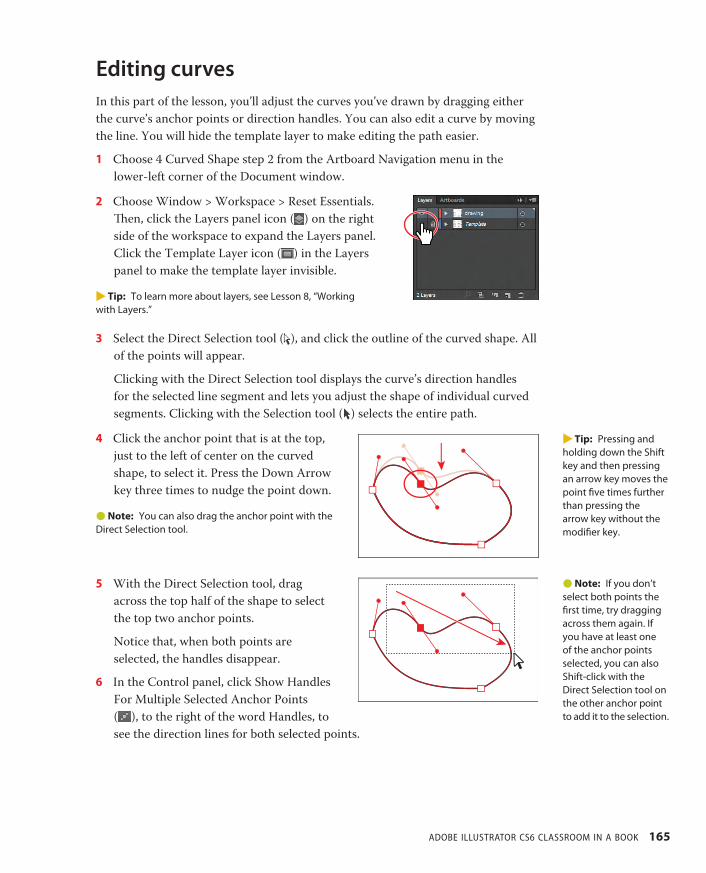
2 Choose Window > Workspace > Reset Essentials. Then, click the Layers panel icon ( ) on the right side of the workspace to expand the Layers panel. Click the Template Layer icon ( ) in the Layers panel to make the template layer invisible.
�Tip: To learn more about layers, see Lesson 8, “Working with Layers.”
3 Select the Direct Selection tool ( ), and click the outline of the curved shape. All of the points will appear.
Clicking with the Direct Selection tool displays the curve’s direction handles for the selected line segment and lets you adjust the shape of individual curved segments. Clicking with the Selection tool ( ) selects the entire path.
4 Click the anchor point that is at the top, just to the left of center on the curved shape, to select it. Press the Down Arrow key three times to nudge the point down.
� Note: You can also drag the anchor point with the Direct Selection tool.
5 With the Direct Selection tool, drag across the top half of the shape to select the top two anchor points.
Notice that, when both points are selected, the handles disappear.
6 In the Control panel, click Show Handles For Multiple Selected Anchor Points ( ), to the right of the word Handles, to see the direction lines for both selected points.
�Tip: Pressing and holding down the Shift key and then pressing an arrow key moves the point five times further than pressing the arrow key without the modifier key.
� Note: If you don’t select both points the first time, try dragging across them again. If you have at least one of the anchor points selected, you can also Shift-click with the Direct Selection tool on the other anchor point to add it to the selection.
ptg7971238
166 LESSON 5 Drawing with the Pen and Pencil Tools
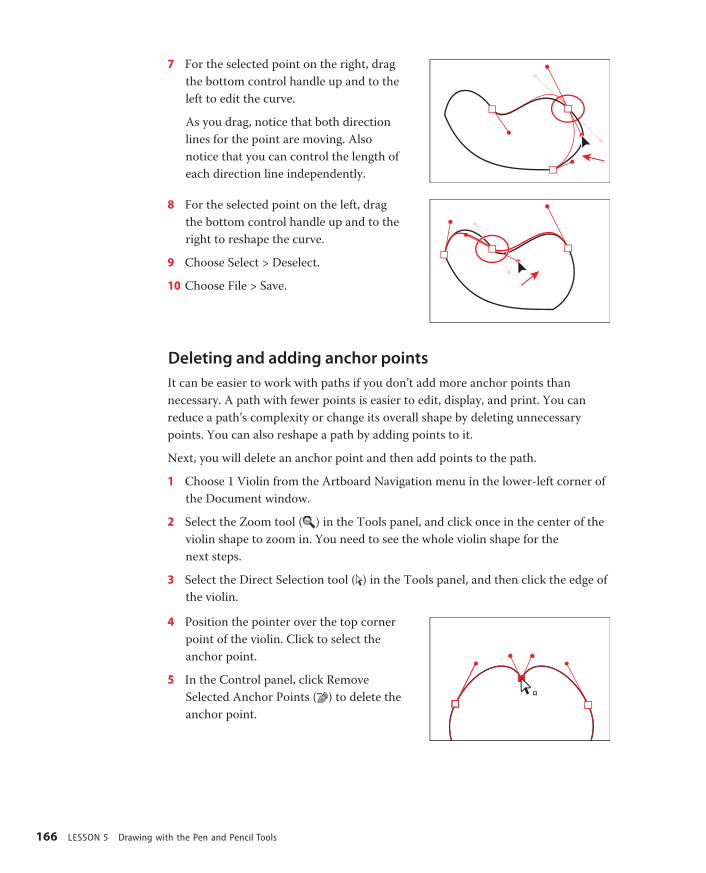
7 For the selected point on the right, drag the bottom control handle up and to the left to edit the curve.
As you drag, notice that both direction lines for the point are moving. Also notice that you can control the length of each direction line independently.
8 For the selected point on the left, drag the bottom control handle up and to the right to reshape the curve.
9 Choose Select > Deselect.
10Choose File > Save.
Deleting and adding anchor pointsIt can be easier to work with paths if you don’t add more anchor points than necessary. A path with fewer points is easier to edit, display, and print. You can reduce a path’s complexity or change its overall shape by deleting unnecessary points. You can also reshape a path by adding points to it.
Next, you will delete an anchor point and then add points to the path.
1 Choose 1 Violin from the Artboard Navigation menu in the lower-left corner of the Document window.
2 Select the Zoom tool ( ) in the Tools panel, and click once in the center of the violin shape to zoom in. You need to see the whole violin shape for the next steps.
3 Select the Direct Selection tool ( ) in the Tools panel, and then click the edge of the violin.
4 Position the pointer over the top corner point of the violin. Click to select the anchor point.
5 In the Control panel, click Remove Selected Anchor Points ( ) to delete the anchor point.
ptg7971238
ADOBE ILLUSTRATOR CS6 CLASSROOM IN A BOOK 167
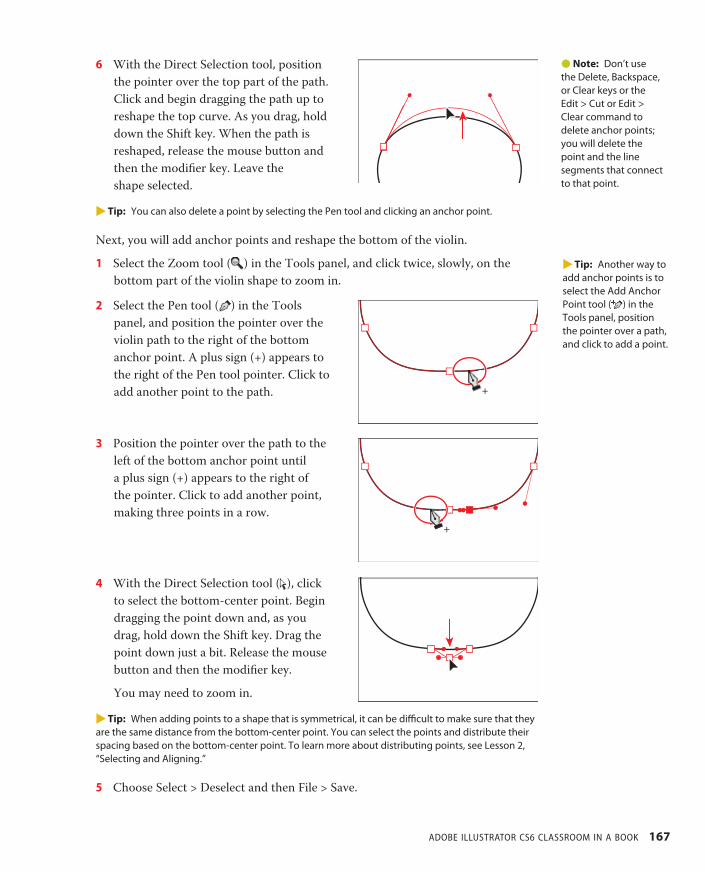
6 With the Direct Selection tool, position the pointer over the top part of the path. Click and begin dragging the path up to reshape the top curve. As you drag, hold down the Shift key. When the path is reshaped, release the mouse button and then the modifier key. Leave the shape selected.
�Tip: You can also delete a point by selecting the Pen tool and clicking an anchor point.
Next, you will add anchor points and reshape the bottom of the violin.
1 Select the Zoom tool ( ) in the Tools panel, and click twice, slowly, on the bottom part of the violin shape to zoom in.
2 Select the Pen tool ( ) in the Tools panel, and position the pointer over the violin path to the right of the bottom anchor point. A plus sign (+) appears to the right of the Pen tool pointer. Click to add another point to the path.
3 Position the pointer over the path to the left of the bottom anchor point until a plus sign (+) appears to the right of the pointer. Click to add another point, making three points in a row.
4 With the Direct Selection tool ( ), click to select the bottom-center point. Begin dragging the point down and, as you drag, hold down the Shift key. Drag the point down just a bit. Release the mouse button and then the modifier key.
You may need to zoom in.
�Tip: When adding points to a shape that is symmetrical, it can be difficult to make sure that they are the same distance from the bottom-center point. You can select the points and distribute their spacing based on the bottom-center point. To learn more about distributing points, see Lesson 2, “Selecting and Aligning.”
5 Choose Select > Deselect and then File > Save.
�Note: Don’t use the Delete, Backspace, or Clear keys or the Edit > Cut or Edit > Clear command to delete anchor points; you will delete the point and the line segments that connect to that point.
�Tip: Another way to add anchor points is to select the Add Anchor Point tool ( ) in the Tools panel, position the pointer over a path, and click to add a point.
ptg7971238
168 LESSON 5 Drawing with the Pen and Pencil Tools
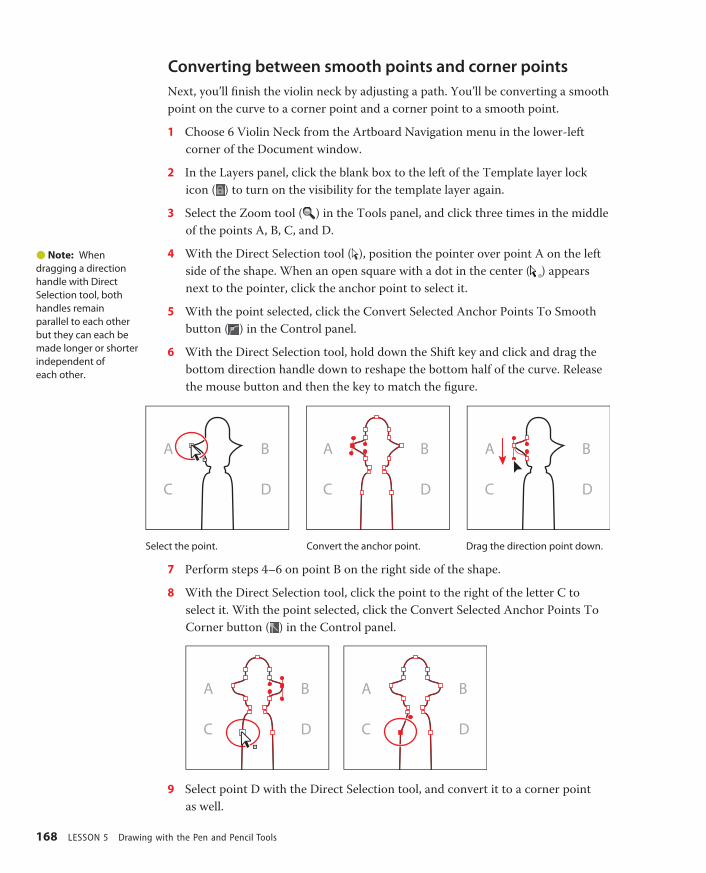
Converting between smooth points and corner pointsNext, you’ll finish the violin neck by adjusting a path. You’ll be converting a smooth point on the curve to a corner point and a corner point to a smooth point.
1 Choose 6 Violin Neck from the Artboard Navigation menu in the lower-left corner of the Document window.
2 In the Layers panel, click the blank box to the left of the Template layer lock icon ( ) to turn on the visibility for the template layer again.
3 Select the Zoom tool ( ) in the Tools panel, and click three times in the middle of the points A, B, C, and D.
4 With the Direct Selection tool ( ), position the pointer over point A on the left side of the shape. When an open square with a dot in the center ( ) appears next to the pointer, click the anchor point to select it.
5 With the point selected, click the Convert Selected Anchor Points To Smooth button ( ) in the Control panel.
6 With the Direct Selection tool, hold down the Shift key and click and drag the bottom direction handle down to reshape the bottom half of the curve. Release the mouse button and then the key to match the figure.
7 Perform steps 4–6 on point B on the right side of the shape.
8 With the Direct Selection tool, click the point to the right of the letter C to select it. With the point selected, click the Convert Selected Anchor Points To Corner button ( ) in the Control panel.
9 Select point D with the Direct Selection tool, and convert it to a corner point as well.
�Note: When dragging a direction handle with Direct Selection tool, both handles remain parallel to each other but they can each be made longer or shorter independent of each other.
Select the point. Convert the anchor point. Drag the direction point down.
ptg7971238
ADOBE ILLUSTRATOR CS6 CLASSROOM IN A BOOK 169
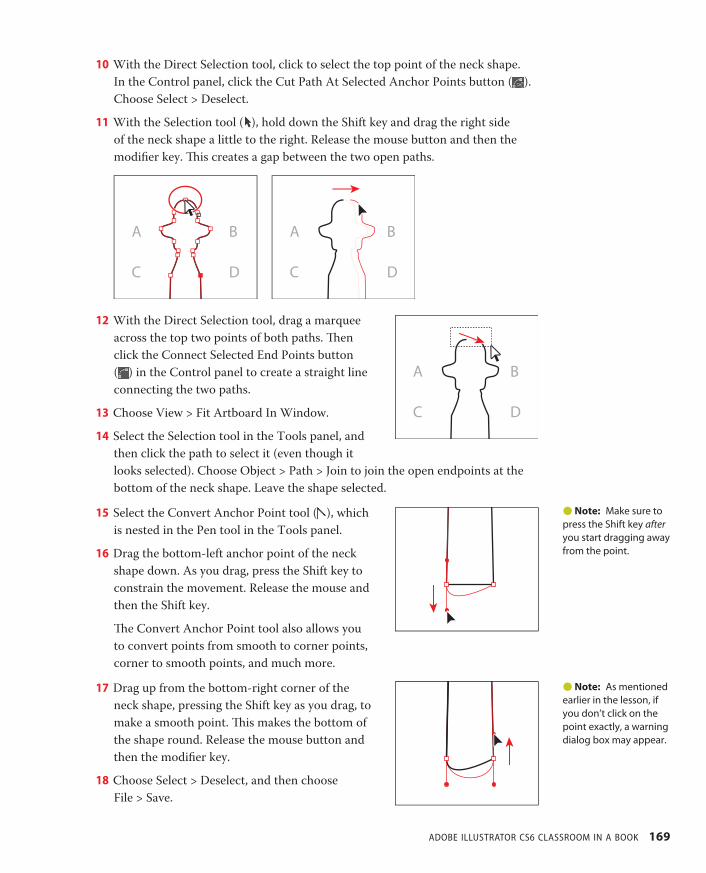
10With the Direct Selection tool, click to select the top point of the neck shape. In the Control panel, click the Cut Path At Selected Anchor Points button ( ). Choose Select > Deselect.
11With the Selection tool ( ), hold down the Shift key and drag the right side of the neck shape a little to the right. Release the mouse button and then the modifier key. This creates a gap between the two open paths.
12With the Direct Selection tool, drag a marquee across the top two points of both paths. Then click the Connect Selected End Points button ( ) in the Control panel to create a straight line connecting the two paths.
13Choose View > Fit Artboard In Window.
14Select the Selection tool in the Tools panel, and then click the path to select it (even though it looks selected). Choose Object > Path > Join to join the open endpoints at the bottom of the neck shape. Leave the shape selected.
15Select the Convert Anchor Point tool ( ), which is nested in the Pen tool in the Tools panel.
16Drag the bottom-left anchor point of the neck shape down. As you drag, press the Shift key to constrain the movement. Release the mouse and then the Shift key.
The Convert Anchor Point tool also allows you to convert points from smooth to corner points, corner to smooth points, and much more.
17Drag up from the bottom-right corner of the neck shape, pressing the Shift key as you drag, to make a smooth point. This makes the bottom of the shape round. Release the mouse button and then the modifier key.
18Choose Select > Deselect, and then choose File > Save.
�Note: Make sure to press the Shift key after you start dragging away from the point.
� Note: As mentioned earlier in the lesson, if you don’t click on the point exactly, a warning dialog box may appear.
ptg7971238
170 LESSON 5 Drawing with the Pen and Pencil Tools
Drawing with the Pencil toolThe Pencil tool lets you draw open and closed paths as if you were drawing with a pencil on paper. Anchor points are created by Illustrator and are placed on the path as you draw. However, you can adjust the points when the path is complete. The number of anchor points set down is determined by the length and complexity of the path and by tolerance settings in the Pencil Tool Options dialog box. The Pencil tool is most useful for freeform drawing and for creating more organic shapes.
Next, you will draw a few lines that will be a chin rest on the curved shape you drew earlier.
1 Choose 4 Curved Shape step 2 from the Artboard Navigation menu in the lower-left corner of the Document window.
2 In the Layers panel ( ), click the Template Layer icon ( ) to hide the template layer. Click the Layers panel icon or panel tab to collapse the panel.
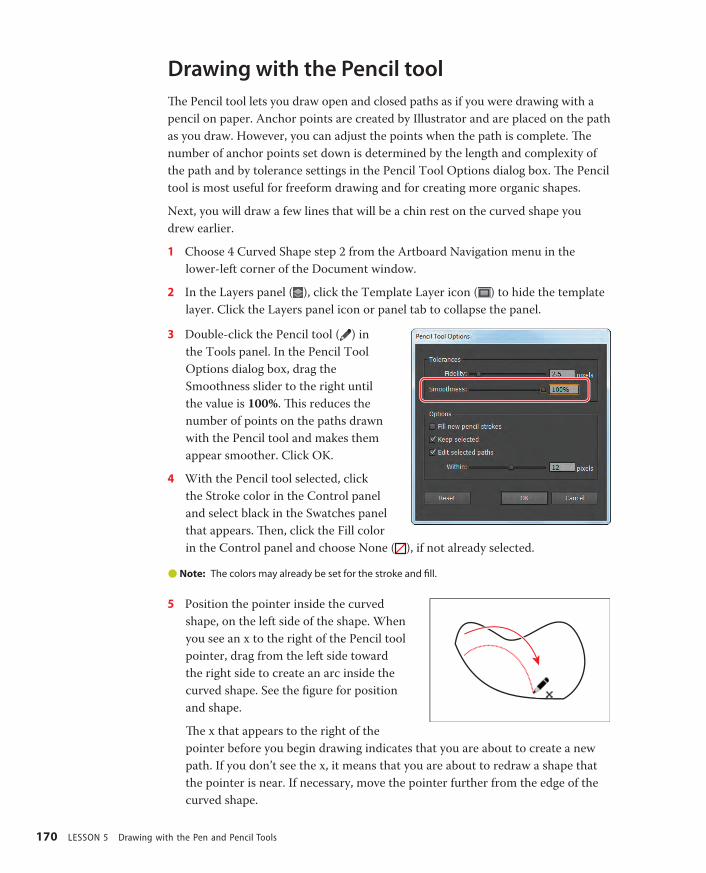
3 Double-click the Pencil tool ( ) in the Tools panel. In the Pencil Tool Options dialog box, drag the Smoothness slider to the right until the value is 100%. This reduces the number of points on the paths drawn with the Pencil tool and makes them appear smoother. Click OK.
4 With the Pencil tool selected, click the Stroke color in the Control panel and select black in the Swatches panel that appears. Then, click the Fill color in the Control panel and choose None ( ), if not already selected.
�Note: The colors may already be set for the stroke and fill.
5 Position the pointer inside the curved shape, on the left side of the shape. When you see an x to the right of the Pencil tool pointer, drag from the left side toward the right side to create an arc inside the curved shape. See the figure for position and shape.
The x that appears to the right of the pointer before you begin drawing indicates that you are about to create a new path. If you don’t see the x, it means that you are about to redraw a shape that the pointer is near. If necessary, move the pointer further from the edge of the curved shape.
ptg7971238
ADOBE ILLUSTRATOR CS6 CLASSROOM IN A BOOK 171
�Tip: To create a closed path, such as a circle, select the Pencil tool and press the Alt (Windows) or Option (Mac OS) key and drag. The Pencil tool displays a small circle to indicate that you’re creating a closed path. When the path is the size and shape you want, release the mouse button but don’t release the Alt or Option key until the path closes. The beginning and ending anchor points are connected with the shortest line possible.
Notice that, as you draw, the path may not look perfectly smooth. When you release the mouse button, the path is smoothed based on the Smoothness value that you set in the Pencil Tool Options dialog box.
6 Position the pointer anywhere over the newly created path. Notice that the x is no longer next to the Pencil tool pointer. This indicates that if you drag to start drawing, you will edit the path from that point rather than draw a new path.
Next, you will set more options for the Pencil tool and then draw another curve to the right of the curved line you just drew.
7 Double-click the Pencil tool ( ) in the Tools panel.
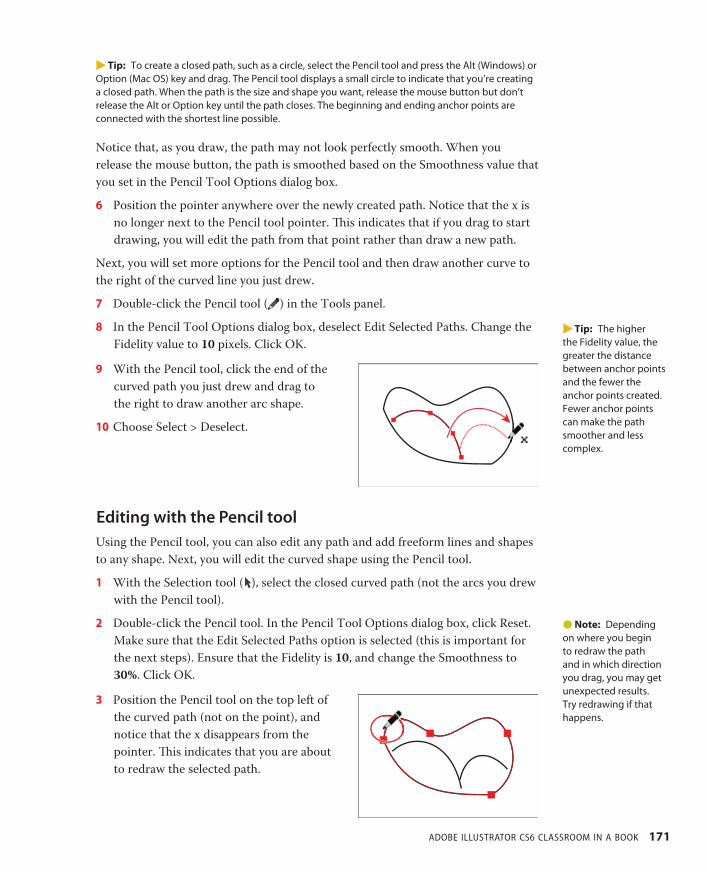
8 In the Pencil Tool Options dialog box, deselect Edit Selected Paths. Change the Fidelity value to 10 pixels. Click OK.
9 With the Pencil tool, click the end of the curved path you just drew and drag to the right to draw another arc shape.
10Choose Select > Deselect.
Editing with the Pencil toolUsing the Pencil tool, you can also edit any path and add freeform lines and shapes to any shape. Next, you will edit the curved shape using the Pencil tool.
1 With the Selection tool ( ), select the closed curved path (not the arcs you drew with the Pencil tool).
2 Double-click the Pencil tool. In the Pencil Tool Options dialog box, click Reset. Make sure that the Edit Selected Paths option is selected (this is important for the next steps). Ensure that the Fidelity is 10, and change the Smoothness to 30%. Click OK.
3 Position the Pencil tool on the top left of the curved path (not on the point), and notice that the x disappears from the pointer. This indicates that you are about to redraw the selected path.
�Tip: The higher the Fidelity value, the greater the distance between anchor points and the fewer the anchor points created. Fewer anchor points can make the path smoother and less complex.
�Note: Depending on where you begin to redraw the path and in which direction you drag, you may get unexpected results. Try redrawing if that happens.
ptg7971238
172 LESSON 5 Drawing with the Pen and Pencil Tools
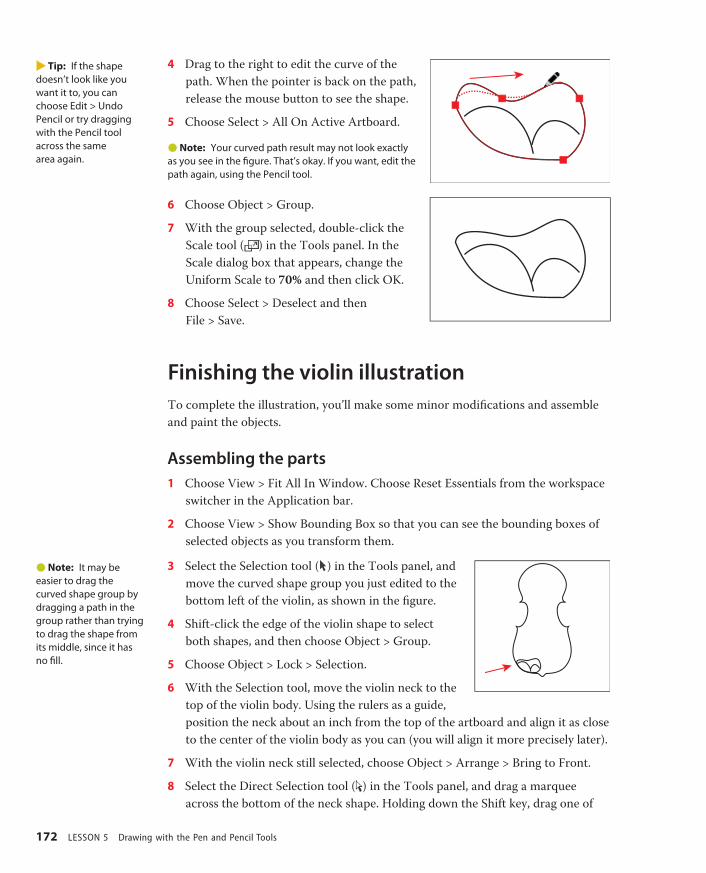
4 Drag to the right to edit the curve of the path. When the pointer is back on the path, release the mouse button to see the shape.
5 Choose Select > All On Active Artboard.
�Note: Your curved path result may not look exactly as you see in the figure. That’s okay. If you want, edit the path again, using the Pencil tool.
6 Choose Object > Group.
7 With the group selected, double-click the Scale tool ( ) in the Tools panel. In the Scale dialog box that appears, change the Uniform Scale to 70% and then click OK.
8 Choose Select > Deselect and then File > Save.
Finishing the violin illustrationTo complete the illustration, you’ll make some minor modifications and assemble and paint the objects.
Assembling the parts1 Choose View > Fit All In Window. Choose Reset Essentials from the workspace
switcher in the Application bar.
2 Choose View > Show Bounding Box so that you can see the bounding boxes of selected objects as you transform them.
3 Select the Selection tool ( ) in the Tools panel, and move the curved shape group you just edited to the bottom left of the violin, as shown in the figure.
4 Shift-click the edge of the violin shape to select both shapes, and then choose Object > Group.
5 Choose Object > Lock > Selection.
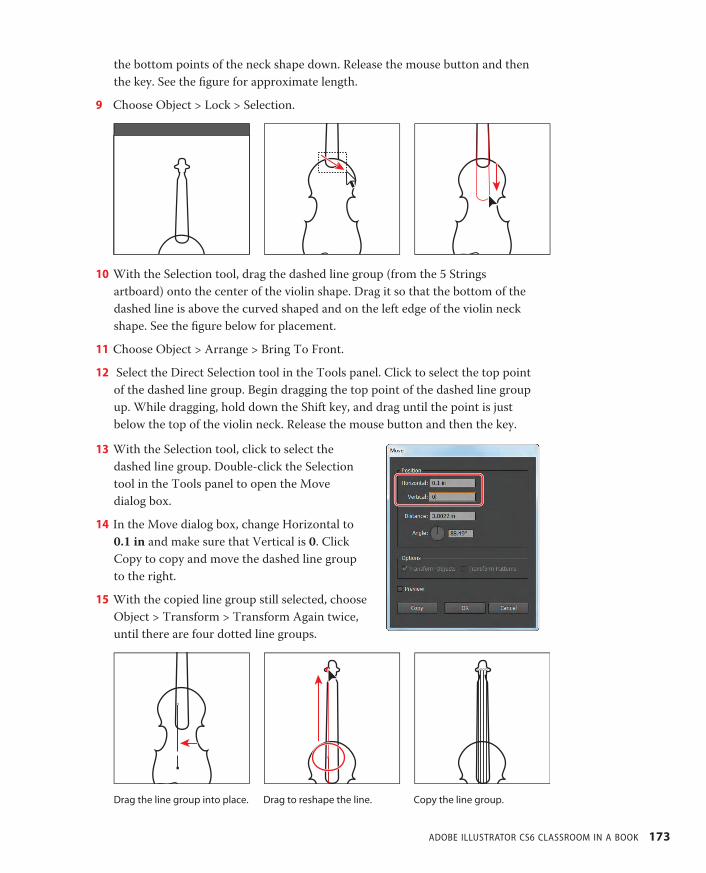
6 With the Selection tool, move the violin neck to the top of the violin body. Using the rulers as a guide, position the neck about an inch from the top of the artboard and align it as close to the center of the violin body as you can (you will align it more precisely later).
7 With the violin neck still selected, choose Object > Arrange > Bring to Front.
8 Select the Direct Selection tool ( ) in the Tools panel, and drag a marquee across the bottom of the neck shape. Holding down the Shift key, drag one of
�Tip: If the shape doesn’t look like you want it to, you can choose Edit > Undo Pencil or try dragging with the Pencil tool across the same area again.
�Note: It may be easier to drag the curved shape group by dragging a path in the group rather than trying to drag the shape from its middle, since it has no fill.
ptg7971238
ADOBE ILLUSTRATOR CS6 CLASSROOM IN A BOOK 173
the bottom points of the neck shape down. Release the mouse button and then the key. See the figure for approximate length.
9 Choose Object > Lock > Selection.
10With the Selection tool, drag the dashed line group (from the 5 Strings artboard) onto the center of the violin shape. Drag it so that the bottom of the dashed line is above the curved shaped and on the left edge of the violin neck shape. See the figure below for placement.
11Choose Object > Arrange > Bring To Front.
12 Select the Direct Selection tool in the Tools panel. Click to select the top point of the dashed line group. Begin dragging the top point of the dashed line group up. While dragging, hold down the Shift key, and drag until the point is just below the top of the violin neck. Release the mouse button and then the key.
13With the Selection tool, click to select the dashed line group. Double-click the Selection tool in the Tools panel to open the Move dialog box.
14 In the Move dialog box, change Horizontal to 0.1 in and make sure that Vertical is 0. Click Copy to copy and move the dashed line group to the right.
15With the copied line group still selected, choose Object > Transform > Transform Again twice, until there are four dotted line groups.
Drag the line group into place. Drag to reshape the line. Copy the line group.
ptg7971238
174 LESSON 5 Drawing with the Pen and Pencil Tools
16Choose Select > All On Active Artboard and then Object > Group.
17 In the Control panel, change the Stroke weight to 1 pt.
18Select the Zoom tool ( ) in the Tools panel, and click the bottom portion of the dotted line groups three times.
19Select the Rectangle tool in the Tools panel. Click anywhere in the artwork. In the Rectangle dialog box, change the Width to .5 in and the Height to .18 in. Click OK.
20With the Rectangle on the page and selected, press the letter D to apply the default stroke and fill to it.
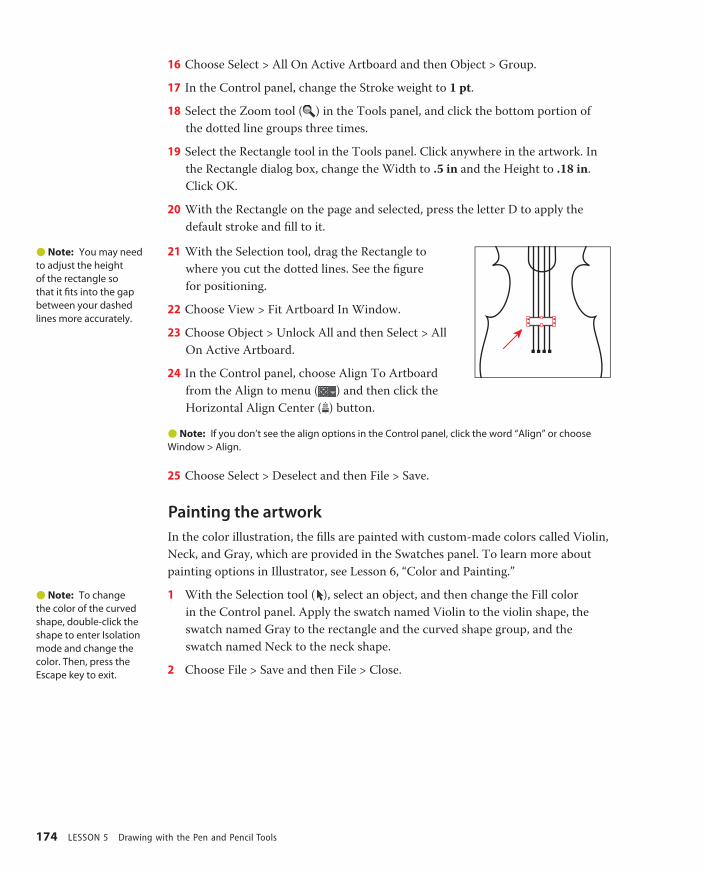
21With the Selection tool, drag the Rectangle to where you cut the dotted lines. See the figure for positioning.
22Choose View > Fit Artboard In Window.
23Choose Object > Unlock All and then Select > All On Active Artboard.
24 In the Control panel, choose Align To Artboard from the Align to menu ( ) and then click the Horizontal Align Center ( ) button.
�Note: If you don’t see the align options in the Control panel, click the word “Align” or choose Window > Align.
25Choose Select > Deselect and then File > Save.
Painting the artworkIn the color illustration, the fills are painted with custom-made colors called Violin, Neck, and Gray, which are provided in the Swatches panel. To learn more about painting options in Illustrator, see Lesson 6, “Color and Painting.”
1 With the Selection tool ( ), select an object, and then change the Fill color in the Control panel. Apply the swatch named Violin to the violin shape, the swatch named Gray to the rectangle and the curved shape group, and the swatch named Neck to the neck shape.
2 Choose File > Save and then File > Close.
�Note: You may need to adjust the height of the rectangle so that it fits into the gap between your dashed lines more accurately.
�Note: To change the color of the curved shape, double-click the shape to enter Isolation mode and change the color. Then, press the Escape key to exit.