Embed Size (px)
Citation preview

MTD MACHINERY (SUZHOU) CO., LTD. SUZHOU, CHINA 215121
Printed In China
Safe Operation Practices • Set-Up • Operation • Maintenance • Service • Troubleshooting • Warranty
WARNINGREAD AND FOLLOW ALL SAFETY RULES AND INSTRUCTIONS IN THIS MANUAL
BEFORE ATTEMPTING TO OPERATE THIS MACHINE. FAILURE TO COMPLY WITH THESE INSTRUCTIONS MAY RESULT IN PERSONAL INJURY.
OperatOr’s Manual
Compact Log Splitter
Form No. 769-09769 (March 6, 2014)

To The Owner 1
2
Safe Operation Practices ........................................ 3Assembly & Set-Up .................................................. 7Controls & Features ................................................. 9Operation ................................................................10Maintenance & Adjustments ................................12
Service .....................................................................13Troubleshooting .....................................................14Replacement Parts .................................................15Warranty ..................................................Back Cover
Table of Contents
Customer SupportPlease do NOT return the machine to the retailer or dealer without first contacting the Customer Support Department.
If you have difficulty assembling this product or have any questions regarding the controls, operation, or maintenance of this machine, you can seek help from the experts. Choose from the options below:
◊ Visit us on the web at www.mtdproducts.com
See How-to Maintenance and Parts Installation Videos at www.mtdparts.com/KnowledgeCenter
◊ Call a Customer Support Representative at (86) 512-62891900
◊ Write to MTD Machinery (Suzhou) Co., Ltd. Suzhou, China 215121
Thank you for purchasing an MTD Log Splitter. It was carefully engineered to provide excellent performance when properly operated and maintained.
Please read this entire manual prior to operating the equipment. It instructs you how to safely and easily set up, operate and maintain your machine. Please be sure that you, and any other persons who will operate the machine, carefully follow the recommended safety practices at all times. Failure to do so could result in personal injury or property damage.
All information in this manual is relative to the most recent product information available at the time of printing. Review this manual frequently to familiarize yourself with the machine, its features and operation. Please be aware that this Operator’s Manual may cover a range of product specifications for various models. Characteristics and features discussed and/or illustrated in this manual may not be applicable to all models. We reserve the right to change product specifications, designs and equipment without notice and without incurring obligation.
If applicable, the power testing information used to establish the power rating of the engine equipped on this machine can be found at www.opei.org or the engine manufacturer’s web site.
If you have any problems or questions concerning the machine, phone your local authorized MTD service dealer or contact us directly. MTD’s Customer Support telephone numbers, website address and mailing address can be found on this page. We want to ensure your complete satisfaction at all times.
Throughout this manual, all references to right and left side of the machine are observed from the operating position
Thank You
Record Product InformationBefore setting up and operating your new equipment, please locate the model plate on the equipment and record the information in the provided area to the right. You can locate the model plate by standing behind the log splitter and looking down at the engine. This information will be necessary, should you seek technical support via our web site, Customer Support Department, or with a local authorized service dealer.
Model NuMber
Serial NuMber

Important Safe Operation Practices 2
3
Training1. Read, understand, and follow all instructions on the
machine and in the manual(s) before attempting to assemble and operate. Keep this manual in a safe place for future and regular reference and for ordering replacement parts.
2. Be familiar with all controls and their proper operation. Know how to stop the machine and disengage them quickly.
3. Never allow children under 16 years of age to operate this machine. Children 16 and over should read and understand the instructions and safe operation practices in this manual and on the machine and be trained and supervised by an adult.
4. Never allow adults to operate this machine without proper instruction.
5. Many accidents occur when more than one person operates the machine. If a helper is assisting in stacking logs, never activate the control until the helper is a minimum of 10 feet from the machine.
6. Keep bystanders, pets, and children at least 20 feet from the machine while it is in operation.
7. Never allow anyone to ride on this machine.
8. Never transport cargo on this machine.
9. Hydraulic log splitters develop high fluid pressures during operation. Fluid escaping through a pin hole opening can penetrate your skin and cause blood poisoning, gangrene, or death. Give attention to the following instructions at all times:
a. Do not check for leaks with your hand.
b. Do not operate machine with frayed, kinked, cracked, or damaged hoses, fittings, or tubing.
c. Stop the engine and relieve hydraulic system pressure before changing or adjusting fittings, hoses, tubing, or other system components.
d. Do not adjust the pressure settings of the pump or valve.
10. Leaks can be detected by passing cardboard or wood, while wearing protective gloves and safety glasses, over the suspected area. Look for discoloration of cardboard or wood.
11. If injured by escaping fluid, see a doctor immediately. Serious infection or reaction can develop if proper medical treatment is not administered immediately.
12. Keep the operator zone and adjacent area clear for safe, secure footing.
13. If your machine is equipped with an internal combustion engine and is intended for use near any unimproved forest, brush, or grass covered land, the engine exhaust should be equipped with a spark arrestor. Make sure you comply with applicable local, state, and federal codes. Take appropriate firefighting equipment with you.
WARNING: This symbol points out important safety instructions which, if not followed, could endanger the personal safety and/or property of yourself and others. Read and follow all instructions in this manual before attempting to operate this machine. Failure to comply with these instructions may result in personal injury. When you see this symbol. HEED ITS WARNING!
DANGER: This machine was built to be operated according to the safe operation practices in this manual. As with any type of power equipment, carelessness or error on the part of the operator can result in serious injury. This machine is capable of amputating hands and feet and throwing debris. Failure to observe the following safety instructions could result in serious injury or death.
CALIFORNIA PROPOSITION 65WARNING: Engine Exhaust, some of its constituents, and certain vehicle components contain or emit chemicals known to State of California to cause cancer and birth defects or other reproductive harm.

4 Section 2 — important Safe operation practiceS
14. This machine should be used for splitting wood only, do not use it for any other purpose.
15. Follow the instructions in the manual(s) provided with any attachment(s) for this machine.
Preparation 1. Always wear safety shoes or heavy boots.
2. Always wear safety glasses or safety goggles when operating this machine.
3. Never wear jewelry or loose clothing that might become entangled in moving or rotating parts of the machine.
4. Make sure machine is on a level surface before operating.
5. Always block wheels to prevent unintended movement.
6. Always operate this machine from the operator zone(s) specified in the manual.
7. Logs should be cut with square ends prior to splitting.
8. Use log splitter in daylight or under good artificial light.
Safe Handling of Gasoline To avoid personal injury or property damage use extreme care in handling gasoline. Gasoline is extremely flammable and the vapors are explosive. Serious personal injury can occur when gasoline is spilled on yourself or your clothes which can ignite. Wash your skin and change clothes immediately.
a. Use only an approved gasoline container.
b. Extinguish all cigarettes, cigars, pipes, and other sources of ignition.
c. Never fuel machine indoors.
d. Never remove gas cap or add fuel while the engine is hot or running.
e. Allow engine to cool at least two minutes before refueling.
f. Never overfill the fuel tank. Fill tank to no more than 1/2 inch below bottom of filler neck to provide space for fuel expansion.
g. Replace gasoline cap and tighten securely.
h. If gasoline is spilled, wipe it off the engine and equipment. Move machine to another area. Wait five (5) minutes before starting the engine.
i. Never store the machine or fuel container inside where there is an open flame, spark or pilot light as on a water heater, space heater, furnace, clothes dryer or other gas appliances.
j. Allow machine to cool at least five (5) minutes before storing.
Operation1. Before starting this machine, review the “Safety
Instructions”. Failure to follow these rules may result in serious injury to the operator or bystanders.
2. Never leave this machine unattended with the engine running.
3. Do not operate machine while under the influence of alcohol, drugs, or medication.
4. Never allow anyone to operate this machine without proper instruction.
5. Always operate this machine with all safety equipment in place and working. Make sure all controls are properly adjusted for safe operation.
6. Do not change the engine governor settings or overspeed the engine. The governor controls the maximum safe operating speed of the engine.
7. When loading a log, always place your hands on the sides of the log, not on the ends, and never use your foot to help stabilize a log. Failure to do so, may result in crushed or amputated fingers, toes, hand, or foot.
8. Use only your hand to operate the controls.
9. Never attempt to split more than one log at a time unless the ram has fully extended and a second log is needed to complete the separation of the first log.
10. For logs which are not cut square, the least square end and the longest portion of the log should be placed toward the beam and wedge, and the square end placed toward the end plate.
11. Always keep fingers away from any cracks that open in the log while splitting. They can quickly close and pinch or amputate your fingers.
12. Keep your work area clean. Immediately remove split wood around the machine so you do not stumble over it.
13. Never move this machine while the engine is running.
14. This machine should not be towed on any street, highway or public road behind a vehicle.
Maintenance and Storage1. Stop the engine, disconnect the spark plug and ground
it against the engine before cleaning, or inspecting the machine.
2. Stop the engine and relieve hydraulic system pressure before repairing or adjusting fittings, hoses, tubing, or other system components.

5Section 2 — important Safe operation practiceS
3. To prevent fires, clean debris and chaff from the engine and muffler areas. If the engine is equipped with a spark arrestor muffler, clean and inspect it regularly according to manufacturers instructions. Replace if damaged.
4. Periodically check that all nuts and bolts, hose clamps, and hydraulic fittings are tight to be sure equipment is in safe working condition.
5. Check all safety guards and shields to be sure they are in the proper position. Never operate with safety guards, shields, or other protective features removed.
6. The pressure relief valve is preset at the factory. Do not adjust the valve.
7. Never attempt to move this machine over hilly or uneven terrain without adequate help.
8. For your safety, replace all damaged or worn parts immediately with original equipment manufacturer’s (O.E.M.) parts only. “Use of parts which do not meet the original equipment specifications may lead to improper performance and compromise safety!”
9. Do not alter this machine in any manner, alterations such as attaching a rope or extension to the control handle, or adding to the width or height of the wedge may result in personal injury.
10. According to the Consumer Products Safety Commission (CPSC) and the U.S. Environmental Protection Agency (EPA), this product has an Average Useful Life of seven (7) years, or 130 hours of operation. At the end of the Average Useful Life have the machine inspected annually by an authorized service dealer to ensure that all mechanical and safety systems are working properly and not worn excessively. Failure to do so can result in accidents, injuries or death.
Spark ArrestorWARNING: This machine is equipped with an internal combustion engine and should not be used on or near any unimproved forest-covered, brushcovered or grass-covered land unless the engine’s exhaust system is equipped with a spark arrestor meeting applicable local or state laws (if any).
If a spark arrestor is used, it should be maintained in effective working order by the operator. In the State of California the above is required by law (Section 4442 of the California Public Resources Code). Other states may have similar laws. Federal laws apply on federal lands. A spark arrestor for the muffler is available through your nearest engine authorized service dealer or contact the service department, MTD Machinery (Suzhou) Co., Ltd. Suzhou, China 215121.
WARNING: Your Responsibility—Restrict the use of this power machine to persons who read, understand and follow the warnings and instructions in this manual and on the machine.
SAVE THESE INSTRUCTIONS!

6 Section 2 — important Safe operation practiceS
Safety SymbolsThis page depicts and describes safety symbols that may appear on this product. Read, understand, and follow all instructions on the machine before attempting to assemble and operate.
Symbol Description
READ THE OPERATOR’S MANUAL(S) Read, understand, and follow all instructions in the manual(s) before attempting to assemble and operate
WARNING— CRUSHING HAZARD Keep hands away from wedge, end plate, partly split wood and moving parts.
BYSTANDARDS Keep bystanders, helpers and children at least 10 feet away.
SINGLE OPERATOR Only one person should operate the machine at a time. The adult who loads and holds log must be the one who operates control handle.
WARNING— PRESSURIZED FLUID Never check for hose leaks with your hands. High pressure fluid can escape through a pin hole leak and cause serious injury by puncturing the skin and causing blood poisoning.
EYE PROTECTION Always wear safety glasses or safety goggles when operating this machine.
WARNING— MOVING WEDGE Keep hands away from wedge and moving parts.
WARNING—GASOLINE IS FLAMMABLE Allow the engine to cool at least two minutes before refueling.
WARNING— CARBON MONOXIDENever run an engine indoors or in a poorly ventilated area. Engine exhaust contains carbon monoxide, an odorless and deadly gas.
WARNING— HOT SURFACE Engine parts, especially the muffler, become extremely hot during operation. Allow engine and muffler to cool before touching.
Assembly & Set-Up 3
7
NOTE: This Operator’s Manual covers several models. Log splitter features may vary by model. Not all features in this manual are applicable to all log splitter models and the log splitter depicted may differ from yours.
WARNING! Use extreme caution unpacking this machine. Some components are very heavy and will require additional people or mechanical handling equipment.
NOTE: All references in this manual to the left or right side of the log splitter are from the operating position only. Exceptions, if any, will be specified.
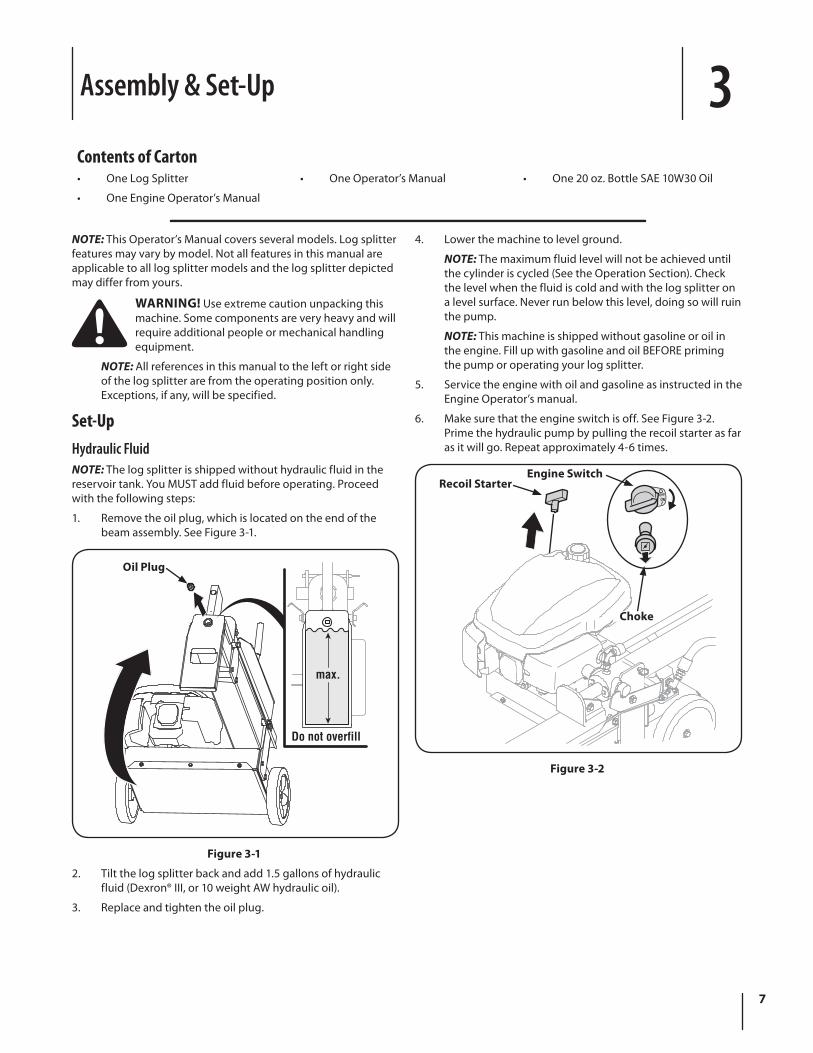
Set-UpHydraulic FluidNOTE: The log splitter is shipped without hydraulic fluid in the reservoir tank. You MUST add fluid before operating. Proceed with the following steps:
1. Remove the oil plug, which is located on the end of the beam assembly. See Figure 3-1.
Do not overfill
max.
Oil Plug
Figure 3-1
2. Tilt the log splitter back and add 1.5 gallons of hydraulic fluid (Dexron® III, or 10 weight AW hydraulic oil).
3. Replace and tighten the oil plug.
4. Lower the machine to level ground.
NOTE: The maximum fluid level will not be achieved until the cylinder is cycled (See the Operation Section). Check the level when the fluid is cold and with the log splitter on a level surface. Never run below this level, doing so will ruin the pump.
NOTE: This machine is shipped without gasoline or oil in the engine. Fill up with gasoline and oil BEFORE priming the pump or operating your log splitter.
5. Service the engine with oil and gasoline as instructed in the Engine Operator’s manual.
6. Make sure that the engine switch is off. See Figure 3-2. Prime the hydraulic pump by pulling the recoil starter as far as it will go. Repeat approximately 4-6 times.
Recoil StarterEngine Switch
Choke
Figure 3-2
Contents of Carton• One Log Splitter • One Operator’s Manual • One 20 oz. Bottle SAE 10W30 Oil
• One Engine Operator’s Manual

8 Section 3 — ASSembly & Set-Up
7. Remove the clevis pin and hairpin clip. See Figure 3-3.
Clevis Pin
Hairpin Clip
HydraulicValve
Control
Figure 3-3
8. Pivot the hydraulic valve control back into the slot of the valve.
9. Align the holes and reinstall the clevis pin and hairpin clip.
10. Pull the locking pin from the cylinder base. See Figure 3-4.
Handle
Cylinder
LockingPin
Figure 3-4
11. Use the handle to slide the cylinder back to lock in place.
12. Reinstall the pin.
13. Lubricate the beam area (where the cylinder will slide) with engine oil. Do not use grease.
EngineAdding OilRefer to the Engine Operator’s Manual packed with your log splitter for information on adding and checking oil.
Adding FuelRefer to the Engine Operator’s Manual packed with your log splitter for information on adding fuel.

Controls & Features 4
9
Handle
HydraulicValve Control
Cylinder
Ram
Wedge
Hydraulic Oil Fill
Beam
Locking Pin
Hydraulic Valve ControlThe hydraulic valve control has three positions; forward, neutral and reverse and controls the movement of the ram.
Hydraulic Oil FillThe hydraulic oil fill is located at the end of the beam and is used to fill the hydraulic tank with hydraulic oil.
HandleThe handle is used to slide the cylinder into operating position.
Air VentThe air vent is located on the rear of the wedge and is used to help vent air out of the hydraulic fluid reservoir. To prevent fluid from escaping out of this hole, the log splitter must always be operated on level ground.
Locking PinThe locking pin is located on the cylinder base and is used to lock the cylinder into the cylinder base. The cylinder can be locked in either the storage position or the operating lock position.
WedgeThe wedge is used to split the wood.
RamThe ram is located on the end of the cylinder and when extended forces the wood against the wedge to split the wood.

Operation 5
10
WARNING! Read, understand and follow all the instructions and warnings on the machine and in this manual before operating.
WARNING! Wear leather work gloves, safety shoes, ear protection, and safety glasses when operating a log splitter. Ensure safe footing.
Starting Log Splitter
WARNING! Always keep hands and feet clear of the equipment’s moving parts. Do not use a pressurized starting fluid. Vapors are flammable.
NOTE: Make sure the hydraulic pump is primed as instructed in the Assembly & Set-Up Section.
1. Remove the locking pin from the cylinder base. See Figure 5-1.
Handle
Cylinder
LockingPin
Figure 5-1
2. Use the handle to slide the cylinder rearward into the operating lock position, engage the safety switch and reinsert locking pin. See Figure 5-2.
Safety Switch
Locking Pin
Figure 5-2
3. Place the log splitter on level, solid and dry ground.
4. Start the engine as instructed in the Engine Operator’s manual.
Stopping Log Splitter1. Stop the engine as instructed in the Engine Operator’s
Manual.
2. Disconnect spark plug wire and ground against the engine to prevent unintended starting.
3. Remove the locking pin.
4. Return the cylinder back to the storage position.
5. Place the locking pin back into cylinder base to lock the log splitter in the storage position.

11Section 5 — operation
Using the Log SplitterNOTE: Always operate on level ground, otherwise fluid may be forced out through the air vent hole.
1. Block the front and back of both wheels.
2. Place the log against the splitting wedge. Only split wood in the direction of the grain.
3. Stabilize the log — if needed — with your left hand on the side of the log only. Never place a hand on the end between the log and the ram.
NOTE: Only one adult should stabilize the log and operate the hydraulic valve control so that the operator has full control over the log and the ram.
4. Move the hydraulic valve control FORWARD until the ram touches the log. Release the hydraulic valve control to NEUTRAL position to stop the ram movement. See Figure 5-3.
Forward
NeutralReverse
Figure 5-3
5. Remove your left hand from the log. Move the hydraulic valve control FORWARD to split the log.
6. Move the hydraulic valve control BACK to fully retract the ram to the locked position.
WARNING! Never remove partially split wood from the wedge with your hands. Your fingers may become trapped between the split wood.
Operating TipsAlways:1. Use clean fluid and check fluid level regularly.
2. Use an approved hydraulic fluid. Approved fluids include Dexron® III, or a 10 Weight AW hydraulic oil.
3. Keep hoses clear and unblocked.
4. Use the hydraulic valve control to extend and retract cylinder 4-6 cycles to remove trapped air in the system before operating.
5. Flush and clean hydraulic system before restarting after servicing.
6. Use “pipe dope” on all hydraulic fittings.
7. Operate on level ground.
8. Allow time for warm-up before splitting wood.
9. Prime the pump before initial start-up by pulling the recoil starter on the engine 4-6 times with engine switch in OFF position and spark plug disconnected.
10. Split the wood along the grain (lengthwise) only.
11. Keep log centered in front of ram.
Never:1. Use when fluid is below 20° F or above 150° F.
2. Operate in FORWARD or REVERSE position with the ram stopped for extended an period.
3. Attempt to adjust the unloading or the relief valve settings.
4. Operate with air in the hydraulic system.
5. Use Teflon tape on the hydraulic fittings.
6. Attempt to cut wood across the grain.
7. Attempt to remove partially split wood from the wedge with your hands.

Maintenance & Adjustments 6
12
WARNING! Before cleaning, lubricating, repairing or inspecting, disengage the control lever and stop engine. Disconnect the spark plug wire and ground it against the engine to prevent unintended starting. Always wear safety glasses during operation or while performing any adjustments or repairs.
MaintenanceHydraulic FluidCheck the hydraulic fluid level in the log splitter reservoir tank before each use. Maintain the fluid level to just below the oil plug.
Have the hydraulic fluid in the reservoir changed every 100 hours of operation. See your authorized service dealer to have the hydraulic fluid changed.
Beam & Splitting WedgeBefore each use, lubricate the top and bottom of the beam (where it comes into contact with the cylinder) with engine oil.
Hardware & Hose ClampsBefore each use, check to see if the hose clamps on the suction hose (attached to the side of the pump) are tight. Check the hose clamps on the return hose at least once a season. Check all the hardware at least once a season and tighten any nuts, bolts, etc. that are loose.
Off-Season StorageWhen the log splitter will not be used for an extended period of time, prepare it for storage as follows.
WARNING! Never store the machine with fuel in the fuel tank inside of a building where fumes may reach an open flame or spark, or where ignition sources are present such as hot water and space heaters, furnaces, clothes dryers, stoves, electric motors, etc.
1. Clean the log splitter thoroughly.
NOTE: Using a pressure washer or garden hose to clean your machine is not recommended. They may cause damage to bearings or the engine. The use of water will result in shortened life and reduce serviceability.
2. Wipe the log splitter with an oiled rag to prevent rust, especially on the wedge and the beam.
3. Drain the fuel tank. Always drain the fuel into an approved container outdoors, away from open flame. Be sure that the engine is cool before draining the fuel. Do not smoke while handling fuel.
4. Start the engine and let it run until the fuel lines and the carburetor are empty.
5. Remove the spark plug. Holding a rag over the cylinder hole, pour approximately 1⁄2 ounce (approximately one tablespoon) of engine oil into cylinder and crank slowly to distribute the oil.
6. Replace the spark plug.
7. Do not store the gasoline from one season to another.
8. Replace your gasoline can if it starts to rust. Rust and/or dirt in the gasoline will cause problems.
NOTE: For information on storing the engine refer to the Engine Operator’s Manual.
9. Store the log splitter in a clean, dry area. Do not store it next to any corrosive materials, such as fertilizer. DO NOT store the machine in an upright position.
NOTE: If storing in an unventilated or metal storage shed, be certain to rustproof the equipment by coating with a light oil or silicone.
Maintenance Schedule
After First 5 Hours Before Each Use Every SeasonEvery Season or 100
Hours
Check Hydraulic Fluid P PLubricate Beam & Splitting wedge PCheck Hardware & Hose Clamps PReplace Hydraulic Fluid P
Service 7
13
Belt ReplacementWARNING! Be sure to shut the engine off, disconnect the spark plug wire and ground it against the engine to prevent unintended starting before removing the belt.
The belt on your log splitter is subject to wear and should be replaced if any signs of wear are present.
NOTE: The V-belt found on your log splitter is a non-clutching, constant tension belt. A substitute (non- OEM) V-belt can be dangerous. For a proper working machine, use factory approved belts.
To change or replace the belt on your log splitter, proceed as follows:
NOTE: This procedure requires the assistance of a second person.
1. Place the log splitter in the transport position with the cylinder in the storage position and on level ground.
2. Disconnect the spark plug wire and ground it against the engine.
3. Drain the gasoline as instructed in the Engine Operator’s Manual or place a piece of plastic beneath the gas cap to prevent any gasoline leakage.
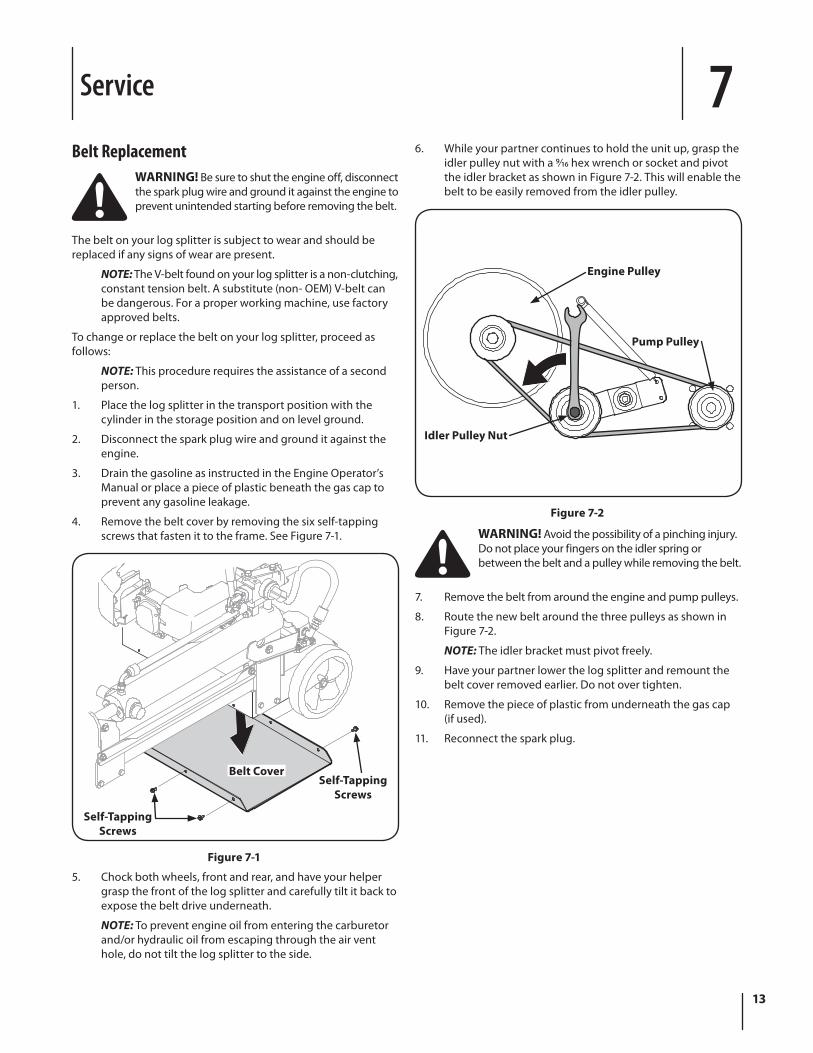
4. Remove the belt cover by removing the six self-tapping screws that fasten it to the frame. See Figure 7-1.
Self-TappingScrews
Self-TappingScrews
Belt Cover
Figure 7-1
5. Chock both wheels, front and rear, and have your helper grasp the front of the log splitter and carefully tilt it back to expose the belt drive underneath.
NOTE: To prevent engine oil from entering the carburetor and/or hydraulic oil from escaping through the air vent hole, do not tilt the log splitter to the side.
6. While your partner continues to hold the unit up, grasp the idler pulley nut with a 9⁄16 hex wrench or socket and pivot the idler bracket as shown in Figure 7-2. This will enable the belt to be easily removed from the idler pulley.
Engine Pulley
Idler Pulley Nut
Pump Pulley
Figure 7-2
WARNING! Avoid the possibility of a pinching injury. Do not place your fingers on the idler spring or between the belt and a pulley while removing the belt.
7. Remove the belt from around the engine and pump pulleys.
8. Route the new belt around the three pulleys as shown in Figure 7-2.
NOTE: The idler bracket must pivot freely.
9. Have your partner lower the log splitter and remount the belt cover removed earlier. Do not over tighten.
10. Remove the piece of plastic from underneath the gas cap (if used).
11. Reconnect the spark plug.

Troubleshooting 8
14
Problem Cause Remedy
Cylinder rod will not move 1. Broken or worn belt.
2. Shipping plugs left in hydraulic hoses.
3. Set screws in pump pulley not adjusted properly.
4. Loose pulley.
5. Pump gear sections damaged.
6. Damaged relief valve.
7. Hydraulic lines blocked.
8. Incorrect oil level.
9. Damaged directional valve.
10. Blocked directional valve.
11. Un-level ground; hydraulic fluid not reaching pump.
1. Replace belt.
2. Disconnect hydraulic hoses, remove shipping plugs, reconnect hoses.
3. See authorized service dealer.
4. Correct engine/pump alignment as necessary.
5. See authorized service dealer.
6. See authorized service dealer.
7. Flush and clean hydraulic system.
8. Check oil level.
9. See authorized service dealer.
10. Flush and clean hydraulic system.
11. Move log splitter to level ground.
Slow cylinder shaft speed while extending and retracting.
1. Gear sections damaged.
2. Excessive pump inlet vacuum.
3. Slow engine speed.
4. Damaged relief valve.
5. Incorrect oil level.
6. Contaminated oil.
7. Directional valve leaking internally.
8. Internally damaged cylinder.
9. Log Splitter not on level ground.
1. See authorized service dealer.
2. Make certain pump inlet hoses are clear and unblocked, use short, large diameter inlet hoses.
3. See authorized service dealer.
4. See authorized service dealer.
5. Check oil level.
6. Drain oil, clean reservoir, and refill.
7. See authorized service dealer.
8. See authorized service dealer.
9. Move log splitter to level ground.
Leaking Cylinder 1. Broken seals.
2. Scored cylinder.
1. See authorized service dealer.
2. See authorized service dealer.
Leaking pump shaft seal 1. Broken drive shaft.
2. Engine/pump misalignment.
3. Gear sections damaged.
4. Poorly positioned shaft seal.
5. Plugged oil breather.
1. See authorized service dealer.
2. Correct alignment as necessary.
3. See authorized service dealer.
4. See authorized service dealer.
5. Make certain reservoir is properly vented.

Replacement Parts 9
15
Component Part Number and Description
754-04128 Belt
727-04182 Valve/Cylinder Hose727-04154 Log splitter Hose727-04156 Return Hose727-04157 Inlet Hose
726-04079 Hose Clamp
734-1781 Wheel, 8 x 1.75
720-04088 Grip, .625
Phone (800) 800-7310 to order replacement parts or a complete Parts Manual (have your full model number and serial number ready). Parts Manual downloads are also available free of charge at www.mtdproducts.com.

Warranty Conditions — Australia (Not applicable to other Regions)The benefits given to you under this warranty are in addition to other rights and remedies that you have under Australian law in relation to the goods.
MTD Products Australia Pty Ltd warrants that this machine is free from defects in material and workmanship. This warranty is limited to repairing or replacing any part which appears upon inspection by MTD Products Australia Pty Ltd or its agent to be defective in material or workmanship.
A separate warranty is provided in respect of the engine for this machine. Refer to the engine warranty statement in the Engine Owner’s Manual which has been included with this machine.
For domestic use, this warranty will apply for a period of 2 years from date of purchase. Warranty for commercial or industrial use is 90 days from the date of purchase. In the event of dispute, MTD Products Australia Pty Ltd will determine whether the machine was used for domestic, or commercial or industrial use.
All costs associated with claiming under this warranty must be borne by you, including transport costs incurred in the repair or replacement of any defective part.
This warranty excludes fair wear and tear and any damage caused by misuse or abuse. Parts such as Blades, Bump Knobs, Outer Spools, Cutting Line, Inner Reels, Starter Pulley, Starter Ropes, Drive Belts, Saw Blades, Guide Bars, Cultivator Tines, Spark Plugs, Carburettor Adjustments and Filters which can be subjected to use beyond their normal intended working capacity are also excluded.
This warranty is void if alterations are made to the machine without MTD Products Australia Pty Ltd prior written authority.
Our goods come with guarantees that cannot be excluded under the Australian Consumer Law. You are entitled to a replacement or refund for a major failure and for compensation for any other reasonably foreseeable loss or damage. You are also entitled to have the goods repaired or replaced if the goods fail to be of acceptable quality and the failure does not amount to a major failure.
IN ORDER TO MAKE A CLAIM UNDER THIS WARRANTY YOU WILL NEED TO TAKE YOUR PRODUCT AND YOUR PROOF OF PURCHASE TO AN AUTHORISED MTD DEALER. YOUR NEAREST MTD DEALER CAN BE FOUND at www. mtd.com.au. All SERVICING AND REPAIRS MUST USE GENUINE SPARE PARTS OR YOUR WARRANTY WILL BE VOID.
For your Record:
Retailers Name: ........................................................................ Address: ......................................................................................
Phone No: .................................................................................. Model No: ..................................................................................
Serial No: .................................................................................... Date of Purchase: ....................................................................
MTD Products Australia Pty Ltd.
Postal Address: PO. Box 376 Dandenong. Vic. 3175
Business Address: 6 Zenith Road, Dandenong. Vic. 3175 and 97 Trade Street. Lytton.
Qld. 4178
Email Address: [email protected] Customer Service Phone: 1300 951 594
A.B.N. 96 004 873 572
© Copyright 201204016921
Revision 10.1. 2012