Embed Size (px)
Citation preview
Visit Rockler.com for the most current product information and videos or call 1-800-260-9663.
48381© Rockler Companies Inc. 2012
Blank Preparation1. Cuttheblanksabout1/8"longerthantheBrassTubesto allowfor“blow-out”orholeelongation.Maintaingrain orientationofthetwoblanksforturningbyplacingan“x” oneithersideofthecutline.
2. Drilltheblankswitha10mmdrillbitataspeedof900 to1200RPM.
3. PolishtheBrassTubeswith220gritsandpapertoremove oxidationandroughentheTubesforbetteradhesion.This canbedonebyhandorbychuckingtheminadrillpressor portablehanddrill.
4. PreparetogluewithmediumCA(cyanoacrylate)glueor two-partfastdryingepoxy.
5. ApplythegluetotheoutsideofoneBrassTubewithaliberal amountaroundtheendthatisinsertedfirst.Donotapply gluetotheinsideoftheblank,asthiswillcausetheglueto getinsidetheBrassTubeandruinit.
6. InserttheBrassTubewithatwistingmotionintotheblank untiltheTubeisequidistantbetweenbothendsoftheblank. Wipeoffanyexcessglueontheendsoftheblank.Allow thegluetodry.GluethesecondBrassTubeusingthe samemethod.
7. Usingabarreltrimmer,disk,orbeltsander,trimtheends oftheblanksuntilyoucanjustseethebrightbrassends oftheTubes.Thefacesoftheendsmustbeperpendicular totheBrassTubesandparallelwitheachother.Itis imperativetomatchthelengthofthetrimmedblanksto theoriginallengthoftheBrassTubesandthattheinsides oftheBrassTubesarecleanandfreeofanyglue.
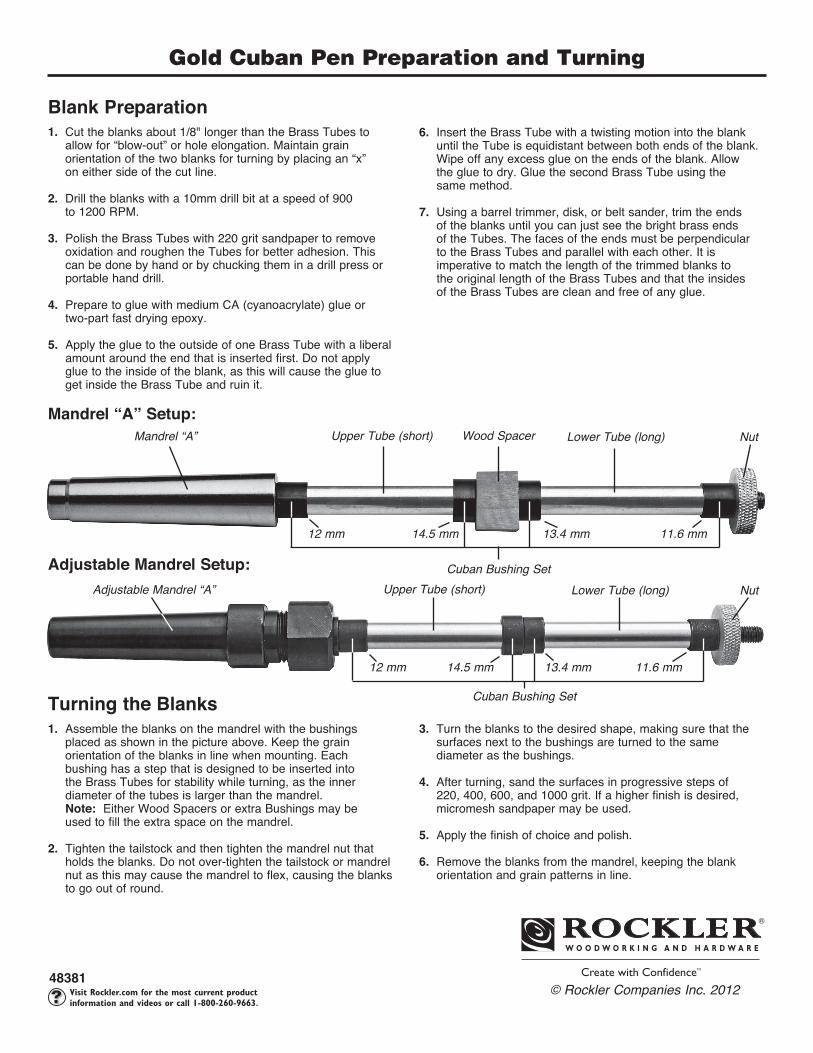
Turning the Blanks1. Assembletheblanksonthemandrelwiththebushings placedasshowninthepictureabove.Keepthegrain orientationoftheblanksinlinewhenmounting.Each bushinghasastepthatisdesignedtobeinsertedinto theBrassTubesforstabilitywhileturning,astheinner diameterofthetubesislargerthanthemandrel. Note:EitherWoodSpacersorextraBushingsmaybe usedtofilltheextraspaceonthemandrel.
2. Tightenthetailstockandthentightenthemandrelnutthat holdstheblanks.Donotover-tightenthetailstockormandrel nutasthismaycausethemandreltoflex,causingtheblanks togooutofround.
3.Turntheblankstothedesiredshape,makingsurethatthe surfacesnexttothebushingsareturnedtothesame diameterasthebushings.
4.Afterturning,sandthesurfacesinprogressivestepsof 220,400,600,and1000grit.Ifahigherfinishisdesired, micromeshsandpapermaybeused.
5. Applythefinishofchoiceandpolish.
6. Removetheblanksfromthemandrel,keepingtheblank orientationandgrainpatternsinline.
Gold Cuban Pen Preparation and Turning
Upper Tube (short) NutAdjustable Mandrel “A” Lower Tube (long)
Cuban Bushing Set
12 mm 14.5 mm 13.4 mm 11.6 mm
Upper Tube (short) NutMandrel “A” Lower Tube (long)
Cuban Bushing Set
Wood Spacer
12 mm 14.5 mm 13.4 mm 11.6 mm
Mandrel “A” Setup:
Adjustable Mandrel Setup:
48381 - Rev 04/12
WARN
ING: T
his product contains one or m
ore chem
icals, including lead, that are know
n to the State of C
alifornia to cause cancer and birth defects or other reproductive harm
. W
ash hands after handling.
Made in C
hina
Distributed by R
ockler C
ompanies Inc.
© 2012 R
ockler Woodw
orking and H
ardware
4838
1 - R
ev 0
4/12
Go
ld
Cu
ba
n P
en
A
sse
mb
ly
Inst
ruc
tio
ns
Go
ld C
ub
an
P
en
Asse
mb
ly In
struc
tion
s
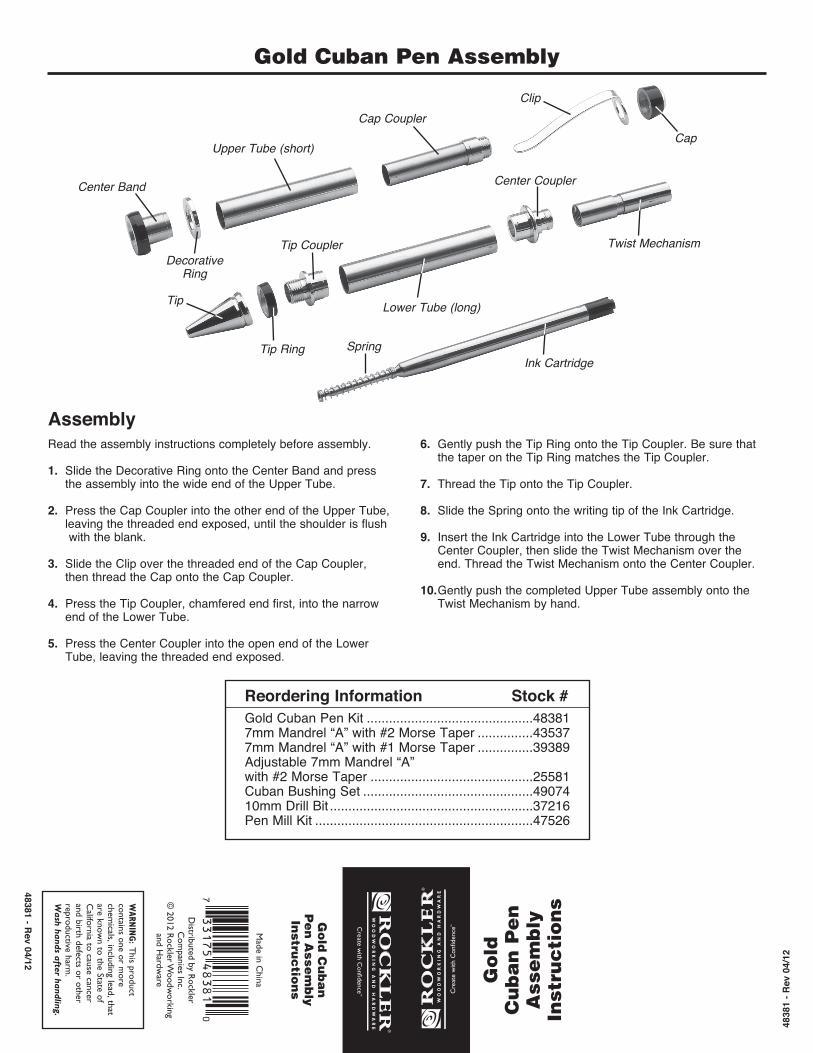
AssemblyReadtheassemblyinstructionscompletelybeforeassembly.
1. SlidetheDecorativeRingontotheCenterBandandpress theassemblyintothewideendoftheUpperTube.
2. PresstheCapCouplerintotheotherendoftheUpperTube, leavingthethreadedendexposed,untiltheshoulderisflush withtheblank.
3.SlidetheClipoverthethreadedendoftheCapCoupler, thenthreadtheCapontotheCapCoupler.
4.PresstheTipCoupler,chamferedendfirst,intothenarrow endoftheLowerTube.
5.PresstheCenterCouplerintotheopenendoftheLower Tube,leavingthethreadedendexposed.
6. GentlypushtheTipRingontotheTipCoupler.Besurethat thetaperontheTipRingmatchestheTipCoupler.
7. ThreadtheTipontotheTipCoupler.
8. SlidetheSpringontothewritingtipoftheInkCartridge.
9. InserttheInkCartridgeintotheLowerTubethroughthe CenterCoupler,thenslidetheTwistMechanismoverthe end.ThreadtheTwistMechanismontotheCenterCoupler.
10.GentlypushthecompletedUpperTubeassemblyontothe TwistMechanismbyhand.
Reordering Information Stock #GoldCubanPenKit.............................................483817mmMandrel“A”with#2MorseTaper...............435377mmMandrel“A”with#1MorseTaper...............39389Adjustable7mmMandrel“A”with#2MorseTaper............................................25581CubanBushingSet..............................................4907410mmDrillBit.......................................................37216PenMillKit...........................................................47526
Gold Cuban Pen Assembly
Upper Tube (short)
Cap CouplerClip
Cap
Center Band
Decorative Ring
Tip
Tip Ring
Tip Coupler
Ink Cartridge
Lower Tube (long)
Center Coupler
Twist Mechanism
Spring