Embed Size (px)
Citation preview
9/11/2012
1
1
Chapter 41Spine and
Nervous System Trauma
2
Learning Objectives
• Describe the incidence, morbidity, and mortality related to spinal injury.
• Predict mechanisms of injury that are likely to cause spinal injury.
• Describe the anatomy and physiology of the spine and spinal cord.
3
Copyright © 2013 by Jones & Bartlett Learning, LLC, an Ascend Learning Company
9/11/2012
2
Learning Objectives
• Outline the general assessment of a patient with suspected spinal injury.
• Distinguish between types of spinal injury.
• Describe prehospital evaluation and assessment of spinal cord injury.
4
Learning Objectives
• Identify prehospital management of the patient with spinal injuries.
• Distinguish between spinal shock, neurogenic shock, and autonomic hyperreflexiasyndrome.
• Describe selected nontraumatic spinal conditions and the prehospital assessment and treatment of them.
5
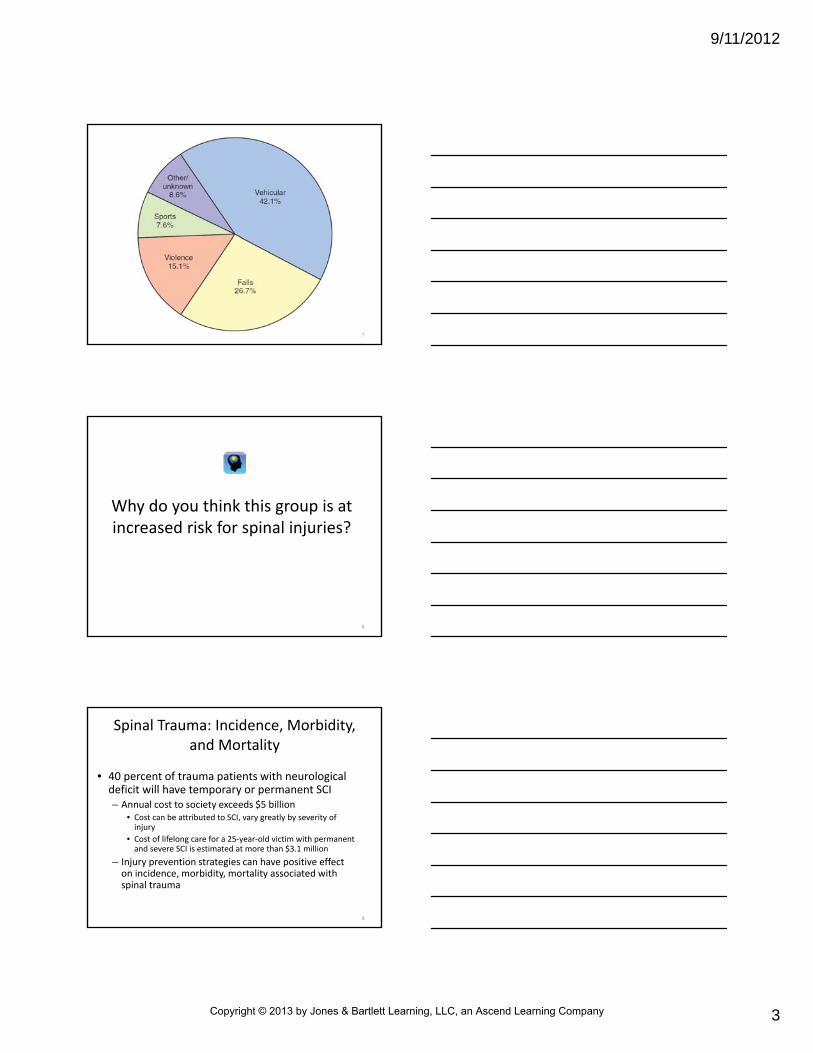
• Most spinal cord injuries result from
– Motor vehicle crashes (42.1 percent)
– Falls (26.7 percent)
– Penetrating injuries from acts of violence (15.1 percent)
– Injuries from sports (7.6 percent)
• Median age of spinal injury victims is 38 years
– About 80 percent of victims are male
Spinal Trauma: Incidence, Morbidity, and Mortality
6
Copyright © 2013 by Jones & Bartlett Learning, LLC, an Ascend Learning Company
9/11/2012
3
7
Why do you think this group is at increased risk for spinal injuries?
8
• 40 percent of trauma patients with neurological deficit will have temporary or permanent SCI– Annual cost to society exceeds $5 billion
• Cost can be attributed to SCI, vary greatly by severity of injury
• Cost of lifelong care for a 25‐year‐old victim with permanent and severe SCI is estimated at more than $3.1 million
– Injury prevention strategies can have positive effect on incidence, morbidity, mortality associated with spinal trauma
Spinal Trauma: Incidence, Morbidity, and Mortality
9
Copyright © 2013 by Jones & Bartlett Learning, LLC, an Ascend Learning Company
9/11/2012
4
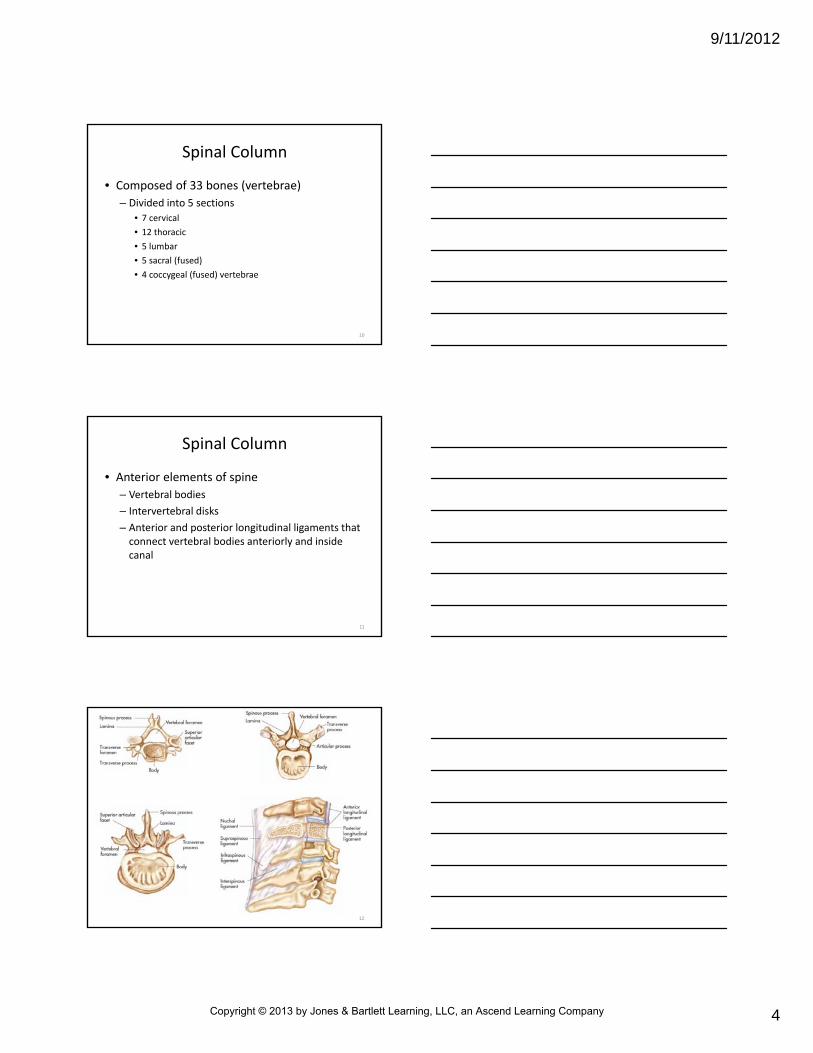
Spinal Column
• Composed of 33 bones (vertebrae)
– Divided into 5 sections
• 7 cervical
• 12 thoracic
• 5 lumbar
• 5 sacral (fused)
• 4 coccygeal (fused) vertebrae
10
Spinal Column
• Anterior elements of spine
– Vertebral bodies
– Intervertebral disks
– Anterior and posterior longitudinal ligaments that connect vertebral bodies anteriorly and inside canal
11
12
Copyright © 2013 by Jones & Bartlett Learning, LLC, an Ascend Learning Company
9/11/2012
5
Spinal Column
• Each vertebra consists of
– Solid body (bearing most weight of vertebral column)
– Posterior and anterior arch
– Posterior spinous process
– In some vertebrae, transverse process
• Ligaments between spinous processes provide support for movements of flexion and extension
– Those between laminae provide support during lateral flexion
– Spinal cord lies in spinal canal
13
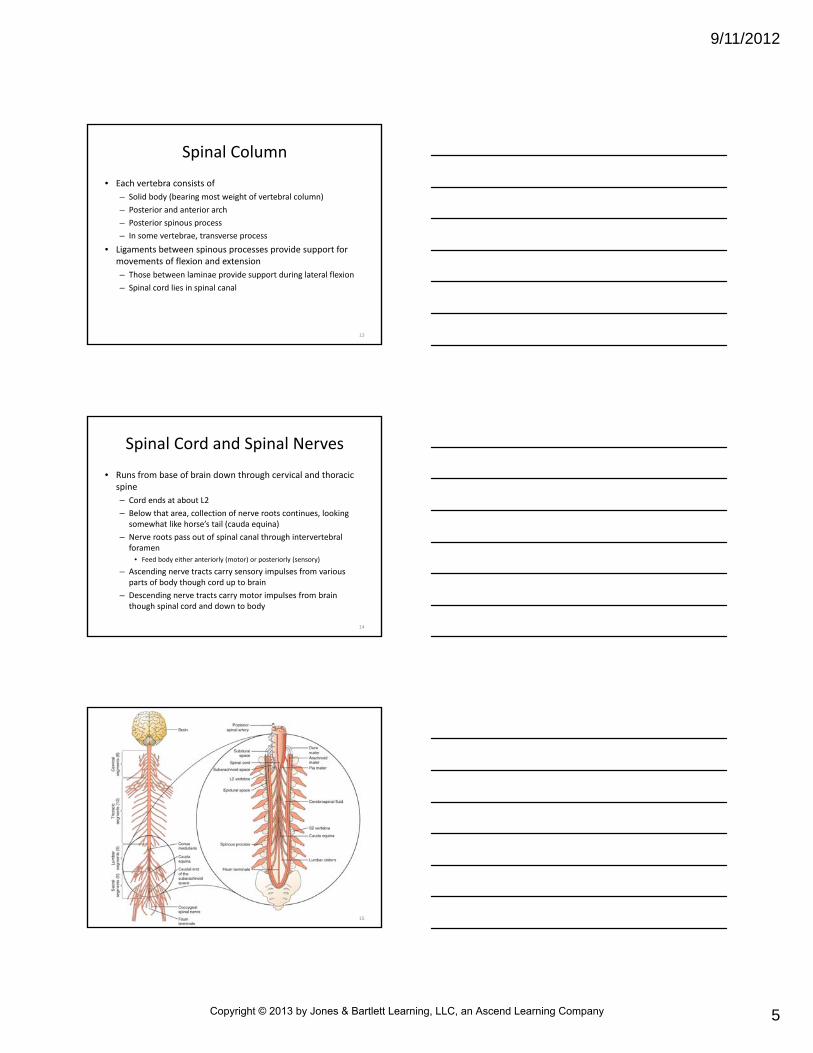
Spinal Cord and Spinal Nerves
• Runs from base of brain down through cervical and thoracic spine
– Cord ends at about L2
– Below that area, collection of nerve roots continues, looking somewhat like horse’s tail (cauda equina)
– Nerve roots pass out of spinal canal through intervertebralforamen
• Feed body either anteriorly (motor) or posteriorly (sensory)
– Ascending nerve tracts carry sensory impulses from various parts of body though cord up to brain
– Descending nerve tracts carry motor impulses from brain though spinal cord and down to body
14
15
Copyright © 2013 by Jones & Bartlett Learning, LLC, an Ascend Learning Company
9/11/2012
6
Spinal Cord and Spinal Nerves
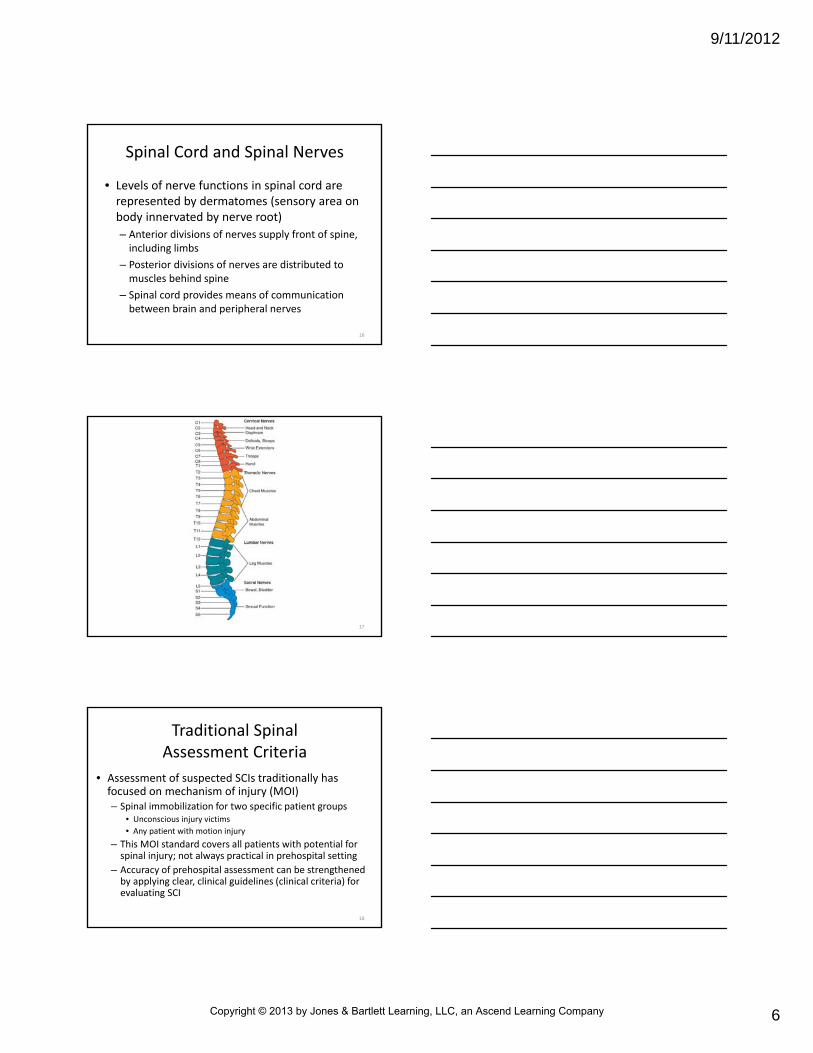
• Levels of nerve functions in spinal cord are represented by dermatomes (sensory area on body innervated by nerve root)
– Anterior divisions of nerves supply front of spine, including limbs
– Posterior divisions of nerves are distributed to muscles behind spine
– Spinal cord provides means of communication between brain and peripheral nerves
16
17
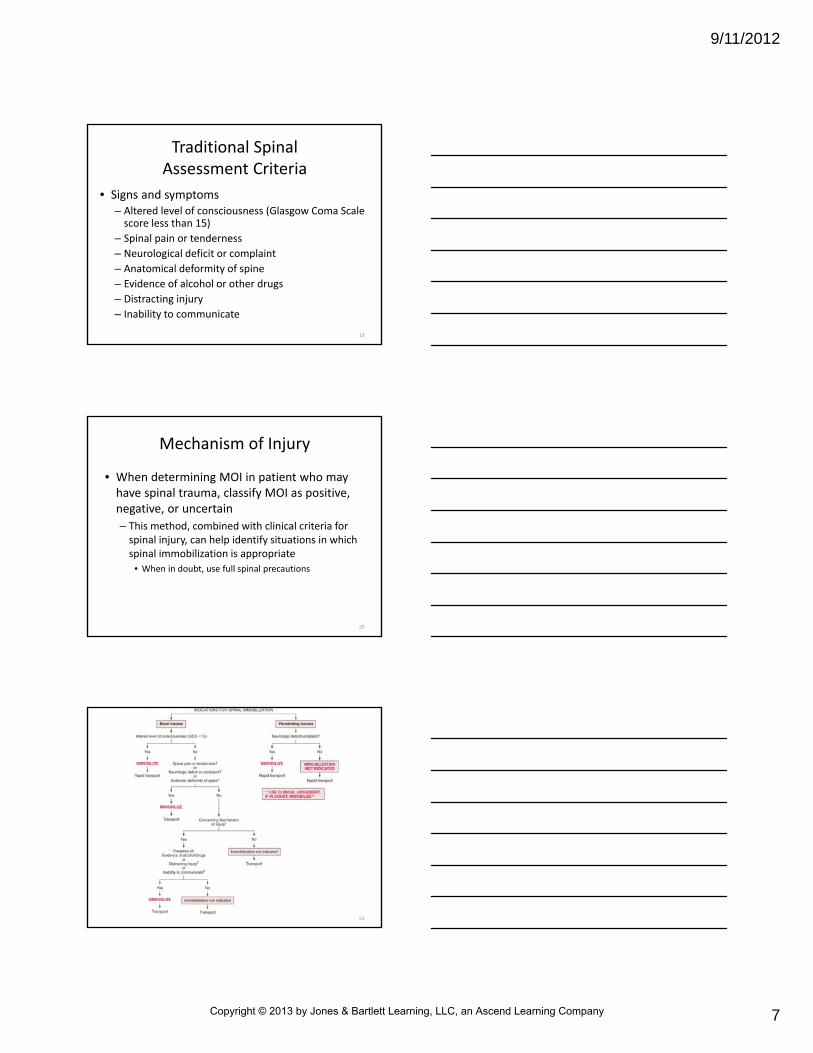
Traditional Spinal Assessment Criteria
• Assessment of suspected SCIs traditionally has focused on mechanism of injury (MOI)– Spinal immobilization for two specific patient groups
• Unconscious injury victims
• Any patient with motion injury
– This MOI standard covers all patients with potential for spinal injury; not always practical in prehospital setting
– Accuracy of prehospital assessment can be strengthened by applying clear, clinical guidelines (clinical criteria) for evaluating SCI
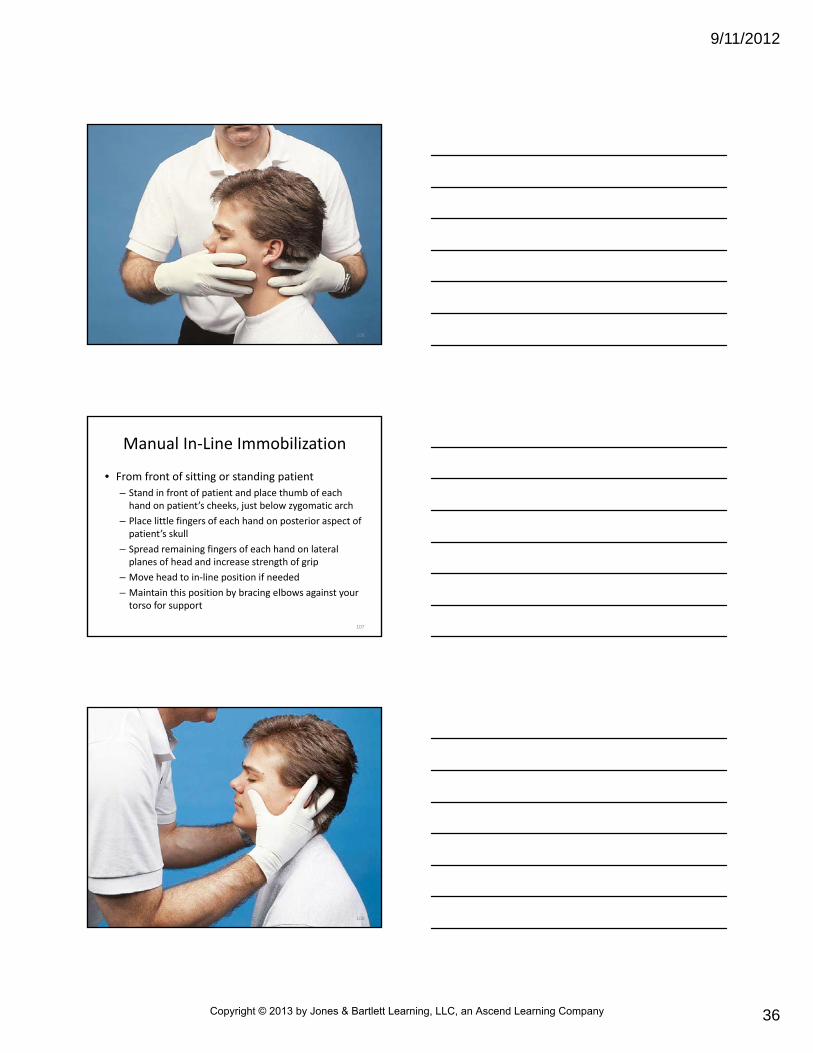
18
Copyright © 2013 by Jones & Bartlett Learning, LLC, an Ascend Learning Company
9/11/2012
7
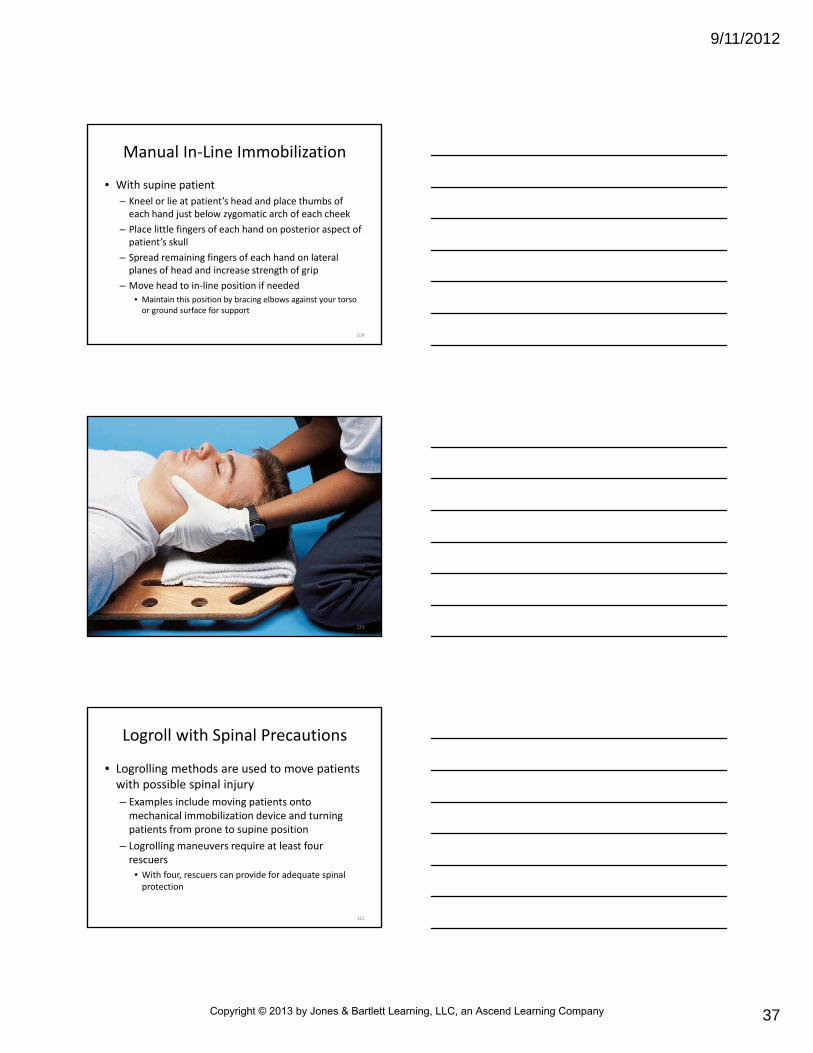
• Signs and symptoms– Altered level of consciousness (Glasgow Coma Scale score less than 15)
– Spinal pain or tenderness
– Neurological deficit or complaint
– Anatomical deformity of spine
– Evidence of alcohol or other drugs
– Distracting injury
– Inability to communicate
Traditional Spinal Assessment Criteria
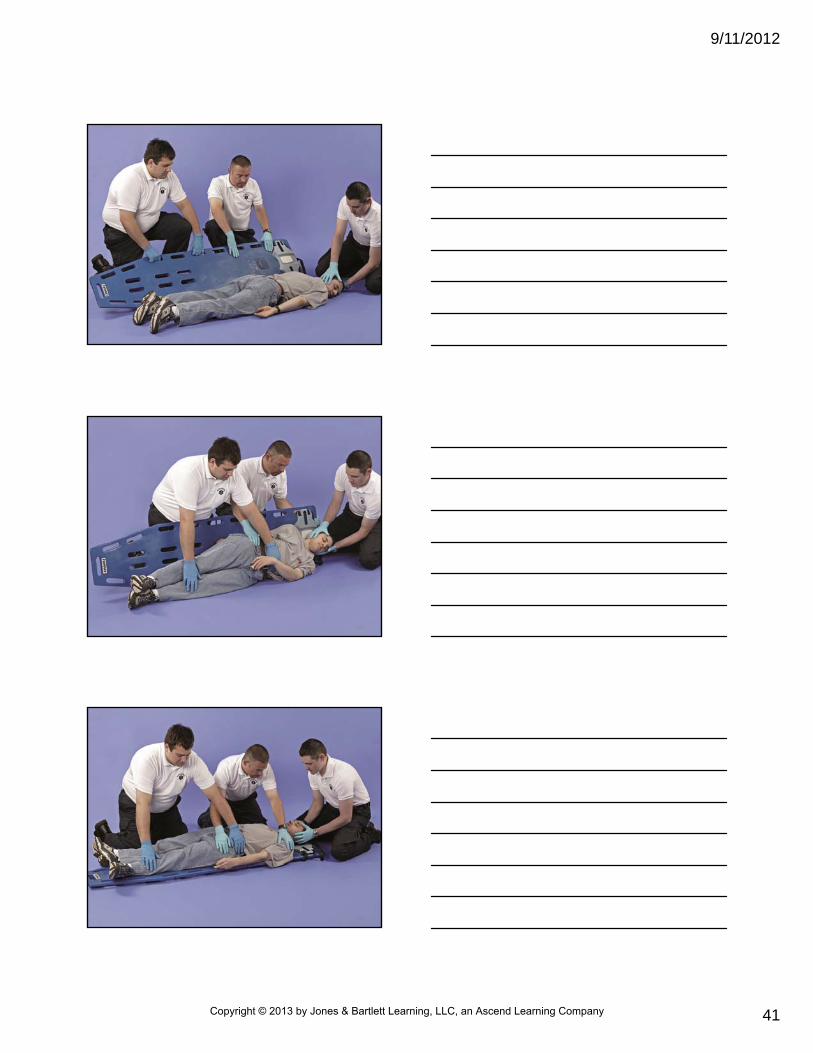
19
Mechanism of Injury
• When determining MOI in patient who may have spinal trauma, classify MOI as positive, negative, or uncertain
– This method, combined with clinical criteria for spinal injury, can help identify situations in which spinal immobilization is appropriate
• When in doubt, use full spinal precautions
20
21
Copyright © 2013 by Jones & Bartlett Learning, LLC, an Ascend Learning Company
9/11/2012
8
What are the disadvantages of immobilizing a patient on a long
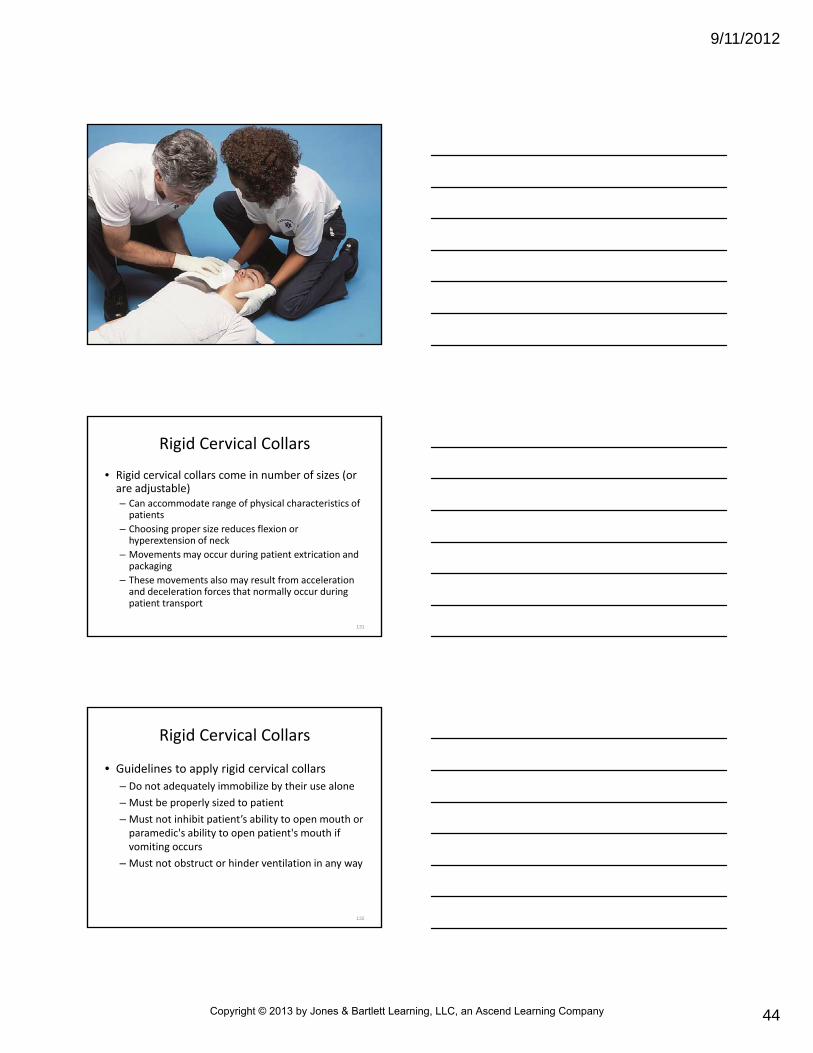
spine board?
22
Positive Mechanism of Injury
• Forces exerted on patient are highly suggestive of SCI– Positive MOI with physiological findings for spinal injury calls for full spinal immobilization
– Examples of positive MOIs• High‐speed motor vehicle crashes
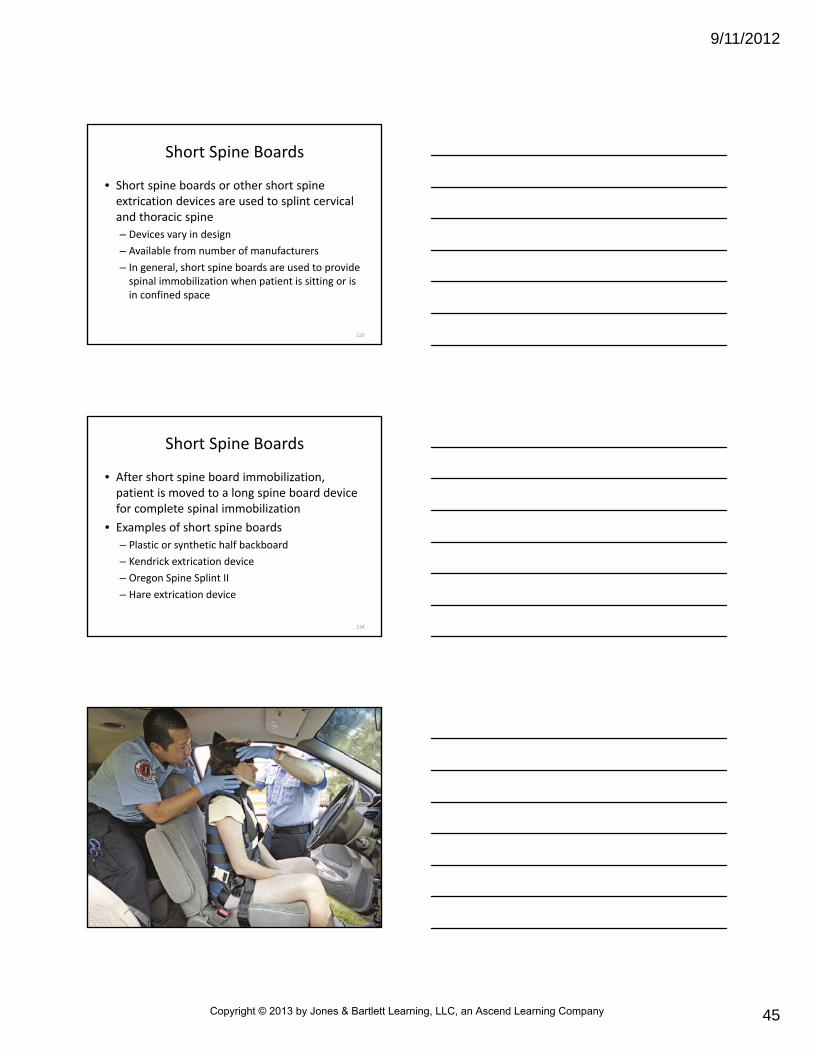
• Falls from more than three times patient’s height
• Violent situations occurring near patient’s spine (e.g., blunt and penetrating injuries)
• Sports injuries
• Other high‐impact situations
23
Positive Mechanism of Injury
• In absence of signs and symptoms of SCI, some medical direction agencies may recommend that patient with positive MOI not be immobilized
– Medical direction bases this action on paramedic’s assessment, reliable patient history, and absence of distracting injuries
24
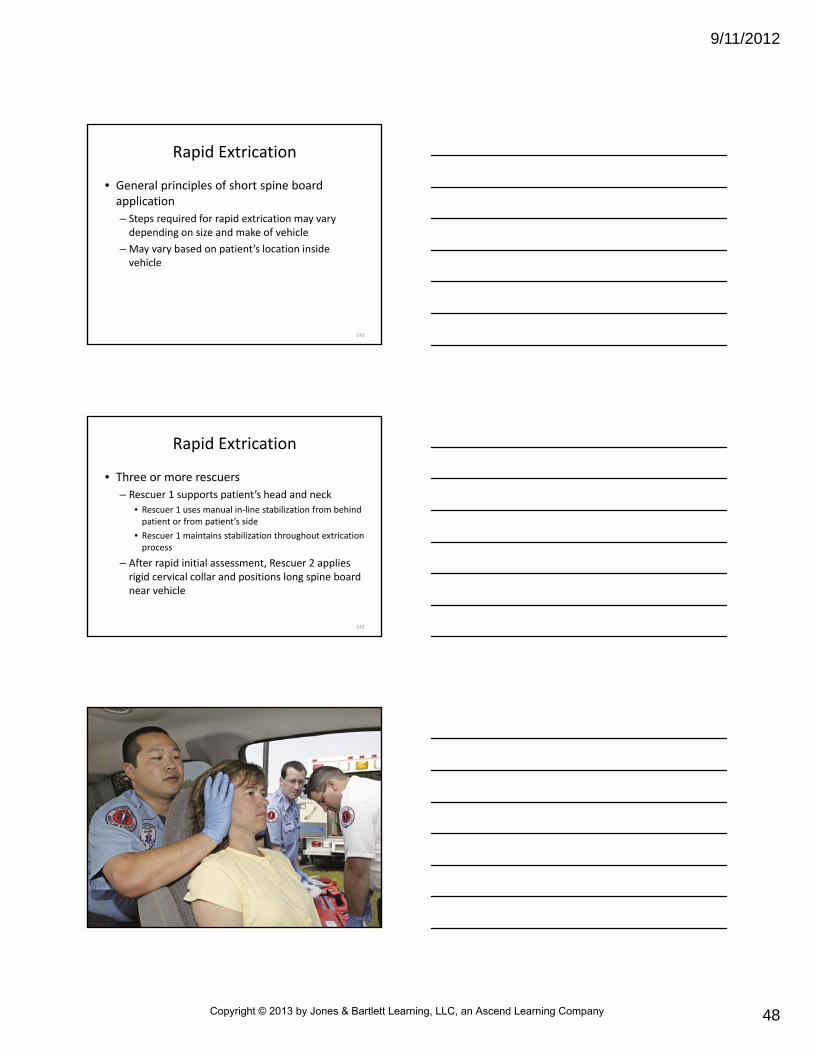
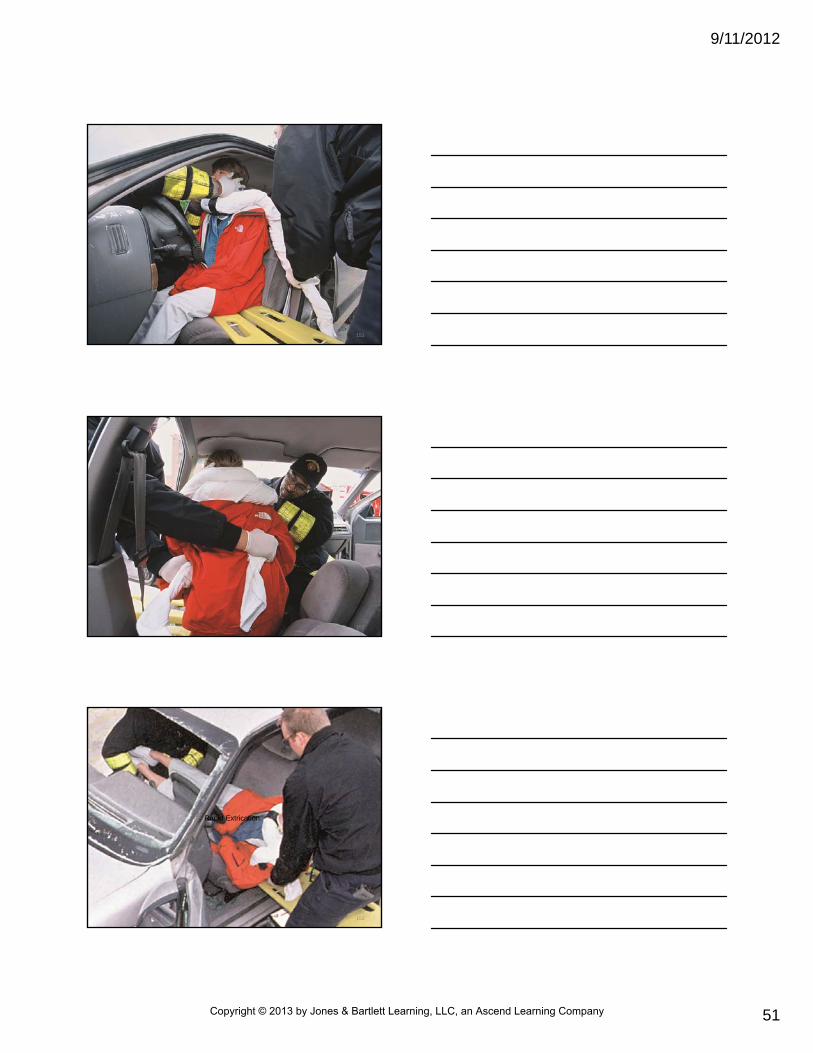
Copyright © 2013 by Jones & Bartlett Learning, LLC, an Ascend Learning Company

9/11/2012
9
Negative Mechanism of Injury
• Includes events in which force or impact does not suggest likely spinal injury
– In absence of SCI signs and symptoms, negative MOI injuries do not require spinal immobilization
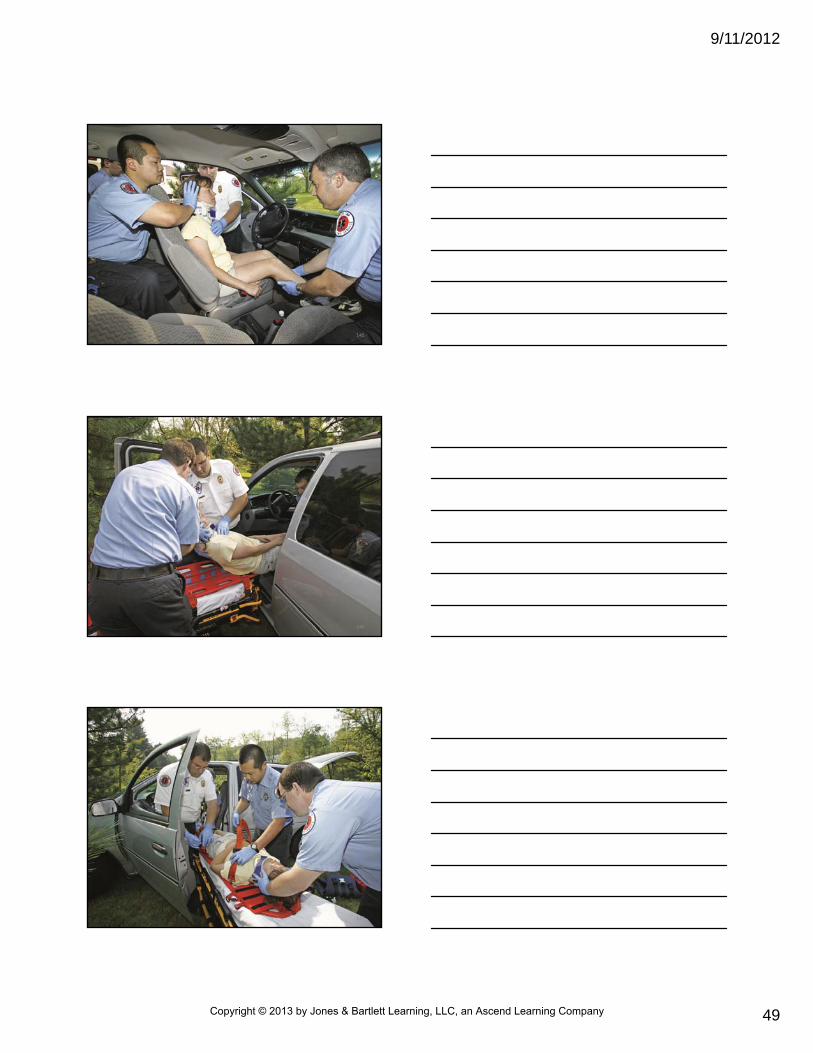
– Examples of negative MOIs
• Dropping an object on the foot
• Twisting an ankle while running
• Isolated soft tissue injury
25
Uncertain Mechanism of Injury
• At times, impact or force involved in injury is unknown or uncertain
– Clinical criteria must be basis used to determine need for spinal immobilization
– Examples of uncertain MOIs
• Tripping or falling to ground and hitting head
• Falls from 2 to 4 feet
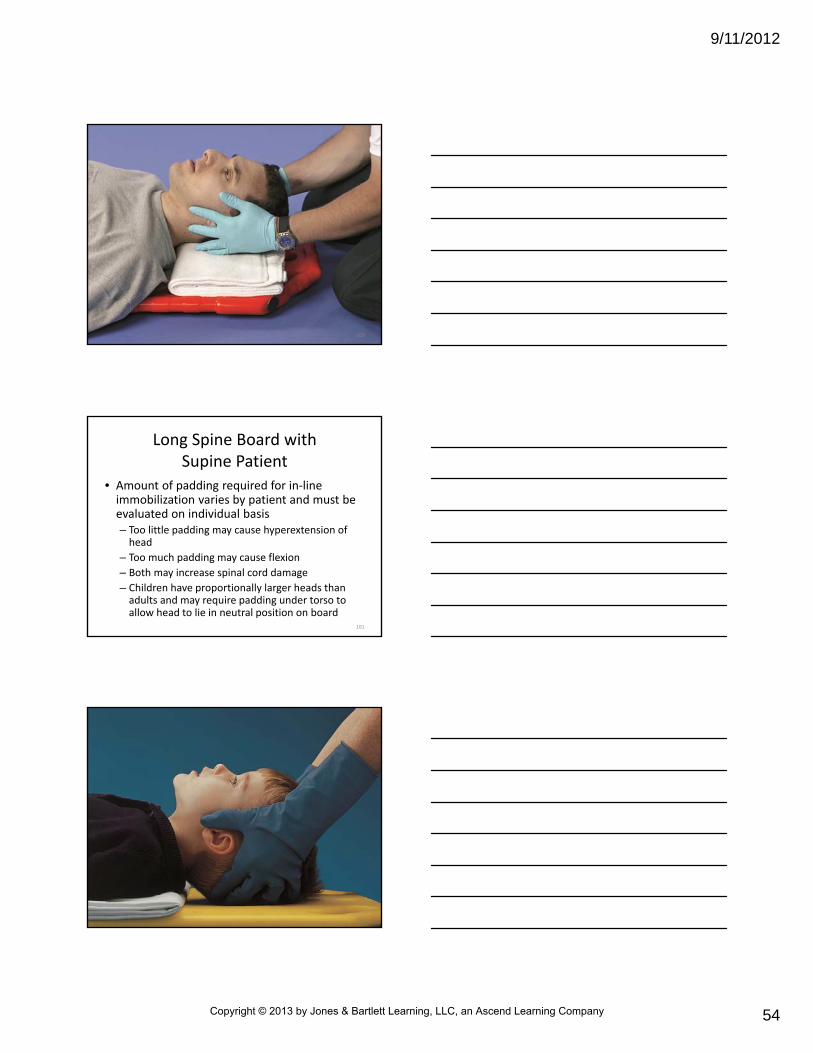
• Low‐speed motor vehicle crashes (“fender benders”)
26
Assessment of Uncertain Mechanism of Injury
• When evaluating need for spinal immobilization in which MOI is uncertain, ensure patient is reliable– One who is calm, cooperative, sober, alert, and oriented
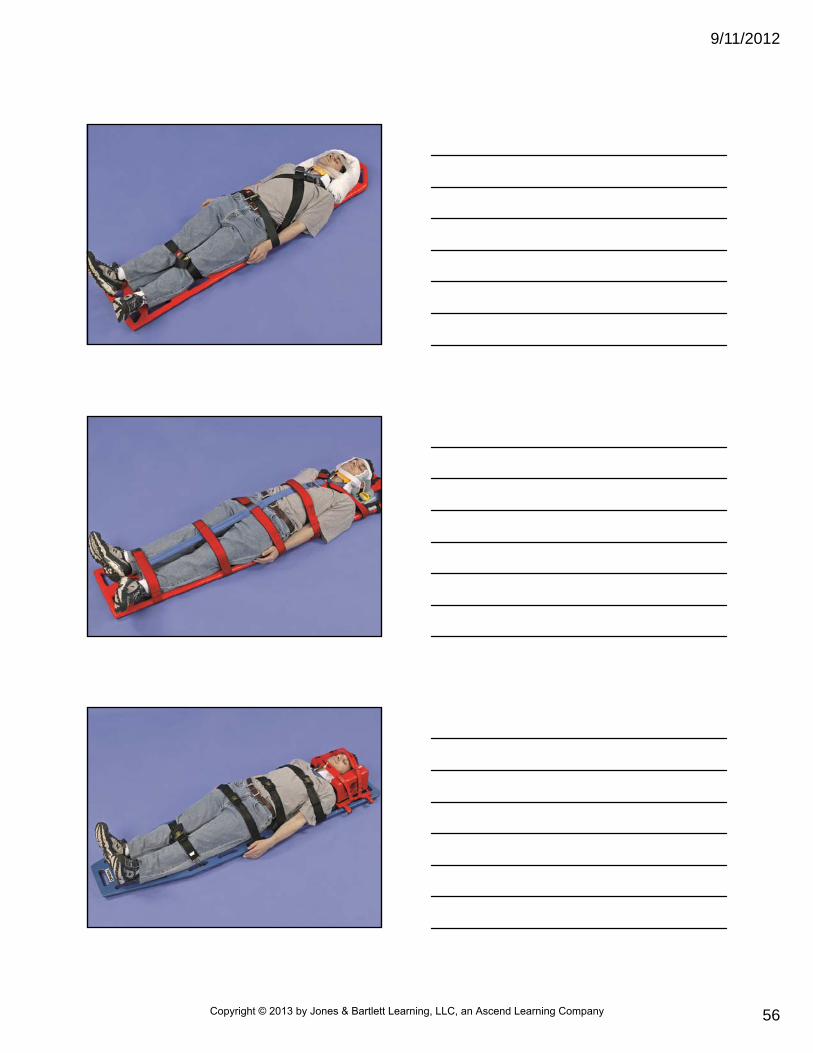
– Unreliable patients• Have acute stress reactions from sudden stress of any type• Have brain injury• Are intoxicated• Have abnormal mental status • Have distracting injuries• Have problems communicating
27
Copyright © 2013 by Jones & Bartlett Learning, LLC, an Ascend Learning Company
9/11/2012
10
The reliability of a patient is not always easy to assess quickly in the prehospital setting. Why is this?
28
General Assessment of Spinal Injury
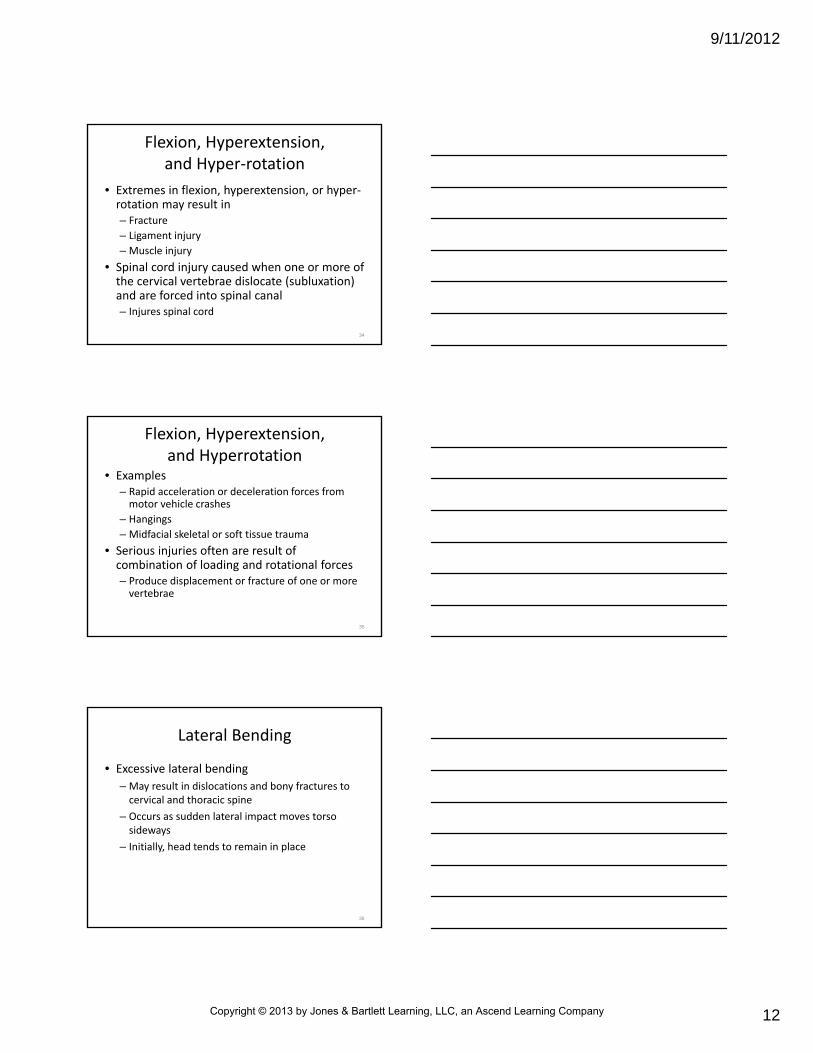
• Spinal injury most often results from spine being forced beyond its normal range and limits of motion– Adult skull weighs 16 to 22 lbs
• Sits on top of first cervical vertebra (C1), or atlas
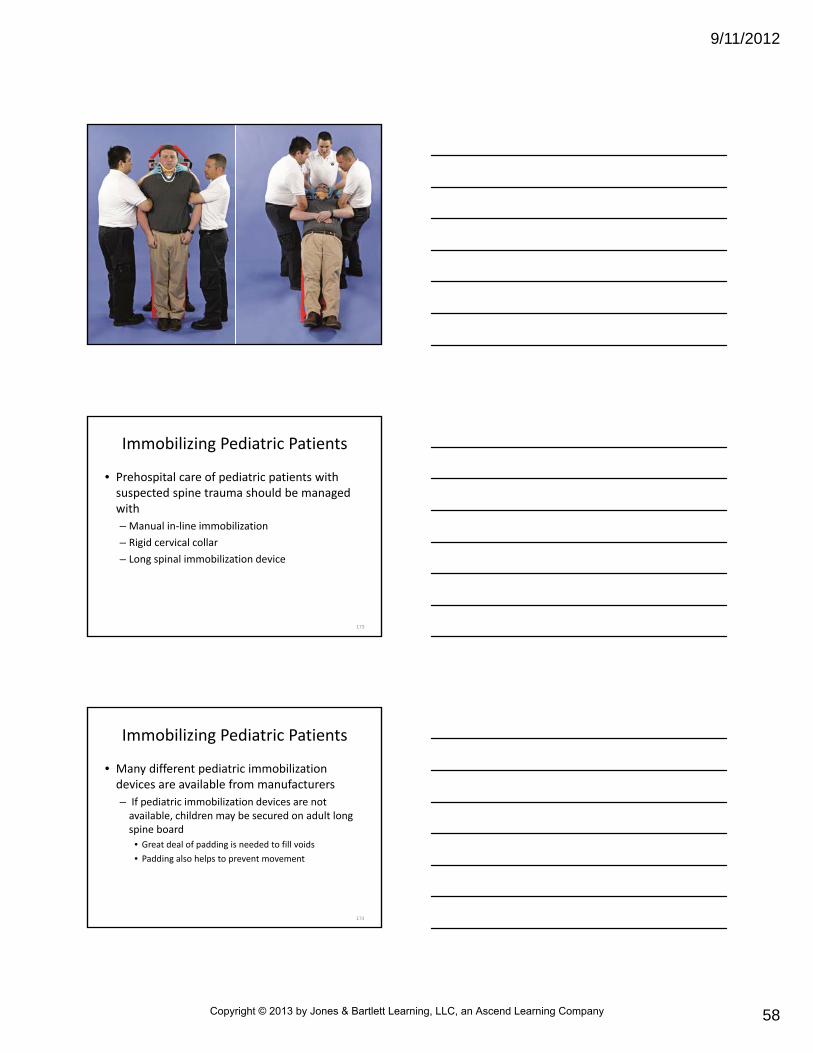
• Second cervical vertebra (C2), or axis and its odontoid process, allow head to move with about 180‐degree range of motion
• Because of weight and position of head in relation to thin neck and cervical vertebrae, cervical spine is particularly susceptible to injury (27 to 33 percent of all SCIs occur in C1 to C2 region)
29
30
Copyright © 2013 by Jones & Bartlett Learning, LLC, an Ascend Learning Company

9/11/2012
11
• Other spinal components that affect physiological limits of motion are posterior neck muscles and sacrum
– Posterior neck muscles allow up to 60 degrees of flexion and 70 degrees of extension without stretching of spinal cord
– Sacrum is joined to pelvis by immovable joints
General Assessment of Spinal Injury
31
• Specific MOIs that often cause spinal trauma
– Axial loading
– Extremes of flexion, hyperextension, or hyper‐rotation
– Excessive lateral bending
– Distraction
• May result in stable and unstable injuries
• Based on extent of damage to spinal structures and relative strength of structures remaining intact
General Assessment of Spinal Injury
32
Axial Loading
• Vertical compression of spine results when direct forces are sent down length of spinal column– Striking head against windshield of car
– Shallow diving injuries
– Vertical falls
– Being struck on head or helmet with heavy object
– Forces may produce compression fracture or crushed vertebral body without SCI and most commonly occur from T12 to L2
33
Copyright © 2013 by Jones & Bartlett Learning, LLC, an Ascend Learning Company
9/11/2012
12
Flexion, Hyperextension, and Hyper‐rotation
• Extremes in flexion, hyperextension, or hyper‐rotation may result in– Fracture
– Ligament injury
– Muscle injury
• Spinal cord injury caused when one or more of the cervical vertebrae dislocate (subluxation) and are forced into spinal canal– Injures spinal cord
34
• Examples– Rapid acceleration or deceleration forces from motor vehicle crashes
– Hangings
– Midfacial skeletal or soft tissue trauma
• Serious injuries often are result of combination of loading and rotational forces– Produce displacement or fracture of one or more vertebrae
Flexion, Hyperextension, and Hyperrotation
35
Lateral Bending
• Excessive lateral bending
– May result in dislocations and bony fractures to cervical and thoracic spine
– Occurs as sudden lateral impact moves torso sideways
– Initially, head tends to remain in place
36
Copyright © 2013 by Jones & Bartlett Learning, LLC, an Ascend Learning Company
9/11/2012
13
Lateral Bending
• Excessive lateral bending
– Then head is pulled along by cervical attachments
– Examples
• Side or angular collisions from motor vehicle crashes
• Injuries from contact sports
– Mechanism of this lateral force requires less movement to produce injury than flexion or extension forces in frontal or rear impacts
37
Distraction
• May occur if cervical spine is stopped suddenly while weight and momentum of body pull away from it
– Force or stretching may result in tearing and laceration of spinal cord
– Examples include intentional or unintentional hangings (e.g., suicide or school yard or playground injuries)
38
Other Mechanisms
• Other less common mechanisms of spinal injury– Blunt and penetrating trauma
– Electrical injury
• Spinal cord may suffer concussions, contusions, and lacerations– May develop hematomata and edema in response to blunt trauma
– Examples: spinal injuries that result from direct blows such as from falling tree limbs or other heavy objects
39
Copyright © 2013 by Jones & Bartlett Learning, LLC, an Ascend Learning Company
9/11/2012
14
Other Mechanisms
• Penetrating trauma to spine may be caused by missile‐type injuries or stab wounds to neck, chest, or abdomen
– May result in laceration of spinal cord or nerve roots over wide area
– At times penetrating trauma may produce complete transection (lesion)
– Areas of edema or contusion adjacent to laceration may disrupt cord tissue
40
Other Mechanisms
• Spinal trauma may occur from
– Direct electrical injury
– Violent muscle spasms that accompany electrical shock
41
Classifications of Spinal Injury
• Spinal injury classifications
– Sprains and strains
– Fractures and dislocations
– Sacral and coccygeal fractures
– Cord injuries
42
Copyright © 2013 by Jones & Bartlett Learning, LLC, an Ascend Learning Company
9/11/2012
15
Classifications of Spinal Injury
• Regardless of specific injury, all patients with suspected spinal trauma and signs and symptoms of SCI should be immobilized
– Unnecessary movement should be avoided until injury to spine or spinal cord can be excluded by clinical examination and radiography
– Unstable spine can be ruled out only by radiography or lack of any potential MOI
43
Classifications of Spinal Injury
• Assume presence of spine injury and unstable spine with– Any mechanism that produced violent impact on head, neck, torso, or pelvis
• Assault
• Entrapment in structural collapse
– Incidents that produce sudden acceleration, deceleration, or lateral bending forces to neck or torso
• Moderate‐ to high‐speed motor vehicle collisions
• Pedestrians struck by vehicle
• Involvement in explosion
44
Classifications of Spinal Injury
• Assume the presence of spine injury and unstable spine with
– Any fall, especially in elderly persons
– Ejection or fall from any motorized or otherwise powered transportation device
– Any victim of shallow‐water incident (e.g., diving, body surfing)
– Head injuries with any alteration in level of consciousness
45
Copyright © 2013 by Jones & Bartlett Learning, LLC, an Ascend Learning Company
9/11/2012
16
Classifications of Spinal Injury
• Assume presence of spine injury and unstable spine with
– Significant helmet damage
– Significant blunt injury to torso
– Impact or other deceleration fractures of legs or hips
– Significant localized injuries to area of spinal column
46
Classifications of Spinal Injury
• Spinal injury (bony injury) can occur with or without SCI
– May have SCI without bony injury
– Spinal cord injury without radiological abnormality is more common finding in children
47
Classifications of Spinal Injury
• Damage produced by injury forces can be complicated further by– Patient’s age (calcification from aging process)
– Preexisting bone diseases• Osteoporosis
• Spondylosis
• Rheumatoid arthritis
• Paget’s disease
– Congenital spinal cord anomalies• Fusion or narrow spinal canal
48
Copyright © 2013 by Jones & Bartlett Learning, LLC, an Ascend Learning Company
9/11/2012
17
Classifications of Spinal Injury
• Spinal cord neurons do not regenerate to any great extent
– Any injury to CNS that causes destruction of tissue often results in irreparable damage and permanent loss of function
• Role of paramedic in protecting this critical area cannot be overemphasized
49
Sprains and Strains
• Usually result from hyperflexion and hyperextension forces
– Hyperflexion sprain
• Occurs when posterior ligamentous complex tears at least partially
• Can result in tears of joint capsules
• May allow partial dislocation (subluxation) of intervertebral joints
50
Sprains and Strains
• Usually result from hyperflexion and hyperextension forces
– Hyperextension strains
• Common in low‐speed, rear‐end car crashes
• Known commonly as whiplash
• Injury occurs as person is thrown backward against posterior thorax during impact
• Damages anterior soft tissues of neck
51
Copyright © 2013 by Jones & Bartlett Learning, LLC, an Ascend Learning Company
9/11/2012
18
How can the paramedic distinguish between cervical
sprain/strain and spinal fracture in the prehospital setting?
52
Sprains and Strains
• With sprains and strains, local pain may be produced by spasms of neck muscles and injury to vertebrae, intervertebral disks, and ligamentous structures
– Pain usually is described as nonradiating, aching soreness of neck or back muscles
– Discomfort often varies in intensity and with changes in posture
53
Sprains and Strains
• On examination, deformity of spine may be palpable if dislocation (subluxation) has occurred
– Patient may complain of associated point tenderness and swelling
– Until SCI is ruled out by x‐ray exam, treat these patients as having unstable cervical spine injuries with potential for damage to spinal cord
54
Copyright © 2013 by Jones & Bartlett Learning, LLC, an Ascend Learning Company
9/11/2012
19
Sprains and Strains
• On examination, deformity of spine may be palpable if dislocation (subluxation) has occurred
– After diagnosis is confirmed, treatment of cervical sprain or strain usually is symptomatic
– Following physician evaluation, treatment occasionally may include cervical collar to decrease neck movement, heat application, and analgesics
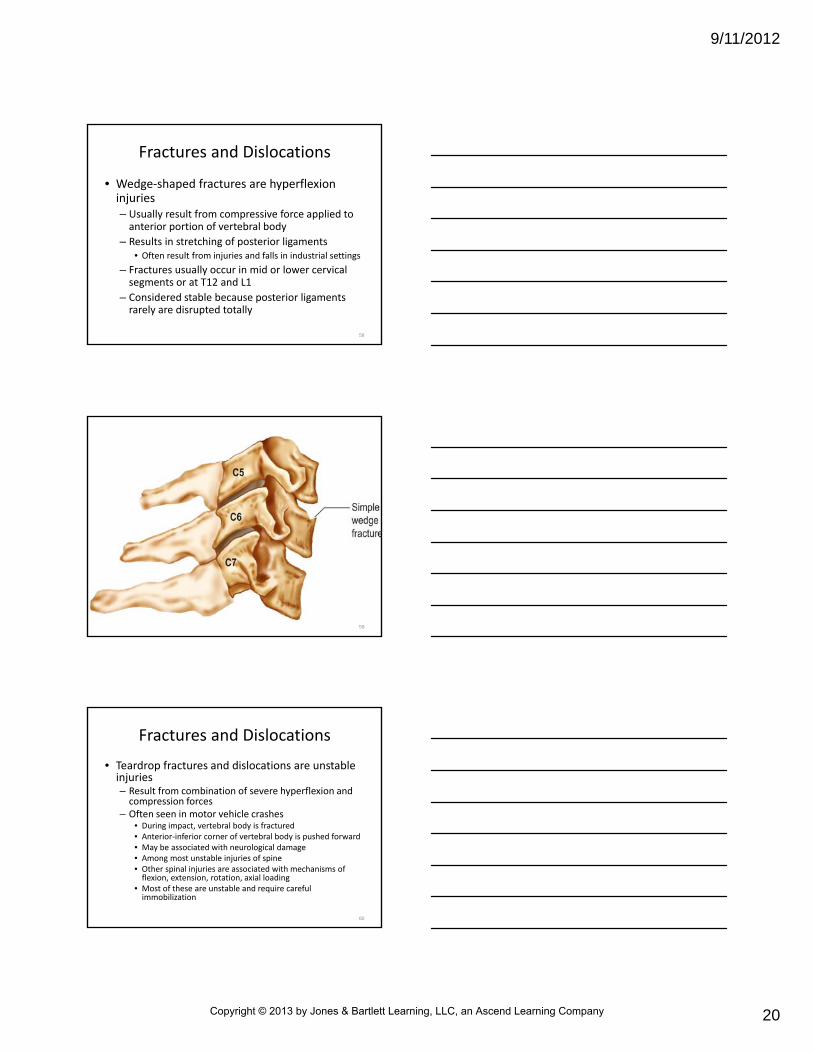
55
Fractures and Dislocations
• Most frequently injured spinal regions in descending order are C5 to C7, C1 to C2, and T12 to L2
– Of these injuries, most common are wedge‐shaped compression fractures and teardrop fractures or dislocations
– Neurological deficits associated with these fractures and dislocations vary with location
• Vary with extent of injury
– Although spine and spinal cord are close to each other, spine can be fractured without SCI and vice versa
– Spinal injuries at multiple levels are common
56
Look at an illustration of the spinal column. Why do you think these areas (C5 to C7, C1 and C2) are susceptible to fractures?
57
Copyright © 2013 by Jones & Bartlett Learning, LLC, an Ascend Learning Company
9/11/2012
20
Fractures and Dislocations
• Wedge‐shaped fractures are hyperflexioninjuries– Usually result from compressive force applied to anterior portion of vertebral body
– Results in stretching of posterior ligaments• Often result from injuries and falls in industrial settings
– Fractures usually occur in mid or lower cervical segments or at T12 and L1
– Considered stable because posterior ligaments rarely are disrupted totally
58
59
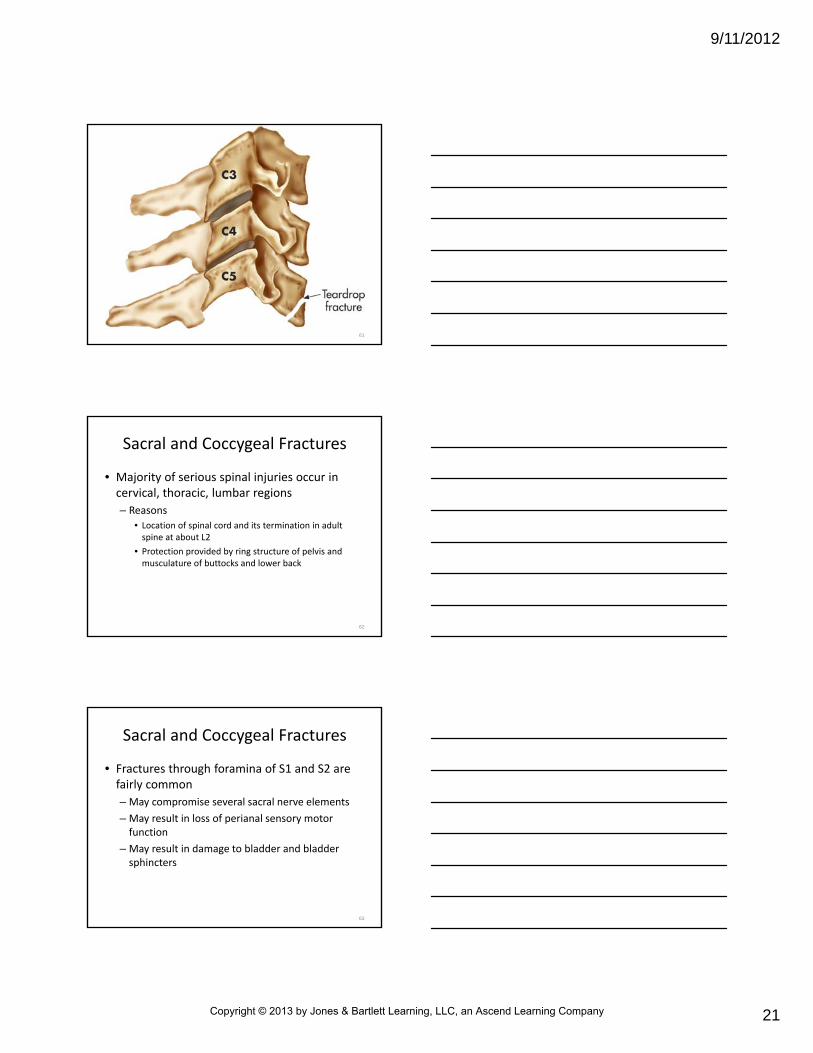
Fractures and Dislocations
• Teardrop fractures and dislocations are unstable injuries– Result from combination of severe hyperflexion and compression forces
– Often seen in motor vehicle crashes• During impact, vertebral body is fractured• Anterior‐inferior corner of vertebral body is pushed forward• May be associated with neurological damage• Among most unstable injuries of spine• Other spinal injuries are associated with mechanisms of flexion, extension, rotation, axial loading
• Most of these are unstable and require careful immobilization
60
Copyright © 2013 by Jones & Bartlett Learning, LLC, an Ascend Learning Company
9/11/2012
21
61
Sacral and Coccygeal Fractures
• Majority of serious spinal injuries occur in cervical, thoracic, lumbar regions
– Reasons
• Location of spinal cord and its termination in adult spine at about L2
• Protection provided by ring structure of pelvis and musculature of buttocks and lower back
62
Sacral and Coccygeal Fractures
• Fractures through foramina of S1 and S2 are fairly common
– May compromise several sacral nerve elements
– May result in loss of perianal sensory motor function
– May result in damage to bladder and bladder sphincters
63
Copyright © 2013 by Jones & Bartlett Learning, LLC, an Ascend Learning Company
9/11/2012
22
Sacral and Coccygeal Fractures
• Sacrococcygeal joint also may be injured as result of direct blows and falls
– Patients often complain they have “broken their tailbone”
– Often experience moderate pain from mobile coccyx
– Diagnosis usually confirmed by physician through rectal examination
64
Cord Injuries
• May be classified further as primary and secondary injuries– Primary injuries occur at time of impact– Secondary injuries occur after initial injury
• Swelling• Ischemia• Movement of bony fragments
– Spinal cord can be• Concussed• Contused• Compressed• Lacerated
65
Cord Injuries
• All mechanisms can cause temporary or permanent loss of cord‐mediated functions distal to injury from compression or ischemia
• Bleeding from damaged blood vessels also can occur in tissue of spinal cord– Bleeding can cause obstruction to spinal blood supply
– Severity of injuries depends on amount and type of force that produced them and duration of injury
66
Copyright © 2013 by Jones & Bartlett Learning, LLC, an Ascend Learning Company
9/11/2012
23
Cord Lesions
• Lesions (transections) to spinal cord are classified as complete or incomplete
– Complete lesions associated with spinal fracture or dislocation
• Have total absence of pain, pressure, joint sensation
• Have complete motor paralysis below level of injury
• May have autonomic nervous system dysfunction may be associated with complete cord lesions; depends on level of cord involvement
67
Cord Lesions
• Manifestations of autonomic dysfunction– Bradycardia caused by loss of sympathetic autonomic activity
– Hypotension caused by loss of vasomotor control and peripheral vascular resistance
– Priapism
– Loss of sweating and shivering
– Poikilothermy (body temperature varying with ambient temperature)
– Loss of bowel and bladder control
68
Why should you immobilize a patient who already is showing
signs and symptoms of a complete cord lesion?
69
Copyright © 2013 by Jones & Bartlett Learning, LLC, an Ascend Learning Company
9/11/2012
24
Incomplete Spinal Cord Syndromes
• Be familiar with signs and symptoms of several incomplete spinal cord syndromes
• Knowledge of these rare syndromes helps to understand potential for further injury
• There are three syndromes indicating incomplete lesions of spinal cord– Central cord syndrome
– Anterior cord syndrome
– Brown‐Séquard syndrome
70
Incomplete Spinal Cord Syndromes
• Central cord syndrome – Commonly occurs with hyperextension or flexion cervical injuries
– Characterized by greater motor impairment of upper than lower extremities
– Signs and symptoms• Paralysis of arms
• Sacral sparing (preservation of sensory or voluntary motor function of perineum, buttocks, scrotum, or anus)
71
Incomplete Spinal Cord Syndromes
• Anterior cord syndrome
– Usually seen in flexion injuries
– Caused by pressure on anterior aspect of spinal cord by ruptured intervertebral disk or fragments of vertebral body forced posteriorly into spinal canal
– Signs and symptoms
• Decreased sensation of pain and temperature below level of lesion (including lesions of sacral region)
• Intact light touch and position sensation
• Paralysis
72
Copyright © 2013 by Jones & Bartlett Learning, LLC, an Ascend Learning Company
9/11/2012
25
Incomplete Spinal Cord Syndromes
• Brown‐Séquard syndrome
– Hemitransection of spinal cord
– May result from ruptured intervertebral disk or pushing of fragment of vertebral body on spinal cord
– Occurs after knife or missile injuries
– In classic presentation, pressure on half of spinal cord results in weakness of extremities on ipsilateral(same) side
– Pressure also results in loss of pain and temperature sensation on contralateral (opposite) side
73
How will the prehospital care differ for a patient who has signs or symptoms of one of these
syndromes?
74
Pharmacological Therapy for Incomplete Cord Injury
• Benefits of pharmacological agents in management of incomplete cord injury are controversial
– Thought to provide some type of damage control following some SCIs
– Some are thought to work by reducing toxicity of excitatory amino acids that cause cells to die
– By encouraging growth of new neurons or by reducing inflammation of injured spinal cord and bursting open of damaged cells
– Of these, only methylprednisolone currently is used routinely for human victims of SCI
75
Copyright © 2013 by Jones & Bartlett Learning, LLC, an Ascend Learning Company
9/11/2012
26
Pharmacological Therapy for Incomplete Cord Injury
• Methylprednisolone is synthetic steroid that reduces posttraumatic spinal cord edema and inflammation– Routinely used in victims of SCI– Studies have found that patients treated with large doses (30 mg/kg IV bolus, followed by maintenance drip) within 8 hours of injury had improved patient recovery
– Consult with medical direction and follow local protocol regarding use of these drugs in prehospitalsetting
76
Evaluation and Assessment of Spinal Cord Injury
• Spinal cord trauma should be evaluated only after all injuries that pose threat to life have been assessed and treated– As with any scenario of serious illness or injury, first priority must be scene survey, including ensuring personal safety
– Primary survey and assessment and management of patient’s airway, breathing, and circulation must be performed in way that minimizes further damage
– Second priority is to preserve spinal cord function and avoid secondary injury to spinal cord
77
Evaluation and Assessment of Spinal Cord Injury
• Primary injury to spine occurs at impact
– Critical role of paramedics is to prevent secondary injury
• Could result from unnecessary movement of unstable spinal column, hypoxemia, edema, or shock (which may reduce perfusion of injured cord)
78
Copyright © 2013 by Jones & Bartlett Learning, LLC, an Ascend Learning Company
9/11/2012
27
Evaluation and Assessment of Spinal Cord Injury
• Primary injury to spine occurs at impact
– Goals are best met by
• Maintaining high degree of suspicion for presence of spinal trauma (based on scene survey, kinematics, and history of event)
• Providing early spinal immobilization
• Rapidly correcting any volume deficit through fluid replacement, pneumatic antishock garment application (per protocol), and O2 administration
79
Evaluation and Assessment of Spinal Cord Injury
• After any life‐threatening problems found in initial assessment are treated, perform neurological examination– May be done in field
– May be done en route to receiving hospital if patient’s condition requires rapid transport
– Any movement of patient for performing general or neurological examination must be accompanied by continuous, manual protection and in‐line stabilization of spine
80
Evaluation and Assessment of Spinal Cord Injury
• Once spine is stabilized, palpate entire spine– Any report of pain on palpation indicates need to immobilize spine
– Full documentation of paramedic’s findings provides important baseline
• Will be useful for further assessment and evaluation of patient in emergency department
• Components of neurological examination include evaluation of motor and sensory findings and reflex responses
81
Copyright © 2013 by Jones & Bartlett Learning, LLC, an Ascend Learning Company

9/11/2012
28
Motor Findings • Question conscious patients about pain in neck or back with and without palpation– Ask about ability to move arms and legs– If possible, test strength and motion of all four extremities
• Can be done by asking patient to flex elbows (biceps, C6), extend elbows (triceps, C7), and abduct/adduct the fingers (C8, T1)
• In unconscious patients, painful stimuli in hands and lower extremities may initiate involuntary muscle reflex unless patient is in profound coma
82
Upper Extremity Neurological Function Assessment
• To test interosseous muscle function (controlled by T1 nerve roots)
– Instruct patient to spread fingers of both hands
– Instruct patient to keep fingers apart while paramedic squeezes second and fourth fingers
– Normal resistance should be springlike and equal on both sides
83
Upper Extremity Neurological Function Assessment
• To test extensors of hands and fingers (controlled by C7 nerve roots)– Instruct patient to hold wrists or fingers straight out and to keep them out while paramedic presses down on fingers
– Arm should be supported at wrist to avoid testing arm function and other nerve roots
– Moderate resistance is normal with moderate pressure
– Both sides of patient should be evaluated if not contraindicated by injury
84
Copyright © 2013 by Jones & Bartlett Learning, LLC, an Ascend Learning Company
9/11/2012
29
Lower Extremity Neurological Function Assessment
• To test plantar flexors of the foot (controlled by S1 and S2 nerve roots)
– Place hands at sole of each foot and instruct patient to push against hands
– Both sides should feel equal and strong
85
Lower Extremity Neurological Function Assessment
• To test dorsal flexors of the foot and great toe (controlled by L5 nerve roots)
– Hold patient’s foot (with fingers on toes) and instruct patient to pull feet back or toward nose
– Both sides should feel equal and strong
86
Sensory Findings
• In conscious patients, sensory examination should be performed with light touch on each hand and each foot (while patient’s eyes are closed) to evaluate ability to feel this type of stimuli– Light touch is carried by more than one nerve tract
– Sensation should be equal on both sides
– Question patient about weakness, numbness, paresthesia, radicular pain (shooting pain that travels along nerve)
87
Copyright © 2013 by Jones & Bartlett Learning, LLC, an Ascend Learning Company
9/11/2012
30
Sensory Findings
• If patient cannot feel light touch or is unconscious, evaluate sensation by gently pricking hands and soles of feet
– Sharp object that will not penetrate skin is useful
• Example: end of a pen or broken cotton‐tipped applicator can be used
– One method of evaluation moves from head to toe
• Recording level at which sensation stops or unconscious patient ceases to respond to painful stimulus by marking that location on patient’s skin with ink or marker
88
Sensory Findings
• Another method is to begin sensory assessment by moving from area of no sensation to area where sensation begins
– Note area where sensation begins with ink or marker
• Make it possible to compare sensory level accurately after repeated examinations
– Lack of response to stimulation in upper extremities indicates cord damage in cervical region
• Failure of only lower extremities to respond indicates cord injury in thoracic region, lumbar regions, or both
89
How will you respond to the patient who fearfully asks you, “Why can’t I move or feel my arms or legs?”
90
Copyright © 2013 by Jones & Bartlett Learning, LLC, an Ascend Learning Company
9/11/2012
31
Sensory Findings
• Dermatomes correspond to spinal nerves
• Landmarks useful for quick sensory evaluation in prehospital setting– C2 to C4 dermatomes provide collar of sensation around neck and over anterior chest to below clavicles
– T4 dermatome provides sensation to nipple line
– T10 dermatome provides sensation to umbilicus
– S1 dermatome provides sensation to soles of feet
91
Reflex Responses
• Reflex responses seldom are evaluated in prehospital setting– Some abnormal responses are observed easily, may indicate autonomic nerve injury
– Loss of temperature control, hypotension, bradycardia, and priapism
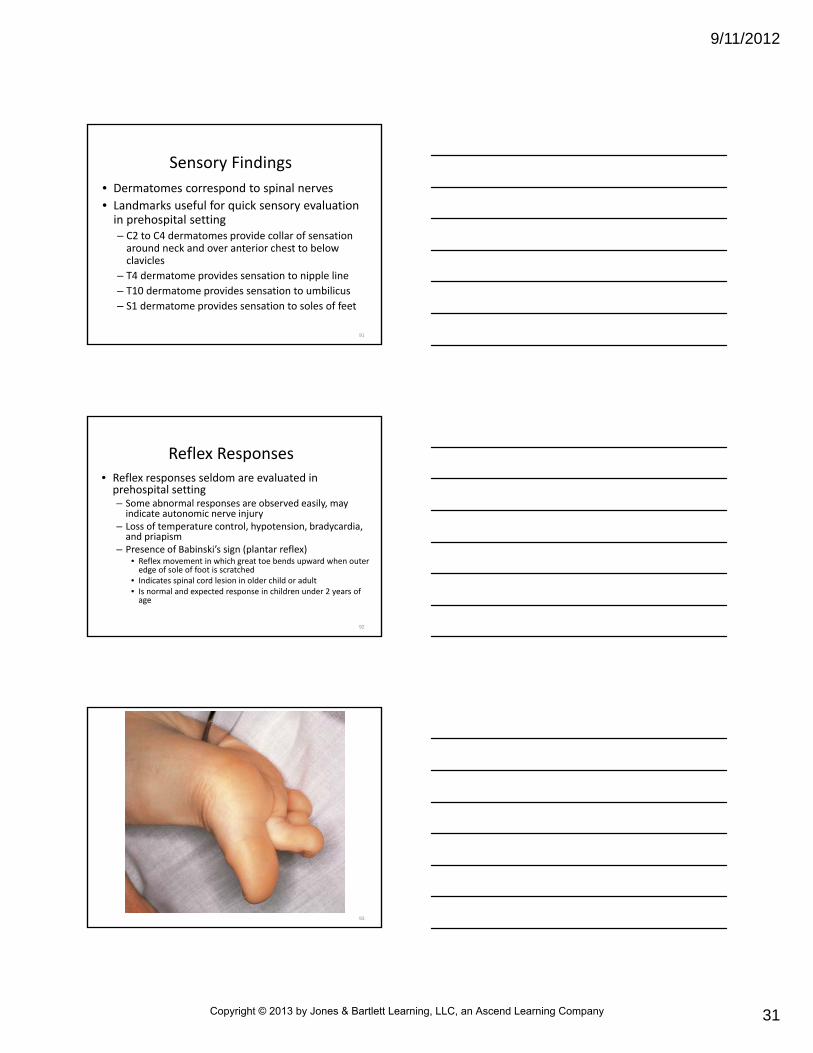
– Presence of Babinski’s sign (plantar reflex)• Reflex movement in which great toe bends upward when outer edge of sole of foot is scratched
• Indicates spinal cord lesion in older child or adult• Is normal and expected response in children under 2 years of age
92
93
Copyright © 2013 by Jones & Bartlett Learning, LLC, an Ascend Learning Company
9/11/2012
32
Other Methods of Evaluation
• Visual inspection of spine may reveal presence of injury and its level
– Transection of cord above C3 often results in respiratory arrest
– Lesions that occur at C4 may result in paralysis of diaphragm
94
Other Methods of Evaluation
• Visual inspection of spine may reveal presence of injury and its level– Transections that occur at C5 to C6 usually spare diaphragm, allowing diaphragmatic breathing
• Because intercostal muscles are innervated sequentially between C4 to C5 and T12
• As a result, intercostal muscle groups may be paralyzed with cervical or thoracic spinal cord lesions below level where diaphragmatic nerves are located
• Higher the lesion, the greater loss of intercostal muscle function
95
Other Methods of Evaluation
• Patient’s body position also may offer clues about neurological injury
– Patient with SCI at C6 may lie with arms flexed at elbows and wrists (“holdup” position)
96
Copyright © 2013 by Jones & Bartlett Learning, LLC, an Ascend Learning Company
9/11/2012
33
General Management of Spinal Injuries
• Some patients with cervical spinal injuries have normal responses to motor, sensory, and reflex examinations
– If paramedic suspects spinal injury for any reason, paramedic must protect patient’s spine
– Patient’s ability to walk does not rule out need for spinal precautions
– As previously stated, unstable spine can be ruled out only by
• Clinical examination
• Radiography
• Lack of any potential mechanism for spinal injury
97
General Management of Spinal Injuries
• General principles of spinal immobilization– Primary goal is to prevent further injury
– Spine should be treated as long bone with joint at either end (head and pelvis)
– Paramedic should always use complete spinal immobilization
• Splinting and isolation of specific injury site is impossible
• Having spine fractures in more than one location is common
98
General Management of Spinal Injuries
• General principles of spinal immobilization– Spinal immobilization begins in initial assessment and must be maintained until spine is immobilized completely on long spine board
– Patient’s head and neck must be placed in neutral, in‐line position unless contraindicated by condition or MOI
• Neutral positioning allows for most space for spinal cord, thereby reducing cord hypoxia and excess pressure
99
Copyright © 2013 by Jones & Bartlett Learning, LLC, an Ascend Learning Company
9/11/2012
34
Spinal Stabilization/Immobilization Techniques
• As soon as potential spine injury is recognized, manually protect the patient’s head and neck
• Basic principle to follow is that head and neck must be maintained in line with long axis of body
• If other injuries need treatment, maintain patient’s head and neck position without interruption
100
Spinal Stabilization/Immobilization Techniques
• Number of devices for immobilizing spinal column are designed for prehospital use
– When properly applied to patients who are sitting, standing, or lying, these devices can provide adequate spinal protection
– However, no device should be considered for use until head and neck have been stabilized with manual in‐line immobilization
101
Manual In‐Line Immobilization
• Can be done from almost any patient position
– Should be applied without traction on head
– Only enough tension should be applied to relieve weight of head from cervical spine
– After manual immobilization has been initiated, must be continued without stopping until head and spine are immobilized to proper device
• Short spine board or vest
• Long spine board
102
Copyright © 2013 by Jones & Bartlett Learning, LLC, an Ascend Learning Company

9/11/2012
35
Manual In‐Line Immobilization
• Contraindications for moving patient’s head to in‐line position
– If contraindications exist, all manual movement of patient’s head should stop
– At that point, head and neck should be stabilized in position found
103
Manual In‐Line Immobilization
• Contraindications– Resistance to movement
– Neck muscle spasm
– Increased pain
– Presence or increase in neurological deficits during movement (e.g., numbness, tingling, and loss of motor function)
– Compromise of airway or ventilation
– Severe misalignment of head away from the midline of the shoulders and body axis (rare)
104
Manual In‐Line Immobilization
• From sitting or standing patient’s side– Stand alongside patient, holding back of head with one hand
– Place thumb and first finger of other hand on each cheek, just below zygomatic arch
– Tighten position of both hands without moving head or neck
– Move head to in‐line position if needed
– Maintain this position by bracing elbows against your torso for support
105
Copyright © 2013 by Jones & Bartlett Learning, LLC, an Ascend Learning Company
9/11/2012
36
106
Manual In‐Line Immobilization
• From front of sitting or standing patient
– Stand in front of patient and place thumb of each hand on patient’s cheeks, just below zygomatic arch
– Place little fingers of each hand on posterior aspect of patient’s skull
– Spread remaining fingers of each hand on lateral planes of head and increase strength of grip
– Move head to in‐line position if needed
– Maintain this position by bracing elbows against your torso for support
107
108
Copyright © 2013 by Jones & Bartlett Learning, LLC, an Ascend Learning Company
9/11/2012
37
Manual In‐Line Immobilization
• With supine patient
– Kneel or lie at patient’s head and place thumbs of each hand just below zygomatic arch of each cheek
– Place little fingers of each hand on posterior aspect of patient’s skull
– Spread remaining fingers of each hand on lateral planes of head and increase strength of grip
– Move head to in‐line position if needed
• Maintain this position by bracing elbows against your torso or ground surface for support
109
110
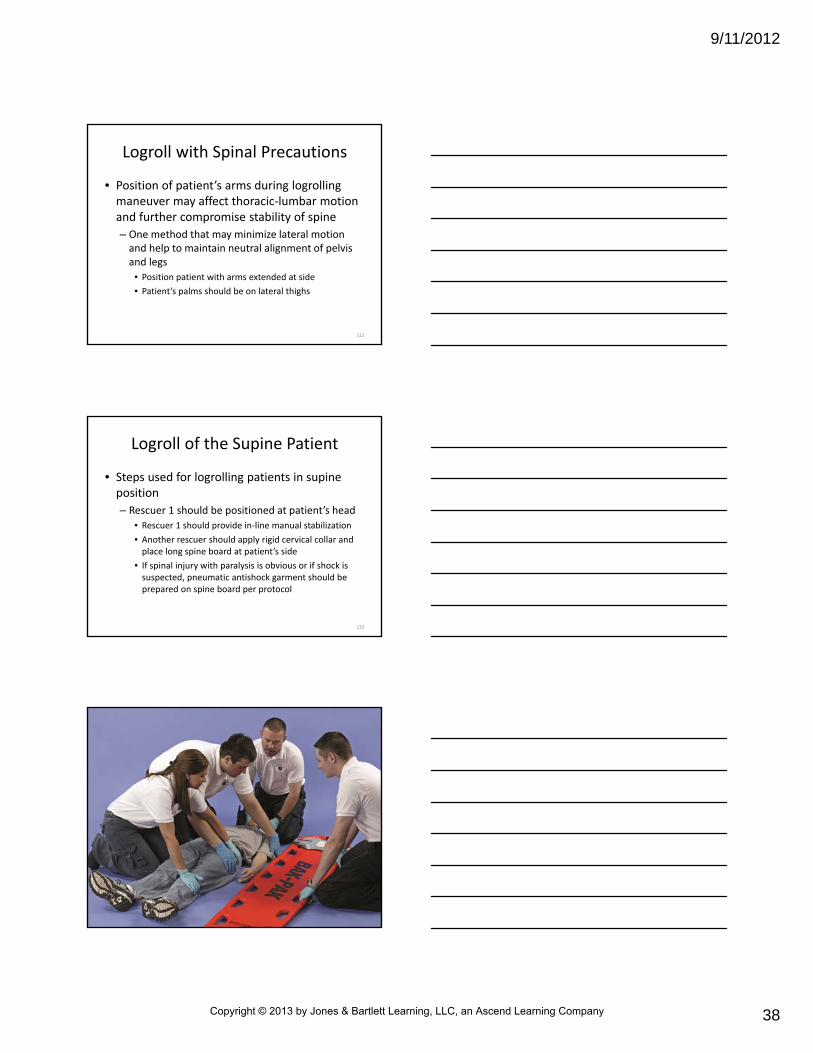
Logroll with Spinal Precautions
• Logrolling methods are used to move patients with possible spinal injury
– Examples include moving patients onto mechanical immobilization device and turning patients from prone to supine position
– Logrolling maneuvers require at least four rescuers
• With four, rescuers can provide for adequate spinal protection
111
Copyright © 2013 by Jones & Bartlett Learning, LLC, an Ascend Learning Company
9/11/2012
38
Logroll with Spinal Precautions
• Position of patient’s arms during logrolling maneuver may affect thoracic‐lumbar motion and further compromise stability of spine
– One method that may minimize lateral motion and help to maintain neutral alignment of pelvis and legs
• Position patient with arms extended at side
• Patient’s palms should be on lateral thighs
112
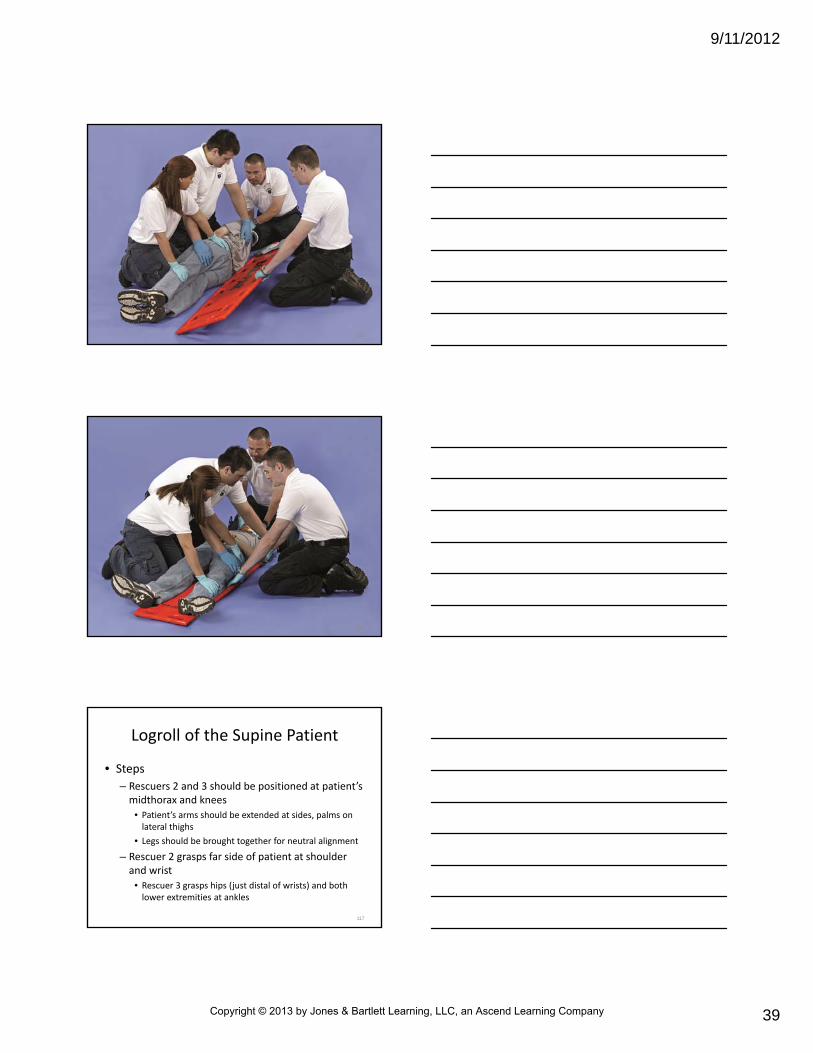
Logroll of the Supine Patient
• Steps used for logrolling patients in supine position
– Rescuer 1 should be positioned at patient’s head
• Rescuer 1 should provide in‐line manual stabilization
• Another rescuer should apply rigid cervical collar and place long spine board at patient’s side
• If spinal injury with paralysis is obvious or if shock is suspected, pneumatic antishock garment should be prepared on spine board per protocol
113
114
Copyright © 2013 by Jones & Bartlett Learning, LLC, an Ascend Learning Company
9/11/2012
39
115
116
Logroll of the Supine Patient
• Steps
– Rescuers 2 and 3 should be positioned at patient’s midthorax and knees
• Patient’s arms should be extended at sides, palms on lateral thighs
• Legs should be brought together for neutral alignment
– Rescuer 2 grasps far side of patient at shoulder and wrist
• Rescuer 3 grasps hips (just distal of wrists) and both lower extremities at ankles
117
Copyright © 2013 by Jones & Bartlett Learning, LLC, an Ascend Learning Company
9/11/2012
40
Logroll of the Supine Patient
• Steps
– In one organized move, rescuers slowly logroll patient onto his or her side
• At same time, they slide spine board under patient
• In‐line support of patient’s head must be maintained
• Done by rotating head exactly with torso to avoid flexion or hyperextension
• Ankles must be elevated slightly to maintain lateral and anterior‐posterior alignment
118
Logroll of the Supine Patient
• Steps
– Rescuer 4 positions long spine board by placing device flat on ground or at a 30‐ to 40‐degree angle against patient’s back
– In one organized move, rescuers slowly logroll and center patient on long spine board
119
Logroll of the Prone Patient
• Basic principles used in logrolling supine patients can be applied to patient who is in prone or semiprone position– Procedure uses same initial alignment of patient’s arms and legs
– Rescuers have same responsibilities for maintaining alignment
– Two major differences in this logroll maneuver• Rescuer 1’s hand position during logroll
• Application of rigid cervical collar, which can be applied only after patient is in supine position
120
Copyright © 2013 by Jones & Bartlett Learning, LLC, an Ascend Learning Company
9/11/2012
41
121
122
123
Copyright © 2013 by Jones & Bartlett Learning, LLC, an Ascend Learning Company

9/11/2012
42
124
Logroll of the Prone Patient
• Rescuer 1 places his or her hands in position that provides in‐line stabilization and that accommodates rotation of patient with torso
• In one organized move, rescuers rotate patient away from direction of initial prone position
• Rescuer places long spine board on flat surface or positions it between patient’s back and rescuers at patient’s side
125
Logroll of the Prone Patient
• In one organized move, rescuers slowly logroll and center patient on long spine board
• Rescuer applies rigid cervical collar
126
Copyright © 2013 by Jones & Bartlett Learning, LLC, an Ascend Learning Company
9/11/2012
43
Mechanical Devices
• Spinal immobilization equipment
– Rigid cervical collars
– Short spine boards
– Long spine boards
• Become familiar with equipment used in your locale
• Follow application guidelines of manufacturer
127
Rigid Cervical Collars
• Designed to protect cervical spine from compression
– May reduce movement and some range of motion of head.
– Do not by themselves provide adequate immobilization of spine
– Must always be used along with manual in‐line stabilization or immobilization by suitable device (e.g., vest, short spine board, or long spine board)
– Effective rigid collar sits on chest, posterior thoracic spine and clavicle, trapezius muscles where tissue movement is at minimum
– Collar also must be correctly sized for patient
128
Rigid Cervical Collars
• Application general steps– Rescuer 1 applies manual in‐line immobilization from behind patient and maintains this position throughout procedure
– Rescuer 2 properly angles collar for placement– Rescuer 2 positions collar bottom– Rescuer 2 sets collar in place around patient’s neck– Rescuer 2 secures collar with Velcro straps– Rescuer 1 spreads his or her fingers and maintains support until patient is secured to short or long spine board
129
Copyright © 2013 by Jones & Bartlett Learning, LLC, an Ascend Learning Company
9/11/2012
44
130
Rigid Cervical Collars
• Rigid cervical collars come in number of sizes (or are adjustable)– Can accommodate range of physical characteristics of patients
– Choosing proper size reduces flexion or hyperextension of neck
– Movements may occur during patient extrication and packaging
– These movements also may result from acceleration and deceleration forces that normally occur during patient transport
131
Rigid Cervical Collars
• Guidelines to apply rigid cervical collars
– Do not adequately immobilize by their use alone
– Must be properly sized to patient
– Must not inhibit patient’s ability to open mouth or paramedic's ability to open patient's mouth if vomiting occurs
– Must not obstruct or hinder ventilation in any way
132
Copyright © 2013 by Jones & Bartlett Learning, LLC, an Ascend Learning Company
9/11/2012
45
Short Spine Boards
• Short spine boards or other short spine extrication devices are used to splint cervical and thoracic spine
– Devices vary in design
– Available from number of manufacturers
– In general, short spine boards are used to provide spinal immobilization when patient is sitting or is in confined space
133
Short Spine Boards
• After short spine board immobilization, patient is moved to a long spine board device for complete spinal immobilization
• Examples of short spine boards
– Plastic or synthetic half backboard
– Kendrick extrication device
– Oregon Spine Splint II
– Hare extrication device
134
135
Copyright © 2013 by Jones & Bartlett Learning, LLC, an Ascend Learning Company
9/11/2012
46
When would the use of the short board not be indicated for spinal
column immobilization?
136
Short Spine Boards
• General principles of short spine board application
– After manual in‐line immobilization and application of rigid cervical collar, place short spine board device behind patient
– Board should be positioned snugly beneath patient’s axillae
• Will prevent it from moving up torso
137
Short Spine Boards
• General principles of short spine board application– Immobilize upper and middle torso by fastening chest straps, starting with middle chest straps and followed by lower chest straps
– Upper chest strap (if used) should not be so tight that it impedes patient ventilation
– Middle and lower straps should be snug so that fingers cannot be slipped beneath straps
– Readjust as needed
138
Copyright © 2013 by Jones & Bartlett Learning, LLC, an Ascend Learning Company

9/11/2012
47
Short Spine Boards
• General principles of short spine board application
– Position and fasten each groin strap separately, forming loop
• These straps prevent Kendrick extrication device from moving up and lower end from moving laterally
– Pad device as needed and secure head to short spine board
139
Short Spine Boards
• General principles of short spine board application– Carefully move patient as unit to long spine board by rotating patient and Kendrick extrication device onto board
• Hold legs proximal to knees and lift them during transition
– Center patient on long spine board, release leg straps, and slowly lower patient’s legs to inline position
140
Short Spine Boards
• General principles of short spine board application
– Secure patient and Kendrick extrication device to long spine board, maintaining neutral in‐line position with long axis of body
• Slightly loosen Kendrick extrication device leg straps
141
Copyright © 2013 by Jones & Bartlett Learning, LLC, an Ascend Learning Company
9/11/2012
48
Rapid Extrication
• General principles of short spine board application
– Steps required for rapid extrication may vary depending on size and make of vehicle
– May vary based on patient’s location inside vehicle
142
Rapid Extrication
• Three or more rescuers
– Rescuer 1 supports patient’s head and neck
• Rescuer 1 uses manual in‐line stabilization from behind patient or from patient’s side
• Rescuer 1 maintains stabilization throughout extrication process
– After rapid initial assessment, Rescuer 2 applies rigid cervical collar and positions long spine board near vehicle
143
144
Copyright © 2013 by Jones & Bartlett Learning, LLC, an Ascend Learning Company
9/11/2012
49
145
146
147
Copyright © 2013 by Jones & Bartlett Learning, LLC, an Ascend Learning Company
9/11/2012
50
Rapid Extrication
• Three or more rescuers
– Rescuer 3 manually stabilizes and controls movement of patient’s upper and lower torso and legs during extrication
148
Rapid Extrication
• Three or more rescuers– Rescuers then rotate patient in series of short, controlled movements so that patient’s back faces open doorway
• Rescuer 2 exits vehicle
• Rescuer 2 assumes control of manual stabilization from outside vehicle
• Rescuer 1 assumes control of patient’s lower torso and legs
• Each movement during rotation of patient should be coordinated, stopping so that rescuers and patient can be repositioned as needed to limit unwanted patient movement
149
Rapid Extrication
• Three or more rescuers
– Rescuer should insert foot end of long spine board on car seat at patient’s buttocks and should position head end on ambulance stretcher
• Rotation of patient continues until patient can be positioned onto long spine board
– Rescuers center and secure patient on long spine board
150
Copyright © 2013 by Jones & Bartlett Learning, LLC, an Ascend Learning Company
9/11/2012
51
151
152
Rapid Extrication.
153
Copyright © 2013 by Jones & Bartlett Learning, LLC, an Ascend Learning Company
9/11/2012
52
Rapid Extrication
• Two rescuers
– Rescuer 1 supports patient’s head and neck
• Rescuer 1 uses manual in‐line stabilization from behind patient or from patient’s side
• Rescuer 1 maintains this stabilization throughout extrication process
154
Rapid Extrication
• Two rescuers
– After rapid initial assessment, Rescuer 2 applies rigid cervical collar and places prerolled blanket around patient
• Rescuer 2 places center of blanket roll at patient’s midline on rigid cervical collar
• Rescuer 2 then wraps ends of blanket roll around cervical collar and places them under patient’s arms
• Rescuer 2 positions long spine board near vehicle
155
Rapid Extrication • Two rescuers
– Using ends of blanket roll, rescuers rotate patient in series of short, controlled movements so that patient’s back faces open doorway
• Each movement during rotation of patient should be coordinated, stopping so that rescuers and patient can be repositioned as needed to limit unwanted patient movement
– Rescuer 1 takes control of blanket ends, moving them under patient’s shoulders, and moves patient by blanket while Rescuer 2 controls patient’s lower torso, pelvis, and legs
– Rescuers center and secure patient on long spine board
156
Copyright © 2013 by Jones & Bartlett Learning, LLC, an Ascend Learning Company
9/11/2012
53
Long Spine Board with Supine Patient
• Available in variety of configurations
– Plastic and synthetic spine boards
– Metal alloy spine boards
– Vacuum mattress splints
– Split litters (scoop stretchers) that must be used along with long spine board
157
• Immobilization of torso to long spine board must be done before immobilization of head
– Will prevent angulation of cervical spine
– Torso must not be allowed to move up, down, or to either side
– Straps should be placed at
• Shoulders or upper chest below axilla to avoid compression and lateral movement of thorax
• Around midtorso
• Across iliac crest to prevent movement of lower torso
– Take care not to tighten straps to point of reducing chest wall movement
Long Spine Board with Supine Patient
158
• After immobilization of torso, head and neck should be immobilized in neutral, in‐line position– When most adults are placed on long or short spinal device, large space is produced between back of head and spine board
– Nnoncompressible padding (e.g., commercial padding or folded towels) should be added (body shims)
– Can be done before securing head
Long Spine Board with Supine Patient
159
Copyright © 2013 by Jones & Bartlett Learning, LLC, an Ascend Learning Company
9/11/2012
54
160
• Amount of padding required for in‐line immobilization varies by patient and must be evaluated on individual basis– Too little padding may cause hyperextension of head
– Too much padding may cause flexion
– Both may increase spinal cord damage
– Children have proportionally larger heads than adults and may require padding under torso to allow head to lie in neutral position on board
Long Spine Board with Supine Patient
161
162
Copyright © 2013 by Jones & Bartlett Learning, LLC, an Ascend Learning Company
9/11/2012
55
• Padding (if needed) should be firm and should extend full length and width of torso from buttocks to top of shoulders to prevent movement and misalignment of spine
• In addition to providing enhanced stabilization, padding also improves patient comfort during transport
Long Spine Board with Supine Patient
163
• Head is secured to spinal device by placing commercial pads or rolled blankets on both sides of head and securing them with included straps, 2‐ to 3‐inch tape strips, or a self‐adhering firm wrap
– Upper forehead should be secured across supraorbitalridge
– Lower portion of head should be secured across anterior portion of rigid cervical collar
– Chin straps, sandbags, IV bags are considered less optimal in immobilizing head to spinal device
Long Spine Board with Supine Patient
164
• Patient’s legs should be secured to long spine board
– Two or more straps can be applied above and below knees
– Towels, blankets, or suitable padding may be placed on both sides of patient’s lower legs
• Will minimize movement and will help maintain patient’s central position on spinal device
Long Spine Board with Supine Patient
165
Copyright © 2013 by Jones & Bartlett Learning, LLC, an Ascend Learning Company
9/11/2012
56
166
167
168
Copyright © 2013 by Jones & Bartlett Learning, LLC, an Ascend Learning Company
9/11/2012
57
• Before moving patient, patient’s arms should be secured to spinal device for safety
– Best achieved by placing patient’s arms at his or her side
– Patient’s palms should be facing body
– Arms should be secured with separate strap placed across forearms and torso
Long Spine Board with Supine Patient
169
• Technique
– Rescuer 1 applies manual in‐line immobilization from behind patient or in front of patient
• Rescuer 1 maintains this position throughout the procedure
• Rescuer 2 applies rigid cervical collar
– Rescuer 2 slides long spine board behind patient from side and presses it against patient
Long Spine Board with Supine Patient
170
• Technique
– Rescuers 2 and 3 stand on either side of patient and insert hand that is closest to patient under patient’s armpit and grasp nearest handhold of backboard without moving patient’s shoulders
• Rescuers grab higher handhold on board with their other hands and lower patient and backboard to ground while maintaining manual in‐line immobilization
– Once on ground, rescuers secure patient to long backboard
Long Spine Board with Supine Patient
171
Copyright © 2013 by Jones & Bartlett Learning, LLC, an Ascend Learning Company
9/11/2012
58
172
Immobilizing Pediatric Patients
• Prehospital care of pediatric patients with suspected spine trauma should be managed with
– Manual in‐line immobilization
– Rigid cervical collar
– Long spinal immobilization device
173
Immobilizing Pediatric Patients
• Many different pediatric immobilization devices are available from manufacturers
– If pediatric immobilization devices are not available, children may be secured on adult long spine board
• Great deal of padding is needed to fill voids
• Padding also helps to prevent movement
174
Copyright © 2013 by Jones & Bartlett Learning, LLC, an Ascend Learning Company
9/11/2012
59
175
Helmet Issues
• Purpose of helmets is to protect head and brain
– Helmets are not intended to protect neck
– Various types of helmets include full‐face or open‐face designs
– Helmets designed for sports such as football and motocross
176
Helmet Issues
• Factors determining need to remove helmet from injured patient who requires airway management and spinal immobilization
– Athletic trainers may have special equipment (and training) to remove face pieces from sports helmets, allowing easier access to patient’s airway
– Sports garb (e.g., shoulder pads) could compromise cervical spine further if only helmet were removed
– Firm fit of helmet may provide firm support for patient’s head
177
Copyright © 2013 by Jones & Bartlett Learning, LLC, an Ascend Learning Company
9/11/2012
60
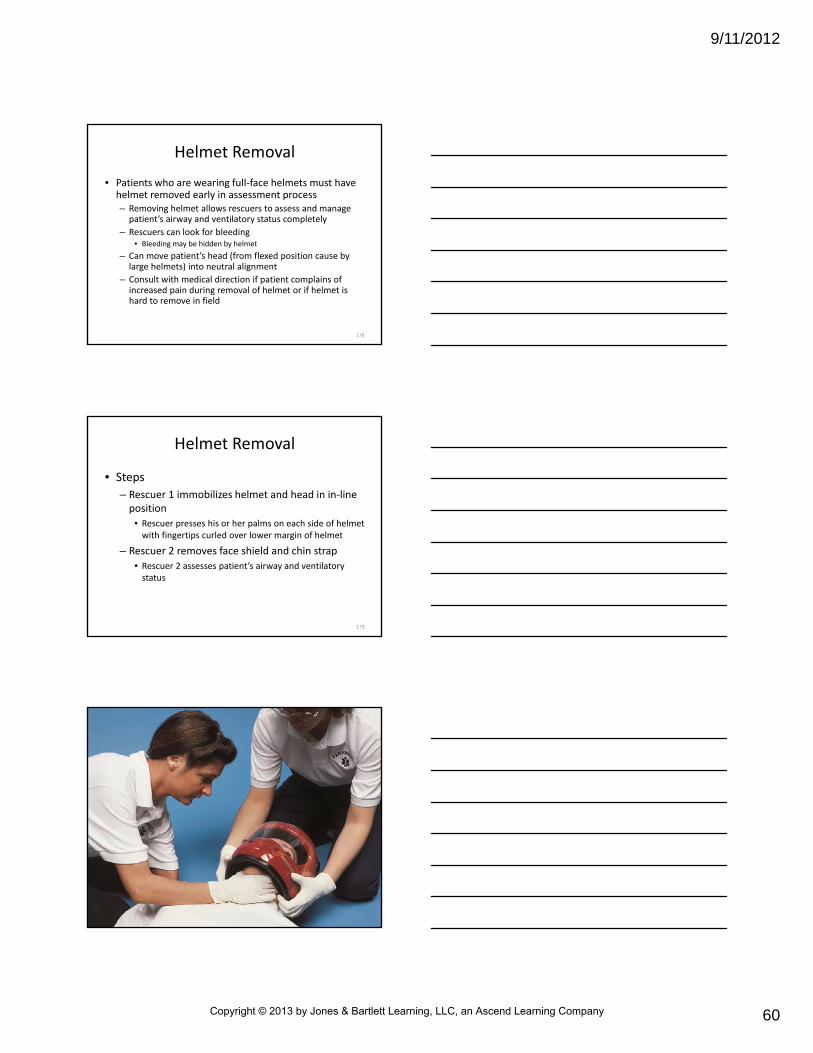
Helmet Removal
• Patients who are wearing full‐face helmets must have helmet removed early in assessment process– Removing helmet allows rescuers to assess and manage patient’s airway and ventilatory status completely
– Rescuers can look for bleeding• Bleeding may be hidden by helmet
– Can move patient’s head (from flexed position cause by large helmets) into neutral alignment
– Consult with medical direction if patient complains of increased pain during removal of helmet or if helmet is hard to remove in field
178
Helmet Removal
• Steps
– Rescuer 1 immobilizes helmet and head in in‐line position
• Rescuer presses his or her palms on each side of helmet with fingertips curled over lower margin of helmet
– Rescuer 2 removes face shield and chin strap
• Rescuer 2 assesses patient’s airway and ventilatorystatus
179
180
Copyright © 2013 by Jones & Bartlett Learning, LLC, an Ascend Learning Company
9/11/2012
61
181
182
183
Copyright © 2013 by Jones & Bartlett Learning, LLC, an Ascend Learning Company
9/11/2012
62
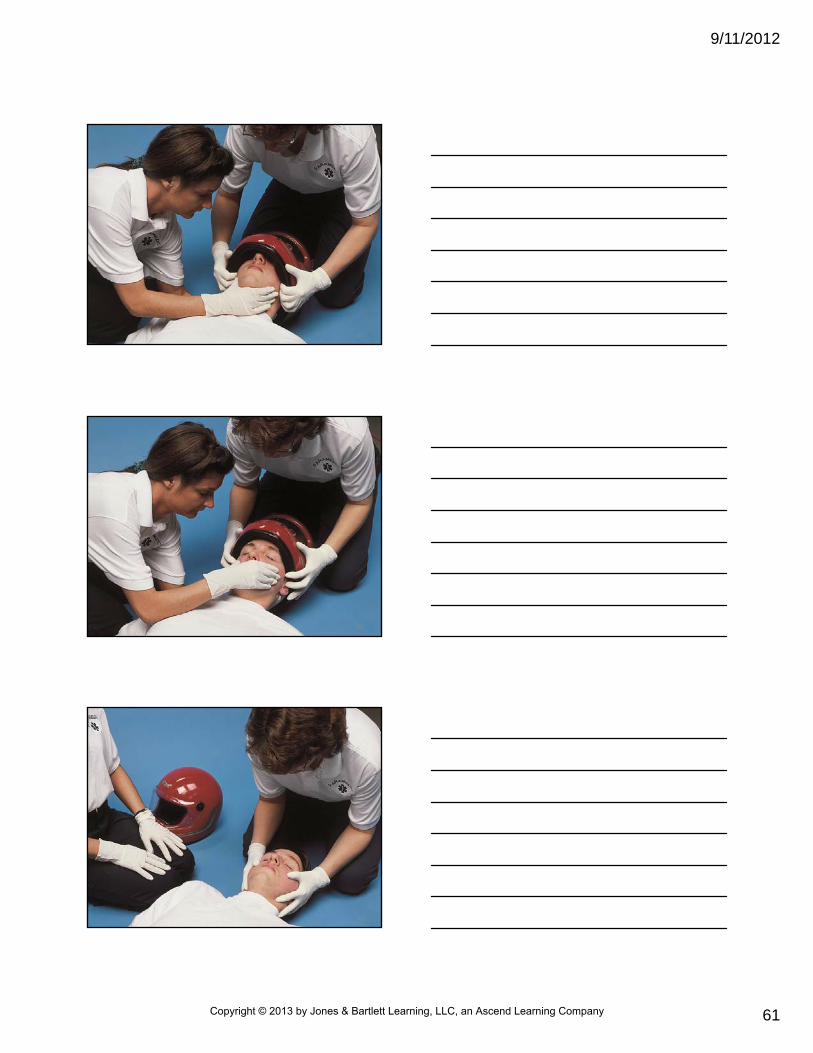
Helmet Removal
• Steps
– Rescuer 2 grasps patient’s mandible by placing thumb at angle of mandible on one side and two fingers at angle on other side
• Rescuer 2 places his or her other hand under neck at base of skull, taking over in‐line immobilization of patient’s head
184
Helmet Removal
• Steps
– Rescuer 1 carefully spreads sides of helmet away from patient’s head and ears
• Rescuer 1 then rotates helmet rotated toward rescuer to clear patient’s nose
• Rescuer 1 then removes helmet from patient’s head in straight line
• Just before removing helmet from under patient’s head, Rescuer 1 assumes in‐line immobilization by squeezing sides of helmet against patient’s head
185
Helmet Removal
• Steps
– Rescuer 2 repositions his or her hands to support head and to prevent it from dropping as helmet is removed completely
• Accomplished by rescuer placing hand farther up on occipital area of head and by grasping maxilla with thumb and first fingers of other hand on each side of nose
• After securing this position, Rescuer 2 takes over in‐line immobilization
186
Copyright © 2013 by Jones & Bartlett Learning, LLC, an Ascend Learning Company

9/11/2012
63
Helmet Removal
• Steps
– Rescuer 1 rotates helmet about 30 degrees, following curvature of patient’s head
• Rescuer 1 completely removes helmet by carefully pulling it in straight line
– After removal of helmet, Rescuer 1 applies in‐line immobilization, and Rescuer 2 applies a rigid cervical collar
187
Spinal Immobilization in Diving Incidents
• Most diving incidents involve injury to patient’s head, neck, and spine
– If patient is still in water when EMS arrives, patient should be managed as follows
• Ensure scene and personal safety
• Only rescuers trained in water rescue should enter water
– Float supine patient to shallow area without unnecessary movement of spine
188
189
Copyright © 2013 by Jones & Bartlett Learning, LLC, an Ascend Learning Company
9/11/2012
64
• Steps
– Approach prone patient from the top of head
• Position one arm under patient to support head, neck, torso
• Place other arm across patient’s head and back, splinting head and neck between rescuer’s arms
• Carefully turn patient to supine position and quickly assess airway and breathing
• Paramedic may initiate rescue breathing while in water
Spinal Immobilization in Diving Incidents
190
• Steps
– Second rescuer slides long spine board or other rigid device under patient’s body while first rescuer continues to support patient’s head and neck without flexion or extension
• Apply rigid cervical collar
• Maintain manual in‐line immobilization throughout rescue
Spinal Immobilization in Diving Incidents
191
• Steps
– Float the spinal immobilization device to edge of water and lift it out
– Patient should be immobilized completely on long spine board
Spinal Immobilization in Diving Incidents
192
Copyright © 2013 by Jones & Bartlett Learning, LLC, an Ascend Learning Company
9/11/2012
65
Cord Injury Presentations
• Three cord injury presentations deserve special mention
– Spinal shock
– Neurogenic hypotension
– Autonomic hyper‐reflexia syndrome
193
Spinal Shock
• Refers to temporary loss of all types of spinal cord function distal to injury
• Signs and symptoms– Flaccid paralysis distal to injury site– Loss of autonomic function, which may be demonstrated by
• Hypotension• Vasodilation• Loss of bowel and bladder control• Priapism• Loss of thermoregulation
– Spinal shock does not always involve permanent, primary injury
194
Spinal Shock
• Autonomic dysfunction usually resolves within 24 hours
– Rarely, may last a few days to few weeks
– Careful handling of these patients to avoid secondary injury is crucial
– Initial management
• Full spinal immobilization
• High‐concentration oxygen administration
• Administering crystalloids intravenously (per protocol)
195
Copyright © 2013 by Jones & Bartlett Learning, LLC, an Ascend Learning Company
9/11/2012
66
Neurogenic Shock
• Neurogenic hypotension following spinal shock results from
– Blockade of vasoregulatory fibers
– Motor fibers
– Sensory fibers
196
Neurogenic Shock
• Block produces loss of sympathetic tone to vessels or vasodilation
– Patients with neurogenic hypotension often have relative hypotension (a systolic BP of 80 to 100 mm Hg)
– Warm, dry, pink skin (from cutaneousvasodilation)
– Relative bradycardia
197
Neurogenic Shock
• Neurogenic hypotension is rare
– Should not be considered as cause of hypovolemiain patient with spine injury
– Consider other causes of hypotension
• Internal hemorrhage
• Cardiac tamponade
• Tension pneumothorax
– If hypotension is severe, initiate shock management (per protocol)
198
Copyright © 2013 by Jones & Bartlett Learning, LLC, an Ascend Learning Company
9/11/2012
67
Autonomic Hyper‐reflexia Syndrome
• May occur after resolution of spinal shock – Associated with chronic SCI in patients who have injuries at T6 or above
– Often caused by distended bladder or rectum
– Effects result from massive, uncompensated cardiovascular response that stimulates sympathetic nervous system
• Stimulation of sensory receptors below level of cord injury causes intact autonomic nervous system to respond with spasms of arterioles
199
• Spasms in turn increase BP
– Baroreceptors sense rise in BP
– Stimulate parasympathetic nervous system
• Decreases heart rate and sends message to peripheral and visceral vessels to dilate
• Because of cord injury, vasodilation is not possible
• BP continues to rise and could pose threat to life
Autonomic Hyper‐reflexia Syndrome
200
• Characteristics– Paroxysmal hypertension (up to 300 mm Hg)
– Pounding headache
– Blurred vision
– Sweating (above the level of injury) with flushing of skin
– Increased nasal congestion
– Nausea
– Bradycardia (30 to 40 beats/min)
– Distended bladder or rectum
Autonomic Hyper‐reflexia Syndrome
201
Copyright © 2013 by Jones & Bartlett Learning, LLC, an Ascend Learning Company
9/11/2012
68
• Emptying of bladder or bowel often relieves syndrome
– BP may need to be controlled with antihypertensive agents
– Best managed in hospital setting under close physician supervision
Autonomic Hyper‐reflexia Syndrome
202
Nontraumatic Spinal Conditions
• Nontraumatic spinal conditions
– Lower back pain
– Degenerative disk disease
– Spondylosis
– Herniated intervertebral disk
– Spinal cord tumors
203
Lower Back Pain
• Between 60 and 90 percent of U.S. population is estimated to experience some form of lower back pain– Usually affects area between lower rib cage and gluteal muscles
• Often radiates into thighs
• About 1 percent of those with lower back pain have sciatica
• Most lower back pain is idiopathic
• Makes precise diagnosis difficult
204
Copyright © 2013 by Jones & Bartlett Learning, LLC, an Ascend Learning Company
9/11/2012
69
Lower Back Pain
• Causes– Tension from tumors
– Disk prolapse
– Bursitis
– Synovitis
– Degenerative joint disease
– Abnormal bone pressure
– Inflammation caused by infection (e.g., osteomyelitis)
– Fractures
– Ligament strains
205
What are some other medical conditions that may cause the
patient to have a chief complaint of lower back pain?
206
Lower Back Pain
• Risk factors
– Occupations that require repetitive lifting
– Exposure to vibrations from vehicles or industrial machinery
– Osteoporosis (elderly women report more symptoms than men)
207
Copyright © 2013 by Jones & Bartlett Learning, LLC, an Ascend Learning Company

9/11/2012
70
Lower Back Pain
• Must come from innervated structures– Deep pain and way it is referred to other parts of body vary by individual
– Although disk has no specific innervation, irritation of surrounding membranes that have pain receptors often occurs
– Source of most lower back pain occurs at L3, L4, L5, and S1
– Other areas of abundant pain receptors are found in anterior and posterior longitudinal ligaments that are vulnerable to strains and sprains
208
Degenerative Disk Disease
• Degenerative disk disease is common finding in persons over 50 years of age
– Causes include deterioration of tissue of intervertebral disk that occurs with aging
– Associated narrowing of disk results in instability of spine and can cause occasional lower back pain
209
Spondylosis
• Structural defect of spine
– Involves lamina or vertebral arch
– Usually occurs in lumbar spine between superior and inferior articulating surfaces
– Rotational stress fractures are common at affected site
– Heredity appears to be key factor
210
Copyright © 2013 by Jones & Bartlett Learning, LLC, an Ascend Learning Company
9/11/2012
71
Herniated Intervertebral Disk
• Tear in posterior rim of capsule that encloses gelatinous center of the disk
– Rupture of disk usually is caused by
• Trauma
• Degenerative disk disease
• Improper lifting (most common)
211
Herniated Intervertebral Disk
• Tear in posterior rim of capsule that encloses gelatinous center of the disk– Men between ages of 30 and 50 are more prone to develop this condition
– Disks that most commonly affected are L5‐S1 and L4‐L5
– Herniated intervertebral disk also at times occurs in cervical area at C5‐C6 and C6‐C7
– Injuries may have immediate onset
– May develop over months to years
212
Spinal Cord Tumors
• Tumors in spinal cord may develop from
– Cord compression
– Degenerative changes in bones and joints
– Interruption in blood supply to cord
• Classified by
– Cell type
– Growth rate
– Structure of origin
213
Copyright © 2013 by Jones & Bartlett Learning, LLC, an Ascend Learning Company
9/11/2012
72
Spinal Cord Tumors
• Clinical manifestations depend on tumor type and location– Bilateral or asymmetrical motor dysfunction
– Paresis
– Spasticity
– Pain
– Temperature dysfunction
– Sensory changes
– Other abnormalities
214
Assessment and Management of Nontraumatic Spinal Conditions
• Nontraumatic spinal conditions such as lower back pain are difficult to diagnose
– Assessment and management are based on
• Patient’s chief complaint
• Physical examination
• Through evaluation of associated risk factors
215
Assessment and Management of Nontraumatic Spinal Conditions
• Signs and symptoms– Discomfort
– Difficulty standing erect
– Pain with straining (e.g., coughing, sneezing)
– Limited range of motion
– Alterations in sensation, pain, and temperature
– Upper extremity pain or paresthesia that increases with motion
– Motor weakness
216
Copyright © 2013 by Jones & Bartlett Learning, LLC, an Ascend Learning Company
9/11/2012
73
Assessment and Management of Nontraumatic Spinal Conditions
• Management in prehospital setting mainly is supportive
– Focuses on• Decreasing patient’s pain and discomfort
• Immobilization on full spine board or vacuum‐type stretcher
• Full spinal immobilization is not required unless condition is result of trauma
– In‐hospital evaluation may include various testing such as
• Computed tomography
• Electromyelography
• Magnetic resonance imaging
217
Summary
• Most SCIs are result of motor vehicle crashes
– Other causes are falls, penetrating injuries from acts of human violence, and sport injuries
• Spinal column is composed of 33 vertebrae
– Divided into 5 sections
– Sections are 7 cervical, 12 thoracic, 5 lumbar, 5 sacral (fused), and 4 coccygeal (fused)
218
Summary
• Paramedic can classify the MOI as positive, negative, or uncertain
– Classification is combined with the clinical guidelines for evaluating SCI, which include the following signs and symptoms: pain, tenderness, painful movement, deformity, cuts/bruises over spinal area, paralysis, paresthesias, and weakness
– System can help to identify cases in which spinal immobilization is appropriate
219
Copyright © 2013 by Jones & Bartlett Learning, LLC, an Ascend Learning Company
9/11/2012
74
Summary
• Specific mechanisms of injury that frequently cause spinal trauma are axial loading; extremes of flexion, hyperextension, or hyper‐rotation; excessive lateral bending; and distraction
220
Summary
• Spinal injuries may be classified as sprains and strains, fractures and dislocations, sacral and coccygeal fractures, and cord injuries
– Spinal cord may sustain primary or secondary injury
– Lesions (transections) of spinal cord are classified as complete or incomplete
221
Summary
• With spinal injuries, the first priority is to evaluate and manage any threats to life
– Second priority is to preserve spinal cord function
• Includes avoiding secondary injury to the spinal cord
– Best met by maintaining a high degree of suspicion for the presence of spinal trauma, by providing early spinal immobilization, by rapidly correcting any volume deficit, and by administering oxygen
222
Copyright © 2013 by Jones & Bartlett Learning, LLC, an Ascend Learning Company
9/11/2012
75
Summary
• General principles of spinal immobilization include prevention of further injury; treating the spine as a long bone with a joint at either end (the head and pelvis); always using complete spinal immobilization; beginning spinal immobilization in the initial assessment and maintaining it until the spine is immobilized completely on the long spine board; and placing the patient’s head in a neutral, in‐line position, unless contraindicated
223
Summary
• Spinal shock refers to temporary loss of all types of spinal cord function distal to injury
• Neurogenic shock produces a loss of sympathetic tone to vessels
– Causes relative hypotension; warm, dry, and pink skin; and relative bradycardia
224
Summary
• Autonomic hyper‐reflexia syndrome results from a massive, uncompensated cardiovascular response that stimulates the sympathetic nervous system
– Response in turn causes an increase in blood pressure and other symptoms
225
Copyright © 2013 by Jones & Bartlett Learning, LLC, an Ascend Learning Company
9/11/2012
76
Questions?
226
Copyright © 2013 by Jones & Bartlett Learning, LLC, an Ascend Learning Company


![9/10/2012 Chapter 28ems.jbpub.com/aehlert/paramedic/docs/PPT_Lectures/Chapter_028.pdf · Title: Microsoft PowerPoint - Chapter_028 [Compatibility Mode] Author: Jennifer.Meltz Created](https://img.pdfslide.us/doc/110x75/5b88ad807f8b9a301e8dfbe4/9102012-chapter-28emsjbpubcomaehlertparamedicdocspptlectureschapter028pdf.jpg)